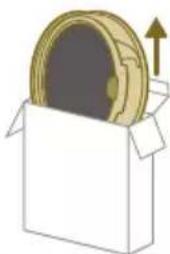
7000 Series XC7057 - Vacuum Cleaner PHILIPS - Free user manual and instructions
Find the device manual for free 7000 Series XC7057 PHILIPS in PDF.
| Brand | Philips |
| Model | 7000 Series XC7057 |
| Product Type | Cordless stick vacuum with washing function |
| Power Supply | Rechargeable Li-Ion battery, charging time 6 h |
| Runtime | Variable depending on power level (eco, normal, turbo) |
| Water Tank Capacity | 250 ml |
| Dust Bin Capacity | Approximately 0.6 L (estimate) |
| Main Functions | Dry vacuuming and hard floor washing, automatic floor type recognition, 3 power levels, adjustable LED lighting |
| Included Accessories | PrecisionPower smart nozzle, water tank, microfiber washing pad, mini Turbo brush (XC7057), combination tool, soft brush (XC7057), upholstery tool (XC7057), crevice tool, wall mount, adapter |
| Filter | Washable foam filter, recommended replacement every 6 months (ref. XV1681/01) |
| Operating Temperature | 5 °C to 40 °C |
| Weight | Approximately 4.5 kg (estimate with battery and tube) |
| Dimensions (H x W x D) | Approximately 110 cm x 25 cm x 20 cm (estimated) |
| Maintenance | Empty dust bin after each use, clean filter monthly, descale water tank monthly |
| Safety | Automatic shutdown in case of overheating, error codes displayed, use only with original adapter |
| Spare Parts | Filter XV1681/01, washing pad XV1670/02 available at philips.com |
| Warranty | See Philips website for conditions |
Frequently Asked Questions - 7000 Series XC7057 PHILIPS
User questions about 7000 Series XC7057 PHILIPS
0 question about this device. Answer the ones you know or ask your own.
Ask a new question about this device
Download the instructions for your Vacuum Cleaner in PDF format for free! Find your manual 7000 Series XC7057 - PHILIPS and take your electronic device back in hand. On this page are published all the documents necessary for the use of your device. 7000 Series XC7057 by PHILIPS.
USER MANUAL 7000 Series XC7057 PHILIPS
XC7057, XC7055, XC7053

natural_image
Black Philips vacuum cleaner with gold liquid and transparent hood against blue background (no text or symbols visible)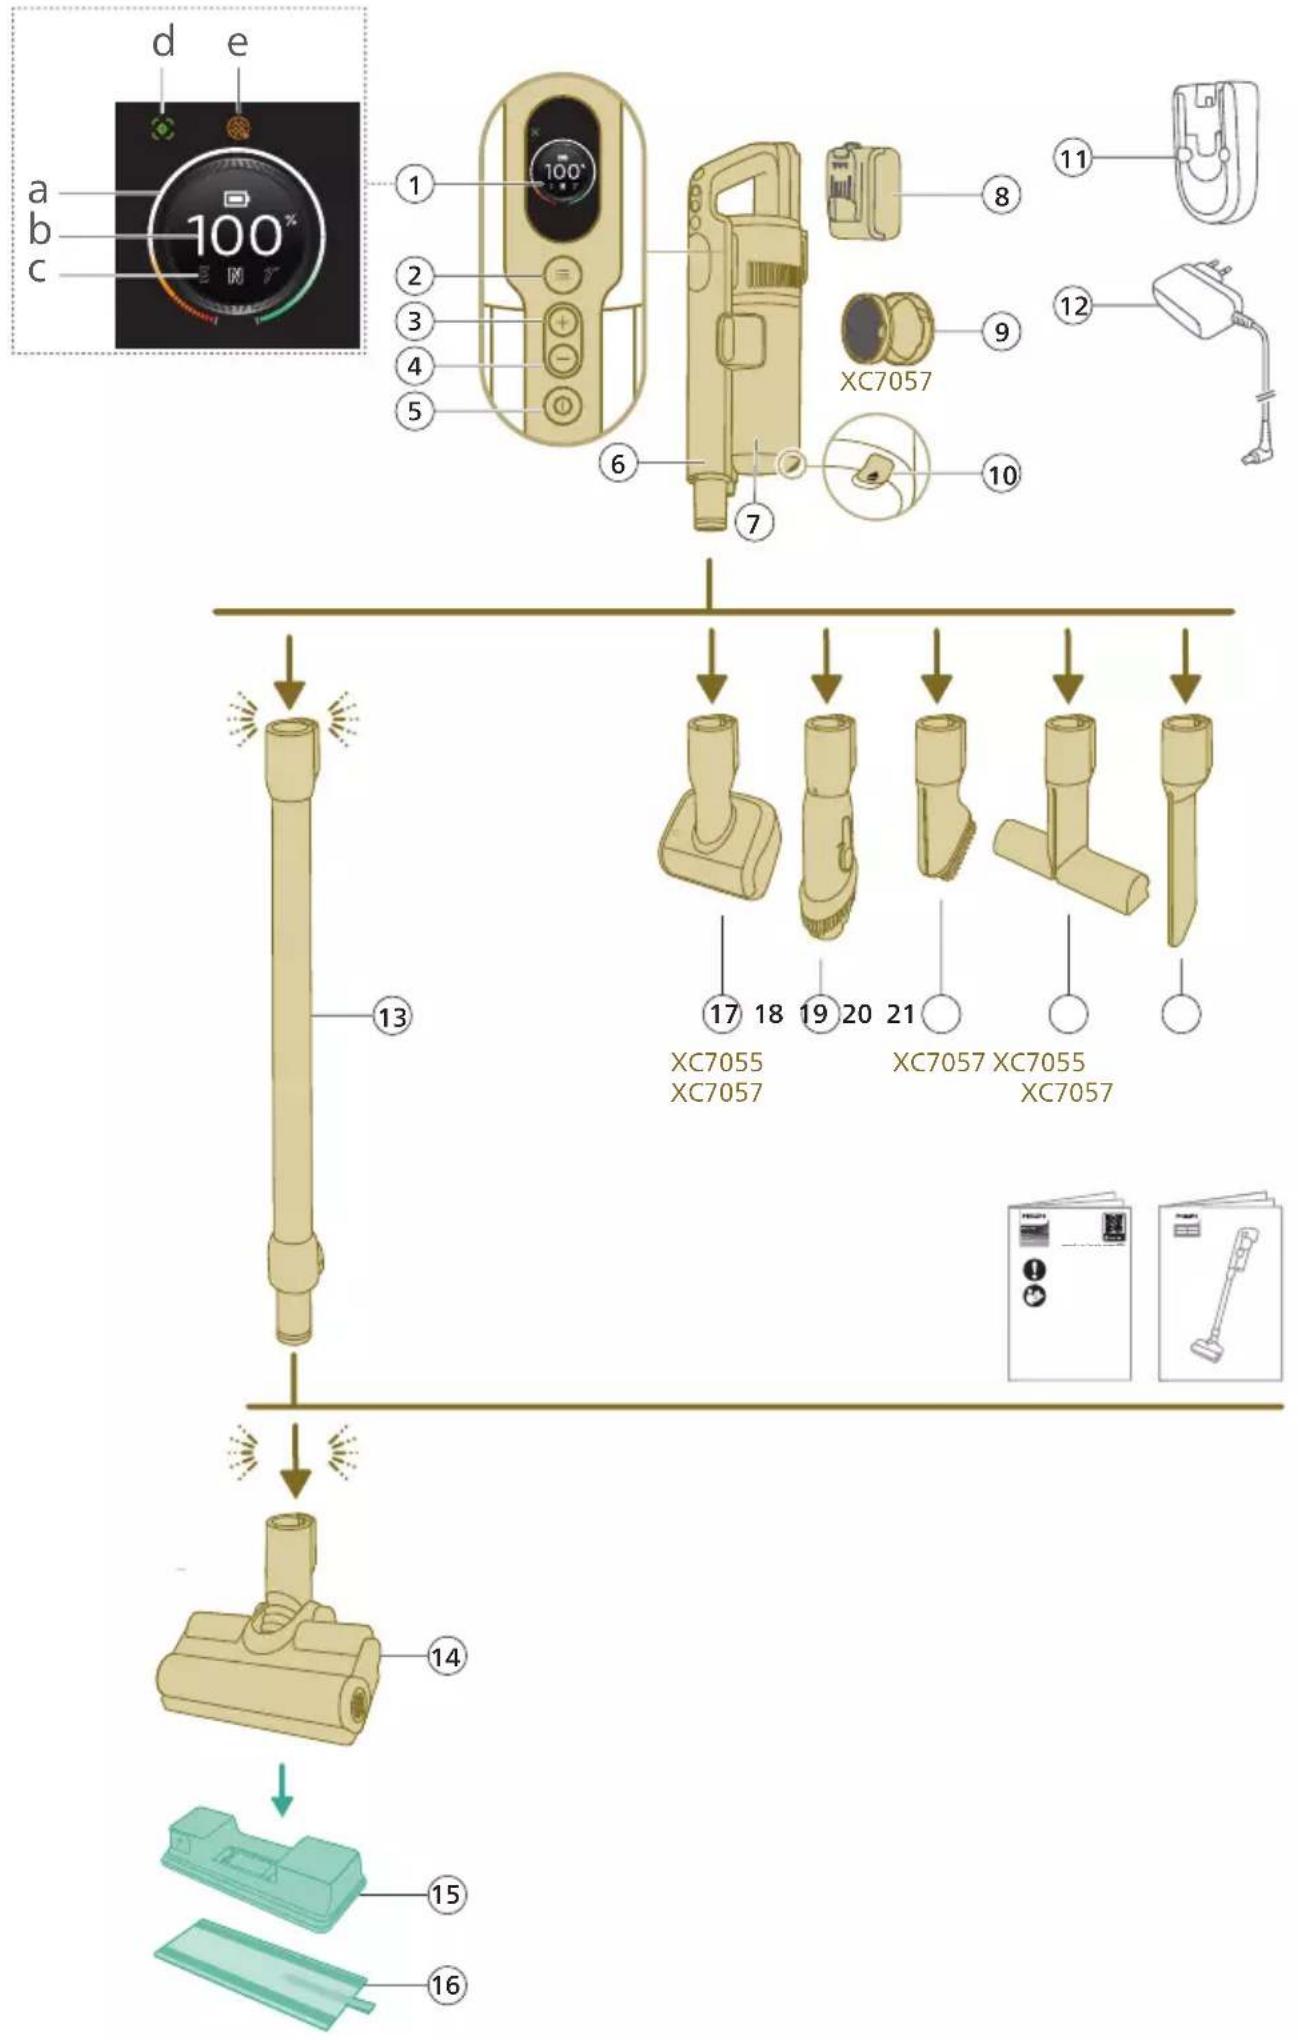
text_image
d e a 100° b c XC7057 XC7055 XC7055 XC7057 XC7055 XC7057 XC7057 XC7055 XC7057 XC7057 XC7055 XC7057 XC7057 XC7055 XC7055 XC7055 XC7055 XC7055 XC7055 XC7055 XC7055 XC7055 XC7055 XC7055 XC7055 XC7055 XC7055 XC7055 XC7055 XC7055 XC7055 XC7055 XC7055English 6
Bahasa Indonesia 37
Bahasa Melayu 68
Čeština 99
Crnogorski 129
Dansk 159
Deutsch 190
Eesti 222
Español 252
Français 283
Hrvatski 314
Italiano 345
Latviešu 376
Lietuviškai 407
Magyar 438
Nederlands 469
Norsk 500
Polski 530
Português 561
Română 592
Shqip 623
Slovenščina 654
Slovensky 685
Srpski 716
Suomi 747
Svenska 777
Tiếng Việt 808
Türkçe 839
Ελληνικά 870
Български 902
Македонски 933
Українська 965
ภาษาไทย 996
简体中文 1030
繁體中文 1062
한국어 1091
1121 العربية
Contents
Introduction 6
General description 6
Before first use 7
Installing the wall mount 7
Preparing for use 8
Using the appliance 9
Assembling the appliance 9
Vacuuming soft and hard floors 10
Vacuuming while mopping hard floors 11
Versatile usage and accessories 14
Customizations and additional information 17
After use – Maintenance 19
Frequent maintenance after each cleaning cycle 19
Periodic maintenance intermittently 22
Replacement 28
User interface signals and their meaning 29
Troubleshooting 31
Dry cleaning 31
Wet cleaning 35
Introduction
Thank you for buying this product! To fully benefit from the support that we offer, register your product at www.philips.com/mycordlessvacuum-7000s.
General description
1 Digital display
a Ring indicator of battery level
b Percentage of battery level
c Selected power level
d Floor Type Recognition feature activation icon
e Filter cleaning reminder icon
2 Menu/Confirm button
3 + Button
4 - Button
5 On/off button
6 Handheld
7 Dust bucket
8 Battery
9 Extra filter (XC7057 only)
10 Dust bucket release button
11 Wallmount
12 Adapter
13 Tube
14 PrecisionPower Smart Nozzle
15 Aqua tank
16 Microfiber mopping pad
17 Mini TurboBrush (XC7055, XC7057 only)
18 Combination tool
19 Soft brush (XC7057 only)
20 Upholstery tool (XC7055, XC7057 only)
21 Crevice tool
Before first use
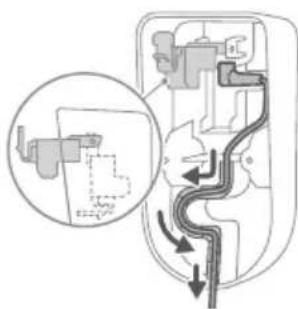
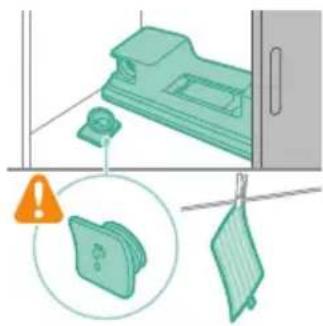
Installing the wall mount
natural_image
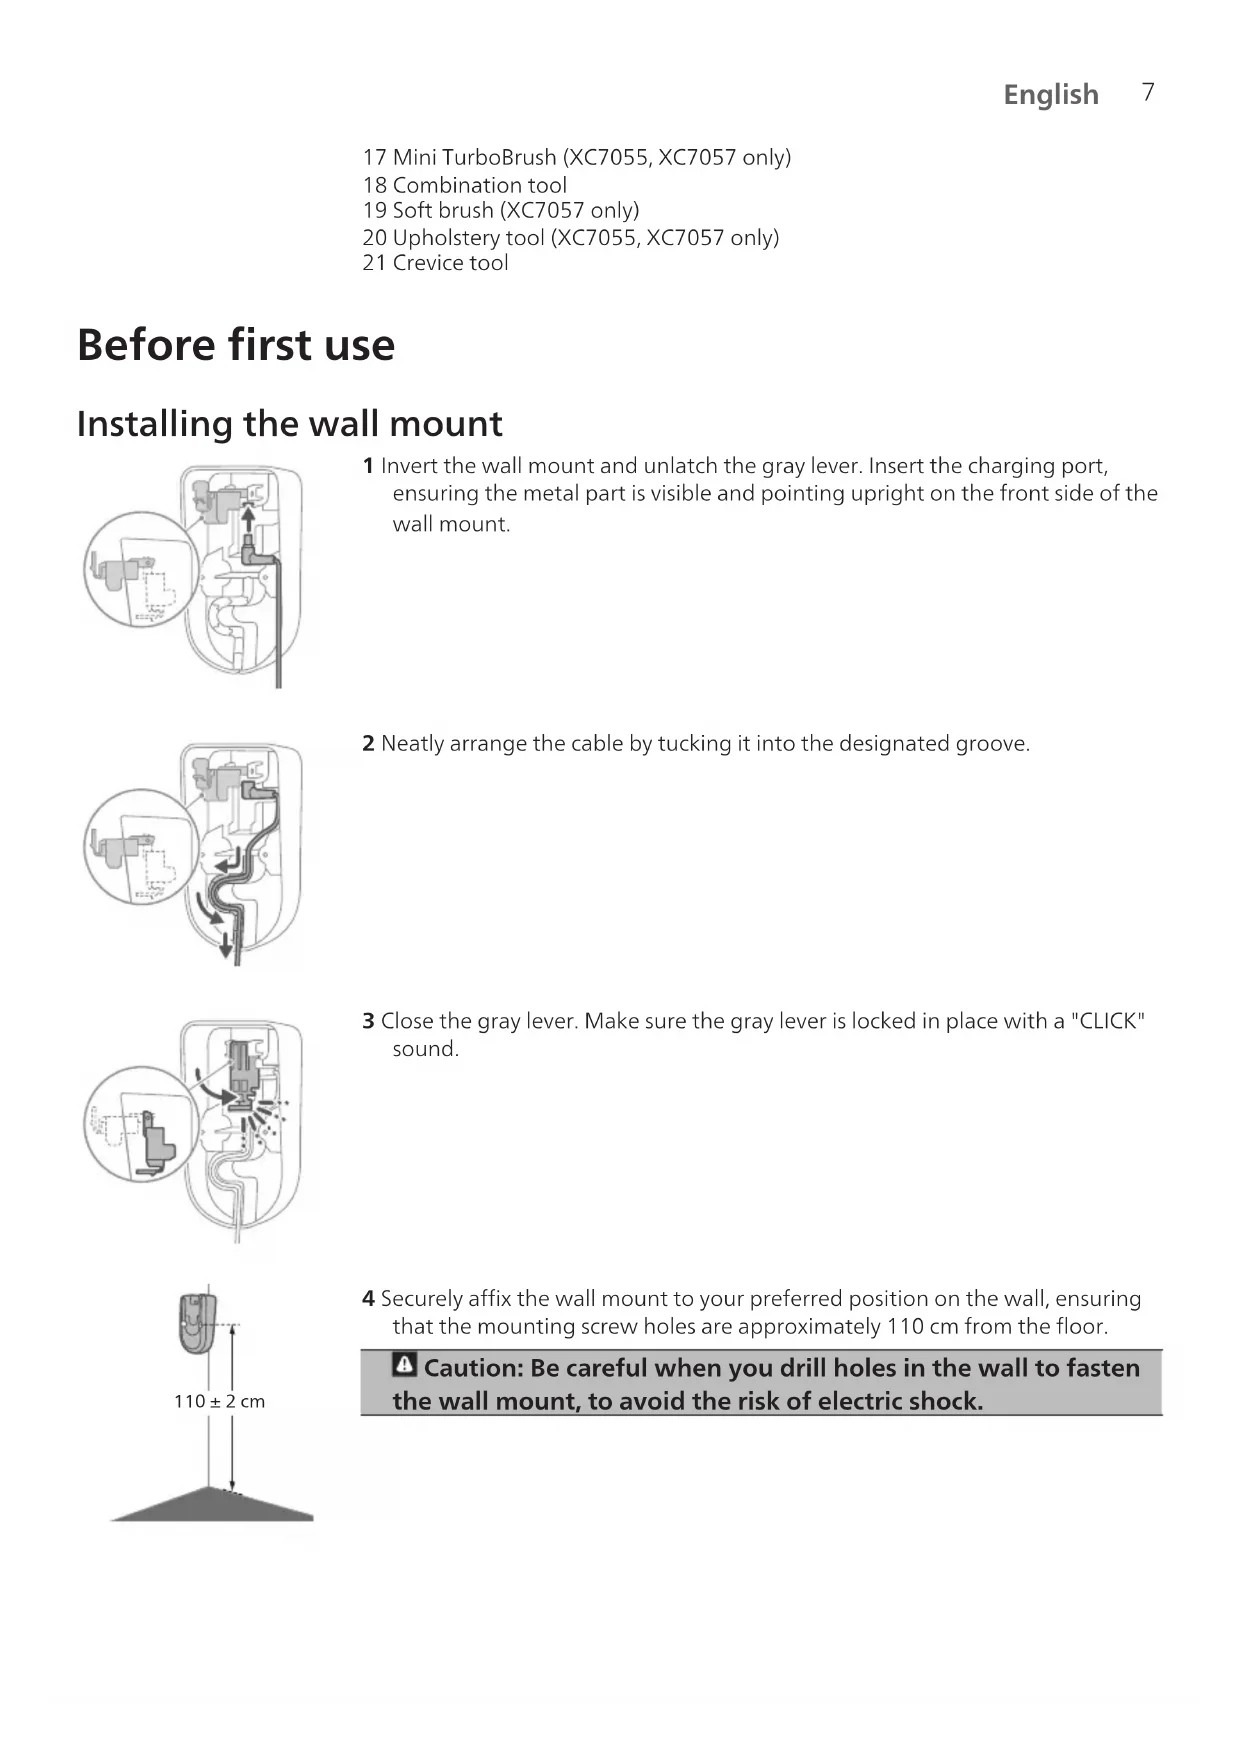
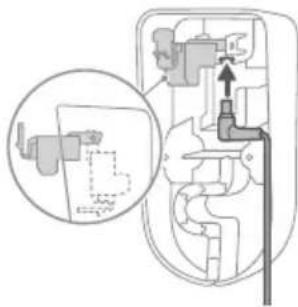
Diagram of a mechanical device with internal components and an inset showing a close-up view of a component (no text or symbols present)1 Invert the wall mount and unlatch the gray lever. Insert the charging port, ensuring the metal part is visible and pointing upright on the front side of the wall mount.
natural_image
Diagram of a mechanical device with internal components and directional arrows, no text or symbols present2 Neatly arrange the cable by tucking it into the designated groove.

natural_image
Diagram of a mechanical device with internal components and a magnified inset showing a detail (no text or labels)3 Close the gray lever. Make sure the gray lever is locked in place with a "CLICK" sound.
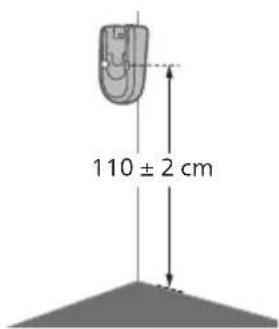
text_image
110 ± 2 cm4 Securely affix the wall mount to your preferred position on the wall, ensuring that the mounting screw holes are approximately 110 cm from the floor.
Caution: Be careful when you drill holes in the wall to fasten the wall mount, to avoid the risk of electric shock.

natural_image
Illustration of a vacuum cleaner with a magnified view showing the handle and base (no text or symbols)
natural_image
Diagram of a mechanical component with curved arrows indicating motion or force direction (no text or symbols)i Note: Verify that the placement of the wall mount allows the entire appliance to hang on the wall without the nozzle coming into contact with the floor.
5 Once you have determined the optimal position and height for storing and charging your appliance, firmly tighten the screws to secure the wall mount in place.
Preparing for use

natural_image
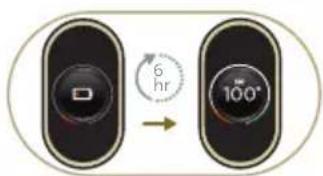
Diagram showing a device with a lock and a magnified view of its internal structure (no text or symbols)The appliance is equipped with a Li-Ion battery. Charging from empty to full takes about 6 hours.
1 Attach the battery pack to the main body of the appliance, ensuring a secure connection that's confirmed with a "CLICK" sound.

text_image
MAX 40°C MIN 5°C2 Charge your appliance by placing it onto the assembled wall mount.
⚠ Warning: Store and charge the appliance at a temperature above 5 °C and below 40 °C.
natural_image
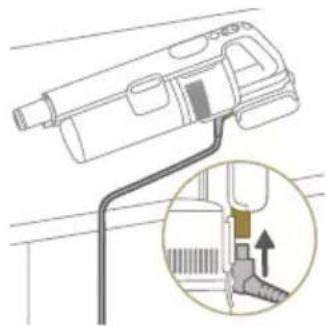
Diagram of a handheld device with a close-up inset showing a tool interacting with a mechanical component (no text or symbols present)i Note: You can also place the handheld on a level and stable surface, and directly connect the charging cable to the appliance.
text_image
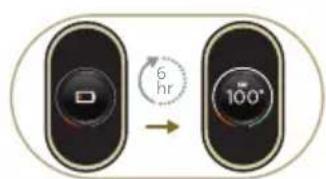
6 hr 100°3 The appliance is designed to reach a complete charge within 6 hours. You can monitor the charging progress on the screen. When the appliance is fully charged, the value 100% lights up on the screen. After a few minutes, the display will switch off.
Using the appliance
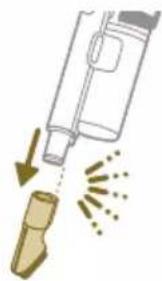
Assembling the appliance

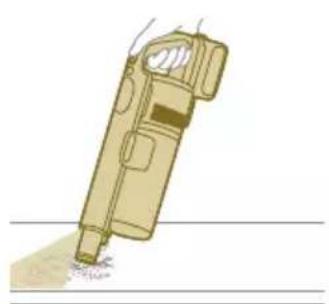
natural_image
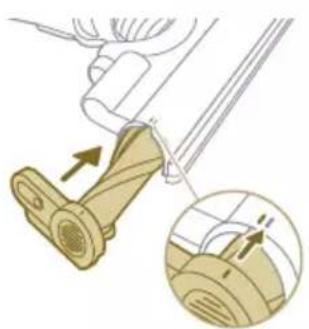
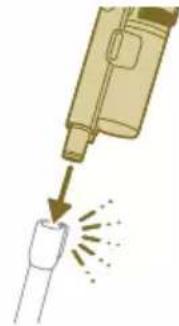
Illustration of a soldering iron being inserted into a tip, showing the process (no text or symbols)1 Attach the handheld to the tube. Confirm the attachment with a "CLICK" sound.

natural_image
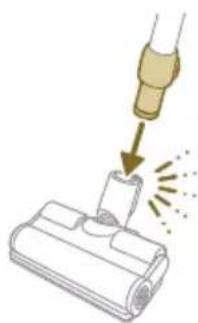
Illustration of a hairdryer being inserted into a device (no text or symbols)2 Attach the tube to the nozzle. Confirm the attachment with a "CLICK" sound.
Vacuuming soft and hard floors
text_image
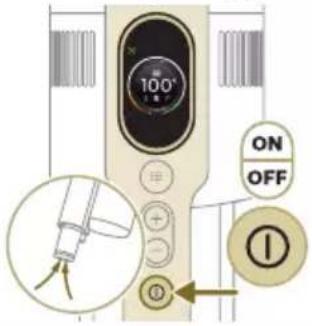
100° ON OFF ①1 Press the on/off button to switch on the appliance.
i Note: To switch off the appliance, press the on/off button again.
text_image
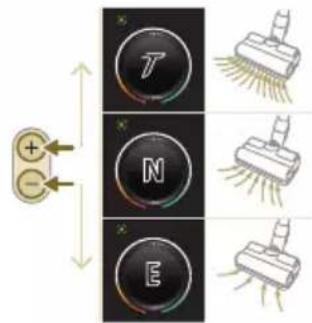
Diagram illustrating electric field lines between positive and negative charges, with labeled components and corresponding electric current illustrations.2 Use the + and - buttons to toggle through three different power settings.
E - eco mode
N - normal mode
T - turbo mode

natural_image
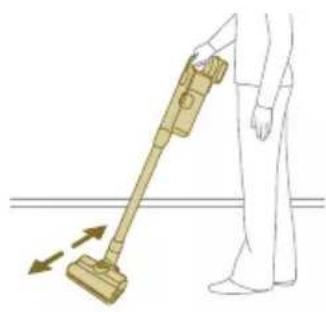
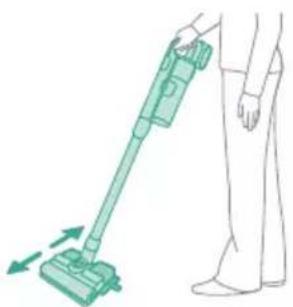
Illustration of a person using a vacuum cleaner to lift a floor, with arrows indicating motion (no text or symbols)3 You can clean on hard or soft floors with the vacuum cleaner.
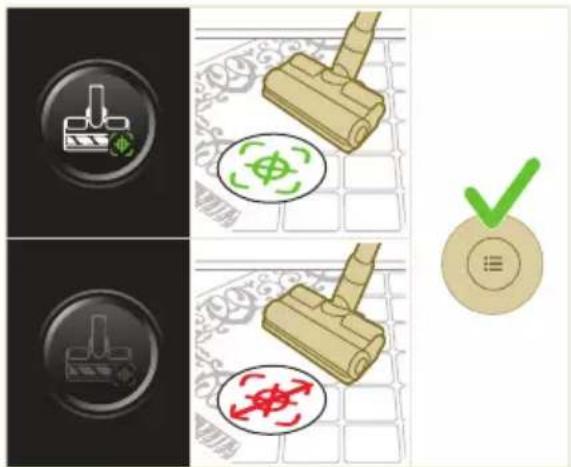
natural_image
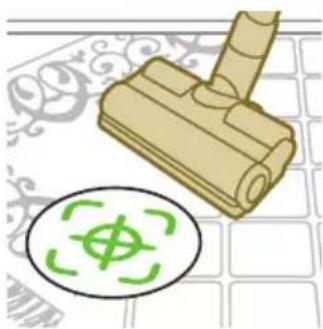
Illustration of a wooden tool and a circular green symbol on a grid background (no text or symbols)i With Floor Type Recognition enabled, the appliance recognizes the floor type and automatically optimizes its performance within the power settings you have selected. To disable this feature, check how to customize settings below.
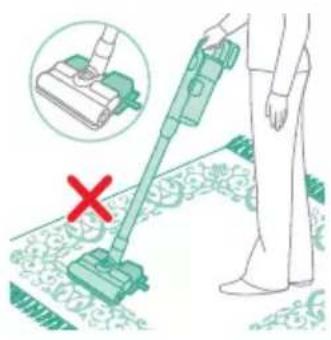
text_image
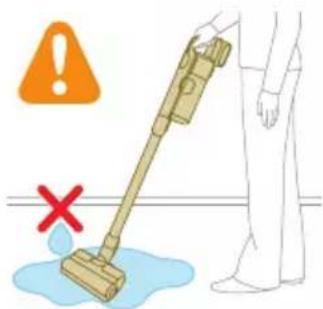
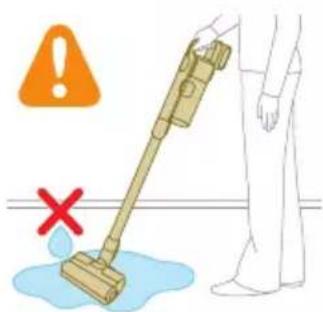
Safety warning illustration showing a person using a vacuum cleaner to clean water, with an orange warning symbol and red X mark indicating no need.Warning: Do not vacuum up water or other liquids.
natural_image
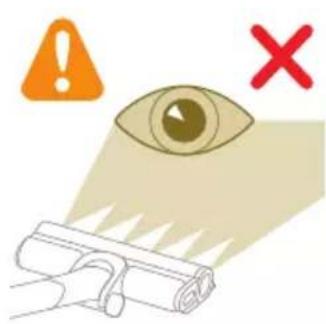
Illustration of an eye with warning symbols (anxiety, red X) and a rolled document, no text presentCaution: Do not look directly into the illuminated LEDs or point the LEDs at someone's eyes. The LED light is very bright.
Vacuuming while mopping hard floors
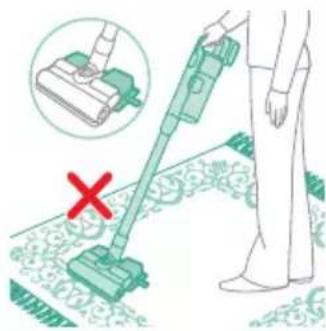
Caution: Only use the aqua tank on hard floors with a water-resistant top coat (such as linoleum, enameled tiles and varnished parquet) and stone floors (such as marble). If your floor has not been treated to make it water-resistant, check with the manufacturer if you can use water to clean it. Do not use the aqua tank on hard floors of which the water-resistant top coat is damaged.
i Note: Do not use the aqua tank to clean carpets.
i Note: Do not move the appliance with aqua tank assembled sideways, as this leaves water traces. Only move forwards and backwards.
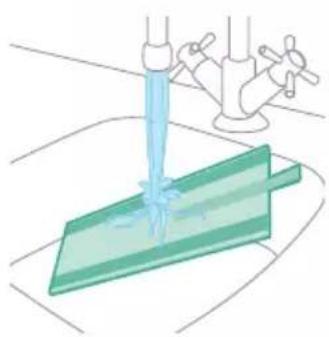
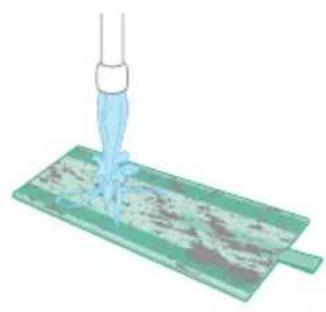
1 Pre-wet the microfiber mopping pad with water before use.
natural_image
Illustration of a pipette dispensing liquid into a green plastic sheet, with water flowing out (no text or symbols)2 Secure the microfiber mopping pad underneath the aqua tank. Align the velcro straps under the aqua tank and behind the cloth.

natural_image
Illustration of a green plastic mechanical component with a magnified inset showing a document or folder (no text or symbols present)
text_image
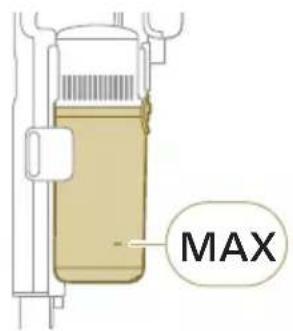
MAX 50 °C3 Fill the tank with water, ensuring the water temperature does not exceed 50^ C.

text_image
10 ml4 (Optional) If you wish to add a liquid floor cleaner into the aqua tank, opt for a low-foaming or non-foaming variety that can be diluted. We recommend the XV1792 Philips Floor Cleaner. Add only a few drops of the liquid cleaner to the water.
natural_image
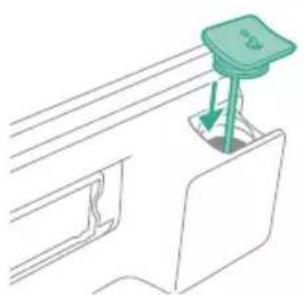
Diagram of a mechanical component with a green handle and arrow indicating direction (no text or symbols)5 Close the aqua tank properly.
natural_image
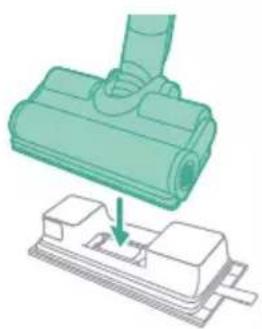
Illustration of a mechanical component being inserted into a base, showing a downward arrow (no text or symbols present)6 Attach the prepared aqua tank to the aqua nozzle and you're set to begin.

natural_image
Illustration of a person using a vacuum cleaner to clean or stand (no text or symbols present)7 Press the on/off button to switch on the appliance. You can effectively clean hard floors with the attached aqua module on the nozzle.
text_image
Illustration showing a person using a vacuum cleaner with a red X mark indicating the absence of the device.i Note: The aqua module is not suitable for soft floors like carpet.
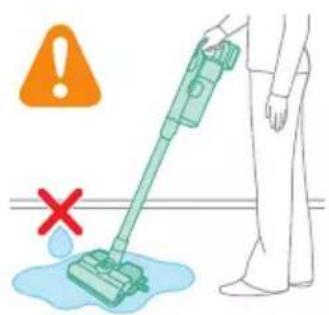
text_image
Safety warning illustration showing a person using a vacuum cleaner with a red X mark indicating water release, accompanied by an orange warning symbol.Caution: The aqua module should not be used to pick up water puddles.
Tips and other important information
- It is not necessary to vacuum the floor before mopping, as the Vacuum & Mop set-up actively wet-cleans your hard floor to capture all kinds of dirt, including liquids and stains. On carpets and rugs, use the Vacuum only set-up.
- The appliance can leave a small puddle of water on the floor if you do not move the appliance while switching it off. You can reduce the size of the puddle by moving the appliance while switching it off. If needed, you can remove the last drops with a cloth.
Usage restrictions
- The Vacuum & Mop set-up is suitable for vacuuming and mopping all types of hard floors, except uncoated wooden floors.
- The Vacuum & Mop set-up is intended for regular cleaning of hard floors. Always follow the cleaning instructions for your hard floor when you use this appliance.
- If you want to add a liquid floor cleaner other than XV1792 Philips Floor Cleaner to the water in the clean aqua tank, make sure that you use a low-foaming or non-foaming liquid floor cleaner that can be diluted in water like XV1792 Philips Floor Cleaner.
- As the clean aqua tank has a capacity of 250 ml, you only have to add a few drops (max 10ml) of liquid floor cleaner to the water.
- If you use the Vacuum & Mop set-up on linoleum floors, only do so on linoleum floors that are properly affixed to prevent linoleum from being drawn into the nozzle.
- If you move/lift the appliance over a carpet or rug when it is switched off, wastewater droplets may end up on your carpet or rug.
- Do not push the appliance over the floor grilles of convector heaters. As the appliance cannot pick up water that comes out of the nozzle when you move it over the grille, water ends up at the bottom of the convector pit.
- While cleaning, do not lift the nozzle from the floor or move the nozzle sideways, and do not make strong turns, as this leaves water traces. Only move forwards and backwards.
i Note: The operating time depends on the power level used during cleaning.
Versatile usage and accessories
natural_image
Illustration of a mechanical device with a pointed tip and handle, emitting exhaust smoke (no text or symbols)Warning: When using any accessory, do not vacuum up water or other liquids.
Caution: Do not look directly into the illuminated LEDs or point the LEDs at someone's eyes. The LED light is very bright.
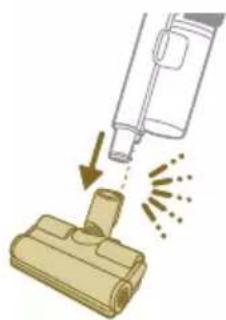
Using the handheld
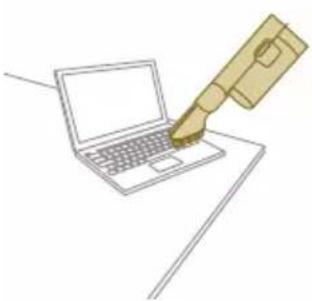
You can use the handheld directly without any cleaning tool to vacuum up dusts.
natural_image
Illustration of a spray gun dispensing liquid into a cylindrical container with motion lines indicating spray (no text or symbols)Using the nozzle
1 Attach the nozzle directly to the handheld.

natural_image
Illustration of a mechanical component with a cross-section view showing a grooved part (no text or symbols)2 This combination is for cleaning dynamic surface height, such as stair case.

Using the Mini TurboBrush
1 To attach the Mini TurboBrush, insert the tube of the handheld into the Mini TurboBrush.
2 You can use the Mini Turbo brush for standard cleaning, for instance of soft areas such as beds and couches. You can adjust the power setting to suit your cleaning needs.
3 You can use the Mini Turbo brush for extra thorough cleaning, for instance to vacuum up pet hair, or to clean small patches of dirt, such as spilled breadcrumbs. You can adjust the power setting to suit your cleaning needs.
Using the crevice tool
1 To attach the crevice tool, insert the tube or handheld into the crevice tool.
2 You can use the long crevice tool to clean narrow corners or hard-to-reach places. You can adjust the power setting to suit your cleaning needs.
Using the combination tool
1 To attach the combination tool, insert the tube or handheld into the combination tool.
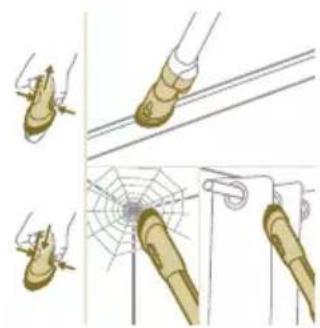
natural_image
Illustration of a spiderweb manipulation technique showing step-by-step steps (no text or symbols)2 The combination tool is designed for cleaning window frames, curtains, or spider webs, with a customizable brush release and illumination settings.
natural_image
Illustration of a soldering iron being dispensed from a tip, with no text or symbols presentUsing the soft brush
1 To attach the soft brush, insert the tube or handheld into the soft brush.

natural_image
Line drawing of a hand holding a pen writing on a laptop (no text or symbols present)2 The soft brush is designed for dedicated surfaces and comes with customizable illumination.

natural_image
Illustration of a spray bottle dispensing liquid into a pipe with motion arrows indicating spray (no text or symbols)Using the upholstery tool
1 To attach the upholstery tool, insert the tube or handheld into the upholstery tool.

natural_image
Diagram showing a gas cylinder connected to a mechanical device with a magnified inset of a cylindrical component (no text or symbols)2 The upholstery tool is ideal for cleaning furniture with soft fabric, and its illumination can be adjusted according to your liking.
Customizations and additional information
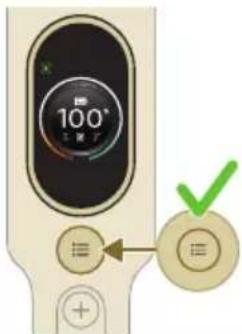
text_image
100° ≡ ≡ ≡The appliance is equipped with various options to customize and monitor in the menu.
1 To access the menu settings, press the menu button.
2 Toggle through the options using the + and - buttons. These options include adjusting illumination, enabling or disabling Floor Type Recognition, accessing additional information about your appliance, and returning to the previous screen.
3 Once your desired option is highlighted, confirm your choice by pressing the menu button again.

natural_image
Gray circular icon with a white lightbulb symbol (no text or numbers)Modify the illumination brightness
Press the menu button and toggle to the illumination feature. Confirm by pressing the menu button again.
To modify the illumination brightness, toggle through the available levels and confirm by pressing the menu button.
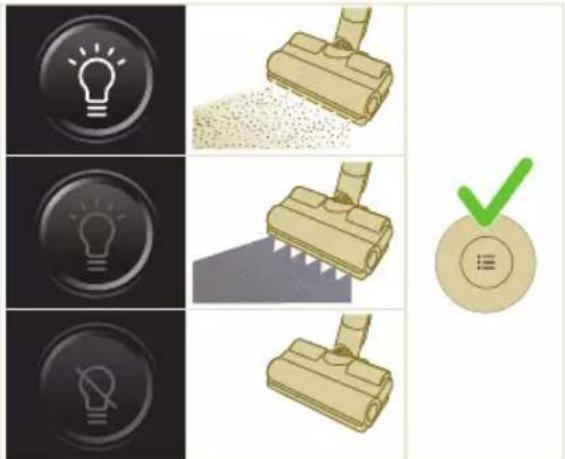
text_image
Diagram showing three icons: a light bulb, a light bulb with a brush, and a no-lit tool, alongside a green checkmark on a circular badge.
natural_image
Circular icon with a white lightning bolt symbol and green leaf (no text or numbers)Floor Type Recognition
Press the menu button and toggle to the Floor Type Recognition feature.
Confirm by pressing the menu button again.
In the Floor Type Recognition screen, toggle this function and confirm your decision by pressing the menu button. When successfully enabled, a green icon will appear at the upper left corner of the display after you go back to the main screen.
text_image
Diagram showing two sets of icons and a checkmark, likely illustrating a process or safety scenario with labeled symbols.
natural_image
Gray circular button with a white lowercase 'i' in the center, no additional text or symbols.i Note: Floor Type Recognition can only be enabled or disabled when the motorized nozzle is attached to the handheld. As a result, when no motorized nozzle is attached to the main appliance, there will be one item less in your menu. Attach the motorized nozzle to see this Floor Type Recognition item in your menu.
i Note: When you first receive your appliance, Floor Type Recognition is enabled.
i Note: The Floor Type Recognition function becomes active when the nozzle identifies different cleaning surfaces while in motion.
Additional information
Press the menu button and toggle to the "additional information" option. Confirm by pressing the menu button again.
In the "additional information" screen, you can check the filter health, battery health, total usage time, model of your appliance, and access of a QR code for additional online information.

text_image
01234 12:34 PHILIPS X:756.4, X:756.6 X:756.7, X:806.5 X:906.7 www.philips.com/ mytcardlessvacuum: 8000xReturn
To exit the menu and return to the previous screen, select the "Return" option.

natural_image
Circular button with a white up-turn arrow icon (no text or symbols)
text_image
Diagram of a remote control device with directional pad and checkmark indicatorAfter use – Maintenance
Frequent maintenance after each cleaning cycle
Dust management system maintenance
Empty the dust bucket after each use or when the dust is reaching the MAX level indicator.
text_image
MAX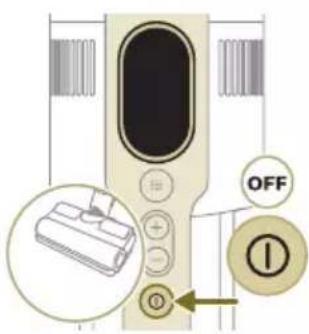
text_image
OFF ①1 Switch off the appliance.
text_image
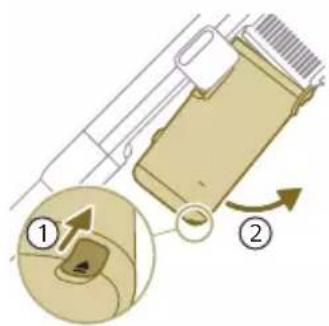
Diagram showing a mechanical device with labeled parts and directional arrows indicating motion or movement.2 Hold the appliance in a 45 degree angle like shown in the illustration. Remove the dust bucket by pressing the release button. The release button is located at the bottom of the bucket.

natural_image
Illustration of a mechanical device with a green checkmark indicating a correct assembly (no text or symbols present)i Note: Remove the dust bucket while keeping the appliance in an upright position.

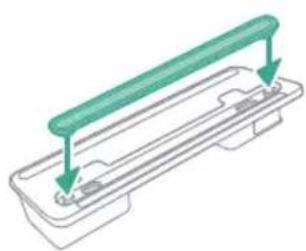
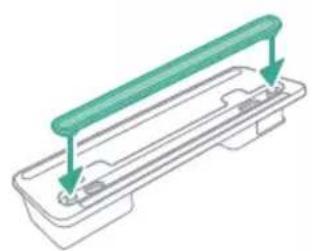
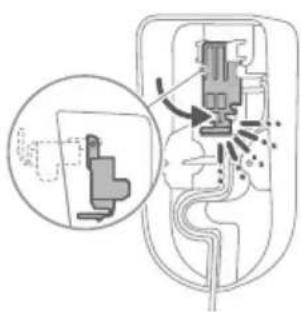
3 Hold onto the black grip. Remove the cyclone from the dust bucket by lifting it out from the bucket
4 Empty the collected dust in the dust bucket over the trash bin.
5 Place the cyclone back in the dust bucket. Make sure the two parts are aligned.
6 Place back the assembled bucket. First align the filter side of the bucket before hinging it in place.
Aqua tank maintenance
Clean the aqua tank after each use.
1 Remove the microfiber mopping pad.
natural_image
Illustration of a pipette dispensing liquid into a green plastic sheet (no text or symbols)2 Rinse the mopping pad under the tap and wash it by hand or in a washing machine.

natural_image
Illustration of a green mechanical component with a blue base and circular end, no text or symbols present3 Pour out any remaining water in the aqua tank.

text_image
MAX 50 °C4 Fill the aqua tank with water.

natural_image
Diagram showing a printer with green components and directional arrows, no text or symbols present5 Close the aqua tank properly and shake the aqua tank to remove detergent residuals.

natural_image
Illustration of a green mechanical component with a blue base and circular hole, no text or symbols present6 Empty the aqua tank and leave it open to dry.
natural_image
Illustration of a mechanical device with a warning icon and hanging clothes (no text or symbols)7 Make sure to not lose the tank cap during storage. Hang the microfiber mopping pad dry.
Periodic maintenance intermittently
Dust management system maintenance
natural_image
Close-up of a beige remote control with a black dial and circular button (no text or symbols visible)Clean the filter at least once every month or when you see the notification for filter cleaning (i8).

text_image
Diagram illustrating a lock mechanism with labeled steps and directional arrows, likely illustrating a mechanical or electrical process.1 Rotate the filter counter-clockwise to remove it from the dust bucket.

natural_image
Diagram showing a container with a lid and a magnified inset of its interior (no text or symbols)2 Remove the washable foam filter from the plastic filter casing.

natural_image
Illustration of two hands pouring liquid into a container with granular material (no text or symbols)3 Tap both the filter casing and the foam filter over a trash bin.

text_image
Diagram illustrating a medical procedure with labeled steps and a checkmark indicating a validation or confirmation point.4 Rinse the foam filter and squeeze it till clean water comes out.
i Note: for best cleaning result, run the water through the filter with the filter tab facing downwards, allowing deeply set dust to be washed out.

natural_image
Illustration of a hand holding a dark object with liquid droplets falling (no text or symbols)
text_image
24 hrs5 Leave the washed filter to dry for 24 hours before reassembling the foam filter in the filter casing.

natural_image
Illustration of a faucet spraying water onto a box with motion lines indicating flow (no text or symbols)6 For thorough maintenance, clean the dust bucket and cyclone under a running tap or in warm soapy water.

natural_image
Illustration of a hand cleaning a wooden notebook (no text or symbols)7 Wipe the cleaned dust bucket and relevant parts dry.

Caution: Make sure all parts are completely dry before you reassemble them.
i Note: all parts cannot be cleaned in the dishwasher.
8 Reassemble the filter in the dust bucket. Rotate the filter clock-wise to fix it in place.
9 Place back the assembled bucket. First align the filter side of the bucket before hinging it in place.
i Note: After maintenance, always make sure the filter is assembled in the appliance before using it.

PrecisionPower Smart Nozzle maintenance
1 Always switch off the appliance before cleaning the nozzle brush roll.
2 To access the brush roll, locate the button on the side of the nozzle. Press it and rotate to open.
3 Gently remove the brush roll and the side cap of the nozzle.
4 Carefully detach any tangled hair from the brush roll. Support the removal of pollution with a pair of scissors.
5 When reassembling, ensure proper alignment of the brush roll.

natural_image
Illustration of a hand using a tool to lift a component, showing motion and wear (no text or symbols)6 Lock the nozzle brush roll by securing it until you hear a "CLICK" sound.

Mini TurboBrush maintenance
1 Turn the brush over to access the cleaning area.
2 Slide the side button to release the brush from its position.
3 Use your hands or a pair of scissors to remove any pollution from the brush.
4 When reassembling the brush, start by placing one side in position before attaching the other side. When the brush is properly assembled, you will hear a "CLICK" sound.
Aqua tank maintenance
Descale the aqua tank once every month to avoid limescale build-up.
1 Add some descaling liquid to a measuring cup.

2 Add the correct amount of water in the measuring cup.
3 Add the mixed liquid in the aqua tank.
4 Close the Aqua tank properly before shaking the tank for the descaling liquid to spread evenly.
5 Leave the aqua tank (without the microfiber mopping pad) upright over 12 hours. Water is expected to slowly come out from the bottom of the aqua tank. We recommend to place the aqua tank inside the sink or over a cloth.

natural_image
Illustration of a green mechanical component with a blue threaded rod inserted into a base (no text or symbols)6 Rinse and remove any remaining liquid inside the aqua tank.

natural_image
Illustration of a green cylindrical object with two arrows pointing upward, placed on a rectangular base (no text or symbols)Water strip maintenance
1 Remove the water strip from the bottom of the aqua tank for a thorough cleaning.

natural_image
Illustration of a medical procedure with a pipette inserted into a green surgical gauze (no text or symbols)2 Rinse the water strip under the tap.
natural_image
Technical line drawing of a mechanical component with green and gray parts, no text or symbols present3 Attach the water strip back to the aqua tank after cleaning.
Replacement
To buy accessories or spare parts, visit www.philips.com/parts-and-accessories or go to your Philips dealer. You can also contact the Philips Consumer Care Center in your country.
Replacement parts and type numbers:
Replacement filter XV1681/01
natural_image
Illustration of a box containing a coin with an upward arrow, symbolizing growth or accumulation (no text or symbols present)XV1681/01
Brush roll CP0667/01

natural_image
Diagram of a mechanical component inside a transparent housing, showing a rolled part being inserted (no text or symbols)CP0667/01
Microfiber mopping pad XV1670/02

natural_image
Isometric illustration of a rectangular block with a green internal component, no text or symbols present.XV1670/02
Water strip CP0381/01

natural_image
Simple line drawing of a cylindrical object with a green arrow pointing downward (no text or symbols)CP0381/01
i Note: Replace the filter and the microfiber mopping pad every 6 months to ensure maximum performance.
User interface signals and their meaning
Signal Meaning of signal
E1 Malfu
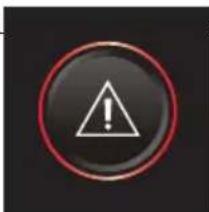
natural_image
Warning symbol with exclamation mark inside a black circle (no text or numbers)pliance.
Remove the battery, wait 10 seconds, and then put the battery back. If this does not work, please take the appliance to a Philips service center or contact the Consumer Care Center.
Signal Meaning of signal
| E2 The a |  | ated below the functioning temperature.Move the appliance to a warmer room. Do not store, charge or use the appliance at a temperature below 5 °C or above 40 °C. |
| E3 The a | 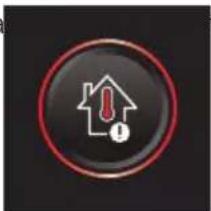 | ated above the functioning temperature.Move the appliance to a cooler room. Do not store, charge or use the appliance at a temperature below 5 °C or above 40 °C. |
| E5 The b |  | ed.Take the appliance to a Philips service center or contact the Consumer Care Center. |
| E9 The r |  | d above the functioning temperature.Switch off the appliance and wait 15 minutes. Touch the upper housing of the nozzle to feel if it is still warm. If the nozzle is still warm, wait longer for the nozzle to cool down. Once the nozzle has cooled down, try switching the appliance back on. |
| i4 The n | 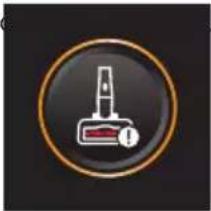 | Make sure the appliance is switched off. Clean the nozzle according to the user manual and check the tube by removing the tube from the main appliance.Remove the object in the nozzle or tube and restart the appliance. |
| i5 Foreign |  | in the airflow passage.Make sure the appliance is switched off. Clean the nozzle according to the user manual and check the tube by removing the tube from the main appliance.Remove the object in the nozzle, tube, or handheld and restart the appliance. |
| i6 The a |  | oved.Remove the adapter before operating the appliance. |
| i7 A wrc | 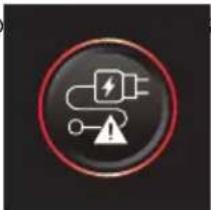 | ed.Only use the original adapter to charge the appliance. |
Signal Meaning of signal
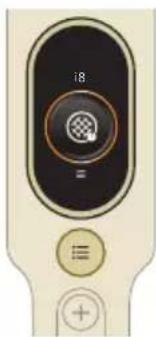
i8 The fil

natural_image
Circular icon with a grid pattern inside, no text or symbols present.Clean the filter. Follow the instructions on the screen or in the users manual. You can buy new filters in the online Philips shop at www.philips.com/support or at your Philips dealer.
i10 The

natural_image
Circular icon with a document symbol and a question mark, no text or labels present.operly inserted.
Remove the battery, and then put the battery back. If this does not work, please take the appliance to a Philips service center or contact the Consumer Care Center.

natural_image
Circular black button with a white battery symbol at center, no text or numbers visibleThe battery level is low and needs to be charged. Charge the appliance or the battery via the suggested charging method.
Troubleshooting
This chapter summarizes the most common problems you could encounter with the appliance. If you are unable to solve the problem with the information below, visit www.philips.com/support for a list of frequently asked questions or contact the Consumer Care Center in your country.
Dry cleaning
Problem Possible cause Solution
| The appliance does not respond when the on/off button is pushed. | The display shows the battery empty icon. | To charge the battery, connect the appliance to the charging station or attach the handheld vacuum cleaner directly to the power plug of the adapter. |
| The charging station is not stable on the wall. | The screws holding the charging station are loose. | Tighten the screws. |
| The screws are not the right size. | Mount the charging station with the supplied screws. | |
| The charging station is not attached to a stable wall. | Check that the wall on which the charging station will be mounted is stable. | |
| The appliance suddenly stops working. | When the appliance has an internal malfunction, the buttons will not respond and the screen will remain blank. | Connect the appliance to the charging station or attach the handheld vacuum cleaner directly to the adapter. Check the display. If an error code appears, you can find its meaning in the user manual. |
Problem Possible cause Solution
| (code: E2, E3) The appliance is not working at a suitable temperature. | Make sure the appliance is used at a temperature of 5-40 °C. | |
| (code: i4, i5) The brush roll is stuck or objects are stuck in the air flow channel. | Make sure the appliance is switched off. Clean the nozzle according to the user manual and check the tube by removing the tube from the main appliance. Remove the object in the nozzle or tube and restart the appliance. | |
| (code: E9) The motorized nozzle is overheated. | Switch off the appliance and wait 15 minutes. Touch the upper housing of the nozzle to feel if it is still warm. If the nozzle is still warm, wait longer for the nozzle to cool down. Once the nozzle has cooled down, try switching the appliance back on. | |
| The appliance has a lower suction power than usual. | The filter and the cyclone are dirty. | Empty the dust bucket. Clean the filter and the cyclone. Make sure the filter is washed at least once a month, when using the appliance regularly. Make sure hair and dirt stuck in the cyclone are removed. |
| The dust container is not attached properly to the appliance. | Make sure the dust container is attached properly. | |
| Dust escapes from the appliance. | The filter is dirty. Clean the filter. See also the user manual. | |
| The filter is not present in the appliance. | Make sure that the filter is in the appliance and assembled correctly. | |
| Something is blocking the cyclone. | Check the cyclone for stuck objects and remove any object blocking the cyclone. Also ensure all hair and dirt stuck in the cyclone are removed. | |
| The dust container is not properly attached to the appliance. | Empty the dust container and attach the dust container correctly to the appliance. | |
| The appliance is rotated or flipped when the power is off. | Keep the appliance upright when the power is off. | |
| The appliance does not move smoothly across the floor when cleaning a carpet. | The floor type recognition function is not on. | Switch on the floor type recognition function in the digital menu. |
| The selected suction power has been too high. | Decrease the suction power. See also the user manual. | |
| The brush does not turn anymore. | The brush is clogged with hair or dirt. | Clean the brush by hand or with a pair of scissors. |
Problem Possible cause Solution
| (code i4) The brush may stop turning when it encounters too much resistance from a high-pile carpet. | Switch off the appliance and then switch it back on again. | |
| The roller brush has not been assembled properly into the nozzle after cleaning. | Follow the instructions in the cleaning chapter of the user manual to slide the roller brush into the nozzle properly. Secure the roller brush inside the nozzle by snapping the locking lever in place. | |
| (code: E9) The motorized nozzle is overheated. | Switch off the appliance and wait 15 minutes. Touch the upper housing of the nozzle to feel if it is still warm. If the nozzle is still warm, wait longer for the nozzle to cool down. Once the nozzle has cooled down, try switching the appliance back on. | |
| The LEDs in the nozzle do not come on. | The nozzle has not been attached to the tube or appliance properly. | Attach the nozzle to the appliance or handheld properly. |
| The lighting feature is disabled. | Enable this feature in the menu. Adjust the brightness of nozzle LEDs in the menu. | |
| The LEDs in the handheld do not come on. | The lighting feature is disabled. | Enable this feature in the menu. Adjust the brightness of handheld LEDs in the menu. |
| The light in the accessory does not come on. | The accessory is attached to the tube. | Remove the tube and attach the accessory directly to the handheld. |
| The accessory is not attached to the appliance properly. | Attach the accessory to the appliance properly. | |
| The lighting in my nozzle, handheld, and accessories is not bright enough. | The brightness is dimmed. | Adjust the brightness of lighting in the menu. |
| The appliance is not charging. | The power plug is not connected properly to the appliance or the adapter is not inserted into the wall socket properly. | Make sure that the power plug is connected properly to the appliance and that the adapter is inserted into the wall socket properly. |
| The power plug is not placed properly in the charging station. | Make sure the plug is fixed properly in the charging station. Check if the plug is angled and the charging station is holding the plug in place. | |
| (code i7) An adapter other than the supplied adapter is being used. | Make sure that you use the adapter supplied. | |
| (code i10) The battery is not properly installed. | Make sure that the battery is pushed all the way in the slot and properly installed. |
Problem Possible cause Solution
| (code E5) The battery malfunctions. | The battery has failed. Replace the battery. | |
| If you have checked the above and the appliance still does not charge, take it to a Philips service center or contact the Consumer Care Center. | ||
| The appliance is charging very slow. | An external adapter or an adapter from other appliances is used. | Charge the appliance with the supplied adapter. |
| The battery is charged and attached, but the appliance cannot be switched on. | The appliance is still connected to the adapter. | Remove the appliance from the adapter before restarting it. |
| (code: E1) Something is wrong with the appliance. | Remove the battery, wait 10 seconds, and then put the battery back. If this does not work, please take the appliance to a Philips service center or contact the Consumer Care Center. | |
| The display shows the filter icon (code: i8). | The filter is dirty. Clean the filter. | Follow the instructions on the screen or in the users manual. |
| The filter is old. You can buy new filters in the online Philips shop at www.philips.com/support or at your Philips dealer. | ||
| If you have checked the above and the appliance still shows the error, take it to a Philips service center or contact the Consumer Care Center. | ||
| The mini Turbo brush does not function properly. | The roller brush is blocked. Remove hairs from the brush with a pair of scissors. Follow the instructions in the user manual. | |
| The roller brush is blocked by fabric or surfaces during cleaning. | Keep the mini Turbo brush aligned with the surface and do not push the Turbo brush into soft surfaces. | |
| The roller brush is not properly inserted into the mini Turbo brush. | Make sure that roller brush and the mini Turbo brush are properly connected and that there is no gap between the parts. Follow the instructions in the manual. | |
| The suction power does not feel stable. | Nothing is wrong. This is the feature of "Floor Type Recognition" being triggered. Your appliance is detecting the floor type and cleaning with an optimized performance for that floor. | No action needed. If you prefer to clean with a consistent power of your choice, disable this smart feature in the menu of your appliance. |
Problem Possible cause Solution
| The Floor Type Recognition is not reacting logically. | The brush is clogged with hair or dirt. | Clean the brush with a pair of scissors or by hand. See the instructions in the user manual. |
| The appliance delivers static shocks. | The appliance builds up static electricity. The lower the air humidity, the more state electricity is build up. | Discharge the appliance by frequently holding the tube against other metal objects in the room (for example the legs of a table or chair, etc.). Or raise the air humidity level in the room. |
| The dust and dirt that is vacuumed up is static. | Empty the dust container and clean the filter according to the instructions in the user manual. |
Wet cleaning
Problem Possible cause Solution
| The water flow from the water tank is reduced. | The wetting strip is blocked by dirt. | Remove the wetting strip and clean it. Place the clean wetting strip back. |
| The microfiber mopping pad is not placed correctly and blocks the wetting strip as a result. | Make sure that you place the mopping pad correctly. Check the user manual for proper placement. | |
| The water tank is empty or nearly empty. | Refill the water tank. | |
| A microfiber mopping pad is used that is not supplied by Philips. | Only use an original Philips microfiber mopping pad. The mopping pads can be bought in the online Philips shop at www.philips.com/support or at your Philips dealer. | |
| Lime scale has build up in the wetting strip. | Buy a new wetting strip in the online Philips shop at www.philips.com/support or at your Philips dealer. | |
| Too much water flows out of the water tank at a too high speed. | The water tank cap is not attached properly. | Check the cap and make sure it is fully and properly closed. |
| The strip is not placed properly in the bottom of the water tank. | Check the strip and make sure that it is fitted properly in the bottom plate of the water tank. | |
| The floor dries with stripes. Too much liquid cleaner has been added to the water. | Use only a few drops of liquid cleaner or use a cleaner that foams less. | |
Problem Possible cause Solution
| The microfiber mopping pad is not placed correctly. | Make sure that the mopping pad is placed correctly. Check the user manual for proper placement. | |
| An incorrect mopping pad is used. | Only use Philips XV1670/02 microfiber mopping pad for the 7000 series. The mopping pads can be bought in the online Philips shop at www.philips.com/support or at your Philips dealer. |
lsi
Pendahuluan 37
Keterangan umum 37
natural_image
Diagram of a mechanical device with an inset showing a close-up of a component (no text or symbols visible)natural_image
Diagram of a mechanical device with internal components and directional arrows, no readable text or symbols present.natural_image
Diagram of a mechanical device with internal components and a magnified inset showing a detail (no text or symbols)text_image
110 ± 2 cmnatural_image
Illustration of a vacuum cleaner with a magnified view showing the handle and base (no text or symbols)
natural_image
Diagram of a mechanical component with curved arrows indicating motion or force direction (no text or symbols)natural_image
Diagram showing a device with a lock and a magnified view of its internal structure (no text or symbols)natural_image
Illustration of a handheld device connected to a tool, with an inset showing a close-up of the tool's tip (no text or symbols present)natural_image
Illustration of a soldering iron being inserted into a tip, with no text or symbols present.natural_image
Illustration of a hairdryer being inserted into a device (no text or symbols)text_image
100° ON OFF ①text_image
Diagram illustrating electric field lines between positive and negative charges, with labeled components and corresponding electric current symbols.natural_image
Illustration of a person using a vacuum cleaner to lift a floor, with motion arrows indicating movement (no text or symbols)natural_image
Illustration of a mechanical component with a green circular symbol and a magnified inset showing a dollar sign (no text or symbols present)text_image
Safety warning illustration showing a person using a vacuum cleaner to clean water, with an orange warning symbol and a red X mark indicating no need.natural_image
Illustration of an eye with warning symbols (anxiety, red X) and a rolled-up object, no text present.natural_image
Illustration of a pipette dispensing liquid into a green rectangular container with a ribbon, no text or symbols present
natural_image
Illustration of a green mechanical component with a magnified inset showing a folded paper or sheet (no text or symbols)
text_image
MAX 50 °Cnatural_image
Diagram of a mechanical component with a green pin inserted into a housing (no text or symbols)natural_image
Illustration of a mechanical component being inserted into a base, showing a downward arrow (no text or symbols present)natural_image
Illustration of a person using a vacuum cleaner to clean or stand (no text or symbols present)text_image
Illustration showing a person using a vacuum cleaner with a red X mark indicating the absence of the device.text_image
Safety warning illustration showing a person using a vacuum cleaner with a red 'X' symbol indicating water residue.natural_image
Illustration of a mechanical device with a cylindrical component and a base, positioned above two horizontal lines (no text or symbols)natural_image
Illustration of a spray gun dispensing liquid into a rubber stopper (no text or symbols)Menggunakan nozel
1 Pasang nozel langsung ke mode genggam.

natural_image
Illustration of a mechanical component with a magnified inset showing a textured surface (no text or symbols)natural_image
Illustration of a spiderweb manipulation technique showing step-by-step steps (no text or symbols)natural_image
Illustration of a soldering iron being dispensed from a tip, with arrows indicating motion (no text or symbols)natural_image
Line drawing of a hand holding a pen writing on a laptop (no text or symbols present)natural_image
Illustration of a spray bottle pouring liquid into a pipe with motion arrows indicating flow (no text or symbols)natural_image
Diagram showing a gas cylinder connected to a mechanical device with a magnified inset of a cylindrical component (no text or symbols)natural_image
Gray circular icon with a white lightbulb symbol (no text or numbers)Mengubah kecerahan pencahayaan
text_image
Diagram showing three icons: a light bulb, a light bulb with a brush, and a no-lit tool, alongside a green checkmark on a circular badge.natural_image
Circular icon with a white lightning bolt symbol and green leaf (no text or numbers)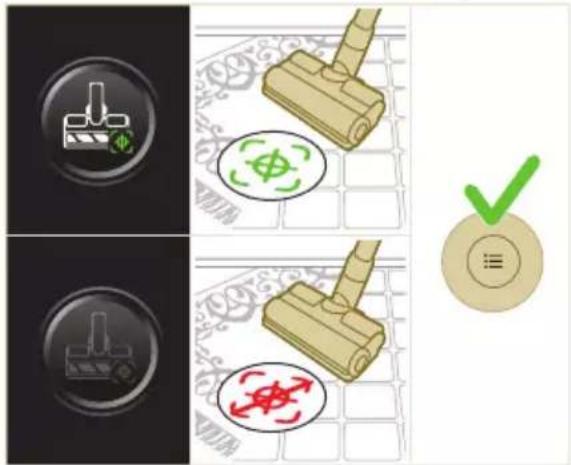
text_image
Diagram showing four different states of a device with icons and control symbols, including a checkmark and a circular icon.
natural_image
Gray circular button with a white lowercase 'i' in the center, no additional text or symbols.natural_image
Circular button with a white curved arrow icon, no text or symbols present.
text_image
Diagram of a remote control device with labeled buttons and a green checkmark indicating actiontext_image
Diagram showing a mechanical device with labeled parts and directional arrows, including numbered annotations ① and ②.natural_image
Illustration of a mechanical device with a green checkmark indicating a correct assembly (no text or symbols present)i Catatan: Lepaskan wadah debu sambil mempertahankan posisi alat tetap tegak.

natural_image
Illustration of a pipette dispensing liquid into a green plastic sheet (no text or symbols)natural_image
Illustration of a green mechanical component with a blue screw and circular base (no text or symbols)natural_image
Diagram showing a printer with green components and directional arrows, no text or symbols presentnatural_image
Illustration of a green mechanical component with a blue base and circular hole, no text or symbols presentnatural_image
Illustration of a mechanical device with a warning icon and hanging clothes (no text or symbols)natural_image
Close-up of a beige remote control with a black dial and circular button (no text or symbols visible)text_image
Diagram illustrating a lock mechanism with labeled steps and directional arrows, likely illustrating a mechanical or electrical process.natural_image
Diagram showing a container with a lid and a magnified inset of its interior (no text or symbols)natural_image
Illustration of two hands pouring liquid into a container with granular material (no text or symbols)text_image
Diagram illustrating a medical procedure with labeled steps and a checkmark indicating a validation or confirmation point.natural_image
Illustration of a hand holding a dark object with liquid droplets (no text or symbols)
text_image
24 hrsnatural_image
Illustration of a faucet pouring liquid into a bag with swirling lines indicating flow (no text or symbols)natural_image
Illustration of a hand cleaning a wooden door (no text or symbols)natural_image
Illustration of a hand pressing down on a mechanical component with an inset showing the close-up of a device (no text or symbols present)natural_image
Illustration of a hand holding a car seatbelt with an arrow indicating motion (no text or symbols)natural_image
Illustration of a hand using scissors to cut a piece of wood (no text or symbols present)natural_image
Mechanical assembly diagram showing a lever mechanism with an inset close-up of the component (no text or symbols)natural_image
Illustration of a hand using a tool to lift a component, showing motion and wear (no text or symbols)natural_image
Illustration of a mechanical lever with rotational arrows indicating clockwise motion (no text or symbols)text_image
Diagram of a hand holding a device with labeled parts and directional arrows indicating movement or operation.natural_image
Illustration of hands tying a knot around a wooden object with a directional arrow (no text or symbols)text_image
Diagram showing a hand holding a device with labeled parts, including numbered callouts (① and ②) indicating different states or functions.natural_image
Illustration of a plastic bottle pouring liquid from a bottle into a beaker, next to a water tap (no text or symbols)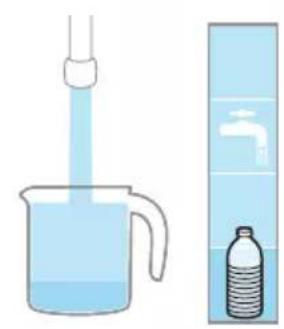
natural_image
Illustration of a beaker with liquid being inverted and a water bottle beside a water tap (no text or symbols)natural_image
Diagram showing a mechanical device with a green component and a green base, connected by directional arrows (no text or symbols)natural_image
Illustration of a green plastic component with a blue anchor and a small circular mark on a surface (no text or symbols)natural_image
Illustration of a green cylindrical object with two arrows pointing upward, placed on a rectangular base (no text or symbols)natural_image
Illustration of a medical procedure with a blue needle inserted into a green surgical gasket (no text or symbols)2 Bilas strip penyalur air di bawah keran.
natural_image
Technical line drawing of a mechanical component with green and gray parts, no text or symbols presentnatural_image
Illustration of a box containing a coin with an upward arrow, no text or symbols presentXV1681/01
Rol sikat CP0667/01

natural_image
Diagram of a mechanical component inside a transparent housing, showing a rolled part being inserted (no text or symbols)CP0667/01
Kain pel serat mikro XV1670/02

natural_image
Isometric illustration of a rectangular block with a green internal component, no text or symbols present.XV1670/02
Strip penyalur air CP0381/01

natural_image
Simple line drawing of a mechanical component with a green arrow indicating direction (no text or symbols)CP0381/01
natural_image
Warning symbol with exclamation mark inside a black circle (no text or numbers)natural_image
Diagram of a mechanical device with an inset showing a close-up of a component (no text or symbols visible)natural_image
Diagram of a mechanical device with internal components and directional arrows, no readable text or symbols present.natural_image
Diagram of a mechanical device with internal components and a magnified inset showing a detail (no text or labels)text_image
110 ± 2 cmnatural_image
Illustration of a vacuum cleaner with a magnified view showing the handle and base (no text or symbols)
natural_image
Diagram of a mechanical component with curved arrows indicating motion or force direction (no text or symbols)natural_image
Diagram showing a device with an arrow pointing to a component, and a magnified inset illustrating the internal structure (no text or symbols present)natural_image
Diagram of a handheld device with a close-up inset showing a tool interacting with a mechanical component (no text or symbols present)natural_image
Illustration of a soldering iron being inserted into a tip, with no text or symbols presentnatural_image
Illustration of a hairdryer being inserted into a device (no text or symbols)text_image
100° ON OFF ①text_image
Diagram illustrating electric field lines around a positively charged battery, showing N and E poles with corresponding electric field symbols.natural_image
Illustration of a person using a vacuum cleaner to lift a floor, with motion arrows indicating movement (no text or symbols)natural_image
Illustration of a mechanical component with a circular green symbol and a magnified inset showing a crosshair (no text or symbols present)text_image
Safety warning illustration showing a person using a vacuum cleaner to clean water, with an orange warning symbol and a red X mark indicating no need.Amaran: Jangan vakum air atau cecair lain.

natural_image
Illustration of an eye with warning symbols (anxiety, red X) and a rolled-up object, no text present.natural_image
Illustration of a pipette dispensing liquid into a green plastic tray (no text or symbols)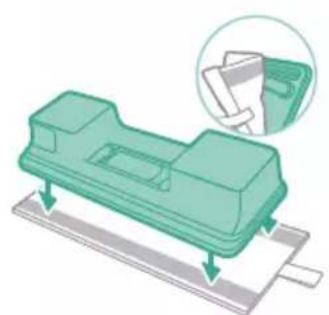
natural_image
Illustration of a green mechanical component with arrows indicating direction, no text or symbols present
text_image
MAX 50 °Cnatural_image
Diagram of a mechanical component with a green arrow indicating direction (no text or symbols)natural_image
Illustration of a mechanical component being inserted into a base, showing a downward arrow (no text or symbols present)natural_image
Illustration of a person using a vacuum cleaner to lift a person's legs (no text or symbols present)text_image
Illustration showing a person using a vacuum cleaner with a red X mark indicating the absence of the device.text_image
Safety warning illustration showing a person using a vacuum cleaner with a red X mark indicating water residue, accompanied by an orange warning symbol.natural_image
Illustration of a mechanical device with a handle and base, no visible text or symbolsnatural_image
Illustration of a vacuum cleaner emitting powder from a bottle (no text or symbols)Penggunaan muncung
natural_image
Illustration of a mechanical device with a highlighted section showing a textured surface (no text or symbols)natural_image
Illustration of a spiderweb manipulation technique showing four steps: wire handling, spiderweb insertion, wire holding, and wire disassembly (no text or symbols present)natural_image
Illustration of a soldering iron being dispensed from a tip, with arrows indicating motion (no text or symbols)natural_image
Line drawing of a hand holding a pen writing on a laptop (no text or symbols present)natural_image
Illustration of a spray bottle dispensing liquid into a pipe with motion arrows indicating spray (no text or symbols)natural_image
Diagram of a gas cylinder connected to a mechanical device with a magnified inset showing a cylindrical component (no text or symbols)natural_image
Gray circular icon with a white lightbulb symbol (no text or numbers)Ubah suai keterangan pencahayaan
natural_image
Illustration of three different cleaning tools: a light bulb, a light bulb with a brush, and a light bulb without a tool, alongside a green checkmark on a circular badge (no text or symbols on the tools themselves)
natural_image
Circular icon with a white downward arrow and green leaf symbol (no text or numbers)text_image
Diagram showing four different states of a device with icons and control symbols, including a checkmark and a circular icon.
natural_image
Gray circular button with a white lowercase 'i' in the center, no additional text or symbols.natural_image
Circular button with a white up-turn arrow icon (no text or symbols)Kembali
text_image
Diagram of a remote control device with labeled buttons and a green checkmark indicating actiontext_image
Diagram showing a mechanical device with labeled parts and directional arrows indicating motion or movement.natural_image
Illustration of a vacuum cleaner with a green checkmark indicating the process (no text or symbols present)natural_image
Illustration of a pipette dispensing liquid into a green plastic sheet (no text or symbols)natural_image
Illustration of a green mechanical component with a blue base and circular end, no text or symbols presentnatural_image
Diagram showing a printer with green components and directional arrows, no text or symbols presentnatural_image
Illustration of a green mechanical component with a blue screw and base, no text or symbols presentnatural_image
Illustration of a mechanical device with a warning icon and a magnified view of a folder (no text or symbols present)natural_image
Close-up of a beige remote control with a black dial and circular button (no text or symbols visible)text_image
Diagram illustrating a lock mechanism with labeled steps and directional arrows, likely illustrating a mechanical or electrical process.natural_image
Diagram showing a container with a lid and a magnified inset of its interior (no text or symbols)natural_image
Illustration of two hands pouring liquid into a container with granular material (no text or symbols)text_image
Diagram illustrating foot positioning with a checkmark and red X mark indicating incorrect positioning, showing foot positioning on a platform.natural_image
Illustration of a hand holding a dark object with liquid dripping (no text or symbols)natural_image
Illustration of a faucet spraying water onto a bag, with motion lines indicating fluid flow (no text or symbols)natural_image
Illustration of a hand cleaning a brown notebook (no text or symbols)
natural_image
Illustration of a hand pressing down on a mechanical component with an inset showing the close-up of a device (no text or symbols present)natural_image
Illustration of a hand holding a car seatbelt with an arrow indicating motion (no text or symbols)natural_image
Illustration of a hand using scissors to cut a piece of wood (no text or symbols present)4 Keluarkan apa-apa rambut yang kusut daripada gulungan berus dengan berhati-hati. Bantu penanggalan pencemaran tersebut dengan sepasang gunting.
natural_image
Mechanical assembly diagram showing a lever mechanism with an inset close-up of the component (no text or symbols)natural_image
Illustration of a hand using a tool to lift a component, showing motion and wear (no text or symbols)natural_image
Illustration of a mechanical lever with rotational arrows indicating clockwise motion (no text or symbols)text_image
Diagram of a hand holding a device with labeled parts 1 and 2, showing mechanical components and directional arrows.natural_image
Illustration of hands connecting a mechanical component with a spring (no text or symbols)text_image
Diagram showing a hand holding a device with labeled parts, including numbered callouts (① and ②) indicating different components or states.natural_image
Illustration of a plastic bottle pouring liquid into a beaker, next to a water tap (no text or symbols)
natural_image
Illustration of a beaker with liquid being inverted in a funnel and a water bottle beside it (no text or symbols)natural_image
Diagram showing a mechanical device with a green component and a separate green device with bidirectional arrows (no text or symbols)natural_image
Illustration of a green mechanical component with a blue threaded rod inserted into a base (no text or symbols)natural_image
Diagram of a green rod inserted into a rectangular container with two submerged plates (no text or symbols)natural_image
Illustration of a medical procedure with a pipette inserted into a green surgical gauze (no text or symbols)2 Bilas jalur air di bawah pili.

natural_image
Technical line drawing of a mechanical component with green and gray parts, no text or symbols presentnatural_image
Illustration of a box containing a coin with an upward arrow, symbolizing growth or direction (no text or symbols present)XV1681/01
Gulungan berus CP0667/01

natural_image
Diagram of a mechanical component inside a transparent housing, showing a rolled part being inserted (no text or symbols)CP0667/01
Pad mengemop mikrofiber XV1670/02

natural_image
Isometric illustration of a rectangular block with a green internal component, no text or symbols present.XV1670/02
Jalur air CP0381/01

natural_image
Simple line drawing of a cylindrical object with a green arrow pointing downward (no text or symbols)CP0381/01
natural_image
Warning symbol with exclamation mark inside a black circle (no text or numbers)natural_image
Circular icon with a grid pattern inside, no text or symbols presentBersihkan penuras. Ikut arahan pada skrin atau dalam manual pengguna. Anda boleh membeli penuras baharu di kedai dalam talian Philips di www.philips.com/support atau di pengedar Philips anda.
i10 Bate

natural_image
Circular icon with a document symbol and a question mark, no text or labels present.kan dengan betul.
natural_image
Circular black button with a white battery symbol at center, no text or numbers visiblewww.philips.com/mycordlessvacuum-7000s.
Všeobecný popis
1 Digitální displej
natural_image
Diagram of a mechanical device with an inset showing a close-up of a component (no text or symbols visible)natural_image
Diagram of a mechanical device with internal components and directional arrows, no readable text or symbols present.natural_image
Diagram of a mechanical device with internal components and a magnified inset showing a detail (no text or symbols)text_image
110 ± 2 cmnatural_image
Illustration of a vacuum cleaner with a magnified view showing the handle and base (no text or symbols)
natural_image
Diagram of a mechanical component with curved arrows indicating motion or force (no text or symbols)natural_image
Diagram showing a car seat with a device and its magnified view of the seat (no text or symbols)natural_image
Diagram of a handheld device with a cable and connector, showing a magnified inset of its internal structure (no text or symbols present)natural_image
Illustration of a soldering iron being inserted into a tip, showing the process (no text or symbols)natural_image
Illustration of a hairdryer being inserted into a device (no text or symbols)text_image
100° ON OFF ①text_image
Diagram illustrating electric field lines around a positively charged battery, showing N and E poles with corresponding electric field symbols.natural_image
Illustration of a person using a vacuum cleaner to lift a floor, with motion arrows indicating movement (no text or symbols)natural_image
Illustration of a mechanical component with a circular green symbol and a magnified inset showing a crosshair (no text or symbols present)text_image
Safety warning illustration showing a person using a vacuum cleaner to clean water, with an orange warning symbol and a red X mark indicating no need.natural_image
Illustration of an eye with warning symbols (anxiety, no protection) and a red X mark, no text or labels present.natural_image
Illustration of a pipette dispensing liquid into a green plastic sheet, with a faucet nearby (no text or symbols)natural_image
Illustration of a green mechanical component with arrows indicating assembly or movement, and an inset showing a folder (no text or symbols present)
text_image
MAX 50 °Cnatural_image
Diagram of a mechanical component with a green handle and arrow indicating direction (no text or symbols)natural_image
Illustration of a mechanical component being inserted into a base block, showing a downward arrow (no text or symbols present)natural_image
Illustration of a person using a vacuum cleaner to clean or stand (no text or symbols present)text_image
Illustration showing a person using a vacuum cleaner with a red X mark indicating the absence of the device.
text_image
Safety warning illustration showing a person using a vacuum cleaner with a red 'X' symbol indicating water pollution.natural_image
Illustration of a handheld device with a handle and screen, positioned above a horizontal line (no text or symbols)natural_image
Illustration of a spray gun dispensing liquid into a rubber block with motion lines indicating spray (no text or symbols)Používání hubice
natural_image
Illustration of a mechanical device with a gear and handle, shown in profile view (no text or symbols)natural_image
Illustration of a spiderweb manipulation technique showing step-by-step steps (no text or symbols)natural_image
Illustration of a soldering iron being dispensed from a tip, with arrows indicating motion (no text or symbols)natural_image
Line drawing of a laptop with a pen writing on it, no text or symbols presentnatural_image
Illustration of a spray gun dispensing liquid into a pipe with motion arrows indicating spray (no text or symbols)natural_image
Diagram of a gas cylinder connected to a mechanical device with a magnified inset showing a cylindrical component (no text or symbols)natural_image
Circular icon with a lightbulb symbol and radiating lines, no text or symbols present.text_image
Diagram showing three lighting icons and a checkmark, likely illustrating cleaning or anti-smoking concepts.
natural_image
Circular icon with a white lightning bolt symbol and green text '电源' (Power Supply) at the bottom (no readable text or numbers)text_image
Diagram showing four different types of electrical circuit components with icons and labels, including switches, coils, and a checkmark.natural_image
Gray circular button with a white lowercase 'i' in the center, no additional text or symbols.

Návrat
natural_image
Circular button with a white up-turn arrow icon (no text or symbols)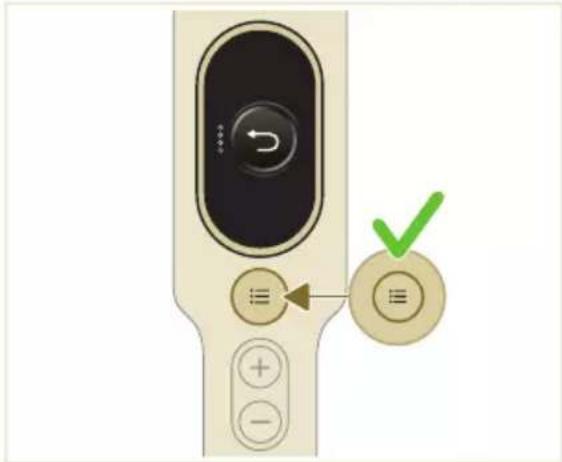
text_image
Diagram of a remote control device with labeled buttons and a green checkmark indicating actionPo použití – údržba
text_image
Diagram showing a hairbrush mechanism with labeled parts and directional arrows indicating movement or process.natural_image
Illustration of a vacuum cleaner with a green checkmark indicating inspection (no text or symbols present)natural_image
Illustration of a pipette dispensing liquid into a green plastic sheet (no text or symbols)natural_image
Illustration of a green mechanical component with a blue cylindrical base and circular end, no text or symbols present.natural_image
Diagram showing a printer with green components and directional arrows, no text or symbols presentnatural_image
Illustration of a green mechanical component with a blue screw and base, no text or symbols presentnatural_image
Illustration of a mechanical device with a warning icon and hanging clothes (no text or symbols)natural_image
Close-up of a beige remote control with a black dial and circular button (no text or symbols visible)text_image
Diagram illustrating a lock mechanism with labeled steps and directional arrows, likely illustrating a mechanical or electrical process.natural_image
Diagram showing a container with a lid and a magnified inset of its interior (no text or symbols)natural_image
Illustration of two hands pouring liquid into a container with granular material (no text or symbols)text_image
Diagram illustrating a medical procedure with labeled steps and a checkmark indicating a validation or confirmation point.natural_image
Illustration of a hand holding a dark object with liquid droplets (no text or symbols)
text_image
24 hrsnatural_image
Illustration of a faucet spraying water onto a box with motion lines indicating flow (no text or symbols)natural_image
Illustration of a hand cleaning a rectangular object with a cloth (no text or symbols)natural_image
Illustration of a hand using a tool to lift a component, showing motion and wear (no text or symbols)natural_image
Illustration of a mechanical component with rotational arrows indicating cycle (no text or symbols)Údržba mini Turbo kartáče
text_image
Diagram of a hand holding a device with labeled parts, showing mechanical components and directional arrows.natural_image
Illustration of hands tying a knot around a wooden object with a directional arrow (no text or symbols)text_image
Diagram showing a hand holding a device with labeled parts, including numbered callouts (① and ②) indicating different components or functions.natural_image
Illustration of a box containing a coin with an upward arrow, symbolizing growth or accumulation (no text or symbols present)XV1681/01
natural_image
Diagram of a mechanical component inside a transparent housing, showing a rolled part being inserted (no text or symbols)CP0667/01
natural_image
Isometric illustration of a rectangular block with a green internal component, no text or symbols present.XV1670/02
Smáčecí pásek CP0381/01

natural_image
Simple line drawing of a cylindrical object with a green arrow pointing downward (no text or symbols)CP0381/01
natural_image
Warning symbol with exclamation mark inside a red circle on black background (no text or numbers)natural_image
Circular icon with a grid pattern inside, no text or symbols presentnatural_image
Circular icon with a document symbol and a question mark, no text or labels present.asunuta.
natural_image
Circular black button with a white battery symbol at center, no text or numbers visiblenatural_image
Diagram of a mechanical device with an inset showing a close-up of a component (no text or symbols visible)1 Okrenite zidni nosač i otpustite sivu polugu. Umetnite priključak za punjenje. Metalni dio mora da bude vidljiv i usmjeren nagore na prednjoj strani zidnog nosača.

natural_image
Diagram of a mechanical device with internal components and directional arrows, no readable text or symbols present.2 Ugurajte kabl u namjenski žlijeb da stoji uredno.
natural_image
Diagram of a mechanical device with an inset showing a close-up of a component (no text or symbols present)text_image
110 ± 2 cm4 Dobro pričvrstite zini nosač na željenom položaju na zidu. Otvori za montažne vijke moraju da budu na visini od približno 110 cm od poda.
A Oprez: Prilikom bušenja rupa u zidu za pričvršćivanje zidnog nosača pazite na opasnost od strujnog udara.

natural_image
Illustration of a vacuum cleaner with a magnified view showing the handle and base (no text or symbols)
natural_image
Simple line drawing of a mechanical component with arrows indicating rotation or force (no text or symbols)natural_image
Diagram showing a car seat with a device and its magnified view of the seat (no text or symbols)U aparatu se nalazi litijum-jonska baterija. Punjenje od prazne do pune baterije traje oko 6 sati.
natural_image
Illustration of a hairdryer with a magnified inset showing the tool tip (no text or symbols present)i Napomena: Ručni aparat možete da stavite na ravnu i stabilnu površinu i direktno povežete kabl za punjenje.
text_image
6 hr 100°3 Aparat je projektovan tako da se potpuno napuni u roku od 6 sati. Proces punjenja možete pratiti na ekranu. Kada se aparat potpuno napuni, na ekranu će zasvijetliti vrijednost 100%. Nakon nekoliko minuta ekran će se isključiti.
Korišćenje aparata
Sastavljanje aparata
natural_image
Illustration of a soldering iron being inserted into a tip, showing the process (no text or symbols)1 Pričvrstite ručni aparat na cijev. Bićete sigurni da je dobro postavljen kad začujete zvuk „klik”.
natural_image
Illustration of a hairdryer being inserted into a device (no text or symbols)2 Pričvrstite cijev na mlaznicu. Bićete sigurni da je dobro postavljen kad začujete zvuk „klik”.
Usisavanje mekih i tvrdih podova

text_image
100° ON OFF ①text_image
Diagram illustrating electric field lines around a positively charged battery, showing N and E poles with corresponding electric field symbols.natural_image
Illustration of a person using a vacuum cleaner to lift a floor, with motion arrows indicating movement (no text or symbols)natural_image
Illustration of a mechanical component with a circular green symbol and a magnified inset showing a crosshair (no text or symbols present)i Ako je omogućena funkcija za prepoznavanje vrste poda, aparat prepoznaje vrstu poda i automatski optimizuje svoje performanse u okviru postavke snage koju ste izabrali. Ako želite da onemogućite ovu funkciju, pogledajte kako se prilagođavaju postavke u nastavku.
text_image
Safety warning illustration showing a person using a vacuum cleaner to clean water, with an orange warning symbol and red X mark indicating no need.natural_image
Illustration of an eye with warning symbols (anxiety, red X) and a rolled-up object, no text present.natural_image
Illustration of a hand pouring liquid into a green plastic sheet with a faucet in the background (no text or symbols)2 Pričvrstite umetak za brisanje od mikrovlakana ispod rezervoara za vodu. Poravnajte čičak trake na rezervoaru za vodu sa onima ispod krpe.

natural_image
Illustration of a green mechanical component with a paper holder and a magnified inset showing a document (no text or symbols present)
text_image
MAX 50 °Cnatural_image
Diagram of a mechanical component with a green arrow indicating direction (no text or symbols)natural_image
Illustration of a mechanical component being inserted into a base, showing a downward arrow (no text or symbols present)6 Pričvrstite pripremljeni rezervoar za vodu na mlaznicu i možete da počnete.
natural_image
Illustration of a person using a vacuum cleaner to lift their arm (no text or symbols present)7 Pritisnite dugme za uključivanje/isključivanje i uključite aparat. Kada je na mlaznicu priključen vodeni modul, možete efikasno čistiti tvrde podove.
text_image
Illustration showing a person using a vacuum cleaner with a red X mark indicating the absence of the device.
text_image
Safety warning illustration showing a person using a vacuum cleaner with a red 'X' indicating water release, alongside an orange warning symbol.i Napomena: Vodeni modul nije pogodan za meke podove kao što su tepisi.
A Oprez: Vodeni modul se ne smije koristiti za prikupljanje lokvica vode.
natural_image
Illustration of a handheld device with a handle and screen, positioned above a horizontal line (no text or symbols)natural_image
Illustration of a spray gun dispensing liquid into a rubber block with motion lines indicating spray (no text or symbols)Korišćenje mlaznice
1 Pričvrstite mlaznicu direktno na ručni aparat.

natural_image
Illustration of a mechanical device with a gear and handle, shown above a window frame (no text or symbols)2 Ova kombinacija je pogodna za čišćenje površina različite visine kao što je stepenište.

Korišćenje četke Mini TurboBrush
1 Da biste pričvrstili Mini TurboBrush, umetnite cijev ručnog aparata u Mini TurboBrush.
natural_image
Illustration of a spiderweb manipulation technique showing step-by-step steps (no text or symbols)natural_image
Illustration of a soldering iron being dispensed from a tip, with arrows indicating motion (no text or symbols)Korišćenje meke četke
1 Da biste pričvrstili meku četku, umetnite cijev ručnog aparata u meku četku.
natural_image
Illustration of a hand holding a pen writing on a laptop (no text or symbols present)natural_image
Illustration of a spray gun dispensing liquid into a pipe with motion arrows indicating spray (no text or symbols)natural_image
Diagram showing a gas cylinder connected to a mechanical device with a magnified inset of a cylindrical component (no text or symbols)2 Alatka za tapacirani namještaj je idealna za čišćenje namještaja od mekih tkanina i njeno osvjetljenje možete prilagoditi prema sopstvenom nahođenju.
natural_image
Circular icon with a white lightbulb symbol and radiating lines, representing an idea or illumination (no text or symbols)text_image
Diagram showing three lighting icons and a checkmark, likely illustrating cleaning or anti-smoking concepts.Prepoznavanje vrste poda
Pritisnite dugme menija i krećite se kroz funkciju prepoznavanja vrste poda. Potvrdite ponovnim pritiskom na dugme menija.
Na ekranu prepoznavanja vrste poda krećite se kroz ovu funkciju i potvrdite odluku pritiskom na dugme menija. Ako je uspješno omogućena, pojaviće se zelena ikona u gornjem lijevom uglu ekrana kada se vratite na glavni ekran.

natural_image
Circular icon with a white lightning bolt symbol and green text '电源' (Power Supply) at the bottom (no readable text or numbers)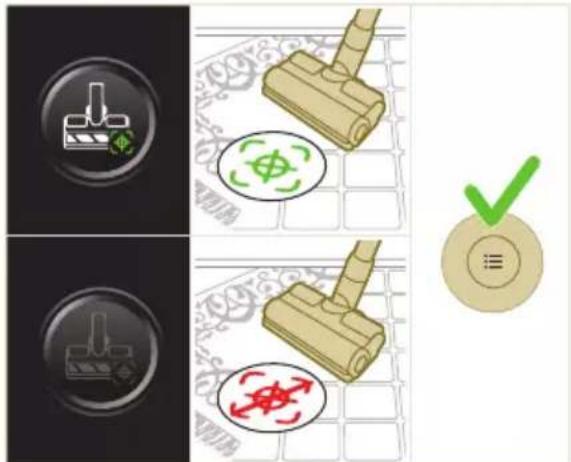
text_image
Diagram showing four different states of a device with icons and labels, including control buttons, circular indicators, and a checkmark.natural_image
Gray circular button with a white lowercase 'i' in the center, no additional text or symbols.

Vraćanje
natural_image
Circular button with a white up-turn arrow icon (no text or symbols)
text_image
Diagram of a remote control device with labeled buttons and a green checkmark indicating actionNakon korišćenja – održavanje
text_image
Diagram showing a mechanical device with labeled parts and directional arrows, likely illustrating a motion or assembly process.2 Držite aparat pod uglom od 45 stepeni, kako je prikazano na slici. Pritisnite dugme za oslobadanje i skinite posudu za prašinu. Dugme za oslobadanje se nalazi na dnu posude.

natural_image
Illustration of a mechanical device with a green checkmark indicating a correct assembly (no text or symbols present)i Napomena: Posudu za prašinu skidajte dok držite aparat u uspravnom položaju.

natural_image
Illustration of a pipette dispensing liquid into a green plastic sheet (no text or symbols)2 Isperite umetak za brisanje tekućom vodom i operite ga ručno ili u mašini za pranje veša.

natural_image
Illustration of a green mechanical component with a blue base and circular end, no text or symbols present3 Ispraznite svu preostalu vodu iz rezervoara za vodu.
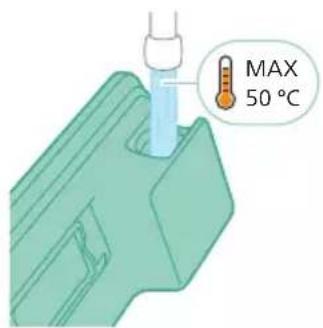
text_image
MAX 50 °C4 Napunite rezervoar vodom.

natural_image
Diagram showing a printer with green components and directional arrows, no text or symbols present5 Dobro zatvorite rezervoar za vodu i protresite ga da bi se uklonili ostaci deterdženta.
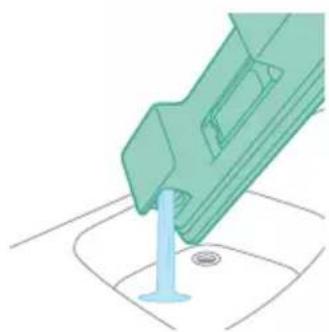
natural_image
Illustration of a green mechanical component with a blue base and circular hole, no text or symbols present6 Ispraznite rezervoar za vodu, ostavite rezervoar otvoren da se osuši.

natural_image
Illustration of a mechanical device with a warning icon and hanging clothes (no text or symbols)natural_image
Close-up of a beige remote control with a black dial and circular button (no text or symbols visible)text_image
Diagram illustrating a lock mechanism with labeled steps and directional arrows, likely illustrating a mechanical or electrical process.natural_image
Diagram showing a container with a lid and a magnified inset of its interior (no text or symbols)natural_image
Illustration of two hands pouring liquid into a container with granular material (no text or symbols)3 Istresite i kućište filtera i pjenasti filter iznad kante za smeće.
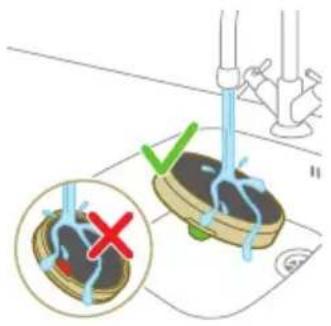
text_image
Diagram illustrating a medical procedure with labeled steps and a checkmark indicating a validation or confirmation point.
natural_image
Illustration of a hand holding a sponge with liquid droplets (no text or symbols)
text_image
24 hrs
natural_image
Illustration of a pipe bag pouring liquid into a container with motion lines indicating flow (no text or symbols)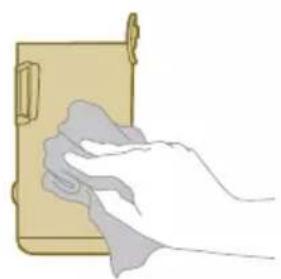
natural_image
Illustration of a hand cleaning a wooden notebook (no text or symbols)natural_image
Illustration of a hand using a tool to lift a component, showing motion and wear (no text or symbols)natural_image
Illustration of a mechanical lever with rotational arrows indicating clockwise motion (no text or symbols)Održavanje četke Mini TurboBrush
1 Prevrnite četku da biste imali pristup površini za čišćenje.
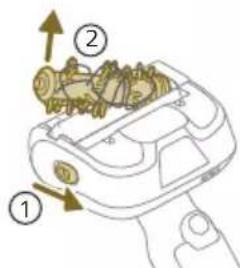
text_image
Diagram of a mechanical device with numbered parts and directional arrows indicating motion or assembly.natural_image
Illustration of hands connecting a mechanical component with a spring (no text or symbols)3 Rukama ili makazama uklonite prljavštinu sa četke.

text_image
Diagram showing a hand holding a device with labeled parts, including numbered callouts (① and ②) indicating different states or functions.4 Prilikom sastavljanja četke, prvo postavite jednu stranu u ležište prije nego što pričvrstite drugu stranu. Kada se četka ispravno sklopi začućete zvuk „klik“.

natural_image
Illustration of a green plastic component with a blue anchor and a small circular mark on a surface (no text or symbols)6 Isperite i ispraznite svu preostalu tečnost iz rezervoara za vodu.
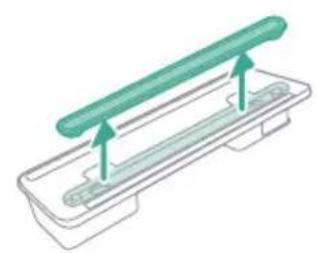
natural_image
Illustration of a green cylindrical object with two arrows pointing upward, placed on a rectangular base (no text or symbols)natural_image
Illustration of a medical procedure with a pipette inserted into a green surgical gasket (no text or symbols)2 Isperite traku za vodu pod mlazom vode.

natural_image
Technical line drawing of a mechanical component with green and gray parts, no text or symbols present3 Nakon čišćenja ponovo pričvrstite traku za vodu na rezervoar za vodu.
Replacement
Da biste kupili pribor ili rezervne dijelove, posjetite www.philips.com/parts-and-accessories ili zastupnika kompanije Philips. Možete i da se obratite centru za korisničku podršku kompanije Philips u svojoj zemlji.
natural_image
Illustration of a box containing a coin with an upward arrow, symbolizing growth or direction (no text or symbols present)XV1681/01
Valjak četkice CP0667/01

natural_image
Diagram of a mechanical component inside a transparent housing, showing a rolled part being inserted (no text or symbols)CP0667/01
natural_image
Isometric illustration of a rectangular block with a green internal component, no text or symbols present.XV1670/02
Traka za vodu CP0381/01

natural_image
Simple line drawing of a cylindrical object with a green arrow pointing downward (no text or symbols)CP0381/01
natural_image
Warning symbol with exclamation mark inside a black circle (no text or numbers)Izvadite bateriju, sačekajte 10 sekundi, a zatim je vratite. Ako to ne uspije, odnesite aparat u ovlašćeni servis kompanije Philips ili se obratite centru za korisničku podršku.
www.philips.com/mycordlessvacuum-7000s.
Generel beskrivelse
1 Digitalt display
a Ringindikator for batteriniveau
b Batteriniveau i procent
c Valgt effektniveau
natural_image
Diagram of a mechanical device with an inset showing a close-up of a component (no text or symbols visible)natural_image
Diagram of a mechanical device with internal components and directional arrows, no readable text or symbols present.natural_image
Diagram of a mechanical device with internal components and a magnified inset showing a detail (no text or symbols)text_image
110 ± 2 cmnatural_image
Illustration of a vacuum cleaner with a magnified view showing the handle and base (no text or symbols)
natural_image
Diagram of a mechanical component with curved arrows indicating motion or force direction (no text or symbols)Klargøring
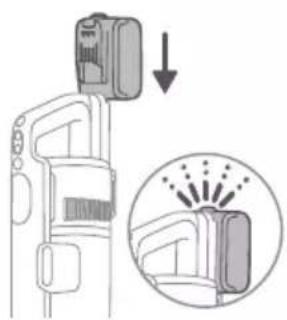
natural_image
Diagram showing a device with a lock and a magnified view of its internal structure (no text or symbols)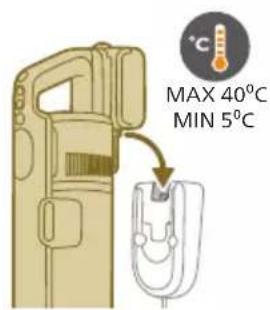
text_image
MAX 40°C MIN 5°Cnatural_image
Illustration of a hairdryer with a magnified inset showing the tool tip (no text or symbols present)natural_image
Illustration of a soldering iron being inserted into a tip, showing the process (no text or symbols)natural_image
Illustration of a hairdryer being inserted into a device (no text or symbols)text_image
100° ON OFF ①text_image
Diagram illustrating electric field lines around a positively charged conductor with labeled poles and current direction indicatorsnatural_image
Illustration of a person using a vacuum cleaner to lift a floor, with motion arrows indicating movement (no text or symbols)natural_image
Illustration of a mechanical component with a circular green symbol and a magnified inset showing a crosshair (no text or symbols present)text_image
Safety warning illustration showing a person using a vacuum cleaner to clean water, with an orange warning symbol and red X mark indicating no need.natural_image
Illustration of an eye with warning symbols (anxiety, red X) and a rolled-up object, no text present.natural_image
Illustration of a hand pouring liquid into a green plastic sheet with a faucet in the background (no text or symbols)natural_image
Illustration of a green mechanical component with a paper holder and a magnified inset showing a document (no text or symbols present)
text_image
MAX 50 °Cnatural_image
Diagram of a mechanical component with a green handle and arrow indicating direction (no text or symbols)natural_image
Technical illustration of a mechanical component being processed into a base plate (no text or symbols)natural_image
Illustration of a person using a vacuum cleaner to clean or stand (no text or symbols present)text_image
Illustration showing a person using a vacuum cleaner with a red X mark indicating the absence of the device.
text_image
Safety warning illustration showing a person using a vacuum cleaner with a red 'X' symbol indicating water residue.natural_image
Illustration of a handheld device with a handle and screen, emitting sound waves (no text or symbols)natural_image
Illustration of a vacuum cleaner emitting exhaust from a bottle (no text or symbols)Brug af mundstykket
natural_image
Illustration of a mechanical device with a cross-section inset showing a textured surface (no text or symbols)natural_image
Illustration of a spiderweb manipulation technique showing step-by-step steps (no text or symbols)natural_image
Illustration of a soldering iron being dispensed from a tip, with arrows indicating motion (no text or symbols)natural_image
Line drawing of a hand holding a pen writing on a laptop (no text or symbols present)natural_image
Illustration of a spray gun dispensing liquid into a pipe with motion arrows indicating spray (no text or symbols)natural_image
Diagram showing a gas cylinder connected to a mechanical device with a magnified inset of a cylindrical component (no text or symbols)natural_image
Gray circular icon with a white lightbulb symbol (no text or numbers)text_image
Diagram showing three icons: a light bulb, a light bulb with a brush, and a no-lit tool, alongside a green checkmark on a circular badge.
natural_image
Circular icon with a white lightning bolt symbol and green leaf (no text or numbers)text_image
Diagram showing two identical icons with a checkmark, one with a green checkmark and circular grid pattern, the other with a red checkmark and circular grid pattern.
natural_image
Gray circular button with a white lowercase 'i' in the center, no additional text or symbols.natural_image
Circular button with a white up-turn arrow icon (no text or symbols)Retur
text_image
Diagram of a remote control device with labeled buttons and a green checkmark indicating actiontext_image
Diagram showing a hairbrush mechanism with labeled parts and directional arrows indicating movement or flow.natural_image
Illustration of a mechanical device with a green checkmark indicating selection (no text or symbols present)text_image
Diagram illustrating a mechanical assembly with an inset showing a cross-section of a component being inserted into a device.
text_image
Diagram illustrating a chemical process with labeled steps and a magnified view showing a reaction or separation step.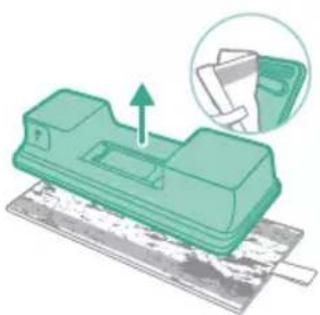
natural_image
Green mechanical component with an arrow indicating upward movement, partially enclosed in a circular inset showing a folder (no text or symbols visible)natural_image
Illustration of a pipette dispensing liquid into a green plastic sheet (no text or symbols)natural_image
Illustration of a green mechanical component with a blue base and circular end (no text or symbols)natural_image
Diagram showing a printer with green components and directional arrows, no text or symbols presentnatural_image
Illustration of a green mechanical component with a blue base and circular hole, no text or symbols presentnatural_image
Illustration of a mechanical device with a warning icon and hanging clothes (no text or symbols)natural_image
Close-up of a beige remote control with a black dial and circular button (no text or symbols visible)text_image
Diagram illustrating a lock mechanism with labeled steps and directional arrows, likely illustrating a mechanical or electrical process.natural_image
Diagram showing a container with a lid and a magnified inset of its interior (no text or symbols)natural_image
Illustration of two hands pouring liquid into a container with granular material (no text or symbols)text_image
Diagram illustrating a medical procedure with labeled steps and a checkmark indicating a validation or confirmation point.natural_image
Illustration of a hand holding a dark object with liquid droplets (no text or symbols)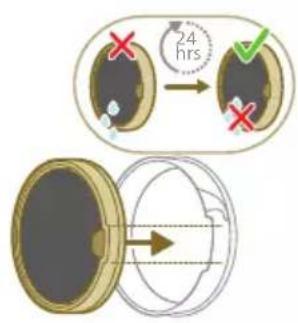
text_image
24 hrsnatural_image
Illustration of a faucet spraying water onto a bag with motion lines indicating flow (no text or symbols)natural_image
Illustration of a hand cleaning a rectangular object with a cloth (no text or symbols)natural_image
Illustration of a hand using a tool to lift a component, showing motion and wear (no text or symbols)natural_image
Illustration of a mechanical component with rotational arrows indicating cycle (no text or symbols)text_image
Diagram of a mechanical device with numbered parts and directional arrows indicating motion or assembly.2 Skub sideknappen for at frigøre børsten fra dens position.

natural_image
Illustration of hands tying a knot around a wooden object with a directional arrow (no text or symbols)text_image
Diagram showing a hand holding a device with labeled parts, including numbered callouts (① and ②) indicating different states or functions.natural_image
Illustration of a box containing a coin with an upward arrow, symbolizing growth or accumulation (no text or symbols present)XV1681/01
Børsterulle CP0667/01

natural_image
Diagram of a mechanical component inside a transparent housing, showing a rolled part being inserted (no text or symbols)CP0667/01
Mikrofibermoppeptide XV1670/02

natural_image
Isometric line drawing of a rectangular block with a green internal component and a small arrow pointing to it (no text or symbols)XV1670/02
Vandstrimmel CP0381/01

natural_image
Simple line drawing of a mechanical component with a green handle and arrow indicating direction (no text or symbols)CP0381/01
natural_image
Warning symbol with exclamation mark inside a red circle (no text or numbers)natural_image
Circular icon with a house symbol and thermometer, no text or numbers presentnatural_image
Circular icon with a house symbol and thermometer, no text or numbers presentnatural_image
Circular icon with a document symbol and question mark, no readable text or labelset.
Aflever apparatet hos et autoriseret Philips-servicecenter, eller kontakt kundeplejecenteret.
E9 Munc
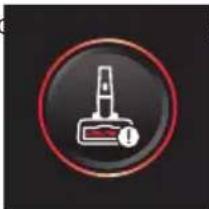
natural_image
Icon of a stylus inside a red circular border (no text or symbols)t betjent over den funktionelle temperatur.
natural_image
Circular icon with a stylized pen or tool symbol inside, no text or numbers present.opet.
natural_image
Circular icon with a white prohibition symbol inside a golden ring on a black background (no text or numbers)ar sat sig fast i luftpassagen.
natural_image
Circular icon with a plug symbol and downward arrow, no text or symbols presentnet.
Fjern adapteren, inden apparatet betjenes.
i7 Der br

natural_image
Circular icon with a plug and warning symbol, no text or numbers presentadapter.
natural_image
Diagram of a mechanical device with an inset showing a close-up of a component (no text or symbols visible)natural_image
Diagram of a mechanical device with internal components and directional arrows, no readable text or symbols present.natural_image
Diagram of a mechanical device with internal components and a magnified inset showing a detail (no text or symbols)text_image
110 ± 2 cmnatural_image
Illustration of a vacuum cleaner with a close-up view showing the handle and base (no text or symbols)
natural_image
Simple line drawing of a mechanical component with arrows indicating motion or force (no text or symbols)natural_image
Diagram showing a car interior with a mounted device and an inset close-up of the interior (no text or symbols)natural_image
Diagram of a handheld device with a close-up inset showing a tool interacting with a mechanical component (no text or symbols present)natural_image
Illustration of a soldering iron being inserted into a tip, showing the process (no text or symbols)natural_image
Illustration of a hairdryer being inserted into a device (no text or symbols)text_image
100° ON OFF ①text_image
Diagram illustrating electric field lines around a positively charged conductor with labeled poles and current direction indicatorsnatural_image
Illustration of a person using a vacuum cleaner to lift a person's legs (no text or symbols present)natural_image
Illustration of a mechanical component and a circular green symbol on a grid background (no text or symbols)text_image
Safety warning illustration showing a person using a vacuum cleaner to clean water, with an orange warning symbol and a red 'X' indicating no need.natural_image
Illustration of an eye with warning symbols (anxiety, red X) and a rolled-up object, no text present.natural_image
Illustration of a pipette dispensing liquid into a green rectangular container (no text or symbols)
natural_image
Illustration of a green mechanical component with arrows indicating assembly or movement, and an inset magnified view showing a document (no text or symbols present)
text_image
MAX 50 °Cnatural_image
Diagram of a mechanical component with a green handle and arrow indicating direction (no text or symbols)natural_image
Illustration of a mechanical component being inserted into a base, showing a downward arrow indicating insertion (no text or symbols present)natural_image
Illustration of a green vacuum cleaner with motion arrows indicating airflow or movement, standing on a human figure (no text or symbols)text_image
Illustration showing a person using a vacuum cleaner with a red X mark indicating the absence of the device.text_image
Illustration showing a person using a vacuum cleaner with a warning symbol and a red X mark indicating water residue.natural_image
Illustration of a mechanical device with a handle and base, partially grounded (no text or symbols)natural_image
Illustration of a vacuum cleaner emitting powder from a bottle onto a surface (no text or symbols)Verwenden der Düse
natural_image
Illustration of a mechanical component with a cross-section inset showing a grooved surface (no text or symbols)natural_image
Illustration of a spiderweb manipulation technique showing step-by-step steps (no text or symbols)natural_image
Illustration of a soldering iron being dispensed from a tip, with arrows indicating motion (no text or symbols)natural_image
Line drawing of a hand holding a pen writing on a laptop (no text or symbols present)natural_image
Illustration of a spray bottle dispensing liquid into a pipe with motion arrows indicating spray (no text or symbols)natural_image
Diagram showing a gas cylinder connected to a mechanical device with a magnified inset of a cylindrical component (no text or symbols)natural_image
Gray circular icon with a white lightbulb symbol and radiating lines, representing an idea or illumination (no text or symbols)text_image
Diagram showing three icons: a light bulb, a light bulb with a brush, and a no-lit tool, alongside a green checkmark on a circular badge.
natural_image
Circular icon with a white downward arrow and green leaf symbol (no text or numbers)Bodenarterkennung
text_image
Diagram showing two identical icons with a checkmark and a circular button, each containing a symbolic diagram of a brush or tool on a grid background.
natural_image
Gray circular button with a white lowercase 'i' in the center, no additional text or symbols.natural_image
Circular button with a white up-turn arrow icon (no text or symbols)Zurückkehren
text_image
Diagram of a remote control device with labeled buttons and a green checkmark indicating actiontext_image
Diagram showing a mechanical device with labeled parts and directional arrows indicating motion or movement.natural_image
Illustration of a hand holding a vacuum cleaner with a green checkmark indicating inspection (no text or symbols present)natural_image
Illustration of a pipette dispensing liquid into a green plastic sheet (no text or symbols)natural_image
Illustration of a green mechanical component with a blue base and circular end, no text or symbols presentnatural_image
Diagram showing a printer with green components and directional arrows, no text or symbols presentnatural_image
Illustration of a green mechanical component with a blue base and circular hole, no text or symbols presentnatural_image
Illustration of a mechanical device with a warning icon and hanging clothes (no text or symbols)natural_image
Close-up of a beige remote control with a black dial and circular button (no text or symbols visible)text_image
Diagram illustrating a lock mechanism with labeled steps and directional arrows, likely illustrating a mechanical or electrical process.natural_image
Diagram showing a container with a lid and a magnified inset of its interior (no text or symbols)natural_image
Illustration of two hands pouring liquid into a container with granular material (no text or symbols)text_image
Diagram illustrating foot positioning with a green checkmark and red X mark, showing foot positioning on a platform.natural_image
Illustration of a hand holding a dark object with liquid dripping (no text or symbols)natural_image
Illustration of a pipe bag with blue liquid being compressed, emitting steam (no text or symbols)natural_image
Illustration of a hand cleaning a rectangular object with a cloth (no text or symbols)
natural_image
Illustration of a hand using a tool to lift a component, showing motion and wear (no text or symbols)natural_image
Simple line drawing of a mechanical component with rotational arrows (no text or symbols)text_image
Diagram of a hand holding a device with labeled parts 1 and 2, showing mechanical components and directional arrows.natural_image
Illustration of hands tying a knot around a wooden object (no text or symbols)text_image
Diagram showing a hand holding a device with labeled parts, including arrows and text annotations.natural_image
Illustration of a box containing a coin with an upward arrow, no text or symbols presentXV1681/01
Bürstenrolle CP0667/01

natural_image
Diagram of a mechanical component inside a transparent housing, showing a rolled part being inserted (no text or symbols)CP0667/01
natural_image
Pure 3D diagram of a rectangular block with a green internal channel and a small arrow pointing to it (no text or symbols)XV1670/02
Wasserspender CP0381/01

natural_image
Simple line drawing of a mechanical component with a green arrow indicating direction (no text or symbols)CP0381/01
natural_image
Warning symbol with exclamation mark inside a red circle (no text or numbers)natural_image
Circular icon with a grid pattern inside, no text or symbols presenttzt.
natural_image
Circular icon with a document and question mark symbol, no readable text or numbersnatural_image
Circular black button with a white rectangular symbol at center, no text or symbols presentnatural_image
Diagram of a mechanical device with an inset showing a close-up of a component (no text or symbols visible)natural_image
Diagram of a mechanical device with internal components and directional arrows, no readable text or symbols present.natural_image
Diagram of a mechanical device with internal components and a magnified inset showing a detail (no text or symbols)text_image
110 ± 2 cmnatural_image
Illustration of a vacuum cleaner with a magnified view showing the handle and base (no text or symbols)
natural_image
Simple line drawing of a mechanical component with arrows indicating rotation or force (no text or symbols)natural_image
Diagram showing a car seat with an attached device and its magnified view of the seat (no text or symbols present)natural_image
Diagram of a handheld device with a close-up inset showing a tool interacting with a mechanical component (no text or symbols present)natural_image
Illustration of a soldering iron being inserted into a tip, showing the tip and tip with radiating lines (no text or symbols)natural_image
Illustration of a hairdryer being inserted into a device (no text or symbols)text_image
100° ON OFF ①text_image
Diagram illustrating electric field lines around a positively charged battery, showing N and E poles with corresponding electric field symbols.natural_image
Illustration of a person using a vacuum cleaner to lift a person's legs (no text or symbols present)natural_image
Illustration of a mechanical component with a circular symbol containing a green cross and number 5, set on a patterned grid background (no text or symbols)text_image
Safety warning illustration showing a person using a vacuum cleaner to clean water, with an orange warning symbol and a red X mark indicating failure.⚠️ Hoiatus! Ärge kunagi imege seadme sisse vett ega mönda muud vedelikku.

natural_image
Illustration of an eye with warning symbols (anxiety, no protection) and a red X mark, no text or labels present.natural_image
Illustration of a hand pouring liquid into a green rectangular container with a faucet in the background (no text or symbols)natural_image
Illustration of a green mechanical component with arrows indicating force or movement, and an inset magnified view showing a document (no text or symbols present)
text_image
MAX 50 °Cnatural_image
Diagram of a mechanical component with a green handle and arrow indicating direction (no text or symbols)natural_image
Illustration of a mechanical component being inserted into a base, showing a downward arrow (no text or symbols present)natural_image
Illustration of a person using a vacuum cleaner to clean or stand (no text or symbols present)text_image
Illustration showing a person using a vacuum cleaner with a red X mark indicating the absence of any text or symbols.text_image
Safety warning illustration showing a person using a vacuum cleaner with a red 'X' symbol indicating water residue.natural_image
Illustration of a handheld device with a handle and screen, partially visible against a plain background (no text or symbols)natural_image
Illustration of a spray gun dispensing liquid into a rubber stopper (no text or symbols)Otsaku kasutamine
natural_image
Illustration of a mechanical device with a circular inset showing a textured surface (no text or symbols)natural_image
Illustration of a mechanical device emitting powder from a cylindrical component (no text or symbols)text_image
Illustration showing three steps of cleaning a bed using a tool, with images of a bench and cat.natural_image
Illustration of a soldering iron being inserted into a tip with motion arrows indicating process (no text or symbols)natural_image
Illustration of a soldering iron with a cylindrical base and a magnified view of the solder (no text or symbols)natural_image
Illustration of a hand holding a small object with motion lines indicating movement or force (no text or symbols)natural_image
Illustration of a spiderweb manipulation technique showing hand positioning and wire meshing (no text or symbols)
text_image
Illustration showing a step-by-step procedure for using a laser gun to remove a cylindrical object from a laptop, with a gas cylinder being inserted.natural_image
Gray circular icon with a white lightbulb symbol (no text or numbers)natural_image
Illustration of industrial cleaning tools including lightbulb, screwdriver, and vacuum cleaner (no text or symbols)natural_image
Circular icon with a white mechanical component and green leaf symbol (no text or numbers)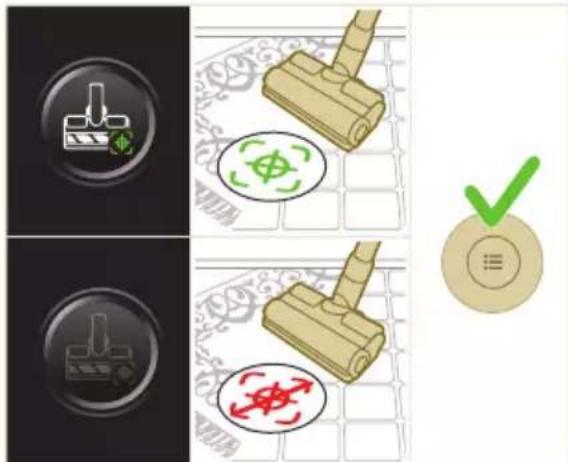
text_image
Diagram showing four different mechanical or electrical component states with icons and labels, including a checkmark icon.natural_image
Gray circular button with a white lowercase 'i' in the center, no additional text or symbols.
text_image
01234 12:34 PHILIPS XCT053,XCT055 XCT057,XCT055 XCT057 www.philips.com/ mycroadlessvacuum-8000s
Tagasi
natural_image
Circular button with a white up-turn arrow icon (no text or symbols)
text_image
Diagram of a remote control device with directional pad, control buttons, and a green checkmark indicating action.text_image
Diagram showing a hairbrush mechanism with labeled parts and directional arrows indicating movement or process.natural_image
Illustration of a mechanical device with a green checkmark indicating selection (no text or symbols present)i Märkus. Eemaldage tolmukamber, hoides masinat püstises asendis.

natural_image
Illustration of a pipette dispensing liquid into a green plastic sheet (no text or symbols)natural_image
Illustration of a green mechanical component with a blue base and circular end (no text or symbols)natural_image
Diagram showing a printer with green components and directional arrows, no text or symbols presentnatural_image
Illustration of a green mechanical component with a blue base and circular hole, no text or symbols presentnatural_image
Illustration of a mechanical device with a warning icon and hanging clothes (no text or symbols)natural_image
Close-up of a beige remote control with a black dial and circular button (no text or symbols visible)text_image
Diagram illustrating a lock mechanism with labeled steps and directional arrows, likely illustrating a mechanical or electrical process.natural_image
Diagram showing a container with a lid and a magnified inset of its interior (no text or symbols)natural_image
Illustration of two hands pouring liquid into a container with granular material (no text or symbols)text_image
Diagram illustrating foot positioning with a checkmark and red X mark indicating incorrect positioning, showing foot positioning on a platform.natural_image
Illustration of a hand holding a dark object with liquid droplets (no text or symbols)5 Enne filtrikorpusesse tagasipaigaldamist laske pestud vahtfiltril kuivada 24 tundi.
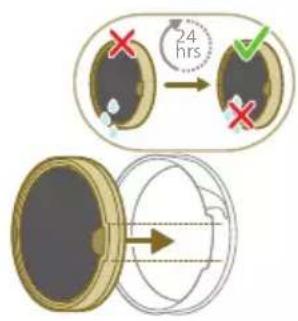
text_image
24 hrsnatural_image
Illustration of a pipe bag with water flowing through it, showing fluid flow (no text or symbols)natural_image
Illustration of a hand cleaning a wooden notebook (no text or symbols)
natural_image
Illustration of a hand pressing down on a mechanical component with an inset showing the close-up of a device (no text or symbols present)natural_image
Illustration of a hand holding a car seatbelt with an arrow indicating motion (no text or symbols)natural_image
Illustration of a hand using scissors to cut a piece of wood (no text or symbols present)natural_image
Mechanical assembly diagram showing a lever mechanism with an inset close-up of the component (no text or symbols)natural_image
Illustration of a hand using a tool to lift a component, showing motion and wear (no text or symbols)natural_image
Illustration of a mechanical lever with rotational arrows indicating clockwise motion (no text or symbols)Väikese turboharja hooldus
text_image
Diagram of a hand holding a device with labeled parts and directional arrows indicating movement or operation.natural_image
Illustration of hands tying a knot around a wooden object (no text or symbols)text_image
Diagram showing a hand holding a device with labeled parts, including numbered callouts (① and ②) indicating different states or functions.natural_image
Illustration of a green mechanical component pouring liquid into a blue cylindrical object (no text or symbols)natural_image
Diagram of a green rod inserted into a rectangular container with two submerged plates (no text or symbols)Niisutusriba hooldus
natural_image
Illustration of a medical procedure with a pipette inserted into a green surgical gauze (no text or symbols)2 Loputage niisutusriba kraani all.

natural_image
Technical line drawing of a mechanical component with green and gray parts, no text or symbols presentnatural_image
Illustration of a box containing a coin with an upward arrow, symbolizing growth or direction (no text or symbols present)XV1681/01
Harjarull CP0667/01

natural_image
Diagram of a mechanical component inside a transparent housing, showing a rolled part being inserted (no text or symbols)CP0667/01
Mikrokiust puhastuslapp XV1670/02

natural_image
Isometric illustration of a rectangular block with a green internal component, no text or symbols present.XV1670/02
Niisutusriba CP0381/01

natural_image
Simple line drawing of a cylindrical object with a green arrow pointing downward (no text or symbols)CP0381/01
natural_image
Warning symbol with exclamation mark inside a black circle (no text or numbers)natural_image
Circular icon with a grid pattern inside, no text or symbols presentnatural_image
Circular icon with a document symbol and a question mark, no text or labels present.se pandud.
natural_image
Circular black button with a white battery symbol at center, no text or symbols presentwww.philips.com/mycordlessvacuum-7000s.
Descripción general
natural_image
Diagram of a mechanical device with an inset showing a close-up of a component (no text or symbols visible)natural_image
Diagram of a mechanical device with internal components and directional arrows, no readable text or symbols present.natural_image
Diagram of a mechanical device with internal components and a magnified inset showing a detail (no text or symbols)text_image
110 ± 2 cmnatural_image
Illustration of a vacuum cleaner with a magnified view showing the handle and base (no text or symbols)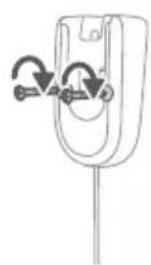
natural_image
Diagram of a mechanical component with curved arrows indicating motion or force direction (no text or symbols)natural_image
Diagram showing a device with a downward arrow and an inset close-up of a mechanical component (no text or symbols)natural_image
Diagram of a handheld device with a close-up inset showing a tool interacting with a mechanical component (no text or symbols present)natural_image
Illustration of a soldering iron being inserted into a tip, showing the tip and tip with radiating lines (no text or symbols)natural_image
Illustration of a hairdryer being inserted into a device (no text or symbols)text_image
100° ON OFF ①text_image
Diagram illustrating electric field lines around a positively charged battery, showing N and E poles with corresponding electric field symbols.natural_image
Illustration of a person using a vacuum cleaner to lift a floor (no text or symbols present)natural_image
Illustration of a mechanical component with a green circular symbol and a dollar sign, set on a patterned surface (no text or symbols)text_image
Safety warning illustration showing a person using a vacuum cleaner to clean water, with an orange warning symbol and red X mark indicating failure.natural_image
Illustration of an eye with warning symbols (anxiety, red X) and a rolled-up object, no text present.natural_image
Illustration of a pipette dispensing liquid into a green plastic sheet, with a faucet nearby (no text or symbols)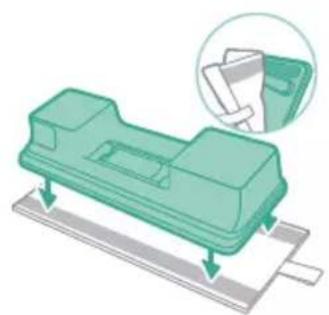
natural_image
Illustration of a green mechanical component with arrows indicating force or movement, and an inset magnified view showing a folder (no text or symbols present)
text_image
MAX 50 °Cnatural_image
Diagram of a mechanical component with a green arrow indicating direction (no text or symbols)natural_image
Illustration of a mechanical component being inserted into a base, showing a downward arrow (no text or symbols present)natural_image
Illustration of a person using a vacuum cleaner to clean or stand (no text or symbols present)text_image
Illustration showing a person using a vacuum cleaner with a red X mark indicating the absence of any text or symbols.text_image
Safety warning illustration showing a person using a vacuum cleaner with a red 'X' symbol indicating water residue.natural_image
Illustration of a handheld device with a handle and screen, positioned above a horizontal line (no text or symbols visible)natural_image
Illustration of a vacuum cleaner emitting exhaust from a bottle (no text or symbols)Uso de la boquilla
natural_image
Illustration of a mechanical device with a cross-section inset showing a grooved surface (no text or symbols)natural_image
Illustration of a spiderweb manipulation technique showing step-by-step steps (no text or symbols)natural_image
Illustration of a soldering iron being dispensed from a tip, with no text or symbols present.Uso del cepillo suave
natural_image
Line drawing of a hand holding a pen writing on a laptop (no text or symbols present)natural_image
Illustration of a spray bottle dispensing liquid into a pipe with motion arrows indicating spray (no text or symbols)natural_image
Diagram showing a gas cylinder connected to a mechanical device with a magnified inset of a cylindrical component (no text or symbols)natural_image
Gray circular icon with a white lightbulb symbol (no text or numbers)text_image
Diagram showing three icons: a light bulb, a light bulb with a brush, and a no-lit tool, alongside a green checkmark on a circular badge.
natural_image
Circular icon with a white lightning bolt symbol and green leaf (no text or numbers)text_image
Diagram showing two identical icons with a checkmark and a circular button, each containing a symbolic diagram of a brush or tool on a grid background.
natural_image
Gray circular button with a white lowercase 'i' in the center, no additional text or symbols.
natural_image
Circular button with a white up-turn arrow icon (no text or symbols)text_image
Diagram of a remote control device with labeled buttons and a green checkmark indicating actiontext_image
Diagram showing a device with labeled parts and directional arrows, likely illustrating a mechanical or electrical component.natural_image
Illustration of a mechanical device with a green checkmark indicating selection (no text or symbols present)natural_image
Illustration of a pipette dispensing liquid into a green plastic sheet (no text or symbols)natural_image
Illustration of a green mechanical component with a blue base and circular end, no text or symbols presentnatural_image
Diagram showing a printer with green components and directional arrows, no text or symbols presentnatural_image
Illustration of a green mechanical component with a blue base and circular hole, no text or symbols presentnatural_image
Illustration of a mechanical device with a warning icon and hanging clothes (no text or symbols)natural_image
Close-up of a beige remote control with a black dial and circular button (no text or symbols visible)text_image
Diagram illustrating a lock mechanism with labeled steps and directional arrows, likely illustrating a mechanical or electrical process.natural_image
Diagram showing a container with a lid and a magnified inset of its interior (no text or symbols)natural_image
Illustration of two hands pouring liquid into a container with granular material (no text or symbols)text_image
Diagram illustrating a medical procedure with labeled steps and a checkmark indicating a validation or confirmation point.natural_image
Illustration of a hand holding a dark object with liquid droplets (no text or symbols)
text_image
24 hrsnatural_image
Illustration of a faucet pouring liquid into a bag with motion lines indicating flow (no text or symbols)natural_image
Illustration of a hand cleaning a wooden notebook (no text or symbols)natural_image
Illustration of a hand using a tool to lift a component, showing motion and wear (no text or symbols)natural_image
Illustration of a mechanical lever with rotational arrows indicating clockwise motion (no text or symbols)text_image
Diagram of a mechanical device with numbered parts and directional arrows indicating motion or assembly.natural_image
Illustration of hands tying a knot around a wooden object (no text or symbols)text_image
Diagram showing a hand holding a device with labeled parts, including numbered callouts (① and ②) indicating different states or functions.natural_image
Illustration of a box containing a coin with an upward arrow, symbolizing growth or direction (no text or symbols present)XV1681/01
Cepillo giratorio CP0667/01

natural_image
Diagram of a mechanical component inside a transparent housing, showing a rolled part being inserted (no text or symbols)CP0667/01
Almohadilla para fregar de microfibra XV1670/02

natural_image
Isometric illustration of a rectangular block with a green internal component, no text or symbols presentXV1670/02
Tira humectante CP0381/01

natural_image
Simple line drawing of a cylindrical object with a green arrow pointing downward (no text or symbols)CP0381/01
natural_image
Warning symbol with exclamation mark inside a black circle (no text or numbers)rrecto del aparato.
natural_image
Circular icon with a grid pattern inside, enclosed in a golden border (no text or symbols)natural_image
Circular icon with a document symbol and a question mark, no text or labels present.natural_image
Circular black button with a white rectangular symbol at center, no text or symbols presentInstallation du support mural
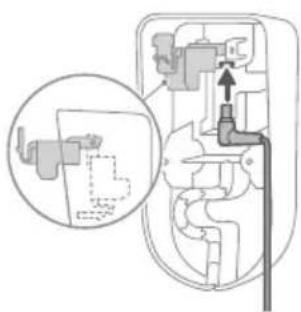
natural_image
Diagram of a mechanical device with an inset showing a close-up of a component (no text or symbols visible)natural_image
Diagram of a mechanical device with internal components and directional arrows, no readable text or symbols present.natural_image
Diagram of a mechanical device with internal components and a magnified inset showing a detail (no text or symbols)text_image
110 ± 2 cmnatural_image
Illustration of a vacuum cleaner with a magnified view showing the handle and base (no text or symbols)
natural_image
Diagram of a mechanical component with curved arrows indicating motion or force direction (no text or symbols)natural_image
Diagram showing a device with a lock and a magnified view of its internal structure (no text or symbols)natural_image
Diagram of a mechanical device with a close-up inset showing a tool interacting with a component (no text or symbols present)natural_image
Illustration of a soldering iron being inserted into a tip, showing the process (no text or symbols)natural_image
Illustration of a hairdryer being inserted into a device (no text or symbols)text_image
100° ON OFF ①text_image
Diagram illustrating electric field lines around a positively charged battery, showing current direction and component placement.natural_image
Illustration of a person using a vacuum cleaner to lift a floor, with motion arrows indicating movement (no text or symbols)natural_image
Illustration of a mechanical component with a circular green symbol and a magnified inset showing a crosshair (no text or symbols present)text_image
Safety warning illustration showing a person using a vacuum cleaner to clean water, with an orange warning symbol and red X mark indicating no need.natural_image
Illustration of an eye with warning symbols (anxiety, red X) and a rolled paper roll, no text or labels present.natural_image
Illustration of a pipette dispensing liquid into a green rectangular container with a ribbon, above a surface with two washers (no text or symbols)
natural_image
Illustration of a green mechanical component with a magnified inset showing a folded paper or sheet (no text or symbols)
text_image
MAX 50 °Cnatural_image
Diagram of a car interior showing a green plastic component inserted into a housing (no text or symbols)natural_image
Illustration of a mechanical component being inserted into a base, showing a downward arrow (no text or symbols present)natural_image
Illustration of a person using a vacuum cleaner to clean or stand (no text or symbols present)text_image
Illustration showing a person using a vacuum cleaner with a red X mark indicating the absence of any text or symbols.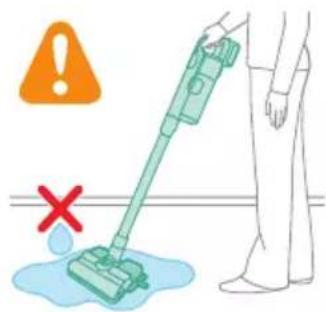
text_image
Safety warning illustration showing a person using a vacuum cleaner with a red 'X' indicating the water level, alongside an orange warning symbol.natural_image
Illustration of a handheld device with a pointed tip and screen, positioned above a horizontal line (no text or symbols)natural_image
Illustration of a spray gun dispensing liquid into a rubber pad (no text or symbols)natural_image
Illustration of a mechanical component with a magnified inset showing a textured surface (no text or symbols)natural_image
Illustration of a spiderweb manipulation technique showing step-by-step steps (no text or symbols)natural_image
Illustration of a soldering iron being dispensed from a tip, with arrows indicating motion (no text or symbols)natural_image
Line drawing of a hand holding a pen writing on a laptop (no text or symbols present)natural_image
Illustration of a spray bottle dispensing liquid into a pipe with motion arrows indicating spray (no text or symbols)natural_image
Diagram showing a gas cylinder connected to a mechanical device with a magnified inset of a cylindrical component (no text or symbols)natural_image
Gray circular icon with a white lightbulb symbol (no text or numbers)natural_image
Six-panel image showing icons of a vacuum cleaner, lightbulb, light bulb, clean bulb, and clean plug, with a green checkmark on the right (no text or symbols in the main visual elements)
natural_image
Circular icon with a downward arrow and green text '毛' (no readable text or symbols)text_image
Diagram showing four different states of a device with icons and control symbols, including a checkmark icon.
natural_image
Gray circular button with a white lowercase 'i' in the center, no additional text or symbols.natural_image
Circular button with a white curved arrow icon, no text or symbols present.
text_image
Diagram of a remote control device with labeled buttons and a green checkmark indicating actiontext_image
Diagram showing a car interior with labeled parts and directional arrows indicating movement or flow.natural_image
Illustration of a mechanical device with a green checkmark indicating a step, showing a lever and a close-up of the handle (no text or symbols present)natural_image
Illustration of a pipette dispensing liquid into a green plastic sheet (no text or symbols)natural_image
Illustration of a green mechanical component with a blue base and circular end, no text or symbols presentnatural_image
Diagram showing a printer with green components and directional arrows, no text or symbols presentnatural_image
Illustration of a green mechanical component with a blue base and circular hole, no text or symbols presentnatural_image
Illustration of a mechanical device with a warning icon and hanging clothes (no text or symbols)natural_image
Close-up of a beige remote control with a black dial and circular button (no text or symbols visible)text_image
Diagram illustrating a lock mechanism with labeled steps and directional arrows, likely illustrating a mechanical or electrical process.natural_image
Diagram showing a container with a lid and a magnified inset of its interior (no text or symbols)natural_image
Illustration of two hands pouring liquid into a container with granular material (no text or symbols)text_image
Diagram illustrating foot movement with a checkmark and red X mark, showing foot positioning and safety symbolsnatural_image
Illustration of a hand holding a dark object with liquid droplets (no text or symbols)
text_image
24 hrsnatural_image
Illustration of a faucet spraying water onto a box, with motion lines indicating flow (no text or symbols)natural_image
Illustration of a hand cleaning a rectangular object with a cloth (no text or symbols)natural_image
Illustration of a hand using a tool to interact with a device, showing motion and vibration (no text or symbols)natural_image
Illustration of a mechanical component with rotational arrows indicating motion (no text or symbols)Entretien de la mini-brosse Turbo
text_image
Diagram of a robotic hand holding a gear with numbered parts and directional arrows indicating motion or assembly.natural_image
Illustration of hands tying a knot around a coiled spring (no text or symbols)text_image
Diagram showing a hand holding a device with labeled parts, including numbered annotations ① and ②.natural_image
Illustration of a green plastic component with a blue anchor and a small circular mark on a surface (no text or symbols)natural_image
Diagram of a green rod inserted into a rectangular container with two side slots (no text or symbols)Entretien de la bandelette
natural_image
Illustration of a medical procedure with a needle inserted into a green surgical gauze (no text or symbols)natural_image
Diagram of a mechanical component with green and gray parts, no text or symbols presentnatural_image
Illustration of a box containing a coin with an upward arrow, symbolizing growth or direction (no text or symbols present)XV1681/01
Brosse rotative CP0667/01

natural_image
Diagram of a mechanical component inside a transparent housing, showing a rolled part being inserted (no text or symbols)CP0667/01
natural_image
Isometric illustration of a rectangular block with a green internal component, no text or symbols present.XV1670/02
Bandelette CP0381/01

natural_image
Simple line drawing of a cylindrical object with a green arrow pointing downward (no text or symbols)CP0381/01
natural_image
Warning symbol with exclamation mark inside a black circle (no text or numbers)de l'appareil.
natural_image
Circular icon with a grid pattern inside, enclosed in a golden border (no text or symbols)natural_image
Circular icon with a document symbol and a question mark, no text or labels present.natural_image
Circular black button with a white battery symbol at center, no text or numbers visiblenatural_image
Diagram of a mechanical device with an inset showing a close-up of a component (no text or symbols visible)natural_image
Diagram of a mechanical device with internal components and directional arrows, no readable text or symbols present.2 Pravilno postavite kabel umetanjem u žlijeb koji je tome namijenjen.

natural_image
Diagram of a mechanical device with internal components and a magnified inset showing a detail (no text or symbols)text_image
110 ± 2 cm4 Sigurno pričvrstite zidni nosač na željeni položaj na zidu, pritom pazeći da se rupe za nosive vijke nalaze otprilike 110 cm iznad poda.
natural_image
Illustration of a vacuum cleaner with a magnified view showing the handle and base (no text or symbols)
natural_image
Simple line drawing of a mechanical component with curved arrows indicating motion or force (no text or symbols)natural_image
Diagram showing a device with a lock and a magnified view of its internal structure (no text or symbols)Uredaj je opremljen litij-ionskom baterijom. Potpuno punjenje prazne baterije traje otprilike 6 sati.
1 Pričvrstite komplet baterija na glavno tijelo uređaja, pritom pazeći da je veza čvrsta, što će vam potvrditi zvuk „KLIK”.

text_image
MAX 40°C MIN 5°C2 Napunite uredaj tako što ćete ga postaviti na sastavljeni zidni nosač.
⚠ Upozorenje: uredaj pohranite i punite pri temperaturi iznad 5 °C i ispod 40 °C.

natural_image
Diagram of a handheld device with a close-up inset showing a tool interacting with a mechanical component (no text or symbols present)natural_image
Illustration of a tool emitting powder into a tip, with no visible text or symbolsnatural_image
Illustration of a hand using a tool to press or install a component, with no visible text or symbols.text_image
100° ON OFF ①text_image
Diagram illustrating electric field lines around a positively charged battery, showing N and E poles with corresponding electric field symbols.2 S pomoću gumba + i – prebacujte se između tri različite postavke snage.
E – ekološki način rada
N – normalni način rada
T – turbo način rada

natural_image
Illustration of a person using a vacuum cleaner to lift a floor, with motion arrows indicating movement (no text or symbols)3 Pomoću usisavača možete čistiti tvrde ili meke podove.

natural_image
Illustration of a mechanical component with a circular green symbol and a magnified inset showing a crosshair (no text or symbols present)text_image
Safety warning illustration showing a person using a vacuum cleaner to clean water, with an orange warning symbol and a red X mark.natural_image
Illustration of an eye with warning symbols (anxiety, red X) and a rolled-up object, no text present.natural_image
Illustration of a hand pouring liquid into a green plastic sheet with a faucet in the background (no text or symbols)2 Pričvrstite jastučić za brisanje od mikrovlakana ispod spremnika za vodu. Poravnajte trake od čičak-materijala ispod spremnika za vodu s onima na stražnjoj strani krpe.

natural_image
Illustration of a green mechanical component with a paper holder and a magnified inset showing a document (no text or symbols present)
text_image
MAX 50 °C3 Napunite spremnik vodom pritom pazeći da temperatura vode ne prelazi 50 °C.

text_image
10 mlnatural_image
Diagram of a mechanical component with a green arrow indicating direction (no text or symbols)natural_image
Illustration of a mechanical component being inserted into a base, showing a downward arrow (no text or symbols present)6 Spojite pripremljeni spremnik za vodu na mlaznicu za vodu i spremni ste početi.

natural_image
Illustration of a person using a vacuum cleaner to clean or stand (no text or symbols present)text_image
Illustration showing a person using a vacuum cleaner with a red X mark indicating the absence of the device.
text_image
Safety warning illustration showing a person using a vacuum cleaner with a red X mark indicating water release, accompanied by an orange warning symbol.i Napomena: vodeni modul nije prikladan za meke podove kao što su tepisi.
A Oprez: Vodeni modul se ne smije upotrebljavati za brisanje vodenih lokvi.
natural_image
Illustration of a mechanical device with a pointed tip and handle, emitting powder (no text or symbols)natural_image
Illustration of a spray gun dispensing liquid into a cylindrical container with motion lines indicating spray (no text or symbols)Uporaba mlaznice
natural_image
Illustration of a mechanical component with a magnified inset showing a textured surface (no text or symbols)natural_image
Illustration of a spiderweb manipulation technique showing step-by-step steps (no text or symbols)natural_image
Illustration of a soldering iron being dispensed from a tip, with no text or symbols present.Uporaba meke četke
natural_image
Illustration of a hand holding a pen writing on a laptop (no text or symbols present)natural_image
Illustration of a spray bottle dispensing liquid into a pipe with an arrow indicating flow (no text or symbols)Uporaba nastavka za namještaj
1 Za pričvršćivanje nastavka za namještaj umetnite u njega cijev ili držak.

natural_image
Diagram showing a gas cylinder connected to a mechanical device with a magnified inset of a cylindrical component (no text or symbols)2 Nastavak za namještaj idealan je za čišćenje namještaja presvučenog mekim tkaninama, a njegova se rasvjeta može po želji prilagoditi.
Prilagodbe i dodatne informacije
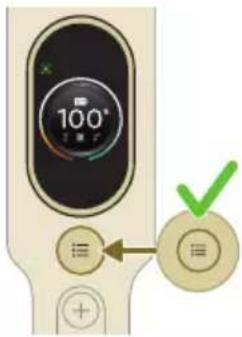
text_image
100° ≡ ≡ +natural_image
Gray circular icon with a white lightbulb symbol and radiating lines, representing an idea or illumination (no text or symbols)text_image
Diagram showing three lighting icons and a checkmark, likely illustrating cleaning or anti-smoking concepts.Prepoznavanje vrste poda
natural_image
Circular icon with a stylized white arrow and green checkmark, no text or symbols present.
text_image
Diagram showing four different states of a device with icons and labels, including control buttons, circular indicators, and a checkmark.natural_image
Gray circular button with a white lowercase 'i' in the center, no additional text or symbols.natural_image
Circular button with a white curved arrow icon, no text or symbols present.
text_image
Diagram of a remote control device with labeled buttons and a green checkmark indicating actionNakon upotrebe – održavanje
text_image
Diagram showing a mechanical device with labeled parts and directional arrows, including numbered annotations ① and ②.2 Držite uredaj pod kutom od 45 stupnjeva kao što je prikazano na ilustraciji. Uklonite spremnik za prašinu pritiskom gumba za otpuštanje. Gumb za otpuštanje nalazi se na dnu spremnika.
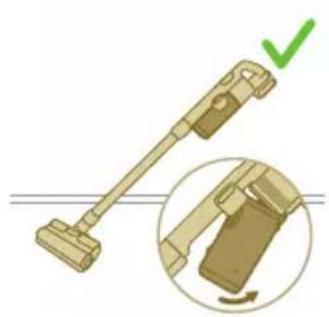
natural_image
Illustration of a mechanical device with a green checkmark indicating a correct assembly (no text or symbols present)i Napomena: uklonite spremnik za prašinu pritom držeći uređaj u uspravnom položaju.
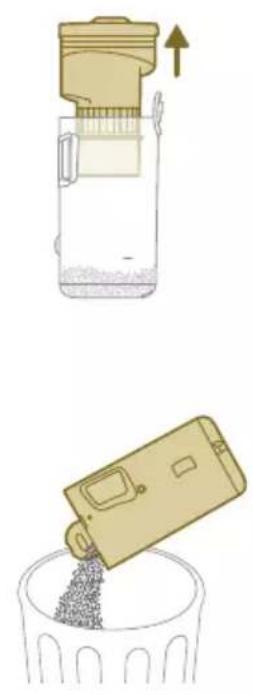
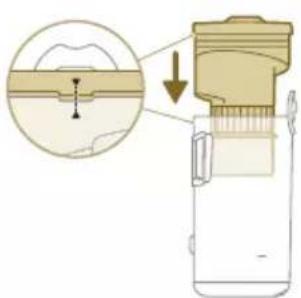
text_image
Diagram illustrating a mechanical device with a magnified inset showing a detail of a component being inserted into a slot.
text_image
Diagram illustrating a chemical process with labeled steps and a magnified view showing a reaction or separation step.
natural_image
Green mechanical component with an arrow indicating upward motion, shown with a magnified inset of its part (no text or symbols visible)3 Držite crnu dršku. Uklonite ciklonsku komoru iz spremnika za prašinu podizanjem iz spremnika.
4 Ispraznite prašinu prikupljenu u spremniku za prašinu u kantu za smeće.
natural_image
Illustration of a pipette dispensing liquid into a green plastic sheet (no text or symbols)2 Isperite jastučić za brisanje pod slavinom te ga operite ručno ili u perilici rublja.

natural_image
Illustration of a green mechanical component with a blue base and circular end, no text or symbols present3 Izlijte svu vodu preostalu u spremniku za vodu.
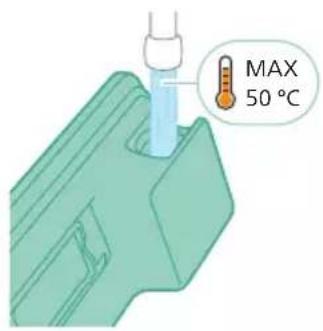
text_image
MAX 50 °C4 Napunite spremnik za vodu vodom.

natural_image
Diagram showing a printer with green components and directional arrows, no text or symbols present5 Pravilno zatvorite spremnik za vodu i protresite ga kako biste uklonili ostatke sredstva za čišćenje.

natural_image
Illustration of a green mechanical component with a blue base and screw hole (no text or symbols)6 Ispraznite spremnik za vodu i ostavite ga da se osuši.

natural_image
Illustration of a mechanical device with a warning icon and hanging clothes (no text or symbols)natural_image
Close-up of a beige remote control with a black dial and circular button (no text or symbols visible)Filtar očistite barem jednom svakog mjeseca ili kada vidite obavijest o čišćenju filtra (i8).

text_image
Diagram illustrating a lock mechanism with labeled steps and directional arrows, likely illustrating a mechanical or electrical process.natural_image
Diagram showing a container with a lid and a magnified inset of its interior (no text or symbols)2 Izvadite perivi pjenasti filtar iz plastičnog kućišta filtra.

natural_image
Illustration of two gold coins pouring liquid into a container with scattered particles (no text or symbols)3 Istresite kućište filtra i pjenasti filtar iznad kante za smeće.
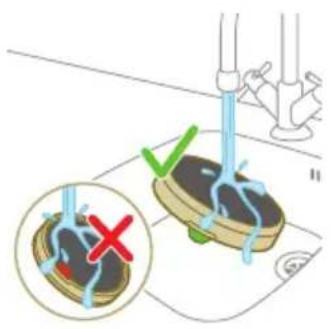
text_image
Diagram illustrating a medical procedure with labeled steps and a checkmark indicating a validation or confirmation point.4 Isperite pjenasti filtar i gnječite ga dok iz njega ne počne izlaziti čista voda.
i Napomena: za najbolje rezultate čišćenja pustite vodu kroz filtar tako da je jezičak filtra okrenut prema dolje, time omogućujući ispiranje duboko zaglavljene prašine.

natural_image
Illustration of a hand holding a dark object with liquid dripping (no text or symbols)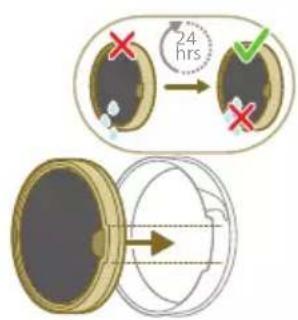
text_image
24 hrs5 Oprani filtar ostavite da se osuši 24 sata prije ponovnog postavljanja pjenastog filtra u kućište filtra.

natural_image
Illustration of a faucet spraying water onto a bag (no text or symbols)natural_image
Illustration of a hand cleaning a brown notebook (no text or symbols)7 Brisanjem osušite očišćeni spremnik za prašinu i relevantne dijelove.

natural_image
Illustration of a hand pressing down on a mechanical component with an inset showing the close-up of a device (no text or symbols present)2 Za pristup valjkastoj četki pronadite gumb na bočnoj strani mlaznice. Pritisnite ga i zakrenite da biste ga otvorili.
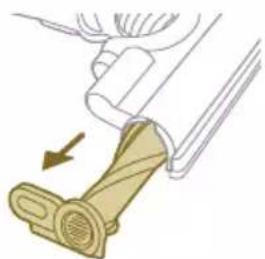
natural_image
Illustration of a hand holding a car seatbelt with an arrow indicating motion (no text or symbols)natural_image
Illustration of a hand using scissors to cut a piece of wood (no text or symbols present)4 Pažljivo uklonite zapetljanu kosu s valjkaste četke. Olakšajte si uklanjanje prljavštine škarama.

natural_image
Mechanical assembly diagram showing a lever mechanism with an inset close-up of the component (no text or symbols)natural_image
Illustration of a hand using a tool to lift a component, showing motion and wear (no text or symbols)natural_image
Illustration of a mechanical lever with rotational arrows indicating clockwise motion (no text or symbols)Održavanje četke Mini TurboBrush
text_image
Diagram of a hand holding a device with labeled parts 1 and 2, showing mechanical components and directional arrows.natural_image
Illustration of hands tying a knot around a wooden object with a directional arrow (no text or symbols)3 Rukom ili pomoću škara uklonite prljavštinu s četke.
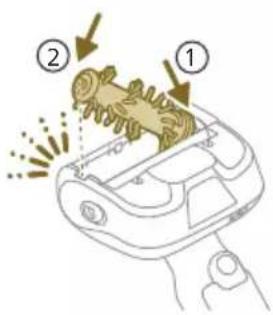
text_image
Diagram showing a hand holding a device with labeled parts, including numbered callouts (① and ②) indicating different components or states.4 Kada ponovno postavljate četku, počnite postavljanjem jedne strane na mjesto prije nego što pričvrstite drugu stranu. Kada se četka pravilno sastavi čut ćete zvuk „KLIK”.
Održavanje spremnika za vodu
natural_image
Illustration of a green mechanical component pouring liquid into a blue cylindrical object (no text or symbols)6 Isperite spremnik za vodu i izlijte svu preostalu tekućinu.
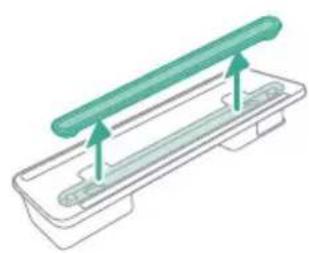
natural_image
Diagram of a green rod inserted into a rectangular container with two submerged plates (no text or symbols)natural_image
Illustration of a medical procedure with a pipette inserted into a green surgical gasket (no text or symbols)natural_image
Technical line drawing of a mechanical component with green and gray parts, no text or symbols present3 Vratite traku za vlaženje natrag na spremnik za vodu nakon čišćenja.
Zamjena dijelova
Kako biste kupili dodatke ili rezervne dijelove, posjetite
www.shop.philips.com/parts-and-accessories ili se obratite distributeru tvrtke Philips. Također se možete obratiti centru za korisničku podršku tvrtke Philips u svojoj zemlji.
natural_image
Illustration of a box containing a coin with an upward arrow, no text or symbols presentXV1681/01
Valjkasta četka CP0667/01

natural_image
Diagram of a mechanical component inside a transparent housing, showing a rolled part being inserted (no text or symbols)CP0667/01
Jastučić za brisanje od mikrovlakana XV1670/02

natural_image
Isometric view of a rectangular block with a green internal component and an arrow pointing to it (no text or symbols)XV1670/02
Traka za vlaženje CP0381/01

natural_image
Simple line drawing of a mechanical component with a green arrow indicating direction (no text or symbols)CP0381/01
natural_image
Warning symbol with exclamation mark inside a black circle (no text or numbers)Izvadite bateriju, pričekajte 10 sekundi, a zatim vratite bateriju. Ako time ne otklonite problem, uređaj odnesite u servisni centar tvrtke Philips ili se obratite korisničkoj službi.
natural_image
Circular icon with a grid pattern inside, no text or symbols presentnatural_image
Circular icon with a document symbol and a question mark, no text or labels present.umetnuta.
Izvadite bateriju pa je zatim vratite na mjesto. Ako time ne otklonite problem, uređaj odnesite u servisni centar tvrtke Philips ili se obratite korisničkoj službi.

natural_image
Circular black button with a white battery symbol at center, no text or numbers visibleRazina napunjenosti baterije je niska i potrebno je napuniti bateriju. Uređaj i bateriju punite preporučenim načinom punjenja.
Rješavanje problema
natural_image
Diagram of a mechanical device with internal components and an inset showing a close-up view of a component (no text or symbols present)natural_image
Diagram of a mechanical device with internal components and directional arrows, no readable text or symbols present.natural_image
Diagram of a mechanical device with internal components and a magnified inset showing a detail (no text or symbols)text_image
110 ± 2 cmnatural_image
Illustration of a vacuum cleaner with a magnified view showing the handle and base (no text or symbols)
natural_image
Simple line drawing of a mechanical component with curved arrows indicating motion or force (no text or symbols)natural_image
Diagram showing a device with a lock and a magnified view of its internal structure (no text or symbols)natural_image
Diagram of a handheld device with a close-up inset showing a tool interacting with a mechanical component (no text or symbols present)natural_image
Illustration of a soldering iron being inserted into a tip, with no text or symbols presentnatural_image
Illustration of a hand using a tool to press or install a component, with no visible text or symbols.text_image
100° ON OFF ①text_image
Diagram illustrating electric field lines around a positively charged battery, showing N and E poles with corresponding electric field symbols.natural_image
Illustration of a person using a vacuum cleaner to lift a floor, with motion arrows indicating movement (no text or symbols)natural_image
Illustration of a mechanical component with a circular green symbol and a magnified inset showing a crosshair (no text or symbols present)text_image
Safety warning illustration showing a person using a vacuum cleaner to clean water, with an orange warning symbol and red X mark indicating no need.natural_image
Illustration of an eye with warning symbols (anxiety, red X) and a rolled-up object, no text present.natural_image
Illustration of a pipette dispensing liquid into a green plastic tray (no text or symbols)
natural_image
Illustration of a green mechanical component with arrows indicating direction, no text or symbols present
text_image
MAX 50 °Cnatural_image
Diagram of a mechanical component with a green handle and arrow indicating direction (no text or symbols)natural_image
Illustration of a mechanical component being inserted into a base block, showing a downward arrow (no text or symbols present)natural_image
Illustration of a person using a vacuum cleaner to clean or stand (no text or symbols present)text_image
Illustration showing a person using a vacuum cleaner with a red X mark indicating the absence of any text or symbols.text_image
Safety warning illustration showing a person using a vacuum cleaner with a red 'X' indicating water release, accompanied by an orange warning symbol.natural_image
Illustration of a handheld device with a pointed tip and handle, positioned above a horizontal line (no text or symbols)natural_image
Illustration of a spray gun dispensing liquid into a rubber component (no text or symbols)natural_image
Illustration of a mechanical component with a cross-section view showing a grooved part (no text or symbols)natural_image
Illustration of a spiderweb manipulation technique showing step-by-step steps (no text or symbols)natural_image
Illustration of a soldering iron being dispensed from a tip, with no text or symbols present.natural_image
Line drawing of a hand holding a pen writing on a laptop (no text or symbols present)natural_image
Illustration of a spray bottle dispensing liquid into a pipe with motion arrows indicating spray (no text or symbols)natural_image
Diagram showing a gas cylinder connected to a mechanical device with a magnified inset of a cylindrical component (no text or symbols)natural_image
Gray circular icon with a white lightbulb symbol (no text or numbers)text_image
Diagram showing three icons: a light bulb, a light bulb with a brush, and a no-lit tool, alongside a green checkmark on a circular badge.
natural_image
Circular icon with a white lightning bolt symbol and green leaf (no text or numbers)text_image
Diagram showing two identical icons with a checkmark and a circular button, each containing a symbolic diagram of a brush or tool on a grid background.
natural_image
Gray circular button with a white lowercase 'i' in the center, no additional text or symbols.natural_image
Circular button with a white up-turn arrow icon (no text or symbols)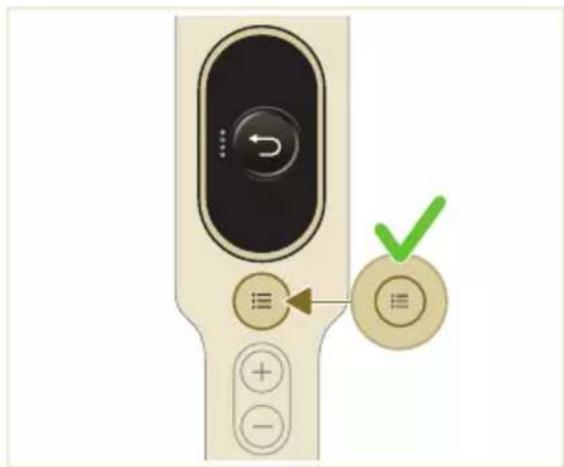
text_image
Diagram of a remote control device with directional pad, control buttons, and a green checkmark indicating action.text_image
Diagram showing a mechanical device with labeled parts and directional arrows indicating motion or movement.natural_image
Illustration of a mechanical device with a green checkmark indicating a step, showing a lever and a close-up of the handle (no text or symbols present)text_image
Diagram illustrating a mechanical device with a magnified cross-section showing internal components and a downward arrow indicating motion or force.
text_image
Diagram illustrating a chemical process with labeled steps and a magnified view showing a reaction or separation step.
natural_image
Green mechanical component with an arrow indicating upward movement, partially enclosed in a circular inset showing a folder (no text or symbols visible)natural_image
Illustration of a pipette dispensing liquid into a green plastic sheet (no text or symbols)natural_image
Illustration of a green mechanical component with a blue base and circular end, no text or symbols presentnatural_image
Diagram showing a printer with green components and directional arrows, no text or symbols presentnatural_image
Illustration of a green mechanical component with a blue base and circular hole, no text or symbols presentnatural_image
Illustration of a mechanical device with a warning icon and hanging clothes (no text or symbols)natural_image
Close-up of a beige remote control with a black dial and circular button (no text or symbols visible)text_image
Diagram illustrating a lock mechanism with labeled steps and directional arrows, likely illustrating a mechanical or electrical process.natural_image
Diagram showing a container with a lid and a magnified inset of its interior (no text or symbols)natural_image
Illustration of two hands pouring liquid into a container with granular material (no text or symbols)text_image
Diagram illustrating a medical procedure with labeled steps and a checkmark indicating a validation or confirmation point.natural_image
Illustration of a hand holding a dark object with liquid droplets (no text or symbols)
text_image
24 hrsnatural_image
Illustration of a pipe bag with water flowing from it, showing fluid flow (no text or symbols)natural_image
Illustration of a hand cleaning a wooden notebook (no text or symbols)natural_image
Illustration of a hand using a tool to lift a component, showing motion and wear (no text or symbols)natural_image
Illustration of a mechanical lever with rotational arrows indicating clockwise motion (no text or symbols)text_image
Diagram of a hand holding a device with labeled parts and directional arrows indicating movement or operation.natural_image
Illustration of hands tying a knot around a wooden object (no text or symbols)text_image
Diagram showing a hand holding a device with labeled parts, including numbered callouts (① and ②) indicating different states or functions.natural_image
Illustration of a box containing a coin with an upward arrow, symbolizing growth or accumulation (no text or symbols present)XV1681/01
natural_image
Diagram of a mechanical component inside a transparent housing, showing a rolled part being inserted (no text or symbols)CP0667/01
natural_image
Isometric illustration of a rectangular block with a green internal component, no text or symbols present.XV1670/02
natural_image
Simple line drawing of a cylindrical object with a green arrow pointing downward (no text or symbols)CP0381/01
natural_image
Warning symbol with exclamation mark inside a black circle (no text or numbers)ell'apparecchio.
natural_image
Circular icon with a white house symbol and a red ring, no text or numbers present.natural_image
Circular icon with a white house silhouette and red warning symbol, no text or numbers present.natural_image
Circular icon with a document symbol and question mark, no readable text or labelsgiata.
natural_image
Circular icon with a stylized pen or tool symbol, no text or numbers present.a.
natural_image
Circular icon with a white prohibition symbol on black background, enclosed in a golden ring (no text or numbers)natural_image
Circular icon with a plug symbol and downward arrow, no text or labels present.to rimosso.
natural_image
Circular icon with an electric plug and warning symbol (no text or numbers)dattatore errato.
natural_image
Circular icon with a grid pattern inside, no text or symbols presentnatural_image
Circular icon with a document and question mark, no text or symbols presentnatural_image
Circular black button with a white battery symbol at center, no text or numbers visiblenatural_image
Diagram of a mechanical device with an inset showing a close-up of a component (no text or symbols visible)natural_image
Diagram of a mechanical device with internal components and directional arrows, no readable text or symbols present.natural_image
Diagram of a mechanical device with internal components and a magnified inset showing a detail (no text or labels)text_image
110 ± 2 cmnatural_image
Illustration of a vacuum cleaner with a magnified view showing the handle and base (no text or symbols)
natural_image
Diagram of a mechanical component with curved arrows indicating rotation or force direction (no text or symbols)natural_image
Diagram showing a car seatbelt with a camera and a magnified inset illustrating the impact of light on the seatbelt (no text or symbols present)natural_image
Diagram of a handheld device with a close-up inset showing a tool interacting with a mechanical component (no text or symbols present)natural_image
Illustration of a soldering iron being inserted into a tip, with no text or symbols presentnatural_image
Illustration of a hand using a tool to press or install a component, with no visible text or symbols.text_image
100° ON OFF ①text_image
Diagram illustrating electric field lines around a positively charged conductor with labeled poles and current direction indicatorsnatural_image
Illustration of a person using a vacuum cleaner to lift a person's leg (no text or symbols present)natural_image
Illustration of a mechanical component with a circular symbol containing a green cross and number 5, set on a patterned surface (no text or symbols)text_image
Safety warning illustration showing a person using a vacuum cleaner to clean water, with an orange warning symbol and red X mark.natural_image
Illustration of an eye with warning symbols (anxiety, red X) and a rolled document, no text presentnatural_image
Illustration of a pipette dispensing liquid into a green plastic sheet, with another hand valve nearby (no text or symbols)2 Piestipriniet mikroškiedras mazgāšanas paliktni zem ūdens tvertnes. Salāgojiet "Velcro" aizdares zem ūdens tvertnes un aiz paliktna.

natural_image
Illustration of a green plastic mechanical component with arrows indicating assembly or movement, and an inset showing a magnified view of a document (no text or symbols present)
text_image
MAX 50 °Cnatural_image
Diagram of a car intake manifold with a green sensor or sensor mounted on the intake (no text or symbols)natural_image
Illustration of a mechanical component being inserted into a base, showing a downward arrow indicating insertion (no text or symbols present)natural_image
Illustration of a green vacuum cleaner with motion arrows indicating airflow or movement, standing on a human figure (no text or symbols)text_image
Illustration showing a person using a vacuum cleaner with a red X mark indicating the absence of the device.text_image
Safety warning illustration showing a person using a vacuum cleaner with a red 'X' indicating the water level, alongside an orange warning symbol.natural_image
Illustration of a handheld device with a handle and screen, positioned above a horizontal line (no text or symbols)natural_image
Illustration of a spray gun dispensing liquid into a rubber block with motion lines indicating spray (no text or symbols)Uzgaļa lietošana
1 Pievienojiet uzgali tieši rokas modulim.

natural_image
Illustration of a mechanical component with a magnified inset showing a grooved surface (no text or symbols)natural_image
Illustration of a spiderweb manipulation technique showing step-by-step steps (no text or symbols)
natural_image
Illustration of a soldering iron being dispensed from a tip, with no text or symbols present.
natural_image
Illustration of a hand holding a pen writing on a laptop (no text or symbols present)
natural_image
Illustration of a spray bottle dispensing liquid into a pipe with motion arrows indicating spray (no text or symbols)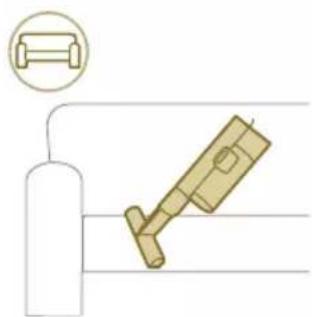
natural_image
Diagram showing a gas cylinder connected to a mechanical device with a magnified inset of a cylindrical component (no text or symbols)natural_image
Gray circular icon with a white lightbulb symbol (no text or numbers)text_image
Diagram showing three icons: a light bulb, a light bulb with a brush, and a no-lit tool, alongside a green checkmark on a circular badge.
natural_image
Circular icon with a white lightning bolt symbol and green leaf (no text or numbers)text_image
Diagram showing four different states of a device with icons and control symbols, including a checkmark and a circular icon.
natural_image
Gray circular button with a white lowercase 'i' in the center, no additional text or symbols.natural_image
Circular button with a white up-turn arrow icon (no text or symbols)Atgriešanās
text_image
Diagram of a remote control device with labeled buttons and a green checkmark indicating actiontext_image
Diagram showing a device with labeled parts and directional arrows, likely illustrating a mechanical or electrical component.natural_image
Illustration of a mechanical device with a green checkmark indicating selection (no text or symbols present)natural_image
Illustration of a pipette dispensing liquid into a green plastic sheet (no text or symbols)natural_image
Illustration of a green mechanical component with a blue base and circular end, no text or symbols present3 Izlejiet no ūdens tvertnes atlikušo ūdeni.

text_image
MAX 50 °C4 Piepildiet üdens tvertni ar üdeni.
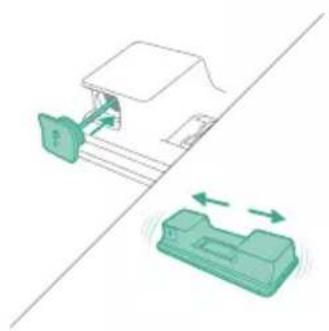
natural_image
Diagram showing a printer with green components and directional arrows, no text or symbols presentnatural_image
Illustration of a green mechanical component with a blue base and circular hole, no text or symbols presentnatural_image
Illustration of a mechanical device with a warning icon and hanging clothes (no text or symbols)natural_image
Close-up of a beige remote control with a black dial and circular button (no text or symbols visible)text_image
Diagram illustrating a lock mechanism with labeled steps and directional arrows, likely illustrating a mechanical or electrical process.natural_image
Diagram showing a container with a lid and a magnified inset of its interior (no text or symbols)2 Izņemiet mazgājamo putu filtru no plastmasas filtra korpusa.

natural_image
Illustration of two gold coins pouring liquid into a container with scattered particles (no text or symbols)3 Pasitiet pa atkritumu tvertni gan ar filtra korpusu, gan ar putu filtru.

text_image
Diagram illustrating foot positioning with a checkmark and red X mark indicating incorrect positioning, showing foot positioning on a platform.natural_image
Illustration of a hand holding a dark object with liquid droplets falling (no text or symbols)
text_image
24 hrsnatural_image
Illustration of a faucet spraying water onto a box with motion lines indicating flow (no text or symbols)natural_image
Illustration of a hand cleaning a wooden notebook (no text or symbols)natural_image
Illustration of a hand pressing down on a mechanical component with an inset showing the close-up of a device (no text or symbols present)natural_image
Illustration of a hand holding a car seatbelt with an arrow indicating motion (no text or symbols)natural_image
Illustration of a hand using scissors to cut a piece of wood (no text or symbols present)natural_image
Mechanical assembly diagram showing a lever mechanism with an inset close-up of the component (no text or symbols)natural_image
Illustration of a hand using a tool to lift a component, showing motion and wear (no text or symbols)natural_image
Simple line drawing of a mechanical component with rotational arrows (no text or symbols)text_image
Diagram of a hand holding a device with labeled parts and directional arrows indicating movement or operation.natural_image
Illustration of hands tying a knot around a wooden object with a directional arrow (no text or symbols)text_image
Diagram showing a hand holding a mechanical device with labeled parts ① and ②, indicating process steps.natural_image
Illustration of a green mechanical component pouring liquid into a blue cylindrical object (no text or symbols)6 Izskalojiet üdens tvertni un izlejiet no tās visu atlikušo škidrumu.

natural_image
Diagram of a green rod inserted into a rectangular container with two submerged plates (no text or symbols)Üdens sloksnes apkope
natural_image
Illustration of a medical procedure with a pipette inserted into a green surgical gauze (no text or symbols)2 Skalojiet üdens sloksni zem tekoša krāna üdens.

natural_image
Technical line drawing of a mechanical component with green and gray parts, no text or symbols presentnatural_image
Illustration of a box containing a coin with an upward arrow, symbolizing growth or accumulation (no text or symbols present)XV1681/01
Rullišu suka CP0667/01

natural_image
Diagram of a mechanical component inside a transparent housing, showing a rolled part being inserted (no text or symbols)CP0667/01
natural_image
Isometric illustration of a rectangular block with a green internal component, no text or symbols present.XV1670/02
Üdens sloksne CP0381/01

natural_image
Simple line drawing of a cylindrical object with a green arrow pointing downward (no text or symbols)CP0381/01
natural_image
Warning symbol with exclamation mark inside a black circle (no text or numbers)natural_image
Circular icon with a grid pattern inside, no text or symbols present.natural_image
Circular icon with a document symbol and a question mark, no text or labels present.reizi ievietots.
natural_image
Circular black button with a white battery symbol at center, no text or numbers visiblenatural_image
Diagram of a mechanical device with an inset showing a close-up of a component (no text or symbols visible)natural_image
Diagram of a mechanical device with internal components and directional arrows, no readable text or symbols present.natural_image
Diagram of a mechanical device with internal components and a magnified inset showing a detail (no text or labels)text_image
110 ± 2 cmnatural_image
Illustration of a vacuum cleaner with a close-up view showing the handle and base (no text or symbols)
natural_image
Simple line drawing of a mechanical component with arrows indicating rotation or force (no text or symbols)natural_image
Diagram of a car seatbelt with an attached device and its magnified view showing the seatbelt detail (no text or symbols present)natural_image
Illustration of a hairdryer with a magnified inset showing the tip and handle (no text or symbols)natural_image
Illustration of a soldering iron being inserted into a tip, showing the process (no text or symbols)natural_image
Illustration of a hairdryer being inserted into a device (no text or symbols)text_image
100° ON OFF ①text_image
Diagram illustrating electric field lines around a positively charged battery, showing current direction and component placement.natural_image
Illustration of a person using a vacuum cleaner to lift a floor, with motion arrows indicating movement (no text or symbols)natural_image
Illustration of a mechanical component with a circular symbol containing a green cross and number 5, set on a patterned grid background (no text or symbols)text_image
Safety warning illustration showing a person using a vacuum cleaner to clean water, with an orange warning symbol and red X mark indicating no need.natural_image
Illustration of an eye with a warning sign and a red X mark, no text or symbols presentnatural_image
Illustration of a hand pouring liquid into a green plastic sheet with a faucet in the background (no text or symbols)natural_image
Illustration of a green mechanical component with a paper holder and directional arrows indicating assembly or movement (no text or symbols)
text_image
MAX 50 °Cnatural_image
Diagram of a mechanical component with a green handle and arrow indicating direction (no text or symbols)5 Tinkamai uždarykite vandens bakelj.

natural_image
Illustration of a mechanical component being inserted into a base, showing a downward arrow (no text or symbols present)natural_image
Illustration of a person using a vacuum cleaner to clean or stand (no text or symbols present)text_image
Illustration showing a person using a vacuum cleaner with a red X mark indicating the absence of the device.
text_image
Safety warning illustration showing a person using a vacuum cleaner with a red 'X' symbol indicating water release or damage.natural_image
Illustration of a handheld device with a handle and screen, partially visible against a plain background (no text or symbols)natural_image
Illustration of a spray gun dispensing liquid into a rubber block with motion lines indicating spray (no text or symbols)Antgalio naudojimas
natural_image
Illustration of a mechanical component with a magnified inset showing a stepped surface (no text or symbols)natural_image
Illustration of a mechanical device emitting powder from a cylindrical component (no text or symbols)text_image
Illustration showing three steps of hair cleaning: using a hammer to clean teeth, adding a cat's hair, and using a tool to clean the bed.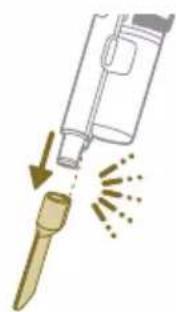
natural_image
Illustration of a soldering iron being inserted into a tip with sparks (no text or symbols)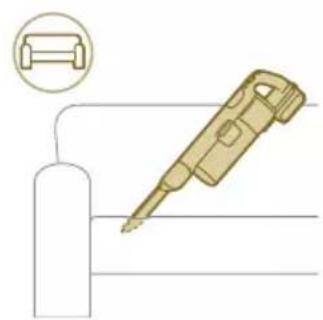
natural_image
Illustration of a soldering iron with a cylindrical base and a magnified view of the solder joint (no text or symbols)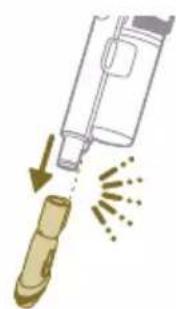
natural_image
Illustration of a soldering iron being inserted into a tip, with arrows indicating the process (no text or symbols present)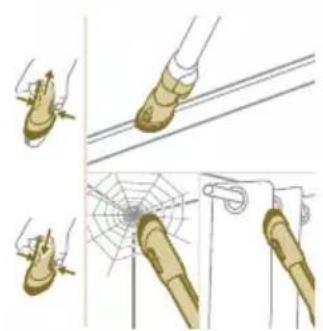
natural_image
Illustration of a spiderweb manipulation technique showing hand positioning and wire handling (no text or symbols)natural_image
Gray circular icon with a white lightbulb symbol and radiating lines, representing an idea or illumination (no text or symbols)text_image
Diagram showing three lightbulb icons and four different cleaning tools, with a green checkmark indicating a circular icon.natural_image
Circular icon with a white arrow and green leaf symbol, no text or numbers present.
text_image
Diagram showing four different mechanical or electrical component states with icons and labels, including a checkmark icon.natural_image
Gray circular button with a white lowercase 'i' in the center, no additional text or symbols.
text_image
01234 12:34 PHILIPS XCF/7-7, XCF/7- XCF/7-7, XCF/7- XCF/7- www.philips.com/ mycardlessvacuum-8000s
Grjžtis
natural_image
Circular button with a white up-turn arrow icon (no text or symbols)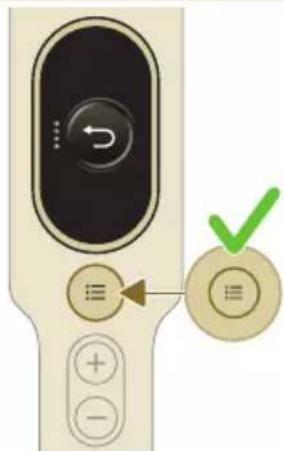
text_image
Diagram of a remote control device with directional pad, navigation buttons, and a green checkmark indicating selection.text_image
Diagram showing a hairbrush mechanism with labeled parts and directional arrows indicating movement or process.natural_image
Illustration of a mechanical device with a green checkmark indicating selection (no text or symbols present)natural_image
Illustration of a pipette dispensing liquid into a green plastic sheet (no text or symbols)natural_image
Illustration of a green mechanical component with a blue cylindrical base and circular end, no text or symbols present.natural_image
Diagram showing a printer with green components and directional arrows, no text or symbols presentnatural_image
Illustration of a green mechanical component with a blue threaded rod inserted into a blue surface (no text or symbols)natural_image
Illustration of a mechanical device with a warning icon and hanging clothes (no text or symbols)natural_image
Close-up of a beige remote control with a black dial and circular button (no text or symbols visible)text_image
Diagram illustrating a lock mechanism with labeled steps and directional arrows, likely illustrating a mechanical or electrical process.natural_image
Diagram showing a container with a lid and a magnified inset of its interior (no text or symbols)natural_image
Illustration of two hands pouring liquid into a container with granular material (no text or symbols)text_image
Diagram illustrating foot positioning with a checkmark and red X mark, showing foot positioning on a sandal platform.natural_image
Illustration of a hand holding a dark object with liquid dripping (no text or symbols)
text_image
24 hrsnatural_image
Illustration of a pipe bag pouring liquid into a container with motion lines indicating flow (no text or symbols)natural_image
Illustration of a hand cleaning a brown notebook (no text or symbols)natural_image
Illustration of a hand pressing down on a mechanical component with an inset showing the internal mechanism (no text or symbols)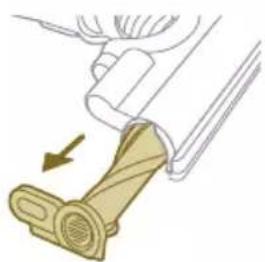
natural_image
Illustration of a mechanical component with a belt buckle and directional arrow (no text or symbols)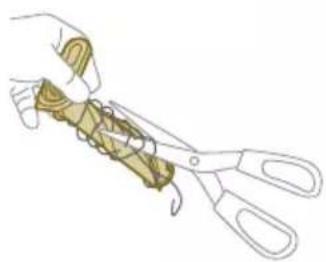
natural_image
Illustration of hands using scissors to cut a piece of paper or tape (no text or symbols visible)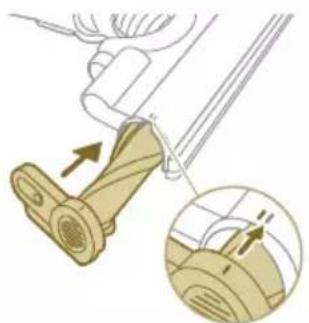
natural_image
Illustration of a mechanical device with an arrow indicating motion, showing a close-up of the component (no text or symbols present)natural_image
Illustration of a hand using a tool to lift a component, showing motion and wear (no text or symbols)natural_image
Illustration of a mechanical lever with rotational arrows indicating clockwise motion (no text or symbols)text_image
Diagram of a hand holding a device with labeled parts and directional arrows indicating movement or operation.natural_image
Illustration of hands tying a knot around a wooden object (no text or symbols)text_image
Diagram showing a hand holding a device with labeled parts, including numbered callouts (① and ②) indicating different states or functions.natural_image
Illustration of a box containing a coin with an upward arrow, symbolizing growth or direction (no text or symbols present)XV1681/01
natural_image
Diagram of a mechanical component inside a transparent housing, showing a rolled part being inserted (no text or symbols)CP0667/01
Mikropluošto plovimo šluostė XV1670/02

natural_image
Isometric illustration of a rectangular block with a green internal component, no text or symbols presentXV1670/02
Drékinimo juosta CP0381/01

natural_image
Simple line drawing of a mechanical component with a green arrow indicating direction (no text or symbols)CP0381/01
natural_image
Warning symbol with exclamation mark inside a black circle (no text or numbers)natural_image
Diagram of a mechanical device with an inset showing a close-up of a component (no text or symbols visible)natural_image
Diagram of a mechanical device with internal components and directional arrows, no readable text or symbols present.natural_image
Diagram of a mechanical device with an inset showing a close-up of a component (no text or symbols present)text_image
110 ± 2 cmnatural_image
Illustration of a vacuum cleaner with a magnified view showing the handle and base (no text or symbols)
natural_image
Diagram of a mechanical component with curved arrows indicating rotation or force direction (no text or symbols)natural_image
Diagram of a car seatbelt device with an inset showing the impact of welding (no text or symbols present)natural_image
Diagram of a handheld device with a close-up inset showing a tool interacting with a mechanical component (no text or symbols present)natural_image
Illustration of a soldering iron being inserted into a tip, with no text or symbols presentnatural_image
Illustration of a hairdryer being inserted into a device (no text or symbols)text_image
100° ON OFF ①text_image
Diagram illustrating electric field lines around a positively charged conductor with labeled poles and current direction indicatorsnatural_image
Illustration of a person using a vacuum cleaner to lift a floor, with motion arrows indicating movement (no text or symbols)natural_image
Illustration of a mechanical component with a circular symbol containing a green cross and number 5, set on a patterned grid background (no text or symbols)text_image
Safety warning illustration showing a person using a vacuum cleaner to clean water, with an orange warning symbol and a red X mark.natural_image
Illustration of an eye with warning symbols (anxiety, red X) and a rolled document, no text present.natural_image
Illustration of a pipette dispensing liquid into a green plastic sheet, with another hand valve nearby (no text or symbols)natural_image
Illustration of a green plastic mechanical component with arrows indicating assembly or movement, and an inset showing a magnified view of a document (no text or symbols present)
text_image
MAX 50 °Cnatural_image
Diagram of a mechanical component with a green arrow indicating direction (no text or symbols)natural_image
Technical illustration of a mechanical component being inserted into a base plate (no text or symbols)natural_image
Illustration of a person using a vacuum cleaner to clean or stand (no text or symbols present)text_image
Illustration showing a person using a vacuum cleaner with a red X mark indicating the absence of the device.text_image
Safety warning illustration showing a person using a vacuum cleaner with a red X mark indicating water residuenatural_image
Illustration of a handheld device with a pointed tip and handle, emitting exhaust smoke (no text or symbols)natural_image
Illustration of a spray gun dispensing liquid into a rubber pad (no text or symbols)natural_image
Illustration of a mechanical component with a magnified inset showing a textured surface (no text or symbols)natural_image
Illustration of a spiderweb manipulation technique showing step-by-step steps (no text or symbols)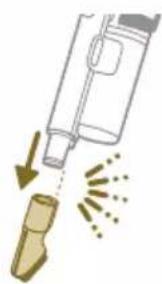
natural_image
Illustration of a soldering iron being dispensed from a tip, with no text or symbols present.
natural_image
Line drawing of a hand holding a pen writing on a laptop (no text or symbols present)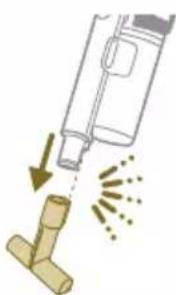
natural_image
Illustration of a spray bottle dispensing liquid into a pipe with an arrow indicating flow (no text or symbols)
natural_image
Diagram showing a gas cylinder connected to a mechanical device with a magnified inset of a cylindrical component (no text or symbols)natural_image
Gray circular icon with a white lightbulb symbol (no text or numbers)text_image
Diagram showing three icons: a light bulb, a light bulb with a brush, and a no-lit tool, alongside a green checkmark on a circular badge.natural_image
Circular icon with a white lightning bolt symbol and green leaf (no text or numbers)
text_image
Diagram showing four different mechanical or electrical component states with icons and symbols, including a checkmark and a circular symbol.
natural_image
Gray circular button with a white lowercase 'i' in the center, no additional text or symbols.
natural_image
Circular button with a white up-turn arrow icon (no text or symbols)text_image
Diagram of a remote control with directional pad, navigation buttons, and a green checkmark indicating action.text_image
Diagram showing a device with labeled parts and directional arrows, likely illustrating a mechanical or electrical component.natural_image
Illustration of a mechanical device with a green checkmark indicating selection (no text or symbols present)natural_image
Illustration of a pipette dispensing liquid into a green tiled surface (no text or symbols)natural_image
Illustration of a green mechanical component with a blue cylindrical base and circular end (no text or symbols)natural_image
Diagram showing a device with a green component and a green base, connected by directional arrows (no text or symbols)natural_image
Illustration of a green plastic container being inserted into a blue cylindrical component (no text or symbols)natural_image
Illustration of a mechanical device with a warning icon and hanging clothes (no text or symbols)natural_image
Close-up of a beige remote control with a black dial and circular button (no text or symbols visible)text_image
Diagram illustrating a lock mechanism with labeled steps and directional arrows, likely illustrating a mechanical or electrical process.natural_image
Diagram showing a container with a lid and a magnified inset of its interior (no text or symbols)natural_image
Illustration of two hands pouring liquid into a container with granular material (no text or symbols)text_image
Diagram illustrating a medical procedure with labeled steps and a checkmark indicating a validation or confirmation point.natural_image
Illustration of a hand holding a dark object with liquid dripping (no text or symbols)
text_image
24 hrsnatural_image
Illustration of a faucet spraying water onto a bag with motion lines indicating flow (no text or symbols)natural_image
Illustration of a hand cleaning a brown notebook (no text or symbols)natural_image
Illustration of a hand pressing down on a mechanical component with an inset showing the close-up of a device (no text or symbols present)natural_image
Illustration of a hand holding a car seatbelt with an arrow indicating motion (no text or symbols)natural_image
Illustration of a hand using scissors to cut a piece of wood (no text or symbols present)natural_image
Mechanical assembly diagram showing a lever mechanism with an inset close-up of the component (no text or symbols)natural_image
Illustration of a hand using a tool to lift a component, showing motion and wear (no text or symbols)natural_image
Illustration of a mechanical component with rotational arrows indicating cycle (no text or symbols)text_image
Diagram of a mechanical device with numbered parts and directional arrows indicating motion or assembly.natural_image
Illustration of hands tying a knot around a wooden object (no text or symbols)text_image
Diagram showing a hand holding a device with labeled parts, including numbered callouts (① and ②) indicating different states or functions.natural_image
Illustration of a plastic bottle pouring liquid into a beaker, next to a water tap (no text or symbols)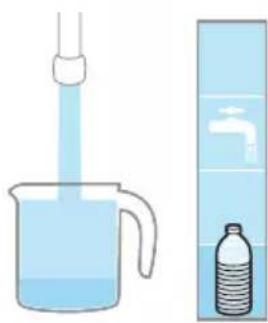
natural_image
Illustration of a beaker with liquid being inverted in a funnel and a water bottle beside it (no text or symbols)natural_image
Diagram showing a mechanical device with a green component and a separate green device with bidirectional arrows (no text or symbols)natural_image
Illustration of a green mechanical component with a blue threaded rod inserted into a base (no text or symbols)natural_image
Illustration of a green cylindrical object with two arrows pointing upward, placed on a rectangular base (no text or symbols)natural_image
Illustration of a medical procedure with a blue needle inserted into a green surgical gasket (no text or symbols)natural_image
Diagram of a mechanical component with green and gray parts, no text or symbols presentnatural_image
Illustration of a box containing a coin with an upward arrow, symbolizing growth or direction (no text or symbols present)XV1681/01
CP0667/01 forgókefe

natural_image
Diagram of a mechanical component inside a transparent housing, showing a rolled part being inserted (no text or symbols)CP0667/01
natural_image
Isometric view of a rectangular block with a green internal component and a small arrow pointing to it (no text or symbols)XV1670/02
CP0381/01 vízadagoló lapka
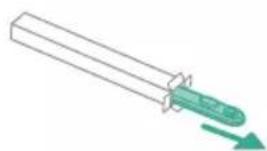
natural_image
Simple line drawing of a mechanical component with a green arrow indicating direction (no text or symbols)CP0381/01
natural_image
Warning symbol with exclamation mark inside a black circle (no text or numbers)között.
natural_image
Circular icon with a grid pattern inside, no text or symbols present.natural_image
Circular icon with a document symbol and a question mark, no text or labels present.natural_image
Circular black button with a white battery symbol at center, no text or numbers visiblenatural_image
Diagram of a mechanical device with an inset showing a close-up of a component (no text or symbols visible)natural_image
Diagram of a mechanical device with internal components and directional arrows, no readable text or symbols present.natural_image
Diagram of a mechanical device with internal components and a magnified inset showing a detail (no text or symbols)text_image
110 ± 2 cmnatural_image
Illustration of a vacuum cleaner with a magnified view showing the handle and base (no text or symbols)
natural_image
Diagram of a mechanical component with curved arrows indicating motion or force direction (no text or symbols)natural_image
Diagram showing a car seat with a mounted device and an inset close-up of the seat (no text or symbols)natural_image
Illustration of a hairdryer with a magnified inset showing the tool tip (no text or symbols present)natural_image
Illustration of a soldering iron being inserted into a tip, showing the process (no text or symbols)natural_image
Illustration of a hairdryer being inserted into a device (no text or symbols)text_image
100° ON OFF ①text_image
Diagram showing electric field lines between a positively charged battery and three labeled terminals (N, E, T) with corresponding electric current illustrations.natural_image
Illustration of a person using a vacuum cleaner to lift a floor, with arrows indicating motion (no text or symbols)natural_image
Illustration of a mechanical component and a circular symbol with a green cross, set on a patterned grid background (no text or symbols)text_image
Safety warning illustration showing a person using a vacuum cleaner to clean water, with an orange warning symbol and red X mark indicating no need.natural_image
Illustration of an eye with warning symbols (anxiety, no protection) and a red X mark, no text or labels present.natural_image
Illustration of a pipette dispensing liquid into a green plastic tray (no text or symbols)natural_image
Illustration of a green mechanical component with arrows indicating assembly or movement, and an inset showing a magnified view of a document (no text or symbols present)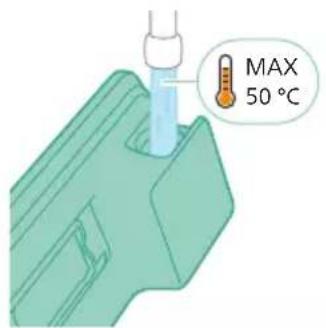
text_image
MAX 50 °Cnatural_image
Diagram of a mechanical component with a green handle and arrow indicating direction (no text or symbols)natural_image
Illustration of a mechanical component being inserted into a base, showing a downward arrow (no text or symbols present)natural_image
Illustration of a person using a green vacuum cleaner to clean or stand (no text or symbols present)text_image
Illustration showing a person using a vacuum cleaner with a red X mark indicating the absence of any text or symbols.
text_image
Safety warning illustration showing a person using a vacuum cleaner with a red 'X' indicating the water level, alongside an orange warning symbol.natural_image
Illustration of a handheld device with a handle and screen, emitting sound waves (no text or symbols)natural_image
Illustration of a vacuum cleaner spraying liquid onto a mechanical component (no text or symbols)natural_image
Illustration of a mechanical device with a cross-section inset showing a textured surface (no text or symbols)natural_image
Illustration of a spiderweb manipulation technique showing step-by-step steps (no text or symbols)natural_image
Illustration of a soldering iron being dispensed from a tip, with no text or symbols present.natural_image
Line drawing of a hand holding a pen writing on a laptop (no text or symbols present)natural_image
Illustration of a spray bottle dispensing liquid into a pipe with an arrow indicating flow (no text or symbols)natural_image
Diagram showing a gas cylinder connected to a mechanical device with a magnified inset of a cylindrical component (no text or symbols)natural_image
Gray circular icon with a white lightbulb symbol (no text or numbers)text_image
Diagram showing three lightbulb icons and three cleaner clips, with a green checkmark indicating a confirmation or status.
natural_image
Circular icon with a stylized lightning bolt symbol and green '电' (electricity) text, no readable text or numbers present.Vloertypeherkenning
text_image
Diagram showing four steps of a mechanical or electrical component inspection, including disassembly, rotation, and confirmation with checkmark.
natural_image
Gray circular button with a white lowercase 'i' in the center, no additional text or symbols.natural_image
Circular button with a white curved arrow icon, no text or symbols present.Terug
text_image
Diagram of a remote control device with labeled buttons and a green checkmark indicating actiontext_image
Diagram showing a hairbrush mechanism with labeled parts and directional arrows indicating movement or process.natural_image
Illustration of a mechanical device with a green checkmark indicating selection (no text or symbols present)text_image
Diagram illustrating a mechanical device with a magnified cross-section showing internal components and a downward arrow indicating motion or force.
text_image
Diagram illustrating a chemical process with labeled steps and a magnified view showing a reaction or separation step.
natural_image
Green mechanical component with an arrow indicating upward movement, partially enclosed in a circular inset showing a folder (no text or symbols visible)natural_image
Illustration of a pipette dispensing liquid into a green plastic sheet (no text or symbols)natural_image
Illustration of a green mechanical component with a blue base and circular end, no text or symbols presentnatural_image
Diagram showing a printer with green components and directional arrows, no text or symbols presentnatural_image
Illustration of a green mechanical component with a blue base and circular hole, no text or symbols presentnatural_image
Illustration of a mechanical device with a warning icon and hanging clothes (no text or symbols)natural_image
Close-up of a beige remote control with a black dial and circular button (no text or symbols visible)text_image
Diagram illustrating a lock mechanism with labeled steps and directional arrows, likely illustrating a mechanical or electrical process.natural_image
Diagram showing a container with a lid and a magnified inset of its interior (no text or symbols)natural_image
Illustration of two hands pouring liquid into a container with granular material (no text or symbols)text_image
Diagram illustrating foot movement with a checkmark and red X mark, showing foot positioning and movement pathnatural_image
Illustration of a hand holding a dark object with liquid droplets (no text or symbols)
text_image
24 hrsnatural_image
Illustration of a pipe bag with water flowing through it, emitting steam (no text or symbols)natural_image
Illustration of a hand cleaning a rectangular object with a cloth (no text or symbols)natural_image
Illustration of a hand using a tool to lift a component, showing motion and wear (no text or symbols)natural_image
Illustration of a mechanical lever with rotational arrows indicating clockwise motion (no text or symbols)text_image
Diagram of a hand holding a device with labeled parts and directional arrows indicating movement or operation.natural_image
Illustration of hands tying a knot around a wooden object (no text or symbols)text_image
Diagram showing a hand holding a device with labeled parts, including numbered callouts (① and ②) indicating different states or functions.natural_image
Illustration of a box containing a coin with an upward arrow, symbolizing growth or direction (no text or symbols present)XV1681/01
Rolborstel CP0667/01

natural_image
Diagram of a mechanical component inside a transparent housing, showing a rolled part being inserted (no text or symbols)CP0667/01
Microvezeldweilmop XV1670/02
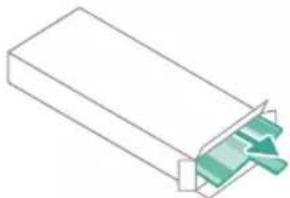
natural_image
Isometric view of a rectangular block with a green arrow pointing to its corner (no text or symbols)XV1670/02
Watertuit CP0381/01

natural_image
Simple line drawing of a mechanical component with a green arrow indicating direction (no text or symbols)CP0381/01
natural_image
Warning symbol with exclamation mark inside a red circle on black background (no text or numbers)neert niet correct.
natural_image
Circular icon with a grid pattern inside, no text or symbols present.natural_image
Circular icon with a question mark and document symbol on dark background (no text or symbols)ct geplaatst.
natural_image
Circular black button with a white battery symbol at center, no text or numbers visiblenatural_image
Diagram of a mechanical device with an inset showing a close-up of a component (no text or symbols visible)natural_image
Diagram of a mechanical device with internal components and directional arrows, no readable text or symbols present.natural_image
Diagram of a mechanical device with internal components and a magnified inset showing a detail (no text or symbols)3 Lukk den grå hendelen. Det skal komme en "KLIKK"-lyd når den grå hendelen går i inngrep.
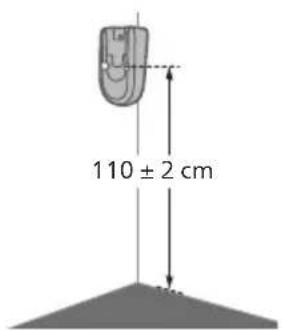
text_image
110 ± 2 cmnatural_image
Illustration of a vacuum cleaner with a magnified view showing the handle and base (no text or symbols)
natural_image
Diagram of a mechanical component with curved arrows indicating rotation or force (no text or symbols)Før bruk
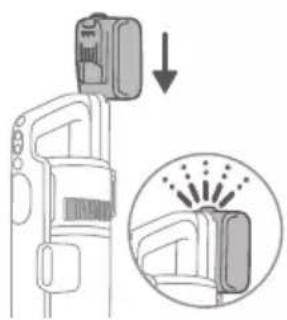
natural_image
Diagram of a car seatbelt with an attached device and its magnified view showing the seatbelt detail (no text or symbols present)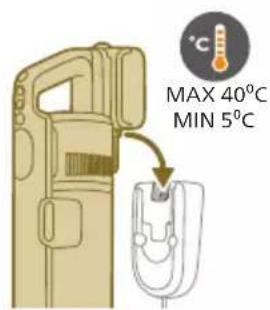
text_image
MAX 40°C MIN 5°Cnatural_image
Diagram of a handheld device with a close-up inset showing a tool interacting with a mechanical component (no text or symbols present)natural_image
Illustration of a soldering iron being inserted into a tip, showing the process (no text or symbols)natural_image
Illustration of a hairdryer being inserted into a device (no text or symbols)2 Fest slangen på munnstykket. Det skal kommen en "KLIKK"-lyd när den går i inngrep.
text_image
100° ON OFF ①text_image
Diagram illustrating electric field lines between positive and negative charges, with labeled components and corresponding electric field illustrations.natural_image
Illustration of a person using a vacuum cleaner to clean or walk (no text or symbols present)natural_image
Illustration of a wooden screwdriver and a green circular symbol on a grid background (no text or symbols)text_image
Safety warning illustration showing a person using a vacuum cleaner to clean water, with an orange warning symbol and red X mark indicating no need.Advarsel: Ikke sug opp vann eller andre væsker.

natural_image
Illustration of an eye with warning symbols (anxiety, red X) and a rolled document, no text presentnatural_image
Illustration of a pipette dispensing liquid into a green plastic sheet, with water flowing out (no text or symbols)natural_image
Illustration of a green plastic mechanical component with a magnified inset showing its assembly (no text or symbols)
text_image
MAX 50 °Cnatural_image
Diagram of a mechanical component with a green handle and arrow indicating direction (no text or symbols)5 Lukk vannbeholderen ordentlig.
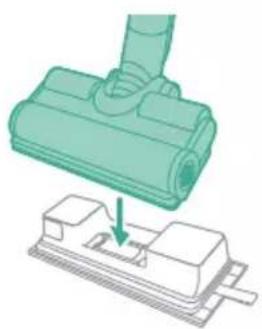
natural_image
Illustration of a mechanical component being inserted into a base, showing a downward arrow indicating insertion (no text or symbols present)6 Fest den klargjorte vannbeholderen til munnstykket, så er alt klart.

natural_image
Illustration of a person using a green vacuum cleaner to clean or stand (no text or symbols present)text_image
Illustration showing a person using a vacuum cleaner with a red X mark indicating the absence of the device.text_image
Safety warning illustration showing a person using a vacuum cleaner with a red X mark indicating water residue, accompanied by an orange warning symbol.natural_image
Illustration of a handheld device with a handle and screen, partially visible against a plain background (no text or symbols)natural_image
Illustration of a spray gun dispensing liquid into a rubber pad (no text or symbols)Bruke munnstykket
natural_image
Illustration of a mechanical component with a magnified inset showing a textured surface (no text or symbols)natural_image
Illustration of a spray gun dispensing liquid into a wooden block, with motion arrows indicating spray (no text or symbols)text_image
Illustration showing three steps of cleaning a bed using a tool, with magnified views of the bed and cat.natural_image
Illustration of a soldering iron being inserted into a tip with powder spilling out (no text or symbols)natural_image
Illustration of a soldering iron with a cylindrical base and a magnified view of the solder pad (no text or symbols)natural_image
Illustration of a soldering iron being dispensed from a tip, showing motion and spark (no text or symbols)natural_image
Illustration of four steps to tie a spiderweb with a tool, showing hand positioning and wire connection (no text or symbols)
text_image
Illustration showing a step-by-step procedure for using a laser gun to remove a cylindrical object from a laptop, with a gas cylinder being inserted.natural_image
Gray circular icon with a white lightbulb symbol and radiating lines, representing an idea or illumination (no text or symbols)Endre styrke på belysningen
text_image
Diagram showing three lightbulb icons and four cleaner clips, with a green checkmark indicating a confirmation or status.natural_image
Circular icon with a white mechanical component and green leaf symbol (no text or numbers)
text_image
Diagram showing four different mechanical or electrical component states with icons and labels, including a checkmark icon.i Merk: Gulvtypegjenkjenning kan bare bli aktivert eller deaktivert når den motoriserte dysen er festet til den håndholdte enheten. Som et resultat av dette, når ingen motorisert dyse er festet til hovedapparatet, vil det være ett element

natural_image
Gray circular button with a white lowercase 'i' in the center, no additional text or symbols.natural_image
Circular button with a white up-turn arrow icon (no text or symbols)
text_image
Diagram of a remote control device with labeled buttons and a green checkmark indicating actiontext_image
Diagram showing a hairbrush mechanism with labeled parts and directional arrows indicating movement or process.natural_image
Illustration of a mechanical device with a green checkmark indicating selection (no text or symbols present)natural_image
Illustration of a pipette dispensing liquid into a green tiled surface (no text or symbols)2 Skyll moppeputen under springen og vask den for hånd eller i vaskemaskin.

natural_image
Illustration of a green mechanical component with a blue cylindrical base and circular end, no text or symbols present.natural_image
Diagram showing a device with a green component and a green base, connected by directional arrows (no text or symbols)5 Lukk vannbeholderen godt, og rist den for å få bort eventuelle rester av vaskemiddel.

natural_image
Illustration of a green plastic container being inserted into a blue cylindrical component (no text or symbols)natural_image
Illustration of a mechanical device with a warning icon and hanging clothes (no text or symbols)natural_image
Close-up of a beige remote control with a black dial and circular button (no text or symbols visible)text_image
Diagram illustrating a lock mechanism with labeled steps and directional arrows, likely illustrating a mechanical or electrical process.natural_image
Diagram showing a container with a lid and a magnified inset of its interior (no text or symbols)2 Ta det vaskbare skumfilteret ut av filterhuset i plast.

natural_image
Illustration of two gold coins pouring liquid into a container with scattered particles (no text or symbols)3 Bank ut filterhuset og skumfilteret over en søppelbøtte.
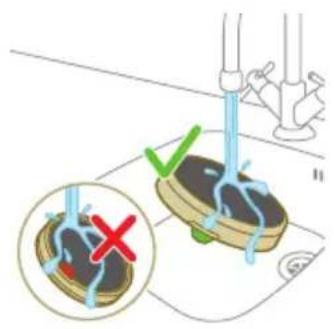
text_image
Diagram illustrating foot positioning with a checkmark and red X mark indicating incorrect positioning, showing foot positioning on a platform.natural_image
Illustration of a hand holding a dark object with liquid droplets (no text or symbols)5 La det vaskede skumfilteret få tørke i 24 timer før du setter det tilbake på plass i filterhuset.

text_image
24 hrsnatural_image
Illustration of a pipe bag with water flowing through it, showing fluid flow (no text or symbols)natural_image
Illustration of a hand cleaning a wooden door (no text or symbols)
natural_image
Illustration of a hand using a tool to lift a component, showing motion and wear (no text or symbols)natural_image
Simple line drawing of a mechanical component with rotational arrows (no text or symbols)text_image
Diagram of a hand holding a device with labeled parts 1 and 2, showing mechanical components and directional arrows.natural_image
Illustration of hands tying a knot around a wooden object (no text or symbols)text_image
Diagram showing a hand holding a device with labeled parts, including arrows and text annotations.natural_image
Illustration of a green mechanical component pouring liquid into a blue cylindrical object (no text or symbols)natural_image
Diagram of a green rod inserted into a rectangular container with two submerged plates (no text or symbols)natural_image
Illustration of a medical procedure with a pipette inserted into a green surgical gauze (no text or symbols)2 Skyll vannstrimmelen under springen.

natural_image
Technical line drawing of a mechanical component with green and gray parts, no text or symbols presentnatural_image
Illustration of a box containing a coin with an upward arrow, symbolizing growth or direction (no text or symbols present)XV1681/01
Børsterull CP0667/01

natural_image
Diagram of a mechanical component inside a transparent housing, showing a rolled part being inserted (no text or symbols)CP0667/01
Moppepute i mikrofiber XV1670/02

natural_image
Isometric illustration of a rectangular block with a green internal component, no text or symbols present.XV1670/02
Vannstrimmel CP0381/01

natural_image
Simple line drawing of a cylindrical object with a green arrow pointing downward (no text or symbols)CP0381/01
natural_image
Warning symbol with exclamation mark inside a black circle (no text or numbers)Ta ut batteriet, vent i 10 sekunder og sett deretter tilbake batteriet. Hvis dette ikke fungerer, må du ta apparatet til et Philips-servicesenter eller kontakte kundeservice.
natural_image
Circular icon with a grid pattern inside, no text or symbols presentnatural_image
Circular icon with a document symbol and a question mark, no text or labels present.inn riktig.
natural_image
Circular black button with a white battery symbol at center, no text or numbers visiblenatural_image
Diagram of a mechanical device with an inset showing a close-up of a component (no text or symbols visible)natural_image
Diagram of a mechanical device with internal components and directional arrows, no readable text or symbols present.natural_image
Diagram of a mechanical device with internal components and a magnified inset showing a detail (no text or labels)text_image
110 ± 2 cmnatural_image
Illustration of a vacuum cleaner with a magnified view showing the handle and base (no text or symbols)
natural_image
Diagram of a U-shaped device with directional arrows indicating rotation or movement (no text or symbols)natural_image
Diagram of a car seatbelt with an attached device and its magnified view showing the seatbelt detail (no text or symbols present)natural_image
Diagram of a handheld device with a close-up inset showing a tool interacting with a mechanical component (no text or symbols present)natural_image
Illustration of a soldering iron being inserted into a tip, with no text or symbols presentnatural_image
Illustration of a hairdryer being inserted into a device (no text or symbols)text_image
100° ON OFF ①text_image
Diagram illustrating electric field lines around a positively charged conductor with labeled poles and current direction indicatorsnatural_image
Illustration of a person using a vacuum cleaner to clean or stand (no text or symbols present)natural_image
Illustration of a mechanical component and a circular symbol with green markings (no text or symbols present)text_image
Safety warning illustration showing a person using a vacuum cleaner to clean water, with an orange warning symbol and a red X mark indicating no hazard.natural_image
Illustration of an eye with warning symbols (anxiety, red X) and a rolled paper roll, no text or labels present.natural_image
Illustration of a pipette dispensing liquid into a green rectangular container with a ribbon, above a surface with two washers (no text or symbols)natural_image
Illustration of a green mechanical component with a magnified inset showing a document (no text or symbols present)
text_image
MAX 50 °Cnatural_image
Diagram of a mechanical component with a green handle and arrow indicating direction (no text or symbols)natural_image
Illustration of a mechanical component being inserted into a base, showing a downward arrow (no text or symbols present)natural_image
Illustration of a person using a vacuum cleaner to clean or stand (no text or symbols present)text_image
Illustration showing a person using a vacuum cleaner with a red X mark indicating the absence of the device.text_image
Safety warning illustration showing a person using a vacuum cleaner with a red 'X' indicating the water level, and an orange warning symbol.natural_image
Illustration of a handheld device with a pointed tip and handle, emitting exhaust smoke (no text or symbols)natural_image
Illustration of a vacuum cleaner spraying liquid onto a mechanical component (no text or symbols)Używanie ssawki
natural_image
Technical illustration of a mechanical component with a magnified inset showing a textured surface (no text or symbols)natural_image
Illustration of a spiderweb manipulation technique showing step-by-step steps (no text or symbols)natural_image
Illustration of a soldering iron being dispensed from a tip, with no text or symbols present.natural_image
Line drawing of a hand holding a pen writing on a laptop (no text or symbols present)natural_image
Illustration of a spray gun emitting powder from a wooden tool (no text or symbols)natural_image
Diagram showing a gas cylinder connected to a mechanical device with a magnified inset of a cylindrical component (no text or symbols)natural_image
Gray circular icon with a white lightbulb symbol (no text or numbers)text_image
Diagram showing three lighting icons and a checkmark, likely illustrating cleaning or anti-smoking concepts.text_image
Diagram showing four different states of a device with icons and labels, including control buttons, status indicators, and a green checkmark.natural_image
Gray circular button with a white lowercase 'i' in the center, no additional text or symbols.natural_image
Circular button with a white up-turn arrow icon (no text or symbols)
text_image
Diagram of a remote control device with labeled buttons and a green checkmark indicating actiontext_image
Diagram showing a mechanical device with labeled parts and directional arrows, likely illustrating a motion or assembly process.natural_image
Illustration of a mechanical device with a green checkmark indicating selection (no text or symbols present)natural_image
Illustration of a pipette dispensing liquid into a green plastic sheet (no text or symbols)natural_image
Illustration of a green mechanical component with a blue base and circular end, no text or symbols presentnatural_image
Diagram showing a printer with green components and directional arrows, no text or symbols presentnatural_image
Illustration of a green plastic component being inserted into a blue cylindrical part (no text or symbols)natural_image
Illustration of a mechanical device with a warning icon and hanging clothes (no text or symbols)natural_image
Close-up of a beige remote control with a black dial and circular button (no text or symbols visible)text_image
Diagram illustrating a lock mechanism with labeled steps and directional arrows, likely illustrating a mechanical or electrical process.natural_image
Diagram showing a container with a lid and a magnified inset of its interior (no text or symbols)natural_image
Illustration of two hands pouring liquid into a container with scattered particles (no text or symbols)text_image
Diagram illustrating foot positioning with a checkmark and red X mark, showing incorrect foot positioning.natural_image
Illustration of a hand holding a dark object with liquid droplets (no text or symbols)natural_image
Illustration of a pipe bag with water flowing through it, showing fluid flow (no text or symbols)natural_image
Illustration of a hand cleaning a wooden door (no text or symbols)
natural_image
Illustration of a hand pressing down on a mechanical component with an inset showing the close-up of a device (no text or symbols present)natural_image
Illustration of a hand holding a car seatbelt with an arrow indicating motion (no text or symbols)natural_image
Illustration of a hand using scissors to cut a piece of wood (no text or symbols present)natural_image
Mechanical assembly diagram showing a lever mechanism with an inset close-up of the component (no text or symbols)natural_image
Illustration of a hand using a tool to lift a component, showing motion and wear (no text or symbols)natural_image
Simple line drawing of a mechanical component with rotational arrows (no text or symbols)text_image
Diagram of a hand holding a device with labeled parts 1 and 2, showing mechanical components and directional arrows.natural_image
Illustration of hands tying a knot around a wooden object (no text or symbols)text_image
Diagram showing a hand holding a device with labeled parts, including arrows and text annotations.natural_image
Illustration of a green mechanical component with a blue threaded rod inserted into a base (no text or symbols)natural_image
Diagram of a green rod inserted into a rectangular container with two internal channels (no text or symbols)natural_image
Illustration of a medical procedure with a pipette inserted into a green surgical gauze (no text or symbols)natural_image
Technical line drawing of a mechanical component with green and gray parts, no text or symbols presentnatural_image
Illustration of a box containing a coin with an upward arrow, symbolizing growth or direction (no text or symbols present)XV1681/01
Rolka szczotki CP0667/01

natural_image
Diagram of a mechanical component inside a transparent housing, showing a rolled part being inserted (no text or symbols)CP0667/01
natural_image
Isometric illustration of a rectangular block with a green internal component, no text or symbols presentXV1670/02
natural_image
Simple line drawing of a cylindrical object with a green arrow pointing downward (no text or symbols)CP0381/01
natural_image
Warning symbol with exclamation mark inside a black circle (no text or numbers)ządzenia.
natural_image
Circular icon with a grid pattern inside, no text or symbols present.natural_image
Circular icon with a document and question mark, no text or symbols presentnatural_image
Circular black button with a white battery symbol at center, no text or numbers visiblenatural_image
Diagram of a mechanical device with an inset showing a close-up of a component (no text or symbols visible)natural_image
Diagram of a mechanical device with internal components and directional arrows, no readable text or symbols present.natural_image
Diagram of a mechanical device with internal components and a magnified inset showing a detail (no text or symbols)text_image
110 ± 2 cmnatural_image
Illustration of a vacuum cleaner with a magnified view showing the handle and base (no text or symbols)
natural_image
Diagram of a mechanical component with curved arrows indicating motion or force direction (no text or symbols)natural_image
Diagram showing a device with a lock and a magnified view of its internal components (no text or symbols)natural_image
Illustration of a hairdryer with a magnified inset showing the tool tip (no text or symbols present)natural_image
Illustration of a soldering iron being inserted into a tip, with no text or symbols presentnatural_image
Illustration of a hairdryer being inserted into a device (no text or symbols)text_image
100° ON OFF ①text_image
Diagram illustrating electric field lines around a positively charged battery, showing N and E poles with corresponding electric field symbols.natural_image
Illustration of a person using a vacuum cleaner to lift a floor, with arrows indicating motion (no text or symbols)3 Pode limpar pavimentos ou superfícies macias com o aspirador.

natural_image
Illustration of a mechanical component with a green circular symbol and a magnified inset showing a dollar sign (no text or symbols present)text_image
Safety warning illustration showing a person using a vacuum cleaner to clean water, with an orange warning symbol and red X mark indicating no need.natural_image
Illustration of an eye with warning symbols (anxiety, no protection) and a red X mark, no text or labels present.natural_image
Illustration of a pipette dispensing liquid into a green lab tray (no text or symbols)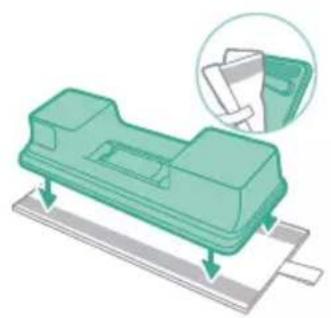
natural_image
Illustration of a green mechanical component with a magnified inset showing a folded paper or sheet (no text or symbols)
text_image
MAX 50 °Cnatural_image
Diagram of a mechanical component with a green handle and arrow indicating direction (no text or symbols)natural_image
Technical illustration of a mechanical component being processed into a base plate (no text or symbols)natural_image
Illustration of a person using a vacuum cleaner with motion arrows indicating airflow (no text or symbols)text_image
Illustration showing a person using a vacuum cleaner with a red X mark indicating the absence of any text or symbols.
text_image
Safety warning illustration showing a person using a vacuum cleaner with a red 'X' indicating the water level, alongside an orange warning symbol.natural_image
Illustration of a handheld device with a handle and screen, positioned above a horizontal line (no text or symbols visible)natural_image
Illustration of a vacuum cleaner emitting exhaust from a bottle (no text or symbols)Utilizar o bocal
natural_image
Illustration of a mechanical device with a cross-section inset showing a grooved surface (no text or symbols)natural_image
Illustration of a spiderweb manipulation technique showing step-by-step steps (no text or symbols)natural_image
Illustration of a soldering iron being dispensed from a tip, with arrows indicating motion (no text or symbols)Utilizar a escova macia
natural_image
Illustration of a hand holding a pen writing on a laptop (no text or symbols present)natural_image
Illustration of a spray bottle dispensing liquid into a pipe with motion arrows indicating spray (no text or symbols)natural_image
Diagram showing a gas cylinder connected to a mechanical device with a magnified inset of a cylindrical component (no text or symbols)natural_image
Gray circular icon with a white lightbulb symbol (no text or numbers)text_image
Diagram showing three icons: a light bulb, a light bulb with a brush, and a no-lit tool, alongside a green checkmark on a circular badge.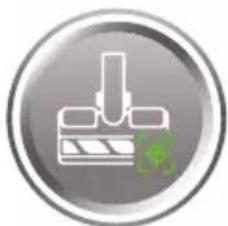
natural_image
Circular icon with a white lightning bolt symbol and green leaf (no text or numbers)text_image
Diagram showing two identical icons with a checkmark, one with a green checkmark and circular grid pattern, the other with a red checkmark and circular grid pattern.
natural_image
Gray circular button with a white lowercase 'i' in the center, no additional text or symbols.natural_image
Circular button with a white curved arrow icon, no text or symbols present.
text_image
Diagram of a remote control device with labeled buttons and a green checkmark indicating actiontext_image
Diagram showing a hairbrush mechanism with labeled parts and directional arrows indicating movement or flow.natural_image
Illustration of a mechanical device with a green checkmark indicating selection (no text or symbols present)natural_image
Illustration of a pipette dispensing liquid into a green plastic sheet (no text or symbols)natural_image
Illustration of a green mechanical component with a blue base and circular end, no text or symbols presentnatural_image
Diagram showing a printer with green components and directional arrows, no text or symbols presentnatural_image
Illustration of a green mechanical component with a blue base and circular hole, no text or symbols presentnatural_image
Illustration of a mechanical device with a warning icon and hanging clothes (no text or symbols)natural_image
Close-up of a beige remote control with a black dial and circular button (no text or symbols visible)text_image
Diagram illustrating a lock mechanism with labeled steps and directional arrows, likely illustrating a mechanical or electrical process.natural_image
Diagram showing a container with a lid and a magnified inset of its interior (no text or symbols)natural_image
Illustration of two hands pouring liquid into a container with granular material (no text or symbols)text_image
Diagram illustrating a medical procedure with labeled steps and a checkmark indicating a validation or confirmation point.
natural_image
Illustration of a hand holding a sponge with water droplets (no text or symbols)
text_image
24 hrs
natural_image
Illustration of a pipe bag with water flowing through it, showing fluid flow (no text or symbols)
natural_image
Illustration of a hand cleaning a wooden notebook (no text or symbols)natural_image
Illustration of a hand using a tool to lift a component, showing motion and wear (no text or symbols)natural_image
Illustration of a mechanical lever with rotational arrows indicating clockwise motion (no text or symbols)text_image
Diagram of a hand holding a device with labeled parts, showing mechanical components and directional arrows.natural_image
Illustration of hands tying a knot around a wooden object with a directional arrow (no text or symbols)text_image
Diagram showing a hand holding a device with labeled parts, including numbered callouts (① and ②) indicating different components or states.natural_image
Illustration of a green plastic component with a blue anchor and a small circular mark on a surface (no text or symbols)natural_image
Illustration of a green cylindrical object with two arrows pointing upward, placed on a rectangular base (no text or symbols)natural_image
Illustration of a medical procedure with a pipette inserted into a green surgical gauze (no text or symbols)natural_image
Technical line drawing of a mechanical component with green and gray parts, no text or symbols presentnatural_image
Illustration of a box containing a coin with an upward arrow, symbolizing growth or direction (no text or symbols present)XV1681/01
Escova rotativa CP0667/01

natural_image
Diagram of a mechanical component inside a transparent housing, showing a rolled part being inserted (no text or symbols)CP0667/01
natural_image
Isometric illustration of a rectangular block with a green internal component, no text or symbols present.XV1670/02
natural_image
Simple line drawing of a cylindrical object with a green arrow pointing downward (no text or symbols)CP0381/01
natural_image
Warning symbol with exclamation mark inside a red circle on black background (no text or numbers)natural_image
Circular icon with a white house symbol and a red border, no text or numbers present.natural_image
Circular icon with a house outline and exclamation mark, no text or symbols presentnatural_image
Circular icon with a white rectangular symbol and a red border, no text or numbers present.ada.
natural_image
Circular icon with a stylized pen or tool symbol, no text or numbers present.natural_image
Circular icon with a stylized pen and screwdriver symbol, no text or numbers present.。
natural_image
Circular black button with a white prohibition symbol (no text or numbers)natural_image
Circular icon with a white plug symbol and downward arrow, no text or numbers present.emovido.
natural_image
Circular icon with a plug and warning symbol (no text or numbers)tador errado.
natural_image
Diagram of a mechanical device with an inset showing a close-up of a component (no text or symbols visible)natural_image
Diagram of a mechanical device with internal components and directional arrows, no readable text or symbols present.natural_image
Diagram of a mechanical device with internal components and a magnified inset showing a detail (no text or symbols)text_image
110 ± 2 cmnatural_image
Illustration of a vacuum cleaner with a magnified view showing the handle and base (no text or symbols)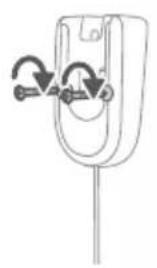
natural_image
Diagram of a mechanical component with curved arrows indicating rotation or force (no text or symbols)natural_image
Diagram of a car seatbelt with an attached device and its magnified view showing the seatbelt detail (no text or symbols present)natural_image
Diagram of a handheld device with a close-up inset showing a tool interacting with a mechanical component (no text or symbols present)natural_image
Illustration of a tool emitting powder into a tip, with no visible text or symbolsnatural_image
Illustration of a hand using a tool to press or install a component, with no visible text or symbols.text_image
100° ON OFF ①text_image
Diagram illustrating electric field lines around a positively charged battery, showing N and E poles with corresponding electric field symbols.natural_image
Illustration of a person using a vacuum cleaner to clean floor, with motion arrows indicating movement (no text or symbols)natural_image
Illustration of a mechanical component and a circular green symbol with crosshair (no text or labels)text_image
Safety warning illustration showing a person using a vacuum cleaner to clean water, with an orange warning symbol and red X mark.natural_image
Illustration of an eye with warning symbols (anxiety, red X) and a rolled-up object, no text present.natural_image
Illustration of a hand pouring liquid into a green plastic sheet with a faucet in the background (no text or symbols)natural_image
Illustration of a green mechanical component with a paper holder and a magnified inset showing its paper being inserted (no text or symbols present)
text_image
MAX 50 °Cnatural_image
Diagram of a mechanical component with a green handle and arrow indicating direction (no text or symbols)natural_image
Illustration of a mechanical component being inserted into a base, showing a downward arrow (no text or symbols present)natural_image
Illustration of a person using a green vacuum cleaner to clean or stand (no text or symbols present)text_image
Illustration showing a person using a vacuum cleaner with a red X mark indicating the absence of the device.text_image
Safety warning illustration showing a person using a vacuum cleaner with a red X mark indicating water residue, accompanied by an orange warning symbol.natural_image
Illustration of a handheld device with a handle and screen, positioned above a horizontal line (no text or symbols)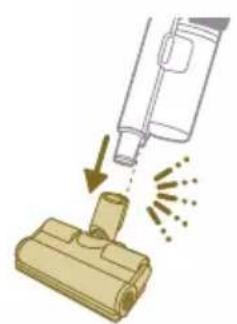
natural_image
Illustration of a spray bottle dispensing liquid into a cylindrical container with motion lines indicating spray (no text or symbols)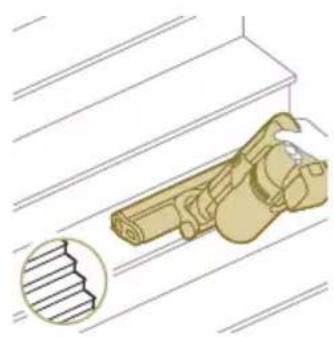
natural_image
Illustration of a mechanical device with a magnified inset showing a stepped component (no text or symbols)natural_image
Illustration of a spiderweb manipulation technique showing step-by-step steps (no text or symbols)
natural_image
Illustration of a soldering iron being dispensed from a tip, with no text or symbols present.
natural_image
Line drawing of a hand holding a pen writing on a laptop (no text or symbols present)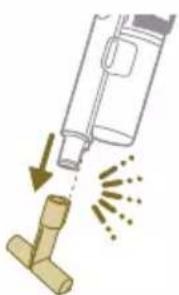
natural_image
Illustration of a spray bottle dispensing liquid into a pipe with motion arrows indicating spray (no text or symbols)
natural_image
Diagram showing a gas cylinder connected to a mechanical device with a magnified inset of a cylindrical component (no text or symbols)natural_image
Circular icon with a lightbulb symbol and radiating lines, no text or symbols present.text_image
Diagram showing three lightbulb icons and three cleaner clips, with a green checkmark indicating a completed item.natural_image
Circular icon with a stylized mechanical or electrical symbol, no readable text or numbers present.
text_image
Diagram showing four different states of a device with icons and labels, including a checkmark icon.natural_image
Gray circular button with a white lowercase 'i' in the center, no additional text or symbols.text_image
01234 12:34 PHILIPS XC7851, XC7856 XC7857, XC8055 XC8057 www.philips.com/ mycordlessvacuum-8000s
natural_image
Circular button with a white up-turn arrow icon (no text or symbols)Return (Revenire)
text_image
Diagram of a remote control device with labeled buttons and a green checkmark indicating actiontext_image
Diagram showing a mechanical device with labeled parts and directional arrows indicating motion or assembly.natural_image
Illustration of a mechanical device with a green checkmark indicating a correct assembly (no text or symbols present)text_image
Diagram illustrating a mechanical device with a magnified inset showing a detail of a component being inserted into a slot.
text_image
Diagram illustrating a chemical process with labeled steps and a magnified view showing a reaction or separation step.
natural_image
Illustration of a green mechanical component with an arrow indicating upward motion, and a magnified inset showing a document or folder (no text or symbols present)natural_image
Illustration of a pipette dispensing liquid into a green surface (no text or symbols)natural_image
Illustration of a green mechanical component with a blue cylindrical base and circular end, no text or symbols present.natural_image
Diagram showing a device with a green component and a green base, connected by directional arrows (no text or symbols)natural_image
Illustration of a green plastic container being inserted into a blue cylindrical component (no text or symbols)natural_image
Illustration of a mechanical device with a warning icon and hanging clothes (no text or symbols)natural_image
Close-up of a beige remote control with a black dial and circular button (no text or symbols visible)text_image
Diagram illustrating a lock mechanism with labeled steps and directional arrows, likely illustrating a mechanical or electrical process.natural_image
Diagram showing a container with a lid and a magnified inset of its interior (no text or symbols)natural_image
Illustration of two gold coins pouring liquid into a container with scattered particles (no text or symbols)text_image
Diagram illustrating a medical procedure with labeled steps and a checkmark indicating a validation or confirmation point.natural_image
Illustration of a hand holding a dark object with liquid droplets (no text or symbols)
text_image
24 hrsnatural_image
Illustration of a faucet pouring liquid into a container with swirling flow lines (no text or symbols)natural_image
Illustration of a hand cleaning a wooden notebook (no text or symbols)natural_image
Illustration of a hand pressing down on a mechanical component with an inset showing the close-up of a device (no text or symbols present)
natural_image
Illustration of a mechanical device with a lever and handle, showing a force or motion indicator (no text or symbols present)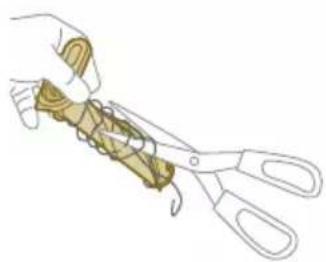
natural_image
Illustration of a hand using scissors to cut a piece of wood (no text or symbols present)
natural_image
Mechanical assembly diagram showing a lever mechanism with an inset close-up of the component (no text or symbols)natural_image
Illustration of a hand using a tool to lift a component, showing motion and wear (no text or symbols)natural_image
Simple line drawing of a mechanical component with rotational arrows (no text or symbols)text_image
Diagram of a hand holding a device with labeled parts and directional arrows indicating movement or operation.natural_image
Illustration of hands tying a knot around a wooden object with a directional arrow (no text or symbols)text_image
Diagram showing a hand holding a device with labeled parts, including arrows and text annotations.natural_image
Illustration of a box containing a coin with an upward arrow, symbolizing growth or direction (no text or symbols present)XV1681/01
Rola periei CP0667/01

natural_image
Diagram of a mechanical component inside a transparent housing, showing a rolled part being inserted (no text or symbols)CP0667/01
natural_image
Pure 3D diagram of a rectangular block with a green internal channel and a small arrow pointing to it (no text or symbols)XV1670/02
natural_image
Simple line drawing of a cylindrical object with a green arrow pointing downward (no text or symbols)CP0381/01
natural_image
Warning symbol with exclamation mark inside a red circle (no text or numbers)pasă a aparatului.
natural_image
Circular icon with a grid pattern inside, enclosed in a golden border (no text or symbols)natural_image
Circular icon with a document symbol and a question mark, no text or numbers present.dusă adecvat.
natural_image
Circular black button with a white rectangular symbol at center, no text or numbers visiblenatural_image
Diagram of a mechanical device with an inset showing a close-up of a component (no text or symbols visible)natural_image
Diagram of a mechanical device with internal components and directional arrows, no readable text or symbols present.natural_image
Diagram of a mechanical device with internal components and a magnified inset showing a detail (no text or symbols)text_image
110 ± 2 cmnatural_image
Illustration of a vacuum cleaner with a magnified view showing the handle and base (no text or symbols)
natural_image
Diagram of a mechanical component with curved arrows indicating motion or force direction (no text or symbols)natural_image
Diagram showing a device with a lock and a magnified view of its internal structure (no text or symbols)natural_image
Diagram of a handheld device connected to a wire, with an inset showing a mechanical component (no text or symbols present)natural_image
Illustration of a soldering iron being inserted into a tip, showing the process (no text or symbols)natural_image
Illustration of a hairdryer being inserted into a device (no text or symbols)text_image
100° ON OFF ①text_image
Diagram illustrating electric field lines around a positively charged conductor with labeled poles and current direction indicatorsnatural_image
Illustration of a person using a vacuum cleaner to lift a person's leg (no text or symbols present)natural_image
Illustration of a mechanical component with a circular symbol containing a green cross and number 5, set on a grid background (no text or symbols)text_image
Safety warning illustration showing a hand using a vacuum cleaner to clean water, with an orange warning symbol and a red X mark.natural_image
Illustration of an eye with warning symbols (anxiety, red X) and a rolled-up object, no text present.natural_image
Illustration of a hand pouring liquid into a green rectangular container with a handle, no text or symbols present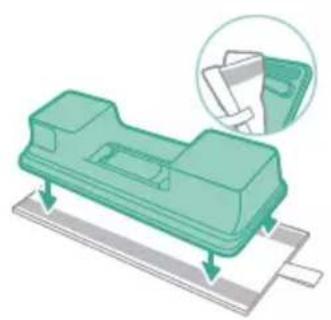
natural_image
Illustration of a green plastic mechanical component with a magnified inset showing a folded paper or sheet (no text or symbols)
text_image
MAX 50 °Cnatural_image
Diagram of a mechanical component with a green handle and arrow indicating direction (no text or symbols)natural_image
Illustration of a mechanical component being inserted into a base, showing a downward arrow (no text or symbols present)natural_image
Illustration of a person using a vacuum cleaner to clean or stand (no text or symbols present)text_image
Illustration showing a person using a vacuum cleaner with a red X mark indicating the absence of any text or symbols.
text_image
Safety warning illustration showing a person using a vacuum cleaner with a red 'X' indicating water release, accompanied by an orange warning symbol.natural_image
Illustration of a handheld device with a handle and screen, positioned above a horizontal line (no text or symbols)natural_image
Illustration of a spray gun dispensing liquid into a rubber block with motion lines indicating spray (no text or symbols)natural_image
Illustration of a mechanical device with a highlighted section showing a grooved surface (no text or symbols present)natural_image
Illustration of a spiderweb manipulation technique showing step-by-step steps (no text or symbols)natural_image
Illustration of a soldering iron being dispensed from a tip, with no text or symbols present.natural_image
Line drawing of a hand holding a pen writing on a laptop (no text or symbols present)natural_image
Illustration of a spray bottle dispensing liquid into a pipe with motion arrows indicating spray (no text or symbols)natural_image
Diagram showing a gas cylinder connected to a mechanical device with a magnified inset of a cylindrical component (no text or symbols)natural_image
Circular icon with a lightbulb symbol and radiating lines, no text or symbols present.Modifikoni nivelin e ndriçimit
text_image
Diagram showing three lightbulb icons and three cleaner clips, with a green checkmark indicating selection.natural_image
Circular icon with a white lightning bolt symbol and green checkmark, no text or numbers present.
text_image
Diagram showing four different mechanical or electrical component states with icons and labels, including a checkmark icon.
natural_image
Gray circular button with a white lowercase 'i' in the center, no additional text or symbols.natural_image
Circular button with a white up-turn arrow icon (no text or symbols)Kthimi
text_image
Diagram of a remote control device with labeled buttons and a green checkmark indicating actiontext_image
Diagram showing a mechanical device with labeled parts and directional arrows indicating motion or assembly.natural_image
Illustration of a mechanical device with a green checkmark indicating a correct assembly (no text or symbols present)natural_image
Illustration of a pipette dispensing liquid into a green plastic sheet (no text or symbols)natural_image
Illustration of a green mechanical component with a blue base and circular end, no text or symbols presentnatural_image
Diagram showing a printer with green components and directional arrows, no text or symbols presentnatural_image
Illustration of a green mechanical component with a blue base and circular hole, no text or symbols presentnatural_image
Illustration of a mechanical device with a warning icon and hanging clothes (no text or symbols)natural_image
Close-up of a beige remote control with a black dial and circular button (no text or symbols visible)text_image
Diagram illustrating a lock mechanism with labeled steps and directional arrows, likely illustrating a mechanical or electrical process.natural_image
Diagram showing a container with a lid and a magnified inset of its interior (no text or symbols)natural_image
Illustration of two hands pouring liquid into a container with granular material (no text or symbols)text_image
Diagram illustrating a medical procedure with labeled steps and a checkmark indicating a validation or confirmation point.
natural_image
Illustration of a hand holding a sponge with water droplets (no text or symbols)
text_image
24 hrs
natural_image
Illustration of a pipe bag with water flowing through it, showing fluid flow (no text or symbols)
natural_image
Illustration of a hand cleaning a wooden notebook (no text or symbols)natural_image
Illustration of a hand using a tool to lift a component, showing motion and wear (no text or symbols)natural_image
Illustration of a mechanical lever with rotational arrows indicating clockwise motion (no text or symbols)text_image
Diagram of a hand holding a device with labeled parts and directional arrows indicating movement or operation.natural_image
Illustration of hands tying a knot around a wooden object (no text or symbols)text_image
Diagram showing a hand holding a device with labeled parts, including numbered callouts (① and ②) indicating different states or functions.natural_image
Illustration of a green plastic component with a blue anchor and a small circular mark on a surface (no text or symbols)natural_image
Illustration of a green cylindrical object with two arrows pointing upward, placed on a rectangular base (no text or symbols)natural_image
Illustration of a medical procedure with a blue needle inserted into a green surgical gasket (no text or symbols)natural_image
Technical line drawing of a mechanical component with green and gray parts, no text or symbols presentnatural_image
Illustration of a box containing a coin with an upward arrow, symbolizing growth or direction (no text or symbols present)XV1681/01
Ruli i furçës CP0667/01
natural_image
Diagram of a mechanical component inside a transparent housing, showing a rolled part being inserted (no text or symbols)CP0667/01
natural_image
Isometric illustration of a rectangular block with a green internal component, no text or symbols present.XV1670/02
natural_image
Simple line drawing of a cylindrical object with a green arrow pointing downward (no text or symbols)CP0381/01
Sinjali Kuptimi i sinjalit
E1 Keqfu

natural_image
Warning symbol with exclamation mark inside a red circle (no text or numbers)jes.
Sinjali Kuptimi i sinjalit
Sinjali Kuptimi i sinjalit
natural_image
Diagram of a mechanical device with an inset showing a close-up of a component (no text or symbols visible)natural_image
Diagram of a mechanical device with internal components and directional arrows, no readable text or symbols present.natural_image
Diagram of a mechanical device with internal components and a magnified inset showing a detail (no text or symbols)text_image
110 ± 2 cm4 Dobro pritrdite stenski nosilec na želeno mesto na steni in poskrbite, da bodo luknje za vijake približno 110 cm od tal.
natural_image
Illustration of a vacuum cleaner with a magnified view showing the handle and base (no text or symbols)
natural_image
Diagram of a U-shaped device with directional arrows indicating rotation or movement (no text or symbols)natural_image
Diagram of a car seatbelt device with an inset showing the impact of welding (no text or symbols present)natural_image
Diagram of a handheld device with a close-up inset showing a tool interacting with a mechanical component (no text or symbols present)natural_image
Illustration of a soldering iron being inserted into a tip, showing the tip and tip with radiating lines (no text or symbols)natural_image
Illustration of a hairdryer being inserted into a device (no text or symbols)text_image
100° ON OFF ①1 Za vklop aparata pritisnite gumb za vklop/izklop.
i Opomba: Za izklop aparata ponovno pritisnite gumb za vklop/izklop.

text_image
Diagram illustrating electric field lines between positive and negative charges, with labeled components and corresponding electric current illustrations.natural_image
Illustration of a person using a vacuum cleaner to lift a floor, with arrows indicating motion (no text or symbols)natural_image
Illustration of a wooden tool and a green circular symbol on a grid background (no text or symbols)text_image
Safety warning illustration showing a person using a vacuum cleaner to clean water, with an orange warning symbol and red X mark indicating no hazard.natural_image
Illustration of an eye with warning symbols (anxiety, red X) and a rolled document, no text presentnatural_image
Illustration of a pipette dispensing liquid into a green plastic sheet, with water flowing out (no text or symbols)2 Mikrovlaknasto blazinico za mokro brisanje pritrdite pod posodo z vodo. Poravnajte ježke pod posodo za vodo in na spodnji strani krpe.
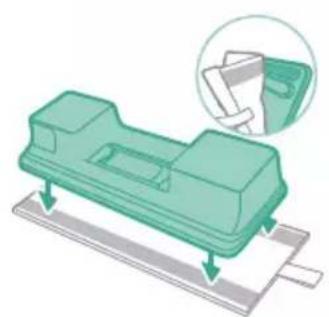
natural_image
Illustration of a green plastic mechanical component with a magnified inset showing its assembly (no text or symbols)
text_image
MAX 50 °C3 Posodo napolnite z vodo, katere temperatura ne sme presegati 50 °C.
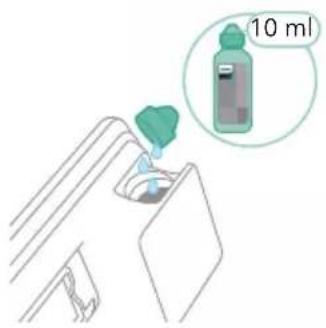
text_image
10 mlnatural_image
Diagram of a mechanical component with a green handle and arrow indicating direction (no text or symbols)natural_image
Illustration of a mechanical component being inserted into a base, showing a downward arrow indicating insertion (no text or symbols present)natural_image
Illustration of a green vacuum cleaner with motion arrows indicating airflow or movement, standing on a human figure (no text or symbols)text_image
Illustration showing a person using a vacuum cleaner with a red X mark indicating no need, accompanied by an inset image of a hand holding a vacuum cleaner.text_image
Safety warning illustration showing a person using a vacuum cleaner with a red X mark indicating water release, accompanied by an orange warning symbol.A Opozorilo: Mokrega modula se ne sme uporabljati za sesanje lužic.
natural_image
Illustration of a handheld device with a handle and screen, partially visible against a plain background (no text or symbols)natural_image
Illustration of a spray gun dispensing liquid into a rubber block with motion lines indicating spray (no text or symbols)Uporaba nastavka
natural_image
Illustration of a mechanical component with a magnified inset showing a grooved surface (no text or symbols)natural_image
Illustration of a spray gun dispensing liquid into a cylindrical container with motion lines indicating spray (no text or symbols)text_image
Illustration showing three steps of cleaning a bed using a tool, with magnified views of the bed and cat.natural_image
Illustration of a soldering iron being inserted into a tip, showing powder dispersion (no text or symbols)natural_image
Illustration of a fuel injector with a cylindrical tank and a magnified inset showing a cylindrical component (no text or symbols)Uporaba kombiniranega nastavka
1 Kombinirani nastavek pritrdite tako, da vanj vstavite cev ali ročno enoto.
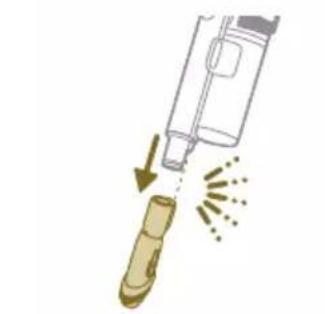
natural_image
Illustration of a hand holding a pen or tool with arrows indicating motion (no text or symbols)natural_image
Illustration of four steps of a spiderweb manipulation technique, showing hand positioning and wire handling (no text or symbols)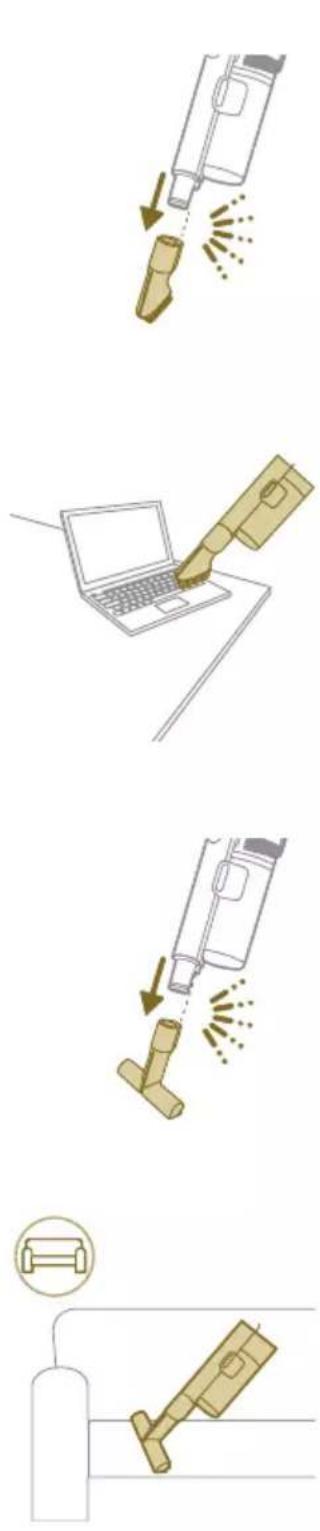
text_image
Illustration showing a step-by-step procedure for using a laser gun, with steps from tip to end.natural_image
Gray circular icon with a white lightbulb symbol and radiating lines, representing an idea or illumination (no text or symbols)text_image
Diagram showing three lighting icons and a cleaning tool with a green checkmark, alongside a circular badge with a number 3.natural_image
Circular icon with a white mechanical component and green leaf symbol (no text or numbers)
text_image
Diagram showing four different mechanical or electrical component states with icons and labels, including a checkmark icon.natural_image
Gray circular button with a white lowercase 'i' in the center, no additional text or symbols.
text_image
01234 12:34 PHILIPS XCT053, XCT055 XCT057, XCB055 XCB057 www.philips.com/ mycnrolleetsvacuum-8000s
Vrnitev
natural_image
Circular button with a white curved arrow icon, no text or symbols present.
text_image
Diagram of a remote control device with directional pad, control buttons, and a green checkmark indicating action.text_image
Diagram showing a device with labeled parts and directional arrows, likely illustrating a mechanical or electrical component.natural_image
Illustration of a mechanical device with a green checkmark indicating selection (no text or symbols present)natural_image
Illustration of a pipette dispensing liquid into a green plastic sheet (no text or symbols)2 Mikrovlaknasto blazinico za mokro brisanje izperite pod tekočo vodo in jo operite ročno ali v pralnem stroju.

natural_image
Illustration of a green mechanical component with a blue base and circular end (no text or symbols)3 Iz posode za vodo izlijte morebitno preostalo vodo.

text_image
MAX 50 °C4 Posodo za vodo napolnite z vodo.

natural_image
Diagram showing a printer with green components and directional arrows, no text or symbols presentnatural_image
Illustration of a green mechanical component with a blue base and circular hole, no text or symbols presentnatural_image
Illustration of a mechanical device with a warning icon and hanging clothes (no text or symbols)7 Pazite, da med shranjevanjem ne izgubite pokrovčka posode. Mikrovlaknasto blazinico za mokro brisanje obesite, da se posuši.
natural_image
Close-up of a beige remote control with a black dial and circular button (no text or symbols visible)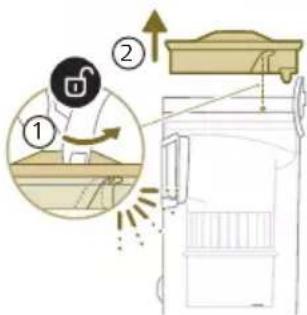
text_image
Diagram illustrating a lock mechanism with labeled steps and directional arrows, likely illustrating a mechanical or electrical process.1 Filter obrnite v levo in ga odstranite iz posode za prah.
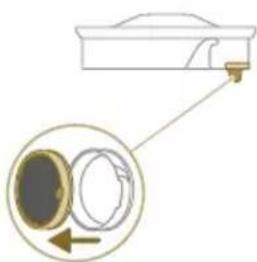
natural_image
Diagram showing a container with a lid and a magnified inset of its interior (no text or symbols)natural_image
Illustration of two gold coins pouring liquid into a container with scattered particles (no text or symbols)3 Ohišje filtra in penasti filter stresite nad smetnjakom.

text_image
Diagram illustrating foot positioning with a checkmark and red X mark indicating incorrect positioning, showing foot positioning on a platform.4 Izpirajte in ožemajte penasti filter, dokler iz njega ne priteče čista voda.
natural_image
Illustration of a hand holding a sponge with water droplets (no text or symbols)5 Oprani filter pustite sušiti 24 ur, preden ga znova vstavite v ohišje filtra.

text_image
24 hrsnatural_image
Illustration of a pipe bag with water flowing through it, showing fluid flow (no text or symbols)natural_image
Illustration of a hand cleaning a wooden notebook (no text or symbols)
A Opozorilo: Preden ponovno sestavite dele, pazite, da so vsi popolnoma suhi.
natural_image
Illustration of a hand pressing down on a mechanical component with an inset showing the close-up of a device (no text or symbols present)natural_image
Illustration of a hand holding a car seatbelt with an arrow indicating motion (no text or symbols)3 Previdno odstranite vrtljivo krtačo in stranski pokrovček nastavka.

natural_image
Illustration of a hand using scissors to cut a piece of wood (no text or symbols present)natural_image
Mechanical assembly diagram showing a lever mechanism with an inset close-up of the component (no text or symbols)5 Pri ponovnem sestavljanju poskrbite, da bo vrtljiva krtača pravilno poravnana.

natural_image
Illustration of a hand using a tool to interact with a device, showing motion and vibration (no text or symbols)natural_image
Illustration of a mechanical component with rotational arrows indicating motion (no text or symbols)text_image
Diagram of a mechanical device with numbered parts and directional arrows indicating motion or assembly.2 Potisnite stranski gumb, da sprostite krtačo iz položaja.
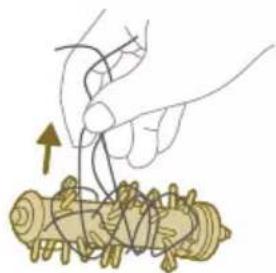
natural_image
Illustration of hands tying a knot around a wooden object (no text or symbols)text_image
Diagram showing a hand holding a device with labeled parts, including numbered annotations ① and ②.natural_image
Illustration of a green mechanical component pouring liquid into a blue cylindrical object (no text or symbols)natural_image
Diagram of a green rod inserted into a transparent container with two tubes, no text or symbols presentnatural_image
Illustration of a medical procedure with a blue surgical tool inserted into tissue, placed on a green medical strip (no text or symbols)natural_image
Technical line drawing of a mechanical component with two green arrows indicating assembly or force direction (no text or symbols)natural_image
Illustration of a box containing a coin with an upward arrow, symbolizing growth or accumulation (no text or symbols present)XV1681/01
Vrtljiva krtača CP0667/01

natural_image
Diagram of a mechanical component inside a transparent housing, showing a rolled part being inserted (no text or symbols)CP0667/01
Mikrovlaknasta blazinica za mokro brisanje XV1670/02

natural_image
Isometric illustration of a rectangular block with a green internal component, no text or symbols present.XV1670/02
natural_image
Simple line drawing of a cylindrical object with a green arrow pointing downward (no text or symbols)CP0381/01
i Opomba: Filter in mikrovlaknasto blazinico za mokro brisanje zamenjajte vsakih 6 mesecev, da zagotovite optimalno delovanje aparata.
natural_image
Warning symbol with exclamation mark inside a black circle (no text or numbers)Odstranite baterijo, počakajte 10 sekund in jo spet vstavite. Če to ne deluje, aparat odnesite na Philipsov pooblaščeni servis ali se obrnite na center za pomoč uporabnikom.
Signal Pomen signala
natural_image
Circular icon with a grid pattern inside, no text or symbols presentnatural_image
Circular icon with a document symbol and a question mark, no text or labels present.stavljena.
Odstranite baterijo in jo nato znova vstavite. Če to ne deluje, aparat odnesite na Philipsov pooblaščeni servis ali se obrnite na center za pomoč uporabnikom.
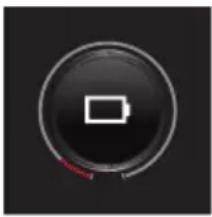
natural_image
Circular black button with a white rectangular symbol at center, no text or numbers visiblenatural_image
Diagram of a mechanical device with an inset showing a close-up of a component (no text or symbols visible)natural_image
Diagram of a mechanical device with internal components and directional arrows, no readable text or symbols present.natural_image
Diagram of a mechanical device with internal components and a magnified inset showing a detail (no text or symbols)3 Zatvorte sivú páku. Podl'a počutelného cvaknutia sa uistite, že sivá páka je na svojom mieste.
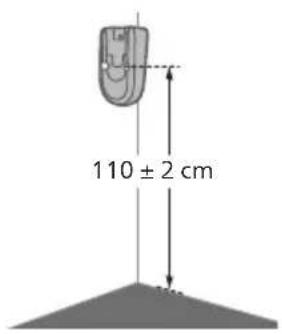
text_image
110 ± 2 cmnatural_image
Illustration of a vacuum cleaner with a close-up view showing the component (no text or symbols present)
natural_image
Simple line drawing of a mechanical component with arrows indicating motion or force (no text or symbols)natural_image
Diagram showing a device with a lock and a magnified view of its internal components (no text or symbols)natural_image
Diagram of a handheld device with a cable and connector, showing a magnified inset of its internal structure (no text or symbols present)natural_image
Illustration of a soldering iron being inserted into a tip, showing the process (no text or symbols)natural_image
Illustration of a hairdryer being placed on a device with motion lines indicating emission (no text or symbols)2 Pripojte trubicu k hubici. Pripojenie overte podla počutelného cvaknutia.
text_image
100° ON OFF ①text_image
Diagram illustrating electric field lines around a positively charged battery, showing N and E poles with corresponding electric field symbols.natural_image
Illustration of a person using a vacuum cleaner to lift a floor, with motion arrows indicating movement (no text or symbols)natural_image
Illustration of a mechanical component with a green circular symbol and a magnified inset showing a dollar sign (no text or symbols present)text_image
Safety warning illustration showing a person using a vacuum cleaner to clean water, with an orange warning symbol and red X mark indicating no need.Varovanie: Nevysávajte vodu ani iné kvapaliny.

natural_image
Illustration of an eye with warning symbols (anxiety, red X) and a rolled document, no text present.natural_image
Illustration of a hand pouring liquid into a green rectangular container with a handle, no text or symbols present
natural_image
Illustration of a green plastic mechanical component with a magnified inset showing a folded paper or sheet (no text or symbols)
text_image
MAX 50 °C3 Naplňte nádobu vodou. Teplota vody nesmie presiahnuť 50 °C.

text_image
10 mlnatural_image
Diagram of a mechanical component with a green handle and arrow indicating direction (no text or symbols)5 Pevne nádobu na vodu uzavrite.

natural_image
Illustration of a mechanical component being inserted into a base, showing a downward arrow (no text or symbols present)natural_image
Illustration of a person using a vacuum cleaner to clean or stand (no text or symbols present)text_image
Illustration showing a person using a vacuum cleaner with a red X mark indicating the absence of the device.
text_image
Safety warning illustration showing a person using a vacuum cleaner with a red 'X' indicating water residue, accompanied by an orange warning symbol.natural_image
Illustration of a handheld device with a handle and screen, positioned above a horizontal line (no text or symbols)Varovanie: Nech použijete akékolvek príslušenstvo, nevysávajte vodu ani iné tekutiny.
natural_image
Illustration of a spray gun dispensing liquid into a rubber block with motion lines indicating spray (no text or symbols)Používanie hubice
1 Hubicu pripojte priamo k ručnému vysávaču.
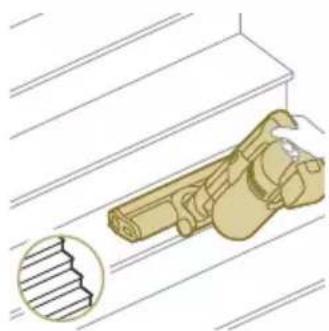
natural_image
Illustration of a mechanical device with a highlighted section showing a grooved surface (no text or symbols present)natural_image
Illustration of a spiderweb manipulation technique showing step-by-step steps (no text or symbols)natural_image
Illustration of a soldering iron being dispensed from a tip, with no text or symbols present.natural_image
Line drawing of a hand holding a pen writing on a laptop (no text or symbols present)natural_image
Illustration of a spray bottle dispensing liquid into a pipe with an arrow indicating flow (no text or symbols)natural_image
Diagram showing a gas cylinder connected to a mechanical device with a magnified inset of a cylindrical component (no text or symbols)natural_image
Gray circular icon with a white lightbulb symbol (no text or numbers)Zmena jasu osvetlenia
text_image
Diagram showing three lightbulb icons and a clean cleaner, with a green checkmark indicating it is checked.
natural_image
Circular icon with a stylized white arrow and green checkmark, no text or symbols present.text_image
Diagram showing four different states of a device control interface with icons and labels, including a checkmark icon.natural_image
Gray circular button with a white lowercase 'i' in the center, no additional text or symbols.

Návrat
natural_image
Circular button with a white up-turn arrow icon (no text or symbols)
text_image
Diagram of a remote control device with labeled buttons and a green checkmark indicating actionPo použití – údržba
text_image
Diagram showing a mechanical device with labeled parts and directional arrows indicating motion or assembly.natural_image
Illustration of a mechanical device with a green checkmark indicating selection (no text or symbols present)text_image
Diagram illustrating a mechanical device with a magnified cross-section showing internal components and a downward arrow indicating motion or assembly.
text_image
Diagram illustrating a chemical process with labeled steps and a magnified view showing a reaction or separation step.
natural_image
Green mechanical component with an arrow indicating upward movement, partially enclosed in a circular inset showing a folder (no text or symbols visible)3 Uchopte čiernu rukovát. Vytiahnutím vyberte cyklón z nádoby na prach.
natural_image
Illustration of a pipette dispensing liquid into a green plastic sheet (no text or symbols)2 Opláchnite mopovaciu podušku pod tečúcou vodou a vyperte ju v ruke alebo v práčke.

natural_image
Illustration of a green mechanical component with a blue base and circular end, no text or symbols presentnatural_image
Diagram showing a printer with green components and directional arrows, no text or symbols presentnatural_image
Illustration of a green mechanical component with a blue base and circular hole, no text or symbols presentnatural_image
Illustration of a mechanical device with a warning icon and hanging clothes (no text or symbols)7 Dajte si pozor, aby ste počas skladovania nestratili veko nádoby. Mopovaciu podušku z mikrovlákna zaveste a nechajte uschnút.
natural_image
Close-up of a beige remote control with a black dial and circular button (no text or symbols visible)text_image
Diagram illustrating a lock mechanism with labeled steps and directional arrows, likely illustrating a mechanical or electrical process.natural_image
Diagram showing a container with a lid and a magnified inset of its interior (no text or symbols)natural_image
Illustration of two hands pouring liquid into a container with scattered particles (no text or symbols)text_image
Diagram illustrating foot movement with a checkmark and red X mark, showing foot positioning and movement pathnatural_image
Illustration of a hand holding a dark object with water droplets (no text or symbols)
text_image
24 hrs5 Umytý filter nechajte 24 hodín schnút a až potom znovu nasad'te penový filter do puzdra filtra.
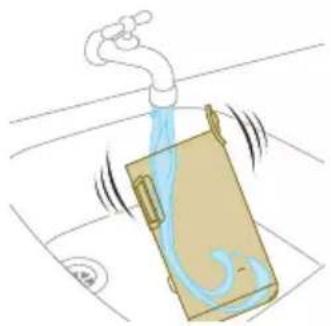
natural_image
Illustration of a faucet spraying water onto a box, with motion lines indicating fluid flow (no text or symbols)natural_image
Illustration of a hand cleaning a rectangular object with a cloth (no text or symbols)natural_image
Illustration of a hand using a tool to lift a component, showing motion and wear (no text or symbols)6 Uzamknite valček kefy hubice utahovaním, kým nebudete počut cvaknutie.

natural_image
Illustration of a mechanical lever with rotational arrows indicating clockwise motion (no text or symbols)text_image
Diagram of a hand holding a device with labeled parts, showing mechanical components and directional arrows.natural_image
Illustration of hands connecting a mechanical component with a spring (no text or symbols)text_image
Diagram showing a hand holding a device with labeled parts, including numbered callouts (① and ②) indicating different components or states.natural_image
Illustration of a box containing a coin with an upward arrow, symbolizing growth or direction (no text or symbols present)XV1681/01
Valček kefy CP0667/01

natural_image
Diagram of a mechanical component inside a transparent housing, showing a rolled part being inserted (no text or symbols)CP0667/01
Mopovacia poduška z mikrovlákna XV1670/02
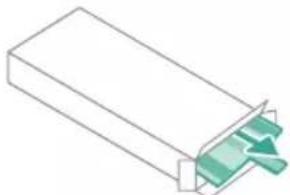
natural_image
Isometric illustration of a rectangular block with a green internal component, no text or symbols present.XV1670/02
natural_image
Simple line drawing of a cylindrical object with a green arrow pointing downward (no text or symbols)CP0381/01
i Poznámka: Filter a mopovaciu podušku z mikrovlákna vymieňajte každých 6 mesiacov, aby ste zaručili maximálny výkon.
natural_image
Warning symbol with exclamation mark inside a red circle (no text or numbers)natural_image
Diagram of a mechanical device with an inset showing a close-up of a component (no text or symbols visible)1 Okrenite zidni nosač naopačke i otkačite sivu ručicu. Postavite priključak za punjenje tako da metalni deo bude vidljiv i okrenut uspravno sa prednje strane zidnog nosača.
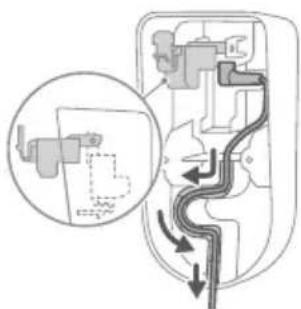
natural_image
Diagram of a mechanical device with internal components and directional arrows, no readable text or symbols present.natural_image
Diagram of a mechanical device with internal components and a magnified inset showing a detail (no text or labels)text_image
110 ± 2 cm4 Čvrsto zakačite zidni nosač na željeni položaj na zidu i uverite se da su rupe za zavrtnje za montažu na zid udaljene približno 110 cm od poda.
A Oprez: Budite oprezni prilikom bušenja rupa u zidu za pričvršćivanje zidnog nosača kako biste izbegli opasnost od strujnog udara.
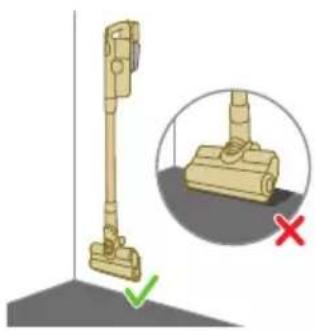
natural_image
Illustration of a vacuum cleaner with a magnified view showing the handle and base (no text or symbols)
natural_image
Diagram of a mechanical component with curved arrows indicating rotation or force (no text or symbols)i Napomena: Uverite se da postavljanje zidnog nosača omogućava celom aparatu da visi na zidu tako da mlaznica ne dodiruje pod.
5 Kada utvrdite optimalni položaj i visinu za odlaganje i punjenje aparata, čvrsto pritegnite zavrtnje kako biste učvrstili zidni nosač.
Priprema za upotrebu

natural_image
Diagram of a car seatbelt with an attached device and its magnified view showing the seatbelt detail (no text or symbols present)natural_image
Diagram of a handheld device with a close-up inset showing a tool interacting with a mechanical component (no text or symbols present)i Napomena: Možete i da postavite dršku na ravnu i stabilnu površinu i da direktno povežete kabl za punjenje sa aparatom.

text_image
6 hr 100°natural_image
Illustration of a soldering iron being inserted into a tip, showing the tip and tip with radiating lines (no text or symbols)natural_image
Illustration of a hairdryer being inserted into a device (no text or symbols)2 Spojite cev sa mlaznicom. Potvrdite spajanje tako što ćete čuti klik kada postavljate.
Usisavanje podova od mekog i tvrdog materijala
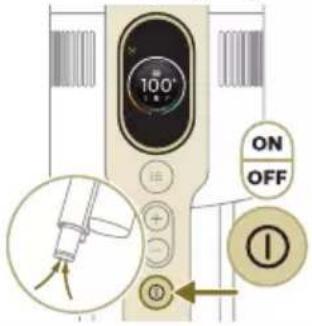
text_image
100° ON OFF ①text_image
Diagram illustrating electric field lines around a positively charged battery, showing N and E poles with corresponding electric field symbols.2 Pomoću dugmadi + i – prebacujte između tri različite postavke snage.
E – režim eco
N - normalan režim
T – režim turbo
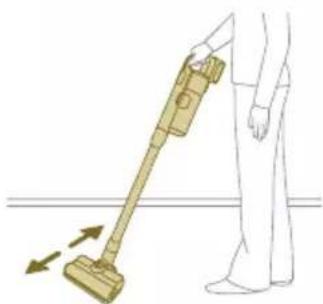
natural_image
Illustration of a person using a vacuum cleaner to lift a floor, with motion arrows indicating movement (no text or symbols)3 Usisivačem možete čistiti tvrde ili mekane podne površine.

natural_image
Illustration of a mechanical component with a green circular symbol and a magnified inset showing a dollar sign (no text or symbols present)i Sa omogućenim prepoznavanjem vrste podne površine, aparat prepoznaje tip podne površine i automatski optimizuje svoj učinak unutar podešavanja snage koje ste izabrali. Da biste onemogućili ovu funkciju, u nastavku proverite kako da prilagođavate podešavanja.
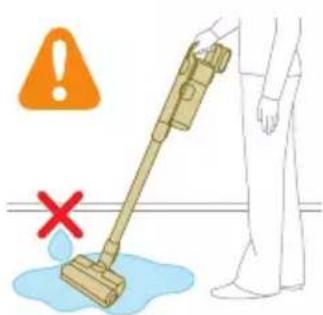
text_image
Safety warning illustration showing a person using a vacuum cleaner to clean water, with an orange warning symbol and red X mark indicating no need.Upozorenje: Nemojte usisavati vodu niti neku drugu tečnost.
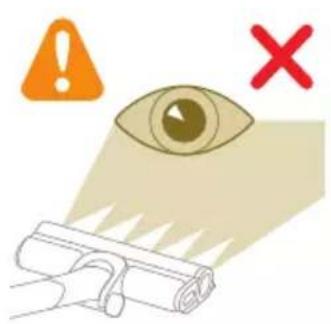
natural_image
Illustration of an eye with warning symbols (anxiety, red X) and a rolled-up object, no text present.A Oprez: Nemojte gledati direktno u uključene LED lampice niti usmeravati LED lampice u nečije oči. LED svetlo je vrlo blještavo.
Usisavanje tokom brisanja podova od tvrdog materijala
A Oprez: Rezervoar za vodu koristite samo na tvrdim podovima s vodootpornom površinom (kao što su linoleum, pločice ili lakirani parket) i kamenim podovima (kao što je mermer). Ako vaš pod nije tretiran da postane vodootporan, proverite sa proizvođačem da li možete da koristite vodu za njegovo čišćenje. Nemojte da koristite rezervoar za vodu na tvrdim podovima na kojima je vodootporni sloj oštećen.
i Napomena: Nemojte da koristite rezervoar za vodu za čišćenje tepiha.
i Napomena: Aparat sa montiranim rezervoarom za vodu ne pomerajte bočno, pošto to može da ostavi tragove vode. Pomerajte je samo napred ili nazad.
1 Pre upotrebe prvo pokvasite uložak za čišćenje od mikrovlakana.
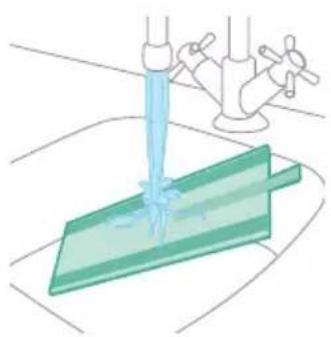
natural_image
Illustration of a hand pouring liquid into a green plastic sheet with a faucet in the background (no text or symbols)2 Pričvrstite uložak za čišćenje od mikrovlakana ispod rezervoara za vodu. Poravnajte čičak trake ispod rezervoara za vodu iza krpe.

natural_image
Illustration of a green mechanical component with a paper holder and a magnified inset showing a document (no text or symbols present)
text_image
MAX 50 °C3 Napunite rezervoar vodom, pazeći da temperatura vode ne prelazi 50°C.
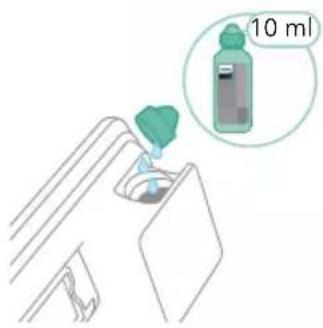
text_image
10 mlnatural_image
Diagram of a mechanical component with a green pin inserted into a housing (no text or symbols)natural_image
Illustration of a mechanical component being inserted into a base, showing a downward arrow (no text or symbols present)natural_image
Illustration of a person using a vacuum cleaner to clean or stand (no text or symbols present)text_image
Illustration showing a person using a vacuum cleaner with a red X mark indicating the absence of any text or symbols.i Napomena: Vodeni modul nije pogodan za upotrebu na mekanim podovima poput tepiha.

text_image
Safety warning illustration showing a person using a vacuum cleaner with a red 'X' symbol indicating water release.natural_image
Illustration of a handheld device with a handle and screen, partially visible against a plain background (no text or symbols)natural_image
Illustration of a spray gun dispensing liquid into a rubber block with motion lines indicating spray (no text or symbols)Korišćenje mlaznice
natural_image
Illustration of a wooden mechanical component with a magnified inset showing a textured surface (no text or symbols)natural_image
Illustration of a spiderweb manipulation technique showing step-by-step steps (no text or symbols)2 Kombinovani nastavak je dizajniran za čišćenje okvira prozora, zavesa ili paučine, sa prilagodljivim otpuštanjem četke i podešavanjima osvetljenja.

natural_image
Illustration of a soldering iron being dispensed from a tip, with arrows indicating motion (no text or symbols)natural_image
Line drawing of a hand holding a pen writing on a laptop (no text or symbols present)2 Mekana četka je dizajnirana za namenske površine i poseduje prilagodljivo osvetljenje.

natural_image
Illustration of a spray bottle dispensing liquid into a pipe with motion arrows indicating spray (no text or symbols)Upotreba nastavka za tapacirani nameštaj
1 Za pričvršćivanje nastavka za tapacirani nameštaj, umetnite u njega cev ili dršku.

natural_image
Diagram showing a gas cylinder connected to a mechanical device with a magnified inset of a cylindrical component (no text or symbols)2 Nastavak za tapacirani nameštaj je idealan za čišćenje nameštaja mekom krpom, a njegovo osvetljenje možete podesiti prema svom nahođenju.
natural_image
Gray circular icon with a white lightbulb symbol (no text or numbers)Izmena jačine osvetljenosti
Pritisnite dugme menija i krećite se do funkcije osvetljenja. Potvrdite ponovnim pritiskanjem dugmeta menija.
Da biste izmenili jačinu osvetljenja, krećite se kroz dostupne nivoe i potvrdite pritiskom na dugme menija.
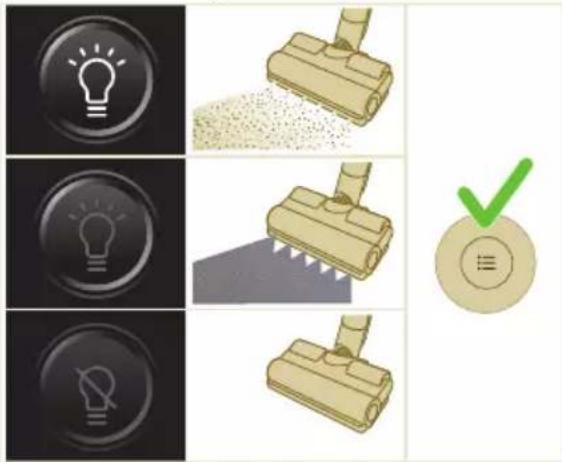
text_image
Diagram showing three lightbulb icons and three cleaner clips, with a green checkmark indicating a confirmation or status.Prepoznavanje vrste poda
Pritisnite dugme menija i krećite se do prepoznavanja vrste poda. Potvrdite ponovnim pritiskanjem dugmeta menija.
U ekranu za prepoznavanje vrste poda, krećite se kroz ovu funkciju i potvrdite odluku pritiskom na dugme menija. Kada je uspešno omogućeno, zelena ikona će se pojaviti u gornjem levom uglu ekrana nakon što se vratite na glavni ekran.

natural_image
Circular icon with a stylized white arrow and green checkmark, no text or symbols present.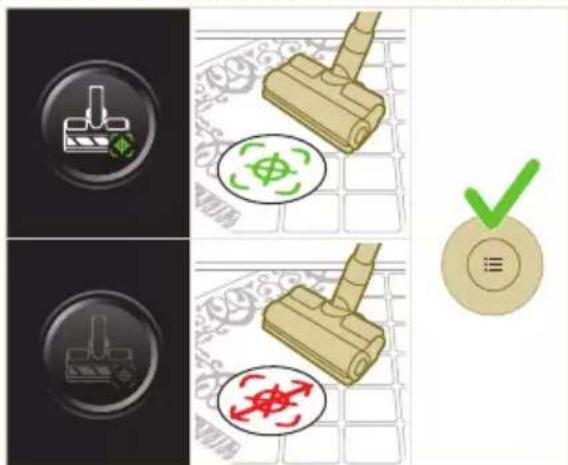
text_image
Diagram showing four different states of a device control interface with icons and labels, including a checkmark icon.i Napomena: Prepoznavanje vrste poda može biti omogućeno ili onemogućeno samo kada je motorizovana mlaznica spojena za dršku. Kao rezultat toga, kada

natural_image
Gray circular button with a white lowercase 'i' in the center, no additional text or symbols.motorizovana mlaznica nije spojena za glavni aparat, u meniju će se nalaziti jedna stavka manje. Pričvrstite motorizovanu mlaznicu kako biste videli ovu stavku za prepoznavanje vrste poda u meniju.
i Napomena: Kada dobijete uređaj, prepoznavanje vrste poda je omogućeno.
i Napomena: Funkcija prepoznavanja vrste poda postaje aktivna kada mlaznica tokom kretanja identifikuje različite vrste podnih površina.
Dodatne informacije
Pritisnite dugme menija i krećite se do opcije „dodatne informacije“. Potvrdite ponovnim pritiskanjem dugmeta menija.
Na ekranu „dodatne informacije“ možete proveriti ispravnost filtera, ispravnost baterije, ukupno vreme korišćenja, model aparata i pristupiti QR kodu za dodatne informacije na internetu.

text_image
01234 12:34 PHILIPS XC7853, XC7856 XC7857, XC8056 XC8057 www.philips.com/ mycordlessvacuum-8000sVraćanje
natural_image
Circular button with a white up-turn arrow icon (no text or symbols)
text_image
Diagram of a remote control device with directional pad, control buttons, and a green checkmark indicating action.Nakon korišćenja – Održavanje
text_image
Diagram showing a mechanical device with labeled parts and directional arrows, including numbered annotations ① and ②.natural_image
Illustration of a mechanical device with a green checkmark indicating selection (no text or symbols present)i Napomena: Izvadite posudu za prašinu držeći aparat u uspravnom položaju.

natural_image
Illustration of a pipette dispensing liquid onto a green surface (no text or symbols)2 Isperite i uložak za čišćenje ispod česme i ga operite ga ručno ili u mašini za pranje veša.

natural_image
Illustration of a green mechanical component with a blue base and circular end, no text or symbols presentnatural_image
Diagram showing a printer with green components and directional arrows, no text or symbols present5 Pravilno zatvorite rezervoar za vodu i protresite ga kako biste uklonili ostatke deterdženta.

natural_image
Illustration of a green mechanical component with a blue screw and base, no text or symbols present6 Ispraznite rezervoar za vodu i ostavite da otvorenog da se osuši.

natural_image
Illustration of a mechanical device with a warning icon and hanging fabric (no text or symbols)7 Uverite se da čep nije odvrnut tokom odlaganja. Okačite uložak za čišćenje od mikrovlakana da se osuši.
Povremeno održavanje
Održavanje sistema za prikupljanje prašine

natural_image
Close-up of a beige remote control with a black dial and circular button (no text or symbols visible)text_image
Diagram illustrating a lock mechanism with labeled steps and directional arrows, likely illustrating a mechanical or electrical process.1 Okrenite filter u smeru suprotnom od kretanja kazaljke na satu da biste ga odvojili od posude za prašinu.

natural_image
Diagram showing a container with a lid and a magnified inset of its interior (no text or symbols)natural_image
Illustration of two hands pouring liquid into a container with granular material (no text or symbols)3 Istresite kućište filtera i filter od pene iznad korpe za otpatke.

text_image
Diagram illustrating foot positioning with a checkmark and red X mark, showing foot positioning on a platform4 Ispirajte filter od pene i istisnite ga sve dok čista voda ne počne da izlazi.
i Napomena: za najbolje rezultate čišćenja, neka voda curi kroz filter tako da jezičak filtera bude okrenut nadole, kako bi se isprala prašina koja je prodrla duboko.

natural_image
Illustration of a hand holding a sponge with water droplets (no text or symbols)5 Ostavite oprani filter da se suši 24 sata pre nego što ponovo sklopite filter od pene u kućište filtera.

text_image
24 hrs6 Za temeljno održavanje, očistite posudu za prašinu i ciklonsku komoru pod mlazom tekuće vode ili u toploj vodi sa sapunicom.

natural_image
Illustration of a pipe bag with water flowing through it, showing fluid flow (no text or symbols)natural_image
Illustration of a hand cleaning a wooden door (no text or symbols)
natural_image
Illustration of a hand pressing down on a mechanical component with an inset showing the close-up of a device (no text or symbols present)
natural_image
Illustration of a mechanical device with a lever and handle, showing a force or motion indicator (no text or symbols present)
natural_image
Illustration of a hand using scissors to cut a piece of wood (no text or symbols present)
natural_image
Mechanical assembly diagram showing a lever mechanism with an inset close-up of the component (no text or symbols)Održavanje PrecisionPower pametne mlaznice
1 Uvek isključite aparat pre nego čišćenja valjkaste četke mlaznice.
2 Da biste pristupili valjkastoj četki, pronadite dugme sa strane mlaznice. Pritisnite ga i okrenite da biste otvorili.
3 Nežno skinite valjkastu četku i bočni poklopac mlaznice.
4 Pažljivo otkačite svu zapetljanu kosu sa valjkaste četke. Makazama možete olakšati uklanjanje prljavštine.
5 Prilikom ponovnog sklapanja, uverite se da je valjkasta četka pravilno poravnata.
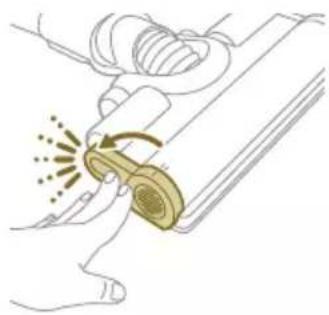
natural_image
Illustration of a hand using a tool to lift a component, showing motion and wear (no text or symbols)natural_image
Simple line drawing of a mechanical component with rotational arrows (no text or symbols)text_image
Diagram of a hand holding a device with labeled parts and directional arrows indicating movement or operation.natural_image
Illustration of hands tying a knot around a wooden object (no text or symbols)3 Rukama ili makazama uklonite svu prljavštinu sa četke.
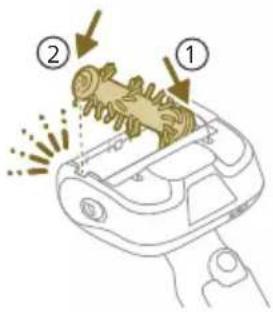
text_image
Diagram showing a hand holding a device with labeled parts, including arrows and spray effects4 Prilikom ponovnog sklapanja četke, počnite tako što ćete postaviti jednu stranu u položaj pre nego što zakačite drugu stranu. Kada je četka pravilno sklopljena, čućete zvuk klika.
natural_image
Illustration of a plastic bottle pouring liquid into a beaker with a funnel and water bottle nearby (no text or symbols)natural_image
Illustration of a beaker pouring liquid from a piping bag into a water bottle, next to a vertical container with a faucet (no text or symbols)2 Dodajte odgovarajuću količinu vode u posudu za merenje.
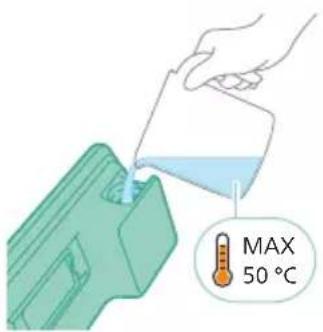
text_image
MAX 50 °Cnatural_image
Diagram showing a mechanical device with a green component and a green base, both without any text or symbols.4 Pravilno zatvorite rezervoar za vodu pre nego što ga protresete kako bise tečnost za uklanjanje kamenca ravnomerno rasporedila.
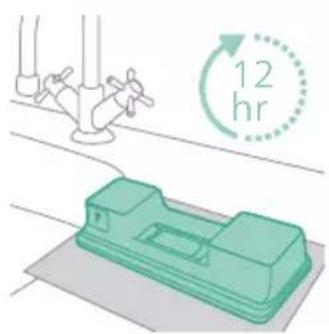
text_image
12 hr5 Ostavite rezervoar za vodu (bez uloška za čišćenje od mikrovlakana) u uspravnom položaju 12 sati. Očekuje se da voda polako curi iz donjeg dela rezervoara za vodu. Preporučujemo da postavite rezervoar za vodu u lavabo ili na krpu.
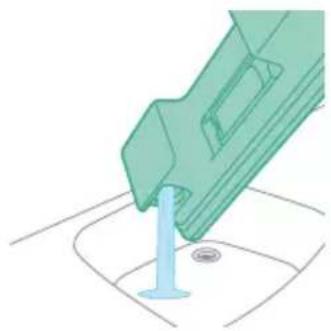
natural_image
Illustration of a green mechanical component pouring liquid into a blue cylindrical object (no text or symbols)6 Isperite i uklonite preostalu tečnost u rezervoaru za vodu.
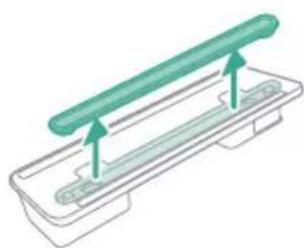
natural_image
Illustration of a green cylindrical object with two arrows pointing upward, placed on a rectangular base (no text or symbols)natural_image
Illustration of a medical procedure with a blue surgical tool inserted into a green medical strip (no text or symbols)2 Isperite traku za vodu pod mlazom vode.
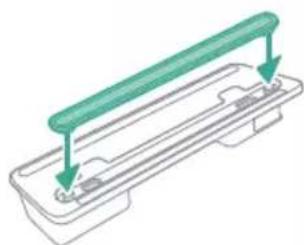
natural_image
Technical line drawing of a mechanical component with two green arrows indicating direction (no text or symbols)3 Nakon čišćenja vratite traku za vodu u rezervoar za vodu.
Zamena
natural_image
Illustration of a box containing a coin with an upward arrow, symbolizing growth or direction (no text or symbols present)XV1681/01
Rotaciona četka CP0667/01

natural_image
Diagram of a mechanical component inside a transparent housing, showing a rolled part being inserted (no text or symbols)CP0667/01
natural_image
Isometric illustration of a rectangular block with a green internal component, no text or symbols present.XV1670/02
Traka za vodu CP0381/01

natural_image
Simple line drawing of a cylindrical object with a green arrow pointing downward (no text or symbols)CP0381/01
natural_image
Warning symbol with exclamation mark inside a black circle (no text or numbers)natural_image
Circular icon with a grid pattern inside, no text or symbols presentOčistite filter. Pratite uputstva na ekranu ili iz korisničkog priručnika. Nove filtere možete da kupite u Philips prodavnici na mreži na adresi www.philips.com/support ili kod zastupnika kompanije Philips.
i10 Bate

natural_image
Circular icon with a document symbol and a question mark, no text or labels present.umetnuta.
Izvadite bateriju, a zatim vratite bateriju. Ako to ne funkcioniše, odnesite aparat u servisni centar kompanije Philips ili se obratite centru za korisničku podršku.

natural_image
Circular black button with a white battery symbol at center, no text or numbers visibleNivo baterije je nizak i treba da se napuni. Napunite aparat ili bateriju putem predloženog načina punjenja.
Rešavanje problema
U ovom poglavlju su u kratkim crtama navedeni najčešći problemi sa kojima možete da se susretnete dok koristite aparat. Ukoliko ne možete da rešite problem pomoću liste mogućih problema u nastavku, posetite www.philips.com/support da biste pronašli listu najčešćih pitanja ili se obratite centru za korisničku podršku u svojoj zemlji.
Suvo čišćenje
natural_image
Diagram of a mechanical device with an inset showing a close-up of a component (no text or symbols visible)natural_image
Diagram of a mechanical device with internal components and directional arrows, no readable text or symbols present.natural_image
Diagram of a mechanical device with internal components and a magnified inset showing a detail (no text or symbols)text_image
110 ± 2 cmnatural_image
Illustration of a vacuum cleaner with a magnified view showing the handle and base (no text or symbols)
natural_image
Diagram of a U-shaped device with directional arrows indicating rotation or movement (no text or symbols)natural_image
Diagram showing a car seatbelt with a camera and a magnified inset illustrating the impact of light on the seatbelt (no text or symbols present)natural_image
Illustration of a hairdryer with a magnified inset showing the tool tip (no text or symbols present)natural_image
Illustration of a soldering iron being inserted into a tip, with no text or symbols present.natural_image
Illustration of a hand using a tool to press or install a component, with no visible text or symbols.text_image
100° ON OFF ①text_image
Diagram showing electric field lines between a positively charged battery and three labeled terminals (T, N, E) with corresponding electric current icons.natural_image
Illustration of a person using a vacuum cleaner to lift a floor, with arrows indicating motion (no text or symbols)natural_image
Illustration of a wooden tool and a green circular symbol on a grid background (no text or symbols)text_image
Safety warning illustration showing a person using a vacuum cleaner to clean water, with an orange warning symbol and red X mark indicating no need.natural_image
Illustration of an eye with warning symbols (anxiety, red X) and a rolled-up object, no text present.natural_image
Illustration of a hand pouring liquid into a green plastic sheet with a faucet in the background (no text or symbols)natural_image
Illustration of a green plastic mechanical component with arrows indicating assembly or movement, and a magnified inset showing a document (no text or symbols present)
text_image
MAX 50 °Cnatural_image
Diagram of a car intake manifold with a green sensor or sensor mounted on the intake (no text or symbols)natural_image
Illustration of a mechanical component being inserted into a base, showing a downward arrow indicating insertion (no text or symbols present)natural_image
Illustration of a person using a green vacuum cleaner to clean or stand (no text or symbols present)text_image
Illustration showing a person using a vacuum cleaner with a red X mark indicating the absence of any text or symbols.text_image
Safety warning illustration showing a person using a vacuum cleaner with a red 'X' symbol indicating water release or damage.natural_image
Illustration of a handheld device with a handle and screen, positioned above a horizontal line (no text or symbols)natural_image
Illustration of a spray gun dispensing liquid into a rubber block with motion lines indicating spray (no text or symbols)natural_image
Illustration of a mechanical device with a highlighted section showing a textured surface (no text or symbols)natural_image
Illustration of a spiderweb manipulation technique showing step-by-step steps (no text or symbols)natural_image
Illustration of a soldering iron being dispensed from a tip, with no text or symbols present.natural_image
Line drawing of a laptop with a pen writing on it, no text or symbols presentnatural_image
Illustration of a spray bottle dispensing liquid into a pipe with motion arrows indicating spray (no text or symbols)natural_image
Diagram showing a gas cylinder connected to a mechanical device with a magnified inset of a cylindrical component (no text or symbols)natural_image
Gray circular icon with a white lightbulb symbol and radiating lines, representing an idea or illumination (no text or symbols)text_image
Diagram showing three lighting icons and a checkmark, likely illustrating cleaning or anti-smoking concepts.natural_image
Circular icon with a stylized white arrow and green checkmark, no text or symbols present.
text_image
Diagram showing four different types of electrical switch symbols and a green checkmark, likely illustrating circuit or safety measures.natural_image
Gray circular button with a white lowercase 'i' in the center, no additional text or symbols.
text_image
01234 12:34 PHILIPS XCF76-1, XCF76-2, XCF76-3, XCF8657 XCF8657 www.philips.com/ mycardlessvacuum-8000s
Palaa
natural_image
Circular button with a white up-turn arrow icon (no text or symbols)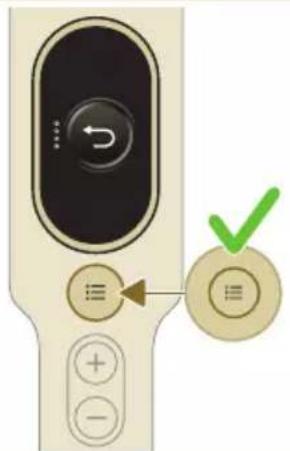
text_image
Diagram of a remote control device with directional pad, navigation buttons, and a green checkmark indicating action.text_image
Diagram illustrating a mechanical device with labeled parts and directional arrows indicating motion or assembly.natural_image
Illustration of a vacuum cleaner with a green checkmark indicating the correct handle (no text or symbols present)text_image
Diagram illustrating a mechanical device with a magnified cross-section showing internal components and a downward arrow indicating motion or assembly.
text_image
Diagram illustrating a chemical process with labeled steps and a magnified view showing a reaction or separation step.
natural_image
Green mechanical component with a paper holder and paper stack, showing a lifting operation (no text or symbols)natural_image
Illustration of a pipette dispensing liquid into a green plastic sheet (no text or symbols)natural_image
Illustration of a green mechanical component with a blue screw and circular base (no text or symbols)natural_image
Diagram showing a printer with green components and directional arrows, no text or symbols presentnatural_image
Illustration of a green mechanical component with a blue screw and base, no text or symbols presentnatural_image
Illustration of a mechanical device with a warning icon and hanging clothes (no text or symbols)natural_image
Close-up of a beige remote control with a black dial and circular button (no text or symbols visible)text_image
Diagram illustrating a lock mechanism with labeled steps and directional arrows, likely illustrating a mechanical or electrical process.natural_image
Diagram showing a container with a lid and a magnified inset of its interior (no text or symbols)natural_image
Illustration of two hands pouring liquid into a container with granular material (no text or symbols)text_image
Diagram illustrating a medical procedure with labeled steps and a checkmark indicating a validation or confirmation point.natural_image
Illustration of a hand holding a dark object with liquid droplets (no text or symbols)
text_image
24 hrsnatural_image
Illustration of a pipe bag with blue liquid being compressed, emitting steam (no text or symbols)natural_image
Illustration of a hand cleaning a rectangular object with a cloth (no text or symbols)natural_image
Illustration of a hand using a tool to lift a component, showing motion and wear (no text or symbols)natural_image
Illustration of a mechanical lever with rotational arrows indicating clockwise motion (no text or symbols)Miniturboharjan kunnossapito
text_image
Diagram of a hand holding a device with labeled parts and directional arrows indicating movement or operation.natural_image
Illustration of hands tying a knot around a wooden object (no text or symbols)text_image
Diagram showing a hand holding a device with labeled parts, including numbered callouts (① and ②) indicating different states or functions.natural_image
Illustration of a box containing a coin with an upward arrow, symbolizing growth or direction (no text or symbols present)XV1681/01
Harjarulla CP0667/01

natural_image
Diagram of a mechanical component inside a transparent housing, showing a rolled part being inserted (no text or symbols)CP0667/01
Mikrokuitumoppi XV1670/02

natural_image
Isometric illustration of a rectangular block with a green internal component, no text or symbols present.XV1670/02
Vesiliuska CP0381/01

natural_image
Simple line drawing of a cylindrical object with a green arrow pointing downward (no text or symbols)CP0381/01
natural_image
Warning symbol with exclamation mark inside a red circle on black background (no text or numbers)iö.
natural_image
Circular icon with a grid pattern inside, no text or symbols presentnatural_image
Circular icon with a document symbol and a question mark, no text or labels present.natural_image
Circular black button with a white battery symbol at center, no text or numbers presentwww.philips.com/mycordlessvacuum-7000s.
Allmän beskrivning
1 Digital skärm
natural_image
Diagram of a mechanical device with an inset showing a close-up of a component (no text or symbols visible)natural_image
Diagram of a mechanical device with internal components and directional arrows, no readable text or symbols present.natural_image
Diagram of a mechanical device with internal components and a magnified inset showing a detail (no text or labels)text_image
110 ± 2 cmnatural_image
Illustration of a vacuum cleaner with a magnified view showing the handle and base (no text or symbols)
natural_image
Diagram of a U-shaped device with directional arrows indicating rotation or movement (no text or symbols)natural_image
Diagram showing a car seatbelt with a device and a magnified inset illustrating the seatbelt structure (no text or symbols present)natural_image
Illustration of a hairdryer with a magnified inset showing the tool tip (no text or symbols present)natural_image
Illustration of a soldering iron being inserted into a tip, with no text or symbols presentnatural_image
Illustration of a hairdryer being inserted into a device (no text or symbols)text_image
100° ON OFF ①text_image
Diagram illustrating electric field lines around a positively charged battery, showing N and E poles with corresponding electric field symbols.natural_image
Illustration of a person using a vacuum cleaner to lift a floor, with motion arrows indicating movement (no text or symbols)natural_image
Illustration of a mechanical component with a green circular symbol and a magnified inset showing a dollar sign (no text or symbols present)text_image
Safety warning illustration showing a person using a vacuum cleaner to clean water, with an orange warning symbol and red X mark indicating no need.natural_image
Illustration of an eye with warning symbols (anxiety, red X) and a rolled document, no text presentnatural_image
Illustration of a pipette dispensing liquid into a green plastic sheet, with two water pumps in the background (no text or symbols)natural_image
Illustration of a green plastic mechanical component with a magnified inset showing its assembly (no text or symbols)
text_image
MAX 50 °Cnatural_image
Diagram of a mechanical component with a green arrow indicating direction, no text or symbols presentnatural_image
Technical illustration of a mechanical component being inserted into a base plate (no text or symbols)natural_image
Illustration of a person using a vacuum cleaner to interact with another person (no text or symbols present)text_image
Illustration showing a person using a vacuum cleaner with a red X mark indicating the absence of the device.
text_image
Safety warning illustration showing a person using a vacuum cleaner with a red 'X' symbol indicating water residue.natural_image
Illustration of a handheld device with a handle and screen, positioned above a horizontal line (no text or symbols)natural_image
Illustration of a spray gun dispensing liquid into a rubber block with motion lines indicating spray (no text or symbols)Använda munstycket
natural_image
Illustration of a mechanical device with a highlighted section showing a grooved surface (no text or symbols present)natural_image
Illustration of a spiderweb manipulation technique showing step-by-step steps (no text or symbols)natural_image
Illustration of a soldering iron being dispensed from a tip, with no text or symbols present.natural_image
Line drawing of a hand holding a pen writing on a laptop (no text or symbols present)natural_image
Illustration of a spray gun emitting powder from a wooden tool (no text or symbols)natural_image
Diagram showing a gas cylinder connected to a mechanical device with a magnified inset of a cylindrical component (no text or symbols)natural_image
Circular icon with a lightbulb symbol and radiating lines, no text or symbols present.text_image
Diagram showing three lightbulb icons and three cleaner clips, with a green checkmark indicating selection.
natural_image
Circular icon with a white lightning bolt symbol and green leaf, no text or numbers present.text_image
Diagram showing four different mechanical or electrical component states with icons and labels, including a checkmark icon.
natural_image
Gray circular button with a white lowercase 'i' in the center, no additional text or symbols.natural_image
Circular button with a white curved arrow icon, no text or symbols present.Retur
text_image
Diagram of a remote control device with labeled buttons and a green checkmark indicating actiontext_image
Diagram showing a hairbrush mechanism with labeled parts and directional arrows indicating movement or flow.natural_image
Illustration of a mechanical device with a green checkmark indicating selection (no text or symbols present)natural_image
Illustration of a pipette dispensing liquid onto a green surface (no text or symbols)natural_image
Illustration of a green mechanical component with a blue rod inserted into a base, no text or symbols presentnatural_image
Diagram showing a device with a green component and a green mechanical part, both without any text or symbols.natural_image
Illustration of a green mechanical component with a blue screw and mounting base (no text or symbols)natural_image
Illustration of a mechanical device with a warning icon and hanging clothes (no text or symbols)natural_image
Close-up of a beige remote control with a black dial and circular button (no text or symbols visible)text_image
Diagram illustrating a lock mechanism with labeled steps and directional arrows, likely illustrating a mechanical or electrical process.natural_image
Diagram showing a container with a lid and a magnified inset of its interior (no text or symbols)natural_image
Illustration of two hands pouring liquid into a container with granular material (no text or symbols)text_image
Diagram illustrating a medical procedure with labeled steps and a checkmark indicating a validation or confirmation point.
natural_image
Illustration of a hand holding a sponge with water droplets (no text or symbols)
text_image
24 hrs
natural_image
Illustration of a faucet spraying water onto a box with motion lines indicating flow (no text or symbols)
natural_image
Illustration of a hand cleaning a wooden notebook (no text or symbols)natural_image
Illustration of a hand using a tool to lift a component, showing motion and wear (no text or symbols)natural_image
Illustration of a mechanical lever with rotational arrows indicating clockwise motion (no text or symbols)text_image
Diagram of a hand holding a device with labeled parts and directional arrows indicating movement or operation.natural_image
Illustration of hands tying a knot around a wooden object (no text or symbols)text_image
Diagram showing a hand holding a device with labeled parts, including numbered callouts (① and ②) indicating different states or functions.natural_image
Illustration of a green plastic component with a blue anchor and a small circular mark on a surface (no text or symbols)natural_image
Illustration of a green cylindrical object with two arrows pointing upward, placed on a rectangular base (no text or symbols)natural_image
Illustration of a medical procedure with a pipette inserted into a green surgical gauze (no text or symbols)natural_image
Technical line drawing of a mechanical component with green and gray parts, no text or symbols presentnatural_image
Illustration of a box containing a coin with an upward arrow, no text or symbols presentXV1681/01
Borstenhet CP0667/01

natural_image
Diagram of a mechanical component inside a transparent housing, showing a rolled part being inserted (no text or symbols)CP0667/01
Mikrofibermoppdyna XV1670/02
natural_image
Isometric illustration of a rectangular block with a green internal component, no text or symbols present.XV1670/02
Vattendoserare CP0381/01
natural_image
Simple line drawing of a cylindrical object with a green arrow pointing downward (no text or symbols)CP0381/01
natural_image
Warning symbol with exclamation mark inside a red circle (no text or numbers)nte.
natural_image
Diagram of a mechanical device with internal components and an inset showing a close-up view of a component (no text or symbols present)natural_image
Diagram of a mechanical device with internal components and directional arrows, no text or symbols presentnatural_image
Cross-sectional diagram of a mechanical device with internal components and an inset showing a zoomed-in section (no text or labels)text_image
110 ± 2 cmnatural_image
Illustration of a vacuum cleaner with a magnified view showing the handle and base (no text or symbols)
natural_image
Diagram of a U-shaped device with directional arrows indicating rotation or movement (no text or symbols)natural_image
Diagram of a car seatbelt with an attached device and its magnified view showing the seatbelt detail (no text or symbols present)natural_image
Diagram of a handheld device with a close-up inset showing a tool interacting with a mechanical component (no text or symbols present)natural_image
Illustration of a soldering iron being inserted into a tip, showing the tip and tip with radiating lines (no text or symbols)natural_image
Illustration of a hairdryer being inserted into a device (no text or symbols)text_image
100° ON OFF ①text_image
Diagram illustrating electric field lines between positive and negative charges, with labeled components and corresponding electric current illustrations.natural_image
Illustration of a person using a vacuum cleaner to lift a floor, with arrows indicating motion (no text or symbols)natural_image
Illustration of a wooden tool and a circular green symbol on a grid background (no text or symbols)text_image
Safety warning illustration showing a person using a vacuum cleaner to clean water, with an orange warning symbol and a red X mark indicating no hazard.natural_image
Illustration of an eye with warning symbols (anxiety, red X) and a rolled-up object, no text present.natural_image
Illustration of a hand pouring liquid into a green rectangular container with a faucet in the background (no text or symbols)natural_image
Illustration of a green mechanical component with arrows indicating force or movement, and an inset magnified view showing a document (no text or symbols present)
text_image
MAX 50 °Cnatural_image
Diagram of a mechanical component with a green handle and arrow indicating direction (no text or symbols)natural_image
Illustration of a mechanical component being inserted into a base, showing a downward arrow (no text or symbols present)natural_image
Illustration of a person using a vacuum cleaner to clean or stand (no text or symbols present)text_image
Illustration showing a person using a vacuum cleaner with a red X mark indicating no change, accompanied by an inset image of a hand holding a vacuum cleaner.text_image
Safety warning illustration showing a person using a vacuum cleaner with a red X mark indicating water leakage, accompanied by an orange warning symbol.natural_image
Illustration of a handheld device with a pointed tip and handle, emitting exhaust smoke (no text or symbols)natural_image
Illustration of a spray gun dispensing liquid into a rubber pad (no text or symbols)Sử dụng đầu phun
natural_image
Illustration of a mechanical device with a cross-section view showing a grooved surface (no text or symbols)natural_image
Illustration of a spiderweb manipulation technique showing step-by-step steps (no text or symbols)natural_image
Illustration of a soldering iron being dispensed from a tip, with no text or symbols present.natural_image
Line drawing of a hand holding a pen writing on a laptop (no text or symbols present)natural_image
Illustration of a spray gun emitting powder from a wooden tool (no text or symbols)natural_image
Diagram showing a gas cylinder connected to a mechanical device with a magnified inset of a cylindrical component (no text or symbols)natural_image
Gray circular icon with a white lightbulb symbol and radiating lines, representing an idea or illumination (no text or symbols)text_image
Diagram showing three lightbulb icons and three cleaner clips, with a green checkmark indicating selection.Nhận dạng loại sàn
natural_image
Circular icon with a stylized mechanical or electrical component symbol, no text or labels present.
text_image
Diagram showing four different mechanical or electrical component states with icons and labels, including a checkmark icon.
natural_image
Gray circular button with a white lowercase 'i' in the center, no additional text or symbols.natural_image
Circular button with a white up-turn arrow icon (no text or symbols)Quay lại
text_image
Diagram of a remote control device with labeled buttons and a green checkmark indicating actiontext_image
Diagram showing a hairbrush mechanism with labeled parts and directional arrows indicating movement or flow.natural_image
Illustration of a mechanical device with a green checkmark indicating selection (no text or symbols present)natural_image
Illustration of a pipette dispensing liquid into a green tiled surface (no text or symbols)natural_image
Illustration of a green mechanical component with a blue cylindrical base and circular end (no text or symbols)natural_image
Diagram showing a device with a green component and a green base, connected by directional arrows (no text or symbols)natural_image
Illustration of a green mechanical component with a blue screw and base, no text or symbols presentnatural_image
Illustration of a mechanical device with a warning icon and hanging fabric (no text or symbols)natural_image
Close-up of a beige remote control with a black dial and circular button (no text or symbols visible)text_image
Diagram illustrating a lock mechanism with labeled steps and directional arrows, likely illustrating a mechanical or electrical process.natural_image
Diagram showing a container with a lid and a magnified inset of its interior (no text or symbols)natural_image
Illustration of two hands pouring liquid into a container with granular material (no text or symbols)text_image
Diagram illustrating foot positioning with a checkmark and red X mark indicating incorrect positioning, showing foot positioning on a platform.natural_image
Illustration of a hand holding a sponge with water droplets (no text or symbols)natural_image
Illustration of a faucet spraying water onto a box with motion lines indicating flow (no text or symbols)natural_image
Illustration of a hand cleaning a wooden door (no text or symbols)
natural_image
Illustration of a hand pressing down on a mechanical component with an inset showing the close-up of a device (no text or symbols present)natural_image
Illustration of a hand holding a car seatbelt with an arrow indicating motion (no text or symbols)natural_image
Illustration of a hand using scissors to cut a piece of wood (no text or symbols present)natural_image
Mechanical assembly diagram showing a lever mechanism with an inset close-up of the component (no text or symbols)natural_image
Illustration of a hand using a tool to interact with a device, showing motion and vibration (no text or symbols)natural_image
Illustration of a mechanical component with rotational arrows indicating motion (no text or symbols)text_image
Diagram of a robotic arm with labeled parts and directional arrows indicating movement or forcenatural_image
Illustration of hands tying a knot around a wooden object with a directional arrow (no text or symbols)text_image
Diagram showing a hand holding a device with labeled parts, including arrows and spray effects.natural_image
Illustration of a water being poured into a beaker with a plastic bottle nearby (no text or symbols)
natural_image
Illustration of a beaker with liquid being inverted by a funnel, next to a water bottle and a wall-mounted faucet (no text or symbols)natural_image
Diagram showing a device with a green component and a green device with directional arrows, intersected by a diagonal line (no text or symbols)natural_image
Illustration of a green mechanical component pouring liquid into a blue cylindrical object (no text or symbols)natural_image
Illustration of a green cylindrical object with two arrows pointing upward, placed on a rectangular base (no text or symbols)natural_image
Illustration of a medical procedure with a blue surgical tool inserted into tissue, placed on a green medical strip (no text or symbols)natural_image
Technical line drawing of a mechanical component with two green arrows indicating assembly or force direction (no text or symbols)natural_image
Illustration of a box containing a coin with an upward arrow, no text or symbols presentXV1681/01
natural_image
Diagram of a mechanical component inside a transparent housing, showing a rolled part being inserted (no text or symbols)CP0667/01
natural_image
Pure 3D diagram of a rectangular block with a green internal channel and a small arrow pointing to it (no text or symbols)XV1670/02
natural_image
Simple line drawing of a mechanical component with a green arrow indicating direction (no text or symbols)CP0381/01
natural_image
Warning symbol with exclamation mark inside a red circle on dark background (no text or numbers)natural_image
Circular icon with a grid pattern inside, no text or symbols presentnatural_image
Circular icon with a document symbol and a question mark, no text or labels present.cách.
natural_image
Circular black button with a white battery symbol at center, no text or numbers presentnatural_image
Diagram of a mechanical device with an inset showing a close-up of a component (no text or symbols visible)natural_image
Diagram of a mechanical device with internal components and directional arrows, no readable text or symbols present.natural_image
Diagram of a mechanical device with internal components and a magnified inset showing a detail (no text or symbols)text_image
110 ± 2 cmnatural_image
Illustration of a vacuum cleaner with a magnified view showing the handle and base (no text or symbols)
natural_image
Diagram of a U-shaped device with directional arrows indicating rotation or movement (no text or symbols)natural_image
Diagram of a car seatbelt with an attached device and its magnified view showing the seatbelt detail (no text or symbols present)natural_image
Illustration of a hairdryer with a magnified inset showing the tool tip (no text or symbols present)natural_image
Illustration of a soldering iron being inserted into a tip, showing the process (no text or symbols)natural_image
Illustration of a hairdryer being inserted into a device (no text or symbols)text_image
100° ON OFF ①text_image
Diagram showing electric field lines between a positively charged source and three labeled blocks (N, E, 7) with corresponding schematic representations.natural_image
Illustration of a person using a vacuum cleaner to lift a person's leg (no text or symbols present)natural_image
Illustration of a mechanical component with a circular symbol containing a green cross and number 5, set against a patterned background (no text or symbols)text_image
Safety warning illustration showing a person using a vacuum cleaner to clean water, with an orange warning symbol and a red X mark.natural_image
Illustration of an eye with warning symbols (anxiety, red X) and a rolled-up object, no text present.natural_image
Illustration of a pipette dispensing liquid into a green plastic sheet, with no text or symbols present.natural_image
Illustration of a green plastic mechanical component with a magnified inset showing a folded paper sheet (no text or symbols)
text_image
MAX 50 °Cnatural_image
Diagram of a mechanical component with a green handle and arrow indicating direction (no text or symbols)natural_image
Illustration of a mechanical component being inserted into a base, showing a downward arrow (no text or symbols present)natural_image
Illustration of a person using a vacuum cleaner to clean or stand (no text or symbols present)text_image
Illustration showing a person using a vacuum cleaner with a red X mark indicating the absence of the device.
text_image
Safety warning illustration showing a person using a vacuum cleaner with a red 'X' indicating the water level, alongside an orange warning symbol.natural_image
Illustration of a mechanical device with a pointed tip and handle, emitting exhaust smoke (no text or symbols)natural_image
Illustration of a spray gun dispensing liquid into a cylindrical container with motion lines indicating spray (no text or symbols)Başlığı kullanma
natural_image
Illustration of a mechanical component with a magnified inset showing a crack (no text or symbols)natural_image
Illustration of a spiderweb manipulation technique showing step-by-step steps (no text or symbols)natural_image
Illustration of a soldering iron being dispensed from a tip, with arrows indicating motion (no text or symbols)natural_image
Line drawing of a laptop with a pen writing on it, no text or symbols presentnatural_image
Illustration of a spray bottle dispensing liquid into a pipe with motion arrows indicating spray (no text or symbols)natural_image
Diagram showing a gas cylinder connected to a mechanical device with a magnified inset of a cylindrical component (no text or symbols)natural_image
Gray circular icon with a white lightbulb symbol and radiating lines, representing an idea or illumination (no text or symbols)text_image
Diagram showing three lighting icons and a checkmark, likely illustrating cleanroom or anti-smoking concepts.Zemin Türü Tanıma
natural_image
Circular icon with a stylized white arrow and green checkmark, no text or symbols present.
text_image
Diagram showing four different mechanical or electrical component states with icons and labels, including a checkmark icon.natural_image
Gray circular button with a white lowercase 'i' in the center, no additional text or symbols.
text_image
01234 12:34 PHILIPS XCT053, XCT055 XCT057, XCT055 XG867 www.philips.com/ mycnroflessvaguum-8000s
Geri Dön
natural_image
Circular button with a white up-turn arrow icon (no text or symbols)
text_image
Diagram of a remote control device with directional pad, control buttons, and a green checkmark indicating action.text_image
Diagram showing a hairbrush mechanism with labeled parts and directional arrows indicating movement or flow.natural_image
Illustration of a mechanical device with a green checkmark indicating selection (no text or symbols present)natural_image
Illustration of a pipette dispensing liquid into a green plastic sheet (no text or symbols)natural_image
Illustration of a green mechanical component with a blue base and circular end, no text or symbols presentnatural_image
Diagram showing a printer with green components and directional arrows, no text or symbols presentnatural_image
Illustration of a green mechanical component with a blue screw and base, no text or symbols presentnatural_image
Illustration of a mechanical device with a warning icon and hanging fabric (no text or symbols)natural_image
Close-up of a beige remote control with a black dial and circular button (no text or symbols visible)text_image
Diagram illustrating a lock mechanism with labeled steps and directional arrows, likely illustrating a mechanical or electrical process.natural_image
Diagram showing a container with a lid and a magnified inset of its interior (no text or symbols)natural_image
Illustration of two hands pouring liquid into a container with granular material (no text or symbols)text_image
Diagram illustrating a medical procedure with labeled steps and a checkmark indicating a validation or confirmation point.
natural_image
Illustration of a hand holding a sponge with liquid droplets (no text or symbols)
text_image
24 hrs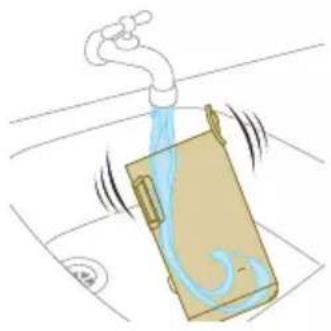
natural_image
Illustration of a faucet spraying water onto a box with motion lines indicating flow (no text or symbols)
natural_image
Illustration of a hand cleaning a wooden notebook (no text or symbols)natural_image
Illustration of a hand using a tool to lift a car tire, showing motion and wear (no text or symbols)natural_image
Illustration of a box containing a coin with an upward arrow, no text or symbols presentXV1681/01
Firça rulosu CP0667/01

natural_image
Diagram of a mechanical component inside a transparent housing, showing a rolled part being inserted (no text or symbols)CP0667/01
Mikrofiber paspaslama bezi XV1670/02
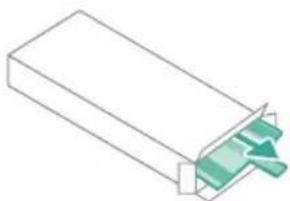
natural_image
Pure 3D diagram of a rectangular block with a green internal channel and a small arrow pointing to it (no text or symbols)XV1670/02
Su şeridi CP0381/01

natural_image
Simple line drawing of a mechanical component with a green handle and arrow indicating direction (no text or symbols)CP0381/01
natural_image
Warning symbol with exclamation mark inside a black circle (no text or numbers)natural_image
Diagram of a mechanical device with an inset showing a close-up of a component (no text or symbols visible)natural_image
Diagram of a mechanical device with internal components and directional arrows, no readable text or symbols present.natural_image
Diagram of a mechanical device with internal components and a magnified inset showing a detail (no text or symbols)text_image
110 ± 2 cmnatural_image
Illustration of a vacuum cleaner with a magnified view showing the handle and base (no text or symbols)
natural_image
Simple line drawing of a mechanical component with arrows indicating motion or force (no text or symbols)natural_image
Diagram showing a device with a lock and a magnified view of its internal components (no text or symbols)natural_image
Diagram of a mechanical device with a close-up inset showing a tool interacting with a component (no text or symbols present)natural_image
Illustration of a soldering iron being inserted into a tip, showing the process (no text or symbols)natural_image
Illustration of a hand using a tool to press or print a component, with no visible text or symbols.text_image
100° ON OFF ①text_image
Diagram illustrating electric field lines around a positively charged battery, showing current direction and component placement.natural_image
Illustration of a person using a vacuum cleaner to lift a floor, with motion arrows indicating movement (no text or symbols)natural_image
Illustration of a mechanical component with a circular green symbol and a magnified inset showing a dollar sign (no text or symbols present)text_image
Safety warning illustration showing a person using a vacuum cleaner to clean water, with an orange warning symbol and red X mark indicating no need.natural_image
Illustration of an eye with warning symbols (anxiety, red X) and a rolled document, no text presentnatural_image
Illustration of a pipette dispensing liquid into a green plastic sheet, with two washers in the background (no text or symbols)natural_image
Illustration of a green mechanical component with arrows indicating force or movement, and an inset magnified view showing a folder (no text or symbols present)
text_image
MAX 50 °Cnatural_image
Diagram of a mechanical component with a green handle and arrow indicating direction (no text or symbols)natural_image
Illustration of a mechanical component being inserted into a base, showing a downward arrow indicating insertion (no text or symbols present)natural_image
Illustration of a green vacuum cleaner with motion arrows indicating airflow, standing on a human leg (no text or symbols)text_image
Illustration showing a person using a vacuum cleaner with a red X mark indicating the absence of any text or symbols.text_image
Safety warning illustration showing a person using a vacuum cleaner with a red 'X' symbol indicating failure or absence.natural_image
Illustration of a mechanical device with a lever and base, showing motion lines (no text or symbols)natural_image
Illustration of a spray gun dispensing liquid into a rubber block with motion lines indicating spray (no text or symbols)Χρήση του πέλματος
natural_image
Illustration of a mechanical component with a highlighted section showing a grooved part (no text or symbols present)natural_image
Illustration of a hand pouring liquid into a wooden block with motion lines indicating flow (no text or symbols)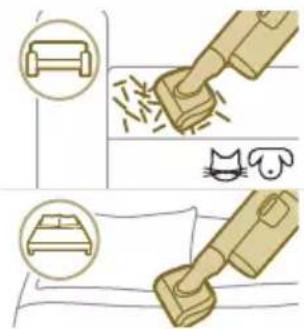
text_image
Illustration showing three-step cleaning process: bed, brush, and postnatural_image
Illustration of a soldering iron being inserted into a tip with motion lines indicating force (no text or symbols)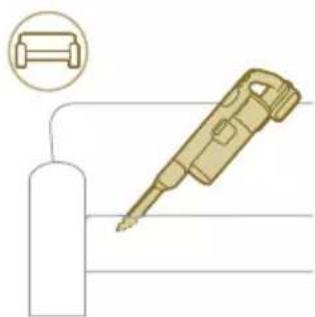
natural_image
Illustration of a gas cylinder connected to a pen-like tool, with a magnified inset showing a cylindrical component (no text or symbols)natural_image
Diagram of a mechanical device connected to a cylinder, with a magnified inset showing a cylindrical component (no text or symbols)natural_image
Gray circular icon with a white lightbulb symbol and radiating lines, representing an idea or illumination (no text or symbols)text_image
Diagram showing three lightbulb icons and a cleaning tool, with a green checkmark indicating a completed step.
natural_image
Circular icon with a stylized white arrow and green leaf symbol, no text or numbers present.text_image
Diagram showing two identical icons with a checkmark and a circular icon, illustrating a process or control mechanism.natural_image
Gray circular button with a white lowercase 'i' in the center, no additional text or symbols.
text_image
01234 12:34 PHILIPS XC7653, XC7655 XC7657, XC8055 XC8057 www.philips.com/ mycordlessvacuum-8000sΕπιστροφή
natural_image
Circular button with a white up-turn arrow icon (no text or symbols)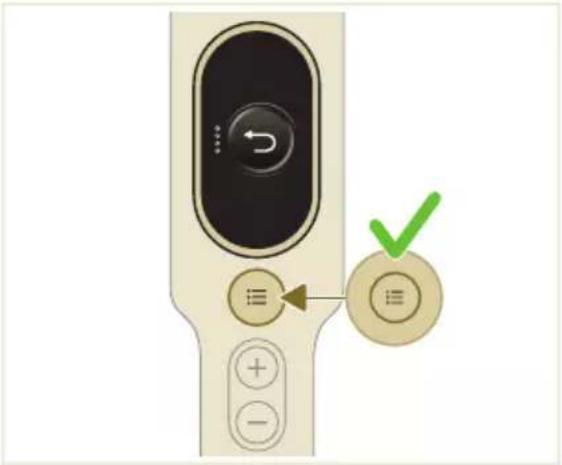
text_image
Diagram of a remote control device with labeled buttons and a green checkmark indicating actiontext_image
Diagram showing a car interior with labeled parts and directional arrows indicating movement or change.natural_image
Illustration of a vacuum cleaner with a green checkmark indicating the correct handle (no text or symbols present)natural_image
Diagram of a mechanical device with a lever and handle, showing an upward arrow (no text or symbols)natural_image
Illustration of a container pouring granular material into a cylindrical container (no text or symbols)text_image
Diagram illustrating a mechanical device with a magnified cross-section showing internal structure and force application.text_image
Diagram illustrating a chemical reaction or filtration process with labeled steps and a warning symbolnatural_image
Green mechanical component with an arrow indicating upward motion, shown with a magnified inset of its part (no text or symbols visible)natural_image
Illustration of a pipette dispensing liquid into a green plastic sheet (no text or symbols)natural_image
Illustration of a green mechanical component with a blue screw and circular base (no text or symbols)natural_image
Diagram showing a device with green components and directional arrows, no text or symbols presentnatural_image
Illustration of a green mechanical component with a blue screw and a circular base (no text or symbols)natural_image
Illustration of a cleaning or laundry system with a plastic bag, hanging clothes, and warning symbol (no text or labels)natural_image
Close-up of a handheld device control panel with a circular dial and plus button (no readable text or symbols)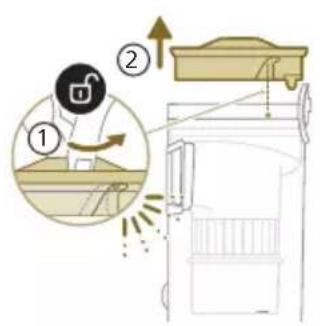
text_image
Diagram illustrating a lock mechanism with labeled steps and directional arrows, likely illustrating a mechanical or electrical process.natural_image
Diagram showing a container with a handle and a magnified view of its internal components (no text or symbols)natural_image
Illustration of two hands pouring liquid into a container with scattered particles (no text or symbols)text_image
Diagram illustrating foot movement with labeled zones and a checkmark indicating selection, including a red X symbol highlighting a specific zone.natural_image
Illustration of a hand holding a dark object with water droplets falling (no text or symbols)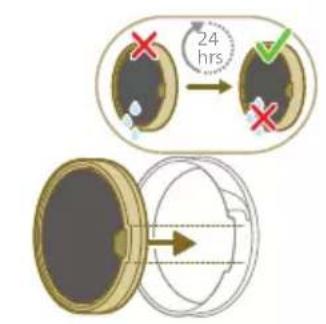
text_image
24 hrsnatural_image
Illustration of a faucet spraying water onto a box with motion lines indicating airflow (no text or symbols)natural_image
Illustration of a hand cleaning a brown cylindrical object (no text or symbols)text_image
Diagram showing a container with liquid and a trash can, both marked with red X symbols indicating prohibition or rejection.text_image
Safety warning icon showing an orange warning sign, a trash can, and a computer screen displaying a warning symbol with a red X.text_image
Diagram illustrating a lock mechanism with labeled steps and directional arrows, showing mechanical components and safety symbols.text_image
Diagram illustrating a chemical process with labeled steps and a warning symbol for removal of particles.natural_image
Illustration of a portable device with warning symbol and open lid, no text or symbols presentnatural_image
Illustration of a hand pressing down on a mechanical component with an inset showing a close-up of the component (no text or symbols present)text_image
Illustration showing four steps of a hairpin tool application, with arrows indicating the process and magnified detail of the action.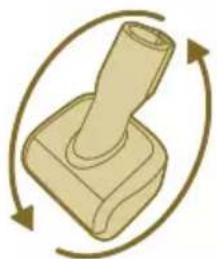
natural_image
Simple 3D icon of a mechanical knob with rotational arrows, no text or symbols presenttext_image
Diagram of a device with labeled parts and directional arrows indicating movement or assemblynatural_image
Illustration of hands tying a knot around a wooden object with a directional arrow (no text or symbols)text_image
Diagram showing a mechanical device with labeled parts, including numbered annotations ① and ②.natural_image
Illustration of a plastic bottle pouring liquid into a beaker, next to a water dispenser (no text or symbols)natural_image
Diagram of a green rod inserted into a rectangular container with two side slots (no text or symbols)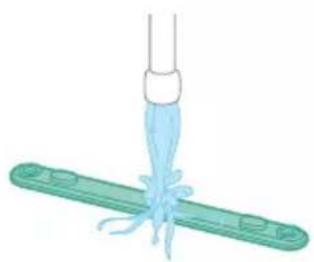
natural_image
Illustration of a medical procedure with a surgical tool and tubing (no text or symbols)natural_image
Technical line drawing of a mechanical component with green and gray parts, no text or symbols presentnatural_image
Illustration of a box containing a coin with an upward arrow, symbolizing growth or direction (no text or symbols present)XV1681/01
natural_image
Diagram of a mechanical component inside a transparent housing, showing a rolled roller and directional arrow (no text or symbols)CP0667/01
natural_image
Isometric view of a rectangular block with a green arrow pointing to its side (no text or symbols)XV1670/02
natural_image
Simple line drawing of a cylindrical object with a green handle and arrow, no text or symbols present.CP0381/01
natural_image
Warning symbol with exclamation mark inside a red circle (no text or numbers)υσκευής.
natural_image
Circular icon with a white upward arrow and a blue thermometer symbol, no text or numbers present.natural_image
Circular icon with a house symbol and thermometer, no text or numbers presentnatural_image
Circular icon with a document and question mark, no text or symbols presentστεί ζημιά.
natural_image
Circular icon with a stylized pen or tool symbol inside a red ring (no text or numbers)natural_image
Circular icon with a stylized pen or tool symbol, no text or numbers present.natural_image
Circular icon with a white prohibition symbol on black background, enclosed in a gold ring (no text or numbers)natural_image
Circular icon with a plug symbol and downward arrow, no text or symbols present.εν έχει αφαιρεθεί.
natural_image
Circular icon with a plug and warning symbol, no text or numbers presentος μετασχηματιστής.
natural_image
Circular icon with a grid pattern inside, no text or symbols presentnatural_image
Circular icon with a document symbol and a question mark, no text or labels present.τοποθετηθεί σωστά.
natural_image
Circular black button with a white battery symbol at center, no text or numbers visiblenatural_image
Diagram of a mechanical device with an inset showing a close-up of a component (no text or symbols visible)natural_image
Diagram of a mechanical device with internal components and directional arrows, no readable text or symbols present.natural_image
Diagram of a mechanical device with internal components and a magnified inset showing a detail (no text or symbols)text_image
110 ± 2 cmnatural_image
Illustration of a vacuum cleaner with a magnified view showing the handle and base (no text or symbols)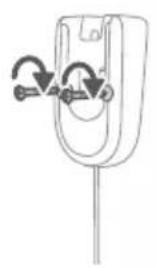
natural_image
Simple line drawing of a mechanical component with two curved arrows indicating rotation or assembly (no text or symbols)natural_image
Diagram showing a device with a lock and a magnified view of its internal structure (no text or symbols)natural_image
Diagram of a mechanical device with a close-up inset showing a tool interacting with a component (no text or symbols present)natural_image
Illustration of a soldering iron being inserted into a tip, showing the process (no text or symbols)natural_image
Illustration of a hairdryer being inserted into a device (no text or symbols)text_image
100° ON OFF ①text_image
Diagram illustrating electric field lines around a positively charged battery, showing current direction and magnetic polarity.natural_image
Illustration of a person using a vacuum cleaner to lift a person's legs (no text or symbols present)natural_image
Illustration of a mechanical component with a circular symbol containing a green cross and number 5, set on a patterned grid background (no text or symbols)text_image
Safety warning illustration showing a person using a vacuum cleaner to clean water, with an orange warning symbol and a red X mark indicating no need.natural_image
Illustration of an eye with warning symbols (anxiety, red X) and a rolled-up object, no text present.natural_image
Illustration of a pipette dispensing liquid into a green plastic sheet, with no text or symbols present.
natural_image
Illustration of a green mechanical component with a magnified inset showing a paper being inserted (no text or symbols)
text_image
MAX 50 °Cnatural_image
Diagram of a mechanical component with a green arrow indicating direction (no text or symbols)natural_image
Illustration of a mechanical component being inserted into a base, showing a downward arrow (no text or symbols present)natural_image
Illustration of a person using a vacuum cleaner to lift a person's legs (no text or symbols present)text_image
Illustration showing a person using a vacuum cleaner with a red X mark indicating no change, accompanied by an inset image of a hand holding a brush.text_image
Safety warning illustration showing a person using a vacuum cleaner with a red X mark indicating water release, accompanied by an orange warning symbol.natural_image
Illustration of a handheld device with a handle and screen, positioned above a horizontal line (no text or symbols visible)natural_image
Illustration of a spray gun dispensing liquid into a rubber stopper (no text or symbols)natural_image
Illustration of a mechanical component with a cross-section view showing internal structure (no text or symbols)natural_image
Illustration of a spiderweb manipulation technique showing step-by-step steps (no text or symbols)natural_image
Illustration of a soldering iron being dispensed from a tip, with arrows indicating motion (no text or symbols)natural_image
Line drawing of a hand holding a pen writing on a laptop (no text or symbols present)natural_image
Illustration of a spray gun dispensing liquid into a pipe with motion arrows indicating spray (no text or symbols)natural_image
Diagram showing a gas cylinder connected to a mechanical device with a magnified inset of a cylindrical component (no text or symbols)natural_image
Gray circular icon with a white lightbulb symbol and radiating lines, representing an idea or illumination (no text or symbols)text_image
Diagram showing three lighting icons and a checkmark on a circular badge, likely illustrating cleanroom or anti-smoking concepts.
natural_image
Circular icon with a downward arrow and green leaf symbol (no text or numbers)text_image
Diagram showing two identical icons with a checkmark and a circular icon, each containing a symbolic diagram of a brush or tool with a green symbol and red directional arrows.
natural_image
Gray circular button with a white lowercase 'i' in the center, no additional text or symbols.
natural_image
Circular button with a white up-turn arrow icon (no text or symbols)text_image
Diagram of a remote control device with labeled buttons and a green checkmark indicating actiontext_image
Diagram showing a mechanical device with labeled parts and directional arrows indicating motion or movement.natural_image
Illustration of a mechanical device with a green checkmark indicating a correct assembly (no text or symbols present)natural_image
Illustration of a pipette dispensing liquid into a green plastic sheet (no text or symbols)natural_image
Illustration of a green mechanical component with a blue base and circular end, no text or symbols presentnatural_image
Diagram showing a printer with green components and directional arrows, no text or symbols presentnatural_image
Illustration of a green mechanical component with a blue screw and base, no text or symbols presentnatural_image
Illustration of a mechanical device with a warning icon and hanging clothes (no text or symbols)natural_image
Close-up of a beige remote control with a black dial and circular button (no text or symbols visible)text_image
Diagram illustrating a lock mechanism with labeled steps and directional arrows, likely illustrating a mechanical or electrical process.natural_image
Diagram showing a container with a lid and a magnified inset of its interior (no text or symbols)natural_image
Illustration of two hands pouring liquid into a container with granular material (no text or symbols)text_image
Diagram illustrating foot positioning with labeled positions and a checkmark indicating alignment, plus an inset showing incorrect foot positioning.natural_image
Illustration of a hand holding a dark object with liquid droplets (no text or symbols)
text_image
24 hrsnatural_image
Illustration of a faucet spraying water onto a bag (no text or symbols)natural_image
Illustration of a hand cleaning a rectangular object with a cloth (no text or symbols)natural_image
Illustration of a hand pressing down on a mechanical component with an inset showing a close-up of the component (no text or symbols present)natural_image
Illustration of a hand gripping a car seatbelt with an arrow indicating motion (no text or symbols)natural_image
Illustration of hands using scissors to cut a piece of wood or tape (no text or symbols present)natural_image
Mechanical assembly diagram showing a lever mechanism with an inset close-up of the component (no text or symbols)natural_image
Illustration of a hand using a tool to lift a component, showing motion and wear (no text or symbols)natural_image
Simple line drawing of a mechanical component with rotational arrows (no text or symbols)text_image
Diagram of a hand holding a device with labeled parts 1 and 2, showing mechanical components and directional arrows.natural_image
Illustration of hands tying a knot around a wooden object (no text or symbols)text_image
Diagram showing a hand holding a device with labeled parts, including arrows and text annotations.natural_image
Illustration of a plastic bottle pouring liquid into a beaker with a funnel and water bottle nearby (no text or symbols)natural_image
Illustration of a beaker pouring liquid from a piping bag into a water bottle, next to a vertical container with a faucet and plastic bottle (no text or symbols)natural_image
Diagram showing a mechanical device with a green component and a green base, both without any text or symbols.natural_image
Illustration of a box containing a coin with an upward arrow, symbolizing growth or accumulation (no text or symbols present)XV1681/01
natural_image
Diagram of a mechanical component inside a transparent housing, showing a rolled part being inserted (no text or symbols)CP0667/01
natural_image
Isometric illustration of a rectangular block with a green internal component, no text or symbols presentXV1670/02
Водна лента CP0381/01

natural_image
Simple line drawing of a cylindrical object with a green arrow pointing downward (no text or symbols)CP0381/01
natural_image
Warning symbol with exclamation mark inside a red circle (no text or numbers)еда.
natural_image
Circular icon with a grid pattern inside, no text or symbols present.natural_image
Circular icon with a document and question mark, no text or symbols presentрана правилно.
natural_image
Circular black button with a white battery symbol at center, no text or numbers visiblenatural_image
Diagram of a mechanical device with internal components and an inset showing a close-up view of a component (no text or symbols present)natural_image
Diagram of a mechanical or electrical component with internal channels and directional arrows, no readable text or symbols present.natural_image
Diagram of a mechanical device with internal components and a magnified inset showing a detail (no text or symbols)text_image
110 ± 2 cmnatural_image
Illustration of a vacuum cleaner with a magnified view showing the handle and base (no text or symbols)
natural_image
Diagram of a mechanical component with curved arrows indicating motion or force direction (no text or symbols)natural_image
Diagram showing a device with a lock and a magnified view of its internal structure (no text or symbols)natural_image
Diagram of a handheld device connected to a wire, with an inset showing a mechanical component (no text or symbols present)natural_image
Illustration of a soldering iron being inserted into a tip, showing the process (no text or symbols)natural_image
Illustration of a mechanical device with a lever and sparkles, no text or symbols presenttext_image
100° ON OFF ①text_image
Diagram illustrating electric field lines around a positively charged battery, showing N and E poles with corresponding electric current symbols.natural_image
Illustration of a person using a vacuum cleaner to clean or walk (no text or symbols present)natural_image
Illustration of a mechanical component with a circular symbol containing a green cross and number 5, set on a patterned grid background (no text or symbols)text_image
Safety warning illustration showing a person using a vacuum cleaner to clean water, with an orange warning symbol and a red 'X' indicating no need.natural_image
Illustration of an eye with warning symbols (anxiety, no text present)natural_image
Illustration of a pipette dispensing liquid into a green rectangular container with a handle, no text or symbols present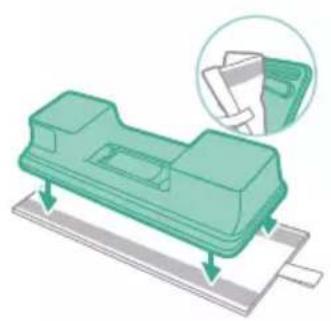
natural_image
Illustration of a green mechanical component with a magnified inset showing a folded paper or sheet (no text or symbols)
text_image
MAX 50 °Cnatural_image
Diagram of a mechanical component with a green handle and arrow indicating direction (no text or symbols)natural_image
Illustration of a mechanical component being inserted into a base, showing a downward arrow indicating insertion (no text or symbols present)natural_image
Illustration of a green vacuum cleaner with motion arrows indicating airflow or movement, standing on a person's legs (no text or symbols)text_image
Illustration showing a person using a vacuum cleaner with a red X mark indicating no change, accompanied by an inset image of a hand holding a brush.text_image
Safety warning illustration showing a person using a vacuum cleaner with a red X mark indicating water release, accompanied by an orange warning symbol.natural_image
Illustration of a handheld device with a pointed tip and handle, emitting exhaust smoke (no text or symbols)natural_image
Illustration of a vacuum cleaner emitting powder from a bottle onto a base (no text or symbols)natural_image
Illustration of a mechanical component with a magnified inset showing a textured surface (no text or symbols)natural_image
Illustration of a spiderweb manipulation technique showing step-by-step steps (no text or symbols)natural_image
Illustration of a soldering iron being dispensed from a tip, with no text or symbols present.natural_image
Line drawing of a hand holding a pen writing on a laptop (no text or symbols present)natural_image
Illustration of a spray gun spraying liquid onto a wooden tool, with motion arrows indicating spray (no text or symbols)natural_image
Diagram showing a gas cylinder connected to a mechanical device with a magnified inset of a cylindrical component (no text or symbols)natural_image
Gray circular icon with a white lightbulb symbol (no text or numbers)text_image
Diagram showing three icons: a light bulb, a light bulb with a brush, and a no-lit tool, alongside a green checkmark on a circular badge.
natural_image
Circular icon with a white lightning bolt symbol and green leaf (no text or numbers)text_image
Diagram showing two identical icons with a QR code and circular indicators, alongside a green checkmark icon on a beige circular background.
natural_image
Gray circular button with a white lowercase 'i' in the center, no additional text or symbols.natural_image
Circular button with a white up-turn arrow icon (no text or symbols)Врати се
text_image
Diagram of a remote control device with labeled buttons and a green checkmark indicating actiontext_image
Diagram showing a mechanical device with labeled parts and directional arrows, likely illustrating a motion or assembly process.natural_image
Illustration of a mechanical device with a green checkmark indicating a correct assembly (no text or symbols present)text_image
Diagram illustrating a mechanical device with a magnified cross-section showing internal components and a downward arrow indicating motion or assembly.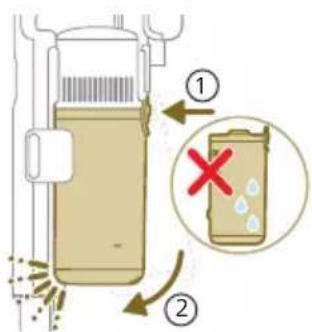
text_image
Diagram illustrating a chemical process with labeled steps and a magnified view showing a reaction or separation step.
natural_image
Green mechanical component with an arrow indicating upward motion, shown with a magnified inset of its part (no text or symbols visible)natural_image
Illustration of a pipette dispensing liquid into a green electronic component (no text or symbols)natural_image
Illustration of a green mechanical component with a blue screw and base, no text or symbols presentnatural_image
Diagram showing a printer with green components and a separate device with directional arrows (no text or symbols)natural_image
Illustration of a green mechanical component with a blue screw and base, no text or symbols presentnatural_image
Illustration of a mechanical device with a warning icon and hanging clothes (no text or symbols)natural_image
Close-up of a beige remote control with a black dial and circular button (no text or symbols visible)text_image
Diagram illustrating a lock mechanism with labeled steps and directional arrows, likely illustrating a mechanical or electrical process.natural_image
Diagram showing a container with a lid and a magnified inset of its interior (no text or symbols)natural_image
Illustration of two hands pouring liquid into a container with granular material (no text or symbols)text_image
Diagram illustrating foot movement with a checkmark and red X mark, showing foot positioning and movement pathnatural_image
Illustration of a hand holding a dark object with water droplets falling (no text or symbols)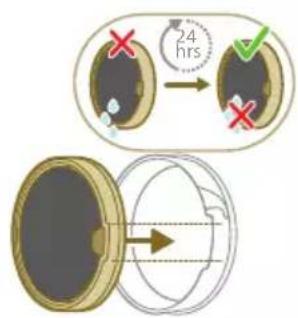
text_image
24 hrsnatural_image
Illustration of a pipe bag pouring liquid into a container with motion lines indicating flow (no text or symbols)natural_image
Illustration of a hand cleaning a rectangular object with a cloth (no text or symbols)natural_image
Illustration of a hand using a tool to lift a component, showing motion and wear (no text or symbols)natural_image
Illustration of a mechanical lever with rotational arrows indicating clockwise motion (no text or symbols)text_image
Diagram of a hand holding a device with labeled parts, showing mechanical components and directional arrows.natural_image
Illustration of hands connecting a mechanical component with a spring (no text or symbols)text_image
Diagram showing a hand holding a device with labeled parts, including numbered callouts (① and ②) indicating different components or states.natural_image
Illustration of a box with a coin inside, showing an upward arrow (no text or symbols)XV1681/01
natural_image
Diagram of a mechanical component inside a transparent housing, showing a rolled part being inserted (no text or symbols)CP0667/01
natural_image
Isometric view of a rectangular block with a green arrow pointing to its side (no text or symbols)XV1670/02
natural_image
Simple line drawing of a mechanical component with a green arrow indicating direction (no text or symbols)CP0381/01
natural_image
Warning symbol with exclamation mark inside a red circle on black background (no text or numbers)natural_image
Circular icon with a house silhouette and thermometer symbol (no text or numbers)natural_image
Circular icon with a white house outline and red warning symbol, no text or numbers present.natural_image
Circular icon with a document and question mark, no text or symbols presentHa.
natural_image
Circular icon with a stylized pen or tool symbol inside, no text or numbers present.natural_image
Circular icon with a stylized pen or tool symbol, no text or numbers present.a.
natural_image
Circular black button with a white prohibition symbol, no text or numbers present.natural_image
Circular icon with a white plug symbol and downward arrow, no text or numbers present.данет.
natural_image
Circular icon with a plug and warning symbol, no text or numbers presentн адаптер.
natural_image
Circular icon with a grid pattern inside, enclosed in a golden ring (no text or symbols)natural_image
Circular icon with a question mark and document symbol on dark background (no text or symbols)вилно вметната.
natural_image
Circular black button with a white battery symbol and red scroll wheel (no text or numbers)natural_image
Diagram of a mechanical device with an inset showing a close-up of a component (no text or symbols visible)natural_image
Diagram of a mechanical device with internal components and directional arrows, no readable text or symbols present.natural_image
Diagram of a mechanical device with internal components and a magnified inset showing a detail (no text or symbols)text_image
110 ± 2 cmnatural_image
Illustration of a vacuum cleaner with a magnified view showing the handle and base (no text or symbols)
natural_image
Diagram of a mechanical component with curved arrows indicating motion or force direction (no text or symbols)natural_image
Diagram showing a device with a lock and a magnified view of its internal structure (no text or symbols)natural_image
Diagram of a handheld device with a cable and connector, showing a magnified inset of its internal structure (no text or symbols present)natural_image
Illustration of a soldering iron being inserted into a tip, showing the process (no text or symbols)natural_image
Illustration of a hand using a tool to press or install a component, with no visible text or symbols.text_image
100° ON OFF ①text_image
Diagram illustrating electric field lines around a positively charged battery, showing N and E poles with corresponding electric field symbols.natural_image
Illustration of a person using a vacuum cleaner to lift a floor, with motion arrows indicating movement (no text or symbols)natural_image
Illustration of a mechanical component with a green circular symbol and a magnified inset showing a dollar sign (no text or symbols present)text_image
Safety warning illustration showing a person using a vacuum cleaner to clean water, with an orange warning symbol and red X mark indicating no need.natural_image
Illustration of an eye with a warning sign and a red X mark, no text or symbols presentnatural_image
Illustration of a hand pouring liquid into a green rectangular container with a faucet in the background (no text or symbols)
natural_image
Illustration of a green plastic electronic component with mounting base and paper holder, no text or symbols present
text_image
MAX 50 °Cnatural_image
Diagram of a mechanical component with a green handle and arrow indicating direction (no text or symbols)natural_image
Technical illustration of a mechanical component being processed into a base plate (no text or symbols)natural_image
Illustration of a person using a vacuum cleaner to clean or stand (no text or symbols present)text_image
Illustration showing a person using a vacuum cleaner with a red X mark indicating the absence of the device.text_image
Safety warning illustration showing a person using a vacuum cleaner with a red 'X' indicating the water level, alongside an orange warning symbol.natural_image
Illustration of a handheld device with a pointed tip and handle, emitting light rays (no text or symbols)natural_image
Illustration of a spray gun dispensing liquid into a rubber stopper (no text or symbols)natural_image
Illustration of a mechanical device with a cross-section inset showing a textured surface (no text or symbols)natural_image
Illustration of a spiderweb manipulation technique showing step-by-step steps (no text or symbols)natural_image
Illustration of a soldering iron being dispensed from a tip, with arrows indicating motion (no text or symbols)natural_image
Line drawing of a hand holding a pen writing on a laptop (no text or symbols present)natural_image
Illustration of a spray bottle dispensing liquid into a pipe with motion arrows indicating spray (no text or symbols)natural_image
Diagram showing a gas cylinder connected to a mechanical device with a magnified inset of a cylindrical component (no text or symbols)natural_image
Gray circular icon with a white lightbulb symbol (no text or numbers)natural_image
Six-panel image showing icons of a vacuum cleaner, lightbulb, light bulb, clean bulb, and clean plug, with a green checkmark on the right (no text or symbols in the main visual elements)
natural_image
Circular icon with a downward arrow and green text '毛' (no readable text or symbols)text_image
Diagram showing four different states of a device with icons and labels, including a checkmark icon.
natural_image
Gray circular button with a white lowercase 'i' in the center, no additional text or symbols.natural_image
Circular button with a white up-turn arrow icon (no text or symbols)text_image
Diagram of a remote control device with labeled buttons and a green checkmark indicating actiontext_image
Diagram showing a car interior with labeled parts and directional arrows indicating movement or flow.natural_image
Illustration of a mechanical device with a green checkmark indicating a correct assembly (no text or symbols present)natural_image
Illustration of a pipette dispensing liquid into a green plastic sheet (no text or symbols)natural_image
Illustration of a green mechanical component with a blue cylindrical base and circular end, no text or symbols present.natural_image
Diagram showing a printer with green components and directional arrows, no text or symbols presentnatural_image
Illustration of a green mechanical component with a blue screw and base, no text or symbols presentnatural_image
Illustration of a mechanical device with a warning icon and hanging clothes (no text or symbols)natural_image
Close-up of a beige remote control with a black dial and circular button (no text or symbols visible)text_image
Diagram illustrating a lock mechanism with labeled steps and directional arrows, likely illustrating a mechanical or electrical process.natural_image
Diagram showing a container with a lid and a magnified inset of its interior (no text or symbols)natural_image
Illustration of two hands pouring liquid into a container with granular material (no text or symbols)text_image
Diagram illustrating a medical procedure with labeled steps and a checkmark indicating a validation or confirmation point.natural_image
Illustration of a hand holding a dark object with liquid dripping (no text or symbols)
text_image
24 hrsnatural_image
Illustration of a faucet spraying water onto a box with motion lines indicating flow (no text or symbols)natural_image
Illustration of a hand cleaning a rectangular object with a cloth (no text or symbols)natural_image
Illustration of a hand using a tool to lift a component, showing motion and wear (no text or symbols)natural_image
Illustration of a mechanical lever with rotational arrows indicating clockwise motion (no text or symbols)text_image
Diagram of a hand holding a device with labeled parts, showing mechanical components and directional arrows.natural_image
Illustration of hands tying a knot around a wooden object with a directional arrow (no text or symbols)text_image
Diagram showing a hand holding a device with labeled parts, including numbered callouts (① and ②) indicating different components or states.natural_image
Illustration of a box containing a coin with an upward arrow, symbolizing growth or accumulation (no text or symbols present)XV1681/01
natural_image
Diagram of a mechanical component inside a transparent housing, showing a rolled part being inserted (no text or symbols)CP0667/01
natural_image
Isometric illustration of a rectangular block with a green internal component, no text or symbols presentXV1670/02
natural_image
Simple line drawing of a cylindrical object with a green arrow pointing downward (no text or symbols)CP0381/01
natural_image
Warning symbol with exclamation mark inside a red circle on black background (no text or numbers)ООЮ.
www.philips.com/mycordlessvacuum-7000s
a Iran's business consolidation and implementation
natural_image
Diagram of a mechanical device with an inset showing a close-up of a component (no text or symbols visible)natural_image
Diagram of a mechanical device with internal components and directional arrows, no readable text or symbols present.natural_image
Cross-sectional diagram of a mechanical device showing internal components and a magnified inset (no text or labels)text_image
110 ± 2 cmnatural_image
Illustration of a vacuum cleaner with a magnified view showing the base and wall (no text or symbols)natural_image
Diagram of a plug with two arrows indicating rotation or adjustment (no text or symbols)natural_image
Diagram showing a device with a lock and a magnified inset illustrating the process of lighting or explosion (no text or symbols present)natural_image
Diagram of a mechanical device with a close-up inset showing a tool interacting with a workpiece (no text or symbols present)natural_image
Illustration of a soldering iron being inserted into a tip, with sparks flying (no text or symbols)natural_image
Illustration of a hand inserting a plug into a battery, with no text or symbols present.text_image
100° ON OFF ①text_image
Diagram illustrating electric field lines between positive and negative charges, with labeled components 7, N, E and corresponding electric field illustrations.N - Normal Mode (IKUOPnT)
T - Turbo Mode (IKUANOSI)