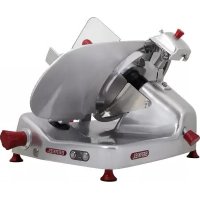
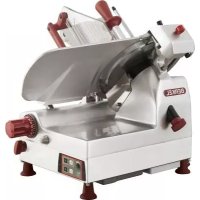
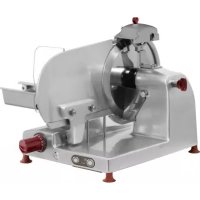
trancheusehome line plus - Electric slicer Berkel - Free user manual and instructions
Find the device manual for free trancheusehome line plus Berkel in PDF.

| Product Type | Electric Slicer |
| Model | Berkel Home Line Plus Slicer |
| Manufacturing Materials | Stainless Steel |
| Blade Diameter | 200 mm |
| Motor Power | 170 watts |
| Adjustable Cutting Thickness | Yes, up to 20 mm |
| Safety in Use | Blade Protection Included |
| Ease of Cleaning | Removable Blade for Easy Cleaning |
| Product Dimensions | 460 x 385 x 280 mm |
| Weight | 12 kg |
| Manufacturer's Warranty | 2 years |
Frequently Asked Questions - trancheusehome line plus Berkel
User questions about trancheusehome line plus Berkel
0 question about this device. Answer the ones you know or ask your own.
Ask a new question about this device
Download the instructions for your Electric slicer in PDF format for free! Find your manual trancheusehome line plus - Berkel and take your electronic device back in hand. On this page are published all the documents necessary for the use of your device. trancheusehome line plus by Berkel.
USER MANUAL trancheusehome line plus Berkel
WARNING: The blade is very sharp, like a knife. For any cleaning and maintenance operation that involves dismalting of the blade, make sure to pay extra attention to keep hands far away from the edge of the blade itself. Always use protective, cut resistant gloves. To remove the blade, always use the blade extractor. Always hold the blade by the blade extractor only. Make sure nobody gets close to the blade when extracted.

USER MANUAL: Electrical Slicer Home Line Plus
MODEL:
HL PLUS 200 - HL PLUS 250
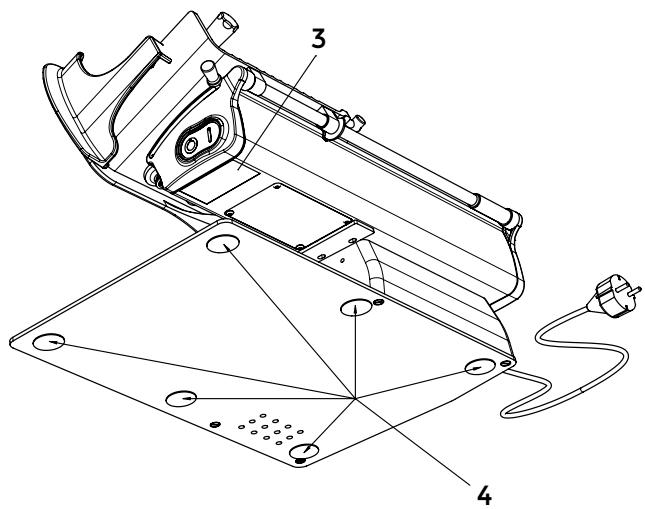
GENERAL PLAN OF THE MACHINE
- Start button (white)
- Stop button (red)
- Identification plate, technical information and CE marking
- Foot
- Thickness adjustment knob
- Thickness gauge plate
- Safety guards
- Meat table
- Product press holder
- Blade
- Blade guard
- Blade cover
- Baseplate
- Product holder knob
- Power cable
- Blade extractor

Fig. 1
DESCRIPTION
Electrical slicer machine for home use with circular blade, designed solely to slice food products of the types and within the dimensional limits indicated in this manual. The main parts that make up this machine are illustrated in figure 1. Electrical diagrams are reported in Fig. 2.
DECLARATION OF CONFORMITY
The machines described in this manual comply with 2006/95/CE, 2004/108/CE, 2012/19/UE, 2011/65/CE, with European Regulation (EC) 1935/2004 and with relative standards such EN60204-1, EN60335-1, EN60335-2-14.

SAFETY
Please observe the following instructions for your safety:
- carefully read all instructions before using the machine;
- the product is not intended to be used by children;
- use the machine only if you have been properly trained and are in perfect psychological and physical condition;
- do not use the machine in any way other than as described in this manual;
- install the machine in conformity to the instructions indicated in the "Installation" section;
- install the machine in a location out of the reach of personnel unauthorised to operate it;
- stay highly concentrated when using the machine and avoid any distraction during use;
- do not allow the machine to be used by personnel who have not read and fully comprehended the content of this manual;
- do not wear baggy clothing
or clothing with open sleeves;
- do not allow anyone besides the operator to approach during product cutting operations;
- do not remove, cover or modify the tags located on the machine body and, in case of damage of these, replace them promptly;
- do not remove the protections and do not modify or bypass the mechanical and electrical protective devices;
- slice only the permitted products. Do not attempt cuts on prohibited type products;
- always keep the sliced product resting surface, the work area all around the machine and the operator floor area clean and dry;
- do not use the machine as a resting surface and do not place any objects on it which are foreign to normal cutting operations;
- do not use the slicer when, due to normal wear, the distance between the edge of the blade and the blade protection exceeds 5mm
- in this case, contact the manufacturer or an Authorised Service Centre to change the blade;
- do not use the machine with "movable" type electrical connections, with temporary or non insulated cables;
- periodically check the condition of the power cable and the cable gland on the machine body. Replace it promptly when necessary, requesting operation by qualified personnel;
- immediately stop the machine in the event of a defect, abnormal operation, suspicion of breakdown, incorrect movement, unusual noises;
- before cleaning or carrying out maintenance, disconnect the machine from the electrical mains;
- use protective gloves for the cleaning and maintenance operations;
- place and remove the goods to be sliced on the sliding meat table only with the carriage completely pulled back and with the thickness adjustment lever placed in the safety position (Fig. A);
- for movement of the meat table during cutting operations use only the manoeuvring handle located on the arm or the product holder grip;
- use of cutting accessories which were not provided by the manufacturer with the machine is prohibited;
- the device cannot be used without the meat table or product holder.
The manufacturer declines any direct and indirect responsibility stemming from inappropriate use, unauthorised modifications and/or repair carried out on the machine, or use of non original accessories and replacement parts.
The machine may not be used in open areas and/or areas which are exposed to atmospheric agents and in environments with vapours, fumes or corrosive and/or abrasive powders, with risk of fire or explosion and in any case where the use of anti-explosive components is required.
Environmental conditions of use:
- Temperature
from -5^ to +40^ - Max. humidity 95%
DO NOT SLICE: - frozen food products;
- deep frozen food products;
- any other product not intended for food use.

WARNING! The motor may overheat! After 15
minutes of continuous use, switch off the machine and let the motor cool.
The blade can sever parts of the body. For this reason, never
extend hands into the cutting area between the gauge plate and the blade if the thickness adjustment lever (5) is not in the safety position (in position 0) (Fig. A).
Take extreme care to keep hands as far away as possible from the cutting area during blade cleaning and sharpening. The use of protective gloves is recommended.
INSTALLATION
Install the machine on a level, smooth and dry surface suitable for supporting the weight of the machine itself plus the products to be sliced.
WARNING: Verify that there are no obstacles to table travel and to the loading of products to be sliced onto the table itself.
The machine must be installed in the immediate vicinity of an EEC standard outlet connected to a system which is in conformity with the prevailing regulations and which has:
-
magneto-thermic protection;
-
automatic differential switch;
-
earthing system.
Before carrying out electrical hook up verify that the characteristics of the electrical power mains are in agreement with those indicated on the machine information plate.
USE OF THE SLICER
WARNING! Blade is sharp, cutting hazard!
Check that the slice thickness adjustment knob (5) is in the safety position (in position 0) (Fig. A).
- Pull the meat table (8) back all the way toward the operator, in the loading position;
- lift the product holder (9) and put it into the standby po
sition;
- rest the product to be sliced on the table near the vertical edge of the table (8) on the operator side. Block it with the product holder, applying slight pressure;
- adjust the slice thickness. Activate the blade (10) by pressing the on button. Grip the product holder handle (14) and begin alternative cutting motion;
- at the end of cutting operations return the slice thickness adjustment knob to the safety position and pull the carriage back. Stop the blade motion by pressing the off button (2).
CLEANING
Keep the machine thoroughly clean. If used, it should be cleaned at least once a day and more often if necessary. After a period of inactivity, the machine should also be cleaned before use.
Risk of electric shock! Before cleaning the machine, disconnect the plug from the electrical mains socket and return the slice thickness adjustment knob to the safety position.
WARNING! Blade is sharp, cutting hazard!
Check that the slice thickness adjustment knob (5) is in the safety position (in position 0) (Fig. A).
Cleaning products:
use only water and biodegradable foaming detergent for dishwashers with PH 7-8, using a soft, spongy cloth and a semi-rigid nylon brush for the sharp areas of the table, the sharpened product holder and the back area of the blade. Do not use abrasive cleaning tools, such as rigid sponges or semi-rigid nylon brush, to clean the painted areas of the slicer.
Do not clean the machine with
jets of water or steam or similar methods.
Table tilting for cleaning operations (Fig. B):
- make sure that the machine is switched off;
- make sure that the thickness adjustment knob (5) is in safety mode (position 0) (Fig. A);
- pull the meat table (8) back all the way toward the operator;
- gradually push the table upward, rotating it clockwise.

WARNING! Check that the slice thickness adjust
ment knob (5) is in the safety position (in position O) (Fig. A)..
Remove the:
-blade cover:
1) Rotate the blade cover of few degrees anticlockwise (Fig. C); 2) Extract the blade cover holding it with both hands;
2) a spring facilitates the extraction of the blade cover (Fig. C);
- product holder:
unscrew the product holder handle in the anticlockwise direction until the product holder is completely removed.
-blade:
1) Fix the extractor to the blade using the two side knobs on the extractor (Fig. F):
2) Rotate the central knob of the extractor anticlockwise while holding one of the two side knobs firmly
3) extract the blade by holding the extractor with both hands.

WARNING! Blade is sharp, cutting hazard!
Use protective gloves when cleaning sharpening areas, the table, the product holder and the blade.
Clean the:
- back of the blade: with the extractor holding the blade, press a damp cloth on the surface of the blade and slowly move it from the center outwards, as shown in the figure (Fig.D2). Dry it, in the same way, using a dry cloth;
- blade protector shell: clean the blade protector shell using, if necessary, a semi-rigid nylon brush
- machine body: clean with a damp cloth or a soft sponge. Carefully dry all parts of the machine using a soft cloth.
Finally, assemble the:
-blade:
1) rotate the pulley until the red pin is positioned on the left side (or towards the operator) (Fig.G)
2) insert the blade into the pulley making sure to insert the red pin into one of the three holes on the blade
3) fix the blade to the pulley by turning the central knob of the extractor clockwise while holding one of the two side knobs firmly
4) remove the extractor from the blade by unscrewing the two side knobs making sure that the blade is firmly fixed to the pulley.
-blade cover:
1) replace the blade cover as in the figure E;
2) slightly rotate the blade cover clockwise until it locks into its initial position;
- meat table:
lift the meat table and move it to the cutting position, pressing down lightly until it clicks (Fig. B).
MAINTENANCE
Blade maintenance
Cleans the blade regularly to keep it sharp and functional. Do not wash the blade in the dishwasher.
Slice maintenance
To keep the linear sliding of the machine in optimal conditions, oil the bars using Berkel lubricants, the use of other oils could damage the sliding.
SERVICE
No replacement parts are supplied in the package. All repair and replacement activities (such as replacement or repair of the blade, belt, electrical components, structural parts, etc.) must be carried out solely by persons authorised by the manufacturer.
If a repair is required, it is advisable to return the machine to the manufacturer or to an Authorised Service Centre.
For information about services centres, contact:
service@berkelinternational. com.

WARNING! The blade must be replaced when
the distance between the edge of the blade itself and the internal edge of the protection exceeds 5 mm.
WARRANTY
AND RESPONSIBILITY
The manufacturer provides machines with a warranty of 24 months starting from the date of purchase. The warranty covers only those defects if used properly and according to the conditions of use provided by the manual. The warranty does not cover defects due to transport, the purchaser's incompetence or negligence, improper installation or placement, damage due to wear, or voltage greater than 10% of the nominal value. Furthermore, the warranty does not cover components inherently subject to wear, such as the blade and sharpener wheels, except in the case of obvious production defects.
The manufacturer declines any direct and indirect responsibility stemming from:
- failure to observe the instructions in this manual;
- use which does not conform to regulations in the country of installation;
- unauthorised modifications and/or repairs on the machine;
- use of non original accessories or replacement parts;
- exceptional event.
The transfer of machine ownership involves the immediate release from any responsibility by the manufacturer, with the exception of compliance with Directive 2006/42/EC (liability for any manufacturing defect of the product).
The identification plate at the base of the machine registers the manufacturer, the machine, technical information and the CE marking.
DEMOLITION
AND DISPOSAL
The machine is composed of:
-aluminium alloy;
- inserts and various components in stainless steel;
- electrical parts and electrical cables;
- electric motor;
- plastic, etc.
If disposal is entrusted to a third party, contact only authorised companies for disposal of the materials mentioned above. The device contains materials which can be recovered or recycled. Proper separate collection facilitates recycling. At the end of machine life, deposit in your device at a collection point. Information on disposal can be obtained from local authorities.
Troubleshooting
| PROBLEM | PROBABLE CAUSE | REMEDY |
| The machine does not start when the on button is pressed | No power or defective control circuit | Check if the plug has been inserted correctly. Contact a Service Centre if the problem persists |
| When the start button is pressed, the machine starts but the operation indicator light does not switch on | Defective indicator light | Do not use the machine with the indicator light off. Contact a service centre |
| When the stop button is pressed, the machine does not stop | Defective control circuit | Immediately stop the machine by pulling the plug out of the socket and immediately contact a service centre |
| Excessive resistance to sliding component movement (product holder, carriage). | Sliding guide lubrication not performed periodically | Perform periodic lubrication using Berkel lubricants. |
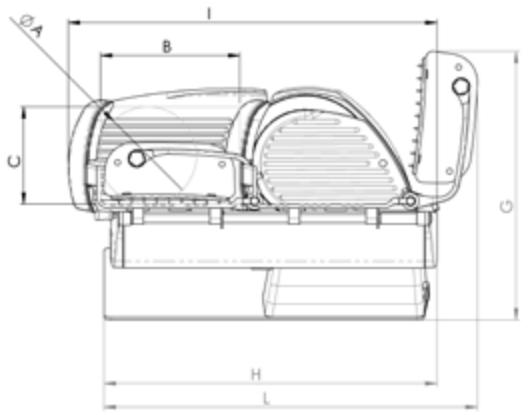
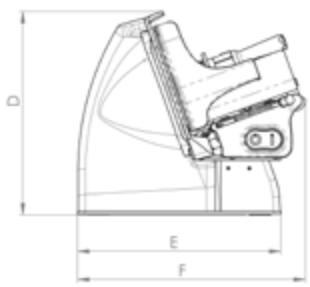
| HOME LINE PLUS | 200 | 250 |
| A | 140 mm | 183 mm |
| B | 200 mm | 200 mm |
| C | 140 mm | 183 mm |
| D | 292 mm | 315 mm |
| E | 290 mm | 290 mm |
| F | 328 mm | 340 mm |
| G | 390 mm | 390 mm |
| H | 480 mm | 490 mm |
| I | 530 mm | 552 mm |
| L | 538 mm | 566 mm |
| SPECIFICHE | ||
| Circular cutting capacity | 140 mm | 183 mm |
| Rectangular cutting capacity | 200x140h mm | 200x183h mm |
| Max slice thickness | 0 - 18 mm | 0 - 18 mm |
| Blade diameter | 195 mm | 250 mm |
| Weight | 12,5 kg | 14,5 kg |
| Motor rating | 0,19 kW | 0,19 kW |
| Electrical specifications | 230 V - 50 Hz | 230 V - 50 Hz |
Note: The technical features and appearance of the products may be subject to changes without prior notice.
Conditions de service am-
For at holde maskinens line
aere glidning under optimale forhold, skal skinnerne smores med Berkel-smoremidler. Brug af andre olier kan beskadige skinnen.
ASSISTANCE
Der fölger darüberreservedelemed leveringen. Alreparationogudskiftingafdele(f.eks.klinge, drivrem, elektriskekomponenter, strukturelledele)màudelukkende udforesaf producentens autoriseredepersonale.
PURKAMINEN JA HAVITYS
-machinemebehuizing: