USER MANUAL BLOOM - BLOOM-S - BLOOM-S DEKT/A/85 ELICA
EN Instruction on mounting and use
Closely follow the instructions set out in this manual. All responsibility, for any eventual inconveniences, damages or fires caused by not complying with the instructions in this manual, is declined. This appliance is intended to be used in household and similar application such as: - staff kitchen areas in shop, offices and other working environments; - farm houses; - by clients in hotels, motels and other residential type environments; - bed and breakfast type environments.
The hood can look different to that illustrated in the drawings in this booklet. The instructions for use, maintenance and installation, however, remain the same.
It is important to conserve this booklet for consultation at any moment. In the case of sale, cession or move, make sure it is together with the product.
- Read the instructions carefully: there is important information about installation, use and safety.
- Do not carry out electrical or mechanical variations on the product or on the discharge conduits.
Before proceeding with the installation of the appliance verify that there are no damaged all components. Otherwise contact your dealer and do not proceed with the installation.
Note: The parts marked with the symbol "(^)" are optional accessories supplied only with some models or otherwise not supplied, but available for purchase.

Caution
- Before any cleaning or maintenance operation, disconnect hood from the mains by removing the plug or disconnecting the mains electrical supply.
Always wear work gloves for all installation and maintenance operations.
- This appliance can be used by children aged from 8 years and above and persons with reduced physical, sensory or mental capabilities or lack of experience and knowledge if they have been given supervision or instruction concerning use of the appliance in a safe way and understand the hazards involved.
Children shall not be allowed to tamper with the controls or play with the appliance.
- Cleaning and user maintenance shall not be made by children without supervision.
- The premises where the appliance is installed must be sufficiently ventilated, when the kitchen hood is used together with other gas combustion devices or other
fuels.
- The hood must be regularly cleaned on both the inside and outside (AT LEAST ONCE A MONTH).
- This must be completed in accordance with the maintenance instructions provided. Failure to follow the instructions provided regarding the cleaning of the hood and filters will lead to the risk of fires.
- Do not flambe under the range hood.
- Do not remove filters during cooking.
- For lamp replacement use only lamp type indicated in the Maintenance/Replacing lamps section of this manual.
The use of exposed flames is detrimental to the filters and may cause a fire risk, and must therefore be avoided in all circumstances.
Any frying must be done with care in order to make sure that the oil does not overheat and ignite.
CAUTION: Accessible parts of the hood may become hot when used with cooking appliances.
- Do not connect the appliance to the mains until the installation is fully complete.
- With regards to the technical and safety measures to be adopted for fume discharging it is important to closely follow the regulations provided by the local authorities.
- The air must not be discharged into a flue that is used for exhausting fumes from appliance burning gas or other fuels.
- Do not use or leave the hood without the lamp correctly mounted due to the possible risk of electric shocks.
- Never use the hood without effectively mounted grids.
- The hood must NEVER be used as a support surface unless specifically indicated.
- Use only the fixing screws supplied with the product for installation or, if not supplied, purchase the correct screws type.
- Use the correct length for the screws which are identified in the Installation Guide.
- In case of doubt, consult an authorized service assistance center or similar qualified person.
WARNING!
- Failure to install the screws or fixing device in accordance with these instructions may result in electrical hazards.
-
Do not use with a programmer, timer, separate remote control system or any other device that switches on automatically.
-
This appliance is marked according to the European directive 2012/19/EC on Waste Electrical and Electronic Equipment (WEEE).
- By ensuring this product is disposed of correctly, you will help prevent potential negative consequences for the environment and human health, which could otherwise be caused by inappropriate waste handling of this product.

- The symbol on the product, or on the documents accompanying the product, indicates that this appliance may not be treated as household waste. Instead it should be taken to the appropriate collection point for the recycling of electrical and electronic equipment. Disposal must be carried out in accordance with local environmental regulations for waste disposal.
- For further detailed information regarding the process, collection and recycling of this product, please contact the appropriate department of your local authorities or the local department for household waste or the shop where you purchased this product.
Appliance designed, tested and manufactured according to:
Safety: EN/IEC 60335-1; EN/IEC 60335-2-31, EN/IEC 62233
Performance: EN/IEC 61591; ISO 5167-1; ISO 5167-3; ISO 5168; EN/IEC 60704-1; EN/IEC 60704-2-13; EN/IEC 60704-3; ISO 3741; EN 50564; IEC 62301.
- EMC: EN 55014-1; CISPR 14-1; EN 55014-2; CISPR 14-2; EN/IEC 61000-3-2; EN/IEC 61000-3-3. Suggestions for a correct use in order to reduce the environmental impact: Switch ON the hood at minimum speed when you start cooking and kept it running for few minutes after cooking is finished. Increase the speed only in case of large amount of smoke and vapor and use boost speed(s) only in extreme situations. Replace the charcoal filter(s) when necessary to maintain a good odor reduction efficiency. Clean the grease filter(s) when necessary to maintain a good grease filter efficiency. Use the maximum diameter of the ducting system indicated in this manual to optimize efficiency and minimize noise.
If the product exterior is made using a special material, which is non-standard for the type of hood application, such as Wood, Porcelain stone and Krion, any distinctive marks, differences in colour and surface deformations shall not be considered as defects but rather a characteristic of the material itself.
In the specific case of wood, this is a noble, natural and living material that tends to change over time. This makes each product unique and unrepeatable.
Use
The hood is designed to be used either for exhausting or filter version.

In this case the fumes are conveyed outside of the building by means of a special pipe connected with the connection ring located on top of the hood.
CAUTION!
The exhausting pipe is not supplied and must be purchased apart.
Diameter of the exhausting pipe must be equal to that of the connection ring.
CAUTION!
If the hood is supplied with active charcoal filter, then it must be removed.
Connect the hood and discharge holes on the walls with a diameter equivalent to the air outlet (connection flange).
Using the tubes and discharge holes on walls with smaller dimensions will cause a diminution of the suction performance and a drastic increase in noise.
Any responsibility in the matter is therefore declined.
Use a duct of the minimum indispensable length.
! Use a duct with as few elbows as possible (maximum elbow angle: 90^ ).
! Avoid drastic changes in the duct cross-section.

Filtration version
The aspirated air will be degreased and deodorised before being fed back into the room.
In order to use the hood in this version, you have to install a system of additional filtering based on activated charcoal.
Installation
The minimum distance between the supporting surface for the cooking equipment on the hob and the lowest part of the range hood must be not less than 45cm from electric cookers and 50cm from gas or mixed cookers.
If the instructions for installation for the gas hob specify a greater distance, this must be adhered to.

Electrical connection
The mains power supply must correspond to the rating indicated on the plate situated inside the hood. If provided with a plug connect the hood to a socket in compliance with current regulations and positioned in an accessible area, after installation. If it not fitted with a plug (direct mains connection) or if the plug is not located in an accessible area, after installation, apply a double pole switch in accordance with standards which assures the complete disconnection of the mains under conditions relating to over-current category III, in accordance with installation instructions.

WARNING!
Before re-connecting the hood circuit to the mains supply and checking the efficient function, always check that the mains cable is correctly assembled.
The hood is provided with a special power cable; if the cable is damaged, request a new one from Technical Service.
Mounting
Before beginning installation:
- Check that the product purchased is of a suitable size for the chosen installation area.
- Remove the charcoal (*) filter/s if supplied (see also relative paragraph). This/these is/are to be mounted only if you want to use the hood in the filtering version.
- Check (for transport reasons) that there is no other supplied material inside the hood (e.g. packets with screws () , guarantees () , etc.), eventually removing them and keeping them.
Expansion wall plugs are provided to secure the hood to most types of walls/ceilings. However, a qualified technician must verify suitability of the materials in accordance with the type of wall/ceiling. The wall/ceiling must be strong enough to take the weight of the hood.
Do not tile, grout or silicone this appliance to the wall.
Surface mounting only.
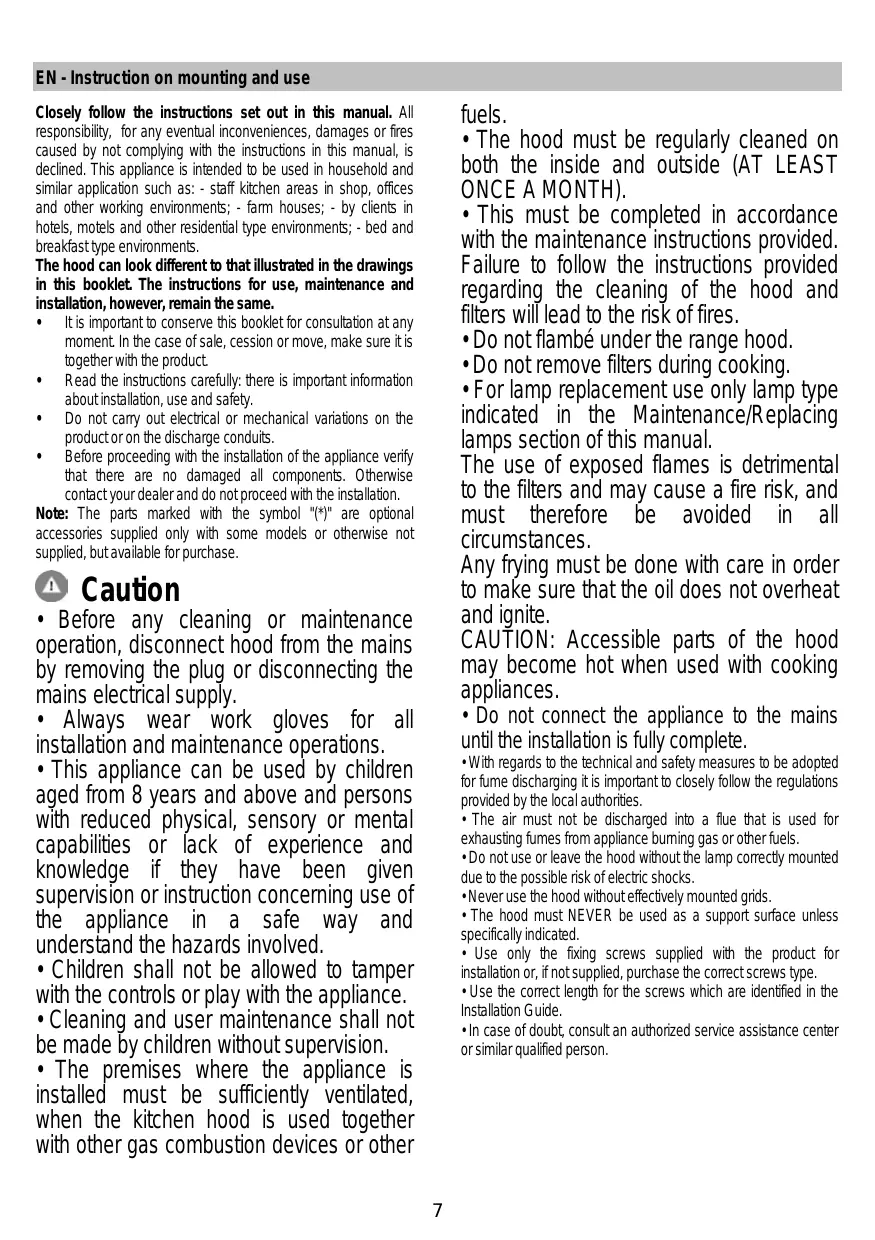
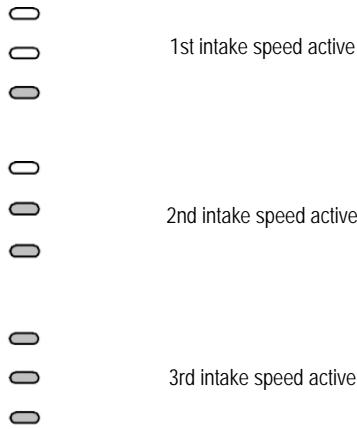
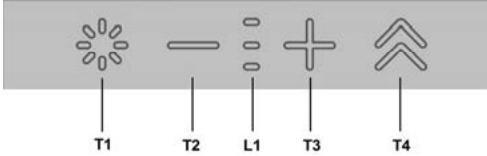
T1. Light ON/OFF button
T2. Decrease intake speed / motor off button
L1. Speed indicator LED on
T3. Motor on / increase intake speed button
T4. "BOOST" - intensive speed - function button
T1:LightON/OFFbutton
to turn the light on and off
T2: Decrease speed / motor off button
press the decrease the intake power, until the extractor hood is turned off.
press and hold to turn the hood off directly.
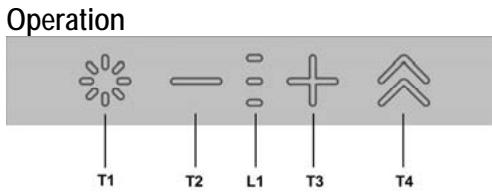
L1: Speed indicator LED on
the central LEDs light up according to the intake speed active/used
T3: Increase speed button
press to turn the hood on
press to increase the intake power.
T4: "BOOST" - intensive speed - function button
press T4 to activate the intensive intake speed "BOOST 1",
timed for 30 minutes
this prolonged timing has been designed to guarantee a useful
cooking time when a high smoke content is produced while
cooking
Note : after the 30 minutes, the hood will go back to the previously set intake speed ***
with the motor on "BOOST 1", press T4 again to activate the intensive intake speed "BOOST 2", timed for 7 minutes
Note : after the 10 minutes, the hood will go back to the previously set intake speed ***
Note : press T4 again, during the 7 minutes, to go back to the previously set intake speed ***
with the "BOOST1" and "BOOST2" functions active, press:
to go back to the previously set intake speed

to go back to the 3rd intake speed
*** the previous intake speed remains visible via the indicator LEDs L1
- if you have set the intensive speed directly with the hood off, the motor will be turned off.
While using the "BOOST" functions, the T4 symbol flashes:

(“BOOST 1” : white light - “BOOST 2” : blue light)
Filter saturation indicators
At regular intervals, the hood signals the need to perform maintenance on the filters.
LED (L1) on and flashing light (all indicator lights flashing together): perform maintenance on the grease filter.
LED (L1) on and alternating light (the indicator lights turn on in sequence): perform maintenance on the active carbon filter
Note: The filter saturation indicator is visible within the first 10 seconds on turning on the hood; the saturation indicators must be reset within this time.
Reset filter saturation indicator:
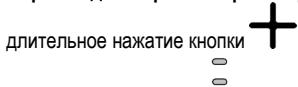
Press and hold button

LED (L1) turns on and off (depending on the type of filter being reset, the indicator lights flash together or turn on in sequence); an acoustic signal will confirm the operation.
Activation of filter saturation indicator
Note: this operation must be performed with the hood off.
- Grease filter
This indicator is normally activated
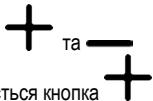
1st prolonged press of buttons + and - if the indicator is active, button turns on press button to deactivate it
if the indicator is not active, button turns on press button to activate it
- Active carbon filter
This indicator is normally deactivated
2nd prolonged press of buttons + and — if the indicator is active, button + turns on press button →, to deactivate it
if the indicator is not active, button turns on press button to activate it
Maintenance
Cleaning
Clean using ONLY a cloth dampened with neutral liquid detergent. DO NOT CLEAN WITH TOOLS OR INSTRUMENTS. Do not use abrasive products. DO NOT USE ALCOHOL!
Grease filter
Fig. 9-25
Traps cooking grease particles.
This must be cleaned once a month (or when the filter saturation indication system - if envisaged on the model in possession - indicates this necessity) using non aggressive detergents, either by hand or in the dishwasher, which must be set to a low temperature and a short cycle.
When washed in a dishwasher, the grease filter may discolor slightly, but this does not affect its filtering capacity.
To remove the grease filter, pull the spring release handle.
Charcoal filter (filter version only)
Fig. 24
It absorbs unpleasant odors caused by cooking.
The saturation of the charcoal filter occurs after more or less prolonged use, depending on the type of cooking and the regularity of cleaning of the grease filter.
In any case it is necessary to replace the cartridge at least every four months (or when the filter saturation indication system - if envisaged on the model in possession - indicates this necessity). The charcoal filter may NOT be washed or regenerated.
Circular charcoal filter
Apply one on each side as cover to both the shield grids of the motor impeller, then turn clockwise.
For the disassembly, turn counter-clockwise.
Replacing lamps
The hood is equipped with a lighting system based on LED technology.
The LEDs guarantee an optimum lighting, a duration up to 10 times longer than the traditional lamps and allow to save 90% electrical energy.
For replacement, contact the technical service.
Activering indicator verzadiging filters
tryk for at taenke emhaeten
Indikatorer for filtermating
Pred zahajenim instalace:
Okružno uhońy filter
DnAmETbPT Ha B3dYxOBoHATA Tp6Ba Tp6Ba Da OTroBaprHa DnAmETbPa Ha CbeDNHHTENHIN PpCTeH.

BHIMAHNE!
Ako acnnpatopbte cnaedcn C nntpu C aKTMBEN BbrIeH, Bnpochnte Tpba da bdat OCTPaeHH.
Cbpxte acnnapatopa KbM B3dyxoxoBOHN TpbN n OTBOPN BCTehata. DnAmETbpT Ha TpbNTE Tp8Ba Da CbOTBcTBA Ha DnAmETpa Ha CbeHInTeJHnA pHae 3a OTBeXdaHe Ha B3dyxa.
Cbbp3BaHETo KbM Bb3dYXOBODn Tpb6n N OTBOp C NoMaIbK DnAmEeTp HamaJIaBa KaNAcHTeTa Ha acNipRapHe NyBeJIuHabA 3NaHrTeHNO UyMa N IO BpeMe Ha paBota.
B Te3n cnyuan fmpMaTa He Noema HnKaKBa OTROBOPHOCT.
I3nON3BaIeTp6aCHeo6xOIMMaTa bJnxHa.
!N3IOIN3BaIe Tp6a C Bb3MOXHO HaM-MaIKO Tp6HNOKJIeHa (CMAKCImaJIe HbJL HA N3BVBKa:90°).
He npomehraaipe p3ko ceheneto Ha Tpb6nte!

Bercnca c fnnltpnpane
AcnpnpanrBb3dyx ce npceCTBa nOCBeKaba npdI da Bne 0THOBO B o6pIeHMe B nOmeJeHTo. 3a Da N3oN3BaTe acnpaTopa B To3n BapnAHT Ha pa6ota Tp6Ba Da IHCTanPnate DoTbnHnITHeHa qInTpnpaCa Cntema Ha 6a3ata Ha qInTPnC A kTINBEH BbrJIe.
MOHTnpahe
MHHMaHHTO pa3CToHHe Mekdy NOBbpxHOCTTa, Ha KOrTO ce NOCTaBRT CbDOBeTe 3a TOBHe Hn HnHCkATA qACT Ha kXyHcKmAcnPiatop, Tp6Ba Da 6Je He no-MaIKO OT 45cm B cnyaH na EneKtpUeCKn NeHKn Hne No-MaIKO OT 50cm, B cnuyaH ra3OBu INI KOMbUnHpaHn neHKn.
Ako B INHCTpyKUInHe Ha r3oBnI ypeD 3a rotBeHe e nocOueHO No-ROJMA POa3CToRHe, To Tp8Ba Da ce Hma npedNt.

En.Bpb3ka
HanpexeHneto B en.Mpejata Tp6ba Da otroBapra Ha HanaPexeHneto, KOeTo e NocOeHO Bbpy EtnKeta C daHHnTe 3a acnnpaTopa, noCTabEn OT bTpeuHata My cTpaHa. Ako e ChAbDen C uenCen CbPjExete acnnpaTopa KbM KOnTaKT, CbOTBeTCTBaUc Ha DeIcTBaUHTe HOpMN HAMnpaC Ce Ha JleCHO DoCTbHNO MAcTO DOpN i CNeD npKlNoHuaHe HA MOtaxa. AKe He e ChAbDen C uenCeN (DInpeKTHo CbP3BaHe KbM pMeXaTAt), nIIu UeNCeJIbT He e Ha DoCTbHNO MAcTO CneD npKlNoHuaHe HA MOtaxa, hNtONBaTE DByIPOIooH ePekCbay CNopeD HOpMITE, taka Ye da CE OCNyprn PblHo N3KlNoUHae Ha MpeXaTApn CBpXHAnpeXeHne III, B CbOTBeTCTBne C npABINATA 3a MoHTnPaHe.

BHIMAHNE!
Ipei Da CbPKeTe OTHOBO ACnnpaTopo KbM MpeKaTa N da npOBepTe DaII FyHKUOnHpa npabINHO, npOBepTe daII KaBeJIbTe MOHTpAH KAKTO TpA6Ba.
AcnipatobTe cahbden CbC cneuaen Ka6e 3a 3axpaHbahe; Bcnyai, YeKa6ebTb6BeYbpeHOn6bPheTe ce KbI rapaunOHnna cepBn3 3a da nOlyuHte HOB.
MOHTAX
Ipei Da npicTbnte KbM MONTXa::
YBepTe Ce, Ye 3aKyIeHnIaT O Bac npOdyKT oTROBaPn no pa3MePN Ha n36paHOTo MxCTO 3a HcTaNipAne.
- OtctpaHeteФnITbpa/ФnITPnTe cakTNBEN BblIeN (pa3bnpa ce,ako n36paHnTOT Bac moJIeP a3nOJa r taKbB).3a da n38bPwITE TOBA npocneDeTe onepaunite B cbOTBeTHnA naparpaΦ. MoTHnPauTeФmITPnTe oTOHO bCaMo Bcnya, ye keNaeTe da n3NOJ3BaTe acnnpatopa BbB BapnAHT HaФnITpnpaUa BepCn.
- YBepete ce, ye no Bpeme Ha TpaHcnpTa BBb BtpeuHATA quch HA acnnpatopa He ca nonaHaJI Npe6HNI pIeDMTe, KATO HApIMep PIIHKHTa C BNHTOBe, rapaHIOHHN KapTn I .Ako HAmepTE TaKINBa OTCpAHene m n nn 3ana3e.
Pn BCE TOBA, Bn npenopbYBaMe Da ce NocBbETBaTe c KbaJINФmUpaH TeXHnK, 3a Da CTE cnTyprHn, Ye DoCTaBeHNte Akcecoapn Ca nOxOJaIz 3a ZeIeta. CTeHata, CbOTBeTHo TABAHbT, Tp86Ba Da 6bDat IOCTaTbHNo CTaBmHn 3a Da n3Dbpxkat Ha HATOBAPBaHETO.
Haun Ha ynoTpe6a
T1. Byton CbETnHa ON/OFF
T2. BytoH HamamraBaHe Ha ckopocTHa ha acnnpaun / N3KJIIOUbaHe Ha MOTOP
L1. AKTNBnpan INDnKaTOp Led 3a CnHnAIn3aUna Ha CKopoCT
T3.БутонВКИЧУBAнеHaMOTOP/YBЕЛЧУBAнeHaCKOPOCTTaHa acnIPAuaŋ
T4.Функунанен6утон"BOOST" -ИнтузиBNСКОРСТ -
T1: ByToH cBeTmHa ON/OFF
3a Da BKJIIOHHTe N N3KJIIOHHTe CBETJINHaTAt
T2: Byton HamaJIbaHe Ha ckOpocT / N3KlnOuBaHe Ha MOTOP
HaTnCHETe 3a Da HamaJIte MOUHOCCTTa Ha acnIPAuJa, Do N3KJIOUBAHeTo Ha acnIPAtopa.
HaTnCHETe 3aApbXTe HaTnCHaT 3a Da N3KJIIOUHTe DnpeKTHO acnnpatopa.
L1: AKTINBIPan INHdNkatOp Led 3a cnHnI3auJna HcKoPoCT
zetaTpaHnTe LED nHdNkaTopn CBetBb3 OCHOBa HcKoPoCTTa Ha akTbIpaHaT/aM3NoJ3BaHa acnPaun
| 1° ckopotм Ha acnupaця akTbupaHa |
| 2° ckopotм Ha acnupaця akTbupaHa |
| 3° ckopotм Ha acnupaця akTbupaHa |
T3: ByToH 3a yBEnMuaBaHe Ha CKOpocTta
HATNCHETe 3a Da BKJIIOUHTe acnnpauJyTa
HaTINCHeTe 3a Da yBVeIInuHte MOUHOCCTTa Ha acnnpaun.
T4:Функионален6утон"BOOST"--HHTeH3nBnCKOPOCTN-
HATNCHE T4 3a da aKTbBpate cKOpocTtHa HnHTeH3nBHa acnpaia "BOOST1", c Temnop3tOp 3a 30 MmHyT Ta3u YlbJnKeHa Temnop3auaE Cb3daJeHa 3a Da rapaHTmae eDHO BpeMe, POnE3Ho 3a rTOBeHe C BcOko CbDbPkaHne Ha DnM
3a6eJexka : cIeI n3TmUaHe Ha 30 MNHyt, acnnpaTopbT ue Ce BbPhe KbM npedBapntelHO 3aJaHata CKOpOCT Ha acnnpaunia ***
OT BKNIOHcH MToP B"BOOST 1", HATNCHE TNOBTOHO T4 3a da AKTNBnPaTe CkOPOCTHa HNHTeH3NBbA cNIPAuHA "BOOST 2", C TEMNOPIN3TOP 3a 7 MNHyTn
3a6eJekka:cneiN3TuHaNe Ha 10 MNHyTn,acnnpaTopbT ue CE BpHc KbM npedBapntelHo 3aJaHeHata CKOpOCT Ha acnnpaunna ***
3a6eJekka:HaTnCKaIKN NOBtOHO T4,no BpeMe Ha7-Te MInHyTu,CEBpbUa KbM ppeDabPteHNO 3aJaDeHaTa CKoOpCT HaacnnpaIura***
noBpeMeHaФyHcHnTe“BOOST1"u“BOOST2"akTbHpaHn,HaTnCKaKn:

BpB7a Ce KbM CkOpOCTTHa aCnnpaun, 3daDena npeDbapnteHNo ***

Bpb7a ce KbM 3-Ta ckopocst Ha acnnpauqna
*** CKOPOCTTA Ha npédxoHnHaTa acnnpaunocctBa C Bb3MOKHOCT 3a Bn3yaIIN3auN noCpeIcTBOM LED INHdkaTOPte 3a CNHANIN3auN L1
ako e 3aadaeHa HHTehnHBHATA CKOpOCT DnpeKTHOT N3KJIIOHeHnA cAnpApToP, MOTOpbT CeN3KJIIOyBa.
По врeme на уnotpeba на Функшипе "BOOST" симьюльт
T4 Mura:
He IopKIOUaTb np6Op K 3JIeKTPnuecko CETn Do Tex nop, NOKa YCTAHOBKa PONHOCTbIO He 3aKOHHeHa.
To TcKacaetcayTexnuecknxMepmep6e3oNachoctnB npimHeHnn Do c6poca napOB cTporo npinpejKBaTBcra TORO TcnpedyCMatPnBaetcno HOpMaJIOkAJIbHbIX KOMNETHTbIX opraHOB.
- BcacbBaemb Bo3dyx He DoIOnKeH BByIyCkTaBcB Tpy6y, nCIObn3yEmyIO DnA Bbl6pOcOB DblMOB npN6bOpAMn, pa60taUoMm Ha ra3e NIN dpynx TOnPiBax.
- He INCNOJb3OBA Tb INI ONCTABJIb BbITJkky 6e3 IaMNoeK npabINbHO yCTaHOBJIeHHbIX C pNCKOM NIOyHITb ydap 3NEKTpUeCKIM TOKOM.
- HNKOrJa He NcNoJb3ObA bBbITaKky 6e3 npaBnIbHO yCTAHOBHeHHpeiEeTK!
- BbITJXka HNKOTDA He DoIIXHa IcNoJIb3ObaTbca, KaK OONOPHAA NOBepxHOCTb, ecIN TOJIbKO He YKa3aHO INaHe.
- IcnoJb30BaTb ToJIbKO BnHTbl DnI ΦHKCnPOBaHnB B KOMIIeKTe C npOyKTOM DnI yCTaHOBKn UIn, ecN HET B KOMIIeKTe, npIObEpCTn BnHTbl npabINbHOrTO Tnna.
- IcnoIb3ObaT npaBnIbHyo DInHy BnHTOB, yka3aHHyO BpykoBOCTBe no YctahOBKe.
B Cnyuae comHenei, KOHCyIbTIpOBaTbCBA TOpN3nPobAHHom CEHTpe no 06cJyKINBaHIO nIN CKBaJIInΦnIUPoBaHbIM nepcoHaJIOM.
BHIMAHHE!
- HeyctaHObKa COOTBeTCTByHUsNX BINTOB m npncnOCo6JIeHm IpyfHKcnpOBAHmB COOTBeTCTBmC 3TmM INHCTpyKJzHM MOKeT pNBeCTN K pNCKAM 3JIeKTpUeCKOrO pONCXOXDeHnR.
He nOJb3yIte yCTpoiCTBO c npOrpAMMaTOpOM, TaMepOM,OTdJIbHbIM NjIbTOM dNCTaHcUHOHHo YnpabJIeHn IIN NIObIM Dpym UCTpoiCTBOM, KOTOpOE BkIIOHaeTcA ABtOMaTUnCeKn.
Danhoe n3dJIeIne npoMapKIpOBOH BO CootBETCTBUN C Ebponeckoi DnpeKTbBoi 2012/19/EC NO yTnIm3aunn 3NeKTPnueckoro and NekTPOHOHor o6opyDoBaHnA (WEEE).
OeceueH npabnblHyu ytnlnaaun daHHoro n3denn, BbI NOMOXETe PneD0TbpaTb NtEHNaIbHbIe HeraTnBhie. noclectBn Dn Okpykaioe Cpebl 3doPobBaYeJIOBeKa.

CnMBoI Ha cAMOM N3dEINN INIc COpOBODntbHOJ DOKyMeHTaUy Kya3bIAeT, YTO pRn yTNJIINaAcm DaHNOrO N3dEINN C HMM HeB3a OBpaATbCe KAc C obHybIMn 6bITobbIMN OTXOdAMu BmecTo 3TOrO, erO cNeDyET cDaBaTb COOTBeTCTByOuOu PNHK npneMkn 3NeKTPnueCKoro N 3NeKTPoHnOro ObopyDobAHn DJIPOcNeDyKOuSeY TNIIN3aUIN.
CdaHa hCNOMdoJXHaIPOIN3BOIDHTCB8B COOTBETCTBIM C MECTbIMN PAPBNIAMN NO YTNJIN3aUN OTXOIOB.
3a 6oIe neopob6Hn HnFopMaueNe O npabInax oBpaueHn C taKIMN 3dEJIaMn, IN yTNIIN3aUN IN pepebaOTKn 6bpaauTeCB MeCTHbE opraHb Bnactn, B cnYk6y no yTNIIN3aUN OTXOIOB INB Mgar3HN, B KOTOpOM Bbl npio6pei nn daHnoe IN3deJine.
UcTpoIcTBpa3pa6oTaHO,NCbItaHOuN3roTOBneHO B COOTBETCTBmC:
- Bezona ChocTb: EN/IEC 60335-1; EN/IEC 60335-2-31, EN/IEC 62233.
- 3KcNJIpyaTauMOHHbIe XapaKTepnCTnKn: EN/IEC 61591; ISO 5167-1; ISO 5167-3; ISO 5168; EN/IEC 60704-1; EN/IEC 60704-2-13; EN/IEC 60704-3; ISO 3741; EN 50564; IEC 62301.
EMC:EN55014-1; CISPR 14-1; EN55014-2; CISPR 14-2; EN/IEC61000-3-2; EN/IEC61000-3-3. Претложенядпарыноги И сальзовни Bцелх Chнжения bo3dienTBHAOKpykaHouOcredy:BklnHOTeBbTJKHOI KONNAH MaMHIMaJIbHOB KcOKoCTN, KOrDA HauHnAteTe roTOBnTb, nOCTaBtEero pa6OtaTB TeueHne HeCKoJIbKIN MInHyT NOcNE TOnK, KAcZaKOHrTe rOToBnTb. YBeIuNHBaTe CcKoPcTb ToJbKO B cCnyae BoJbUO KOmHecCTBa DmaHnnapa, Nnp6eRaiTe K INcNoJIb3OBAHINO NObIuIeHHbIX CKoPocTei ToJbKO B 3KcTpEmaJIbHbIX CnTuayuHx.3aMeHNeTyeJrOblHbIΦnIbTp(b), KOrDA 3To Heo6XoDmO,ДгnoNDepjckAnHoxoOse 3ΦΦeKTnBHOCTn yMeHbSeHnA3anXOB.OChuaTe JxIpOBov/bieФnIbTp(b), KOrDA 3To Heo6XoDMO,ДгnoNDepjckAnHoxoOse 3ΦΦeKTnBHOCTn XIpOBorOfHbTp.NcNoJIb3yIte MaKcImaJIbHbI DaAMetp CnCTeMbBo3dYxOBODOB,Yka3aHNbIBDaAHHom pyKobOdCTBe,ДгЯ ONTMMa3aUN 3ΦΦeKTnBHOCTN MmHMIMa3aUyn yPoBnY shMa.
EcniOntDJIeKaN3dJIeNbBInOJIHeHaN3cNEUAnbHOro,a He N3 cTaNapTHorO dIa Tnna BbITJXKn MATEpHaIa, Takoro KaK DepeBO,KepamOrpaHITn Krion,JIb6aOnOTNIHTeJBHApOCOBeHHocTb,pa3Hnua CBeta NdeΦopMaunIOBepxHOCTn DOJXHa paccMaTpNBaTbCn HE KaK DeΦeKT,a KAK xapaKTePncTnKa camO r MaTePHaIa.
B Yacthoctn, DepeBo -3to 6nlaropodHbI, HATypalnbHbIM XINBOI MaTePnAn, KOTOpBIMMeET THeDcHIO MeHrTbcra Co Bpemehm.3To Denaet KaxKdoe N3dJIne yHNkaJIbHbIM IM HENOBTOPMbIM.
Ponb3ObaHne
BbIyKa cKoHcTpynOpBaHa nIpa6Otbl B pexIMe OTbOda BO3DyHa HApKy nIIN peUrpkyIaun BO3Dyxa.

IcnoJIb3ObaHnE CpeXnme OTbOda BO3dYxa
B 3tOM pexnme nnapenHb BbIbOaTcH npayKy uepe3 n6kn tyboipobOD, noCoeHNHeHbK CoeHNHTeJbHOMy KOJIbU.

BHIMAHNE!
BbIbOHa Tpy6a He BXoJIT B KOMPnKeT n DoJIkHa 6blb npIO6peTeHa OTdJIbHO.
DnAmETp BbIOHOI Tpy6I DOJIxH COOTBETCTBOBaTb DnAmETpy CoeINHITelbHOrO KOJIba.

BHIMAHNE!
EcnBbITgKa ChabkeHa yOrIbHbIM fNtPOM,To yBepeTe erO.
IpoDcOeMHInTe BbITaKky K bYbIOHOn Tpy6e C dAmEtPOM COOTBeTCTByUoMM OTBepCTnO BbIXoDa BO3dUxA (coeDHINTeNbHbI ΦnaHeu).
UctahOBka Tpy6 C MehblIM DnAmETpOM DaCT yMeHbWeHne MOUHOCTN BCaCbIBaHnB BO3Dyxa N pe3Koe YBeIuYeHne yPoBHn Wyma.
ПОНЗВОДИТЕСИМАЕТСЕБСВЕКУTO OTВЕТСBEHNOCTB NO OTHOWEHIO BVISE CKA3aHHORO.
I NcnoIb3OBAtB Tpy6y C MmHImaIbHO Heo6xoDIMOJ DnIHoi.
!NcnoIb3OBAbTpy6yCHaIMeHbIIMKoJIuYeCTBOM n3r6OB(MAkCImaJIbHbIyrOJn3r6a: 90^ )
! 136eRaTb pe3KOrO n3MeHeHn CeYeHn Tpy6bl.

IcnoIb3ObaHneBpeXnme peunPKyIaIu
B03dUyxa
T1: Khonka BKN/BblkI ocbeuenia
L1: CBeToBoi HnDnKaTOp OTo6paXeHnIaTeKyuIeckOPOCTN
ZHTpaJIbHbIe CBeTObIe INHdNkAToPbI 3aRopaHOTcB 3aBNCIMOCTn OT TEKUzEINCNoJIb3yEmoN CKOpOCTn BCacblBaHINr
| akTINBHa 1-я скорoctb BCacbIBaHЯ |
| akTINBHa 2-я скорoctb BCacbIBaHЯ |
| akTINBHa 3-я скорoctb BCacbIBaHЯ |
T3: Khonka yBéniuèn énckopoctn
HaxMITE DnB KJIIOUeHn BbITAKN
HaxMNTe IyBvEJIuChEnI MOUHOCTN BCaCbIbAHnI
T4: KhonkaФункци "BOOST" - nobblueHHa ckopoctb
HAKMITE KHOKNIy T4 IJRA BKNIOUeHHN NOBIIeHHOICKOpocTN BCaCbIBaHHN“BOOST1”,KOTOPA 6yDetakTINBA TeueHne 30 MInyT
TakaydIINTeJIbHOCTb3ToI dyHKunPipeDyCMOTpeHa dIa ObecIeHnI POIe3HOro BPeMeHN IpiPiRIOTOBHeHN 6JIIO C O6pa3OBAHnEM 60JIbWoRO KOniHecTBa DblMOB
PpimMeaHHe: NO NCTeueHn 30 MmHT cKOpOCTb BbITRAKKn npIMET3NaueHHe, yCTaHOBLeHHoe pahee ***
KordaDbiratelpaobotaetBpexime“BOOST1”,eue pa3 haxmte KhoNkTy4,IINBKNUChENn NOBbIeHHOCKOpOCTn BCacbIaHnna“BOOST2”npoDIOXnTeJIbHoCTb daHHoro pexima coctabJrert7 MNHyT
PpimMeaHHe: IIO NCTeueHn 10 MNHT CKOpOCTb BbITRAKKn npIMET3NaueHHe, yCTaHOBLeHHeo paHee***
Ппшеманг: пи NOВTOPHOM Haxatm KhoIKN T4,В Teчени INHTepBana 7 MnHyT, CkOPOCTb BbITJXKN ПпмET 3haЧENHe, YctahOBJIeHHOpe pahee ***
ecnФyHKuN“BOOST1"m“BOOST2"akTnBbI, npn Haxatm:

OCyIeCTBJIaTcBO3BpaK yCTaHOJIeHHo paHee ckOPOCTN ***

OCyUeCTBnIeTcB O3BpaT K 3-н SCopoctN BCaCbIbAHIN
*** BbIbpaHHa paHee CKOpOCTb BCaCbIbAHnI OToBpaXaETcC nOMoUHcBeTObByx INdKAtopOB L1
ECIN NOBbIeHHa CkOPOCTy yCTaHOblHa pN OTKIOUeHHo BbITXKE, DBIRATEJIb BbIKIOuaeTcra.
Пи Испльбзовани Фчнкш "BOOST" CMBON T4 Miraet:

(“BOOST 1”: 6eIbIM ζBETOM - “BOOST 2”: CINHIM ζBETOM)
HnDkaTOpbI 3acopeHnaΦnIbTpoB
Yepe3 OINHaKOBbI INTHepBaIbI BpEmHn BByTJKa CInrHaJIIm3NpyeT 0 Heo6xOIMOCtN BblIOJIHeHHa Teo6cJyKmBAHnIΦnIbTPOB.
CBeTOBoi HndnKatOp (L1) NaHnaET MIRaTB (Bce CBTeOAnIObI MIRaHO T BMECTe): BbINOJIHTe Texo6cJyKnBaHne KInpoynabNlaIOUe OfMlbTpa.
CBeTOBoi HndnKaTOp (L1) BkIIOuHaETcra nonepemHeHO (CBeTOIDIObl BkIOUaKOTcra nocJeIOBaTeNbHO): BbIOJIHNTe TeXo6cJyKINBaHne fNlbtpa c AKTINBIPOBAHHbIM yTlEM
PpimmeaHne: INDkaZna 3acopeHn OJbTPOB OTo6paKaETc npBbIe 10 ckyHn nocNe BKIOHeHn BItjAKn. B TeueHne DaHHoro INHTepBaNa cJeNyet BInOJIHNt bCpO INDkaTOpOB 3acopeHn.
C6poc INHdkatopob 3acopenia qnlbtpoB:
CBETOBI HNDAKATOP (L1) BKNIOUaTcRA I BYIKNUOaTcRA (B 3aBNCIMOCTN OT TnPa OINbTpA, INI KOTOPORO OCUyueCTBIAEYTCa CbPOC, CBETODIObI MmraIOT BMecTe NIM BKNIOUaTOcNocNeIOBaTeNbHO); NOaETcRA 3BYKOBO CNHAn, KOTOpBI NIOdTBeRJaAeT npabUNbHOE BInONHeHne cboPca.
BkIIOUeHHe INdkaTopa 3aqr3HeHnF qnlbtpOB
PpHMeaHHe: DaHHa OpepaunBbIIOJIHReTcR pN BblKJIIOUeHHO BblTJXKE.
KnipooynaBnBaOuNmΦnIbTp
DaHHbI INHdNkATOp ObHyNo BKnHoye

HAKMTTe KHOIky -ДЯ OTKJIOUeHINa

DToPmMyTeCn HOpM MlueBnx KOMneTeHTnX OpraHIB.
ПовитразиВТУгЕТС, He NOВИНно ВИNYСКATNСВВ TrpyБуяк BAИКОПСТОВЕТС ДДЯ BAИКИДУ ДИМIB ПИСТРОМ NIO npaцJOТь Ha ra3i Ta iHINX nANBax.
He BnKOpNCToBvBatn a6o 3aIiMaTn BNTAJKy 6e3 npabInbHO BCTaHOBJIeHX JAMN0YOK 3 pN3IKOM OTPIMATu yap eJekTpUHIM CTpyMOM.
HikoJIN He BnKOpNCTOByBatn BnTgKky 6e3 npaBnIbHO BCTAHOBJIeHO peSiITKn!
- BnTjKKa HIKOJIH He NOBHHa BNKOpIcTObYBaTcra KOnOPHa NoBepxH, RaJIO TjIbKn HE BkAzCyTbCra.
BnKOpNCtOByBaTN rBnHTn DnI φikcYBaHnB Habopi 3 npOdyKTOM DnI yCTaHOBKn, JaKIo HemaE B hAbopi, npiD6bTn rBnHTn IpabInlbHoTOny.
BukopncObyBatn npabInbHy doBXnHy rHNTIB kka Bka3yTeCbra B noc6Hmky no BcTaHOBneHHIO.
- Y BnnaIky CymHIBIB, KOHCyIbTyBaTncB A BAtOpN3ObaHOMy
- ΚeHTpi a60 3 KBaIiΦiKOBaHIM NepcoHaIOM.

YBAGA!
He BCTaHOBIIbAHnB BiINOBiHNx TBNHTi pIncTPOIB dIy fikCyBaHHy BiINOBiHOCTi 3 cIMN IHCTpyKlAmM MoKe npBecTe Do pN3NK eNEKTpUHOro noXOJxehn.
He cnid BnKOpNCToBvBaTn 3 npOrpaMaTOpom, TaHMePOM, OKpemIM NybTom KepyBaHHa 6o3 6ybJkMM iHsMM pNCTPOeM, kNIM npNbOBDtbcra B dIO ABTomATuHO.
DanHH Bnpi6 npomapKobAHn BiDnOBiDn Do EbponecBkoI DnepeTnBn 2012/19/EC, ytni3auiy eNeKtpnHoro i eNtPOnHoro obnadHaHn (WEEE). 3a6e3neuyuHn BipHy ytinl3auio cIoro Bnp6y, Bu donOMOKeTe nonepednTn NOTeHui Hi eRaTbHi HacniDn Ipn OTOUYOHoro cepEOBua i 3dopOB'JIIOHNu, KOTPI MOrn5 MaTn MiCe B nPoTInEChHomy BnAaKy.

Cnmbon ha camomy Bnpo1 a0b Ha cynpobodkyohomy
Horo dokymenti bka3ye, 0 npn ytniiauii cyboro Bnpo6y 3
Hm He moKHa NOBODTNCRA K3 i 3BnuaiHMMN NO6yTOBIMn
BIDXOAMn. BIn Mae 3daBaTnca y BINIOBINHN pyHKt npriomHy
eNEkTPuHoro I eNEKTPoHoro oBnaDnHnA DnI noaJbIoU
tynIiaui. 3dabAHNa HsIaM NoBNHNO BVKOHyBaTnca 3rIdHO
3 MicueBMn npabnAmn PO tnoBIAuii BIDxOIB. DnI 6bnwe
detaJIbHOIHΦopMauiPi npapBnA NoOBdoHeHH 3 TakIMn
Bnpo6Ba, ix tyniiaui i nepepo6Kn 3BeptaItecb BmicBti
opraHN BnAdn, B Cnyk6y O tyniiauii BIDXoIB, a0b B
MarazHN, B kOMy BN pnpdban daHn Bpi6.
Прилад снроektовано,Вишибунаи i Ви�товлес 3гдн 3:
Бezneka: EN/IEC 60335-1; EN/IEC 60335-2-31, EN/IEC 62233.
Ekniyyatauzhiякosci: EN/IEC 61591; ISO 5167-1; ISO 5167-3; ISO 5168; EN/IEC 60704-1; EN/IEC 60704-2-13; EN/IEC 60704-3; ISO 3741; EN 50564; IEC 62301.
EMC: EN 55014-1; CISPR 14-1; EN 55014-2; CISPR 14-2
EN/IEC 61000-3-2; EN/IEC 61000-3-3. Iopadn nnpabunboi ekcnnyatau ta Dnna 3HnKHeHH BnInBy Ha cepeoBniue: Bmkaite BnTakky Ha MihimalbHy WbNdkictb nepeod noatkom npirotoybanha iki, i zanuaiute II npaiobatn Ha deiklbka Xbnin Nicra 3akHueHH npirotoybanha. 36inbuyte wbnkictb tibkn y paai BeNkoi kilbkocti dmy i napy ta BnKOpncToBvye HndyB tibkn y kpaHix BnAdkax. Dnpi ndpmaHn BnCOoi eFeKTnbHOCTi BndaHeneh 3anaxib, 3a Heo6xHoocti, BnKOHye 3amiHy ByrInbHorO(-nx) fiptpy(-). Dnpi ndpmaHn BnCOoi eFeKTnbHOCTi fiptpy KupiB, 3a Heo6xHoocti, BnKOHye TcNCTKy fiptpy(-) Xkpiv. BnKOpncTOByte MAKCImaIbHni diameTp cntemn nobitpoBoID, 100 Bkazahn y IHCTpykui di na ONTtima3aui eFeKTNbHOCTi Ta Mihimiaaui shymy.
Y BnnaKy, KOJI N O3do6neHn BnO6y BnroTOBnCTbC 3i CneuiaIbHoro MATEpiany i He cStaNdAPTHM dN Tny BVITXKN, TaKnx Jk DepeBO, NOPeJHOBa KepaMika i Krion, 6yIb-ky BiDmInHy O3haky, pi3HniO y KOJIbopi i DeΦopMaio NOBepxHi cnip o3rJaATn He Jk DeΦeKT, a Jk XapakTePrcNTKy MATEpiany.
y KOHKpeTHOMy BnauDKy DepeBnHa -Ze 6NaIroPOdHn, npnpOHN i XnBn MaTePiaJ, kN3 3aCom 3MiHIOCTbC. Ze poobTb KoXeH Bnip6 yHikaJIbHM i HenoBTOpHM.
BnKOpncTaHHa
Bntjka po3po6JIeHa dI pyo6OTn BpeKIMi BCMOKTyBaHH, BnBOJHn NOBITpr Ha3OBHI a60 B fiNbTpyKOHmy peKIMi 3 peuPKyIJIueIO nobITpr.

BapiaHT BiBVeHn
Iapn BvBOnaTbCn Ha3OBHn chepe3 BvBiNDy Tpy6y 3akpinEnHy DoФlaHn4 3'EdHaHHN.

YBAGA!
BvBHa TpyBa He noctaAeTbCt i Tomy Heo6XiHNo ii npiDbaTN Okpem.
Diametp BmBjIoH Ipy6n NobHEn BiNobiDatn Diametpy 3'cHyBaJIbHOrO KInbIa.

YBARA!
KIO BNTXKNH KOBNAK Mae ByrInbHi pJInbTpN,TO iX Tpe6a 3HATN.
Пд' endaTN KOBnak Do HactiHoi BvBidHOI Tpyb Ta BvBIDHoro OTbOpy 3 OndaKOBIM diAmetpOM BxOyo Nobitpr (3'edHyOch yФlaHeu).
BukopnctaHna HactiHHnx BvBiHnx Tpy6 Ta OTbopib 3 MeHIm Diametpom npBBeDo 3MeHWeHHe epeKTHBOCTI BCMOKTyBaHHaTa 3Haune 3bIbWeHHa pIBH yMy.
Tomy Mm 3Himaem0 3 Ce6e 6ydb-ky BiinobiidaIbHiCTb no Bnuecka3aHOMy.
BukopncTObyTe HauKopoToHn BntJxHn KaHn.
! BnKOpIcTObyTe BnTjXHNI KAHJI 3 HaMeHsIOKINbKiCTIO NOBOPOTIB (MAKCMaJIbHNI KYT NOBOPOT: 90^
! YHnKaIePi3Knx 3mIH nlooi nepepi3y BNTJXHO KAHaNo.

Bapiant 3 pfinbtpauieo
BTRHYte NOIBITp3HEKINPOEcTBcra Ta OUYIyETbCra Ta 3HOBy NOBepTaetbCBA pNIMUeHH. Tnro, 0o6 BVKNOPICTOBYATNI KOBNAK yCbOMy pexkmi, Heo6XiJHO BCTAHOBHTI DOaTKBOY CNTEMy fInbTPIB 3 aKTINBOBAHIM ByrillnM.
Inctanlaia
BicTaHb HNxHbOi BiDcaTnHn BNTaKKn Do nocyDu Ha KxyOnHHI pnti Mae 6ytu He MeHue 45cm, y BnAky eNeKtpuHnx pnt, ta 50cm, y BnAky ra3OBnx Ta KomboiHOBaHnx pnt.
Heo6xioH npinmatn do ybaru BiDctahi, kki Bka3yHtbcraB IHCTpykui 3 IHCTaIaui raoBOi PInTN.

Pi'd'cHaHnI do eNeKtpomepeksi
Hanpyra B eJektpomepexi Maé BiIDNoBidaTn Bk3aHIMXapakTepeNtKam Ha etKeTci, RaKa 3hAXoDnTbCra BCEpeNHIBVTRXKN. RaIIO B KOMPLeKT BXoNTb BVIIka NiE6DNHNNB EeJokTPomepexy, To cnIid NiE6DAHATn BVTRKky Do pO3eTKN, 0IO BIDNOBIAe ICHYUChM HOPMaT Ta 3hAXoDnTbCBA DOCTYNHOMYMICi, 0IO MOKHA BVKOHaTNI NICNl IHCTANJI. KaIIO JX BVIIKAHe BXoNTb B KOMPLeKT (nprme NiE6DNHNNB EeJokTPomepexy), a6o PO3eTKa He 3hAXoDnTb B DOCTYNHOMYMICi, TAKOX i NICLa IHCTANJI,To cnIid BMOHTyBaTN HALEXHNDBOX-POIIOCHIN BVMNKau, JaIKY 3a63eJIeHTb NOBHEBIKDIOUeHHA BID MEPEKi BYMOBXIpeHAnpyr lI KateropiiB NOBH BIJDNOBIDHOCTI 3 npabINAm HCTANJI.

YBARA!
nepei TmI K 3HOByPiKJIIOUHTN BNTRAKKy Do eNEKTPOMEpeksi nepeBipn npabInbHicTb pOBoT, 3aBXKn KOHTpOnHte Uo6 uHyp Mepeki 6yB 3MOHTOBAHn BIPHO.
Bntjxhnn KOBnak Mae cneuaJIbHn npoBid JxNBHeHHa; y BnnaIky noIkoJKeHHn npOBOy, 3AmOBe Ioro y CnyK6i TexHiHOrO o6cIyroByBaHH.
Inctantia
Ipeep noaTkom MOHTaxy:
- IpeBipTe 06 po3mIP npuD6aHOro Bamn BInpo6y nIXOINI Do BV6paHOrO Micra NOro MOHTaxy.
3HimtBByilbHnΦilbTp/nKaIooBiIN/BOHNpncyTHi (DnBNTcB TaKoX BiNIOBIDHN po3dIn).ΦIbTp/n 3HOBy BCTaHOBIIIObTcR JaKIO Bu XOHTe BnKOpNCTOBaTn KObnak B peKmIp ceuPKyIaJI.
- IpeBipnIu Ⅲ6 BCEPeHNI KOBnaka He 3aIIuAnOcR npEometi, NOMUeHNX Tyn Ha Yac Ioro TpaHCnOpTyBaHn (HaPnKnIa, NaKeTknB 3 uypnAmn, NtCTIB rapaHTii i T.n.) ,KaIoo BOH e, BmIMt bix i 3beepkItb.
B KOMNIIeKT BITRAKKI BXOJAb TUpyuIN DnA KpINNeHn, po3paxoBaHi Ha 6iNbUcIb TUniB CTIn/CTen. Ipote Heo6XiHo 3BepHyTncd O KBaIicPikOBaHorO TexHika DnA nepeBipKn npDAtHOCTi MATEpiAnIB B 3aJexHOCTi BiD TIny CTIn Hn CTeJI. CTHa/CTeI NOBHH6ByN DoCTaTHb MOiHMM, Uo6 BHTPMATn Bary BITRAKKI.
Функюнвань.
T1. Khonka yBIMKHeHHBIMKHeHHCBiTa
T2.KhOnika 3MeHsueHHa WbNkOci T BCMOKTyBaHHa /BmKHeHH DaRyHa
L1. lHdkatop yBimKHeHOI uBnDkOci
T3. Khonka yBIMKHeHHa DnBryHa / 36iNbSeHHa WBNkOcTi BCMOKTyBaHHA
T4. Khonka Фуннкш "BOOST" - iTHeHcBnA wBnDkiCt b
T1: Khonka yBIMKHeHHB/BMKNHeHH CBITJa
IIO6 yBIMKHyTN Ta BIMKHyTN CBIITIO
T2: Khonka 3mehuHHe HwBnKocTi / BvmKHeHHaBnTuHaHTCHITb, uo6 3MeHUnTI NOTyKHiCTb BCMOkTyBaHHa DO BvmKHeHH BnTRXKN.
HaTCHiB i yTpmyTe, 06 oDpa3y BmKHyTn BtJkKy.
L1: IINKATOP yBIMKHEHOI WBNKOCTI
ZHTpaIbHI CBITIOIOI CNaIaXyIOb BiIDNObIHO DO AKTNBHOI / BNKOPCTOBYBaHOI WbIDKOCTI BCMOKTYBaHH
1°aKTHBHA WBNIKCTBCMOKTYBaHH
2^ aKTbHbA WbNdkCTb BCMOKtYBaHHa
3^ aKTbHA WbNdkCTb BCMOKtYBaHHr
T3: Khonka 36ilbweHH WbUdkocti
HaTNCiTb,IOB BKIOUHTN BITXKky HATNCiTb,IOB 36JIbUHTN NOTyXHcIb BCMOKTyBaHHa
T4: KhonkaФункii“BOOST”-iTHeHcBnBa WbNdkicTB -HaTNCHTb T4,単6akTNByBatn iTHeHCBNHy WbNdkictb BCMOKTyBaHHA《BOOST1》,po3paxObayu Ha 30xbNJIN
ue npomikok yacy sbv Bn3haeHn came TaKIM YNHOM, 063a6e3neHTN Kopuchn yac dIy npiroToYBaHHj iKi 3 BnCOKM BMICTOM BNAPy
Ppimitka:Yepe3 30 XbvinH BnTjKkNa NOBepHeTcBdo paHie BCTaHOBNeHoi WbNDKOcti BCMOKTyBaHHN ***
KONI DnBHyN npaHcE B pexiMi I BOOST 1》,3HOBy HATNCiTb T4,IO6 akTnByBaTH INTEHCNBHy WBnDkICTb BCMOKtYBaHHA IBOOST2,pO3paxoBaHy Ha7XBNINH
Ппмитka:Чepeз 10xbилн Вигяк Повертабсьdo paHIwe BCTaHOBNeHoI WbNДКоTi BCMOKtbyBaHHA ***
PnmuTka:ue pa3 HATNCHByuN T4,npOTAROM7XBUNIN, npUaIADNoBepTaAcTbCraDpaHIIe BCTAHOBJIeHOI WBNDKoCTI BCMOKTyBaHHA***
KoIIN cyHKui "BOOST1" ta "BOOST2" aKTHBOBaHI, HATNCHYBUN:

npnilad noBepTaetbCao paniwe BCTAHOBHeHOI WBNKOcTi BCMOKTyBaHn***

NOBepTaεTbca Ha 3° WbɪnʌkICTb BCMOKTyBaHH
*** PONepeHnI WBnIKCTb BCMOKTyBaHHa BkA3yETbCa 3a DOnOMorHO CBITNoIOJHO rINKAtopa L1
KkIIO IHTEHCNBHA 1WbIKiCTb BCTaHOBNIoETbC8 6e3IOcepeHbO 3 BIMKHeHOI BNTJxKK, DnBHy H BIMNKaETbC8.
Пд Ус ВИКОРИСТАнгункш "BOOST" CIMBON T4 6нмаe

(“BOOST 1”:6ine cibitno - “BOOST 2”:cHHe cBttno) IIndkaTopn Hacnyehocti fInbtpiB
Yepe3 neBni npomixknyacy BnTjXka CnRHaJI3yepno Heo6xHicThb o6cnyroByaHna fiIbtpa.
Cbitnojio (L1) 6nmae (bcicbittnobi iHdkatopn 6nmaotb pa30M) BIKOHaTe Texo6nyroByBaHHa
phiIbtpra npotn knpy.
Cbitnojio (L1)BMkaetbca no yep3i (cbitnoi iHdkatopn BMKAOTbcn NOcniIOBHO): BKNOHte o6cnyoBuHaHHaftpa 3akTmbOBaHM ByrllnM
Pnmitka: CnHan HacnueHnq fInbTpiB BiDobpaKaetbCp npTROM nepux 10 ckyHn nicJy BkNIOUeHHn BNTaKKn, iB cei npomixok yacy cnid cknHytn iHnKATopn HacnueHoCTi.
CknadHnIhNkatoPiB hacuHeNocti pibtpa:
Tpmbane HatackanHn KhoNk Cbitnojod (L1) BMkaetbca Ta 3raacc (B 3aIeXHoCTi BiD TmNy fInbTa, dny kKOrO BnKoHyctcbcCKndaHn, iNDkATOpOn roprTb OndHocHO a60 BMKAHTbCn no cep3); niTBePdKeHHm npabInbHoro BVKOHHa CNdaHn Byde 3ByKOb nCnHaJ.
Aktbauia iIndkaatopa hacnueHHa jltpB
PnMItKa: Oepaio NOBHHBaKOHyBaTcH Na BmKHeH NITXu.
-KnipoBniΦiNbTp
Ley iHnkaTop 3a3BnuayakTNByeTbc8
1° TrpBaJIIM HATnCKaHHaM KHOJOK Ta 一
KJIO iHdNkaTOp aKTbHm, 3aRopAeTbCra KHOJka
HATNCHTb KHONKy, 06B BMKHyTN NORO
KkIiHnKaTOp BIMKHeHm,3aOpaTebKa KHONKa HATNCHTb KNONky ,06yBIMKHyTu Noro
-Φinbtp 3akTNBOBaHmByrinnn
Ley iHnkaTOp 3a3Bnau BiKnIOuAeTbc8
2^ TpmbaJIIM HaNTCKaHHaM KHONOK
KAKIO IHDNKATOP AKTNBHN, 3aORPAETBCN KHONKa HATNCHTB KHONKY , IO6 BIMKHYTN IORO
KIO iHINKATOP BIMKHeHn, 3aogpctbC KONKa HATNCHTB KHONKY , 06yBIMKHyTn Noro
Доглад
UncTka
Для чстkn BИКОПICTOBYITE ЛWE сецьалы СерBetky, habочену НелтабнIM piДКIM МИОHM 3acobom. HE BИКОПICTOBYITE 3ACOBIB A5O IHCTPМENTIB ДлЯ OЧИSEHн!
He BnKOpNCTOBByTe 3aoc6n 10 MaO Tb abpa3nBHi MaTepiAJIi. HE BnKOpNCTOBByTE CnIPT!
ΦiNbTp 3aTpMKn KnpiB
Man. 9-25
3atpmye xnpoBI cnoJyehn, 10 BHHKaHb nIac npiroTsyBaHH iKi.
PONINH YNCTNTICN OINB pa3 B MICIb (a60 KOIN CNTEMA IHDINAJI IIpePNOBHNH NJIbTPIB, JXUO E y BAUII MOENI, BKA3ye Ha DaHY Heo6XiHCTb), 3 BIKOPINCTAHNM HEARPECBNHX MNIOHx 3ACoBI BpyHy A60 B NOCYDMIOHJ MaUNH i npn HsBkiy TEMnepaTy i KOPOTKOMY UKNJI.
Pn MNTI B NocyDomNooi MaunH MoKe MaTm Mice DeKe 3he6apBlenHn FInbTpPy,npote Ioro FInbtpuyoi XapakTepeNCTKIN 3aJIuAHObCBe He3MiHHMn.
ДлЯЗнгТЯФИБТУ 3атуМКИЖИРNotягпьHa ce6e npукнHypyKu BiDчЕПENHЯФIFIbTpy.
ByrInbHm fInbTp (TilbKn B pexnmi peunpkynaii) Man. 24
B6npaHenpncMHI 3aapanx KuyxHi.
HacnueHicIb ByrInbHorO fipIbtpy nepeBipReTc nicIa 6IbIw abo MeHs DoBOrO BnKOpNCTaHHB a3aJExHoCTi BiD TINy PnHTu Ta peryIaRpHOCTi YnUeHN HxIpONoRfNHaOHoTO FipIbtpy. Y 6YbIb-MyeOMBy BNpaKy Heo6XiDHO ZAMIHn KarpTpIaX npNaHmHi Pez3 KOxHi OToPi MciCi (a60 KoIin CnCTema IHnKaJIi HacnueHocti fipIbTPiB - JaXIo Taka nepedBaChEu y Baai MoJeI - Bka3yEc h TaKny Heo6XiDHeCTb) HE nIpdrae MmTTIO CHNoHOBnEHnIO.
Kpyrnn ByrInbHn fIbTp
PnKnactn fInbTp n o 6nDbI cTOpOnH Ia nokpTTA 3axncnpxuitok potopa Dbrnyha, nicna yoro nobepHytn fInbTp 3a roHHNKOBOIO CTpiKIO.
BnTjXka 6bIaIHaHa CnCTeMoIO OCBIJIeHHa Ha OCHOITexHoJIorii IIOJIB (LED).
IIOIN 3a6e3neuyoTb ONIMaJIbHe OCBITNeHHra, TpBaNicTB ix B 10 pa3iB BnUa BiD 3BmuaHnx JAMNOpOK Ta daIOb 90% ekOHOMII eJKeTPOeHeprii.
L0do ix 3amHn 3BepTaiTeCn Do cnJbN texHCHoro 06cnyTOBYaHH.
ailllll lllllllllllll
()24
j 1 j 1 j 1 j 1 j 1 j 1 j 1 j 1 j 1 j 1 j 1 j 1 j 1 j 1 j 1 j 1 j 1 j 1 j 1 j 1 j 1 j 1 j 1 j 1 j 1 j 1 j 1 j 1 j 1 j 1 j 1 j 1 j 1 j 1 j
( 12 + 2) ( 3 - 1) = - 4
2012/19/ 11/11/11/11/11/11/11/11/11/11/11/11/11/11/11/11/11/11/11/11/11/11/11/11/11/11/

aiee aiee iie e ie 1iie aiee 1ie 1ie 1ie 1ie 1ie 1ie 1ie 1ie 1ie 1ie 1ie 1ie 1ie 1ie 1ie 1ie 1ie 1ie 1ie 1ie 1ie 1ie 1ie 1ie 1ie 1ie 1ie 1ie 1ie 1ie 1ie 1ie 1ie 1ie
jgl 4i ci j
Clllglallglllgljglalglaiai jglil 11a a
EN/IEC 60335-2- EN/IEC 60335-1:
.62233 IEC/EN 31
EN/IEC 61591; ISO 5167-1; ISO :5167-3; ISO 5168; EN/IEC 60704-1; EN/IEC 60704-2-13; EN/IEC 60704-3; ISO 3741; EN
.50564; IEC 62301
EN 55014-1; CISPR 14-1; EN: 55014-2; CISPR 14-2; EN/IEC 61000-3-2; EN/IEC 61000-3-3
balaal jaliy jali y i a jali c al jali 61000-3-3
baaall gai jali b a lac o y iie al jali y lai jali
jali gai jali gai y i a jali gai y lai y i a jali
gai y i a jali y i a jali y i a jali y i a jali
jali gai gai gai y i a jali y i a jali y i a jali
jali gai gai gai y i a jali y i a jali y i a jali
jali gai gai gai y i a jali y i a jali y i a jali
jali gai gai gai y i a jali y i a jali y i a jali
jali gai gai gai y i a ji liy jali y i a jali
111 111 111 111 111 111
G G G G G G G G G G G G G G G G G G G G G G G G G G G G G G G G G G G G G G G G G G G G G G G G G G G G G G G G G G G G G G G G G G G G G G G G G G G G G G G G G G G G G G G G G G G G G G G G G G G G G
1 2
2
aai jai bai aai iui ic ai
.
()
LJIg
e 1
a lac g bfaull a biii 2clg ololj
jbi 1
.
iCi iilll lalbll sb Lly Eaio
blicl
Jcuiuieiuiiuai
iilipu wsi g o jolllg jglill
Jdall 12
y jll
i j
111
1
iJ 1
jSry 8bll 1ggo 12iwl ic:
aiai bila jia jjai jai
yjll jill ljj jll
(1) S jill a loc j l loa l s( 2,1) = 2,1
aL
Laiyegjll bbslaia Laii lill 1
- 1,2,3,4,5,6
y
m = 311
J 1
Jai jia gil aolbj aLac J
a1 = 2,an + 1 = n1 + n2 - _n3
Jjoll pall 211 all Jaa g j uill
Joc jolj ooi Joll
JibjI Jg jglall plaiui jS
J 8 J
y
a
a
1gj j 1j 1j
a
a
jgl jgl gl gl gl gl gl
a.ball cui jubiyy
15.12.13.14.15.16.17.18.19.20.
jL
· = 0