
EFBP90681X - Built-in oven ELECTROLUX - Free user manual and instructions
Find the device manual for free EFBP90681X ELECTROLUX in PDF.

 FR
FR
 BG
BG
 CS
CS
 DA
DA
 DE
DE
 EL
EL
 EN
EN
 ES
ES
 ET
ET
 FI
FI
 HU
HU
 IT
IT
 KK
KK
 LT
LT
 LV
LV
 MK
MK
 NL
NL
 NO
NO
 PL
PL
 PT
PT
 RO
RO
 RU
RU
 SK
SK
 SL
SL
 SQ
SQ
 SR
SR
 SV
SV
 TR
TR
 UK
UK
| Product type | Built-in extractor hood |
| Brand | Electrolux |
| Model | EFBP90681X |
| Dimensions (H x W x D) | Approximately 60 x 90 x 50 cm (estimate) |
| Weight | Approximately 15 kg (estimate) |
| Power supply | 230 V / 50 Hz |
| Motor power | Maximum extraction power 4 speeds |
| Lighting | Integrated LED, long life, energy saving |
| Grease filter | Dishwasher-safe metal filter |
| Activated carbon filter | Regenerable in oven (150°C, 2-3 h) |
| Controls | Touch panel with 4 extraction speeds, delay shut-off, filter saturation control |
| Delay shut-off function | Yes, programmable by speed (5 to 20 min) |
| Filter saturation indicator | Yes, for grease filter (steady) and carbon filter (flashing) |
| Extraction type | External extraction or internal recirculation version |
| Minimum safety distance | 50 cm (electric), 65 cm (gas/mixed) |
| Cleaning | Interior and exterior with damp cloth and mild detergent, at least once a month |
| Safety | Disconnect before maintenance, surge protection, do not use without filter |
| Spare parts | Original spare parts available at www.electrolux.com/shop |
| Repairability | Professional technical assistance required for installation and repair |
| General information | User manual in French, 188 pages, available for download |
Frequently Asked Questions - EFBP90681X ELECTROLUX
User questions about EFBP90681X ELECTROLUX
0 question about this device. Answer the ones you know or ask your own.
Ask a new question about this device
Download the instructions for your Built-in oven in PDF format for free! Find your manual EFBP90681X - ELECTROLUX and take your electronic device back in hand. On this page are published all the documents necessary for the use of your device. EFBP90681X by ELECTROLUX.
USER MANUAL EFBP90681X ELECTROLUX
WE'RE THINKING OF YOU
Thank you for purchasing an Electrolux appliance. You've chosen a product that brings with it decades of professional experience and innovation. Ingenious and stylish, it has been designed with you in mind. So whenever you use it, you can be safe in the knowledge that you'll get great results every time. Welcome to Electrolux.
Visit our website to:

Get usage advice, brochures, trouble shooter, service information:
www.electrolux.com

Register your product for better service:
www.electrolux.com/productregistration

Buy Accessories, Consumables and Original spare parts for your appliance:
www.electrolux.com/shop
ENVIRONMENT CONCERNS
Recycle the materials with the symbol ©. Put the packaging in applicable containers to recycle it. Help protect the environment and human health and to recycle waste of electrical and electronic appliances. Do not dispose appliances marked with the symbol © with the household waste. Return the product to your local recycling facility or contact your municipal office department for household waste or the shop where you purchased this product.
CUSTOMER CARE AND SERVICE
We recommend the use of original spare parts.
When contacting Service, ensure that you have the following data available.
The information can be found on the rating plate. Model, PNC, Serial Number.

Warning / Caution - Safety information.

General information and tips

Environmental information.
Subject to change without notice.
1. SAFETY INSTRUCTIONS
Caution! Closely follow the instructions set out in this manual. All responsibility, for any eventual inconveniences, damages or fires caused by not complying with the instructions in this manual, is declined. The extractor hood has been designed exclusively for domestic use.
Caution! Do not connect the appliance to the mains until the installation is fully complete. Before any cleaning or maintenance operation, disconnect hood from the mains by removing the plug or disconnecting the mains electrical supply.
Always wear work gloves for all installation and maintenance operations. The appliance is not intended for use by children or persons with impaired physical, sensorial or mental faculties, or if lacking in experience or knowledge, unless they are under supervision or have been trained in the use of the appliance by a person responsible for their safety. This appliance is designed to be operated by adults, children should be monitored to ensure that they do not play with the appliance. This appliance is designed to be operated by adults. Children should not be allowed to tamper with the controls or play with the appliance. Never use the hood without effectively mounted grating! The hood must NEVER be used as a support surface unless specifically indicated. The premises where the appliance is stalled must be sufficiently ventilated, when the kitchen hood is used together with other gas combustion devices or other fuels. The ducting system for this appliance must not be connected to any existing ventilation system which is being used for any other purpose such as discharging exhaust fumes from appliances burning gas or other fuels. The flaming of foods beneath the hood itself is severely prohibited. The use of exposed flames is detrimental to the filters and may cause a fire risk, and must therefore be avoided in all circumstances. Any frying must be done with care in order to make sure that the oil does not overheat and ignite.

Caution! Accessible parts of the hood may become hot when used with cooking appliance.
With regards to the technical and safety measures to be adopted for fume discharging it is important to closely follow the regulations provided by the local authorities. The hood must be regularly cleaned on both the inside and outside (AT LEAST ONCE A MONTH).
This must be completed in accordance with the maintenance instructions provided in this manual). Failure to follow the instructions provided in this user guide regarding the cleaning of the hood and filters will lead to the risk of fires. Do not use or leave the hood without the lamp correctly mounted due to the possible risk of electric shocks. We will not accept any responsibility for any faults, damage or fires caused to the appliance as a result of the non-observation of the instructions included in this manual.
Warning! Failure to install the screws or fixing device in accordance with these instructions may result in electrical hazards.
2. USE
The hood serves to aspirate the fumes and vapors resulting from cooking. The attached installation manual indicates the version to be used depending on the model you have, the suction version with
external evacuation or filtering with internal recirculation
3. INSTALLATION
The mains power supply must correspond to the rating indicated on the plate situated inside the hood. If provided with a plug connect the hood to a socket in compliance with current regulations and positioned in an accessible area, after installation. If it not fitted with a plug (direct mains connection) or if the plug is not located in an accessible area, after installation, apply a double pole switch in accordance with standards which assures the complete disconnection of the mains under conditions relating to over-current category III in accordance with installation instructions.
Warning! Before re-connecting the hood circuit to the mains supply and checking the efficient function, always check that the mains cable is correctly assembled.
The minimum distance between the supporting surface for the cooking equipment on the hob and the lowest part of the range hood must be not less than 50cm from electric cookers and 65cm from gas or mixed cookers. If the instructions for installation for the gas hob specify a greater distance, this must be adhered to.
Warning! Installation and electrical connection, may only be carried out by authorised technicians.
4. MAINTENANCE
ATTENTION! Before performing any maintenance operation, isolate the hood from the electrical supply by switching off at the connector and removing the connector fuse. Or if the appliance has been connected through a plug and socket, then the plug must be removed from the socket. The cooker hood should be cleaned regularly (at least with the same frequency with which you carry out maintenance of the fat filters) internally and externally. Clean using the cloth dampened with neutral liquid detergent. Do not use abrasive products. DO NOT USE ALCOHOL!
Warning! Failure to carry out the basic cleaning recommendations of the cooker hood and replacement of the filters may cause fire risks. Therefore, we recommend observing these instructions.
The manufacturer declines all responsibility for any damage to the motor or any fire damage linked to inappropriate maintenance or failure to observe the above safety recommendations.
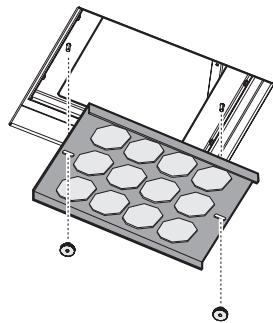
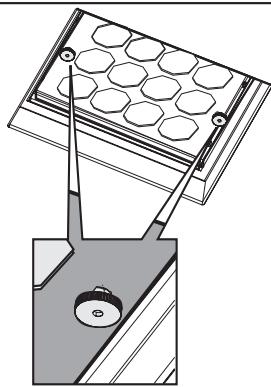
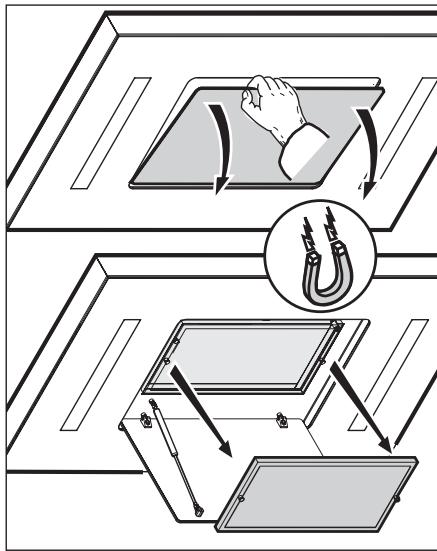
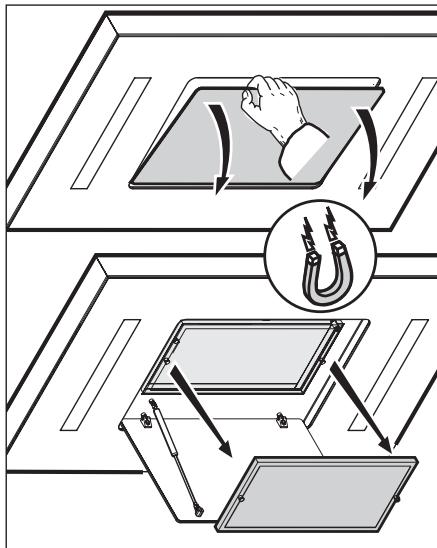
4.1 Grease filter - This must be cleaned once a month (or when the filter saturation indication system - if envisaged on the model in possession - indicates this necessity) using non aggressive detergents, either by hand or in the dishwasher, which must be set to a low temperature and a short cycle. When washed in a dishwasher, the grease filter may discolour slightly, but this does not affect its filtering capacity.
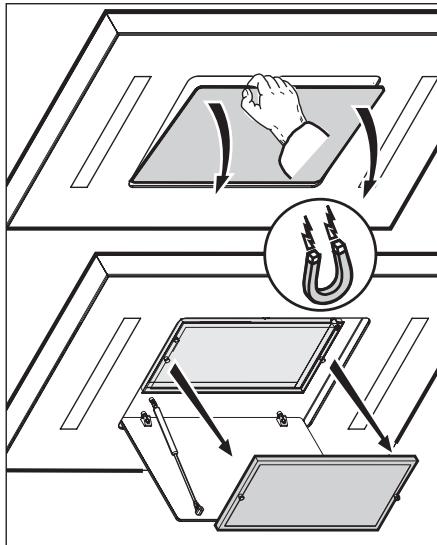
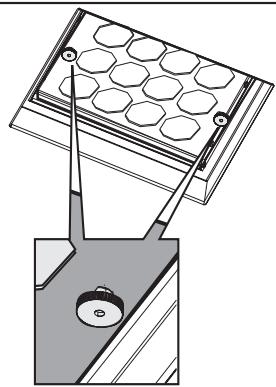
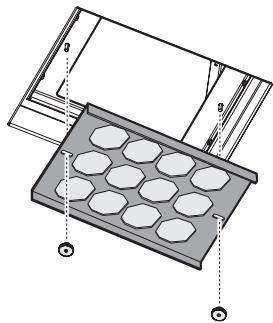
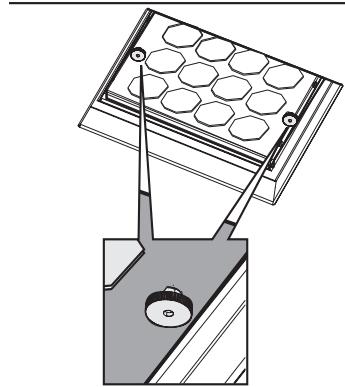
4.2 Regenerable activated charcoal filter
To regenerate the charcoal filters, place them into a baking oven preheated to 150°C.
The process will take 2 to 3 hours, depending on the level of odor contamination.
Caution: Avoid burning yourself!
- Do not under any circumstances regenerate the active carbon filter in the microwave.
- Do not under any circumstances use the pyrolysis function of the oven for the active carbon filter regeneration. Before regeneration, clean the active carbon filter with a damp cloth.
Remove the active charcoal filters from the baking oven only after they have had time to cool down.
During the cooling down process, unpleasant odors may develop in the air for a short period of time!
The frequency of charcoal filter honeycomb element regeneration depends on the intensity of your cooking operations.
We recommend performing a regeneration every 2-3 months. Additional cleaning of the active charcoal filter with a moist cloth should be performed every 2-3 months.
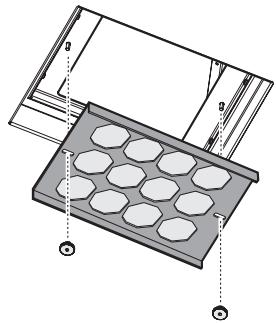
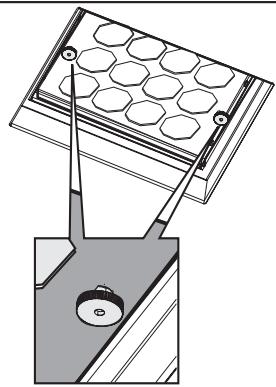
5. CONTROLS
The hood is fitted with a control panel with aspiration speed selection control and a light switch to control cooking area lights. Use the high suction speed in cases of concentrated kitchen vapours. It is recommended that the cooker hood suction is switched on for 5 minutes prior to cooking and left in operation during cooking and for another 15 minutes approximately after terminating cooking.
The control switches are located on the unit's front panel.
Note: a remote control can be purchased separately; contact the local authorized dealer.
Note: The hood is equipped with a protection system against disturbances of the mains power network; in case of peaks exceeding 2kVolts, the hood will reactivate autonomously after approximately two minutes from the last disturbance.


11 Button Speed (power) of suction 1 T2 Button Speed (power) of suction 2 3 Button Speed (power) of suction 3 T4 Button ON/OFF Speed (power) of suction 4
Note: The Speed (power) of suction 4 remains in function for 5 minutes, then it returns to the previous setting.
15 Button for filter saturation control T6 Button OFF speed
Button for control panel activation-deactivation
7 Button ON/OFF lights
Button for activation/deactivation of charcoal filter saturation control
Delayed switch-off function for the suction speed (power):
Select the desired speed and press the same button again for more than 2 sec.; the button flashes to indicate that the function has been activated. Press again to deactivate the function.
The selected speed will turn off after:
Speed (power) of suction 1: 20 minutes Speed (power) of suction 2: 15 minutes Speed (power) of suction 3: 10 minutes Speed (power) of suction 4: 5 minutes
Function Activation - Deactivation control panel
Press the T6 button for more than 5 seconds
Function Activation - Deactivation control of charcoal filter saturation
With the hood off press the 17 button for more than 5 seconds.
Button 15 flashes:
Twice to indicate that the saturation control for the charcoal filter has been activated Once to indicate that the saturation control for the charcoal filter has been deactivated
Function of filter saturation control and reset
At regular intervals, depending on how long the hood is used, button 15 lights up to indicate that it is necessary to carry out the maintenance of the filters according to the instructions in the related paragraphs.
Button 15 lights up with a steady light: it is necessary to perform maintenance on the grease filter.
Button 15 lights up flashing: it is necessary to perform maintenance on the charcoal filter.
Reset filter saturation indicator:
With the hood off, press button 15 for more than 2 seconds.
Repeat the operation if necessary.
6. LIGHTING
The hood is equipped with a lighting system based on LED technology.
The LEDs guarantee optimal lighting, a duration up to 10 times as long as traditional lamps, and allow to save 90% electrical energy.

Caution! Do not look directly into the LED light.
For replacement, contact the technical service.


www.electrolux.com/productregistration

WE'RE THINKING OF YOU
DO NOT USE ALCOHOL!
WE'RE THINKING OF YOU
www.electrolux.com/productregistration

ATTENTION! DANGER OF FIRE!
Never regenerate the charcoal filter in the microwave. Never use the oven function for regenerating charcoal filters. Before starting the filter regeneration procedure, clean it with a damp cloth.
The charcoal filter must be removed from the oven only after it has completely cooled.
During this procedure, you may notice an unpleasant smell. The frequency of regenerating the charcoal filter depends on the frequency of use of the oven and hob. In any case, it is recommended to regenerate every 2-3 months. Also, every 2-3 months, perform preventive cleaning with a damp cloth.
5. CONTROLS
The hood is equipped with a control panel for controlling the speed of the extraction fan and switching on the light and lighting of the cooking surface. Use the intensive mode of the hood in case of particularly high concentration of cooking vapors. We recommend turning on the hood 5 minutes before starting the cooking process and leaving it on for 15 minutes after the process ends. The command switches are located on the front panel of the block.
Note: As an additional accessory, you can purchase a remote control. For more detailed information, contact your supplier.
Note: The hood has protection against voltage fluctuations in the electrical network, and in cases of voltage fluctuations exceeding 2 volts, the hood automatically switches to the previous state after 2 minutes from the last fluctuation.


11 Speed button (power) suction 1 12 Speed button (power) suction 2 13 Speed button (power) suction 3 14 On/Off button speed (power) suction 4 Note: Speed (power) suction 4 will work for 5 minutes, after which it will return to the previous position. 15 Filter saturation control button 16 Off speed button Activation-Deactivation panel control button 17 On/Off light button Activation-Deactivation control of filter saturation activated charcoal
Delayed shutdown function of speed (power) suction:
To adjust the suction speed, press the same button again for more than 2 seconds. The button flashes to indicate that the function is activated. Press again to deactivate the function.
The suction speed switches off after: Speed (power) suction 1: 20 minutes
Speed (power) suction 2: 15 minutes
Speed (power) suction 3: 10 minutes
Speed (power) suction 4: 5 minutes
The hood is equipped with LED lighting.
The LEDs provide optimal lighting, their service life is 10 times longer than traditional bulbs, and they save 90% energy.

Warning! Protect your eyes and do not look directly at the switched-on halogen lamp.
For replacing the LEDs, contact the technical service.

You will find the data on the rating plate. Model, product number (PNC), serial number.
The appliance is intended for domestic use and for similar applications such as: staff kitchen areas in shops, offices and other working environments; farm houses; by clients in hotels, motels and other residential type environments; bed and breakfast type environments.
In the instructions, the functions that can be used on your model are indicated.

a60ЯK BNTJAKKY 3

BHTpiHbOIOpezipKyIaIeIO nobITpr
3. IHCTAJLJ
The voltage in the electrical network must correspond to the characteristics indicated on the label, which is located inside the plug. If the plug is included in the electrical network, then connect the plug to the socket, which corresponds to the existing standards and is located in an accessible place, so that it can be done after installation. If the plug is not included in the electrical network (i.e., not connected to the electrical network), or the socket is not in an accessible place, also after installation, then it is necessary to install a reliable two-pole switch, which ensures disconnection from the network under overload conditions, in full compliance with the installation rules.
! Warning! Before reconnecting the plug to the electrical network and checking the correct operation, check the network fuse or the circuit breaker is installed correctly.
The distance from the lower part of the plug to the hob surface must be at least 50 cm, in the case of electric hobs, and 65 cm, in the case of gas and combined hobs.
It is necessary to take into account the distances indicated in the instructions for installing the hob.
Warning! Installation and connection to the electrical network must be performed only by qualified personnel.
4. MAINTENANCE
! Warning! Before any operation of cleaning or maintenance, disconnect the plug from the electrical network, pulling out the plug or turning off the circuit breaker.
The plug must be cleaned often and also inside (at least every 3 months, as well as after each filter cleaning). For cleaning, use a special sponge, or a soft cloth with a mild detergent. Do not use abrasive or sharp materials.
DO NOT USE ALCOHOL!
! Warning! Failure to perform proper cleaning and filter replacement may lead to a risk of fire. Therefore, we recommend following the instructions provided.
The manufacturer disclaims all liability for any damage to persons or property caused by improper installation or failure to follow the above precautions.
4.1 Grease filter
It should be cleaned once a month (or when the filter fill indicator system, if your model has one, indicates the need), using non-abrasive cleaning agents inside or in the dishwasher at low temperatures and a short cycle.
Cleaning in the dishwasher may leave stains on the filter, but its filtering characteristics remain unchanged.
4.2 Activated carbon filter
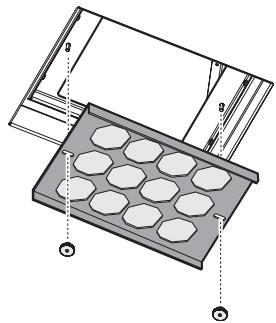
Regeneration is carried out in a preheated oven (150°C) and lasts, depending on the saturation of odors, from 2 to 3 hours.

Warning! Fire hazard!
Do not regenerate the activated carbon filter in a microwave oven under any circumstances. Do not use the function for the activated carbon filter in any case. Regenerate in the oven - first wipe the regenerated activated carbon filter with a damp cloth. The activated carbon filter is removed from the oven and left to cool. During the entire procedure, the oven may emit unpleasant odors! The need for regeneration of the activated carbon filter depends on the intensity of use, but it is recommended to regenerate at least every 2-3 months. In addition, clean the activated carbon filter every 2-3 months with a damp cloth.
5. CONTROL ELEMENTS
The hood is equipped with a command panel with extraction speed control and light control for illuminating the cooking surface.
Use intensive extraction speed especially when cooking with high concentrations of vapors. We recommend turning on the hood 5 minutes before starting to cook and leaving it on for 15 minutes after finishing cooking.
The commands are located on the front panel of the appliance.
Note: As additional equipment, a remote control can be purchased; contact the authorized service center.
Note: The hood is equipped with a protection system against connection to the electrical network, and in case of voltage drops exceeding 2 volts, the hood will automatically restart approximately 2 minutes after the last shutdown.


1 Extraction speed button 1 12 Extraction speed button 2 T3 Extraction speed button 3 T4 On/Off button for extraction speed 4 Note: Extraction speed 4 will work for 5 minutes, then it will return to the previous level. T5 Filter saturation control button T6 Light on/off button Activation/deactivation button of the control panel 17 Light on/off button Activation/deactivation button of the activated carbon filter saturation control
Function of the extraction speed (suction power) control:
Select the desired speed and press the same button again for more than 2 seconds; the button will show that the function has been activated. Press again to deactivate the function.
Switch off the device: Press and hold the power button for 1 minute 20 seconds.
Switch off (power off) the device: Press and hold for 2 minutes 15 seconds.
Switch off (power off) the device: Press and hold for 3 minutes 10 seconds.
Switch off (power off) the device: Press and hold for 4 minutes 5 seconds.
In the event of a malfunction, based on the use of the device, press button 15 for 5 seconds, which indicates the need to perform technical inspection of the filters based on the indications given in the relevant paragraphs.
Button 15 lights up with a steady light: It is necessary to perform inspection of the coarse filter.
Button 35 lights up with a flashing light: It is necessary to perform inspection of the activated carbon filter.
Filter saturation indicator reset:
To reset the indication, press button T5 and hold it for 2 seconds.
Repeat the operation if necessary.
6. LIGHTING DEVICE
The device is equipped with an LED lighting system. It provides optimal lighting, lasts 10 times longer than conventional lamps, and saves up to 90% of electrical energy.

Warning! Do not look directly at the LED lamp.
For any issues, contact the technical service department.
www.electrolux.com/productregistration

www.electrolux.com/productregistration

You can purchase accessories, consumables and original spare parts for your appliance at:
www.electrolux.com/shop
ENVIRONMENT PROTECTION
www.electrolux.com/productregistration
www.electrolux.com/productregistration

Register your product to get better service: www.electrolux.com/productregistration

Buy accessories, consumables and original spare parts for your appliance at: www.electrolux.com/shop

ENVIRONMENTAL CONCERNS
Recycle materials with the symbol. Put the packaging in relevant containers to recycle it.
Remove the cap to reveal the symbol. Place the equipment and the container in the recycling bin.
Buy accessories, consumables and original spare parts for your appliance at:

Before starting, consult the original and reserve parts for the price.
ENVIRONMENT PROTECTION
Recycle materials with the symbol . Dispose of packaging in the appropriate recycling containers.
Help protect the environment and public health, as well as recycle waste from electrical and electronic devices. Do not dispose of
the device with household waste. Return the device to a local recycling point or contact your municipal waste service.
CARE AND MAINTENANCE
Always use original spare parts.
When contacting the "Service" department, have the following information ready.
The information can be found on the rating plate. Model, PNC (product number), Serial Number.
! Warning/Caution - Important safety information. General information and tips for environmental protection.
We reserve the right to make changes without prior notice.
1. SAFETY INSTRUCTIONS
Caution! Follow the instructions strictly. The manufacturer is not responsible for any damage or malfunction caused by failure to follow the instructions in this manual. The appliance is intended for household use only.
! Warning! Do not connect the appliance to the mains until the installation is fully completed. Before cleaning or maintenance, the appliance must be disconnected from the mains by unplugging it or by switching off the circuit breaker.
For any operation and maintenance, use work gloves.
This appliance can be used by children aged from 8 years and above and persons with reduced physical, sensory or mental capabilities or lack of experience and knowledge if they have been given supervision or instruction concerning use of the appliance in a safe way and understand the hazards involved. Children shall not play with the appliance.
The hood must be installed correctly! The hood should never be used as a work surface, unless specifically indicated.
The room must have adequate ventilation when the hood is used simultaneously with other appliances using gas or other fuels. The exhaust air must not be discharged through a flue used for exhausting fumes from appliances burning gas or other fuels.
It is strictly forbidden to cook over an open flame under the hood.
Using an open flame is harmful to the filters and may cause a fire, so it must be absolutely avoided.
The first use must be carried out under supervision to check the correct functioning of the hood.
Warning: accessible parts may become hot when used with cooking appliances.
This applies to the technical measures and safety measures that must be adopted for the discharge of fumes; they must be strictly followed.
The manufacturer is not responsible for improper installation or failure to comply with local regulations. The hood must be cleaned regularly, both the exterior and the interior (at least once a month). In any case, the instructions for maintenance must be followed, especially those indicated. Failure to comply with the cleaning standards of the hood and the cleaning/replacement of filters may lead to a fire hazard. Do not use or leave the hood without correctly installed lamps! Danger of electric shock! No responsibility is accepted for any malfunction, fire, or damage to the appliance caused by failure to follow the instructions in this manual.

Warning! Failure to install the screws and fixing mechanism in accordance with these instructions may result in electrical hazards.
2. USE
The hood is used to extract fumes and vapors produced during cooking.
The accompanying instruction manual indicates the appropriate version for your model, depending on the model purchased, and you can choose between the aspirating hood
and the filtering version with recirculation.

3. INSTALLATION
The voltage must match the rating indicated on the data plate inside the hood. If it is equipped with a plug, connect the hood to a socket that complies with current regulations and is accessible after installation. If it is equipped with a plug (direct connection to the mains), or if the plug is not accessible after installation, use a double-pole switch with a contact opening of at least 3 mm, in compliance with the regulations, so that the hood can be completely disconnected from the mains when necessary, in accordance with the installation rules.
Warning! Before connecting the appliance to the mains and to check the function properly, check that the cable is mounted as required.
The minimum distance between the surface on which the cookware is placed and the lowest part of the kitchen extractor hood must be no less than 50 cm in the case of electric cookers and no less than 65 cm in the case of gas or combined cookers. If the instructions for the gas cooker specify a greater distance, this must be respected.
Warning! The appliance and its accessible parts become hot during use. Care should be taken to avoid touching heating elements. Children less than 8 years of age shall be kept away unless continuously supervised.
4. MAINTENANCE
Warning! Before carrying out any cleaning or maintenance operation, disconnect the appliance from the mains. When removing the filters, also disconnect the mains plug.
The hood should be cleaned frequently (at least with the same frequency as the filter maintenance), both inside and out. Use a damp cloth and neutral detergent. Avoid abrasive products. Warning! Do not use alcohol!
Warning! Failure to observe the instructions for cleaning the hood and replacing the filters may result in a fire hazard.
Follow the instructions strictly! No responsibility is accepted for any damage to the motor or other parts caused by improper use or failure to follow the instructions.
4.1 Grease filter
It should be cleaned monthly or when the indicator for filter saturation shows (if you have purchased a model with indicator). Use warm water and mild detergent, or wash in the dishwasher, but at low temperature and short cycle. In the case of metal grease filters in the dishwasher, it is possible that they may become discolored, but this in no way affects their filtering capacity.
4.2 Regeneration of the active carbon filter
The regeneration of the filter takes place in a preheated oven at 150°C for 2 hours, depending on the degree of saturation.

Warning! Risk of fire!
Absolutely forbidden is the regeneration of the active carbon filter in a microwave oven! In no case use the microwave for regenerating the active carbon filter in the oven! - Before regenerating the active carbon filter, clean it with a damp cloth. The active carbon filters must be removed from the oven only after they have cooled. During the operation, it is possible that a slight odor may form in the oven. The frequency with which the regeneration of the filter must be carried out depends on how often you cook, but in any case it is recommended to regenerate the filter every 2 to 3 months. In addition, every 2 to 3 months, clean the filter with a damp cloth.
5. CONTROLS
The aspirator is equipped with a control panel with the possibility to adjust the suction speed and to switch off the lighting of the accessories. If during operation you notice any irregularities, stop the device immediately. It is recommended to switch on the aspirator 5 minutes before you start cooking and to leave it to operate for about 15 minutes after you have finished. The controls are located on the front panel of the device.
Note: As an additional accessory, you can purchase remote control, by connecting with an authorized representative.
Note: The aspirator is equipped with a system for protection against sudden electrical surges. In case of overvoltage above 2 kV, the aspirator will be activated automatically after approximately 2 minutes.


T1 Button for 1st speed (power) of suction 12 Button for 2nd speed (power) of suction 3 Button for 3rd speed (power) of suction T4 Button ON/OFF for 4th speed (power) of suction
Note: The fourth speed (power) of suction operates for 5 minutes, after which the aspirator switches to the previously set speed.
15 Button for checking the clogging of the filter T6 Button for switching off (OFF) the speed
Button for activating / deactivating the control panel
17 Button ON/OFF for the lighting Button for activating / deactivating the function for control of the clogging of the filter with active indication
Function for delayed switching off of the speed (power) of suction:
Select the desired speed, press the button and hold it for more than 2 seconds and release the button.
The button will light up, which means that the function is activated. Press the button again to deactivate the function.
The selected speed is switched off after: 1st speed (power) of suction: 20 minutes 2nd speed (power) of suction: 15 minutes 3rd speed (power) of suction: 10 minutes 4th speed (power) of suction: 5 minutes
Function for activating / deactivating the control panel
Press button 16 and hold it for more than 5 seconds
Function for activating / deactivating the control of the clogging of the filter with active indication
Press the button and hold it for at least 5 seconds.
The button will start to flash:
- Two flashes, which means that the control function for the filter saturation has been activated.
It was activated.
- One flash, which means that
the control function for the saturation of
the aspirator, the button will light up,
which means that it is necessary to
perform filter maintenance, according to
the instructions placed in
the corresponding paragraphs.
Button 16 lights constantly: it is necessary
to perform filter maintenance
for the vacuum cleaner.
The button will flash: it is necessary to
Instructions for the indicator for requesting the device:
When the aspirator is switched on,
press button T5 and hold it for
more than 2
seconds.
If necessary, repeat the operation.
6. LIGHTING DEVICE
The aspirator is equipped with a lighting system with LED.
LEDs guarantee optimal lighting, up to 10 times longer than
traditional lamps and allow 90%
energy savings.

Warning! Do not look directly at the LED light!
For replacement, contact the technical service.
CI3 O'bIMbl3DA BOJIbIHbI3
Electrolux KpybIfblcih Catbn anfaHbHb3fpa paxMe. Ciz OHdaFah KblJap 60iCi6n TaXipnb MeH INHOBaunra CyneHin JkacanFaH KpyblfblHb TaHaDaHbI3. TaKbIpNbIKTbIH TybHbCbl 60nfA, Ke3 TaptapBik 6yN KpyblfblHb Xacay 6apbcHda c3 Ombim3da 6oBdBiH3. CoHbIKTaH, KOJaHaFah caBbH TaMa7a HAtnxKeere Kon KeTKi3e anaTbHbHb3Fa ceHmDi 60blHbI3. Electrolux aemeHie kow KeIin3.
B3diH Be6-caTka 6apbIn KeNeciHi KapaHbI3:

KoIandahyra KaTbIcTb KeHeceTp, KITaIshaanap, aKayIbIKTb TY3eTy, KbI3MeT KepCetTy TypaIbI aknapaT: www.electrolux.com

Cizre 6apbHwa JkaKcbI Kbi3MeT KepCeTy yuHIn eHimHizDi MbHa Jepre TipKeHiz: www.electrolux.com/productregistration

KypbIbIbI3fa KaKeTTi KepeK-JkapaKTapDbI, YbIbIHdbI MaTePnAnapDbI XHe fmpalIK KocankbI 6eNWeKTePdi catbn any ywiH: www.electrolux.com/shop
KOPSHAFAH OPTAFA 3иян KEлДIPMEY TYPАльы MAFЛMMATTAP
Befri canbHrah MaTeepnAnapDbKaTAteHdeyDeH eTKi3yre TaCbIbH3. OpaMaMATEpHaanapbIH KaTAteHdeyDeH eTKi3y yuHIn TnicTi KOHTeHepJepre caBbH3. 3NeKtpNIk KHe 3JIeKTPoHnKaIbIK KypbIbIaPdbIH KaIbIbIH KaTAte HdeyDeH eTKi3y apKbIbI, KopUarAH opTaFA XaAaMHbIH DeHCayIbIFbHa 3NbIH KeTIpeTIH KaFdai napFa KOJI bepMeYre 3Y UneciH3di KocBbH3. Befri caBbHraH KypblfblnapdbI TyMbICbIK KaIbIKTapMeH bipre TactaMaHbI. OHIMDi JxepriniKiTi KaTAte Hdey optaIbIfbHa eTKi3iH3 HeMece JxepriniKiTi MekeMere xaabapNaCbIH3.
TYTbIHyIbIFA KbI3MET KOPCETV
ΦπμMaMbIK 3aTTapDbI KOДаHуды YсbIHaMbI3.
Kb3met KepceTy opTaIbIbHa xa6apnackaHa KeNeci depekTeprH daBbH 6OlybH KaMTamacbI3 etHi3.
IepeKTeepi TeXnIkaIbIK aknapaTakTaIwacbIHan Ta6yfa 6oJaIbI. Ylrici, EHiM Hemipi, CepraJIbIK
Eckepty /A6aiaNaHb3 - Kayinci3ik TypanbMaHb3db MaflymaT. i KaJIbIJaMa aknapaT XeHe KeHeCTep KopwaFAH opTafa KaTbICTbl aknapaT.
AnbH aIa eckepTyci 3e3reptinei.
1.!KAYIINCI3IIK
WARNING! Before operating the device, carefully read the operating instructions contained in this manual. The device is intended for use only as described in the manual. Use only for the intended purpose, otherwise the warranty may be void.
CAUTION! The device must only be connected to a power supply with the voltage specified on the rating plate! Before cleaning and maintenance, disconnect the device from the power supply or switch off the circuit breaker.
During all cleaning and maintenance work, wear protective gloves! Keep children and unauthorized persons away from the device. If the device is not in use, store it out of reach of children. Do not leave the device unattended. If the device is damaged, do not use it!
Only use the device for the intended purpose as described in the operating instructions.
If the device is not used for a long time, disconnect it from the power supply and store it in a dry place, protected from dust and moisture.
Do not immerse the device in water or other liquids, and do not rinse it under running water.
The labels on the device must be kept legible. If they are damaged, they must be replaced. Do not operate the device without the rating plate.
The device may only be used by persons who have read and understood the operating instructions. Keep the instructions for future reference.
WARNING! When using the device with accessories, the device may become hot. Use protective gloves.
Technical data and safety instructions
Read the operating instructions carefully before use!
The device may only be used for the purpose described in the operating instructions. The device may be used only with the accessories specified in the manual. Use of other accessories may cause damage.
Do not use the device if it has been dropped or damaged, and do not attempt to repair it yourself.
We do not provide a warranty for damage caused by failure to follow the operating instructions.
Warning! Before connecting the device to the electrical network, make sure that the voltage corresponds to the mains voltage.
2. INSTALLATION
The filter must be installed in a place protected from moisture. Make sure that the filter is not exposed to direct water splashes or dripping water.
Do not install the filter near heat sources or open flames.
3. CONNECTION
The device must be connected to the electrical network through a correctly installed socket with a grounding contact. If the socket is not grounded, do not use it; instead, contact a qualified electrician to replace it with a properly grounded one. If the socket is not grounded and cannot be replaced, or if there is no qualified electrician available, then the connection must be made by a specialist in accordance with the manufacturer's instructions and safety regulations.
Warning! When connecting the filter to the electrical network, make sure that the cable is correctly connected to the terminal block.
The filter must be installed at a distance of at least 50 cm from the electrical outlet for 220-240 V, and at least 65 cm for other voltages.
If the socket is not grounded, do not use it.
Warning! The socket must be easily accessible for connection and disconnection of the device.
4. MAINTENANCE
Warning! Before performing any cleaning or maintenance operations, disconnect the filter from the electrical network.
Clean the filter housing and external surfaces with a soft cloth (do not use abrasive cleaners or solvents). For cleaning, use a damp cloth with a mild detergent. Do not use abrasive cleaners. Do not immerse in water!
Warning! Do not use the filter without a filter element. This may damage the device. Consult a specialist for replacement.
Check the filter element regularly for damage or wear. Replace it if necessary.
The filter must be replaced with a new one after the specified period or when the pressure drop exceeds the permissible value (or when the indicator shows the need for replacement).
It is possible to replace the filter without stopping the unit. However, it is recommended to replace it only when necessary.
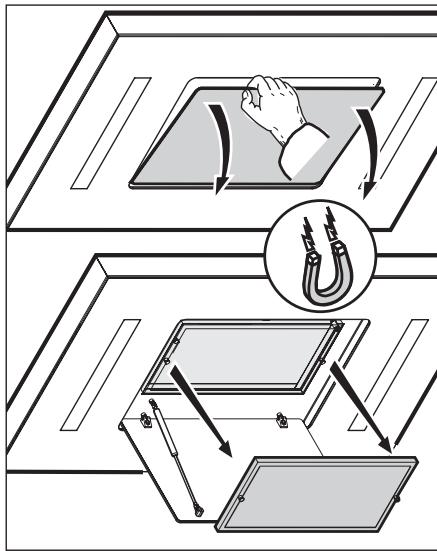
4.2 Replacing the filter element
Before starting regeneration, heat the filter element to 150°C and hold for 2-3 hours.

Warning! Do not touch the hot surface!
After removing the filter element, clean the housing. Before installing a new filter element, clean the housing thoroughly. Do not use the filter element if it is damaged. Install the new filter element and clean the housing with a clean cloth.
Filter elements should only be replaced after they have cooled down. The process may cause burns if not handled carefully! The large particles in the filter should be removed by tapping the housing; then, the filter element should be cleaned with compressed air every 2-3 months. The filter element should also be cleaned with water every 2-3 months.
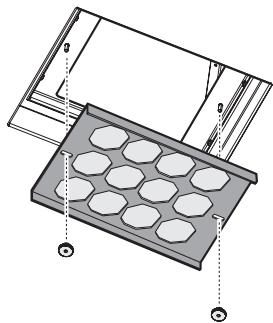
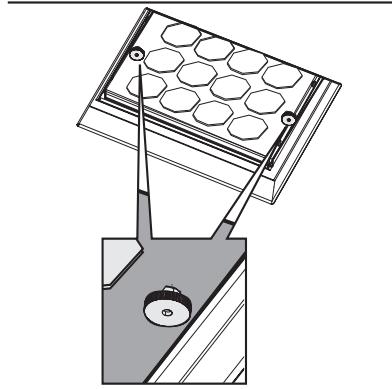
5. CONTROL DEVICES
To control the water level and to release air from the system, a water level control device is installed. When the concentration of the solution reaches the required level, the pump is turned off. We recommend checking the pump every 15 minutes after starting it.
The control device is installed in the upper part of the tank.
Warning: The control device must be checked regularly - it may fail, so contact a specialist.
Warning: The pump is protected by a thermal overload relay; if it trips, wait at least 2 minutes before resetting.

T1
T2
T3
T4
T5
1st copy of the blade (knife) type 2nd copy of the blade (knife) type 3rd copy of the blade (knife) type T4 4th copy of the blade (knife) for cutting/separating type Expert: 4th copy of the blade (knife) 5 minutes before the end, the main parameters will be displayed. 15 seconds before the end, the shutdown type T6 blade separation type Earlier, the old cutting/separating type 17 standard cutting/separating type For the last seconds, the old cutting/separating type
Copy of the blade (knife) cleaning function:
After the blade is heated, press the button for 2 seconds; the blade is heated, the function is connected to the network. To turn off the function, press the button. The heated blade is used for cutting:
1st copy of the blade (knife): 20 minutes 2nd copy of the blade (knife): 15 minutes 3rd copy of the blade (knife): 10 minutes 4th copy of the blade (knife): 5 minutes
Function of the old cutting/separating panel
T6 type 5 seconds before the end
For the last seconds, the function of the old cutting/separating
When the cleaning is done, press the T7 type for 5 seconds.
T5 type is heated:
For the last seconds, the cutting element of the old cutting is needed for two times
One-time use of the control element for the first activation
Functional control and basic adjustment of the device
In case of malfunctions, first check the
the device, the power supply
and the connections, and then perform the necessary technical maintenance.
Device power supply: mains voltage
Technical maintenance required
Device power supply: mains
Technical maintenance required for the device.
Device operation
Basic adjustment:
If the device does not start, wait 2 seconds and try again.
If necessary, replace the fuse.
6. INSTALLATION DIAGRAM
The housing is made of impact-resistant plastic on a technological basis.
WARNING: To reduce the risk of fire, electric shock, or injury, follow these instructions.

DANGER!
Do not use this appliance.
For service, contact the authorized service center.
WE'RE THINKING OF YOU
Thank you for purchasing an Electrolux appliance. You have chosen a product that brings with it decades of professional experience and innovation. Ingenious and stylish, it has been designed especially for you. So whenever you use it, you can be safe in the knowledge that you will get great results every time. Welcome to Electrolux.
Visit our website to:

Get usage advice, brochures, trouble shooter, service information:
www.electrolux.com

Register your product for better service:
www.electrolux.com/productregistration

Buy Accessories, Consumables and Original spare parts for your appliance: www.electrolux.com/shop
ENVIRONMENTAL CONCERNS
Recycle materials with the symbol. Put the packaging in relevant containers to recycle it.
Help protect the environment and human health by recycling waste electrical and electronic appliances. Do not dispose of appliances marked with the symbol with household waste.
CIM60NOT BO OTNaIOT OD JOMaKInHCTBOTO. BpaTeTe ro npOn3BoOT O B aWnOIT NOKaJIeK anaIITET 3a peuNKInpaHe IIN KOHTAKtnpajTe ja BaWata ONUHTNHcKa KaHcIepaJa.
ГРИЖА И УСЛУГА 3A KОПИСHIЦИ
Bn npenopaaybame da kopncntte opunnaHn deIOBN.
Kora Ke KONTAKTIPATE co CepBnCOT, 6ndete cnrypHn DeKa rH nMaTe Ha pacnoJaraHe cIeHNBE noaTOuN.
www.electrolux.com/productregistration

Blini aksesore, pjese konsumi, pjese kembimi originale perpajisjen tuaj:
www.electrolux.com/shop
PROBLEME QÉ LIDHEN ME MJEDISIN
Ricikloni materialet me simbolin Vendoseni ambalazhin te kontejneret e riciklimit nese ka.
Ndihmoni né mbrojtjen e mjedisit dhe shendetit tí njerezve dhe né riciklimin e mbetjeve tê pajisjeve elektrike dhe elektronike. Mos hidhni pajisjet e shenuara me simbolin e mbeturines shtépiake. Ktheni produktin né piken lokale tí riciklimt oskontaktoni me zyrén komunale.
KUJDESI DHE SHERBIMI PÉR KCLIENTÉT
Rekomandojmē pērdorimin e pjeseve origjinale tkembimit.
Kur kontaktoni me Sherbimin, sigurohuni qè tè dispononi tè dhénat e mēposhtme.
Informazioni mund tè gjendet né PLLakēn e specifikimeve. Modeli, PNC, Numri i serise.
Paralajmerim / Té dhêna Pér siguriné dhe kujdesin. i Te dhena tepergjithshme dhe keshilla Té dhêna pé ambientin.
Subject to change.
1. SAFETY INSTRUCTIONS

www.electrolux.com/productregistration

Use the appliance, the material and the original spare parts for your appliance:
www.electrolux.com/shop
ENVIRONMENTAL CONCERNS
Recycle materials with the symbol . Put the packaging in applicable containers to recycle it.
Help protect the environment and human health and to recycle waste of electrical and electronic appliances. Do not dispose appliances marked with the symbol
with the household waste. Return the product to your local recycling facility or contact your municipal office.
INFORMATION ON THE APPLIANCE AND SERVICING
We recommend you to use original spare parts.
When contacting the service, ensure that you have the following data available.
The information can be found on the rating plate. Model, PNC, serial number.
Warning - Important safety instructions.
General information and tips
Information about the device.
Changes may be made without prior notice.
1. SAFETY INSTRUCTIONS

Attention! Please read the instructions that accompany this device carefully. We disclaim any liability for possible injuries, damage or fire caused by the device if it has not been used in accordance with the instructions that accompany this device. This aspirator is designed exclusively for household use.

Attention! Do not connect the device to the electrical mains until you have completely finished with the installation. Before any procedure of cleaning or maintenance, disconnect the aspirator from the electrical mains to avoid any risk of electric shock or to remove any objects that may be in the kitchen.
Persons with reduced physical, sensory or mental capabilities, or those who lack experience or sufficient knowledge, must not use this device unless they are under the supervision of persons responsible for their safety or have been instructed by these persons on how to use the device. Always supervise children to ensure they do not play with the device. Never use the aspirator without having correctly installed the filter! The aspirator must never be used as a surface for placing or resting objects unless this is explicitly indicated. The space where you need to install the aspirator must have good ventilation when the aspirator is used together with other devices in the space that operate on gas or another type of fuel. The exhaust air must not be discharged into pipes that are used for the exhaust of fumes from devices that operate on gas or another type of fuel. It is strictly forbidden to prepare food on the flame under the aspirator. The use of an uncontrolled flame is harmful to the filters and can lead to the occurrence of a fire, so it must be avoided in every case. During the preparation of food, control that the flame does not spread.

Attention! Parts that are accessible can become hot when used together with cooking devices.
Regarding the technical and safety measures that can be taken in relation to the extraction of fumes, strictly follow the regulations of the local authorities.
The aspirator must be cleaned at least once a month, both externally and internally (at least once a month), follow the instructions for maintenance that accompany this device. Failure to follow the rules for cleaning the aspirator and replacing or cleaning the filters increases the possibility of fire. Do not use or leave the aspirator without the correctly installed lamp because there is a risk of electric shock. We disclaim any liability for possible injuries, damage or fire caused by the device if it has not been used in accordance with the instructions that accompany this device.

Attention! If you do not install these parts and do not complete the installation in accordance with these instructions, it can lead to electrical hazards.
2. USE
The aspirator can be used in the extraction mode or in the recirculation mode, depending on the model. In the instructions, which are attached to the aspirator, you can find out how to use your model.
Extraction mode with external exhaust or recirculation mode with internal filter.
3. INSTALLATION
The appliance must be installed in accordance with the characteristics indicated on the rating plate located inside the appliance. If there is an outlet, connect the appliance with the outlet that is in accordance with the supply voltage and is placed in an accessible position for inspection after installation.
If the appliance is without an outlet (direct connection to the mains), and the outlet is not placed in an accessible position, after installation install a bipolar outlet that ensures complete disconnection from the mains under overvoltage category III conditions, in accordance with installation rules.
Warning! Before connecting the appliance to the electrical mains again, check the correct operation, make sure that the mains cable is installed correctly.
The minimum distance between the surface used for placing the cookware on the cooking hob and the appliance must not be less than 50 mm when working with electric hobs and 65 mm when working with gas or mixed hobs. If the installation instructions for gas hobs specify a greater distance, follow those instructions.
Warning! Installation and connection to the mains must be carried out exclusively by a qualified person.
4. MAINTENANCE
! Warning! Before any repair or maintenance, disconnect the appliance from the power supply by unplugging it from the outlet or by switching off the main circuit breaker in the house or apartment.
The appliance should be cleaned frequently (at least as often as you clean the grease filter), both inside and outside. For cleaning, use a soft damp cloth and neutral detergents. Avoid using products that require scrubbing. DO NOT USE ALCOHOL!
! Warning! Failure to follow the rules for cleaning the appliance and the rules for replacing the filter increases the risk of fire. Therefore, we advise you to follow the given instructions.
We disclaim any responsibility for any damage caused by the motor, fire resulting from improper maintenance or failure to follow the given warnings.
4 button (s) on/OFF T4
5 5al 4 button (s) ac a
aaii aaii jia jia
sall
acjull OFF jj.T6
ON/OFF .T7
jssllsaaaaiy jsslll lal / j
biill (s) a jull jall e bill ai
2 2
a
yilll lalll aall cllgss 2.4
150) 1
clicu 3 2 jao yjai
- ci s j : j i
Laa 888888888888888888888888888 8
alal jalal laiy aliy bajl ay
1
a a a a a a a a a a a a a a a a a a a a a a a a a a a a a a a a a a a a a a a a a a a a a a a a a a a a a a a a a a a aaa
(1) = ( x 1,y 1) , = ( x 2,y 2)
y j 1
Sai
www.electrolux.com/productregistration


www.electrolux.com/shop
4 1
User manual: English
Ooyniecs xpnons: Elambdavikac


- WE'RE THINKING OF YOU
- VISIT OUR WEBSITE TO
- ENVIRONMENT CONCERNS
- CUSTOMER CARE AND SERVICE
- SAFETY INSTRUCTIONS
- USE
- INSTALLATION
- MAINTENANCE
- REGENERABLE ACTIVATED CHARCOAL FILTER
- CAUTION: AVOID BURNING YOURSELF
- CONTROLS
- DELAYED SWITCH-OFF FUNCTION FOR THE SUCTION SPEED (POWER)
- FUNCTION ACTIVATION - DEACTIVATION CONTROL PANEL
- FUNCTION ACTIVATION - DEACTIVATION CONTROL OF CHARCOAL FILTER SATURATION
- FUNCTION OF FILTER SATURATION CONTROL AND RESET
- RESET FILTER SATURATION INDICATOR
- LIGHTING
- DELAYED SHUTDOWN FUNCTION OF SPEED (POWER) SUCTION
- IHCTAJLJ
- GREASE FILTER
- ACTIVATED CARBON FILTER
- WARNING! FIRE HAZARD
- CONTROL ELEMENTS
- FUNCTION OF THE EXTRACTION SPEED (SUCTION POWER) CONTROL
- FILTER SATURATION INDICATOR RESET
- LIGHTING DEVICE
- WWW.ELECTROLUX.COM/PRODUCTREGISTRATION
- RECYCLE MATERIALS WITH THE SYMBOL. PUT THE PACKAGING IN RELEVANT CONTAINERS TO RECYCLE IT
- ENVIRONMENT PROTECTION
- CARE AND MAINTENANCE
- REGENERATION OF THE ACTIVE CARBON FILTER
- INSTRUCTIONS FOR THE INDICATOR FOR REQUESTING THE DEVICE
- WARNING! DO NOT LOOK DIRECTLY AT THE LED LIGHT
- CI3 O'BIMBL3DA BOJIBIHBI
- B3DIH BE6-CATKA 6APBIN KENECIHI KAPAHBI
- KOPSHAFAH OPTAFA 3ИЯН KEЛДIPMEY TYPАЛЬЫ MAFЛMMATTAP
- TYTBIHYIBIFA KBI3MET KOPCETV
- !KAYIINCI3IIK
- CONNECTION
- REPLACING THE FILTER ELEMENT
- WARNING! DO NOT TOUCH THE HOT SURFACE
- CONTROL DEVICES
- COPY OF THE BLADE (KNIFE) CLEANING FUNCTION
- FUNCTION OF THE OLD CUTTING/SEPARATING PANEL
- FOR THE LAST SECONDS, THE FUNCTION OF THE OLD CUTTING/SEPARATING
- FUNCTIONAL CONTROL AND BASIC ADJUSTMENT OF THE DEVICE
- DEVICE OPERATION
- BASIC ADJUSTMENT
- INSTALLATION DIAGRAM
- ENVIRONMENTAL CONCERNS
- ГРИЖА И УСЛУГА 3A KОПИСHIЦИ
- PROBLEME QÉ LIDHEN ME MJEDISIN
- KUJDESI DHE SHERBIMI PÉR KCLIENTÉT
- INFORMATION ON THE APPLIANCE AND SERVICING
- YILLL LALLL AALL CLLGSS
Brand : ELECTROLUX
Model : EFBP90681X
Category : Built-in oven