
MUMS2EW30 - Food Processor BOSCH - Free user manual and instructions
Find the device manual for free MUMS2EW30 BOSCH in PDF.
| Brand | Bosch |
| Reference | MUMS2EW30 |
| Series | MUM Serie 2 |
| Motor power | 700 W |
| Bowl capacity | 3.8 L |
| Bowl material | Stainless steel |
| Color | White |
| Speed levels | 4 + Pulse |
| Kneading system | 3D Planetary Movement (Multi-motion-drive) |
| Kneading/mixing accessories | Dough hook, beater, whisk |
| Continuous shredder | Included, 3 discs (reversible slicer thick/thin, reversible grater coarse/fine, fine grater) |
| Blender | 1.25 L, Tritan material (BPA-free) |
| Meat grinder | Included |
| Compatible with optional MUM Serie 2 accessories | Yes |
| EAN Code | 4242005252336 |
Frequently Asked Questions - MUMS2EW30 BOSCH
- Thick/fine slicer disc: slices of vegetables, cucumber, zucchini
- Coarse/fine grater disc: carrots, potatoes, hard cheeses
- Fine grater disc: parmesan, chocolate, zests
User questions about MUMS2EW30 BOSCH
0 question about this device. Answer the ones you know or ask your own.
Ask a new question about this device
Download the instructions for your Food Processor in PDF format for free! Find your manual MUMS2EW30 - BOSCH and take your electronic device back in hand. On this page are published all the documents necessary for the use of your device. MUMS2EW30 by BOSCH.
USER MANUAL MUMS2EW30 BOSCH
new device on /Bosch now and et free benefits:
bosch-home.com/ welcome
Meat mincer
MUZS2FWW
text_image
Diagram showing two steps of a blue mechanical device with downward arrows indicating process, labeled ① and ②.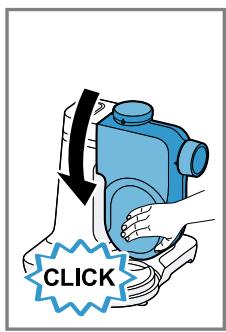
text_image
CLICK3
natural_image
Illustration of a blue microscope and its internal components, showing a black arrow indicating direction (no text or symbols present)4
text_image
Technical diagram illustrating a mechanical assembly with labeled components and directional arrows indicating motion or force.5
natural_image
Technical illustration of a pipe fitting and its mechanical component, showing assembly and disassembly (no text or symbols)6
text_image
Diagram illustrating the process of a fan blade tool with directional arrows and labeled checkmarks for inspection or validation.7
text_image
Diagram illustrating a hairdryer with labeled parts and a magnified view showing the internal structure.8
natural_image
Illustration of a manual laborer with a blue checkmark indicating inspection (no text or symbols present)9
text_image
Technical diagram illustrating the process of a mechanical screwdriver with labeled parts and directional arrows indicating assembly steps.10
text_image
Technical diagram showing mechanical assembly with labeled parts and directional arrows indicating motion or force11
natural_image
Mechanical assembly diagram showing a lever mechanism with a blue valve and threaded shaft (no text or symbols)12

text_image
Diagram illustrating a mechanical device with directional arrows and a magnified view of the component being turned with a brush.13
text_image
Diagram illustrating a mechanical device with directional arrows and a checkmark indicating action or approval.14
natural_image
Diagram showing a pipe fitting and its mechanical assembly, with no visible text or symbols.15
text_image
Diagram illustrating a mechanical component with labeled parts and an inset showing the close-up of the component.16
natural_image
Mechanical component diagram showing a valve assembly with a blue and gray housing (no text or symbols)17
text_image
Diagram showing a mechanical device with directional arrows and a checkmark, likely illustrating a process or control mechanism.18
text_image
Technical diagram illustrating the assembly of a mechanical component with numbered parts and directional arrows indicating process flow.19
text_image
Technical diagram showing a hairdryer with labeled components and directional arrows indicating assembly or operation.20
natural_image
Technical illustration of a mechanical component with no visible text or symbols21
natural_image
Diagram of a mechanical device with a blue cylindrical component and a black arrow indicating direction, accompanied by a checkmark (no text or symbols present)22
text_image
Diagram showing a mechanical device with a blue pushpin inserted, labeled with an arrow indicating the insertion direction.23

natural_image
Mechanical assembly diagram showing a blue pump connected to a motor, with no visible text or symbols24
natural_image
Illustration of a hand operating a microscope with a blue tool inserted, showing mechanical components and motion arrows (no text or symbols)25
natural_image
Illustration of a microscope with a magnified inset showing a blue tool interacting with a surface (no text or symbols present)26
text_image
Diagram showing a microscope with a blue funnel and warning symbol, alongside a blue cylindrical device with an exclamation mark.27

natural_image
Illustration of a microscope with a blue bowl and arrow indicating direction (no text or symbols)28
natural_image
Illustration of a blue mechanical device with an arrow pointing to it, alongside a close-up of its internal components (no text or symbols present)29

natural_image
Line drawing of a manual hand mixer with a blue lever and bucket (no text or symbols)30
text_image
off31
natural_image
Illustration of a microwave oven with a close-up view of its internal components (no text or symbols)32
text_image
Diagram illustrating a mechanical device with labeled parts and directional arrows, including a magnified inset showing the highlighted component.33

natural_image
Illustration of a blue electric motor being adjusted for a cable, shown from two different angles (no text or symbols present)34
 |  |  |  |  | |
 |  |  |  |  |  |
 |  |  |  |  |  |
 |  |  |  |  |  |
 |  |  |  |  |  |
 |  |  |  |  | ,A6ZZ] |

Sicherheit
Please read the safety information to ensure that you use your accessories safely.
General information
You can find general information for this instruction manual here.
- Read this instruction manual carefully. Only this will ensure that you operate accessories safely and efficiently.
■ Observe the instructions for the base unit.
■ This manual is intended for the user of the appliance.
■ Follow the safety instructions and warnings. - Keep the manual and the product information in a safe place for future reference or for the next owner.
- Check the accessories after unpacking. Do not use the accessories if they have been damaged in transit.
Intended use
Please read the information on intended use to ensure that you use the accessories correctly and safely.
Only use the accessories:
■ with a food processor from the same series MUMS2.
■ As specified in this instruction manual.
■ With genuine parts and accessories.
■ For cutting up raw or cooked food, e.g. meat, fish and vegetables.
■ For additional applications described in these instructions.
Safety instructions
Observe the safety instructions.

WARNING – Risk of injury!
■ Rotating drives, tools or accessory parts may cause injury.
▶ Do not reach into the filling shaft.
▶ Only use the pusher to push down ingredients.
en Safety
■ Improper use may cause injuries.
▶ Never assemble the accessories on the base unit.
▶ Only attach and remove accessories once the drive has stopped and the appliance has been unplugged.
▶ Only use the accessories once fully assembled.
▶ The accessories should only be used in the intended operating position.
⚠ WARNING – Risk of harm to health!
Soiling on surfaces may be harmful to health.
▶ Follow the cleaning instructions.
- Clean surfaces which come in contact with food before each use.
Avoiding material damage
Follow these instructions to prevent material damage to your appliance, accessories or other objects in your kitchen.
ATTENTION!
Improper use may cause material damage.
▶ Do not process food that contains hard components, e.g. bones.
- Do not insert objects into the filling shaft or housing, e.g. wooden spoons.
▶ Before use, check the filling shaft and housing for foreign objects.
Unpacking and checking
Find out here what you need to note when unpacking the appliance.
Unpacking the accessories and parts
- Take the accessories out of the packaging.
- Take all other parts and the accompanying documents out of the packaging and place them to hand.
- Remove any packaging material.
- Remove any stickers or film.
Contents of package
After unpacking all parts, check for any damage in transit and completeness of the delivery.
→ Fig. 1
A
Meat mincer attachment
B
Accompanying documents
Cleaning the accessories before using for the first time
- Clean all parts that come into contact with food before using for the first time.
→ "Cleaning and servicing", Page 20 - Put the cleaned and dried parts out ready for use.
Familiarising yourself with the accessories
Familiarise yourself with your accessory.
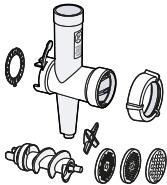
Components
You can find an overview of the parts of your accessories here.
→ Fig. 2
| A | Meat mincer attachment |
| B | Juicer attachment ^1 |
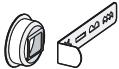
| C | Perforated discs ^1 |
| D | Grater attachment ^1 |
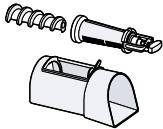
| E | Viennese whirl attachment ^1 |
| 1 | Housing |
| 2 | Worm gear with agitator paddle |
| 3 | Knife |
| 4 | Perforated disc, medium |
| 5 | Threaded ring |
| 6 | Seal |
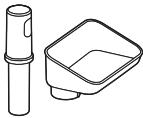
| 7 | Filling tray |
| 8 | Pusher |
^1 Special accessory
| 9 | Worm gear for juicer attachment |
| 10 | Strainer housing |
| 11 | Juicer housing |
| 12 | Perforated disc, fine |
| 13 | Perforated disc, coarse |
| 14 | Worm gear for grater attachment |
| 15 | Grater drum |
| 16 | Cover |
| 17 | Holder for shape plate |
| 18 | Shape plate |
^1 Special accessory
Special accessory
You can find an overview of the special accessories and how to use them here.
Perforated discs
The fine and the coarse perforated disc are suitable for additional processing functions.
Juicer attachment
The juicer attachment is suitable for squeezing soft fruit and vegetables, e.g. berries, tomatoes, apples, pears, rose hips.
Notes
■ Do not press fruit whose pips are similar in diameter to the hole diameter in the strainer insert, e.g. raspberries.
■ Cook hard food before squeezing to make it soft enough, e.g. rose hips.
Viennese whirl attachment
The Viennese whirl attachment is suitable for shaping biscuit dough or shortcrust pastry.
Grater attachment
The grater attachment is suitable for grating hard foods, e.g. almonds, nuts, chocolate, hard cheese or dry bread rolls.
Note: Only process dry nuts and almonds in small quantities.
Overload protection
The overload protection system prevents the motor and other components from being damaged through being overloaded. If the meat mincer is overloaded or blocked, the agitator paddle on the worm gear will break at the predetermined breaking point.
Note: Spare parts with a predetermined breaking point are not covered by our warranty obligations. A new agitator paddle is available from customer service under order number 00418076.
Replacing the agitator paddle
- Release the fastening screw in the agitator paddle using a suitable screwdriver and remove.
- Remove the faulty agitator paddle.
- Insert a new agitator paddle and screw tight.
Before using the appli- ance
Prepare the base unit and the accessories for use.
Preparing the base unit
Note: The food processor shown in the pictures may differ from your model in terms of shape and features.
- Set up the base unit as described in the main operating instructions.
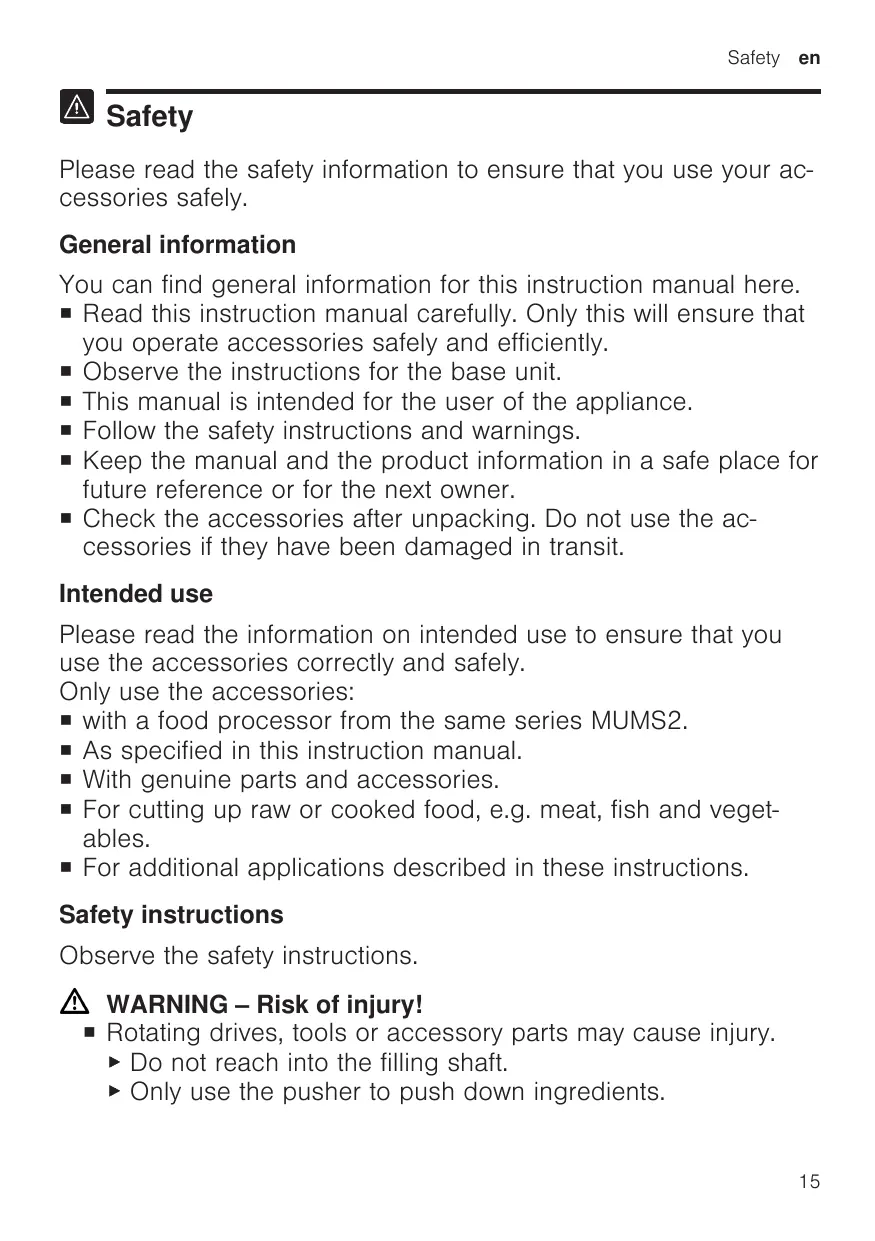
- Press the release button and move the swivel arm down until it engages in the vertical position.
→ Fig. 3
√ The swivel arm is fixed in position 3.
3. Rotate the base unit to the operating position.
→ Fig. 4
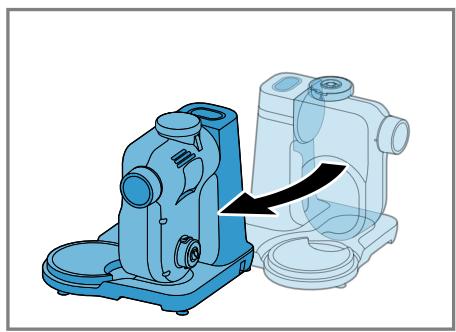
Inserting the seal
- Insert the seal into the housing and press in firmly.
→ Fig. 5
The recesses must match up exactly.
Assembling the attachments
Note: To use the special accessory, you need the parts of the meat min-cer, except for the knife and perforated disc.
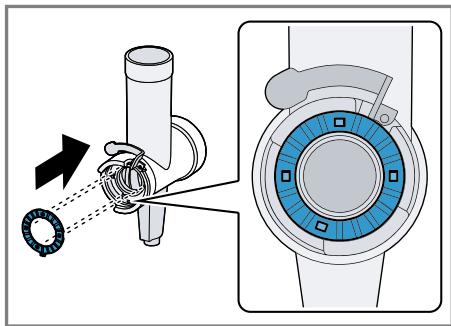
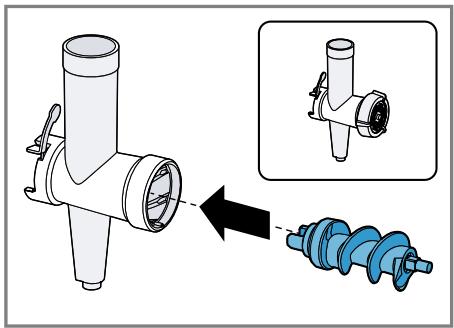
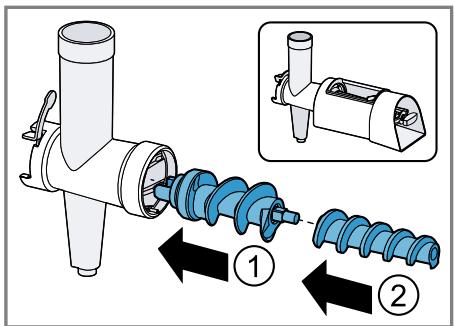
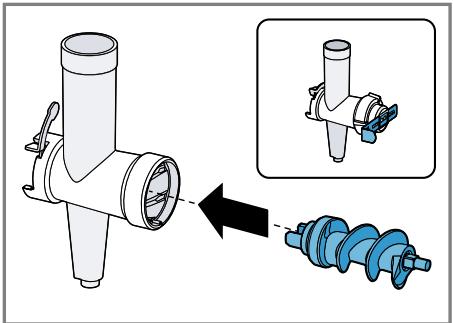
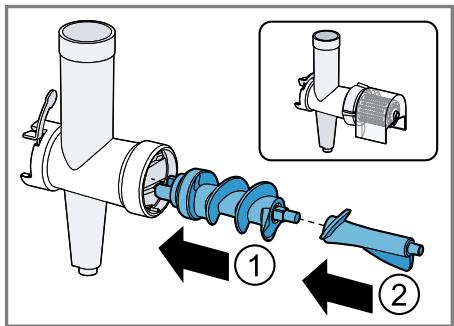
Assembling the meat mincer
- Fit the worm gear into the housing with the agitator paddle at the front.
→ Fig. 6
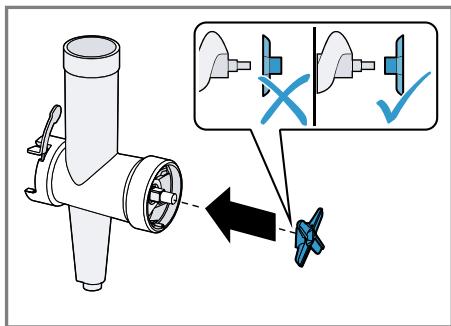
- Fit the knife onto the worm gear with the square projection at the front.
→ Fig. 7
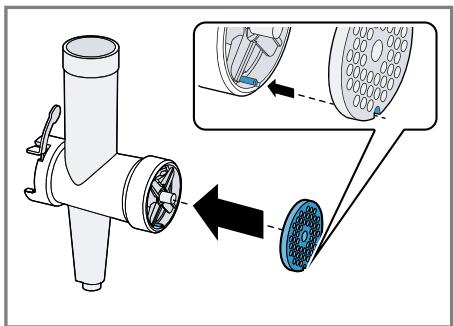
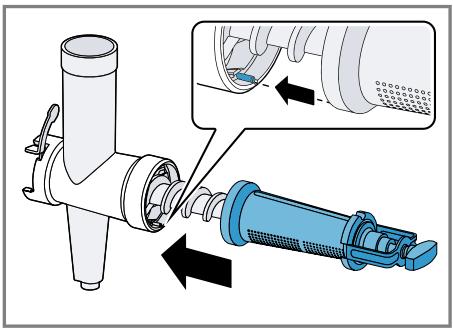
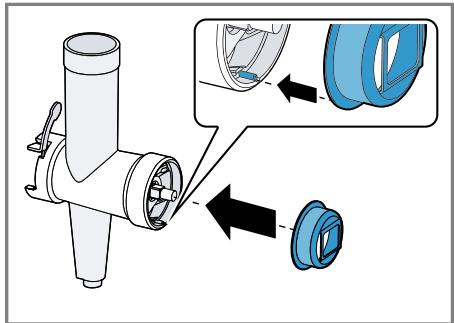
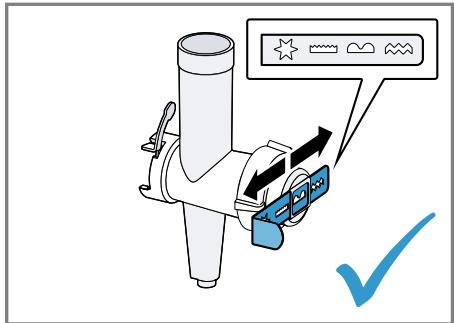
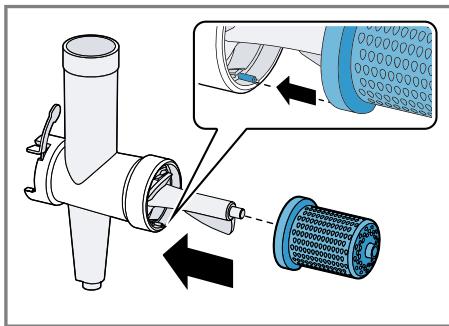
- Insert the required perforated disc into the housing.
→ Fig. 8
Observe the recess on the perforated disc.
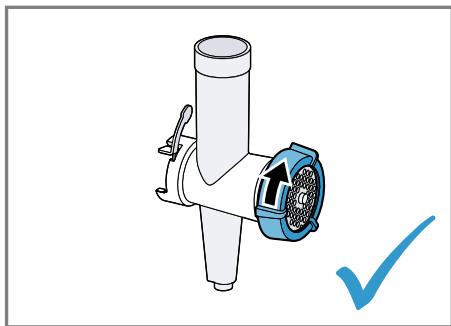
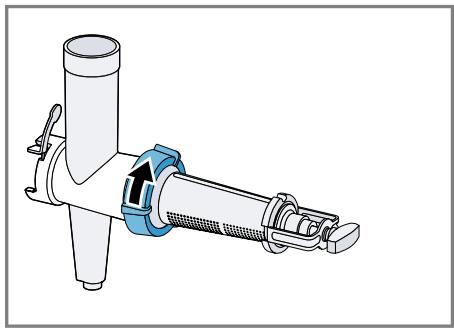
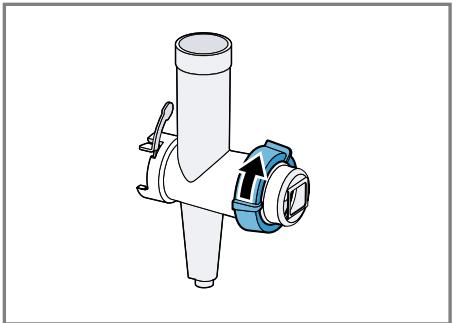
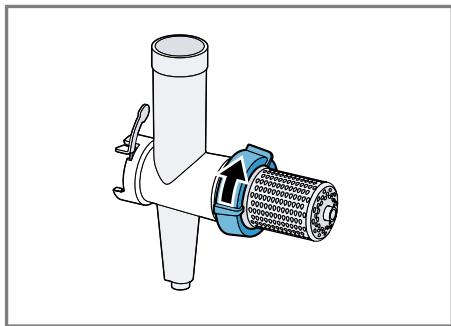
- Fit the threaded ring and tighten clockwise slightly.
→ Fig. 9
Assembling the juicer attachment ^1
Follow the illustrated instructions.
→ Fig. 10 - 14
Assembling the Viennese whirl attachment ^1
Follow the illustrated instructions.
→ Fig. 15 - 18
Assembling the grater attachment ^1
Follow the illustrated instructions.
→ Fig. 19 - 22
Fitting the attachment
- Open the locking lever.
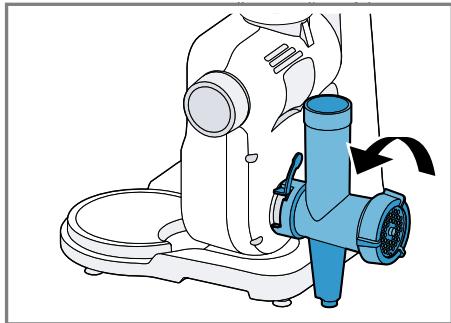
→ Fig. 23 - Hold the prepared attachment horizontally and match up the ends of the agitator paddle with the drive.
→ Fig. 24 - Push the attachment fully onto the drive.
- Rotate the attachment anticlockwise as far as possible.
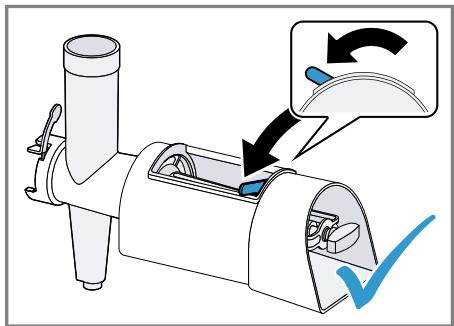
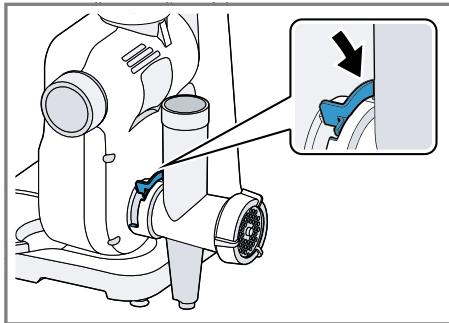
→ Fig. 25 - Close the locking lever.
→ Fig. 26 - Tighten the threaded ring clockwise.
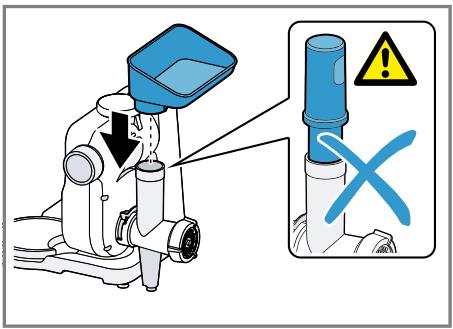
- Attach the filling tray.
→ Fig. 27 - Place a suitable container under the attachment.
→ Fig. 28
Basic operation
You can find out everything you need to know about operating your accessory here.
Recommended speeds
Observe the recommended speeds for optimum results.
Note: Your model is equipped with a 4- or 7-level rotary switch depending on the features of the appliance. The recommended speeds for the 4-level rotary switch are always shown in brackets in these instructions for use.
| Setting | Use |
| 7 (4) | Meat mincer |
| 7 (4) | Juicer attachment |
| 4-5 (2-3) | Viennese whirl attachment |
| 3-4 (2-3) | Shredding attachment |
Processing food
- Prepare your food.
Cut large items of food into pieces so they fit into the filling shaft. - Insert the mains plug.
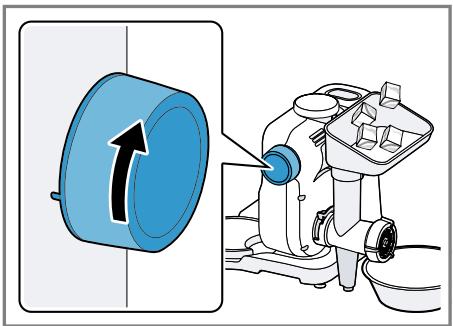
- Set the rotary switch to the recommended speed.
→ Fig. 29 - Insert the food into the filling shaft and press down with the pusher, applying light pressure.
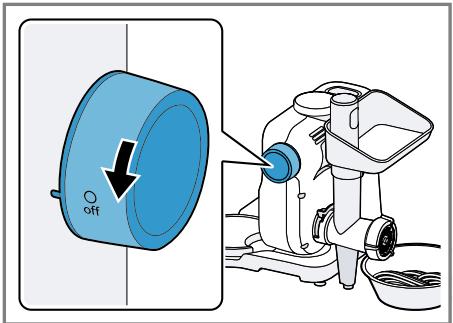
→ Fig. 30 - Set the rotary switch to O off.
→ Fig. 31
Wait until the appliance stops. - Unplug the mains plug.
Processing food with the juicer attachment ^1
Note: When working with the juicer attachment, note the following special features.
-
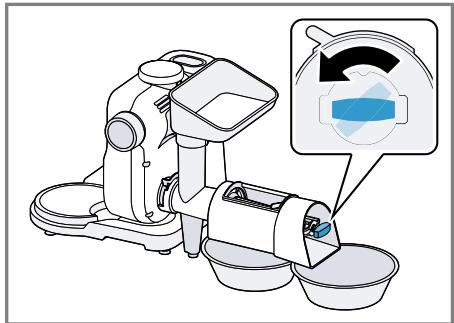
Place two containers under the relevant openings.
-
Before starting processing, turn the setting screw anticlockwise and open.
→ Fig. 32 - During processing use the setting screw to select the desired consistency of the fruit purée and pulp.
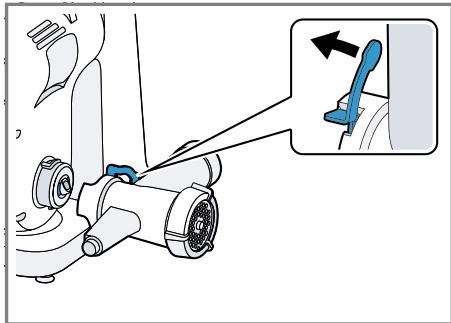
Removing the attachment
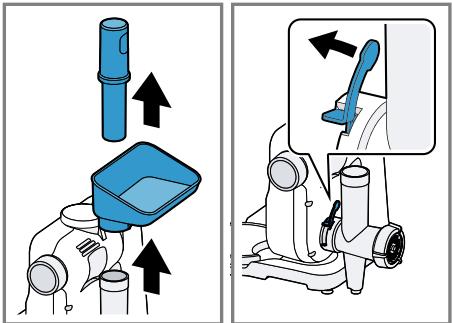
- Remove the filling tray and pusher and open the locking lever.
→ Fig. 33 - Rotate the attachment and remove from the base unit.
→ Fig. 34
Tip: Clean all parts immediately after use so that residues do not dry on.
Cleaning and servicing
To keep your accessory working efficiently for a long time, it is important to clean and maintain it carefully.
Cleaning products
Find out here what cleaning agents are suitable for your accessories.
ATTENTION!
Using unsuitable cleaning agents or incorrect cleaning may damage the accessories.
- Do not use cleaning agents containing alcohol or spirits.
- Do not use sharp, pointed or metal objects.
- Do not use abrasive cloths or cleaning agents.
▶ Only clean the control panel and the display using a damp microfibre cloth.
Cleaning the individual parts
- Dismantle the attachment used.
To do so, proceed in reverse order as described for assembly.
→ "Assembling the attachments", Page 19 - Clean all individual parts with detergent solution and a soft cloth or sponge.
- Dry metal parts. Dry the other parts.
Note: Rub the cleaned metal parts with a little cooking oil to protect them from rust.
Overview of cleaning
Here you will find a overview of the best way to clean the individual components.
→ Fig. 35

Sécurité
Sécurité anti-surcharge
⚠ WAARSCHUWING – Gezondheidsrisico!
Thank you for buying a Bosch Home Appliance!
Register your new device on MyBosch now and profit directly from:
- Expert tips & tricks for your appliance
- Warranty extension options
• Discounts for accessories & spare-parts
• Digital manual and all appliance data at hand - Easy access to Bosch Home Appliances Service
Free and easy registration – also on mobile phones:
www.bosch-home.com/welcome
BOSCH HOME APPLIANCES SERVICE
Looking for help? You'll find it here.
Expert advice for your Bosch home appliances, help with problems or a repair from Bosch experts.
Find out everything about the many ways Bosch can support you:
www.bosch-home.com/service
Contact data of all countries are listed in the attached service directory.


