
BPK556360M - BPK556360M - Built-in oven AEG - Free user manual and instructions
Find the device manual for free BPK556360M - BPK556360M AEG in PDF.

| Product type | Built-in oven |
| Brand | AEG |
| Model | BPK556360M |
| Usable volume | 71 L |
| Dimensions (HxWxD) | 594 x 595 x 567 mm |
| Built-in niche dimensions (HxWxD) | 578 x 560 x 550 mm |
| Net weight | 35 kg |
| Energy efficiency class | A+ |
| Energy consumption (conventional) | 1.09 kWh/cycle |
| Energy consumption (fan forced) | 0.69 kWh/cycle |
| Cooking modes | Fan forced, Top/bottom heat, Low humidity, Pizza, Bottom heat, Frozen dishes, Moist fan forced, Grill, Turbo grill, Steam cooking |
| Special functions | Assisted cooking (45 programs), Cooking probe, Timer, Delayed start, Quick preheat, Key lock |
| Cleaning | Pyrolysis (3 levels: light 1h, normal 1h30, full 3h) |
| Included accessories | Metal rack, Baking tray, Roasting dish, Cooking probe |
| Interior lighting | Halogen bulb resistant to 300°C |
| Safety | Automatic shutdown, Door lock, Child safety |
| Power supply type | Electric (230 V, 50 Hz) |
| Power cable length | 1500 mm |
| Repairability index | Available on request |
Frequently Asked Questions - BPK556360M - BPK556360M AEG
User questions about BPK556360M - BPK556360M AEG
0 question about this device. Answer the ones you know or ask your own.
Ask a new question about this device
Download the instructions for your Built-in oven in PDF format for free! Find your manual BPK556360M - BPK556360M - AEG and take your electronic device back in hand. On this page are published all the documents necessary for the use of your device. BPK556360M - BPK556360M by AEG.
USER MANUAL BPK556360M - BPK556360M AEG
OBCJIYKBAHE HA KJINEHTN
BnHaHn 3nOJ3BaIte opuHaJIHn pe3epBHN qacTn.
Korato ce cBbP3BaTe c haunia OToPi3IpaH OTJe "ObcnykBaHe", Tpr6Ba da IMaTe npd pbka cnEHaTnIHOpMaunr: MoDen, PNC, cepneH Homep.
Информачиета може за сьдени OTКрпт ha ТабелкатС OCHOBNДаHHN

IpeDynpexdEne/BnHmAnHe-INcOpMaun3a6e0nacnoct

1.2 067a 6e3oNaChOCT
To3n ypeI e npedHa3NaueH cAmO 3a rOTBeHe.
To3n ypeE npedHa3NaueH 3a DomaHa ynoTpe6a B 3aTBOpEn NOMEeHnA.
To3n ypei MoKe Ja Ce N3NoJ3Ba B OocN, CTaN B XOTeJ, CTaN B MOTeJ, KbIu 3a TocTn IpyrN NOO6Hn MeCTa 3a HactaHaBHe, KbTeTO TOBa N3NoJ3BaHe He HaDbNtAba (cpeDHO) HNBOTO Ha DomaSha yNtpe6a.
- Camo KBaJInΦuIcIpaH O JInCe TpIbBa Da IHHCTaJInpa UpeDa N da CMeHn KaIbEJa.
He n3noJ3BaIte ypeDa, npeDi Da ro IHCTaInpaTe BbB BrpaJeHaTa KOHcTpyKznia.
- Прази n3Bbршванeto Ha KaKBaTo Ида e подрьжka, n3KЛючete урEDA OT eNEKТр03axpaHbaHoTe.
- Ako 3axpaHbAunT Ka6eI e nobpeDen, ToT Tp8Ba Da ce CMeHN OT IPOUN3BOJNTeJIa, HeROB OTOPI3npanh CepBn3eH UENTbp NII IN KBAJIINΦNcIpaHO JInCe, 3a Da Ce n36berHe ONaCHOCT.
- ПЕДУПЕЖДЕНЕ: Уверete ce, чу урет e ИЗКлочен,
прази за смене Лампа та, за на збогнete Евentуален
ТOKOB удap.
- ПЕДУПЕЖДЕНЕ: Урети和他的овпесьнчаси ce haropeeяват по ВсpeMe Ha ynotpe6a. Тразва за ce BнIMаВа дa He ce DoKOCBaT HarpeBaTeJHnTe eJemeHTи Илп NOBbpxHOCTTa Na BbTpewHOCTTa Ha урета.
BnHaHn n3NoJ3BaIe pBJKaBnI 3a Фурн a npn n3BaJdaHe nJI INOCTaBЯH e Ha akceCoapn nJI IN CbIOBe 3a NeueHe.
- Използваite само сени ора захара (Термocонда), пелорван за тозуре.
3a da cbaJIte HocauIte Ha paΦTa, IIbPBO n3dIbPnaIte IpeiHaT auct Ha HocauIte, a cIeI TOBa I 3aHnIg KpaI Ha HocauIte ot cTpaHnUHInTe cTeHi. IocTaBeTe HocauIte Ha paΦTa B o6paTHa IocJIeIOBaTeJHoCT.
- He nouchteBaIte ypeIa c npoUncTaUka.
He n3no3BaIte rpy6n, a6pa3nBHN, nooNCTBaU npenapatn nnOCTpn, MeTaNHc CTbprAJKN 3a NOuNCTBaHe Ha CtbkNToHa BpTaTa, 3aOToTe MOraT Da HApackaT IOBbPxHOCTTa n TOBa Da DOBeDe Do CuynBaHe Ha CtbkNoto.
- Преди пиролитунно поисвае ИЗваде ТЕ BCИЧКИ Akсес_COари и п配电омерни натуговая/разлова OT Вътpeшонста на урEDA.
2.2 EneKtpnuecko CBbp3BaHe

BHIMAHNE!
Pnck OT noxap nn TOKOB ynap.
BcunKn en. Bpb3kn Tpr6Ba da ce hnapaBt OT KBaIINΦuIpaH eNeKTpoTeXnK.
- YpeIbT TpI6Ba Da e 3a3eMeH.
- YBepTe ce, Ye napameTpnte Ha TabeIkaTc TexHnueckn DaHHn Ca CbBMeCTmMn CeJeKTPnuecknte daHHN Ha 3axpaHbAaTa Mpeka.
Binharn 3non3BaIte npabINHO MOHTnpaH KOHTaTc bC 3aunTa OT TOKOB yap.
He n3noI3BaIte pa3KIOHInTeIIN IIN aIaIaTepn c MHOro BXoIOBe.
BHHMabaiTe da He noBpeDInTe 3axpaHbAunia quenCeI n 3axpaHbAunia ka6eI. Ako 3axpaHbAunr Ka6e Tp8Ba Da 6bJe N0mHeH, TOBa Tpr6Ba Da 6bJe N3BbPseHo OT Ha7nra OTOpn3Unapn CepBn3En cHTbp.
He donyckaIte 3axpaHbauIte Ka6elen da ce do6nKabat Do BpaTuKaTa Ha ypea nn npoctpaHCTBOTo NOI Hero, Oc6eHO KOrato E BkIoUeH nn KOraTO BpaTuKaTa e ropeua.
3aunntata OT TKOB ynap Ha ropeuinte N 30nupanu nactn Tp6Ba da bde 3aterhata no TaKb HauH, ye da He MoKe da ce OTcpanu 6e nHCTpyMeHTN.
CbpxeTe Ka6ena 3a 3axpaHbaHeTo KbM KOHTaTe eINHCTBeHO B Kpar Ha INHCTaIaIyraTa. YBepete Ce, ye uenCeIbT 3a 3axpaHbaHe e DocTBpeH cIeD INHCTaIypaHTo.
Ako KOHTaKbT e pa3Xna6eH, He CBbP3BaIte 3axpaHbaUaIy IepeJI.
He n3IbprBaIte 3axpaHbAaJia Ka6eI, 3a da n3KIOUHTe ypeJa. BnHarn n3IbprBaIte Ie enCeHa h3axpaHbAheTo.
- I3no3BaIte cAmo npabuJIHy uCTpoIcTbA 3a n3OJa: npedna3Hn npekbcAun Ha Mpejata, npedna3nteJi (npedna3nteJiTcOT BNTOB TIN TpIb6Ba Da CE n3BaJrT OT facyHrata), n3KnUohBaTeJi N KOHTAKTopn 3a yTeyKa Ha 3a3EmraBaHeto.
- EneKtpnueckata nHcTaIauZna Tp86Ba da nMa n3OlnpaUo yCTpoiCTBO, KoETo Bn no3BOJIraBa da n3KJIIOHTe UpeDa ot en. MpeXaTApn Bu CnUKN noJIIOcN. N3OlnpaUOy uCTpoiCTBO Tp86Ba da e c sInpHa Ha oTBaprHe Ha KOHTaKTA MNHMym 3 MM.
3aTbopeTe n3zIIO BpaTnUkata Ha ypeDa, npeDn Da cBbpxKeTe 3axpaHbaun Ka6eN KbM KOHTaKTA.
To3n ypeD ce doctabra c eIeKtpo3axpaHbau n uenceN kaBEn.
2.3 IV3noI3BaHe

BHIMAHHE!
PnCK OT HapaHbAHe, n3rapHnIy, TOKOB yIap IIN EKcnNo3nI.
He npomehnTe npedHa3NaueHneTo Ha ypeda.
- Ybepete ce, ye BeHTnlaZIOHHNe OTBOpHe ca 6JOKupaHn.
He octabrayte ypea 6e3 nAizop no Bpeme Ha pa6ota.
- N3KJIIOUBAIte ypeDa cIeD BCaKO I3N0N3BaHe.
-Бьдete BHHMaTeHn, KOraTo OTbApTte BpaTaTaHa ypeDa,ДokaTo ypeBt pa60Tu.МождаиЗлесе ropeu Bb3dYx.
He pa6oTeTe c ypeDa c MOKpn Pbue nn KOraTo NMa KOHTaKT C B0da.
He OKa3BaIte HaTnCK BbPxy OTBOpHaTa BpaTa.
He n3noJ3BaIte ypeia KaTo pa6OTHa NOBbpxHOCT INI NIOBbpxHOCT 3a CbXpaHene.
- OТьарайтЕВИМATEЛНОВРаТАнHaуpeДaИЗПОЛЗВаHETOHaСьСТавКиСаNKOXOЛMOKe
ДапгдИЗВИКa CMecBaHеHa anKoxOЛиВьзДух.
He n03BOJRAIte NCKPN INN OTKPNT PIAMbK Da BnI3aT B KOHTaKT C ypeDa, KOraTO OTBaprTe BpaTata.
He noctabayIte 3anaIIMn npOdyKtn uIIN ppeImTe, KOITo Ca hAMOKpeHc bC 3aIaIIMn npOdyKtn, B 6bn30ct do ypeDa uIIN BbpxHy Hero.

BHIMAHNE!
Onacnoct ot nobpea Bypea.
3a da ce n36erhaT nobpeiN o6e3zBeTBAhe Ha emaiJa:
- He nocTabraTe CbdoBe 3a fypHa nnI npyTu npedMeTu BypeDa DnpeKTHo Bbpxy DbHOTO.
- He noctabrayTe aIyMHHnEBO FOJIO NIDPeKTHO Bbpxy DbHOTo Ha ypeJa.
- He nocTae BODa dIpeKTHO B ropeu ypei.
- He noctabraye BlaJxHn CbdoBe I XpaHa B ypeJa, CneI KaTo npKJIIOHTe C rotBeHeTO.
-
6bTeBHNMaTeJIHn, KOraTo MaxaTe NIn NoCTaBtE akceCoapuTe.
-
06e3üBéTЯBaHéTo Ha éMaJNa iπi HεpβxJaEmaTa CTOMaHa He OKa3Ba BJIyHne Bbpxy pa6oTaTa Ha ypeDa.
- I3non3BaIte DbJ6Oka TaBa 3a BnAIXH TopTn. PINOOBITE COKOe npuHHaBt netHa, KOINTo MOrat da 6bDat TpaHn.
Binharn rotBeTe npn 3aTBopeHa BpaTuKa Ha ypeJa.
Ako ypeBt e nHCTaInpaH 3ad npperpaT o Me6eIeN TnH, HnP. 3aD BpTaUcKa B WkaΦ, Ta3N BpaTnUcKa Tpr6Ba BnHaRn Da e OTbOpeHa, DOKaTO ypeBt pa6OTn. AKO e 3aTbOpeHa, MORaT da ce akymylnpar Tat tonlinHa Nbnara, KOITo BnOcneJeCTBne Da nobpeJr TypeA, WkaΦa nII nOda. He 3atBapraTe npperpaDaTa, DOKaTO ypeBt He n3CTnHe HnBnHO cneD ynoTpe6a.
2.4 FrpIka n noOuNCTBaHe

BHIMAHNE!
OnachocT OT hapaHbAHe, noXap nIIN NOBpeHa Ha ypeHa.
- Прени поддрьжka ИЗкlioчete урEDA и ИЗвадеTe Усеньета на захсановeto OT KOHTaKaTа на сел. Мржata.
- Ybepete ce, ye ypeBt e ctydH. IMa onaCHOCT cbKHeHnTe naHeI da ce cyyIaT.
CmeHnTe He3a6abHbO CTbKlHeHnte NaHeIHa BpaTuKkata, KOraTO ca NOBpeHn. CbpxKeTe ce c OTOpu3npaH cepBu3eh ueHTbp.
BhimabaTe, kOrato cBaIaTe BpaTuKaTa oYpeJa. BpaTuKaTa e TeKka! - Почистваиме рedingовно урета, за за пededOTвразитЕ развяп He Na NOBbpxHOCTHNЯ MaTePnAJI.
- Почисте ураза с мokра и мека кьрna. Изолзайтесамо Heytrални пета rat. He n3рлзайтабраэнгп рорукtn, гралави, поисваши Кьрп, разовпели плmetални п dedмети.
- Ako n3non3BaTe cnpe 3a φурнa, cneDbaiTe INHCTpyKcunTe 3a 6e3onacnoct Bbpxy onakOBkata My.
A B T O M A T N U H O T O I N K I N O U B A H E He De I E N C T B A p n cIe I N H T e Φ y H K C I N: O C B E T N E H N E, TepMOCO H D A, O T N O X E H C T a p T.
9.3 OxnaXdaBentnlaTop
Korato ypebT pa60Tu, oxJaKaaunr BHTnlaTOp ce BKNoUba aBtOMaTuHO, 3a da POnDbPka NOBpXHoCTne My XlaAdn. Ako n3KnHouTe ypeDa, oxJaKaaunr BeHTnlaTOp MoKe Da npOdbJn Da pa60Tu, dOKaTo ypebT ce oxJaDu.
10. ПЕПОРьКИ СбВETN
10.1 Пpenopbkn 3a roTbeHe
| i |
| Temnépatура tá и врето 3a rotvehe B tablinuite ca camo opneHTnpobvchn. Te 3abicaret OT peçuŋtne, kaçéctbOTOи колучесвOTO ha n3non3BaHNTe cbCTabKN. Baшят уpres може да че no-pažlnuho OT to3n, koIto cte Imamni npèdi. CьВeTnte no-dony poka3bat npenopbchynteHNITE hactpojkn 3a temnépatуpa, bpeme 3a rotveheи поэцяna ha paΦ-ta 3a onpeDélenHi BVDObe xpaHI. Ako He mökete da hamepitne hactpojknte 3a cneuaiaHa peçentra, notbpcete noqobn peçentn. |
10.2Пechенсвлжноct
3a ha- do6pn pe3yntatn cneBbaTe npednoxeknra Ta doJHaTa tabla.
N3noJ3BaIte no3nuaTHa TpeTna paft.
| (℃) | (Мин) | |
| Оретен с поста | 200 - 220 | 45 - 55 |
| Започeni karтофи | 180 - 200 | 70 - 85 |
| Мусaka | 170 - 190 | 70 - 95 |
| Лазаня | 180 - 200 | 75 - 90 |
| КанZoomи | 180 - 200 | 70 - 85 |
| Хлобен пдинг | 190 - 200 | 55 - 70 |
| Оретов пдинг | 170 - 190 | 45 - 60 |
| Ябков Кейс с падишпанова торта (кръгla Форma за сладши) | 160 - 170 | 70 - 80 |
| Бал xляб | 190 - 200 | 55 - 70 |
10.3 Пechеньлaxhoct - прорьчтелн akcecoapn
I3no3BaIe TbMnH, HeoTpa3aBau n foJna n cbIObe. Te a6copbupat tonJnHa no-dO6pe ot CBETnTe n OTpaxkATEJIHn CbIOBe.
OnachoctOT TokOB yap.
Jaamnata moKe da e ropea.
| Прешида смен�е лamпату: | ||
| Стбнka 1 | Стбнka 2 | Стбнka 3 |
| Изк nullе турна. Изча- кайт, дokato турна на з-стиhe. | Изк nullе турна от elek- trоческata мразж. | Поставete паре плат вьрху дьною на турна. |
Topha J lamna
- INFORMACije O SIGURNOSTI. 41
1.1 Sigurnost djece i ranjivih osoba....41
1.2 Opca sigurnost. 42
- SIGURNOSNE UPUTE 43
2.1 Instalacija 43
2.2 Elektrichi priključak 44
2.3 Primjena 45
2.4 Održavanje i cisćenje 45
2.5 Pirolitico cişcenje 46
2.6 Unutarnje osvjetjenje 46
2.7 Servis 46
2.8 Zbrinjavanje 47
- OPIS PROIZVODA 47
3.1 Opci pregled 47
3.2 Dodatna oprema 47
- UPRAVLJACKA PLOCA... 48
4.1 Uvlacive tipke 48
4.2 Pregled upravljačke ploče....48
4.3 Zaslon 49
- PRIJE PRVE UPORABE 50
5.1 Pocetno ciscenje.. 50
5.2 Pocetno predgrijavanje 50
- SVAKODNEVNA UPORABA 50
6.1 Kako postaviti: Funkcije pećnice....50
6.2 Funkcije pecnice. 51
6.3 Napomene o: Vlažno pečenje......52
6.4 Kako postaviti: Pomoc
pri kuhanju. 53
6.5 Pomo'pri kuhanju. 53
7. FUNKCIJE SATA. 58
7.1 Funkcije sata. 58
7.2 Kako postaviti: Funkcije sata.... 58
8. KORISTENJE PRIBORA 59
8.1 Umetanje dodatne opreme 60
8.2 Senzor za hranu 60
9. DODATNE FUNKCIJE 62
9.1 Blokiranje 62
9.2 Automatsko isključivanje 62
9.3 Ventilator za hladenje 62
10.SAVJETI. 63
10.1 Preporuke za kuhanje.. 63
10.2 Vlažno pečenje 63
10.3 Vlažno pečenje - preporučeni dodaci 63
10.4 Tablice pečenja za ispitne ustanove 64
11. CIŠÇENJE I ODRŽAVANJE 66
11.1 Napomene za ciscenje.. 66
11.2 Kako očistiti: Udubljenje u unutrasnjosti 66
11.3 Kako ukloniti: Nosači police 66
11.4 Način upotrebe: Pirolitěcko cisćenje 67
11.5 Podsjetnik Za Ciścenje 68
11.6 Kako ukloniti i postaviti: Vrata....68
11.7 Kako zamijeniti: Žarulju. 69
12.RJESAVANJE PROBLEMA. 70
6. SVAKODNEVNA UPORABA

UPOZORENJE!
Pyrolyticka cisticic
3. BESCHRIJVING VAN HET PRODUCT...120
12.PROBLEEMOPLOSSING. 143
Thank you for choosing this AEG product. We have created it to give you impeccable performance for many years, with innovative technologies that help make life simpler – features you might not find on ordinary appliances. Please spend a few minutes reading to get the very best from it.
Visit our website to:

Get usage advice, brochures, trouble shooter, service and repair information:
www.aeg.com/support

Register your product for better service:
www.registeraeg.com

Buy Accessories, Consumables and Original spare parts for your appliance:
www.aeg.com/shop

For more recipes, hints, troubleshooting download My AEG Kitchen app.

Available on the
AppStore

GETITON
Google Play
CUSTOMER CARE AND SERVICE
Always use original spare parts.
When contacting our Authorised Service Centre, ensure that you have the following data
available: Model, PNC, Serial Number.
The information can be found on the rating plate.
Warning / Caution-Safety information
① General information and tips
Environmental information
Subject to change without notice.
CONTENTS
1.SAFETY INFORMATION. 150
1.1 Children and vulnerable people
safety. 150
1.2 General Safety 151
2.SAFETYINSTRUCTIONS. 152
2.1 Installation 152
2.2 Electrical connection 153
2.3 Use 154
2.4 Care and cleaning. 154
2.5 Pyrolytic cleaning 155
2.6 Internal lighting 155
2.7 Service 155
2.8 Disposal. 156
3.PRODUCT DESCRIPTION. 156
3.1 General overview 156
3.2 Accessories.. 156
4.CONTROL PANEL. 157
4.1 Retractable knobs.. 157
4.2 Control panel overview 157
4.3 Display 158
5.1 Initial cleaning. 158
5.2 Initial preheating 159
6.DAILYUSE. 159
6.1 How to set: Heating functions..... 159
6.2 Heating functions 160
6.3 Notes on: Moist Fan Baking......161
6.4 How to set: Assisted Cooking....161
6.5 Assisted Cooking 162
7.CLOCK FUNCTIONS. 166
7.1 Clock functions 166
7.2 How to set: Clock functions..... 166
8. USING THE ACCESSORIES 168
8.1 Inserting accessories.. 168
8.2 Food Sensor. 168
9. ADDITIONAL FUNCTIONS 170
9.1 Lock. 170
9.2 Automatic switch-off 170
9.3 Cooling fan. 170
10. HINTS AND TIPS 171
10.1 Cooking recommendations 171
10.2 Moist Fan Baking 171
10.3 Moist Fan Baking - recommended accessories. 171
10.4 Cooking tables for test institutes 172
11.CARE AND CLEANING. 173
11.1 Notes on cleaning. 174
11.2 How to clean: Cavity embossment 174
11.3 How to remove: Shelf supports .174
11.4 How to use: Pyrolytic Cleaning.. 175
11.5 Cleaning Reminder 176
11.6 How to remove and install: Door176
11.7 How to replace: Lamp. 177
12. TROUBLESHOOTING 178
12.1 What to do if. 178
12.2 Service data 180
13. ENERGY EFFICIENCY 180
13.1 Product Information and Product Information Sheet 180
13.2 Energy saving 181
14.MENUSTRUCTURE. 181
14.1 Menu. 181
15. ENVIRONMENTAL CONCERNS. 182
1. SAFETY INFORMATION
Before the installation and use of the appliance, carefully read the supplied instructions. The manufacturer is not responsible for any injuries or damage that are the result of incorrect installation or usage. Always keep the instructions in a safe and accessible location for future reference.
1.1 Children and vulnerable people safety
-
This appliance can be used by children aged from 8 years and above and persons with reduced physical, sensory or mental capabilities or lack of experience and knowledge if they have been given supervision or instruction concerning the use of the appliance in a safe way and understand the hazards involved. Children of less than 8 years of age and persons with very extensive and complex disabilities shall be kept away from the appliance unless continuously supervised.
-
Children should be supervised to ensure that they do not play with the appliance.
- Keep all packaging away from children and dispose of it appropriately.
- WARNING: The appliance and its accessible parts become hot during use. Keep children and pets away from the appliance when in use and when cooling down.
- If the appliance has a child safety device, it should be activated.
- Children shall not carry out cleaning and user maintenance of the appliance without supervision.
1.2 General Safety
- This appliance is for cooking purposes only.
- This appliance is designed for single household domestic use in an indoor environment.
- This appliance may be used in, offices, hotel guest rooms, bed & breakfast guest rooms, farm guest houses and other similar accommodation where such use does not exceed (average) domestic usage levels.
- Only a qualified person must install this appliance and replace the cable.
- Do not use the appliance before installing it in the built-in structure.
- Disconnect the appliance from the power supply before carrying out any maintenance.
- If the mains power supply cable is damaged, it must be replaced by the manufacturer, its Authorised Service Centre or similarly qualified persons to avoid an electrical hazard.
- WARNING: Ensure that the appliance is switched off before replacing the lamp to avoid the possibility of electric shock.
-
WARNING: The appliance and its accessible parts become hot during use. Care should be taken to avoid touching heating elements or the surface of the appliance cavity.
-
Always use oven gloves to remove or insert accessories or ovenware.
- Use only the food sensor (core temperature sensor) recommended for this appliance.
- To remove the shelf supports first pull the front of the shelf support and then the rear end away from the side walls. Install the shelf supports in the opposite sequence.
- Do not use a steam cleaner to clean the appliance.
- Do not use harsh abrasive cleaners or sharp metal scrapers to clean the glass door since they can scratch the surface, which may result in shattering of the glass.
- Before pyrolytic cleaning, remove all accessories and excessive deposits/spills from the appliance cavity.
2. SAFETY INSTRUCTIONS
2.1 Installation

WARNING!
Only a qualified person must install this appliance.
- Remove all the packaging.
- Do not install or use a damaged appliance.
- Follow the installation instructions supplied with the appliance.
Always take care when moving the appliance as it is heavy. Always use safety gloves and enclosed footwear. - Do not pull the appliance by the handle.
- Install the appliance in a safe and suitable place that meets installation requirements.
- Keep the minimum distance from other appliances and units.
- Before mounting the appliance, check if the appliance door opens without restraint.
- The appliance is equipped with an electric cooling system. It must be operated with the electric power supply.
- The built-in unit must meet the stability requirements of DIN 68930.
| Cabinet minimum height (Cabinet under the work-top minimum height) | 578 (600) mm |
| Cabinet width | 560 mm |
| Cabinet depth | 550 (550) mm |
| Height of the front of the appliance | 594 mm |
| Height of the back of the appliance | 576 mm |
| Width of the front of the appliance | 595 mm |
| Width of the back of the appliance | 559 mm |
| Depth of the appliance | 567 mm |
| Built in depth of the appliance | 546 mm |
| Depth with open door | 1027 mm |
| Ventilation opening minimum size. Opening placed on the bottom rear side | 560x20 mm |
| Mains supply cable length. Cable is placed in the right corner of the back side | 1500 mm |
| Mounting screws | 4x25 mm |
2.2 Electrical connection

WARNING!
Risk of fire and electric shock.
- All electrical connections should be made by a qualified electrician.
- The appliance must be earthed.
- Make sure that the parameters on the rating plate are compatible with the electrical ratings of the mains power supply.
Always use a correctly installed shockproof socket. - Do not use multi-plug adapters and extension cables.
- Make sure not to cause damage to the mains plug and to the mains cable. Should the mains cable need to be replaced, this must be carried out by our Authorised Service Centre.
- Do not let mains cables touch or come near the appliance door or the niche below the appliance, especially when it operates or the door is hot.
- The shock protection of live and insulated parts must be fastened in such a way that it cannot be removed without tools.
- Connect the mains plug to the mains socket only at the end of the installation. Make sure that there is access to the mains plug after the installation.
If the mains socket is loose, do not connect the mains plug. - Do not pull the mains cable to disconnect the appliance. Always pull the mains plug.
- Use only correct isolation devices: line protecting cut-outs, fuses (screw type fuses removed from the holder), earth leakage trips and contactors.
- The electrical installation must have an isolation device which lets you disconnect the appliance from the mains at all poles. The isolation device must have a contact opening width of minimum 3 mm.
-
Fully close the appliance door before you connect the mains plug to the mains socket.
-
This appliance is supplied with a main plug and a main cable.
2.3 Use

WARNING!
Risk of injury, burns and electric shock or explosion.
- Do not change the specification of this appliance.
Make sure that the ventilation openings are not blocked. - Do not let the appliance stay unattended during operation.
- Deactivate the appliance after each use.
- Be careful when you open the appliance door while the appliance is in operation. Hot air can release.
- Do not operate the appliance with wet hands or when it has contact with water.
- Do not apply pressure on the open door.
- Do not use the appliance as a work surface or as a storage surface.
- Open the appliance door carefully. The use of ingredients with alcohol can cause a mixture of alcohol and air.
- Do not let sparks or open flames to come in contact with the appliance when you open the door.
- Do not put flammable products or items that are wet with flammable products in, near or on the appliance.

WARNING!
Risk of damage to the appliance.
- To prevent damage or discoloration to the enamel:
- do not put ovenware or other objects in the appliance directly on the bottom.
- do not put aluminium foil directly on the bottom of cavity of the appliance.
- do not put water directly into the hot appliance.
- do not keep moist dishes and food in the appliance after you finish the cooking.
- be careful when you remove or install the accessories.
- Discoloration of the enamel or stainless steel has no effect on the performance of the appliance.
- Use a deep pan for moist cakes. Fruit juices cause stains that can be permanent.
Always cook with the appliance door closed. - If the appliance is installed behind a furniture panel (e.g. a door) make sure the door is never closed when the appliance operates. Heat and moisture can build up behind a closed furniture panel and cause subsequent damage to the appliance, the housing unit or the floor.
Do not close the furniture panel until the appliance has cooled down completely after use.
2.4 Care and cleaning

WARNING!
Risk of injury, fire, or damage to the appliance.
- Before maintenance, deactivate the appliance and disconnect the mains plug from the mains socket.
- Make sure the appliance is cold. There is the risk that the glass panels can break.
-
Replace immediately the door glass panels when they are damaged. Contact the Authorised Service Centre.
-
Be careful when you remove the door from the appliance. The door is heavy!
- Clean regularly the appliance to prevent the deterioration of the surface material.
- Clean the appliance with a moist soft cloth. Use only neutral detergents. Do not use abrasive products, abrasive cleaning pads, solvents or metal objects.
If you use an oven spray, follow the safety instructions on its packaging.
2.5 Pyrolytic cleaning

WARNING!
Risk of Injury / Fires / Chemical Emissions (Fumes) in Pyrolytic Mode.
- Before carrying out the pyrolytic cleaning and initial preheating remove from the oven cavity: - any excess food residues, oil or grease spills / deposits.
- any removable objects (including shelves, side rails, etc., provided with the appliance) especially any non-stick pots, pans, trays, utensils, etc.
- Read carefully all the instructions for pyrolytic cleaning.
- Keep children away from the appliance while the pyrolytic cleaning operates. The appliance becomes very hot and hot air is released from the front cooling vents.
-
Pyrolytic cleaning is a high temperature operation that can release fumes from cooking residues and construction materials, as such consumers are advised to:
-
provide good ventilation during and after the pyrolytic cleaning.
provide good ventilation during and after the initial preheating. -
Do not spill or apply water on the oven door during and after the pyrolytic cleaning to avoid damaging the glass panels.
- Fumes released from all pyrolytic ovens / cooking residues as described are not harmful to humans, including children, or persons with medical conditions.
- Keep pets away from the appliance during and after the pyrolytic cleaning and initial preheating. Small pets (especially birds and reptiles) can be highly sensitive to temperature changes and emitted fumes.
- Non-stick surfaces on pots, pans, trays, utensils etc., can be damaged by the high temperature pyrolytic cleaning operation of all pyrolytic ovens and can be also a source for low level harmful fumes.
2.6 Internal lighting

WARNING!
Risk of electric shock.
- Concerning the lamp(s) inside this product and spare part lamps sold separately: These lamps are intended to withstand extreme physical conditions in household appliances, such as temperature, vibration, humidity, or are intended to signal information about the operational status of the appliance. They are not intended to be used in other applications and are not suitable for household room illumination.
This product contains a light source of energy efficiency class G. - Use only lamps with the same specifications.
2.7 Service
- To repair the appliance contact the Authorised Service Centre.
- Use original spare parts only.
2.8 Disposal

WARNING!
Risk of injury or suffocation.
- Contact your municipal authority for information on how to dispose of the appliance.
- Disconnect the appliance from the mains supply.
- Cut off the mains electrical cable close to the appliance and dispose of it.
- Remove the door catch to prevent children or pets from becoming trapped in the appliance.
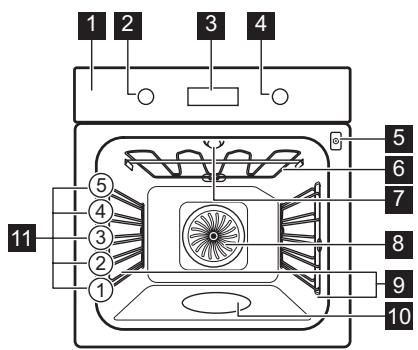
3. PRODUCT DESCRIPTION
3.1 General overview

1 Control panel
2 Knob for the heating functions
3 Display
4 Control knob
5 Socket for the food sensor
6 Heating element
7 Lamp
8 Fan
9 Shelf support, removable
10 Cavity embossment
11 Shelf positions
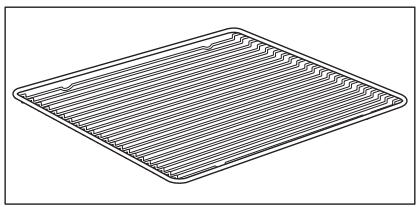
3.2 Accessories
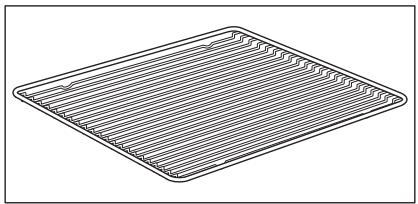
Wire shelf
For cookware, cake tins, roasts.
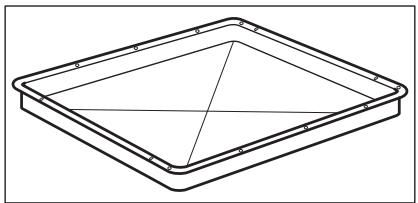
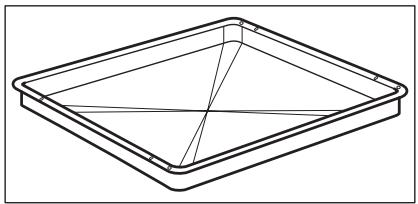
Baking tray
For cakes and biscuits.
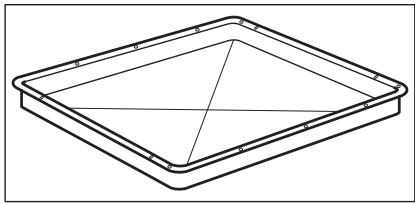
Grill-/Roasting pan
To bake and roast or as a pan to collect fat.
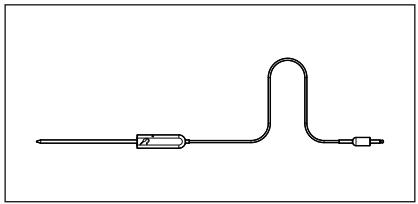
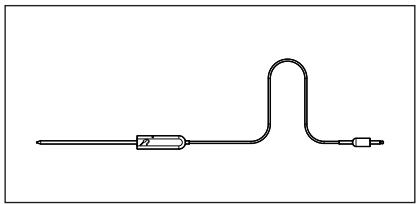
Food sensor
To measure the temperature inside food.
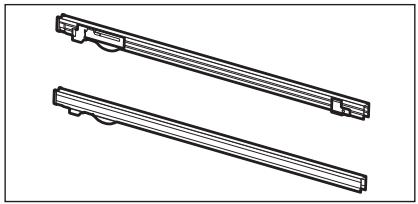
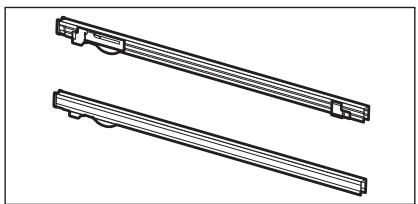
Telescopic runners
For inserting and removing trays and wireshelf more easily.

4. CONTROL PANEL
4.1 Retractable knobs
To use the appliance press the knob. The knob comes out.
4.2 Control panel overview
| OK | ||||||
| Timer | Fast Heat Up | Light | Food Sensor | Confirm setting | Press | Turn the knob |
| Select a heating function to turn on the appliance. | ||||||
| Turn the knob for the heating functions to the off position to turn the appliance off. | ||||||
4.3 Display
| Display with key functions. |
Display indicators
| Basic indicators | ||||
| Lock | Assisted Cooking | Cleaning | Settings | Fast Heat Up |
| Timer indicators | ||||
| Minute minder | STOPEnd time | Time Delay | Uptimer | |
| Progress bar - for temperature or time. The bar is fully red when the appliance reaches the set temperature. | - | |||
| Steam cooking indicator | |
| Food sensor indicator |
5. BEFORE FIRST USE

WARNING!
Refer to Safety chapters.
5.1 Initial cleaning
| Before the first use, clean the empty appliance and set the time: | |||
| 00:00 Set the time. Press OK. | |||
5.2 Initial preheating
| Preheat the empty oven before the first use. | |
| Step 1 | Remove all accessories and removable shelf supports from the oven. |
| Step 2 | Set the maximum temperature for the function: □. Let the oven operate for 1 h. |
| Step 3 | Set the maximum temperature for the function: □. Let the oven operate for 15 min. |
| i The oven can emit an odour and smoke during preheating. Make sure that the room is ventilated. | |
6. DAILY USE
| WARNING! Refer to Safety chapters. |
6.1 How to set: Heating functions
| Step 1 | Turn the knob for the heating functions and select a heating function. |
| Step 2 | Turn the control knob to set the temperature. |
| Steam cooking | |||
| Make sure that the oven is cold. | |||
| Step 1 | Step 2 | Step 3 | Step 4 |
| Preheat the empty oven for 10 min to create humidity. Put food in the oven. | |||
| Fill the cavity embossment with tap water. | Select the steam heating function. | Set the temperature. | |
| Steam cooking |
| iThe maximum capacity of the cavity embossment is 250 ml. Do not refill the cavity emboss-ment during cooking or when the oven is hot. |
| When the steam cooking ends: | ||
| Step 1 | Step 2 | Step 3 |
| Turn the knob for the heating functions to the off position to turn off the oven. | Carefully open the door. Re-leased humidity can cause burns. | Make sure that the oven is cold. Remove the remaining water from the cavity em-bossment. |
6.2 Heating functions
| Heating function | Application |
| True Fan Cooking | To bake on up to three shelf positions at the same time and to dry food. Set the temperature 20 - 40 °C lower than for Conventional Cooking. |
| Conventional Cooking | To bake and roast food on one shelf position. |
| Humidity Low | To add humidity during the cooking. To get the right colour and crispy crust during baking. To give more juiciness during reheating. To preserve fruit or vegetables. |
| Pizza Function | To bake pizza. To make intensive browning and a crispy bottom. |
| Bottom Heat | To bake cakes with crispy bottom and to preserve food. |
| Frozen Foods | To make convenience food (e.g., french fries, potato wedges or spring rolls) crispy. |
| Moist Fan Baking | This function is designed to save energy during cooking. When you use this function, the temperature in the cavity may differ from the set temperature. The residual heat is used. The heating power may be reduced. For more information refer to "Daily Use" chapter, Notes on: Moist Fan Bak-ing. |
| Grill | To grill thin pieces of food and to toast bread. |
| Turbo Grilling | To roast large meat joints or poultry with bones on one shelf position. To make gratins and to brown. |
| Menu | To enter the Menu: Assisted Cooking, Cleaning, Settings. |
6.3 Notes on: Moist Fan Baking
This function was used to comply with the energy efficiency class and ecodesign requirements (according to EU 65/2014 and EU 66/2014). Tests according to:
IEC/EN 60350-1
The oven door should be closed during cooking so that the function is not interrupted and the oven operates with the highest energy efficiency possible.
When you use this function the lamp automatically turns off after 30 sec.
For the cooking instructions refer to "Hints and tips" chapter, Moist Fan Baking. For general energy saving recommendations refer to "Energy Efficiency" chapter, Energy Saving.
6.4 How to set: Assisted Cooking
Every dish in this submenu has a recommended heating function and temperature. Use the function to prepare a dish quickly with default settings. You can also adjust the time and the temperature during cooking.
| For some of the dishes you can also cook with: | The degree to which a dish is cooked: |
| • Food Sensor | • Rare • Medium • Well done |
| Step 1 | Step 2 | Step 3 | Step 4 |
| 三 | × | P1-P45 | OK |
| Enter the menu. | Select Assisted Cooking. Press OK. | Select the dish. Press OK. | Insert the dish to the oven. Confirm setting. |
6.5 Assisted Cooking
| Legend | |
| ? | Food sensor available. Place the Food sensor in the thickest part of the dish. The appliance turns off when the set Food sensor temperature is reached. |
| | | The amount of water for the steam function. |
| || | Preheat the appliance before you start cooking. |
| - | Shelf level. |
The display shows P and a number of the dish that you can check in the table.
| Dish | Weight | Shelf level / Accessory | |
| 1 | Roast Beef, rare | 1 - 1.5 kg; 4 - 5 cm thick pieces | 2; baking tray Fry the meat for a few minutes on a hot pan. In-sert to the appliance. |
| 2 | Roast Beef, me-dium | ||
| 3 | Roast Beef, well done | ||
| 4 | Steak, medium | 180 - 220 g per piece; 3 cm thick slices | 3; roasting dish on wire shelf Fry the meat for a few minutes on a hot pan. In-sert to the appliance. |
| 5 | Beef roast / braised (prime rib, top round, thick flank) | 1.5 - 2 kg | 2; roasting dish on wire shelf Fry the meat for a few minutes on a hot pan. Add liquid. Insert to the appliance. |
| 6 | Roast Beef, rare (slow cooking) | 1 - 1.5 kg; 4 - 5 cm thick pieces | 2: baking tray Use your favourite spices or simply salt and fresh grounded pepper. Fry the meat for a few minutes on a hot pan. Insert to the appliance. |
| 7 | Roast Beef, me-dium (slow cook-ing) | ||
| 8 | Roast Beef, well done (slow cook-ing) | ||
| 9 | Fillet, rare (slow cooking) | 0,5 - 1.5 kg; 5 - 6 cm thick pieces | 2: baking tray Use your favourite spices or simply salt and fresh grounded pepper. Fry the meat for a few minutes on a hot pan. Insert to the appliance. |
| 10 | Fillet, medium (slow cooking) | ||
| 11 | Fillet, done (slow cooking) | ||
| 12 | Veal roast (e.g. shoulder) | 0.8 - 1.5 kg; 4 cm thick pieces | 2: roasting dish on wire shelf Use your favourite spices. Add liquid. Roast covered. |
| 13 | Pork roast neck or shoulder | 1.5 - 2 kg | 2: roasting dish on wire shelf Turn the meat after half of the cooking time. |
| 14 | Pulled pork (slow cooking) | 1.5 - 2 kg | 2: baking tray Use your favourite spices. Turn the meat after half of the cooking time to get an even browning. |
| 15 | Loin, fresh | 1 - 1.5 kg; 5 - 6 cm thick pieces | 2: roasting dish on wire shelf Use your favourite spices. |
| 16 | Spare Ribs | 2 - 3 kg; use raw, 2 - 3 cm thin spare ribs | 3: deep pan Add liquid to cover the bottom of a dish. Turn the meat after half of the cooking time. |
| 17 | Lamb leg with bones | 1.5 - 2 kg; 7 - 9 cm thick pieces | 2: roasting dish on baking tray Add liquid. Turn the meat after half of the cooking time. |
| 18 | Whole chicken | 1 - 1.5 kg; fresh | 2; 200 ml; casserole dish on baking tray Use your favourite spices. Turn the chicken after half of the cooking time to get an even browning. |
| 19 | Half chicken | 0.5 - 0.8 kg | 3; baking tray Use your favourite spices. |
| 20 | Chicken breast | 180 - 200 g per piece | 4; 2; casserole dish on wire shelf Use your favourite spices. Fry the meat for a few minutes on a hot pan. |
| 21 | Chicken legs, fresh | - | 3; baking tray If you marinated chicken legs first, set lower temperature and cook them longer. |
| 22 | Duck, whole | 2 - 3 kg | 2; roasting dish on wire shelf Use your favourite spices. Put the meat on roasting dish. Turn the duck after half of the cooking time. |
| 23 | Goose, whole | 4 - 5 kg | 2; deep pan Use your favourite spices. Put the meat on deep baking tray. Turn the goose after half of the cooking time. |
| 24 | Meat loaf | 1 kg | 2; wire shelf Use your favourite spices. |
| 25 | Whole fish, gril-led | 0.5 - 1 kgper fish | 2; baking tray Fill the fish with butter and use your favourite spices and herbs. |
| 26 | Fish fillet | - | 3; casserole dish on wire shelf Use your favourite spices. |
| 27 | Cheesecake | - | 2; 28 cm springform tin on wire shelf |
| 28 | Apple cake | - | 2; 100 - 150 ml; baking tray |
| 29 | Apple tart | - | 2; pie form on wire shelf |
| 30 | Apple pie | - | 2; 100 - 150 ml; 22 cm pie form on wire shelf |
| 31 | Brownies | 2 kg of dough | 3; deep pan |
| 32 | Chocolate muf-fins | - | 2; 100 - 150 ml; muffin tray on wire shelf |
| 33 | Loaf cake | - | 2; loaf pan on wire shelf |
| 34 | Baked potatoes | 1 kg | 2; baking tray Put the whole potatoes with skin on baking tray. |
| 35 | Wedges | 1 kg | 3; baking tray lined with baking paper Use your favourite spices. Cut potatoes into pieces. |
| 36 | Grilled mixed vegetables | 1 - 1.5 kg | 3; baking tray lined with baking paper Use your favourite spices. Cut the vegetables in-to pieces. |
| 37 | Croquets, frozen | 0.5 kg | 3; baking tray |
| 38 | Pommes, frozen | 0.75 kg | 3; baking tray |
| 39 | Meat / vegetable lasagna with dry pasta sheets | 1 - 1.5 kg | 2; casserole dish on wire shelf |
| 40 | Potato gratin (raw potatoes) | 1 - 1.5 kg | 1; casserole dish on wire shelf Rotate the dish after half of the cooking time. |
| 41 | Pizza fresh, thin | - | 2; 100 ml; baking tray lined with baking paper |
| 42 | Pizza fresh, thick | - | 2; baking tray lined with baking paper |
| 43 | Quiche | - | 2; baking tin on wire shelf |
| 44 | Baguette / Cia-batta / White bread | 0.8 kg | SS 2; 150 ml; baking tray lined with bak-ing paper More time needed for white bread. |
| 45 | All grain / rye / dark bread all grain in loaf pan | 1 kg | SS 2; 150 ml; baking tray lined with baking paper / wire shelf |
7. CLOCK FUNCTIONS
7.1 Clock functions
| Clock Function | Application |
| Minute minder | When the timer ends, the signal sounds. |
| STOCK Cooking time | When the timer ends, the signal sounds and the heating function stops. |
| Time Delay | To postpone the start and / or end of cooking. |
| Uptimer | Maximum is 23 h 59 min. This function has no effect on the operation of the oven. To turn on and off the Uptimer select: Menu, Settings. |
7.2 How to set: Clock functions
| How to set: Time of day | ||
| Step 1 | Step 2 | Step 3 |
| = | = | = |
| To change the time of day enter the menu and select Settings, Time of day. | Set the clock. | Press: OK. |
| How to set: Minute minder | |||
| Step 1 | The display shows:0:00 | Step 2 | Step 3 |
| Press: | Set the Minute minder | Press: OK. | |
| ① Timer starts counting down immediately. | |||
| How to set: Cooking time | ||||
| Step 1 | Step 2 | The display shows:0:00STOP | Step 3 | Step 4 |
| Choose a heating function and set the temperature. | Press repeated-ly: | Set the cooking time. | Press: OK. | |
| i Timer starts counting down immediately. | ||||
| How to set: Time Delay | |||||||
| Step 1 | Step 2 | The dis-play shows: the time of day ① START | Step 3 | Step 4 | The dis-play shows: STOP | Step 5 | Step 6 |
| Select the heating function. | Press repeatedly: ② | Set the start time. | Press: OK. | Set the end time. | Press: OK. | ||
| ① Timer starts counting down at a set start time. | |||||||
8. USING THE ACCESSORIES

WARNING!
Refer to Safety chapters.
8.1 Inserting accessories
A small indentation at the top increases safety. The indentations are also anti-tip devices. The high rim around the shelf prevents cookware from slipping of the shelf.
| Wire shelf: Push the shelf between the guide bars of the shelf support. | |
| Baking tray / Deep pan: Push the tray between the guide bars of the shelf support. |
8.2 Food Sensor
Food Sensor - measures the temperature inside the food.
| There are two temperatures to be set: | |
| °C The oven temperature. | °C The core temperature. |
| For the best cooking results: | ||
| Ingredients should be at room temperature. | Do not use it for liquid dishes. | During cooking it must remain in the dish. |
How to use: Food Sensor
| Step 1 | Turn on the oven. | |
| Step 2 | Set a heating function and, if necessary, the oven temperature. | |
| Step 3 | Insert: Food Sensor. | |
| Meat, poultry and fish | Casserole | |
| Insert the tip of Food Sensor into the centre of meat, fish, in the thickest part if possible. Make sure that at least 3/4 of Food Sensor is inside of the dish. | Insert the tip of Food Sensor exactly in the centre of the casserole. Food Sensor should be stabilized in one place during baking. Use a solid ingredient to achieve that. Use the rim of the baking dish to support the silicone handle of Food Sensor. The tip of Food Sensor should not touch the bottom of a baking dish. | |
| Step 4 | Plug Food Sensor into the socket at the front of the oven. The display shows the current temperature of: Food Sensor. | |
| Step 5 | - press to set the core temperature of the sensor. | |
| Step 6 | OK - press to confirm. When food reaches the set temperature, the signal sounds. You can choose to stop or to continue cooking to make sure the food is well done. | |
| Step 7 | Remove Food Sensor plug from the socket and remove the dish from the oven. WARNING! There is a risk of burns as Food Sensor becomes hot. Be careful when you unplug it and remove it from the food. | |
9. ADDITIONAL FUNCTIONS
9.1 Lock
| This function prevents an accidental change of the appliance function. | ||
| Turn it on when the appliance works - the set cooking continues, the control panel is locked. Turn it on when the appliance is off - it cannot be turned on, the control panel is locked. | ||
| OK | OK - press and hold to turn on the function. A signal sounds. | OK - press and hold to turn it off. |
| 3 x - flashes when the lock is turned on. | ||
9.2 Automatic switch-off
For safety reasons the appliance turns off after some time, if a heating function works and you do not change any settings.
| (℃) | (h) |
| 30 - 115 | 12.5 |
| 120 - 195 | 8.5 |
| 200 - 245 | 5.5 |
| 250 - maximum | 3 |
The Automatic switch-off does not work with the functions: Light, Food sensor, Time Delay.
9.3 Cooling fan
When the appliance operates, the cooling fan turns on automatically to keep the surfaces of the appliance cool. If you turn off the appliance, the cooling fan can continue to operate until the appliance cools down.
10. HINTS AND TIPS
10.1 Cooking recommendations
| i |
| The temperature and cooking times in the tables are guidelines only. They depend on the recipes and the quality and quantity of the ingredients used. Your appliance may bake or roast differently to the appliance you had before. The hints below show recommended settings for temperature, cooking time and shelf position for specific types of the food. If you cannot find the settings for a special recipe, look for the similar one. |
10.2 Moist Fan Baking
For the best results follow suggestions listed in the table below.
Use the third shelf position.
| (℃) | (min) |
| Pasta gratin | 200 - 220 |
| Potato gratin | 180 - 200 |
| Moussaka | 170 - 190 |
| Lasagne | 180 - 200 |
| Cannelloni | 180 - 200 |
| Bread pudding | 190 - 200 |
| Rice pudding | 170 - 190 |
| Apple cake, made of sponge cake mixture (round cake tin) | 160 - 170 |
| White bread | 190 - 200 |
10.3 Moist Fan Baking - recommended accessories
Use the dark and non-reflective tins and containers. They have better heat absorption than the light colour and reflective dishes.
| Pizza pan | Baking dish | Ramekins | Flan base tin |
| Dark, non-reflective 28 cm diameter | Dark, non-reflective 26 cm diameter | Ceramic 8 cm diameter, 5 cm height | Dark, non-reflective 28 cm diameter |
10.4 Cooking tables for test institutes
Information for test institutes
Tests according to: EN 60350, IEC 60350.
Baking on one level - baking in tins
| ℃ | min | |||
| Fatless sponge cake | True Fan Cooking | 160 | 45 - 60 | 2 |
| Fatless sponge cake | Conventional Cooking | 160 | 45 - 60 | 2 |
| Apple pie, 2 tins Ø20 cm | True Fan Cooking | 160 | 55 - 65 | 2 |
| Apple pie, 2 tins Ø20 cm | Conventional Cooking | 180 | 55 - 65 | 1 |
| Short bread | True Fan Cooking | 140 | 25 - 35 | 2 |
| Short bread | Conventional Cooking | 140 | 25 - 35 | 2 |
Baking on one level - biscuits
Use the third shelf position.
| ℃ | min | ||
| Small cakes, 20 per tray, preheat the empty oven | True Fan Cooking | 150 | 20 - 30 |
| Small cakes, 20 per tray, preheat the empty oven | Conventional Cooking | 170 | 20 - 30 |
Multilevel baking - biscuits
| ℃ | ℃ | min | ||
| Short bread | True Fan Cooking | 140 | 25 - 45 | 2 / 4 |
| Small cakes, 20 per tray, preheat the empty oven | True Fan Cooking | 150 | 25 - 35 | 1 / 4 |
| Fatless sponge cake | True Fan Cooking | 160 | 45 - 55 | 2 / 4 |
| Apple pie, 1 tin per grid (Ø 20 cm) | True Fan Cooking | 160 | 55 - 65 | 2 / 4 |
Grill
Preheat the empty oven for 5 minutes.
Grill with the maximum temperature setting.
| min | |||
| Toast | Grill | 1-2 | 5 |
| Beef steak, turn halfway through | Grill | 24-30 | 4 |
11. CARE AND CLEANING

WARNING!
Refer to Safety chapters.
11.1 Notes on cleaning
| Cleaning Agents | Clean the front of the appliance only with a microfibre cloth with warm water and a mild detergent. |
| Use a cleaning solution to clean metal surfaces. | |
| Clean stains with a mild detergent. |
| Everyday Use | Clean the cavity after each use. Fat accumulation or other residue may cause fire. |
| Do not store the food in the appliance for longer than 20 minutes. Dry the cavity only with a microfibre cloth after each use. |
| Accessories | Clean all accessories after each use and let them dry. Use only a microfibre cloth with warm water and a mild detergent. Do not clean the accessories in a dishwasher. |
| Do not clean the non-stick accessories using abrasive cleaner or sharp-edged objects. |
11.2 How to clean: Cavity embossment
Clean the cavity embossment to remove limestone residue after cooking with steam.
| Step 1 | Step 2 | Step 3 |
| Pour: 250 ml of white vinegar into the cavity embossment. Use maximum 6% vinegar without any additives. | Let the vinegar dissolve the limestone residue at the ambient temperature for 30 minutes. | Clean the cavity with warm water and a soft cloth. |
| For the function: Humidity Low clean the oven for every 5 - 10 cooking cycles. | ||
11.3 How to remove: Shelf supports
Remove the shelf supports to clean the oven.
| Step 1 | Turn off the oven and wait until it is cold. | |
| Step 2 | Pull the front of the shelf support away from the side wall. | |
| Step 3 | Pull the rear end of the shelf support away from the side wall and remove it. | |
| Step 4 | Install the shelf supports in the opposite sequence. The retaining pins on the telescopic runners must point to the front. |
11.4 How to use: Pyrolytic Cleaning
Clean the oven with Pyrolytic Cleaning.

WARNING!
There is a risk of burns.

CAUTION!
If there are other appliances installed in the same cabinet, do not use them at the same time as this function. It can cause damage to the oven.
| Before the Pyrolytic Cleaning: | ||
| Turn off the oven and wait until it is cold. | Remove all accessories and removable shelf supports. | Clean the oven floor and the in-ner door glass with warm water, a soft cloth and a mild detergent. |
| Pyrolytic Cleaning | ||
| Step 1 | Enter menu: Cleaning ml/. | |
| Option | Duration | |
| C1 - Light cleaning | 1 h | |
| C2 - Normal cleaning | 1 h 30 min | |
| C3 - Thorough cleaning | 3 h | |
| Step 2 | OK - press to select the cleaning programme. | |
| Step 3 | OK - press to start the cleaning. | |
| Step 4 | After cleaning, turn the knob for the heating functions to the off position. | |
| ① When the cleaning starts, the oven door is locked and the lamp is off. Until the door unlocks the display shows: □. | ||
| When the cleaning ends: | ||
| Turn off the oven and wait until it is cold. | Clean the cavity with a soft cloth. | Remove the residue from the bottom of the cavity. |
11.5 Cleaning Reminder
| The oven reminds you when to clean it with pyrolytic cleaning. | |
| flashes in the display for 5 sec after each cooking session. | To turn off the reminder enter the Menu and select Settings, Cleaning Reminder. |
11.6 How to remove and install: Door
You can remove the door and the internal glass panels to clean it. The number of glass panels is different for different models.

WARNING!
The door is heavy.

CAUTION!
Carefully handle the glass, especially around the edges of the front panel. The glass can break.
| Step 1 | Fully open the door. | |
| Step 2 | Lift and press the clamping levers (A) on the two door hinges. | |
| Step 3 | Close the oven door to the first opening position (approximately 70° angle). Hold the door at both sides and pull it away from the oven at an upwards angle. Put the door with the outer side down on a soft cloth on a stable surface. | |
| Step 4 | Hold the door trim (B) on the top edge of the door at the two sides and push inwards to release the clip seal. | |
| Step 5 | Pull the door trim to the front to remove it. | |
| Step 6 | Hold the door glass panels on their top edge one by one and pull them up out of the guide. | |
| Step 7 | Clean the glass panel with water and soap. Dry the glass panel carefully. Do not clean the glass panels in the dishwasher. | |
| Step 8 | After cleaning, do the above steps in the opposite sequence. | |
| Step 9 | Install the smaller panel first, then the larger and the door. Make sure that the glasses are inserted in the correct position otherwise the surface of the door may overheat. | |
11.7 How to replace: Lamp

WARNING!
Risk of electric shock.
The lamp can be hot.
Top lamp
| Before you replace the lamp: | ||
| Step 1 | Step 2 | Step 3 |
| Turn off the oven. Wait until the oven is cold. | Disconnect the oven from the mains. | Put a cloth on the bottom of the cavity. |
| Step 1 | Turn the glass cover to remove it. | |
| Step 2 | Clean the glass cover. | |
| Step 3 | Replace the lamp with a suitable 300 °C heat-resistant lamp. | |
| Step 4 | Install the glass cover. | |
12. TROUBLESHOOTING

WARNING!
Refer to Safety chapters.
12.1 What to do if...
In any cases not included in this table please contact with an Authorised Service Centre.
| The appliance does not turn on or does not heat up | |
| Problem | Check if... |
| You cannot activate or operate the appliance. | The appliance is correctly connected to an electrical supply. |
| The appliance does not heat up. | The automatic switch-off is deactivated. |
| The appliance does not heat up. | The appliance door is closed. |
| The appliance does not heat up. | The fuse is not blown. |
| The appliance does not heat up. | The Lock is off. |
| Components | |
| Problem | Check if... |
| The lamp is turned off. | Moist Fan Baking - is turned on. |
| The lamp does not work. | The lamp is burnt out. |
| The Food sensor does not operate. | The plug of the Food sensor is fully inserted in- to the socket. |
| ? Error codes | |
| The display shows... | Check if... |
| Err C2 | You removed the Food sensor plug from the socket. |
| Err C3 | The appliance door is closed or the door lock is not broken. |
| Err F102 | The appliance door is closed. |
| Err F102 | The door lock is not broken. |
| 00:00 | There was a power cut. Set the time of day. |
| If the display shows an error code that is not in this table turn the house fuse off and on to restart the appliance. If the error code recurs contact an Authorised Service Centre. | |
| Cleaning | |
| Problem | Check if... |
| The water leaks out of the cavity embossment. | There is too much water in the cavity emboss-ment. |
12.2 Service data
If you cannot find a solution to the problem yourself, contact your dealer or an Authorised Service Centre.
The necessary data for the service centre is on the rating plate. The rating plate is on the front frame of the appliance cavity. Do not remove the rating plate from the appliance cavity.
| We recommend that you write the data here: | |
| Model (MOD.) | .................. |
| Product number (PNC) | .................. |
| Serial number (S.N.) | .................. |
13. ENERGY EFFICIENCY
13.1 Product Information and Product Information Sheet
| Supplier's name | AEG | |
| Model identification | BPE556360M 944188664 BPK556360M 944188665 | |
| Energy Efficiency Index | 81.2 | |
| Energy efficiency class | A+ | |
| Energy consumption with a standard load, conventional mode | 1.09 kWh/cycle | |
| Energy consumption with a standard load, fan-forced mode | 0.69 kWh/cycle | |
| Number of cavities | 1 | |
| Heat source | Electricity | |
| Volume | 71 l | |
| Type of oven | Built-In Oven | |
| Mass | BPE556360M | 35.0 kg |
| BPK556360M | 35.0 kg | |
IEC/EN 60350-1 - Household electric cooking appliances - Part 1: Ranges, ovens, steam ovens and grills - Methods for measuring performance.
13.2 Energy saving

The appliance has features which help you save energy during everyday cooking.
Make sure that the appliance door is closed when the appliance operates. Do not open the appliance door too often during cooking. Keep the door gasket clean and make sure it is well fixed in its position.
Use metal cookware to improve energy saving.
When possible, do not preheat the appliance before cooking.
Keep breaks between baking as short as possible when you prepare a few dishes at one time.
Cooking with fan
When possible, use the cooking functions with fan to save energy.
Residual heat
The fan and lamp continue to operate. When you turn off the appliance, the display shows the residual heat. You can use that heat to keep the food warm.
When the cooking duration is longer than 30 min, reduce the appliance temperature to minimum 3 - 10 min before the end of cooking. The residual heat inside the appliance will continue to cook.
Use the residual heat to warm up other dishes.
Keep food warm
Choose the lowest possible temperature setting to use residual heat and keep a meal warm. The residual heat indicator or temperature appears on the display.
Cooking with the lamp off
Turn off the lamp during cooking. Turn it on only when you need it.
Moist Fan Baking
Function designed to save energy during cooking.
When you use this function the lamp automatically turns off after 30 sec. You may turn on the lamp again but this action will reduce the expected energy savings.
14. MENU STRUCTURE
14.1 Menu
| Step 1 | Step 2 | Step 3 | Step 4 | Step 5 |
| - select to enter the Menu. | Select the option from Menu struc-ture and press OK. | Select the setting. | OK - press to confirm setting. | Adjust the value and press OK. |
| Turn the knob for the heating functions to the off position to exit the Menu. | ||||
| Menu structure | ||
| Assisted Cooking | Cleaning mm | Settings |
| Settings | |||||
| 01 | Time of day | Change | 02 | Display brightness | 1 - 5 |
| 03 | Key tones | 1 - Beep 2 - Click 3 - Sound off | 04 | Buzzer volume | 1 - 4 |
| 05 | Food Sensor Action | 1 - Alarm and stop 2 - Alarm | 06 | Uptimer | On / Off |
| 07 | Light | On / Off | 08 | Fast Heat Up | On / Off |
| 09 | Cleaning Reminder | On / Off | 10 | Demo mode | Activation code: 2468 |
| 11 | Software version | Check | 12 | Reset all settings | Yes / No |
15. ENVIRONMENTAL CONCERNS
Recycle materials with the symbol . Put the packaging in relevant containers to recycle it. Help protect the environment and human health by recycling waste of electrical and electronic appliances. Do not dispose of appliances marked with the symbol with the household waste. Return the product to your local recycling facility or contact your municipal office.
PARIMATE TULEMUSTE SAAVUTAMISEKS
Available on the App Store

GET IT ON Google Play
KLIENDITEENINDUS JA HOOLDUS
| HOIATUS! Uks on raske. |
Available on the App Store

GETIT ON Google Play
3mno508%6my63o aadusbmymds
ym30m030u 8dmooy6o mno8o5mo uooosnoa 6fo
0j35u 3mno6gmyug30u 85moos6o2doonouu, oyny6000, mda bmon
0j30 gooa0 am6gdo: amgo, PNC, ugoom 5mdgo.
563m6200u 56300uudmo0m0u66ym 3u3m68o.
36mcgjg0o sluogmo 5b0000000000000000000000000000000000000000000000000000000000000000000000000000000000000000
g 36moyjoo8083u G-3o5ouo 6o8mo8o8yymnou 4m5u5oomou yomnu.
8dmoy600abmmnoa30u300300nlu 500y600.
2.7 Uo63obo
amymonmou 2030000000000000000000000000000000000
gdoomoy600abmmmo mno8o5mo uooosno 600mgo.
2.8 36306330

gogogobogdo!
0s60s6g0nUs 6g6b0g30u6n3o.
oo03o6000 0135u 06003000h uduv6hu, uymn36m3600 m 00186m
dmmydmoaou uoo56cm yolu co300 00cogoo 0jlu6o 6gmdsbo
doosoo.
gdmooonomymmogcogolooos
- 80000000000000000000000000000000000000000000000
a mblg500 36nou 0o8o6o, 033300u 56 065ymo 6b39m00nu 0yme366m60d m20j6hm amymdommoosoo h3030u o3005 uugomdooc.
3. 3mmyjou
3.1 mgoon 0aombogm3
1 3m5g6mmol 36gmo
2 a8b0m0dou 8y6f300dou mdo
3 00u3
4 afo03ol moo3o
5 UgmoU U5UmMoM6
6 0
7 6600
8 3050000000
9 mssmlu c0g3gmo, 2mu6u6gmo
10 3886960600000
11 006mggol 3m60b0g0
3.2 sJUGUyOgdo
golmugos6o 006m
Jy6moloo3ou,5o3b3molqmmdo0o3ou, 003000300.
UgBmdo mo5go
6a3b3m0dolus 2u33n0daun3a.
Gnol /gul30
gdoomugbmoocooofofofofofofofofofofofofofofofofofofofofofofofofofofofofofofofofofofofofofofofofofofofofofofofofofofofofofofofofofofofofofofofofo
Us330do 36mmoggogolug5umno
U3380u 08600g03g03g0ygmol gulmdo.
Ggug3m3y60 2088603gogoo
m56gmoos gou malugooo osmmu y3mm
00000 hudouo oosdmo0000
4. 3m5g6mmol 3s5gmo
4.1 0aumu03-0uua03o u6bmyoo
aymdmoommool aodmuyg6oogoofoon uobomgyu.ubomgyno aodmcou.
4.2 3003003560000000000000000000
| OK | ||||||
4.3 00b3ggo
| mangamngs ydngs ydngs ydngs o500300000 | |
| luy3300 36mm ydgds ydgds ydgds ydgds ydgds ydgds ydgds ydgds ydgds ydgds ydgds ydgds ydgds ydgds ydgds ydgds ydgds ydgds ydgds ydgds ydgds ydgds ydgds ydgds ydgds ydgds ydgds ydgds ydgds ydgds ydgds ydgds ydgds ydgds |
5. 30630m 8ddmy6d8dco

gogogobomgdo!
abomgyn yluogmboqmdou 30300
5.1 Luyobg806
| 30630000000000000000000000000000000000000000000000000000000000000000000000000000000000000000000000000000: | |||
| 00:00 06mmol Lysyl200.0000 OK. | |||
5.2 030306300605ufoa 866
| mhwqwqydwqds | |||
| gwhqwqydwqds. mwhqwqydwqds. | |||
| 6d0x01 | 6d0x02 | 6d0x03 | 6d0x04 |
| 60000000000000000000000000000000000000000000000000000000000000000000000000000000000000000000000000000 | 60000000000000000000000000000000000000000000000000000000000000000000000000000000000000000000000000 | 65000000000000000000000000000000000000000000000000000000000000000000000000000000000000000000000000000 |
6.2 886000000000000000
| dongyongyong | dongmyo50 | |
| dongmu 0603m6030000000000000000000000000000000000000000000000000000000000000000000000000000000000000000000000000000 | ||
| dongyongyong | dongyongyong |
6.3 85083600a 84986: 85mbs 85050 35800m600
JU 365600000000000000000000000000000000000000000000000000000000000000000000000000000000000
IEC/EN 60350-1
y5606m 600000000000000000000000000000000000000000000000000000000000000000000
a 6y6g6oou aodmy6g6oouu 6oogy6o 30 6dou
uouuouuouuouuueoogguguaonooauoofooooo,oh3oo ooo 000000000000000000000000000000000000000000000000000000000000000000000
6.4 Gmamn oosyj5mo: amoogosgds osbsdo
330060y000 00000000000000000000000000000000000000000000000000000000000000000
| Бмогледул, Стбдου, Ддддддддддддддддддддддддддддддддддддддддддддддддддддддддддддддддддддддддддддддддддддддддддддддддддддд Богледул, Стбдου, Ддддддддддддддддддддддддддддддддддддддддддддддддддддддддддддддддддддддддддддддддддддддд • Богледул 36mmФгФФФФФФФФФФФФФФФФФФФФФФФФФФФФФФФФФФФФФФФФФФФФФФФФФФФФФФФФФФФФФФФФФФФФФФФФФФФФФФФФФФФФФФФФФФФФФФФФФФФФΦ: | Богледул 36mmФгФФФФФФФФФФФФФФФФФФФФФФФФФФФФФФФФФФФФФФФФФФФФФФФФФФФФФФФФФФФФФФФФФФФФФФФФФФФФФФФФФФФФФФФФΦ: |
| • Богледул 36mmФгФФФФФФФФФФФФФФФФФФФФФФФФФФФФФФФФФФФФФФФФФФФФФФФФФФФФФФФФФФФФФФФФФФФФФФФФФФФФФФФФФФФФФФΦ: | • Богледул 36mmФгФФФФФФФФФФФФФФФФФФФФФФФФФФФФФФФФФФФФФФФФФФФФФФФΦ: |
| UdDgBb UdDgBb UdDgBb | UdDgBb UdDgBb UdDgBb UdDgBb UdDgBb UdDgBb UdDgBb UdDgBb UdDgBb UdDgBb UdDgBb UdDgBb UdDgBb UdDgBb UdDgBb Uda Uda Uda Uda Uda Uda Uda Uda Uda Uda Uda Uda Uda Uda Uda Uda Uda Uda Uda Uda Uda Uda Uda Uda Uda Uda Uda Uda Uda Uda Uda Uda Uda Uda |
| Uda Uda Uda Uda Uda Uda Uda Uda Uda Uda Uda Uda Uda Uda Uda Uda Uda Uda Uda Uda Uda Uda Uda Uda Uda Uda Uda Uda Uda Uda Uda Uda Uda T | |
| Uda Uda Uda Uda Uda Uda Uda Uda Uda Uda Uda Uda Uda Uda Uda Uda Uda Uda Uda Uda Uda Uda Uda Uda Uda Uda Uda Uda Uda Uda Uda Uda | |
| y300000 60 863868 | |
| ygljyogdo | yml3000 ydlmy6000 ydlce800 ydlje6000 ydlg6000 ydlg6000 ydlg6000 ydlg6000 ydlg6000 ydlg6000 ydlg6000 ydlg6000 ydlg6000 ydlg6000 ydlg6000 ydlg6000 ydlg6000 ydlg6000 ydlg6500 ydlg6500 ydlg6500 ydlg6500 ydlg6500 ydlg6500 ydlg6500 ydlg6500 ydlg6500 ydlg6500 ydlg6500 ydlg6500 ydlg6500 ydlg6500 ydlg650 |
| yml3000 ydlmy6000 ydlce800 ydlje6000 ydlg6000 ydlg6000 ydlg6000 ydlg6000 ydlg6000 ydlg6000 ydlg6000 ydlg6000 ydlg6000 ydlg6000 ydlgL6500 ydlg6500 ydlg6500 ydlg6500 ydlg6500 ydlg6500 ydlg6500 ydlg6500 ydlg6500 ydlg6500 ydlg6500 ydlg6500 ydlg6500 ydlg6500 ydlg6750 ydlg6750 ydlg6750 ydlg6750 ydlg6750 ydlg6750 ydlg6750 ydlg6750 ydlg6750 ydlg6750 ydlg6750 ydlg6750 ydlg6750 ydlg6750 ydlg6750 |
11.2 gUyegoo308oBul yJuo: mHbYbU bOgmoogyo 5foom
gdo5000 jodjmou moogyno 5600, mda aobommo 3063ymo 5000o uagmou mnojmoa ma6600oou ooo.
| 5680x1 | 328mm600mm 4500mm 5000mm 6500mm 7500mm 8000mm |
| 5680x2 | 328mm600mm 4500mm 5000mm 6500mm 7500mm 8000mm |
| 5680x3 | |
| 5680x4 |
11.4 gdoy6dou yJuo: 3o6mmno8yofo 8do
yogmou golwogg6oog oomoy60m 306mmno6yfo 806co.

gogogobogdo!
MgOgOMu GgOg3GmOnu OoOgOnu OoU30.

6666666
0030 00600000000000000000000000000000000000000000000000000000000000000000000
| Lalal de 306mmol y100 g205g: | ||
| 3060000000000000000000000000000000000000000000000000000000000000000000000000000000000000000000000000000 | ||
| 680001 | 680002 | 680003 |
| mghgns | b5546d9m3ds | |
| C1 - 4000000000000000000000000000000000000000000000000000000000000000000000000000000000000000000000000000 | ||
| C2 - 1000000000000000000000000000000000000000000000000000000000000000000000000000000000000000000000000000 | 1 h | 1 h |
| C3 - 2000000000000000000000000000000000000000000000000000000000000000000000000000000000000000000000000000 | 3 h | |
| 680002 | OK - 4000000000000000000000000000000000000000000000000000000000000000000000000000000000000000000000000 | |
| 36mm80mm | |
| 56mm80mm | |
| 56mm80mm | |
| ? | |
| 3365678901234567890... | |
| Err C2 | |
| Err C3 | |
| Err F102 | |
| Err F102 | 356mol 432mol 56mol 68mol 76mol 80mol 86mol 90mol. |
| 00:00 | |
| Δθθθθθθθθθθθθθθθθθθθθθθθθθθθθθθθθθθθθθθθθθθθθθθθθθθθθθθθθθθθθθθθθθθθθθθθθθθθθθθθθθθθθθθθθθθθθθθθθθθθθ | |
| 36mmol/mol | 20mol/mol mol... |
12.2 aMauu6y6j0ou aM5b3j0o
Omy 36mmommoou goofoolgfool oovoo 30n 3mymmoo,oyyfoohoomo onj30lu oomohu 583mno6goyum uon30luogfu.
Ugmo 500u Uofoom dvofoon oonoooymo Uofoom gnofo. Uofoom
Oofoom o amyommonu 0ofou fo hohmfo. d m dofoon omymmonu 0ofou
Uofoom gnofo.
| dongzhong, dongzhongdongdongdongdongdongdongdongdongdongdongdongdongdongdongdongdongdongdongdongdongdongdongdongdongdongdongdongdongdongdongdongdongdongdongdongdongdongdongdongdongdongdongdongdongdongdongdongdongdongdongdongdongdongdongdongdongdongdongdongdongdongdongdongdongdongdongdongdongdongdongdongdongdongdongdongdongdongdongdongdongdongdongdongdongdongdongdongdongdongdongdongdongdongdongdongdongdongdongdongdongdiamond | ||
| dongzhong(MOD.) | ............ | |
| dongzhongdongdongdongdongdongdongdongdongdongdongdongdongdongdongdongdongdongdongdongdongdongdongdongdongdongdongdongdongdongdongdongdongdongdongdongdongdongdongdongdongdongdongdongdongdongdongdongdongdongdongdongdongdongdongdongdongdongdongdongdongdongdongdongdongdongdongdongdongdongdongdongdongdongdongdongdongdongdongdongdongdongdongdongdongdongdongdongdongdongdongdongdongdongdongdongdongdongdiamond | ||
| dongzhongdongdongdongdongdongdongdongdongdongdongdongdongdongdongdongdongdongdongdongdongdongdongdongdongdongdongdongdongdongdongdongdongdongdongdongdongdongdongdongdongdongdongdongdongdongdongdongdongdongdongdongdongdongdongdongdongdongdongdongdongdongdongdongdongdongdongdongdongdongdongdongdongdongdongdongdongdongdongdongdongdongdongdongdongdongdongdongdongdongdongdongdongdongdiamond | ||
13. 0506m080JyMm
13.1 60m620s 36m0yj8oU 8u6b8 36m0yj8oU u60g636s6om y636m
| Δmρρρρρρρρρρρρρρρρρρρρρρρρρρρρρρρρρρρρρρρρρρρρρρρρρρρρρρρρρρρρρρρρρρρρρρρρρρρρρρρρρρρρρρρρρρρρρρρρρρρρrho | AEG |
| Δμνννννννννννννννννννννννννννννννννννννννννννννννννννννννννννννννννννννννννννννννννννννννννννννννννννν | |
| Δμνννννννννννννννννννννννννννννννννννννννννννννννννννννννννννννννννννννννννννννννννννννννννννννννν | |
| A+ | |
| Δμννννννννννννννννννννννννννννννννννννννννννννννννννννννννννννννννννννννννννννννννννν | |
| 1.09 33 60/30 30 | |
| Δμννννννννννννννννννννννννννννννννννννννννννννννννννννννν | |
| 0.69 33 60/30 30 | |
| 1 | |
| Δμννννννννννννννννννννννννννννννν | |
| 71 | |
| Δμνννννννννννννν | |
| BPE556360M | 35.0 38 |
| BPK556360M | 35.0 38 |
/IEC/EN 60350-1-Usymgbsm3dmo mJyHbMboUysymdo uadmol dmuo - 5yjmo 1: yjmo, yjmo, mnoJfmou yjmo, o o amgo - Jmdcmmol u s6md3ou
Oomoo.
13.2 656800u 00%m83s

dymommou j3u yg5j00o, mdo00000000000000000000000000000000000000000000000000000
Available on the AppStore

GETITON Google Play
KUNDENDIENST UND SERVICE
Available on the App Store

GETIT ON Google Play
EeyHPETHsH IeATQN KAI ZEPBI
XpəiμoTIOεIe πáVtα μóvo yνnσia αντλλakTiKa.
Available on the App Store

GET IT ON Google Play
Visite oulosso website para:


Available on the App Store

GETIT ON Google Play
ASISTENÇA PENTRU CLIENTI Şİ SERVICE
Utilizathi ntotdeauna piese de schimb originale.
12.2 Date thru service
Available on the App Store

GETIT ON Google Play
ПОДЕРЖKA KЛNEHTOB И OБСЛУЖИBAHINE
Bcerda nCnoJb3yIte opurnHaJIbHbIe 3aunactn.
HnkaToBb, OTo6paKaemble Ha DnCnnee
Ecnn haTn ycTaHOBKn dny KOHKpeTHoro peeenta He ydaetc, nonuTe noxoxm pecnt.
10.2 BlaJxHa KOBBeKzJa
Дяdoctикеня ONTIMmaIbHbIXpe3yIbTaTOB BOCnOJIb3yITeCb peKOMeHdaZmaMn, npUBeDeHHbIMN B Ta6JIne HIXke.
IcnoB3yIte TpeTbe NIOJKeHne npOTnBn.
CyueCTByeT OAnaCHOctb NOnyuEnnOxKOrOB.

IPEyIpyEKDEHNE
EcnB ToJKe Me6eIbHn HnIe IINu 7kaCy yCTaHOBJIeHbI pyrIne npi6Opbl, He nCNoIb3yIte INx OndHOBpeMeHHO C BbIOnJIHeHem DaHHoI cyHKcIM. 3TO MOKET npiBeCTN K NOBpeJdeHHIO dYXOBORO 7kaFa.
12.1 YuTo DeJaTaB, ecnI...
B cnyuayx, He yka3aHHbIX B daHHoT Ta6JIne, o6pa7aITeCb B aBTOpn3ObaHHbI cepBnCHbI ueHtp.
EcnI dInTeBHOCTb npiroTOBHeHnI pReBbIaet 30 MNHy, yMeHbUHTe TempeATpy npi6opa do MmHmAbHNo 3a 3-10 MNHy Tdo OKOHuaHnI npiroTOBHeHnI. IpoDOnKNTc npiroTOBHeHne OCTaToCHoro TepIIa BHyTpN npi6opa.
IcnoIb3yIte octatoHoe tenIIO Ira pa3oRpeBa npyrnx 6nI.
CoxpaHHe NnB TEnIOM COCTOHN
ДлгИ NSONJIb3OBaHnI OCTaTOUHOrO TENlaДЛЯ COxpaHEnI NIIu B TENTNOM COCTOHNBbIbIpaIte MaKcIMaJIbHO HIN3KOe 3HaueHne TEMpeAtpbl I COxpaHЯIte 6JIIO Do TENTle. HaIINcJIpe 6ydet OTo6paxKaTbCЯ INdIkaCuaN OCTaTOUHOrO TENla IIN TEkyUaIe TEMpeAtpa.
PnroTOBJeHne C BbIKNoeHHoN JaMnoI
Bbiknouhte lamny ha Bpem npiroTOBHeHry. BkIooaHTe ee ToIbKO npH Heo6xoDmOcTn.
BnaXnHa KOHBeKzIa
KOPINCHNUCHA NOIDPIUKA IN CEPBNC
YBeK KOpIcTnTe opuHnHaJIne pe3epBHe DeIOBe.
Kaada kohtaktpaTe obnaheHn cepBnCH n eHTap, BOJITe paUHa da KOd ce6e imate
- INHΦOPMALUJE O BE3BEdHOCTN......597
1.1 Be36eHnOCT Deue n ocetTbNbNx
oc06a. 597
1.2 OniTe Mepe 6e36eHocTn...598
- BE3BEdHOCHA YIyTCTBA 599
2.1 MoHTaxa 599
2.2 PnukbyeHe Ha eNeKtpnHy
mpexy 600
2.3 Ynotpe6a 601
2.4 Hera n yu whebe 602
2.5Пиролитчко ушне...... 602
2.6 YHytpaHbe OcBeTbeHe 603
2.7 CepBncupahe.. 603
2.8 Ondarabe 603
3.ОПИС ПОИЗВODА 604
3.1 Onst npika3 604
3.2 Pnp6op 604
- KOMAHДHA TÁБЛА 605
4.1 Dymaekoja ce ybnaue... 605
4.2Пергелд командне tabл.. 605
4.3Диспел.. 606
- INPE INPBE YNOTPEBE 606
5.1 IprBo Ynshene607
5.2 HnuijanaHno npedrpeBahe... 607
6.CBAKOДHEBHA YIOTPEБA. 607
6.1 KaKo Da noDeciTe:Функиje 3aRpeBaHa... 607
6.2Функци je 3arpeBaHa. 608
6.3 HanomeHe y Be3n ca: BnaKho neueHe y3 BeHTnIaTOp... 609
6.4 KaKo Da nOdecuTe: IOTnOMOrHyTa npInpema 610
6.5ПOTTNOMOrHyTa npnnpema... 610
7.ФУHKLЛJE CATA. 615
7.1Функиjee cata... 615
7.2 KaKa Da nOdecuTe:Функиjse cata... 615
8.KOPNIHTHeBEPINBOPA. 617
8.1 U6aunBaHepn6opa.. 617
8.2 Tempepatyphn ceh3op.. 618
9.ДОДАТHEФУKHЦИJE 619
9.1 KontrponHa 6paBa. 619
9.2 AytomatcKO nckbvyBahe... 620
9.3 BeHTnIaTOp 3a XlaJehe... .620
10.KOPINCHN CABETU. 620
10.1 Ppenopyke y Be3n ca neueHem 620
10.2 BnaxHo neYeBe y3
BentnaTOp 620
10.3 BnaxHo neeHe y3 BeHTnIaTOp - npenopuyehn npnbop... 621
10.4 Tabeile KyBaHa 3a INHCTNtYte 3a TecnpaHe.. 621
11.HERA IN YIWTHEHe 623
11.1 Hanomene y Be3n ca
yuushenbem.. 624
11.2 KaKo Da Ouchntte: UdybBeHa y uhyTpaUHbOcTn 624
11.3 KaKo Da n3BaDiTe: HocauH peWeTke 624
11.4 Kako da kopustte:Пиролитчко
чшенье...... 625
11.5Подсетнкзачшehe...626
11.6 Kako da yKIOHnTe mOHTnpaTe: Bpata... 626
11.7 Kako da 3aMeHnte: lamnua.... 627
12. PEJABAJIbe IPOBJEMA 628
12.1 LtTa yuHHTn ako... 628
12.2 Poida n o cepBncnpaHy.. 630
13. EHEPRETCKA EΦUKACHOCT 630
13.1 INHΦopMaζηe o npOn3Bovu n IiNCT ca INHΦopMaζηjama o npOn3Bovu.....630
13.2 YwTeJa eHeprJne.. 631
14. CTPYKTYPA MEHNIJA 632
14.1 MeHH 632
15. EKOLOUSA KIITAHBA 633
1. UNHΦOPMAÇUJE O BΕBΕДHOCTN
Ipe nHcTaJaunje n KopuShHeBa ypehaja, naKbNBO npOHTajTe npInLoJeHO uNyTCTBO. IpOn3BoJau Hnje OAndOBopan 3a 6nlo KaKBe NOBpeDe nnn 7TeTy KoJe cy pe3yTTaT HeNCnPabHe nHcTaJaunje nnn yNoTpe6e. CyBajTe ynyTCTBO 3a yNoTpe6y Ha 6e36eDHom n npInCTyNaHOM MeCTy 3a 6byne KopuShHeBe.
1.1 Be36eHocT Deue n ocetJbNbx Oc06a
Obaj ypehaj mory da kopncte deca ctapna od 8 roDnHa n ocObe ca cMaHBeHIM qn3nUkM, YyHIM nIIM MeHTaNHm cnOCo6bHOCTnma, kao ocObe KoJIma HeIOCTajy NCKyCTBO I
3HaJIbe, yKoJInKO nM Ce o6e36eDi nHaД3Op nIi nM Ce dajy UnyTCTBa y Be3n Ca yNoTpe6bOM ypeJaja Ha 6e36eJaH nauH n YkoJInKO cXBaTajy MoryHe onaChocTn. DeCy mlaJHa oD 8 rOdInHa, KAO n OcOBe ca BeOMa TeuKIM n CLOxKeHm INHbaJIuNTeTOM, Tpe6a DpKaTu DaJIbe od ypeJaja, OCIM aKO cy NOD CTaJIHm HaN3OpOM.
- Д ecу Треба КОнтpoлисТи Кадо се He Би ИграJa ca ypehajem.
- Дожи te cby ambaяу дaje od deuce n odlojte je ha odroBaayh nuHn.
- UПОЗОРЕБЕ: Урегaj и НBEROBи ДOCТуПни DeJOВи могу bintи врели TOKOM коришеньа. Дожип Te Deцу и Кун He lyбимце дajbe od урегajа Када урегaj ради и Када ce xлади.
- Ako obaj anapatima ypehaj 3a 6e36eHocT dece, Tpe6a ra aKTHBnparTu.
- Деца He с mejuда обавьajу чшненье и Кориснико odржавиBE ypehaja 6e3 NaДЗopa.
1.2 Onstemepe 6e36eHocTn
Obajypehaj je HameHbeH cAmO 3a KyBaHbe.
Obaj ypehaj je Hamehen 3a ynoTpe6y y jeHOM domaHnHCTBy y 3aTBOpEHm npocToPIma.
- Ypehaj ce moxe kopncnttu y kaHcJIapnjama, xOteJIckm co6ama, MOTeIIma, NaHCNOHMa, CEOCKM TypNCHTUKNM DOMaHnHCTBnMa n CInuHm Objektima 3a CMeUstaj rDe yNtpe6a He 6n IpeBa3nla3nla (npocueaH) HnBO NOTPOShBe NO DomaHnHCTBy.
- Camo KBaJIInΦnKOBaHa ocO6a MoJKe da MOHTnpa OBaj ypehaj n 3aMeHn Ka6I.
He kopructnte obaj ypehaj npe Hero To ra yrpaanTe.
- Ickbuyute ypehaj n3 ctpyje ppe 6nlo kaKBor odpXaBaHa.
- YkoJnKo je Ka6I 3a HanajaHe oUTeHEn, Hera Mopa Da 3aMeHn npOn3BoHau, odroBaApajyHn OBlauHEn cepBnCnH
IJIINJIUcA CInuHe KBaJIINΦnKaunje, KaKo 6n Ce n36erla eJekTpnuHa onaCHOCT.
- YIPO3OPEHbE: YBepnte ce da je ypehaj nckJbUyeH npe Hero lo 3aMeHnTe cnjaJIuCy kaKo 6nCTe n36erIn MoryhHOCT da doHe do eJeKTpUHOr WoKa.
- UПОЗОРЕБЕ: Урегaj и Нерови достунни.deлови могу вп Врели током коршонь. Треба ВODИТN рачна за се ИЗбeгне Ддирваъе гравянх eLEMehaТа плу hyтрашьnx NOВшина anapata.
- Kaanda Baandte npnbop nnn nocyhe n3 pepne nnnx CTaBbate y pepHy, yBek Hocnte 3austnThe pyKaBnCe.
Kopncntte cmo Tempeatypn Hen 30p (cen30p TemepaType y cpeinH neeHOr meca) koJn je npenOpyuEn 3a OBaj ypehaj. - Да бисту уклонлійшиною коjetдрже ршетke,првовуцnte падьдошна,a 3aTNM 3aHbN Deo da 6nstechх odBojniln od 6OuHnx 3nOba.ПocstabJbAbe shHa 3aNoDpShky peшетkeВршce обрHyTmpeДOCJIeDOM.
- Hemojte Kopnstitnpaopounctau 3a uinshhe ypehaja.
Hemojte KopinCTnI rpy6a abpa3nBHa cpeDCTBa 3a YnshHeBe nnn OoTpe MeTaJIHe cyhHepe 3a YnshHeBe CTAkJIeHnx Bpata jep OHH MOry N3rpe6aTn NOBpShInHy 360r Yera MoKe DoHn Do paCnPcKaBaHa b cTaKJa. - Пгпролитчког чишениьа, уклонITE cab пибор n3 peрне, кao и OCTатke xpahe Или масно跟他koje cy npocуTe/ hataложене унутap уpehaja.
2.БE3БЕДHOCHAУПТCTBA
2.1 MoHTaxa

YINO3OPEHbE!
Camo KBaIIMΦIKOBAHa OcO6a MoKe Da INHCTaIIpa OBaj ypehaj.
- YKNOHInTe KOMnJIeTHy am6aJaxKy.
Hemojte da nHctanipate nn KOpncnte oWtehen ypehaj. - Пидраьajte ce уутста за монтуразе koje CTe Добли уз уpe Haj.
- YBek Bojnte paCyHa npJiNKOM nomepaHa ypehaja 3aTo 7To je TeKak. YBek Kopuncte 3aHTHe pyKaBnue n 3aTBopeHy obyhy.
He ByuTe ypehaj 3a puynu.
- Инсталларajte уpe Haj Na Cnrypho И ппкладно Mectо Koje Испуньа 3axTeBe 3a Инсталдау.
Heonxodno je npindpkaBatn ce mHmamHor pactojaHa od npyra ypehaja n kynbcnx elemehata.
- Пп мontхе урега, поверпту за ли се вразу урега отварajу 6e3 здшke.
Obaj ypehaj je onpembEn cncTeMOM 3a eNeKtpnHOn Xnahe. Mopa ce ynoTpe6bAbatn ca n3BOpom eNeKtpnHOr HanajaHa.
- Yrpaheta jeennna Mopa da 3aobOBJn 3axTeBe ctaBnHocTn npema DIN 68930.
| Минимална висиа кухиьског[elemende ta (Minna- мална висиа[elemende ta Incpop od padne поче) | 578 (600) mm |
| ШирINA кухиьског[elemende ta | 560 mm |
| ДубINA Кухиьског[elemende ta | 550 (550) mm |
| Висиа поедныестаре урега | 594 mm |
| Висиа заюг(eстаре урега) | 576 mm |
| ШирINA поедныестаре урега | 595 mm |
| ШирINA заюг(eстаре урега) | 559 mm |
| ДубINA урега | 567 mm |
| ДубINA уграhaligor урега | 546 mm |
| ДубINA са OTворень IM bpaима | 1027 mm |
| Минимална вличина ВENTEлалононог OTbopa. Отвор поставльен наdoesьог заюг страви | 560x20 mm |
| ДужINA кабla за layingajы. Кабл je поставльен у dechenom углу са заюг страве | 1500 mm |
| Монтajни завrtны | 4x25 mm |
2.2 PnKJbUyeHe Ha eJeKtpnHy MpeKy

YI03OPEHbE!
Pn3nk oD noxkapa n ctpyHor yapa.
Cba npikbbyuBaHa ctpye tpe6a da oabn KbaJInΦKOBaH eJeKtpuap.
- Ypehaj mopa da 6ynde y3embhen.
- YBepnte ce da cy napametpn Ha nlouNc ca TexHnKm KapaKTePncTnKaMa KOMNaTn6nHn ca odrobapajyhm npametprma eNeKTpnuHe mpexe 3a Hanajahe.
- Ybek KopinCTnte npoincho yrgpaheHy yTuHnCy ca 3aHTTOM od CTpyjHor yapa.
Hemojte da kopictte aandaTepe ca Bnwe yTuHnua n npodyxKne ka6JnoBe.
Поберпд ДИСТЕ OЛТЕТINI ГАВно HANajaHe I Ka6JI 3a HANajaHc. YKОПКО CTpyJHn Ka6JI Tpe6a Да ce 3amEHN,TO Tpe6a Дa obAи NaIbuaSHeHc epBnCHN ueHTap.
He do3Bolnte da Ka6I 3a Hanajahe DoOpnyje IIN Dohe 6n3y BpaTIma ypehaja IIN HnI INcno ypehaja, HapOHTo KaJa ypehaj paIIN IIN Kada cy BpTa Bpena.
3aHTIa Oy ydapa DeIOBA nOi HanoHOM I30OBaHnx DeIOBa Mopa Da ce npuBpTn Tako da He MoKe Ja ca ye kNOH 6e aJata. - Pπικβυγήτe rπανBΗ παδλη 3a ḀπαραJAhe Μα ΣιDHy yΤιχΝΙγι τεΚ Ḁκρajy έΝΤΑλαιύη. BODιTe paγγα Ας ποστόγι πριστυμεχΗΟγ yΤικΑγι ḀκοH έΝΤΑλαιύη.
- Ako je 3инда утчница паба, hemojte дл рпкьучjete Мржни утka.
He ByuNTe Ka6n 3a HanajaHc KaKo 6ncTe NCKbUyHIn ypehaj. Ka6n NCKbUyHIne Tako ITo he Te n3ByHn yTuKauch n3 yTuHnue. - Kopncntte camo ncpnabHe pactabHe npeknJaue: 3aHTnThe npeknJaue, ocInrpyaee (ocnrypaee ca habojem Tpe6a cknHyTu ca Hocaua), ayTomatCke 3aHTnThe npeknJaue in KOhtakTope.
- Y eJekTpnuHoj nHCTanaJn Mopa nocTojatn paCTaBn npKeiDauch KoJn Bam omOryhaba da nckbuynte cBe qa3e hAnajaHa ypehaja. Pa3MaK n3MeHy kONTakata Ha pactaBHOM npKeiDaCy Mopa Da n3Hocn HajmaHe 3 mm.
- Потунно засторе врata на уpeшajу пе Heroшиюсякete Мразхни утукай утучницу.
- Ypehaj ce nClopyyje ca cTpyjHm yTuKaayem n cTpyjHm Ka6Jom.
2.3 ynotpe6a

YNO3OPEHbE!
Ioctoj np3nk od nobpehna,oneKOTnHa n ctpyjHor yapa nn ekcnnoJe.
- Hemojte da Meheate cneunkauniy oBor ypehaja.
Bodnte paunha da OTBOpn 3a BeHTnlaqjy He 6dy 3anyweHn.
He octabjajte ypehaj 6e3 Hau3opa TOKOM pada. - Ypehaj Tpe6a NCKbUyHtN HakoH CBAke yNoTpe6e.
-Будnte onpe3n KaД OTbapate Bpata ypehaja DoK OH paДn.Може ce DecuTn da n3aHe Bpeo Ba3dYx. - HemojTe pykoBAtn ypehajem KaJa cy Bam MOKpe pyke nJIn KaJa je OH y KOHTaKtY ca BOJOM.
Hemojte n3laatn OTbopeha Bpata BeNikom ONtepeheh. - HemojTe KOpncTnTu ypehaj kao paAnHy nobpShnHy nI npocToP 3a odnaRaHe.
- Палъно OTвори Te Bpata ypehaja. Kopише He cacstoja koj caapxe ankoxOJ MOKe DoBecTNdo nCnapaBaHa aAnKOxoJa I MeShaHa ca Ba3dyXOM.
Bapnue nnn OTbopeni nnamEn He cmeju da 6ydy y 6n3nHypejaja KaJa otBapate Bpata.
3anaBbme MaTepeJe nIIN pIeMeTe HATOnJIbeHe 3anaBbIM MaTepnJaMa HEmoJTe CTaBbATn yHyTap I NopeI ypehaja nIIN Ha Hera.

YI03OPEHbE!
Ioctoju p3nk oD oShteheha ypehaja.
Ja 6nCTe cnpeynnl OwTehe He nI rbyntak 6oje Ha emajlnpaHm NOBpunHaMa:
- Hemojte cTabbaTn nocyhe u3 pepHe uu npyre npedMeTe yypehajy dIpeKTHo Ha dHO.
- He ctabbajte anyMNHNjymcky foJny dInpeKTHO ha nDo yHyTpaUhocn ypehaja.
-
HemojTre cunatn Body dIpuKeTHO y Bpyh ypehaj.
-
HemojTe dpkaTn yupehajy BnaXHo nocyhe i xpaHny hakoN 3aBpSeTka KyBaHa.
-
Byndte naKbnu KaDa cKndaTe nnNoctabBe np6op.
-
Гуитak boje на有很大ajларим поршнама пи Нерсajyem ченику не утче наCAM pad ypejahaja.
Kopuncte dy60kniJex 3a 3aJIbHeKe kOJaue.BoHNcOK moKe da ocTaN TpaJHe MpIbe.
-Дokспемате joLO,Врataуpeиатpe6a увекдауdu 3aTbOpeHa.
Ako je ypehaj mONTupan n3a panaHna HameuTaja (Hnp. Bpata), o6e3bneTa da npnKoM paDa Bpata Nkada He 6byd 3aTBPOHe. I3a 3aTBPOeHOr panaHa HameuTaja MOry da ce hkyne TOnlOta n Bnra n npoy3pOKyjy NaHaNHO OwTeHeJe ypehaja, KyHnTu nn PoJa. He 3atBapajte pAnen HameuTaja cBe DoK ce ypehaj y NotnyHOCTn He oxlaDiN hakon KopuShHeBa.
2.4 Hera n yu shnebe

YI03OPEHbE!
8. KOPINTHEHEI PUNBOPA

YINO3OPEHbE!
Iorneajte norgabla a 6e36dnoctn.
8.1 y6aunBaHbe npnbopa
Mano ydybheBa ca rope ctpane noBehaba 6e36dnoct. YdybHeTa takohe cnpeaBajy npebrtaHe. YzdrHyta nBuCa oko noniue cnpeuaba KIn3aBe nocyHa Ha noPiu.
PeWetKacta noJnua:
Yrpyajte noJIuCy n3MeHy BoHnca Ha Hocany peWeTke.
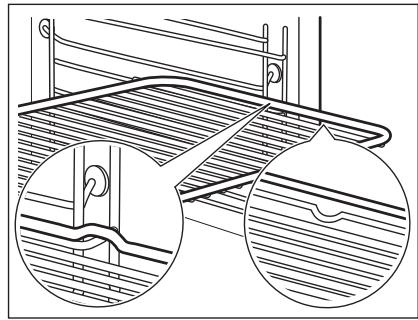
KyBaHc ca nCKJbUeyehom JAmnIuOM
IckbyuTe IamnTu TOKOM KyBaHa. YkByuTe je camo KaJa Bam je notpe6Ha.
BnaXho neeHbe y3 BeHTnlaTop
Available on the App Store

GETIT ON Google Play
STAROSTLIVOST O ZÁKAZNIKA A ZÁKAZNICKY SERVIS
- IHCTPYKl3 3 TEXHIK B63NEKN.745
2.1 BctaHOBJIeHHra 745
2.2Пд'снанняdo eNeKtpomepeksi..746
2.3 KopncTyBaHHra 747
2.4 DorigI iuHenn748
2.5 lipoiitnue ouuienna 748
2.6 BnytpiwnnpiCbiTka. 749
2.7 Cepsic 749
2.8 Ytulizaiia 749
- ONIC BINO6y 750
3.1 3araJIbHn orJra7. 750
3.2 Akcescyapu 750
- PAHEJIb KEPYBAHHra 751
4.1 BucyBhi nepemukayi 751
4.2OrJn dan naHJI kepyBaHHn751
4.3 Ducnnei 752
- ПЕPED ПЕPSIM ВИКОПUCTAHЯМ...... 752
5.1 PEPBHHe OunuHn.. 753
5.2 PonepeHne nporpibaHHa 753
Deko dnyrpnj/cMaKeHHa
10.4 Ta6nzi npnroTyBaHnI iXi IJnI dOcJIiHNuCbKnx yCTaHOB
IhopmauiJnIdoCNIiHNuKx yCTaHOB
Tectn 3riJIO 3: EN 60350, IEC 60350.
BunikahnHa na odHomy pibhi — BunikahnHa y fopmax
12. YCYHEHNA IPOBJEM

NONEPEDXEHHRA
IINB. po3diin 3 iHΦopMaicε IoOTo texhikn 6e3neKn.
12.1ДiВ pa3i BnHnKHeHH npo6JIem
Y6yNb-kaNX BnnaKax, kKi He 3a3NaueHi y ciN Ta6nCi, 3BepHITbcr Do aBTOpuHOcpeBicHorO cePbICHO zentpy.
KoJI MoxJInBO, He po3irpiBaIte npiJaI nepeI roTyBaHHaM.
KaIO Bn nocniIOBHO roTyTe kiIbKa CtpaB, 3BeiTb nepepbM iX HmN Do MiHimMy.
ToTyBaHH3 BnKOpNCTaHHm BEHTNJIATOPa
KoJIIMMOJINBO, BnKOpNCTOByIe 9yHKiI rOtyBaHHa3 BeHTnIaTOpOM IJIa 36epexHHeJIeKTPoeHeprii.
3aIIuKOBe TenIoo
BentnIaTOp i lamna npOIOBkyIb npauOBoATn. Ppi BmKHeHHi npIaNy dncIne Ioka3ye 3aIIuKoBe TepNo. 3aIIuKoBe TepNo MOxHa BnKOpNCTOByBatn Dny NiITpIMaHHc TpaBN TepNoJ.
JaKIO TpINBaNlCtB roTyBaHn nepeBnUyE 30 XBnInH, onycitb temnepaTpy npinady do mimiymy 3a 3-10 xBnInH do 3aBepueHn rO TyBaHH. OctanHi eTannr oTyBaHH cTpaBn 6byTB BnKOHaHI 3a paxyHOK 3aIIuKOBOro TeNa.
BnKopncTobyTe 3aIIuKOBe TeIIO dIy po3irpiBaHH iHux CTpaB.
IiTpmyBaHHcTpaBn TenoIO
Bn6epiTb haHnKxuy TemnepaTyp3 MoKlnBnx, 06 BnKOpncTaTn 3aNtKoBe TenNo dIy 36epeKeHHy iXi TeNIOU. Ha ducnnie 3'ABnEcbc iHdNKatop 3aNtKoBOrO TeNla a6o TemnepaTypu.
ToryBaHH3 BmKHeHOJ lamnoH
BmKHiB lamny niD yac rotyBaHHa. BmKaIte ii Iiue 3a notpe6n.
Bolora konbekui
Функця, пизнаец дя 3бержени ehepriп яд ус rotybaHHЯ.
Прии ВИКОРИСТАНHI UIJI EФИКUДI LAМNAВИМКЯЕТСАВТOMATУHо Yepe3 36ceKHyD.ВИ MOЖЕТЕ BBIMKHHTI LAМNY 3HOBY, ane UIДЯ ПИЗBEDEdo 3HIXKEHHaOYBaHOi eΦeKTNUBHOCTI 3бeржehня eHepriII.