USER MANUAL SHIRE WH/A/90 ELICA
EN Instruction on mounting and use
RU IHHCTpykuzno MOHTaJy N 3KcIpyataznn
UK Ihctpykuia 3 MOHTaKy i ekcnnyatauii
Closely follow the instructions set out in this manual. All responsibility, for any eventual inconveniences, damages or fires caused by not complying with the instructions in this manual, is declined. This appliance is intended to be used in household and similar application such as: - staff kitchen areas in shop, offices and other working environments; - farm houses; - by clients in hotels, motels and other residential type environments; - bed and breakfast type environments.
The hood can look different to that illustrated in the drawings in this booklet. The instructions for use, maintenance and installation, however, remain the same.
It is important to conserve this booklet for consultation at any moment. In the case of sale, cession or move, make sure it is together with the product.
- Read the instructions carefully: there is important information about installation, use and safety.
- Do not carry out electrical or mechanical variations on the product or on the discharge conduits.
- Before proceeding with the installation of the appliance verify that there are no damaged all components. Otherwise contact your dealer and do not proceed with the installation.
Note: The parts marked with the symbol ( ^ * ) " are optional accessories supplied only with some models or otherwise not supplied, but available for purchase.
Caution
- Before any cleaning or maintenance operation, disconnect hood from the mains by removing the plug or disconnecting the mains electrical supply.
- Always wear work gloves for all installation and maintenance operations.
- This appliance can be used by children aged from 8 years and above and persons with reduced physical, sensory or mental capabilities or lack of experience and knowledge if they have been given supervision or instruction concerning use of the appliance in a safe way and understand the hazards involved.
- Children shall not be allowed to tamper with the controls or play with the appliance.
- Cleaning and user maintenance shall not be made by children without supervision.
- The premises where the appliance is
installed must be sufficiently ventilated, when the kitchen hood is used together with other gas combustion devices or other fuels.
-
The hood must be regularly cleaned on both the inside and outside (AT LEAST ONCE A MONTH).
-
This must be completed in accordance with the maintenance instructions provided. Failure to follow the instructions provided regarding the cleaning of the hood and filters will lead to the risk of fires.
-
Do not flambe under the range hood.
-
For lamp replacement use only lamp type indicated in the Maintenance/Replacing lamps section of this manual.
The use of exposed flames is detrimental to the filters and may cause a fire risk, and must therefore be avoided in all circumstances.
Any frying must be done with care in order to make sure that the oil does not overheat and ignite.
CAUTION: Accessible parts of the hood may become hot when used with cooking appliances.
- Do not connect the appliance to the mains until the installation is fully complete.
- With regards to the technical and safety measures to be adopted for fume discharging it is important to closely follow the regulations provided by the local authorities.
- The air must not be discharged into a flue that is used for exhausting fumes from appliance burning gas or other fuels.
- Do not use or leave the hood without the lamp correctly mounted due to the possible risk of electric shocks.
- Never use the hood without effectively mounted grids.
- The hood must NEVER be used as a support surface unless specifically indicated.
- Use only the fixing screws supplied with the product for installation or, if not supplied, purchase the correct screws type.
- Use the correct length for the screws which are identified in the Installation Guide.
- In case of doubt, consult an authorized service assistance center or similar qualified person.
WARNING!
- Failure to install the screws or fixing device in accordance with these instructions may result in electrical hazards.
-
Do not use with a programmer, timer, separate remote control system or any other device that switches on automatically.
-
This appliance is marked according to the European directive 2012/19/EC on Waste Electrical and Electronic Equipment (WEEE).
- By ensuring this product is disposed of correctly, you will help prevent potential negative consequences for the environment and human health, which could otherwise be caused by inappropriate waste handling of this product.

- The symbol on the product, or on the documents accompanying the product, indicates that this appliance may not be treated as household waste. Instead it should be taken to the appropriate collection point for the recycling of electrical and electronic equipment. Disposal must be carried out in accordance with local environmental regulations for waste disposal.
- For further detailed information regarding the process, collection and recycling of this product, please contact the appropriate department of your local authorities or the local department for household waste or the shop where you purchased this product.
Appliance designed, tested and manufactured according to:
- Safety: EN/IEC 60335-1; EN/IEC 60335-2-31, EN/IEC 62233.
Performance: EN/IEC 61591; ISO 5167-1; ISO 5167-3; ISO 5168; EN/IEC 60704-1; EN/IEC 60704-2-13; EN/IEC 60704-3; ISO 3741; EN 50564; IEC 62301.
- EMC: EN 55014-1; CISPR 14-1; EN 55014-2; CISPR 14-2; EN/IEC 61000-3-2; EN/IEC 61000-3-3. Suggestions for a correct use in order to reduce the environmental impact: Switch ON the hood at minimum speed when you start cooking and kept it running for few minutes after cooking is finished. Increase the speed only in case of large amount of smoke and vapor and use boost speed(s) only in extreme situations. Replace the charcoal filter(s) when necessary to maintain a good odor reduction efficiency. Clean the grease filter(s) when necessary to maintain a good grease filter efficiency. Use the maximum diameter of the ducting system indicated in this manual to optimize efficiency and minimize noise.
Use
The hood is designed to be used either for exhausting or filter version.

In this case the fumes are conveyed outside of the building by
means of a special pipe connected with the connection ring located on top of the hood.
CAUTION!
The exhausting pipe is not supplied and must be purchased apart.
Diameter of the exhausting pipe must be equal to that of the connection ring.
CAUTION
If the hood is supplied with active charcoal filter, then it must be removed.
Connect the hood and discharge holes on the walls with a diameter equivalent to the air outlet (connection flange).
Using the tubes and discharge holes on walls with smaller dimensions will cause a diminution of the suction performance and a drastic increase in noise.
Any responsibility in the matter is therefore declined.
Use a duct of the minimum indispensable length.
! Use a duct with as few elbows as possible (maximum elbow angle: 90^ ).
Avoid drastic changes in the duct cross-section.

Filtration version
The aspirated air will be degreased and deodorised before being fed back into the room.
In order to use the hood in this version, you have to install a system of additional filtering based on activated charcoal.
Installation
The minimum distance between the supporting surface for the cooking equipment on the hob and the lowest part of the range hood must be not less than 45cm from electric cookers and 50cm from gas or mixed cookers.
If the instructions for installation for the gas hob specify a greater distance, this must be adhered to.

Electrical connection
The mains power supply must correspond to the rating indicated on the plate situated inside the hood. If provided with a plug connect the hood to a socket in compliance with current regulations and positioned in an accessible area, after installation. If it not fitted with a plug (direct mains connection) or if the plug is not located in an accessible area, after installation, apply a double pole switch in accordance with standards which assures the complete disconnection of the mains under conditions relating to over-current category III, in accordance with installation instructions.
WARNING!
Before re-connecting the hood circuit to the mains supply and checking the efficient function, always check that the mains cable is correctly assembled.
The hood is provided with a special power cable ; if the cable is damaged, request a new one from Technical Service.
Mounting
Before beginning installation:
- Check that the product purchased is of a suitable size for the chosen installation area.
- Remove the charcoal (*) filter/s if supplied (see also relative paragraph). This/these is/are to be mounted only if you want to use the hood in the filtering version.
- Check (for transport reasons) that there is no other supplied material inside the hood (e.g. packets with screws (), guarantees (), etc.), eventually removing them and keeping them.
Expansion wall plugs are provided to secure the hood to most types of walls/ceilings. However, a qualified technician must verify suitability of the materials in accordance with the type of wall/ceiling. The wall/ceiling must be strong enough to take the weight of the hood.
Do not tile, grout or silicone this appliance to the wall. Surface mounting only.
Operation
To select the functions of the hood just touch the commands.

Light key ON/OFF

Intensive speed selection key (suction power) - duration 5 minutes: the hood sets this power and at the end of the 5 minutes returns to the previous setting.

High-speed selection key (suction power).

Medium-speed selection key (suction power) - when flashing it indicates the need to wash or replace the carbon filter. This signal is normally deactivated. To activate the alarm, disable the electronic by pressing the 0 button for 3 seconds.
Next, simultaneously press buttons 1 and 2 for 3 seconds; at first, only button 1 will flash, then both buttons 1 and 2 will flash to indicate activation. Repeat the procedure to deactivate the alarm; at first buttons 1 and 2 will flash and subsequently only button 1 to indicate deactivation.

Low-speed selection key (suction power) - when flashing it indicates the need to wash the
fats filter.

Motor key OFF (stand by) - excludes the electronics - reset wash/replace filters signals. MOTOR OFF
Press briefly to switch the motor off. RESET FILTERS SIGNALS
In functioning mode, after carrying out filter maintenance, press the key until hearing the sound signal. The flashing LED 1 (grease filter) or 2 (carbon filter) stops flashing.
EXCLUDING THE ELECTRONICS
Press the key for 3 seconds. The hood command electronics will be excluded.
This function can be useful during the product cleaning operations.
Just repeat the operation to reinsert the electronics.
If the hood fails to operate correctly, briefly disconnect it from the mains power supply for almost 5 sec. by pulling out the plug. Then plug it in again and try once more before contacting the Technical Assistance Service.
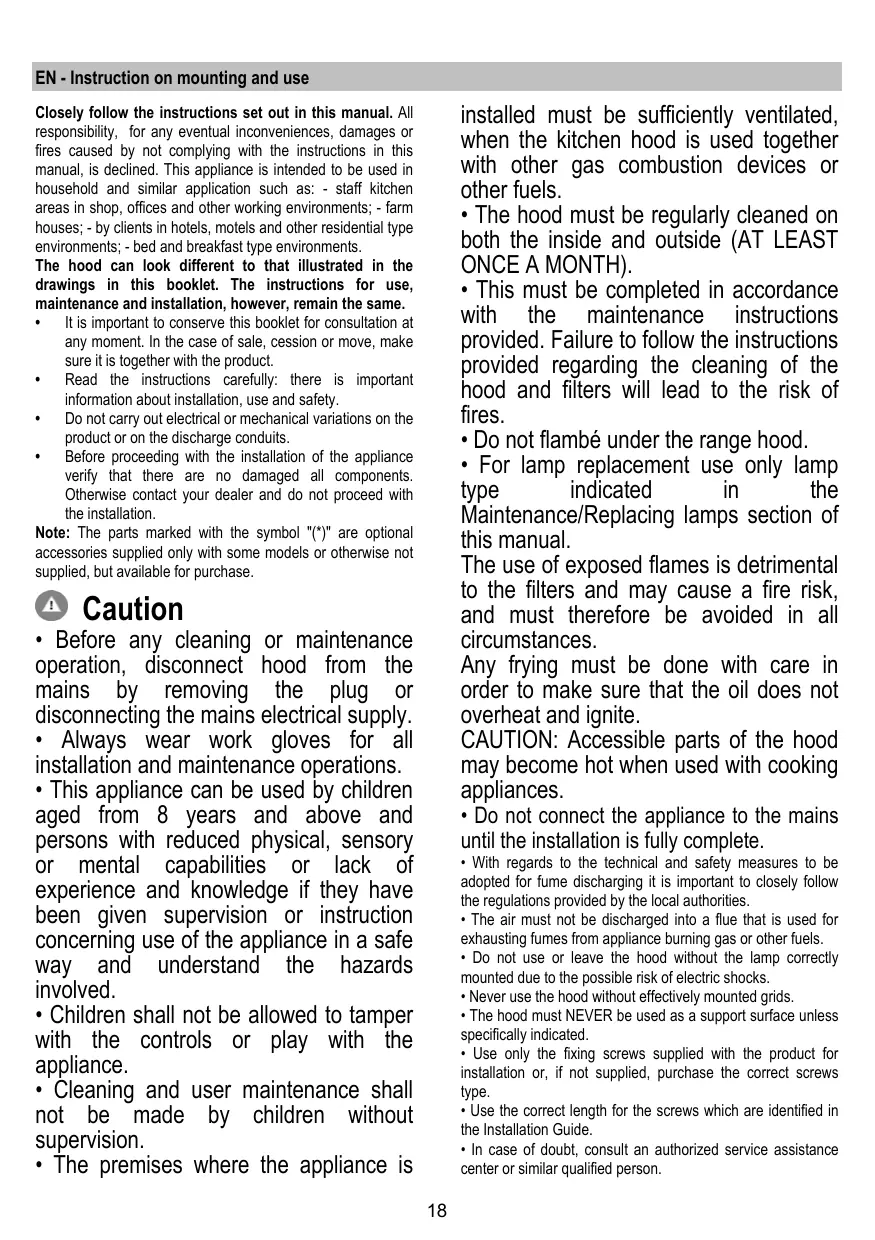
T1. Button ON/OFF lights (Led L1 lit)
T2. Button OFF - Selection button suction speed (power) 1 (Led L2 lit)
T3. Selection button suction speed (power) 2 (Led L2+L3 lit)
T4. Selection button suction speed (power) 3 (Led L2+L3+L4 liti)
T5. Selection button intensive suction speed (power) (Led L2+L3+L4 lit + Led L5 flashing) - duration 5 minutes - after which the hood automatically sets suction speed (power) 2.
Delayed switch-off of the hood (flashing LEDs):
It is possible to set the delayed hood switch-off by pressing again for more than 2 seconds the button of the suction speed (power) active at that time.
The available delayed switch-off options are:
Suction speed (power) 1: 20 minutes
Suction speed (power) 2: 15 minutes
Suction speed (power) 3:10 minutes
Intensive suction speed (power): 5 minutes
Filter saturation indicator
The hood is equipped with a function that warns the user, at regular time intervals, when the filters are saturated and it is necessary to perform their maintenance.
Grease filter saturation indicator: With the hood off (OFF) all suction speed (power) LEDs light up with steady light for 40 seconds.
Activated charcoal filter saturation indicator: With the hood off (OFF) all suction speed (power) LEDsflash for 40 seconds.
Activation of the active charcoal filter saturation signal: normally, this function is disabled; to activate it, switch off the hood (OFF) and simultaneously press buttons T3 and T5 for more than 3 seconds. LEDs L3 and L5 will start flashing.
To disable repeat the operation: LEDs L3 and L5 light up with steady light.
Resetting the filters' saturation indicator:
With the hood on (ON) press button T2 for more than 2 seconds; all LEDs will light up briefly.
Note: if necessary, repeat the operation in case both indicators (grease filter and activated charcoal filter) are active.
Maintenance
Cleaning
Clean using ONLY a cloth dampened with neutral liquid detergent. DO NOT CLEAN WITH TOOLS OR INSTRUMENTS. Do not use abrasive products. DO NOT USE ALCOHOL!
Grease filter
Fig. 10a-20
Traps cooking grease particles.
This must be cleaned once a month (or when the filter saturation indication system - if envisaged on the model in possession - indicates this necessity) using non aggressive detergents, either by hand or in the dishwasher, which must be set to a low temperature and a short cycle.
When washed in a dishwasher, the grease filter may discolor slightly, but this does not affect its filtering capacity.
To remove the grease filter, pull the spring release handle.
Charcoal filter (filter version only)
Fig. 19
It absorbs unpleasant odors caused by cooking.
The saturation of the charcoal filter occurs after more or less prolonged use, depending on the type of cooking and the regularity of cleaning of the grease filter.
In any case it is necessary to replace the cartridge at least every four mouthths (or when the filter saturation indication system - if envisaged on the model in possession - indicates this necessity). The charcoal filter may NOT be washed or regenerated.
Circular charcoal filter
Apply one on each side as cover to both the shield grids of the motor impeller, then turn clockwise.
For the disassembly, turn counter-clockwise.
Replacing lamps
Fig. 22
The hood is equipped with a lighting system based on LED technology.
The LEDs guarantee an optimum lighting, a duration up to 10 times as long as the traditional lamps and allow to save 90% electrical energy.
To replace lights, contact authorised spare part center.
Reset filter verzadiging indicate:
Pred zahajenim instalace:
Vezerlopanel 6 gombbal
HNCPTpyKcnn 3a 6e30nacHO n3NoJ3BaHe Ha ypeNa N CBbp3aHNTe C Hero ONaCHOCTN.
He no3B0JIaBaIte Ha decaTa da cn irpaT cypeda!
- NocCTBaHETO I NOIDpBxKkata He Tp6Ba Da ce N3BbPwBa OT Deca 6e3 HabIOHeHEnTo Ha Bb3paCTeH.
-Помешиенeto Tрябвада pa3poJana cdoCTaTbUHa BeHTnlaцЯ KOraTO acnnpaTopbT ce n3No3Ba eHOBpeMeHHOC dpyr upeDN Ha ra3 nIu dpyr BnD rOpNBO.
- AcnnpaTopbT Tp86Ba Da ce NocntBa
queCTO KaKTo OTBbTpE TaKa N OTBbH (PIOHE BEdHbX B MECELJ).
- Пидьрkaite ce KbM Инстукиnte nocoehn B hapchnka 3a noДрьжka!
- HecnbaheTo Ha nHCTpyKcHnte 3a
NouchTbaHe Ha acnnpatopa N 3a
NoDMraHa n NouchTbaHe Ha φnIPTne
BODn Do pNCK OT NOJap.
- Ctporo 3a6paHEno e npnroTbHEnTo Ha
Ястя Фламбе по acnnpaTopa.
3a Da NODMeHNTe JAMNITe,
M3NOJ3BaITe CAMO Te3n, KOINTO Ca
PocOeyH B pa3deJ
"PoDpBjKka/NoDMHa Ha JAMNITe",
KaKTo e NOCOeyHO B HACTOUI
HapbYHK 3a EKCnloatau.
I3noI3BaHeto Ha OTKpnt PnAmbK e BpeJHO 3aФnITpTe N MOKe Da IpeIIN3BnKa IOXap, 3aTOBa TpI6Ba HcBA Czka UeHa Da ce I36yRbA.
PnirrotbHTo Ha nBpXeHN XpaHn Tp6Ba Da Ce N3BbPwBa POnHa6JIIODeHne, TbKaTO CROpeSeHOTO OJNO MOKe Da CE Bb3PiAmEHN.
BHIMAHNE: Korato roTbapcknT pIot pa60t, DoCTbHnTe qactn Ha acnnpaTopa Morat da ce haropeuT.
He cBbpr3BaIte ypeda KbM eJ. Mpexkata DOKaTO He cTe npKJIouHnI
OKOHyateJIHO C MOHTaJa.
- Ebponeckata DnpekTna 2012/19/EC
- Waste Electrical and Electronic Equipment (WEEE).
YBepaikn Ce, Ye To3n ypei 6bJe peuKlnpaH no nOIOobabaunr 3a TOBa HauHn, Bne DOnpHacrTe 3a ona3BaHeto Ha OKoJIHATA Cpea N BaWTo 3dPabe.

CIMBOJbT Bbpxy ypea nINB npDpykBaAuaata ro DOKymEntaunia NocOuBa, ye To3n npDyKT He Tpr6Ba da 6bde CHTAH 3a Domauhen OTnadBk, a Tpr6Ba da 6bde npedaehen B CNEUaHNO PnpDaHaehENITE 3a TOBA NYHKTOBE 3a peUKKnipane Ha eneKTPnuCeKa n eneKTPoHnHa TexNtka. PnpDpKaaTe Ce KbM MeCTHNe HOpMaTHNB 3a npepa60Ta Ka HTNaBtu. 3a No-nOpRoBa HnΦopMaZnaBB BbPb3a C npedabAHTo, CbNpaHTo n PeuMKnPaHTo HA To3n npOkyT Bu cBeBTBame Da ce ObpHete KbM KomPeTeHTHnTe MeCHN CnyKbN, CnyKbnte 3a CbNpaHe Ha DomauHH OTNaDbuMI Mm Mara3nHbT, B KOIT Ote 3a kynPiN To3n en. eyed.
YpeBt e IpoeKtnpaH, TcTeBaH n npOn3BeDeH B
CbotBETCTBNE C:
- Бразносяст: EN/IEC 60335-1; EN/IEC 60335-2-31, EN/IEC 62233.
- PaobTmX xapaKTepeNCTnKn: EN/IEC 61591; ISO 5167-1; ISO 5167-3; ISO 5168; EN/IEC 60704-1; EN/IEC 60704-2-13; EN/IEC 60704-3; ISO 3741; EN 50564; IEC 62301.
- EMC - EnektpomarHHTha CbBMecTmocCT: EN 55014-1; CISPR 14-1; EN 55014-2; CISPR 14-2; EN/IEC 61000-3-2; EN/IEC 61000-3-3.
IpeJnoJeHn 3a npBnHa yOnTp6a, 3a da ce HamaJIb B3dEChTBHeTo Bpxy OkJHATA Cpeda: BKnOHeTe (ON) acNIPAtoPA Ha MNHMaJIHn CKOpCT, KORATO 3anoHHeT Da rotBNTe I RO OCTabe T da paBOTn HAKoKo MInHTn CneI prNKIOUBAHe HA roTBeHEno. YBeIMuYBaIte CKOpCTTa cAMo B CUYaHn HA rOLMA KOINcHecTBO DmN I napi N3NOJ3BaIte YBeJIneHENTe CKOpOCTn cAMo B EKCTpeMHN CNTyaIuN. CMeHnIe FInITbpa/FeINTPitce C AKTIBeH BByIeH, KORATO e Heo6XODIMO, 3a da NOIDbPxAte Do6pa eFekTbHOCT Ha HAmalBaHHe Ha MmI3MaT. POnCTBaIte FInITbpa/FeINTPtpe 3a Ma3HNHn, KORATO e Heo6XODIMO, 3a da NoIDbPxAte Do6pa eFekTbHOCT Ha FInITbpa 3a Ma3HNHIne. IV3No13BaIte MAKCImaJIHn DnAmETbp Na CTEmata 3a OTBeKDaIHe Ha BV3dYxA, NOCOH B TOBa pKOB0DCTBO 3a ONMn3IpaHae Ha eFekTbHOCTTA n 3a HAMJIbaHE Ha Wyma.
Ynotpe6a
Acnipatobt mma cneHnOTo npedHa3NaueHne: BCMyKbna OTBeJda HabbN INIΦnITnpura Bb3dUxa, KaTO eHOBpeMeHHOC TOBa r peuNKInpa.

Bercna c acnpaunia
Iapata ce OTBexJa HABh NocpeCTBOM Bb3dyXOBoHa Tpb6a CbBy3aHa CbC CbeHnHTenHnF pIaHeu.
BHIMAHNE!
Bb3dyxobOoHATA Tpb6a He e BKJIIOUeHa KbM aKCEcoapTe n Tp86Ba Da 6bde 3aKyIeHa OTdJIHO.
Диаметьрт ha B3dxyOBODHATA tr6ba Tp6Ba da OTROBAPHa Diametbpa Ha CbeDHNHTENHIN PpCTeH.
BHIMAHHE!
Ako acnnapatopbTe cnaDben C pfntpu cakTneB H Bbnpochnte Tp8ba da bDat OCTpaHEn.
Cbpxkete acnnpatopa KbM B3xvXOBODHn Tp6n m OTBOpn BCTehata. DnAmetbpT Ha Tpb6nte Tpr6ba Da CbOTBeTcBa Ha DNAmetbpa Ha CbeHNHTeINHn FnaHe 3a OTBeXdaHe Ha B3dyxa.
Cbbp3BaHETo KbM Bb3dYXOBODn Tpb6n N OTBOpn C NoMaIbK DnAmEeTp HamaJIaBa KaNAcHTeTa Ha acNIpuraHe yBelenuaba 3NaUteHNO UyMa nO BpeMe Ha pa6ota.
B Te3n cnyuan fnpMaTa He Noema HnKaKBa OTROBOPHOCT.
I 13noJ3BaIte Tp6a c Heo6xOImMaTa bJInKaHa.
!N3nOJ3BaIe TpB6a C Bb3MOXHO HaM-MaIKO TpB6Hn KOJIeHa (CMAKCImaJIe HbTbI HA N3BVBKa:90°).
He npomehaTe p3ko ceheneto Ha Tpbnte!
Acnnpnnapnrt B3dxy Ce npneicntba n OcbejkaB npedna Bne3e OTHOBO B obpueHne B NOMEuHneHTo. 3a da n3no13bATE acnpaTopa B To3N Bapnant Ha pa6ota Tp6Ba da IHCTaInpate DoIbHNITeHa FInTPnPaua CnCTema Ha 6a3ata Ha FInTPnC aKTHBeH BbrJIen.
MOHTIPAHE
MHHMaHHTO pa3CToHHe MEXdy NOBbpxHOCTTa, Ha KOrTO ce NoCTaBt CbDoBete 3a RotBeHe Nai HauNHCkata Yact Ha kXyHeCNKHa acnPiAtop, Tp6Ba Da 6bDe He no-MaNK O T 45cm B cnyaH a EneKtpueckn neKn H e no-MaNK O 50cm, B cnuyaH raZOBn INI KOMOHNHPaHn neKn.
Ako B INCHTPKUHnTe Ha ra3OBuYpeI 3a rotBHe e nocOeHo no-TOJIAMo pa3CTOAHne, TO Tp8Ba Da ce Ima npEdn.

En.Bpb3ka
HanpexeHneto B en.MpeXaTa Tp6Ba Da otroBapra Ha HanaPexeHneto, KOeTo e NocOeHb BbyxEtnKeta C daHHnTe 3a acnnpatopa, noctabeh O bTpeWHa My ctpaHa. Ako e Chabdene C uence Cbpxte aCnnpatopa KbM KOtAKr, CbOTBeCTBaU Ha DeNCTBaUHTe HOpMN HAMnpau Ce Ha JIeCHO DoCTbHNO MCTO DOpN i CLeD PnIKHNoHa MoNTaxa. AKe He e ChabdeH c UcENe (DnpeKTHo CbP3BaHe KbM MPeXaTa), IuI UcENCeJIbT He e Ha DoCTbHNO MCTO CLeD PnIKHNoBaHe Ma HOATXA, hON0N3BaTE DByN0NIOceH npeKcbuChOped HOpMITE, Taka Ye Da ce OcnIpynblHo n3KnHOBaHe MapeXaTa npCbpXhAnpexeHne III, B CbOTBeCTBVe C npABINATA 3a MOHTnpaHe.

BHIMAHNE!
IpeDn da CbPkTe OTHOBO acnnpaTopa KbM mpeKaTa n da npOBepTe daHnФyHKUOnHpa npabINHO, npOBepTe daHn Ka6BtE MOHTpah KAKTO Tp6Ba.
AcnipatopbTe cna6ben CbC cneuaen Ka6e 3a 3axpaHbahe; Bcnya, YeKa6eBt 6bDe yBpeH eOBpHete Ce KbM rapaHnOHnHc cepBn3 3a da nOlyuHte HOB.
MOHTAX
Ppei Da npntbnte KbM MONTaKa:
- Ybepete ce, ye 3akyenmjt Ot Bac npodykT oTrobapn no pa3mepn Ha n36paHOTo MCTO 3a HnCTanipahe.
- OtrctpaHete fIINbpa/IFInTPnTe c aKTHBEN BByIeN (pa3bnpa ce, aKo 136bpAnrT OT Bac moen pa3noIarac TaB). 3a da n3BbPnITE TOBA npocIeTe onepaunite B Cb0tBeTHnaparpa. MoTHnPauTe fIINTPnTe OTHOBO cAmO Bcnyaay, ye XeJenaTe da m3NoI3BaTE acnnpaTopa BB BapnAHT Ha fIINTPnPaua BepCn.
- YBepete ce, ye no Bpeme Ha TpaHcnpTa BBb BtpeuHaT aCHT Ha acnPaTopa He ca NonaHajn Ipe6Hn pIeMTeN, KaTo HapMpEe PIIKChEt C BNHTObe, rapaHcOHHN KaprN n Dp.; ako HamePte TaKINBa OTCPAHETe mN m 3ana3eTe.
PnBce ToBa, Bn npenopbUbame Da ce nocbBeTbate C
KbAINHΦnIpaH TeXnK, 3a Da CTE cnYpHn, Ye DoCTaBeHNte akCEcoapn Ca nOxOJaIz 3a ceJIa. CTeHata, CbOTBeTHo TabAHbT, Tp8Ba Da 6bDat DocTaTbUHO CTaBmHn 3a Da N3dPjKAT Ha HATOBAPBaHETO.
Haun Ha ynoTpe6a
KohtpOJIeH nAHeI c 6 6yToHa
3a da n36epete keenahnrt ot Bac pekim Ha pa6ota e doctaTbUHO da hatcHete neko cbOTBeTHN6 bytoH.

Bytoh ON/OFF 3a oCBTeTneHne

Bytoh 3a n3bnpahe Ha pexma Ha pa6oTa (cteneH Ha acnpaun - HHTeH3NBHa) - BpeMeTpaene - 5 MNHyTu: acnparTopbT 3aedCTBa Ta3N MOuHcT N CLeD n3TuHaHe Ha 5-Te MNHyTu Ce BpbUa KbM PpeDuHaTa MOuHcT.

Bytoh 3a n3bnpahe Ha pexima Ha pa6ota (ctenenHa acnnpaunia-Bvcoka)

Bytoh 3a n3bnpaHe Ha cpeHa ckopocT (MOUHOCT Ha acnnpaHe) - KORATO npemrBaO3Hauaba, Ye FInIITbPbT C aKTINBEN BByIeH Tp6Ba Da ce H3Mne HIN NODMeH. IIO npinHtua Ta3n CNIHAN3aun e De3akTbNpaHa. 3a da y aKTINbPaTe, N3KIIIOyete eNEKTPoHnKaTa KATO HAtNCHeTe Bytoh O n3aIbPxHte B pOdoJIxKeHHe Ha 3CEkyHd.
CneTTOBaHaTnCHeteEeHOBpeMeHHo6yToHn 1n2n3aDpBxTe BnpDbIxnKeHne Ha 3 cekHydm, TpbO Oe 3aOnOHe da npemrBa cAmo 6yToH 1,a CneT TOBa eHOBpeMeHHo 6yToHn 1n2,KoETO O3NaHauBa,YeФyHKuYraTe aKtBNBpuHa.3a Da De3aKtBNBpuTa CnHAnl3aCnTa, NOBTope OepaUraTt. TpbO Oe 3aOnOHTa PmEIMRbAT 6yToHn 1 n2,a CneT TOBa cAmo 6yToH 1,Koeto O3NaHauBa,YeФyHKuYraTe EDe3aKtBNBpuHa.

Bytoh 3a n3bnpahe Ha pexima Ha pa6ota (cteneH Ha acnnpaunia-HNcKa). Korato Mmra O3naHauaba, ye e Heo6xOJIMO da NoHCTnTe fIITbpa 3a Ma3HNHTe.

Bytoh OFF motore (stand by) - I3KIIIOUVAHe Ha eNEKTPOHkata - Hynpahe Ha cInHaJIIN3aIyra 3a MneHe / noDMHaHa HJTPnTe. OFF MOTORE
HATNCHETE NEK0 3a Da N3KJIQUHTe MOTopa.
HUYINPAHE HA CNIHAIIN3AUJRA 3A ΦNJTPNTE
PnB KIOUOe ACNIPaTOp N CNeI KATO CTe N3BbPUNIN NODpBxKATA Ha FNITPte, HATNCHE Te 6yTOHa N 3aDpBXTe DOkato YcTe 3ByKOB CnHAn. PmEIMrBaUHT CBToDIOd 1 (Ha FNITbPa 3a Ma3HNH) IN2 (Ha FNITbPa CAKTNBEH BbRHeH) pectaba da npEMrBa.
N3KJIIOUBAHE HA EJIEKTPOHNKATA
HaTnCHete 3aDpBxTe HATnCHat 6yToHa B npOdbJIxKeHne Ha 3 cekyHn, n0 To3n HauHH ce N3KJIOUba KOMaHdHaTa eNeKTPoHnka Ha acnupatopa.
Ta3nФyHKUma MoKe Da Bn 6bJe nOle3Ha npri nouchBaHe Ha ypea.
3a da akTbBnPate OTHOBeNEKtpoHnKaTa Tp86Ba da NOBtOpnte Opeauyra.
Ako 3a6eJekite Heu3npabHocTn No BpeMe Ha pa60THNIAKbI, u3KnIOyete Ka6eJa OT KOHTaKTA, u3YakaiTe MHNIMYM5 cekyni n ro BKIOyete OTHOB. Ako TOBa He pa3peuINpO6JIema, Bu cbBETBame Da ce o6bPHe T KbM CboTBtTHNrahpUHOEN cepBn3.
MoeHa Hmnyncn Moynatop c 56ytoHa
T1. ByToH ON/OFF 3a ocBcTeJIeHne (CBeToIIOJIbT L1 e BKLIOUeH)
T2. Byton OFF - Byton 3a 3b6npahe ha ckopoc7ta (MouchcTa) Ha acnnpahe 1 (CBeToDIOBt L2 e BKJIHOyEH)
T3. Byton 3a 36bnpane Ha ckopocTTa (MoHOCTTa) Ha acnnpane2 (CBeToDIOOJTE L2+L3 ca BKNIOyehn)
T4. Byton 3a 36bnpane Ha ckopocTTa (MoHOCTTa) Ha acnnpane 3 (CBeToDIOOJTE L2+L3+L4 ca BkIIOueHIN)
T5. Byton 3a N36bpahe Ha NHTeH3N8BHaTa Ckopoct (Mouchoc) Ha acnnpupahe (CbeToNDIOte L2+L3+L4 ca BKJHOChEN + CBeToMDIObt L5 npemirBa) - Bpemetpahe 5 MInyTu - cnei Koeto acnpatOpbt npemHHaba abTomATuHo HA Btopa (2) CKoOcP (Mouchoc) Ha acnnpupahe.
3a6aBHeO n3KJIIOUbaHe Ha acnnpaTopa (CBeToIIOmTe npemrBaT):
Bb3Moxho Ea nporpamipate 3a6abeHo nKJIOUbahe Ha acnipatopa (OFF) KATO HATINCHETe OTHOBu 3aIbpKInTe B npOblJxKeHne Ha NOBEe OT 2 cekyHmB MOMHTa AKTINBpaHata CKOPCT (MOUHOCT) HA acnipupaHe.
3a6abehOTO n3KNIOUbaHe e cbc CneIHOTo BpeMeTpaHe:
1-BACKOPOCT (MOUHOCT) Ha acnnpupahe: 20 MNHyTN
2-pa ckopoct (MOUHOC) Ha acnnpupahe: 15 MNHyTn
3-Ta ckopoCt (MOUHOCT) Ha acnnpupaHe: 10 MInHyTN
VHTeH3NBbA CKOpOCT (MOUHOCT) Ha acnnpahe: 5 MmHyTN
CnHann3aun3a3ambpcBaHeHaΦnITpnte
AcnipatopbT pa3noIaracfynKu, npi KoTo Ha onpeJeHnHTepBant OT Bpeme Ce noDaba CnHnA, ye fHnTPnte ca 3aMbpcEH n e Heo6xOJIMo da ce n3BbPsin nOdpjkka.
CnHaHn3aun 3a 3aMbpcBaHe HaФnTbpa 3a Ma3HNHn: npn n3KJIIOUeH acnnpatop (OFF) BCNUKn CBETOINOJn 3a CKOpocCTTa (MOuHOCCTTa) Ha acnPnpuane ce 3aJeIcTBaN octabat BKIOUeH N bPNOBJIKeHne Ha 40 cekyHn.
CnHaJIH3aI3aMbpcBaHe HaΦHITbpa CakTNBeH BByIeH: npn N3KJIIOUeH acnIpaTOp (OFF) BCNUKc CBToDIOm 3a ckOPOCTTA (MOUHOCTTA) Ha acnIpupeH npemIRbAT BnpoIbJNXeHHe Ha 40 cekyHdN.
AkmubupaHaCu2Haun3aum3a 3aMbpc8aHe HaФmmbpa c Akmuben EbIeH: NO prnHcHn CnHnHn3aunraE AeakTNBpaHa.3a da a kTnBpate nKIIIOHTe acnnpaTopo (OFF) HATNCHEte eHOBPemHNO 6yToHn T3 N T5 n 3aDpbXTe B npOdbkHeHe Ha NoBeeOT 3 cekYdn.CBeTOnDoNTe L3 n L5 ue 3anoHnat da npemrBat.
3a da DeakTNBnPaTe OTHOBO CnHnHaN3aunrTa nobTopeTe onepaunra.TcBeToNDn L3 n L5 ce BKJIOuBaT C NOCToHnHa CBETINHa.
HynipaHe Ha cnHaJIIn3aunra 3a 3aMbpcBaHe Ha cnIITpIte:
Пив BKЛIOHEn acINnpatOp (ON), HATnCHete 6yTOH T2 m3aIpbXTe B pIObJIxKeHHe Na nobYe ot 2 cekyHm. BcNKn CBeToDnOuN Ie ce BKIOUcat 3a KpaTko.
Benexka: ako n DBeTe CnHaNIm3aunn (KaKTo Ta3n Ha QnITbpa 3a Ma3HNHH, Taka N Ta3n Ha QnITbpa c AKTINBEN BByIeH) ca AKNBIPaHH, NOBTOpe TE Oepaunra.
NoDpBxKka
Почистванe
3a nouchtaheTo n3noJI3BaIte EINHCTBEHO Kbpna, HABJXHeHa C HeYtpaIIH TeuHn NoUcTbaI npenapatn. HE n3IOJI3BAITE INCHTPUEMHT NIN IPIBOPN 3A IOUcHCTBAHE!
I368BaIte npenapatN, KOITo CbIbPkaT a6pa3uBnH uactnU. HE I3IOJI3BAIte CINPT!
ΦπTp3aMa3HHH
Фиг.10a-20
Фиntbpyt 3aIbpxma3HnTe qactu,OTdJIaHn npri rotBeHe.
Ja ce nouchta BehdbX MeceHNO KOraTO HnDnKaTOpBt 3a npenacuane Ha fnnTpTe ro nokA3Ba (pa3bnpa Ce B Cnyaai, Ye moeJIbT, KOITcE 3akyniIN e ChabdEN C TaKbB HndnKaTOp).
I3noI3BaIe He MHOrO CnHNI MmRnH npenapatn I nOuNCTBaIe PbUHO INB CbDOMyINHa MaINHa, HO Ha Hncka TEMnepatya KpaTbK peXIM Ha N3MnBaHe.
PnMHeHaMeTaNHnФnTb3aMa3HNHTe B CbDOMNJIHATA MaUNHa eB3MOXHO ToI da Ce 06e3UBeTI, HO TOBA IIO HNKaKB CnyaH He HAMJRABa B3MOXHOCTNTe My 3aФnTpnpaHe.
3a da paarIIO6NteΦnITbpa 3a Ma3HNHtE,dpbHHeTe dpbkKaTaC npyKIneH MexAHm3bM.
ФИNTьс acTINBEN BbIeH (cAmO 3a ФИNTpnpauaBepcn)
Фur.19
3aIbPka HnepnraTHnTe Mnpu3Mn, KOIO ce OTdEJIr Tpni npIpbxKeHe.
ФИNTbPbT C aKINBEH BByIeN CE 3aNyUba PnB6JIu3IteHIO CNeI dIbIbI rpeiOIO Ha I3NoI3BaHe B 3aBcIMMoCT OT HauHHa roTBeHe N OT TOBA KONKO YecTo NOUYCTBaTe FInITbpa .
BbB BcEKN Cnuya e HcO6XoDIMO da nOIMHeTpe cHPTpa c AKTINBEH BByIeH Ha BcEKN YcTNPI MecUca IIN KORATO INdKATOpBT 3a 3acNIaHe Ha cHITPnTe (pa3bnpa ce aKO BAAMrT MoJel pAnONarA c TaKbB) NOKa3Ba, Ye e HcO6XoDIMO.
He ce mne HnTo MoKe Da ce n3noI3Ba noBTOPO.
KpbTbJnHJTbp cakTNBeH BblneH
Iocabete no eDINH qinltbOp BCa Ka ctpana, taKa Ye da ce nokprrdBeTe npednazn peWetKn Ha paBoTHOto KoIeNo Ha MOTOPa, Cnei KOeTO 3aBbptTe NO Nocoka Ha YacOBHKOBata CTpeNka.
Pn DEmoHTaKa 3aBbPtTe B Nocoka ObaPaHa Ha YacOBHnKOBaTa CTrpeIka.
POnmHa Ha en. KpyuShK
Фиг.22
AcnipatopbT pa3noIaracocBteNTeHa cNCTema CbC CBETOIOIIN.
CBETODINOIDTE rapaHTnpat ONTmMaJIHO OCBETJIeHne,do 10 nbTu No-CINHO OT TpaIauIOHHNITe IaMnI INo3BOJABAT 90% IKOHOMMA HA eNEKTPOeHeprna.
3a da noIMeHnTe NaMnTe,MOJI CbIpxTe C OToPn3npAHHa cepBn3 3a pe3epBn YactN.
UcTpoCTBO pa3pa6oTaHO,MCbIaHO uN 3roTOBHeHO B COOTBETCTBmC:
- BezonaChocTb: EN/IEC 60335-1; EN/IEC 60335-2-31, EN/IEC 62233.
- Εκηληγαταιούηνβεχ ελαρακτερπεικηκ: EN/IEC 61591; ISO 5167-1; ISO 5167-3; ISO 5168; EN/IEC 60704-1; EN/IEC 60704-2-13; EN/IEC 60704-3; ISO 3741; EN 50564; IEC 62301.
EMC:EN55014-1; CISPR 14-1; EN55014-2; CISPR 14-2; EN/IEC61000-3-2; EN/IEC61000-3-3. PpeIIOJxHnE nI npaBnBHO NcONb3OBAHn B CEJIAX CHNIXHn BO3dIeCTBn HA OKpyKaHOuO Cpey: BkIIOnHTe BbITJXHn KOIaK Ha MInHMaJIbHO CKOpOCTN, KOrDa HauINHaTe TOTOBtB, N OCTaBte ero paBOTaB B TeueHne HeCKoJIbKIM X MNHT NocIe TORK, KAK 3aKOHNTe TOTOBtB. YBeJIuMnBaTe CKOpOCTb TOIbKO B CnUyae Bo5bUoro KOnNUeCTBa DbIMa Nnapa, IN pIbGERaTE KcNOLb3OBAHnIO NOBbIeHNbIX CKOpOCTe ToIbKO B 3KCTpeMaJIbHbIX CnTuAunx. 3AmEnrTe yOrbHbIy Fmbltp(b), KOrDa 3TO HeO6XODIMO, dI NaNDepjxAHn XopoOe 3ΦFekTnBHOCTN yMeHbSeHn 3AnaxOB.OuIaTe JxipOBoBie bIe Fmbltp(b), KOrDa 3TO HeO6XoDIMO, dI NaNDepjxAHn XopoOe 3ΦFekTnBOHCTN XipOBo FO mbltp. IVcNlB3yIte MaKcIMaJIbHbIy DnAMetp CNCTEmbBo3DyXOBoOB, Yka3AHhBI B DaHHOM pyKOBoDCTBE, dI Na ONIMn3aUN 3ΦFekTnBHOCTN MInHMn3aUN yPOBnH yUma.
Ponb3ObaHne
BbIyKa cKoHcTpynOpBaHa nIpaBoToB I pexIMe OTOBaO3dyxa HApKy nIIN peuNPKJyAunn Bo3dyxa.

IcnoIb3OBAHnE cpeXmE OTOBa BO3Dyxa
B 3TOM peXIME nCnapeHnA BbIOdTaTc HApKy Upe3 rI6KnI Tpy6OpnoBOi, NOcOeINHeHbIK COeINHTeblHomY KOJIbU.
BHIMAHNE!
BbIbOHa Tpy6a He BXoJIT B KOMnJIeKt I DoJIxHa 6bItb npNo6peTeHa OTdJIbHo.
DnAmETp BbIOHOI Tpy6bl OJIXeH COOTBETCTBOBaTb DnAmETpy CoEINHTeNBoHOrO KOJIba.
BHIMAHHE!
EcnBbITJkKa Cha6KeHa yOrIbHbIM fOp,To y6epntero.
IIOaCOeINHInTe BbITJAKK Ky K bblBOHOH TpyBe C dAmMetPOM COOTBETCTBYUOIM OTBepCTNUO BbIXOda BO3dyxa (coeHNHTeJIbHbI ΦlaHeu).
UctahOBka Tpy6 C MeHbIIM DnAmETpOM DaCT yMeHbIeHne MOUHOCTN BCaCbIBaHnB BO3Dyxa N pe3Koe YBeINuHHeHne yPoBHa Wyma.
ПОНЗВОДЕТЛСИМАЕТСЕБСВЕКУОТВЕТСBEHNOCTI NO OTHOUSHENIO BIISE CKA3aHHORO.
I NcnoIb3ObaTb Tpy6y C MmHImaIbHo Heo6xoDmOu DnIHOr.
I NcnoB3OBAbT Tpy6C HnMeHbUIM KOJInueCTBOM n3rN6OB (MAKcImaJIbHbI yrOJ n3rN6a:90°).
! 136eRaTpe3kOroIm3MeHnIceEHnIpybI.
B03dyxa
Khonka nepekIIOUeHnHa BBICOKyOCKoPoCTb (MOUHcT BCAcbBaHn)

KhONka nepeKluOeHnHa cpeDHIoCKOpocTb (MOUHOCt bBCaCbIbAHn) - KOrdaMnraet, yKa3bIbAEt Ha Heo6XoDMOCtB OUMCTKn, INN 3aMeHbI yTObnHO rOuNbTpa. DAnHnA rCnHAN3aunr O6bHNo OTKIOueHa, INn AKTNBaUN CnHAN3aUNn Heo6XoDMOn NCKNUHTb 0NEKTPoHnky. INn 3TORo HaxMMTe HA KhoNkO 0 N depKnte ee HaxKatoH Na npOTaeHH 3ceyHd. 3aTEM ODHOBPeMHNO HaxmMaIte Ha KhoNk1 2 HA npOTaeHH 3ceyHd, ChauAna HauHET NpMbCnPOBaTB KhoNk1, NOTOM HauHY TnybCnPOBaTB o6e KhoNk1 n 2, YTOCBnDETEbCTByET O TOM, YTO AKTNBaUN 3abeRpeHa. NToBToPbT daHHyO onepaHIO dIra OTKIOueHHn CnHAN3aUnn, ChauAna HauHY NpMbcPOBaTB KhoNk1 n 2, NOTOM HauHET NpMbcPOBaTB KhoNk1 1, YTOyKa3bIbAEt HA OTKIOUeHHe CnHAN3aUN.

Khonka nepeknouhenna Hn3kyoCKOPOCTb (MOUHOCTb BCaCbIBaHnra) - KOrJaMnraet, yKa3bIbAeT Ha Heo6xOIMOCtB ONUCTKn FmJIbTpTa 3aIepKKn Jnpa.

Khoika OFF MOTopa (stand by) - UckJIOUeHne 3JeKTPoHnKn - C6poc CnHAn3aunOuNCTKa/3aMeHaФnIbTpOB. OFF MOTOP
KpaTkoBpeMeHHo HaxaTb Ha KhoNky, YTO6bl BbIKJIOUYtB MOTOP.
CBPOC CnHJIN3AUIMNΦJIbTPOB
PnB KIIIOUeHHO BbITXKke, Nocne TOrO, KaK bIIO BblONHeNo TexHNUeCKoe 06cNyKbAHnE fNtBPOB, HauKaTb Ha KhoNkY I depKxab HauKaToI noka He npO3ByuHT akCyTHeCKn CnHAn. MiraOuOns CBetOaND 1 (MeTAJIUNeCKn fNtBtp) m2 2 (yOrbHbI yfNtBtp) npKpATNT MIRTaB.
NCKJIIOUeyHE 3JIeKTPOHNKIN
CKopoocTb (MOUHOCTB) BCacbIBaHn2:15MmHyT
CKopoocTb (MOUHOCTB) BCaCbIBaHn3:10MmHyT
CKoPoCTb (MOUHOCb) BCaCbIbAHne HHTeHCNBHOe: 5 MnHyT
CnHnHaN HacbIeHne fHnbTropB
BbTgKa ChabxHa e HKne, TTO B peyIpaHbIX
npomexytkax BpeMeHn Pneynpexkaet Nolb3oBeTJIa, KOrdaФmblTpbl HacblIeHbN HyxHNO pOBecTN npOtnakTtueckn yXoJd.
CnHn HacbIeHn HnBtPoB 3aepKKn Jnpa: BbIKNoeyHn BbITxKa (BbIK), BCE Led cKopocTn (MOUHOCT) BCaCbIBaHn BKIOyATcC fNkCnpoBaHHbIM CBETOM Ha 40 cekyHd.
CnHn HacbIeHne FmIbTpoB aKTHBnPoBaHHoro yrIa: BbIKIOUeHNHa BbITJCKa (BbIKI), BCE Led cKOpocTn (MOuHcOHT) BCaCbIbAHN MmraHOT Ha npoTjKeHn 40 cekyHd.
Akmuaa Cuehana HacbueHua pmpa
akmubupoeahno 0yra: CNHAN DE3AKTMBNPOBAH,
YTO6bl AKTNBUPoBaT ERO BbIKIOHOTb BbITRAKky (BblKI)
n Haxatb ODHOBPEMeHHO KHONIK T3 N50JIbUe Yem 3
CEkyHbI, Led L3 n L5 NaHTMnTaB.
YtobI DeaKTHBnPoBaT nobTOPTb onepauH Led L3 nL5 BKJIOUATcA cKCNPOBaHHbIM CBETOM.
Bo3Bpat B nCxOdHoe noIoxeHne cnHaHa hacbIeHnA ΦnIbTPOB:
B COCTOARHIM BKNIOUeHHOH BbITRKKN (ON) HauKaTb KHOIky T2 6oJIbe 2 cekyH, BCE Led BKNIOuHa cHa KOpOTKe Bpemr.
PpimmuHHe:ecnHHeo6xOIMO NOBtOpNTb oBe Onepaunu B CnyaH aKTHBbIX DByX CNrHaNoB (ΦnIbTp 3aDepkKn Jknpa n ΦnIbTp aKTHBnPoBaHOrO yTn).
yxo
OuInCTka
ДлгочNTКИ NGTOJIb3aIte TOЛьКО cneцmaJIbHyo Tprnky, CMOUEHHyIO HeITpaJIbHbIM JxNДКIM MOOUSM cpeDCTBOM. HE NCПОЛБ3YITE HNKAKNE NHCTPYMEThI Dlner OCHNTKII. He npIMeHЯTe cpeDCTBA, coedekaUme abpa3uHBIe MaTePraJIaJI. HE NPIMEHAITE CnINT!
YdAnrT He npHrTHbIe 3anaxn KyxHn.
HacbIeHne yrolbHoro fInbTpa npocXoDnT no nCTeHn H6Oee nIIMeHHe dInTeBHoro nepnoa 3KcPnyatauun, PnpOnpeJeRMeORo TINOM KxHN I nepNOJNUOCTbO OuchTKfNlTpoB 3aepkKn Jkpa. B NIObOM cnuae, 3aMeHnJIte KaptnDxNo kpaHNe Mepe uepe3 kaxdble 4 MecraCa (NJN KOrDa CnCTema NHdkAuaun HacbIeHnHaFbTPOB, eCNI OHmEeTcBAwSeMoeN, yka3bBaet Ha daHHy NOe6XoDMOCtB).
YroIbHbI ΦnIbTp HE noIeXnT MoKe nI npereHepaun.
Kpyrbly yrornbhyn qniltp
PokpbIbФnIbTpamn Obe cTOpHbI dIa3ayExnHn3aunThbXpeWetOK potopA dBiratela, nocne yero BpaataBfNtpo YacobOc TpeKe.
Дя сягеля - Вашильpinotив acoboь CTpeлк.
3aMeHa JAmn
Pnc.22
BbIyKa o6OpUObaHa OcBeIeHnEM Ha CbTeOIOJax LED. CBeTOnIOJbI o6cneYBaIOT ONImaJIbHOe OCBeIeHne, IN cPOK cnjKbI B 10 pa3 npEByIaET cPOK pa6Otbl TpaIIuONHbIX IamNIOeK, I NO3BOJIaOT 3KOHOMITb 90% 3JeKTPO3Heprn.
ДлЯЗамени CBETODIOOBобразИТecьВ abTOpINIOBAHнь CepBnCHbI ΚeHTp.
Yitko doTPmyTeCn npBedeHnx B daHOMy KepiBnHTBI nIcTpykui. BnO6hNk 3Hima 3 c6e 6ydu-ky BiDnOBiDaNbHiCtB 3a HecnpabHocTi, 3bNTKn a60 noxekxy, yO MoXe MaTI MlCiE Pn BIKOPNCaHHI pncTPOB BHacNiDOK HeBHKoHAnH I nIcTpykui, pnBDEHnx B daHOMy KepiBnHTBI. BuTJHXKIOPAKCTOBAHN DnI BCMOKTyBaHHa DMy Ta npA, QO YTBOpHeCBn iD Nc npriOTyBaHHa Xi ta np3HaueHNI LIIe nI naNo6yTOBO BRKOpNCaHHa..
Kyxohha Bnrrkka MoKe MaTH d3aH, 100 BiDpi3Hrcb8cB Bd BnrrkXn 36paXeHHoHa MaJIOHkax ciE I HCTpyKuII anE B 6yDb-RAKOy BnAaKy IHCTpyKuII 3 MOHTaxy, TexhiHoro 06cnyrobyaHHa Ta ekcnnyatauui 3AnHsaOTc 63 3MH.
BaxkInBO 36epeTn Ui IHcTpkyi DnI toro, uOb MoXHa 6yIIO 3BepHyTncrdo HIX B yIDb-kyn Yac. Y BnPaKy npOaKy, nepeaui Yn peei3dy, nepeKoHaTncr B TOMy 606 IHcTpkyi 6yIIN pa3OM 3 Bnpo6om.
- YbaxHo npOHTa nI hCTpykuii: B HnX MICTNbCBA xBaxImBa iHΦopMaizir 3 BcTaHOBNeHH, BmKOpIcTAHN Ta 6e3neKn.
3a6bOpOHeHO BVKoHByBatn eJeKTPuHi Ym MexaHiHi 3MiHy BnPo6i YN YBbIDHX KAHaJax.
- Persh Hix npictyntn do MOtaxy BnOby nepeBipte YN Bci KOMnoHEnTH 63 deFeKTB Ta He nOwkoJKeHHM. Y npOTnHexHOMy BnAaKy 3BepHITbC B MicE npoaxy Ta 3ynHtB MoTyBaHHa BnOby.
Pnmitka: Detani, no3HaHehi 3NaKOM (^*) e DoaTkoBIMn akceCyapamTa noCTaHaOTbcr Nlue 3 DeaKIMM MoJeJIIMN, a6o e Detanm, kI He noCTaHaOTbcr B KOMPiKeTI i ix notpi6Ho KyuBatn.

PonepeJxHnNo
6e3neci
Ipeed noaTkom 6ydb yko i onepauii no Ounuennu a6o obcnyrobyBaHHU, BiKluoyitb BuTjKky BiEneKtpnHoi CIk N BuTayuOn BuJky 3 po3eKn a6o BiKluoyauOn 3araJIbHn BmNKauch npMiuueHH.
-Дя усix onepaци no yctanobu Ta obcnyrobyBaHHIO BnKOpNCTOByIte pOboUpyKaBnU.
- Pnpctpi MOKe BnKOpNCTOByBaTncr DaTbMn He MOnoIshmN 8 pokIB Ta Oco6amn i3 3HnKeHmN φi3nHuHMn, CEHCOPHmN a60 po3ymOBmN 3di6HOCTaMn, a6o 3 HeOCTaTHIM DOCBiOM Jkso 3hAxOJaTBcR NiD KOHTPOJEM, a6o 6yJIn Habuehi BnKOpNCTOByBaTn Pnpctpi B 6e3neuHi
cnocis Ta rkyu p0zmyIOb IOB'ra3aHI 3 Tm He6e3neK.
-ДiTи NOBHHI 6yTu NiД KOHTpoJIe m I He NOBHHI rpaTnca 3 pNCTPOEM.
Onepaui no YnueHHo Ta 6cnyrobybaHHo He NOBHHI npOBODNTNCdItbMn 6e3 HargJy.
-Приимишни NOВИнно MaTN DoCTaTHIO BEHTINJIЯцIO KOJIN BNTJXKA BKNODNCTOBVETCBY ODHOyACHO 3 iHIMMII PnCtPOrM NIO ppaIOTb Ha ra3i a60 iHxN X naJIbax.
- BntjKy Heo6xIDHO qACTO YnCTHTN Jk BCepeHNI, TaK i 33OBHI (XOUYA B ODNHPA3 HA MICaLb), DOTpIMyBaTncB 6yDb jKOMy BnPaIky TORO, IIO Bka3yETbcr B IHCTpyKcIax NO 06CnyROvBaHHIO.
He DotpmaHHa HOpM OunuHnTa 3amH i OunuHnHa oJbTpB 36IbWye IMOBiPHiCTb pN3NKy 3aropHHa.
Cybopo 3abopoheno npiroTybaHHHa BIDKpNTOMY BORHI NiD BVTRXKOHO.
-ДяЗamIHлamnochN OCBITJehH BnKOpNCTOByBaTN TiIbKN TINлamnochB Bka3aHn B po3diJI o6cnyroByBaHHa/3amHa JAMNOCH NbOro nociHnka.
BukopncTaHH BIKPnTOI NOyM' HaHocntb 3bTOK pIbTpam i MoKe np3BeCTn Do 3arOpAHN, TOMy nOTpi6Ho yHkATn B 6yd jKOMy BnPaIky.
CmaxeHnnoBHHNO npOBODNTNcR niHaJrdom 06 yHKnHyTN 3aogpHHPO3NIto oII.
YBAFA: KoIIn BapnilbHa NOBepxHn npaioe, DocTyPiHi YactInH N MOKytB HarpiBaTnCra.
He PiDKIIOUATn npucTpii Do eJeKTPnHoi CItKn Do Tnx nip, POKn He 6yde nobHicTIO 3aKiHcHe yCTaHOBka.
- LIO CTOCYETbC TEXHcHmX MIP Ta MIP 6e3neKn y BIKOpNCTaHHI 00 BiJDNocTbCn DO BIKnDb napB, cyBopo
DToPmMyTeCeHOPM MlueBnx KOMneTeHTnX OprAhIB.
Повитра сьгубс, He NOBHHNO BUNyCKATnCBA Trpy6y Jka BKNOPNCTOBycSДЯ BKNUY DmMIB pNCTPOMN Ito npaTObHa razi Ta iHux NaBax.
He BnKOpNCTOByBatn a6o 3aIIuIaTn BNTAKKy 6e3 npabINbHO BCTaHOBJIeHIX JAMNOYOK 3 pN3NKOM OTPIMATnyap eJekTpUHIM CTpyMOM.
HikoJIN He BnKOpNCTOByBatn BnTgKky 6e3 npaBnIbHO BCTAHOBJIeHO peSiITKn!
BHTJkKa HIKOJIH He NOBHnHa BKNOpIcTObyBaTncr RaONOPHa NOBExhRA,RAUo TIlbKn HE BKA3yETbcR.
BmKOpNCtOByBaTN rBnHTn DnI pKcYBaHnB Habopi 3 npOdyKTOM DnI yCTaHOBN, JaKIO HeMaE B Habopi, PnpIbSaTn rBnHTn npAunbHOro Tnny.
Bukopnctobvatni npabnilbny doBXinhy TBnHTIB kka Bkaytbcra B nocibnky no BctaHOBJIeHHIO.
- Y BnpiKy CymHIBiB, KOHCyIbTyBaTINcR B aBTOpN3OBAHOMy CEHTpi a60 3 KBaIipikOBAHm NepcoHApOM.
YBAGA!
He BCTaHOBIIbAHnB BiIDNObIHIN TBnHTi pIncIpOIB dIy fikCyBaHH y BiIOBIDHOCTI 3 cIMM IHCTpyKcIaMM MOKe npBecTN Do pN3NK eNEKTpnHOro noXoJxehn.
He cnid BnKOpNCtOByBaTn 3 npOrpaMaTOpom, TaHMePOM, OKpemIM nIbTOM KepyBaHHa 6o3 6yDjaKM iHsIM pNCTPOcM, kNn npNbOuNTbcra B diHO ABTomATUHO.
DanHH Bnpi6 npomapKobAHn BiNObiDn do EbponecBkoI npeKtmbn 2012/19/EC, ytniiaaig eKeTpnHoro i eneKtpOnHoro obnaHann (WEEE).3a6e3neUoyn BipHy ytinl3aizu cboRBO BnO6y, Bu donoMoxete nonepednT noTeHuiHi HeRaTHBi HacniDKn Ipy OTOuyOHoro cepedBouia i 3doob'JIOHN, KOTPI MOrn 6 Matn MiCue B npotnHexHomy BnAky.

Cnmbon ha camomy Bnpo1 a6o Ha cynpobodkyohomy
Horo dokymte Bkazc, 0 npn ytniiauui cyb0r Bnpoby 3
Hm He moKHa nOBoJTNCSRA K3 i3BnuahHHMn NO6yTOBHMn
BiXoDAMn. BIn Mae 3daBaTNCa Y BiNObiHNn PnyKT npnOmy
EnektpuHoro I enektpoHoro 6oaJaNHHA TnNoaIbWo
tynIiauui. 3DaabAHna Hs 3NaI NobINHO BVKOHyBATNC 3riDho
3 MicueBmnpabnAmn no ytniiauaii BIDxoD. Jpn 6bnwe
DetaIbHOIHOpmaui npo npabnA NoOBdoHeHH 3 TakIMn
Bnpobamn, ix ytniiauaui I nepepo6kn 3BeptaInTeCB Micuebi
opraHN BnAdn, B Cnyx6y no ytniiauaui BIXxOIB, a6o B
MarasIH, B kOMy BN npndbaan daHn Bpi6.
Пилад спpoeKTOBaHо, ВирpoБуBaHо i ВИROTOВNeHо 3riДно 3:
- Be3neka: EN/IEC 60335-1; EN/IEC 60335-2-31, EN/IEC 62233.
- Eknnyatauihi kocti: EN/IEC 61591; ISO 5167-1; ISO 5167-3; ISO 5168; EN/IEC 60704-1; EN/IEC 60704-2-13; EN/IEC 60704-3; ISO 3741; EN 50564; IEC 62301.
EMC: EN 55014-1; CISPR 14-1; EN 55014-2; CISPR 14-2;
EN/IEC 61000-3-2; EN/IEC 61000-3-3. Iopadn nnpabunbooi ekcnnyataui Ta dnn 3HnKHeHH BnBnBy Ha cepeoBniue: BmkaIte BnTjKky Ha mHimaBHy SwnDkiCTb nepeodouk om npirotoYBaHH Nki, i zanuuaite II npauObatn Ha deKilba XbnHn Nicna 3akHueHH npiroTOyBaHH. 36Inbuyte WbNdkiCt b tInbKn y paai BeNkoi kIlbKOti DMy i napy Ta BnKOpNCBOyHe HADyB TINbKn y KpaHix BnAaKdx. Dnpi ndpMaHn BnCOoI eFeKTNbHOCTi BnDaHEnn 3aAnxib, 3a Heo6XdHcTo, BnKOHyTe 3amiHy ByrInbHorO(-nx) fipItpy(-IB). Dnpi ndpMaHn BnCOoI eFeKTNbHOCTi fipItpy KupiB, 3a Heo6XdHcTo, BnKOHyTe qncTy KIpB. BnKOpNCBOyTe MAKcImaBnH ni diAMetpr CnCTemM NOBITPOBoID, 100 BkazAHm y IHCTpykui Dn ONTmiaaui eFeKTNbHOCTi Ta mHimiaaui uMy.
BukopncTaHHa
Bntjka po3po6JIeHa dI pyo6OTn BpeKIMi BCMOKTyBaHH, BnBOJHn NOBITpr Ha3OBHI a60 B fiNbTpyOCHMy peKIMi 3 peuPKyIJIueIO nobITpr.

BapiaHT BiBVeHn
Iapn BvBODaTbCn Ha3OBHc Hpee3 BvBiDHy Tpy6y 3akpinHeNy DoФlaHua 3'cDHaHHN.
YBAGA!
BvBHa TpyBa He noctaAeTbC a I TOMy Heo6XiDHO II npuDbaTN Okpem.
JiAmTe BvBjDHOI Tpy6n NobHEn BiNObiDatn DiAmTepy 3eHyBaJIbHOrO KInbIa.
YBAGA!
Ykpo BNTaKHN KOBnak Mae ByrIbHi pInbtpn, To ix Tpe6a 3HrtN.
Пд' endat no hactinho BvBidno trpyb Ta BvBIDHoro OTbOpy 3 odHaKOBIM diaMetpom BxOxy nobitpr (3'edHyUChnФlaheu).
BukopncTahn Hn HactiHn X BmDnX Tpy6 Ta OTbopib 3 MeHIM DiAMetpom npBBeDo 3MeHWeHH eEeKTHBOCTI BCMOKTyBaHH Ta 3Haune 3bIbWeHH pIBH yMy.
Tomy Mm 3Himaem 3 ce6e 6ydb-ky BiJIOBiaIbHiCt b no Bnuecka3aHOMy.
! BnKOpNCtOByTe HaKopoTusn BnTjxKnHaJaI.
! BnKOpNCTOByTe BnTJxHNI KaHaJI 3 HaMeHIoHO KInbKiCtIO NOBOPOTIB (MAcHMajbHNI KYT NOBOPOTy: 90^
! YHnKaIeTe pi3Knx 3mIH nlooi nepepi3y BNTJxHoro KaHaNo.

Bapiant 3 pfinbtpauieio
BTRHnye NOIBITp3 HEXKINPOEbTa OUYIyETbC Ta 3HOBy NOBepBaTcBcB B pNIMiueHH. IJr TORO, UIOB BIKOPNCTOByBatn KOBnak yCbOMy pexkmi, Heo6xIdNo BCTAHOBnT DoaTKOBY CNTeMy fInbTpiB 3 aKTINBOBAHm ByirllnM.
Inctanlaic
BicntaHb HNkhBoi BiDuctnH BNTJxKn Do nocydy Ha kxyonHiPiMae 6ytn He MeHwe 45cm, y BNapky eIektpuHnx PINT, ta 50cm, y BNAPKy ra3OBnx Ta KOMoHOBAHX PINT.
Heo6xioH No pImMaTn Do yBaTn BiDctani, kki Bka3yOHTbCBA IHCTpyKii 3 IHCTaIaII rai0BOi PInTN.

Пд'еданндаоеелктрөрөхi
Hanpyra B enektpomepexi mac BiinobidaTn Bka3aHIM xapaKTEpncTikam Ha etkeTu, kya 3haxoDnTcBcR BCEpeHHI BVJAKK. RaKIO B KOMPNEKT BXOHTb BNkA nID eHNHBA B enektpomepexy, TO cnId niiE hAnTH BNRTKQ DO pO3eTKN, zo BiNDOBiAc iCHyUHM HOPMa Ta 3hAXoDnTcB C DoCTynHOMY MICU, 00 MoKHa BVOKOHn N icNJI hCTanJIu. I KaIO X BNkA He BXODNTB B KOMPNEKT (Pnape Ni dEHNHBA B enektpomepexy), a6o PO3eTKa HE 3haxoDnTcB C DoCTynHOMY MICU, TAKOX I niCIA N hCTanJIu, TO cnI D BMOTyBaTn HAIeXHNI DBOX-NONIOCHN BIMMKau, kAAK 3aBe3neHuTb NOBHe BiKDIOUeHHN BA Mepexi B yMOBax nepeHANpyr lll Kateropii, B NOBH INBIPOBDHOCTI 3 npabINAm iHCTanJIu.

YBARA!
nepe TmK 3HOBy NIKJIOUHTN BNTJCKy DO eNEKTPOMEPEKJI i nepeBIPNTn npabINbHicTb pOBoTn, 3aBXn KOnTHPOHNe Tc06 uHyp MEPEKi 6yB 3MOHTOBAHn BIPHO.
BntaXnH KOBnak Mae cneJIaIbHn NpOBId XNbIeHHa; y BnPaIky NIOkOJKeHHn PNOBOy, 3AmOBe Ioro y CnyK6i TexHiHOro OBCnyROByAHn.
InCTanuaia
IpeepnoaTKOMMOHTaxy:
- PpeBipTe 06 po3mIPn prnDbaHO BAmn Bnpo6y nIXoAnIIO Do BVbpaHO Micra Ioro MOHTaKy.
3HimItb ByitbHn BInbTp/n RaKIO BIn/BOH npCytHi (DINBNTcB TaKoX BiNIOBIDHN po3di).ΦIbTp/n 3HOBy BCTaHOBIIIOYbCe RaKIO Bu XOHTe BnKOpNCTOByBaTN KOBNak B peKIMPeuNPKyIaJI.
- IpeBipnTn 06 BCEpEnHi KOBnaka He 3aIiuaNoCn npEpmTeB, NOMiueHnx Tyn Ha Yac NOro TpaHcnpOtpyBaHHa (HaPnKlnd, NaKeTKiB 3 uypyamn, ImCTIB rapaHTii i T.n.), RaKIO BOHc E, BmIMt b ix i 36epeXitb.
B KOMNJIeKT BITRAKKI BXOJAb TzUpyuIN DnI KpINNeHn, po3paxoBAHHa 6iNbUcIb TtNiB CTIn/CTeIN. IIpote Heo6XiHo 3BepHyTnCS Do KBanicIKOBaHOro Texhika DnI nepeBipKn npdaTHocI MATEpiAIB B 3aJexHOCTi BiD TtNy CTIn Hc CTeni. CtHa/CTeIN NOBHHI ByTN DoCTaTHb MiHNMM, Uo6 BHTPMATn Bary BITRAKKN.
Функционувня
TaNHeB KOHTpOJIIO 3 KHOJIkAMN
Ha BvBIMKHyTIN BnTJXJI, nicJ npOBeHnHa 6bCyIryOByBaHHn FInbTpIB, HATNCHTu HA KHOKNy Ta yTPMnYBaTI n II do OTPMaHHn 3BykoBOro CnHany. Cbitno iod 1, 00 MroTHTB (xHPOBm FInbTp) N2 (ByrInhN FInbTp) nepeCTAne MroTITn.
BKNJIIOUeHHEJEKTPOHIKI
HaTnchTu Ha 3 cekyHn Ha KhoNky, BKNJIOHTbcKOMaHdHa eJeKTPOHika KOBnaka.
LZ onepaio moke 6ytn kopncnoo nIu c HcTkn Bnpo6y.
Toro, 06 3HOBy nikHHTn eKPTPOHIki, Docntb NOBtOPITu diI.
YBnadky anHomaniyfHKUHyBaHnepH HIX 3BepHyTncdo CEHTpy texhniHoro o6cnlyroByBaHHa BdknIOHTn Ha 5 cek.Bpi6 BiEneKtpomepexi, BntraOuN BuNKy i notIM 3HOBYBMKNHTI. JAKIo anHomaiy fHKUHyBaHH He 3NHKe3BepHyTnc do CEHTpy texo6cnyroByBaHH.
Moenb 3 naneHJIHO Ha 5 KhoNk
T1. Khonka BKJI/BNKI cBITNa (Led L1 BKNIOUeHnI)
T2. Khonka BKNK - Khonka Bn6opy uBndkocti (notyXhcti) BCaCbIBaHna BO3dyxa 1 (Led L2 BKJHOeHnI)
T3. Khonka Bn6bopy uBnKocti (notyXhOci) BtaryBaHnnoBITPra 2 (Led L2+L3 BKIOUeHNI)
T4. Khonka Bn6bopy uBnKocti (notyXhOcti) BtaryBaHnnoBITP3 (Led L2+L3+L4 BKnIOHeHn)
T5. Khonka Bn6bopy Wbndkocti (notyXhocti) IHTEHCBHOro BtaryBaHH NoBITpRa (Led L2+L3+L4 BKIIIOHEN + Led L5 mraOch) - TpBbIaNCTb 5 xBNIHN - NICNA QTO BNTJHKs BCTaHOBIe ABOTMaTHHO CKOpICTb (NOTyKHiCTb) BtaryBaHH 2.
YnobijbHehe BnKJIoueHHBNTaXKn (Led MrraioCh):
Moxnbo BCTaHOBtynoBJIbHeNE BnKIOUeHHN BITXKK (BNKJI), TpImaOuH 3HOy 6JIbIe YIM 2 XBNIHN HaxaTOH KONKY WbIKOCTI (NOTyKHOCTI) BTryBaHH, RaKa DcE B cEe MOMeHT.
YacynobInbHeHOro BnKInoueHHMaIObB HArBaHbOCTiTilbK:
WBnKicTb (notyXhictb) BTRyBaHHa 1:20 xBnHn
WBnKictb (notyXHcTb) BTRyBaHHa 2:15 XBnHH
WBnKicTb (notyXhictb) BTRyBaHH3:10XBnH
Ubukicb (nOtjuHcIb) BtaryBaHn iHTeHcBHe:5XuINH
CnHn Hacnyehn qinbtpiB
Bntjka ochae ha fynkciio, 0o B perylnpHnx npomixkax yacy nonepdkae kopncTybau, koni pfIbtpn hacuhe i notip6ho npobectn npoipinaKTnue ocbnyrobybaHHa.
CnHnI hacuHnHnΦiNbtpB 3aTpMkn Xnpy: BnKlIOueHa BNTJCKA (BKNJI), Bci Led uBnKOcti (notyXhOCTi) BTaryBaHHN BKIOUaTbcaΦIKCOBAHm CBITnOM Ha 40 cekyHd.
CnHn HnChuHnHnФiNbTpBnAknBOBaHOro ByrInna:BnKJUeHa BnTjAka (BNKJ), Bci Led WbNkOcti (notyXhOcTi) BtRyBaHHn MmraIb npToaROM 40 cekyHd.
Akmuaa cuzhany hacuehnphi bmpy akmboa0o eyin: CnHan de3aKTHBOBaH, 106n Ioro aKTHBbATN, BNkIOUHTN BITXkY (BNJI) i
Hajatn OndOchao KhoNk T3iT5 6Inbue YIM Ha 3 cekydn, Led L3 iL5 noHytb MmraTn.
Ioo6 De3aKTHByBAtn NobTopitb onepaHIO Led L3 i L5 BKJIOUaTbCra fIKCOBAHM CBITLOM.
Kpyrnn ByrInbHn fInbTp
Ppikactn pifbtpn no ombdi CTOPOH nIPOKPTT 3axnchnx pwiitok potopa DnHyna, nicra yoro NOBepHTN pifbtp 3a rOHHNKOBHO CTPIKIO.
ДяЗHA附T-NOBEPHTNФIbTpnpOTnROINHKNKOВICTPJIKN.
3amiHa JAmn
Man. 22
Bintjcka 6bnadnha CNTeMOIO OCBITJIENHNA H a OCHOBI texhONorii diOJB (LED).
IIOIN 3a6e3neuytob ONTImaJIbHe OCBITNeHHra, TpBaNlICTb ix B 10 pa3 BnUa BiJ 3BnuaHnx IamNoOk Ta daIOb 90% ekOHOMII eNEKTPoeHeprii.
ДяЗAMHлamнКоТakTyBaTN abTopn3OBaHn cepBicHn ceHTp 3anachnx YactMH.
Ohu valjatombega version
MaHbIH 7aMaHaTbIC Kbl3bIN HeMece XaHbIn KeTneyiH KaMTaMaCbI3 eTy yuH, TaMaKTbl a6aJnan KybIpyKaKeT.
CAK BOJbIHbI3: CopfbltbiH KOJIkeTIMdi 6eJIkTepi TaMaK DaJIbIHay Kypblfblapbl NaJaIaNbIFaH Ke3De KbI3bIN KeTyI MymKiH.
-
Ophaty Tobilbik aayktaJMaBihSha KpypbIJIbIHbI 3JIeKTp JxeliciHe KocpHaB13.
-
BydbH 乌fhyHa KapcbI KOJaHaJIaTbH texHnKaHbIK KHe Kayinci3ik WaapanapBn Eckepe OblpIn, JepriJikTi BuNik OpraHdpB bekiTKe h epexepeDIMyKnTOpbHdayMaHb3bl.
OcbI KpyblfblHbIH TyIK apKbIbI 6aftTay JyueciH ra3 Hemece 6acka OTbHbI XaraTbH KpyblfblnapdAn ShlkKaan 6bynapDbI Shlifapy CmRkTbI 6bacKa da MaKCaTTapDa naJaTaHaBnTaBn Ke3 KeIreH KOJaHaBCTarFbXeJeTeY JyueciHe XaNfay KaKxt. 3NeKtP TorblHbIN cory Kaynihe BaJNaHbICTbl 7AmbI Dpybc BEkITINMereH COPfblWbTI naJaTaHaBbI3 XeHE KaNDbIpMaHbI3.
TopnapbTnictTyprde6eKitImerehen copfbltbeuKaWan naDaanHaBb3.
- Apnaы! KepcetIINMeIHHe, copfblTbELKAAUH TIpeK 6eTI petiHne naJaIaN6aHbI3.
- Tek opnaty yuin Ehimmen bipre bepiireh 6ekitybpaHdaIapbIn naIaIahbIb3, erep bepiimee,6paHdaHbTHticti TypiH catbIn anlbHb3.
BypaHdaanapdbiH opHaTy HcKayIbIFbIHda. KepceTinreH dypbic y3bIHdbfBn naIdaNaHbIbI3.
KymHdHaCahB3, 0kiJETti Kbi3MeT KepeTy BoiHwA XepDem KepeCy OpTaIbIbHa HemeCe Tnicti MaMaHaHaFAn TyIraFaXa6apnaCbHbI3.
ECKEPTY!
-Бураздаларды Hemece Беку Крьлфсibиocbl Hyckaynapra caikec opHaTnay3neKtpniK Kayintepre ekenyi MymkiH.
- BaIapIamaiaybImeH, TaImepeMeH, 6JIek KaIbIKTaH backapy KJYecimeh Hemece ABTomaTTbI TypJe KOCbIaNbIH Ke3 KeJIreH backa KypblfBImeH KOJaHaHaHbI3.
3JNeKtpnIK JxHe 3JNeKtpOnHbIK acnTapbl KaTaNandaFa acbpy XeHiNderi 2012/19/EC EbponaBbIK DnpeKtNBke (WEEE) caiKeC bepinre Him TaHbanaHbl.
BepinreH eHIMdi dypbic KaTaNa nda acbipydbI
KamTaMaCCbI3 eTymEn, C3 KopUaFaH optFa XHe aDAM DeHCayNbIFbHa Kepi Aecpi H TnI3y Di 6oJIbIpMayra KEmeKTececi3.

Acnantarbl Hemece KOndaMa KpKaTarl TaHbAcbl 6epiReh acnantbl KaTaNdaF aCbpyda eDeTeri TypMbICTbIK KaNbIK peTIHe nIrepYre BoImaTbHbIN KepCteJI. ObIH opNbHa 3IeKTPlK XaHE 3IeKTPoHDbIK acnantapbl KaTa Ta naDabry acbpyra apHaJIFaH Ka6BJdAynHKTIHe Tancbpy Kepek.
Бутfa tancbyp acnantb KaTaNaDara acbipy XeHInderi xepriniKti epexenepre cKeC mbifrapblIybl Tnic.
BHydai eHimdepi naIaIaNHy, KaIta naIadara acbipy epexenepi xeHINDe TOIbIK aKnapaTbI KepriIkiTc ekIMwiNik opbIHapbHaH, KaIbIKtapbl KaIta naIdara acbipy Kb3MetiHeH HeMece 6epinre hImDi C3 catbn anfah dyKeHen ana anlacb3.
KypbIfbl KeNecinepre caJ K06aJIahFaH, cBiHaIFaH XHe Xacan sbIrapblraH:
Kayinci: EN/IEC 60335-1; EN/IEC 60335-2-31, EN/IEC 62233.
- ΘΗΠάνικ: EN/IEC 61591; ISO 5167-1; ISO 5167-3; ISO 5168; EN/IEC 60704-1; EN/IEC 60704-2-13; EN/IEC 60704-3; ISO 3741; EN 50564; IEC 62301.
EMC: EN 55014-1; CISPR 14-1; EN 55014-2; CISPR 14-2; EN/IEC 61000-3-2; EN/IEC 61000-3-3.
KopuafAn optara acepi a3aIy yuH nypbic naandaany Typalb Hcaynap:
3ipnydi bactaHaJa KaKaTbI eH a3 KbldAmdbkneh KoclbIb3 XaHe a3ipney aAraTaNFaHnAH KeiHbipa3 MNHyT BoBbI JxMbIC icteIH3. KbldAmdbkTa TcK TyTINH JxHe 6yDbH yKeH MeNlpei XaFdaBnHda apTTbIPbHb3 XeHE KyweHT YbldAmdbfBnH(KTabpBn) TeK WeKTI KaFdaNapda naDaIaNbHbI3. XaKcbI JxaBIMCb3 nicti a3aTy TmDinirih CaTay ywiH KaKeT 6oIFaHa kMip cy3rici(NepiH) aybICTbPbHb3. XaKcbMa cnSyrici TmDinirih CaTay ywiH KaKeT 6oIFaHa ma Csyrici(NepiH) aybICTbPbHb3. TmDinikti OThaNaHdbpy XeHe Wdyb BapbHnla a3aTuY wih Ocb HycKaynbTKa KpcTeiTnReH eTKi3y KjyeecinH eYkEN dAnMeTpH naidanaHbHb3.
PaiDanaHy
Copfblu cblptka aya 6ypfblb6ap TaTpY keJdtkiu petiHne, Hemece iuki kaTaN aHaNly cy3riu petiHne naJaIaNHyra apHaIraH.

Copy Hyckacbl
By cIpyka biikipuyi 1naneKe KocblfAH
COPfblu Ky6bIp apKblblu bIfapblnaDbI.

ECKEPTY!
Copfblu K6bipdbn DnaMeTpbi 6ipiKtpyui caKaHaHbH dNaMeTpIme TeHece bOny Kepek.

ECKEPTY!
Copfblu Kbybplb copfblu XnHaKTamacbIme HKeTki3iImmeDi, OHb6eK catbn any Kepek.
CopfbltBkabpFadaBfCopfblKy6bIpaBmeh aya 1bIfapTaBH TecikTepDe, con dnaMeTpderi TecikTepre KocblH3 (6ipiktipyi fnaHeu).
Ka6bipraaBc copTbI Kx6bipnapbI MeH KeMDey
DnAmetprderi Teciknt naDaanany, copy KyaTbIH HaWapnAtbIn,
rypindeYiH KyweTei.
! KaKeTTI MHHMaJIbI Y3bIHbIKTaFbI TYTikTI KOJaHbIHbI3.
!BapbHwaKeNminiMi6apTyrkTiKoJaHbHb3(nimHiMaKcMamJb6pybIb:90°).
! TytkTIN KENDeHcKIMacbIHda Ty6ereNti e3repictepdi 6oIdbipMaHbI3.

Cy3y Hyckacbl
On yuiship kEmip cyrici kaxet, Ohbl eDetteri caTyshilapdah anyfa 60ana.
Cy3ri llbIrapblIraH ayahbl XOFapfbl 1bIfbc TOpbl apkblbl 6eMere KaTt Xibepy anlnda OHbl Ma Mm HicTepeh Ta3aTpabI.
KoHdbipy
CopfbliTbIH TEmHri KbipbMeh bIDbc actbHaDaftiipeiyihka3blfBtBihbHapa KaBbIKTbIFbEJNEKTP NNITacbl ywih 45cm
, an ra3 hemece 6ipiktipinreH pntanap ywiH 50cm deH keM 6oImaybTmic.
ErepHcykaTa3PiITacbIhOpHaTyfapaTbIbIpaKaAaBtBk6enrIneHReh6oCa,OnbIeckepiH3.

3NeKtp Kocynapbl
KeniiHKePheyi acnantbH iHHe opHaIaCKaH TaKaTaaanda 6eRineHre HTexHnKaIbIK
depekterde Kepheyre ckec Kenyi kepck. Erep copfbw BNkameh XabdktaIraH 60nca, opHaTbJnfaHHa KeIH De icTeyre 60nTaBH, Kon KeptpiK Jepde 60nyi Tnic, icten TypraH epexenepre Cekce anMaJIb-canMaJIb WTeNCBHe copfbWbIKoCbHb3. Erep copfbw BNkameh XabdktaImaHaF 60nca (KeNire Typa Kocblny), Hemece anMaJIb-canMaJIb WTeNCBb OPHaTbJnfaHHa KeIH De Kon KeTpePiK Jepde 60maca, OHDA opHTy HcckaybiHa Cekec 3- dapexeaderi ackbH KepHeydi 60nbipMaJIbTHn KHe He JeJIHH TOJIbK aUbIyH kAMTaMaCCb3 etetIH Tnicti ekINIOHCTIK axbIpAeTkblTb NaJaDaNaHbHb3.

ECKEPTY!
Kopek Jxelicihe CopfbltBn 3JneKtpnIK KjyNecIH Kocy aIbHda Kopek Ka6eni Dypbc MOHTaJaIFaHbHa Ke3 KeTki3iH3.
Cybyy KaIIaIbI apHaIbI Hep 6epyui cyIMKeIImeH Ka6blKTanFaH. CbIMXeni 6y3blfA H KaFdaIda OHb ayIcTbpy YUH Tmicti KbI3MeT KepeTy optaIbIKTapbHa6apblH3.
Bekity
Ophatydbb6actayandbHda:
- ΘΗΜΗΙΝ ΕΙΝΑΜΙ ΜρΗγ ΟΡΗβι ΦΟχιν ἀνρυίς ἐκεύτουν τέκεριής.
- BeIceHdi Kemip cy3ric(HepiH) (KaMTbIJFaH 60nca) (6aca kepdi kapaHbI3) anblHbI3. KaKNaKTbIH cy3ri HcCKaCbIH naJaHaHfBbI3 KeNce, OHbl/OlapDbI any KepeK.
IwHne bpaHdnap, KeninDik KapTacbl, T.6. cnKTBbap cemKeJep cnKTBb KaKnak iHnderi Kocalkb Kypandapp (coHa ona Hac TaMaNday yuiH opHaNaCTbipbInraH) TeKcePi3. Onapbl aBbIn, KayinciOpbHda caKaTaHbI3.
Cy3ri KeNTeren Ka6bIPfA/Te6e TypneipHe caikec Kenetin 6ekiTkiUtePmeH (fKcATOpnapMeH) KaTAMacBlaDnBbIPtnFa. AnaJa, MaTeepnAnIap 6epInre Ka6bIPfa/Te6e Typei CaKeCTirHe Ke3 JeKti3y yuH BinikTi MAmahFxaKOJIbIbHb3.Cy3ri CanMaftbHKeTepe anatbIHda Ka6bIPfA/Te6e JeKtiiKITMiMbIKTb 0JnybKepek.
PaiDanaHy
6 Tymeci 6ap 6ackpa neni
Cv3HdiHHyHKnIaPbIH TaNday yuH caikeciHwe 6atbIpMaFa bacy kTJIkti.

KapblkTb6atbipmacbl
ON/OFF(KOCY./CΘH.)

KapKbIHbI XblIaMblkTbI TaHday 6aTbIPmacbl (copy Kyyu) -y3aKTbIFb5 MnHyT -5 MNHT OTKEHHEN KeIH CopFbIIS 6yraH DeiH opHaTbIraH XblIaMblk TəptiBiHe opanaIbI.

Kofapbl XbIJaAMbIKTbTaHday 6aTbIPmacbl (copy Kyuui)

OpTaWbIJaAMbIKb TaHday 6aTbIpMacbi (copy Kywi) - XbIbIbIKtan TpyFaKe3e KEMipni cy3iwi Tyy Hemece aybCTbipy KaKcETTirirn KepeTei. Byn
CnHaHn3aJna 3eTe DeakTbuaJnAhnFaH.
CnHaHn3aJnHb AKTbuaJnay yuHIN 0
6BaTbIpMaCbHa 3 CeKHy d iUHDe 6acBn
OTbIPbIN, 3NeKTPoHHKaHb CenDipy KepeK.
Oan HKeiH 3 CeKHy d iUHDe 1 XeHe 2
6BaTbIpMaNapbHa 6ipyAkBTta 6acy KepeK,
anDbimEn TeK 1 6BaTbPMA fana XbInblbIKtAn
TypaBbI, Oan HKeiH 1 XeHe 2 Eki 6BaTbPMA da
XbInblkTaN 6actaNb, 6yn
AKTbuaJnAHaFaNDbfBh 6inDipeDi.
CnHaHn3aJnHb CenDipy YuHn OepaJnBb
KaiTanay Kepe, anDbimEn 1 XeHe 2
6BaTbPMAnap XbInblbIKTaIdbI, Oan H KeiH TeK
1 6BaTbPMA fana, 6yn
deakTbuaJnAHaFaHdbIbH 6inDipeDi.

TeMeH XbIaMbIKtB TaHday 6aTbIPmacbl (copy Kywi) - XbIbJIbIKTan TpyfAH Ke3Ne MaIIapDbIH cy3riiIN Kyy KaKETtinirH Kepcetei.

Ko3fANTKbIbTH Off 6aTbIpMacbl (KYTy pexkMJI) - 3neKtpoHnKaHbI cEHdipy Cy3riti xyy/aybIcTbIpy CnHaHn3aunCbIH Tycipin Tactay. KO3FANTKbIbTHbI cEHdIPy
Kbicka yaBt 6acBn typy K03FaTKnblItb ceHdipei. CNHAN3AUJHbI CY3IITTEPDEH TYCIPIN TACTAY
Icke KocblbIn TyprAh Cy3Hdi Ke3iHde cy3riIupre TexHnKaBbIK Kb3MeT KepcTeYdi opBlnDaFAnHH KeIN Dbl6bICTbIK CnHAN naJa 60lanFaHa7a 6atbIpMaFA 6acy KepeK. XbInbIbIbKTan TpyaBH XapbIKNo1 (MnaJIaDbH cy3ri) Hemece 2 (Kemip cy3ri)XbInbIbNltaybIH TOkTaTabe.
3JIeKTPoHnKAhBi COnHIpY
BaTbIpMaF a 3 cekyH iuiHne 6acbl typy, cohBIme h 6pire cy3iHdiH 6ackapyduH 3neKtPOHHaCbl cHdiPineJI. Byn fyuHKc6yblMbI Ta3anaybl Jxprizre H Ke3ne naJbnbl 6onybl Mymkh. 3NeKtPOHHaBl kaitalan icKe Kocv ywhon onepaunHb KaTanay keTkiniKTi.
Kymbicta akaynap 60lanfah Ke3e, KOnday Kbl3metiHe
KryHniH anDhda, acnantan 3neKTpIki Kyat Ke3in,
MHHmym, 5 cekyndka cehdipy kepk, on yuiH wTekepi
BbFapy kepk, an oan H keinh OHbl KaTadah icke Kocy kepk.
Erep Kymbicta bI aKay caKtanca, Onda Konday Kbl3metiHe
KryHny kepk.
5 Tymeci 6ap 6ackapny naheni
T1. KOCY/ΘIIPY TyImeiH uAMdapbl (L1 JApblK DIObl JHaHaDbl)
T2. ΘUIPY Tymeci - 1-iii copy JbIaMdbIbIbH (KyaT) TaHday Tymeci (L2JapbIK dIObI JkaHaIbI)
T3. 2-5i copy kbldAmdbIbH (KyaT) taHday tyMeci (L2+L3 xapbIK dnoDbI xaHaDbI)
T4. 3-5i copy kblambfbn (KyaT) taHday tyMeci (L2 + L3 + L4 xapbIK dnoDbI khaDbl)
T5. Kapkblb copy XblamblbfH (KyaT) TaHday TYmeci (L2+L3+L4 kapbl dnobl jkaHa1bl + L5 kapblk DnObl XblblkTaNbl) - 3aKTbIfbl 5 MNHyT - OdaH KeiH copFbll 2-11 copy XblamblbfHa (KyaT) aBTOMaTTb Tpyde aybCaBl.
CopfbltBnKiipintJireeipiny (XapbIK DnoDtapbl XblnbikTaunbl):
Copfbltih Kijiptinre H euiipinyiin con yakblta 6eNcHdi copy Xblamdbfbhlh (Kyat) TYmecin 2 cekyHtah aptbk KaTb6acy apkbblb opnatya 6oJabl.
Kidiptinren OwipydiN KOJxetimDi onuynapbI TEmeHderiJe:
1-1i copy kbldAmdbifb (Kyat): 20 MNHyT
2-Ui copy JxbldAmdbIfb (KyaT): 15 MnHyT
3-iii copy kblndamdbifbl (kyaT): 10 MNHYT
KapkbiHbI copy kbiIaMdbIbI (kyaT): 5 MInHyT
Cy3riHIn KaHbIKTBiHK INHnKaTOpB1
Copfbll cy3rlep KaHbIn, onapra TexnKanblk KbI3MeT KepcTe KyKaKeTTiniri TypaII naIdanaHybHbI JyIeNi Tpyde eceptetIH yHKuMaMeH J6bIKtanFaH.
Mai cy3ricinH KaBHtBik HnDkataopbl: Copfblw eWipyni (OFF) 6oIraHa, copy XblIaMdbFbHbH (KyaT) 6apblk Japblk IIOaTapbl 40 ckyH d iHHe TpaKbI JapblKnep HkaHbTIypaBl.
BencnHdpinre H KEMIP cy3ricihi KaHbIKtbIK nHnKAtopbl: Copfblu eWipyni (OFF) 60JrHa, copy XblaMdbfbH (KyaT) 6apblk Japblk DnOdTbp40 cekHyd iuiHe JxblnbltkTaibl.
Benchdipinzen KEmip cy32icihin KaHbikmbiK cuhaibihin icke Kocblby: aTeTte 6yn fHykunu eupyni typa,b, OHb icke KOCY ywiH, copfbiUtBi eupipiz3 (OFF) Xahe T3 Xahe T5 Tymenepih bip yaKaht3 cekyHdTai Bacbin typbHbI.3 LXaHe L5 kapbIK DNOHTapbi XblnbIbKTai BactaNbl.
Uipy yuH npEketti KaTanaHbI: L3 XeHe L5 JapbIK IIOdTApbl TypaKbI JapbkNeh XaHbIN TypaBJI.
Cy3rinepiK KaHbIKbIK HnHnKaTOpBbI bCbipy YuiH: Copfbl Kocyl (ON) 60JFaHa, T2 TYmeciH 2 cekyHtAn apTbIK 6acbl TpybHb; 6apblk XapblKn DnOdTapbl XblnAm KaHaBl.
EckepTne: KaKet 60nca, INDnKaTOpnapbH ekeyi de (MaJ cy3rici MeH 6enCeHdipinTeR KEmIp cy3rici) 6eNceHdi 6oFan H KaFdaJa apekeTTI KaTalaHaB3.
TexHnKaJIbIK KbI3MeT KepceTy
Ta3anay
Ta3aIay yuIH TEK 6eIrapan xyfbls 3atneH
Cynahfah aphaibi wybepekTi naJaAnaHbIbI3.
K¥PbIJfblHbI HEMECE TA3AJAY K¥PAJIbIH
PANDAHAHbI3!A6pa3nJaBkKocnacbI 6ap
3aTbI naiDanaH6aHbI3. CnIPTTI
ПАДАЛАБАнbl3!
MaCy3rici
10a-20-cyper
AcdaihndaydaBImaH6JIweKTePiYctanKaIaB1.
Фильтд ai caibH xyfbl 3aTtAPmEH KOLIMEN HEMeCE TEmEH TEmNepaTyPada Xhe YHeMdi Xyy UKINHderi bIDbc XyflbMaunHacnbHa Ta3anlan Typy Kepek (Hemece FInlbTpki KaHbKbIpy KxNyeci,erep ci3dIH yrIpe BoNaCA, 6beipirehKaKetTIJIKTIKI KpcetKeH kafdaJa).
MaJbI Ta3aIay FJIbTpI BiIbIC XyFbI MaUNHaCbIMeH xyFaHda EHCi3dEnyi MyMKIH. BIPAK Ohbln Ta3aIay CInaTbI Mynde E3repMei.
MaCy3icin anbIn Tactay ywiH cepinneni 6ocaty TyTKacbH TaTbIHbI3
Kemip cy3riw (Tek cy3riw-copfbiW Typinde)
19-cyper
Ac nicipren Ke3de xapaMcbI3 niCTi yctan KaIadbl.
Kemip fInbTpHiH KaHbIybl, acHydH Typi MeH KEmip fInbTpHiH xMyEni TazanaHbIybiHa 6aIaNbIcTb y3ak yaBkIT KOJaHaFahHH KeIH 6oNaIb. KaHdai XaFdaI 6oMaCbH, KapTnDxJI KeMInHe 4 aI caBbI ayBcIbPbI npTy kKaKet (HeMece fInbTpDiH KaHbIFu INdkaTop JyNeci, erepe C3iHmOdeniHirre opHaTbFnFaH 6oLa, ayBcIbpydbH kKaKET eKeHN KOpCeTKeH XaFdaIa).
JyyfHa HemeCe KaNbHa KaTipyRe BOJMAIJIbl.
Dehrenek kemip cy3rici
Ko3fantkbIbH KanaKbI dHeRerEHH TopaHbHa 6ipeyIH opHbHb3, ceTIN OanapDbI carF tJImen 6paHb3.
Any yuishi onapdbicarfat tinihekepiyaipb3.
Uam aybictbipy
22-cyper
Kopnyc xkapbIK INOD texHOIOIgNcBiHa Heri3dienreH xkapbIK KyecimEn Ka6DbIKTaJFaH.
KapbIK DINOITapBI OHTaINbI XkapbIKTbI, AETteri
WamdapdAn 10 cce apTBIK Y3AKTbIKTbI KaMTaMaCbI3
eTeDi XHe 90% 3NeKTP 3HeprNcBIn CaKTayFa
MymKiHNik bepedi.
UamnapbI aybICTbpy yuH, eKineTTI KocalkbI 6eIweKTe pOtaIbIbHa xaBaplaCbIb3.
J 1
20-10a
a a a a a a a a a a a a
pbi yioic j) j 5 o al g o aaii i
2ggo jS lj - ciaai jall g i, eLiau uai i aiiill
(1aiial o r g i - p jy jay dll gall
g y k ay el gaw bale wiy ojy cieiaia plsiuy
o y y aiaia ojrl qal y all uae
. y y aaii
n aill j! zw y aaiy all uae
J Lwll ic
y wjjl uil n jr jy jk
aillll 1 all jao a o jao all j
()
19
a a a a a a a a a a a a a a a a a a a a a a a a a a a a a a a a a a a a a a a a a a a a a a a a a a a a a a aaa
g j
a a a a a a a a a a a a a a a a a a a a a a a a a a a a
Aclawl jLac
acwall jic oai jie 1
Cuaai Jiu
22
Jl lgljki 1e ggsolal blaa. LED
oJiaoo ool 1 yj jn aod LED ool 1
cuaall n 10 jaiu w g
aull 90% 2y juy cuiw ay uall
aull
aull
1 1
aal aaiil (al) baii ai iaiy
:()
gblll 0ie gblil (OFF) 1
alill gblll beall (8a) ae nn jle nll
ylll g aiall blll jiall cebll yalld
20:1 baiil (s) ac
a 15:2 baiil (s) a
a 10:3 baiill (s) a j
5: 5
aalaae aee
joo 1000000000000000000000000000000000000000000000000
- gii 2.
a 1000000000000000000000000000000000000000000000000000000000000000000000000000000000
40 40 40 40 40 40 40 40 40 40 40 40 40 40 40 40 40 40 40 40 40 40 40 40 40 40 40 40 40 40 40 40 40 40 15
23
23
23
23
23
23
23
23
23
23
23
23
23
23
23
23
23
23
23
23
23
23
23
23
23
23
23
23
23
23
23
23
23
23
gul 3 10 T5
L5 L3 a
L5jL3 gaiill laii jgaiie
a.ii.0c.
e 1
:
T2 jllgbc bcl (ON)blal Jao Lioic 1iil culll gao laic eliae wu
必须使 a ≥ 0
i 1
a
aill
a
a a a a a a a a a a a a a a a a a a a a a a a a a a a a
i.
- ab cd alge 1. ab all al al al al
1Jg
Jaiyly baleill aie jil
i
OFF/ON 1 j
- aill(bai) 5 ai
jai 5 ai

4all (laill a) 4y yll j
0jllg jil 1 2 1 jll 1 jll jll jll jll jll jll jll jll jll jll jll jll jll jll jll jll jll jll jll jll jll jll jll jll jll jll jll jll jll jll jll jll jll jll jll jll jll jll jll jll jll jll jll jll jll jll jll jll jll jll jill jll jill jill jill jill jill jill jill

aistial (laillg) ae jlll jy jdydlj jll l aayloie . 1jldi jao Juee
j 1 j 1 j 1 j 1 j 1 j 1 j 1 j 1 j 1 j 1 j 1 j 1 j 1 j 1 j 1 j 1 j 1 j 1 j 1 j 1 j 1 j 1 j 1 j 1 j 1 j 1 j 1 j 1 j 1 j 1 j 1 j 1 j 1 j 1 j
1
j 1 1 1 1 1 1 1 1 1 1 1 1 1 1 1 1 1 1 1 1 1 1 1 1 1 1 1 1 1 1 1 1 1 1 1 1 1 1 1 1 1 1 1 1 1 1 1
山
J 1 J 1 J 1 J 1 J 1 J 1 J 1 J 1 J 1 J 1 J 1 J 1 J 1 J 1 J 1 J 1 J 1 J 1 J 1 J 1 J 1 J 1 J 1 J 1 J 1 J 1 J 1 J 1 J 1 J 1 J 1 J 1 J 1 J 1 J
1
billy
J 1
Jlll l 1 1 1 1 1 1 1 1 1 1 1 1 1 1 1 1 1 1 1 1 1 1 1 1 1 1 1
Jg 1
jll jll jll
1 1 1 1 1 1 1 1 1 1 1 1 1 1 1 1 1 1 1 1 1 1 1 1 1 1 1 1 1 1 1 1 1 1 1 1 1 1 1 1 1 1 1 1 1 1 1 1 1 1 1
j jlll l l l a 1
i k i i i i i i i i i i i i i i i i i i i i i i i i i i i i i i i i i i i i i i i i i i i i i i i i i i i i i i i i i i i
ii bia ii ii ii ii ii ii ii ii ii ii ii ii ii ii ii ii ii ii ii ii ii ii ii ii ii ii ii ii ii ii ii ii ii ii ii ii ii ii ii ii ii ii ii ii ii ii ii ii ii ii ii ii ii ii ii ii ii ii ii ii ii ii ii ii ii ii ii ii ii ii ii ii ii ii ii ii ii ii ii ii ii ii ii ii ii ii ii ii ii ii ii ii ii ii ii ii ii ii ii ii
山
a aai jui i1i 1s 100 all jn .
g Ljlc E bly si wiy g iially
g U jI lill g uill g. A biil a
g aai ci li sll j n o 5u iall
1 1 1 1 1 1 1 1 1 1 1 1 1 1 1 1 1 1 1 1 1 1 1 1 1 1 1 1 1 1 1 1 1 1 1 1 1 1 1 1 1 1 1