Multiherramienta Oscilante Flexitool 500 Oneclick - Washing machine CECOTEC - Free user manual and instructions
Find the device manual for free Multiherramienta Oscilante Flexitool 500 Oneclick CECOTEC in PDF.


| Product type | Multifunction oscillating tool |
| Brand | Cecotec |
| Model | Flexitool 500 Oneclick |
| Power supply | Mains 220-240 V, 50 Hz |
| Power | 500 W |
| Oscillation speed | 10,000 to 18,000 oscillations/min |
| Oscillation angle | 3.2° |
| Accessory change system | Oneclick, tool-free |
| Included accessories | Saw blades, sanding pads, scrapers |
| Compatible materials | Wood, metal, plastic, drywall |
| Cable length | 2 m |
| Weight | 1.5 kg |
| Dimensions (L×W×H) | 32 × 10 × 10 cm |
| Noise level | 90 dB(A) |
| Vibration | 10 m/s² |
| Maintenance | Clean the ventilation openings, wipe with a soft cloth |
| Safety | Wearing eye, hearing and respiratory protection recommended |
| Warranty | 2 years |
| Repairability | Spare parts available on the manufacturer's website |
| CE standards | CE certified, compliant with European directives |
Frequently Asked Questions - Multiherramienta Oscilante Flexitool 500 Oneclick CECOTEC
User questions about Multiherramienta Oscilante Flexitool 500 Oneclick CECOTEC
0 question about this device. Answer the ones you know or ask your own.
Ask a new question about this device
Download the instructions for your Washing machine in PDF format for free! Find your manual Multiherramienta Oscilante Flexitool 500 Oneclick - CECOTEC and take your electronic device back in hand. On this page are published all the documents necessary for the use of your device. Multiherramienta Oscilante Flexitool 500 Oneclick by CECOTEC.
USER MANUAL Multiherramienta Oscilante Flexitool 500 Oneclick CECOTEC
- Parts and components 169
- Before use 169
- Installation 170
- Operation 172
- Cleaning and maintenance 175
- Technical specifications 176
- Recycling of electrical and electronic equipment 177
- Technical support and warranty 177
- Copyright 177
- EU Declaration of Conformity 177
SOMMAIRE
EN · The coding in this manual is generic and applies to all code variants of the appliance.
- WARNING — Mandatory reading: Before using this tool or any of its accessories, read this manual and follow all Safety Rules and Operating Instructions.
- IMPORTANT — Scope of instructions: The warnings in this manual do not cover all possible situations. Operator common sense and caution are essential.
- WARNING — Eye protection: Always use appropriate eye protection. Projectiles can cause permanent eye damage. Prescription glasses are not a substitute for safety glasses.
- WARNING — Hearing protection: Use hearing protection, especially during prolonged periods of use or if the operation is noisy.
- WARNING — Respiratory protection: Use a dust mask designed for use with power tools in dusty environments.
- WARNING — Hazardous dust: Dust generated by sanding, sawing, grinding, drilling, and other construction activities can contain chemicals known to cause cancer, birth defects, or other reproductive harm (e.g., lead from lead-based
paints; crystalline silica from bricks, cement, and other masonry products; arsenic and chromium from chemically treated timber). The risk depends on the frequency and level of exposure. To reduce exposure, work in well-ventilated areas and use approved safety equipment, such as a dust mask capable of filtering microscopic particles.
- WARNING — Tool ventilation: Keep ventilation openings free of dust and obstructions. Obstruction causes overheating and a risk of fire.
- WARNING — Hand-arm vibration: This tool generates vibrations. To reduce the risk of vibration injury, take regular breaks, avoid applying excessive pressure, keep accessories sharp, and hands warm.
- WARNING — Dust extraction: Connect the tool to a dust extraction system suitable for the material and complying with local regulations. Keep filter elements correctly installed and clean.
- IMPORTANT — Noise and vibration (comparability note): The declared noise and vibration values are for comparing tools and may differ in actual use; exposure depends on working conditions and mode of use. Take reduction measures (PPE, breaks, reduced feed pressure).
ELECTRICAL SAFETY
- WARNING — Supply voltage: Before plugging in, check that the mains voltage and frequency match the tool's rating plate.
- WARNING — Circuit protection: To prevent electrical hazards, fire risk, or damage to the tool, use appropriate circuit protection.
- WARNING — Damaged power cable: To prevent electric shock or fire, immediately replace the power cable if it is worn, cut, or damaged in any way.
- WARNING — Unexpected restart: After a power cut and restoration, the tool may restart. Always switch off and disconnect the tool before carrying out any work on it.
SAFETY IN THE USE OF POWER TOOLS
- WARNING — Mandatory reading: Read all safety warnings and instructions. Failure to comply can result in electric shock, fire, and/or serious injury.
- IMPORTANT — Retention: Save these warnings and instructions for future reference.
WORK AREA SAFETY
- WARNING — Lighting and tidiness: Keep the work area clean and well lit. Cluttered or dark areas invite accidents.
- WARNING — Explosive atmospheres: Do not operate power tools in explosive atmospheres (presence of flammable liquids, gases, or dust). Sparks from the tool can ignite the dust or fumes.
- WARNING — Bystanders: Keep children and bystanders away while operating the tool. Distractions can make you lose control of the tool.
ELECTRICAL SAFETY
- WARNING — Suitable plugs: Tool plugs must match the socket. Never modify the plug or use adapters with earthed tools. Unmodified plugs and matching sockets reduce the risk of electric shock.
-
WARNING — Earthed surfaces: Avoid body contact with earthed surfaces (e.g., pipes, radiators, cookers, and refrigerators). The risk of electric shock increases if your body is earthed.
-
WARNING — Moisture: Do not expose the tool to rain or wet conditions. Water entering the tool increases the risk of electric shock.
- WARNING — Power cable: Do not misuse the cord. Do not use it for carrying, pulling, or unplugging the tool. Keep it away from heat, oil, sharp edges, or moving parts. Damaged or entangled cords can increase the risk of electric shock.
- WARNING — Outdoor use: When operating the tool outdoors, use an extension cable suitable for outdoor use. Using an outdoor-rated cable reduces the risk of electric shock.
- WARNING — Wet locations: If working in wet locations is unavoidable, use a supply protected by a residual current device (RCD). he use of a ground fault circuit interrupter (GFCI) reduces the risk of electric shock.
PERSONAL SAFETY
- WARNING — Operator attention and condition: Stay alert, watch what you are doing, and use common sense when operating a power tool. Do not use it if you are tired or under the influence of drugs, alcohol, or medication. A moment of distraction can cause serious injury.
- WARNING — Personal protective equipment (PPE): Always wear eye protection. Depending on the task, use an appropriate dust mask, non-slip safety footwear, helmet, and hearing protection. Correct use of PPE reduces injuries.
- WARNING — Complete stop before resting: Wait for the accessory to come to a complete stop before resting or carrying the tool.
-
WARNING — Unintentional start-up: Before connecting to the mains and/or installing the battery, or lifting/carrying the tool, ensure the ON/OFF switch is in the 'off' position. Carrying the tool with your finger on the switch or energising it with the switch in the 'on' position causes accidents.
-
WARNING — Keys and wrenches: Remove any adjusting key or wrench before switching on the tool. A wrench left attached to a rotating part can cause personal injury.
- WARNING — Grip and control: Maintain a firm grip, preferably with both hands, and adopt a stable posture, especially during plunge cuts or when the accessory may snag.
- WARNING — Posture and balance: Do not overreach. Always maintain a firm footing and balance. This allows for better control of the tool in unexpected situations.
- WARNING — Clothing and hair: Wear appropriate clothes. Do not wear loose clothing or jewellery. Keep hair, clothing, and gloves away from moving parts. Loose clothing, jewellery, or long hair can get caught in moving parts.
USE AND CARE OF THE POWER TOOL
- WARNING — Suitable tool: Do not force the tool. Use the correct tool for the application; it will do the job better and more safely at the rate for which it was designed.
- WARNING — Defective switch: Do not use the tool if the switch does not turn it on and off. Any tool that cannot be controlled with the switch is dangerous and must be repaired.
- WARNING — Disconnection before adjustments: Disconnect the plug from the mains and/or remove the battery before making adjustments, changing accessories, or storing the tool. These preventive measures reduce the risk of accidental start-up.
-
WARNING — Storage and untrained users: Store idle tools out of the reach of children and do not allow their use by persons unfamiliar with the tool or these instructions. Power tools are dangerous in the hands of untrained users.
-
WARNING — Tool maintenance: Maintain the tool in good condition. Check for misalignment or binding of moving parts, breakage of parts, and any other condition that may affect operation. If damaged, have the tool repaired before use. Many accidents are caused by poor maintenance.
- IMPORTANT — Cutting tools: Keep cutting tools sharp and clean. Well-maintained tools with sharp cutting edges are less likely to bind and are easier to control.
- WARNING — Use according to instructions: Use the tool, accessories, and tool bits in accordance with these instructions, taking into account the working conditions and the task to be performed.
- WARNING — Misuse: Use of the tool for operations different from those intended can lead to dangerous situations.
- WARNING — Insulated gripping surfaces: Hold the tool by the insulated gripping surfaces when there is a possibility that the cutting accessory may contact hidden wiring or its own cable. Contact with a “live” conductor can make exposed metal parts of the tool live and cause an electric shock to the operator.
- WARNING — Workpiece clamping: Use clamps or any other practical method to secure and support the workpiece on a stable platform. Holding it by hand or against your body makes it unstable and can lead to loss of control.
- WARNING — Accessories and rated speed: Use only accessories compatible with the tool holder and with a rated speed equal to or greater than the oscillations per minute (OPM) of the tool. Install them correctly and verify their fastening before use.
- WARNING — Accessory jamming: If the accessory jams, switch off, unplug, and wait for it to come to a complete stop before removing the tool from the workpiece or freeing the accessory.
- WARNING — Cable clear of cutting line: Keep the cable and any extension cable away from the accessory and the cutting path.
SERVICE
- WARNING — Qualified repair: Have the tool serviced and repaired by qualified personnel.
- WARNING — Identical spare parts: Use only spare parts identical to the original ones. This ensures that the safety characteristics of the tool are maintained.
EXTENSION CABLE SAFETY
- WARNING — Keep the extension cable clear of the work area: Position it so that it does not snag on the workpiece, the tool, or other obstructions while working.
- WARNING — Adequate gauge/cross-section: Always use an extension cable with a cross-section sufficient for the tool's rated current and the cable length. An undersized cable causes voltage drop, loss of power, and overheating. If in doubt, choose the next larger gauge. Note: In the AWG system, the smaller the number, the thicker the cable.
- WARNING — Condition and wiring: Ensure that the extension cable is correctly wired and in good condition. Replace any damaged extension cable or have it repaired by a qualified electrician before use. Protect the cable from sharp objects, excessive heat, and damp or wet areas.
- WARNING — Dedicated circuit and protection: Use a separate electrical circuit for power tools, with appropriate protection (delayed fuse or circuit breaker) in accordance with local regulations. Before connecting to the mains, verify that the tool's switch is in the OFF position and that
the supply voltage matches that indicated on the rating plate. Operating at a lower voltage can damage the motor.
- WARNING — Immediate replacement: Immediately repair or replace damaged or worn extension cables.
- WARNING — Selection according to table: Select the gauge/cross-section and length of the extension cable following the selection table corresponding to the cable length and the tool's rated current. In case of doubt, use the next larger gauge.
- WARNING — Outdoor use: For outdoor work, use an extension cable specifically designed for outdoor use (marked as suitable for outdoor use). These cables reduce the risk of electric shock in damp environments.
SYMBOLS
WARNING: Some of the following symbols may appear on the tool. Study them and learn their meaning. Correct interpretation of these symbols will allow for more efficient and safer use of this tool.
| Symbol | Meaning |
| V | Volts |
| A | Amperes |
| Hz | Hertz |
| W | Watts |
| kW | Kilowatts |
| μF | Microfarads |
| L | Litres |
| kg | Kilograms |
| D008G | Hours |
| Newtons per square centimetre | |
| Pascals | |
| Oscillations per minute | |
 | Minutes |
| Seconds | |
| Alternating current (AC) | |
| Three-phase alternating current | |
| Three-phase alternating current with neutral | |
| Direct current (DC) | |
| No-load speed | |
| Alternating or direct current | |
| Class II construction (double insulation) | |
| Protective earth (Class I tools) | |
| Revolutions or strokes per minute | |
| Diameter | |
| Off position | |
| Arrow | |
| Warning symbol | |
| Wear eye protection | |
| Wear protective gloves |
SPECIFIC SAFETY RULES
- WARNING — Know your oscillating multi-tool: Before plugging it into the mains, read and understand this
Instruction Manual. Learn its applications, limitations, and specific hazards. Complying with this rule reduces the risk of electric shock, fire, or serious injury.
- WARNING — Eye protection: ALWAYS wear approved safety glasses. Any power tool can project particles and cause permanent eye damage. Everyday glasses are not safety glasses.
- WARNING — Hands clear of the path: Always keep hands out of the saw blade's path. Avoid awkward positions where a sudden slip could cause your hand to move into the cutting area.
- WARNING — Workpiece clamping: Secure the workpiece with clamps or a vice. his is safer than holding it by hand and leaves both hands free to operate the tool.
- WARNING — Foreign objects: Check for nails or foreign objects in the area of the workpiece to be cut or sanded.
- WARNING — Accidental start-up: To prevent injuries from unintentional start-ups, always unplug the tool before installing or removing an accessory.
- WARNING — Dull blades: Do not use dull blades. They cut slower, leave rough cuts, and break easily due to pressure and overheating. Furthermore, they overload the motor and cause earlier tool failure.
- WARNING — Damaged or bent blades: Do not use damaged or warped blades. They are fragile and can break easily, causing injury to the operator.
- WARNING — Hot blade: Do not touch the blade immediately after using the tool. It will be extremely hot and can cause burns.
- WARNING — Compatible accessories: Use only accessories designed for this tool.
- WARNING — Plunge cuts and blind areas: Exercise extreme caution when making plunge cuts in walls, floors, or ceilings. Previously check for hidden wires or pipes and limit the cutting depth; where possible, use a depth stop.
RETAIN THESE INSTRUCTIONS FOR FUTURE REFERENCE.
CONSIGNES DE SÉCURITÉ GÉNÉRALES
ALGEMENE VEILIGHEIDSWAARSCHUWINGEN
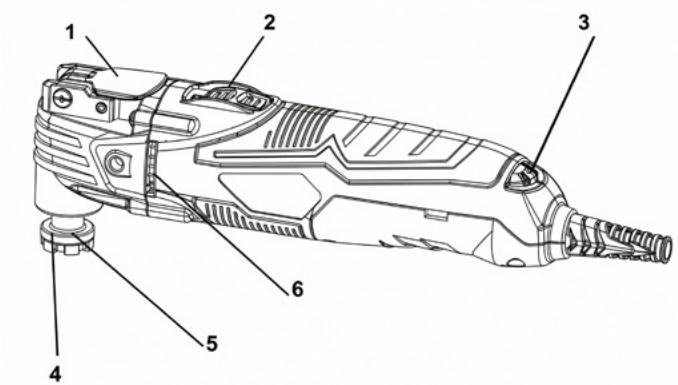
- Accessory holder release lever
- ON/OFF switch
- Speed control wheel
- Accessory holder open
- Accessory holder closed
- Ventilation grilles
- 2" rigid scraper blade
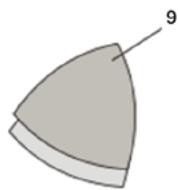
- Triangular sanding pad
- Triangular sanding sheets (60 grit, 80 grit, 100 grit, 120 grit)
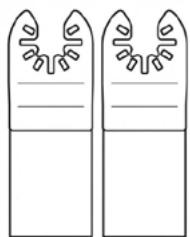
- 34 mm cutting blade (metal)
- 34 mm cutting blade (wood)
- 20 mm cutting blade (wood)
- 10 mm cutting blade (wood)
- 63.5 mm ceramic semi-circular saw blade (exclusive to reference EU01_127953 - FlexiTool 500 OneClick oscillating multi-tool)
- ∅88 mm semi-circular saw blade (wood)
Note:
The graphics in this manual are schematic representations and may not exactly match the product.
2. BEFORE USE
- This appliance comes in a packaging designed to protect it during transport. Remove the appliance from its box. You can keep the original box and other packaging materials in a safe place to prevent damage to the appliance if you need to transport it in the future. In case the original packaging is disposed of, make sure all packaging materials are recycled accordingly.
- Check that all parts and components are included and in good condition. If any of them are missing or damaged, please contact Cecotec's Official Technical Support Service immediately.
Box contents for reference EU01_111281 - FlexiTool 300 OneClick oscillating multi-tool:
- Oscillating multi-tool
- Vacuum cleaner connector
- 1 x 10 mm cutting blade (wood)
- 1 x 20 mm cutting blade (wood)
ENGLISH
- 1 x 34 mm cutting blade (wood)
- 1 x 34 mm cutting blade (metal)
- 1 x 52 mm stainless steel scraper blade
- 1 x ø88 mm semi-circular saw blades
- 1 x Triangular sanding pad
- 5 x P60 sanding sheets
- 5 x P80 sanding sheets
- 5 x P100 sanding sheets
- 5 x P120 sanding sheets
- Instruction manual
Box contents for reference EU01_127953 – FlexiTool 500 OneClick oscillating multi-tool:
- Oscillating multi-tool
- Vacuum cleaner connector
- 1 x 10 mm cutting blade (wood)
- 1 x 20 mm cutting blade (wood)
- 1 x 34 mm cutting blade (wood)
- 1 x 34 mm cutting blade (metal)
- 1 x 52 mm stainless steel scraper blade
- 2 x ∅88 mm semi-circular saw blades
- 1 x ø63.5 mm ceramic semi-circular saw blade
- 1 x Triangular sanding pad
- 5 x P60 sanding sheets
- 5 x P80 sanding sheets
- 5 x P100 sanding sheets
- 5 x P120 sanding sheets
- Instruction manual
- Do not remove the product's serial number in order to keep proper traceability if technical assistance is required.
3. INSTALLATION
Accessory installation
⚠ WARNING. Accidental start-up: Always disconnect the tool from the mains before installing or removing accessories or triangular sanding sheets. Failure to do so can result in accidental start-up of the tool and cause serious injury.
All accessories are installed on this multi-tool in a similar way. To describe the assembly, the triangular sanding pad and a metal cutting blade are illustrated. This multi-tool is designed for tool-free accessory changes, for both open-backed and closed-backed accessories. No tools are required for open-backed accessories.
Procedure
- Lift the Accessory holder release lever upwards and towards the front of the tool until it stops. This moves the Accessory holder to the open position. Fig. 2
Note: This operation opens the holder to accept the accessory.
CAUTION. Pinch hazard: Keep fingers away from the Accessory holder during opening and closing.
- Insert the accessory into the open Accessory holder.
- Align the slots and holes of the accessory with the mounting teeth/pins of the holder.
Note: The slots and holes of the accessory must engage with the teeth/pins of the holder for the accessory to be correctly secured.
WARNING: If the lever offers resistance when closing, slightly remove the accessory and reposition it until the slots and holes engage correctly with the teeth/pins.
- Return the Accessory holder release lever to its initial position to close the mechanism (Accessory holder closed) and secure the accessory.
Note: Check that the mounting pins of the holder remain aligned with the slots and holes once the holder is closed.
WARNING. Incomplete lock: Verify that the lever has fully returned to its locked position and that the Accessory holder is closed. (If your tool shows LOCK/UNLOCK pictograms, confirm that the LOCK mark is aligned.)
- Pull test: Firmly pull the accessory to confirm that it is correctly secured before starting the tool.
Compatibility with closed-back accessories
The mounting system for closed-back accessories on the Accessory holder allows this type of accessory to be used with this oscillating multi-tool. For convenience, open-backed accessories can also be used.
Installation of triangular sanding sheets
- Install the triangular sanding pad (1) on the tool (2). Fig. 3
- Firmly press the triangular sanding sheets onto the triangular sanding pad (hook-and-loop fastening system).
Notes
a) Position the triangular sanding sheets by aligning the holes on the sheet with the corresponding holes on the triangular sanding pad.
b) Firmly press the triangular sanding sheets onto the triangular sanding pad to ensure correct fastening.
- To remove the triangular sanding sheets, simply peel the sheet off the triangular sanding pad. Fig. 4
ENGLISH
4. OPERATION
ON/OFF switch
- To switch the tool on, slide the ON/OFF switch towards the front of the tool. Fig. 5.
- To switch it off, slide the ON/OFF switch towards the rear of the tool.
Speed control wheel
The tool's speed can be adjusted between 10,000 OPM and 23,000 OPM by rotating the speed control wheel located at the rear of the tool body. Fig. 6.
- To increase the speed, turn the speed control wheel to the right.
- To decrease the speed, turn it to the left.
Note: Speed 1 is the lowest. 6 is the highest. The optimum setting varies depending on the type of accessory used, the work surface, and the complexity of the project. For general recommendations, refer to the table on the following page.
| Project | Accessory | Spin speed |
| Balsa wood | Wood saw blade | Low |
| Plasterboard | Semi-circular blade | Maximum |
| Window restoration | Semi-circular blade | Medium |
| Door jamb | Wood saw blade | Maximum |
| Door architrave | Wood saw blade | Medium / Maximum |
| Wooden dowels | Wood saw blade | Maximum |
| Floor grille | Wood saw blade | Medium / Maximum |
| PVC pipe | Wood saw blade | Medium |
| Glued flooring | Rigid scraper blade | Medium |
| Sanding | Triangular sanding pad + triangular sanding sheets | Medium / Maximum |
Mandatory reading before use Before using this oscillating multi-tool, read the chapters in the manual titled "GENERAL SAFETY WARNINGS", "POWER TOOL SAFETY", "SPECIFIC SAFETY RULES", and "SYMBOLS".
Pre-use checklist
- Protective glasses, safety goggles, or face shield worn.
- Hearing protection worn.
- The saw blade or triangular sanding sheets are in good condition.
- The accessory is correctly secured to the tool's accessory holder.
Failure to comply with these instructions significantly increases the risk of injury.
Cutting flush with the door frame
The oscillating multi-tool can be used to cut the door frame (jamb and architrave/trim) flush, allowing new flooring to fit cleanly underneath. To demonstrate the procedure, a floor tile offcut is used as a guide.
- Install a plunge-cut wood saw blade onto the tool. Note: The blade should be mounted centrally to the tool body ( 0° position) and NOT in the 90° position.
- Place a floor tile offcut (1) on the flooring, approximately 1/2" (12.5 mm) from the door jamb (2). Fig. 7
Note: Ensure the "good" side of the tile faces upwards to provide a smooth surface for the blade to slide along. - Position the tool so that the saw blade (3) lightly touches the surface of the tile and the cutting teeth do NOT yet touch the surface to be cut.
- Set the speed control wheel to the highest position.
- Slide the ON/OFF switch to the 'on' position.
- Once the tool reaches the selected speed, carefully plunge the blade into the door jamb while sliding it along the tile. Note: Hold the tool firmly and do not apply excessive forward pressure on the blade during cutting, as this could cause excessive vibration.
- Continue making several plunge cuts until the bottom of the jamb and architrave are completely cut, and the loose pieces (4) can be easily removed.
For carpet: follow the same procedure using a thicker spacer, of the same thickness as the carpet to be installed.
Cutting a hole in a wooden floor
This oscillating multi-tool can be used to cut a hole in wooden flooring to install a ventilation grille.
- Install a plunge-cut wood saw blade onto the tool.
Note: The blade should be mounted centrally to the tool body ( 0° position) and NOT in the 90° position. - Place the ventilation grille on the floor and, using a soft-lead pencil, mark the required rectangular hole on the flooring. Fig. 8
- Position the saw blade near the floor surface, approximately in the centre of one of the cut lines.
- Set the speed control wheel to a medium speed.
- Slide the ON/OFF switch to switch on the tool.
Note: To make the initial plunge cut, hold the tool and blade at a 45° angle to the floor so that the corner of the blade penetrates the wood. - Holding the tool firmly, slowly plunge the corner of the blade into the flooring until it cuts through. Once the plunge cut is complete, adjust the speed to the highest setting and extend the cut to the corner of the rectangle.
ENGLISH
- Slide the ON/OFF switch to the 'off' position, remove the tool from the cut, and proceed in the opposite direction to complete the first side of the rectangle.
- Repeat steps 4, 5, and 6 to cut the other three sides of the rectangle.
- When all cuts are finished, use a flat-head screwdriver to carefully pry and remove the cut-out piece from the flooring.
Note: DO NOT use the saw blade to pry; it could break. If the piece does not come away easily, verify that each cut line fully reaches the corners of the rectangle.
Cutting a hole in plasterboard
This oscillating multi-tool can be used to cut a hole in plasterboard to install a socket box.
- Install the 1 1/4" wood and plasterboard saw blade onto the tool.
Note: The blade should be centred to the tool body and NOT installed in the 90° position. - Place the socket box on the plasterboard and, using a soft-lead pencil, mark the required rectangular hole on the surface (1). Fig. 9
- Position the corner of the blade near the plasterboard, approximately in the centre of one of the cut lines.
- Set the speed control wheel to the highest speed.
- Slide the ON/OFF switch to the 'on' position.
- Once the tool reaches maximum speed, carefully plunge the blade (plunge cut) until it cuts through the plasterboard. Complete the cut to the corner of the rectangle.
Note: Hold the tool firmly and do not apply excessive pressure on the blade during cutting.
- Slide the ON/OFF switch to the 'off' position, remove the tool from the cut, and proceed in the opposite direction to complete the first side of the rectangle.
- Repeat steps 4, 5, and 6 to cut the other three sides of the rectangle.
- When all cuts are finished, use a flat-head screwdriver to carefully pry and remove the cut-out piece from the plasterboard.
Note: DO NOT use the saw blade to pry; it could break If the piece does not come away easily, verify that each cut line fully reaches the corners of the rectangle.
Using the detail sanding accessory
- Install the triangular sanding pad onto the oscillating multi-tool.
- Install the triangular sanding sheets onto the triangular sanding pad.
- Set the speed control wheel between 5 and 6.
- Slide the ON/OFF switch to the 'on' position.
This tool is designed for detail sanding on small surfaces. Place the abrasive surface in contact with the workpiece to be sanded and keep the tool moving to avoid marks or grooves.
Use coarse-grit triangular sanding sheets and low speeds for roughing and removing previous finishes. Use fine grits and high speeds to achieve a smoother finish.
Using the scraper blade
- Install the rigid scraper blade onto the oscillating multi-tool.
- Set the speed control wheel to 6.
- Slide the ON/OFF switch to the 'on' position.
To scrape old finishes or adhesive, place the bottom side of the blade flat on the work surface and slightly raise the rear of the tool so that the blade forms a very small angle with the surface. Advance slowly into the material to be removed. Do not force the tool; a slow feed rate improves the cutting action and reduces the risk of marking the workpiece.
To cut carpet with the rigid scraper blade, place a piece of scrap material under the carpet in the cutting area. Set the speed to 6, orient the tool so that the blade is at a right angle (perpendicular) to the carpet, and plunge the blade into the carpet.
5. CLEANING AND MAINTENANCE
General maintenance
Warning:
- During maintenance operations, only use spare parts identical to the original ones. The use of any other part can create a dangerous situation or cause damage to the product.
- Do not use solvents to clean plastic parts. Many commercial solvents damage plastics.
- For cleaning, use a clean cloth to remove dirt, dust, oil, and grease.
- Prevent liquids such as brake fluid, petrol, petroleum-based products, and penetrating oils from coming into contact with plastic parts. These products contain chemicals that can damage, weaken, or destroy plastic.
- Do not misuse power tools; abusive practices can damage both the tool and the workpiece.
- Do not attempt to modify the tool or manufacture accessories. Any alteration or modification constitutes misuse and can create a dangerous condition with a risk of serious injury. Furthermore, it voids the warranty.
Lubrication
The bearings in this tool are factory-lubricated with a sufficient quantity of high-quality lubricant for the entire lifespan of the product under normal use conditions. Therefore, no additional lubrication is required.
6. TECHNICAL SPECIFICATIONS
| Product reference | EU01_111281 / EU01_127953 |
| Product | FlexiTool 300 OneClick / FlexiTool 500 OneClick |
| Voltage | 230-240 V |
| Frequency | 50 Hz |
| Power input (W) | EU01_111281 - FlexiTool 300 OneClick: 300 WEU01_127953 - FlexiTool 500 OneClick: 500 W |
| Protection class | Class II |
| No-load speed (OPM): | 8000-18000 OPM |
| Oscillation angle (°) | 3.2° |
| Mass (kg) | 1.6 kg |
| Cable length (m) | 2 m |
| Maximum accessory dimensions | 144x38 mm |
| Sound pressure level LpA (dB(A)) | 91 dB |
| Sound power level LwA (dB(A)) | 99 dB |
| LpC,peak (dB) | 3 dB |
| Hand-arm vibration ah,eq — cutting (m/s2) | 5.81 m/s2 |
| Hand-arm vibration ah,eq — sanding (m/s2) | 5.81 m/s2 |
| Dust extraction port (diameter) | ∅ 38 mm |
- Noise: The declared sound emission values (LpA, LwA) with their uncertainty are for comparing tools; they may differ under actual use conditions. Use hearing protection when appropriate.
- Vibration: The declared ah,eq values (with uncertainty) have been measured according to EN 62841-1. Actual daily exposure depends on use and work procedures; the responsible person must assess and implement reduction measures.
- Dust: Use a vacuum cleaner with the specified filter class and maintain the extraction system to preserve its effectiveness.
Technical specifications may change without prior notice to improve product quality.
Made in China | Designed in Spain
7. RECYCLING OF ELECTRICAL AND ELECTRONIC EQUIPMENT

This symbol indicates that, according to the applicable regulations, the product and/or batteries must be disposed of separately from household waste. When this product reaches the end of its shelf life, you should dispose of the batteries/accumulators and take them to a collection point designated by the local authorities.
For detailed information on how to properly dispose of electrical and electronic appliances and/or batteries, consumers should contact their local authorities.
Information regarding national packaging recycling systems and their marking can be found on our website.
Compliance with the above guidelines will help protect the environment.
8. TECHNICAL SUPPORT AND WARRANTY
Cecotec shall be liable to the end user or consumer for any lack of conformity that exists at the time of product delivery under the terms, conditions and deadlines established by applicable regulations.
Repairs should be carried out by qualified personnel.
If you detect any problem with the product or have any queries, please contact Cecotec's Official Technical Support Service at +34 96 321 07 28.
9. COPYRIGHT
The intellectual property rights over the texts in this manual belong to CECOTEC INNOVACIONES, S.L. All rights reserved. The content of this publication may not, either in part or in its entirety, be reproduced, stored in a retrieval system, transmitted or distributed by any means (electronic, mechanical, photocopying, recording or similar) without prior authorisation from CECOTEC INNOVACIONES, S.L.
10. EU DECLARATION OF CONFORMITY
MANUFACTURER: CECOTEC INNOVACIONES S.L
ADDRESS: Av. Reyes Católicos, 60, 46910, Alfafar, Valencia (Spain)
DESCRIPTION: Oscillating multi-tool
PRODUCT IDENTIFICATION: EU01_111281 - FlexiTool 300 OneClick Oscillating Multi-tool
EU01_127953 - FlexiTool 500 OneClick Oscillating Multi-tool
ENGLISH
FUNCTION: Multi-function
MODEL: EU01_111281 and EU01_127953
It certifies that the product described has been designed, manufactured and tested and complies with all applicable requirements.
EU DIRECTIVES IMPLEMENTED:
- Directive 2006/42/CE on machinery.
- Directive 2014/30/EU on the harmonisation of the laws of the Member States relating to electromagnetic compatibility.
- Directive 2011/65/EU and delegated directive (EU) 2015/863 on the restriction of the use of certain hazardous substances in electrical and electronic equipment.
APPLICABLE HARMONISED NORMS:
- EN 62841-1:2015+ A11
- EN 662841-2-4:2014
- EN ISO 12100:2010
- EN IEC 55014-1:2021
- EN IEC 55014-2:2021
- EN IEC 61000-3-2:2019+A1
- EN 61000-3-3:2021+A1+A2
- IEC 62321-2: 2021; IEC 62321-3-1:2013; IEC 62321-4:2013+A1:2017; IEC 62321-5:2013;
- IEC 62321-6:2015; IEC 62321-7-1:2015; IEC 62321-7-2:2017; IEC 62321-8:2017.
1. PIÈCES ET COMPOSANTS
Image 1
- IEC 62321-6:2015; IEC 62321-7-1:2015; IEC 62321-7-2:2017; IEC 62321-8:2017.
PORTUGUÊS
1. PEÇAS E COMPONENTES
Figura 1
AAN/UIT-schakelaar (ON/OFF)
6. TEKNIK ÖZELLIKLER
Y:Y. Y1-00.12 EN IEC -
A1+2:2·19-71···EN IEC -
A 2 +A1+ 3 : 4 · 5 1- 6 -71···EN -
:0:Y·14-77771 IEC:A1:Y·1V+ε:Y·14-77771 IEC:1:Y·14-77771 IEC:Y:Y·11-77771 IEC -
A:Y·1V-77771 IEC :Y:Y·1V-Y-77771 IEC :1:Y·10-Y-77771 IEC :7:Y·10-77771 IEC -


10

12

13

14

15
Fig./Img./Abb./Afb./Rys.1

Fig./Img./Abb./Afb./Rys. 2

Fig./Img./Abb./Afb./Rys. 3

Fig./Img./Abb./Afb./Rys. 4
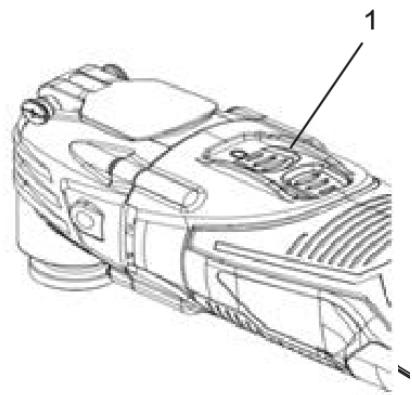
Fig./Img./Abb./Afb./Rys. 5
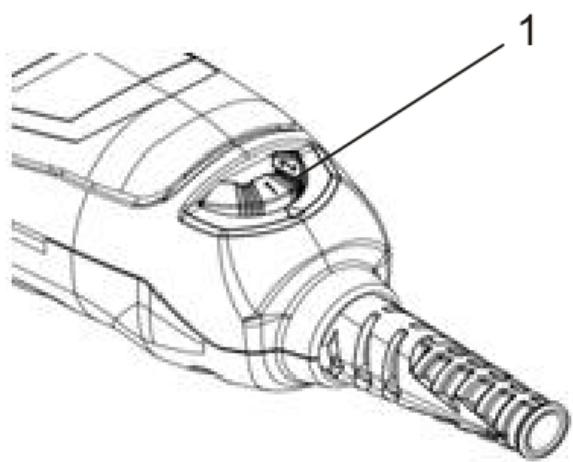
Fig./Img./Abb./Afb./Rys. 6

Fig./Img./Abb./Afb./Rys. 7

Fig./Img./Abb./Afb./Rys. 8
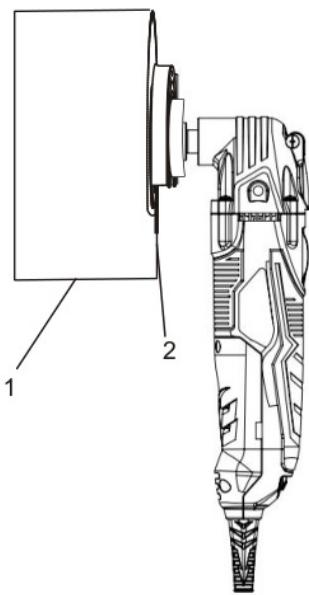
Fig./Img./Abb./Afb./Rys. 9
www.cecotec.es


- SOMMAIRE
- ELECTRICAL SAFETY
- SAFETY IN THE USE OF POWER TOOLS
- WORK AREA SAFETY
- PERSONAL SAFETY
- USE AND CARE OF THE POWER TOOL
- SERVICE
- EXTENSION CABLE SAFETY
- SYMBOLS
- SPECIFIC SAFETY RULES
- CONSIGNES DE SÉCURITÉ GÉNÉRALES
- ALGEMENE VEILIGHEIDSWAARSCHUWINGEN
- NOTE
- BEFORE USE
- BOX CONTENTS FOR REFERENCE EU01_111281 - FLEXITOOL 300 ONECLICK OSCILLATING MULTI-TOOL
- ENGLISH
- BOX CONTENTS FOR REFERENCE EU01_127953 – FLEXITOOL 500 ONECLICK OSCILLATING MULTI-TOOL
- INSTALLATION
- ACCESSORY INSTALLATION
- PROCEDURE
- COMPATIBILITY WITH CLOSED-BACK ACCESSORIES
- INSTALLATION OF TRIANGULAR SANDING SHEETS
- NOTES
- OPERATION
- ON/OFF SWITCH
- SPEED CONTROL WHEEL
- PRE-USE CHECKLIST
- CUTTING FLUSH WITH THE DOOR FRAME
- CUTTING A HOLE IN A WOODEN FLOOR
- CUTTING A HOLE IN PLASTERBOARD
- USING THE DETAIL SANDING ACCESSORY
- USING THE SCRAPER BLADE
- CLEANING AND MAINTENANCE
- GENERAL MAINTENANCE
- WARNING
- LUBRICATION
- TECHNICAL SPECIFICATIONS
- RECYCLING OF ELECTRICAL AND ELECTRONIC EQUIPMENT
- TECHNICAL SUPPORT AND WARRANTY
- COPYRIGHT
- EU DECLARATION OF CONFORMITY
- EU DIRECTIVES IMPLEMENTED
- APPLICABLE HARMONISED NORMS
- PIÈCES ET COMPOSANTS
- IMAGE 1
- PORTUGUÊS
- PEÇAS E COMPONENTES
- FIGURA 1
- AAN/UIT-SCHAKELAAR (ON/OFF)
- TEKNIK ÖZELLIKLER
Brand : CECOTEC
Model : Multiherramienta Oscilante Flexitool 500 Oneclick
Category : Washing machine