Mini Air Max - Washing machine CECOTEC - Free user manual and instructions
Find the device manual for free Mini Air Max CECOTEC in PDF.


| Product type | Portable air inflator |
| Brand | Cecotec |
| Model | Mini Air Max |
| Intended use | Inflating tires, balls, inflatable mattresses, and other items |
| Power supply | Built-in rechargeable battery |
| Battery type | Lithium-ion |
| Charging port | USB-C |
| Display | Real pressure display |
| Pressure units | PSI/BAR, switch via button |
| Control buttons | On/off, increase/decrease pressure, unit/lights switch |
| Battery level indicator | Yes |
| Integrated lighting | Yes, LED lamp |
| Included accessories | Valve adapter |
| Safety | Do not use in an explosive atmosphere |
| Charging temperature | Between 0 °C and 35 °C |
| Recommended continuous use duration | 10 minutes |
| Cooling before next use | 30 minutes |
| Maintenance | Clean with a dry cloth, do not immerse in water |
| Repairability | Contact the official Cecotec technical service |
Frequently Asked Questions - Mini Air Max CECOTEC
User questions about Mini Air Max CECOTEC
0 question about this device. Answer the ones you know or ask your own.
Ask a new question about this device
Download the instructions for your Washing machine in PDF format for free! Find your manual Mini Air Max - CECOTEC and take your electronic device back in hand. On this page are published all the documents necessary for the use of your device. Mini Air Max by CECOTEC.
USER MANUAL Mini Air Max CECOTEC
Read these instructions thoroughly before using the appliance. Keep this instruction manual for future reference or new users.
This appliance can be used by children aged 8 years and above and people with reduced physical, sensory, or mental capabilities or lack of experience and knowledge if they have been given supervision or instruction concerning use of the appliance in a safe way and understand the hazards involved. Children must not play with the appliance. Cleaning and user maintenance should not be carried out by unsupervised children.
The appliance must be powered at a low safety voltage as stated on the marking. Ensure that the mains voltage matches the voltage specified on the device rating label and that the plug is earthed.
This appliance is designed for domestic use only and is not intended for bars, restaurants, farmhouses, hotels, motels, and offices.
For hygienic reasons, do not share this appliance with other people.
Do not immerse the cable, plug, or any other non-removable part of the device in water or any other liquid or expose electrical connections to water. Make sure your hands are dry before handling the plug or switching on the device.
WARNING: keep the appliance dry.
When switched on, the appliance must never come in contact with the hair on your head or eyelashes to prevent any injury hazard as well as to prevent blockage or damage to the appliance.
Do not exchange or manipulate any part of it. Otherwise, there is risk of electric shock.
People with reduced immunological response or that suffer from diabetes mellitus, haemophilia or immunodeficiency must consult their doctor before using the device.
- Use the device only for hair removal and following the instructions in this manual.
- Do not remove hair from areas with open wounds, cuts, burns, warts, moles, sun burnt skin or varicose veins.
- Do not use the appliance if you are suffering from a skin irritation, skin infections like psoriasis or eczema.
- Do not use the appliance for removing hair from your face, head, chest, eyebrows, or eyelashes.
- The appliance has batteries that cannot be replaced.
Battery instructions
- This appliance includes a Li-ion battery. Do not incinerate or expose it to high temperatures, as it may explode.
- The battery may leak under extreme conditions. Do not touch any liquid that leaks from the battery. If the liquid gets into contact with skin, wash immediately with soap and water. If the liquid gets into the eyes, wash them immediately with clean water for a minimum of 10 minutes and seek medical attention. Wear gloves to handle the battery and dispose of it immediately in accordance with local regulations.
Before a new battery is used or the battery is used for the first time after long-term storage, fully charge the battery. - When the device is stored and not used for long periods of time, ensure that the battery pack is fully charged.
- Battery ingestion can cause burns, soft tissue perforation and death. Severe burns may occur within two hours of ingestion.
- In case of battery ingestion, please seek medical help immediately.
1. PARTS AND COMPONENTS
Fig. 1
- Air outlet
- Heat dissipation outlet
- Actual pressure display
- Pressure increase button
- Power button
- Battery level indicator
- Pressure unit indicator (PSI/BAR)
- Operating mode indicator
- Pressure decrease button
- Unit/light switch button
- Type-C charging port
- Light
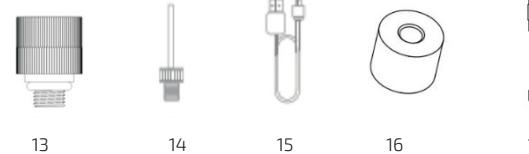
Fig. 2
-
Presta to Schrader valve adapter
-
Inflation needle
-
Type-C charging cable
-
Sealing ring
-
Schrader valve nozzle
NOTE:
The graphics in this manual are schematic representations and may not exactly match the product.
2. BEFORE USE
- This appliance is packaged in a way as to protect it during transport. Take the appliance out of its box and remove all packaging materials. You can keep the original box and other packaging elements in a safe place to prevent damage to the appliance if you need to transport it in the future. If you wish to dispose of the original packaging, make sure all packaging materials are recycled accordingly.
- Make sure all parts and components are included and in good conditions. If there is any piece
- Missing or in bad conditions, contact the official cecotec technical support service immediately. Do not remove the serial number of the appliance in order to keep a correct traceability of it in case of assistance.
Before using the device, check the required pressure of the object to be inflated to avoid the risk of explosion.
Box content
-
Instruction manual
Inflation needle
Tyre inflation nozzle
Schrader valve
Presta valve
Type-C charging cable
3. OPERATION
Warning
If the object to be inflated already has air pressure, follow the steps below:
- Turn on the pump.
Set the pump to operate manually.
- Then attach the pump to the object's valve and start inflating.
On the other hand, if the object is completely deflated, follow the steps below:
-
Attach the corresponding nozzle of the pump to the object's valve
-
Run the pump to inflate the desired object.
3.1 Inflation procedure for Presa valve tyres
Follow the order shown in figure 3
Fig. 3 key
-
Nut
-
Sealing ring
-
Valve body
-
Place the sealing ring over the valve body, making sure that the small opening faces outwards
-
Secure the nut at the top and tighten it firmly to ensure a good seal.
3.2 Inflation procedure for Schrader valve tyres
Follow the order shown in figure 4.
Fig. 4 key
1.
-
Sealing ring
-
Valve core
-
Valve body
-
Place the sealing ring over the valve body, making sure that the large opening faces outwards.
-
Insert the valve core in its position.
-
Secure the nut at the top and tighten it firmly to ensure a good seal.
Note: If you use the device for 3 minutes straight, you must leave it to stand for 8 minutes before using it again. Be careful, as the air outlet may become hot; do not touch it.
3.3 Use
-
Remove the device from the packaging
-
Screw the outer thread of the hose or nozzle onto the outlet side of the hose
-
Press and hold the power button for 3 seconds to turn on the device
-
Attach the outlet nozzle onto the corresponding device.
-
Short press the unit/light switch button to change between PSI and BAR pressure units.
-
Pressure setting: Use the +/- buttons to set the desired pressure value.
-
To start inflating, press the power button briefly
-
Once inflation is complete, press and hold the power button to turn off the device, and remove the hose.
-
Store the device in a dry place.
Note
- If you press the unit/light switch button briefly, you will change the pressure unit; if you press and hold it for 3 seconds, you will switch on the light (to switch it off, press and hold it again for 3 seconds).
- Press and hold the + or - button to switch between Bike mode and Motorbike mode.
3.4 Charging the pump
- Use a 5 V/1.5 A adapter and plug it into the charging port (type C).
- At this time, to indicate that the device is charging, the bars of the battery level indicator will light up cyclically.
- When the battery is fully charged, all bars of the battery level indicator will stay on.
Note: When the battery level is low, the battery level indicator will flash, but the pump will continue to operate until the battery is completely depleted. If this happens, charge it.
Note: Prolonged idle time may damage the battery. It is recommended to recharge the pump at least every three months.
3.5 Using the accessories
- Mountain bikes, electric bikes, motorbikes and cars are usually equipped with Schrader valves. Use the nozzle and attach the device directly.
- To inflate the tyres of road bikes and some mountain bikes, you need to attach the Presta to Schrader valve adapter to the pump hose.
- To inflate balls such as basketballs or soccer balls, use the inflation needle. Attach the needle to the pump hose, then insert the needle into the air opening to inflate the ball.
3.6 Pressure testing
-
Turn on the device and attach it to the object to be pressure tested
-
The pressure value shown on the display indicates the actual pressure of the object.
3.7 Recommended pressure
To ensure safety, check the pressure required for the inflatable object before using the product. Avoid over-inflating it, otherwise it may explode.
Note: Before setting the inflation pressure, make sure that the correct unit of measurement has been selected. Unit conversion: 1 bar = 14.5 psi, 1 bar = 100 kPa.
Table of recommended inflation pressures for common items
| Category | Type of object | Recommended pressure range |
| Bike | Folding bike tyres | 45-50 psi |
| 12", 14" and 16" bike tyres | 30-50 psi | |
| 20", 22" and 24" bike tyres | 45-65 psi | |
| 26", 27" and 29" bike tyres | 100-110 psi | |
| 700c road bike hard tyres | 100-130 psi | |
| 700c road bike soft tyres | 100-130 psi | |
| Motorbike | Electric motorbike tyres | 30-43 psi |
| Ball | Basketball | 7-9 psi |
| Soccer ball | 8-16 psi | |
| Volleyball | 4-5 psi | |
| Rugby ball | 2-14 psi |
3.8 Selecting a mode
Press and hold the + and - buttons to switch between modes.
Note: The factory preset pressure is 45 psi, you can adjust it freely within the range of 3-120 psi.

Bike mode: The default value is 45 psi, with an adjustable range of 3-120 psi.

Motorbike mode: The default value is 35 psi, with an adjustable range of 26-44 psi.

If you press the unit/light switch button briefly, you will change the pressure unit; if you press and hold it for 3 seconds, you will switch on the light (to switch it off, press and hold it again for seconds).
3.9 Setting the default value
After selecting the desired mode, press the + button briefly to gradually increase the pressure. If you hold it down, this value will increase faster.
After selecting the desired mode, you can decrease the default pressure if needed. To do this, first press the + button. When the pressure value flashes on the display, press the - button to decrease it.
3.10 Starting the inflation process
-
To start inflating, press the power button briefly.
-
The display will show pressure changes in real time.
-
Please note that inflation generates noise levels of 75-80 decibels, so take proper precautions.
Note: Prolonged operation of this device may cause a significant rise in its temperature; avoid touching it.
3.11 Stopping the inflation process
The device will stop automatically when the pressure reaches the set value.
During the inflation process, you can also stop the device manually by pressing the power button
Warning: Please note that inflatable products such as balloons, toy balls, floats, etc. have a lower inflation pressure than the minimum pressure value of the device and should therefore not be used for these cases.
3.12 Charging time
When the device is fully charged and the room temperature is 25°C , it can be operated continuously for about 2 minutes. Increasing the pressure or decreasing the room temperature may reduce this time.
3.13 Switching off the pump
- When the device is switched on, press and hold the power button for 3 seconds to switch it off.
Note: Please note that the device will also switch off automatically after 120 seconds of inactivity.
- Press the unit/light switch button to turn the light on or off.
Note: If the light is not on and you do not perform any operation, the device will turn off after 120 seconds of inactivity.
4. CLEANING AND MAINTENANCE
- Make sure that the pump is switched off and disconnected before carrying out any cleaning or maintenance work.
- Use a soft, dry cloth to clean the surface of the pump. If necessary, dampen the cloth slightly with water. Avoid using chemicals or solvents that may damage the finish.
- Check all parts; verify that nozzles, hoses and sealing rings are in good condition. Replace any damaged components to prevent leakage or malfunction.
- Never immerse the pump in water or allow liquid to enter the electrical components.
- Store the pump in a dry place, away from direct sunlight, extreme temperatures and humid environments.
- The storage temperature of the device must not be lower than -10 °C and not higher than 60 °C. Both overheating and extreme cold can shorten its service life and damage the built-in battery.
- Keep the device away from moisture, strong impacts, water and sand.
- The device has a non-removable lithium battery. Do not burn or dispose of in an unauthorised place.
- If the device overheats or gets wet, a fire or explosion may occur. Avoid exposure to high temperatures.
- Do not bend or step on the inflation hose while the device is in operation and make sure that the
air flow is always uniform.
Note: Regular maintenance ensures optimum performance and prolongs the pump's service life.
5. TROUBLESHOOTING
Problem: The device inflates at a slow rate.
Solution: Check if the battery is fully charged. Check for air leaks in the hose. Make sure that connections are tight at both ends of the hose.
Problem: The device does not inflate even though it is turned on.
Solution: Check if the battery is fully charged. Check if the current pressure of the object you inflating is higher than the preset value.
Problem: Pressure cannot be increased/decreased.
Solution: Check if you have selected the correct mode. Select the no preset pressure mode and set value within the range of 3-120 psi.
Problem: The device inflates correctly, but the display shows that the pressure is zero.
Solution: Items requiring a pressure lower than 3 psi (e.g. balloons) are not within the measure range.
Problem: The pump shuts off automatically after attaching the nozzle.
Solution: Press the power button to switch on the device again.
Problem: Air leakage occurs when connecting the hose
Solution: Tighten the hose.
Error codes
Er0: Sensor calibration error, detected during the calibration process.
Er1 or LO: Low battery level, detected when the device is running. If this error code appears on display, the pump will enter standby mode.
Er2: Motor overcurrent protection, activated when the motor is running. If this error code appeal the display, the motor will stop, and the pump will enter standby mode.
Er3: Motor short-circuit protection, activated when the device is running. If this error code appears to display, the motor will stop, and the pump will enter standby mode.
Er4: Motor overtemperature protection, activated when the device is running. If this error code app on the display, the motor will stop, and the pump will enter standby mode.
Er5: The NTC thermistor is damaged, there is an open circuit or a short circuit has occurred while the motor is running. If this error code appears on the display, the motor will stop, and the pump will enter standby mode.
Er6: The NTC thermistor is damaged, there is an open circuit or a short circuit has occurred during the power-on process. If this error code appears on the display, the motor will stop, and the pump will enter standby mode.
Er7: Pressure exceeds 150 psi.
Er8: The battery temperature is too high or too low. If this error code appears on the display while the device is running, the pump will enter standby mode. If it appears while charging, the charging process will be stopped until the problem has been fixed.
EOP: The protection system has been activated.
6. TECHNICAL SPECIFICATIONS
Product reference: EU01_103447
Product: SkinCare Depil-Action One
Epilator: Input: 5 V=, 1 A
Battery: Lithium-ion, 3.7 V, 700 mAh, 2.59 Wh
To recharge the battery, it is recommended to use an adapter with the following characteristics:
Input: 100-240 V\~, 50/60 Hz
Output: 5 V =, 1 A
Technical specifications may change without prior notification to improve product quality
Made in China | Designed in Spain

7. DISPOSAL OF OLD ELECTRICAL AND ELECTRONIC APPLIANCES
This symbol indicates that, according to the applicable regulations, the product and/or batteries must be disposed of separately from household waste. When this product reaches the end of its shelf life, you should dispose of the cells/batteries/accumulators and take them to a collection point designated by the local authorities.
Consumers must contact their local authorities or retailer for information concerning the correct disposal of old appliances and/or their batteries.
Compliance with the above guidelines will help protecting the environment.
8. TECHNICAL SUPPORT AND WARRANTY
Cecotec shall be liable to the end user or consumer for any lack of conformity that exists at the time of delivery of the product under the terms, conditions and deadlines established by the applicable regulations.
Repairs should be carried out by qualified personnel.
If at any moment you detect any problem with your product or have any doubt, do not hesitate to contact the official Cecotec Technical Support Service at +34 963 210 728.
9. COPYRIGHT
The intellectual property rights over the texts in this manual belong to CECOTEC INNOVACIONES, S.L. All rights reserved. The contents of this publication may not, in whole or in part, be reproduced, stored in a retrieval system, transmitted, or distributed by any means (electronic, mechanical, photocopying, recording or similar) without the prior authorization of CECOTEC INNOVACIONES, S.L.
10. SIMPLIFIED EU DECLARATION OF CONFORMITY
MANUFACTURER: CECOTEC INNOVACIONES S.
ADDRESS: Av. Reyes Católicos, 60, 46910, Alfafar, Valencia (Spain).
DESCRIPTION: Battery-powered electric pump
PRODUCT IDENTIFICATION: Mini Air Max
MODEL: EU01_106133
It certifies the appliance described has been designed, manufactured and tested and complies with all applicable provisions.
EU DIRECTIVES IMPLEMENTED:
Directive 2006/42/CF on machinery
Directive 2014/30/EU on the harmonisation of the laws of the Member States relating to
electromagnetic compatibility (EMC)
Directive 2011/65/FU and delegated directive (FU) 2015/863 on the restriction of the use of
certain hazardous substances in electrical and electronic equipment
APPLICABLE HARMONISED NORMS
EN ISO 12100:2010
EN 1012-1:2010
EN 60204-1:2018
EN IEC 55014-1:2
EN IEC 55014-2:2021
EN IEC 61000-3-2:2019 + A1:2021 + A2:2024
EN 61000-3-3:2013 + A1:2019 + A2:2021
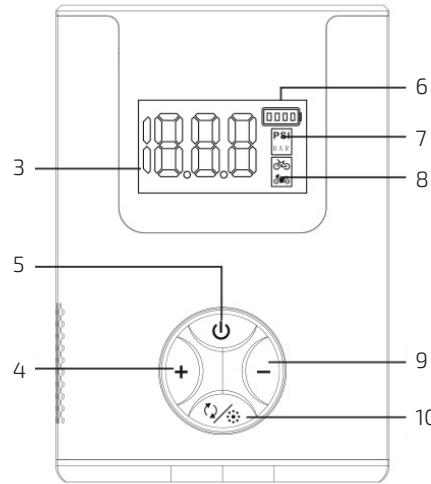


Fig./Img./Abb./Afb./ Rys. 4
Fig./Img./Abb./Afb./Rys.1
NOTA
EU01_106113_Mini Air Max

Fig./Img./Abb./Afb./ Rys. 3
EN · Scan the QR code to access the instruction manual in more languages.
- BATTERY INSTRUCTIONS
- PARTS AND COMPONENTS
- BEFORE USE
- BOX CONTENT
- OPERATION
- 3.1 INFLATION PROCEDURE FOR PRESA VALVE TYRES
- 3.2 INFLATION PROCEDURE FOR SCHRADER VALVE TYRES
- 3.3 USE
- 3.4 CHARGING THE PUMP
- 3.5 USING THE ACCESSORIES
- 3.6 PRESSURE TESTING
- 3.7 RECOMMENDED PRESSURE
- 3.8 SELECTING A MODE
- 3.9 SETTING THE DEFAULT VALUE
- 3.10 STARTING THE INFLATION PROCESS
- 3.11 STOPPING THE INFLATION PROCESS
- 3.12 CHARGING TIME
- 3.13 SWITCHING OFF THE PUMP
- CLEANING AND MAINTENANCE
- TROUBLESHOOTING
- PROBLEM: THE DEVICE DOES NOT INFLATE EVEN THOUGH IT IS TURNED ON
- PROBLEM: PRESSURE CANNOT BE INCREASED/DECREASED
- PROBLEM: THE DEVICE INFLATES CORRECTLY, BUT THE DISPLAY SHOWS THAT THE PRESSURE IS ZERO
- PROBLEM: THE PUMP SHUTS OFF AUTOMATICALLY AFTER ATTACHING THE NOZZLE
- PROBLEM: AIR LEAKAGE OCCURS WHEN CONNECTING THE HOSE
- ERROR CODES
- TECHNICAL SPECIFICATIONS
- DISPOSAL OF OLD ELECTRICAL AND ELECTRONIC APPLIANCES
- TECHNICAL SUPPORT AND WARRANTY
- COPYRIGHT
- SIMPLIFIED EU DECLARATION OF CONFORMITY
- NOTA
Brand : CECOTEC
Model : Mini Air Max
Category : Washing machine