Montanaforce 4000 Hand - Washing machine CECOTEC - Free user manual and instructions
Find the device manual for free Montanaforce 4000 Hand CECOTEC in PDF.


| Product type | Washing machine |
| Brand | Cecotec |
| Model | Montanaforce 4000 Hand |
| Washing capacity | 4 kg |
| Maximum spin speed | 800 rpm |
| Number of programs | 8 wash programs |
| Maximum temperature | 60 °C |
| Drum type | Stainless steel drum |
| Power supply | 220-240 V ~ 50 Hz |
| Power consumption | 500 W |
| Dimensions (W x D x H) | 45 x 45 x 70 cm |
| Net weight | 12 kg |
| Washing noise level | 55 dB |
| Spin noise level | 70 dB |
| Power cord length | 1.5 m |
| Delayed start function | Yes (3-9 hours) |
| Display | LED screen |
| Door reversibility | Yes |
| Child lock | On/off lock |
| Maintenance and cleaning | Regular cleaning of the filter and drum |
| Spare parts and repairability | Available via Cecotec customer service |
| General information | Official 2-year warranty |
Frequently Asked Questions - Montanaforce 4000 Hand CECOTEC
User questions about Montanaforce 4000 Hand CECOTEC
0 question about this device. Answer the ones you know or ask your own.
Ask a new question about this device
Download the instructions for your Washing machine in PDF format for free! Find your manual Montanaforce 4000 Hand - CECOTEC and take your electronic device back in hand. On this page are published all the documents necessary for the use of your device. Montanaforce 4000 Hand by CECOTEC.
USER MANUAL Montanaforce 4000 Hand CECOTEC
Safety instructions 18
-
Parts and components 188
-
Before use 188
-
Tool assembly 189
-
Operation 191
-
Cleaning and maintenance 192
-
Troubleshooting 193
-
Technical specifications 194
-
Disposal of old electrical and
electronic appliances 195
-
Technical support and warranty 196
-
Copyright 196
-
Declaration of conformity 196
SOMMAIRE
EN • The coding in this manual is generic and applies to all code variants of the appliance.
General power tool safety instructions
IMPORTANT
READ CAREFULLY BEFORE USE KEEP FOR FUTURE REFERENCE
Safe operating practices
1. Training
a) Read the instructions carefully. Familiarise yourself with the correct use and operation of the tool.
b) Never allow children or people unfamiliar with these instructions to use the tool. Local regulations may restrict the age of the operator.
c) Please note that the operator or user is responsible for accidents or hazards that may occur to other people or their property.
2. Preparation
a) Before use, check the power cord and extension cord for signs of damage or wear. If the cord is damaged during use, disconnect it from the power supply immediately. DO NOT TOUCH THE CORD BEFORE DISCONNECTING THE POWER. Do not use the appliance if the cord is damaged or worn.
b) Before use, visually check the tool for damaged, missing or improperly fitted guards or covers.
c) Never operate the tool while people, especially children, or pets are nearby.
3. Operation
a) Keep the power and extension cords away from the cutting head.
b) Always wear eye protection and sturdy footwear while operating the tool.
c) Avoid using the tool in adverse weather conditions, especially when there is a risk of lightning.
d) Use the tool only in broad daylight or in good artificial light.
e) Never operate the tool with damaged guards or covers or without them in place.
f) Start the motor only when hands and feet are away from the cutting head.
g) Always disconnect the tool from the power supply (i.e., remove the mains plug, remove the disabling device or removable battery) whenever it is left unattended, before clearing an obstruction, before checking, cleaning or working on it, after hitting a foreign object or whenever it begins to vibrate abnormally.
h) Be careful not to injure your feet and hands with the
blades.
i) Always ensure that the ventilation openings are clear of debris.
- Maintenance and storage
a) Disconnect the tool from the power supply (i.e. remove the mains plug, remove the disabling device or the removable battery) before carrying out maintenance or cleaning tasks.
b) Use only spare parts and accessories supplied by the manufacturer.
c) Check and clean the tool regularly. Have the tool repaired only by an authorised technician.
WARNING: Read all safety warnings and instructions. Failure to follow all warnings and instructions listed below may result in electric shock, fire and/or serious injury.
Save all warnings and instructions for future reference.
1) Work area safety
a) Keep the work area clean and well illuminated. Cluttered or dark areas may cause accidents.
b) Do not operate power tools in explosive environments, such as in the presence of flammable liquids, gases or dust. Power tools create sparks that can ignite dust or fumes.
c) Keep children and bystanders away while operating a power tool. Distractions can make you lose control of the tool.
2) Electrical safety
a) Power tool plugs must match the socket. Never modify the plug in any way. Do not use any adapter plugs with earthed power tools. Unmodified plugs and matching sockets will reduce the risk of electric shock.
b) Avoid body contact with grounded surfaces, like pipes, radiators, stoves and refrigerators. There is a higher risk of electric shock if your body is in touch with grounded surfaces.
c) Do not expose power tools to rain or wet conditions. Water entering a power tool will increase the risk of electric shock.
d) Do not misuse the cord. Never use the cord for carrying, pulling or unplugging the power tool. Keep the cord away from heat, oil, sharp edges or moving parts. The damaged or tangled cables can increase the risk of electric shock.
e) When operating a power tool outdoors, use an extension cord suitable for outdoor use. The use of a cord suitable for outdoor use reduces the risk of electric shock.
f) If operating a power tool in a damp location is unavoidable, use a power supply protected by a residual current device (RCD). The use of an RCD reduces the risk of electric shock.
3) Personal safety
a) Stay alert, watch what you are doing and use common sense when operating a power tool. Do not use a power tool if you are tired or under the influence of drugs, alcohol or medication. Lack of attention while operating the tool may result in serious personal injury.
b) Use personal protective equipment. Wear eye protection. Protective equipment such as dust mask, non-slip safety footwear, helmet or hearing protection, used under the appropriate conditions, will reduce personal injuries.
c) Avoid unintentional start-up. Make sure the switch is in the off position before connecting the tool to a power source and/or battery, or before picking it up or transporting it. Carrying power tools with your finger on the switch or plugging in power tools with the switch in the on position may cause accidents.
d) Remove any adjusting key or wrench before turning the power tool on. Leaving a wrench or a key attached to a rotating part of the power tool may result in personal injury.
e) Do not overstretch yourself. Always keep your feet firmly on the ground and maintain a proper balance. This will provide better control of the power tool in unexpected situations.
f) Wear appropriate clothes. Do not wear loose clothing or jewellery. Keep your hair, clothing and protective gloves away from moving parts. Loose clothes, jewellery or long hair can get caught in moving parts.
g) If devices are provided for the connection of dust extraction and collection facilities, ensure these are connected and properly used. Dust vacuuming can reduce dust-related hazards.
4) Power tool use and maintenance
a) Do not force the power tool. Use the appropriate power tool for the required application. The proper power tool will do the job better and safer at the rate
for which it was designed.
b) Do not use the power tool if the switch does not turn it on and off. Any power tool that cannot be controlled with the switch is dangerous and must be repaired.
c) Disconnect the plug from the power source and/or remove the battery pack, if detachable, from the power tool before making any adjustments, changing accessories or storing it. These preventive safety measures reduce the risk of starting the power tool accidentally.
d) Store idle power tools out of the reach of children and do not allow people unfamiliar with the power tool or these instructions to operate it. Power tools are dangerous in the hands of untrained users.
e) Maintain power tools and accessories. Check if the moving parts are misaligned or stuck, if there are broken pieces or any other condition that may affect the power tool's operation. If damaged, have the power tool repaired before use. Many accidents are caused by poorly maintained power tools.
f) Keep cutting tools sharp and clean. Properly maintained cutting tools with sharp cutting edges are less likely to jam and are easier to handle.
g) Use the power tool, accessories, etc. according to these instructions, taking into account the working conditions and the work to be carried out. The use of the power tool for operations different from those intended could result in a hazardous situation.
5) Battery tool use and maintenance
a) Only recharge with the charger specified by the manufacturer. Using a charger suitable for one type
of battery pack with another type of battery pack may cause a fire.
b) Use power tools only with specifically designated battery packs. Use of any other type of battery packs may create a risk of injury and fire.
c) When the battery is not in use, keep it away from other metal objects, such as paper clips, coins, keys, nails, screws or other small metal objects, which can establish a connection from one terminal to another. A short circuit between the battery terminals may cause burns or fire.
d) Under harsh conditions, liquid may leak from the battery; avoid touching it. In case of accidental contact, rinse the affected part with water. If the liquid comes into contact with eyes, seek additional medical assistance immediately. Liquid leaking from the battery may cause skin irritation or burns.
e) Do not use a damaged or modified battery pack or tool. Do not use a damaged or modified battery pack or tool. Damaged or modified batteries may show unpredictable behaviours leading to fire, explosion or risk of injury.
f) Do not expose a battery or tool to fire or excessive temperatures. Exposure to fire or temperatures above 130\ °C may cause an explosion.
g) Follow all charging instructions and do not charge the battery or the tool outside the temperature range specified in the instructions. Charging improperly or at temperatures outside the specified range may damage the battery and increase the risk of fire.
6) Service
a) Have your power tool repaired by a qualified technician using only original replacement parts. This will ensure that the safety of the power tool is maintained.
b) Never repair damaged batteries. Battery maintenance should only be carried out by the manufacturer or an authorised technician.
1) General chainsaw safety warnings:
a) Keep all body parts away from the saw chain when the chainsaw is running. Before starting the chainsaw, make sure that the saw chain is not in contact with anything. Lack of attention while operating the chainsaw may cause entanglement of your clothing or body with the saw chain.
b) Always hold the chainsaw with your right hand on the rear handle and your left hand on the front handle. Holding the chainsaw with the opposite hand increases the risk of personal injury and should never be done.
c) Hold the chainsaw by the insulated gripping surfaces only, as the saw chain may come into contact with hidden wiring. Saw chains coming into contact with "live" wires may cause exposed metal parts of the chainsaw to be "live" and could give the operator an electric shock.
d) Wear eye protection. The use of further protective equipment for hearing, head, hands, legs and feet is recommended. Proper protective equipment will reduce personal injury from flying debris or accidental contact with the saw chain.
e) Do not operate a chainsaw in a tree, on a ladder, from a rooftop or from any unstable support. Operation
of a chainsaw in this manner could result in serious personal injury.
f) Always keep proper footing and operate the chainsaw only when standing on a fixed, secure and level surface. Slippery or unstable surfaces may cause a loss of balance or control of the chainsaw.
g) When cutting a branch that is under tension, watch for spring-back. When tension in the wood fibres is released, the spring-loaded branch may strike the operator and/or throw the chainsaw out of control.
h) Use extreme caution when cutting bushes and saplings. Thin material may catch the saw chain and be whipped toward you or cause you to lose your balance.
i) Carry the chainsaw by the front handle, switched off and away from your body. When transporting or storing the chainsaw, always fit the guide bar guard. Proper handling of the chainsaw will reduce the likelihood of accidental contact with the moving saw chain.
j) Follow the instructions for lubricating, tensioning and changing the saw chain and guide bar. An improperly tensioned or lubricated saw chain may either break or increase the chance of kickback.
k) Cut wood only. Do not use the chainsaw for purposes for which it was not intended. For example: do not use the chainsaw to cut metal, plastic, masonry or non-wood building materials. Use of the chainsaw for operations other than those intended could result in a hazardous situation.
l) Follow all instructions when clearing jammed material, storing or servicing the chainsaw. Make sure that the switch is off, and the battery is removed. Unexpected
operation of the chainsaw while clearing jammed material or maintenance may result in serious personal injury.
2) Causes and prevention of operator kickback:
Kickback may occur when the tip of the guide bar touches an object, or when the wood closes in and pinches the saw chain in the cut.
In some cases, contact with the tip may cause a sudden reverse reaction, kicking the guide bar up and back towards the operator.
Pinching the saw chain along the top of the guide bar may quickly push the latter back towards the operator.
Either of these reactions may cause you to lose control of the chainsaw, which could result in serious personal injury. Do not rely solely on the safety devices built into the chainsaw. As a chainsaw user, you should take several steps to ensure that your cutting jobs are free from accident or injury.
Kickback is the result of chainsaw misuse and/or incorrect operating procedures or conditions and can be avoided by taking proper precautions as given below:
a) Maintain a firm grip, with thumbs and fingers encircling the handles, with both hands on the chainsaw and position your body and arm to allow you to resist kickback forces. Kickback forces can be controlled by the operator, if proper precautions are taken. Do not let go of the chainsaw.
b) Do not overreach and do not cut above shoulder height. This helps to avoid unintentional contact with the tip and enables better control of the chainsaw in unexpected situations.
c) Use only replacement guide bars and saw chains
specified by the manufacturer. Incorrect replacement of guide bars and saw chains may result in chain breakage and/or kickback.
d) Follow the saw chain manufacturer's sharpening and maintenance instructions. Decreasing the depth gauge height can lead to increased backlash.
- Connect the tool only to a power supply circuit protected by a residual current device (RCD) with a tripping current not exceeding 30 mA.
- Be sure to position the power cord so that it does not get caught in branches, logs or other objects while using the chainsaw.
- Be careful with chainsaw kickback and avoid contact with the tip of the guide bar.
- It is recommended that first-time users practice cutting logs on a sawhorse or cradle beforehand to gain experience and basic skills.
- This chainsaw is not intended for tree felling. Do not attempt to use it for this purpose.
- Follow proper techniques for operations such as basic felling, pruning and cross-cutting.
- Always use the chainsaw with both hands.
- Use the manual lubrication control according to the instructions detailed in this manual to ensure proper operation of the chainsaw.
- Never operate the chainsaw without proper lubrication. Refill the lubricant before the container is completely empty.
- Use only recommended lubricants to avoid damage to the tool.
- The maximum chain speed of this chainsaw is 7 m/s and 8
m/s, respectively.
Safety information for this tool is shown below. Make sure you understand their meaning before using the tool.
| Symbol | Meaning |
 | Warning |
 | Read the instruction manual. |
 | |
 | Wear eye protection |
 | Wear hearing protection. |
 | Wear a helmet. |
 | Wear protective gloves. |
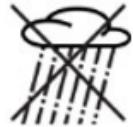 | Do not expose to rain or damp places. |
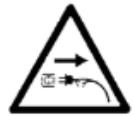 | Disconnect the plug from the mains immediately if the power cord is damaged or cut. |
INSTRUCTIONS DE SÉCURITÉ
lesions personals greus.
MODELO: EU01_106754/ EU01_106755
The graphics in this manual are schematic representations and may not exactly match the product.
2. BEFORE USE
- This appliance is packaged in a way as to protect it during transport. Take the appliance out of its box and remove all packaging materials. You can keep the original box and other packaging elements in a safe place to prevent damage to the appliance if you need to transport it in the future. In case the original packaging is disposed of, make sure all packaging materials are recycled accordingly.
- Make sure all parts and components are included and in good conditions. If there is any piece missing or in bad conditions, contact the official Cecotec Technical Support Service immediately.
- Do not remove the serial number of the appliance in order to keep a correct traceability of it in case of assistance.
Box content
- Handheld chainsaw
- Spare saw chain
- Gloves
- Safety goggles
- Cleaning brush
-
Lubricating oil
-
Screwdriver
- Nexus 21 V battery (x2)
- Charger
- Carrying case
- Instruction manual
3. TOOL ASSEMBLY
Battery
Fig. 2
A. Fitting the battery
Step 1: Make sure that the trigger is not being pressed and that it is fully released. This will prevent possible damage to the tool or accidents.
Step 2: Aligning the battery. Grasp the battery with both hands and locate the guide rails in the tool compartment. Align the battery connectors with the terminals in the tool compartment.
Step 3: Inserting the battery. Slide the battery in firmly along the guide rails, making sure to apply even pressure. Continue pushing until you hear a "click", indicating that the battery is properly fixed in place.
Step 4: Once installed, gently pull the battery out without pressing the release button to confirm that it is properly fixed.
B. Removing the battery
Step 1: Before removing the battery, make sure that the trigger is not being pressed and that the battery is not in use.
Step 2: Locate the battery release button on the top of the compartment and press the button firmly to release the locking mechanism.
Step 3: Removing the battery. While pressing the release button, pull the battery out with one hand and hold the tool with the other. Be sure to slide it straight out to avoid damaging the connectors.
IMPORTANT:
Never install or remove the battery while the tool is switched on, as this may cause malfunction or injury.
Note: Make sure that the trigger is not being pressed when inserting or removing the battery.
Replacing the saw chain
Note: Pay attention to the direction of the saw chain teeth. Fig. 3
- Place the chainsaw on a firm and level surface.
- Then turn the screw counterclockwise to remove the side guard from the chainsaw.
- Be sure to check the direction of the saw chain. Then, without removing the protective gloves, wind the saw chain around the bar guide, making sure that the teeth are facing in the correct direction. Note that the saw chain must be correctly positioned in the groove that runs along the entire outer edge of the guide bar.
- Place the saw chain around the sprocket while aligning the groove in the bar guide with the bolt on the tool base. The saw chain tension adjuster must be aligned with the bolt.
- Fit the side guard and tighten it until it snaps into the bar guide.
- Use the adjustment screw located on the back of the guide bar to adjust the saw chain tension. Turn the screw clockwise to tighten the saw chain or counterclockwise to loosen it

WARNING: The saw chain moves and is very sharp. To prevent the chainsaw from starting accidentally, remove the battery when handling it. Failure to do so could result in serious injury.
-
Check the saw chain tension by pulling it slightly away from the guide bar. If the distance between the saw chain and the guide bar is about 3 mm, it means that the chain is correctly tensioned. (Fig. 4)
-
Make the necessary adjustments.
Note: Do not over-tighten the saw chain; otherwise, excessive wear of both the guide bar and the chain will occur.
Replacing the guide bar
- Turn off the chainsaw and remove the battery:
- Loosen the guide bar clamping screw. Using a suitable wrench, unscrew the clamping screw that secures the guide bar in place.
- Carefully remove the side guard covering the guide bar and saw chain. This will expose the guide bar and make it easier to remove.
- Remove the old guide bar carefully, making sure that the saw chain does not cause damage or become entangled.
- Align the new guide bar into position, making sure that it fits correctly into the bracket and onto the saw chain sprocket.
- Put the side guard back in place, aligning it correctly with the assembly holes.
- Screw the guide bar clamping screw back in place until it is firmly tightened. Check that the guide bar is stable and has no play.
- Use the tension adjustment mechanism to ensure that the saw chain is correctly tensioned. The saw chain should be snug but allow slight manual movement.
- Before use, briefly turn on the chainsaw to check that the guide bar and chain are properly installed and running smoothly.
Oil pump
To ensure proper operation of the chainsaw, follow these steps to fill and use the automatic oil pump for saw chain lubrication:
- Add chain oil and lubricant to the oil filler.
- Lubricate the saw chain by pressing the pump button. When pressed, it pumps oil into the saw chain to lubricate it.
Note: You can use any lubricating oil suitable for chainsaws.
4. OPERATION
To work safely with the chainsaw, it is mandatory to wear appropriate personal protective equipment, including goggles or impact-resistant visor to protect the eyes, ear muffs or ear plugs against noise, safety helmet in case of risk of falling objects, cut-resistant gloves for the hands, trousers with anti-cut reinforcements or chaps for the legs, and safety boots with reinforced toe cap and non-slip soles for the feet. All clothing should be close-fitting to avoid snagging.
Switching on/off the tool
- To switch on the tool, press the trigger lock button and, at the same time, press the trigger. Once the tool starts running, you can release the safety lock button without the tool turning off. Fig. 5
- To switch off the tool, release the trigger.
To use the chainsaw safely, make sure it is properly assembled and lubricated before turning it on. Hold it firmly, maintaining a balanced posture. Use the chainsaw to cut branches, small logs or wood on sawhorses. Do not attempt to fell trees, as this tool is not designed for that task. Make cuts in a controlled manner, avoiding contact with the ground or any object that could damage the saw chain.

WARNING: Before removing the battery, release the trigger and allow the chainsaw to come to a complete stop.
5. CLEANING AND MAINTENANCE
Proper maintenance ensures optimal performance and extends the lifespan of the chainsaw.
After use cleaning
- Make sure that the trigger is fully released and that the lock button is not activated. Remove the battery before cleaning.
- Use a soft brush or compressed air to remove sawdust, dust and wood debris accumulated on the ventilation openings, housing and around the saw chain.
Note: Pay special attention to the base of the saw chain and the bar guide rail grooves.
- Remove the saw chain and bar guide rail following the manufacturer's instructions. Wipe them with a dry cloth or one slightly dampened with oil to prevent rusting.
- Check the bar guide rail grooves for obstructions.
- Use a clean, dry cloth to clean the chainsaw housing. If it is very dirty, dampen the cloth with warm water and a small amount of mild detergent. Prevent water from entering electrical parts.
Regular maintenance
1. Saw chain lubrication:
- Before each use, ensure that the saw chain is properly lubricated to reduce wear and improve performance. Use only the oil recommended by the manufacturer.
2. Tensioning the saw chain:
- Check the saw chain tension regularly. It should be snug, but not too tight. Refer to the specific instructions for correct tension adjustment if necessary.
3. Checking the saw chain:
- Check that the cutting teeth are not worn or damaged. Sharpen them according to the instructions or take them to a specialised workshop.
4. Checking the screws and components:
- Make sure that all screws, bolts and components are tightened securely. Tighten them if necessary, but avoid exerting too much pressure to avoid damaging the tool.
5. Checking the battery:
- Check the battery for signs of damage, corrosion or deformation. Clean the terminals with a dry cloth if necessary. Do not use solvents or harsh chemicals.
- Check that the oil filler cap is tightly closed and sealed. There should be no oil leakage.
- After use, clean the chainsaw and remove shavings and dust.
- Clean the guide bar, guard and tool body with a dry cloth.
- Keep the saw chain sharp and replace it when necessary.
- Store the chainsaw in a dry and clean place, away from direct sunlight and extreme
temperatures.
- Remove the battery before storing the tool for a long period of time.
- Replace worn saw chain, bar guide rail or other components as necessary. Always use recommended original spare parts.
Note: To sharpen the tool, use a specific chain sharpening machine and follow the instructions indicated on it.
Cautions:
- Always remove the battery before performing any maintenance or cleaning tasks to avoid accidents.
- Avoid using pressurised water or aggressive solvents, as this may damage the electrical parts or sensitive components of the tool.
- Keep the ventilation openings clear, make sure there are no obstructions to avoid overheating the motor.
- Check that the lock button is deactivated before inserting or removing the battery to avoid accidental startup of the tool.
Note: The product does not require technical maintenance beyond what is explained in this manual. If you experience any problems, do not attempt to repair the product by yourself, contact the official Cecotec Technical Support Service.
6. TROUBLESHOOTING
| Problem | Possible causes | Solutions |
| The chainsaw does not work. | - The battery is not fitted correctly.- The battery is not charged.- You have not pressed the lock button. | - Check that the battery is correctly fitted.- Check that the battery is charging correctly.- Press the lock button before pressing the trigger. |
| The saw chain or bar guide has overheated. | - The saw chain is too tight.- The saw chain needs lubrication. | - Adjust the saw chain tension.- Lubricate the saw chain as necessary. |
| The saw chain is too loose. | - The saw chain tension is not properly adjusted. | - Adjust the saw chain tension. |
| The chainsaw does not cut well. | - The saw chain needs to be cleaned.- The saw chain needs to be sharpened.- The saw chain needs to be replaced. | - Remove the saw chain and clean it.- Sharpen or replace the saw chain.- Replace the saw chain. |
| The chainsaw is switched on but does not cut. | - The saw chain is fitted inside out.- The battery is not correctly placed in the tool. | - Install the saw chain with the teeth facing the correct direction.- Place the battery correctly in the tool. |
| The battery does not charge. | - The charger is not plugged in.- The room temperature is too low or too high. | - Plug the charger into a working power socket and check that the red indicator light comes on.- Place the charger and the battery in a place where the room temperature is above 4 °C and below 40 °C. |
| The chainsaw turns off suddenly. | - The battery has reached its maximum temperature.- The battery has run out of power. | - Allow the battery to cool down.- Place the battery in the charger and allow it to charge. |
7. TECHNICAL SPECIFICATIONS
| Reference | EU01_106754 | EU01_106755 |
| Model | MontanaForce 4000 Hand | MontanaForce 6000 Hand |
| Motor power | 400 W | 700 W |
| Speed | 25000 rpm | 24500 rpm |
| Battery | 21 V, 2 Ah, 42 Wh | |
| Charger model | HSFS210100 | |
| Charger input | 100-240 V, 50/60 Hz | |
| Charger output | 21 V, 1 A | |
| Guide bar dimensions | 4" | 6" |
| Battery charging time | 2 hrs | |
Technical specifications may change without prior notification to improve product quality.
Made in China | Designed in Spain
8. DISPOSAL OF OLD ELECTRICAL AND ELECTRONIC APPLIANCES


This symbol indicates that, according to the applicable regulations, the appliance and/or batteries must be disposed of separately from household waste. When this product reaches the end of its shelf life, you should dispose of the cells/batteries/accumulators and take them to a collection point designated by the local authorities.
For detailed information on how to properly dispose of electrical and electronic appliances and/or batteries, consumers should contact their local authorities.
Compliance with the above guidelines will help protecting the environment.

9. TECHNICAL SUPPORT AND WARRANTY
Cecotec shall be liable to the end user or consumer for any lack of conformity that exists at the time of delivery of the product under the terms, conditions and deadlines established by the applicable regulations.
Repairs should be carried out by qualified personnel.
If at any moment you detect any problem with your product or have any doubt, do not hesitate to contact the official Cecotec Technical Support Service at +34 96 321 07 28.
10. COPYRIGHT
The intellectual property rights over the texts in this manual belong to CECOTEC
INNOVACIONES, S.L. All rights reserved. The contents of this publication may not, in whole or in part, be reproduced, stored in a retrieval system, transmitted, or distributed by any means (electronic, mechanical, photocopying, recording or similar) without the prior authorization of CECOTEC INNOVACIONES, S.L.
11. DECLARATION OF CONFORMITY
MANUFACTURER: CECOTEC INNOVACIONES S.L
ADDRESS: Av. Reyes Católicos, N°60, 46910, Alfafar, Valencia (Spain).
DESCRIPTION: Electric chainsaw
PRODUCT IDENTIFICATION: MontanaForce 4000 Hand / MontanaForce 6000 Hand
FUNCTION: Battery-powered electric chainsaw
MODEL: EU01_106754 / EU01_106755
It certifies the appliance described has been designed, manufactured and tested and complies with all applicable provisions.
EU DIRECTIVES IMPLEMENTED:
- Directive 2006/42/CE on machinery.
- Directive 2014/30/EU on the harmonisation of the laws of the Member States relating to electromagnetic compatibility.
- Directive 2011/65/EU and delegated directive (EU) 2015/863 on the restriction of the use of certain hazardous substances in electrical and electronic equipment.
APPLICABLE HARMONISED NORMS:
- EN 62841-1:2015 +A11:2022
- EN 62841-4-1:2020
- EN IEC 55014-1:2021
- EN IEC 55014-2:2021
- IEC 62321-3-1:2013; IEC 62321-4:2013+A1:2017; IEC 62321-5:2013; IEC 62321-6:2015;
- IEC 62321-7-1:2015; IEC 62321-7-2:2017; IEC 62321-8:2017.
1. PIÈCES ET COMPOSANTS
Image 1
MODELL: EU01_106754/ EU01_106755
MODELLO: EU01_106754/ EU01_106755
MODELO: EU01_106754/ EU01_106755
MODEL: EU01_106754/ EU01_106755
MODEL: EU01_106754/ EU01_106755
MODEL: EU01_106754/ EU01_106755
MODEL: EU01_106754/ EU01_106755
MODEL: EU01_106754/ EU01_106755
MONTEAO: EU01_106754/ EU01_106755
. Storage of the first two years
Fig./Img./Abb./Afb./Rys. 2

Fig./Img./Abb./Afb./Rys. 3
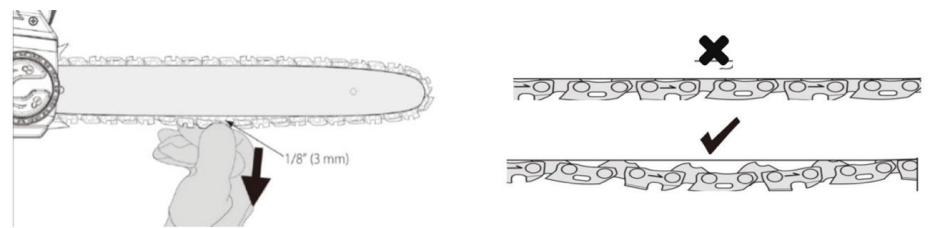
Fig./Img./Abb./Afb./Rys. 4

Fig./Img./Abb./Afb./Rys. 5
www.cecotec.es
- SOMMAIRE
- GENERAL POWER TOOL SAFETY INSTRUCTIONS
- IMPORTANT
- READ CAREFULLY BEFORE USE KEEP FOR FUTURE REFERENCE
- SAFE OPERATING PRACTICES
- TRAINING
- PREPARATION
- OPERATION
- GENERAL CHAINSAW SAFETY WARNINGS
- CAUSES AND PREVENTION OF OPERATOR KICKBACK
- INSTRUCTIONS DE SÉCURITÉ
- BEFORE USE
- BOX CONTENT
- TOOL ASSEMBLY
- BATTERY
- FITTING THE BATTERY
- REMOVING THE BATTERY
- REPLACING THE SAW CHAIN
- REPLACING THE GUIDE BAR
- OIL PUMP
- SWITCHING ON/OFF THE TOOL
- CLEANING AND MAINTENANCE
- AFTER USE CLEANING
- REGULAR MAINTENANCE
- SAW CHAIN LUBRICATION
- TENSIONING THE SAW CHAIN
- CHECKING THE SAW CHAIN
- CHECKING THE SCREWS AND COMPONENTS
- CHECKING THE BATTERY
- CAUTIONS
- TROUBLESHOOTING
- TECHNICAL SPECIFICATIONS
- DISPOSAL OF OLD ELECTRICAL AND ELECTRONIC APPLIANCES
- TECHNICAL SUPPORT AND WARRANTY
- COPYRIGHT
- DECLARATION OF CONFORMITY
- EU DIRECTIVES IMPLEMENTED
- PIÈCES ET COMPOSANTS
- IMAGE 1
Brand : CECOTEC
Model : Montanaforce 4000 Hand
Category : Washing machine