Bellecouture 36000 Control - Sewing machine CECOTEC - Free user manual and instructions
Find the device manual for free Bellecouture 36000 Control CECOTEC in PDF.


User questions about Bellecouture 36000 Control CECOTEC
0 question about this device. Answer the ones you know or ask your own.
Ask a new question about this device
Download the instructions for your Sewing machine in PDF format for free! Find your manual Bellecouture 36000 Control - CECOTEC and take your electronic device back in hand. On this page are published all the documents necessary for the use of your device. Bellecouture 36000 Control by CECOTEC.
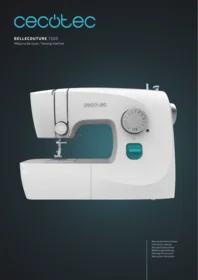
USER MANUAL Bellecouture 36000 Control CECOTEC
Safety instructions 5
-
Parts and components 42
-
Before use 42
-
Operation 43
-
Display 50
-
Sewing 54
-
Cleaning and maintenance 63
-
Troubleshooting 64
-
Disposal of old electrical and electronic appliances 64
-
Copyright 64
-
Simplified EU Declaration of Conformity 65
SOMMAIRE
Read these instructions thoroughly before using the appliance. Keep this instruction manual for future reference or new users.
- Use the appliance only for the purposes described in this manual. Use only accessories recommended by Cecotec.
- This appliance is designed for domestic use only and is not intended for bars, restaurants, farmhouses, hotels, motels, and offices.
- This appliance can be used by children aged 8 years and above and people with reduced physical, sensory, or mental capabilities or lack of experience and knowledge if they have been given supervision or instruction concerning use of the appliance in a safe way and understand the hazards involved. Children must not play with the appliance. Cleaning and user maintenance should not be carried out by unsupervised children.
- The appliance may only be used with the power supply unit supplied with it.
- Turn off and unplug the appliance from the power supply immediately after use or if it is to be left idle for some time.
- Do not pull on the cable to unplug it. To unplug the appliance, pull the plug, not the cord.
- If the power cable is damaged, it must be replaced by a special cable or assembly to be supplied by the manufacturer or its after-sales service.
- Always unplug the sewing machine from the power outlet before carrying out any maintenance operations or when making any adjustments in the needle area, such as threading the thread, changing the presser foot, etc.
- Do not use the appliance if it shows visible signs of damage. In case of malfunction or breakdown, please contact the official Cecotec Technical Support Service.
- Do not try to open, disassemble, or repair the device by yourself.
- Never start the sewing machine if the ventilation holes are blocked. Keep the ventilation holes of the sewing machine and foot pedal free of lint, dust, and remnants.
- Do not insert any foreign objects into any holes.
- Do not use the appliance outdoors.
- Do not use the machine in a place where aerosols are being used or oxygen is being administered.
- Keep fingers away from moving parts. Take special care with the needle.
- Do not use the machine if the needle plate is damaged, as the needle may break.
- Do not use needles that are bent.
- Do not pull or push the fabric while sewing. This could deflect the needle and break it.
- Cecotec accepts no liability for damage caused by improper or incorrect use.
INSTRUCTIONS DE SÉCURITÉ
NOTA
ESPAÑOL
3

⑤ Bobbin winding regulator
4
Insertar la canilla



Enhebrar la máquina

Enhebrar la aguja
ESPAÑOL
2



4. PANTALLA
Coser telas finas
Coser telas pesadas

Coser ojales

- Cremallera oculta

Nido de abeja
Acolchado
Colocar apliques

6. LIMPIEZA Y MANTENIMIENTO


- Speed control slider
- Auto-cut button
- Front plate cover
- Reverse button
- Thread cutter
- Start/Stop button
- Accessory box/free arm
- Thread tension adjustment dial
- Spool pin
- Spool cap
- Bobbin winding spindle
- Display
Rear of the machine
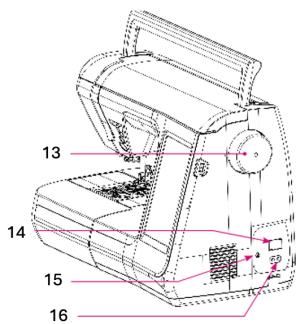
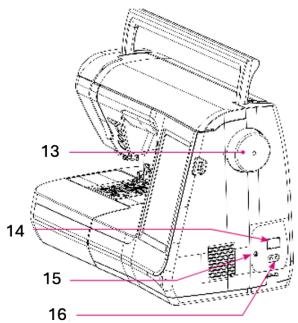
- Handwheel
- Power switch
- Foot controller socket
- Power cord socket
Needle area

- Buttonhole lever
- Auto threader lever
- Presser foot holder screw
- Presser foot holder
- Feed dogs
- Needle plate
- Hook cover/bobbin case
- Needle clamp screw
- Needle
-
Presser foot
-
Hook cover release button
NOTE:
The graphics in this manual are schematic representations and may not exactly match the product.
2. BEFORE USE
- This appliance comes in a packaging designed to protect it during transport. Take the appliance out of its box and remove all packaging materials. You can keep the original box and other packaging materials in a safe place to prevent damage to the appliance if you need to transport it in the future. If you wish to dispose of the original packaging, make sure all items are recycled properly.
- Check that all parts and components are included and in good condition. If any of them are missing or damaged, please contact Cecotec's Official Technical Support Service immediately.
- Wipe the machine with a dry cloth to remove any lint and/or excess oil around the needle area.
NOTE: This sewing machine has been designed to provide optimal sewing performance at normal room temperature. Extreme heat and cold can affect sewing results.
NOTE: To correctly match the fabric with thread and needle, refer to the explanatory table in "Replacing the needle". If the needle or thread is not suitable for the material used, such as when sewing very heavy fabric (e.g. denim) with a fine needle, the needle could break and cause unexpected personal injury.
Box content
- Sewing machine
- Accessory kit
- Instruction manual
Accessories fitted on the machine

- Standard presser foot
- Bobbin (x1)
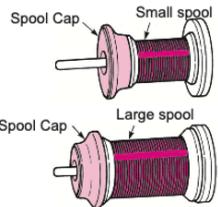
- Spool cap (small)
- Spool cap (large)
Accessories included in the accessory box

3. OPERATION
Types of presser feet and applications
| IMAGE | PRESSER FOOT | APPLICATION |
 | Standard foot | Mainly used for straight and zigzag stitches. Use this foot especially when sewing heavy materials. |
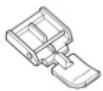 | Zipper foot | Used for inserting zips. |
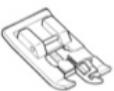 | Overcast foot | This foot is used exclusively for overcasting to prevent cut fabric edges from fraying. |
 | Edge joining foot | This foot is used for joining edges of trousers, skirts or sleeves. |
 | Buttonhole foot | This foot is used for making automatic buttonholes. |
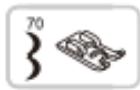
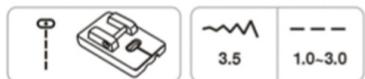
 | Satin stitch foot | Used for sewing decorative stitches, letters and bar tacks. |
Button functions
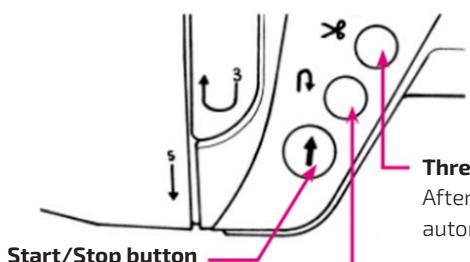
Thread cutter button
After sewing, press this button to cut both threads automatically.
When this button is pressed, the machine starts sewing slowly and then increases the speed according to the speed controller. Pressing this button again stops the machine with the needle in its lower position. The color of the button indicates the status of the machine.
- Green Ready to start and/or while sewing.
- Red Not ready to start (when pressed in red condition, the needle moves one stitch).
- Orange: The machine is in coil winding condition
Notes for thread cutting:
- Do not use thread thicker than #30.
- After cutting, the stitch can be made without lifting the bobbin thread.
- When sewing again after cutting the thread, if you lift the bobbin thread again and place it under the presser foot together with the needle thread, you can avoid bird's nests on the wrong side of the fabric.
- Clean the machine regularly as dust in the wire cutting unit area can cause malfunctions.
Reverse stitching button
While this button is pressed, the machine sews in reverse (safety stitch).
Power connection
- Using the Start/Stop button (without foot controller):
- Turn the power switch off (press "O").
- Insert the power cord connector into the machine socket.
- Insert the plug into the mains socket.
- Turn the power switch on (press "I").
- Using the foot controller:
- Turn the power switch off (press "O").
- Insert the foot controller plug into its corresponding socket.
- Insert the power cord connector into the machine socket.
- Insert the plug into the mains socket.
- Turn the power switch on (press "I").
NOTE: While the foot controller is connected, the Start/Stop button cannot be used.


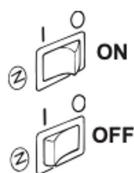
Power switch positions
- To turn the machine off, set the switch to position "O".
- To turn the machine on, set the switch to position "I".
Storage after sewing
- Turn the power switch off. After switching off the machine, electrical energy may remain stored. Some lights might stay on for a few seconds while this energy dissipates. This is normal for an electrical appliance.
- Unplug the cord from the wall socket and then from the machine.
- Wind the cord around the foot controller for easier storage.
- Place all accessories in the accessory box.
- Place the foot controller and cord in the space above the free arm.
- Cover the machine with the included protective cover.
Using the foot controller

To operate the machine, press the foot controller. The harder you press, the faster the machine will sew.
Always keep the foot controller clean.
It is important not to place any objects on the foot controller, as this could cause injury to the user and lead to malfunctions.
Presser foot lever

- The presser foot lever is located at the rear of the sewing machine head. The lever is used to raise and lower the presser foot. Raise the lever for threading the machine. Lower it for sewing.
- The presser foot can be in lowered or raised position using the lever:
- Lowered position: The presser foot must be lowered when sewing.
- Standard raised position: This position is used for removing fabric and changing the presser foot.
- Extra-high position: This position is used for placing heavy materials under the presser foot. To do this, push the presser foot lever upwards, insert the fabric and release the lever so the presser foot returns to the standard raised position.
CAUTION: Take care that the presser foot and needle do not interfere when the needle is in its lowest position and the presser foot is raised to the extra-high position.
Thread cutter

To use the thread cutter, pull the thread from the back to the front as illustrated. This will leave the thread ends long enough so that the needle will not unravel when you start sewing again.
Changing the presser foot
- Make sure the needle is in its highest position and raise the presser foot. The presser foot release lever extends from the back of the presser foot holder. Press this lever to release the presser foot.
- To attach a presser foot to the holder, position the desired foot with its pin directly under the groove of the presser foot holder. Lower the presser foot lever so that the foot snaps into place.

NOTE
The black button on the left side of the presser foot will lock the foot in a horizontal position if pressed before lowering the presser foot. This ensures even feeding at the start of a seam and helps when sewing multiple layers of fabric, such as sewing over thick seams when hemming jeans.
When you reach a thicker area or cross point, lower the needle and raise the standard presser foot. Press the toe of the foot to level it horizontally and hold the black button. Lower the foot and resume sewing. The black button releases automatically after sewing one or a few stitches.

Changing the presser foot holder
- Raise the needle and presser foot lever. Loosen the presser foot holder fixing screw by turning it anticlockwise and remove the presser foot holder.
- To attach the holder, align the screw hole in the presser bar with the hole in the holder. Firmly tighten the fixing screw by turning it clockwise.

Seam guide lines on the needle plate
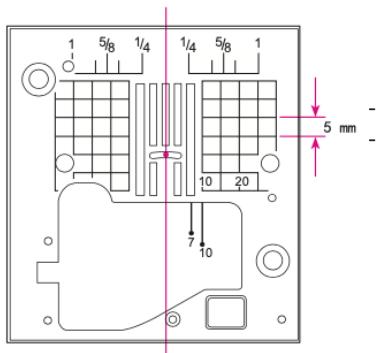
This guide is based on the centre needle position.
- Align the fabric edge with a seam guide line and sew.
- The numbers on the guide line show the distance in mm and inches between the centre needle position and the guide line.
Numbers 7, 10 and 20 are millimetres.
Numbers 1/4, 5/8 and 1 are inches.

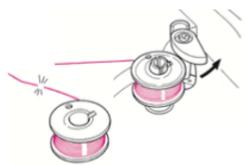
Winding the bobbin
Preparation:
- Open the hook cover and remove the bobbin. If the bobbin has very little thread, do not use it as the thread could become tangled.
-
Place a spool of thread on the spool pin.
-
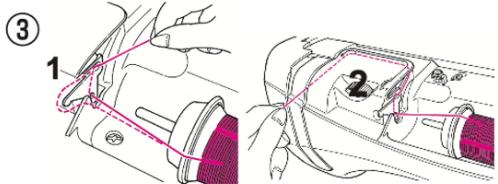
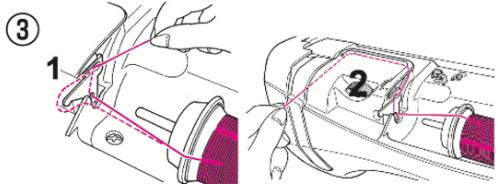
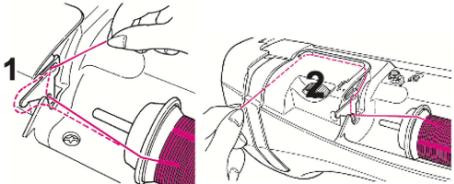
Pass the thread crossing from guide (1) to guides (2) and (3) (guides in the circle) for bobbin winding.
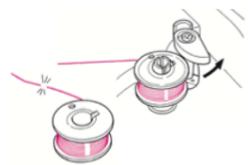
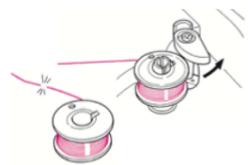
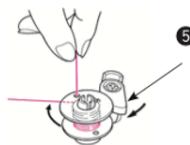
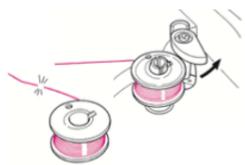
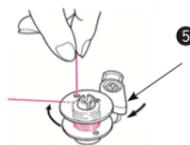
- Place the bobbin on the bobbin winding spindle (4).
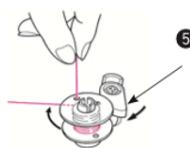
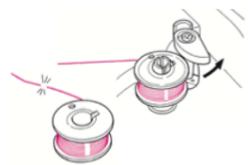
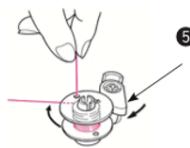
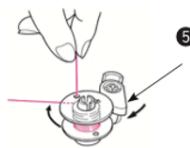
- Pass the thread end through the hole in the bobbin and pull gently on the end. Press the bobbin winding regulator (5) towards the bobbin. The Start/Stop button will now turn orange. When the Start/Stop button is pressed, the machine will begin winding the bobbin thread.
- When winding is complete, the spindle will stop automatically, the bobbin winding regulator will move to the right and return to its original position. Remove the bobbin from the winding spindle and cut the thread.

2

3

⑤ Bobbin winding regulator
4
Inserting the bobbin
Note: Make sure that the needle is fully raised and that the machine is switched off before inserting or removing the bobbin.
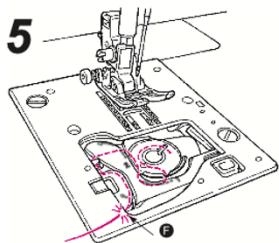
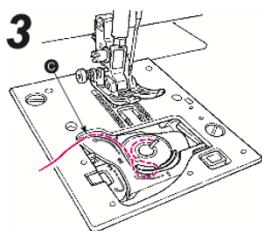
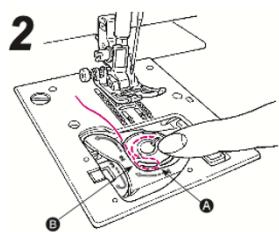
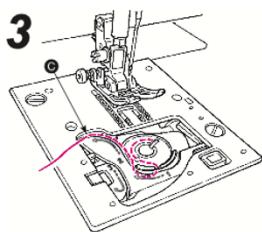
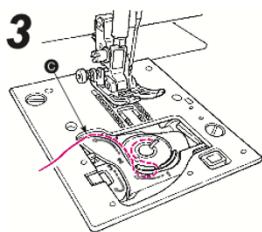
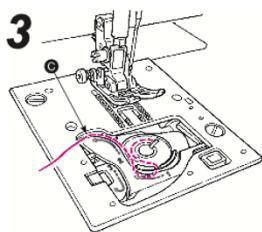
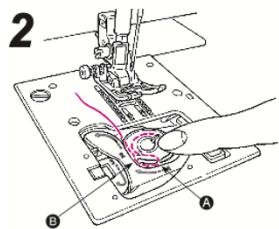
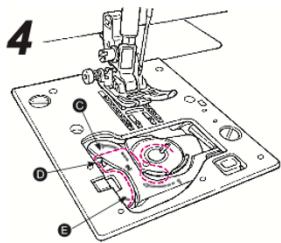
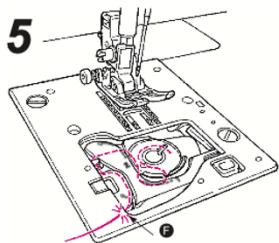
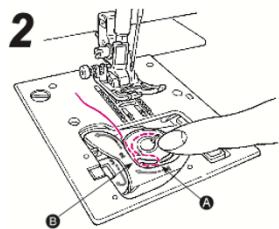
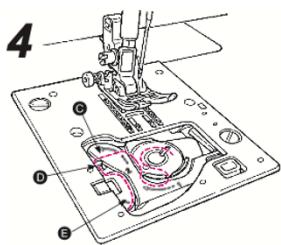
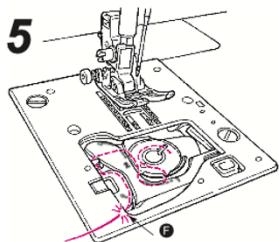
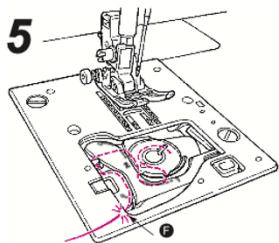
Place the bobbin in the bobbin case.
- Place the bobbin so that the thread unwinds anticlockwise.
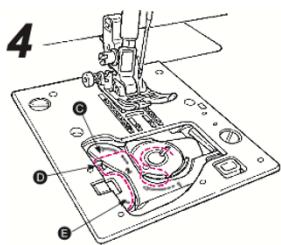
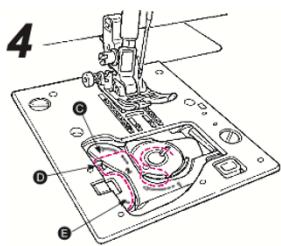
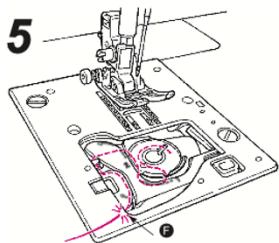
- Pass the thread through slots A and B while pulling the thread end.
It will be easier to thread the slots if you press the bobbin lightly with your finger.
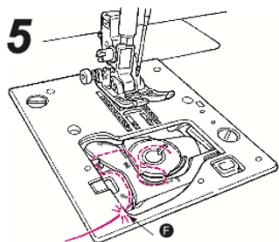
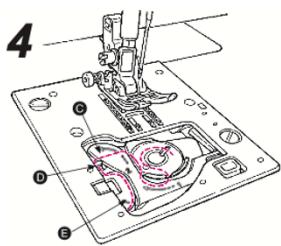
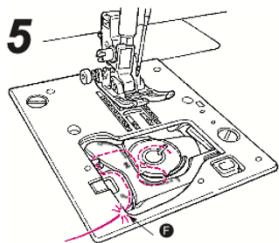
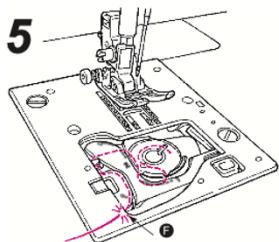
- Pass the thread through guide C by pulling the thread to the left.
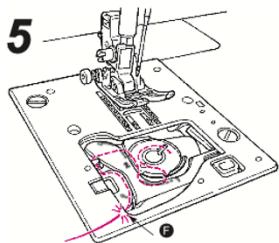
- Pass the thread through guide D and leave the thread underneath. (Thread guide D first and then guide C as well.)
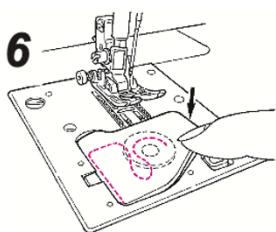
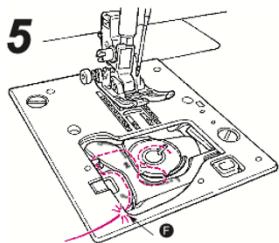
When pulling the bobbin thread, the bobbin should rotate anticlockwise.
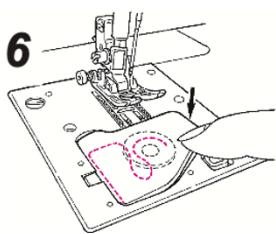
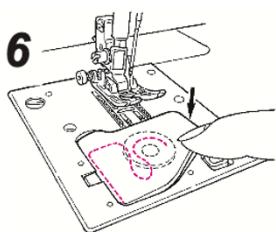
- Cut the thread using the built-in cutter E.
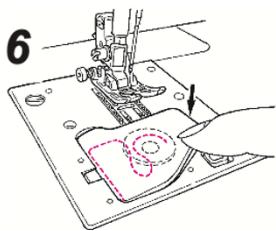
- Close the hook cover.
Note: You can begin sewing in this condition (without drawing up the bobbin thread), however, if you wish to sew with the bobbin thread drawn up, refer to the “Drawing up the bobbin thread” section.


Threading the machine

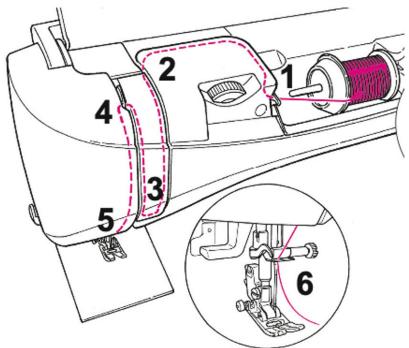
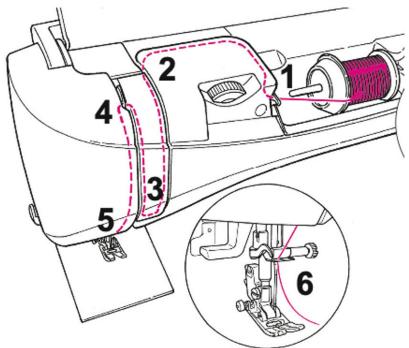
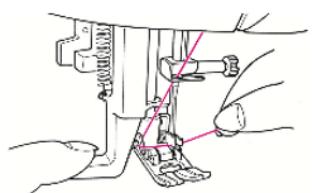
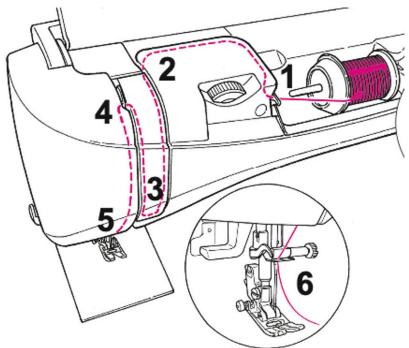
IMPORTANT: Make sure that the presser foot is raised and that the needle is in its highest position by turning the handwheel towards you. Align the mark on the handwheel with the mark on the machine body.
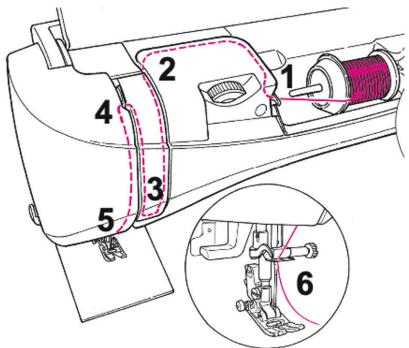
- Raise the presser foot lifting lever.
- Place a spool of thread on the spool holder and a spool cap over it.
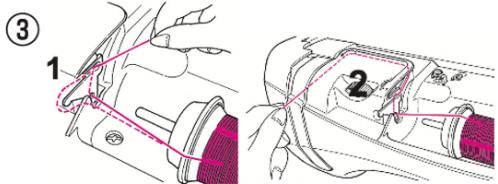
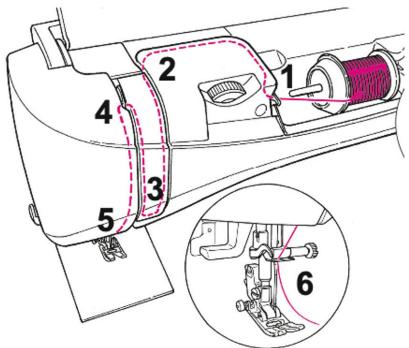
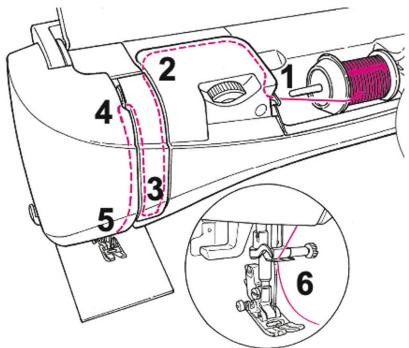
- Pass the thread to guide 1. Hold the end of the thread and thread according to the direction of the arrow passing through points 2, 3, 4 and 5. IMPORTANT: Check that the thread tensioner (4) is correctly threaded.
- Thread guide 6 from the right side.


Threading the needle
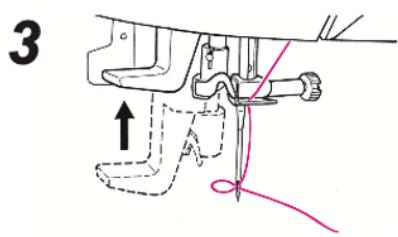
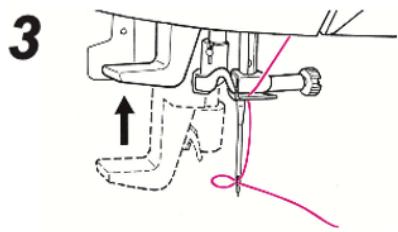
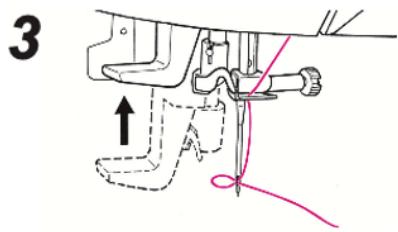
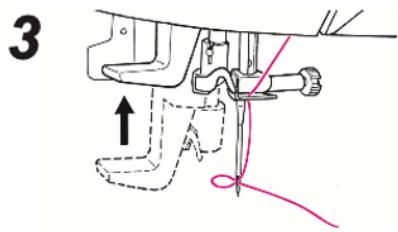
- Lower the presser foot and raise the needle to the upper position. Then lower the needle threader halfway (until the lever offers resistance) and pass the thread through the guide (A).
- Lower the needle threader completely. Then, pass the thread between the guides.
- Release the threading lever and the thread will be threaded into the needle eye. The threader will pass the thread through the eye of the needle.
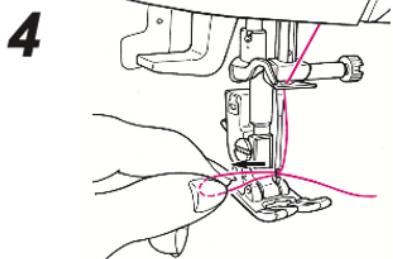
- Pull the thread out of the eye of the needle approximately 10 cm or 4 inches.


ENGLISH
Using the bobbin thread
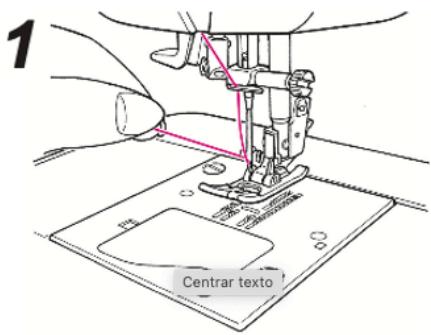
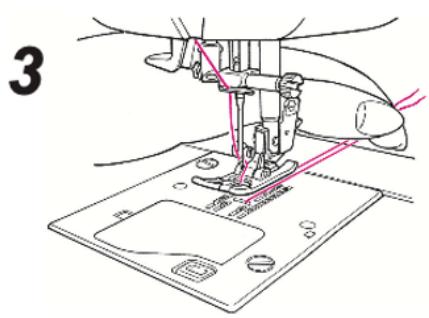
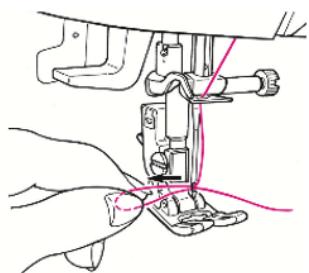
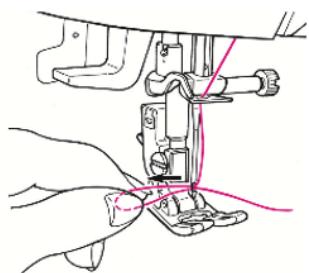
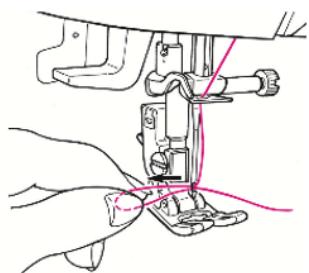
- Raise the presser foot and lightly hold the end of the needle thread.
- Turn the handwheel towards you to move the needle up and down. A loop of the bobbin thread will come loose when you pull the needle thread slightly.
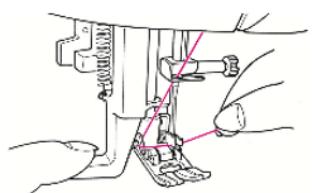
- Pull out both the needle and bobbin threads, approximately 10 cm (4 inches) long, and pass them under the presser foot toward the back of the machine.

Needle
The sewing machine needle plays an important role in successful sewing. Only use good-quality needles. We recommend system needles 130/705H. The needle pack included with the machine contains needles of the most commonly used sizes.
CAUTION: Make sure that the needle and thread you are using match. Thicker threads require a needle with a larger eye. If the needle eye is too small for the thread, the threader may not work properly.
NOTE: To avoid needle breakage, only use medium/low speed and the recommended needle on thick fabrics.
Important information about the needle

- Change the needle frequently. As a general rule, needles should be changed every 6-8 hours of actual sewing time.
- Always use a straight needle with a sharp point and make sure that the point is not bent or damaged (A).
- A defective needle (B) can cause skipped stitches, thread breakage or thread snapping. It could even damage the needle plate.
- Do not use asymmetrical twin needles (C) as they may damage the sewing machine.
Needle size selection guide - According to fabric and thread
 Fabric Fabric | [4276]Thread | 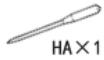 Needle Needle | |
| Lightweight materials | Batista | Silk thread --- No. 80, 90Spun yarn --- No. 80, 90 | No. 11 |
| Gauze | |||
| Tricot | Spun yarn --- No. 60 - 90 | No. 11Knitting needle | |
| Wool and synthetic fabrics | Silk thread --- No. 80, 90Spun yarn --- No. 60 - 90 | No. 11 - 14 | |
| Medium weight materials | Cotton and synthetic fabrics | Spun yarn --- No. 50, 60 | No. 11 - 14 |
| Light sweater | Silk thread --- No. 50Spun yarn --- No. 50, 60 | No. 11Knitting needle | |
| Common wool and synthetic fabrics | Silk thread --- No. 50Spun yarn --- No. 50, 60 | No. 11 - 14 | |
| Heavy materials | Denim | Spun yarn --- No. 30 - 60 | No. 14 - 16 |
| Jersey | Silk thread --- No. 50Spun yarn --- No. 50, 60 | No. 11 - 14Knitting needle | |
| Coat | Silk thread --- No. 50 | No. 11 - 14 |
- In general, the same thread is used for both the needle and the bobbin.
-
Fine thread and needle should be used for light fabrics and coarse thread and needle for heavy materials.
-
Check if the needle and thread combination is correct by performing a sewing test on the material to be sewn.
- When it is difficult to pass through an overlapping section, guide the fabric by hand.
Replacing the needle
IMPORTANT: Always unplug the sewing machine before replacing the needle.
Note: Before starting to change the needle, it may be helpful to place a small piece of paper or cloth under the needle area, over the needle plate hole, so that the needle does not accidentally fall into the machine.
-
Removing the needle:
-
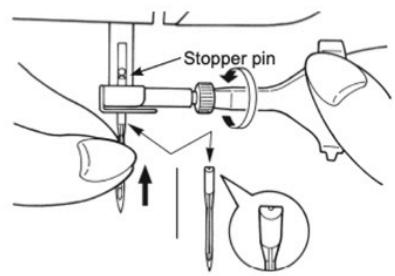
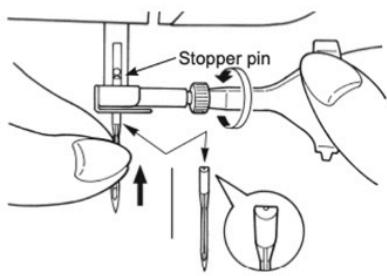
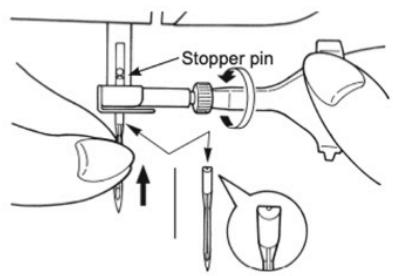
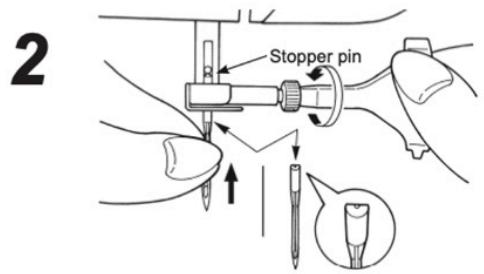
Turn the handwheel towards you until the needle reaches its highest position and lower the presser foot.
-
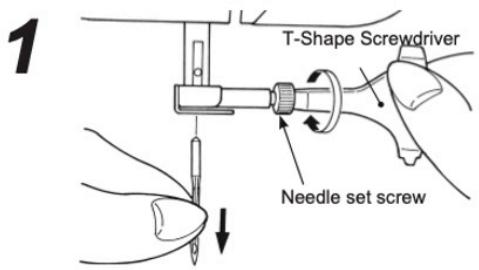
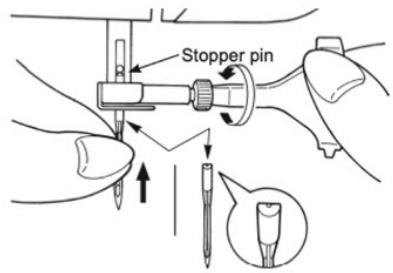
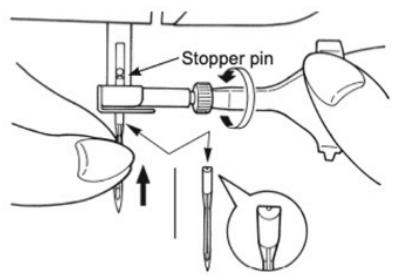
Turn the needle set screw 1 or 2 times and remove the needle.
-
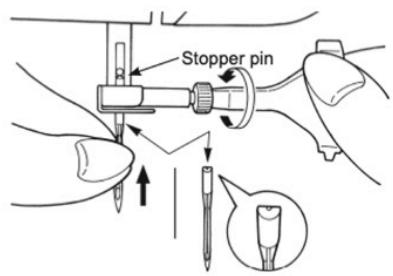
Installing the needle:
- Hold the needle with the flat side facing backwards and insert it until it touches the stop pin. Tighten the needle set screw securely. CAUTION: The machine will not sew if the needle is not correctly inserted or if a bent needle is used. This will cause damage to the machine.
2

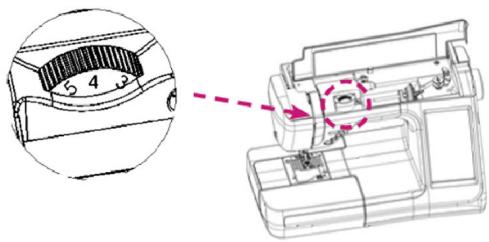
Adjusting thread tension
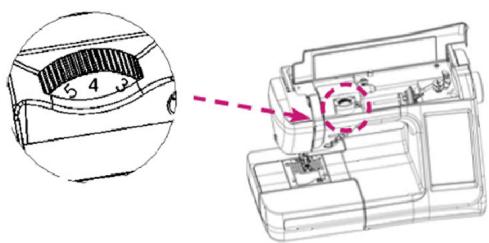
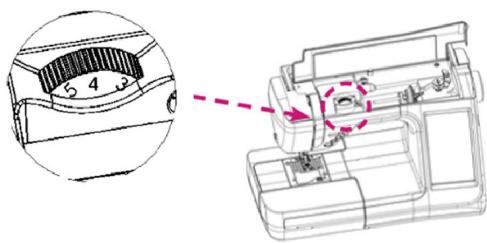
- To adjust thread tension, turn the dial on the front of the machine. You may need to adjust the tension depending on the fabric, thread, etc. For better appearance and longer stitch life, make sure that the needle thread tension is set correctly.
- When sewing, use a thread tension between 3-5
- For sewing, in general, the threads shall be evenly joined between the two layers of fabric (A).
- If the bobbin thread is visible at the top of the fabric, this means that the needle thread tension is too high (B). Reduce the needle thread tension.
- If the top thread is visible on the underside of the fabric, the needle thread tension is too loose (C). Increase the needle thread tension.
- For decorative stitches and buttonholes, the top thread must be visible on the underside of the fabric.
- Do some tests on a piece of the fabric to be sewn and check the tension.


Adjusting the drive teeth
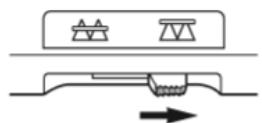
Remove the accessory box by pulling it to the left to access the pull handle.
- Move the drive knob to the right side to lower the drive teeth. This can be used for free motion quilting, button sewing, etc.
- Move the drive knob to the left side after sewing the above seams to raise the drive teeth again. The feed will be activated automatically when the machine starts sewing.


ENGLISH
4. DISPLAY
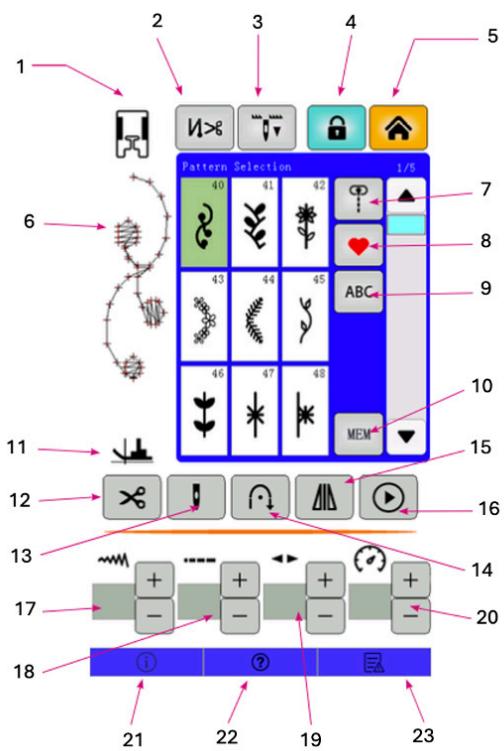
- Presser foot type indicator
- Button for activation/deactivation of auto-reverse/wire cutter
- Needle up/down stop position selection button
- Screen lock button
- Configuration
- Sample of the selected stitch pattern
- Common patterns
- Graphic patterns
- Monogram patterns
- Pattern memory
- Presser foot lift status
- Thread cutter
- Single/double needle selection
- Reverse stitch button (backward)
- Mirror stitch button
- Start/Stop button
- Stitch width adjustment
- Stitch length adjustment
- Adjusting the left/right position of the pattern
- Speed setting
- Model information
- Help
- Alert messages
Specific names and functions of operating buttons
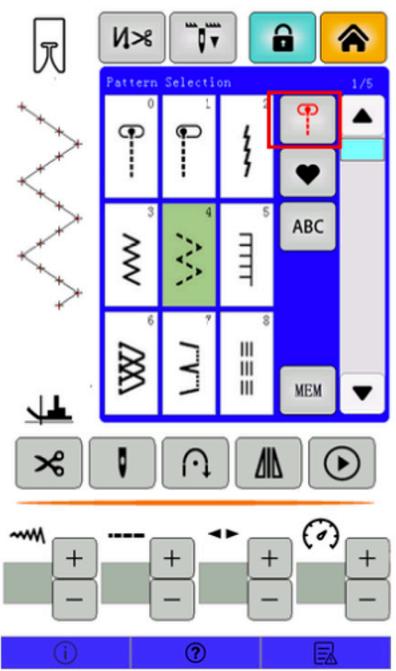
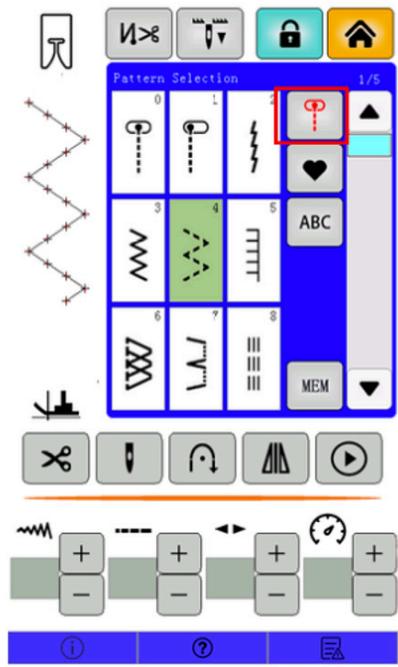
- By selecting buttons 7, 8 and 9, you can choose from 180 different patterns.
- Common patterns (7):
After selecting this option, select the number of the pattern you need.

The screen will display as follows:

2. Graphic patterns (8):
After selecting this option, select the number of the pattern you need.

The screen will display as follows:

3. Monogram patterns (9):
After selecting this option, select the number of the pattern you need.

The screen will display as follows:

- Pattern memory (10):
Use this function to memorize and/or edit monogram patterns.
ENGLISH
- How to combine patterns in memory:

Example: ABCD
Press the pattern memory button (10), press the pattern aggregation button (24), select the letter A and press the check button. The letter will be added to the first box of the memory screen.
Press the pattern aggregation button (24) again, select the letter B and press the check button. The letter will be added to the second box of the memory screen.
Press the pattern aggregation button (24) again, select the letter C and press the check button. The letter will be added to the third box of the memory screen.
Press the pattern aggregation button (24) again, select the letter D and press the check button. The letter will be added to the fourth box of the memory screen.
Press the memory screen check button (27) to save the combined pattern.
On the initial screen, the pattern memory button (10) will turn red and when the start/pause button is pressed, the machine will sew the memorized pattern.
- How to erase the pattern memory:
Once in the memory screen, press the pattern delete button (25) to delete the last added pattern. Press the delete button (26) to delete all patterns from the memory.
Once the desired patterns have been deleted, press the check button to return to the initial screen.
- Button for activating/deactivating the auto-reverse/thread cutter (2):


When this button is pressed, it will light up red indicating that the function has been activated. When the machine stops, it will automatically cut both threads at the end of the monogram stitch pattern.
The machine will automatically lock three stitches when starting to sew straight stitches. When you want to stop sewing, press the reverse button (14); the threads will be cut automatically. When the machine stops, the reverse button and the lock will no longer function.
When this function is deactivated, pressing the backward button (14) will cause the machine to perform only the backward sewing function.
- Needle up/down stop position selection button (3):


This button indicates the needle stop position, if the arrow points down, the needle will stop at its lowest position when sewing stops. If the arrow points up, the needle will stop at its highest position.
IMPORTANT: Always use the needle stop position selection button with the machine stopped.
To momentarily change the needle position, press this button once. The needle will move, but the button will not change, and when sewing is finished, the needle will return to the default position.
To change the stop position, press and hold the button for 3 seconds. Check that the arrow has changed direction when released. The needle will not move but, at the end of sewing, the needle will stop at the position indicated by the arrow.
- Screen lock button (4):


Press this button once to activate the screen lock. The icon will turn red and touching any other button will result in a locked screen warning. Press the button again to unlock the screen. The icon will return to black.
- Settings (5):


To enter the settings menu, press this button.
NOTE: It is not advisable to change the parameters of the configuration menu. To avoid unintentional changes, most menus will not be accessible. Consult an official technician to make these changes.

The accessible buttons of the configuration menu are:
- Display settings button (28): From this menu you can adjust the screen brightness, background color, touch calibration, perform a touch test and change the language.

- Stitch calibration button (29): From this button you can calibrate the stitch in the X and Y axis.
- Light on/off button (30) With this button you can switch the sewing light on/off.
Thread cutter (12):

Pressing this button will cut both threads.
Single/double needle selection (13):

Press this button to indicate the needle you want to use. When switching between single needle and twin needle, the machine will adjust the settings for the selected needle type.
CAUTION: When double needle is selected, graphic and monogram patterns will not be available. If you have previously selected one of these patterns, the machine will not allow you to select the twin needle; switch to the common pattern menu before selecting the twin needle.
Reverse stitch button (14):

Press and hold this button to make the machine sew backwards.
When button (2) is activated, if you press button (14) while the machine is sewing, the machine will sew 3 reverse stitches and then cut both threads.
Mirror stitch button (15):

Press this button to flip the selected pattern.
ENGLISH
Start/Stop button (16):

Press this button to start or stop sewing. You can also press the start/stop button on the front of the machine.
Stitch width adjustment (17):

Press the + or - buttons to increase or decrease the stitch width.
NOTE: This function is not available for all patterns.
Stitch length adjustment (18):
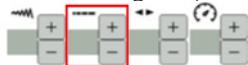
Press the + or - buttons to increase or decrease the stitch length.
Adjustment of the left/right position of the pattern (19):
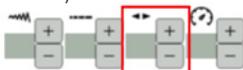
Press the + or - buttons to move the pattern to the right or left of the center axis.
NOTE: This function is not available for all patterns.
Stitch speed adjustment (20):

Press the + or - buttons to increase or decrease the sewing speed.
5. SEWING
- When the pattern selection setting is complete, the machine will enter sewing standby state.
- Thread the upper thread, attach the looper thread, position the fabric correctly and lower the presser foot.
- Press the start/stop button at the bottom right of the display or the start/stop button on the top of the front cover of the machine to start sewing. Press it again to stop the machine from sewing.
- Press the thread cut button after sewing; the machine will automatically cut the upper and lower threads.
- Make sure the needle is in the highest position when raising the presser foot and remove the fabric to complete the operation.
Note: Correctly use the presser foot for the corresponding function when performing sewing operations; otherwise, sewing may fail or the needle may break, causing personal injury.
5.1. Stitches
Straight stitch
| Pattern number | Common pattern 0 | |
| Presser foot | Standard | |
| Thread tension | Manual adjustment |
Zigzag stitch
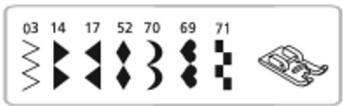
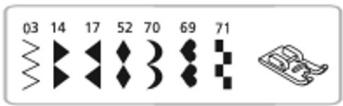
| 03 | Pattern number | Common pattern 3 |
| Presser foot | Standard | |
| Thread tension | Manual adjustment |
Overedge stitch
Overcast stitch 1
| 06 | Pattern number | Common pattern 6 |
| Presser foot | For overcasting |
Overcast stitch 2
| 14 | Pattern number | Common pattern 14 |
| Presser foot | For overcasting |
This stitch is used to overcast medium to heavy weight materials.
Overcast stitch 3
| 15 | Pattern number | Common pattern 15 (light weight fabrics) |
| Presser foot | For overcasting |
This overedge stitch is used for overcasting light materials
3-stitch zigzag overedge stitches
| 04 | Pattern number | Common pattern 4 |
| Presser foot | Standard |
This stitch is used to prevent the cut edge of the fabric from fraying. Leave a seam allowance and cut the sewn fabric carefully so that the stitches are not cut by the scissors.
IMPORTANT: Do not use the presser foot for overcasting.
5.2. Sewing applications
Sewing elastic fabrics
Baste the fabric pieces together and then sew without stretching the fabric.

Sewing fine fabrics
When sewing thin fabrics, the stitch may become misaligned or the fabric may not feed properly. Use stabilizing material under the fabric and sew it together with the fabric. Remove the excess stabilizer material when you have finished sewing.
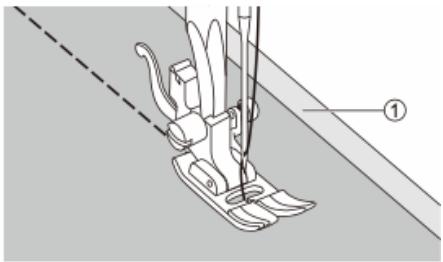
Sewing heavy fabrics
Press the black button on the left side of the presser foot to lock it in the horizontal position and lower the presser foot simultaneously. This ensures an even feed at the beginning of a seam and helps when sewing multiple layers of fabric, such as when sewing over seams when hemming jeans.
When you reach a thicker area or cross stitch, lower the needle and raise the presser foot lever. Press the toe of the foot on the horizontal line and press the black button. Lower the foot and resume sewing. The black button is automatically released after sewing a few stitches.
You can also place another piece of fabric or cardboard of the same thickness (1) on the back of the seam. Or support the presser foot while feeding manually and sew toward the folded side.

Sewing elastic fabrics
The stretch stitch is suitable for elastic and durable seams that stretch with the fabric without breaking. Ideal for elastic and knitted fabrics, as well as for strong seams in firm fabrics such as denim.
NOTE: Use stretch stitches also as visible decorative seams.
Straight stretch stitch
The straight elastic stitch reinforces elastic and strong seams three times. Use the all-purpose foot.

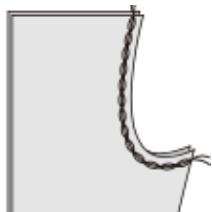
Sew an elastic band to the fabric
By attaching an elastic band, you can sew, for example, an elastic arm cuff or an elastic waistband.
NOTE: When measuring the length of the elastic band for sleeves or waistband, please note that, in the finished elastic waistband, the band stretches when worn.
Use the multi-purpose presser foot to sew the elastic band to the fabric:
- Pin the elastic band at a few points on the back of the fabric to make sure it is positioned evenly on the fabric.
- Sew the elastic band to the fabric while stretching it to the same length as the fabric. When pulling the fabric behind the presser foot with your left hand, hold the fabric by the nearest pin in front of the presser foot with your right hand.
WARNING: When sewing, make sure that the sewing machine needle does not touch any pins, otherwise the needle may bend or break.

Sobrehilado
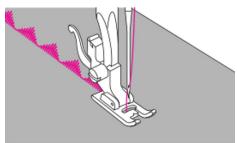
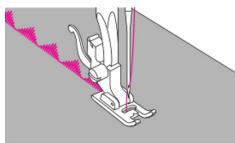
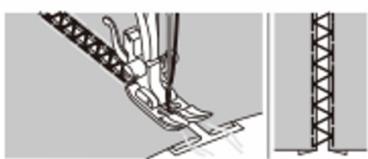
By sewing overlock stitches along the edge of the fabric, you can prevent fraying.
Sewing overcasting stitch with the multi-purpose presser foot:
- Attach the multi-purpose presser foot.
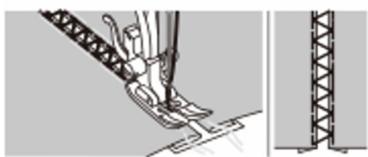
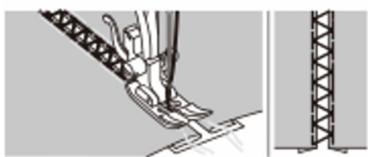
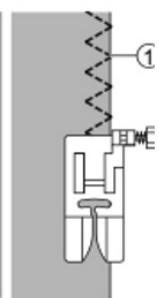
- Sew overcasting stitches along the edge of the fabric so that the needle falls on the right side of the fabric (needle drop stitch).


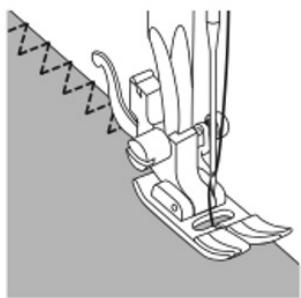

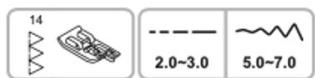
Sewing overcasting stitch with the overcasting foot:
1 Attach the overcasting foot.
2 Sew the fabric with the edge of the fabric resting against the presser foot guide for overcasting. The needle overlaps the fabric on the right side (needle drop stitch).
NOTE: Please test the needle position and make sure it does not hit the presser foot before sewing.


Invisible hem
The seam with this stitch is not visible on the right side of the fabric.
NOTE: Use the invisible hem stitch for hemming skirts and pants.
NOTE: Use the same fabric as for the project and test sew beforehand.
- Use the blind hem foot.
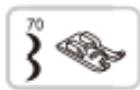
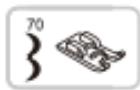
- Use stitch 18 for invisible hems on solid fabrics.
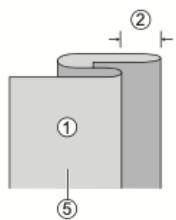
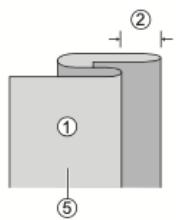
- Fold the fabric as shown, so that the left side (back of the fabric) is facing up.
NOTE: For heavy weight fabrics, follow the illustration on the left. For light/medium weight fabrics, follow the illustration on the right.


(1)
Back of fabric (left)
(2) Distance (5 mm)
(3) Illustration for heavyweight fabrics
(4) Overedge stitch
(5) Illustration for low/medium weight fabrics
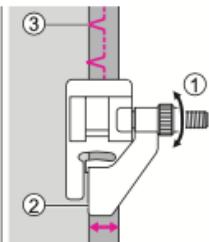
- Place the fabric under the presser foot. Turn the handwheel forwards until the needle moves completely to the left. It should pierce right through the fold of the fabric (3). If it does not, adjust the stitch width accordingly. Adjust the guide by turning the knob (1) so that the guide is right against the fold (2).

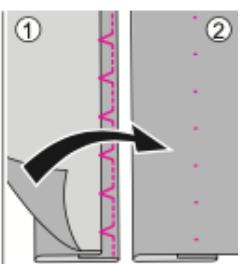
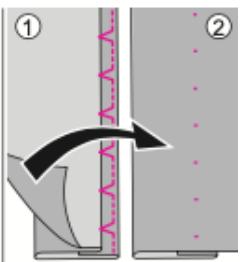
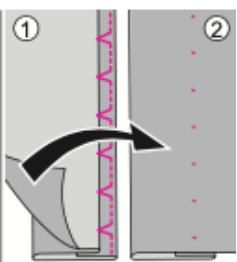
- Sew slowly, guiding the fabric carefully along the edge of the guide. Turn the fabric over. The illustration shows the sewing results.
(1) Invisible hem backside
(2) Invisible hem front side


Buttonhole making
NOTE: Adapt the eyelets to the size of the button.
NOTE: For stretch or thin fabrics, it is recommended to use stabilizer/auxiliary material for better buttonhole sewing. Slightly reduce the upper thread tension with the thread tension dial.
NOTE: Use the same fabric as for the sewing project and test sew beforehand.
Use the buttonhole presser foot. Use:
- Stitch 09 for fine or medium fabrics
- Stitch 24/25 for suits or coats
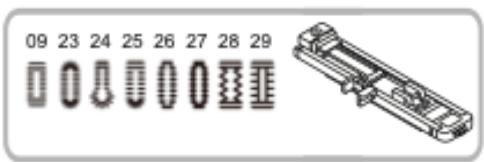
The buttonholes are sewn from the front of the presser foot to the back.
Examples:
09.
![graph LR A["↑"] --> B["→"] B --> C["↑"] C --> D["→"] D --> E["←"] E --> F["→"] F --> G["↑"] G --> H["→"] H --> I["←"]](/content/2026/08/1600226/images/c15e5d8d8fcde1cbfb4c651f37d86e3c84d95d713606e754865f7f6aeac2c485.jpg)
ENGLISH
24.
![graph LR A["↑"] --> B["↓"] B --> C["→"] C --> D["↑"] D --> E["→"] E --> F["↓"] F --> G["→"] G --> H["↑"] H --> I["→"] I --> J["↑"] J --> K["→"]](/content/2026/08/1600226/images/19e469997387ea3406e3f1f65e0692476a23dabd1f7138e08294f82acbbed2de.jpg)
25.
![graph LR A["↑"] --> B["↓"] B --> C["→"] C --> D["←"] D --> E["→"] E --> F["↑"] F --> G["↓"] G --> H["→"] H --> I["↑"] I --> J["→"] J --> K["↑"] K --> L["→"]](/content/2026/08/1600226/images/9e82ce8820aed13a8bad4fd9a9240cdd001d09458e74f7e562b70b9cd0a86e3a.jpg)
Reinforcing seams
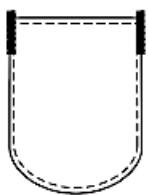
The lock stitch is used to reinforce points subject to tension, such as pocket corners and openings.
NOTE: It is suggested that you sew with stabilizing material under the fabric.
Use the buttonhole presser foot:
- Extend the button fastener plate (1) and adjust it to the desired length. Adjust the stitch width and length to the desired width and density.
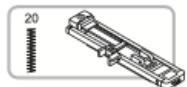
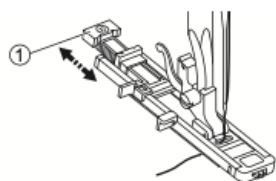
- Attach the buttonhole foot to the sewing machine. Pass the thread through the hole in the presser foot so that it is under the presser foot.
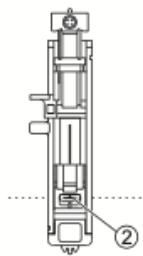
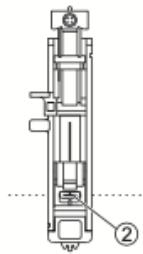
- Align the fabric so that the needle is 2 mm (1) in front of the position where you want to start sewing (2); then lower the presser foot lever.


- Lower the buttonhole lever all the way down. It should be behind the holder on the buttonhole presser foot.
- Lightly hold the end of the upper thread and start sewing until the locking stitch is finished.
Button stitching
Buttons can be sewn on with the sewing machine. Buttons with 2 or 4 holes can be attached.
Use the button sewing foot.
- Slide the drag lever to the position to lower it.
- Place the work under the presser foot and the button in the desired position. Then lower the presser foot.
- Select the buttonhole stitch and adjust the stitch width according to the distance between the two button holes.
- Turn the handwheel to check that the needle enters cleanly into the left and right holes of the button.
- For buttons with 4 holes, sew through the two front holes first, push the work forward and then sew through the two back holes as shown in the image to the left. Alternatively, you can sew the button sewing stitch crosswise as shown in the illustration on the right.
When the job is finished, move the drag lever to the raised drag mark.
IMPORTANT: The drag can only be raised by turning the handwheel.

Sewing of zippers

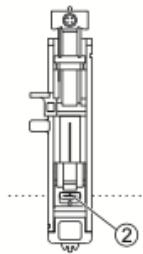
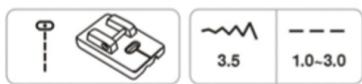
Use the multi-purpose presser foot and zipper presser foot.
NOTE: The zipper foot can be adjusted to sew on either side of the zipper. The edge of the presser foot guides the zipper so that it is straight.
NOTE: The zipper foot should only be used for sewing straight stitches. Using this presser foot can cause the needle to strike and break.
NOTE: When sewing, make sure that the needle does not touch the zipper, otherwise the needle may bend or break.
Zipper centered seam
- Insert the multi-purpose presser foot.
- Place the right sides of the fabric on top of each other and sew to the end of the zipper opening with a seam allowance of approximately 2 cm. Secure the seam with a few reinforcement stitches. In the area of the zipper opening, baste the seam with a thread tension less than 2 and with the maximum stitch length. Press over the seam allowance. Place the zipper down over the seam allowance with the teeth against the seam line. Baste the zipper tape to the fabric to prevent it from slipping.

(1) Back of fabric (left)
(2) 2 cm seam allowance
(3) 5 mm distance to the lower end of the zipper
(4) Seam basting
(5) Reinforcement stitches
- Attach the zipper presser foot.
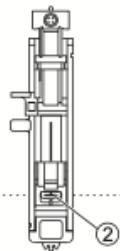
NOTE: When sewing the left side of the zipper, attach the right side of the presser foot holder (1) to the fastener. When sewing the right side of the zipper, attach the left side of the presser foot holder (2) to the fastener.

IMPORTANT: The zipper should not be sewn through both layers of fabric.
- Sew around the zipper. Remove the basting seams and iron the sewing piece.
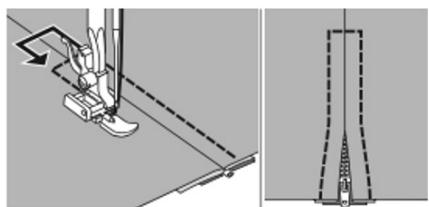
Concealed zipper seam on one side:
- Insert the multi-purpose presser foot.
- Place the right sides of the fabric on top of each other and sew to the end of the zipper opening with a seam allowance of approximately 2 cm. Secure the seam with a few reinforcement stitches. In the area of the zipper opening, baste the seam with a thread tension less than 2 and with the maximum stitch length. Fold back a seam allowance to the left. Fold the other seam allowance to the right to make a 3mm wide fold.

(1) Rear side of fabric
(2) 2 cm seam allowance
(3) 5 mm distance to the lower end of the zipper
(4) Baste the seam
(5) Reinforcement stitches
(6) 3 mm wide crease
ENGLISH
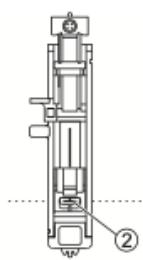
- Attach the zipper presser foot.
NOTE: To sew on the left side of the zipper, attach the zipper foot with the right cross bar. - Sew the zipper to the fabric piece with the additional 3 mm, starting from the end of the zipper. Stop the sewing machine about 5 cm from the top of the zipper. Lower the needle into the fabric and lift the two-step presser foot lever. Open the zipper and continue sewing.
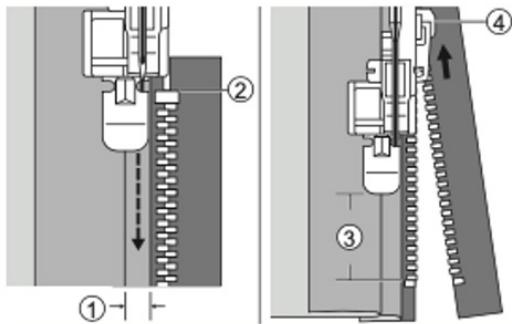
- Turn the sewing piece right side out. To sew on the right side of the zipper, attach the zipper foot with the left cross bar.
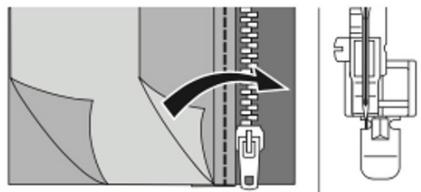
- Sew through the bottom end, then sew the right side of the zipper until approximately 5 cm before the end. Remove the basting thread and open the zipper. Sew the rest of the seam.
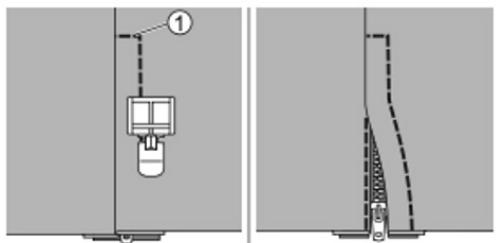
- Concealed zipper
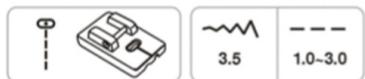
Concealed zippers provide invisible closure on skirts, dresses and a variety of garments and accessories.
Use the presser foot for concealed zippers:
- Insert the presser foot for concealed zippers.
NOTE: Make sure the needle is aligned with the center mark.
NOTE: Be sure to use stabilizing material when sewing the zipper.
- Place the open zipper down on the right side of the fabric.
- Attach the zipper so that the spiral at the seam line is 1.6 cm and the top stop 1.9 cm below the cut edge of the fabric.
- With the right slot of the presser foot on the spiral, sew the zipper until the presser foot touches the slider.
NOTE: Remove the needles step by step.
- Secure the seam at the end with a few reinforcement stitches.
- To attach the other half of the zipper, place it down as before, so that the spiral at the seam line is 1.6 cm and the top stop 1.9 cm below the cut edge of the fabric. Then fix it with pins.
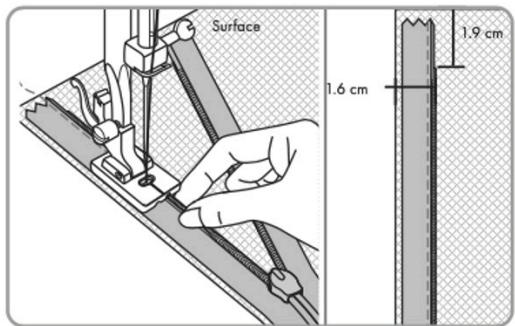
Make sure that the zipper is not twisted at the bottom.
- Use the left slot of the presser foot, making sure that the center mark is still aligned with the needle and stitch, as before.
- Close the zipper.
- Place the zipper under the right slot of the presser foot as shown.
- Attach the seam under the zipper opening.
-
Fold the end of the zipper out of the way and lower the needle by hand slightly above and to the left of the last stitch.
-
Sew the seam for about 5 cm in width as shown.
- Attach the multi-purpose presser foot and complete the seam.

Stitching with satin stitch
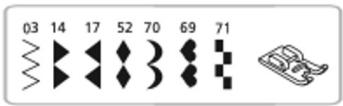
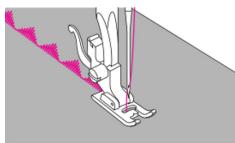
Use the satin stitch presser foot to sew satin stitches and decorative stitches.
When sewing very light fabrics, it is recommended to use interlining or stabilizer on the back of the fabric.
The satin stitch presser foot has a groove at the bottom that allows dense seams to pass freely underneath. Insert the satin stitch presser foot.
To sew the satin or decorative stitch, you may need to adjust the stitch length and width. Experiment with fabric scraps
until you get the desired length and width.
Gathering
Ideal for clothing and home decoration. It works best on fine to medium weight fabrics.
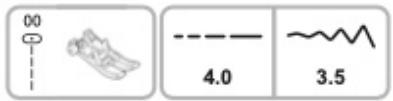
Use the all-purpose foot.
- Before sewing, make sure that the upper and lower threads are extended about 5 cm to leave enough space for sewing. See chapter "How to remove the looper thread" for more information.
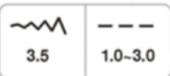
- Adjust the thread tension below 2. Sew one row (or several rows) of straight stitches.
- Pull the lower threads and distribute the gathers evenly. Secure the threads at the other end.

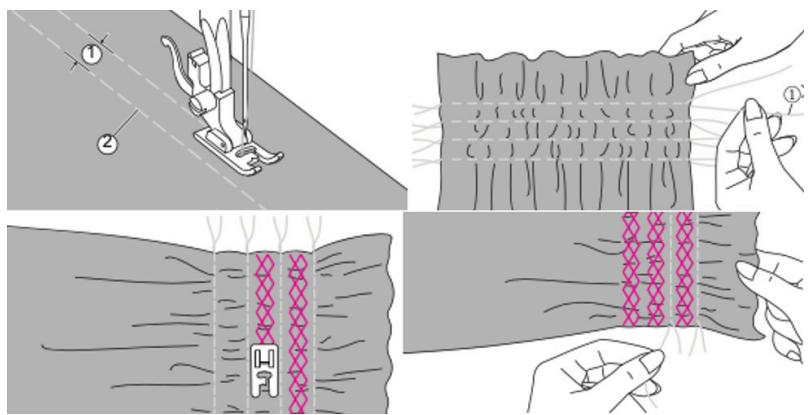
Honeycomb
The decorative stitch on the gathers is called "honeycomb". It is used to decorate the front of blouses or cuffs. The honeycomb stitch adds texture and elasticity to the fabric.

Use the presser foot for satin stitch.
- Increase the stitch length to maximum, adjust the thread tension below 2 and sew parallel basting seams 1 cm apart along the area to be gathered.
- Knot the threads on one side. Pull the lower threads and distribute the gathers evenly. Secure the threads at the other end.
- Reduce tension if necessary and sew decorative stitches between straight basting seams.
- Remove the basting seams.
ENGLISH
Padding
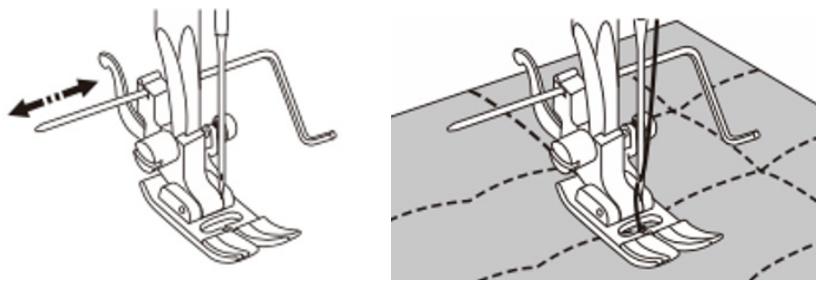
Placing padding between the top and bottom layers of fabric is called “quilting”. The top layer is generally formed by geometric pieces of materials bonded together.

Use the multi-purpose presser foot with the edge/quilting guide.
Use the edge/quilting guide.
- Place the edge/quilting guide on the presser foot holder and adjust the distance as desired.
- The first row is the first row. Continue slipping the fabric to sew the next rows.
Use the edge/quilting guide to orient yourself to the previous row of stitching.
Sewing pieces of fabric together

Use the standard presser foot.
Place the two pieces of fabric right side together and join them with the straight stitch. Join the fabric pieces with a 5 mm seam allowance.

Applying appliqués
NOTE: You can create an applique by cutting a different piece of fabric into a shape and using it as a decoration.

Use the standard presser foot.
- Cut out the desired design and baste it onto the fabric. Sew slowly around the edge of your appliqué.
- Trim excess material away from the stitches. Make sure not to cut any stitches. Remove the basting seams.

Entanglements

Sewing through an open seam is called “interfacing”. It is used in blouses and children’s clothing. This stitch is more decorative when thicker thread is used.
Use the standard presser foot.
- Align the breaks in the fabric pieces 4 mm apart and baste them into a water-soluble fleece.
- Align the center of the presser foot with the center of the two pieces of fabric and start sewing. The water-soluble fleece dissolves when washed.

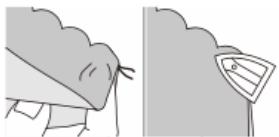
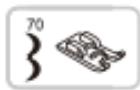
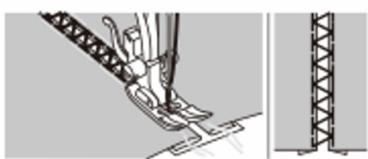
Shell hem
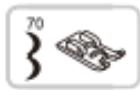
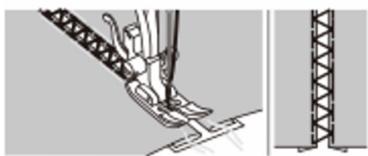
Use the all-purpose foot.
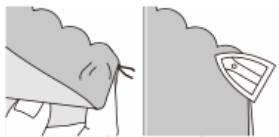
- Fold the fabric with right sides together. Sew along the folded edge.
- Cut the fabric along the hem, leaving 3 mm for hemming and cut this hem.
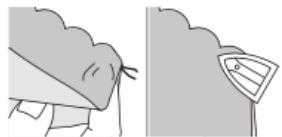
- Turn the fabric over, press the curved hem outwards onto the surface and iron it.
NOTE: For best results, spray starch on the fabric and iron with a hot iron before sewing.

6. CLEANING AND MAINTENANCE
Daily machine maintenance
To ensure that the sewing machine always works properly, clean it regularly. Daily oiling (lubrication) of the machine is not necessary. Wipe the outside surface of the machine with a soft cloth to remove dust or lint build-up.
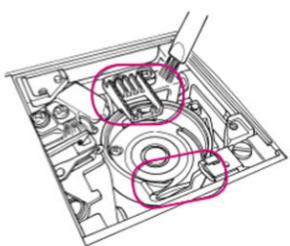
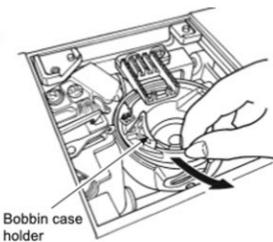
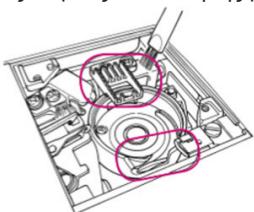
Cleaning the bobbin area
CAUTION: Lift the needle and switch off the machine before starting cleaning.
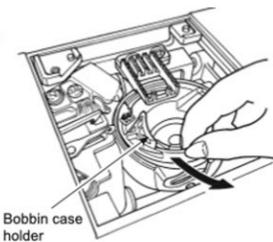
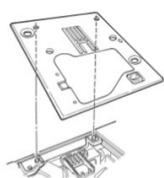
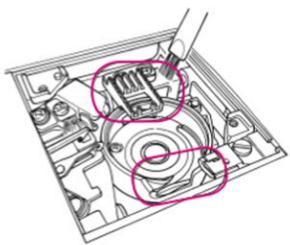
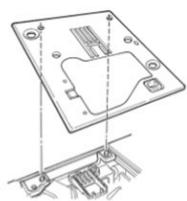
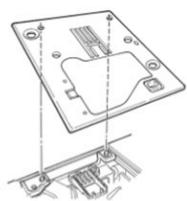
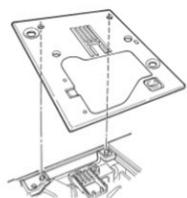
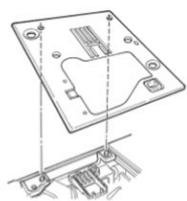
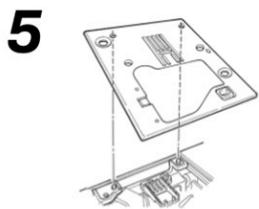
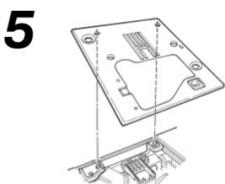
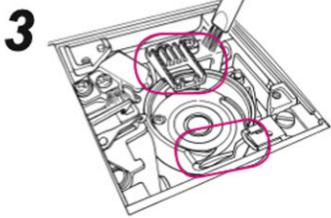
- Remove the needle and presser foot and remove the needle plate using a T-shaped screwdriver.
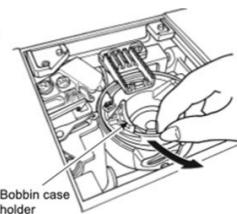
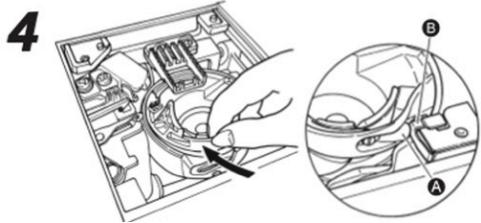
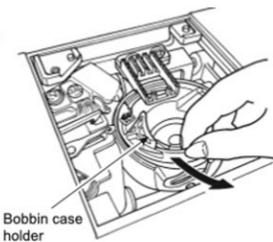
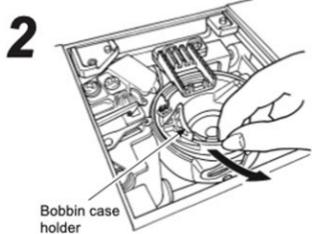
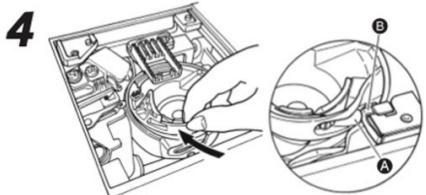
- Remove the bobbin case
- Remove lint and dirt around the drag and the bobbin holder with the cleaning brush.
- Install the bobbin case so that points A and B align.
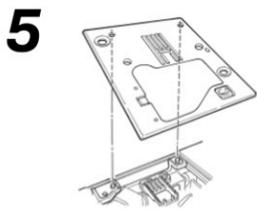
- When positioning the needle plate, align the positioning pins with the holes in the plate.

2
3


5

- TROUBLESHOOTING
| PROBLEM | POSSIBLE CAUSES | POSSIBLE SOLUTIONS |
| The machine suddenly stops sewing. | The machine sews at low speed continuously. | Turn off the machine and wait a moment (about 10 minutes). The safety mechanism will reset and the machine will return to normal. |
| The machine stops while sewing. | Tangled thread or bent needle; motor locks up. | Eliminate the cause(s) of the thread tangle. Check if the needle is bent. Turn off the machine before checking the needle. |
| The machine stops after a few stitches. | Low temperature, thread tangling, excessive motor load. | Leave the machine in the room to adjust to the temperature. Eliminate the cause(s) of the thread tangle. |
| The machine does not work at start-up. | The presser foot is raised. | Lower the presser foot and begin sewing. |
| The machine does not operate when the start/stop button is pressed. | The needle hits the presser foot.The needle has fallen into the hook area.The pedal is connected. | Use the correct presser foot.Remove the needle from the hook area.The start/stop button will operate when the foot pedal is removed. |
| The needle breaks | Thick material with fine needle.Needle incorrectly inserted or screw loose. | Check the combination of fabric, thread and needle.Make sure the needle is properly installed and the screw tightened. |
| Loud noise when sewing. | Lint or dust on the drag or hook. | Clean the drag and hook area. |
| The machine does not feed the fabrics. | Stitch length set to "0".She is sewing soft fabrics like towels.Drag lowered. | Reselect the stitch pattern, the needle will return to the original setting.Adjust the stitch length to 3 - 5.Set the drag knob to the left side. |
| The needle cannot be threaded. | The needle is not in the high position.The needle is not fully inserted. | Turn the hand wheel and lift the needle.Check the needle installation. |
| The threading lever does not return to the original position. | The hand wheel was turned while the threading lever was down. | Turn the handwheel slightly to the opposite side when sewing. |
| The thread breaks. | The machine is incorrectly threaded.There is a knot in the thread.The manual thread tension is incorrect. | Thread the machine correctly.Remove the knot from the thread.Adjust the thread tension manually according to the fabrics and yarns. |
| The appliance skips stitches | The thread tension is incorrect.Bent needle.Incorrect needle installation.Incorrect threading of the bobbin thread. | Adjust the thread tension.Replace the needle.Install the needle correctly.Check the threading of the bobbin thread. |
| The thread tension is not good. | Incorrect threading of the needle or bobbin thread.Incorrect direction of the reel cover. | Thread the machine correctly and check the threading of the bobbin thread.Place the reel cover in the correct direction. |
| Fabric wrinkles | The stitch length is too long on light fabrics.The needle tip is broken. | Reduce the stitch length.Replace the needle. |
8. DISPOSAL OF OLD ELECTRICAL AND ELECTRONIC APPLIANCES

This symbol indicates that, according to the applicable regulations, the product and/or batteries must be disposed of separately from household waste. When this product reaches the end of its service life, you must remove the batteries/accumulators and take it to a collection point designated by local authorities.
For detailed information on how to properly dispose of electrical and electronic equipment and/or the corresponding batteries, consumers should contact their local authorities.
Compliance with the above guidelines will help to protect the environment.
9. COPYRIGHT
The intellectual property rights over the texts in this manual belong to CECOTEC INNOVACIONES, S.L. All rights reserved. The content of this publication may not, either in part or in its entirety, be reproduced, stored in a retrieval system, transmitted or distributed by any means (electronic, mechanical, photocopying, recording or similar) without prior authorisation from CECOTEC INNOVACIONES, S.L.
10. SIMPLIFIED EU DECLARATION OF CONFORMITY
CE Cecotec Innovaciones hereby declares that this appliance complies with the essential requirements and other relevant provisions of the regulations applicable in the European Union. This appliance has been designed, manufactured and tested in compliance with required safety and quality standards. The full text of the EU Declaration of Conformity can be found on the following website: https://cecotec.es/es/information/declaration-of-conformity
1. PIÈCES ET COMPOSANTS
2x80/12 2x90/14
NOTE
Changer le support du pied-de-biche
FRANÇAIS
3

⑤ Bobbin winding regulator
4

Insérer la bobine


Enfiler la machine


Enfiler l'aiguille


FRANÇAIS
2


FRANÇAIS
4. ÉCRAN
Coudre tissus fins
Ourlet invisible
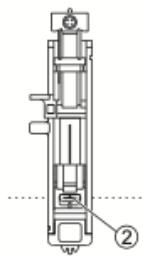


Point de satin

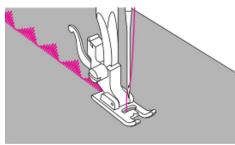
Pied-de-biche universel.
Nid d'abeille
Rembourrage
Utilisez le pied-de-biche standard.
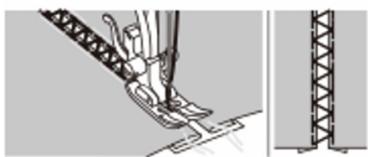
Ourlet coquille
Pied-de-biche universel.

6. NETTOYAGE ET ENTRETIEN
2
3

4

5
7. RÉSOLUTION DE PROBLÈMES
Hinweis


Einsetzen der Spule

Maschineneinfädeln

Einfädeln der Nadel

2
B


4. DISPLAY
- Musterspeicher (10):
Feine Stoffe nähen
Stretchstoffe nähen
Unsichtbarer Saum


Knopflöcher nähen
Plattstichheftung


Bienenwabenstich
Steppung


- PROBLEMBEHEBUNG
NOTA
ITALIANO
3
⑤ Bobbin winding regulator
4

Inserire la spolina


Infilare l'ago
ITALIANO
2


ITALIANO
4. DISPLAY
Cucire tessuti fini
Orlo invisibile
Cucitura di asole
- Zip invisibile

Nido d'ape
Imbottito
Montaggio applique

Orlo a conchiglia


3


5

NOTA
PORTUGUÊS
3

⑤ Bobbin winding regulator
4




Enfiar a agulha


PORTUGUÊS
2


PORTUGUÊS
4. ECRÃ
Tecidos elásticos para costura
Coser o ponto de remate com o calcador de remate:
Bainha invisível
Reforçar as costuras
Ponto de cetim costura


Favo de me
Algodão
Bainha da casca
2

3
5
Accessoires meegeleverd in accessoiredoos

OPMERKING



De machine inrijgen
Rijg de naald in
NEDERLANDS
2



4. SCHERM
Stretchstoffen naaien

Onzichtbare zoom

Knoopsgaten naaien

Ritsen naaien

Honeycomb
Bodembedekking

Schelp zoom

6. SCHOONMAAK EN ONDERHOUD

3


5

7. PROBLEEMOPLOSSING
UWAGA
3

⑤ Bobbin winding regulator
4
Wtóż szpulkę



Nawlekanie maszyny
2

4
Igta
2




4. WYŚWIETLACZ


Satynowe przeszycie
Plaster miodu
Wyściółka

Szew muszelkowy

6. CZYSZCZENIE I KONSERWACJA
2
3


5
- ROZWIAZYWANIE PROBLEMÓW
POZNÁMKA
ČEŠTINA
3
⑤ Bobbin winding regulator
4

Vložte cívku


Navlékání stroje

2
4
ČEŠTINA
Jehla
2



ČEŠTINA
4. OBRAZOVKA
Šití jemných látek
Šití těžkých látek

Neviditelný lem


Zesílení švů

Šití zipů


Skrytý zip

Honeycomb
Padding

Skořepinový lem

6. ČIŠTĚNÍ A ÚDRŽBA
2

3


5
7. ŘEŠENÍ PROBLÉMŮ
NOT
TÜRKÇE
3
⑤ Bobbin winding regulator
4




2
4
TÜRKÇE



TÜRKÇE
4. EKRAN
Sürfile ayağı ile sürfile dikişi dikin:
Görünmez etek ucu


İlik dik
Fermuar dikimi

- Gizli fermuar
Saten dikiş dikişi

Bal Peteği
Kapitone

Kabuk etek

6. TEMIZLIK VE BAKIM
2
3


5
7. SORUN GIDERME
MEGJEGYZÉS

3
⑤ Bobbin winding regulator
4



A gép menetvágása
Füzze be a tút
MAGYAR
2


4. KÉPERNYŐ
Start/stop gomb (16):

Láthatatlan szegély


Gomblyukak varrása

Cipzárvarrás

- Rejtett cipzár

Szatén öltés öltés

Méhsejt
Párnázott
Kagylószegély
3


7. HIBAELHÁRÍTÁS
NOTA
3
⑤ Bobbin winding regulator

Inserir la canilla


Enfilar la màquina
Enfilar l'agulla
Agulla
2



4. PANTALLA
Cosir teles fines
Cosir teles pesades

Doblecs invisible

Cosir traus
Reforçar costumes
Costura de cremalleres

- Costura de cremallera oculta a un costat:
- Cremallera oculta

Les cremalleres ocultes proporcionen un tancament invisible a faldilles, vestits i una varietat de peces i accessoris.
Niu d'abella
Encoixinat
Col·locar aplics
Doblecs en petxina

6. NETEJA I MANTENIMENT


ΣΗΜΕΙΩΣΗ
3

⑤ Bobbin winding regulator


4. OΘONH
Αόρατο στρίφωμα

Ράψιμο κουμπότρυπες

Ράψιμο φερμουάρ


- Κρυφό φερμουάρ

Κέλυφος μελιού
Πάπλωμα
Προσαρμογή απλικέ

Στεφάνι κελύφους


3
أداة تشذيب Chip
تغيير قدم المكيس

ملاحظة
Bobbin winding shaft 4

3

⑤ Bobbin winding regulator
4

إدخال المكوك
②
③


④

خيط الإبرة
2

3

4

رفع خيط المكوك
الإبرة
2


ضبط شد Chip

ضبط أseenان المحرك
23 24 25 26 27 28 29 30 31 32 33 34 35 36 37 38 39

.٢ :٨
(1)
(2)
(٢)
(ξ)
(0)
ظهر القماش (يسار)
المسافة (٥ مم)
خياطة العراوي
خياطة السحابات

- السحاب المخفي

قرص العصل
خياطة الحف

إرفاق الزخرف
حاشية Palace


https://cecotec.es/es/information/declaration-of-conformity
www.cecotec.es


- SOMMAIRE
- INSTRUCTIONS DE SÉCURITÉ
- NOTA
- ESPAÑOL
- INSERTAR LA CANILLA
- ENHEBRAR LA MÁQUINA
- ENHEBRAR LA AGUJA
- PANTALLA
- COSER TELAS FINAS
- COSER TELAS PESADAS
- COSER OJALES
- CREMALLERA OCULTA
- NIDO DE ABEJA
- ACOLCHADO
- COLOCAR APLIQUES
- LIMPIEZA Y MANTENIMIENTO
- NOTE
- BEFORE USE
- BOX CONTENT
- OPERATION
- BUTTON FUNCTIONS
- THREAD CUTTER BUTTON
- REVERSE STITCHING BUTTON
- POWER CONNECTION
- POWER SWITCH POSITIONS
- STORAGE AFTER SEWING
- USING THE FOOT CONTROLLER
- PRESSER FOOT LEVER
- THREAD CUTTER
- CHANGING THE PRESSER FOOT
- CHANGING THE PRESSER FOOT HOLDER
- SEAM GUIDE LINES ON THE NEEDLE PLATE
- WINDING THE BOBBIN
- INSERTING THE BOBBIN
- THREADING THE MACHINE
- THREADING THE NEEDLE
- ENGLISH
- USING THE BOBBIN THREAD
- NEEDLE
- IMPORTANT INFORMATION ABOUT THE NEEDLE
- NEEDLE SIZE SELECTION GUIDE - ACCORDING TO FABRIC AND THREAD
- REPLACING THE NEEDLE
- ADJUSTING THREAD TENSION
- ADJUSTING THE DRIVE TEETH
- DISPLAY
- SPECIFIC NAMES AND FUNCTIONS OF OPERATING BUTTONS
- GRAPHIC PATTERNS (8)
- MONOGRAM PATTERNS (9)
- PATTERN MEMORY (10)
- SEWING
- STITCHES
- OVEREDGE STITCH
- SEWING APPLICATIONS
- SEWING ELASTIC FABRICS
- SEWING FINE FABRICS
- SEWING HEAVY FABRICS
- STRAIGHT STRETCH STITCH
- SEW AN ELASTIC BAND TO THE FABRIC
- SOBREHILADO
- SEWING OVERCASTING STITCH WITH THE MULTI-PURPOSE PRESSER FOOT
- SEWING OVERCASTING STITCH WITH THE OVERCASTING FOOT
- INVISIBLE HEM
- BUTTONHOLE MAKING
- REINFORCING SEAMS
- BUTTON STITCHING
- SEWING OF ZIPPERS
- ZIPPER CENTERED SEAM
- CONCEALED ZIPPER SEAM ON ONE SIDE
- CONCEALED ZIPPER
- GATHERING
- HONEYCOMB
- PADDING
- SEWING PIECES OF FABRIC TOGETHER
- APPLYING APPLIQUÉS
- ENTANGLEMENTS
- SHELL HEM
- CLEANING AND MAINTENANCE
- DAILY MACHINE MAINTENANCE
- CLEANING THE BOBBIN AREA
- DISPOSAL OF OLD ELECTRICAL AND ELECTRONIC APPLIANCES
- COPYRIGHT
- SIMPLIFIED EU DECLARATION OF CONFORMITY
- PIÈCES ET COMPOSANTS
- CHANGER LE SUPPORT DU PIED-DE-BICHE
- FRANÇAIS
- INSÉRER LA BOBINE
- ENFILER LA MACHINE
- ENFILER L'AIGUILLE
- ÉCRAN
- COUDRE TISSUS FINS
- OURLET INVISIBLE
- POINT DE SATIN
- PIED-DE-BICHE UNIVERSEL
- NID D'ABEILLE
- REMBOURRAGE
- OURLET COQUILLE
- NETTOYAGE ET ENTRETIEN
- RÉSOLUTION DE PROBLÈMES
- HINWEIS
- EINSETZEN DER SPULE
- MASCHINENEINFÄDELN
- EINFÄDELN DER NADEL
- MUSTERSPEICHER (10)
- FEINE STOFFE NÄHEN
- STRETCHSTOFFE NÄHEN
- UNSICHTBARER SAUM
- KNOPFLÖCHER NÄHEN
- BIENENWABENSTICH
- STEPPUNG
- ITALIANO
- INSERIRE LA SPOLINA
- INFILARE L'AGO
- CUCIRE TESSUTI FINI
- ORLO INVISIBILE
- CUCITURA DI ASOLE
- ZIP INVISIBILE
- NIDO D'APE
- IMBOTTITO
- MONTAGGIO APPLIQUE
- ORLO A CONCHIGLIA
- PORTUGUÊS
- ENFIAR A AGULHA
- ECRÃ
- TECIDOS ELÁSTICOS PARA COSTURA
- COSER O PONTO DE REMATE COM O CALCADOR DE REMATE
- BAINHA INVISÍVEL
- REFORÇAR AS COSTURAS
- FAVO DE ME
- ALGODÃO
- BAINHA DA CASCA
- ACCESSOIRES MEEGELEVERD IN ACCESSOIREDOOS
- OPMERKING
- DE MACHINE INRIJGEN
- RIJG DE NAALD IN
- NEDERLANDS
- SCHERM
- STRETCHSTOFFEN NAAIEN
- ONZICHTBARE ZOOM
- KNOOPSGATEN NAAIEN
- RITSEN NAAIEN
- BODEMBEDEKKING
- SCHELP ZOOM
- SCHOONMAAK EN ONDERHOUD
- PROBLEEMOPLOSSING
- UWAGA
- WTÓŻ SZPULKĘ
- NAWLEKANIE MASZYNY
- IGTA
- WYŚWIETLACZ
- SATYNOWE PRZESZYCIE
- PLASTER MIODU
- WYŚCIÓŁKA
- SZEW MUSZELKOWY
- CZYSZCZENIE I KONSERWACJA
- POZNÁMKA
- ČEŠTINA
- VLOŽTE CÍVKU
- NAVLÉKÁNÍ STROJE
- JEHLA
- OBRAZOVKA
- ŠITÍ JEMNÝCH LÁTEK
- ŠITÍ TĚŽKÝCH LÁTEK
- NEVIDITELNÝ LEM
- ZESÍLENÍ ŠVŮ
- ŠITÍ ZIPŮ
- SKRYTÝ ZIP
- SKOŘEPINOVÝ LEM
- ČIŠTĚNÍ A ÚDRŽBA
- ŘEŠENÍ PROBLÉMŮ
- NOT
- TÜRKÇE
- EKRAN
- SÜRFILE AYAĞI ILE SÜRFILE DIKIŞI DIKIN
- GÖRÜNMEZ ETEK UCU
- İLIK DIK
- FERMUAR DIKIMI
- GIZLI FERMUAR
- SATEN DIKIŞ DIKIŞI
- BAL PETEĞI
- KAPITONE
- KABUK ETEK
- TEMIZLIK VE BAKIM
- SORUN GIDERME
- MEGJEGYZÉS
- A GÉP MENETVÁGÁSA
- FÜZZE BE A TÚT
- MAGYAR
- KÉPERNYŐ
- LÁTHATATLAN SZEGÉLY
- GOMBLYUKAK VARRÁSA
- CIPZÁRVARRÁS
- REJTETT CIPZÁR
- SZATÉN ÖLTÉS ÖLTÉS
- MÉHSEJT
- PÁRNÁZOTT
- KAGYLÓSZEGÉLY
- HIBAELHÁRÍTÁS
- INSERIR LA CANILLA
- ENFILAR LA MÀQUINA
- ENFILAR L'AGULLA
- AGULLA
- COSIR TELES FINES
- COSIR TELES PESADES
- DOBLECS INVISIBLE
- COSIR TRAUS
- REFORÇAR COSTUMES
- COSTURA DE CREMALLERA OCULTA A UN COSTAT
- NIU D'ABELLA
- ENCOIXINAT
- COL·LOCAR APLICS
- DOBLECS EN PETXINA
- NETEJA I MANTENIMENT
- ΣΗΜΕΙΩΣΗ
- OΘONH
- ΑΌΡΑΤΟ ΣΤΡΊΦΩΜΑ
- ΡΆΨΙΜΟ ΚΟΥΜΠΌΤΡΥΠΕΣ
- ΡΆΨΙΜΟ ΦΕΡΜΟΥΆΡ
- ΚΡΥΦΌ ΦΕΡΜΟΥΆΡ
- ΚΈΛΥΦΟΣ ΜΕΛΙΟΎ
- ΠΆΠΛΩΜΑ
- ΠΡΟΣΑΡΜΟΓΉ ΑΠΛΙΚΈ
- ΣΤΕΦΆΝΙ ΚΕΛΎΦΟΥΣ
Brand : CECOTEC
Model : Bellecouture 36000 Control
Category : Sewing machine