Bellecouture 1500 A90 Eu01 001152 - Sewing machine CECOTEC - Free user manual and instructions
Find the device manual for free Bellecouture 1500 A90 Eu01 001152 CECOTEC in PDF.


| Product type | Sewing machine |
| Brand | Cecotec |
| Model | Bellecouture 1500 A90 Eu01 001152 |
| Sewing speed | 1500 stitches per minute |
| Number of stitches | 22 stitch patterns |
| Stitch width | Adjustable up to 7 mm |
| Stitch length | Adjustable up to 5 mm |
| Automatic buttonhole | In 1 step |
| Needle threader | Automatic |
| Thread cutter | Automatic |
| Lighting | Integrated LED |
| Power supply | 220-240 V ~ 50 Hz |
| Motor power | 90 W |
| Weight | 5.5 kg |
| Dimensions | 40 x 18 x 30 cm |
| Extension table | Included |
| Accessories included | Bobbins, needles, spool holder, screwdriver, presser feet |
| Care and cleaning | Dust the bobbin compartment after each use |
| Safety | On/off switch and lock button |
| Spare parts | Available from the manufacturer |
| Warranty | 2 years |
| General information | Downloadable user manual in French |
Frequently Asked Questions - Bellecouture 1500 A90 Eu01 001152 CECOTEC
User questions about Bellecouture 1500 A90 Eu01 001152 CECOTEC
0 question about this device. Answer the ones you know or ask your own.
Ask a new question about this device
Download the instructions for your Sewing machine in PDF format for free! Find your manual Bellecouture 1500 A90 Eu01 001152 - CECOTEC and take your electronic device back in hand. On this page are published all the documents necessary for the use of your device. Bellecouture 1500 A90 Eu01 001152 by CECOTEC.
USER MANUAL Bellecouture 1500 A90 Eu01 001152 CECOTEC
- Parts and components 25
- Before use 26
- Operation 26
- Sewing 32
- Cleaning and maintenance 36
- Troubleshooting 37
- Technical specifications 39
- Disposal of old electrical and electronic appliances 40
- Technical support and warranty 40
SOMMAIRE
Read these instructions thoroughly before using the appliance. Keep this instruction manual for future reference or new users.
- Use the appliance only for the purposes described in this manual. Use only accessories recommended by Cecotec.
- This appliance is designed for domestic use only and is not intended for bars, restaurants, farmhouses, hotels, motels, and offices.
- This appliance can be used by children aged 8 years and above and people with reduced physical, sensory, or mental capabilities or lack of experience and knowledge if they have been given supervision or instruction concerning use of the appliance in a safe way and understand the hazards involved. Children must not play with the appliance. Cleaning and user maintenance should not be carried out by unsupervised children.
-
The appliance may only be used with the power supply unit supplied with it.
-
Turn off and unplug the appliance from the power supply immediately after use or if it is to be left idle for some time.
- Do not pull on the cable to unplug it. To unplug the appliance, pull the plug, not the cord.
- If the power cable is damaged, it must be replaced by a special cable or assembly to be supplied by the manufacturer or its after-sales service.
- Always unplug the sewing machine from the power outlet before carrying out any maintenance operations or when making any adjustments in the needle area, such as threading the thread, changing the presser foot, etc.
- Do not use the appliance if it shows visible signs of damage. In case of malfunction or breakdown, please contact the official Cecotec Technical Support Service.
- Do not try to open, disassemble, or repair the device by yourself.
- Never start the sewing machine if the ventilation holes are blocked. Keep the ventilation holes of the sewing machine and foot pedal free of lint, dust and remnants.
- Do not insert any foreign objects into any holes.
- Do not use the appliance outdoors.
- Do not use the machine in a place where aerosols are being used or oxygen is being administered.
- Keep fingers away from moving parts. Take special care with the needle.
- Do not use the machine if the needle plate is damaged, as the needle may break.
- Do not use needles that are bent.
- Do not pull or push the fabric while sewing. This could deflect the needle and break it.
- Cecotec accepts no liability for damage caused by improper or incorrect use.
INSTRUCTIONS DE SÉCURITÉ
Zona de la aguja
NOTA:
3. FUNCIONAMIENTO
Palanca del prensatelas
Cortahilos

ESPAÑOL
2
③
④

Enhebrar la máquina

Agujas
Tensión del hilo
Terminar la costura
ESPAÑOL

Tejido elástico
ESPAÑOL
Cremallera centrada
- Removable sewing table/Free arm: provides a flat surface when sewing and allows storing accessories. Remove the sewing table to use the free arm which facilitate sewing, e.g. trouser hems and sleeves.
- Presser foot lifter
- Thread cutter: used to cut the thread ends at the end of the seam.
- Tension discs: positioned behind the thread tension knob.
- Thread tension knob: used to set the desired tension for the stitch, thread and fabric.
- Thread slots: thread trajectory considering the tension discs and thread take-up lever.
- Handwheel: used to manually control the movement of the needle and thread take-up lever.
- Pattern selection knob: used to select stitch patterns and buttonhole settings.
- Piece for balancing buttonholes.
- Reverse stitch switch: press and hold to sew in reverse, e.g. when securing the beginning or end of a seam.
- Power socket and foot control.
- Power switch

Top of the machine
- Thread take-up lever
- Bobbin winder tension knob
- Thread guide
- Handle
- Spool pin
- Bobbin winder stop
- Bobbin winder shaft

Needle zone
- Needle plate: it provides a flat area around the presser foot for sewing. The guidelines indicate various seam allowances used to guide the fabric during sewing.
- Feed dogs: they feed the fabric under the presser foot when sewing.
- Presser foot: it holds the fabric against the feed dogs which pull the fabric under the presser foot while sewing.
- Presser foot holder screw: loosen the screw to remove the presser foot holder.
- Presser foot holder: it holds the presser foot.
- Presser foot bar: it accommodates the presser foot holder.
- Needle clamping screw: it secures the needle.
- Needle thread guide: it helps to maintain thread flow when sewing.
- Bobbin cover: it protects the bobbin while sewing.

NOTE:
The graphics in this manual are schematic representations and may not exactly match the device.
ENGLISH
2. BEFORE USE
- This appliance is packaged in a way as to protect it during transport. Take the appliance out of its box and remove all packaging materials. You can keep the original box and other packaging elements in a safe place. This will help you prevent damage to the appliance when transporting it in the future. In case the original packaging is disposed of, make sure all packaging materials are recycled accordingly.
- Make sure all parts and components are included and in good conditions. If there is any piece missing or in bad conditions, contact the official Cecotec Technical Support Service immediately.
- Wipe the machine with a dry cloth to remove any lint and/or excess oil around the needle area.
NOTE: this sewing machine has been designed to give the best sewing result at normal room temperature. Extreme heat and cold can affect the sewing result.
Box content
- Sewing machine
- Accessory kit
- Instruction manual
Do not remove the product's serial number to ensure proper traceability of your device in case you request assistance.
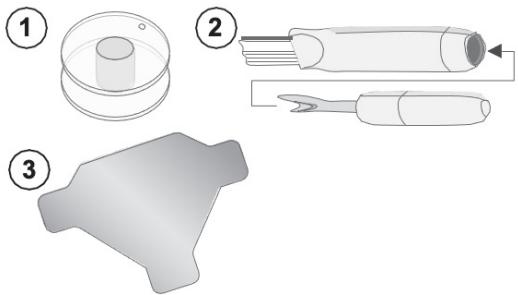
Accessories
- Bobbin x3: only use the type of transparent bobbins included with the machine. One of the bobbins is inserted in the machine at the time of delivery.
- Ripper/brush: used for stitch removal/lint removal.
- Screwdriver: used to remove the needle plate, presser foot holder or needle screw.
Accessories included (not shown in the figure)
- Needles
- Foot control
- Power cable
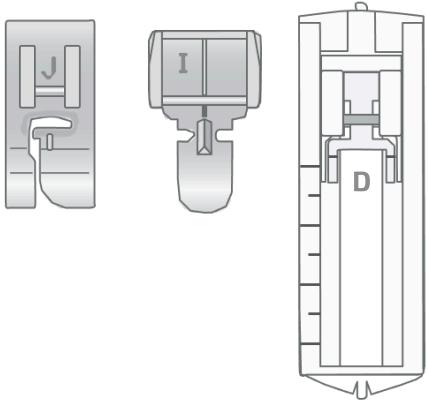
Presser foot
Multipurpose presser foot (J) (supplied)
This presser foot is used for general sewing on most types of fabric. The bottom of the presser foot is flat, so that the fabric is held firmly on the feed dog while sewing. It also has a wide slot that allows the needle to move from left to right, depending on the stitch.
Zipper foot (I)
This presser foot is used to insert zips. Attach the presser foot to the presser foot holder on either side of the foot, depending on which side of the zip you are sewing. This presser foot can also be used to create and insert piping.
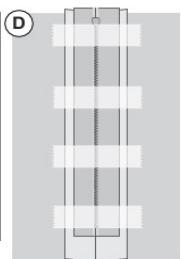
Four step buttonhole foot (D)
This presser foot is used to make a 4-step buttonhole. It holds the fabric securely while sewing the top, bottom, left and right sides of your buttonhole.
3. OPERATION
Stitch overview
The stitches described in the table below are utility stitches, mainly used for utility sewing. When sewing, use a thread tension between 3-5. Always test sew on a scrap piece of fabric and adjust the tension if necessary.
| [604X] | [A234X] | App | |
 | Centre position of the straight stitch |  | The basic stitch used for sewing. The most common use of a straight stitch is to sew two pieces of fabric together.Use stitches with a longer stitch length when sewing on heavy fabric. |
| [60+3] | Straight stitch, left position |  | Use for top stitching. |
 | Zigzag stitch |  | A very versatile stitch for decorative stitching, appliqué, attaching ornaments, and more. |
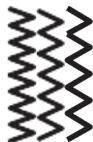 | Satin stitch | 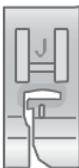 | Use for decorative sewing and appliqué. |
| [svcc] | Multi-step zigzag stitch | — | Finish seam allowances to prevent the fabric from unravelling. When finishing seams, the smaller step of the stitches will help to keep the fabric flatter than a regular zigzag stitch. It can also be used for mending tears and sewing elastics. |
| [owm] | Blind hem stitch | — | Sew hems that are practically invisible on the right side of the fabric. Used for skirts, dresses, trousers, curtains, etc., made of non-stretch fabrics. |
| [awo] | Stretch blind hem stitch | — | Sew hems that are practically invisible on the right side of the fabric. Used for garments and other projects made from stretch knitted fabrics. |
 | Buttonhole | 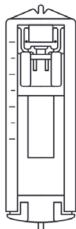 | Sew buttonholes in home decoration, garments, crafts and much more. |
Connection to the power supply
- The accessories include a power cable and foot pedal.
Note: consult a qualified electrician if you are in any doubt about how to connect the machine to the power supply. Unplug the power cable when the machine is not in use.
- On the bottom right side of the sewing machine, you will find the connection sockets and the power switch.
- Connect the power cable to the socket on the bottom right of the machine (A). Plug the power cable into the wall socket.
- Set the power switch (B) to "I" to switch on the machine and the light.
- The sewing speed is regulated by pressing the foot control.
Note: after switching off the machine, residual energy may remain in the machine. The light may remain on for a few seconds while this energy is consumed. This is normal for an energy efficient appliance.

Putting away after sewing
- Switch off the appliance. After switching off the appliance, residual energy may remain in the machine. The light may remain on for a few seconds while this energy is consumed. This is normal for an electrical appliance.
- Unplug the power cord from the wall socket and then from the machine.
- Wrap the cable around the foot control for easy storage.
- Place all accessories in the removable sewing table. Insert the sewing table onto the machine.
- Place the foot control and the cable in the space above the free arm.
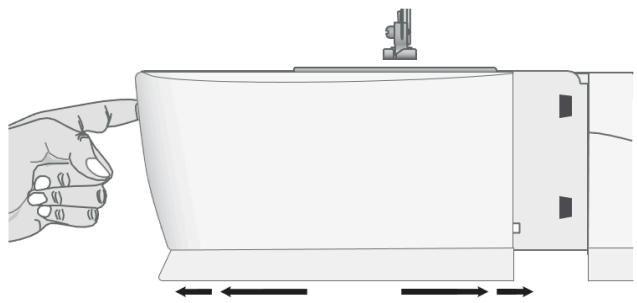
Free arm/Removable sewing table
- Store presser feet, bobbins, needles and other accessories in the removable sewing table so that they are easily accessible.
- Keep the sewing table on the machine to provide a larger, flatter work surface.
- Use the free arm to facilitate the sewing of trouser legs and sleeve hems. To use the free arm, remove the sewing table. When attached, a hook keeps the removable sewing table firmly attached to the machine. Remove the sewing table by sliding it to the left.
Presser foot lifter
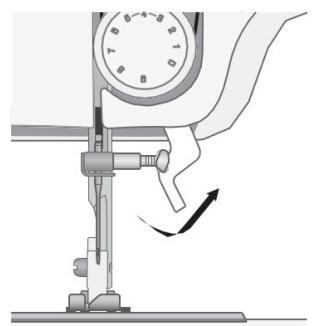
- The presser foot lifter is located on the side of the sewing machine head. The lifter is used to raise and lower the presser foot. Raise the lifter to thread the machine. Lower it to sew.
- When the presser foot is in the raised position, press the lifter higher to obtain more space under the presser foot. This is good for sewing thick projects.

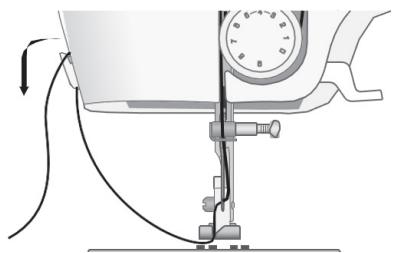
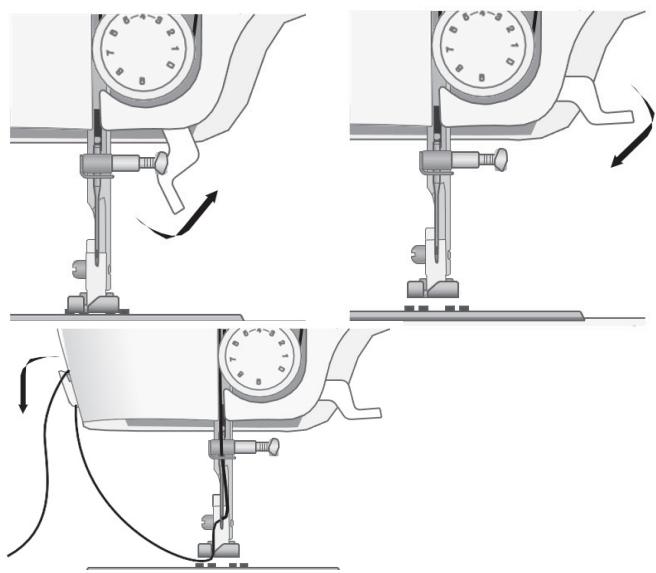
Thread cutter
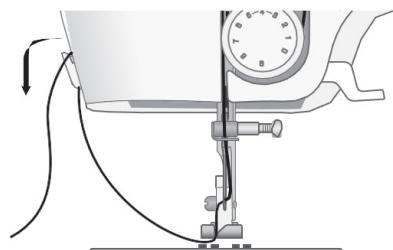
To use the thread cutter, pull the thread from the back to the front as illustrated. This will leave the thread ends long enough so that the needle will not unravel when you start sewing again.
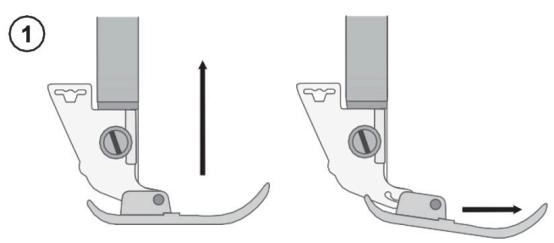
Changing the presser foot
- Check that the needle is in the highest position and the presser foot is lifted. The presser foot release lever extends from the back of the presser foot holder. Press this lever to release the presser foot.
- To attach a presser foot to the holder, place the desired presser foot with the pin directly under the slot of the presser foot holder. Lower the presser foot lever so that the presser foot snaps into place.
Note: if you find it difficult to set the presser foot in the correct position, keep the release lever pressed down while lowering the presser foot. Use your thumb to carefully guide the presser foot into the correct position and it will click into place.

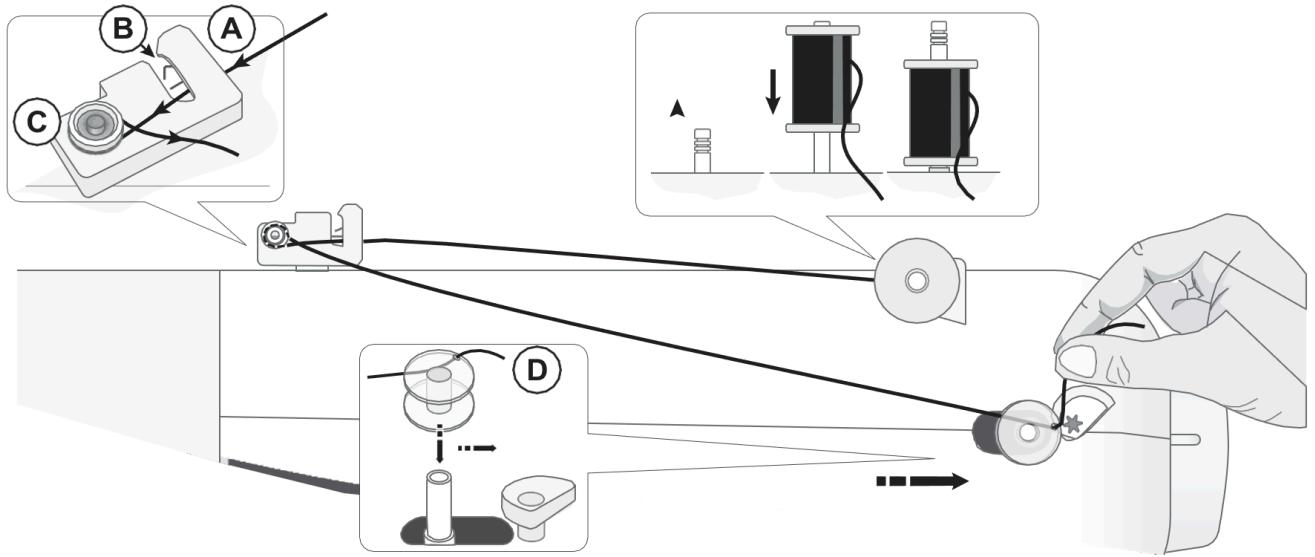
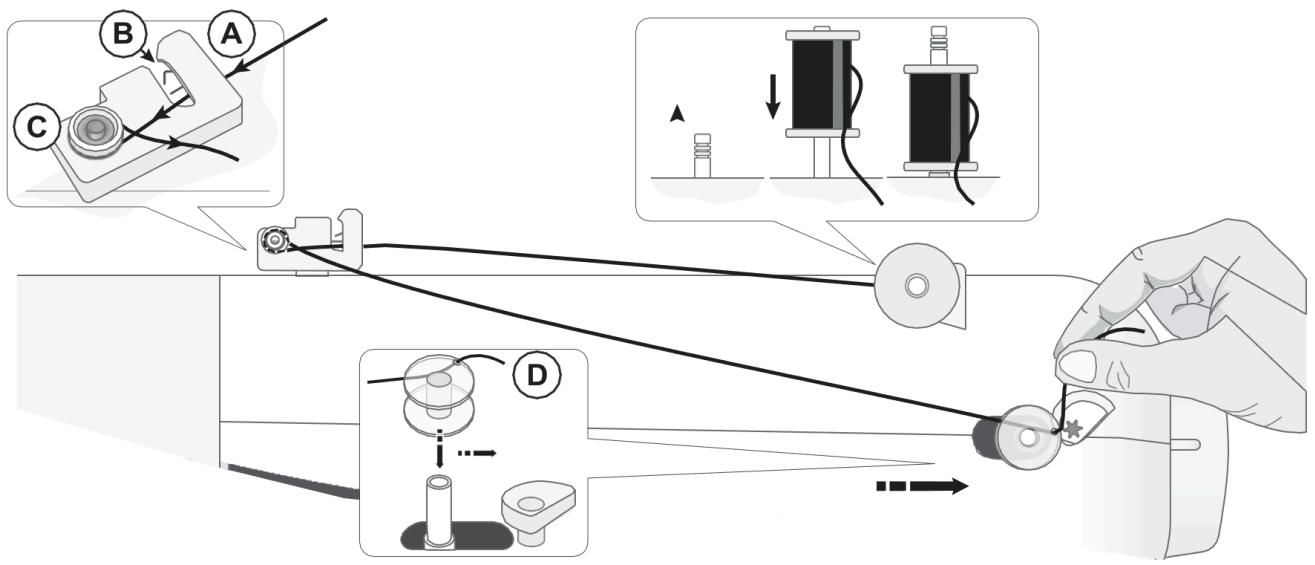
Winding the bobbin

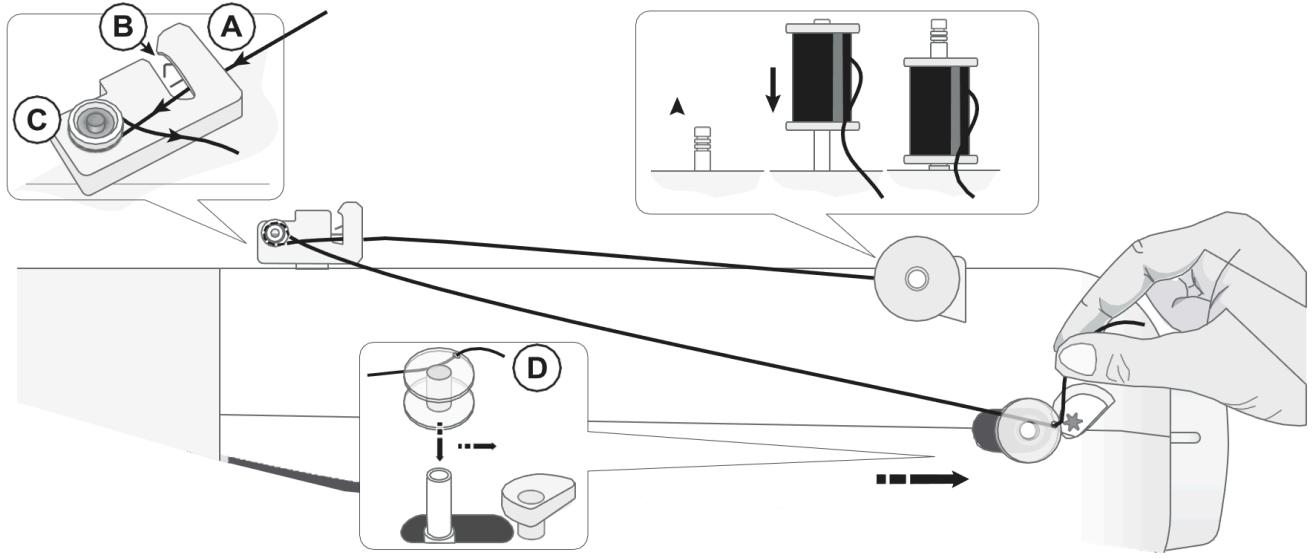
- Pull up the spool pin to its full extent.
- Place a thread spool on the spool pin.
- Place the thread into the thread guide (A) from back to front. Make sure that the threads slide into the spring (B). Pull the thread clockwise around the bobbin winder tension disc (C).
- Thread through the bobbin hole (D) from the inside out.
- Place the bobbin on the bobbin winder shaft. Make sure that the bobbin is pushed down firmly.
- Push the bobbin winder shaft to the right. Hold the end of the thread and step on the foot control to start winding. After a few turns, release the foot control to stop winding. Cut the excess thread off the bobbin, making sure to cut it close to the bobbin. Step on the foot control to resume winding. When the bobbin is full, the bobbin winding will slow down.
- Remove the foot from the foot control to stop the winding.
- Push the bobbin winder shaft to the left. Remove the bobbin and cut the thread.
Note: when the bobbin winder shaft is pushed to the right, the machine will not sew. Be sure to push the bobbin winder shaft to the sewing position (left) before sewing.
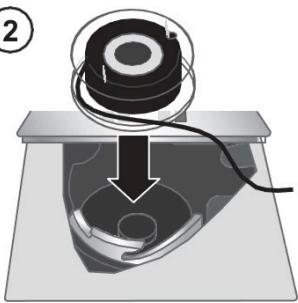
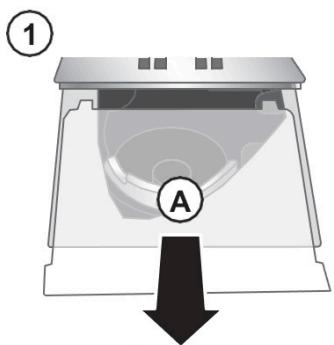
Inserting the bobbin
Note: make sure that the needle is fully raised, and the machine is switched off before inserting or removing the bobbin.
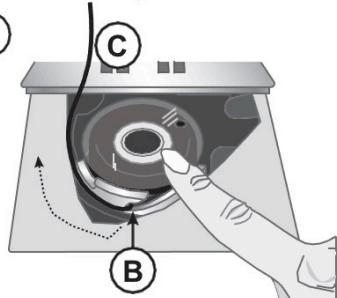
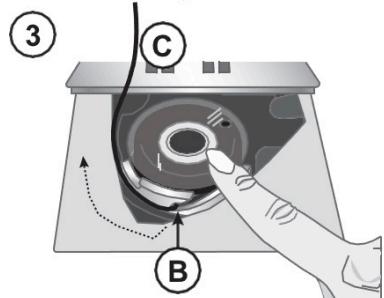
- Remove the bobbin cover (A) by sliding it forward.
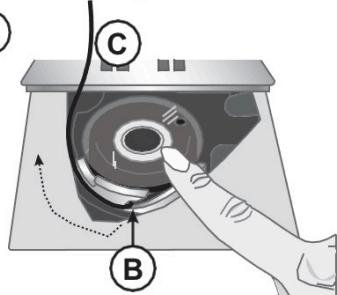
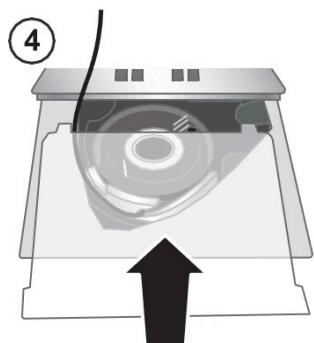
- Insert the bobbin into the bobbin case with the thread sliding counterclockwise.
- Pull the thread through the opening (B). Pull out about 15 cm (6 inches) of thread and place it on the back of the stitch plate (C).
- Attach the bobbin cover plate.


ENGLISH
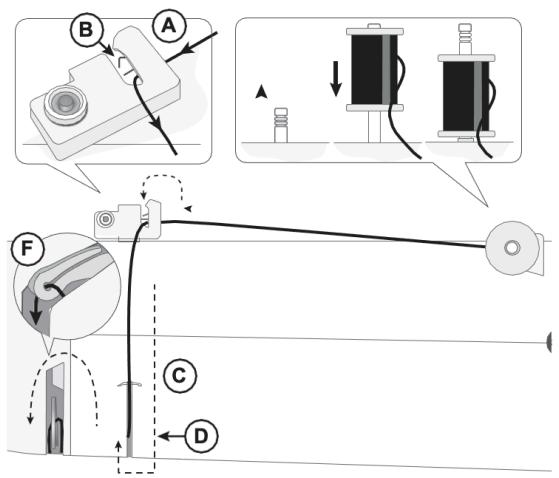
Threading the machine
NOTE: make sure that the presser foot is raised and that the needle is in its highest position by turning the handwheel towards you. This is very important to ensure that the machine is threaded correctly. Failure to do so may result in poor stitch quality when you start sewing.
- Pull up the spool pin to its full extent.
- Place a thread spool on the spool pin.
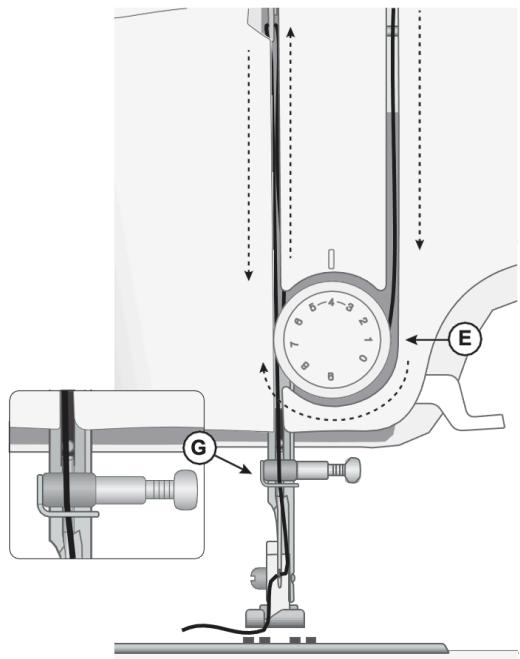
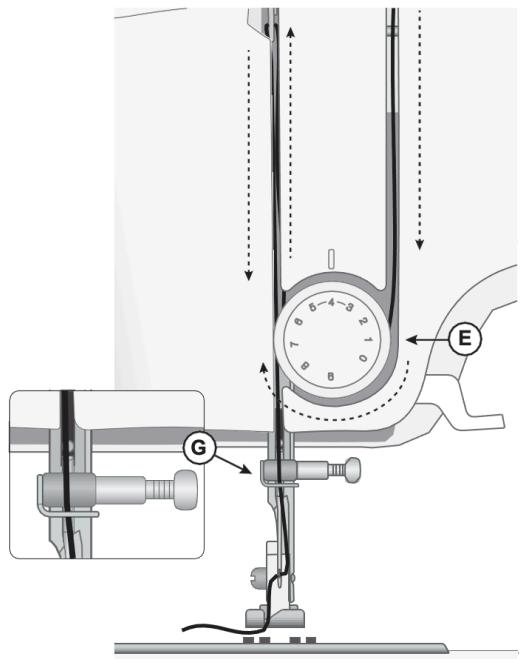
- Place the thread into the thread guide (A) from back to front. Make sure that the threads slide into the spring (B).
- Pull the thread over the thread guide (C) and down into the thread slot (D).
- Continue lowering the thread through the right thread slot, around the tension knob (E) (make sure that the thread slides into the tension discs). Then, bring the thread back up through the left threading slot.
- Pass the threads from the right side through the thread take-up lever (F) and down through the thread slot on the left side and into the needle thread guide (G).
- Thread the needle from front to back.

Bringing up the bobbin thread
- Hold the top thread with your left hand. Turn the handwheel towards you by lowering and then raising the needle.
- If it is difficult to lift the thread from the bobbin, check that the thread is not caught in the bobbin cover.
- Gently pull the top thread to bring the bobbin thread through the hole in the needle plate.
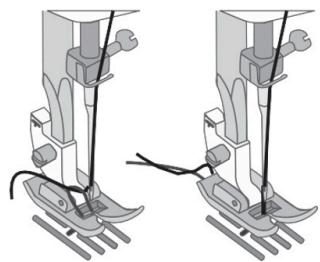
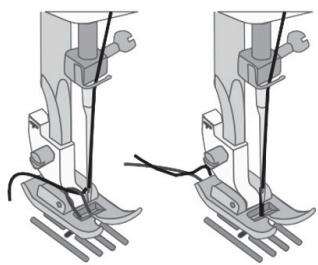
- Place both threads at the back under the presser foot. Pull out about 15-20 cm of thread behind the needle.
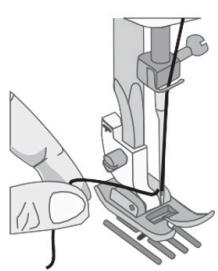
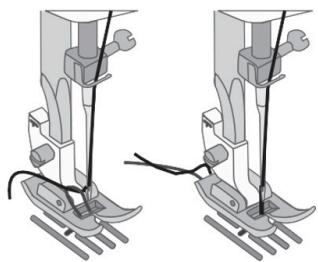
Needles
The sewing machine needle plays an important role in successful sewing. Only use good-quality needles. We recommend system needles 130/705H. The needle pack included with the machine contains needles of the most commonly used sizes.
ATTENTION: make sure that the needle and thread you are using match. Thicker threads require a needle with a larger eye. If the needle eye is too small for the thread, the threader may not work properly.
NOTE: to avoid needle breakage, only use medium/low speed and the recommended needle on thick fabrics.
Important information about the needle
- Change the needle frequently. As a general rule, needles should be changed every 6-8 hours of actual sewing time.
- Always use a straight needle with a sharp point and make sure that the point is not bent or damaged (A).
- A defective needle (B) can cause skipped stitches, thread breakage or thread snapping. It could even damage the needle plate.
- Do not use asymmetrical twin needles (C) as they may damage the sewing machine.
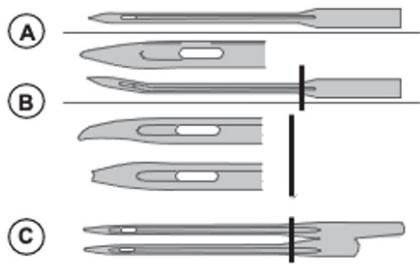
Needle size, thread and fabric selection chart
| Needle size | Fabric | Thread |
| 70 (9)80 (12) | Lightweight fabric: Fine cotton, linen, silk, muslin, interlaced, knitted, jersey, crepe, polyester, chiffon, organza, organdie. | Multipurpose low-strength thread |
| 80 (12)90 (14) | Medium weight fabrics: Quilting cotton, satin, double knit, lightweight wool, rayon, polyester, lightweight linen. | Use polyester threads on synthetic materials and cotton thread on natural fabrics for best results. |
| 90 (14) | Medium weight fabrics: Firm fabrics, medium linen, cotton/polyester blend, plush, chambray, double knitted fabrics. | |
| 100 (16) | Canvas, wool, denim, home decor, fleece, coarse knitted fabrics. | Polyester or multipurpose thread. |
| 110 (18) | Coarse weave, woollen fur, upholstery fabrics. | High-strength needle thread, with multipurpose thread for the bobbin. |
Changing the needle
NOTE: before starting to change the needle, it may be helpful to place a small piece of paper or cloth under the needle area, over the needle plate hole, so that the needle does not accidentally fall into the machine.
- Loosen the needle clamping screw (A). If it feels tight, use the screwdriver from your accessories to help loosen the screw.
- Remove the needle.
- Push the new needle up into the needle clamp with the flat side of the needle towards the back.
- When the needle will go up no further, tighten the screw securely.

Thread tension
- To adjust the thread tension, turn the thread tension knob at the front of the machine. You may need to adjust the tension depending on the fabric, thread, etc. For better appearance and longer stitch life, make sure that the needle thread tension is set correctly.
- When sewing, use a thread tension between 3-5
- For sewing, in general, the threads shall be evenly joined between the two layers of fabric (A).
- If the bobbin thread is visible at the top of the fabric, this means that the needle thread tension is too high (B). Reduce the needle thread tension.
- If the top thread is visible on the underside of the fabric, the needle thread tension is too loose (C). Increase the needle thread tension.
- For decorative stitches and buttonholes, the top thread must be visible on the underside of the fabric.
- Do some tests on a piece of the fabric to be sewn and check the tension.




Selecting a stitch
Turn the pattern selection knob to the left or right until the stitch you want to sew is aligned with the stitch mark on the knob (A).

ENGLISH
Reverse sewing
To set the beginning and end of a seam, press the reverse stitch switch. Sew a few reverse stitches. Release the switch to make the machine sew forward again.
4. SEWING
Next to each stitch or sewing technique described in this section of the manual, a chart shows the recommended settings and presser foot. See an example of the chart on the right.
The recommended settings are also shown on the display but may need to be adjusted to suit a special technique.
NOTE: some fabrics have excess dye, which can fade other fabrics or the sewing machine. This dye can be very difficult or impossible to remove. Denim, especially in red and blue, is often over-dyed. If you think that the fabric or
the ready-made garment contains excess dye, wash it before sewing to prevent fading.
NOTE: for best sewing results, use the same top and bobbin thread. If sewing with special/decorative stitches, use the regular sewing thread on the bobbin.
NOTE: when sewing on light fabrics, always use stabiliser under the fabric. This is to ensure that the fabric is fed correctly and that the stitches are formed correctly.

A Stitch
B Presser foot
C Thread tension
4.1 Starting to sew - Straight stitch
- Set your machine to sew straight stitches (see figures).
- Raise the presser foot and place the fabric underneath, next to the seam allowance guideline on the needle plate or bobbin cover.
- Place the top thread under the presser foot.
- Lower the needle to the stitch where you want to start. Pull the threads to the back and lower the presser foot. Press the foot control.
- Gently guide the fabric along the sewing guide, letting the machine pull the fabric along (A).
NOTE: do not forget to remove the thread from the bobbin before you start sewing.
- To secure the beginning of a seam, press and hold the switch to sew in reverse. Sew a few reverse stitches. Release the switch to make the machine sew forward again (B).

Straight stitch settings
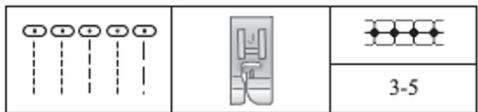
Changing the sewing direction
- To change the sewing direction, stop the machine and turn the handwheel towards you to lower the needle into the fabric.
- Raise the presser foot.
- Pivot the fabric around the needle to change the sewing direction as desired. Lower the presser foot and continue sewing in the new direction.

Finishing the sewing
- Press and hold the reverse stitch switch to sew in reverse and sew a few stitches of this type when you get to the
- end of the seam. Release the switch and sew forward again until the end of the seam. This will secure the seam so that the stitches will not be damaged.
- Turn the handwheel towards you to raise the needle to its highest position. Raise the presser foot and remove the fabric by pulling the threads backwards.
- Pull the threads up and place them in the thread cutter to cut the threads to the appropriate length, and so that the needle does not unravel when the next seam begins.
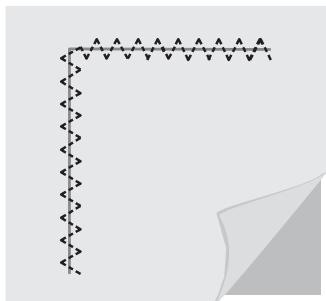
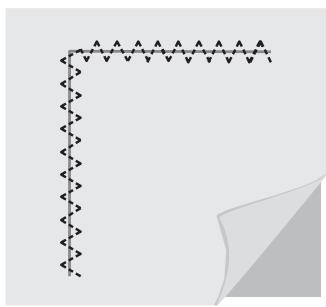
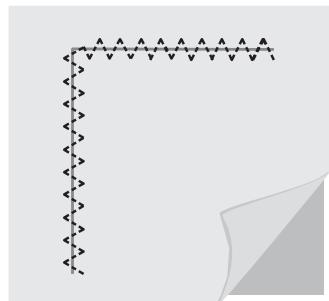
Multi-step zigzag stitch
- The multi-step zigzag stitch is used to cover raw edges. Check that the needle goes through the fabric on the left side and overcasts the edge on the right side.
- This stitch can also be used as a stretch stitch to allow the seam to pucker when sewing knitted fabrics.
Multi-step zigzag stitch settings
| 3-5 |

4.3 Blind hems
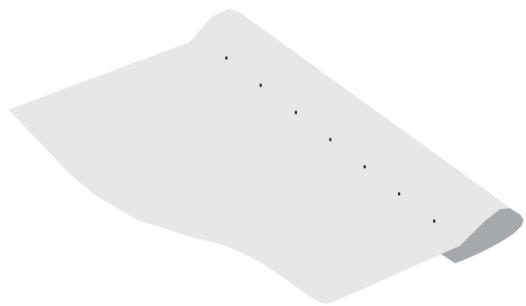
Blind hems stitch is used to make invisible hems on skirts, trousers and home decorations. There are two types of blind hems, one is recommended for medium to thick fabrics (1) and the other for medium to thick stretch fabrics (2).
- Finish the raw edge of the hem if you are sewing on a non-stretch fabric. In most knitted fabrics it is not necessary to finish the edge before hemming.
- Fold and press the hem allowance to the reverse side.
- Fold the reverse of the hem over itself so that approximately 1 cm of the finished edge extends beyond the fold. The wrong side should be facing upwards.
- Place the fabric under the presser foot so that the fold runs along the presser foot as illustrated (A).
- When the needle goes into the fold, it should catch a little bit of fabric.
Blind hem settings
| (1) | (2) | 3-5 |

Non-stretch fabric

Stretch fabric
Right side of fabric
4.4 Darning and mending
Repairing large holes
To cover large holes, it is necessary to sew a new piece of fabric in the damaged area.
- Baste the new piece onto the fabric in the damaged area from the right side.
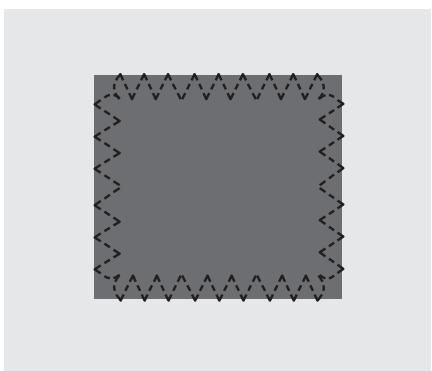
- Sew over the edges of the fabric with the zigzag stitch or the multi-step zigzag stitch.
- Cut out the damaged area near the seam, on the reverse side of the fabric.
Set up for zigzag

Multi-step zigzag stitch settings
| 3-5 |

Repairing tears
For tears, frayed edges or small holes, it is useful to place a piece of fabric on the reverse side of the fabric. The fabric reinforces the damaged area.
Place a piece of cloth under the damaged fabric. It should be slightly larger than the damaged area. Sew over the damaged area using the zigzag or multi-step zigzag stitch.
Cut out the piece of fabric used as reinforcement.

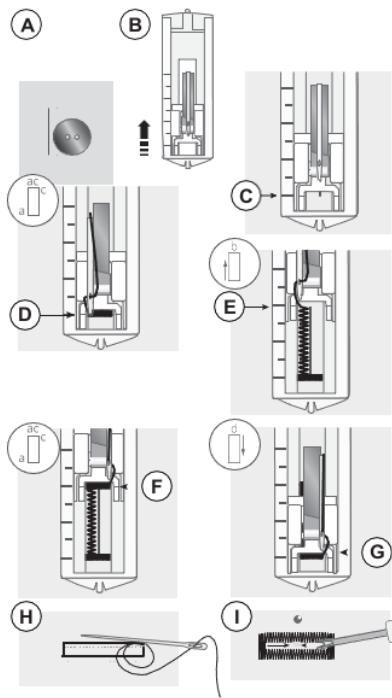
4.5 Sewing with the four-step buttonhole presser foot
Sew buttonholes the perfect size for your button. The fabric must be interfaced and/or stabilised where the buttonholes are to be sewn.
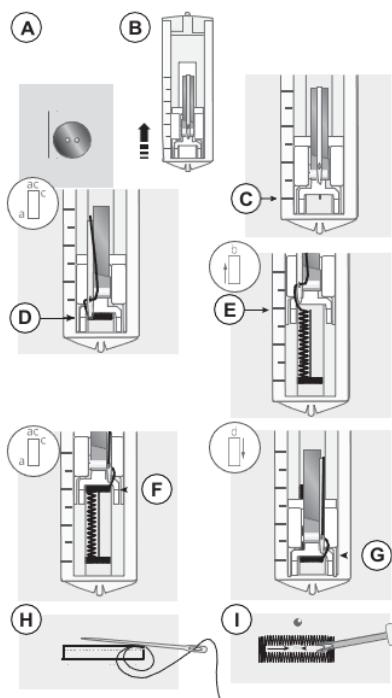
- Measure the button to be used for your project. Add 5/8 inch (3 mm). Use a fabric marking pencil to mark the starting position and the length of the buttonhole on the fabric (A).
- Attach the buttonhole foot and slide the presser foot back as far as it will go (B).
- Place the fabric under the presser foot, aligning the marks on the presser foot with the lines marked on the fabric (C).
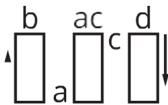
- Select the buttonhole stitch "ac". Lower the presser foot and sew 5-6 stitches to create the first buttonhole loop (D). Stop when the needle is on the left side of the loop.
- Raise the needle to its highest position and select buttonhole stitch "b". Sew the left column back to the desired buttonhole length (E). Stop when the needle is on the left side of the column.
- Raise the needle to its highest position and select buttonhole stitch "ac". Sew the second loop (F). Stop when the needle is on the right side of the loop.
- Raise the needle to its highest position and select buttonhole stitch "d". Sew the right side of the buttonhole to the same length as the first column (G).
- To attach the loop, thread the end of the top thread onto a hand sewing needle, turn it inside out and tie a knot at the end before cutting off the excess thread (H).
- Use a ripper to cut the buttonhole from both ends towards the centre (I).
NOTE: always sew a test buttonhole in a piece of scrap fabric.
Buttonhole settings

Buttonhole balance
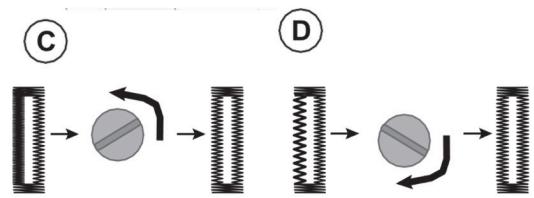
- If the density of the buttonhole columns differs, you can adjust the stitch density of the buttonhole. The buttonhole balance knob (A) is located on the right side of the pattern selection knob. Only the left column of the buttonhole shall be adjusted. Balance it to match the right buttonhole column.
- Normally, the knob should be set to a neutral position (B).
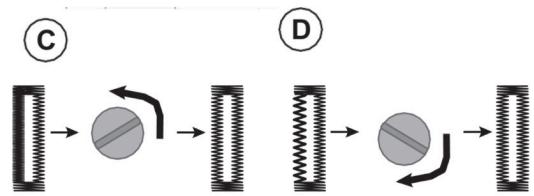
- If the stitches of the left buttonhole column are too dense, turn the knob to the left (C).
- If the stitches of the left buttonhole column are too scarce, turn the knob to the right (D).

4.6 Sewing zips
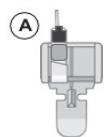
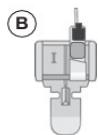
The zipper foot can be attached to the right or left side of the needle, allowing you to easily sew both sides of the zip.
- To sew the right side of the zip, set the presser foot to the left position (A).
- To sew the left side of the zip, set the presser foot to the right position (B).
Set up for basting

Arrangement for sewing zips

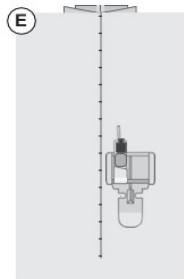
Centered zip
- Place the pieces of fabric right sides together and pin them. Mark the length of the zip on the fabric.
- Baste the zip seam using the specified seam allowance (use a straight stitch with the longest stitch length, thread tension 2). Baste up to the end of the zip mark (C).
- Set the machine for a straight stitch (provision for sewing zips), backstitch a few stitches and sew the rest of the seam using the specified seam allowance (C).
- Iron the open seam allowances. Place the right side of the zip on the wrong side of the seam, tape in place (D).
- Turn the fabric over, making sure that the right side is facing up. Set the zipper foot to the left side of the needle (B).
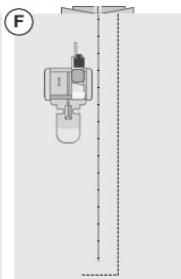
- Sew along the right side of the zip to the end of the zip; remember to backstitch at the beginning (E). Stop the needle at the end of the fabric, raise the presser foot and turn the project to sew the bottom of the zip.
- Set the zipper foot to the right side of the needle (B). Sew the remaining side of the zip the same way you sewed the first side (F).
- Turn the fabric inside out to remove the tape from the back.
- Turn the fabric right side out and remove the stitching.



5. CLEANING AND MAINTENANCE
Daily cleaning of the machine
To ensure that the sewing machine always works properly, clean it regularly. It is not necessary to grease (lubricate) the machine. Wipe the outside surface of the machine with a soft cloth to remove dust or lint build-up.
Cleaning the bobbin area
ATTENTION: lift the needle and switch off the machine before starting cleaning.
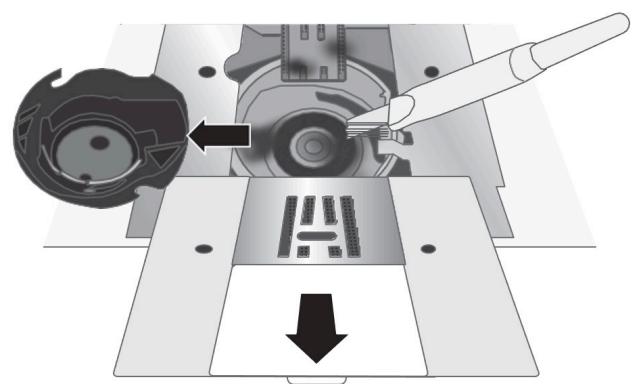
- Remove the presser foot. Slide the bobbin cover off the bobbin and remove the bobbin.
- Clean the feed dog and the bobbin area with the brush provided in the accessory kit.
- Reinsert the bobbin, replace the cover and attach the presser foot.
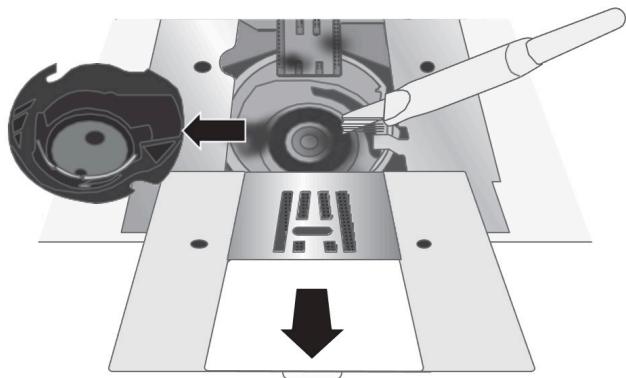
Cleaning under the bobbin area
ATTENTION: lift the needle and switch off the machine before starting cleaning.
- Clean the area under the bobbin case after sewing several garments or when you notice a build-up of lint in this area.
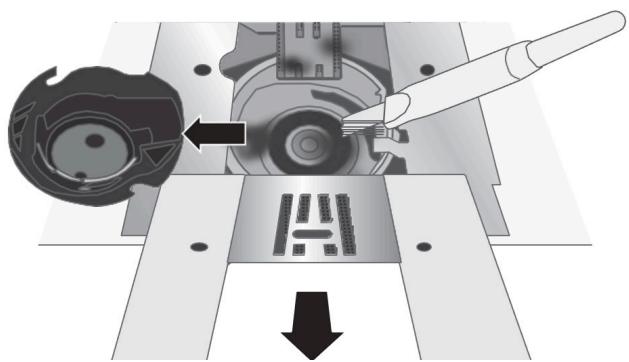
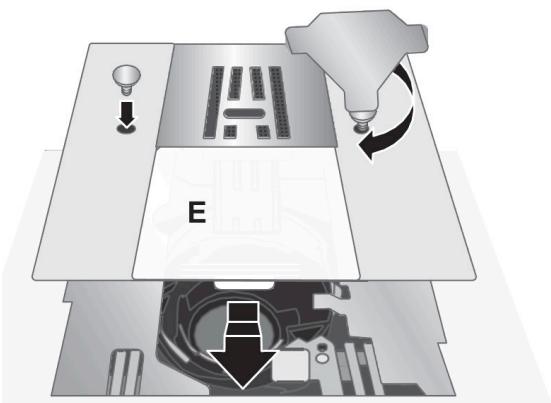
- Remove the presser foot. Remove the screws from the needle plate with the screwdriver. Lift and remove the needle plate.
- Pull the bobbin case upwards.
- Clean the area with the brush or a dry cloth.
- NOTE: do not blow air into this area. Dust and lint could fly into the machine.
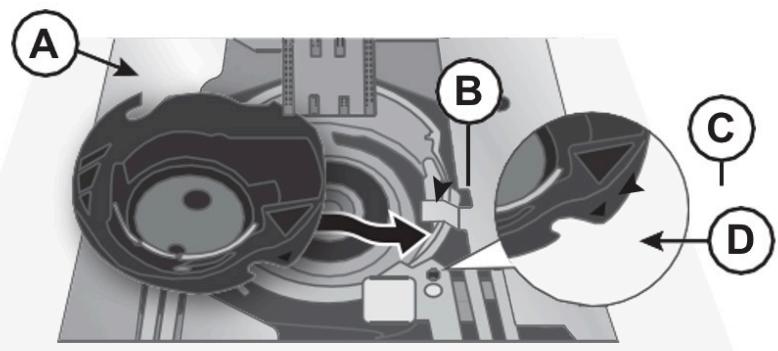
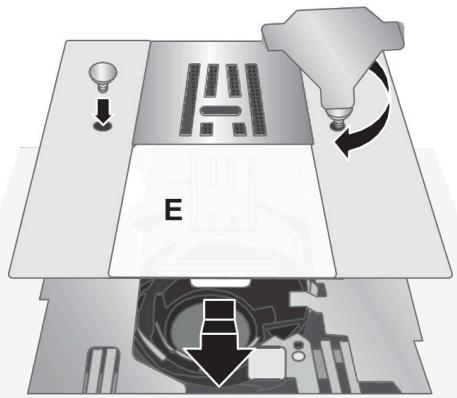
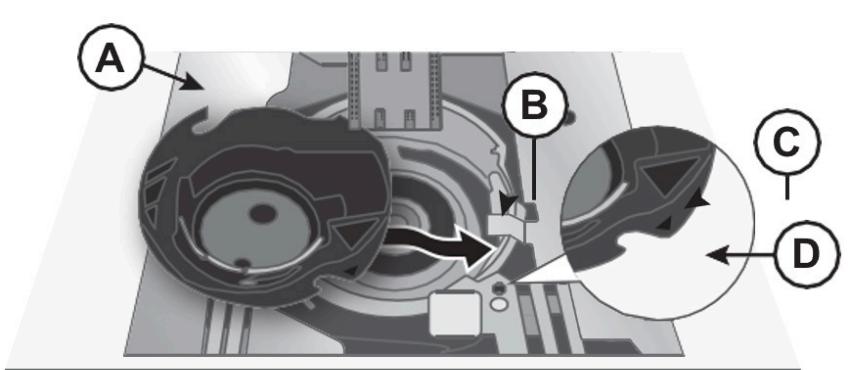
- Guide the end of the bobbin case (A) under the slots from left to right. The bobbin case must be placed between the slots and the spring (B). The mark (C) on the bobbin case must be aligned with the mark (D) to facilitate fitting. Move the bobbin case slightly until it slides correctly (E). To ensure that the bobbin case is correctly positioned, turn the handwheel towards you. The bobbin must rotate freely in counterclockwise direction.
- Place the needle plate over the feed dog, replace the screws and tighten them.
- Attach the presser foot and replace the cover.


- TROUBLESHOOTING
| Knots are formed on the underside of the fabric | |
| Possible cause | The formation of knots on the underside of the fabric is always an indication that the top thread is not threaded correctly. This occurs when the top thread is not correctly positioned in the thread tension mechanism and has not been threaded by the thread take-up lever. |
| Solution | Re-thread the machine, making sure to first raise the presser foot lifter before starting to thread, so that the thread enters the tensioning mechanism and the thread take-up lever correctly. If you want to know if you have threaded the machine correctly, try this test:Lift the presser foot lifter and thread the top thread.Thread the needle, but do not yet place the thread under the presser foot. When you pull the thread to the left, it should move freely.Lower the presser foot lifter. When you pull the thread to the left, you should feel resistance. This means that it is correctly threaded.Place the thread under the presser foot and then draw up the thread from the bobbin. Slide the thread strands under the presser foot to the back. Lower the presser foot and begin sewing.If you lower the presser foot lifter, but the thread still moves freely (no difference between the presser foot down or up), this means that it is not threaded correctly. Remove the top thread and rethread the machine. |
| The bobbin thread breaks | |
| Possible cause | The bobbin is not properly threaded. |
| Solution | Check that the bobbin is correctly positioned in the bobbin case. |
| Possible cause | The bobbin has been wound too tightly or unevenly. |
| Solution | The bobbin thread may not have been correctly placed on the bobbin winder tension disc during the bobbin winding process. |
| Possible cause | Dirt or lint in the bobbin case. |
| Solution | Clean the bobbin case. |
| Possible cause | You are using the wrong bobbins. |
| Solution | Use bobbins that are the same type as those supplied with the machine, do not exchange them for other bobbins. |
| The bobbin thread can be seen at the top of the fabric | |
| Possible cause | The top thread is too tight. |
| Solution | Reduce the top thread tension. |
| Possible cause | The thread path is obstructed, which applies extra tension to the top thread. |
| Solution | Check that the top thread path is not obstructed and that the thread moves freely through the thread path. |
| Possible cause | The bobbin thread does not have enough tension. |
| Solution | Re-thread the bobbin. |
| Bobbin winding problems | |
| Possible cause | The bobbin thread does not have enough tension. |
| Solution | Rewind the bobbin making sure that the thread is tightly fitted on the bobbin winder tension disc. |
| Possible cause | The bobbin winder shaft is not fully activated, so the bobbin is not wound. |
| Solution | Check that the bobbin winder shaft has been fully activated before starting the winding. |
| Possible cause | The bobbin is being wound awkwardly because the end of the thread has not been clamped at the start of the winding process. |
| Solution | Before starting winding, hold the thread strand (coming out of the bobbin) firmly, let the bobbin partially fill and then stop to cut the thread strand close to the bobbin. |
| Fabric puckers | |
| Possible cause | The top thread is too tight. |
ENGLISH
| Solution | Reduce the top thread tension. |
| Possible cause | Unsuitable needle type for the type of fabric. |
| Solution | Use the correct needle type and size for the fabric. |
| The fabric puckers under the stitches | |
| Possible cause | The fabric is not properly stabilised for the stitch density (e.g. satin stitch, scallop edge stitch). |
| Solution | Add a fabric stabiliser under the fabric to help prevent the stitches from twisting and gathering, forming a creased fold in the fabric. |
| Loud noise when sewing | |
| Possible cause | The thread is not on the thread take-up lever. |
| Solution | Re-thread the machine, making sure that the take-up lever is in its highest position so that the thread passes through the eye of the take-up lever. Turn the machine handwheel towards you to raise the take-up lever to its highest position for threading. |
| Possible cause | The thread path is obstructed. |
| Solution | Check that the thread is not jammed on the thread spool or behind the spool cap. |
| The machine is not feeding fabric | |
| Possible cause | The presser foot lever is not lowered onto the fabric after threading. |
| Solution | Lower the presser foot lever before starting to sew. Do not pull or push the fabric while sewing. |
| The machine does not work | |
| Possible cause | The bobbin winder shaft is activated when you try to sew. |
| Solution | Disengage the bobbin winder shaft by pushing it to the left. |
| Possible cause | The power cable and foot control are not plugged in correctly. |
| Solution | Make sure that the power cable/foot control cable is correctly inserted into the machine and into the power socket. |
| Possible cause | You are using the wrong bobbins. |
| Solution | Use bobbins that are the same type as those supplied with the machine, do not exchange them for other bobbins. |
| The needle breaks | |
| Possible cause | Bent, broken or damaged needle. |
| Solution | Discard the needle and insert a new one. |
| Possible cause | Wrong size needle for the fabric. |
| Solution | Insert the appropriate needle for the type of fabric. |
| Possible cause | The machine is not correctly threaded. |
| Solution | Re-thread the machine completely. |
| Possible cause | Pushing or pulling the fabric. |
| Solution: | Do not manually push/pull the fabric to sew but let the feed dogs of the machine pass the fabric under the presser foot as you guide it. |
| Skipping stitches | |
| Possible cause | The needle has been inserted incorrectly. |
| Solution | Check that the flat side of the top of the needle is towards the rear of the machine and that the needle is inserted as far as it will go. Tighten the needle clamping screw. |
| Possible cause | Incorrect needle for the fabric you are sewing. |
| Solution | Use the correct needle type and size for the fabric. |
| Possible cause | Bent, broken or damaged needle. |
| Solution | Discard the needle and insert a new one. |
| Distorted stitches | |
| Possible cause | Pushing or pulling the fabric. |
| Solution | Do not manually push/pull the fabric to sew but let the feed dogs of the machine pass the fabric under the presser foot as you guide it. |
| Possible cause | You may need a stabiliser. |
| Solution | Place the stabiliser under the fabric. |
| The thread puckers at the beginning | |
| Possible cause | The top and bobbin threads have not been correctly positioned under the presser foot before starting to sew. |
| Solution | Make sure that the top thread and bobbin thread are under the presser foot and towards the back before you start sewing. |
| Possible cause | You have started sewing without fabric under the presser foot. |
| Solution | Place fabric under the presser foot, making sure that the needle reaches the fabric; hold both strands of thread lightly during the first few stitches. |
| Possible cause | You may need a stabiliser. |
| Solution | Place the stabiliser under the fabric. |
| The top thread breaks | |
| Possible cause | The thread path is obstructed |
| Solution | Check if the thread is caught in the thread spool (rough spots on the thread spool itself). |
| Possible cause | The machine is not correctly threaded. |
| Solution | Remove the upper thread completely, raise the presser foot lifter, rethread the machine, making sure that the thread is on the take-up lever (raise the take-up lever to its highest position by turning the handwheel towards you). |
| Possible cause | Upper tension too high. |
| Solution | Reduce the top thread tension. |
7. TECHNICAL SPECIFICATIONS
Product: BelleCouture 1500
Product reference: EU01_001152
Voltage: 220-240 V\~
Frequency: 50 Hz
Power: 50 W
Technical specifications may change without prior notification to improve product quality.
Made in China | Designed in Spain
8. DISPOSAL OF OLD ELECTRICAL AND ELECTRONIC APPLIANCES
EThis symbol indicates that, according to the applicable regulations, the product and/or batteries must be disposed of separately from household waste. When this product reaches the end of its shelf life, you should dispose of the cells/batteries/accumulators and take them to a collection point designated by the local authorities.
Consumers must contact their local authorities or retailer for information concerning the correct disposal of old appliances and/or their batteries.
You can find information about national packaging recycling systems and their labeling on our website.
Compliance with the above guidelines will help protecting the environment.
9. TECHNICAL SUPPORT AND WARRANTY
Cecotec shall be liable to the end user or consumer for any lack of conformity that exists at the time of delivery of the product under the terms, conditions, and deadlines established by the applicable regulations.
It is recommended that repairs be carried out by qualified personnel.
If at any moment you detect any problem with your product or have any doubt, do not hesitate to contact the official Cecotec Technical Support Service at +34 96 321 07 28.
10. SIMPLIFIED EU DECLARATION OF CONFORMITY

Cecotec Innovaciones hereby declares that this appliance complies with the essential requirements and other relevant provisions of the regulations applicable in the European Union. This appliance has been designed, manufactured and tested in compliance with required safety and quality standards. The full text of the EU Declaration of Conformity can be found on the following website: https://cecotec.es/es/information/declaration-of-conformity
1. PIÈCES ET COMPOSANTS
Zone d'aiguille
NOTE :
Pied-de-biche universel (J) (fourni)

Coupe-fil
Enrouler la bobine


FRANÇAIS
Enfiler la machine

Aiguilles
Tension du fil



Terminer la couture
4.3 Ourlets invisibles
Endroit du tissu

4.4 Reprisage



5. NETTOYAGE ET ENTRETIEN

6. RÉSOLUTION DE PROBLÈMES


HINWEIS:
Stromanschluss
Nähfußlifter

Fadenabschneider

Spulenwicklung
Nadeln


Stichauswahl
Beendigung der Naht

4.6 Reißverschlüsse nähen

Zona dell'ago
NOTA:

③
④

ITALIANO


Aghi


4.3 Orli invisibili
Tessuto elastico
Dritto del tessuto

4.6 Cucire cerniere
Cerniera centrata


ITALIANO

6. RISOLUZIONE DEI PROBLEMI
Área da agulha
NOTA:
Alavanca do calcador
Cortador da linha
Mudar o calcador

Enrolador da bobina


PORTUGUÊS
Agulhas



4.4 Zurcido e remendo



The Ground Truth image displays a single, solid horizontal line. According to Rule 2 (UNDERSCORE & LINE RULES), if the GT contains lines used for stylistic emphasis or as background (like ruled paper), the OCR result must ignore them. The line in the GT is clearly a stylistic or background line, not a placeholder for text. Therefore, the OCR should not have output any underscores. Outputting `____` constitutes an error under Rule 2, as it hallucinates placeholder symbols where none are semantically intended. No punctuation mismatch or formatting transformation applies here.


- SOMMAIRE
- INSTRUCTIONS DE SÉCURITÉ
- ZONA DE LA AGUJA
- FUNCIONAMIENTO
- PALANCA DEL PRENSATELAS
- CORTAHILOS
- ESPAÑOL
- ENHEBRAR LA MÁQUINA
- AGUJAS
- TENSIÓN DEL HILO
- TERMINAR LA COSTURA
- CREMALLERA CENTRADA
- TOP OF THE MACHINE
- NEEDLE ZONE
- NOTE
- ENGLISH
- BEFORE USE
- BOX CONTENT
- ACCESSORIES
- ACCESSORIES INCLUDED (NOT SHOWN IN THE FIGURE)
- PRESSER FOOT
- MULTIPURPOSE PRESSER FOOT (J) (SUPPLIED)
- ZIPPER FOOT (I)
- FOUR STEP BUTTONHOLE FOOT (D)
- OPERATION
- STITCH OVERVIEW
- CONNECTION TO THE POWER SUPPLY
- PUTTING AWAY AFTER SEWING
- FREE ARM/REMOVABLE SEWING TABLE
- PRESSER FOOT LIFTER
- THREAD CUTTER
- CHANGING THE PRESSER FOOT
- WINDING THE BOBBIN
- INSERTING THE BOBBIN
- THREADING THE MACHINE
- BRINGING UP THE BOBBIN THREAD
- NEEDLES
- IMPORTANT INFORMATION ABOUT THE NEEDLE
- CHANGING THE NEEDLE
- THREAD TENSION
- SELECTING A STITCH
- REVERSE SEWING
- SEWING
- 4.1 STARTING TO SEW - STRAIGHT STITCH
- STRAIGHT STITCH SETTINGS
- CHANGING THE SEWING DIRECTION
- FINISHING THE SEWING
- MULTI-STEP ZIGZAG STITCH
- 4.3 BLIND HEMS
- BLIND HEM SETTINGS
- RIGHT SIDE OF FABRIC
- 4.4 DARNING AND MENDING
- REPAIRING LARGE HOLES
- REPAIRING TEARS
- 4.5 SEWING WITH THE FOUR-STEP BUTTONHOLE PRESSER FOOT
- BUTTONHOLE BALANCE
- 4.6 SEWING ZIPS
- CENTERED ZIP
- CLEANING AND MAINTENANCE
- DAILY CLEANING OF THE MACHINE
- CLEANING THE BOBBIN AREA
- CLEANING UNDER THE BOBBIN AREA
- TECHNICAL SPECIFICATIONS
- DISPOSAL OF OLD ELECTRICAL AND ELECTRONIC APPLIANCES
- TECHNICAL SUPPORT AND WARRANTY
- SIMPLIFIED EU DECLARATION OF CONFORMITY
- PIÈCES ET COMPOSANTS
- ZONE D'AIGUILLE
- PIED-DE-BICHE UNIVERSEL (J) (FOURNI)
- COUPE-FIL
- ENROULER LA BOBINE
- FRANÇAIS
- ENFILER LA MACHINE
- AIGUILLES
- TENSION DU FIL
- TERMINER LA COUTURE
- 4.3 OURLETS INVISIBLES
- ENDROIT DU TISSU
- 4.4 REPRISAGE
- NETTOYAGE ET ENTRETIEN
- RÉSOLUTION DE PROBLÈMES
- HINWEIS
- STROMANSCHLUSS
- NÄHFUSSLIFTER
- FADENABSCHNEIDER
- SPULENWICKLUNG
- NADELN
- STICHAUSWAHL
- BEENDIGUNG DER NAHT
- 4.6 REISSVERSCHLÜSSE NÄHEN
- ZONA DELL'AGO
- NOTA
- ITALIANO
- AGHI
- 4.3 ORLI INVISIBILI
- DRITTO DEL TESSUTO
- 4.6 CUCIRE CERNIERE
- CERNIERA CENTRATA
- RISOLUZIONE DEI PROBLEMI
- ÁREA DA AGULHA
- ALAVANCA DO CALCADOR
- CORTADOR DA LINHA
- MUDAR O CALCADOR
- ENROLADOR DA BOBINA
- PORTUGUÊS
- AGULHAS
- 4.4 ZURCIDO E REMENDO
Brand : CECOTEC
Model : Bellecouture 1500 A90 Eu01 001152
Category : Sewing machine