Bellecouture 6600 - Sewing machine CECOTEC - Free user manual and instructions
Find the device manual for free Bellecouture 6600 CECOTEC in PDF.


User questions about Bellecouture 6600 CECOTEC
0 question about this device. Answer the ones you know or ask your own.
Ask a new question about this device
Download the instructions for your Sewing machine in PDF format for free! Find your manual Bellecouture 6600 - CECOTEC and take your electronic device back in hand. On this page are published all the documents necessary for the use of your device. Bellecouture 6600 by CECOTEC.
USER MANUAL Bellecouture 6600 CECOTEC
- Parts and components 24
- Before use 25
- Operation 25
- Starting to sew 29
- Cleaning and maintenance 36
- Troubleshooting 36
- Technical specifications 37
- Disposal of old electrical and electronic appliances 37
- Technical support and warranty 37
- Copyright 37
SOMMAIRE
Read these instructions thoroughly before using the appliance. Keep this instruction manual for future reference or new users.
- Use the appliance only for the purposes described in this manual. Use only accessories recommended by Cecotec.
- This appliance is designed for domestic use only and is not intended for bars, restaurants, farmhouses, hotels, motels, and offices.
-
This appliance can be used by children aged 8 years and above and people with reduced physical, sensory, or mental capabilities or lack of experience and knowledge if they have been given supervision or instruction concerning use of the appliance in a safe way and understand the hazards involved. Children must not play with the appliance. Cleaning and user maintenance should not be carried out by unsupervised children.
-
The appliance may only be used with the power supply unit supplied with it.
- Turn off and unplug the appliance from the power supply immediately after use or if it is to be left idle for some time.
- Do not pull on the cable to unplug it. To unplug the appliance, pull the plug, not the cord.
- If the power cable is damaged, it must be replaced by a special cable or assembly to be supplied by the manufacturer or its after-sales service.
- Always unplug the sewing machine from the power outlet before carrying out any maintenance operations or when making any adjustments in the needle area, such as threading the thread, changing the presser foot, etc.
- Do not use the appliance if it shows visible signs of damage. In case of malfunction or breakdown, please contact the official Cecotec Technical Support Service.
- Do not try to open, disassemble, or repair the device by yourself.
- Never start the sewing machine if the ventilation holes are blocked. Keep the ventilation holes of the sewing machine and foot pedal free of lint, dust, and remnants.
- Do not insert any foreign objects into any holes.
- Do not use the appliance outdoors.
- Do not use the machine in a place where aerosols are being used or oxygen is being administered.
- Keep fingers away from moving parts. Take special care with the needle.
- Do not use the machine if the needle plate is damaged, as the needle may break.
- Do not use needles that are bent.
- Do not pull or push the fabric while sewing. This could deflect the needle and break it.
- Cecotec accepts no liability for damage caused by improper or incorrect use.
INSTRUCTIONS DE SÉCURITÉ


NOTA:


Devanar de la bobina


Colocar la canilla



Cambiar la aguja



COSER BOTONES
PONER CREMALLERAS Y RIBETES
COSER CON EL PIE PRENSATELAS PARA DOBLADILLO
PUNTADA ZIGZAG EN 3 PASOS
PUNTADA TRIPLE RECTA: (1/3)
PUNTO SMOCK (FRUNCIR)



PUNTADA DE CONCHA (A)
COLOCAR ENCAJE
COLOCAR APLIQUES
COSER CON AGUJA DOBLE
ACOLCHAR
FRUNCIR
HACER PATCHWORK
5. LIMPIEZA Y MANTENIMIENTO
MANTENIMIENTO
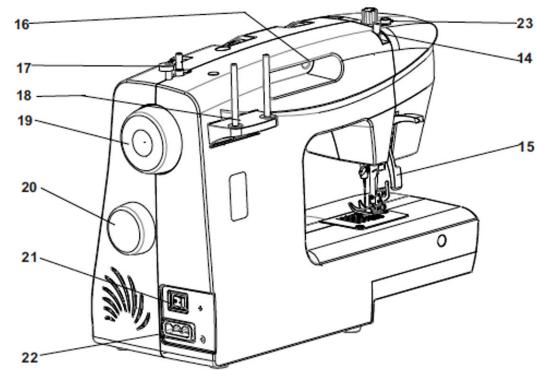
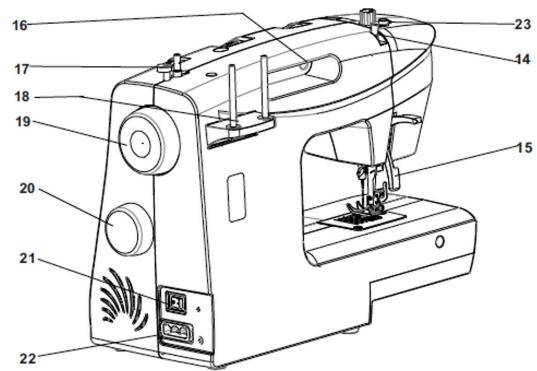
- Thread tension knob
- Presser foot pressure knob
- Thread take-up lever
- Thread cutter
- Presser foot
- Needle plate
- Removable sewing table
- Bobbin winder stop
- Stitch length adjustment knob
- Stitch width adjustment knob
- Stitch display
- Reverse stitch switch
-
Automatic needle threader
-
Top thread guide
-
Presser foot lifter
-
Handle
-
Bobbin winder shaft
-
Spool pin
-
Handwheel
-
Pattern selection knob
-
Power switch
-
Machine socket
-
Bobbin thread guide
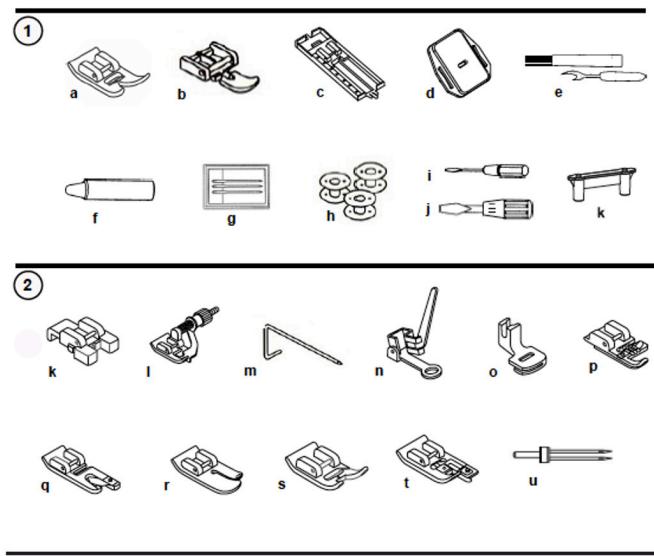
Accessory kit
Standard accessories (included)
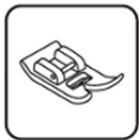
a. Multipurpose presser foot
b. Double sided zipper foot
c. Four step buttonhole foot
d. Embroidery plate
e. Ripper/brush
f. Lubricating oil
g. Needle x 3 pcs.
h. Bobbin x 3 pcs.
i. Small screwdriver
j. Large screwdriver
k. Spool pin holder
Optional accessories (not included)
k. Button sewing foot
I. Blind hem foot
m. Edge/Quilting guide
n. Darning/embroidery foot
o. Gathering foot
p. Cording foot
q. Hemmer foot
r. Quilting foot
s. Satin stitch foot
t. Overcasting foot
u. Twin needle
NOTE:
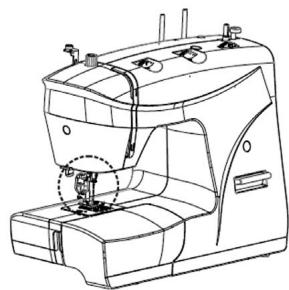
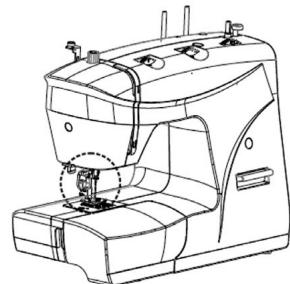
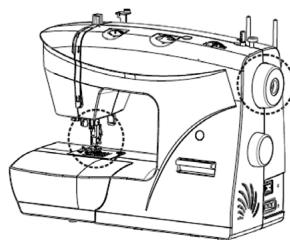
The graphics in this manual are schematic representations and may not exactly match the device.


2. BEFORE USE
- This appliance is packaged in a way as to protect it during transport. Take the appliance out of its box and remove all packaging materials. You can keep the original box and other packaging elements in a safe place. This will help you prevent damage to the appliance when transporting it in the future. In case the original packaging is disposed of, make sure all packaging materials are recycled accordingly.
- Make sure all parts and components are included and in good conditions. If there is any piece missing or in bad conditions, contact the official Cecotec Technical Support Service immediately.
Box content
- BelleCouture 6600
- Accessory kit
- Instruction manual
3. OPERATION
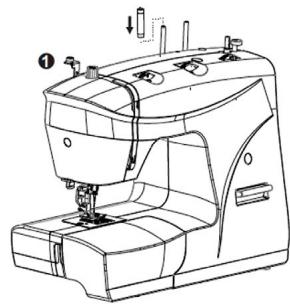
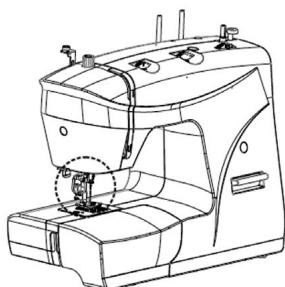
Installing the removable sewing table and the spool pin
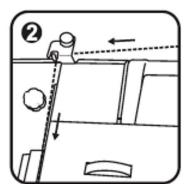
- Hold the removable sewing table in horizontal position and push it in the direction of the arrow to position it.
- This compartment can be used for storing accessories. To open it, simply pull it out.

Connecting the appliance to the mains
Always make sure that the machine is switched off (0) and unplugged from the mains when not in use and before fitting or removing any parts.
- This machine has a polarised plug which must be used in a suitable socket.
- Connect the cable to the socket on the machine and to a power socket (1/2).
- The power switch is located on the socket of the machine. The machine will not switch on if the switch is not in the on (1) position (1).
- The indicator light on the machine will automatically turn on when you turn the switch to the on (1) position.
- To start operating the appliance, press the foot control (3). The speed is adjusted by the pressure exerted on it.
NOTE: when not in use, first switch off the machine by pressing the power switch and then disconnect it from the mains socket.

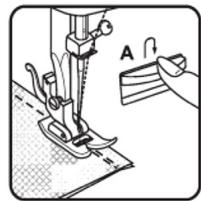
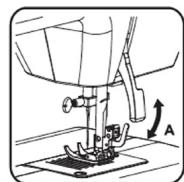
Two-step presser foot lifter
When sewing several layers or thick fabrics, the presser foot can be raised to a second position to facilitate the positioning of the fabric to be sewn (A).

Adjusting the presser foot pressure

The presser foot pressure is preset and does not require any readjustment, regardless of the type of fabric (light or heavy). However, if you need to adjust it, turn the presser foot pressure knob as shown in the figure below.

To sew very thin fabrics, reduce the pressure by turning the knob counterclockwise. On the contrary, when sewing thick fabrics, turn the knob clockwise to increase the pressure.
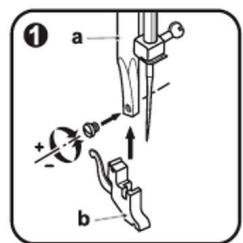
Attaching the presser foot holder
NOTE: turn the machine switch to the off position (0) before performing any of the operations listed below.
- Raise the needle to the highest position and raise the presser foot. Place the foot holder (b) on the bar (a).
- To attach the presser foot, lower the presser foot holder (b) until the slot (c) is directly above the pin (d). When you lower the holder (b), the presser foot (f) will automatically engage.
- To remove the presser foot, first lift it up and then release it by lifting the presser foot release lever (e) at the back of the foot holder (3).
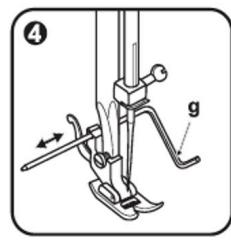
- Place the guide (g) in the slot as shown in the figure. Adjust the distance according to what is to be sewn (4).


Winding the bobbin
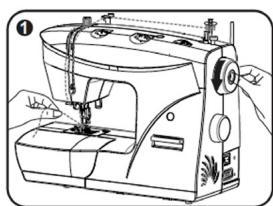
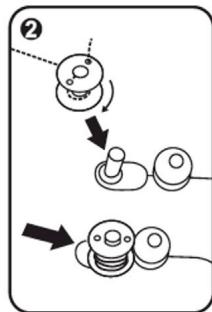
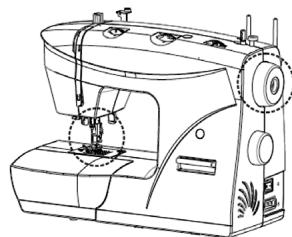
- Place a bobbin on the spool pin. Pull the thread out from the bobbin and thread it through the thread guides as shown in the figure below.
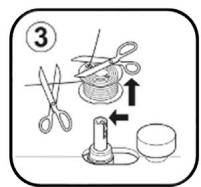
- Pass the end of the thread through the hole in the bobbin. Wind the thread clockwise around the bobbin several times by hand. Push the bobbin winder shaft to far left position (if it is not already there). Place the bobbin onto the shaft with the end of the thread coming out of the top. Push the bobbin winder shaft to the right until it clicks. Hold the thread end.
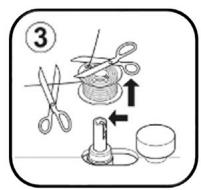
- Press the foot control gently. The bobbin will stop winding when it is full. Push it to the left to the sewing position, remove it and cut the thread.
NOTE: when the bobbin winder shaft is in the winding position, the machine will not sew and the handwheel will not turn. To start sewing, push the bobbin winder shaft to the left (sewing position).


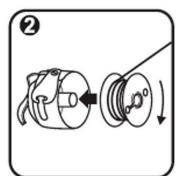
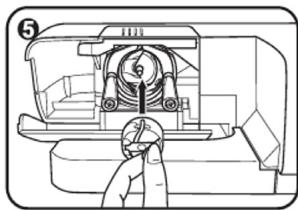
Inserting the bobbin
NOTE: switch off the machine (0) before inserting or removing the bobbin. When inserting or removing the bobbin, the needle must be in the highest position.
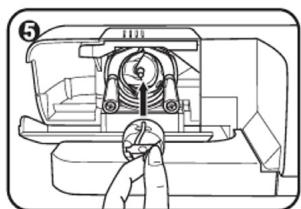
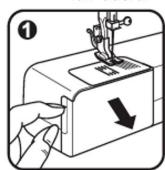
- Open the cover.
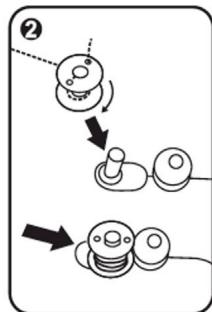
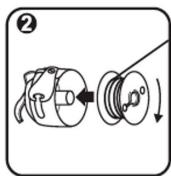
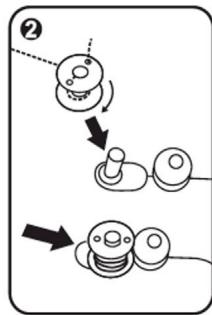
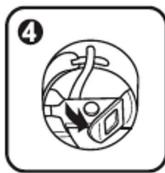
- Hold the bobbin case with one hand. Insert the bobbin so that the thread comes out clockwise.
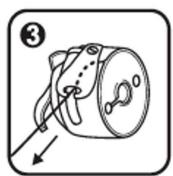
- Pull the thread through the slot, downwards and into the rectangular hole below the tension spring.
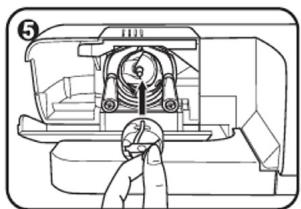
- Hold the bobbin case by the tab.
- Insert the bobbin case fully into the shuttle rail and release the tab. Make sure that the metal projection fits into the notch at the top of the shuttle cover.



Changing the needle
NOTE: switch off the machine (0) before inserting or removing the needle.
- Replace the needle if the thread breaks or if the machine skips stitches.
- Select the correct type and size of needle for the fabric to be sewn. Turn the handwheel towards you until the needle is at highest position. Loosen the needle clamping screw (A) and tighten again after inserting the new needle. The flat side of the needle shaft must be facing away from you (B). Insert the needle as far as possible into the clamping piece (C). Tighten the screw. The needle must always be straight and sharp so that the machine can sew properly.
- Replace the needle if it is bent (A), blunt (B) or has a damaged tip (C).


Threading the top thread
NOTE: before threading, switch off the machine (0).
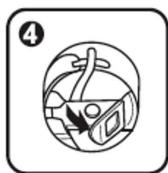
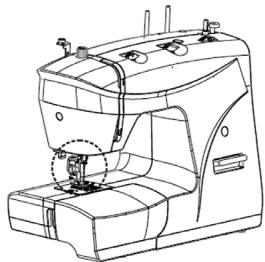
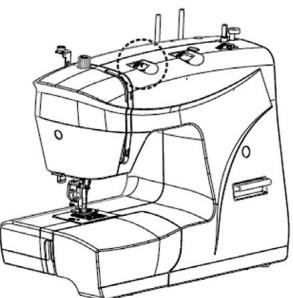
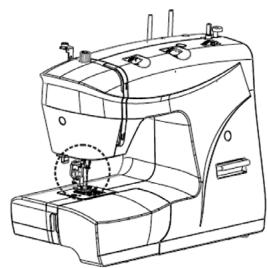
- Raise the needle bar to the highest position. Follow exactly the threading sequence shown in figures 1 to 5. If you skip a step or do not hook the thread correctly on any of the thread guides, the machine will not sew correctly.
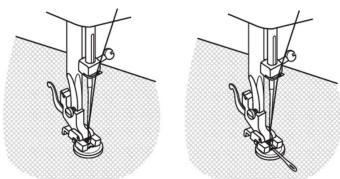
- Continue pulling the thread towards the needle bar thread guide. Pass the thread through the eye of the needle from front to back. Leave about 10 cm of loose thread behind the needle. Cut the thread as shown in figure 6.


Automatic needle threader (optional)
NOTE: put the power switch in the 0 position before threading.
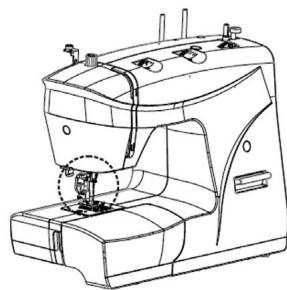
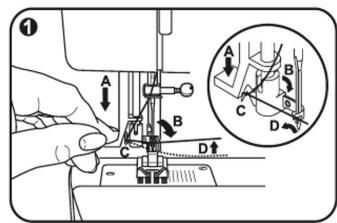
- Raise the needle to the highest position. Press the lever (A) downwards. The threader will automatically move to the threading position (B). Pass the thread around the hook (C). Pass the thread in front of the needle around the hook (D) from bottom to top.
- Release the lever (A). Pull the thread through the eye of the needle.
NOTE: the automatic needle threader is an optional accessory which may not be included with your machine model.


Thread tension
NOTE: the bobbin thread tension is set at the factory and usually does not need to be readjusted.
- Bottom thread tension:
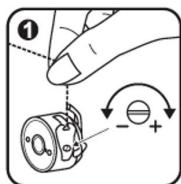
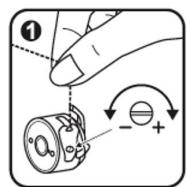
To check the bottom thread tension, remove the bobbin case and bobbin from the machine, and hold the bobbin case by letting it hang by the thread. Shake it a couple of times. If the tension is correct, the thread will unwind about 5 centimetres. If the thread is too tight, it will not unwind. If the thread is too loose, it will unwind more than 5 centimetres.
To adjust the tension, turn the small screw on the side of the bobbin case.
- Top thread tension:
Basic thread tension setting: "4".
To increase the tension, set the thread tension knob to a higher number. To reduce the tension, set the thread tension knob to a lower number.
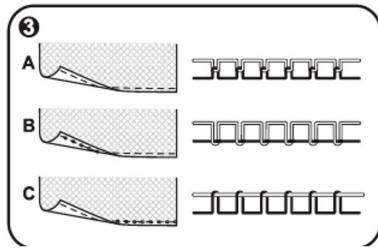
- Look at the stitches to determine if you have a proper tension setting:
A. Normal tension.
B. Tension too loose.
C. Excessive tension.


Bringing up the bottom thread
- Hold the top thread with your left hand. Turn the handwheel towards you with your right hand until the needle moves down and then back up again to the highest position.
- Pass the needle thread so that the bobbin thread binds into it. Pull the needle thread towards you and the bottom thread will come out of the bobbin. Pull both threads about 15 cm away from you and pass them under the presser foot.

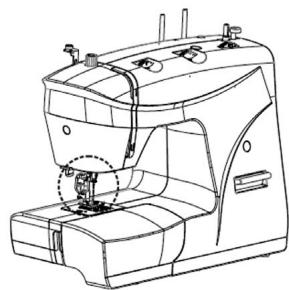


Reverse sewing
Reverse stitching is used to secure the end of seams and to reinforce the parts that need it. When you reach the end of the seam, press down the reverse stitch lever in the opposite direction and press the foot control lightly. Sew a few reverse stitches. When you release the lever, the machine will resume forward sewing (A).
Undo stitch
Turn the handwheel towards you until the thread take-up lever is in the highest position. Lift the presser foot and pull the fabric away from you.
Cutting the thread
Hold the threads behind the presser foot. Guide them with both hands into the slot (B) at the back of the presser foot bar and press down to cut the thread. You can also use the thread cutter on the side of the machine.
Selecting the right needle, fabric, and thread
The fabric to be sewn determines the choice of needle and thread. The following tables are a practical guide to needle and thread selection. Always refer to them before starting a new sewing project. Make sure to use the same size and type of thread in the bobbin and the top thread.
Needle selection according to fabric and thread
| Needle size | Fabric | Thread |
| 9-11(65-75) | Lightweight fabrics: fine cottons, chiffon, silk, muslin, quiana, interlock, cotton knits, tricot, jerseys, crepes, polyester fabrics, fabrics for shirts and blouses. | Lightweight cotton, nylon or polyester thread. |
| 12(80) | Medium weight fabrics: cotton, sateen, kettle cloth, canvas, double knit and lightweight wool. | Most of the threads sold are of medium size and suitable for these fabrics and needle types. Use polyester yarns on synthetic materials and cotton yarns on natural fabrics for best results. Always use the same thread on the top and bottom. |
| 14 (90) | Medium weight fabrics: cotton duck, wool, heavy knit, fleece, denim. | |
| 16 (100) | Heavy fabrics: tarpaulins, wool, tent and quilting fabrics, netting, upholstery material (light to medium). | |
| 18 (110) | Heavyweight fabrics, outerwear fabrics, upholstery fabrics, some leathers and vinyls. | Strong thread, carpet thread. (exert strong pressure with your foot - use high numbers). |
NOTE: adapt the needle size to the thread size and the weight of the fabric.
Needle selection depending on the fabric
| Needle | Description | Type of fabric |
| HAx 115x 1 | Sharp or blue-tipped needles. Sizes range from fine to coarse. From 9 (65) to 18 (110). | Natural fabrics: wool, cotton, silk, etc. Quiana. Not recommended for double fabrics. |
| 15x 1/705H (SIN) | Universal needles (slightly rounded tip). From 9 (65) to 18 (110). | Natural and synthetic fabrics, polyester blends. Knitted fabrics: polyester, interlocks, tricot, single and double knit. Can be used instead of 15x1 for sewing all fabrics. |
| 15x 1/705HS (SUK) | Ball-tipped needle. From 9 (85) to 18 (110). | Jersey, lycra, swimwear fabrics, stretch fabrics. |
| 130 PCL | Leather needles. From 12 (80) to 18 (110). (110) | Leather, vinyl, upholstery. (Leaves a smaller hole than the standard large needle). |
NOTE:
- Double needles can be used for specific or decorative tasks.
- When sewing with twin needles, the stitch width dial must be set to less than 2.5.
- European needle sizes are 65, 70, 80, etc. The American and Japanese needle sizes are 9, 11, 12, etc.
- Change the needle frequently, about every other garment, or when the thread breaks or the machine skips stitches.


Selecting the stitch pattern
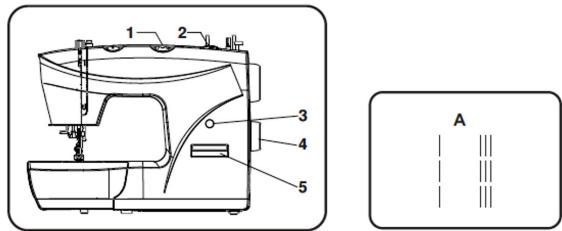
- To make a straight stitch, select pattern A with the pattern selection knob (4). Set the stitch length with the stitch length adjustment knob (2). You can choose any needle position by turning the stitch width adjustment knob (1).
- To make a zigzag stitch, select pattern B with the pattern selection knob (4). Adjust the stitch length (2) and stitch width (1) according to the fabric to be used.
- To make any of the stitch patterns of the top row, turn the stitch length adjustment knob (2) to position S2. Then select the desired pattern with the patter selection knob (4). Finally, set the stitch width with the stitch width adjustment knob (1).
- To make any of the stitch patterns of the second row, turn the stitch length adjustment knob (2) to position S1. Then select the desired pattern with the patter selection knob (4). Finally, set the stitch width with the stitch width adjustment knob (1).
- To make any pattern in the third row, select the letter above the stitch with the pattern selection knob (4). Set the stitch length (2) and width (1) with the corresponding knobs.
- With the stitch display (3), you can see the selected settings.
- If desired, select the opposite stitch direction by moving the reverse stitch switch (5).


4. STARTING TO SEW
STRAIGHT STITCHING AND NEEDLE POSITION
- Turn the pattern selection knob (4) until the stitch display (3) shows the straight stitch position (A).
- In general, the thicker the fabric, thread, and needle, the longer the stitch should be.
- Choose the needle position (from the middle to the right) by changing the position of the stitch width adjustment knob (1). The positions of this knob range from 0 to 5.
ZIGZAG STITCHING
Set the pattern selection knob to position B.
- Function of the stitch width adjustment knob
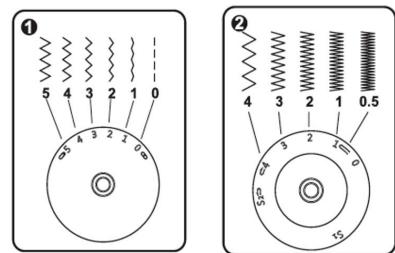
The maximum width of the zigzag stitch is 5. However, it can be reduced in any pattern. The stitch width increases as you move the knob from 0 to 5. If you are sewing with a twin needle, do not select a width greater than 2.5 (1). - Stitch length adjustment knob function while performing zigzag stitches
The zigzag stitch density increases as the stitch length adjustment knob setting approaches 0. To achieve clean zigzag stitches, we recommend that you do not choose a length longer than 2.5 (2).
SATIN STITCHING
When the stitch length is set between 0 and 1, the stitches will be close together, which will produce the satin stitch, used to make buttonholes and decorative stitches.
SEWING THIN FABRICS
If you are sewing very thin fabrics, it is recommended that you use an interlining on the reverse side of the fabric.
BLIND HEM/LINGERIE STITCHING
This stitch is suitable for hems, curtains, trousers, skirts, etc.
The most suitable settings for this stitch are as follows:
a. Stitch width 3 to 5.
b. Stitch length from 1 to 2.
c. Hemmer foot
d. Stitch pattern D, E or F.
Blind hem for stretch fabrics. Set the knob to position D.
Blind hem/lingerie for firm fabrics. Set the knob to position E or F.

NOTE: the blind hem foot is a standard accessory.
NOTE: it takes practice to sew blind hems. Always make a test seam first.
Adjust the machine as shown in the figure below, to do so:
Then, fold the fabric as shown in the figure below, with the wrong side facing up (1). Put the fabric under the presser foot. Turn the handwheel towards you until the needle moves all the way to the left. The needle should only pierce the fold of the fabric. If not, adjust the stitch width (2). Adjust the guide (3) by turning the knob (4) so that the guide rests right against the fold. Sew slowly, pressing the foot control lightly and guiding the fabric along the edge of the guide.

OVEREDGE STITCHING
This stitch is suitable for visible seams, topstitching, hems.
The most suitable settings for this stitch are as follows:
a. Stitch width 3 to 5.
b. Stitch length S1.
c. Overcasting foot
d. Stitch pattern F or G.
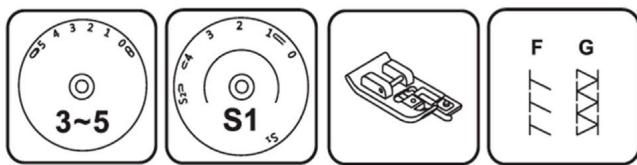
NOTE: The overcasting foot is an optional accessory which is not included with the machine.
STRETCH OVERLOCK:
For fine fabrics, jumpers, collar trimmings and ribbed fabric (A).
DOUBLE OVERLOCK STITCHING:
For fine fabrics, hand knitted fabrics and seams (B).
- All overlock stitches are suitable for sewing and finishing edges and visible seams in a single operation.
- When finishing, the needle should pass just over the edge of the fabric.
NOTE: use new needles, ball point needles, or stretch needles.

SEWING BUTTONS
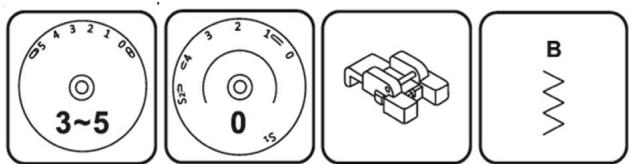
The most suitable settings for this stitch are as follows:
a. Stitch width 3 to 5.
b. Stitch length 0.
c. Button sewing foot
d. Stitch pattern B.
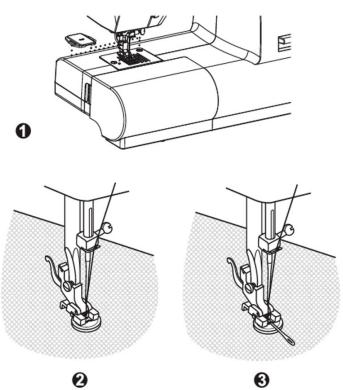
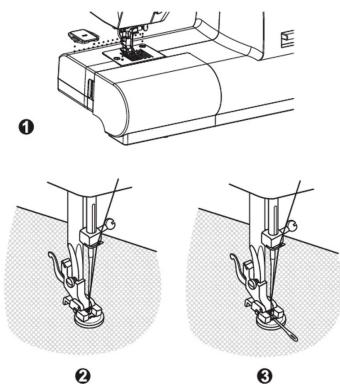
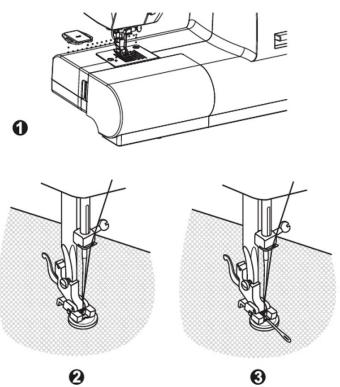
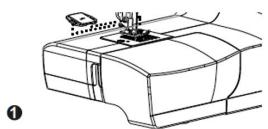
- Place the embroidery plate on the needle plate as shown in figure (1).
- Install the button sewing foot.
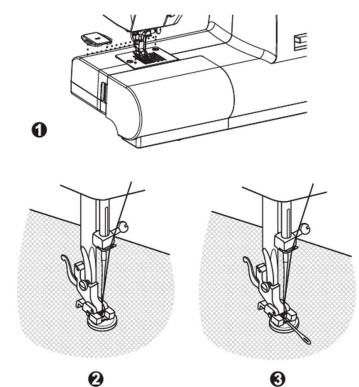
- Set the pattern selection knob to the zigzag stitching position. Set the stitch width to a position between 3 and 5, depending on the distance between the two button holes. Turn the handwheel to check that the needle enters correctly into both holes of the button. Set the pattern selection knob to the straight stitch position and make a few reinforcement stitches. Set the knob to the zigzag stitching position and stitch slowly about 10 stitches. Set the pattern selection knob to the straight stitch position and make a few reinforcement stitches (2).
- If it is a shank button, sew it on with a darning needle. (3) For buttons with four holes, sew through the front two holes first (2). Next, push the fabric forward and then sew the button through the two rear holes (3).
HOW TO SEW 4-STEP BUTTONHOLES
The most suitable settings for this stitch are as follows:
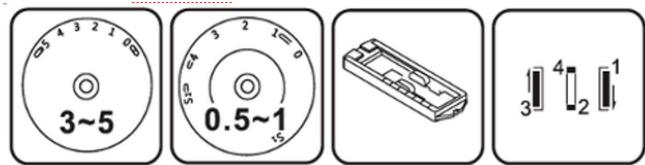
a. Stitch width 3 to 5.
b. Stitch length from 0.5 to 1.
c. Buttonhole foot
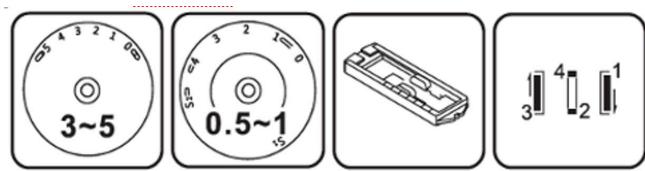
- Remove the multipurpose presser foot and attach the buttonhole presser foot.
- Measure the diameter and thickness of the button and add 0.3 cm for the reinforcement seams. Mark the size of the buttonhole on the fabric.
- Place the fabric under the foot, so that the mark on the foot matches the mark on the fabric. Lower the foot until the centre line of the buttonhole marked on the fabric is aligned with the centre of the foot.
- Set the stitch length adjustment knob to a position between 0.5 and 1 to adjust the stitch density.
- NOTE: the density varies according to the fabric. Always test sew a buttonhole seam on the fabric to be used.
- Follow 4-step sequence by changing from one step to the next with the pattern selection knob. Take care not to sew too many stitches in steps 2 and 4. Use a ripper to open the buttonhole from the ends towards the centre.

ZIPPERS AND PIPING
The most suitable settings for this stitch are as follows:
a. Stitch width 2.5.
b. Stitch length from 1 to 4.
c. Zipper foot
d. Stitch pattern A.

- Set the knob to position A.
- Adjust the stitch length by setting the stitch length adjustment knob to a position between 1 and 4 (depending on the thickness of the fabric).
- The presser foot for sewing zips (zipper foot) can be positioned on the right or on the left, depending on which side of the foot is to be sewn (1).
- To sew the pull part, lower the needle to the fabric, raise the presser foot and pass the zip pull to the back so that it does not interfere with the presser foot. Lower the foot and continue sewing.
- You can also sew a piece of cord on a bias strip to form a border (2).

SEWING WITH THE HEMMER FOOT
This stitch is suitable for hems on thin or sheer fabrics.
The most suitable settings for this stitch are as follows:
a. Stitch width 2.5.
b. Stitch length from 1 to 4.
c. Hemmer foot
d. Stitch pattern A.

NOTE: the hemmer foot is an optional accessory which is not included with the machine.
- Set the pattern selection knob to position A.
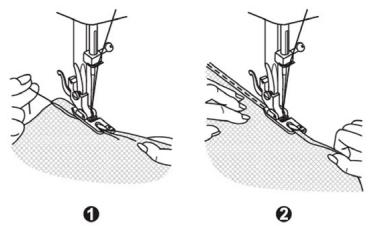
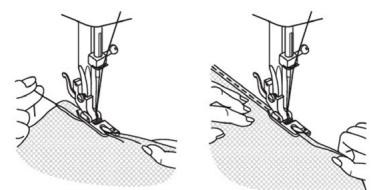
- Neaten the edge of the fabric. First, fold the edge of the fabric twice (approximately 0.3 cm) and stitch 4 or 5 times to secure. Pull the thread slightly towards the back. Stick the needle into the fabric, raise the presser foot (1).
- To adjust the fabric, gently pull the edge towards you and lower the presser foot. Start sewing, pulling the fabric inwards along the inside edge of the hem (2).
3-STEP ZIGZAG
This stitch is suitable for sewing lace and elastic, darning, mending, and reinforcing edges.
The most suitable settings for this stitch are as follows:
a. Stitch width 3 to 5.
b. Stitch length from 1 to 2.
c. Multipurpose presser foot
d. Stitch pattern C.
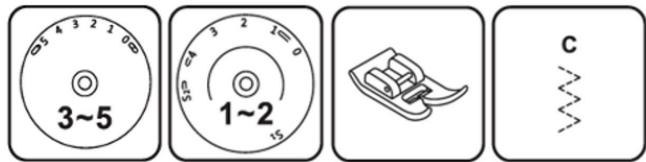
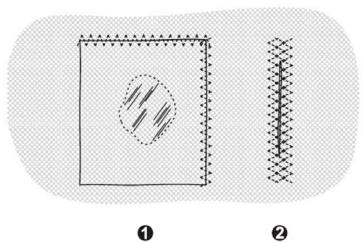
Set the pattern selection knob to position C.
Lay the fabric. The stitch length can be shortened to achieve close stitches (1).
When mending tears, it is advisable to use a piece of reinforcing fabric. The stitch density can be changed by adjusting the stitch length. Sew through the centre first and then overlap on both sides. Depending on the type of damaged fabric, sew between 3 and 5 rows (2).
OTHER STITCHES
TRIPLE STRAIGHT STITCH: (1/3)
Set the pattern selection knob to position A.
For strong seams.
Turn the stitch length adjustment knob to position S1. The machine will sew two stitches forward and one backwards. This will provide triple reinforcement.
TRIPLE ZIGZAG: (2/4)
Set the pattern selection knob to position B.
For strong seams, hems, and decorative seams.
Turn the stitch length adjustment knob to position S1. Set the stitch width adjustment knob to a position between 3 and 5. The triple zigzag stitch is suitable for firm fabrics like denim, corduroy, etc.

SMOCK STITCH
This stitch is suitable for seams, hems, underwear, etc.
The most suitable settings for this stitch are as follows:
a. Stitch width 4 to 5.
b. Stitch length S1.
c. Multipurpose presser foot
d. Stitch pattern C.

- Set the pattern selection knob to position C.
- Turn the stitch length adjustment knob to position S1.
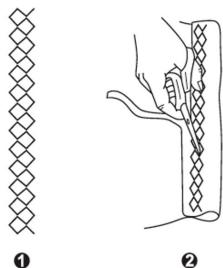
- Smock stitch can be used for all types of knitted fabrics, as well as for woven fabrics (1).
- Sew 1 cm from the edge of the fabric and trim the excess fabric (2).
SEWING WITH THE CORDING FOOT
This stitch is suitable for decorative effects, cushions, tablecloths, etc.
The most suitable settings for this stitch are as follows:
a. Stitch width 3 to 5.
b. Stitch length from 1 to 4.
c. Cording foot
d. Stitch pattern B.

NOTE: the cording foot is an optional accessory which is not included with the machine.
- There are several stitches that are suitable for sewing on cord, such as zigzag, triple zigzag or decorative stitches.
- Insert the cord underneath the plate. Then, pass it through the slot until it is under the foot (1). The cord must slide in the groove. You can sew one, two or three cords. The stitch width must be set according to the number of cords and the selected stitch (2).

FREE MOTION DARNING
The most suitable settings for this stitch are as follows:
a. Stitch width 2.5.
b. Stitch length 0.
c. Darning/embroidery foot
d. Stitch pattern A.
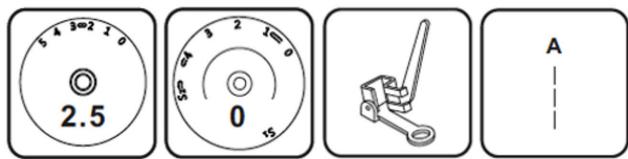
NOTE: the darning foot is an optional accessory which is not included with the machine.
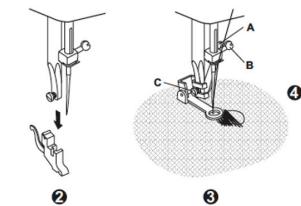
- Attach the embroidery plate (1).
- Remove the presser foot clamping piece (2).
- Attach the darning foot to the presser foot bar. The lever (A) must be behind the needle clamping screw (B). Press the darning foot firmly from behind with your index finger and tighten the screw (C) (3).
- Sew around the edge of the hole first (to secure the threads) (4). First row: always sew from left to right. Turn the fabric 1/4 and oversew.
- The use of a darning ring is recommended to facilitate sewing and achieve better results.

DECORATIVE STITCHES
The most suitable settings for this stitch are as follows:
a. Stitch width 3 to 5.
b. Stitch length from 1 to 2.
c. Multipurpose presser foot
d. Stitch pattern F, K or G.
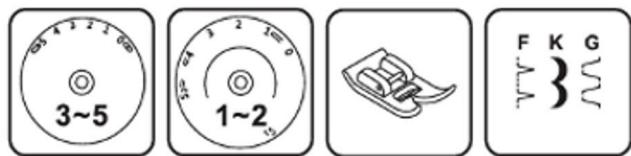
Turn the stitch width and stitch length adjustment knobs to adapt these two values to the fabric.
SHELL STITCH (A)
To decorate edges.
Suitable for the edges of sheer, thin and stretch fabrics.
The largest stitch should go just above the edge of the fabric to create the shell effect.
CRESCENT STITCH (B)
For a delicate finish along the edge of the fabric.
The stitch length must be set between 0.5 and 1.0.
LADDER STITCH (C)
For flat seams, seams over elastic and visible hems.
This stitch can be used for firm, thicker fabrics.

DARNING
The most suitable settings for this stitch are as follows:
a. Stitch width 2.5.
b. Stitch length from 2 to 4.
c. Multipurpose presser foot
d. Stitch pattern A.
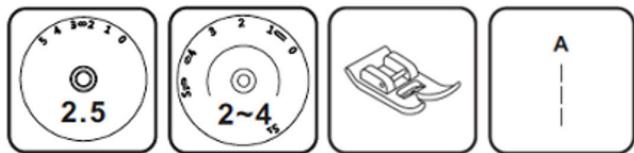
- Turn the stitch length adjustment knob to the desired length.
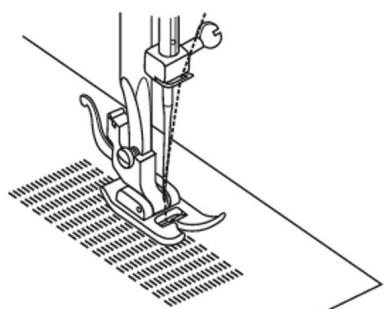
- Set the pattern selection knob to the straight stitch position. The needle shall be placed in the centre.
- Place the fabric to be darned under the presser foot together with the fabric to be placed underneath.
- Lower the presser foot and sew alternately forwards or backwards using the lifter.
- Repeat this movement until the area to be darned is covered with rows of stitches.
- To sew in the opposite direction, refer to the corresponding section in this manual.
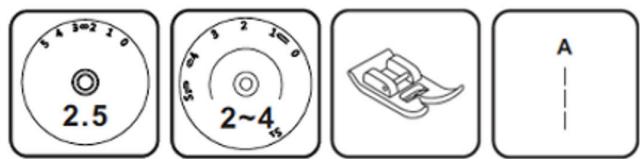
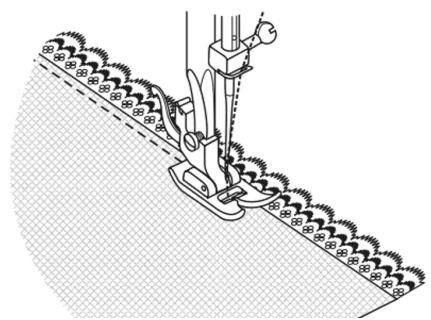
ATTACHING LACE
The most suitable settings for this stitch are as follows:
a. Stitch width 2.5.
b. Stitch length from 2 to 4.
c. Multipurpose presser foot
d. Stitch pattern A.
- Turn the stitch length adjustment knob to the desired length.
- Set the pattern selection knob to the straight stitch position. The needle shall be placed in the centre.
- Fold the edge of the fabric inwards (approx. 6 mm).
- Place the lace under the folded edge of the fabric, leaving it slightly below the fabric, as required by the lace pattern.
- Sew along the edge of the fabric fold.
- You can add a decorative touch by using the satin stitch to sew the lace.

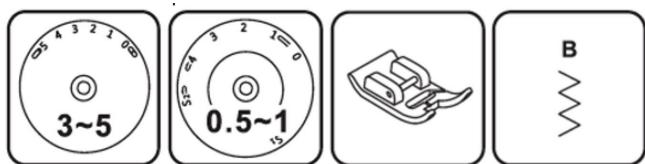
APPLIQUÉ
The most suitable settings for this stitch are as follows:
a. Stitch width 3 to 5.
b. Stitch length from 0.5 to 1.
c. Multipurpose presser foot
d. Stitch pattern B.
- Turn the stitch length adjustment knob to the desired length.
- Set the pattern selection knob to the zigzag stitching position.
- Select a narrow width.
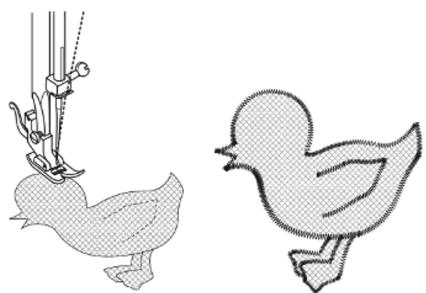
- Cut out the appliqué design and baste it to the fabric.
- Stitch slowly around the edge of the design.
- Trim any excess material outside the seam. Make sure not to cut any stitches.
- Remove the basting thread.
Tie the top and bottom threads under the appliqué to avoid unravelling.
TWIN NEEDLE
NOTE: the twin needle is an optional accessory which is not included with the machine.
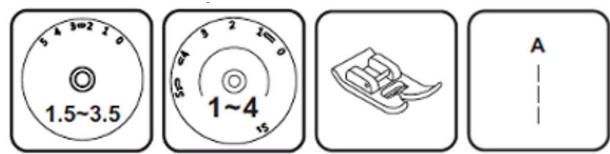
The most suitable settings for this stitch are as follows:
a. Stitch width 1.5 to 3.5.
b. Stitch length from 1 to 4.
c. Multipurpose presser foot
d. Stitch pattern A.
- Turn the stitch length adjustment knob to the desired length.
- Set the pattern selection knob to the straight stitch position. The needle shall be placed in the centre. Set the width to 0.
- Make sure that the two threads used to thread the twin needle have the same weight. You can only use one or two colours.
- Insert the twin needle in the same way as the single needle. The flat side of the needle must be facing away from you.
- Follow the instructions for single needle threading. Thread each needle separately.
TIPS
- When sewing with a twin needle, always sew slowly to ensure the quality of the stitch.
- When using a twin needle for zigzag stitching, make sure that the stitch width adjustment knob is set between 1.5 and 3.5. Do not use this needle with a setting higher than 3.5.

QUILTING
The most suitable settings for this stitch are as follows:
a. Stitch width 1.5 to 3.5.
b. Stitch length from 1 to 4.
c. Multipurpose presser foot
d. Stitch pattern A.

NOTE: the quilting foot is an optional accessory which is not included with the machine. If you do not have it, use the multipurpose presser foot instead.
Set the pattern selection knob to the straight stitch position.
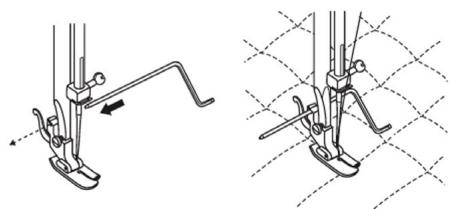
Insert the edge/quilting guide into the presser foot holder and adjust it as desired.
Move the fabric and sew successive lines. Each time you sew a new row, place the guide on the previous row of stitches.
GATHERING
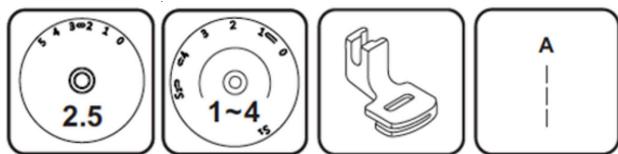
The most suitable settings for this stitch are as follows:
a. Stitch width 2.5.
b. Stitch length from 1 to 4.
c. Gathering foot
d. Stitch pattern A.
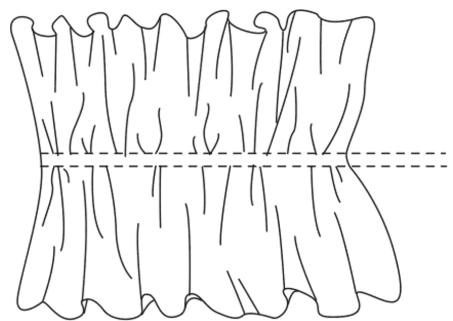
NOTE: the gathering foot is an optional accessory which is not included with the machine. If you do not have this foot, use the multipurpose presser foot instead and gather the fabric manually by lowering the tension below 2 and pulling the bottom thread to gather the material.
- Set the pattern selection knob to the straight stitch position.
- Attach the gathering foot.
- Sew one or more rows of straight stitches.
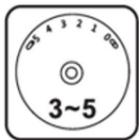
- If you need more gathering, loosen the top thread tension (choose a setting below 2) so that the bottom thread is on the ungathered side.
- Pull the bottom thread to gather more of the material.
PATCHWORK
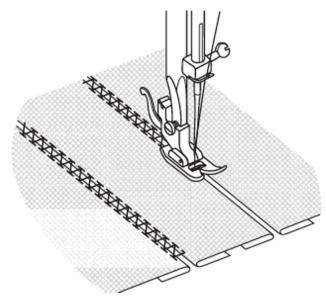
Patchwork stitches are used to join two pieces of fabric while leaving a space between their edges.
The most suitable settings for this stitch are as follows:
a. Stitch width 3 to 5.
b. Stitch length S1.
c. Multipurpose presser foot
d. Stitch pattern G.


- Fold the edges of the two pieces of fabric for the hem and baste them to a piece of thin piece of paper leaving a small gap.
- Set the pattern selection knob to position G. Turn the stitch length adjustment knob to position S1.
- Sew along the edge, pulling slightly on both threads as you start to sew. Use thicker threads than normal.
- Once sewn, remove the basting thread and the piece of paper. To finish, tie knots on the reverse side at the beginning and end of the seams.
5. CLEANING AND MAINTENANCE
MAINTENANCE
WARNING: always ensure that the power switch is in the 0 position and the machine is unplugged from the mains before fitting or removing any parts and before cleaning.
REMOVING THE STITCH PLATE
- First, turn the handwheel until the needle is in the highest position.
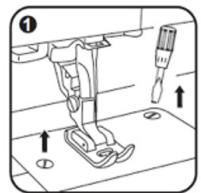
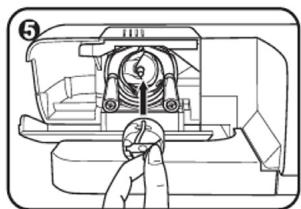
- Open the front cover and unscrew the needle plate screw with the supplied screwdriver (1).
CLEANING THE FEED DOG
Remove the bobbin case and use the brush provided to clean the entire area (2).
CLEANING AND LUBRICATING THE SHUTTLE
- Remove the bobbin case.
- Move the two clamping arms (a) outwards.
- Remove the shuttle cover (b) and the crescent (c) and clean both parts with a soft cloth.
- Lubricate at the points (d) with one or two drops of sewing machine lubricant. Next, turn the handwheel until the hook (e) is on the left.
- Refit the crescent (c).
- Replace the shuttle cover and move the two clamping arms inwards again.
- Insert the bobbin case and bobbin and replace the stitch plate.
WARNING: lint and threads shed by the different fabrics must be removed regularly.
The machine must be checked from time to time by a qualified technician.

6. TROUBLESHOOTING

| PROBLEM | POSSIBLE CAUSES | POSSIBLE SOLUTIONS |
| The top thread breaks | The machine is not correctly threaded.The top thread tension is too tight.The thread is too thick for the needle.The needle is not correctly inserted.The thread has been wound onto the spool pin holder.The needle is damaged. | Re-thread the machine.Reduce the thread tension (select a lower number).Choose a larger needle.Remove the needle and reinsert it (flat side back).Remove the bobbin and wind the thread onto it.Replace the needle. |
| The bottom thread breaks | The bobbin case is not placed correctly.The bobbin is badly wound.The thread tension is too tight. | Remove the bobbin case and replace it. Then pull the thread.You should be able to pull the thread easily.Check the bobbin and the bobbin case.Reduce the bottom thread tension. |
| The appliance skips stitches | The needle is not correctly inserted.The needle is damaged.The needle size used is incorrect.The presser foot is not attached correctly. | Remove the needle and reinsert it (flat side back).Insert a new needle.Choose a needle that is suitable for the thread and fabric.Position it correctly. |
| The needle breaks | The needle is damaged.The needle is not correctly inserted.The needle size used is incorrect.The wrong presser foot has been inserted. | Insert a new needle.Insert the needle correctly (flat side to the back).Choose a needle that is suitable for the thread and fabric.Choose the correct presser foot. |
| The stitches remain loose | The machine is not correctly threaded.The bobbin case is not threaded correctly.The needle/fabric/thread combination is incorrect.The thread tension is incorrect. | Check the threading.Thread the bobbin case.The needle size must be suitable for the fabric and thread.Correct the thread tension. |
| Seams gather or pucker | The needle is too thick for the fabric.The stitch length is incorrectly set.The thread tension is too tight. | Choose a finer needle.Readjust the stitch length.Reduce the thread tension. |
| The stitches are uneven, and the feed is irregular | The quality of the thread is poor.The bobbin case is not threaded correctly.Fabric has been pulled. | Choose a better quality thread.Remove the bobbin case, rewind it, and then replace it correctly.Do not pull on the fabric while sewing, let it be taken by the machine. |
| The machine makes noise | Lubricate the machine.Lint or lubricant has accumulated on the hook or needle bar.Low quality lubricant has been used.The needle is damaged. | Lubricate the machine.Clean the hook and feed dog as described.Only use good quality sewing machine lubricant.Replace the needle. |
| The machine jams | The thread is caught in the hook. | Remove the top thread and bobbin, turn the handwheel back and forth, and remove the excess thread. Lubricate the machine. |
7. TECHNICAL SPECIFICATIONS
Product: BelleCouture 6600
Product reference: 01153
Voltage: 220-240 V\~
Frequency: 50 Hz
Power: 60 W
Technical specifications may change without prior notification to improve product quality.
Made in China | Designed in Spain
8. DISPOSAL OF OLD ELECTRICAL AND ELECTRONIC APPLIANCES

This symbol indicates that, according to the applicable regulations, the product and/or batteries must be disposed of separately from household waste. When this product reaches the end of its shelf life, you should dispose of the cells/batteries/accumulators and take them to a collection point designated by the local authorities.
Consumers must contact their local authorities or retailer for information concerning the correct disposal of old appliances and/or their batteries.
Compliance with the above guidelines will help protecting the environment.
9. TECHNICAL SUPPORT AND WARRANTY
Cecotec shall be liable to the end user or consumer for any lack of conformity that exists at the time of delivery of the product under the terms, conditions, and deadlines established by the applicable regulations.
It is recommended that repairs be carried out by qualified personnel.
If at any moment you detect any problem with your product or have any doubt, do not hesitate to contact the official Cecotec Technical Support Service at +34 96 321 07 28.
10. COPYRIGHT
The intellectual property rights over the texts in this manual belong to CECOTEC INNOVACIONES, S.L. All rights reserved. The contents of this publication may not, in whole or in part, be reproduced, stored in a retrieval system, transmitted, or distributed by any means (electronic, mechanical, photocopying, recording or similar) without the prior authorization of CECOTEC INNOVACIONES, S.L.
1. PIÈCES ET COMPOSANTS
Accessoires standard (inclus)

2. AVANT UTILISATION
Brancher la machine
FRANÇAIS


Placer la bobine
Changer l'aiguille


Point surjet
Insérer de la dentelle


Quilting
Froncer
Faire du patchwork
5. NETTOYAGE ET ENTRETIEN
ENTRETIEN


2. VOR DEM GEBRAUCH



Fadenspannung

OVERLOCKSTICH
KNÖPFE NÄHEN
VERWENDUNG DES NÄHFUßES ZUM SÄUMEN
DEUTSCH
ZICKZACKSTICH IN DREI SCHRITTEN
DREIFACH-ZICKZACKSTICH: (2/4)
1
②

STOFFAPPLIKATIONEN
ZWILLINGSNADEL
TIPPS:
KRÄUSELN
PATCHWORK


NOTA:




PUNTO SOPRAGGITTO

②
③
INSERIRE CERNIERE E CORDONATURE
CUCIRE CON IL PIEDINO PER ORLI
PUNTO A ZIG-ZAG IN 3 FASI
ZIG-ZAG A 3 PUNTI: (2/4)
CUCIRE PIZZO
CUCIRE TOPPE O APPLIQUÉ
CUCIRE CON AGO DOPPIO
SUGGERIMENTI:
ARRICCIARE
RIMUOVERE LA PLACCA PER PUNTI:

2. ANTES DE USAR
PORTUGUÊS


Colocar a torneira


Mudar a agulha
AVISO: Desligar a máquina (0) antes de colocar ou retirar a agulha.
Tensão do fio
Costura reversa/reversa Costura reversa/reversa

FECHOS DE CORRER E DEBRUNS
1
②
PONTO ZIGUEZAGUE EM 3 PASSOS
① ②


PORTUGUÊS

DICAS:
ACOLCHAR
FRANZIR
COSER RETALHOS


- SOMMAIRE
- INSTRUCTIONS DE SÉCURITÉ
- DEVANAR DE LA BOBINA
- COLOCAR LA CANILLA
- CAMBIAR LA AGUJA
- COSER BOTONES
- PONER CREMALLERAS Y RIBETES
- COSER CON EL PIE PRENSATELAS PARA DOBLADILLO
- PUNTADA ZIGZAG EN 3 PASOS
- PUNTADA TRIPLE RECTA: (1/3)
- PUNTO SMOCK (FRUNCIR)
- PUNTADA DE CONCHA (A)
- COLOCAR ENCAJE
- COLOCAR APLIQUES
- COSER CON AGUJA DOBLE
- ACOLCHAR
- FRUNCIR
- HACER PATCHWORK
- LIMPIEZA Y MANTENIMIENTO
- MANTENIMIENTO
- ACCESSORY KIT
- BEFORE USE
- BOX CONTENT
- OPERATION
- INSTALLING THE REMOVABLE SEWING TABLE AND THE SPOOL PIN
- CONNECTING THE APPLIANCE TO THE MAINS
- TWO-STEP PRESSER FOOT LIFTER
- ADJUSTING THE PRESSER FOOT PRESSURE
- ATTACHING THE PRESSER FOOT HOLDER
- WINDING THE BOBBIN
- INSERTING THE BOBBIN
- CHANGING THE NEEDLE
- THREADING THE TOP THREAD
- AUTOMATIC NEEDLE THREADER (OPTIONAL)
- THREAD TENSION
- BRINGING UP THE BOTTOM THREAD
- REVERSE SEWING
- UNDO STITCH
- CUTTING THE THREAD
- SELECTING THE RIGHT NEEDLE, FABRIC, AND THREAD
- NOTE
- SELECTING THE STITCH PATTERN
- STARTING TO SEW
- STRAIGHT STITCHING AND NEEDLE POSITION
- ZIGZAG STITCHING
- SATIN STITCHING
- SEWING THIN FABRICS
- BLIND HEM/LINGERIE STITCHING
- OVEREDGE STITCHING
- STRETCH OVERLOCK
- DOUBLE OVERLOCK STITCHING
- SEWING BUTTONS
- HOW TO SEW 4-STEP BUTTONHOLES
- ZIPPERS AND PIPING
- SEWING WITH THE HEMMER FOOT
- 3-STEP ZIGZAG
- OTHER STITCHES
- TRIPLE STRAIGHT STITCH: (1/3)
- TRIPLE ZIGZAG: (2/4)
- SMOCK STITCH
- SEWING WITH THE CORDING FOOT
- FREE MOTION DARNING
- DECORATIVE STITCHES
- SHELL STITCH (A)
- CRESCENT STITCH (B)
- LADDER STITCH (C)
- DARNING
- ATTACHING LACE
- APPLIQUÉ
- TWIN NEEDLE
- TIPS
- QUILTING
- GATHERING
- PATCHWORK
- CLEANING AND MAINTENANCE
- MAINTENANCE
- REMOVING THE STITCH PLATE
- CLEANING THE FEED DOG
- CLEANING AND LUBRICATING THE SHUTTLE
- TROUBLESHOOTING
- TECHNICAL SPECIFICATIONS
- DISPOSAL OF OLD ELECTRICAL AND ELECTRONIC APPLIANCES
- TECHNICAL SUPPORT AND WARRANTY
- COPYRIGHT
- PIÈCES ET COMPOSANTS
- AVANT UTILISATION
- BRANCHER LA MACHINE
- FRANÇAIS
- PLACER LA BOBINE
- CHANGER L'AIGUILLE
- POINT SURJET
- INSÉRER DE LA DENTELLE
- FRONCER
- FAIRE DU PATCHWORK
- NETTOYAGE ET ENTRETIEN
- ENTRETIEN
- VOR DEM GEBRAUCH
- FADENSPANNUNG
- OVERLOCKSTICH
- KNÖPFE NÄHEN
- VERWENDUNG DES NÄHFUSSES ZUM SÄUMEN
- DEUTSCH
- ZICKZACKSTICH IN DREI SCHRITTEN
- DREIFACH-ZICKZACKSTICH: (2/4)
- STOFFAPPLIKATIONEN
- ZWILLINGSNADEL
- TIPPS
- KRÄUSELN
- PUNTO SOPRAGGITTO
- INSERIRE CERNIERE E CORDONATURE
- CUCIRE CON IL PIEDINO PER ORLI
- PUNTO A ZIG-ZAG IN 3 FASI
- ZIG-ZAG A 3 PUNTI: (2/4)
- CUCIRE PIZZO
- CUCIRE TOPPE O APPLIQUÉ
- CUCIRE CON AGO DOPPIO
- SUGGERIMENTI
- ARRICCIARE
- ANTES DE USAR
- PORTUGUÊS
- COLOCAR A TORNEIRA
- MUDAR A AGULHA
- TENSÃO DO FIO
- COSTURA REVERSA/REVERSA COSTURA REVERSA/REVERSA
- FECHOS DE CORRER E DEBRUNS
- PONTO ZIGUEZAGUE EM 3 PASSOS
- DICAS
- FRANZIR
- COSER RETALHOS
Brand : CECOTEC
Model : Bellecouture 6600
Category : Sewing machine