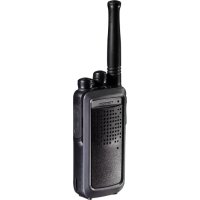
PROTALKER PT-1078 - Talkie Walkie TOPCOM - Free user manual and instructions
Find the device manual for free PROTALKER PT-1078 TOPCOM in PDF.
| Brand | TOPCOM |
| Model | PROTALKER PT-1078 |
| Product Type | Walkie-talkie |
| Maximum Range | Up to 10 km in open terrain |
| Number of Channels | 8 |
| Sub-channels | CTCSS and DCS |
| Protection Rating | IPX7 (submersible up to 1 m for 30 min) |
| Power Supply | Rechargeable NiMH battery packs |
| Charging Time | Approximately 16 hours |
| Display | LCD screen |
| Main Functions | Radio communication, channel scanning, silent mode, roger beep, key lock, group mode (up to 122 groups), individual and group calls, monitoring |
| Included Accessories | 2 walkie-talkies, 1 dual charger, 1 power adapter, 2 NiMH battery packs, 2 belt clips, user manual |
| Maintenance | Clean with a damp cloth; avoid harsh chemicals; after contact with salt water, rinse with fresh water and dry |
| Safety | Do not touch damaged antenna; keep away from pacemakers; turn off in explosive areas; do not use while driving if prohibited |
| Warranty | 24 months |
| Compliance | R&TTE Directive 1999/5/EC |
| Frequency Band | 446 MHz (license-free) |
| Group Mode | Up to 16 devices per group, 122 group codes |
| Call Tones | 10 available tones |
Frequently Asked Questions - PROTALKER PT-1078 TOPCOM
User questions about PROTALKER PT-1078 TOPCOM
0 question about this device. Answer the ones you know or ask your own.
Ask a new question about this device
Download the instructions for your Talkie Walkie in PDF format for free! Find your manual PROTALKER PT-1078 - TOPCOM and take your electronic device back in hand. On this page are published all the documents necessary for the use of your device. PROTALKER PT-1078 by TOPCOM.
USER MANUAL PROTALKER PT-1078 TOPCOM
UK The features described in this manual are published with reservation to modifications.
NL De in deze handleiding beschreiben möglichkheden worden gepublicieerd onder voorbehoud van wijzigingen.
F Les possibilités décrites dans ce manuel sont publiées sous réserve de modifications.
Die in dieser Bedienungsanleitung umschriebenen Mochlichkeiten, werden vorbehaltlich Änderungen publiziert.
ES Las caracteristicas descritas en este manual peuvent ser objeto de futuras modificaciones.
S Funktionerna ienna braksanvisning publiceras med reservation for andringar.
N Funksjoner beskrevet i dette manualen kan endres uten naermere informasjon.
SF Tassohjekirjassa julkaissut tiedot voivat muuttua ilman ennakkoilmoitusta.
IT Le caratteristiche descripte nel presente manuale vengono pubblicate con riserva di modifica.
PT As caracteristicas descritas neste manual são publicadas sobreshva de modificação.
CZ Moznost upravy funkci popsanych v teo priruce vyhrazena
GR OI AIEIOUPYIE C TPO TEPiPpOvTAt OTo TApov ExyEpiDIO, DnOoieuovTAt EETIIpUaAsn TuXov TPOITTOINoeWV.
PL Wlasciwocki opisane w niniejszej instrukcji obslugi są publikowane z zatrzezeniem prawa wprovadzeniazmian.
SK Vlastnosti popisané v tejo priručke su publikovane s vyhradeným právom na zmenu.
Illustration 1
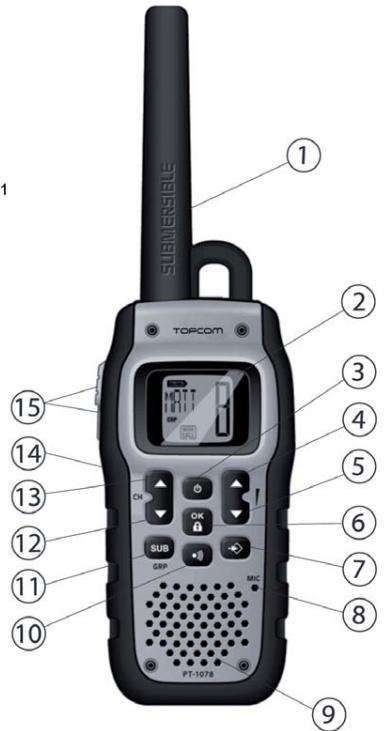
Illustration 2
1 Introduction
Thank you for purchasing the Protalker PT-1078. It's a long range, low powered radio communication device with a range of maximum 10 Km. It has no running costs other than the minimal cost of re-charging the batteries. The Protalker PT-1078 operates on 8 channels. The radio is built according the IPX7 standard. This implies that it is submersible: it will float in water and it can be held 1 meter below the water surface during 30 minutes without being damaged.
2 Intended purpose
It can be used for recreational purposes. For example: to keep in contact during travelling with 2 or more cars, biking, skiing. It can be used to keep in contact with your children when they are playing outside, etc...
3 CE Mark
The CE symbol on the unit, user guide and giftbox indicates that the unit complies with the essential requirements of the R&TTE directive 1995/5/EC.
4 Safety instructions
4.1 General
Please read carefully through the following information concerning safety and proper use. Make yourself familiar with all functions of the device. Keep this manual in a safe place for future use.
4.2 Burning injuries
If the cover of the antenna is damaged, do not touch because when an antenna comes in contact with the skin, a minor burn may result when transmitting.
- Batteries can cause property damage such as burns if conductive material such as jewellery, keys or beaded chains touches exposed terminals. The material may complete an electrical circuit (short circuit) and become quite hot. Exercise care in handling any charged battery, particularly when placing it inside a pocket, purse or other container with metal objects.
4.3 Injuries
- Do not place your device in the area over an air bag or in the air bag deployment area. Air bags inflate with great force. If a PMR is placed in the bag deployment area and the air bag inflates, the communicator may be propelled with great force.
- Keep the PMR at least 15 centimetres away from a pacemaker.
- Turn your PMR OFF as soon as interference is taking place with medical equipment.
4.4 Danger of explosion
- Do not replace batteries in a potentially explosive atmosphere. Contact sparking may occur while installing or removing batteries and cause an explosion.
Turn your PMR off when in any area with a potentially explosive atmosphere. Sparks in such areas could cause an explosion or fire resulting in bodily injury or even death. - Never throw batteries in fire as they may explode.

Areas with potentially explosive atmospheres are often, but not always, clearly marked. They include fuelling areas such as below deck on boats, fuel or chemical transfer or storage facilities; areas where the air contains chemicals or particles, such as grain, dust or metal powders; and any other area where you would normally be advised to turn off your vehicle engine.
4.5 Poisoning danger
- Keep batteries away from small children.
4.6 Legal
In some countries it is prohibited to use your PMR while driving a vehicle. In this case leave the road before using the device.
Turn your PMR OFF when on board an aircraft when instructed to do so. Any use of the PMR must be in accordance with airline regulations or crew instructions.
Turn your PMR OFF in any facilities where posted notices instruct you to do so. Hospitals or health care facilities may be using equipment that is sensitive to external RF energy.
- Replacing or modifying the antenna may affect the PMR radio specifications and violate the CE regulations.
Unauthorised antennas could also damage the radio.
4.7 Notes
Do not touch the antenna while transmitting, it could affect the range.
- Remove the batteries if the device is not going to be used for a long period.
5 Cleaning and maintenance
To clean the unit, wipe with a soft cloth dampened with water. Don't use a cleaner or solvents on the unit; they can damage the case and leak inside, causing permanent damage.
Battery contacts may be wiped with a dry lint-free cloth.

After your radio is submerged in water, you might notice that the sound is distorted. This is because there is still water remaining in and around the speaker and microphone. Just shake the radio to clear excess water, and the sound should return to normal. If your radio is exposed to salt water, clean your radio thoroughly with fresh water, and dry it before turning it on.
6 Disposal of the device (environment)

At the end of the product lifecycle, you should not throw this product into the normal household garbage but bring the product to a collection point for the recycling of electrical and electronic equipments. The symbol on the product, user, or manufacturer is used to indicate that it has been recycled.
Some of the product materials can be re-used if you bring them to a recycling point. By re-using some parts or raw materials from used products you make an important contribution to the protection of the environment. Please contact your local authorities in case you need more information on the collection points in your area.
7 Using a PMR device
To communicate between PMR devices they need to be set all on the same channel and sub-channel (CTCSS/DCS) and within receiving range (up to max.10 km in open field). Since these devices use free frequency bands (channels), all devices in operation share these channels(total 8 channels - Annex A). Therefore, privacy is not guaranteed. Anybody with a PMR set to your channel can overhear the conversation. If you want to communicate (transmitting a voice signal) you need to press the PTT-key (13) . Once this key pressed, the device will go into transmit mode and you can speak into the microphone. All other PMR devices in range, on the same channel and in standby mode (not transmitting) will hear your message. You need to wait until the other party stops transmitting before you can reply to the message. At the end of each transmission the unit will send a beep if the Roger Beep is enable (See chapter "13.12 Roger Beep On/Off"). To reply, just press the PTT-key (15) and speak into the microphone.

If 2 or more users press the PTT-key 15 at the same time the receiver will receive only the stongest signal and the other signal(s) will be suppressed. Therefore you should only transmit a signal (press PTT-key 15 ) when the channel is free.

The range of radio waves is strongly affected by obstacles such as buildings, concrete/metal structures, the unevenness of the landscape, woodland, plants, ... This implies that the range between two or more PMR's may in some extreme cases be restricted to a maximum of a few tens of meters. You will soon notice that PMR works best when there is a minimum of obstacles between users.
8 Included in the package
2x Protalker PT-1078
1x Duo charger
1xPoweradapter
2x NiMH battery pack
2x Belt clip
- User guide
Card with service address and Hotlinenumbers
9 Getting started
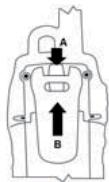
9.1 Installing / Removing the belt clip
- To remove the belt clip from the unit, push the belt clip (B) towards the antenna, while pulling the clip tab (A).
- When re-installing the belt clip, a click indicates that the belt clip is locked into position.
9.2 Installing the batteries
- Open the battery compartment. Use a screwdriver or a coin to turn the screw counter clockwise.
- Put in the battery. The battery pack label will indicate the correct position of the battery.
- Before closing the battery door, check the rubber seal around the battery and ensure that the seal is in good condition and that there is no foreign matter under the seal.
- Close the battery compartment door and tighten the screw again (clockwise).
10 Charging the batteries
The desktop charger provides drop-in charging conveniency.
- Put the desktop charger on a flat surface.
- Plug one end of the supplied adapter into an easy accessible electric socket and the other end into the connector on the backside of the desktop charger.
- Make sure that the radio is turned OFF.
- Put the radio in the charger.
- The charging LED will turn on if it's properly inserted and charging.
It will take about 16 hours to fully charge the Ni-Mh battery.

Do not short-circuit the batteries or dispose in fire. Remove the batteries if this device is not going to be used for a long period.
Do not charge non rechargeable batteries like Alkaline batteries in the charger. This might damage the PMR's and charger unit.
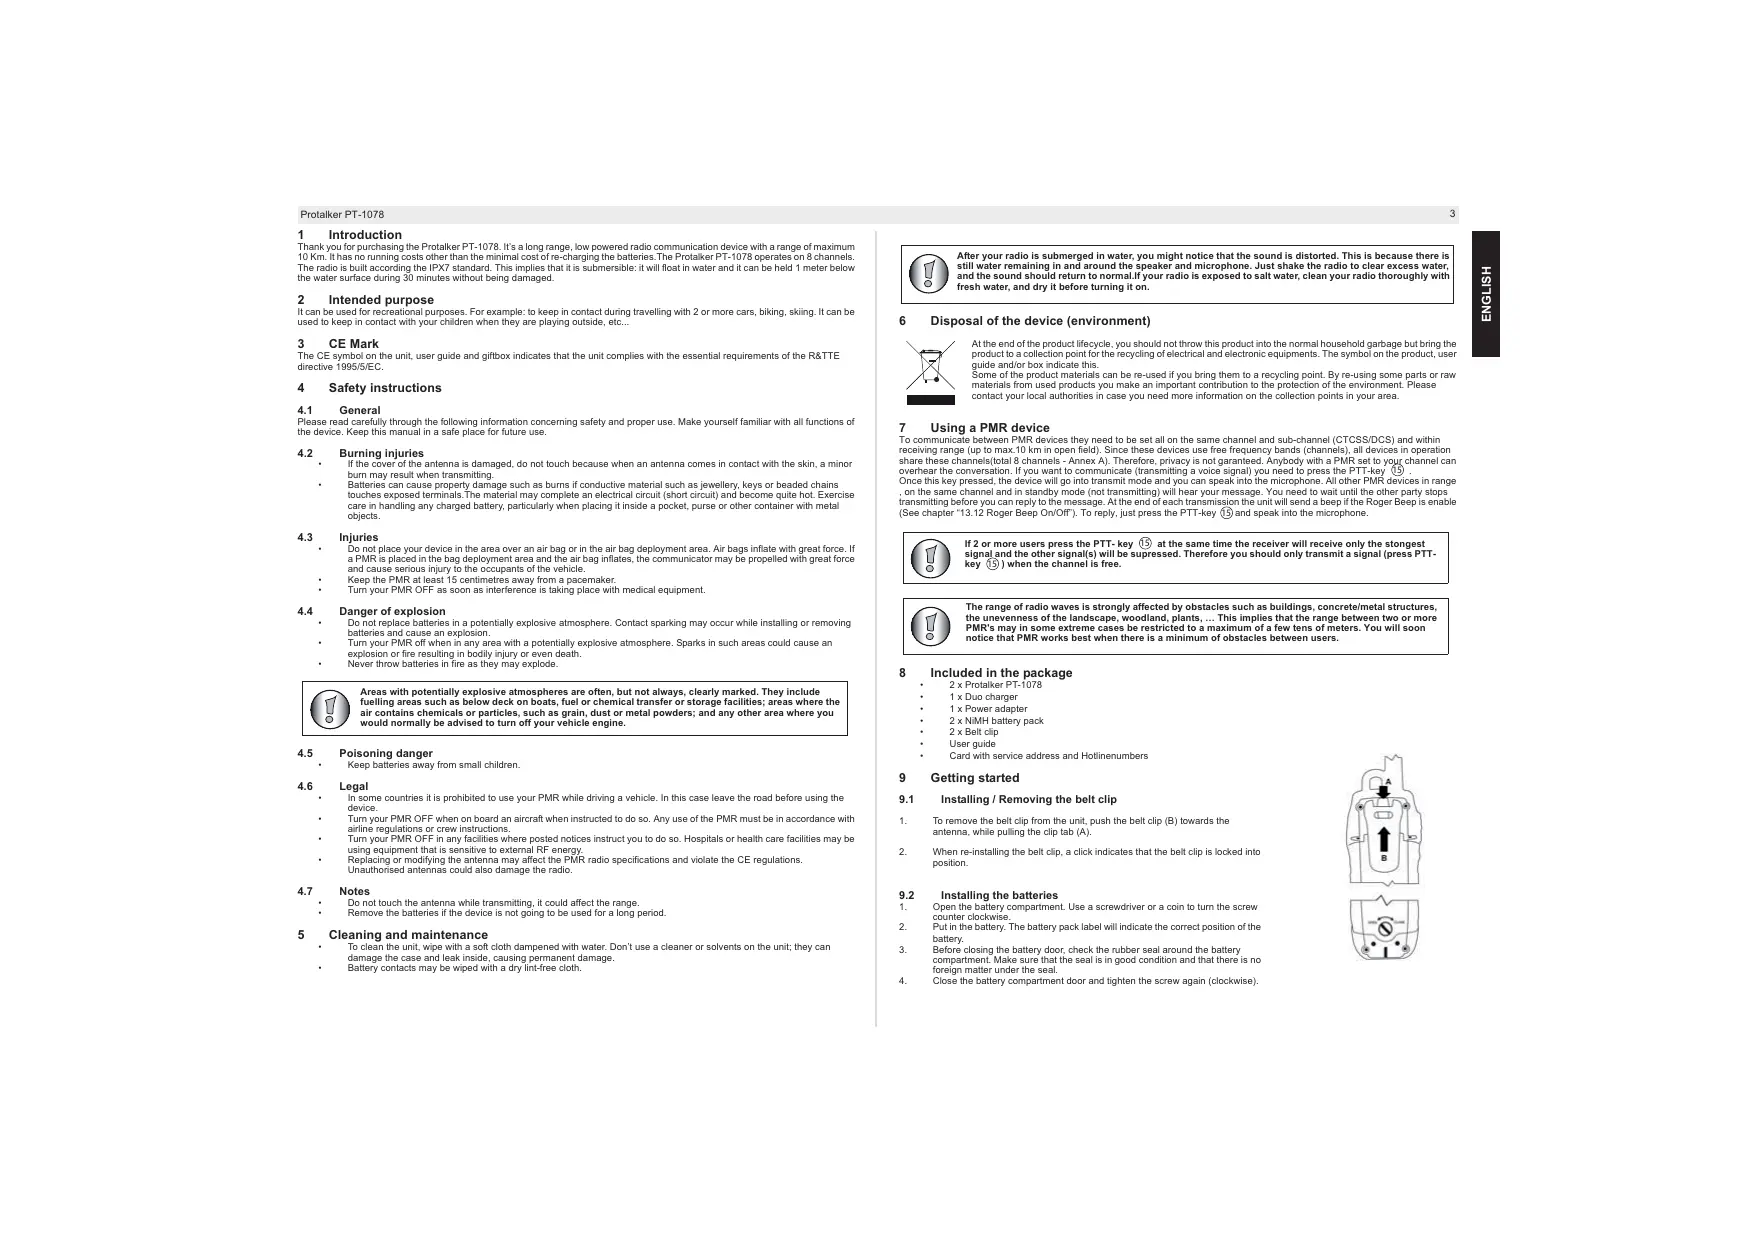
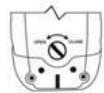
11 Description
See folded cover page - illustration 1
- Antenna
- LCD display
- On/Off key
- Speaker volume up
- Speaker volume down
- OK / keylock -
- Menu key
- Microphone
- Speaker
- Call key
- Sub-channel/Group key SUB/GRP
- Channel down
- Channel up CH
- Monitor key MON
- PTT-key
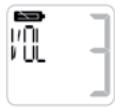
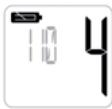
12 LCD display information
See folded cover page - illustration 2
- Channel indication
- Call / Missed call icon
- RXicon
- Group icon
- Sub channel/Menu item/Group number,... indication
- Battery level indication
13 Using the PT-1078

If the segments and icons of the displays are shown in light grey in this user guide, it indicates that they are blinking.
13.1 Turning the Unit ON/OFF

To turn ON:
Press and hold the ① - key ③ for 2 seconds. The unit will "beep" and the LCD display will display the current channel.
To switch OFF:
Press and hold the -key 3 for 2 seconds. The unit will "beep" and the LCD display will turn blank.

In case the unit name is programmed, this name will be displayed for two seconds during startup
(Chapter 13.15.3).
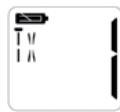
13.2 Battery Charge Level / Low Battery Indication
The battery charge level is indicated by the battery icon on the LCD Screen.


Battery full
Battery low
Battery almost empty

When the battery is almost empty, will appear on the display and the unit will turn OFF automatically after 30 seconds.
13.3 Adjusting Speaker Volume
There are 8 speaker volume levels (0..7)
Press the -key 4 in stand-by-mode to increase the speaker volume. The volume level is displayed.
- Press the -key (5) to decrease the speaker volume.
Press the OK -key 6 to confirm the volume level.
13.4 Receiving a signal
The unit is continuously in the receive mode when the unit is switched ON and not transmitting.

In order for other people to receive your transmission, they must also be on the same channel and have set the same sub-channel (Chapter 13.6 and 13.7).
13.5 Transmitting a signal
Press and hold the PTT - key 15 to transmit. The TX symbol is displayed.
- Hold the unit in a vertical position with the microphone 10cm from the mouth and speak into the microphone ⑧
- Release the PTT - key (15) when you want to stop transmitting.
13.6 Changing channels

- Use the CH▲ - key (13) or the CH▼ - key (12) to go to a higher or lower channel.
After selecting the desired channel, press the OK - key 6 to confirm.
13.7 Sub-channels: CTCSS (Continuous Tone Coded Squelch System)/ DCS (Digital Coded Squelch)
License free PMR radio's operating on the 446 MHz frequency band, have 8 available radio channels. If there are many PMR users in your neighborhood, there is a chance that some of these users are operating on the same radio channel.
To prevent that you receive signals from other users, sub-channels have been integrated.
Two PMR radio's will only be able to communicate with each other when they are operating on the same radio channel and when they have selected exactly the same sub-channel.
There are two kind of sub-channels
Continuous Tone Coded Squelch System (CTCSS)
Digital Coded Squelch (DCS)
When using CTCSS, a low frequency tone (between 67 and 250Hz ) will be transmitted along with the voice signal. There are 38 available tones to choose from. You are free to choose one of these 38 available tones. Due to filtering, these tones will generally not be audible so they will not disturb the communication.
DCS is similar to CTCS, but instead of sending a continuous tone of a selected frequency, a digital data transmission is added to the radio signal. This Digital Code is transmitted at a really low rate, around 134 bits per second (the code is 23 bits long). Only the PMR's of the latest generation will support DCS. There are 83 available DCS codes that can be used. Since earlier models will only support CTCS it will be better to use DCS to prevent that other users will be audible during your PMR conversations.
13.7.1 Changing sub-channels

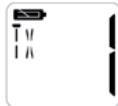
- Press the SUB - key (1) the current selected sub-channel (or OFF in case of no sub-channel) will blink.
- Use the CH - key ③ or the CH - key ⑫ to select the desired sub-channel:
1..38: CTCSS code (1..38)
39..121: DCS code (1..83)
Press the OK -key ⑥ to confirm

Annex B will show all detailed information about the CTCSS and DCS sub-channel codes.
13.8 Making a call
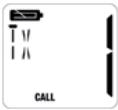
When you press the -key 10 you will transmit a call tone to the other users on the same channel/sub-channel. This will indicate that you want to start a conversation.
Press the -key 10

There are 10 different call tones. You can select a call tone in the menu:
- Press the -key ⑦ three times (four times in Group mode)
Press the OK -key ⑥
Use the CH▲-key 13 or the CH▼-key 12 to select the call tone
Press the OK -key 6 to confirm
13.9 Monitor
You can use the monitor function to check for weaker signals in the current channel.
Press the MON - key (14) to start monitoring.
If you hold this key for more than 3 seconds, the radio will go into continuous monitoring mode.
Press the key again to disable the monitor function.
13.10 Channel Scan
Channel scan performs a search for active signals in an endless loop from channel 1 to 8.
Once an active channel is found, the scanning will stop so you can listen to the conversation.
If there is no more activity on the found channel, the scanning will resume after two seconds.
If you press the PTT- key (15) on the found channel, the scan function will end and the radio will remain on this channel.
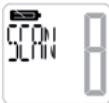
Press the key ⑦ SCAN will appear on the display
Press the OK - key 6 to start scanning
Press the PTT - key 15 to stop scanning
13.11 Silent mode
In silent mode no audio can be heard when receiving a signal
When receiving a signal (or a call) in silent mode the following will happen:
The display backlight, SLNT and channel number will flash during 15 seconds
The " Missed Call" (17) icon will blink on the display
The vibrator will vibrate during 3 seconds
In the next 3 minutes, the vibrator will vibrate again every minute.

Once a key is pressed or a transmission is made by pressing the PTT - key 15 or the key 10, the silent mode will be temporary disabled so the PMR radio will be able to receive signals. If there is no action during 15 seconds the unit will go back into silent mode.
Enable / Disable silent mode:

- Press the -key ⑦ twice SLNT will appear on the display
Press the OK -key 6 - Use the CH▲ - key ⑬ or the CH▼ - key ⑫ to enable (ON) or disable (OF) the silent mode
13.12 Roger Beep On/Off
After the PTT - key 15 is released, the unit will send out a roger beep to confirm that you have stopped talking.
The Roger Beep can be switched On or Off:
Press the -key ⑦ five times (six times in Group Mode) RGR will appear on the display
Press the OK -key 6
- Use the CH▲-key ③ or the CH▼-key ② to enable (ON) or disable (OF) the Roger Beep
Press the OK - key 6 to confirm
13.13 Key Tone On/Off
When a key is pressed, a tone can be heard.

The key tone can be switched On or Off:
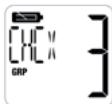
Press the -key 6 six times (seven times in Group Mode) TONE will appear on the display
Press the OK -key 6
- Use the CH▲-key ⑬ for the CH▼-key ⑫ to enable (ON) or disable (OF) the key tone
Press the OK - key 6 to confirm
13.14 Key lock
Press and hold the OK - key (6) during 3 seconds to enable/disable key lock.
- LOCK will appear for 2 seconds when enabled
- UNLK will appear for 2 seconds when disabled

When key lock is enabled, the PTT-key 13 , the volume control keys, the monitor-key (MON), the callkey and the power-key 1 will still be operational. All other keys are locked.
In "Group Mode" (next chapter) the call key will also be locked when key lock is enabled.
13.15 Group Mode
The PT-1078 can be used in group mode. 122 different groups can be created (0..121).
You can use at maximum 16 PT-1078's in the same group.
Each PT-1078 can be programmed with an ID-code (1..16) and each user can program his name in the unit.
A user can call another user individually or call all users in the group at the same time. The called user will be able to see who initiated the call.
When an individual user is called, a private conversation can be made without disturbing the other users of the same group.
13.15.1 Activating/Deactivating Group mode
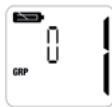
Activate:
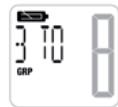
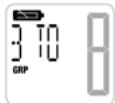
Press and hold the SUB/GRP- key (1) for two seconds GRP will appear on the display
Deactivate:
Press and hold the SUB/GRP- key 1 for two seconds GRP will disappear from the display
13.15.2 Change the group code
You can select 122 different group codes (0..121)
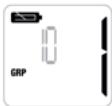
- Press the SUB/GRP- key ① the current selected group code will blink
Use the CH▲-key 13 or the CH▼-key 12 to select the desired code
Press the OK -key 6 to confirm
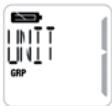
13.15.3 Entering unit ID / unit name
In one group you can create 16 users. Each user has its own ID (1..16) and name.
- Press the -key ⑦ four times (5 times in Group mode)
Press the OK -key 6 - Us the CH▲ - key ⑬ or the CH▼ - key ⑫ to select the unit ID (1..16)
Press the OK -key 6 to confirm

- Use the CH▲-key ⑬ or the CH▼-key ⑫ to select the character of the name
Press the OK - key 6 to go to the next character
When finished, Press the -key ⑦

Make sure that all units have a different ID and name. If two units have the same ID, "FAIL" will appear on the display when all users are called.
13.15.4 Transmitting your unit ID / unit name to other users
When you have successfully entered your unit ID / unit name you can broadcast the ID / name to all other users of your group.
Make sure that all PMR's are set to the same channel/group code!
Press the -key ⑩
Press the -key 19 again to broadcast the call to all users
All users in range on the same channel and in the same group will now receive the ID and name of the PMR radio.
Repeat this procedure for all units so all ID's / user names will be stored in all PMR's.
13.15.5 Making a call
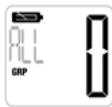
Call all users
When you call all users in group mode, all units in range will receive the call. Your name will also appear on the display of the other users and the units will beep (or vibrate in silent mode).

Press the -key 10
Press the -key 10 again to broadcast the call to all users
Private call
You can call one individual user by selecting his ID / user name. The other users will not hear this call. Additionally, when the call is answered you will be able to make a private conversation so no other users of the group will be able to hear you and your called partner.
Press the -key 10
- Use the CH▲ - key ① or the CH▼ - key ② to select the ID / name of the user you want to call
Press the -key 10 again to broadcast the call
The receiver will see the name of the user who is calling and an alert tone will be heard. By pressing a key, the alert tone will stop. If the receiver of the call presses the PTT - key 15 within 15 seconds, the conversation between both users will be private. Both users will see each other's name on the display. If there is no transmission between the users during 15 seconds, the private channel will be disabled.
13.15.6 Changing the group channel for all users
Any user in a group has the option to change the group channel for all PMR's at the same time.
This feature is only available when the PMR is set in group mode!
- Press the -key (three times in Group mode)
Press the OK -key 6
Use the CH▲ -key 13 or the CH▼ -key 12 to select new channel
Press the OK -key 6
All users of the group in range will receive the command and the channel will be changed automatically.

This function is only available in group mode.
14 Warranty
14.1 Warranty period
The devices have a 24-month warranty period. The warranty period starts on the day the new unit is purchased. There is no warranty on standard or rechargeable batteries (AA/AAA type).
Consumables or defects causing a negligible effect on operation or value of the equipment are not covered. The warranty has to be proven by presentation of the original or copy of the purchase receipt, on which the date of purchase and the unit-model are indicated.
14.2 Warranty exclusions
Damage or defects caused by incorrect treatment or operation and damage resulting from use of non-original parts or accessories are not covered by the warranty.
The warranty does not cover damage caused by outside factors, such as lightning, water and fire, nor any damage caused during transportation. No warranty can be claimed if the serial number on the units has been changed, removed or rendered illegible. Any warranty claims will be invalid if the unit has been repaired, altered or modified by the buyer
This product is in compliance with the essential requirements and other relevant provisions of the R & TTE directive 1999/5/EC.
The Declaration of conformity can be found on :
http://www.topcom.net/support/cedeclarations.php
1 Inleiding
Continuous Tone Coded Squelch System (CTCSS)
Digital Coded Squelch (DCS)
39..121: DCS-code (1...83)
1..38: code CTCSS (1...38)
39..121: code DCS (1...83)
Continuous Tone Coded Squelch System (CTCSS)
Digital Coded Squelch (DCS)
1..38:ovsky@ccss.com
39..121:#: DCS (1-83)
4.4 Risk for explosion
13.7 Koder: CTCSS (Continuous Tone Coded Squelch System)/DCS (Digital Coded Squelch)
Licensfria PMR-radioapparater som anvands pa 446 MHz-frekvensbandet, har 8 radiokanaler tillganglia. Om det finns manga
CTCSS (Continuous Tone Coded Squelch System)
DCS (Digital Coded Squelch)
4.5 Fare for forgiving
Oppbevar batteriene utilgengelig for sma barn.
4.6 Juridisk
13.7 Underkaner: CTCSS (Continuous Tone Coded Squelch System)/ DCS (Digital Coded Squelch)
Continuous Tone Coded Squelch System (CTCSS)
Digital Coded Squelch (DCS)
13.7 Alakanavat:CTCSS (Continuous Tone Coded Squelch System) / DCS (Digital Coded Squelch)
CTCSS (Continuous Tone Coded Squelch System)
DCS (Digital Coded Squelch)
CH▲-nappainta 13 tai CH▼-nappainta 12
39...121: codice DCS (1...83)
9.2 Instalar as pilhas
10 Carregar as pilhas
1..38:#: CTCSS (1..38)
39..121:#:DCS (1..83)
13.5 Vysilani signalu
Continuous Tone Coded Squelch System (CTCSS)
Digital Coded Squelch (DCS)
Continuous Tone Coded Squelch System (CTCSS)
Digital Coded Squelch (DCS)
Orav xpaiaouoitee To CCTSS, 8a meafoBoei evac tovoc xauanMc auovntnac (muef67 ka 250 Hz) maiz e to quwnikto ojua. Ynptxoyu biaotoiu 38 daoepenioi tovO. Mopote ive a mteEeEv tato aTOUC 38 daieoouc Tovouc Xapn otio ptipraoua, o ti vovai autel de AkoAovuyor, uovtue K de empeoCev tvr EKovivua.
To DCS eivai napoiou me to CTSS, evioiou viy a nvi ta otooanl ovueovoc tovu ma cieiaevmucvaoitnac, oto a jua TpOeKtIO pTcBETAI u anquiqk metdoaoddeouv. Autc o yPnAikoc kukicok metadibetraed 2r paayatnak ayinohpu bmu, mtpou 134 bit av deutepokntto (o kwidokc exi mokoc 23 bit). Mov to PA rMR teauatiaac vevic ac utootnpivou to DCS. Ytdapoyou daebioj 83 kokiDCS O, omioi umpoovu xpanojotniouho. Eepovu ta laiaotiae voiteia utootnpivou vmo DCSTCS, eivai npoiute po va chonoiotne DCS yva atropeptale daoocx npontce ato va aoiouovcu tvououleac oue mu PRM.
13.7.1 AAAAAyivnOKavAAiwv

TATOTATE TO TAKKPTO Sub 1 to TEPXVE EHTAEMUYU KTOAVAI (T) TO TAKPPO ANEFENPTOIOHSE ATEPIITIWU TOV DEV UAPXU TOKAVAI) BA aVbBae
XpnjaoTOnJOTa TnAKnptca CH 13 nCH 2 ia va emiaEeTe to EtnBmuTn ToUmokavai?
1..38: KomegaCTCSS (1...38)
39.121: Kwokoc DCS (1..83)
- Pntjote to TnAiktpo OK - 6 via va Etnbetaaioe Tnv Etonoyn oac

To Iopaprtjna B EApivcic iAeis TtIeToupeic TAnpoopiecs OTeKia toukswikouc UTOKakvaiCCTCSSKDCS.
- PntnoTe gava to TnKtpo
10 yia ktnoumtn ts Kaon
O aotdoctn 9a dei oovua t x npoitntou kaike ai ka oakouei evav hio eoiotnoian. Patavtac otooiotne iatoktpo statad y nocx eioantoinan. Ea od toxticns ts kiafaoi tanei oiae tniokpTt (15) etvrc 15teuopaaetuv, an ouvouia mea tcu TXPnauiv 8 aviva ilwiukrt. Kai o 60 aoepace 8 doovu oovua t auovouia uovouiaovoc tnv 0eovh. Eev utmpekEKTIOU mertu TXPnauiv etvrc 15teuopaaetuv, a atvepeytoenbe i tobiikk kavdu.
13.15.6 Aaayn rou kavaaiou oadac yia olous roux pnoTc
Ooi o xriptoc e oia oodc exoyu tvn iyoaiyou kuaivao ouoadoc ia oia tpr Mauotopovuc Aun t leiotrypuivie aiov taovt oPM TPOE 0eui puei tce leiotrypuivcu
PiTjote TnAiktpo ⑦ (TpEiC opepc eAeIToupyia Oaδac)
- Pntjnte to TnAiktpo OK - ⑥
XpnioiIOIOIOPO CH ⑬ n to CH ⑫ ia va eTIAEETe VCO kAVaI
- Pntjnte to Tnjktoo OK - ⑥
Oloi ai xpiotc ts oiaoac EOTc eueaeiaoc 8a laouv nTv eoiai kai to kavai Ba aAaei autota.

Autn l eitoupyia eivai diaeog mnovo aeitoupyia oiaac.
14 Eyyunon Topcom
14.1 Nepioo6 eyyunons
Ou ouakeuec Topcox euy 24nvnDbadpckyaevunac, H pteioboc ncs eyunonapxkeivn npjepa apoyadsc uouakeun,Dev tapeyekyu yenyan via tic tumtike c h evanapopovcevmuatrapic.
Avawoiqa n ealwupata Tn pokalouv aelnte c emttowoeic ot n leioupyia nvaia tnc oukeunc, dev kalutovtai.
H E yuyon 1 ptei va aotieivteitva taoiaovicnt anu aebvtikn atoidei anyopac n aytipaa oanr, otnyorla va qaiovtana ne npoupeynayopa kai tovrelao ts ouakeurke.
14.2 Egaipoeic eyyunons
BAdec 日 Aelwujata tou ptoepovotai ato avaouevous xieipiaouc kaowkai ngiies toe oelovatra eun yvnoia eaprtmuatn aeaouoed, dev auilovatotai tvnyvunan.
H E yoyan dev kaiuttei qniie tsou oepiaovtae e 6xoteipikocic npayovtec, otwcs kepaovlo, vepo ka pfuaia n qniie tsou ptonabav atn to t meapopara.
H Evyunon Seiv ixuei e TpeTTTou n o apioo cseipoc stn movba Ee i alayoei aopeapeei kataetai ekuoc (um avayuicuo). Otoeobotie acwusec yevunon tsewpuoyta u Ekyuape cte pitttwnou n ou movaba Ee tmekaeuaet, aeaioohe i npotottonnei am tov ayopate.
To troipov oumuweje iTc baiake cattainaei cai Tt c gaae oxetikce npoBaeieic nO sobyac 1999/5/EK oxetikae R & TTE (Radio & Telecommunications Terminal Equipment - PaiofoovivkoC kai TnAetikovuviaokos TepatuiokEgontAiouoc).
Gamma dHawason osumoepomega, avarpétére tsiδiδvθνan; http://www.topcom.net/support/cdeclarations.php
1 Wstep
13.7 Podkanály CTCSS (Continuous Tone Coded Squelch System)/DCS (Digital Coded Squelch)
Vysiełocky PMR bez licencił, krćo pracuju a ekrefyenčnoman paskse 446 MHz, majki k dispcižić i 8 radióvć chanakol. Ak je vov szej blokstvo věta poucizatevve vysiełacke, je możne, z jej trolno z lytroch poucizatevfo výuživá n ten isty ródvičné knové.
Dve sylieckiy PMR budu moc' spo lu komunkova iba vtedy, ak su nastavene na rovnaky radiosykanal aak maju zvoleny presne ten isly podkanal.
CTCSS (Continuous Tone Coded Squelch System)
DCS (Digital Coded Squelch)
Ak pouzilate CTCSS, spoI sl hasovym signamoi sa bude vysiia' nizkofrenckyn ton (medzi 67 250 Hz). Na yber be 3 tnov. Mozeite si ybrva' jeden z'tycho 38 dostupnichyn. Z dovouho filtrovania lietto tvoa vsioune budoe puce'. Na tke nebudu narus
DCS je podobny ako CTCSS, ale namiesto posielenia suvilesho tónu zvolenji frekvencse sa do rádioveho signulà pridva prenos digitánych dát. Tento digitaly kó sa vysiela pri skutočne iznej krchostl, príblžné 134 bitov za sukendu (kó ma dázku 23 bitov). Systém DCS podoponju i vysiáčěk PMR majnové generación. K disposizije je 83 kód DCS, koře je možné použi. Kedže starsté
modely podporuj iba system CTCSS, je lepsie pouzi' system DCS, aby poças rozhovorov czem PMR nebolo poc' ostatnych pouzivatefov.
13.7.1 Zmena podkanálov
Stäliche tlaicidio SUB ①, zacne blica' aktuániy zvoleny podkanial (alebo OFF, ak ni je ziadyn podkanial).
- Pomocou CH▲ tlačidio ⑬ alebo CH▼ tlačidio ⑫ vyberte požadovány podkanalá
1..38: Kod CTCSS (1...38)
39..121: Kód DCS (1...83)
Stlacte tlaicido OK 6 na potvrdenie.

Annex A
Operation frequencies
Annex B
| Channel Number | RX Frequency (MHz) | TX Frequency (MHz) |
| 1 | 446.00625 | 446.00625 |
| 2 | 446.01875 | 446.01875 |
| 3 | 446.03125 | 446.03125 |
| 4 | 446.04375 | 446.04375 |
| 5 | 446.05625 | 446.05625 |
| 6 | 446.06875 | 446.06875 |
| 7 | 446.08125 | 446.08125 |
| 8 | 446.09375 | 446.09375 |
Sub-channel codes
| CTCSS Code Chart | |||||||
| Code | Freq (Hz) | Code | Freq (Hz) | Code | Freq (Hz) | Code | Freq (Hz) |
| 1 | 67 | 11 | 97.4 | 21 | 136.5 | 31 | 192.8 |
| 2 | 71.9 | 12 | 100 | 22 | 141.3 | 32 | 203.5 |
| 3 | 74.4 | 13 | 103.5 | 23 | 146.2 | 33 | 210.7 |
| 4 | 77 | 14 | 107.2 | 24 | 151.4 | 34 | 218.1 |
| 5 | 79.7 | 15 | 110.9 | 25 | 156.7 | 35 | 225.7 |
| 6 | 82.5 | 16 | 114.8 | 26 | 162.2 | 36 | 233.6 |
| 7 | 85.4 | 17 | 118.8 | 27 | 167.9 | 37 | 241.8 |
| 8 | 88.5 | 18 | 123 | 28 | 173.8 | 38 | 250.3 |
| 9 | 91.5 | 19 | 127.3 | 29 | 179.9 | ||
| 10 | 94.8 | 20 | 131.8 | 30 | 186.2 | ||
| DCS Code Chart | |||||||
| Code | DCS Code | Code | DCS Code | Code | DCS Code | Code | DCS Code |
| 39 | 023 | 60 | 143 | 81 | 315 | 102 | 532 |
| 40 | 025 | 61 | 152 | 82 | 331 | 103 | 546 |
| 41 | 026 | 62 | 155 | 83 | 343 | 104 | 565 |
| 42 | 031 | 63 | 156 | 84 | 346 | 105 | 606 |
| 43 | 032 | 64 | 162 | 85 | 351 | 106 | 612 |
| 44 | 043 | 65 | 165 | 86 | 364 | 107 | 624 |
| 45 | 047 | 66 | 172 | 87 | 365 | 108 | 627 |
| 46 | 051 | 67 | 174 | 88 | 371 | 109 | 631 |
| 47 | 054 | 68 | 205 | 89 | 411 | 110 | 632 |
| 48 | 065 | 69 | 223 | 90 | 412 | 111 | 654 |
| 49 | 071 | 70 | 226 | 91 | 413 | 112 | 662 |
| 50 | 072 | 71 | 243 | 92 | 423 | 113 | 664 |
| 51 | 073 | 72 | 244 | 93 | 431 | 114 | 703 |
| 52 | 074 | 73 | 245 | 94 | 432 | 115 | 712 |
| 53 | 114 | 74 | 251 | 95 | 445 | 116 | 723 |
| 54 | 115 | 75 | 261 | 96 | 464 | 117 | 731 |
| 55 | 116 | 76 | 263 | 97 | 465 | 118 | 732 |
| 56 | 125 | 77 | 265 | 98 | 466 | 119 | 734 |
| 57 | 131 | 78 | 271 | 99 | 503 | 120 | 743 |
| 58 | 132 | 79 | 306 | 100 | 506 | 121 | 754 |
| 59 | 134 | 80 | 311 | 101 | 516 | ||
Annex C
Technical specifications
| Frequency range : | 446.00625 ... 446.09375 MHz |
| Channel spacing : | 12.5 KHz |
| Radio Channels : | 8 |
| 121 Sub-channels : | 38 CTCSS / 83 DCS |
| Maximum RF output power : | 0.5 W |
| Modulation : | FM – F3E |
| Antenna type : | Fixed |
| Battery type : | 4.8V (Ni-MH pack) |
| Power adapter : | 9V — — 210mA |
| IP-standard : | IPX7 (submersible) |
This product is in compliance with the essential requirements and other relevant provisions of the R & TTE directive 1999/5/EC.
The Declaration of conformity can be found on :
http://www.topcom.net/support/cedeclarations.php
TOPCOM
Visit our website
www.topcom.net