
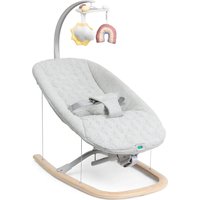
Balloon - Baby swing CHICCO - Free user manual and instructions
Find the device manual for free Balloon CHICCO in PDF.


| Product type | Baby swing |
| Brand | Chicco |
| Model | Balloon |
| Dimensions (L x W x H) | Approximately 75 x 65 x 85 cm |
| Net weight | Approximately 6.5 kg |
| Power supply | 4 LR20 batteries (1.5 V) or mains adapter (not included) |
| Recommended age | From birth to 9 months (max 9 kg) |
| Maximum supported weight | 9 kg |
| Movements | Side-to-side and back-and-forth rocking, 5 speeds |
| Vibrations | Yes, adjustable |
| Music and sounds | Soothing melodies and white noise (adjustable volume) |
| Timer | Yes, programmable automatic shut-off |
| Safety harness | 5-point |
| Non-slip base | Yes, with rubber pads |
| Upholstery | Removable and machine-washable cover (30°C) |
| Care | Clean the frame with a damp cloth; the cover is machine washable |
| Folding | Foldable for storage (folding legs) |
| Spare parts | Available on the Chicco website (covers, toys, adapter) |
| Repairability | Repairability index not provided; parts accessible via customer service |
| Warranty | 2 years (legal compliance) |
Frequently Asked Questions - Balloon CHICCO
User questions about Balloon CHICCO
0 question about this device. Answer the ones you know or ask your own.
Ask a new question about this device
Download the instructions for your Baby swing in PDF format for free! Find your manual Balloon - CHICCO and take your electronic device back in hand. On this page are published all the documents necessary for the use of your device. Balloon by CHICCO.
USER MANUAL Balloon CHICCO
natural_image
Line drawing of a car interior with a child holding a helmet and gear, no text or symbols present• ISTRUZIONI D'USO
• MODE D'EMPLOI
• GEBRAUCHSANLEITUNG
• INSTRUCTIONS FOR USE
• INSTRUCCIONES DE USO
• INSTRUÇÕES PARA A UTILIZAÇÃO
• GEBRUIKSAANWIJZINGEN
• ANVÄNDNINGSINSTRUKTIONER
• BRUGSANVISNING
• NÁVOD K POUŽITÍ
• INSTRUKCJE SPOSOBU UŻYCIA
• ΟΔΗΓΙΕΣ ΧΡΗΣΗΣ
• KULLANIM BİLGİLERİ
• ИНСТРУКЦИЯ ПО ЭКСПЛУАТАЦИИ
• ІНСТРУКЦІЯ З ВИКОРИСТАННЯ
- INSTRUÇÕES DE USO
cdotiamats الاستعمال.


natural_image
Medical illustration showing a hand operating a car with a red circle highlighting the anatomical area (no text or symbols present)

natural_image
Line drawing of a pair of scissors with extended blades, no text or symbols present

natural_image
Line drawing of a baby car seat with a handbag, showing the seat and body positioning (no text or symbols)

natural_image
Line drawing of a medical device with two arms and a central display (no text or symbols)

natural_image
Line drawing of a hand holding a small mechanical component, circled in red (no text or symbols)

natural_image
Illustration of a hand holding a tool, with an inset showing a small object being inserted (no text or symbols present)
natural_image
Illustration of a cartoon-style robot with a head-mounted device and circular components, no text or symbols present
natural_image
Illustration of a car interior with accessories and a magnified inset showing a small object (no text or symbols)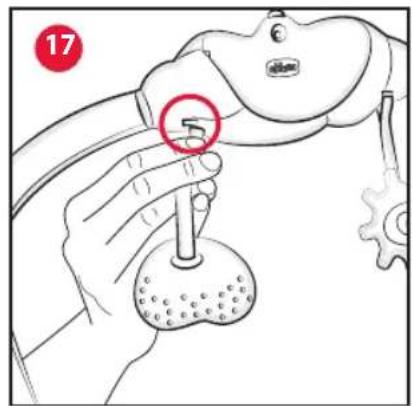


natural_image
Simple line drawing of a hot air balloon with a red circle on top and a bird silhouette inside, no text or symbols present.
natural_image
Illustration of hands tying a knot with a red circle marker (no text or symbols)


natural_image
Line drawing of a hand adjusting a bicycle seatbelt mechanism (no text or symbols)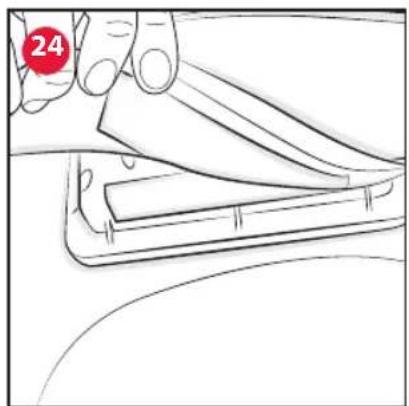
natural_image
Line drawing of a hand holding a flat object with a red circular badge labeled '24' (no text or symbols on the object itself)


0 - 12 M (USO SDRAIETTA)
IMPORTANTE! LEGGERE ATTENTA- MENTE E CONSER- VARE PER FUTURO RIFERIMENTO.
ATTENZIONE: PRIMA DELL'USO RIMUOVE RE ED ELIMINARE EVENTUALI SACCHETTI DI PLASTICA E TUTTI GLI ELEMENTI FACENTI PARTE DELLA CONFEZIONE DEL PRODOTTO O COMUNQUE TENERLI LONTANI DALLA PORTATA DEI BAMBINI.
AVVERTENZE
0 to 12 M (RECLINED CRADLE)
IMPORTANT! READ CAREFULLY AND KEEP FOR FU- TURE REFERENCE.
WARNING: BEFORE USE, REMOVE AND DISPOSE OF ALL PLASTIC BAGS AND PACKAGING MATERIALS AND KEEP THEM OUT OF REACH OF CHIL DREN.
WARNINGS
•WARNING: Only for domestic use.
- WARNING: Age range intended for use: from birth to 12 months.
- WARNING: Never leave the child unattended.
- WARNING: Stop using the product when the child starts to stand up.
- WARNING: Never use this product on an elevated surface (e.g. a table).
- WARNING: Always use the restraint system.
• Always use the restraint system when the child is in the reclined cradle; adjust the length of the straps as necessary.
- WARNING: Never use the toy bar to carry the product.
- WARNING: Do not move or lift this product with the baby inside it.
- WARNING: Never let the child sleep in this product. This product does not replace a cot or a crib. Should the child fall asleep, then it should be placed in a suitable cot or crib.
•WARNING: Do not use the re-
clined cradle if any components are broken or missing.
- WARNING: Do not use accessories or replacement parts other than those approved by the manufacturer.
- The product and all of its components must always be assembled by an adult.
- Do not use the reclined cradle with more than one child at time.
- Never leave the chair on surfaces that are not perfectly horizontal.
• Always supervise children playing near the bouncer.
• To prevent fire hazards, do not leave the reclined cradle near sources of heat, electrical and gas devices, etc.
• Make sure that the cover is properly secured to the structure of the chair.
- Never use it to carry your child in motor vehicles.
• Make sure that all parts are correctly hooked to the mounts.
• Periodically check for any worn parts, loose screws, worn or unstitched materials and replace any damaged parts immediately.
- Do not place the reclined cradle with the child near windows or walls, where strings, curtains or other objects could be used by the child to climb or causing chocking or strangling hazards.
- Do not place the chair near windows or walls to prevent the risk for the child of overreaching and falling over.
- Do not attach any strings to extend the fastening systems of the toy bar's hanging toy and do not make knots/ loops: This could lead to run-
ning knots from accidentally forming which could lead to strangulation.
- WARNING: Always keep strap for the sound toy fastening (I) away from the child.
- WARNING: This toy must only be used under adult supervision.
- WARNING: This product must only be assembled by an adult.
- WARNING: Check the product regularly for signs of wear and damage and to ensure that it is assembled correctly. Should any parts on the toy bar or hanging toy be damaged, do not use them and keep out of reach of children.
- Keep the product out of children's reach when it is not being used.
CARE AND MAINTENANCE
• This product requires periodical maintenance.
- The cleaning and maintenance operations must only be carried out by an adult.
- Periodically inspect the reclined cradle to check for broken, torn or missing parts: If this is the case, do not use it.
- Please refer to the care label for instructions on cleaning the swing.

Wash by hand in cold water

Do not bleach

Do not tumble dry

Do not iron

Do not dry clean
- Check that the fabric and stitching are in good condition each time you wash it.
- Prolonged exposure to direct sun light can cause the fabric colours to fade.
COMPONENTS
Components
A-Base
B - Feet
B1 - Non-slip rubber
B2 - Open/close buttons
C - Seat
D - Booster cushion
DD - Headrest
E - Toy bar
E1 - Sound toy release button
F - Removable sound toy
G-Toys
H - Toy bar coupling slot
I - Strap for the sound toy fastening
L - Safety harness
M - Buckles
N - Clips
O - Ring for the adjustment of the safety harness
P - Reclining button
Q - Click buttons
R - Vibration box
5 - Seat buttonhole
ASSEMBLY
The reclined cradle comes already assembled. To use it, the following operations must be performed:
- To open the reclined cradle pull the seat upward (Fig. 1), when you hear it click, it means the product is correctly opened. Make sure that both sides of the reclined cradle are properly open.
- Fasten the toy bar inserting the lower ends of the Toy bar in the relevant fastening hole (Fig. 2).
HOW TO ADJUST THE BACKREST
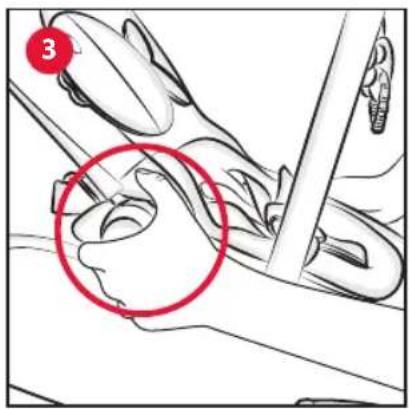
- To adjust the backrest from a higher position to a more inclined one, take the two side buttons (Fig. 3) and pull them upward, keeping them pressed down; choose the desired reclining within the 4 available positions. This operation may also be carried out with the child sitting in the reclined cradle. In this case it can be more difficult.
WARNING: Always guide the backrest with the fingers when adjusting the reclining.
To move from the most inclined position to a less inclined position, just pull the backrest up (Fig. 4-5).
WARNING: Always check that the backrest is properly locked before use.
FIXED OR ROCKING MODE
- The reclined cradle can be used in fixed or rocking mode:
- Fixed mode: turn the front feet (B) forward until the lower part of the foot touches the ground (Fig. 6);
- Rocking mode: turn the front feet (B) in the opposite direction, so that the foot is not touching the ground (Fig. 7).
HOW TO CLOSE THE CHAIR
- The reclined cradle can be closed for transport.
WARNING: The reclined cradle must never be closed with the child sitting in it. Remove the child from the reclined cradle before closing the frame! - To close the reclined cradle, press the 2 buttons inside the front feet (Fig. 8) simultaneously.
- To open the reclined cradle again, just pull the seat upward (Fig. 9) until you hear a click that indicates the correct opening.
USING THE SAFETY HARNESS
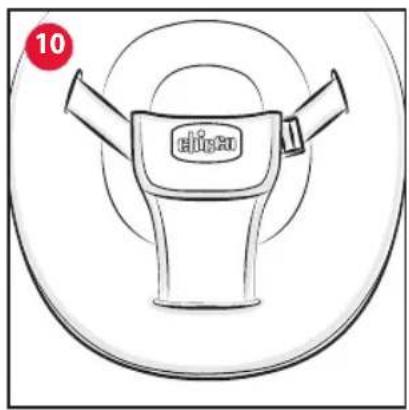
- When using the safety harness for the first time, they are already fitted (Fig. 10).
To release them, press the toothed ends of the clasp and remove the two clasps (Fig. 11). The reclined cradle is ready for the child.
WARNING: When using, always fasten the belts inserting them in the crotch strap and check they are tight enough and in the right position. - Keep one clasp end blocked and simultaneously pull the belt and slide it inside the relative ring (O), to adjust the tension of the safety harness (Fig. 12).
BOOSTER CUSHION
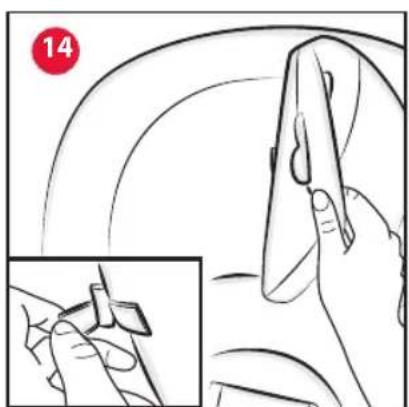
- The reducer cushion (D) - (DD) is ideal from birth and can be removed according to needs. To fix it to the seat, place it on the seat and slide the crotch strap through the hole (Fig. 13). Thread the safety harness in the relative side slots of the reducer cushion (Fig. 13 A). Fix the headrest to the seat, sliding the straps through the slot and close it again using the velcro strap (Fig. 14).
TOY BAR
- Fasten the toybar (E) to the frame inserting the lower ends in the relevant fastening hole of the Toy bar (Fig. 15).
WARNING: Always check that the Toy bar is properly fastened before every use. The Toy bar can be used in two different modes, slightly lifting it from its seat and turning it to the desired position (Fig. 16).
- The toys can be fastened to the Toy bar inserting the belts in the holes in the bar (Fig. 17).
WARNINGS ELECTRICAL PARTS
WARNING: Dispose of used batteries immediately. Keep new and used batteries away from children. If you think batteries may have been swallowed or placed inside any part of the body, seek immediate medical attention.
- To replace the batteries: loosen the screw on the battery compartment cover with a screwdriver and open the cover. Then remove the spent batteries and fit new ones, paying attention that the poles are in the right direction (as shown on the product), close the battery cover and tighten the screw. Repeat the same operation for the Vibrating Box (Toy bar 2 AA 1.5 Volt type batteries - Vibration Box 1 LR20 1.5V battery).
- Batteries must only be fitted by an adult.
- Only use alkaline batteries of the same type or equivalent to the type recommended for the correct function of this product (Toy bar 2 AA 1.5V batteries - Vibration Box 1 LR20 1.5V battery).
- Make sure the batteries are fitted with their poles in the right direction.
- Never mix new and old or different types of batteries.
• Always keep batteries and tools out of the reach of children. - Do not short-circuit the power terminals.
• Always remove discharged batteries from the product to avoid any possible liquid leaks that may damage it. - Always remove the batteries if the product will not be used for a long period of time.
- Remove the batteries from the toy bar and vibrating box before disposing of the product.
- Do not throw dead batteries in fire or leave them in the environment; they must be disposed of through waste sorting.
- If the batteries are leaking liquid, replace them immediately, making sure to clean the battery compartment; thoroughly wash your hands in the case of contact with the liquid.
• Always dispose of leaking batteries immediately: they can cause burns or other types of injuries. - Do not try to recharge non-rechargeable batteries: they may explode.
- The use of rechargeable batteries is not recommended as they may reduce the toy's operability.
- If using rechargeable batteries, remove them from the toy before recharging them.
- Do not leave the product outside under the rain; water infiltrations will damage the electronic circuit.
- Rechargeable batteries must be charged only under adult supervision.
REMOVABLE SOUND TOY
The toy bar is fitted with a sounds and lights panel that is activated by pressing the buttons on the front section (Fig. F).
F1: On button - volume
F2: It plays soothing and relaxing tunes
F3 : It plays lullabies
F4 : It plays funny music
F5 : Voice recording button
F6 : Sound and music activation handle
F7: Microphone - Led
For the voice recording activation, check that the sound toy is on. Keep the FS button pressed; as soon as the red LED flashes, the own voice can be recorded, to stop recording release the button (the LED will turn off). The recording can have a maximum duration of 30 seconds.
To listen to the recording, press the button.
To record again, repeat the steps described above.
To obtain an optimal recording, it is recommended to keep a distance from the microphone (F7) of about 20 cm with a clear and decisive tone of voice; it is important not to block the microphone hole in order not to compromise the quality of your recording
The sound toy can be removed by pressing the button E1 (Fig. 18). Once removed, the sound toy can be fastened to the bed frame using the strap (I) (Fig. 19). The strap has two slots to make it compatible to most of the bed frames (Fig. 20).
WARNING: To prevent possible injury by entanglement, remove this toy when the child starts trying to get up on its hands and knees in a crawling position.
To refit the sound toy on the bar, slide it as indicated in Fig. 21 until you hear it "CLICK" into place.
VIBRATION BOX
The vibration box (Fig. 22) is placed on the front seat support.
Turning the switch clockwise, the vibration starts, to turn it off, bring the switch back to "0".
HOW TO REMOVE THE FABRIC COVER
It is possible to remove the seat cover and the booster cushion from the reclined cradle to wash them.
-
Remove the booster cushion.
-
Remove the safety harness from the slots in the fabric and start to remove the cover (Fig. 23). Release the 6 click buttons (Q) at the side under the metal tubes, remove the cover on the vibrating box (Fig. 24), then take off the fabric through the entire frame paying attention not to damage it. To refit the cover, proceed in reverse order, making sure that the lower fabric strap goes through the adjustment joints of the backrest (Fig. 25) and the toy bar support.
10/12 M, up to 18 Kg (CHAIR USE)
IMPORTANT: READ CAREFULLY AND KEEP FOR FUTURE REFERENCE.
- WARNING! Age range intended for use: From when your child starts walking and is able to sit down and stand up by himself (about 10/12 months, max. 18 kg).
- WARNING: Before using as a chair, remove the safety harness (crotch strap and waist belt) and position them in the relevant spaces. Remove also toy bar.
- WARNING: Always keep strap for the sound toy fastening (I) away from the child.
- WARNING: Chair must be used with the backrest completely raised.
- WARNING: Do not use the product as a chair in rocker mode.
- WARNING: never leave the child unattended.
- WARNING: Do not place this product near a window as it can be used
as a step by the child and cause the child to fall out of the window.
- WARNING: Be aware of the risk of open fires and other sources of strong heat in the vicinity of the product.
- WARNING: Do not place this product near a window where cords from blinds or curtains could strangle a child.
- WARNING: Do not use the product if any part is broken, torn or missing.
- WARNING: Do not use accessories or replacement parts other than those approved by the manufacturer.
- Place only on flat and stable surfaces.
- The dimensions of the product are 80 × 43 × 32 / 62 ~cm .
- WARNING: Check that the space where the chair will be used is free of objects or furniture that may obstruct the product or compromise its correct use.
- Do not let your child stand up on the chair to avoid the risk of falling.
- Do not allow more than one child at a time to sit on the chair in order not to compromise its stability.
- This chair is intended solely for domestic use and on dry surfaces.
- Do not make any modifications: any modification may prejudice its safety.
- Prolonged exposure to direct sunlight can cause the fabric to fade. After prolonged exposure to high temperatures, wait a few minutes before using the product.
- Never move the chair while the child is seated on it.
EN 17191:2021
REMOVING THE RESTRAINT SYSTEMS
• Pass the waist belt through the holes in the backrest (Fig. 26) and
then through the D-shaped rings behind the backrest. Keep the belt out of reach of children.
• Pass the crotch strap in the relevant hole S (Fig. 27) in the seat and place it in the relevant pocket, as shown in Fig. 28.
If you need to fit the restraint systems again (to use the product as a reclined cradle), repeat these steps in reverse order.
If necessary, adjust the belts depending on your child's size.

THIS PRODUCT COMPLIES WITH THE DIRECTIVE 2012/19/EU.
The crossed bin symbol on the appliance indicates that the product, at the end of its life, must be disposed of separately from domestic waste, either by taking it to a separate waste disposal site for electric
and electronic appliances or by returning it to your dealer when you buy another similar appliance. The user is responsible for taking the appliance to a special waste disposal site at the end of its life. If the disused appliance is collected correctly as separate waste, it can be recycled, treated and disposed of ecologically; this avoids a negative impact on both the environment and health, and contributes towards the recycling of the product's materials. For further information regarding the waste disposal services available, contact your local waste disposal agency or the shop where you bought the appliance.
WARRANTY
The product is guaranteed against any conformity defect in normal conditions of use as provided for by the instructions for use. The warranty shall not therefore apply in the case of damages caused by improper use, wear or accidental events. For the duration of warranty on conformity defects please refer to the specific provisions of national laws applicable in the country of purchase, where provided.

JOUET SONORE AMOVIBLE
PT 0 - 12 m (USO ESPREGUIÇA-DEIRA)
IMPORTANTE! LEIA CUIDADOSA- MENTE E GUARDE PARA REFERÊNCIA FUTURA.
AVISO: ANTES DA UTILIZAÇÃO, REMOVA E ELIMINE EVENTUAIS SACOS DE PLÁSTICO E TODOS OS ELEMENTOS QUE FAZEM PARTE DA EMBALAGEM DO PRODUTO OU MANTENHA-OS FORA DO ALCANCE DAS CRIANÇAS.
ADVERTÊNCIAS
MATERACYK REDUKCYJNY
(USO ESPREGUIÇADEIRA)
IMPORTANTE! LER COM ATENÇÃO E GUARDAR PARA EVENTUAIS CONSULTAS.
ATENÇÃO: PARA EVITAR O PERIGO DE ASFIXIA, MANTER ESTE SACO PLÁSTICO LONGE DO ALCANCE DAS CRIANÇAS.
ATENÇÃO
INDSTILLING AF RYGLÆN
ال Offensive Suppression
EN 17191:2021
خلع أنظمة الأمن
ARTSANA GERMANY GMBH
Borsigstrasse 1-3
28923 Alcorcon (Madrid)-Spain
902 117 093
www.CHICCO.es

ARTSANA PORTUGAL S.A.
ARTSANA POLAND Sp.zo.o.
Aquarius, Ul. Połczyńska 31 A
01-377 Warszawa
+48 22 290 59 90
www.CHICCO.com

ООО "Артсана Рус"
ARTSANA BRASIL LTDA.
Dec V. Ruben Dario 1015
Colonia Lomas De Providencia 44647
Guadalajara, Jalisco-Mexico
01800 702 8983
www.CHICCO.com.mx

ARTSANA ARGENTINA S.A.
Av. Santa Rita 2731 Piso 1 Of 5,
1609 Boulogne, Buenos Aires.
Argentina.
Phone: (011) 5254-3030
www.CHICCO.com.ar

ARTSANA INDIA PRIVATE LIMITED,
7Th Floor, Tower B, Paras Twin Towers,
Golf Course Road, Sector 54
Gurgaon - 122002 - Haryana, India
(+91)(124)(4964500)
www.CHICCO.in

ARTSANA S.p.A.
22070 Grandate (CO) - Italy
Tel. (+39) 031 382 111
Fax (+39) 031 382 400
www.CHICCO.com



- - 12 M (USO SDRAIETTA)
- IMPORTANTE! LEGGERE ATTENTA- MENTE E CONSER- VARE PER FUTURO RIFERIMENTO.
- AVVERTENZE
- to 12 M (RECLINED CRADLE)
- IMPORTANT! READ CAREFULLY AND KEEP FOR FU- TURE REFERENCE.
- WARNINGS
- CARE AND MAINTENANCE
- COMPONENTS
- ASSEMBLY
- HOW TO ADJUST THE BACKREST
- FIXED OR ROCKING MODE
- HOW TO CLOSE THE CHAIR
- USING THE SAFETY HARNESS
- BOOSTER CUSHION
- TOY BAR
- WARNINGS ELECTRICAL PARTS
- REMOVABLE SOUND TOY
- VIBRATION BOX
- HOW TO REMOVE THE FABRIC COVER
- 10/12 M, up to 18 Kg (CHAIR USE)
- IMPORTANT: READ CAREFULLY AND KEEP FOR FUTURE REFERENCE.
- EN 17191:2021
- REMOVING THE RESTRAINT SYSTEMS
- THIS PRODUCT COMPLIES WITH THE DIRECTIVE 2012/19/EU.
- WARRANTY
- JOUET SONORE AMOVIBLE
- PT 0 - 12 m (USO ESPREGUIÇA-DEIRA)
- IMPORTANTE! LEIA CUIDADOSA- MENTE E GUARDE PARA REFERÊNCIA FUTURA.
- ADVERTÊNCIAS
- MATERACYK REDUKCYJNY
- IMPORTANTE! LER COM ATENÇÃO E GUARDAR PARA EVENTUAIS CONSULTAS.
- ATENÇÃO
- INDSTILLING AF RYGLÆN
Brand : CHICCO
Model : Balloon
Category : Baby swing