
SE 2001 - Wet and dry vacuum cleaner KARCHER - Free user manual and instructions
Find the device manual for free SE 2001 KARCHER in PDF.
| Product type | Wet and dry vacuum cleaner |
| Brand | KARCHER |
| Model | SE 2001 |
| Dimensions (L x W x H) | 370 x 290 x 470 mm |
| Weight | Approx. 7 kg |
| Power supply | 230-240 V ~50/60 Hz |
| Mains fuse | 10 A (time-lag) |
| Suction turbine power (max/min) | 1400 / 1200 W |
| Air flow rate | 74 l/s |
| Vacuum pressure | 200 mbar |
| Water suction capacity | 11 l |
| Filter bag volume | 12 l |
| Spray rate | 1 l/min |
| Clean water volume | 5 l |
| Dirty water volume | 6 l |
| Sound pressure level | 77 dB(A) |
| Protection class | II |
| Cable length | 5 m |
| Accessory connection diameter | 35/60 mm |
| Main functions | Water cleaning of carpets and hard surfaces (simultaneous spray + suction), water vacuuming, dry vacuuming |
| Included accessories | Combined spray/extraction hose, 2 suction tubes (0.5 m), spray/extraction nozzle with hard surface accessory, combined carpet/hard surface nozzle, brush nozzle for cushions, crevice tool, paper filter bag, flat pleated filter, sanitary microfilter, wet/dry suction adapter |
| Maintenance and cleaning | Changing the paper filter bag (ref. 6.904-143), cleaning the flat pleated filter (ref. 6.414-498), replacing the sanitary microfilter, rinsing the spray lines |
| Safety | Automatic shut-off when the dirt tank is full (float), integrated circuit breaker |
| Warranty | Manufacturer's warranty according to applicable conditions, requires proof of purchase and use of original Karcher filter bags |
Frequently Asked Questions - SE 2001 KARCHER
User questions about SE 2001 KARCHER
0 question about this device. Answer the ones you know or ask your own.
Ask a new question about this device
Download the instructions for your Wet and dry vacuum cleaner in PDF format for free! Find your manual SE 2001 - KARCHER and take your electronic device back in hand. On this page are published all the documents necessary for the use of your device. SE 2001 by KARCHER.
USER MANUAL SE 2001 KARCHER
Here is your new floor cleaner for carpets and hard surfaces
A Filter level indicator:
shows when
the paper bag is full
B Suction turbine: ON/OFF switch
C Spray pump: ON/OFF switch
D Carrying handle
E For storing accessories
F Storing the mains cable
G Replacing the hygienic microfilter
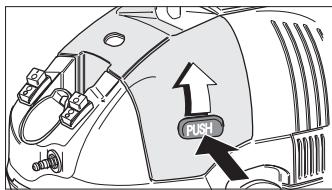
H Cover latch
Locking knob:
open for access to dirt box
J Filter shaker:
- for cleaning flat-folding filter
Accessories
K Spraying and suction hose with handle
L Two suction tubes - 0.5 m long
M Spray-hex nozzle with adapter for hard surfaces
N Combination nozzle (carpet/hard surface)
O Upholstery nozzle
P Crevice nozzle
Q Paper filter bag
R Flat-folding filter - fitted inside cleaner
S Hygienic microfilter - fitted inside cleaner
T Attachment for wet/dry vacuuming
U Spray ex hand nozzle for upholstery cleaning**
- not included in the delivery SE 2001
** not included in the delivery SE 2001/SE 3001
Important information
For your safety
Before using this apparatus for the first time please read and abide by the information contained in this handbook and the enclosed brochure concerning Safety Information 5.956-249!
In addition you should observe all information provided with the cleaning agents that are to be used.
The recommended cleaning agents should not be used undiluted. The products are operationally reliable as they contain no acids, alkaline solutions or substances harmful to the environment. We advise you to keep the cleaning agents in a place inaccessible to children. Eyes should be bathed thoroughly with water should the products come into contact with them, and a doctor should be consulted immediately if the
products are swallowed.
- When disposing of the dirty water and the detergent solution, the statutory regulations should be observed.
Using the cleaner correctly
This cleaner is intended for use as follows:
- as a wet and dry vacuum cleaner for carpets and hard surfaces
- in a domestic environment, such as at home, in a hobby workshop or for a car
- in accordance with the explanatory details and safety information contained in these safety instructions.
Using the cleaner in any other way is considered to be contrary to its intended purpose. The manufacturer will not be liable for any damages that occur as a result of improper usage. In such cases liability rests solely with the user.
On behalf of the environment
Do not throw the packaging materials away with your domestic rubbish.
Take them to an appropriate collection point for recycling.
Warranty
The applicable warranty conditions in different countries are issued by the respective national distributor of KÄRCHER products. During the warranty period, any malfunctions of the cleaner caused by a material or manufacturing defect will be repaired free of charge.
In the event of a warranty claim, please take the cleaner, with accessories and proof of purchase, to your original dealer, or to the nearest authorised customer service centre.
If filter bags are used which are not original Karcher filter bags, the manufacturer accepts no claims under the guarantee.
Preparing the cleaner
for use ① - ⑧
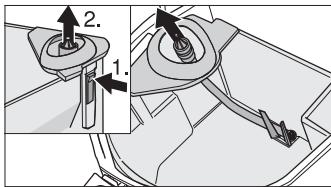
① Release both locking knobs (turn clockwise), and lift motor housing off dirt box.
②Push both wheels onto their mountings until they snap into place. Push both swivel castors onto their mountings until they snap into place.
③Push the accessory holder into its mounting until it snaps into place.
45 For dry vacuuming insert paper filter bag.
(6)Put the motor housing on the dirt box and lock it in place (turn the locking knobs counter-clockwise as far as possible).
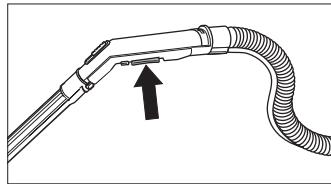
Connecting the accessories
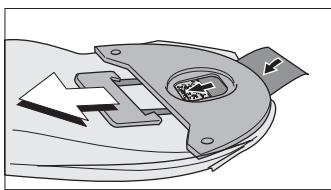
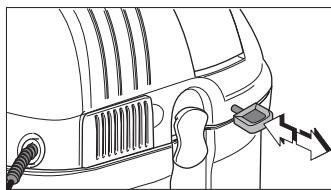
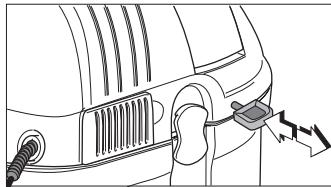
⑦ Insert spraying and suction hose, and press until it snaps into place.
Connect coupling on spraying and suction hose, and press until it snaps into place.
⑧ Attach required accessory to spraying and suction hose or to suction tubes. If necessary engage the catch.
Note: The appropriate additional accessory to be fitted depends upon the actual cleaning task. Read the next section of these instructions for further information.
How to use the cleaner
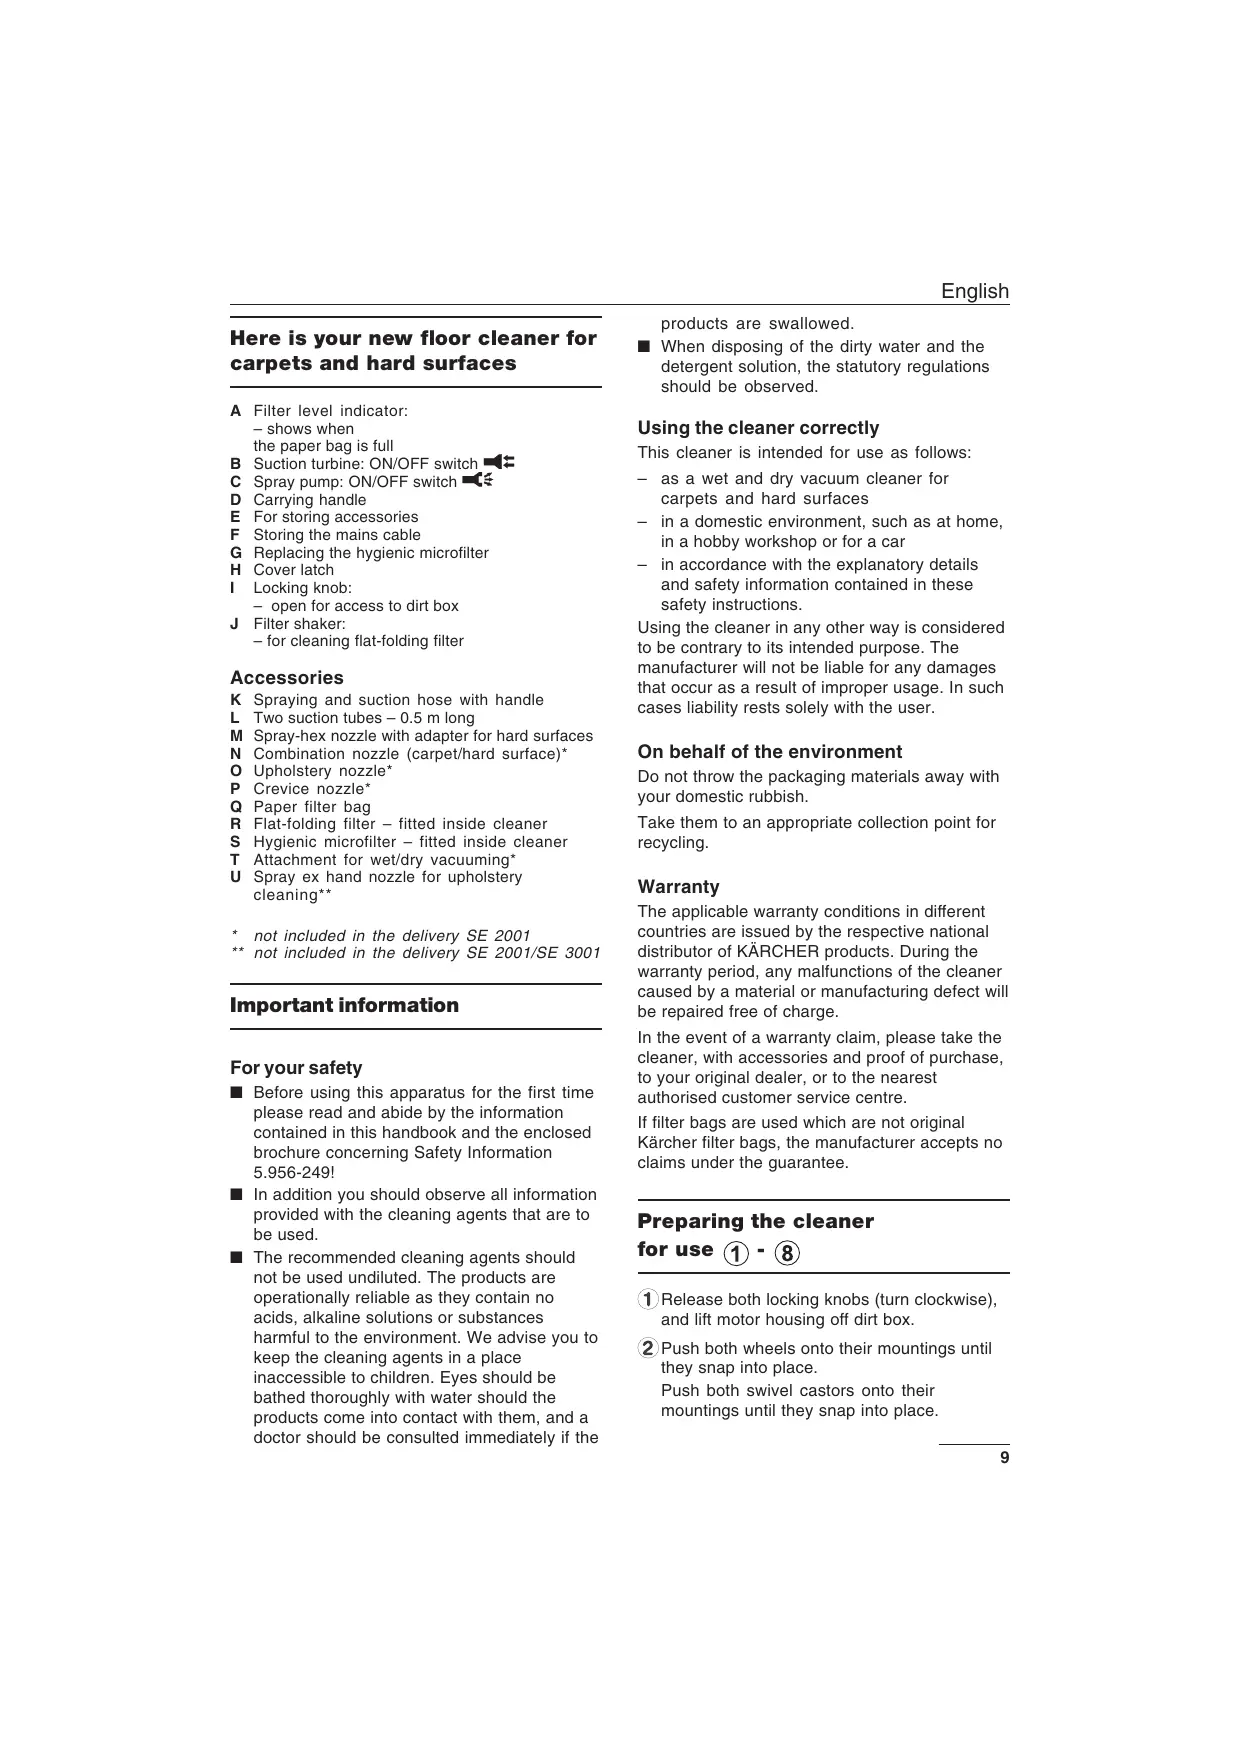
Wet cleaning Carpets/Hard surfaces
(Spraying on cleaning agents and vacuuming them off in one continuous process)
Attention: Do not clean parquet floors in this way (moisture can penetrate the material and damage the floor).
Accessories required
- Spraying and suction hose with handle
- Suction tubes (e.g. for cleaning the floor)
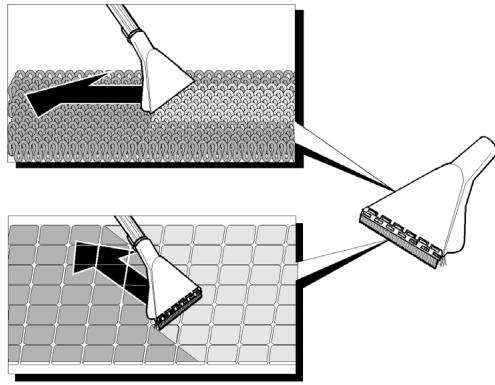
- Spray-hex nozzle without hard-surface adapter for carpets
- Spray-hex nozzle with hard-surface adapter for hard surfaces.
Mixing a detergent solution
Attention: Avoid any damage to health or property by observing all the information provided with the cleaning agents that are to be used.
Removal of mites:
To eliminate mites we recommend our specially developed cleaning agent Mitex RM 765. Depending on the textile type, tests show that mites are removed for 6 - 9 months.
For cleaning please use only the original Karcher cleaning agent RM 519. This is suitable for all textile cleaning processes.
Dissolve half of the supplied test pack (or 1/2 the RM 519 measuring beaker) in 5 litres of water and pour this mixture into the detergent reservoir.
Getting started
Empty dirt box
■ Work without paper filter bag fitted
Fit detergent reservoir
Mount motor housing onto dirt box, and lock in place
Plug into mains socket
Switch on suction turbine
Switch on spray pump
Attention: If the detergent reservoir is empty, switch off the spray pump (pump could become damaged). If you are not working with the pump, switch this off at the ON/OFF switch.
To spray detergent - press and hold button on handle.

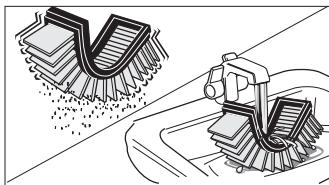
Place spray-hex nozzle on floor, and draw backwards along surface to be cleaned. Tiles are best cleaned diagonally across the joints.
Tips for working with the cleaner
Badly stained areas should be sprayed separately, and the detergent left to soak in for 5-10 minutes.
- Carpets should be rinsed with clear water after cleaning has been completed so that all traces of detergent are removed. Allow carpet to dry out thoroughly before walking on it again.
If you use warm water (up to 50^ ) you achieve better cleaning results.
If the textile layer has become impregnated with moisture after wet cleaning, we recommend our Care Tex RM 762, which is a dirt-repellent and anti-static proofing agent, to help to prevent dirt building up again quickly.
When cleaning has finished
Switch off spray pump
Switchoff suctionturbine
Empty detergent reservoir.
Note: Liquid that has just been vacuumed up could drip from the detergent reservoir while it is being removed.
When the tubes and nozzles are pulled apart some water may escape.
Rinse the spray tubes in the appliance thoroughly:
Fill the cleaning agent container with approximately 1 litre of clear water.
Hold the nozzle above the drain, and switch on the spraying pump until the clear water has been consumed.
Unplug cleaner from mains
Empty dirt box, and rinse out and dry if required
Wet vacuuming (Carpets/Hard surfaces)
(Vacuuming up moisture)
Use spray ex nozzles to vacuum moisture or wetness.
If you use a crevice nozzle:
Attach and secure the adapter for wet/ dry vacuuming. Install the crevice nozzle directly to the adapter.
Getting started
Remove detergent reservoir
Empty dirt box
■ Work without paper filter bag fitted
Mount motor housing onto dirt box, and lock in place
Plug into mains socket
Switch on suction turbine
While cleaning is being carried out
The cleaner cuts out automatically when the dirt box is full.
Note: Switch the suction turbine off after the cleaner has cut out, otherwise the turbine will start up again as soon as the cleaner is opened.
When cleaning has finished
Switch off suction turbine
Unplug cleaner from mains
Empty the dirt container. If required, rinse inside and let dry..
If you have vacuumed sticky liquids:
■ Rinse the accessories and let dry.
Dry vacuuming (Carpets/Hard surfaces)
(Vacuuming fine or coarse dry dirt)
Use the adapter for wet/dry vacuuming Attach the adapter to the handle, turn the locking handle to secure it.
- Select the desired accessories and attach to the spray/suction pipes or directly to the attachment.
Change-over lever set to following symbol
Vacuuming hard surfaces
Change-over lever set to following symbol
Vacuuming carpets
Getting started
Remove detergent reservoir
Empty dirt box, and rinse out and dry if required
The accessory (suction hose and tubes) should be dry inside so that they don't stick.
Vacuuming fine dry dirt: Fit paper filter bag (see section "Tasks to be carried out at regular intervals").
Note: The paper filter bag may be damaged if coarse or sharp objects are picked up by the vacuum cleaner.
Vacuuming coarse dry dirt:
Work without paper filter bag fitted.
Mount motor housing onto dirt box, and lock in place
Plug into mains socket
Switch on suction turbine
Adjust vacuum power by adjusting sliding control on handle.
While cleaning is being carried out
When working without a paper filter bag
Empty the dirt box when it is full.
When the paper filter bag is full
The filter level indicator changes to red. Fit a new paper filter bag (see section "Tasks to be carried out at regular intervals").
When cleaning has finished
Switchoff suctionturbine
Unplug cleaner from mains
When working without a paper filter bag
Empty the dirt container.
Tasks to be carried out at regular intervals
Renewing the paper filter bag
(Order no. 6.904-143)
Switch off cleaner
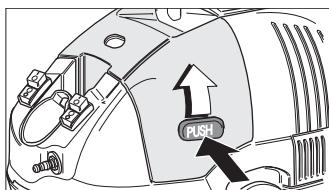
■ Release both locking knobs (turn clockwise), and lift motor housing off dirt box. ①
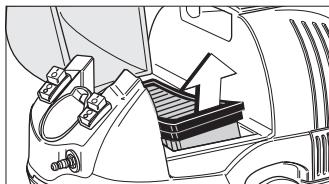
Remove paper filter bag from dirt box, and seal it up.
Insert new paper filter bag. ④ ⑤
Mount motor housing onto dirt box, and lock in place (turn locking knobs anti-clockwise as far as they will go). 6
Cleaning the flat-folding filter
When there is a reduction in vacuuming power:
Switch off cleaner
Pull knob on filter shaker several times.
Every now and then (depending upon how dirty it may be):
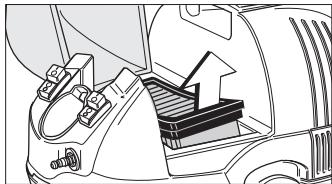
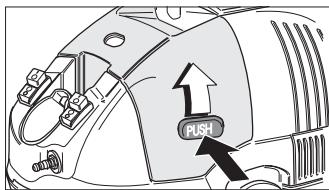
Press knob and open filter compartment.
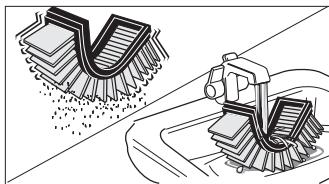
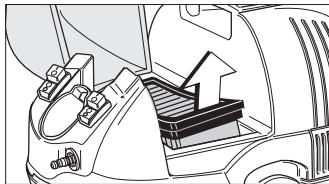
Remove flat-folding filter, and tap to remove dirt
or
if dirt does not drop off, clean flat-folding filter under running water, and leave to dry
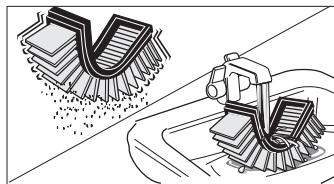
■ Renew filter if covered in stubborn dirt.
Inspecting/renewing the flat-folding filter
(Order no. 6.414-498)
Check the flat-folding filter at regular intervals for signs of damage. The filter should be renewed immediately if it has been damaged, otherwise the motor could also be damaged.
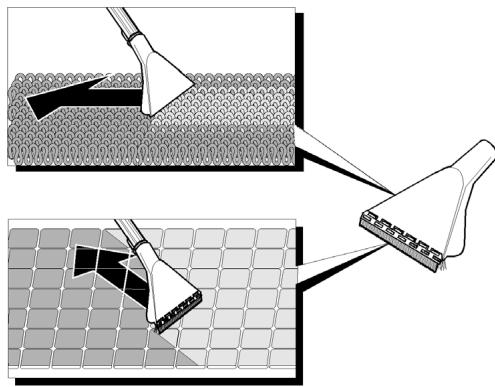
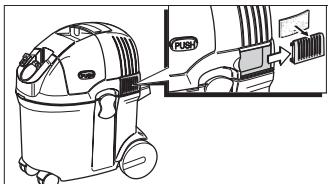
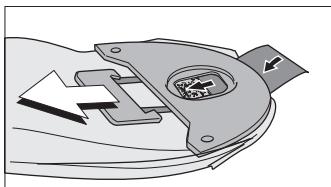
Renewing the hygienic microfilter
(Order no. 6.904-143)
The hygienic microfilter should be replaced whenever the paper filter bag is renewed for the fifth time - earlier if required.
Push cover panels towards rear
Mount hygienic microfilter onto cover panel, and refit both to cleaner.
Inspecting and cleaning the accessories
Check the following accessories at regular intervals to ensure that they are not full of dirt, blocked or damaged:
- all suction and spraying nozzles
- spraying and suction hose with handle
suction tubes - rubber lip and bristles on hard-surface adapter
- suction filter in detergent reservoir
- Parts 1 and 2 must be movable.
Rinse parts with water if required.
Cleaning the device
Fill the cleaning agent container with approximately 1 litre of clear water.
Hold the spray-ex nozzle into a large container or the shower tub.
- Switch on the spraying pump, and rinse the appliance with clear water until it has been consumed.
Switch on the suction turbine, and vacuum the sprayed water to clean the suction tubes.
Empty the dirt container, rinse the dirt container and the accessories and let dry.
Storing the cleaner
Place accessories in holder on cleaner.
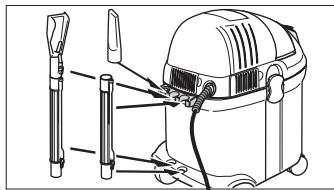
Wind mains cable and spraying and suction hose into coils, and wrap them round accessories.
Note: To release the coupling unit of the spraying and suction hose, press the two housing parts together and remove the coupling.
Technical specifications
| Power supply | 230 - 240 V | |
| 1~50/60 Hz | ||
| Mains fuse (slow) | 10 A | |
| Power: | 1440 Watt | |
| Suction turbine | Pmax1400 Watt | |
| Pnom1200 Watt | ||
| Air flow | 74 L/s | |
| Vacuum | 200 mbar | |
| Capacity, wet vacuuming | 11 L | |
| Capacity, filter bag | 12 L | |
| Spraying rate | 1 L/min | |
| Capacity, fresh water | 5 L | |
| Capacity, dirty water | 6 L | |
| Length | 370 mm | |
| Width | 290 mm | |
| Height | 470 mm | |
| Weight | approx. 7 kg | |
| Size of accessory connection | 35/60 mm | |
| Sound pressure level | 77 dB(A) | |
| Protection class | II | |
| Mains cable: | ||
| Length | 5 m | |
| Type | H 05 VV – F 2x1 | |
Troubleshooting
Attention: Danger due to presence of electric current. Unplug cleaner from mains before working on any electrical components.
| Fault | Cause | Remedy |
| Unit does not start up | No supply voltage | Inspect mains fuse, cable, plug and socket, and have them replaced by a qualified electrician if required. |
| Unit cuts out | When wet vacuuming: water level in dirt box is too high, cleaner cuts out automatically | Press ON/OFF switch, empty dirt box. |
| Reduced suction power | Blocked paper filter bag, flat-folding filter nozzle, suction hose or suction tube. Level indicator has turned to "red". Full paper filter bag or dirt box. Flat-folding filter is missing, or has not been fitted correctly. | Inspect and clean if required. Renew paper filter bag or empty dirt box. Insert flat-folding filter correctly. |
| Dust is expelled during vacuuming | Suction hose is not properly attached. Flat-folding filter is missing, has not been fitted correctly or is defective. | Attach suction hose correctly. Insert flat-folding filter correctly, or renew if required. |
| Water escapes during wet vacuuming | Sticking float. Defective float switch. | Arrange for specialist dealer to inspect. |
| Spray pump does not function | No voltage supply. | Inspect mains fuse, cable, plug and socket. |
| Spray pump is working, but no water is discharged | Empty detergent reservoir. Blocked suction filter. Detergent reservoir has not been correctly positioned inside cleaner. Blockage inside cleaner or accessories. | Top up detergent reservoir. Clean suction filter. Fit detergent reservoir correctly. Detach coupling for spraying hose, and check whether pump is delivering water to outlet if yes, check accessories if no, arrange for customer service to check. |
| No water is discharged from accessories | Blocked nozzle. Blocked spraying and suction tubes or hose. | Clean nozzle. Check accessory connections, clean spraying and suction tubes and hose if required. |
Your KÄRCHER Customer Service representative will be pleased to help if the above-mentioned measure do not enable you to repair the fault yourself.
IoproToBka annapata k pa6oTe
① - ⑧
①OTKpbIbTbO6a3aMkA(NOBOPOTOM NO YacBOBcCTpeJIke)INCHaTB KOpNyc 3JIeKtpoDnRaTeJc Mycopoc6bOpHOro 6aKa.
② UcTaHOBtB KOleCa,HaCauINb INx Ha NOBOkNn 3aΦNKCuPOBaB HaxHMOM. HaTeB Ha NOBOkN o6a NobOPoTHbIX polnka n 3aΦNKCuPOBaTb HaxHMOM Ha HNX.
③ UctaHOBtBaHa KOpNyCe DePkaTeB IJnI npHaADJIeXHOCTeN 3aΦuKcUPOBaTb eO.
45Для pa6obTb B pexmme cyxoh y60pkn yctahOBuTB 6ymaXhbl ΦnIbTp-MeUOK.
⑥ YcTaHOBnTb KOpNyc 3JIeKToPdBnRaTeIHa 6aK n 3aKpeNtB eRO (IOBepHyTb 3aMKn IpOTnB yacOBoi CTpeJkn Do ynpopa).
PpncoeDHeHne npHaIeXHoCTe
⑦ BcTaBnTb WTucep BCacbIbAIOUeero WlnaHra C Tpy6KoI DnI NODaun BObI N 3aΦHKCuPOBaTe erO HaxNMOM. HaTeMb MyfTy WlnaHra I 3aΦHKCuPOBaT b ee HaxNMOM.
HaTeb Ha DpyroI WtUeep BCacBIBaIOeO 1nlaHra C Tpy6KoI JIJI POJaHn BOBbl NIIHa yDInHInTeJbHyIO Tpy6Ky JeJaEMyIO npHaJLeXHOCTb. PpI Heo6xoJIMOCtN 3aΦuKcnpOBaTb ee.
Yka3aHne: BbIOp Tex IIN INHbIX npHaJIeXHOCTe 3aBNCUT OT KOHKpETHOrO npIMeHeHn (CM. CJIeNyUoN pa3JeI daHHoro pyKOBOdCTBa).
Pa6ota c annapatom
Mokpa Ynctka KOBpObblx HanoIbHbIX NOKpbITn / TBepDbIX NOBepXHocTei
(pa36pb3r3nBbAHne YNCTTaeo CpeIcTBa I BCacbBAHne B eINHom pa60eem npoecece)
BHHMaHHe: He cIeIyEt YIcTITb TaKIM CnOc6oM npKeTHbIe Nolbl (XnIKoCTb MoKET npOHnKHytB B IeJI N nPiNbECTN K NOBpeJdeHIO noJa).
Heo6xoIIMbIe npHaIaJIeXHocTn
- BCaCbIbAIOUmI UHaHr C pyKoTko I Tpy6ko I JIPOJauN BObl
- ydlnHnteIbHbIe Tpy6Kn (Ha npimep, Ina y6opkn noJa)
HacdaKdIy MoKpOu YcTKn 6e3 BCTaBKn dIy TBepDbIX NOBepxHOCTei (Iy y6opKn KOBPOBbIX NOKpbITn)
- HacdaKdIЯ MOKpoI YIcTKeN C BCTaBKOI dJIa TBepDbIX NOBepxHocTei (JIЯ OYnCTKIN TBepDbIX NOBepxHocTei)
Ecnn OuncaHhle 3decBneCTBnH He No3BOJrT yCtpaHTb HncnPpABHOCTb, oBpaNTecb, noXaNyIcTa, B MeCTHO otDeHHecePBCHCH cnKx6bl Karcher. Ee CneuaJImCTb OxOTHo NOMORYBam.
(Objed. c. 6.414-498)
Icnpntepn6op.
Pn60yTaKHTe y dpaHa anapaTy.

Hamotajte pinnkbyuHn Ka6eN uYcNo 3peBO 3a npckaHe n NoCTabNTe OKo npnbopa.
Unyta:3a De6IokaIy cnojke ycncHOr UpeBa 3a npckaIbe npTnCHInTe 3ajeNHO DbaJeLa KyHnUHa Tn3ByUIne cnojky.
Texnucn noaun
PpNkpEnBaHe Ha npHnHaJdxKxHocTn
⑦ ΠbXHeTe BnbpckBaIo-N3cMyKBaUaT MapKyu, DOKaTO eB rotOBHOCT. BkIIOUe Te KynlyHra Ha BnpbCKBaTeJIHHa MapKyu, DOKaTO eB rotOBHOCT.
⑧ NocTaBeTe JxelAnHTe npCnOc6JIeHnHa BnpbckBaTeHnMa MapKyu,pecn.Ha BCMyKBaUHTe Tpb6n.B npOTnbEN CnyaH 6Iokupa.
Ppenopbka: KaKBO DoJIbJIHInTeJHO npICnOc6JeHne MoXeTe Da 3aKaUHe, 3aBUCN OT cEJIta Ha yNoTpe6a. IpOyete 3a TOBA CNeDbaunr TeKCT B yIbTBaHeto.
Taka pa6oTe c ypea
BnaJHo nouchTbaHe KnIIMn/TbbpDn NOBbpxHOCTN
(BnpbckBaHe n n3cmyKbaHe Ha nouicTbaU npenapat 3a eINH pa6oTeH deH)
BhMaHHe: Da He Ce NoUcTb NapKeT (BnArata MoKe Da HauIe3e N Nobpeu NapKeTa).
Hyxhn npnHaadneXhoCTn
BnPbckBaTeJIHO-N3CMyKBaU,MapKyU CpbkoXBaTka
- Tpb6n 3a n3cmykBaHe (Ha npimep 3a noHCTBaHe Ha nOi)
Дюза 3a ВпьскBaHe 6e3 Нakраинк 3a TBbpДИ NOВьрхHOCTN 3a KЛIMM
ДIO3a 3aВпрьСКВанeСнakраинк 3a TBbpДИ NOBbpxHOCHTN 3a TBbpДИ NOBbpxHINH.
- PpIroTbAHe Ha pa3TBop 3a NOuHcTbaHe
BHMHHe:3aJa npedotbpaTne 3dpabHn IIn BWeueCTBeHn yBpeJdaHn, Cb6IIOdaBaHTe DOnbJIHNTeHNO BCNUK 3a6eJekK, KOUTo ca npedHa3NaYeHn 3a NoocTbaUnte npenapATn.
OTCTpaHbAhe Ha akapu:
3a OTCTpaHbAhe Ha akapn Hne npenopbyBame pa3BHTnTc CNEuaH0 OT hac nouchCTBaU npenapat Mitex RM 765. Cnopei Bnda TeKCTnI akapnte ue 6bDat OTCTpaHEn 3a nepnoD ot 6 do 9 Mecesa.
I3noJI3BaIte 3a noUcTbaHe caMo opuHnHaJIHHrT noUcTbaU npenapat Ha Kaercher RM 519. ToI e npedna3NaueH 3a BCuKn BUDobe TEKCTNJ nIOUcTbaUdEiHOCTN.
Pa3TBOpTe noJIOBnHaTa OT npJIoXeHTo nakeTte (NIN S KOJI6a RM 519) B 5 J. BOJa N HaleIe Ta3N CMEc B pe3epBoapa 3a NOuICTBaUyI r npenapat.
3anoubahe ha pa6ota
I3npa3BaHeHape3epBoapa 3aOTpaBc
Pa60Ta 6e3 xapTneH qntbP
IocTabAHe Ha pe3epBoapa 3a nouchTbau npenapat
IocTaBeTe n 3aTbOpTe MoTOPnHnT KOpNyc Ha pe3ePBoapa 3a OTnAbu
BkIIOUeTe UeIeCeIa B KOHTaTa
BkIIOUeTe BcMyKBaUaTa Tpy6Ha
BkHIOUeTe pa3npbckBaUaTa nomna
BhmuHne: Korato pe3epBoapbT 3a noocCTBaU npenapat e npa3eH n3kIoUepe pa3npbckBaUaTa nomna (nomnata MoKe Ja ce Nobpeu).Korato He pa6oTte C nomnata n3kIoUeTe oT 6yToHa EIN/ AUS.
3a BnPbCKBaHe HaTnCHTe KOnyTe Ho pBkoXBaTkata N 3aDpBxTe.
IocTaBete HIO3aT3a BnpbckBaHe Ha 3eMraTn pa6oTeHa 3aEN XoN,poN C nIoOKn HauNoDobpe ce NoHcTBa DnaRaHOHaJHo no fpyrnte.
CbBET npn pa6ota
Bnpbchete DOnbHInTeJHo Ha CnIHO 3aMbpceHm MecTa N OCTabete OKOJO 5-10 MNHTN NOHCtBaUHrT Ppenapat Da NoDeiCTBA.
N3yHCTe NOBbpxHOCTHe C KINIM B KpaHa pa6oTata C YnCTa BOda, 3a Da OTCTpaHITc octaTbci NT ONUCTBaUIm T npenapat. Octabete cIed NOuCTBaHETO da N3cbXHe ochOBHNO, ppei Da ce CTbNBA He Hero.
■ПиИЗпOLЗВАеНaТОЛЯВОДa(ДоМakc.50℃) NOCTИГATEнaH-ДОБьрpe3yIITATпи NOUCHCTBAHETO.
CneBnAaJHHTO NOUcCTBaHe TEKCTUNHITe NOKPnBKn Tp8oBa Da ce MMnpeRHipat, 3a da ce n36erHe NOBTOpHO 3aMbpcBaHe. Hne npedarame 3a ToBa HaunrT Care Tex RM 762 c 3a OTbckBaIo 3aMbpcBaHe n aHTNCTaTuHo MMnpErHnPaHe.
3aBbPbBaHe Ha pa6oTa
I3KJIIOHcTe IOMnTa 3a pa3npbCkBaHe
N3KJIIOHeTe Tpy6HHaTa 3a BCMyKBAHe
N3KJIIOUeTe UeENCeLa
I3npa3HePe3epBoapa 3a nouchTba, npenapat.
Yka3aHne: PnO tCpAraBaHe Ha pe3epBoapa 3a nOuNCtBaunI npEnapat MOraT da NaHaT BCMyKaHn KaUnuOn OT TeUHOCTTa.
Ppna pa3dienHeTo Ha Tpb6nte N IIO3nTe MoKe Da noteve Boda
N3JIaKBAHe Ha pa3npbCKBaIuTe Tpb6OpPoBOn B ypeJa:
HanbHHepe3epBoapa 3a npenapatn 3a nouchTaBe HOKOIO1IITbp YNCTa BOJa.
3aDpbXTe HakpaHnka 3a NOuchTbaHe Bbpyx MRCTO 3a OTtHaHe N BKIIOueTe pa3npckBaUaTa TOMna,doKaTo Ce n3xa6u YNCtata BOda.
N3npa3BaHe pe3epBoapa 3a OTnAbu, npn HjxJa da ce N3PnakHe OT BbTpE n Da ce N3Cyu
BnaJxHo n3cMyKBaHe (KnIIMn/TbbpNn HactnIkn)
(ИЗСМУКВАЕ НА ВДагA)
3a n3cmykbahe Ha Bnla rpecn. MOKpn Mecta n3no13BaIe Te pbckaun DIO3n Ex.
9PnH3no3BaHe HaIIO3aTa 3aФyI. IocTabeTe nOCInpyete aAnTep 3a MOKpo/Cyxo I3CMyKbaHe.IocTabeTeIIO3aTa 3aФyIg InpEKTHOHa aAnTepa.
3anoybahe Ha pa6oTa
CbaJIaHe Ha pe3epBoapa 3a noUncTbaI npenapat
I3npa3BaHe Ha pe3epBoap 3a OTpaBcN
Pa6oTa 6e3 xapTneH fntbP
IocTaBeTe I 3aTbOpeTe MOTOpHnI KOpNyc Ha pe3epBoapa 3a OTNaDbu
BkIIOUeTe UeNcEla B KOHTa
N3KJIoueTe TpybHaTa 3a BCMyKBaHe
IbpeMeHa pa6ota
Korato pe3epBoapa 3a otnaIbIe nIbIeH ypea ce N3KJIIOUyBa ABTOMATUHO.
Yka3aHne:Korato ypeIbT ce n3KJIIOUBa, n3KIIIOUBa ce I BCMYKBAaTa Tpy6uHa, Tb KaTO npn OTbapJeHa ypeDa ty6uHaTaOTHOBe 3aJeICBa.
3aBbPbBaHe Ha pa6ota
I3KJIIOUeTe Typ6nHaT3a BCMyKBaHe
V3KJIIOUeTe UeICeNa
I3npa3HeTe pe3epBoapa 3a OTnabu, aKo e Heo6xOIMo, I3JIaKHeTe ro n ro n3Cywete.
Ako cTe n3cMykann JeNkABn TeuHocTn:
I3nIIaKHeTe eJEMeHTnte OT OKOMJIeKTOBkata I nOCTabete Da N3cbxHaT.
Cyxo n3cmykbahe (KnlmN/TVbPn Nactnkn)
(Измквае на Фини посязambpcntelen)
9I3noJ3BaIte aJaanTep 3a MOKpo/cyxo I3CMyKbaHe. IocTabete aJaanTepa Ha pbKOXBaTKata nJIN BCMyKaTeJHATA Tpb6a, 3aBbPTeJeIOCTa 3a 6JIoKpuAne H ro OcnHypeTe.
I36epeTe JeHaHInTe pInHaJdIeXHoCTn I nIIOCTaBete Ha pa3npbckBaUInTe BCMyKaTeJIHITpb6n peCn. DnpeKTHo Ha aadantepa.
IpeBkIOUOBATeI CbC CJIeIDHnCIMBOJI:
I3cMyKBaHe Na TBbPdIO NOBbPxHHN
IpeBkIOUbATEI CbC CTeHnCIMBOJ:
I3cMykBaHe Ha IOBbpxHnHc KINIM
3anoubahe ha pa6ota
OThemaHe Ha pe3epBoapa 3a nouchTbaI npenapat
N3npa3BaHe pe3epBoapa 3a otPnAbu, npn HjxJa da ce N3PnAke O T BbTpE n Da ce N3Cyu
Прииадлжнотte(Mapkyu Tpb6n)Tpr6BaДа ca cyxN OTb6Tppe,3a Да He 3aJIenBa.
13cmykbaHe Ha fHn Cyx OTnaBk: NocTabaHHe Ha xapTneH fHnTbp.
Yka3aHHe: Pnpu N3cMcyBaHe Ha rpy6n HInn OcTpnppeDmTeN, XapTneHnrt FnuTbp MoKe da ce nobpeDu.
13cmykbaHe Ha rpy6 cyx OTnabk: Pa60Ta 6e3 xapTneH cHITbP.
IocTaBeteH 3aTbOpTe MOtOpHnT KOpNyc Ha pe3ePBoaapa 3a OTnAbu
BkIIOUeTe IeIeCeIa B KOHTaTa
BkIIOUeTe BCMyKbAaTaTtyp6Ha
HactpoTe cnilaTa Ha BcMyKBaHe NocpeDCTBOM nIb3raunr peYnlaTOP Ha pbkoXbaTkata.
No Bpeme Ha pa6ota
Pp npabota 6e3 xaptnen fntbP:
Korato pe3epBoapara 3a OTnadbUe nblJeH n3npa3HeTe ro.
Korato xaptneHnT fUntbp e nblJeH:
AKO MOUHOCCTTa Ha BCMYKBAHe CE NOHIXN:
13KJIIOUeYpeJa.
I3nbpnaite HeKoJIkoKpaTHO KOnYeTo 3a I3tpbCKBaHe HaΦnITba.
OT Bpeme Ha Bpeme (B 3aBucmOCT OT CTeneHTa Ha 3ambpcHOCT):
HaTnCHeTe KOnHeTo n OTBopeTe ΦnJIbPhOTOpnpocTpahCTBO.
OThemete n 3aTbOpTe pIOCKnT pIITbp.
NIN
AkoOTnabuHTe He Ce OcBO6OxJaBaT n3MnTe PLOCKNAT FmIITbP C TeaUa BODa n ITO OCTaBETe Da CE N3CyUH.
PnTbpy3aMbpcBaHnIPOdMeHeTeIIOCKnI TpIITbp.
PpOBepKa/cmHaHa nIIOcknT ΦHtbp
(Home 3a npbya 6414-498)
Пловераян Te ПлOCKиТФиптbppeДОВНЗа �рд.Ако ПлOCKиТФиптbp e ПОВпeн,ТябБа Вedнага Дсе ПОДМeHи,Tы КATO MOTOPьТ мОж Да сe поврди.
CmHa Ha XnRHeHHnT MKNpOΦnTbP
(Home 3a npb64 6904-143)
CneB C8ka neta noMnaHa Ha xapTneHnIpnTbp Tp6Ba Da ce noMmEn HxnrHnHnT MkpoΦnItp. Pnp HJka cbio nno-paHO.
■ПьзHTe NOxJynaka Ha3a.
3aKpeTe n crIIOBeTe XnHnEHnRAmKpOΦnITbP B NOxLynaKa.

He BnKndaTe NaKyBaJIbHi MaTepiAIn pa3Om i3 NO6yTOBIM CMITTM.
3dabaiTe ix nIy NOBTOHOI nepeo6Kn Do CnEuaJIIOBAHIN PnIMMaJIbHN NyHKTIB.
Rapantia
YKoXHi KpaHII dIOITb yMOBn rapaHTI, BCTaHOBJIeHI hAnHM TOpRiBeJbHIM npeCTabHHUcTBM. MoXJIbI HecnPraBHOCtI, pNHyHAMmIKx6 DePeKTm MATEpiaLy aBO BnOb6HNTBa, Ha npoT3i rapAHTIHoro nepioDy IJIKBIDOBYIOCTCB HAIM 6e3KOuTBOHIO.
YBnAdky BnHnKHeHn HeCnpBaHocTi Ha npTo3i rapaTNIHOrO nepioNy 3BepTaIeTcE da BoDIINoBIDHOI TOPriBENbHOI opraH3aJIa aIO naHobNkHOr YoBNbObaxHeO rceBICHOr cENTpy. Ipi co6I Heo6xJHO MATn pinnad.Ta DOKYMEnTHn, kI niDTEBpIkyOTb Ioro pniD6BanHH.
GammaTIA BIVOP6HNA BTPA4E CBOO YINHHICTbY BINAIDKYBKNOPCTAHNHE OOpINAHJIbHNX fIbnTpyBaJIbHNX NakeTIB.
ПлгOTOBКа пиладуdo BnKOpNCTaHHЯ ① - ⑧
①BɪdɪkrɪŋTe 0bɪdɪBa 3aʌmɪn, 0eβρhʊbɪn
②Втушиль обидва колицату крплесн,在OKИ BOHи He 3aФikCiyOTbC.
3BtncHItb o6nDbpa polnky kpiInneHn. BcTaBte i3aFikCyIte yTpMByau doaTkoBOr npnilaJa.
45Дясухоуишенивставтпалеровийфыгвальни napet.
6BctaHOBIb KOpIyc MOTopa Ha KOHTeHepiДЯ CMITr i 3aΦikCyITe, O6ePHyBUn 3aMKn IpOTn rOdINHHKOBOI cTPIKN Do yNOPY.
BctaHOJIeHHdoaTkoBOrnpIJaIaIaI
⑦ BcTaBTe UHaHr DnIpo36pN3KyBaHH/BCMOKTyBaHH, NOKI BIn HE 3aΦiKCyETbCra.HacyhTe MyΦTu UHaHra DnIpo36pN3KyBaHH, NOKI BOHa He 3aΦiKCyETbCra.
⑧3akpiinitb notpi6he npnilaanda Ha shaHry dny po36pni3KyBaHH/BCMOKtyBaHHa 60 BCMOKtyBaJIbHi Tpy6i.
PpMItKa. Bn6ipdoaTkoBOr npnilaIy 3aJeKtB Bid 3aJIaHOBaHOr BO BkOpNCtaHnR npJlaNy. YntaTe HAcTyHnPi03dIuBo rOncbNka.
Pobota 3 npnilaioM
BoIore uIeHnKINIMOBORIO NOKPITTTOJy/TBepDIN NOBepxOHb (po36pN3kyBaHnI BCMOKTyBaHHa 3acOby dIy uIeHHa 3a OdHn IpoxiD)
Ybara! LcE MeToD He npu3NaeHn IpyuIeHH naPKeTHnx NiIIOr -PPOHnKaIOHy UJINHN, BOJORA MOKe NOLIKOJNTN NiIIOry.
Heo6xidne npnlaedra
- LJIaHr,IЯpo36pN3KyBaHHra/BCMOKtYBaHHra 3 pyHKOIO
BcMoKtByBaJIbHI Tpy6n (HaPruKJIaI,ДЯ YIeHnI niJIOrI) - Po36pIaKbAJIbHa 0fOpCyHka 6e3 HacIaKn IJIA NIIeHNH TBePdNIX IOBepXoHb (ДЯ KIJIIMMOBOrO nOKpIITTBA
P036pni3KyBaIbHa foOpCyHka 3 HacaIkoIO nIy NiIeHHN TBePnIX NOBepXOHb (IJIa TBePnIX NOBepXOHb)
BCTaBTe HOBn fIbTpBaJIbHn paKeT (INB. po3dIn
"LcTeTpe6a po6nTu peYyIpaHNo".
3aikyuemop60ty
BumKhitbBCMOKTyBaIbHy Typ6iHy

BntarHtB wTekep.
B3 napepoboro pfIbtpybalbHoro naKeta:
CnoopoxHITb KOHTeHep dIa cmTTA.
Ie tpe6a po6ntn perylnpno
3aMiHa nanepoBoro oIbtpyBaIbHoro naKeTa
(HomepДяЗamOBJIeHH6.904-143)
BumKHiTb npnla.
BiiKpnIte Dba 3aMkn, o6epHyBUn 3a roHNHnKOBOO CTpiIKoIO, i3HiIMtB KOpNc MToPap3 KOHTeHepa dJa CmITT. (1)
BHTaHITb 3 KOHTeHepa fIbTpYBaJIbHn IaKeT. 3akpnte KOHTeHep.
BCTABTeHOBNΦiNbtpyBaIbHn naket. ④⑤
BcTaHOBIb KOpNc MOTopa Ha KOHTeHepi dIa CmITra 3aΦikCyIte, O6ebHyBUn 3aMKn IpnTo rOdINHHKOBOI cTpiJIKo Do yIopy. ⑥
UHENnIaCKoRcKlaDaHOrO fIbTp a
YBnIaIky nOriPseHHe CNJIN BCMOKTyBaHHa
BumKHiTb npuHa.
Дeкльka pa3notarHITbpykyДЯВИТуВангфдпьтpa.
Yac BID Yacy (B 3aIexxHocTi BiD pIBHa 3acMieHHA):
HaTnChiTb KhoNky i BiKpnIte BiDcKiBtpa.
BntTnItb icTpychItb nlaackn cklaadHn fIbTp.
a60
KJUcTcNtCmITT3 9IbTpHeBdaETbcra, npomnte 9IbTp npOTOHO BOIO i daTe BnCOxHyTI.
YBnIaKy 3HaHNO, CTiKOrO 3acMHeHHa3AmHt bIaCKn CKlaDaHnΦJIbTp.
Kärcher Cleaning Systems A.E.
31-33, Nikitara & Konstantinoupoleos str.
13671 Acharnes
210-2316153
GB
Kärcher (UK) Limited
Kärcher House
Beaumont Road
Banbury
Oxon, OX16 1TB
01295752200
H
Kärcher Hungária Kft
Tormásrét ut 2.
2051 Biatorbágy
(023) 530-640
HK
Kärcher Limited
Unit 10, 17/F.
APEC Plaza
49 Hoi Yuen Road
Kwun Tong, Kowloon
(02) 357-5863
1
Karcher S.p.A.
Via A. Vespucci 19
21013 Gallarate (VA)
848-998877
IRL
Kärcher Limited
12 Willow Business Park
Nangor Road
Clondalkin
Dublin 12
014097777
KOR
Karcher Co. Ltd. (South Korea)
Youngjae B/D, 50-1, 51-1
Sansoo-dong, Mapo-ku
Seoul 121-060
032-465-8000
MAL
Karcher Cleaning Systems Sdn. Bhd.
No. 8, Jalan Serindit 2
Bandar Puchong Jaya
47100 Puchong, Selangor
(03) 5882 1148
N
Kärcher AS
Stanseveien 31
0976 Oslo
24177700
NL
Kärcher BV
Postbus 474
4870 AL Etten-Leur
09003344433
NZ
Karcher Limited
12 Ron Driver Place
East Tamaki, Auckland
(09) 274-4603
PRC
Kärcher Cleaning Systems Co., Ltd.
Part B, Building 30,
No. 390 Ai Du Road
Shanghai Waigaoquiao 200131
(021) 5046-3579
P
Neoparts Com. e Ind. Automóvel, Lda.
Largo Vitorino Damasio. 10
1200 Lisboa
(21) 395 0040
PL
Karcher Sp. z o.o.
UI. Stawowa 140
31-346 Kraków
(012) 6397-222
RUS
Karcher Ltd.
Vienna House
Strastnoi Blv. 16
107031 Moscow
095-9338748
S
Kärcher AB
Tagenevagen 31
42502 Hisings-Karra
(031) 577-300
SGP
Karcher Asia Pacific Pte. Ltd.
5 Toh Guan Road East
01-00 Freight Links Express Distripark
Singapore 608831
6897-1811
TR
Karcher Servis Ticaret A.S.
9 Eylül Mahallesı
307 Sokak No. 6
Gaziemir / Izmir
(0232) 252-0708
TWN
Karcher Limited
5F/6.No.7
Wu-Chuan 1st Rd
Wu-Ku Industrial Zone
Taipei County
(02) 2299-9626
UA
Kärcher Ukraine
Kilzeva doroga, 9
03191, Kyiv
(044)5947575
UAE
Karcher FZE
Jebel Ali Free Zone
RA 8, XB 1, Jebel Ali, Dubai
(04) 8836-776
ZA
Kärcher (Pty.) Limited
144 Kuschke Street
Meadowdale
Edenvale 1614
(011) 574-5360
05/2008
KARCHER
www.kaercher.com