
STE 90 SCS, STE 90 SCS - Jigsaw METABO - Free user manual and instructions
Find the device manual for free STE 90 SCS, STE 90 SCS METABO in PDF.

| Product Type | Jigsaw |
| Brand | Metabo |
| Model | STE 90 SCS |
| Power Supply | 230 V ~ 50 Hz |
| Protection Class | II |
| Pendulum Stroke | Adjustable from 0 (stop) to III (maximum) |
| Speed Adjustment | Electronic variable speed (thumbwheel) |
| Chip Blower | Switchable (on/off) |
| LED Light | Integrated, LED class 1M |
| Bevel Cut | Yes, tilting base plate |
| Close-to-wall Cutting | Yes |
| SCS Guidance System | Metal guide for straight cuts |
| Dust Extraction | Connection diameter 30 mm |
| Weight (without cable) | Approx. 2.5 kg |
| Sound Level | Up to 80 dB(A) (may exceed) |
| Supplied Accessories | Anti-splinter plate, hex key |
| Maintenance | Regular cleaning, oiling of support disc |
| Safety | Double insulation, emergency stop |
Frequently Asked Questions - STE 90 SCS, STE 90 SCS METABO
User questions about STE 90 SCS, STE 90 SCS METABO
0 question about this device. Answer the ones you know or ask your own.
Ask a new question about this device
Download the instructions for your Jigsaw in PDF format for free! Find your manual STE 90 SCS, STE 90 SCS - METABO and take your electronic device back in hand. On this page are published all the documents necessary for the use of your device. STE 90 SCS, STE 90 SCS by METABO.
USER MANUAL STE 90 SCS, STE 90 SCS METABO
Director Product Engineering & Quality
Responsible Person for Documentation
Metabowerke GmbH, 72622 Nuertingen, Germany

A

Original instructions
1. Declaration of Conformity
We, being solely responsible, hereby declare that these jigsaws conform to the standards and directives specified on page 3.
2. Specified Use
The machine is suitable for sawing non-ferrous metals and sheet steel, wood and similar materials, plastics and similar materials. Any other use is not permitted.
The user bears sole responsibility for damage caused by improper use.
Generally accepted accident prevention regulations and the enclosed safety information must be observed.
3. General Safety Instructions

For your own protection and for the protection of your electrical tool, pay attention to all parts of the text that are marked with this symbol!

WARNING - Reading the operating instructions will reduce the risk of injury.

WARNING Read all safety warnings and instructions. Failure to follow all safety warn-and instructions may result in electric shock, nd/or serious injury.
Keep all safety instructions and information for future reference.
Pass on your electrical tool only together with these documents.
4. Special Safety Instructions
Hold power tool by insulated gripping surfaces, when performing an operation where the cutting accessory may contact hidden wiring. Cutting accessory contacting a "live" wire may make exposed metal parts of the power tool "live" and could give the operator an electric shock.
Ensure that the spot where you wish to work is free of power cables, gas lines or water pipes (e.g. using a metal detector).
Dust from material such as paint containing lead, some wood species, minerals and metal may be harmful. Contact with or inhalation of the dust may cause allergic reactions and/or respiratory diseases to the operator or bystanders.
Certain kinds of dust are classified as carcinogenic such as oak and beech dust especially in conjunction with additives for wood conditioning (chromate, wood preservative). Material containing asbestos must only be treated by specialists.
-
Where the use of a dust extraction device is possible it shall be used.
-
To extract dust more efficiently, use the protective cap (11) and a suitable Metabo vacuum cleaner together with this tool.
- The work place must be well ventilated.
- The use of a dust mask of filter class P2 is recommended.
Follow national requirements for the materials you want to work with.
During work, the workpiece must lay flat and be secured against moving, e.g. using clamps.
Do not try to saw extremely small workpieces.
When sawing, the footplate must make secure contact with the workpiece.
When interrupting a cut for any reason, release the trigger and hold the saw motionless in the material until the saw blade comes to a complete stop. Never attempt to remove the saw from the workpiece while the saw blade is in motion or kickback may occur.
Do not switch the machine on while the saw blade is touching the workpiece. Let the saw blade reach full speed before making a cut.
When restarting a saw in the workpiece, centre the saw blade in the kerf and check that saw teeth are not engaged into the material. If the saw blade seizes, it may kickback from the workpiece when the saw is restarted.
Keep hands well away from the sawing area and the saw blade. Do not reach underneath the workpiece.
Remove chips and similar material only with the machine at standstill.
Pull the plug out of the socket before making any adjustments, converting or servicing the machine.
Danger of injury due to the sharp jigsaw blade. After stopping work, the jigsaw blade may still be hot. Wear protective gloves.
LED (10): Do not view LEDs directly through optical instruments, LED class 1M, classified as per DIN EN 60825-1: 2003, wavelength: 400-700 nm; 300~ s .
5. Overview
See page 2.
1 Clamping lever for securing the saw blade
2 Saw blade clamping fixture
3 Saw blade support roller
4 Saw blade
5 Metal guide of the guide element
6 Guide element
7 Unlocking key for removal of the guide element
8 Anti-splintering footplate insert
9 Footplate
10 LED lights
11 Protective cap
12 Protective rod for preventing unintentional contact with the saw blade
13 Adjustment lever for pendulum motion
14 Switch button on the chip blower
15 Sliding switch
16 Hexagon spanner
17 Setting wheel for speed adjustment
18 Extractor connection piece
19 Screw for adjusting the footplate
20 Curved support plate indicating preset cutting angle
* depending on equipment/not in scope of delivery
6. Commissioning

Before plugging in, check to see that the rated mains voltage and mains frequency, as stated in the rating label, match your power supply.

Australia: Always use a residual current device (RCD) protected supply with a rated residual current of 30mA or less.

Never operate the machine without a saw blade.
6.1 Fitting the anti-splintering footplate insert

- Danger of injury due to the sharp jigsaw blade.
- Remove the saw blade before fitting (8) the anti-stering footplate insert.
Turn the machine over so that the footplate faces upwards. Insert the anti-splintering footplate from the front, ensuring the following:
- The smooth side of the footplate faces upwards.
- The slot is facing to the rear (towards the mains cable).
If you wish to work with the protective plate attached (see chapter Accessories 10.), fit the anti-splintering footplate insert in the protective plate..
6.2 Sawing with a guiding device for straight cuts (SCS)
The metal guide (5) of the guide element (6) dips into the kerf and stabilises the machine to ensure even straighter cuts.
Removing the guide element:
- Hold the machine with the footplate down.
- Press the unlocking key. The guide element thus falls out of its retainer in the footplate. (Should the guide element not fall out by itself, you can insert the hexagon spanner (16) into the guide element hole and remove it in this way).
Inserting the guide element:

For straight cuts, insert the guide element so that the metal guide (5) protrudes under the isolate.

For diagonal and curved cuts, insert the guide element so that the metal guide (5) fits the footplate and is not visible.
- With the unlocking key pressed, insert the guide element into the footplate.
Note: It can only be inserted if the hole in the guide element is facing backwards (towards the mains cable).
6.3 Inserting the saw blade

Danger of injury due to the sharp jigsaw blade.
After stopping work, the jigsaw blade may still not. Wear protective gloves.
Use a saw blade that is suitable for the material being sawn.
- Turn the clamping lever (1) forwards to the stop and hold in place.
- Insert the saw blade (4) up to the stop. Ensure that the saw teeth are facing forwards and the blade is seated correctly in the groove on the saw blade support roller (3).
- Release the clamping lever (1). (It returns to its initial position by itself. The saw blade is now securely tightened).
6.4 Attaching / Removing the protective cap
Attachment: Push on the protective cap (11) from the front until it engages
Removal: Grip both sides of the protective cap (11), lift slightly, then pull forwards and remove.
6.5 Sawing with dust extraction
- Connect a suitable extraction device to the extractor connection piece (18). Use a suction hose with a 30~mm connector diameter.
- Attach the protective cap (11) for maximum extraction efficiency.
- Switch off the chip blower (see chapter 7.1).
6.6 Sawing without dust extraction
- Work with the protective cap (11) removed (see Removal chapter 6.4).
6.7 Diagonal cuts
Remove the protective cap (11), anti-splintering footplate insert (8) and extraction hose. These parts cannot be used for diagonal cuts.
- Remove the guide element (6) (see section 6.2).
- Slacken the screw (19).
- Slid the footplate (9) forwards slightly and turn.
- Then slide the footplate (9) forwards or backwards and engage in one of the detents (the detents can be viewed through the semicircular opening at the rear of the footplate (9).) The preset angle is indicated on the curved support plate (20) on the footplate. Adjust to different angles using an angle gage.
- Tighten the screw (19) again.
- Insert the guide element (6) once more (see section 6.2).
6.8 Sawing close to the wall
Remove the protective cap (11), anti-splintering footplate insert (8), circular-cutting and parallel guide. These parts cannot be used when sawing close to the wall.
- Remove the guide element (6) (see section 6.2).
- Slacken the screw (19) until the footplate (9) can be raised slightly.
- Raise the footplate (9) slightly and slide backwards up to the stop.
-
Tighten the screw (19) again.
-
Insert the guide element (6) once more (see section 6.2).
7. Use
7.1 Chip blower
Optional blower for a clear view of the cutting line.
On: press in the switch button (14) on the right side of the machine. (look for the symbol).
Off: press in the switch button (14) on the left side of the machine. (look for the × symbol).
7.2 Adjusting the pendulum motion
Set the required pendulum motion using the adjustment lever (13).
Position "0" = pendulum motion is switched off
Position "III" = maximum pendulum motion See page 3for recommend setting values.
The best way to determine the ideal setting is through a practical trial.
7.3 Setting maximum speed
Set the machine to maximum speed using the setting wheel (17). This is also possible during operation.
See page 3 for recommend setting values.
The best way to determine the ideal setting is through a practical trial.
7.4 On/Off switch, continuous activation
Avoid inadvertent starts: always switch the tool off when the plug is removed from the mains socket or if there has been a power cut.
In continuous operation, the machine continues running if it is forced out of your hands. Therefore always hold the machine with both hands using the handle provided, stand securely and concentrate.
Switching on: Push the slide switch (15) forward. For continuous activation, now tilt downwards until it engages.
Switching off: Press the rear end of the slide switch (15) and release.
7.5 LED lights
For working on dimly lit areas. The LED lights (10) light up when the machine is switched on.
8. Cleaning, Maintenance
Clean the machine regularly. This includes vacuum cleaning the ventilation lovres on the motor.
Clean the saw blade clamping fixture regularly and thoroughly by blowing with compressed air.
If necessary, clean the openings behind the saw blade support roller (3).
Apply a drop of oil to the saw blade support roller (3) from time to time.
9. Tips and Tricks
Plunging
The jigsaw blade can plunge into workpieces made from thin, soft materials without the necessity of drilling a hole beforehand. Only use short saw blades. Only at 0^ angle setting.
See illustration on page 2. Set the adjustment lever (13) to position "0" (pendulum motion is switched off). Position the jigsaw with the front edge of the footplate (9) on the workpiece. Hold the operating jigsaw firmly and guide slowly downwards. Once the saw blade has penetrated the workpiece, the pendulum motion can be activated.
In thicker workpieces, a hole for inserting the saw blade must be drilled first.
10. Accessories
Use only genuine Metabo accessories.
Use only accessories which fulfil the requirements and specifications listed in these operating instructions.
Fit accessories securely. Secure the machine if it is operated in a bracket. Loss of control can cause personal injury.
See page 4.
A Circular-cutting and parallel guide
For the complete range of accessories, see
www.metabo.com or refer to the main catalogue.
10.1 Attaching the circular-cutting and parallel guide
For sawing circles (dia. 100 - 360 mm) and making cuts parallel with edges (max. 210 mm).
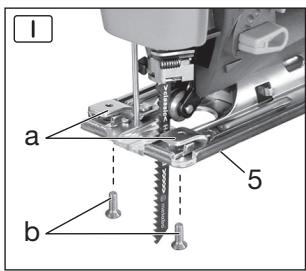
Attaching clamping elements (page 4, Fig. I)
Place the clamping elements (a) on the footplate (9) with the opening facing forwards and the threaded hole facing up. Insert the screws (b) from underneath.
Remove the clamping elements after use otherwise the saw blade clamping fixture (2) may be damaged when diagonal cuts are made.
Attaching the circular-cutting guide (page 4, Fig. II)
Attaching the parallel guide (page 4, Fig. III)
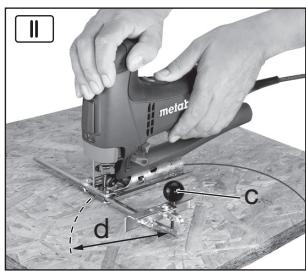
- Slide the rod on the circular-cutting and parallel guide sideways into the clamping elements (a) (centre point (c) faces downwards).
- Set the desired radius (d).
- Tighten the screws (b).
- Slide the rod on the circular-cutting and parallel guide sideways into the clamping elements (a) (centre point (c) faces upwards).
- Unscrew the centre point (c).
- Set the dimension (e)
- Tighten the screws (b).
11. Repairs

Repairs to electrical tools must be carried out by qualified electricians ONLY!
If you have Metabo electrical tools that require repairs, please contact your Metabo service centre. For addresses see www.metabo.com.
You can download spare parts lists from www.metabo.com.
12. Environmental Protection
Observe national regulations on environmentally compatible disposal and on the recycling of disused machines, packaging and accessories.

Only for EU countries: Never dispose of power tools in your household waste! In accordance with European Guideline
2002/96/EC on used electronic and electric equipment and its implementation in national legal systems, used power tools must be collected separately and handed in for environmentally compatible recycling.
13. Technical Specifications
Explanatory notes on the specifications on page 3. Changes due to technological progress reserved.
M = Torque
T_1 = Maximum material thickness in wood
T2 =Maximum material thickness in nonferrous metals
T_3 = Maximum material thickness in sheet steel
n_0 =Stroke rate at idle speed
P1 = Nominal power input
P2 =Power output
m = Weight without mains cable
Measured values determined in conformity with EN 60745.
Machine in protection class II
Alternating current
The technical specifications quoted are subject to tolerances (in compliance with the relevant valid standards).
A Emission values
These values make it possible to assess the emissions from the power tool and to compare different power tools. Depending on the operating conditions, the condition of the power tool or the accessories, the actual load may be higher or lower. For assessment purposes, please allow for breaks and periods when the load is lower. Based on the adjusted estimates, arrange protective measures for the user e.g. organisational measures.
Vibration total value (vector sum of three directions) determined in accordance with EN 60745:
a_h,CM = Vibration emission value (sawing sheet metal)
a_h,CW = Vibration emission value (sawing wood)
K_h, = Uncertainty (vibration)
Typical A-effective perceived sound levels:
L_WA^ = Acoustic power level
K_DA^m , K_WA = Uncertainty
During operation the noise level can exceed 80 dB(A).

Notice originale
Lage III = maximal pending
a_h,CW = Vibrationsemissionsvarde (trasagning)
K_h, = Onoggrannhet (vibrationer)
Normal, A-viktad ljudnivà:
LpA =ljudtrycksnivaa
LWA =ljudeffektniva
K_pA K_WA = Onoggrannhet
Sette inn foringselement:

Reservedelsestiner kan downloads paa www.metabo.com.
a_hCM = Vibrationsemission
a_h.CW = Vibrationsemission (savning at trae)
K_h, = Usikkerhed (vibration)
He BkIIOuayte H He BbIKIOUaTe 3JIeHTPOHHTCPyMeHT, NOKa NIIbHOE NOLOTHO KOHTAKTIPuyet C 3aOTOBKo. PpeKDe Yem HaaytB NIIJHEe,doXdNTEcB,NOIA NIIbHOE NOLOTHO DOCTINHT paOooey qactOTbl XODOB.
B clyuae noBtopHoro 3anycka 3neKtpoLo63nKa npn haoXdeHn nnbHoro nOIoTHa B 3aROTOBKe OtueHTpRpyTe erO B npOnIe N npOBepbTe, HET nn 3aquenHe 3y6beB noIoTHa B 3aROTOBKe. B Cclyuae 3aemLeHnN nnbHoro nOIoTHa npn NOBTOPHom 3anycke 3neKtpoLo63nKa BO3MOxHO BO3HNKHOBeHne OTdauHi.
He npn6bnkajte pykn K pa6ooye 30he nnilenna He npnkacaiTecb K pa6oTaOuEmy nllbHOMy nIoTHy. He depKHTe 3aTOTOBky cH3y.
YdaJIaIYe OINILNn IN dpyroM yMcOp TOnbKO nocne PONHO OCTAHOBKn INHCTpyMeHTa.
Ipeed npoBeHnem KaHX-Lo6o HacTpoEh, nepeOchaueHn IIN pa60 nTO texHnueckomy
O6CnyJHnBaHHIO BbIHMaIte CeTeByIO BnJIky I3 p03eTKI.
OnaCHOCTb TpaBMnPOBaHnO cTpbIMN KpOMKaMN NnblHOro NOJIoTHa. NocJe paBoTb NlIbHoe NOItoHO MoKET 6BtB OeyHb rOpAYM. HadeBaTe 3aunthtle nepaTNk.
CBeToNDIOd (10): He cMOTpIne Ha rOpAuni CBeToNDIOu chepe3 OTNueChnE pnp6Opbl; CBeToNDIOKlacca 1M, KlaaccnPhiunpoBaH no DIN EN 60825-1: 2003, DInna BOJHbI: 400-700 Hm; 300 MkC.
5. 063op
CM.c.2.
1 3aJIMHoiPBiayarDJIaKpeIeHnIINbHOro IIOLOTHa
2 3aJHMHoe npncnocO6JeHne IJI pINbHoro nIOJTOHa
3 OnopHbIpoNik nIbHOro noLoTHa
4Пильhoe noIOTHO
5MetaJIInueckn BbICtyn HappaJIIOUeTo 3JIemEHTa
6 HanpaBraJIOUIN 3JIeMeHrT
7 KhoHka pa36IokuOBKn IJIЯ n3BLeueHnHa npBaJIHOUeO 3JemEHTa
8 PpOTHBOCKoJIbHbI BklaDbIaW
9 HanpaBnaOua naHeIb
10 CBeToaNoA
11 3aunTHoe CTeHIO
12 Ckoba 3aunTbI OT clyuayHoro npNKOCHOBEHNA K NINbHOMy IIOJOTHy
13 PerylaTOp MaTHNkoBOrO XoDa
14 PerenHIOaTeIb ycTpoIcTba cdyBa ONIOK
15 PpeeklouaTeIb
16 KIIOU-WeCTnrgpaHHNK
17 KolénciKo Дя уctaHOBKn YactOTbI XODOB
18 Nappy60 nblneoTcoca
19 BnHT perylnipobkn HappaBlyojue nnHeJI
20 LOKoJIb cyka3aHnEM yCTaHOBJIeHHOrO yrIape3KIn
^* B 3aBnCIMOCTN OT KOMPJIeKtauIN / He BXoIIT B KOMPJIeKT NIOCTaBKN
6. BBoD B 3HcπLyatauHiO
IpepeBBODOMB3KcPnyaTaunIO npOBepbTe COOTBECTBNEHAnpJxHeHnIyacTOTb CeTH, yHa3aHHbIX Ha 3aObDCOH TaBnUHne,napaMeTpam CeTH 3JIeKTponITAHN.
He pa6oTaIte c HnCTpyMeHToM 6e3 nIbHOrO noIoTHa!
6.1 YcTaHOBbI npOTnBOCHOJbHOro BklaDbIa
OnachocTb TpaBMPOBaHnO octpblm KpOMkAM NIIbHO rnoNoToHa. Ipepe yctahOBKn pnoTHBOCKoJIbHO BklaBbIa (8) ydaNHTe NIIbHOe noIoTHo.
IobepHnTe 3JIeKTPoINHCTpyMeHT TaK, YTO6bl HAnpaBIAIOUa IaHeIb 6bIla HAnpaBIIeHa BBepx. 3aDbHHbTe npOTnBOcOJIbHb BkIaIbI cpepei
c c6bIIOeHHeM CJIeDyUOuixx 2 pynKtOB:
A JnKocbIX N KpNBOLHHeHbIX npOnNJ
yctahOBHTe HnPabJIouzIyJEMHT TaHIM Oba3OM,TOb6I MeTALIIeCKN BbICTyn (5) 6blIT CkpbT B HnPabJIaOJeI naHeJI.
BCTABBTE HnaprablaIOUm 3IeMeHT B HnaprabIAIOUyIO NaHeIb pN HaKaToI KOnKe pa36loKIOPOBKn.
Ппмчане;Нарравлйоши 3ЛементВсавлгетяТOLьКВТAKOMПОJOжEHIN,KOrДАOTБердзпн.TИЕТСТУСТОЛМЕТHAHODITCS3aDn(COCTOPOHbI CTeBTOKa6eJIa)
6.3 YctaHOBHa NnIbHOro NoJIoTHa
ONaCHOCb TpaBMPOBaHnOcTpbIMN pOKAMM NIIbHOrO NoIOTHa. IocJe paObTbNIIbHOe NOItoHO MoKeT 6bITb OueHb RopyHM. HadeBaTe 3aunTHbIe nepuATKn.
UcnoIb3yTe ToIbHO To NIIbHoe NoIOTHO, KOTOPOE CneuNAbHO pIepHa3NaYeHO dIa 6obapOToN DaHORo MATEpHaJa.
-ПовернITEзжимновpbuhar(1)doynopa BnepednyepKnBaTeeroB TaKOMnoJokHmN.
BCTaBBTe NnIbHoe NOIoTHO (4) Do ynopa. PnI 3OTM y6eIInTECB TOM, YTO NoIOTHO yCTaHOBLeHO 3y6bAMn BNEpE i PaBnIBHo paCnOJIOKeHO b na3y onOpHOro pOliKa (3).
-OTNytnte 3aKHMHO pblar(1). (Oh aBTOMATmUeCKnOBepHETcB INCXOJHOE noLOXKeHHe. NocIe 3TOrIO nIIbHOe NOIOTHO 6ydet HaedKHo 3aΦNKcHPOBaHO).
6.4 YctaHOBka/CHrTHe 3aunTHoro CTeHna
YcTaHOBHa: yCTaHOBnTE 3aunTHoe cTeKnlo (11) cnpeDn do nnKcaun
CHaTHe:BO3bMITE 3aUHTHOe CTeHIO (11)cO6eX CTOpOH, CJIeRka PnIPOJHIMITE u CHIMITE, NOTAHyB BInepE.
6.5 Пиеленс nbileydaJIOUm annapatom
PekomeHnyemblc yCTaHOBOUHbIe 3HaueHnA cm. Ha c. 3.
OnTImaJIbHbIe 3NaYeHnI LyUHSe Bcero OnpeJeJIaHTcI NyTeM Ipo6HOro IcNoJIb3OBAHnI.
7.3 YcTaHOBka MaHCmMaJIbHOJ YaCTOtbl XOIOB
YCTAHOBITE HA KOJIÉCSHE (17) MAKCHMÁJIHUYO aCTOTY XOJÖB. 3TO JONNYCKAETC TAKHE BO BPEM pABOTI HNCTPYMEHTA.
PekomeHnyembIe yCTaHOBOUHbIe 3HaueHnA cm. Ha c. 3.
OnTImaJIbHbIe 3NaueHnI LyuIe BCero OnpeJeJIaHTcI NyTeM IPO6HOrIO NcNoJIb3OBAHnI.
7.4 BkIIOueHne/BbIKIOueHne,BKIOueHne Ha dIInTeJIbHOe BpeM
He donyuchai Te HenpeHaMepeHoro nycha: BCEJa BaBHKUOaTe IHCTPyMEHT,ecJIN BnIka 6bIa BbHyTa n3 po3eTK NnE ccln npon3oWiel c60B b noJaue ToKA.
B HenpepbIbHOM peKnme 3JIeHTPOINHCTPymEHT npOoJIkaET pa6oTaTb, daKe ecIn OH bIpyBcTe n3 pyKn. Bcerda Kpenko DEpKnnte 3JIeHTPOINHCTPymEHT dBMyr pyKaMn 3a pyKoTkn, pNIMNTe YcTOHnBOE POJIOKeHne I cKOHcHTpnpyIte BcE BHMaHne Ha pa6oTe.
BhlochyHe: nepeBnHbTe pepeKIOuAteIb (15) BnepeI.Д.IngnepepbIBHO paobToI naKMITE pepeKIOUaTeIb BN3I Do ΦIKCaun.
BbIKIIOUHHe:HaKIMTe Ha 3aDNH KOHeu nepeKIOUaTeTl (15), a 3aTEM OTNyCTnTe.
7.5 CBeToaNoA
Дя pa60tby B pIIOxo OCBeIeHHbIX MecTax. CBeToND (10) 3aIropaetc npI BVKIOUeHEN INHCTpyMEnTa.
YctaHObHa KpyroBoH HnpaBJIouSei (c. 4, pnc. II)
BCTabTe 5TuTnHy KpyroBoM n napJIeIbHOn HnapBaJIyUOeI c6OBy B npCnOcO6LeHmI dIa3aJIMa 3aOrTOBOK (a) (zEHTpnpuYooee ocTpne (c) HnapBaJIeHO BnI3).
- YctaHOBnTe HxHbI paDnyc (d).
- 3aTnHTe BnHTbI (b).
UcTaHObKa npaJIeJIbHoi HnPaBIAJIOSei (c. 4, pnc. III)
BCTabbTe 5HTaHry KpyroBoM n napJIeIbHOH HnapBaJIaUOeI c6OHy B npCnOcO6IeHnIy Ia3JHmAs 3aROTOBOK (a) (ueHTpnpuYooee ocTprne (c) HnapBaJIeHO BvEpx).
- BbIbeRnHTe ueHtpnyuOue ocTpe (c).
- YCTAHOBHTe HUHNHUY BELINCHNY OTCTYNA OT KpOMKn (e).
- 3aTaNHTe BnHTbI (b).
11. Pemohr
KpeMoHTy3JIeHTPOHCTpymEHTaDOnyckaTTOCToTbKO KBaJIuΦIuPObAHHbIe CneuaJIInCTbI-JJEHTpRnH!
P2 =BbIXoHnA MoUHOCTb
m =macca6e3ceTeBOrOka6eJra
Pe3yIbTaTbI N3MpeHn N0JyHeB I B COOTBeCTBn CO CTaHapTom EN 60745.
3NeKtpoHnCTpymeHT Klaacca 3aunTbI
\~ IepemEnHHbI TOK
Ha yka3aHHbIe TexHnueckne XapaKTepnCTnIK paacnpocstpaHnOTc DOnyscN, ppeDyCMOTpeHHbIe DeiCTBYUOUMN CTaHdapTaMn.
3NaueHnIyMa nBn6paun
3TN3NaHcHnI NO3BOJLHOUOeHbTaBnCpABHbTaB WmN Bn6paunH, CO3DaBaemle npn paBoTe pa3nHbX 3JeKTPOnHCTPymeTob.3aBNCMooCTN OT yCLOBnE hCNPLyataunn, COctOHNr 3JeKTPOnHCTpyMeHTa nn pa6oynx (CMEHbX) INCTpyMeTOB fakTIueckra Harpy3ka MoKeT 6bItb BwIe NnHKe. Pnnp OpepeLeHHn pImPeMHOrO yPoBnH Wmu M NbPaunu YUnTbBaIte nepepbIBbB paBoTe nFa3bI pa6bToC nOnHKeHHo (WmuMOoi) Hargy3ko. OnpeJeNTe nepeHuN3aQIOHbIX MEP no 3aunTe NoJIb3ObaTeA C yYeTom Tex nIINbIX 3NaHeHH m Wmu Nb6paunn.
CymmaHoe3HaueHeNE.BnBpaunn(BEHTOPHAR Cymma TpEx HAnpaBneHn) paccNtBbAeTcB COOTBECTBN Co cTaHdapTom EN 60745:
ah,CM =3HaueHHe Nb6paunn (PiIeHne IINCTOBORo MeTaJIa)
a_h,CW = 3nAueHneBn6paunn (mJIeHne DpeBecnHbI)
Kh, ... = Ko3ΦΦnUeHNT nOprEshHOCTN (Bn6paun)
YpOBeHbIyMaNoMeToyA:
LpA =ypoBHeH 3ByKOBOrO daBJIeHnIa
LWA =yPOBHeB 3ByKOBOI MOUHOCTN
KpA, KWA= KO3ΦΦnUneHT nOprEwHOCtN
BoBpemra6oTbIypoBeHbUymaMOKeTIpebblaTa8D5(A).

HaedeBaIte 3aunTHbIe HayuHnKn!
PROFESSIONAL POWER TOOLS
metabo®
work. don't play.
Metabowerke GmbH, 72622 Nürtingen, Germany www.metabo.com