
66370 - Tour PROLINE - Free user manual and instructions
Find the device manual for free 66370 PROLINE in PDF.


| Product Type | Pneumatic Impact Wrench (Tour category) |
| Brand | Proline |
| Model | 66370 |
| Power Source | Compressed air |
| Max Supply Pressure | 0.62 MPa (6.2 bar / 89.92 psi) |
| No-Load Speed | 10,000 rpm |
| Drive Size | 1/2" (square drive) |
| Air Inlet | 1/4" NPT |
| Recommended Hose Inner Diameter | 10 mm (3/8") |
| Required Air Flow (at 0.8 MPa) | 169 l/min (6 cfm) |
| Weight | 1.5 kg (3.3 lbs) |
| Torque Settings | Forward: 176, 226, 300 Nm; Reverse: 200, 270, 320 Nm |
| Sound Pressure Level | 81 dB(A) |
| Sound Power Level | 92 dB(A) |
| Vibration Level (weighted) | 5.1 m/s² |
| Maximum Thread Size | M16 |
| Rotation Direction | Reversible (clockwise / counterclockwise) |
| Maintenance Interval | Lubricate before each use; professional inspection every 100 hours or 6 months |
| Safety Features | Pressure regulator, torque selector, safety glasses/gloves/hearing protection required |
| Manufacturer | PROFIX Sp. z o.o., ul. Marywilska 34, 03-228 Warszawa, Poland |
Frequently Asked Questions - 66370 PROLINE
User questions about 66370 PROLINE
0 question about this device. Answer the ones you know or ask your own.
Ask a new question about this device
Download the instructions for your Tour in PDF format for free! Find your manual 66370 - PROLINE and take your electronic device back in hand. On this page are published all the documents necessary for the use of your device. 66370 by PROLINE.
USER MANUAL 66370 PROLINE
natural_image
Black and gray industrial hand tool with no visible text or symbols on the body66 037
PL Instrukcja obsługi KLUCZ UDAROWY PNEUMATYCZNY....3
RO Instructiuni de utilizare CHEIE PNEUMATICĂ CU PERCUȚIE ....10
GB Operation manual PNEUMATIC IMPACT WRENCH 17
DE Gebrauchsanleitung DRUCKLUFT-SCHLAGSCHLÜSSEL 23
RU Инструкция по эксплуатации ГАЙКОВЕРТ ПНЕВМАТИЧЕСКИЙ УДАРНЫЙ......30
LT Naudojimo instrukcija PNEUMATINIS SMÜGINIS SUKTUVAS....38
UK Інструкція з експлуатації ГАЙКОВЕРТ ПНЕВМАТИЧ ИЙ УДАРН Й..... .Н ИАА.
HU Használati útmutató PNEUMATIKUS ÜTVECSAVAROZÓ....52
Lietošanas instrukcija PNEIMATISKÄ TRIECIENATSLËGA....59
ET Kasutusjuhend PNEUMAATILINE LÖÖKMUTRIVÖTI....66
BG Инструкция за експлоатация ПНЕВМАТИЧЕН УДАРЕН ГАЙКОВЕРТ......72
CS Návod na obsluhu PNEUMATICKÝ PŘÍKLEPOVÝ KLÍČ......80
SK Návod na obsluhu PNEUMATICKÝ PRÍKLEPOVÝ KLŮÚČ 86
HR Upute za uporabu PNEUMATSKI UDARNI KLJUČ....92
BS Uputstvo za upotrebu PNEUMATSKI UDARNI KLJUČ....98
SL Navodila za uporabo PNEVMATSKI UDARNI VIJAČNIK.... 104
A
SZANOWNYKLIENCIE,

Before you start using the pneumatic tool (hereinafter "a tool" or "a device"), please read this manual and follow the basic safety measures to avoid any health impairment and death, ensure protection againstelectricshock, injuries, explosionandfire.
The term "pneumatictool" used in this manual refer to all tool powered by compressed air stream under the appropriate pressure.

PLEASE NOTE! This symbol is used for important descriptions, information on hazardous conditions, hazards or safety tips.
The failure to comply with the below warnings, incorrect use and/or modification of the pneumatic tool design makes any warranty rights invalid and releases the manufacturer from any liability for losses resulting from the tool operation incurred by people, animals, property orthetool.
Please keep this manual and tips, to refer to them any time. If the tool is given to another person, hand over also the user manual. We shall not be held liable for any accidents and damage resulting from the failure to comply with this manual and safety tips.
RESERVATION: As we improve our products all the time, we reserve therighttointroducemodificationsnotincludedinthismanual.

GENERAL SAFETY TIPS WHEN USING PNEUMATIC TOOLS:
■Safetyintheworkplace:
a) Ensureyourworkplaceisalwaysneatandtidyandwelllit. Insufficientlightandmessmaycauseaccidents.
b) Do not operate any pneumatic tools in the environment with increased explosion risk, containing flammable liquids, gases or vapours. The air sucked by the compressor must be free from any other gases and/or vapours as they may burn or explode in the compressor.
c) Do not point the pneumatic people at people, animals or oneself. Do not let children and unauthorised people enter the workplace. Loss of concentration may result in losing control of thetool.
■Worksafety:
a) The pneumatic tool connector must match the port of the air hose. Donotmodifytheconnectororthesupplyhoseport.
b) All the hoses, connectors and ports must be clean, free from damage, in good technical condition and designed for pneumatictools.
c) Pneumatic tools are not protected against contact with the sources of power so avoid contact with grounded surfaces, e.g. pipes, radiators and coolers. Your body grounding increases theriskofelectricshock.
d) Do not expose the pneumatic tools to precipitation or moisture. Water and moisture which get inside the tool increase the riskofthetooldamageandinjuries.
e) Do not overload the hose supplying air to the tool. Do not use the high-pressure hose for carrying, connecting and disconnecting the
connectorto/fromthecompressedairsource.
f) Avoid contact of the supply hose with heat, oils, sharp edges andmoving components.
g) Do not supply the pneumatic tool with oxygen, flammable or poisonous gases. Use only filtered and "lubricated" compressed air with adjustable pressure to supply the tool.
h) Ensure the machined item is held securely and well and will not moved during machining.
■Personalsafety:
a) This device is not designed for operation by people (including children) with limited physical, sensory or mental capacities or people not experienced or not acquainted with the equipment unless this takes place under the supervision or in accordance with the device operating manual ensured by the people responsible for their safety.
b) Ensure you are in good physical and mental condition when you start work. Pay attention to what you are doing. Do not work when you are tired or under the influence of drugs, alcohol or medications. Even a short lack of attention may cause serious personal injuries.
c) Always use protection equipment when you operate pneumatic tools. Use safety goggles and ear muffs. Using the protection equipment, e.g. dust-proof masks, non-slip footwear and helmet whenever required reduces the personal injuries. Operating the pneumatic tool, always use safety gloves to protect from mechanical injuries and thermaleffectofthe tool.
d) Avoid inadvertent starting. Before you connect to the compressed air source and before you raise or move the tool, ensure the switch is OFF. Carrying the tool with your finger on the switch or connecting the tool to the compressed air source with the switchONmaycauseanaccident.
e) Before you start the pneumatic tool, remove all wrenches and other tools used for its adjustment. The wrench left on the movingtoolcomponentsmaycauseseriouslybodily injuries.
f) Ensure balance. Keep the proper posture all the time. This will facilitate getting control over the pneumatic tool in case of unexpected situations during your work.
g) Wear appropriate clothes. Do not wear any loose clothes or jewellery. Keep your hair, clothes and work gloves away from the moving parts. Loose clothes, jewellery or long hair may be caught by themoving tool parts.
h) The supply hose is pressurised which may cause its dynamic movements and risk of injuries. The stored compressed air energy may constitute a serious hazard. After you disconnect the quick-release coupling, hold the pressure hose connector to avoid injuries caused by themovinghose.
i) The compressor used with the pneumatic tool becomes very hot during the operation. Touching it may cause escalds.
■Operationof thepneumatictool:
a) Avoid overloading the pneumatic tool. Use the tool appropriate for the task. Do not exceed the permissible
maximumworkingpressure.Theappropriatechoiceofthe toolfor agiventask willensuremoreefficientandsaferwork.
b) Before you start any adjustment, accessory replacement or storage of the tool, disconnect the power cord to avoid inadvertentswitchingonofthepneumatictool.
c) Keep the tools out of reach of children. Do not let any persons not having the appropriate training operate the tool.
Pneumatic tools operated by users lacking proper training are dangerous.
d) Ensure appropriate maintenance of the tool. Check the tool for any maladjusted and loose moving parts. Check if no tool component is damaged. When you detect any defects, remove them before you use the pneumatic tool. Many accidents are caused by incorrect tool maintenance.
e) Always use pneumatic tools and accessories in line with these instructions. Use the tools in line with their designation, considering the type and conditions of work. Using the tools for any work other than they were designed for increasestheriskofdangeroussituations.
f) When you work, always consider the work tool may break which may result in fragments thrown at high speed and causes serious injuries.
g) Ensure the tool rotates in the appropriate direction. Unexpected rotation direction may cause dangerous situations.
h) Do not bring your hands close to moving components of the pneumatictoolasthismaycauseinjuries.
i) If the ring securing the drive is damaged, the tool and fragments may be thrown at high speed. This may cause serious injuries.
j) The torque may rotate the tool. This may cause serious injuries if any body parts get into the range of the rotated tool. Always assume the appropriate posture when working and be prepared for the tool rotation.
k) Use only equipment designed for operation with pneumatic tools. Using inappropriate equipment may cause serious injuries.
1) If your tool loses power suddenly, release the tool switch immediately.
■Repairandmaintenance:
a) The tool should be repaired solely by authorised companies, using only original spare parts. This will ensure proper safety of the pneumatic tool operation.
b) Do not clean the pneumatic tool with petrol, solvent or any other flammable liquid. The vapours may ignite, causing the tool explosion and serious injuries.
c) Always use high-quality products for the tool maintenance. It is prohibited to use any products other than those mentioned in the operation manual.

SPECIAL SAFETY TIPS FOR USING THE PNEUMATIC IMPACTWRENCH:
a) The user shall be obliged to ensure correct operation of the impact wrench. The source of energy for the impact wrench may be solely compressed air connected by means of the air inlet connector.
b) Always ensure the compressed air source enables to
generate the required working pressure and provide the appropriate air flow. In case of excessive supply air pressure, use the pressureregulatorwithasafetyvalve.
c) It is prohibited to supply pneumatic tools directly from the compressor. The pneumatic tool should be supplied via the water filter and lubricator system. This will ensure clean air lubricated with oil.
d) The filter and lubricator condition should be checked before every use. Whenever required, the filter should be cleaned and the oil in the lubricator filled up. This will ensure proper operation of the tool and extend its lifecycle.
e) The socket wrenches and other inserted tools must be designed for operation with pneumatic ones. The attached inserted tools must be in working order, clean and free from damage and their size must match the drive size. It is prohibited to modify the wrench sockets or drive. Use only impact sockets.
f) When operating the impact wrench, always use the required protective measures, including but not limited to noise-protecting ear-muffs, safety goggles, work gloves and hairnet.
g) Adopt the appropriate posture to respond to the standard or unexpected movement of the tool caused by the torque. Any vibrations, pulls and incorrect posture may damage your arm or hands. Stopworking when you feel tiredorexperience pain.
h) Check the technical condition of the device. Before you start working, check the technical condition of the tool component subject to ordinary wear and tear to ensure their correct operation. Check if the moving components do not hit or jam. Check if all the components are mounted correctly, if there are no visible cracks.
i) If you notice any leaks or other irregularities, detach the impact wrench from the compressed air source and remove the irregularity cause. Every damaged component should be repaired or replaced carefully by the specialist. Do not use the device withamalfunctioningpowerswitch.
j) When you replace the work socket, the compressed air supply should be closed to avoid its ejection during the accidentaltoolstart.
k) Do not leave the impact wrench on when you do not operate it. Hazardof injuriescausedbydetachedparts.
1) Protect the tool from falls and impact, as well as from contamination e.g. by mud, water, sand etc. Maintain the tool in line with the operation manual and ensure good conditionofhosessupplyingcompressedair.
m) The worn device should be disposed of in accordance with the applicable regulations.
Given the number of risks, please read and understand the safety instructions before installing, using, repairing, maintaining, replacing accessories.
Failuretodosomayresultinseriousbodilyharm.
Impact wrenches should be installed, adjusted and used only by qualifiedandtrainedoperators.
Do not modify impact wrenches. Modifications may reduce the effectiveness of safety measures and increase risk to the operator
Donotdisposeofthissafetymanual.Giveit totheoperator.
Donotusedamagedimpactwrenches.
The tools require periodic checks to verify and evaluate whether the markings on the tool mandated by the ISO 11148 standard are legible.
If needed, the user should contact the manufacturer for replacement labels.
Failure of the workpiece, accessories or even the tool itself can cause partstobelaunchedatveryhighspeeds.
Always wear impact resistant safety goggles when working with an impact wrench. The required protection should be adapted to each application.
Ensure that the workpiece is securely fastened.
Entanglementcarrieswithitariskofchoking,scalpingandcuts.Keep loose clothing, jewellery, headwear, hair or gloves away from tools andaccessories.
Gloves can become entangled in the rotating drive and cut or break yourfingersasaresult.
Swivel attachments and drive extensions can easily entangle gloves witharubber or metal coating.
Donotwearlooseglovesorgloveswithcut orfrayedfingers.
Neverholdthetoolbythedrivechuckorextension.
Keephandsawayfromthechuck.
Using the tool may puts the operator's hands at risk due to, for example, crushing, impacts, cuts and abrasions, as well as high temperatures. Wear appropriate glovestoprotect your hands.
Operators and maintenance personnel need to be physically able to handle the weight and power of the tool.
Hold the tool correctly. Be ready to counteract any normal or sudden movements and have both hands available.
Maintainabalancedandstableposture.
In the event of a loss of power to the impact driver, release the start-stopbutton.
Useonlymanufacturer-recommendedlubricants.
Do not use in confined spaces and be attentive to the risk of crushing your hand between the tool and the workpiece, especially in case of unscrewing.
When using the device, the operator may experience discomfort in the hands, arms, shoulders, neck or other part of the body.
While using impact wrenches, the operator should adopt a comfortable posture, maintaining at the same time a secure position and avoiding uncomfortable or unbalanced positions. During long tasks the operator should change positions, as this helps avoid discomfort and fatigue.
Symptoms such as persistent or recurring discomfort, pain, throbbing, tingling, numbness, burning or stiffness experienced by the operator should not be ignored, as they are warning signs. The operator should inform the employer and consult a qualified health careprofessional.
Beforechangingthetooloran accessory,removepowerfromthetool.
Do not touch sockets or accessories during work, as this increases the riskofcuts, burnsorvibration-induced injuries.
Do not touch sockets or accessories during work, as this increases the riskofcuts, burnsorvibration-induced injuries.
Use only sizes, types of accessories and consumables recommended bythemanufacturer.
Only use impact wrench sockets in good condition, as sockets in poor conditionorhandsocketsand accessoriesmaybreakandbelaunched athighspeedwhenusedwithimpact wrenches.
Slips, trips and falls are the main causes of injuries. Remember that use of the tool causes slippery surfaces and keep in mind the danger of stumbling on the powertool's air hose.
Be careful in unknown surroundings. Hidden dangers, such as power lines, may exist.
Impact wrenches are not intended for use in potentially explosive atmospheresandarenotinsulatedagainstcontactwithelectricity.
Make sure no electric cables, gas pipes, etc., which might cause a risk when damaged during tool use, are in the vicinity.
Dust and fumes resulting from the use of impact wrenches may cause health issues (e.g. cancer, asthma and dermatitis), so a risk assessment and implementation of appropriate measures to control the said risks is absolutely necessary.
The risk assessment should include dust resulting from the use of the tool, as well as the possible disturbance of existing dust.
Directtheoutlettominimisedustagitationinadustyenvironment.
If dust or fumes are generated, prioritise their control at the point of emission.
All integrated items or accessories used to collect, remove or suppress airborne dust or fumes need to be used properly and maintained in linewiththemanufacturer's instructions.
Use respiratory protective equipment in accordance with the employer's instructions and OHS regulations.
Exposure to high noise levels without hearing protection may cause permanent, disabling hearing loss, as well as other issues, such as tinnitus(ringing,buzzing,whistlingorhummingintheears).
Conducting a risk assessment and implementing appropriate risk controlmeasuresisessential.
Appropriate control measures aimed at reducing the risk may include dampingmaterialstopprevent"ringing"ofworkpieces.
Use hearing protection according to the employer's instructions and OHSregulations
Operate and maintain impact wrenches in themanner recommended in the owner's manual to prevent an unnecessary increase in noise levels.
If the impact wrench is equipped with a silencer, always ensure that it is inplace and ingoodworking condition during work.
Select, maintain and replace consumables inserted into the tool in line with the owner manual's recommendations to prevent an unnecessary increase in noise levels.
Exposure to vibration may result in nerve damage, as well as blood supplytothehandsandarms.
Keephandsawayfromsockets.
When working in low temperature, wear warm clothing, and keep handswarmanddry.
If you experience numbness, tingling, pain, or notice whitening of the skin of the fingers or hands, stop using the tool, inform your employer and consultadoctor.
Operate and maintain the tool in the manner recommended in the owner's manual to prevent an unnecessary increase in vibration levels.
Do not use improperly fitted attachments or extensions, as this can significantly increase vibrations.
Choose, maintain and replace consumables inserted into the tool in line with the owner manual's recommendations to prevent an unnecessary increase invibration levels.
Whereverpossible, usesleevecouplings.
If possible, support the weight of the tool on a standard ortensioner.
Hold the tool lightly but securely, taking into account the required grip strength, as the risk of vibration generally increases proportionally to the gripping force.
Pressurisedaircancauseseriousinjuries.
- always turn off the air supply, depressurise, and disconnect the tool from the air supply when not in use, before changing accessories or whenconductingrepairs;
-neverdirectthestreamofairatyourselforanyoneelse.
Damaged air hoses can cause serious injuries. Always check for damagedor loosehosesandcouplings.
Directcoldairawayfrom thehands.
Do not use quick couplings at the inlet port of impact wrenches and air/hydraulic impact wrenches. Use threaded hardened steel hose fittings (oronesfromamaterialwithcomparableshockresistance).
Whenever universal threaded fittings are used, install cotter pins and use safety cables to protect against possible damage of the hose-to-toolorhose-to-hoseconnection.
Donotexceedthemaximumairpressureindicatedon thetool.
In the case of tools with torque control and continuous air circulation, airpressurehas akeyinfluenceonperformance.Therefore,hose length anddiameterrequirementsneedtobespecified.
Nevercarrypneumatictoolsbythehose.
DEVICEDESIGNATIONANDDESCRIPTION:
The pneumatic impact wrench is a handy tool, powered by a compressed air stream under the appropriate pressure. It is designed for tightening and loosening threaded connections (max. M16) using replaceable impact sockets 1/2" inserted on the drive. Using the wrench for bolts with the diameter exceeding the one mentioned abovemaydamage theimpactmechanism.
It is permitted to use the appropriate adapters, universal connectors and adapters between the drive at the impact wrench outlet and the squaresocketport.
The wrench enables to adjust the torque and set the rotation direction rightwards/leftwards.

PLEASE NOTE! The tool and accessories should be used (in line with their manufacturer's instructions) solely for the purposestheywere designedfor.ltisstrictlyprohibitedto
use the device for any other purposes.
Do not use the wrench as a hammer for removing or straightening the crossconnectors. Nevertrytoadaptthetooltoanyotherdesignationor tomodifyit.
Every use of the tool incompliant with its above-mentioned designation is prohibited and shall invalidate the warranty, leading to the absence of any manufacturer's liability for the losses resulting therefrom.
Any modification of the device made by the user waive the manufacturer's liability for damage and losses caused to the user and the environment.
To ensure use compliant with the designation, follow also the safety tips, installation instructions and operation guidelines in the operation manual. Follow the applicable accident-prevention regulations(OH&S)asstrictlyaspossible.
The correct use of the pneumatic tool entails also maintenance, storage, transport and repairs.
The device may be repaired solely in the service workshops authorised bythemanufacturer. Thetoolssuppliedwithcompressed airshould be repairedsolelybyauthorised personnel.
Even given the use compliant with the designation, it is impossible to rule out certain residual risk factors. Due to the tool structure and design, the followinghazardsmayappear:
- Hazardofinjuriescausedbydetached parts.
- Hearing impairment in the failure to use the required hearing protection.
■Thesetincludes
• Pneumaticimpactwrench-1pc.
- Warranty - 1 pc.
- 1/4"-1Airinlet connector pc.
• Operationmanual-1pc.
■Devicecomponents
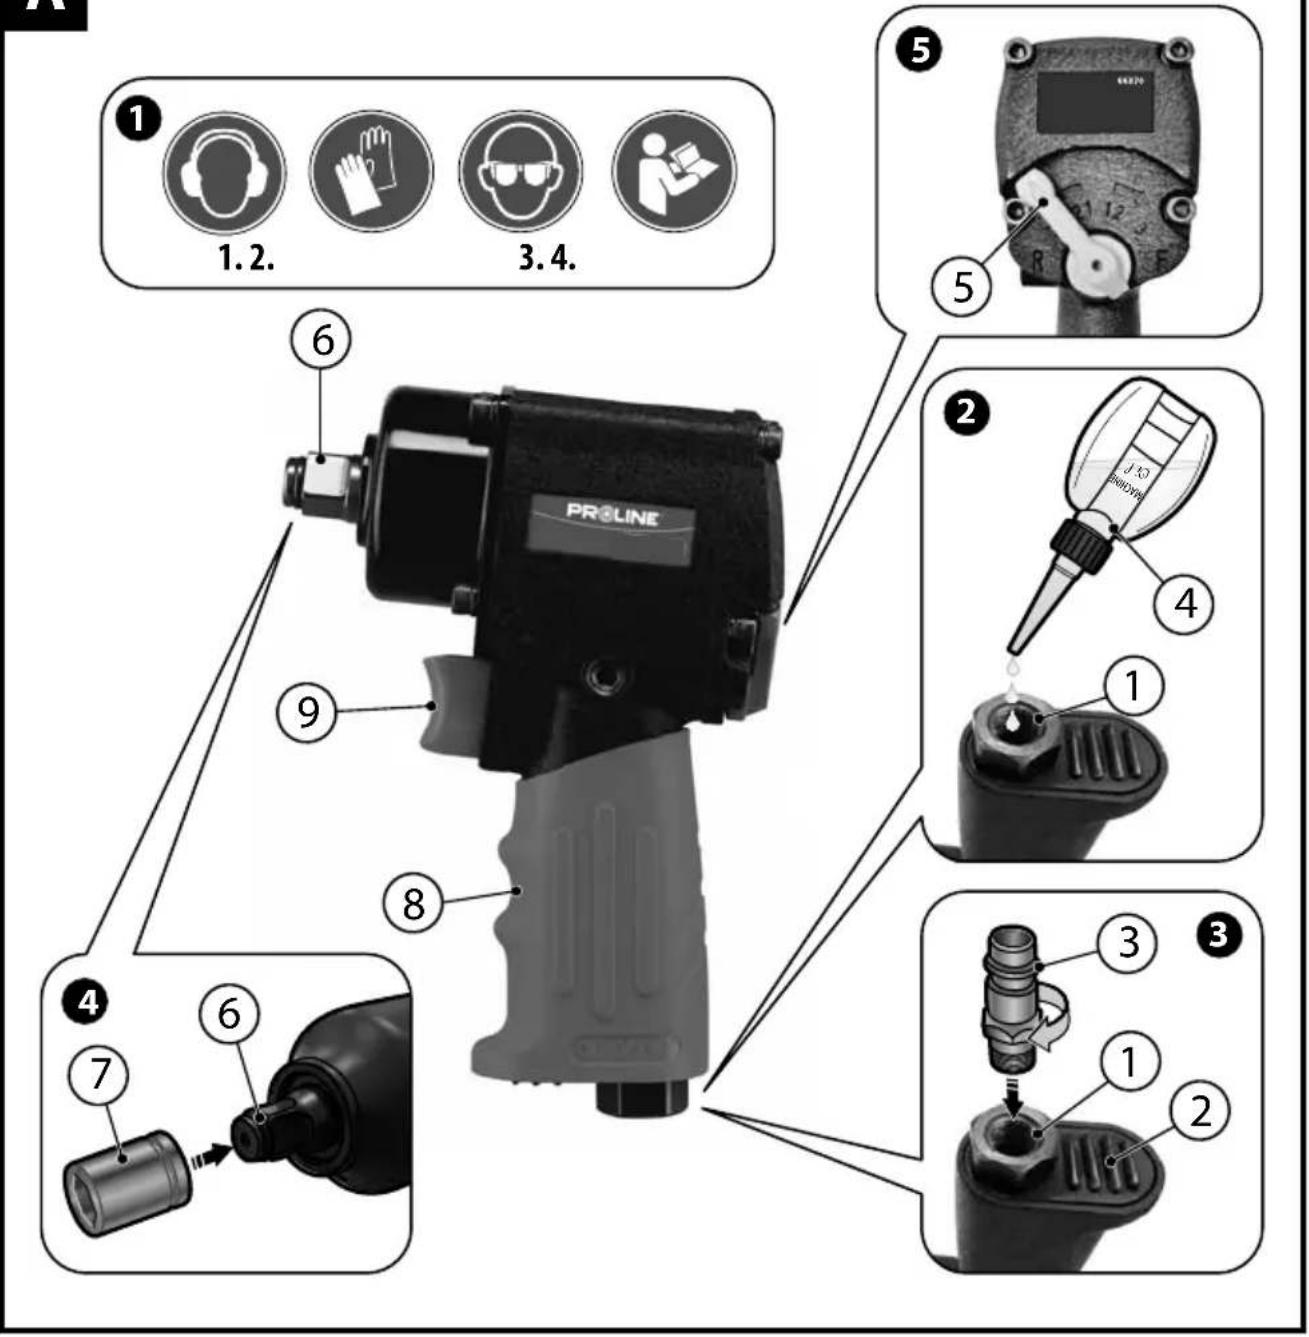
The device component numbers refer to the graphic presentation (fig. A) onpage2oftheoperationmanual:
-
Air inlet
-
Air outlet
-
Air inletconnector
4.Oilcan*
- Torque regulator / Rotation direction selector switch (F- clockwise, R-counterclockwise)
6.Drive1/2"
7.Impactsocket*
8.Handle
9.0n/Offswitch
* The described or presented accessory does not belong to the standard toolequipmentinwhole.
■Pictograms
The explanation of symbols on the device nameplate (see Fig. A1).
Item 1: Wear hearing protection!
Item2: Wearprotectivegloves!
Item 3: Wearprotective goggles!
Item4: Read the operation manual before you switch on the device!
TECHNICALDATA:
| Max.supplypressure | 0,62 Mpa |
| Rotational speed | 10000/min |
| Drive size | 1/2" |
| Supply inlet (air inlet) | 1/4" |
| Recommended hose with inner diameter | 10 mm |
| Required air flow (at 0.8 MPa) | 169 l/min |
| Weight | 1,5 kg |
| Torque data for the individual settings of the Torque regulator / Rotation direction selector switch F- clockwise rotation, R- counterclockwise rotation | |
| F-1 | 176 Nm |
| F-2 | 226 Nm |
| F-3 | 300 Nm |
| R-1 | 200 Nm |
| R-2 | 270 Nm |
| R-3 | 320 Nm |
■Noise and vibration data
Soundpressurelevel(LpA)ofthetoolloaded/withoutloadis: dB(A)81 Sound power level (LwA) of the tool loaded/without load is: 92 dB(A). MeasurementtoleranceK /K = 3dB(A).
PLEASENOTE! Wearhearing protection!
Theaveragevibrationlevelwhenloadedis: ^2 (a), m/s .51
MeasurementtoleranceK=1,5m/s ^2
The stated vibration level is representative for the tool's basic uses. The vibrationlevelmaydiffer,ifthetoolisused differentlyorincombination withotherworktools,orisnotadequatelymaintained.
For the reasons given above an increase in exposure to vibrations during the overall working time may occur. Additional safety measures need to be introduced to protect the operator from vibration exposure, e.g. tool and tool bit maintenance, ensuring appropriate hand temperature, determining these sequence of work operations.
INSTALLATION AND USE:

PLEASE NOTE! Before every use of the tool, ensure no pneumatic system component is damaged. If you notice any damage, replace the system components with new,
undamagedones.
Before every use of the pneumatic system, remove the condensate inside thetool,compressorandhoses.
■Connectingthetooltothepneumaticsystem
Ensure air supply to the tool by means of the air pre-treatment unit and airpressuremeasurement.
It is recommended to use an automatic lubricator in the line although lubricationmaybe done manually before you start work and after every hour of continuous device operation. To ensure the best results, lubricate the device frequently but not excessively. The excess oil could accumulate in the device and would be blown away with the outlet air.
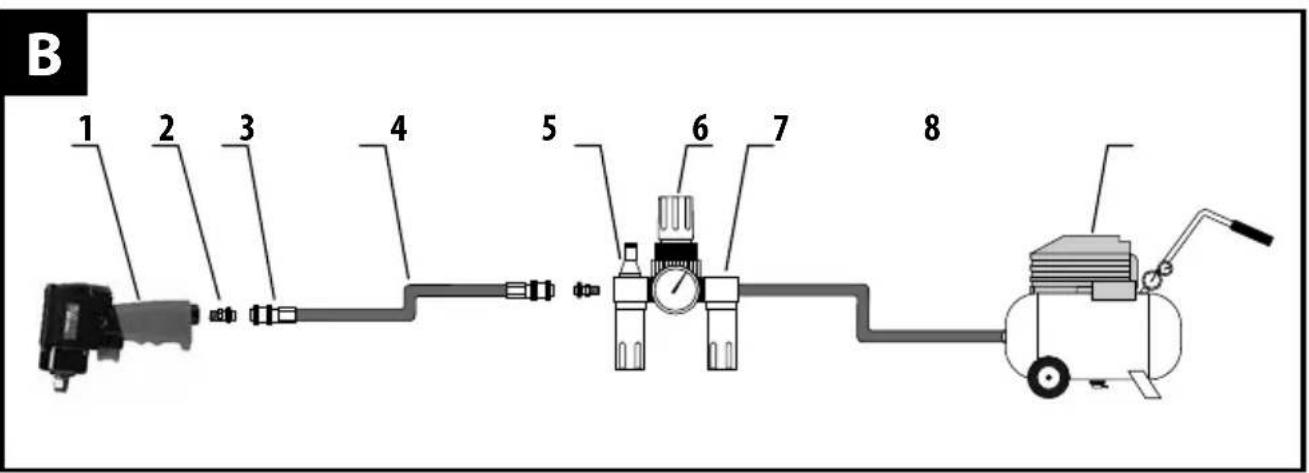
Figure B on page 2 presents the recommended tool attachment method to the pneumatic system.
Systemcomponents:
- Pneumatictool
2.Airinletconnector - Quick-releasecoupling
- Pressurehose
- Lubricator
- Torque regulator / Rotation direction selector switch (F- clockwise, R-counterclockwise)
- Airfilter(dehydrator)
8.Compressor
It is strictly recommended to install the air filter, pressure controller and lubricator as presented in the drawing. This will ensure clean air flow with the appropriate pressure and oil mist to the tool and the most effective use of the tool for longer time.

PLEASE NOTE! The maximum supply pressure for the tool, when used with the switch (9) fully pressed and the torque regulator fully open (positions F-3 and R-3) should not exceed 0.62 MPa / 6.2 bar / 89.92 psi. Too low pressure reduces the device power and rpm, while too high may damage certain components permanently.
Before you start the tool for the first time, use the oil can (4) to insert 3-5 drops of oil with SAE 10 viscosity directly to the air inlet (1) (see Fig. A2). Use only the oil designed for pneumatic devices. Do not use the oil with detergents or other additives as this could lead to sooner wear of the sealing components in the device.
Screw the air inlet connector (3), enabling to connect the air supply hose, strongly and securely onto the air inlet thread(see Fig. A3). The connectorthreadshouldbesealedwithTeflon.
Install the appropriate impact socket (7) on the tool drive (6)(see Fig. A4).

PLEASE NOTE! Use only accessories designed for impact toolsforsuch tools.
Do not install the socket on the wrench drive without the
safelyring. Whenever possible, usethesockets with the lowest wear as the worn socket attachment may damage the drive.
Using the controller (5), set the appropriate rotation direction (see Fig. A.5) and adjust the pressure (the torque applied to the nut or bolt). Setting "1" of the controller corresponds to the lowest torque and is recommended for bolts and nuts with the smallest diameter. Setting "3" corresponds to the highest torque generated.

PLEASE NOTE! Switch the tool off before every change of therotationdirectionandpower.Itmay bedamagedinany othercase.
Connect the tool to the pneumatic system, using the hose with the minimum internal diameter of 10 mm and the maximum length of 6 m. Ensure the hose strength at least 0.6 MPa., 2
Switch the tool on for a couple of minutes and check if it does not generate any strangenoise or vibrations.
■Workwithimpactsockets
Before you start screwing the bolt or nut in with the wrench, screw the bolt or nut manually onto the thread (at lease a couple of rotations). Ensure you have selected the appropriate socket size for the item screwed in or out. Inappropriate size selection may damage both the socket and thenutor bolt.
■Screwing out and in

PLEASE NOTE! When you screw bolts and nuts out, they are inside the impact socket. You, other people and property maybe injuredordamagedbyejectedparts.
Ensure the rotation direction is set correctly before you operate the tool. Do not start the tool before you place the socket on the threaded connection!
When you operate the impact wrench, the vibrations caused by it may be transferred to the operator. Always use work gloves when you work.
- Control the pressure in the pneumatic system to ensure it does not exceed them maximum value for a given tool.
- Set the appropriate tool rotation direction and the torque in case of tightening.
- Installtheappropriatesocketonthetooldrive.
- Connecttheimpactwrenchtothepneumaticsystem.
- Insert the wrench with the socket installed on the item to be screwed outorin.
- Pressthetoolswitchgradually().9
- After you have finished working, disassemble the pneumatic system and carryout the tool maintenance.

PLEASE NOTE! When you open the quick-release coupling, hold the pressure hose to protect against being hit by it ("pulsatinghose"effect).Injuryhazard!
Instructions:
If you are unable to detach the connection within 5 seconds, stop the work with your tool. In such circumstances, you should use penetrating corrosion removers or freezing agents and try todismountagain.
When connecting the threaded connections, including but not limited to tightening the bolts holding the passenger vehicle wheels, always follow the maximum forces specified by the manufacturer. The impact wrench is designed solely for light screwing in (not heavy tightening) of bolts and nuts. The bolts and nuts should be tightened with a torque wrench in line with the appropriaterequirements.
MAINTENANCEANDSTORAGE:
Cleanthetoolthoroughlyafteryouhavecompletedthetask.
Do not use petrol, solvent or any other flammable liquid to clean thetool. The vapours may ignite, causing the toolexlosion and
seriousinjuries.
Alwaysstoretheimpactwrenchindryroomsabove10 C.°
All pneumatic system components must be protected against pollution. Any pollutants that get inside the pneumatic system may damage the toolandotherpneumaticsystemcomponents.
During prolonged storage insert some drops of oil designed for pneumatic tools inside the tool. Connect the tool to the pneumatic systemandstartforashorttime tospreadtheoilonthematingsurfaces.
After you disconnect the tool, remove excess oil which escaped via the outletopenings.Iftheoilisleft,itmaydamagethetoolseals.
After 100 hours of the tool operation or 6 months after the operation start, it is recommended to have the tool inspected and cleaned by the specialised service technicians. If the tool was used without the recommended air supply system, increase the frequency of the tool inspections.
If it is necessary to replace any part, always use the original components. Using other components may reduce the tool efficiency and eliminate any claims resulting from the warranty rights.
TRANSPORT:
Thedisassembleddevicesshouldbetransportedandstoredin theoriginal packaging.
MANUFACTURER:
PROFIXSp.zo.o.,
03-228 Warszawa,
ul.Marywilska34,POLAND
ENVIRONMENTALPROTECTION:
Worntoolsarerecyclableandshould not be discarded into the household waste containers as they may contain substances hazardous for human health and the environment!
Households should contribute to recovery and recycling of worn tools. Please provide active help with respect to economical use of natural resources and natural environment protection by taking the worn tool to the worn tool collection centre. To reduce the waste amount, it is necessary to reuse, recycle or recoveritinanyotherway.
TROUBLESHOOTING GUIDE:
Please stop using the tool immediately after you have detected any defect. Operating damaged tool may cause injuries. Any tool repairs or replacements must be carried out by the qualified personnel in the authorised repair workshop.
| PROBLEM SOLUTIONPOSSIBLE CAUSE | ||
| The tool's rpm is two low or it does not start. | a)Too low working pressure.b) Pollution inside the tool housing. | a)Checkifthepressurehoseisnottwistedorclogged;Increasetheworkpressureto0 @ MPa;b) Insert a small amount of a maintenance fluid (e.g. WD-40) by the air inlet opening. Switch the tool on for about 30 seconds.This will enable to spread the maintenance fluid inside the tool andcleanit.PLEASENOTE!WD-40maynotbeused asthelubricatingoilproper. |
| The tool starts and then slows down. | Too low compressor capacity | Connect the device to the more efficient compressor. |
The policy of the PROFIX company consists in permanent improvements of the offered products and therefore the company reserves the right to make amendments to the product specification without a prior notice. The images included into the operation manual are only of the exemplary nature and mayslightly differ from actual appearance of the device purchased.
This instruction manual is protected by copyright. Copying it without the written consent of PROFIXCo. Ltd. is prohibited.
SEHRGEEHRTERKUNDE,

(EN) EC DECLARATION OF CONFORMITY
(DE) EG-KONFORMITÄTSERKLÄRUNG (PL) DEKLARACJA ZGODNOŚCI WE
(RO) DECLARATIE DE CONFORMITATE CE (LT) EB ATITIKTIES DEKLARACIJA
(HU) EK-MEGFELELŐSÉGI NYILATKOZATA
(LV) EK ATBILSTIBAS DEKLARACIJA
(ET) EÜ VASTAVUSDEKLARATSIOON
(BG) ДЕКЛАРАЦИЯТА ЗА СЪОТВЕТСТВИЕ НА ЕО (CS) ES PROHLÁŠENÍ O SHODĚ
(SK) ES VYHLÁSENIE O ZHODE
(HR) EZ IZJAVA O SUKLADNOSTI
(SL) ES-IZJAVA O SKLADNOSTI
(EN) MANUFACTURER (PL) PRODUCENT (LT) GAMINTOJAS (LV) RAŽOTĀJS (BG)
(SK) VÝROBCA
(SL) PROIZVAJALEC
(DE) HERSTELLER
(RO) PRODUCĂTOR
(HU) GYÁRTÓ
(ET) TOOTJA
ПРОИЗВОДИТЕЛ
(CS) VÝROBCE
(HR) PROIZVOĐAČ
PROFIX Sp. z o.o. ul. Marywilska 34, 03-228 Warszawa
(EN) Person who was authorized to develop technical documentation
• Representative of the Board for Certification
(GB) This declaration of conformity is issued under the sole responsibility of the manufacturer. (DE) Diese Konformitätserklärung ist unter der alleinigen Verantwortung des Herstellers ausgestellt. (PL) Niniejsza deklaracja zgodności wydana zostaje na wyłączną odpowiedzialność producenta. (RO) Prezenta declaratie de conformitate este emisă pe răspunderea exclusivă a producătorulul. (LT) Ši atitikties deklaracija išduota tik gamintojo atsakomybe (HU) E megfelelőségl nyllatkozat a gyártó kizárólagos felelősségére kerül kibocsátásra. (LV) Ši atbilstības deklarāčija Ir Izdota vienígi uz šāda ražotāja atbildību. (ET) Käesolev vastavusdeklaratsloon on välja antud alnuvastutusel tootja. (BG) Настоящата декларация за съответствие е издадена на пълната отговорност на производителя. (CS) Toto prohlásení o shodě vydal na vlastní odpovědnost výrobce (SK) Toto vyhlásenie o zhode sa vydáva na vyhradnú zodpovednost výrobcu. (HR) Za izdavanje EU izjave o sukladnosti odgovoran je isključivo proizvođač (SL) Ta izjava o skladnosti je izdana na lastno odgovornost proizvajalca
- SZANOWNYKLIENCIE,
- ■Worksafety:
- ■Personalsafety:
- ■Operationof thepneumatictool:
- ■Repairandmaintenance:
- SPECIAL SAFETY TIPS FOR USING THE PNEUMATIC IMPACTWRENCH:
- DEVICEDESIGNATIONANDDESCRIPTION:
- To ensure use compliant with the designation, follow also the safety tips, installation instructions and operation guidelines in the operation manual. Follow the applicable accident-prevention regulations(OH&S)asstrictlyaspossible.
- ■Thesetincludes
- ■Devicecomponents
- ■Pictograms
- ■Noise and vibration data
- PLEASENOTE! Wearhearing protection!
- INSTALLATION AND USE:
- ■Connectingthetooltothepneumaticsystem
- ■Workwithimpactsockets
- ■Screwing out and in
- Instructions:
- MAINTENANCEANDSTORAGE:
- seriousinjuries.
- TRANSPORT:
- MANUFACTURER:
- ENVIRONMENTALPROTECTION:
- TROUBLESHOOTING GUIDE:
- SEHRGEEHRTERKUNDE,
- PROFIX Sp. z o.o. ul. Marywilska 34, 03-228 Warszawa
Brand : PROLINE
Model : 66370
Category : Tour