
Genius 10 - Battery charger NOCO - Free user manual and instructions
Find the device manual for free Genius 10 NOCO in PDF.

| Product Type | Intelligent Battery Charger |
| Brand | NOCO |
| Model | Genius 10 |
| Input Voltage | 100-240 V AC, 50-60 Hz |
| Output Current | 10 A (12 V), 10 A (6 V) |
| Max Power | 150 W |
| Charge Voltages | 6 V and 12 V |
| Compatible Battery Chemistries | Lead-acid (flooded, gel, MF, CA, EFB, AGM, Calcium) and Lithium (LiFePO4 with BMS) |
| Max Battery Capacity | 230 Ah (12 V) |
| Charge Modes | Standby, 12V, 12V AGM, 12V Lithium, 6V, 6V AGM, Force, Power Supply 13.6V, Repair 12V |
| Low Voltage Detection | 1 V (12 V and 6 V) |
| Protection | Reverse polarity, overvoltage, short circuit, overheat |
| Protection Rating | IP65 |
| Cooling | Natural Convection |
| Dimensions (L x W x H) | 180 x 91 x 58 mm (7.1 x 3.6 x 2.3 inches) |
| Weight | 1.51 kg (3.33 lb) |
| Operating Temperature | -20 °C to +40 °C |
| Maintenance | Unplug before cleaning; use a soft, lint-free cloth |
| Warranty | 3-year limited NOCO warranty |
Frequently Asked Questions - Genius 10 NOCO
User questions about Genius 10 NOCO
0 question about this device. Answer the ones you know or ask your own.
Ask a new question about this device
Download the instructions for your Battery charger in PDF format for free! Find your manual Genius 10 - NOCO and take your electronic device back in hand. On this page are published all the documents necessary for the use of your device. Genius 10 by NOCO.
USER MANUAL Genius 10 NOCO
User Guide & Warranty

READ AND UNDERSTAND ALL SAFETY INFORMATION BEFORE USING THIS PRODUCT. Failure to follow these safety instructions may result in ELECTRICAL SHOCK, EXPLOSION, FIRE, which may result in a SERIOUS INJURY, DEATH, or PROPERTY DAMAGE.
Electrical Shock. Product is an electrical device that can shock and cause serious injury. Do not cut power cords. Do not submerge in water or get wet.

Explosion. Unmonitored, incompatible, or damaged batteries can explode if used with product. Do not leave product unattended while in use. Do not attempt to charge a damaged or frozen battery. Use product only with batteries of recommended voltage. Operate product in well ventilated areas.

Fire. Product is an electrical device that emits heat and is capable of causing burns. Do not cover product. Do not smoke or use any source of electrical spark or fire when operating product. Keep product away from combustible materials.

Eye Injury. Wear eye protection when operating product. Batteries can explode and cause flying debris. Battery acid can cause eye and skin irritation. In the case of contamination of eyes or skin, flush affected area with running clean water and contact poison control immediately.

Explosive Gases. Working in the vicinity of a lead-acid is dangerous. Batteries generate explosive gases during normal battery operation. To reduce risk of battery explosion, follow all safety information instructions and those published by the battery manufacturer and manufacturer of any equipment intended to be used in the vicinity of battery. Review cautionary markings on these products and on engine.
For more information and support visit:
www.no.co/support
Important Safety Warnings
About Genius10. The NOCO Genius10 represents some of the most innovative and advanced technology on the market, making each charge simple and easy. It is quite possibly the safest and most efficient charger you will ever use. The Genius10 is designed for charging all types of 6V & 12V lead-acid batteries, including Lithium (LiFePO4), Wet (Flooded), Gel, MF (Maintenance-Free), CA (Calcium), EFB (Enhanced Flooded Battery), and AGM (Absorption Glass Mat) batteries. It is suitable for charging battery capacities up to 230 Amp-Hours and maintaining all battery sizes. Getting Started. Before using the charger, carefully read the battery manufacture's specific precautions and recommended rates of charge for the battery. Make sure to determine the voltage and chemistry of the battery by referring to your battery owner's manual prior to charging. Mounting. It is important to keep in mind the distance to the battery. The DC cable length from the charger, with either the battery clamp or eyelet terminal connectors, is approximately 77.7 inches (1973.6mm). Allow for 12-inches (304mm) of slack between connections. Proposition 65. WARNING: This product can expose you to chemicals including lead and exhaust fumes, which are known to the State of California to cause cancer and birth defects or other reproductive harm. For more information go to www.P65Warnings.ca.gov. Personal Precaution. Only use product as intended. Someone should be within range of your voice or close enough to come to your aid in case of emergency. Have a supply of clean water and soap nearby in the case of battery acid contamination. Wear complete eye protection and protective clothing while working near a battery. Always wash hands after handling batteries and related materials. Do not handle or wear any metal objects when working with batteries including; tools, watches or jewelry. If metal is dropped onto battery, it may spark or create a short circuit resulting in electrical shock, fire, explosion which may result in injury, death or property damage. Minors. If the product is intended by "Purchaser" to be used by a minor, purchasing adult agrees to provide detailed instructions and warnings to any minor prior to use. Failure to do so is the sole responsibility of the "Purchaser," who agrees to indemnify NOCO for any unintended use or misuse by a minor. Choking Hazard. Accessories may present a choking hazard to children. Do not leave children unattended with product or any accessory. The product is not a toy. Handling. Handle product with care. The product can become damaged if impacted. Do not use a damaged product, including, but not limited to, cracks to the casing or damaged cables. Do not use product with a damaged power cord. Humidity and liquids may damage product. Do not handle product or any electrical components near any liquid. Store and operate product in dry locations. Do not operate product if it becomes wet. If product is already operating and becomes wet, disconnect it from the battery and discontinue use immediately. Do not disconnect the product by pulling on the cables. Modifications. Do not attempt to alter, modify or repair any part of the product. Disassembling product may cause injury, death or damage to property. If product becomes damaged, malfunctions or comes in contact with any liquid, discontinue use, and contact NOCO. Any modifications to the product will void your warranty. Changes or modifications not expressly approved by the party responsible for compliance could void the user's authority to operate this device. Accessories. This product is only approved for use with NOCO accessories. NOCO is not responsible for user safety or damage when using accessories not approved by NOCO. Location. Prevent battery acid from coming in contact with the product. Do not operate the product in a closed-in area or an area with restricted ventilation. Do not set a battery on top of product. Position cable leads to avoid accidental damage by moving vehicle parts (including hoods and doors), moving engine parts (including fan blades, belts, and pulleys), or what could become a hazard that may cause injury or death. Operating Temperature. This product is designed to work in ambient temperatures between -4°F and 104°F (-20°C and 40°C). Do not operate outside of temperature ranges. Do not charge a frozen battery. Discontinue use of product immediately if the battery becomes excessively warm. Storage. Do not use or store your product in areas with high concentrations of dust or airborne materials. Store your product on flat; secure surfaces so it's not prone to falling. Store your product in a dry location. The storage temperature is -20°C to 25°C (average under-hood temperature). Never exceed 80°C under
any condition. Compatibility. The product is only compatible with 6V & 12-volt Lead-Acid, AGM, and Lithium batteries. Do not attempt to use product with any other type of battery. Charging other battery chemistries may result in injury, death or property damage. Contact the battery manufacturer prior to attempting to charge the battery. Medical Devices. Do not charge pacemakers or other medical devices. Product contains magnetic components that may emit electromagnetic fields, which may interfere with pacemakers, defibrillators, or other medical devices. Consult with your physician prior to use if you have any medical device including pacemakers. If you suspect the product is interfering with a medical device, stop using the product immediately and consult your physician. Cleaning, Power off the product before attempting any maintenance or cleaning. Clean and dry product immediately if it comes in contact with liquid or any type of contaminant. Use a soft, lint-free (microfiber) cloth. Avoid getting moisture in openings. Explosive Atmospheres. Obey all signs and instructions. Do not operate product in any area with a potentially explosive atmosphere, including fueling areas or areas which contain chemicals or particles such as grain, dust or metal powders. High-Consequence Activities. This product is not intended for use where the failure of the product could lead to injury, death or severe environmental damage. Radio Frequency Interference. Product is designed, tested, and manufactured to comply with regulations governing radio frequency emissions. Such emissions from the product can negatively affect the operation of other electronic equipment, causing them to malfunction. Model Number: Genius10 This device complies with Part 15 of the FCC Rules. Operation is subject to the following two conditions: (1) this device may not cause harmful interference, and (2) this device must accept any interference received, including interference that may cause undesired operation. NOTE: This equipment has been tested and found to comply with the limits for a Class A digital device, pursuant to Part 15 of the FCC Rules. These limits are designed to provide reasonable protection against harmful interference when the equipment is operated in a commercial environment. This equipment generates, uses, and can radiate radio frequency energy and, if not installed and used in accordance with the instruction manual, may cause harmful interference to radio communications. Operation of this equipment in a residential area is likely to cause harmful interference in which case the user will be required to correct the interference at his/her own expense.
How To Use
Charging Modes.
The Genius10 has nine (9) modes: Standby, 12V, 12V AGM, 12V LITHIUM, 6V, 6V AGM, REPAIR, SUPPLY and Force. Some charge modes must be pressed and held for three (3) to five (5) seconds to enter the mode. These “Press and Hold” modes are advanced charging modes that require your full attention before selecting. It is important to understand the differences and purpose of each charge mode. Do not operate the charger until you confirm the appropriate charge mode for your battery. Below is a brief description:
Mode Explanation
(Peak Voltage Measured At 25°C, Amperage Rating Is Bulk Amperage When Above 0°C)
| Standby | In Standby mode, the charger is not charging or providing any power to the battery. Energy Save is activated during this mode, drawing microscopic power from the electrical outlet. Canbus is enabled in Standby mode. When in Standby, the orange Standby LED will illuminate. |
| No Power | |
| 12V | For charging 12-volt Wet Cell, Gel Cell, Enhanced Flooded, Maintenance-Free and Calcium batteries. When selected, the 12V white LED will illuminate. |
| 14.5V | 10A | Up To 230Ah Batteries | |
| 12V AGM | For charging 12-volt AGM batteries. When selected, the 12V AGM white LED will illuminate. |
| 14.8V | 10A | Up To 230Ah Batteries | |
| 12V LITHIUM | For charging 12-volt lithium-ion batteries, including lithium iron phosphate. When selected, the 12V Lithium blue LED will illuminate. For use on batteries with Battery Management Systems (BMS) only. |
| 14.6V | 10A | Up To 230Ah Batteries | |
| 6V Press & Hold (3 Seconds) | For charging 6-volt Wet Cell, Gel Cell, Enhanced Flooded, Maintenance-Free and Calcium batteries. When selected, the 6V white LED will illuminate. |
| 7.25V | 10A | Up To 230Ah Batteries | |
| 6V AGM Press & Hold | For charging 6-volt advanced AGM batteries, which requires a higher than normal charging voltage. When selected, a white LED will illuminate. |
| 7.40V | 10A | Up To 230Ah Batteries | |
| Force Mode Press & Hold (5 Seconds) | For charging batteries with a voltage lower than 1V. Press and Hold for five (5) seconds to enter Force Mode. The selected charge mode will then operate under Force Mode for five (5) minutes before returning to standard charging in the selected mode. |
| 10A | Up To 230Ah Batteries | |
| 12V SUPPLY | Converts to a DC power supply for powering any 12VDC device, like a tire inflator, oil changer, or as a memory retainer when replacing a battery. When selected, a red LED will illuminate. |
| 13.6V | 10A [Press and Hold 3 Seconds With Clamps Not Connected] | |
| 12V REPAIR | An advanced battery recovery mode for repairing and restoring, old, idle, damaged, stratified or sulfated batteries. When selected, a red LED will illuminate and flash. |
| Current conditioning up to 16.5V. [From Standby Press and Hold 3 Seconds With Clamps Connected to the Battery] |
Using 6V. [Press & Hold for 3 seconds]
6V charge mode is designed for 6-volt lead-acid batteries only, like Wet Cell, Gel Cell, Enhanced Flooded, Maintenance-Free and Calcium batteries. Press and hold for three (3) seconds to enter 6V Charge Mode. Consult the battery manufacturer before using this mode.
Using 12V Lithium.
12V Lithium charge mode is designed for 12-volt lithium-ion batteries only, including lithium iron phosphate.
CAUTION. USE THIS MODE WITH EXTREME CARE. THIS MODE SHOULD ONLY BE USED WITH 12-VOLT LITHIUM BATTERIES THAT HAVE A BUILT-IN BATTERY MANAGEMENT SYSTEM (BMS). LITHIUM-ION BATTERIES ARE MADE AND CONSTRUCTED IN DIFFERENT WAYS AND SOME MAY OR MAY NOT CONTAIN A BATTERY MANAGEMENT SYSTEM (BMS). CONSULT THE LITHIUM BATTERY MANUFACTURER BEFORE CHARGING AND ASK FOR RECOMMENDED CHARGING RATES AND VOLTAGES. SOME LITHIUM-ION BATTERIES MAY BE UNSTABLE AND UNSUITABLE FOR CHARGING.
Using 13.6V Supply. [Press and Hold 3 Seconds With Clamps Not Connected]
13.6V Supply converts the charger to a constant current, constant voltage DC power supply. It can be used to power 12VDC devices, tire inflators, seat heaters and more. As a power supply, it can also be used to retain a vehicle's on-board computer settings during battery repair or replacement. 13.6V Supply provides 13.6-volts at 10A with overload protection at 12A (Max).
CAUTION. USE THIS MODE WITH EXTREME CARE. SUPPLY MODE DISABLES SAFETY FEATURES AND LIVE POWER IS PRESENT AT THE CONNECTORS. DO NOT TOUCH CONNECTIONS TOGETHER. RISK OF SPARKS, FIRE, EXPLOSION, PROPERTY DAMAGE, INJURY, AND DEATH.
Using 12V Repair. [From Standby Press and Hold 3 Seconds With Clamps Connected to the Battery]
12V Repair is an advanced battery recovery mode for repairing and storing, old, idle, damaged, stratified or sulfated batteries. Not all batteries can be recovered. Batteries tend to become damaged if kept at a low charge and/or never given the opportunity to receive a full charge. The most common battery problems are battery sulfation and stratification. Both battery sulfation and stratification will artificially raise the open circuit voltage of the battery, causing the battery to appear fully charged, while providing low capacity. Use 12V Repair in attempt to reverse these problems. For optimal results, take the 12-volt battery through a full charge cycle, bringing the battery to full charge, before using this mode. The level of sulfation found in the battery will determine the voltage driven into the battery (up to 16.5V). 12V Repair can take up to four (4) hours to complete the recovery process and will return to Standby when completed.
CAUTION. USE THIS MODE WITH CARE. THIS MODE IS FOR 12-VOLT LEAD-ACID BATTERIES ONLY. THIS MODE COULD RESULT IN HIGH CHARGING VOLTAGE AND MAY CAUSE SOME WATER LOSS IN WET (FLOODED) CELL BATTERIES. BE ADVISED, SOME BATTERIES AND ELECTRONICS MAY BE SENSITIVE TO HIGH CHARGING VOLTAGES. TO MINIMIZE RISKS TO ELECTRONICS, DISCONNECT THE BATTERY BEFORE USING THIS MODE.
Force Mode [Press & Hold for 5 seconds]
Force mode allow the charger to manually begin charging when the connected battery's voltage is too low to be detected. If battery voltage is too low for the charger to detect, press and hold the mode button for 5 seconds to activate Force Mode, then select the appropriate mode. All available modes will flash. Once a charge mode is selected, the Charge Mode LED and Charge LED will alternate between each other, indicating Force Mode is active. After five (5) minutes the charger will return to the normal charge operation and low voltage detection will be reactivated.
CAUTION. USE THIS MODE WITH EXTREME CARE. FORCE MODE DISABLES SAFETY FEATURES AND LIVE POWER IS PRESENT AT THE CONNECTORS. ENSURE ALL CONNECTIONS ARE MADE PRIOR TO ENTERING FORCE MODE, AND DO NOT TOUCH CONNECTIONS TOGETHER. RISK OF SPARKS, FIRE, EXPLOSION, PROPERTY DAMAGE, INJURY, AND DEATH.
Connecting to the Battery.
Do not connect the AC power plug until all other connections are made. Identify the correct polarity of the battery terminals on the battery. The positive battery terminal is typically marked by these letters or symbol (POS, P, +). The negative battery terminal is typically marked by these letters or symbol (NEG, N, -). Do not make any connections to the carburetor, fuel lines, or thin, sheet metal parts.
FOLLOW THESE STEPS WHEN BATTERY IS INSTALLED IN VEHICLE. WARNING: A SPARK NEAR THE BATTERY MAY CAUSE A BATTERY EXPLOSION. TO REDUCE THE RISK OF A SPARK NEAR THE BATTERY:
1.) Position AC and DC cords to reduce risk of damage by hood, door, or moving engine part.
2.) Stay clear of fan blades, belts, pulleys, and other parts that can cause injury to persons.
3.) Check polarity of battery terminals. The POSITIVE (POS, P, +) battery terminal usually has a larger diameter than the NEGATIVE (NEG, N, -) battery terminal.
4.) Determine which battery terminal is grounded (connected) to the chassis. If negative battery terminal is grounded to chassis (as in most vehicles), see Step 5. If positive battery terminal is grounded to the chassis, see Step 6.
5.) For negative-grounded vehicle only, connect POSITIVE (RED) battery clamp or eyelet terminal connector from battery charger to POSITIVE (POS, P. +) ungrounded battery terminal. Connect NEGATIVE (BLACK) battery clamp or eyelet terminal connector to vehicle chassis or engine block away from battery. Connect to a heavy gauge metal part of the frame or engine block.
6.) For positive-grounded vehicle only, connect NEGATIVE (BLACK) battery clamp or eyelet terminal connector from battery charger to NEGATIVE (NEG, N, -) ungrounded battery terminal. Connect POSITIVE (RED) battery clamp or eyelet terminal connector to vehicle chassis or engine block away from battery. Connect to a heavy gauge metal part of the frame or engine block.
7.) Connect the battery charger into a suitable electrical outlet. Do not face the battery when making this connection.
8.) When disconnecting the battery charger, disconnect in the reverse sequence, removing the negative first (or positive first for positive ground systems).
FOLLOW THESE STEPS WHEN BATTERY IS OUTSIDE VEHICLE. WARNING: A SPARK NEAR THE BATTERY MAY CAUSE A BATTERY EXPLOSION. TO REDUCE THE RISK OF A SPARK NEAR THE BATTERY:
1.) Check polarity of battery terminals. The POSITIVE (POS, P, +) battery terminal usually has a larger diameter than the NEGATIVE (NEG, N, -) battery terminal.
2.) Attach at least a 24-inch-long 6-gauge (AWG) insulated battery cable to NEGATIVE (NEG, N, -) battery terminal.
3.) Connect POSITIVE (RED) battery clamp or eyelet terminal connector from battery charger to POSITIVE (POS, P. +) battery terminal.
4.) Position yourself and free end of cable as far away from battery as possible - then connect NEGATIVE (BLACK) battery clamp or eyelet terminal connector to free end of cable.
5.) Connect the battery charger into a suitable electrical outlet. Do not face the battery when making this connection.
6.) When disconnecting charger, always do so in reverse sequence of connecting procedure and break first connection while as far away from battery as practical.
7.) A marine (boat) battery must be removed and charged on shore. To charge it on board requires equipment specially designed for marine use.
Begin Charging.
1.) Verify the voltage and chemistry of the battery.
2.) Confirm that you have connected the battery clamps or eyelet terminal connectors properly and the AC power plug is plugged into an electrical outlet.
3.) [First time use] The charger will begin in Standby mode, indicated by an orange LED. In Standby, the charger is not providing any power.
4.) Press the mode button to toggle to the appropriate charge mode (press and hold for three seconds to enter an advanced charge mode) for the voltage and chemistry of your battery.
5.) The mode LED will illuminate the selected charge mode and the Charge LEDs will illuminate (depending on the health of the battery) indicating the charging process has started.
6.) The charger can now be left connected to the battery at all times to provide maintenance charging.
Auto-Memory: The charger has built in auto-memory and will return to the last charge mode when connected. To change modes after the first use, press the mode button.
Charging Times.
Charging Times.
The estimated time to charge a battery is shown below. The size of the battery (Ah) and its depth of discharge (DOD) greatly affect its charging time. The charge time is based on an average depth of discharge to a fully charged battery and is for reference purposes only. Actual data may differ due to battery conditions. The time to charge a normally discharged battery is based on a 50% DOD. Temperature will also impact charging times. The Genius10 features thermal compensation that automatically adjusts charging profiles to maximize charging performance.
Battery Size Approximate Time to Charge In Hours
| 6V 12VAh (Amp hour) | ||
| 20 | 1.5 | 1.5 |
| 40 | 3.0 | 3.0 |
| 80 | 6.0 | 6.0 |
| 100 | 7.0 | 7.0 |
| 230 | 17.3 | 17.3 |
Understanding Charge LEDs.
| LED Explanation | ||
| 25% Red LED | Solid Green LED | |
| 50% Red LED | The 50% Charge LED will slowly pulse "on" and "off", when the battery is less than 50% fully charged. When the battery is 50% charged, the red Charge LED will be solid. | |
| 75% Orange LED | The 75% Charge LED will slowly pulse "on" and "off", when the battery is less than 75% fully charged. When the battery is 75% charged, the orange Charge LED will be solid. | |
| 100% Green LED | Pulsing Green LED - Bulk charge complete, optimizing battery for extended life.Solid Green LED - When the battery is 100% charged, the Charge LED will be solid green. | |
| Maintenance Green LED | After the battery is fully charged, the charger will continue monitoring the battery, and provide ongoing maintenance and optimization. The 100% Charge LED will pulse "on" and "off" slowly during these cycles. The charger can be left connected to the battery indefinitely. | |
Understanding Error LEDs.
| LED Reason/Solution | |
| Solid | Charger is in Standby mode or Battery voltage is too low for charger to detect. |
| Solid | Battery voltage is too high for the selected charge mode. Check the battery and charge mode. |
| Solid | Possible battery short / Battery will not hold a charge. Have battery checked by a professional. |
| Solid | Reverse polarity. Reverse the battery connections. |
| Flashing | Charger internal temperature too high / Charger will resume function once the Charger internal temperature drops.Charger ambient temperature too cold / Charger will resume function once the Charger ambient temperature rises. |
text_image
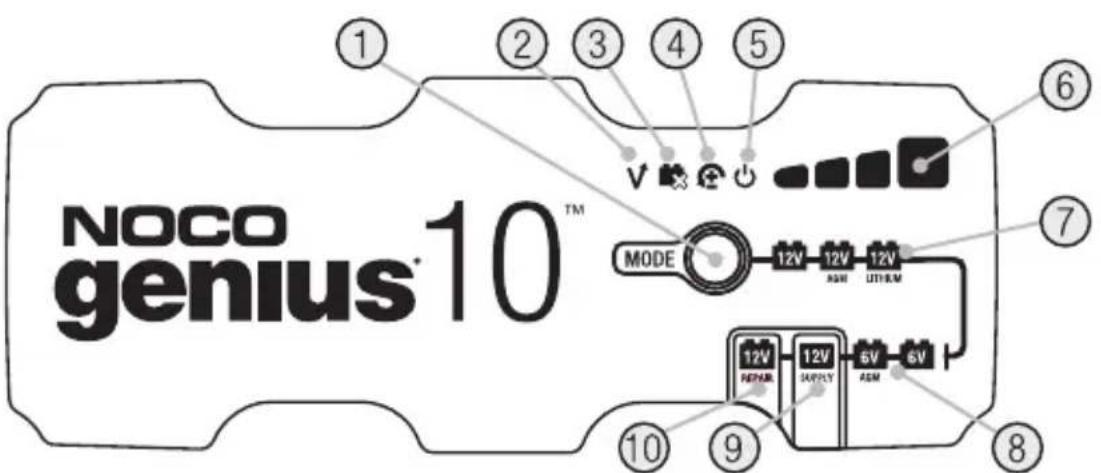
NOCO genius®10™ MODE 12V 12V 12V ASM UTI/RM 12V PWM 12V SHPPLY 5V 6V ASM 10 9 8 7 6 ① ② ③ ④ ⑤ ⑥1.) Mode Button Push to cycle through charging Modes.
2.) Overvoltage Error LED Illuminates solid Red; Battery Voltage is above Protect voltage.
3.) Bad Battery Error LED Illuminates solid Red when connected battery will not hold a charge.
4.) Reverse Polarity Error LED Illuminates solid Red when reverse polarity is detected.
5.) Standby LED Illuminates when the charger is in Standby Mode, the charger is not charging or providing any power to the battery.
6.) Charge LED indicates the connected battery(s) state-of-charge.
7.) Mode LED Indicates the Charge Mode the charger is currently in. Push the MODE button to cycle through charge Modes.
8.) «Press and Hold» Mode LED Mode button must be pressed and held for 3 seconds to enter the mode.
9.) Supply Mode LED Illuminates solid Red when Supply mode is selected.
10.) Repair Mode LED When selected, a red LED will illuminate and flash.
Technical Specifications
Input Voltage AC: 100-240 VAC, 50-60Hz
Output Power: 150 W Max
Charging Voltage: Various
Charging Current: 10A (12V), 10A (6V)
Low-Voltage Detection: 1V (12V), 1V (6V)
Back Current Drain: <0.5mA
Ambient Temperature: -20^ to +40^
Type of Batteries: 6V, 12V
Battery Chemistries: Wet, Gel, MF, CA, EFB, AGM, Calcium, Lithium
Battery Capacity: Up to 230Ah, Maintains All Battery Sizes
Housing Protection: IP65
Cooling: Natural Convection
Dimensions (L x W x H): 7.1 x 3.6 x 2.3 Inches
Weight: 3.33 Pounds
NOCO Three (3) Year Limited Warranty.
IMPORTANT: BY USING THIS PRODUCT, YOU ARE AGREEING TO BE BOUND BY THE TERMS OF THE NOCO THREE (3) YEAR LIMITED WARRANTY («WARRANTY») AS SET OUT BELOW. DO NOT USE THE PRODUCT UNTIL YOU HAVE READ THE TERMS OF THE WARRANTY. IF YOU DO NOT AGREE TO THE TERMS OF THE WARRANTY, DO NOT USE THE PRODUCT AND RETURN IT.
THIS WARRANTY GIVES YOU SPECIFIC LEGAL RIGHTS, AND YOU MAY HAVE OTHER RIGHTS THAT VARY FROM STATE, COUNTRY, OR PROVINCE. OTHER THAN AS PERMITTED BY LAW, NOCO DOES NOT EXCLUDE, LIMIT OR SUSPEND OTHER RIGHTS YOU MAY HAVE, INCLUDING THOSE THAT MAY ARISE FROM THE NONCONFORMITY OF A SALES CONTRACT. FOR A FULL UNDERSTANDING OF YOUR RIGHTS, YOU SHOULD CONSULT THE LAWS OF YOUR STATE, COUNTRY, OR PROVINCE.
TO THE EXTENT PERMITTED BY LAW, THIS WARRANTY AND THE REMEDIES SET FORTH ARE EXCLUSIVE AND IN LIEU OF ALL OTHER WARRANTIES, REMEDIES, AND
CONDITIONS, WHETHER ORAL, WRITTEN, STATUTORY, EXPRESS, OR IMPLIED. NOCO DISCLAIMS ALL STATUTORY AND IMPLIED WARRANTIES, INCLUDING, WITHOUT LIMITATION, WARRANTIES OF MERCHANTABILITY AND FITNESS FOR A PARTICULAR PURPOSE AND WARRANTIES AGAINST HIDDEN ORLatENT DEFECTS, TO THE EXTENT PERMITTED BY LAW. IN SO FAR AS SUCH WARRANTIES CANNOT BE DISCLAIMED, NOCO LIMITS THE DURATION AND REMEDIES OF SUCH WARRANTIES TO THE DURATION OF THIS EXPRESS WARRANTY AND, AT NOCO'S OPTION, THE REPAIR OR REPLACEMENT OF PRODUCTS DESCRIBED BELOW. SOME STATES, COUNTRIES, AND PROVINCES DO NOT ALLOW LIMITATIONS ON HOW LONG AN IMPLIED WARRANTY - OR CONDITION - MAY LAST, SO THE LIMITATION DESCRIBED ABOVE MAY NOT APPLY TO YOU.
NOCO warrants the NOCO-branded Products contained in the original packaging ("NOCO Product") against defects in materials and workmanship when used normally in accordance with NOCO's published guidelines for a period of THREE (3) YEARS from the date of original retail purchase or delivery date by the end-user purchaser ("Warranty Period"). NOCO's published guidelines include but are not limited to, the information contained in this Warranty, technical specifications, and user manuals. IN SOME STATES, COUNTRIES, OR PROVINCES, NATIONAL LAW MAY PROVIDE MORE EXTENDED WARRANTY PERIODS. As such, the benefits of the Limited Warranty are intended to supplement, and not replace, the rights provided by consumer protection laws.
NOCO'S LIABILITY IS LIMITED TO REPLACEMENT OR REPAIR. NOCO SHALL NOT BE LIABLE FOR ANY SPECIAL, INCIDENTAL, CONSEQUENTIAL, OR EXEMPLARY DAMAGES RESULTING FROM ANY BREACH OF WARRANTY OR CONDITION OR UNDER ANY OTHER LEGAL THEORY, INCLUDING, BUT NOT LIMITED TO, LOST PROFITS, LOST REVENUE, LOST BUSINESS, PROPERTY DAMAGE, PERSONAL INJURY, OR ANY INDIRECT OR CONSEQUENTIAL LOSS OR DAMAGE HOWSOEVER.
This Warranty is non-transferable and does not cover return packaging and transportation costs. This Warranty does not apply: (a) to damage caused by accident, abuse, misuse, fire, liquid contact, or other external cause, (b) mishandling, improper installation, modifications, disassembly, or attempted unauthorized repair, (c) cosmetic damage - such as dents or scratches - that doesn't affect the functionality of the Product, (d) to damage caused by operating the Product outside NOCO's published guidelines, (e) to defects caused by normal wear and tear or otherwise due to the normal aging of the Product, or (f) if any serial number has been removed or defaced from the Product.
If, during the Warranty Period, you submit a claim, NOCO will, at its option: (a) repair the Product that has been tested and passed our functional requirements, (b) replace the Product with a replacement product of the same model (or with your consent a product that has the same or substantially similar features as the original Product – e.g., a different model with the same features), that is new or like-new and has been tested and passed our functional requirements, or (c) exchange the Product for a refund of your purchase price. We require certain information, including proof of purchase, to process Limited Warranty claims. To make a claim under the Limited Warranty, please get in touch with NOCO Support at:
(Web) https://no.co/support
(Email) support@no.co
(US/CA/MX) +1.800.456.6626
(UK) +44 20 4520 7738
(EU) +31 20 214 0047
(AU) +61 2 4062 0068
(JP) +81 3 6893 3017
NOCO genius®
GENIUS10EU

DANGER
| (Web) | https://no.co/support |
| (Adresse e-mail) | support@no.co |
| (USA/Canada/Mexique) | +1.800.456.6626 |
(Internet) https://no.co/support
(E-Mail) support@no.co
(US/CA/MX) +1.800.456.6626
(UK) +44 20 4520 7738
(EU) +31 20 214 0047
(AU) +61 2 4062 0068
(JP) +81 3 6893 3017
NOCO genius®
GENIUS10EU

PERICOLO
Manuale d'uso e Garanzia

(Web) https://no.co/support
(UK) +44 20 4520 7738
(AU) +61 2 4062 0068
(E-mail) support@no.co
(US/CA/MX) +1.800.456.6626
(EU) +31 20 214 0047
(JP) +81 3 6893 3017
NOCO genius®
GENIUS10EU

PELIGRO
(Web) https://no.co/support
(Web) https://no.co/support
(E-mail) support@no.co
(EUA/CA/MX) +1.800.456.6626
(Web) https://no.co/support
(E-mail) support@no.co
(US/CA/MX) +1.800.456.6626
(UK) +44 20 4520 7738
(EU) +31 20 214 0047
(AU) +61 2 4062 0068
(JP) +81 3 6893 3017
NOCO genius®
GENIUS10EU

FARE
(E-post) support@no.co
(US/CA/MX) +1.800.456.6626
(UK) +44 20 4520 7738
(EU) +31 20 214 0047
(AU) +61 2 4062 0068
(JP) +81 3 6893 3017
NOCO genius®
GENIUS10EU

VAARATILANTEET
(Web) https://no.co/support
(Sähköposti) support@no.co
(USA/Kanada/Meksiko) +1.800.456.6626
(webb) https://no.co/support
(e-post) support@no.co
(US/CA/MX) +1.800.456.6626
(UK) +44 20 4520 7738
(EU) +31 20 214 0047
(AU) +61 2 4062 0068
(JP) +81 3 6893 3017
NOCO genius®
GENIUS10EU

KINDYNOΣ
https://no.co/support
(UK)
+44 20 4520 7738
(AU)
+61 2 4062 0068
(Email)
support@no.co
(US/CA/MX)
+1.800.456.6626
(EU)
+31 20 214 0047
(JP)
+81 3 6893 3017
NOCO genius®
GENIUS10EU

TEHLIKE
Batarya Türü: 6V, 12V
Batarya Kimyaları: Islak, Jel, MF, CA, EFB, AGM, Kalsiyum, Lithium
https://no.co/support
(E-posta)
support@no.co
(US/CA/MX)
+1.800.456.6626
(BK) +44 20 4520 7738
(AU) +61 2 4062 0068
(AB) +31 20 214 0047
(JP) +81 3 6893 3017
NOCO genius®
GENIUS10EU

NIEBEZPIECZEŃSTWO
https://no.co/support
(UK)
+44 20 4520 7738
(AU)
+61 2 4062 0068
(E-mail)
support@no.co
(US/CA/MX)
+1.800.456.6626
(EU)
+31 20 214 0047
(JP)
+81 3 6893 3017
NOCO genius®
GENIUS10EU

VESZÉLY
(Web) https://no.co/support
(E-mail) support@no.co
(USA/Kanada/Mexikó) +1.800.456.6626
https://no.co/support
(UK)
+44 20 4520 7738
(AU)
+61 2 4062 0068
(E-mail)
support@no.co
(US/CA/MX)
+1.800.456.6626
(EU)
+31 20 214 0047
(JP)
+81 3 6893 3017
NOCO genius®
GENIUS10EU

NEBEZPEČENSTVO
(E-mail) support@no.co
(US/CA/MX) +1.800.456.6626
(UK) +44 20 4520 7738
(EU) +31 20 214 0047
(AU) +61 2 4062 0068
(JP) +81 3 6893 3017
NOCO genius®
GENIUS10EU

NEVARNOST
https://no.co/support
(UK)
+44 20 4520 7738
(AU)
+61 2 4062 0068
(e-naslov)
support@no.co
(US/CA/MX)
+1.800.456.6626
(EU)
+31 20 214 0047
(JP)
+81 3 6893 3017
NOCO genius®
GENIUS10EU

PERICOL
(Web) https://no.co/support
(UK) +44 20 4520 7738
(AU) +61 2 4062 0068
(E-mail) support@no.co
(S.U.A. / CA / MX) +1.800.456.6626
(UE) +31 20 214 0047
(JP) +81 3 6893 3017
NOCO genius®
GENIUS10EU

ОПАСНОСТ
(US/CA/MX) +1.800.456.6626
(Veeb) https://no.co/support
(E-post) support@no.co
(US/CA/MX) +1.800.456.6626
(UK) +44 20 4520 7738
(EU) +31 20 214 0047
(AU) +61 2 4062 0068
(JP) +81 3 6893 3017
NOCO genius®
GENIUS10EU

DÈMESIO!
(Svetainė) https://no.co/support
(El. paštas) support@no.co
(JAV / Kanada / Meksika) +1.800.456.6626
(JK) +44 20 4520 7738
(ES) +31 20 214 0047
(Australija) +61 2 4062 0068
(Japonija) +81 3 6893 3017
NOCO genius®
GENIUS10EU

BİSTAMI!
(Web) https://no.co/support
(Email) support@no.co
(US/CA/MX) +1.800.456.6626
(UK) +44 20 4520 7738
(EU) +31 20 214 0047
(AU) +61 2 4062 0068
(JP) +81 3 6893 3017
NOCO genius®
GENIUS10EU

НЕБЕЗПЕКА
(Web) https://no.co/support
(Email) support@no.co
(US/CA/MX) +1.800.456.6626
(UK) +44 20 4520 7738
(EU) +31 20 214 0047
(AU) +61 2 4062 0068
(JP) +81 3 6893 3017
NOCO genius®
GENIUS10EU

OPASNOST
Korisnički priručnik i jamstvo

PROČITAJTE I SHVATITE SVE SIGURNOSNE INFORMACIJE PRIJE KORIŠTENJA OVOG PROIZVODA. Nepoštivanje ovih sigurnosnih uputa može dovesti do STRUJNOG UDARA, EKSPLOZIJE, POŽARA, što može rezultirati OZBILJNOM OZLJEDOM, SMRĆU ili ŠTETOM IMOVINE.
Strujni udar. Proizvod je električni uređaj koji može izazvati strujni udar i ozbiljne ozljede. Nemojte rezati kabele za napajanje. Nemojte uranjati u vodu ili vlažiti.

Eksplozija. Nenadzirani, nekompatibilni ili oštećeni akumulatori mogu eksplodirati ako se koriste s ovim proizvodom. Ne ostavljajte proizvod bez nadzora dok je u uporabi. Ne pokušavajte puniti oštećeni ili smrznuti akumulator. Proizvod koristite samo s akumulatorima preporučenog napona. Proizvod koristite u dobro prozračenim prostorima.

(Web) https://no.co/support
(Email) support@no.co
(US/CA/MX) +1.800.456.6626
(UK) +44 20 4520 7738
(EU) +31 20 214 0047
(AU) +61 2 4062 0068
(JP) +81 3 6893 3017
NOCO genius®
GENIUS10EU
Tegangan Pengisian: Beragam
Arus Pengisian: 10A (12 V), 10A (6 V)
Deteksi Tegangan Rendah: 1V (12V), 1V (6V)
(Web) https://no.co/support
(Email) support@no.co
(US/CA/MX) +1.800.456.6626
(UK) +44 20 4520 7738
(EU) +31 20 214 0047
(AU) +61 2 4062 0068
(JP) +81 3 6893 3017
NOCO genius®
GENIUS10EU

BAHAYA
Kimia Bateri: Basah, Gel, MF, CA, EFB, AGM, Kalsium, Lithium
Kapasiti Bateri: Sehingga 230Ah, Mengekalkan Semua Saiz Bateri
(Laman Web) https://no.co/support
(E-mel) support@no.co
(US/CA/MX) +1.800.456.6626
(UK) +44 20 4520 7738
(EU) +31 20 214 0047
(AU) +61 2 4062 0068
(JP) +81 3 6893 3017
NOCO genius®
GENIUS10EU

PANGANIB
Gabay ng Gumagamit at Warantiya

BASAHIN AT UNAWAIN ANG LAHAT NG IMPORMASYONG PANGKALIGTASAN BAGO GAMITIN ANG PRODUKTONG ITO. Ang hindi pagsunod sa tagubiling pangkaligtasang ito ay maaaring magresulta ng PAGKAKURYENTE, PAGSABOG, SUNOG, na maaaring magresulta sa isang MALUBHANG PINSALA, PAGKAMATAY o PINSALA SA MGA ARI-ARIAN.
Back Current Drain: <0.5mA
Temperatura sa Paligid: -20^ to +40^
(Web) https://no.co/support
(Email) support@no.co
(US/CA/MX) +1.800.456.6626
(UK) +44 20 4520 7738
(EU) +31 20 214 0047
(AU) +61 2 4062 0068
(JP) +81 3 6893 3017
NOCO genius®
GENIUS10EU

อันตราย
https://no.co/support
(ซีเมล) support@no.co
(US/CA/MX)
+1.800.456.6626
(UK)
+44 20 4520 7738
(EU)
+31 20 214 0047
(AU)
+61 2 4062 0068
(JP)
+81 3 6893 3017
NOCO genius®
GENIUS10EU

[Unreadable]
Consumption 6V4 [ Corruption Division: 3 Years]
Consumption of Charge LEDs
Karnataka emergency department of the National Department of China, 2019, 103-115.
Karnataka, 2017, 10: 2017. The following table presents the annual income (loss) of the company's net earnings from continuing operations in the years ended September 30, 2017.
(US/CA/MX) +1.800.456.6626
(EU) +31 20 214 0047
(JP) +81 3 6893 3017
NOCO genius®
GENIUS10EU

NGUY HIÊM
https://no.co/support
(UK)
+44 20 4520 7738
(AU)
+61 2 4062 0068
(Email)
support@no.co
(US/CA/MX)
+1.800.456.6626
(EU)
+31 20 214 0047
(JP)
+81 3 6893 3017
NOCO genius®
GENIUS10EU

위험
사용자 설명서 및 보증

(웹) https://no.co/support
(영국) +44 20 4520 7738
(호주) +61 2 4062 0068
(이메일) support@no.co
(미국/캐나다/멕시코) +1.800.456.6626
(EU) +31 20 214 0047
(일본) +81 3 6893 3017
NOCO genius®
GENIUS10EU

危险
用戶指南及產品保證

https://no.co/support
(英国)
+44 20 4520 7738
(澳大利亚)
+61 2 4062 0068
(电子邮件)
support@no.co
(網站) https://no.co/support
(UK) +44 20 4520 7738
(AU) +61 2 4062 0068
(電郵) support@no.co
(US/CA/MX) +1.800.456.6626
(EU) +31 20 214 0047
(JP) +81 3 6893 3017
(בִרָהוּי) https://no.co/support
(7"xit) support@no.co
(הכלה/הכלה/הכלה) +1.800.456.6626
(בַרְהָר) +44 20 4520 7738
(1A (12V), 1A (6V :הכלה)
(1V (12V), 1V (6V :הכלה)
0.5mA> :הכלה
or vis 40°+ vis 20°- : vis vis vis vis vis
6V, 12V :הכלה
.(Red LED) (Battery LED) (Battery LED) (Battery LED) (Battery LED) (Battery LED) (Battery LED) (Battery LED) (Battery LED) (Battery LED) (Battery LED) (Battery LED) (Battery LED) (Battery LED) (Battery LED) (Battery LED) (Battery LED) (Battery LED) (Battery LED) (Battery LED) (Battery LED) (Battery LED) (Battery LED) (Battery LED) (Battery LED) (Battery LED) (Batteries, Batteries, Batteries, Batteries, Batteries, Batteries, Batteries, Batteries, Batteries, Batteries, Batteries, Batteries, Batteries, Batteries, Batteries, Batteries, Batteries, Batteries, Batteries, Batteries, Batteries, Batteries, Batteries, Batteries, Batteries, Batteries,
| (0) (Bullk Amperage) (Bullk Amperage) (Bullk Amperage) (Bullk Amperage) (Bullk Amperage) (Bullk Amperage) (Bullk Amperage) (Bullk Amperage) (Bullk Amperage) (Bullk Amperage) (Bullk Amperage) (Bullk Amperage) (Bullk Amperage) (Bollk Amperage) (Bullk Amperage) (Bullk Amperage) (Bullk Amperage) (Bullk Amperage) (Bullk Amperage) (Bullk Amperage) (Bullk Amperage) (Bullk Amperage) (Bullk Amperage) (Bullk Amperage) (Bullk Amperage) (Bullk Amperase) (Bullk Amperase) (Bullk Amperase) (Bullk Amperase) (Bullk Amperase) (Bullk Amperase) (Bullk Amperase) (Bullk Amperase) (Bullk Amperase) (Bullk Amperase) (Bullk Amperase) (Bullk Amperase) (Bullk Amperase) (Bollk Amperase) (Bullk Amperase) (Bullk Amperase) (Bullk Amperase) (Bullk Amperase) (Bullk Amperase) (Bullk Amperase) (Bullk Amperase) (Bullk Amperase) (Bullk Amperase) (Bullk Amperase) (Bullk Amperase) (Bullk Amperose) (Bullk Amperose) (Bullk Amperose) (Bullk Amperose) (Bullk Amperose) (Bullk Amperose) (Bullk Amperose) (Bullk Amperose) (Bullk Amperose) (Bullk Amperose) (Bullk Amperose) (Bullk Amperose) (Bullk Amperose) (Bollk Amperose) (Bullk Amperose) (Bullk Amperose) (Bullk Amperose) (Bullk Amperose) (Bullk Amperose) (Bullk Amperose) (Bullk Amperose) (Bullk Amperose) (Bullk Amperose) (Bullk Amperose) (Bullk Amperose) (Bullk Amperase) (Bullk Amperase) (Bullk Amperase) (Bullk Amperase) (Bullk Amperase) (Bullk Amperase) (Bullk Amperase) (Bullk Amperase) (Bullk Amperase) (Bullk Amperase) (Bullk Amperase) (Bullk Amperase) (Bulk Amperase) (Bullk Amperase) (Bullk Amperase) (Bullk Amperase) (Bullk Amperase) (Bullk Amperase) (Bullk Amperase) (Bullk Amperase) (Bullk Amperase) (Bullk Amperase) (Bullk Amperase) (Bullk Amperase) (Bullk Amperuse) (Bullk Amperuse) (Bullk Amperuse) (Bullk Amperuse) (Bullk Amperuse) (Bullk Amperuse) (Bullk Amperuse) (Bullk Amperuse) (Bullk Amperuse) (Bullk Amperuse) (Bullk Amperuse) (Bullk Amperuse) (Bullk Amperuse) (Bollk Amperuse) (Bullk Amperuse) (Bullk Amperuse) (Bullk Amperuse) (Bullk Amperuse) (Bullk Amperuse) (Bullk Amperuse) (Bullk Amperuse) (Bullk Amperuse) (Bullk Amperuse) (Bullk Amperuse) (Bullk Amperuse) (Bullk Amperususe) (Bullk Amperuse) (Bullk Amperuse) (Bullk Amperuse) (Bullk Amperuse) (Bullk Amperuse) (Bullk Amperuse) (Bullk Amperuse) (Bullk Amperuse) (Bullk Amperuse) (Bullk Amperuse) (Bullk Amperuse) (Bullk Amperuse) (Boilk Amperuse) (Bullk Amperuse) (Bullk Amperuse) (Bullk Amperuse) (Bullk Amperuse) (Bullk Amperuse) (Bullk Amperuse) (Bullk Amperuse) (Bullk Amperuse) (Bullk Amperuse) (Bullk Amperuse) (Bullk Amperuse) (Bullk Amperusesuseuseuseuseuseuseuseuseuseuseuseuseuseuseuseuseuseuseuseuseuseuseuseuseuseuseuseuseuseuseuseuseuseuseuseuseuseuseuseuseuseuseuseuseuseuseuseuseuseuseuseuseuseuseuseuseuseuseuseuseuseuseuseuseuseuseuseuseuseuseuseuseuseuseuseuseuseuseuseuseuseuseuseuseuseuseuseuseuseuseuseuseuseuseuseuseuseuseuseuseusesuseuseuseuseuseuseuseuseuseuseuseuseuseuseuseuseuseuseuseuseuseuseuseuseuseuseuseuseuseuseuseuseuseuseuseuseuseuseuseuseuseuseuseuseuseuseuseuseuseuseuseuseuseuseuseuseuseuseuseuseuseuseuseuseuseuseuseuseuseuseuseuseuseuseuseuseuseuseuseuseuseuseuseuseuseuseuseuseuseuseuseuseuseuseuseuseuseuseusesusesusesusesusesusesusesusesusesusesusesusesusesusesusesusesusesusesusesusesusesusesusesusesusesusesusesusesusesusesusesusesusesusesusesusesusesusesusesusesusesusesusesusesusesusesusesusesusesusesusesusesusesusesusesusesusesusesusesusesusesusesusesusesusesusesusesusesusesusesusesusesusesusesusesusesusesusesusesusesusesusesusesusesusesusesusesusesusesusesusesusesusesusesusesusesusesusesusesusesususesusesusesusesusesusesusesusesusesusesusesusesusesusesusesusesusesusesusesusesusesusesusesusesusesusesusesusesusesusesusesusesusesusesusesusesusesusesusesusesusesusesusesusesusesusesusesusesusesusesusesusesusesusesusesusesusesusesusesusesusesusesusesusesusesusesusesusesusesusesusesusesusesusesusesusesusesusesusesusesusesusesusesusesusesusesusesusesusesusesusesusesusesusesusesusesusesusesusesusingusesusesusesusesusesusesusesusesusesusesusesusesusesusesusesusesusesusesusesusesusesusesusesusesusesusesusesusesusesusesusesusesusesusesusesusesusesusesusesusesusesusesusesusesusesusesusesusesusesusesusesusesusesusesusesusesusesusesusesusesusesusesusesusesusesusesusesusesusesusesusesusesusesusesusesusesusesusesusesusesusesusesusesusesusesusesusesusesusesusesusesusesusesusesusesusesusesusesusesupsusesusesusesusesusesusesusesusesusesusesusesusesusesusesusesusesusesusesusesusesusesusesusesusesusesusesusesusesusesusesusesusesusesusesusesusesusesusesusesusesusesusesusesusesusesusesusesusesusesusesusesusesusesusesusesusesusesusesusesusesusesusesusesusesusesusesusesusesusesusesusesusesusesusesusesusesusesusesusesusesusesusesusesusesusesusesusesusesusesusesusesusesusesusesusesusesusesusesusesusersusesusesusesusesusesusesusesusesusesusesusesusesusesusesusesusesusesusesusesusesusesusesusesusesusesusesusesusesusesusesusesusesusesusesusesusesusesusesusesusesusesusesusesusesusesusesusesusesusesusesusesusesusesusesusesusesusesusesusesusesusesusesusesusesusesusesusesusesusesusesusesusesusesusesusesusesusesusesusesusesusesusesusesusesusesusesusesusesusesusesusesusesusesusesusesusesusesusesusesusedusesusesusesusesusesusesusesusesusesusesusesusesusesusesusesusesusesusesusesusesusesusesusesusesusesusesusesusesusesusesusesusesusesusesusesusesusesusesusesusesusesusesusesusesusesusesusesusesusesusesusesusesusesusesusesusesusesusesusesusesusesusesusesusesusesusesusesusesusesusesusesusesusesusesusesusesusesusesusesusesusesusesusesusesusesusesusesusesusesusesusesusesusesusesusesusesusesusesusesuesusesusesusesusesusesusesusesusesusesusesusesusesusesusesusesusesusesusesusesusesusesusesusesusesusesusesusesusesusesusesusesusesusesusesusesusesusesusesusesusesusesusesusesusesusesusesusesusesusesusesusesusesusesusesusesusesusesusesusesusesusesusesusesusesusesusesusesusesusesusesusesusesusesusesusesusesusesusesusesusesusesusesusesusesusesusesusesusesusesusesusesusesusesusesusesusesusesusesusesbususesusesusesusesusesusesusesusesusesusesusesusesusesusesusesusesusesusesusesusesusesusesusesusesusesusesusesusesusesusesusesusesusesusesusesusesusesusesusesusesusesusesusesusesusesusesusesusesusesusesusesusesusesusesusesusesusesusesusesusesusesusesusesusesusesusesusesusesusesusesusesusesusesusesusesusesusesusesusesusesusesusesusesusesusesusesusesusesusesusesusesusesusesusesusesusesusesusesusesubsusesusesusesusesusesusesusesusesusesusesusesusesusesusesusesusesusesusesusesusesusesusesusesusesusesusesusesusesusesusesusesusesusesusesusesusesusesusesusesusesusesusesusesusesusesusesusesusesusesusesusesusesusesusesusesusesusesusesusesusesusesusesusesusesusesusesusesusesusesusesusesusesusesusesusesusesusesusesusesusesusesusesusesusesusesusesusesusesusesusesusesusesusesusesusesusesusesusesuseshususususususususususususususususususususususususususususususususususususususususususususususususususususususususususususususususususususususususususususususususususususususususususususususususususususus |
For more information and support visit:
www.no.co/support
For patent information visit www.no.co/ip
NOCO HQ
30339 Diamond Parkway,
102, Glenwillow, OH
44139 USA.
+1 800 456 6626
NOCO EU
Kabelweg 57, 1014BA Amsterdam, The Netherlands.
+31 20 214 0047
NOCO UK
18 Soho Square, London W1D 3QL, United Kingdom
+44 20 4520 7738
NOCO AU
Rialto, West Podium, Level Mezzanine 2 (M2), 525 Collins Street, Melbourne, Australia 3000
+61 2 4062 0068
NOCO JP
5F Okura Bekkan 3-4-1 Ginza Chuo-ku Tokyo, 104-0061
+81 3 6893 3017
NOCO®
GENIUS10EU.04292024A
