
LMX7600SP - Cordless electric lawn mower EGO - Free user manual and instructions
Find the device manual for free LMX7600SP EGO in PDF.

| Product Type | Cordless Electric Lawn Mower |
| Brand | EGO |
| Model | LMX7600SP |
| Voltage | 56 V |
| Battery Type | Lithium-ion 56 V (compatible with listed EGO batteries and chargers) |
| Number of Batteries | 2 active ports, operates with 1 or 2 batteries |
| Cutting Width | 76 cm |
| Cutting Heights | 10 positions: 20, 25, 33, 44, 58, 72, 86, 101, 114, 125 mm |
| Height Adjustment | Independent front and rear, with lever |
| Grass Catcher Capacity | 90 L |
| Max Weight (with catcher and battery) | 64 kg |
| Blade Speed Modes | 3: Mode 2 (high performance), Mode 1 (balanced), Mode ECO (quiet and long runtime) |
| Self-Propulsion | Yes, variable speed, independent of blade |
| LED Headlights | Yes, with dedicated switch |
| Connectivity | Bluetooth (for connection to EGO app) |
| Indicators | Operation, blade speed, battery status, overload, overheating |
| Blade Brake | Automatic electric brake (stops in less than 3 seconds) |
| Sound Level (acoustic pressure) | 83 dB(A) (K=3 dB(A)) |
| Sound Level (guaranteed acoustic power) | 98 dB(A) |
| Vibrations (left/right handle) | 0.48 m/s² / 0.54 m/s² (K=1.5 m/s²) |
| Operating Temperature | 0 °C to 40 °C |
| Storage Temperature | -20 °C to 70 °C |
| Protection Rating | IPX5 (protected against water jets) |
| Use in Rain | Yes |
| Cleaning | Clean dry (damp cloth); do not use water |
| Blade | Model AB3000, replaceable |
| Warranty | See egopowerplus.eu |
Frequently Asked Questions - LMX7600SP EGO
User questions about LMX7600SP EGO
0 question about this device. Answer the ones you know or ask your own.
Ask a new question about this device
Download the instructions for your Cordless electric lawn mower in PDF format for free! Find your manual LMX7600SP - EGO and take your electronic device back in hand. On this page are published all the documents necessary for the use of your device. LMX7600SP by EGO.
USER MANUAL LMX7600SP EGO
natural_image
Line drawing of a lawn mower with visible wheels and handle (no text or symbols)LMX7600SP
56 VOLT LITHIUM-ION CORDLESS MOWER
EN 56 Volt lithium-ion cordless mower 8
natural_image
Line drawing of a mechanical component with triangular supports and a rectangular body (no text or symbols)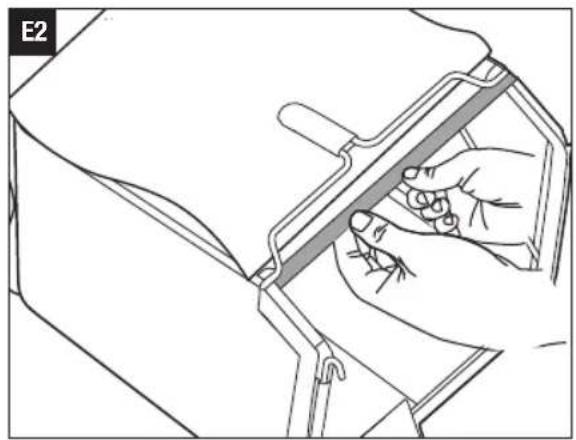
natural_image
Line drawing of a hand using a tool to cut or adjust a component, no text or symbols present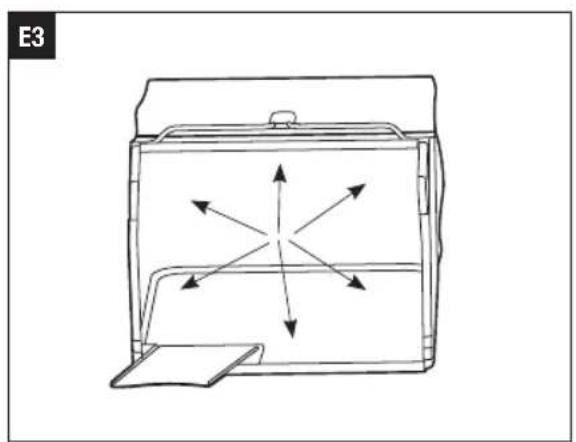
natural_image
Line drawing of a device casing with six directional arrows indicating flow or movement (no text or symbols)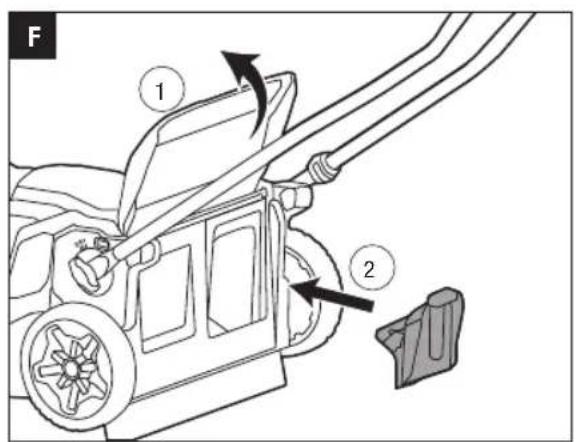
natural_image
Line drawing of a hand holding a mechanical device with attached tubing (no text or symbols)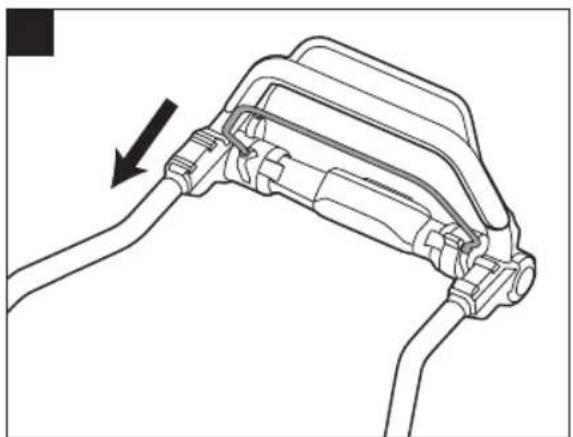
natural_image
Technical line drawing of a mechanical component with an arrow indicating direction (no text or symbols present)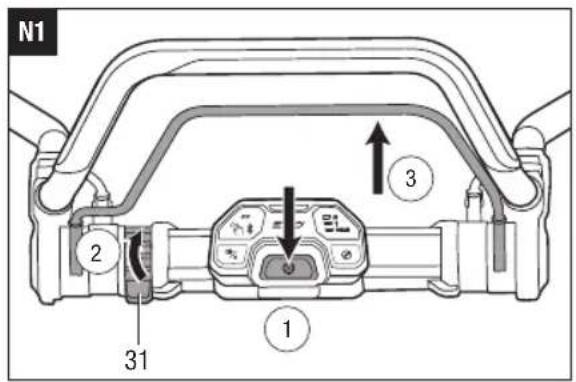
natural_image
Technical line drawing of a mechanical assembly with no visible text or symbols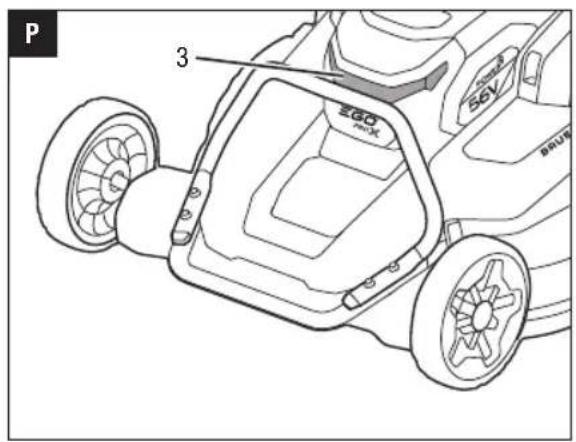


natural_image
Line drawing of a toy car with wheels and propellers (no text or symbols)
natural_image
Line drawing of a mechanical device with wheels and a handle (no text or symbols)EGO Europe GmbH
The Anchorage, 34 Bridge Street Reading, RG1 2LU, United Kingdom
EN
READ ALL INSTRUCTIONS!
Intended use: The product is intended for manual lawn mowing:
- Use only for mowing dry grass. Do not mow wet grass.
- Do not use it for any other purposes.
WARNING: Be sure to read and understand all safety instructions in this Operator's Manual, including all safety alert symbols such as "DANGER", "WARNING" and "CAUTION" before using this machine. Failure to follow all instructions listed below may result in electric shock, fire, and/or serious personal injury.
SAFETY SYMBOLS

Safety Alert

To reduce the risk of injury, user must read and understand operator's manual before using this product.

Always wear hearing protection, safety goggles or safety glasses with side shields and a full face shield when operating this product.

Switch off and remove detachable battery pack (or disabling device) before adjusting or cleaning.
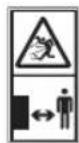
Beware of thrown objects – keep bystanders away. Keep hands and feet away from the blades


Keep hand away Do not stare at operating lamp.


Guaranteed sound power level.

This product is in accordance with applicable EC directives.

This product is in accordance with applicable UK legislation.
Waste electrical products should not be disposed of with household waste. Take to an authorized recycler.

Bluetooth®
V Volt
IPX5 Protection against water jets cm Centimeter
mm Millimeter kg Kilogram

Direct Current
NOTE: The Bluetooth® word mark and logos are registered trademarks owned by Bluetooth SIG, inc. and any use of such marks by EGO is under license.
SPECIFICATIONS
| Voltage | 56 V--- | |
| Blade Speed Mode | 2 | |
| 1 | ||
| ECO | ||
| Cutting-height Positions 10 | ||
| Cutting-height Setting | 20 mm/25 mm/33 mm/44 mm/58 mm/72 mm/86 mm/101 mm/114 mm/125 mm | |
| Cutting Width 76 cm | ||
| Grass Bag Volume 90 L | ||
| Maximum Mower Weight(with grass bag and battery pack) | 64 kg | |
| Blade Model AB3000 | ||
| Recommended Operating Temperature | 0°C-40°C | |
| Recommended Storage Temperature | -20°C-70°C | |
| Measured sound power level L_WA | 97 dB(A)K=0.7 dB(A) | |
| Sound pressure level at operator's ear L_PA | 83 dB(A)K=3 dB(A) | |
| Guaranteed sound power level L_WA (measured according to 2000/14/EC) | 98 dB(A) | |
| Valuation of vibration a_n : | Left handle | 0.48 m/s2K=1.5 m/s2 |
| Right handle | 0.54 m/s2K=1.5 m/s2 | |
■ The declared vibration total value has been measured in accordance with a standard test method and may be used for comparing one machine with another;
■ The declared vibration total value may also be used in a preliminary assessment of exposure.
NOTICE: The vibration emission during actual use of the machine can differ from the declared value in which the machine is used; In order to protect the operator, user should wear gloves and ear protectors in the actual conditions of use.
PACKING LIST (FIG. A1 & A2)
DESCRIPTION
KNOW YOUR MOWER (Fig. A1 & A2)
- Front Bumper
- Middle Bumper (Lift Handle)
- LED Headlight
- Battery Compartment Cover
- Trailing Shield
- Side-discharge Door
- Rear-discharge Door
- Side Rail
- Blade Rotation Trigger
- Handle
- Self-propel Trigger
- Grass Bag
- Locking Gear
- Wing Bolt
- Supporting Plate
- Rear Wheel
- Rear Cutting-height Adjustment Lever
- Deck
- Side Bumper
- Front Wheel
- Front Cutting-height Adjustment Lever
- Side-discharge Chute
- Mulching Insert
- Bluetooth® Indicator
- Dashboard
- Mower Status Indicator
- Blade Speed Indicator
- Blade Speed Mode Button
- Power Button
- LED Headlight Button (Bluetooth® Button)
- Self-propel Speed Dial
ASSEMBLY
⚠ WARNING: If any parts are damaged or missing, do not operate this product until the parts are replaced. Use of this product with damaged or missing parts could result in serious personal injury.
WARNING: To prevent accidental starting that could cause serious personal injury, always remove the battery pack(s) from the machine when assembling parts.
WARNING: Do not attempt to modify this machine or create accessories not recommended for use with this mower. Any such alteration or modification is misuse and could result in a hazardous condition leading to serious injury.
EN
3GO
UNPACKING
This product requires assembly.
■ Remove all the accessories from the carton.
CAUTION: Heavy object. Two persons are required to lift the mower.
■ One person should grasp the middle bumper/lift handle and the other person should grasp two wing bolts to 2 carefully lift the mower out of the carton.
INSTALLING THE HANDLE
The lawn mower is shipped with the handle partially assembled.
WARNING: Do not attempt to start the lawn mower until the handle is properly and securely installed and unfolded. Use caution to avoid pinching fingers and cable between the parts.
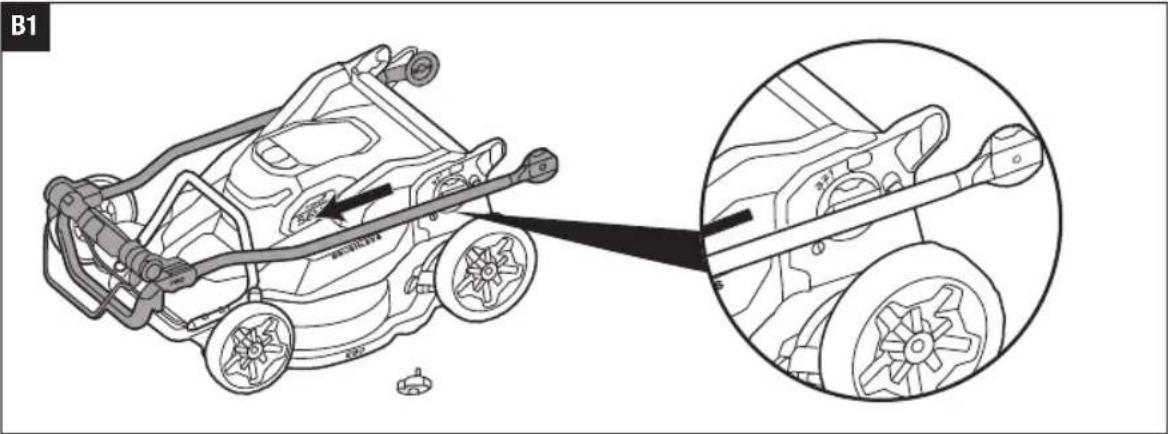
- Unscrew and put aside both wing bolts.
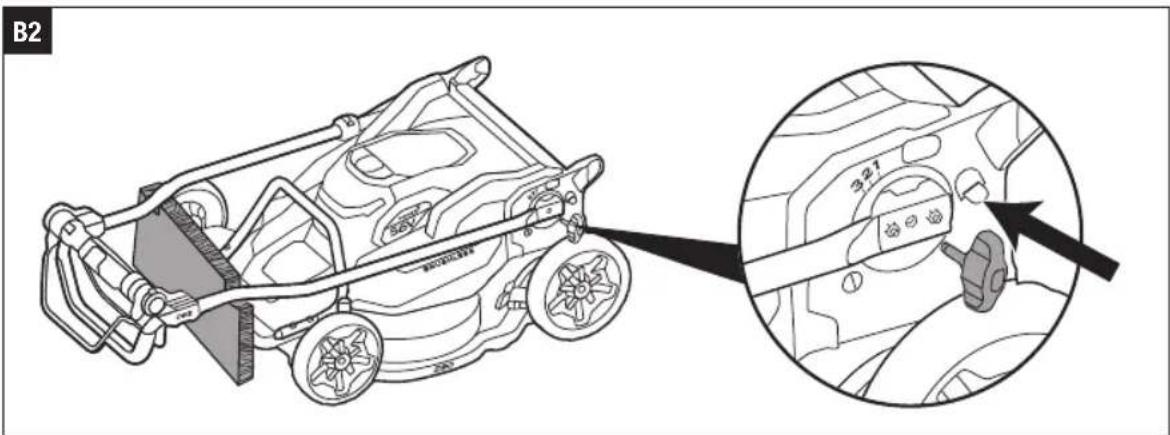
- Move the handle forward until the locking gear on the handle assembly is facing the gear on the mower (Fig. B1).
- Align the marks on the locking gear and supporting plate as shown in Fig. B2, then insert and finger-tighten the two wing bolts.
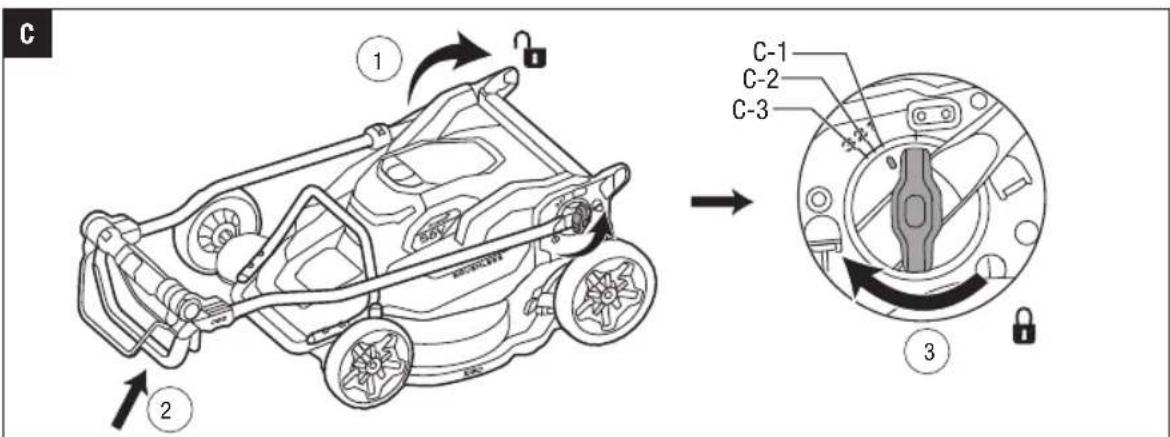
UNFOLDING AND ADJUSTING THE HANDLE (FIG. C)
WARNING: Be sure not to pinch, kink or stress the cable when folding or unfolding the handle. Damaging the cable could impact the activation and operation of the lawn mower and result in an unsafe operating condition.
WARNING: Do not attempt to start the mower and self-propel system until the handle has been locked in one of the three preset operating positions (Upper Operating Position 3, Middle Operating Position 2, and Lower Operating Position 1).
- Loosen the wing bolts on both sides, ensure that the two gears are fully loosened but NOT separated.
- Turn the handle upward until the arrow mark on the locking gear aligns with one of the three operating positions on the supporting plate.
- Tighten the two bolts, make sure the two gears are fully engaged and the handle is securely fixed.
| C-1 Lower Operating Position 1 |
| C-2 Middle Operating Position 2 |
| C-3 Upper Operating Position 3 |
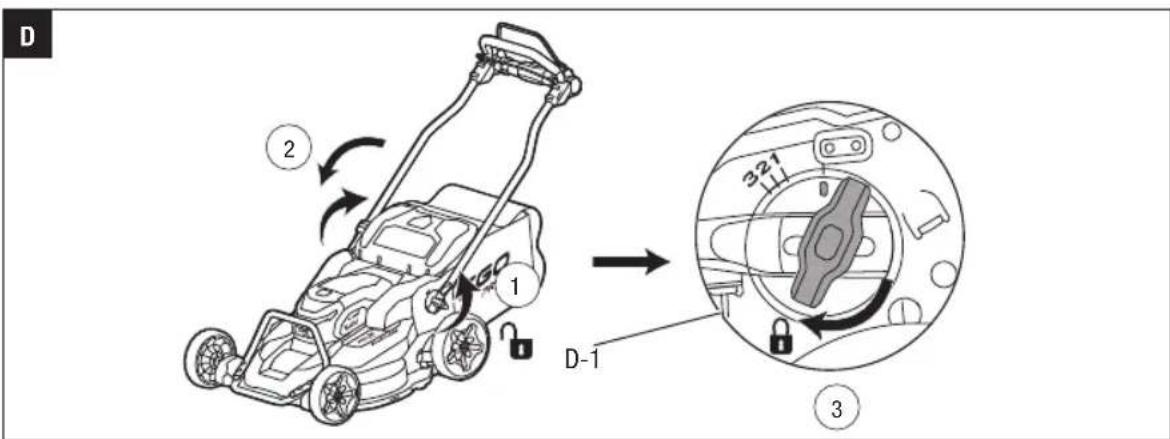
FOLDING THE HANDLE (FIG. D)
WARNING: Be sure not to pinch, kink or stress the cable when folding or unfolding the handle. Damaging the cable could impact the activation and operation of the lawn mower and result in an unsafe operating condition.
- Loosen the wing bolts on both sides, ensure the two gears are fully loosened but NOT separated.
- Turn the handle downward until the handle seats in the storage position.
- Align the arrow mark on the locking gear with the storage position mark on the supporting plate.
- Tighten the two wing bolts, make sure the two gears are fully engaged and the handle is securely fixed.
D-1 Storage Position
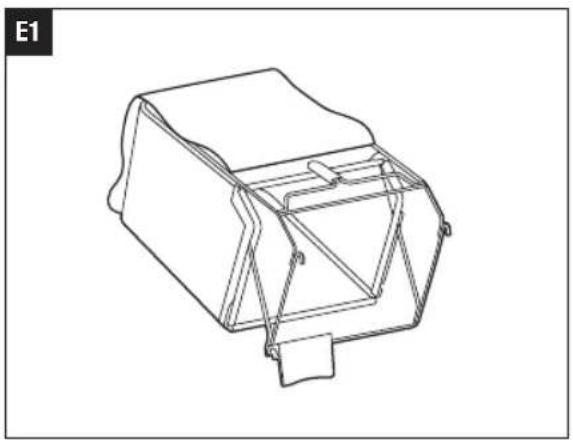
ASSEMBLING THE GRASS BAG (FIG.E1, E2, E3)
Check the grass bag before assembling, to make sure that there is no damage.
Assemble the grass bag as illustrated.
ATTACHING/REMOVING THE MULCHING INSERT
Use the mulching insert for recycling grass and leaf clippings back into the lawn.
Install the mulching insert into the mower as shown in Fig. F.
DANGER: The machine can throw grass clippings and other objects through an opening in the machine housing. Objects thrown with enough force could cause serious personal injury or death to you or to bystanders.
ATTACHING/REMOVING THE GRASS BAG
Use the grass bag when you want to collect grass and leaf clippings from the lawn.
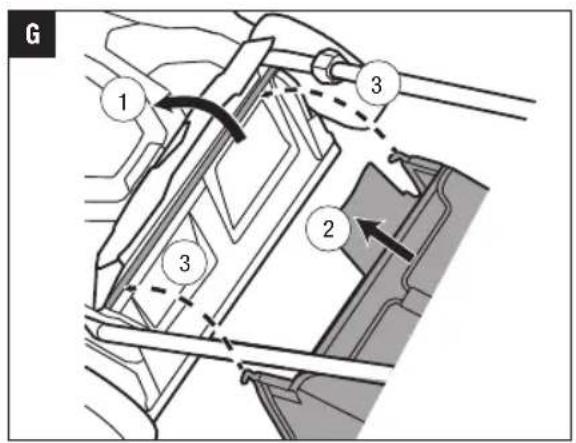
Install the grass bag into the mower as shown in Fig. G.
WARNING: Under normal usage, the grass bag material is subject to wear. To reduce the risk of injury, frequently inspect the grass bag and replace the bag if there are any signs of wear or deterioration. Use only grass bags manufactured for this mower.
WARNING: Remove the mulching insert and side-discharge chute before attaching the grass bag to the mower.
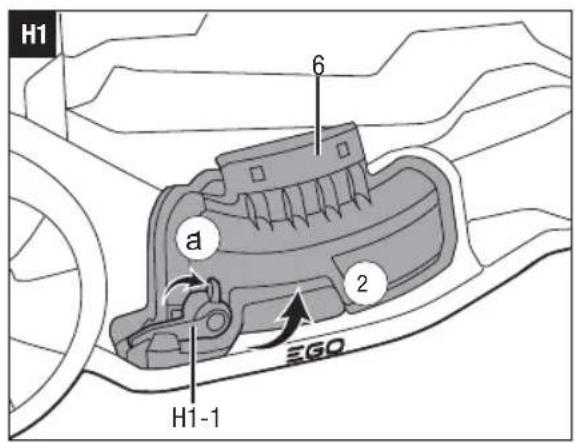
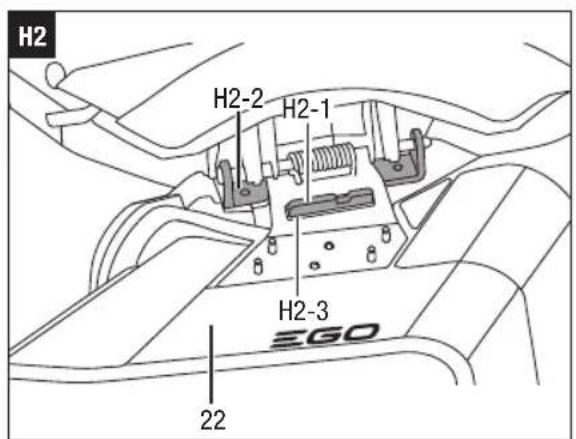
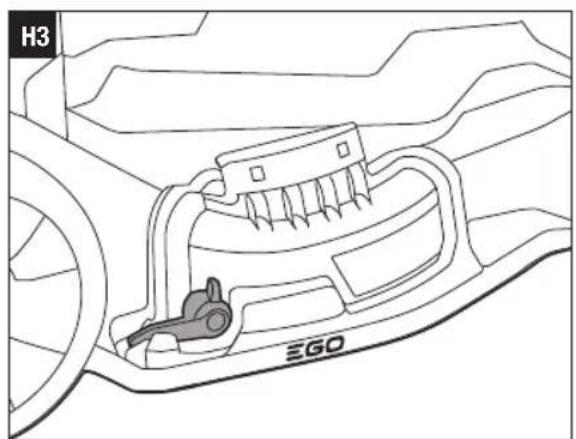
ATTACHING/REMOVING THE SIDE-DISCHARGE CHUTE (FIG. H1,H2,H3)
Use the side-discharge chute for cutting very tall grass.
- Remove the grass bag and attach the mulching insert, and then release the rear-discharge door.
- Press and hold the locking lever of the side-discharge door so that the lever is raised, and then lift the side-discharge door.
- Install the notch of the side-discharge chute onto the rib of the mounting plate.

WARNING: Ensure the mulching insert is in place re attaching the side-discharge chute.
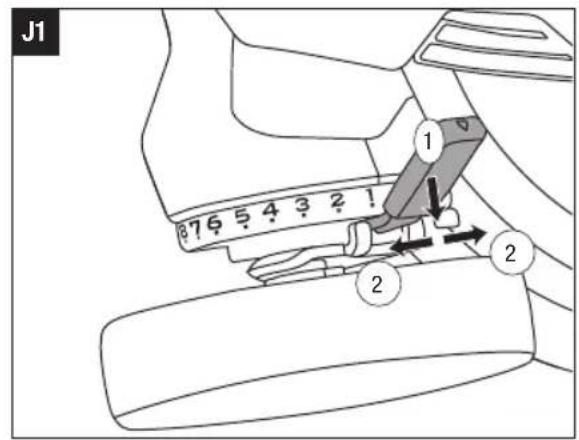
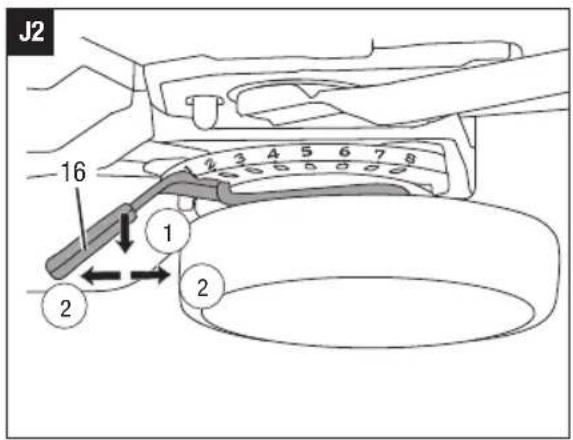
CUTTING-HEIGHT ADJUSTMENT (FIG.J1 & J2)

WARNING: Keep your feet away from the deck when sting the cutting height.
The mower can be set to 10 different cutting heights between 20 mm and 125 mm. A marking next to each cutting height measurement indicates the selected cutting height.
This mower allows you to adjust the cutting height of the front and the rear of the mower individually.

WARNING: To keep balance during mowing, please adjust both front and rear cutting heights at identical settings. For example, the front wheel cutting height is set to 20 mm, the rear wheel cutting height MUST also be set to 20 mm, the front wheel is 25 mm, the rear wheel is 25 mm, and so on, refer to below list, inconsistent height between front and rear wheel may cause accidental injury and tip the grass bag down.
| Front wheel cutting-height setting | Rear wheel cutting-height setting |
| 20 mm 20 mm | |
| 25 mm 25 mm | |
| 33 mm 33 mm | |
| 44 mm 44 mm | |
| 58 mm 58 mm | |
| 72 mm 72 mm | |
| 86 mm 86 mm | |
| 101 mm 101 mm | |
| 114 mm 114 mm | |
| 125 mm 125 mm |
Choose the proper cutting height according to the type and condition of the grass to be cut.
- Switch off the mower and wait for the cutting blades to come to a complete stop.
- Remove the battery packs.
- Pull the front or rear cutting height adjustment lever out of the detent and set it to the desired position.
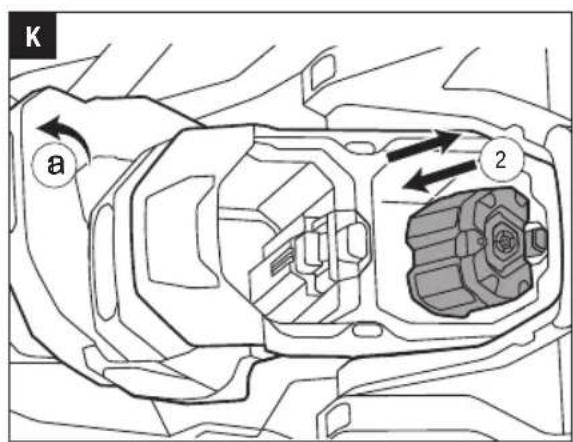
ATTACHING/DETACHING THE BATTERY PACKS (FIG. K)
NOTE: Charge the battery pack before first use.
Use only with the battery packs and chargers listed in Fig A3.
NOTE: The mower has two active battery ports. It can operate using one or two battery packs.
■ To Attach
-
Open the battery compartment cover and push the battery pack into the battery compartment until you hear a "click".
-
Repeat the process to install the second battery pack.
■ To Detach
Depress the battery-release button in the battery compartment.
NOTICE: Make sure that the latch on the mower snaps into place and that the battery pack(s) is secured to the mower before starting operation.
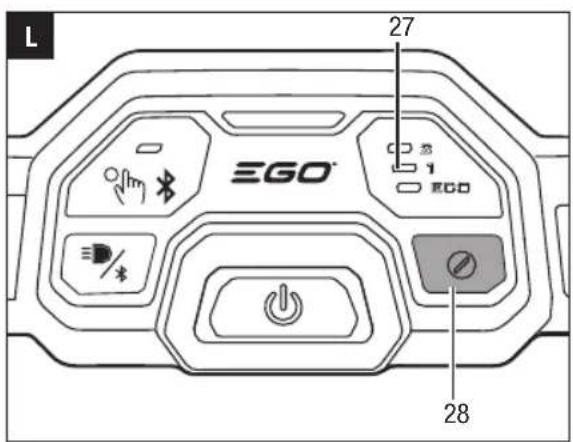
The mower features three blade speed modes:
SELECTING BLADE SPEED MODE (FIG. L)
■ Mode 2 is high blade speed mode for high-lift performance to improve suction force and cutting performance.
■ Mode 1 is the best balance between performance and runtime.
■ ECO mode provides the lowest noise level and longest runtime from your battery pack(s).
■ Select between mode 2, mode 1, and mode ECO by sequentially pressing the blade speed mode button.
NOTE: The default blade speed mode is mode 1.
COMMUNICATION TECHNOLOGY
For information on our full range of connected products and services, including connection instructions, please scan QR Code below or visit www.egopowerplus.eu/ connect.

EN
三GO
OPERATION
The product may be used in rain.
STARTING/STOPPING THE MOWER
WARNING: The operation of any lawn mower can result in foreign objects being thrown into your or others' eyes, which can damage eyes severely. Always wear safety glasses while operating the mower or while performing any adjustments or repairs on the mower.
WARNING: The blade will continue to rotate for a few seconds after the mower is turned off. Allow the motor/blade to stop rotating before starting it again. Do not rapidly turn the mower off and on.
WARNING: Stop the blade if the lawnmower has to be tilted for transportation when crossing surfaces other than grass and when transporting the lawnmower to and from the area to be mowed.
WARNING: Do not tilt the lawn mower when starting switching on the motor, except if the lawn mower has to be tilted for starting. In this case, do not tilt it more than absolutely necessary and lift only the part which is away from the operator.
Before using, always visually inspect to see that the blade and blade bolt are not worn or damaged. Replace worn or damaged blade and bolt in sets to preserve balance.
Check for blockage of the cutting blade
- To prevent blockage, keep the cutting blade and mower deck clean. Remove grass clippings, leaves, dirt and any other accumulated debris before and after each use.
- When blockage happens, stop the mower and remove the battery pack(s), then remove any build-up of grass and leaves on or around the drive shaft and motor fan. Wipe the mower clean with a damp cloth.
CAUTION: Do not attempt to override the operation of the power button and blade rotation trigger.
NOTE: The motor cannot be started unless the handle is locked in one of the three operating positions.
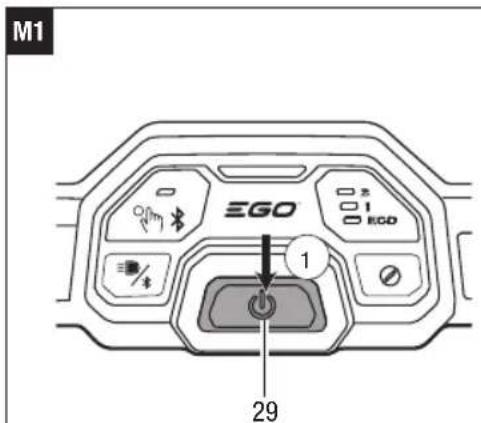
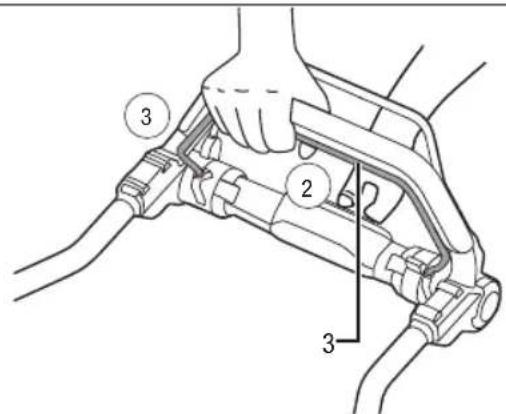
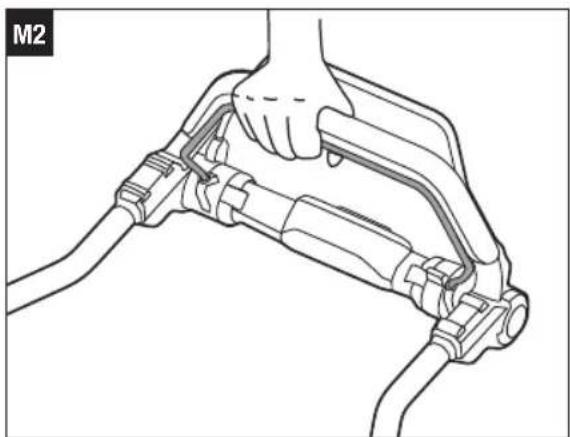
To start the mower (Fig. M1 & M2)
- Attach the battery pack(s) to the mower and close the battery compartment cover.
- Press the power button to illuminate the dashboard, and the mower status indicator along with the blade speed indicator 1 will light up.
- Press the blade speed mode button to select the desired speed.
-
Press and hold the power button.
-
With the power button pressed, pull the blade rotation trigger to meet the handle, and release the power button.
To stop the mower (Fig. M3)
- Fully release the blade rotation trigger.
- The electric brake in the Automatic Braking Mechanism will stop the blade rotation within 3 seconds of the blade rotation trigger release.
VARIABLE-SPEED SELF-PROPEL SYSTEM
The mower is equipped with variable-speed, self-propel capability. This self-propel system is independent from the blade rotation.
NOTE: The self-propel system cannot be started unless the handle is locked into one of the three operating positions.
To operate the self-propel system without blade rotation (Fig. N1)
- Press the power button to illuminate the dashboard.
- Slightly rotate the self-propel speed dial forward until a click can be heard, then pull the self-propel trigger to meet the handle to start the self-propel function.
To turn the self-propel off, release the self-propel trigger.
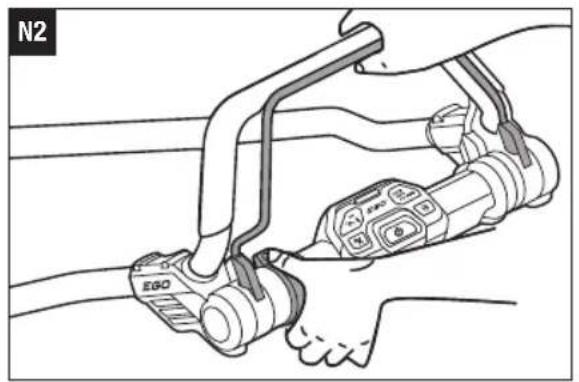
TO OPERATE THE SELF-PROPEL SYSTEM WITH BLADE ROTATION (FIG. N2)
- Press the power button to illuminate the dashboard.
- Press the blade speed mode button to select the desired speed.
- Press and hold the power button.
- With the power button pressed, pull the blade rotation trigger against the handle to start the mower, then release the power button.
- Hold the blade rotation trigger against the handle with one hand. Pull the self-propel trigger against the handle with the other hand to start the self-propel function.
- With one hand holding both the blade rotation trigger and the self-propel trigger against the handle, use the other hand to adjust the self-propel speed dial to choose the desired speed.
CAUTION: To reduce the risk of injury, never attempt to override the operation of the blade rotation trigger or self-propel trigger. Use the self-propel system for its intended purpose only.
LED HEADLIGHT (FIG. P)
To turn on the headlight, press the headlight button. The headlight provides bright light in front of the mower.
To turn off the headlight, press the button again.
MOWER STATUS INDICATOR
The mower status indicator on the dashboard displays the working status of the mower.
| Indicator Description Meaning Action | |||
 | Solid green | Mower is working properly. | None required. |
 | Flashing green | The handle is not locked in operating position. | Stop the mower and make sure that the handle is locked in one of the operating positions. |
 | Flashing red Low | battery charge. | Stop the mower and charge the battery pack(s). |
 | Solid orange Mower is overheated. | Release the blade rotation trigger, wait until the mower temperature drops below 80°C. See “MOWER HIGH-TEMPERATURE PROTECTION” below. | |
 | Flashing orange | The mower is overloaded. | 1. Remove the battery pack(s), then check if grass has accumulated beneath the deck. Clean if necessary.2. Slow down your stride when cutting.3. Raise the cutting height.4. If above solutions do not work, please contact EGO Service Center.See “MOWER OVERLOAD PROTECTION” below. |
 | Flashing red/ green alter-nately | Mower electronics error. Contact EGO Service Center. | |
EN
EGO
MOWER HIGH-TEMPERATURE PROTECTION
If the mower temperature exceeds 90^ C during operation, the temperature-protection circuit will immediately shut off the mower to prevent overheating damage.
The mower status indicator will glow solid orange. Release the blade rotation trigger and wait until the overheated mower cools down and the status indicator turns green, then restart the mower.
MOWER OVERLOAD PROTECTION
To prevent overload conditions, do not try to remove too much grass at one time. Slow down your stride or raise the cut height.
Your mower has built-in overload circuit protection. When the mower is overloaded, the motor will stop and the mower status indicator on the dashboard will flash orange.
MAINTENANCE
WARNING: To avoid serious personal injury, always switch off the mower, remove the battery pack(s), and ensure that all moving parts have come to a complete standstill. before cleaning, performing any maintenance or transporting the mower.
WARNING: Stop the machine, and remove the battery packs to make sure that all moving parts have come to a complete stop after striking a foreign object and to inspect the machine for damage and make repairs before restarting and operating the machine.
WARNING: Stop the machine, and remove the battery packs to make sure that all moving parts have come to a complete stop, if the machine starts to vibrate abnormally, and then to immediately inspect for damage, replace or repair any damaged parts and to check for and tighten any loose parts.
WARNING: When servicing, use only identical replacement parts. Use of any other parts may create a hazard or cause product damage. To ensure safety and reliability, all repairs should be performed by a qualified service technician.
CLEANING THE MOWER
The underside of mower deck should be cleaned after each use, as grass clippings, leaves, dirt and other debris will accumulate.
Remove any buildup of grass and leaves on or around the drive shaft and motor fan. DO NOT USE WATER! Wipe the mower clean with a damp cloth.
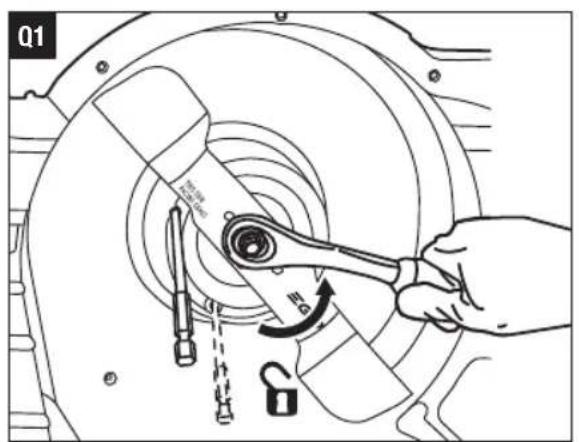
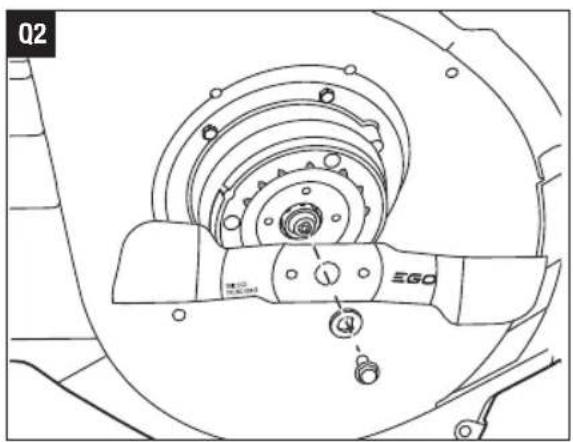
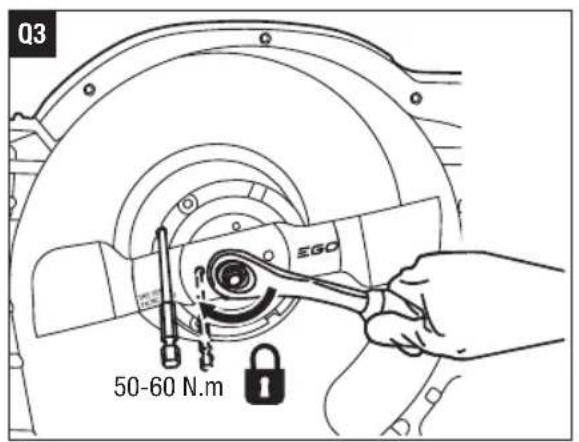
REPLACING THE BLADES (FIG. Q1, Q2, Q3)
WARNING: Always remove the battery pack(s) and grass bag.
WARNING: Always wear protective gloves.
NOTICE: Thoroughly clean the drive shaft area and the underside of the machine before installing the blades.
- Turn the mower upside down
- Remove/install the blade with a torque wrench and two metal rods as aid as illustrated.
- The printed blade side towards outside.
- Repeat the process to replace the second blade.
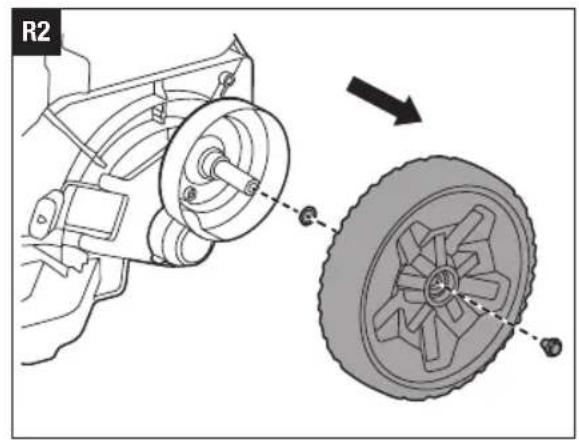
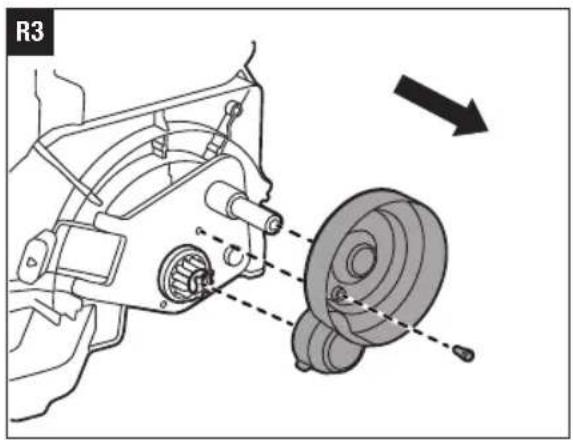
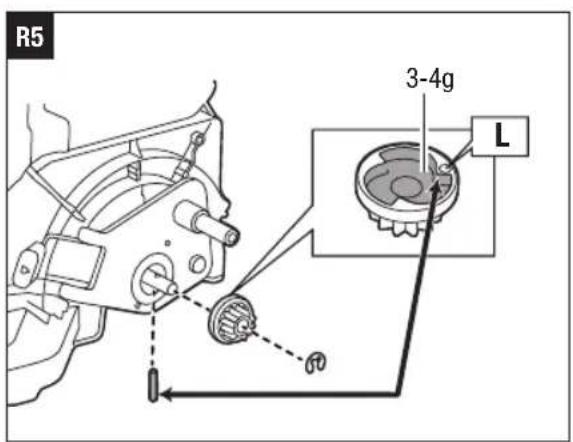
LUBRICATING THE CLUTCH GEARS IN THE REAR WHEELS (FIG. R1-R5)
To ensure better operation and prevent the rear wheels from being locked during movement, need to check and lubricate the clutch gears after every half a year operation.
NOTICE: The following tools (not included) are required:
■ 13 mm wrench
■ 3 mm hex key
■ flat screwdriver
■ needle nose pliers
To remove the clutch gear
Refer to the rear wheel assembly as illustrated in Fig. R1.
| R1-1 | Self-propelled Motor Shaft | R1-7 Bolt |
| R1-2 | Wheel Axle R1-8 Screw | |
| R1-3 | Clamping Spring R1-9 Clutch Gear | |
| R1-4 | Protective Cover R1-10 Inner Cavity | |
| R1-5 | Wave Washer R1-11 Pin | |
| R1-6 | Rear Wheel |
- Use a 13 mm wrench to loosen the bolt COUNTERCLOCKWISE. And remove the bolt, the rear wheel assembly and the wave washer from the wheel axle (Fig. R2).
- Use a 3 mm hex key to loosen the screw and remove the protective cover (Fig. R3).
- Use a flat screwdriver to pry off the clamping spring, and remove the clutch gear from the self-propelled motor shaft. Then remove the pin from the pin hole (Fig. R4).
EN
- Remove any buildup of dust and grease on the pin, pin hole and in the inner cavity of clutch gear. Clean the clutch gear, the pin and pin hole.
To install the clutch gear
- Apply grease about 3-4 g into the inner cavity of clutch gear and on the pin (Fig. R5).
The grease should meet the following requirements:
■ NLGI Grade Penetration: NLGI-2
■ Thickener Type: Ester
■ Recommended Operating Temperature Range: -20°C to 130°C
■ Other than above, the grease should also have excellent low-temperature startup, EP, mechanical shearing, abrasion resistance and oxidative stability.
- Insert the pin to the pin hole, and mount the clutch gear onto the self-propelled motor shaft.
- Install the clamping spring onto the shaft in place with a needle nose pliers.
- Install the protective cover and secure in place with the screw.
- Mount the wave washer and the rear wheel assembly on the wheel axle.
- Tighten the wheel assembly with the bolt CLOCKWISE.
- Repeat the process to lubricate the clutch gear on the other side.
NOTE: Pay more attention to the mark on the clutch gear L, R to avoid wrong installation.
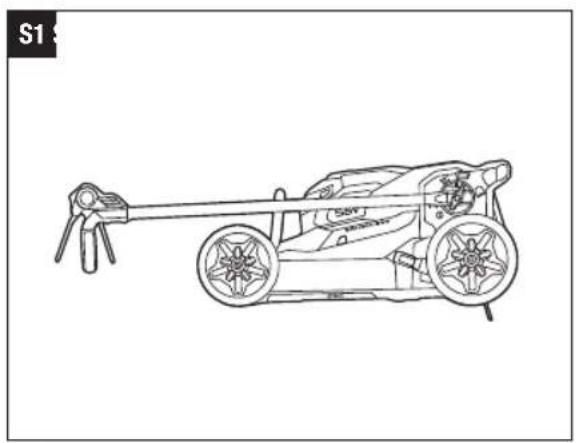
STORING THE MOWER (FIG. S1 & S2)
- Remove the battery pack(s) from the mower.
- Empty the grass bag and clean the mower.
- For saving substantial storage space fold the product handle and store the product as illustrated.
NOTICE: Ensure that the handle cord is not trapped when folding/unfolding the product handle (do not drop the handle).
- Do not place other objects on top of the mower when stored
WARNING: If the mower tips over from the upright position, mower damage or personal injury may result. Always keep the mower stable and out of the reach of children when it is in the upright position. If possible, lay it flat for storage.
PROTECTING THE ENVIRONMENT
Do not dispose of electrical appliances as unsorted municipal waste, use separate collection facilities.
Contact your local government for information regarding the collection systems available.
If electrical appliances are disposed of in landfills or dumps, hazardous substances can leak into the groundwater and get into the food chain, damaging your health and well-being.
TROUBLESHOOTING
| PROBLEM CAUSE SOLUTION | ||
| The mower or self-propel function fails to start. | ■ The battery pack(s) charge is depleted. | ■ Charge the battery pack(s). |
| ■ The battery pack(s) is not properly inserted into the battery compartment. | ■ Insert the battery pack(s) into battery compartment until you hear a "click". | |
| ■ The handle is not locked in an operating position and the mower status indicator flashes green. | ■ Stop the mower and make sur that the handle is locked in one of the operating positions. | |
| ■ The mower deck is clogged with grass and debris. | ■ Clean the mower deck and ensure that the blade has freedom of movement. | |
| The mower cuts unevenly. | ■ The blade(s) is dull. | ■ Sharpen or replace the blade(s). |
| ■ The grass-cutting height is not set properly. | ■ Move the deck height to a higher setting. | |
| ■ The blade(s) is installed incorrectly. | ■ Re-install the blade(s), following the section “REPLACING THE BLADES” in this manual. | |
| ■ The blade speed mode is not set properly. | ■ Select a proper blade speed mode. | |
| ■ The grass-cutting height settings between front and rear wheel are not consistent. | ■ Adjust front and real wheel at identical cutting height. | |
| The mower does not mulch properly. | ■ Wet grass clippings are sticking to the underside of the deck. | ■ Wait until the grass dries before mowing. |
| ■ The mower is set to cut too much grass at once. | ■ Raise the deck to a higher cutter height setting. | |
| ■ The blade speed mode is not set properly. | ■ Set blade speed to a lower setting. |
EN
| The mower unexpectedly stops while mowing. | ■ The battery pack(s) charge is depleted. | ■ Charge the battery pack. |
| ■ Mower is overloaded and the mower status indicator flashes orange. | ■ Check if grass has accumulated beneath the deck and clean if needed. Raise the cutting height or slow down the mowing. | |
| ■ Mower deck is clogged with grass and debris. | ■ Unclog the mower deck. Raise the cutting height and/or cut a narrower swath. | |
| ■ The battery pack(s) or mower circuitry is too hot. If the battery pack is overheated the mower status indicator goes off. If the mower is overheated the mower status indicator glow solid orange. | ■ Allow the battery pack(s) or mower to cool down. | |
| ■ The blade speed mode is not set properly. | ■ Select the blade speed to a lower setting. | |
| ■ The mower electronics error and the mower status indicator flashes red/green alternately. | ■ Contact EGO Service Center. | |
| There is excessive vibration. | ■ The cutting blade(s) is loose. | ■ Tighten the blade bolt. |
| ■ The cutting blade(s) is unbalanced. | ■ Contact the EGO Service Center. | |
| ■ The cutting blade(s) is bent. | ■ Replace the blade(s). | |
| ■ The motor shaft is bent. | ■ Contact the EGO Service Center. | |
| ■ The mower is set to cut too much grass at once. | ■ Raise the deck to a higher cutting-height setting. | |
| ■ The blade speed mode is not set properly. | ■ Set the blade speed to a lower setting. | |
| The motor works but the blade doesn't cut the grass. | ■ The blade(s) is not tightened to the required torque. | ■ Re-tighten the blade(s). The recommended torque for the blade bolt is 50-60 N.m. |
| The rear wheels are locked during movement. | ■ cThch gear in the rear wheel is clogged with dust and grease. | ■ Clean and lubricate the clutch gear, following the section "LUBRICATING THE CLUTCH GEARS IN THE REAR WHEELS". |
WARRANTY
EGO WARRANTY POLICY
Please visit the website egopowerplus.eu for full terms and conditions of the EGO Warranty policy.
directives CE applicables.

Bluetooth®
LAMPES AVANT LED (FIG. P)
LISTA DE PEÇAS (IMAGEM A1 E A2)
DESCRIÇÃO
CONHEÇA A SUA MÁQUINA DE CORTAR RELVA (IMAGEM A1 E A2)
DESDOBRAR E AJUSTAR A PEGA (IMAGEM C)
DOBRAR A PEGA (IMAGEM D)
MONTAR O SACO DE RECOLHA DA RELVA (IMAGEM E1, E2, E3)
FIXAR/RETIRAR A SAÍDA DE DESCARGA LATERAL (IMAGEM H1, H2, H3)
LUZ DIANTEIRA LED (IMAGEM P)
SUBSTITUIÇÃO DAS LÂMINAS (IMAGEM Q1, Q2, Q3)
CHIUSURA DEL MANUBRIO (FIG. D)
LED-KOPLAMP (AFB. P)
LED-FORLYGTE (FIG. P)
SM∅RING AF KOBLINGSGEARENE I BAGHJULENE (FIG. R1-R5)
FESTE/FJERNE GRESSPOSEN
Bruk gressposen när du vil samle opp gress- og løvavklipp fra plenen.
Installer gressposen i klipperen som vist i fig. G.
LED-HOVEDLYS (FIG. P)
SKIFTE AV KNIVER (FIG. Q1, Q2, Q3)
ADVARSEL: Fjern alltid batteripakken(e) og gressposen.
ADVARSEL: Bruk alltid vernehansker.
SM∅RING AV KOBLINGSGIR I BAKHJULENE (FIG. R1-R5)
REFLEKTOR LED (RYS. P)
POLITYKA GWARANCYJNA EGO
SKLOPENIE RUKOVÄTE (OBR. D)
LED SVETLOMET (OBR. P)
Ak chcete zapnút' svetlomet, stlačte tlačidlo svetlometu. Svetlomet poskytuje jasné svetlo pred kosačkou.
FARUL CU LED (FIG. P)
lsbqngngdou qss303s (6sb. D)
A zgsmosbngnds: lshgengmols qss3g30ls sf zsdqmsls snd dmf6son, snd zspsgybnom qs sf qssdsdmon lshgengnjo. zsdgenvols qssbosgdsd dhodengds zszengbs amsbqobml zsbmbol lsz6gflol zssgjngngdsls qs dymdsmdbg qs zsdmofzoml lshogssom lshydam dqmmdsgmds.
- ἀνγδοσος χδβγγόσοςο δόσοδο σόσος δύσης, χαδήσχροσος, θια τόσο σάδόσος δόσοσόςο δόσοδόγεωσος, δαξόσα σό σόσος δύσοσόςτόσοδόγεωσος.
- άοδασμονος υσβησευγόσο ξβασμον, υσβασμονος υσβησευγόσο σή βαχαργός άγβασβούς άγασμασκόγισός.
- გაუსწორეთ ნამვეტ მექახიზმზე არსებული ისრის ნიმანი საყრდენ ფირვიუსზე არსებულ მენახვის პოზიციას.
- ἀνηζούμος Μό χδβγκόσι δύσδύ, ψσδήσχροσ, ὡπό Μό σαδάσο λύσχροσ φόν δύσχροσ φόν λυδρωτό σόν φόν σαδάσχροσ φόν
D-1 3965b30b 3m96080s
6g0b0d0g0o lsbou g0b3mgs0s0sd 3g0d0mgs
KA
三GO
Assomfzoml ygbn lsgbdol oq3b1 mzsngdo dmbgqns, nsdsg qjodngds dscmosb qssbosbl mzsngdo. ymgmwnzol gzzgmm lsbgmbndol lsmsngdo zsbmbol lszfgfnsb ndydsmdol qfmbl sb dolo bjoabogmo nggymngdol sb ndgmydol qfmbl.
LED 3s6s0g8s (6sb. P)
gsmbu bslsmbsszgo, qssfomgon gsmbdou qomssbl. gsmbo ybmbg3genvmgl 3sd3sd gsbsngdsh lsmodobu fob.
gsnol ysdmlsmonzq, 33msg qssfongon moomsb.
zsmbou lszngjo dsbdshou lsgsyngolu obqozsghmo
356m60u 1s36gj4o u 1s8s6gj4o u 0bq0z6gj4o 356gj4o g 9s36gj4o u 1s36gj4o u 0d7dsm8o u 1s8s6gj4o u .
zuydsmosmdol yong6muk3s
| zsmbngds | zsmdh3g3o do6b0 | zsqsf6o 8b5 |
| gsmbou ls3ngfo sb ozon-gemol gngdgos 3g6 sdmjdgqgds. | ■ zsgdynosgm6nol dcmzol qsadhyb5gsgmmos. | ■ qssybjgn szgdynosgm6n |
| ■ zsgdynosgm6nol dcmzol sb qggls zgdynosgm6nol bs3gomgdo lsonbsqmo. | ■ bs300s zgdynosgm6nol dcmz(j8)o sgdynosgm6nol bs3gomgdo, lsbsd sb gsngdom "qsf3sdybjdu" bdsl. | |
| ■ lsbgmngno sb smol bs3g0mo lsadydam 3mbogosdo qs ls3g0jou lsysyjlo sbsondti dh3s8go. | ■ zssybjgn zsmbou ls3ngqs qsnfdybjqom, fmd lsbgmngno bs3g0mos lsadydam 3mbogosdo. | |
| ■ zsmbou ls3ngfo dsbjsbou djgps bsjoeno ysfgpncos dsensbos qs bsmbjgdoon. | ■ zsfdobqgn zsmbou ls3ngfol dzgos bsjoeno qs qsnfdybjqom, fmd qsbs osgolgyzmsq odmdsmdls. | |
| gsmbou ls3ngfo yuymndslfmmpg f6oL. | ■ 306(j8)o dmzs3os. | ■ zsmybjgn sb dd3swnom 306(j8)o. |
| ■ dsmsbou j6oL lodscwng sm smoL lbfm6so qsygbydwno. | ■ qsqsoy3s8gn ddgps bsjoenb lodscwng yg6m dsqse 3s6sdybjby. | |
| ■ 306(j8)o sbslfm6so smoL qsadmbygduwno. | ■ bgmsbns qsadszygn lsfygmo 306(j8)o, da3ygzoa dmabdsgdeomol oblygnyjgosl, fmdqmoq dmagdyqmos sd lsbgmddq3s6qcmu ,qsbou zsdmg3ns" bsfomdo. | |
| ■ qsbou lohjsbou ndgodo sm smoL lbfm6so qsygbydwno. | ■ sobbogm qsbou lohjsno ddusdaolo ndgodo. | |
| ■ dsmsbou mo8oL lodscwnol 3s6sdygmdo j6bs qs y3s6s dm6dwndl dm6nol gmndsbqol s6 ddglsdsdgs. | ■ qssybjgn fi6s qs y3s6s dm6dsmo j6oL oqgbyy6 lodscwnby. |
KA
三GO
| gsmbol uszngfo dsbsbs bfmssq s6 s3gmdb dgnmbogdsu. | ■ bsgmo dsmsbol bsbgbd o dohgdgymos dzgcs bsfomby gzsbs dbmqsb. | ■ qsgmqqon lsbsd dsmsbo zsmdgs dmomdzsdg. |
| ■ bsmbol uszngfo dsbsbs dmadsomyemos, dmfsbl gmodsdsq dsmosb dg3no dsmsbo. | ■ sfgon dmssgmnds fnoi dsmsn bodsmgby csbsgbdgemsq. | |
| ■ qsbol bojsmol mgodo sm sbol ujmssq osggbdymo. | ■ qssgbm qsbol bojdsg yggbm qsdsm dahsdgbdg. | |
| gsmbol uszngfo dmgnmogbcomg hmgqds zfgjzou qcmb. | ■ szgdmgsmgmol dmzmol osdgtbdg osgmoemos. | ■ qsgbcon szgdmgsmmol dmzo. |
| ■ bsmbol uszngfo sgsgzmgmmos qs bsmbol uszngfol bgsgbls obqozgsmo gododgbl bsmbxolgdsq. | ■ ddsmfdgm, osgzmqos om sns dsmsbo dzgcs bsfombl dzg dw os fsfobgom lsfoomgbls agdomggsdo. sfgon fnoi bodsmg sb ddsgbm gnoi fnoi fnoi. | |
| ■ bsmbol uszngfol dzgcs bsfom osgsfgmoemos dsmsbon qs bsmbgbdom. | ■ ssmsgvmgcm wsomdol dzgcs bsfom. zsbsgqm fnoi bodsmg qos/sb gsomdgm zoftim bmnq. | |
| ■ szgdmgsmgmol dmzm( gd)ol sb ysmbol uszngfol gmydgm ljdds bgqodgus gzbgymgymos. ony szgdmgsmmol dmzo gsqsbgmdgymos, ysmbol uszngfol bgsgbls obqozgsmo gsdomongds. ony zsmbol uszngfo bgqodgus gzbgymgymos, ysmbol uszngfol bgsgbls obqozgsmo sbsmgbl bsmbxolgdsq. | ■ dogbm szydgmshl dmzm( gd)u sb zsmbol uszngfl szymcmgbls dahsgmds. | |
| ■ qsbol bojsmol ggoado sm sbol ujmssq osggbdymo. | ■ sobbogm qsbol bojdsg yggbm qsdsm dahsdgbdg. | |
| ■ bsmbol uszngfol gmydgmbozol dygcoms qs bsmbol uszngfol bgsgbls obqozgsmo dmbsgzmgdom sbsomdl fnomcso/dfzsgc. | ■ qsyzsdoqom EGO-l dmalsbghdol gfbgbl. |
KA
الصيانة. lendingت Justin، Agricultural, Agricultural, Agricultural, Agricultural, Agricultural, Agricultural, Agricultural, Agricultural, Agricultural, Agricultural, Agricultural, Agricultural, Agricultural, Agricultural, Agricultural, Agricultural, Agricultural, Agricultural, Agricultural, Agricultural, Agricultural, Agricultural, Agricultural, Agricultural, Agricultural, Agricultural, Agricultural, Agricultural, Agricultural, Agricultural, Agricultural, Agricultural, Agricultural, Agricultural, Agricultural, Agricultural, Agricultural, Agricultural, Agricultural, Agricultural, Agricultural, Agricultural, Agricultural, Agricultural, Agricultural, Agricultural, Agricultural, Agricultural, Agricultural, Agricultural, Agricultural
تحذير: Despite y due to thinking, you just a woman who is going to think. You are willing to try to take her as they are interesting. The girl is doing so that you want to say.
الح Diversity should not be a meaning

| .הכלההוּרָהוּרָהוּרָהוּרָהוּרָהוּרָהוּרָהוּרָהוּרָהוּרָהוּרָהוּרָהוּרָהוּרָהוּרָה�ּרָהוּרָהוּרָהוּרָהוּרָהוּרָהוּרָהוּרָהוּרָהוּרָהוּרָהוּרָהוּרָהוּרָהוֹרָהוּרָהוּרָהוּרָהוּרָהוּרָהוּרָהוּרָהוּרָהוּרָהוּרָהוּרָהוּרָהוּרָהוּר‘ | .הכלההוּרָהוּרָהוּרָהוּרָהוּרָהוּרָהוּרָהוּרָהוּרָהוּרָהוּרָהוּרָהוּרָהוֹרָה:הכלההוּרָהוּרָהוּרָהוּרָהוּרָהוּרָהוּרָהוּרָהוּרָהוּרָהוּרָהוּרָהוּרָהוּר‘ | |
| .הכלההוּרָהוּרָהוּרָהוּרָהוּרָהוּרָהוּרָהוּרָהוּרָהוּרָהוּרָהוּרָהוּרָהוֱרָהוּרָהוּרָהוּרָהוּרָהוּרָהוּרָהוּרָהוּרָהוּרָהוּרָהוּרָהוּרָהוּרָהוּר ‘ | .הכלההוּרָהוּרָהוּרָהוּרָהוּרָהוּרָהוּרָהוּרָהוּרָהוּרָהוּרָהוּרָהוּרָהוִרָהוּרָהוּרָהוּרָהוּרָהוּרָהוּרָהוּרָהוּרָהוּרָהוּרָהוּרָהוּרָהוּרָהוּר 1997. | |
| .הכלההוּרָהוּרָהוּרָהוּרָהוּרָהוּרָהוּרָהוּרָהוּרָהוּרָהוּרָהוּרָהוּרָה:EGO 56 | .הכלההוּרָהוּרָהוּרָהוּרָהוּרָהוּרָהוּרָהוּרָהוּרָהוּרָהוּרָהוּרָהוּרָהוֲרָהוּרָהוּרָהוּרָהוּרָהוּרָהוּרָהוּרָהוּרָהוּרָהוּרָהוּרָהוּרָהוּרָהוּר ^1 | |
| .הכלההוּרָהוּרָהוּרָהוּרָהוּרָהוּרָהוּרָהוּרָהוּרָהוּרָהוּרָהוּרָהוּרָה :EGO | .הכלההוּרָהוּרָהוּרָהוּרָהוּרָהוּרָהוּרָהוּרָהוּרָהוּרָהוּרָהוּרָהוּרָהוֵרָהוּרָהוּרָהוּרָהוּרָהוּרָהוּרָהוּרָהוּרָהוּרָהוּרָהוּרָהוּרָהוּרָהוּר ^1 | |
| .הכלההוּרָהוּרָהוּרָהוּרָהוּרָהוּרָהוּרָהוּרָהוּרָהוּרָהוּרָהוּרָהו-EGO | .הכלההוּרָהוּרָהוּרָהוּרָהוּרָהוּרָהוּרָהו-EGO | |
| .הכלההוּרָהוּרָהוּרָהו-EGO | .הכלההוּרָהוּרָהוּרָהו-EGO | |
| .הכלההוּרָהוּרָהו-EGO | .הכלההוּרָהוּרָהו-EGO | |
| .הכלההוּרָהוּרָהו-EGO | .הכלההוּרָהוּרָהו-EGO | |
| .הכלההוּרָהוּרָהו-EGO | .הכchiaוּרָהוּרָהו-EGO | |
| .הכchiaוּרָהו-EGO | .הכchiaוּרָהו-EGO | |
| .הכchiaוּרָהו-EGO | .הכchiaוּרָהו-EGO | |
| .הכchiaוּרָהו-EGO | .הכchiaוּרָהו-EGO | |
| .הכchiaוּרָהו-EGO | .בְבְבְבְבְבְבְבְבְבְבְבְבְבְבְבְבְבְבְבְבְבְבְבְבְבְבְבְבְבְבְבְבְבְגְבְבְבְבְבְבְבְבְבְבְבְבְבְבְבְבְבְבְבְבְבְבְבְבְבְבְבְבְבְבְבְבְב‐ |
תָרְשָׁת
EGO 70
,הכלההוּרָה,הכלההוּרָה,הכלההוּרָה,הכלההוּרָה,הכלההוּרָה,הכלההוּרָה,הכלההוּרָה,הכלההוּרָה,הכלההוּרָה,הכchia 25 (אשׁ)
.הכלההוּרָהוּרָהוּרָהוּרָהוּרָהוּרָהוּרָהוּרָהוּרָהוּרָהוּרָהוּרָהוּרָהוּרָהוּרָה
natural_image
Line drawing of a lawn mower with visible wheels and handle (no text or symbols)LMX7600SP