
HPW1800E - Pressure washer EGO - Free user manual and instructions
Find the device manual for free HPW1800E EGO in PDF.

| Product type | Cordless pressure washer |
| Brand | EGO |
| Model | HPW1800E |
| Rated voltage | 56 V |
| Rated pressure | 125 bar |
| Maximum pressure | 170 bar |
| Rated flow rate | 4.5 L/min |
| Maximum flow rate | 6.5 L/min |
| Max inlet water pressure | 10 bar |
| Weight (without battery) | 9.26 kg |
| Operating temperature | 5 °C to 40 °C |
| Storage temperature | -20 °C to 70 °C |
| Guaranteed sound power level | 90 dB(A) |
| Sound pressure level | 75 dB(A) |
| Vibration | 0.4 m/s² (K=0.5 m/s²) |
| Protection rating | IPX5 (water jets) |
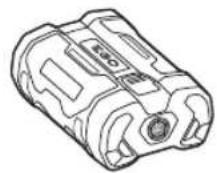
| Power supply type | Lithium-ion battery 56 V (not included) |
| Included nozzles | 15°, 25°, 40°, Turbo nozzle |
| Foam cannon | Yes |
| Functions | 3 speeds (Low, High, Turbo), auto-off after 5 min of inactivity |
| Maintenance | Filter and nozzle cleaning, winterization required with pump protector |
| Safety | Gun lock, protection against accidental starts |
| Spare parts and repairability | Use only genuine EGO spare parts; contact customer service |
| Warranty | Visit egopowerplus.eu |
Frequently Asked Questions - HPW1800E EGO
User questions about HPW1800E EGO
0 question about this device. Answer the ones you know or ask your own.
Ask a new question about this device
Download the instructions for your Pressure washer in PDF format for free! Find your manual HPW1800E - EGO and take your electronic device back in hand. On this page are published all the documents necessary for the use of your device. HPW1800E by EGO.
USER MANUAL HPW1800E EGO
natural_image
Line drawing of a power pump with attached brushes and hoses (no text or symbols)HPW1800E
56V LITHIUM-ION PRESSURE WASHER
EN 56V lithium-ion pressure washer 6


A2
BA1400, BA1400T, CH2100E, BA2240T, BA2242T, CH3200E, BA2800, BA2800T, CH5500E, BA3360T, BA4200, CH7000E, BA4200T, BA5600T, CH7000E-T BA6720T, BA4480X
CH2100E,
CH3200E,
CH5500E,
CH7000E,
CH7000E-
natural_image
Line drawing of a portable electronic device with front panel and internal components (no text or symbols)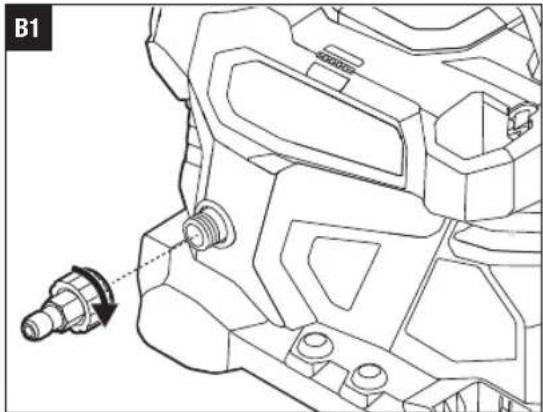
natural_image
Technical line drawing of a mechanical assembly with a connector (no text or symbols)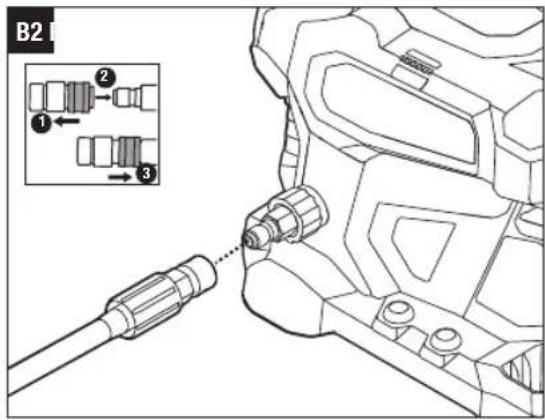

natural_image
Diagram of a medical or surgical tool being inserted into a device, showing a connector and tip assembly (no text or symbols)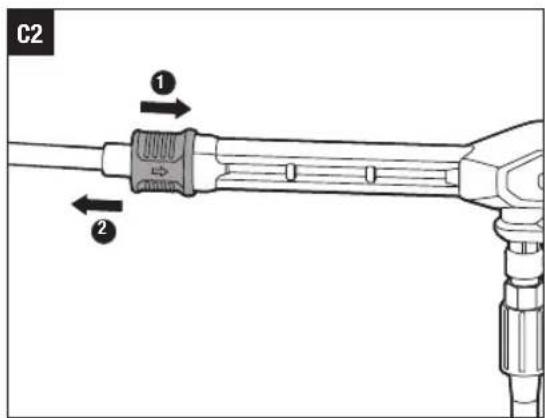

natural_image
Diagram showing a spray gun dispensing liquid onto a cylindrical container (no text or symbols present)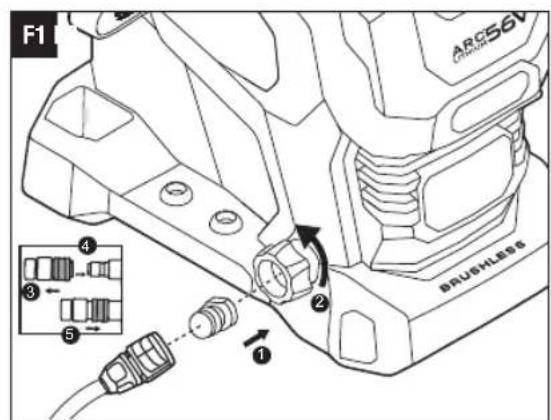
natural_image
Technical line drawing of a mechanical component with two views: one showing internal structure and the other a cylindrical housing labeled G-1 (no text or symbols beyond label)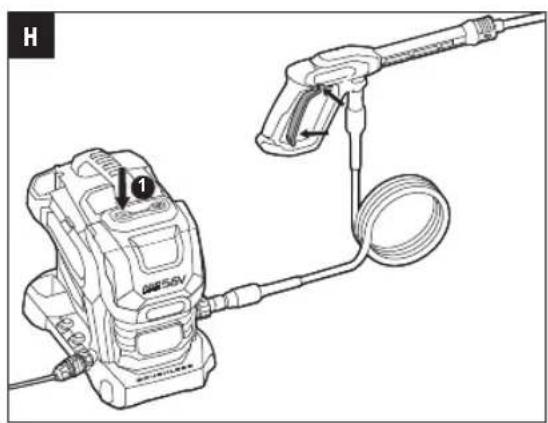
natural_image
Technical line drawing of a water heater connected to a hose and cable (no text or symbols)
natural_image
Technical line drawing of a mechanical component with two views: top view showing a flanged circular part and bottom view showing a threaded cylindrical component (no text or symbols)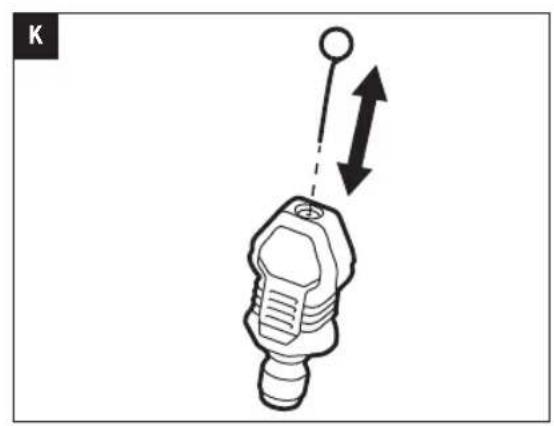
natural_image
Diagram of a mechanical component with an upward arrow indicating motion or force direction (no text or symbols)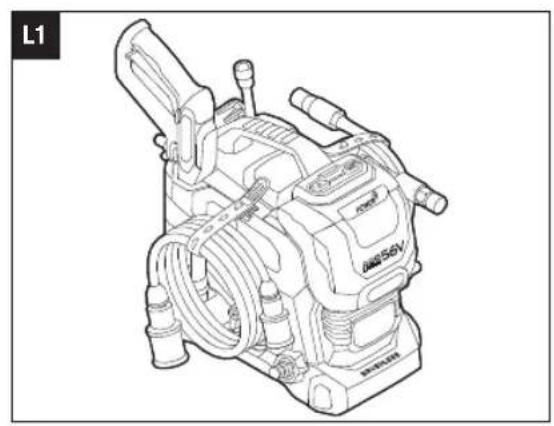
natural_image
Line drawing of a mechanical pressure pump assembly (no text or symbols)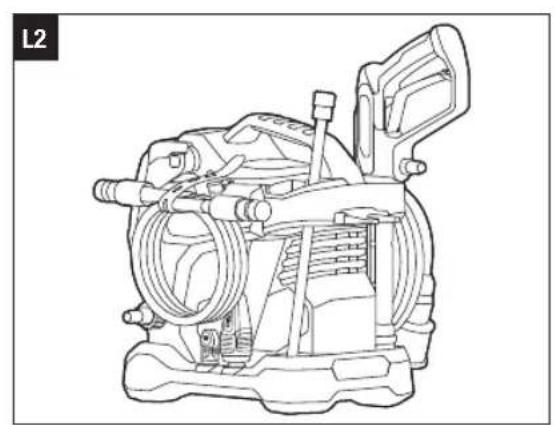
natural_image
Technical line drawing of a mechanical device with hoses and housing (no text or symbols)EN
READ ALL INSTRUCTIONS!

READ OPERATOR'S MANUAL
WARNING: To ensure safety and reliability, all repairs should be performed by a qualified service technician.
SAFETY SYMBOL
The purpose of safety symbols is to attract your attention to possible dangers. The safety symbols and the explanations with them deserve your careful attention and understanding. The symbol warnings do not, by themselves, eliminate any danger. The instructions and warnings they give are no substitutes for proper accident prevention measures.
WARNING: Be sure to read and understand all safety instructions in this Operator's Manual, including all safety alert symbols such as "DANGER", "WARNING" and "CAUTION" before using this machine. Failure to follow all instructions listed below may result in electric shock, fire, and/or serious personal injury.
WARNING: Risk of fire and burns. Do not disassemble, heat above 100 °C, or incinerate. Keep battery out of reach of children and in original package until ready to use. Dispose of used batteries promptly according to local recycling or waste regulations.
SAFETY INSTRUCTIONS
This page depicts and describes safety symbols that may appear on this product. Read, understand, and follow all instructions on the machine before attempting to assemble and operate.

Safety Alert

To reduce the risk of injury, user must read the operator's manual.

Wear Eye Protection Wear Ear Protection


Never spray yourself, others, animals, power sources, or the unit itself.

This product is in accordance with applicable EC directives.

Do not connect to the potable water mains. UK Conformity Assessed

Waste electrical products should not be disposed of with household waste. Take to an authorized recycler.

Water outlet pressure

Noise

Water inlet pressure

Water flow Operating Temperature


Direct Current kg Kilogram
V Voltage MPa Megapascal
°C Celsius L/min Litres per Minute
IPX5 Protection from water jets
EN
EGO
IMPORTANT SAFETY INSTRUCTIONS FOR PRESSURE WASHER
WARNING: Read and understand all instructions before using the machine. Failure to follow all instructions listed below may result in electric shock, fire and/or serious personal injury.
WARNING: This machine has been designed for use with the cleaning agent supplied or recommended by the manufacturer. The use of other cleaning agents or chemicals may adversely affect the safety of the machine.
WARNING: During use of high pressure cleaners, aerosols may be formed. Inhalation of aerosols can be hazardous to health.
WARNING: High pressure jets can be dangerous if subject to misuse. The jet must not be directed at persons, live electrical equipment or the machine itself.
WARNING: Do not use the machine within range of persons unless they wear protective clothing.
WARNING: Do not direct the jet against yourself or others in order to clean clothes or foot-wear.
WARNING: Risk of explosion – Do not spray flammable liquids.
WARNING: High pressure cleaners shall not be used by children or untrained personnel.
WARNING: High pressure hoses, fittings and couplings are important for the safety of the machine.
WARNING: Water that has flowed through backflow preventers is considered to be non-potable. Use only hoses, fittings and couplings recommended by the manufacturer.
⚠ WARNING: To ensure machine safety, use only original spare parts from the manufacturer or approved by the manufacturer.
⚠ WARNING: Do not use the machine if important parts of the machine are damaged, e.g. safety devices, high pressure hoses, short pressure gun.
WARNING: Depending on the application, shielded nozzles can be used for high pressure cleaning, which will reduce the emission of hydrous aerosols dramatically. However, not all applications allow the use of such a device. If shielded nozzles are not applicable for the protection against aerosols, a respiratory mask of class FFP 2 or equivalent may be needed, depending on the cleaning environment.
Machines shall not be used by children. Children should be supervised to ensure that they do not play with the machine.
This machine is not intended for use by persons (including children) with reduced physical, sensory or mental capabilities, or lack of experience and knowledge.
■ Know how to stop the product and bleed pressure quickly. Be thoroughly familiar with the controls.
■ Prevent unintentional starting. Ensure the switch is in the off-position before connecting to battery pack, picking up or carrying the appliance. Carrying the appliance with your finger on the switch or energizing appliance that has the switch on invites accidents.
■ Always be aware of the danger of the reaction force and the sudden torque on the spray assembly when operating the gun.
■ Do not expose the appliance or battery to excessive temperatures.
■ Be aware of the risk of terminals of the battery operated appliance or battery being short-circuited by metal objects.
■ Rechargeable batteries are to be removed from the appliance before being charged.
■ Different types of batteries or new and used batteries are not to be mixed.
■ Exhausted batteries are to be removed from the appliance and safely disposed of.
■ If the appliance is to be stored unused for a long period, the batteries should be removed.
■ Do not use non-rechargeable batteries in place of rechargeable batteries.
■ Do not use modified or damaged batteries.
■ Use only with the specified battery packs and chargers.
■ Do not place the machine on unstable supports. Always keep good footing and balance.
■ The new hose-sets supplied with the appliance are to be used and that old hose-sets should not be reused.
■ Always remove the batteries when leaving the machine unattended.
■ Prior to disposal protect battery terminals with heavy tape to prevent short-circuit.
Save these instructions. Refer to them frequently and use them to instruct others who may use this machine. If you lend someone this machine, lend them these instructions also to prevent misuse of the product and possible injury.
SPECIFICATIONS
| Voltage | 56 V --- |
| Rated Pressure 125 Bar | |
| Maximum Rated Pressure 170 Bar | |
| Rated Flow 4.5 L/min | |
| Maximum Rated Flow 6.5 L/min | |
| Maximum Water Inlet Pressure 10 Bar | |
| Weight (without battery pack) 9.26 kg | |
| Recommended Operating Temperature | 5°C - 40°C |
| Recommended Storage Temperature | -20°C - 70°C |
| Recommended Charging Temperature | 5°C - 40°C |
| Measured sound power level L_WA | 87 dB(A)K=2.7 dB(A) |
| Sound pressure level at operator's ear L_PA | 75 dB(A)K=3 dB(A) |
| Guaranteed sound power level L_WA (measured according to 2000/14/EC) | 90 dB(A) |
| Vibration a_h | 0.4 m/s2K=0.5 m/s2 |
■ The declared vibration total value has been measured in accordance with a standard test method and may be used for comparing one tool with another;
■ The declared vibration total value may also be used a preliminary assessment of exposure.
NOTICE: The vibration emission during actual use of the power tool can differ from the declared value in which the tool is used; In order to protect the operator, user should wear gloves and ear protectors in the actual conditions of use
PACKING LIST (FIG. A1)
DESCRIPTION
KNOW YOUR PRESSURE WASHER (Fig. A1)
- Handle
- Gun Holder Bracket
- Hose Holder Strap
- Nozzles Storage
- Water Inlet Port
- Power Button
- Speed Indicator
-
Speed Button
-
Battery Compartment Cover
- Battery Compartment
- Battery-Release Button
- Electric Contacts
- Ejection Mechanism
- Hose Holder Strap
- Water Outlet Port
- Nozzles Storage
- Wand Holder Bracket
- Foam Cannon Storage
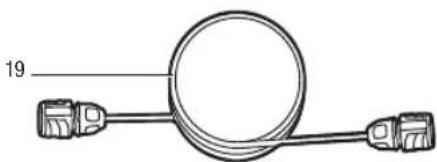
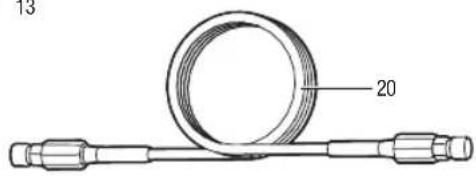
- Siphon Hose
- High-Pressure Hose (with quick-coupler collars)
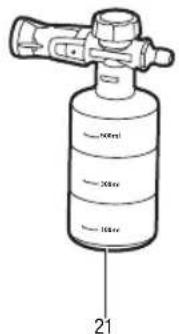
- Foam Cannon
- Quick-coupler Joint
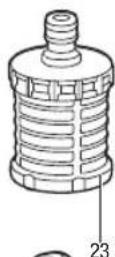
- Filter
- Nozzle Cleaning Needle
- 40° Nozzle
- 25° Nozzle
- 15° Nozzle
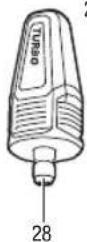
- Turbo Nozzle
- Stainless Steel Wand
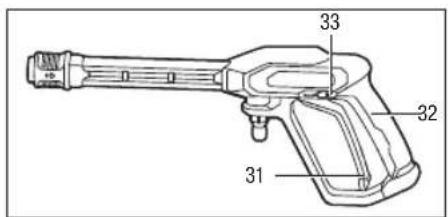
- Short Pressure Gun
- Trigger
- Gun Handle
- Lock-off Button
- Water Inlet Port Adaptor
ASSEMBLY
WARNING: If any parts are damaged or missing, do not operate this product until the parts are replaced. Use of this product with damaged or missing parts could result in serious personal injury
WARNING: Do not attempt to modify this product or create accessories not recommended for use with this pole saw. Any such alteration or modification is misuse and could result in a hazardous condition leading to possibly serious personal injury.
WARNING: To prevent accidental starting that could cause serious personal injury, always remove the battery pack from the machine when assembling parts.
CONNECTING THE HIGH-PRESSURE HOSE
- Tightly screw the quick-coupler joint onto the water outlet port (Fig. B1).
- Pull back quick-coupler collar of the high-pressure hose, and attach it onto the quick-coupler joint of the water outlet port until you hear a "click" (Fig. B2).
NOTE: The quick-coupler collar could be screwed off the high-pressure hose, so that the high-pressure hose connects with the water outlet port directly through thread joints.
EN
EGO
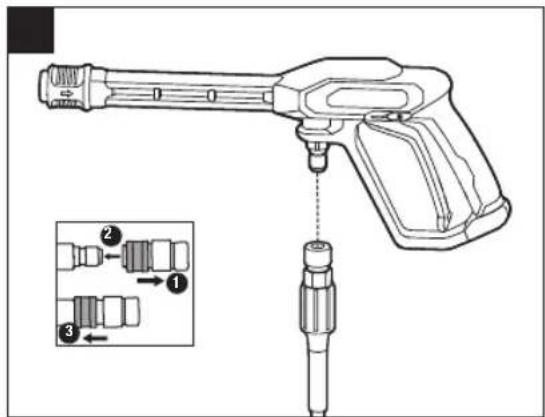
- Pull back the other quick-coupler collar of the high-pressure hose, and attach it onto the connection joint of the gun until you hear a "click" (Fig. B3).
CONNECTING STAINLESS STEEL WAND TO GUN
- Insert the connection joint of the wand into the quick-coupler of the gun until you hear a "click". The outer ring of the quick-coupler will move forward automatically, which indicates the connection is established properly (Fig. C1).
■ To disconnect, pull back the outer ring of the quick-coupler of the gun to pull out the wand (Fig. C2).
WARNING: Always hold the gun with one hand and the wand with the other hand when disconnecting the wand from the gun. Personal injury may result if the wand falls.
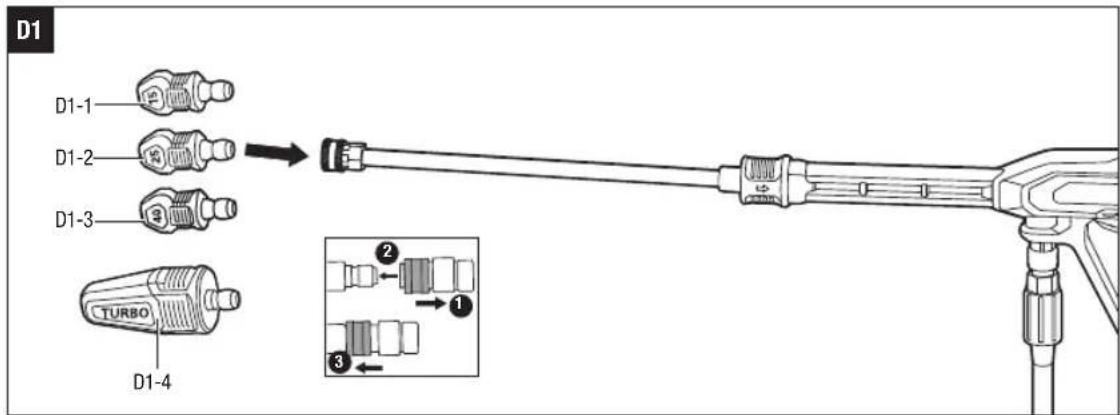
CONNECTING A NOZZLE
NOTICE: Only use the nozzles specified for the pressure washer. Otherwise, the pressure washer may be damaged.
■ Choose the 15° nozzle, 25° nozzle, 40° nozzle, or Turbo nozzle to install onto the wand (Fig. D1).
| D1-1 | 15° Nozzle D1-2 25° | Nozzle | |
| D1-3 | 40° Nozzle D1-4 TUR | B0 Nozzle |
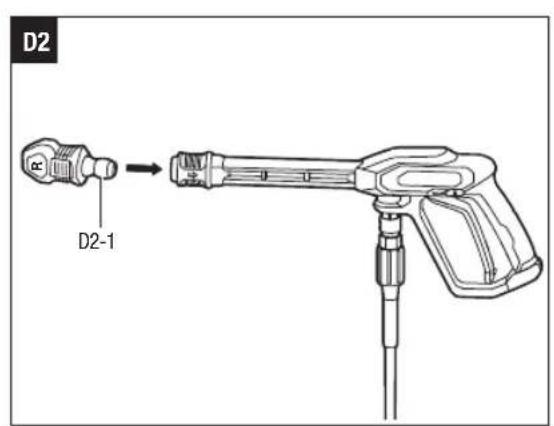
■ The rinse nozzle (sold separately) is connected to the gun directly (Fig. D2).
| D2-1 | Rinse Nozzle |
WARNING: Always hold the gun with one hand and the nozzle with the other hand when disconnecting the nozzle from the gun. Personal injury may result if the nozzle jumps out.
Use the table below to pick the right nozzle for the job.
| Nozzle Selection Applications | |
| Yellow 15° Nozzle | Clean small metal, concrete, or wood surfaces.Not for car cleaning. |
| Green 25° Nozzle | Clean larger metal, concrete, or wood surfaces. |
| White 40° Nozzle | Clean wide metal, concrete, wood, or vinyl surfaces.For car cleaning. |
| Gray Rinse Nozzle | Rinse vehicles. Rinse the detergent off of metal, concrete, wood, or vinyl. |
| Turbo Nozzle | Clean hard surfaces only. To prevent surface damage, do not use on cars and wooden surfaces. |
CONNECTING THE FOAM CANNON (Fig. E)
The foam cannon is connected to the gun directly.
To disconnect, pull back the outer ring of the quick-coupler, and then pull out the foam cannon.
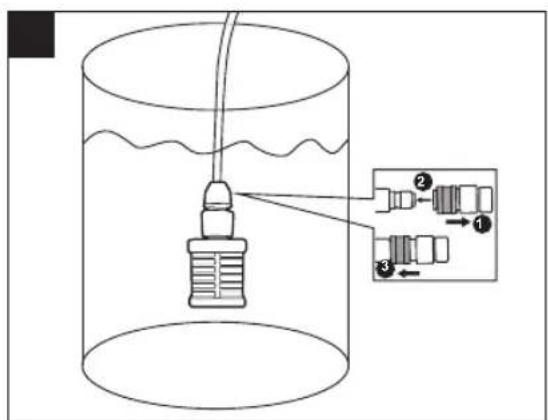
CONNECTING THE SIPHON HOSE (Fig. F1 – Fig. F2)
When using a water bucket (not provided) as a source of water, connect the siphon hose pressure washer to the pressure washer.
NOTE: Prefill the bucket so when immersed filter does not float to the surface.
CONNECTING TO A GARDEN HOSE (NOT PROVIDED)
When using water tap (not provided) as a source of water, connect the pressure washer to a garden hose (not provided).
NOTICE: Always observe all local regulations when connecting hoses to the water main. Some areas have restrictions against connecting directly to public drinking water supply to prevent the feedback of chemicals into the drinking water supply. Direct connection through a receiver tank or backflow preventer is usually permitted.
The water supply must come from a water main. NEVER use hot water or water from pools, lakes, etc.
Before connecting the garden hose to the pressure washer:
■ Run water through the hose for 30 seconds to clean any debris from the hose.
- Inspect the metal mesh in the water inlet port. If the metal mesh is damaged, do not use the machine until the metal mesh has been replaced. If the metal mesh is dirty, clean it.
■ Completely uncoil the garden hose or remove it completely from reel to prevent kinks.
NOTE: There must be enough length of unrestricted hose between the water inlet port and the hose faucet or shut off valve (such as a "Y" shut off connector).
■ With the hose faucet turned completely off, attach the end of the garden hose to the washer.
OPERATION
APPLICATION
WARNING: Always wear eye protection, along with hearing protection. Failure to do so could result in objects being thrown into your eyes and other possible serious injuries.
⚠ WARNING: To prevent serious personal injury, remove the battery pack from the tool before servicing, cleaning, changing attachments or removing material from the unit.
WARNING: For maximum grip and protection, always wear non-slip gloves and non-slip safety footwear when using this washer to ensure secure footing and maintain balance.
You may use this product for the purposes listed below:
■ Cleaning dirt on automobiles, walls, floors, etc.
NOTICE: The product is to be used only for its prescribed purposes. Any other use is deemed to be a case of misuse.
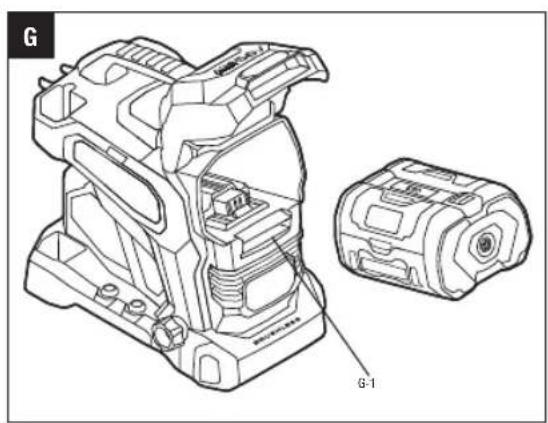
ATTACHING/DETACHING THE BATTERY PACK (Fig. G)
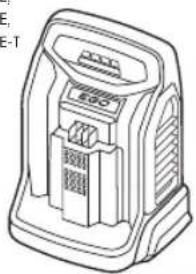
Use only with EGO's battery packs and chargers listed in Fig. A2.
Refer to corresponding battery packs and chargers manuals for more details.
Fully charge before first use.
-
Raise the battery compartment cover by lifting the bottom of the cover.
-
To attach, align the battery ribs with the mounting slots in the battery compartment and press the battery pack down until you hear a "click".
-
To detach, pull up the battery-release button and pull the battery pack out.
G-1 Battery-release button
- Close the battery compartment cover.
STARTING/STOPPING THE PRESSURE WASHER (Fig. H)
To Start the Pressure Washer
NOTICE: Do not start the pressure washer without water supply connected and turned on. This may damage the high-pressure seals and decrease pump life.
-
Ensure that the siphon hose, high-pressure hose, gun and nozzle are connected properly.
-
Connect wand, foam cannon, filter according to your needs.
-
Choose one of below water supply ways:
- When using a garden hose (not provided), connect the pressure washer to the garden hose and then open the water tap.
■ When using a water bucket, connect the filter to the siphon hose and then immerse the filter and the quick-coupler joint fully into the water bucket.
-
Install the battery pack into the pressure washer.
-
Press the power button to power on the pressure washer.
NOTE: When the pressure washer is powered on but with no further actions, the washer will turn off automatically after 5 minutes of standby. During the first several minutes of standby, the speed indicator on the pressure washer will flash three green lights, which indicates there is no water flowing into the siphon hose.
-
Hold the gun with both hands, press the unlock side of the lock-off button and then squeeze the trigger until a steady water flow is produced.
-
Start spray washing.
NOTE: It may take some time for the water to travel from the source and come out of the nozzle as a steady spray. To achieve a steady water flow quickly, you may want to:
a. Remove the nozzle.
b. Press the trigger and wait until a steady water stream starts coming out of the wand.
c. Release the trigger and re-install the nozzle.
WARNING: Car tires and/or tire valves may only be cleaned from a minimum distance of 30 cm in order to avoid damages by the high-pressure jet. The first indication of damage is the discoloration of the tire. Damaged car tires or tire valves present a risk of injury.
To Stop the Pressure Washer
-
Once the washing is completed, release the trigger and press the lock-off button to lock position.
-
Press the power button to power down the pressure washer.
-
Close the water tap or remove the siphon hose from the water bucket.
-
Press the lock-off button of the gun to the unlock position and squeeze the trigger to empty the water from the hoses.
NOTICE: The gun, hoses, wands, nozzles, or foam cannon should not be disconnected for as long as the water remains in the hoses.
- Disconnect and remove the gun, hoses, wand, nozzles, or foam cannon.
EN
EGO
- Press the power button to power on the pressure washer to empty the water in the pressure washer.
- Press the power button again to power down the pressure washer.
- Remove the battery pack.
SPEED SELECTION
■ The speed of the pressure washer could be adjusted by the speed button on the washer.
■ The speed of the pressure washer could be adjusted when the washer is powered on or during spraying.
■ Every time the speed button is pressed, the speed will toggle among low level, high level and TURBO level. The speed indicator displays one green light, two green lights, or three green lights to indicate the pressure washer running at low speed, high speed, or TURBO speed, respectively.
NOTICE: If the pressure washer keeps operating at TURBO speed, the runtime per charge may be affected.
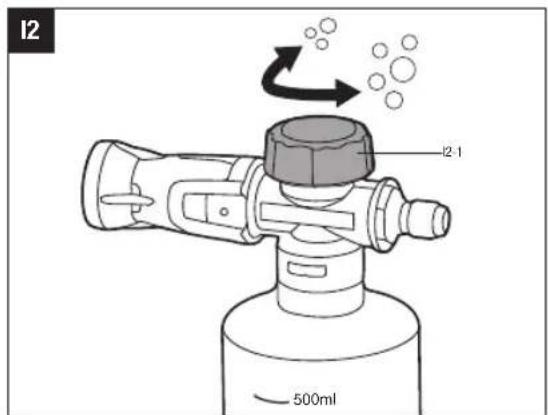
CLEANING WITH DETERGENT
WARNING: Only use detergents specifically made for use with pressure washers. Comply with the application, disposal, and safety instructions of the detergent manufacturer.
- Remove battery pack before clean.
- Turn the bottle of the foam cannon counterclockwise and remove it (Fig. 11).
- Pour detergent into the bottle.
NOTICE: The temperature of the detergent should not exceed 60 °C.
4. Replace the foam cannon and connect it to the quick-coupler of the gun.
5. Rotate the detergent knob to adjust the amount of detergent added to the water flow according to your needs (Fig. 12).
I2-1 Detergent Knob
- Spray the detergent on a dry surface using long, even, overlapping strokes. To prevent streaking, do not allow detergent to dry on the surface.
WARNING: It is recommended to wear protective equipment to prevent accidental contact with the detergent.
MAINTENANCE
⚠ WARNING: To prevent serious personal injury, remove the battery pack from the product before servicing, cleaning, changing attachments, or removing material from the unit.
WARNING: Check and clean the filter and nozzle regularly. Be sure to check for leaks after each cleaning or before operation and repair them in time.
GENERAL MAINTENANCE
Avoid using solvents when cleaning plastic parts. Most plastics are susceptible to damage from various types of commercial solvents and may be damaged by their use. Use a clean cloth to remove dirt, dust, oil, grease, etc.
WARNING: Do not at any time allow brake fluids, gasoline, petroleum-based products, penetrating oils, etc. to come in contact with plastic parts. Chemicals can damage, weaken or destroy plastic which may result in serious personal injury.
WARNING: To reduce the risk of fire, personal injury, and product damage due to a short circuit, never immerse your machine, battery pack or charger in fluid or allow a fluid to flow inside them. Corrosive or conductive fluids, such as seawater, certain industrial chemicals, and bleach or bleach containing products, etc., can cause a short circuit.
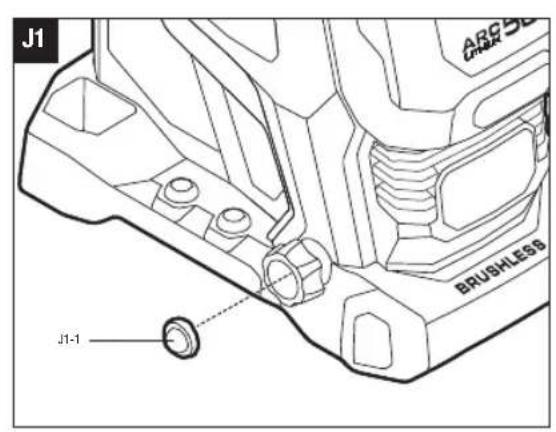
CLEANING THE FILTERS
■ Take out the metal mesh from the water inlet port, rinse the metal mesh or replace it if necessary (Fig. J1). To detach, pull up the battery-release button and pull the battery pack out.
J1-1 Metal Mesh
■ Remove the filter from the quick-coupler of the siphon hose, screw out the filter, and then rinse it thoroughly (Fig. J2).
CLEANING THE NOZZLES (Fig. K)
When the holes of the nozzles are blocked, you may use the provided nozzle cleaning needle to pass through the holes and remove blockage.
TRANSPORTING THE PRESSURE WASHER
WARNING: During transportation or storage, protect the washer from impact. Check and make sure the washer is not damaged before using it.
EN
WARNING: During transportation or storage, pay attention to the overall weight of the washer.
STORING THE PRESSURE WASHER (Fig. L1 - Fig. L2)
- Stop the pressure washer, release pressure, empty water, and remove the battery pack from the pressure washer following the instructions in the section "To Stop the Pressure Washer".
- Store nozzles in the nozzle storage area of the pressure washer.
- Store the gun and wand in the holder brackets.
- Roll up the high-pressure hose and siphon hose, store and secure them on the washer using the hose holder straps.
- Clean the pressure washer thoroughly before storing it.
- Store the pressure washer in a dry, well-ventilated area, locked-up or up high, out of the reach of children. Do not store the pressure washer on or adjacent to fertilizers, gasoline, or other chemicals.
WINTERIZING THE PRESSURE WASHER
Winterizing a pressure washer is essential to protect from freezing temperatures, which can cause damage to the pump, hoses, and other components.
- Remove battery pack before clean.
-
Turn off the pressure washer. Make sure the pressure washer is turned off and the battery pack is removed.
-
Release pressure. Squeeze the trigger on the gun to release any remaining pressure in the system. This could prevent the pressure build-up during the winterization process.
- Disconnect hoses and accessories. Remove all hoses, gun, and other accessories from the pressure washer. Drain any water from the hoses by holding them in a vertical position allowing the water to drain out.
- Connect a pressure washer pump protector (sold separately) to the water inlet port for treatment.
- Use a pressure washer pump protector and dispense the liquid. Once the liquid exits the water outlet port, your pressure washer is protected and winterized.
Protecting the environment
Do not dispose of electrical equipment, used battery and charger into household waste!
Take this product to an authorized recycler and make it available for separate collection. Electric tools must be returned to an environmentally compatible recycling facility.
TROUBLESHOOTING
| PROBLEM CAUSE SOLUTION | ||
| The pressure washer fails to be powered on. | Battery pack charge is low.Battery pack is not installed properly. | Charge the battery pack.Slide the battery pack into the battery compartment until it snaps into position. |
| The pressure washer pump stops working and the speed indicator on the washer flashes three green lights. | The pressure washer or the battery pack is too hot.No water flows into the siphon hose.Battery pack charge is low.Other electronic fault(s). | Wait until the pressure washer or battery pack returns to the recommended operating temperature and then restart the washer.Check and ensure there is water flowing into the siphon hose properly.Charge the battery pack.Contact EGO customer service. |
| The water flow is low during spraying. | The filter is blocked partially.The metal mesh in the water inlet port is blocked partially.The filter and quick-coupler joint of the siphon hose is not fully immersed into water.The siphon hose is folded.Water is dirty.The high-pressure hose is blocked. | Clean the filter.Remove and clean the metal mesh.Fully immerse the filter and quick-coupler joint into water.Unfold the siphon hose or replace it.Use only clean water.Remove the nozzle, and then start water spraying from the hose to clear the blockage of the hose. |
| There's no water spraying out. | There is no water supply.The filter is blocked completely.The metal mesh in the water inlet port is block completely.The metal mesh in the water inlet port is missing.The nozzle is blocked.Pump, hoses, or other components are frozen. | Check and ensure the washer is connected to the water supply properly.Clean the filter.Remove and clean the metal mesh.Check and make sure the metal mesh is installed in the water inlet port properly.Use the nozzle cleaning needle to pass through the holes.Wait until they are thawed. |
| The water flow is not stable. | Air flows into the washer.Pump seals are worn. | Check and ensure the siphon hose is connected properly.Contact EGO customer service. |
| The water spraying starts or stops automatically. | ■ The nozzle is blocked.■ The high-pressure hose is damaged.■ There's water leakage from the gun.■ Pump seals, hose seals are worn. | ■ Use the nozzle cleaning needle to pass through the holes.■ Replace with new high-pressure hose.■ Contact EGO customer service.■ Contact EGO customer service. |
| The water spraying is not in a spiral format when using Turbo nozzle. | ■ The Turbo nozzle is blocked partially. | ■ Depress and release the trigger on gun to start and stop spraying for couple times. If the problem is not solved, contact EGO customer service. |
WARRANTY
EGO WARRANTY POLICY
Please visit the website egopowerplus.eu for full terms and conditions of the EGO Warranty policy.
DE
LISTA DE PEÇAS (IMAGEM A1)
DESCRIÇÃO
VERPAKKINGSLIJST (AFB. A1)
BESCHRIJVING
KEN UW HOGEDRUKREINIGER (Afb. A1)
VINTERFÖRBEREDA HÖGTRYCKSTVÄTTEN
TILKOBLING AV EN DYSE
GENERELT VEDLIKEHOLD
POLITYKA GWARANCYJNA EGO
CITIȚI MANUALUL DE INSTRUCTIUNI
CURĂȚAREA CU DETERGENT
LUGEGE KASUTUSJUHENDIT
g_3g_2g_3o_2 g_3g_6g_3g_2o_2 (65b. A1)
s###
3593600 043961 Q5662790 056901 156986 0396m00m00m00 (65b. A1)
s_3g_md_sg_nf_ns_q, _5g_3d_0g_mo_mg_du_1d_2g_nf_mg_do_du_1b_fm_ns_qg_3s_3g_mg_ds_qg_j(65b.C1).
■ so^6b_oogo 15^ g^6d303ss , 25^ g^6d303ss , 40^ g^6d303ss sb g^6dm g^6d303ss dsx^6bg qslsdsghgdmsp (6sb. D1).
| D1-1 15° gh6d303s6s D1-2 25° gh6d303s6s |
| D1-3 40° gh6d303s6s D1-4 gh6dm gh6d303s6s |
qss qssg30n0z0b, ymsgwn0z0b s8s6g0n s6s1m0sms bgm0ns0d56j6o qss s6s1m0sms psdgs3o ggbls6d9mo, 6mqglus sd ls6g0b dmfymd0cm0d5b ogy6j6m, 6mss y7b6y63g4wym gby6j6o 3m6b0os qss y2g0s6h2y6mon fmb5j6m6m8s.
_3g_6 g_2o_dm_0m g_3d_0m_0g_1b_0m d_0f_ym_0d_0c_0m_0d_5g_3d_0m g_3d_0m h_3d_0m_0z_0m_0m d_0f_bg_3d_0b_0m_0z_0l :
natural_image
Line drawing of a power supply unit with labeled components including ABB56V and Brushless (no text or symbols beyond labels)HPW1800E
- HPW1800E
- 56V LITHIUM-ION PRESSURE WASHER
- EN
- READ ALL INSTRUCTIONS!
- READ OPERATOR'S MANUAL
- SAFETY SYMBOL
- SAFETY INSTRUCTIONS
- EGO
- IMPORTANT SAFETY INSTRUCTIONS FOR PRESSURE WASHER
- PACKING LIST (FIG. A1)
- DESCRIPTION
- KNOW YOUR PRESSURE WASHER (Fig. A1)
- ASSEMBLY
- CONNECTING THE HIGH-PRESSURE HOSE
- CONNECTING STAINLESS STEEL WAND TO GUN
- CONNECTING A NOZZLE
- CONNECTING THE FOAM CANNON (Fig. E)
- CONNECTING THE SIPHON HOSE (Fig. F1 – Fig. F2)
- CONNECTING TO A GARDEN HOSE (NOT PROVIDED)
- OPERATION
- APPLICATION
- ATTACHING/DETACHING THE BATTERY PACK (Fig. G)
- Fully charge before first use.
- STARTING/STOPPING THE PRESSURE WASHER (Fig. H)
- To Start the Pressure Washer
- To Stop the Pressure Washer
- SPEED SELECTION
- CLEANING WITH DETERGENT
- MAINTENANCE
- GENERAL MAINTENANCE
- CLEANING THE FILTERS
- CLEANING THE NOZZLES (Fig. K)
- TRANSPORTING THE PRESSURE WASHER
- STORING THE PRESSURE WASHER (Fig. L1 - Fig. L2)
- WINTERIZING THE PRESSURE WASHER
- Protecting the environment
- WARRANTY
- EGO WARRANTY POLICY
- DE
- LISTA DE PEÇAS (IMAGEM A1)
- DESCRIÇÃO
- VERPAKKINGSLIJST (AFB. A1)
- BESCHRIJVING
- KEN UW HOGEDRUKREINIGER (Afb. A1)
- VINTERFÖRBEREDA HÖGTRYCKSTVÄTTEN
- TILKOBLING AV EN DYSE
- GENERELT VEDLIKEHOLD
- POLITYKA GWARANCYJNA EGO
- CURĂȚAREA CU DETERGENT
- LUGEGE KASUTUSJUHENDIT
- g_3g_2g_3o_2 g_3g_6g_3g_2o_2 (65b. A1)
- s###
Brand : EGO
Model : HPW1800E
Category : Pressure washer