Full Crystal Onyx - Cooker CECOTEC - Free user manual and instructions
Find the device manual for free Full Crystal Onyx CECOTEC in PDF.

| Product type | Induction hob |
| Brand and model | Cecotec Full Crystal Onyx (ref. 03069) |
| Number of cooking zones | 1 |
| Surface material | Ceramic glass |
| Power supply | 220-240 V~, 50/60 Hz |
| Rated power | 2000 W |
| Power levels | 9 (P1 to P9, from 800 to 2000 W) |
| Temperature ranges | 9 settings from 60°C to 240°C |
| Preconfigured programs | Hot pot, Fry, BBQ, Soup, Water, Milk |
| Timer | From 1 to 180 minutes |
| Safety function | Child lock (Child safety) |
| Automatic shut-off | Yes, after 30 seconds in standby mode or 2 hours without use |
| Pan detection | Yes, error codes E0 if absent or incompatible |
| Cooking zone diameter | 21 cm (usable surface) |
| Pan compatibility | Magnetic stainless steel, cast iron; Ø between 12 and 26 cm |
| Cleaning and maintenance | Damp cloth, non-abrasive products |
| Weight | Approximately 2.5 kg |
| Dimensions (approx.) | 29 x 35 x 6 cm |
| After-sales service | Cecotec, phone +34 9 63 21 07 28 |
| Origin | Made in China, designed in Spain |
Frequently Asked Questions - Full Crystal Onyx CECOTEC
User questions about Full Crystal Onyx CECOTEC
0 question about this device. Answer the ones you know or ask your own.
Ask a new question about this device
Download the instructions for your Cooker in PDF format for free! Find your manual Full Crystal Onyx - CECOTEC and take your electronic device back in hand. On this page are published all the documents necessary for the use of your device. Full Crystal Onyx by CECOTEC.
USER MANUAL Full Crystal Onyx CECOTEC
natural_image
Illustration of a black electric stove with white circular patterns and control buttons (no text or symbols)- Parts and components 66
- Before use 66
- Operation 67
- Cleaning and maintenance 69
- Troubleshooting 70
- Technical specifications 72
- Disposal of old electrical and electronic appliances 73
- Technical support and warranty 74
- Copyright 74
- Declaration of conformity 74
SOMMAIRE
Read these instructions thoroughly before using the appliance. Keep this instruction manual for future reference or new users.
- It is your responsibility to make sure every user is informed about the warnings and precautions stated in this instruction manual.
- This appliance is designed for domestic use only and is not intended for bars, restaurants, farmhouses, hotels, motels, and offices.
- The appliance is not intended to be operated by means of an external timer or a separate remote-control system.
- This appliance can be used by children aged 8 years old and above and people with reduced physical, sensory, or mental capabilities or lack of experience and knowledge if they have been given supervision or instruction concerning the use of the appliance in a safe way and understand the hazards involved. Children must not play with the appliance. Cleaning and user maintenance should not be carried out by children unless they are over 8 years old and are under supervision.
- Keep this appliance and its power cable out of reach of children under the age of 8.
- WARNING: if the surface breaks, turn off the device to avoid electric shock. Please handle the induction plate with care to avoid damages. Stop using the appliance and contact the official Cecotec Technical Support Service.
- Metal objects such as knives, forks, spoons and covers must not be placed on the hob as they may become hot.
- This symbol means "caution, hot surface." The surface is susceptible to heat during use. Be
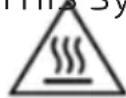
extremely careful.
- If the power cable is damaged, it must be replaced by the official Cecotec Technical Support Service or similar qualified personnel to avoid risks.
- Never immerse the appliance or its power cord in water or any other liquid.
- Any intervention, other than normal cleaning and maintenance, must be performed by the official Cecotec Technical Support Service.
- People with cardiac pacemakers or similar medical devices should be kept away from the induction hob when it is connected to the power supply. If in any doubt, consult a medical practitioner before using this product to avoid any danger.
- Before using it for the first time, check that your mains supply voltage matches the one indicated on the appliance data plate. Any connection error will invalidate your warranty.
- The appliance must be connected to a socket outlet with an earth contact. Do not use a socket adapter or connect any other appliance into the same socket simultaneously, to avoid electrical overloading and risk of fire.
- Given the diverse standards in effect, if the appliance is used in a country other than that in which it is purchased, have it checked by an approved service centre.
- Remove all packaging materials, stickers, and accessories from the inside and outside of the appliance.
- The appliance must be placed and used on a flat, stable, heat-resistant work surface, away from water splashes.
- Do not place or use this appliance in high humidity environments.
- Do not place or use the induction plate on steel or
aluminium surfaces.
- Maintain a gap of at least 10 cm (4 inches) on all sides of the appliance to ensure adequate ventilation.
- Never place or use the appliance close to a wall or below a wall cupboard.
- Never place or use the appliance below or close to easily inflammable objects (e.g. curtains, etc.).
- Never place or use the appliance on or close to a portable stove or other sources of heat.
- Unwind the power cord fully before use.
- Do not use an extension lead. Never leave the product, even for a few moments, while it is connected to the mains, especially if children are present.
- Do not let the power cord hang where children may reach it.
- The power cord must never be close to or in contact with hot parts of the appliance, close to sources of heat, or resting on sharp edges.
- Take all necessary precautions to prevent anyone from tripping over an extension cord.
- Switch off and disconnect the appliance from the power supply when not in use.
- Never disconnect the plug by pulling from the power cord.
- Inspect the appliance and power cord for signs of wear or damage before connecting it to the power supply.
- Never move the appliance when it is hot.
- Allow the appliance to cool down completely before you clean and store it.
- Always keep the induction cooker clean to avoid dust from entering the fan motor and causing a malfunction.
- Should any part of the appliance catch fire, never try to extinguish the flames with water.
- Disconnect the appliance and smother the flames with a
damp cloth.
- Place the pan at the centre of the cooking circle.
- Do not overheat an empty pan or pot during long periods of time.
- Do not heat the food in cans or other airtight containers to avoid explosions caused by air expansion.
INSTRUCTIONS DE SÉCURITÉ
- Glass Surface
- Control panel
- Plastic cover
- Power cord
Fig. 2
A. Child Lock function icon
B. Timer icon
C. Time/temperature decrease icon
D. Time/temperature increase icon
E. Programme selection icon
F. Power icon
NOTE:
The graphics in this manual are schematic representations and may not exactly match the product.
2. BEFORE USE
- This appliance is packaged in a way as to protect it during transport. Take the appliance out of its box and remove all packaging materials. You can keep the original box and other packaging elements in a safe place to prevent damage to the appliance if you need to transport it in the future. If you wish to dispose of the original packaging, make sure all packaging materials are recycled accordingly.
- Make sure all parts and components are included and in good conditions. If there is any piece missing or in bad conditions, contact the official Cecotec Technical Support Service immediately.
- Do not remove the serial number of the appliance in order to keep a correct traceability of it in case of assistance.
Box content
- Induction hob
- Instruction manual
3. OPERATION
Power levels
| Display P1-P3 | P4 P5 P6 P7 | P8 P9 | |||||
| Power (W) | 800 1000 | 1200 1400 | 1600 1800 | 2000 |
Note:
- If you select a power level between P1 and P3 W, the hob will operate intermittently.
- If you select a power level between P4 and P9 W, the hob will operate continuously.
Temperature levels
| Display 60 | 90 120 | 140 160 18 | 0 200 22 | 0 240 | |||||
| Temp.(°C) 60 90 | 120 | 140 160 | 180 200 | 220 240 |
Suitable cookware for induction cooking
- Only use cookware with a base suitable for the induction hob. Look for the induction symbol on the packaging or at the bottom of the cookware. Fig. 3
-
You can check if your cookware is suitable with a magnet test. Move a magnet towards the base of the cookware. If it sticks or is attracted by the utensil, this means that the utensil is compatible with the induction hob. If you do not have a magnet:
-
Put some water in the utensil.
-
Switch on the hob and wait 3 minutes to see if the water heats up.
- Cookware made of the following materials is unsuitable for use on induction hobs: pure stainless steel, aluminium or copper without magnetic base, glass, wood, porcelain, ceramic and earthenware.
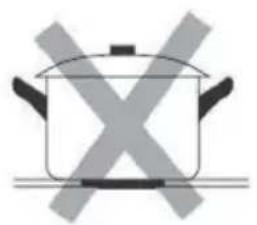
- Do not use cookware with serrated edges or with a curved base. Fig. 4
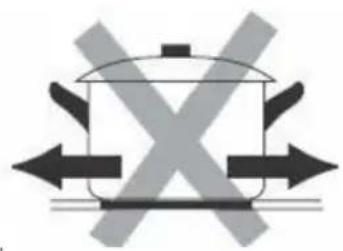
- Make sure to use cookware with a flat base; if the base of the cookware is uneven, this may impair the heat supply. Always place the cookware in the centre of the cooking zone. The diameter of the utensil should not be less than 12 cm to ensure proper heating. Do not use utensils with a diameter greater than 26 cm. Fig. 5
- Always lift the cookware off the induction hob; do not slide it, as it could scratch the glass. Fig. 6
ENGLISH
Operation
1. Switching on/off the hob
- After connecting the plug to the power socket, the hob will beep once. In addition, to indicate that it is switched on, the display will light up for two seconds.
- You can now place a pan suitable for induction cooking on the hob.
- Press the power icon to switch on the appliance. Once this is done, "on" will be shown on the display and the hob will enter standby mode.
- If you press this icon again, the hob will switch off.
- In standby mode, the hob will automatically switch off after 30 seconds of inactivity.
2. Preset programmes
2.1 Hot pot Press the programme selection icon once. When doing so, the Hot pot programme indicator light will come on and "1200" will be shown on the display to indicate that the default power setting is 1200 W. You can adjust the power by pressing the increase or decrease icon. This hob has 9 selectable power levels. After selecting the power level, you can press the timer icon to set the cooking time. If you do not set any cooking time, the hob will automatically switch off after 2 hours.
If you wish to change the chosen programme, press the programme selection icon again. If you wish to switch off the hob, press the power icon.
2.2 Fry : Press the programme selection icon until you reach the Fry programme. When doing so, the Fry programme indicator light will come on and "1800" will be shown on the display to indicate that the default power setting is 1800 W. You can adjust the power by pressing the increase or decrease icon. This hob has 9 selectable power levels. After selecting the power level, you can press the timer icon to set the cooking time. If you do not set any cooking time, the hob will automatically switch off after 2 hours.
Note: It is recommended to use a flat pan when selecting the Fry programme.
2.3 BBQ : Press the programme selection icon until you reach the BBQ programme.
When doing so, the corresponding indicator light will come on and “160 °C” will be shown on the display to indicate that the preset temperature is 160 °C. You can adjust the temperature by pressing the increase/decrease icon. This hob has 9 selectable temperature settings. After selecting the temperature, you can press the timer icon to set the cooking time. If you do not set any cooking time, the hob will automatically switch off after 2 hours.
2.4 Soup : Press the programme selection icon until you reach the Soup programme. The corresponding indicator light will come on. In addition, "2:00" will be shown on the display to indicate that the preset cooking time is 2 hours. The power will be 1600 W. In this case, you will not be able to adjust the power. When the value "2:00" flashes on the display, you can adjust the cooking time by pressing the increase/decrease icon. The maximum time you can select is 3 hours.
2.5 Water 📋: Press the programme selection icon until you reach the Water programme. The corresponding indicator light will come on. In addition, "0:30" will be shown on the display to indicate that the preset cooking time is 30 minutes. The power will be 2000 W. In this case, you will not be able to adjust the power. When the value "0:30" flashes on the display, you can adjust the cooking time by pressing the increase/decrease icon. The maximum time you can choose is 3 hours.
2.6 Milk : Press the programme selection icon until you reach the Milk programme. The corresponding indicator light will come on. In addition, "0:20" will be shown on the display to indicate that the preset cooking time is 20 minutes. In this case, you will not be able to adjust the power. When the value "0:20" flashes on the display, you can adjust the cooking time by pressing the increase/decrease icon. The maximum time you can select is 3 hours.
3. Setting the timer
The timer can only be set when the hob is not in standby mode.
The time range that can be set is from 1 to 180 minutes.
When the hob is not in standby mode, press the timer icon. When doing so, the value "00" will be shown flashing on the display.
Set the desired time using the increase/decrease icon.
The countdown will start after 5 seconds automatically. If you wish to cancel this setting, press the timer icon again.
Note:
- If you press the increase icon briefly, 1 minute will be added.
- If you press and hold it down, 10 minutes will be added.
- If you press the decrease icon briefly, the time value will be reduced by 1 minute.
- If you press and hold it down, the time value will be reduced by 10 minutes.
4. Child Lock function
This function allows you to lock the control panel to prevent unintentional or accidental use of the hob.
To activate this function, press the corresponding icon. When doing so, "Loc" will be shown on the display. While this function is activated, all icons, except the power icon, will be locked. If you press the Child Lock function icon again, it will be deactivated.
4. CLEANING AND MAINTENANCE
- Disconnect the hob before cleaning it. Do not use harsh cleaning products and make sure that no water enters the inside of the hob.
- Do not immerse the hob or any of its components in water or any other liquid.
- Clean the glass surface with a damp cloth or use a mild, non-abrasive soap solution.
ENGLISH
- Clean the control panel with a soft cloth or a non-abrasive cleaning product.
- Do not use petroleum-based products to avoid damaging the plastic parts or the control panel.
- Do not use flammable, acidic or alkaline substances or materials near the appliance.
- Make sure that the bottom of the utensil you use does not scratch the hob glass.
- Make sure that the hob is completely clean and dry before storing it.
5. TROUBLESHOOTING
| Problem Possible causes | Possible solutions | |
| The hob does not switch on. | No power supply. | - Check if the plug is properly connected.- Check that the power cable is not damaged.- Check the power supply.- Make sure that the voltage is not too low.If after the above checks the problem persists, please contact the official Cecotec Technical Support Service. |
| Icons do not respond | The control panel is locked. | Unlock the control panel. See the section "Child Lock function". |
| The hob makes a strange sound. | This may be due to the composition of the cookware used (layers of different metals that vibrate differently). | This is a normal phenomenon. It is not a problem. |
| When you select a high-power level, the hob makes a slight buzzing sound. | This may be due to the induction technology. | This is a normal phenomenon, not a problem. The buzzing sound will disappear completely if you select a lower power level. |
| The fan makes noise. | This induction hob is equipped with a cooling fan to prevent the components from overheating. If necessary, it will continue to operate even after the hob has been switched off. | This is normal and necessary so that no malfunctions occur. Do not disconnect the hob from the mains while the fan is still running. |
| The utensil does not heat up. | The utensil is not suitable for induction cooking, or the hob does not detect it. | Use a utensil suitable for induction cooking that is the correct size for the cooking zone and position it correctly. Please refer to the section on induction cookware. |
Error codes
When the induction cooker stops working, it shows an error code on the display referring to a specific problem. In the following table you can find all codes, as well as their causes and solutions:
| Error codes | Meaning Possible solutions | |
| E0 | The hob does not detect the cookware. | Place a suitable pan in the centre of the cooking zone. |
| E1 The voltage | ge is too low (below 75 V). | Check the power supply. If the voltage is normal, switch the hob back on. |
| E2 | The voltage is too high (above 295 V). | Check the power supply. If the voltage is normal, switch the hob back on. |
| E3 | The main sensor is faulty, or a short circuit has occurred. | Please contact the official Cecotec Technical Support Service. |
| E4 | The IGBT transistor is faulty, or a short circuit has occurred. | Please contact the official Cecotec Technical Support Service. |
ENGLISH
| E5 | - When the surface temperature of the hob is above 275 °C, the display will show "E5", and the cooking zone will stop heating.- Warning: The PCB (printed circuit board) is responsible for temperature control. If you place an empty pan on the induction hob, it will not heat up, as the PCB will adjust the power automatically. | - Make sure that the ventilation openings are not blocked and that the room temperature is not too high.- Do not place the pan outside the cooking zone to prevent the control panel from overheating.- Make sure that the fan is running. |
| E6 | - When the temperature of the IGBT transistor exceeds 75 °C, but does not reach 100 °C, the power will decrease, or the hob will operate intermittently.- If the transistor temperature is between 100 °C and 130 °C, "E6" will be shown on the display, and the hob will stop heating. | - Make sure that the ventilation openings are not blocked and that the room temperature is not too high.- Do not place the pan outside the cooking zone to prevent the control panel from overheating.- Make sure that the fan is running. |
| E7 | Once the hob has started to heat up, if the temperature of the main sensor stays the same for 4 minutes, "E6" will be shown on the display, and the hob will stop heating. | Please contact the official Cecotec Technical Support Service. |
| EC | The connection between the display and the motherboard has failed. | Please contact the official Cecotec Technical Support Service. |
6. TECHNICAL SPECIFICATIONS
Product reference: 03069
Product: Full Crystal Onyx
Voltage: 220-240 V\~
Frequency: 50/60 Hz
Rated power: 2000 W
| Symbol Value Unit | |||
| Model reference 03069 Full Crystal Onyx | |||
| Type of cooking hob — Domestic electric hob — | |||
| Number of cooking zones — 1 — | |||
| Heating technology(induction hotplates and cooking zones, radiation hotplates, solid hotplates) | — Induction cooking zones — | ||
| For circular lamps or cooking zones: diameter of the usable area of each electric cooking zone, rounded to the nearest 5 mm | ∅ | 21 cm | |
| For non-circular lamps or cooking zones: width and length of the usable surface of each lamp or electric cooking zone, rounded to the nearest 5 mm | l -- cm | ||
| W -- cm | |||
| Energy consumption per lamp or cooking area, calculated per kg | EC_electric cooking | 174.3 Wh/kg | |
| Energy consumption of the hob, calculated per kg | EC_electric hob | 174.3 Wh/kg | |
Technical specifications may change without prior notification to improve product quality. Made in China | Designed in Spain
7. DISPOSAL OF OLD ELECTRICAL AND ELECTRONIC APPLIANCES
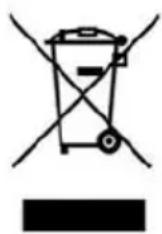
This symbol indicates that, according to the applicable regulations, the appliance and/or batteries must be disposed of separately from household waste. When this product reaches the end of its shelf life, you should dispose of the cells/batteries/accumulators and take them to a collection point designated by the local authorities.
ENGLISH
For detailed information on how to properly dispose of electrical and electronic appliances and/or batteries, consumers should contact their local authorities.
Compliance with the above guidelines will help protecting the environment.
8. TECHNICAL SUPPORT AND WARRANTY
Cecotec shall be liable to the end user or consumer for any lack of conformity that exists at the time of delivery of the product under the terms, conditions and deadlines established by the applicable regulations.
Repairs should be carried out by qualified personnel.
If at any moment you detect any problem with your product or have any doubt, do not hesitate to contact the official Cecotec Technical Support Service at +34 96 321 07 28.
9. COPYRIGHT
The intellectual property rights over the texts in this manual belong to CECOTEC INNOVACIONES, S.L. All rights reserved. The contents of this publication may not, in whole or in part, be reproduced, stored in a retrieval system, transmitted, or distributed by any means (electronic, mechanical, photocopying, recording or similar) without the prior authorization of CECOTEC INNOVACIONES, S.L.
10. DECLARATION OF CONFORMITY
CE Cecotec Innovaciones hereby declares that this appliance complies with the essential requirements and other relevant provisions of the regulations applicable in the European Union. This appliance has been designed, manufactured and tested to meet the required safety and quality standards. The full text of the EU Declaration of Conformity can be found on the following website: https://cecotec.es/es/information/declaration-of-conformity
1. PIÈCES ET COMPOSANTS
Image 1
5. PROBLEEMOPLOSSING
natural_image
Simple line drawing of a cooking pot with crossed-out X marks (no text or symbols)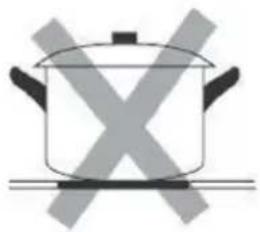
natural_image
Simple line drawing of a cooking pot with crossed X marks (no text or symbols)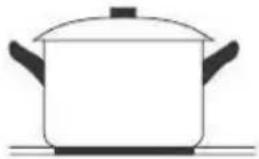
natural_image
Simple line drawing of a cooking pot on a stove (no text or symbols)Fig./Img./Abb./Afb./Rys. 3 Fig./Img./Abb./Afb./Rys. 4
natural_image
Simple line drawing of a cooking pot with crossed X marks (no text or symbols)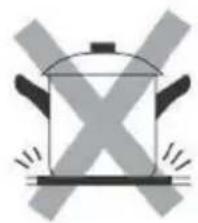
natural_image
Simple line drawing of a cooking pot with X-shaped mark and flames (no text or symbols)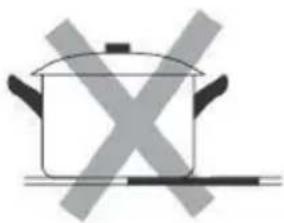
natural_image
Simple line drawing of a cooking pot with crossed-out X marks (no text or symbols)
natural_image
Simple line drawing of a cooking pot on a surface (no text or symbols)Fig./Img./Abb./Afb./Rys. 5
natural_image
Simple line drawing of a cooking pot with crossed arrows indicating pressure or heat (no text or symbols)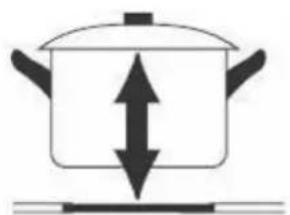
natural_image
Simple line drawing of a cooking pot with upward and downward arrows indicating direction (no text or symbols)Fig./Img./Abb./Afb./Rys. 6
www.cecotec.es