USER MANUAL PKA 20-Li D3 PARKSIDE
natural_image
Exterior view of a Parkside air purifier device with visible branding and wiring (no text-heavy elements)
20 V AKKU-KOMPRESSOR UND -LUFTPUMPE / 20V CORDLESS COMPRESSOR AND AIR PUMP / 20 V COMPRESSEUR ET POMPE À AIR SANS FIL PKA 20-Li D3
DE AT CH
20 V AKKU-KOMPRESSOR
UND -LUFTPUMPE
User manual
Translation of the original
instructions
FR BE
20 V COMPRESSEUR ET
POMPE À AIR SANS FIL
GB/IE User manual Page 25
NOTE: The actual charging time may be slightly different from the above stated depending on the ambient temperature and the condition of the battery pack. The information is subject to change without prior notice.
E
List of pictograms used ...... Page 26
Introduction Page 27
Intended use.... Page 27
Scope of delivery Page 28
Parts list Page 28
Technical data.... Page 28
General safety notes ...... Page 30
Battery charger safety warnings.... Page 33
Assembly.... Page 34
Unpacking the product and basic cleaning . . . . . . . . . . . . . . . . . . . . . . . . . . . . . . . . . . . . . . . . . . . . . . . . . . . . . . . . . . . . . . . . . . . . . . . . . . 34
Inserting/removing the battery .... Page 34
Charging the battery.... Page 34
Checking the battery's charging level ...... Page 35
Operation.... Page 35
Switching the product on/off Page 35
Switching the LED work light on and off .... Page 35
Inflating.... Page 36
Compressor mode Page 36
Air pump mode.... Page 37
Deflating for inflatable articles ...... Page 37
Troubleshooting Page 38
Cleaning and maintenance ...... Page 38
Storage Page 39
Disposal Page 39
Warranty.... Page 39
Warranty claim procedure.... Page 40
Service Page 40
EU Declaration of conformity.... Page 41
| List of pictograms used |
 | Read the instruction manual. |  | Use the product in dry indoor spaces only. |
 | WARNING! - Designating a hazard with moderate risk, which can result in death or severe injury if not avoided (e.g. risk of electric shock) |  | Alternating current/voltage |
 | Direct current/voltage |
 | CAUTION! - Designating a hazard with low risk, which could result in minor or moderate injury if not avoided (e.g. risk of scalding) |  | Fuse |
 | NOTICE! - Warns of possible damage to property/the product if not avoided (e.g. risk of short circuit) |  | Switch the product off and remove the battery pack before replacing attachments, cleaning and when not in use. |
 | Wear a dust mask! |  | Protect the battery pack against heat and continuous intense sunlight. |
 | Wear eye protection! |  | Protect the battery pack against water and moisture. |
 | Wear ear protection! |  | Protect the battery pack from fire. |
| Safety information Instructions for use | | Do not stare into the active light source! |
 | CE mark indicates conformity with relevant EU directives applicable for this product. |  | Air pump mode |
| Compressor mode Lock | | |
 | Air outlet Unlock | | |
 | Sound power level in dB Air pump mode | |
 | Warning – hot surface! Middle position | |
 | Do not expose the product to rain. The product may only be stationed, stored and operated in dry ambient conditions. | ▶ Compressor mode |
 | Adapter attachment procedure |
20V CORDLESS COMPRESSOR AND AIR PUMP
● Introduction
We congratulate you on the purchase of your new product. You have chosen a high quality product. The instructions for use are part of the product. They contain important information concerning safety, use and disposal. Before using the product, please familiarise yourself with all of the safety information and instructions for use. Only use the product as described and for the specified applications. If you pass the product on to anyone else, please ensure that you also pass on all the documentation with it.
Intended use
This product is only intended for the following use:
- Inflating and deflating play, sports and beach articles, as well as largevolume inflatable articles such as air mattresses, inflatable boats, paddling pools etc..
- Filling motorbike, bicycle and car tyres.
- Use only indoors or outdoors for short periods.
- Use this product only as described and for the areas of applications specified.
■ Any other usage of or modification to the product is deemed to be improper and carries the risk of serious personal injury. The manufacturer accepts no responsibility for damage(s) attributable to misuse.
■ This product is not intended for commercial use.
The product is part of the series Parkside X 20 V TEAM. The product can be operated using batteries from the series Parkside X 20 V TEAM. The batteries may only be charged using chargers from the series Parkside X 20 V TEAM.
- Scope of delivery
WARNING!
The product and the packaging are not children's toys! Children must not play with plastic bags, sheets and small parts! There is a danger of choking and suffocation!
1 Cordless Compressor and Air Pump
1 Hose
1 Tapered adapter
1 Ball needle
1 Adapter for bicycle valve
1 User manual
NOTE
▶ Battery and charger are not included in the scope of delivery.
Parts list
1 Handle
2 Control panel
3 Button -
4 On/Off switch
5 Button +
6 Toggle switch
7 LCD display
8 Transparent cover
9 LED button
10 LED work light
11 Battery holder
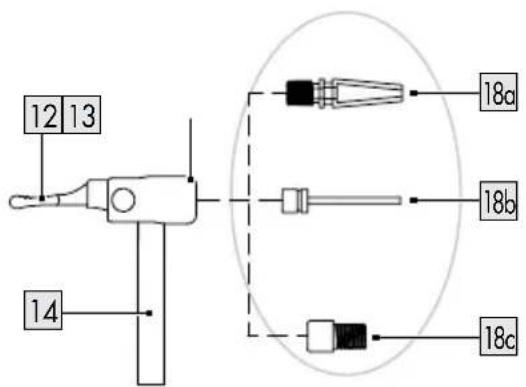
12 Lever
13 Valve connection
14 Compressed air hose
15 Air outlet
16 Hose
17 Hose adapter
18 Adapters
18a Tapered adapter
18b Ball needle
18c Adapter for bicycle valve
19 Battery*
20 Button Charge level indicator Battery
21 Charge level indicator
22 Release button for battery
23 Battery charger*
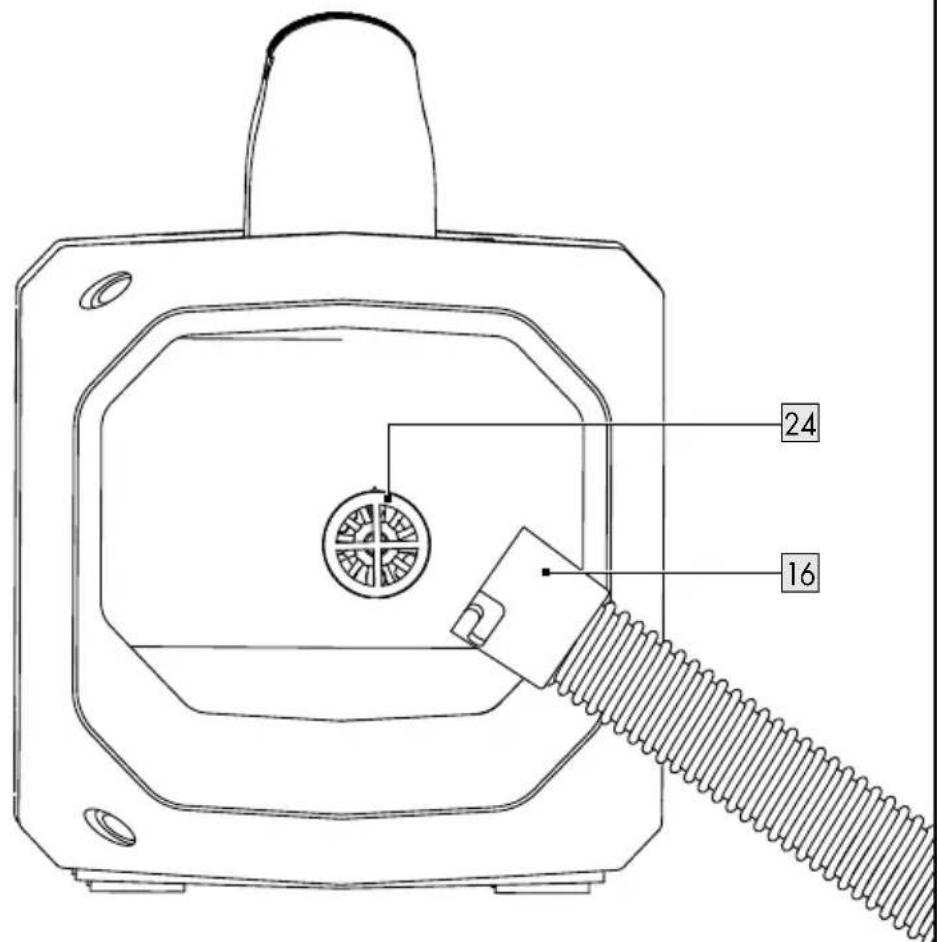
24 Air inlet
* Battery and charger are not included in the scope of delivery.
- Technical data
| 20V Cordless Compressor and Air Pump PKA 20-Li D3 | |
| Max. air output- Compressor 21 l/min-Air pump | 380 l/min |
| Max. pressure (Compressor): 10,3 bar (150 psi) | |
| Gross weight (with 4Ah battery): approx. 2.2 kg | |
| Operating mode * : S3 25% 10 min | |
| * S3 25% 10 min = periodical intermittent duty with a duty cycle of 25% (2.5 min based on a 10 min period) | |
| Rated voltage: | 20 V --- |
| Battery pack | PAP 20 B3 * |
| Type: | Lithium-Ion |
| Rated voltage: | 20 V --- max. |
| Capacity: | 2.0 Ah |
| Energy value: | 40 Wh |
| Rapid battery charger * PLG 20 | C3 |
| Model number:– VDE plug: HG08983– BS plug: HG08983-BS |
| Input: |
| Rated voltage: 230– | 240 V~ |
| Rated frequency: 50 | Hz |
| Rated power: 120 W | |
| Output: |
| Rated voltage: 21.5 V | — — — |
| Charging current: 4.5 A |
| Protection class: | II/☐ |
| Fuse (internal): | 3.15 A/T3.15A |
| Recommended ambient temperature: |
| Overall maximum temperature: +45 °C | |
| While charging: +4 °C to +40 °C |
| During operation: +4 °C to +40 °C |
| During storage: +20 °C to +26 °C |
Noise emission value
The measured values were measured in accordance with EN 1012-1.
| Sound pressure level: | L_pA = 72.3 dB |
| Uncertainty: | K_pA = 3 dB |
| Sound power level: | L_WA = 84.2 dB |
| Uncertainty: | K_WA = 1.93 dB |

WARNING!

Wear ear protection!
NOTE
The declared vibration total value and the declared noise emission value have been measured in accordance with a standard test method and may be used for comparing one tool with another.
The declared total vibration value and the declared noise emission value may also be used for a preliminary assessment of exposure.

WARNING!
The vibration and noise emissions during actual use of the power tool can differ from the declared values depending on the manner in which the tool is used, especially what kind of workpiece is processed.
Try to keep the vibration load as low as possible. Measures to reduce the vibration load are, e.g. wearing gloves and limiting the working time. Wherein all states of operation must be included (e.g. times when the power tool is switched off and times where the power tool is switched on but running without load).

General safety notes
General power tool safety warnings

WARNING!
Read all safety warnings, instructions, illustrations and specifications provided with this power tool. Failure to follow all instructions listed below may result in electric shock, fire and/or serious injury.
Save all warnings and instructions for future reference.
The term “power tool” in the warnings refers to your mains-operated (corded) power tool or battery-operated (cordless) power tool.
Work area safety
a) Keep work area clean and well lit. Cluttered or dark areas invite accidents.
b) Do not operate power tools in explosive atmospheres, such as in the presence of flammable liquids, gases or dust. Power tools create sparks which may ignite the dust or fumes.
c) Keep children and bystanders away while operating a power tool. Distractions can cause you to lose control.
Electrical safety
a) Power tool plugs must match the outlet. Never modify the plug in any way. Do not use any adapter plugs with earthed (grounded) power tools. Unmodified plugs and matching outlets will reduce risk of electric shock.
b) Avoid body contact with earthed or grounded surfaces, such as pipes, radiators, ranges and refrigerators. There is an increased risk of electric shock if your body is earthed or grounded.
c) Do not expose power tools to rain or wet conditions. Water entering a power tool will increase the risk of electric shock.
d) Do not abuse the cord. Never use the cord for carrying, pulling or unplugging the power tool. Keep cord away from heat, oil, sharp edges or moving parts. Damaged or entangled cords increase the risk of electric shock.
e) When operating a power tool outdoors, use an extension cord suitable for outdoor use. Use of a cord suitable for outdoor use reduces the risk of electric shock.
f) If operating a power tool in a damp location is unavoidable, use a residual current device (RCD) protected supply. Use of an RCD reduces the risk of electric shock.
Personal safety
a) Stay alert, watch what you are doing and use common sense when operating a power tool. Do not use a power tool while you are tired or under the influence of drugs, alcohol or medication. A moment of inattention while operating power tools may result in serious personal injury.
b) Use personal protective equipment. Always wear eye protection.
Protective equipment such as a dust mask, non-skid safety shoes, hard hat or hearing protection used for appropriate conditions will reduce personal injuries.
c) Prevent unintentional starting. Ensure the switch is in the off-position before connecting to power source and/or battery pack, picking up or carrying the tool. Carrying power tools with your finger on the switch or energising power tools that have the switch on invites accidents.
d) Remove any adjusting key or wrench before turning the power tool on. A wrench or a key left attached to a rotating part of the power tool may result in personal injury.
e) Do not overreach. Keep proper footing and balance at all times. This enables better control of the power tool in unexpected situations.
f) Dress properly. Do not wear loose clothing or jewellery. Keep your hair, clothing and gloves away from moving parts. Loose clothes, jewellery or long hair can be caught in moving parts.
g) If devices are provided for the connection of dust extraction and collection facilities, ensure these are connected and properly used. Use of dust collection can reduce dust-related hazards.
h) Do not let familiarity gained from frequent use of tools allow you to become complacent and ignore tool safety principles. A careless action can cause severe injury within a fraction of a second.
a) Do not force the power tool. Use the correct power tool for your application. The correct power tool will do the job better and safer at the rate for which it was designed.
b) Do not use the power tool if the switch does not turn it on and off. Any power tool that cannot be controlled with the switch is dangerous and must be repaired.
c) Disconnect the plug from the power source and/or remove the battery pack, if detachable, from the power tool before making any adjustments, changing accessories, or storing power tools. Such preventive safety measures reduce the risk of starting the power tool accidentally.
d) Store idle power tools out of the reach of children and do not allow persons unfamiliar with the power tool or these instructions to operate the power tool. Power tools are dangerous in the hands of untrained users.
e) Maintain power tools and accessories. Check for misalignment or binding of moving parts, breakage of parts and any other condition that may affect the power tool's operation. If damaged, have the power tool repaired before use. Many accidents are caused by poorly maintained power tools.
f) Keep cutting tools sharp and clean. Properly maintained cutting tools with sharp cutting edges are less likely to bind and are easier to control.
g) Use the power tool, accessories and tool bits etc. in accordance with these instructions, taking into account the working conditions and the work to be performed. Use of the power tool for operations different from those intended could result in a hazardous situation.
h) Keep handles and grasping surfaces dry, clean and free from oil and grease. Slippery handles and grasping surfaces do not allow for safe handling and control of the tool in unexpected situations.
a) Recharge only with the charger specified by the manufacturer. A charger that is suitable for one type of battery pack may create a risk of fire when used with another battery pack.
b) Use power tools only with specifically designated battery packs. Use of any other battery packs may create a risk of injury and fire.
c) When a battery pack is not in use, keep it away from other metal objects, like paper clips, coins, keys, nails, screws or other small metal objects, that can make a connection from one terminal to another. Shorting the battery terminals together may cause burns or a fire.
d) Under abusive conditions, liquid may be ejected from the battery; avoid contact. If contact accidentally occurs, flush with water. If liquid contacts eyes, additionally seek medical help. Liquid ejected from the battery may cause irritation or burns.
e) Do not use a battery pack or tool that is damaged or modified. Damaged or modified batteries exhibit unpredictable behaviour resulting in fire, explosion or risk of injury.
f) Do not expose a battery pack or tool to fire or excessive temperature. Exposure to fire or temperature above 130 °C may cause explosion.
g) Follow all charging instruction and do not charge the battery pack or tool outside the temperature range specified in the instruction. Charging improperly or at temperatures outside the specified range may damage the battery and increase the risk of the fire.
WARNING!

Do not dispose of batteries in household waste, fire or water. Do not subject the battery to strong sunlight over long periods and do not leave it on a heater (max. 50 °C).


Service
a) Have your power tool serviced by a qualified repair person using only identical replacement parts. This will ensure that the safety of the power tool is maintained.
b) Never service damaged battery packs. Service of battery packs should only be performed by the manufacturer or authorized service providers.
Additional safety instructions
■ Starting the motor is prohibited at low temperatures below 0 °C.
- Avoid heavy loads on the piping system by using flexible hose connections to avoid kinks.
WARNING!
All hoses and fittings of compressors must be suitable for use at the maximum permissible pressure.
- We recommend providing feed hoses with a safety cable, e.g. a wire rope, at pressures above 7 bar.
- The maximum inclination of the compressor is 0 degrees.
● Battery charger safety warnings
This appliance can be used by children aged from 8 years and above and persons with reduced physical, sensory or mental capabilities or lack of experience and knowledge if they have been given supervision or instruction concerning use of the appliance in a safe way and understand the hazards involved.
Children shall not play with the appliance.
Cleaning and user maintenance shall not be made by children without supervision.
- Do not charge non-rechargeable batteries.
Disregarding this
instruction is hazardous.
If the supply cord is damaged, it must be replaced by the manufacturer, its service agent or similarly qualified persons in order to avoid a hazard.
■ Protect the electrical parts against moisture. Do not immerse such parts in water or other liquids to avoid electrical shock. Never hold the appliance under running water. Pay attention to the instructions provided for cleaning, maintenance and repair.
■ The appliance is suitable for indoor use only.
⚠️ATTENTION! This charger is only designed for charging the battery pack types:
| /// PARKSIDE® 20 Vbattery pack |
| PAP 20 B1 | 2 Ah 5 | cells * |
| PAP 20 B3 | 4 Ah 10 | cells * |
| * Battery and charger are not included in the scope of delivery. |
■ Customers can order compatible replacement batteries and chargers from Lidl online shops for the following countries:
Germany (lidl.de), France (lidl.fr), Belgium (lidl.be), Czech Republic (lidl.cz), Netherlands (lidl.nl), Poland (lidl.pl), Slovakia (lidl.sk), Spain (lidl.es)
Customers from all other countries can order from www.optimex-shop.com.
The device is compatible with all “X 20 V TEAM” batteries. For optimal performance, we recommend using the below battery packs:
Suitable battery packs and chargers
| Batterypack: | /// PARKSIDE'X 20 V Team |
| Charger: | /// PARKSIDE'X 20 V Team |
Assembly
● Unpacking the product and basic cleaning
WARNING!
The product and packaging materials are not toys! Children must not be allowed to play with plastic bags, film and small parts! There is a risk of swallowing and suffocation!
- Take the product out of the packaging and remove all packaging materials and plastic wrappings.
- Check to make sure that all listed parts are included (see "Scope of delivery").
- Check whether the product and all parts are in good condition, if any damage or defect is detected, do not use the product, but follow the procedure described in chapter "Warranty".
- Inserting/removing the battery
Inserting the battery
- Push the battery 19 into the battery holder 11.
- Ensure the battery 19 clicks audibly in place.
Removing the battery
- Press the release button 22 on the battery 19.
- Pull the battery 19 from the battery holder 11.
● Charging the battery
(Fig. C)
NOTE
The batt ^19 may be charged at any time without reducing its life.
Interrupting the charging process does not damage the battery 19.
Before operation: Charge the battery 19 when it is at medium or low charging level (see “Checking the battery’s charging level”).
☐ The charging control LEDs (red and green) indicate the status of the charger 23 and the battery 19.
| LED Status | |
| Red LED lights up Battery charges |
| Green LED lights up | Battery fully charged |
| Green LED and red LED flashing | Battery defective |
| Red LED flashing | Battery too cold or too warm |
| Green LED lights up (without battery) | Charger ready |
- Insert the battery 19 into the charger 23.
- Connect the mains plug of the charger 23 to a mains outlet.
- When the battery 19 is fully charged:
- Disconnect the mains plug of the charger 23 from the mains outlet.
- Remove the batter 19 from the charger 23.
- Checking the battery’s charging level
(Fig. B)
☐ Check battery's 19 charging level: Press the ➕ button 20. The charging level LEDs 21 show the charging level as follows:
| Charging level LEDs | Charging level |
| Red/orange/green Max | imum |
| Red/orange Medium | |
| Red Low | |
Operation

WARNING! Risk of injury!

Wear ear protection!
- Switching the product on/off
Switching on
☐ Press the ON/OFF switch 4. The LCD display 7 lights up.
Switching off
- Press the on/off switch 4 for approx. 5 s until the LCD display 7 goes out.
- Remove the rechargeable battery 19 from the device if you are leaving the product unattended or if you have finished working.
NOTE
The product switches off automatically after a while if it is not used.
- Switching the LED work light on and off
Requirements
☐ The device is switched on.

DANGER!
Do not look into the light source.
| LED button 9 | LED work light 10 |
| Press 1 time | On - level 1 |
| Press 2 time | increase the brightness |
| Press 3 time | Off |
Inflating
- Compressor mode
The compressor mode is suitable for inflatable articles that need to be inflated at high pressures, such as beach items, balls, bicycle and car tyres etc. You may need an adapter.
Selecting the adapter
- Place the product on a stable and flat surface.
- Select the desired adapter depending on the object you want to inflate:
| Adapter Object to be inflated | |
| Tapered adapter 18a | Inflate swimming accessories, e g :☐ Paddling pools☐ Air mattresses☐ Boats |
| Adapter for bicycle valves 18c | Bicycle tyres |
| Ball needle 18b | Balls |
- Remove the compressed air hose 14 from the storage compartment for compressed air hose.
- Fold up the clamping lever 12 on the valve connection 13.
- Connect the compressed air hose 14 with the adapter to the object you wish to inflate.
- Fold down the clamping lever 12 on the valve connection 13 to lock it in place.
Setting the unit and pressure
-
Press the On/Off switch 4. The pressure unit on the LCD display 7 changes between psi, bar and kPa.
-
Set the desired pressure:
- Press the button -5 to increase the value.
- Press the button -3 to decrease the value.
The set pressure value is shown on the display 7.
NOTE
This product is not calibrated! For a calibrated measurement value, check the actual tyre pressure using a calibrated meter after you have inflated the object yourself.
Press and hold the button 5 or 3 to increase or decrease the pressure display rapidly.
Operation
- Press the On/Off switch 4. The device is ready for use.
- Set to the desired pressure. (see Setting the unit and pressure)
- Press the toggle switch 6 towards compressor mode. The inflatable article is inflated until the set pressure is reached.
- Cancel the pumping process: Set the toggle switch 6 to the middle position.
Air pump mode
Air pump mode is suitable for filling and deflating large-volume inflatable articles, such as air mattresses, paddling pools etc. which are filled or emptied at low pressure.
- Attach the hose 16 onto the air outlet 15. Lock the hose in a clockwise direction.
- Remove the valve cap.
- Insert the hose 16 into the valve of the inflation article. For 8 mm valves you need the hose adapter 17.
- Press the On/Off switch 4. The device is ready for use.
- Press the toggle switch 6 towards air pump mode. The inflatable article is inflated.
- Once the desired filling volume is reached, set the toggle switch 6 to the middle position.
- Pull the hose out of inflatable article
- Unlock the hose 16 anticlockwise. Pull the hose 16 off the air outlet 15.
- Put the valve cap back on the inflatable article.
● Deflating for inflatable articles
- Attach the hose onto the air inlet 24.
- Insert the hose 16 into the valve of the inflation article. For 8 mm valves you need the hose adapter 17.
- Press the On/Off switch 4. The device is ready for use.
- Press the toggle switch 6 towards air pump mode. The air in the inflatable article is pumped out.
- Once the inflatable article is deflated, set the toggle switch 6 to the middle position.
- Pull the hose 16 off the air inlet 24.
- Pull the hose 16 out of the valve of the inflatable article.
- Put the valve cap back on the inflatable article.
● Troubleshooting
| Problem Possible cause Action | |
| The product does not start. | The battery 19 is empty. | Charge the battery 19 (see „Charging the battery“). |
| The battery 19 is not properly inserted. | Insert the battery 19 correctly (see „Inserting/removing the battery“). |
| The ON/OFF switch 4 is defective. | Have the product repaired by the Service Centre. |
| The motor is defective. |
| The product works with intermittent operation. | Internal loose contact. Have the product repaired by the Service Centre. |
| The ON/OFF switch 4 is defective. | |
| Low work output | Adapter 18 not attached correctly | Compressor mode |
| Pressure set incorrectly Setting the pressure |
| Low battery power Charge the battery (see the separate operating instructions for the rechargeable battery and charger). |
● Cleaning and maintenance

WARNING! Risk of injury!

Always switch the product off, remove the battery 19 and let the product cool down before performing inspection, maintenance or cleaning works.

CAUTION!
Any maintenance and repair other than described in this manual: Contact an authorised service centre or a similarly qualified person to check or repair the product. Only use original parts.
NOTE
The following cleaning and servicing should be done regularly. This will ensure a long and reliable service life.

WARNING! Risk of electric shock!
Do not spray the product with water and do not immerse it in water. Never allow liquids to get into the product.
NOTE
Do not use cleaning agents or solvents. You may otherwise irreparably damage the product.
The product must always be kept clean, dry and free from oil or grease.
The product is maintenance-free.
□ Clean the product with a dry cloth.
Storage
□ Store the product in a dry and dust-protected place out of reach of children.
☐ The storage temperature for the rechargeable battery 19 and the product is between 0 °C and +45 °C. Avoid extreme cold or heat during storage to ensure the battery output is not adversely affected.
☐ If the battery 19 is to be stored for an extended period, the charge level should be checked regularly. The optimum charge level is between 50 % and 80 %.
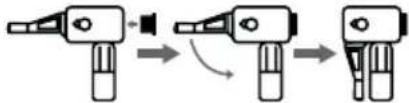
☐ Dismantle the hose 16 and adapters 18. Store the adapters 18 in the slots behind the transparent cover 8. Wind up the compressed air hose 14 and hose 16 and stow them in the cavities on the sides.
- Disposal
The packaging is made of environmentally friendly materials, which may be disposed of through your local recycling facilities.
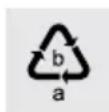
Observe the marking of the packaging materials for waste separation, which are marked with abbreviations (a) and numbers (b) with following meaning:
1–7: plastics/20–22: paper and fibreboard/80–98: composite materials.
Product:
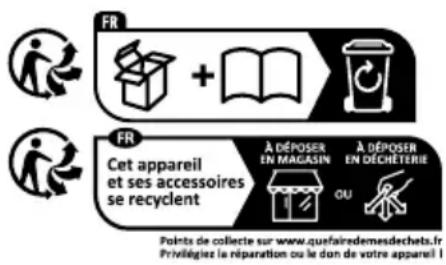
The product incl. accessories, manual and packaging materials are recyclable and are subject to extended producer responsibility.
Dispose them separately, following the illustrated Info-tri (sorting information), for better waste treatment.
The Triman logo is valid in France only.

Contact your local refuse disposal authority for more details of how to dispose of your wornout product.

To help protect the environment, please dispose of the product properly when it has reached the end of its useful life and not in the household waste. Information on collection points and their opening hours can be obtained from your local authority.
Faulty or used batteries/rechargeable batteries must be recycled. Return the batteries/rechargeable batteries and the product to the available collection points.
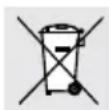
Environmental damage through incorrect disposal of the batteries / rechargeable batteries!
Batteries / rechargeable batteries may not be disposed of with the usual domestic waste. They may contain toxic heavy metals and are subject to hazardous waste treatment rules and regulations. The chemical symbols for heavy metals are as follows: Cd = cadmium, Hg = mercury, Pb = lead. That is why you should dispose of used batteries / rechargeable batteries at a local collection point.
● Warranty
The product has been manufactured to strict quality guidelines and meticulously examined before delivery. In the event of material or manufacturing defects you have legal rights against the retailer of this product. Your legal rights are not limited in any way by our warranty detailed below.
The warranty for this product is 3 years from the date of purchase. The warranty period begins on the date of purchase. Keep the original sales receipt in a safe location as this document is required as proof of purchase.
Any damage or defects already present at the time of purchase must be reported without delay after unpacking the product.
Should the product show any fault in materials or manufacture within 3 years from the date of purchase, we will repair or replace it – at our choice – free of charge to you. The warranty period is not extended as a result of a claim being granted. This also applies to replaced and repaired parts.
This warranty becomes void if the product has been damaged, or used or maintained improperly.
The warranty covers material or manufacturing defects. This warranty does not cover product parts subject to normal wear and tear, thus considered consumables (e.g. batteries, tubes, cartridges), nor damage to fragile parts, e.g. switches or glass parts.
● Warranty claim procedure
So that your request can be processed quickly, please observe the following instructions:
For all inquiries, please have the receipt and item number (e.g., IAN 479363_2410) ready as proof of purchase.
The article number can be taken from the identification label on the product, engraving on the product, the front cover of your manual (at the bottom left), or the sticker on the back or bottom of the product.
If malfunctions or other defects arise, first contact the service department indicated below by phone or email.
You can then send a product recorded as defective to the communicated service address postage-free, making sure to enclose proof of purchase (receipt) and information on the details of the defect and when it occurred.
You can download and view this and numerous other manuals at parkside-diy.com. This QR code takes you directly to parkside-diy.com. Choose your country and use the search screen to search for the operating instructions. Entering the item number (IAN) 479363_2410 takes you to the operating instructions for your item.

Service
GB Service Great Britain
Tel.:08000569216
E-Mail:owim@lidl.co.uk
IE Service Ireland
Tel.:1800200736
E-Mail:owim@lidl.ie
IAN: 479363_2410
Product identification:
"Parkside" 20V Cordless Compressor and Air Pump
Model Number: HG12956
The object of the declaration described above is in conformity with the relevant Union harmonisation legislation:
| Directive 2006/42/EC |
| Directive 2014/30/EU |
| Directive 2000/14/EC |
| Directive 2005/88/EC |
| Directive 2011/65/EU and all related amendments |
References to the relevant harmonised standards used or references to the other technical specifications in relation to which conformity is declared:
| N° / Parts |
| Directive 2006/42/EC |
| EN 62841-1:2015/A11:2022 |
| EN 1012-1:2010 |
| Directive 2014/30/EU |
| EN IEC 55014-1:2021 |
| EN IEC 55014-2:2021 |
| EN IEC 55015:2019/A11:2020 |
| EN IEC 61547:2023 |
The object of the declaration described above is in conformity with Directive 2011/65/EU of the European Parliament and of the Council of 8 June 2011 on the restriction of the use of certain hazardous substances in electrical and electronic equipment:
| N° / Parts |
| EN IEC 63000:2018 |
Conformity Assessment procedure / name&address notified body where appropriate:
Directive 2000/14/EC Annex VI, TÜV SÜD Industrie Service GmbH, Westendstraße 199, 80686 München, Germany
Measured sound power level on an equipment representative for this type: 84.2 dB(A)
Guaranteed sound power level for this equipment: 86 dB(A)
Keeper of the technical documentation: OWIM GmbH & Co.KG
Signed for and on behalf of:
This declaration of conformity is issued under the sole responsibility of the manufacturer.
Translation of the original declaration of conformity
Neckarsulm 24.02.2025
Place
Date
ppa. Schusel ppa. Buchen
ppa. Stefan Haensel ppa. Jens Buchheim
Authorised Signatory Authorised Signatory
EN
PDF ONLINE parkside-diy.com
Service après-vente
FR Service après-vente France
Tél.:0800904879
E-Mail:owim@lidl.fr


