
PDSS B2 - Compressor PARKSIDE - Free user manual and instructions
Find the device manual for free PDSS B2 PARKSIDE in PDF.


User questions about PDSS B2 PARKSIDE
0 question about this device. Answer the ones you know or ask your own.
Ask a new question about this device
Download the instructions for your Compressor in PDF format for free! Find your manual PDSS B2 - PARKSIDE and take your electronic device back in hand. On this page are published all the documents necessary for the use of your device. PDSS B2 by PARKSIDE.
USER MANUAL PDSS B2 PARKSIDE
PNEUMATIC TOOL SET PDSS B2
GB IE
PNEUMATIC TOOL SET
Operation and Safety Notes
Translation of the original instructions
SE
TRYCKLUFTSTILLBEHÖRSSET
Before reading, unfold both pages containing illustrations and familiarise yourself with all functions of the device.
FI
GB / IE Operation and Safety Notes Page 5
natural_image
Hand holding a pressure gauge attached to a soccer ball with tubing (no text or symbols visible)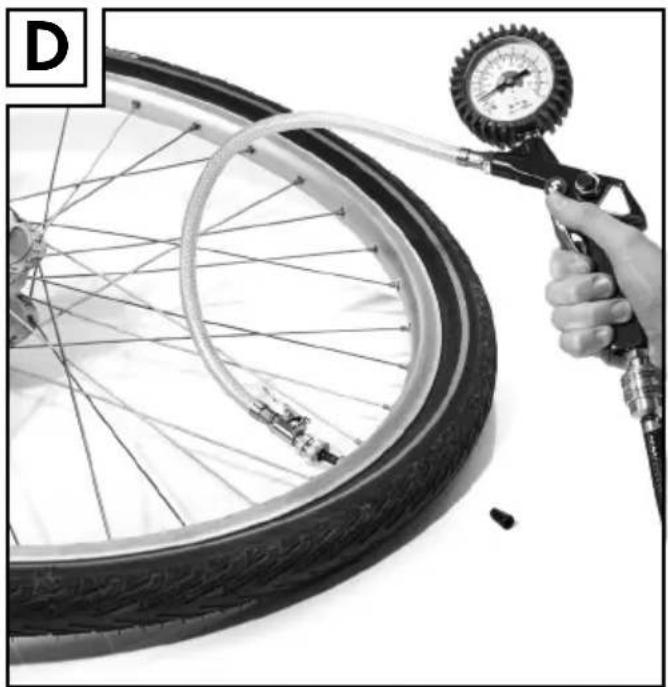
natural_image
Close-up of a hand holding a pressure gauge attached to a bicycle tire, with no visible text or symbols.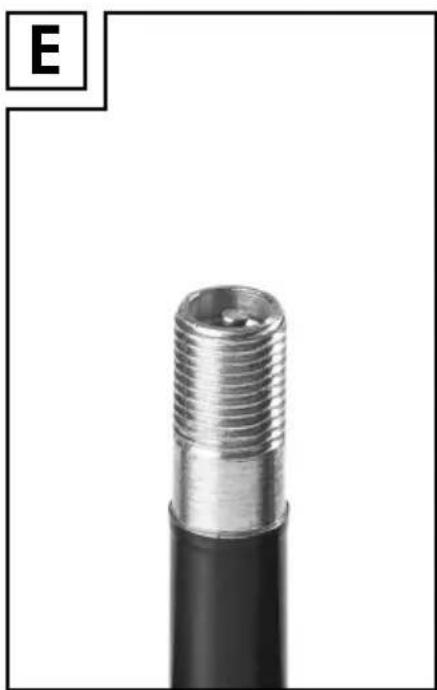
natural_image
Close-up of a metallic threaded connector with a black cylindrical body (no text or symbols visible)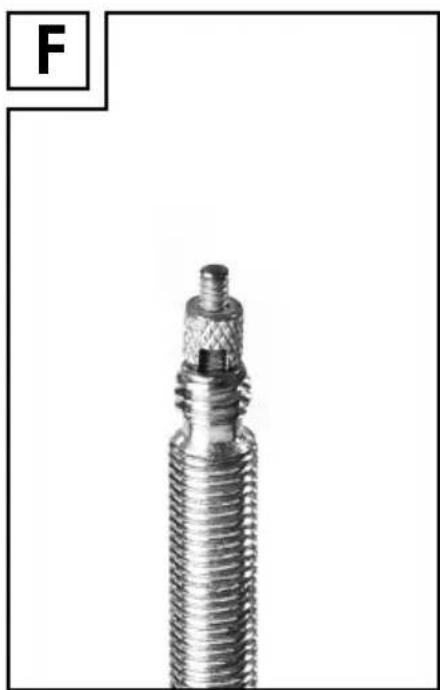
natural_image
Close-up of a metallic screw or connector with threaded shaft and threaded end (no visible text or symbols)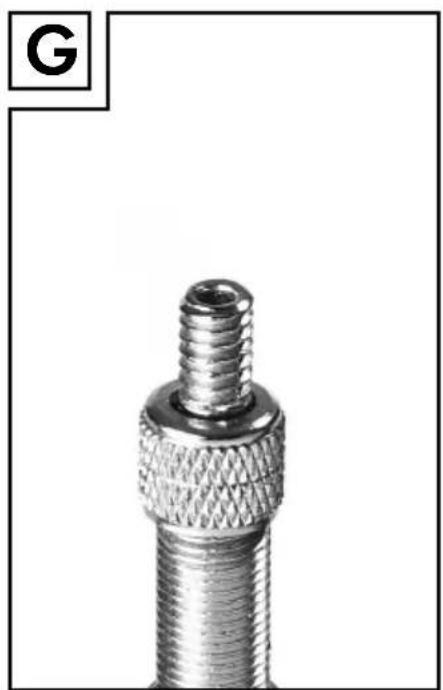
natural_image
Close-up of a metallic threaded connector with textured cap (no text or symbols visible)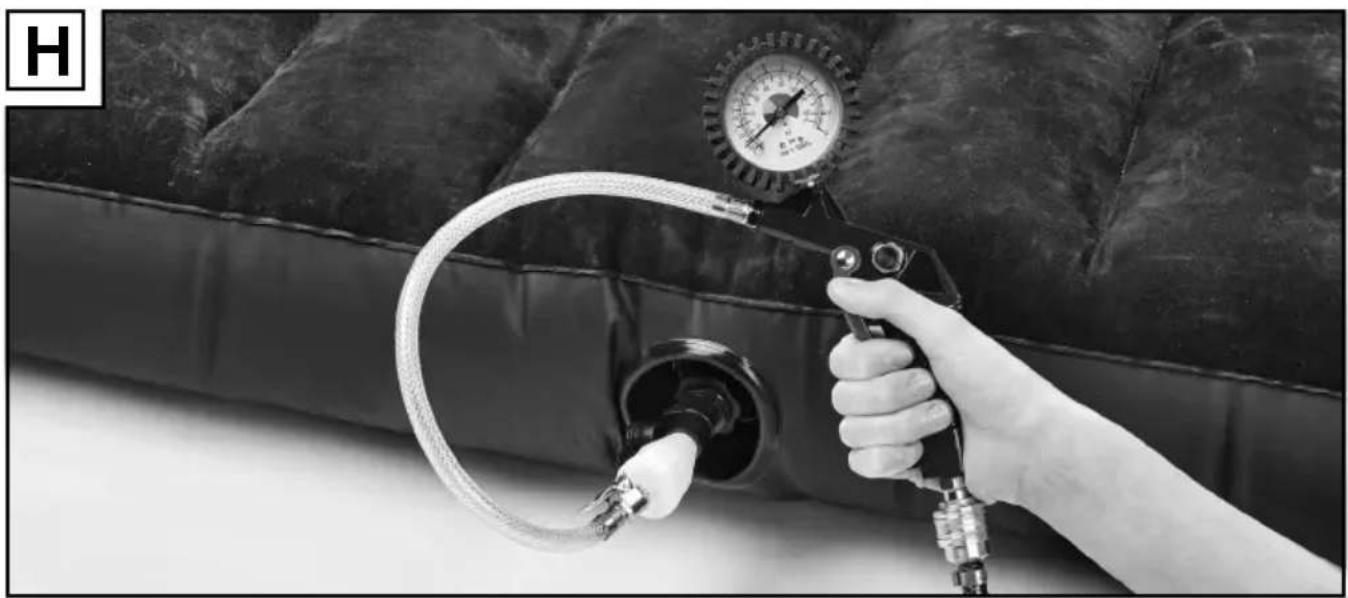
natural_image
Hand holding a pressure gauge attached to a black rubber hose, with a pressure vessel in the background (no text or symbols visible)Introduction
Proper use....Page 6
Features and equipment....Page 6
Included items Page 6
Technical data....Page 6
Safety advice....Page 6
Original accessories/attachments Page 7
Bringing into use
Connecting the compressed air source Page 7
Using the tyre inflator gauge....Page 7
Using the blow gun....Page 8
Maintenance and cleaning......Page 8
Service Page 8
Warranty Page 9
Disposal Page 9
Translation of the original declaration of conformity /
Manufacturer Page 9
Pneumatic Tool Set PDSS B2
- Introduction
We congratulate you on the purchase of your new device. You have chosen a high quality product. The instructions for use are part of the product. They contain important information concerning safety, use and disposal. Before using the product, please familiarise yourself with all of the safety information and instructions for use. Only use the unit as described and for the specified applications. If you pass the product on to anyone else, please ensure that you also pass on all the documentation with it.
- Proper use
This tyre inflator gauge is intended for pumping up cycle tyres, inflatable boots, inflatable mattresses, balls etc. The blow gun is intended for cleaning and blowing out material from objects and difficult to access places. Any other use or modification to the device shall be considered as improper use and could give rise to considerable risk of accident. We will not accept liability for loss or damage arising from improper use. The device is intended for private domestic use only.
● Features and equipment
Gauge
Tyre inflator gauge
Deflator valve
Plug-in nipple
Hose with valve connector, straight
Trigger
Blow gun
Extension nozzle
Accessory:
9 Cap for 14, 15, 16
10 Ball needle
11 Universaladapter,
for valves with internal ∅ of approx. 9 mm
12 Universaladapter,
for valves with internal ∅ of approx. 6 mm
13 Valve adapter, e.g. for cycle tyre valves
14 Universaladapter,
for valves with internal ∅ of approx. 8 mm
15 Adapter for screw valves, e.g. on inflatable dinghies
16 Adapter for deflator valves
- Included items
1 Tyre inflator gauge
1 Blow gun
2 Extension nozzles
1 Adapter set (8-piece)
1 Operating instructions
- Technical data
Working pressure: Max. 8 bar
Compressed air quality: Cleaned, oil- and condensate-free
Volume flow rate: Typically 170-300 Ltr./Min.
Sound pressure level
(tyre filling device): 84 dB(A)
Sound pressure level
(blow-out gun): 88 dB(A)
Sound power level
(tyre filling device): 95 dB(A)
Sound power level
(blow-out gun): 99 dB(A)
Uncertainty: K = 3 dB(A)
Values determined in accordance with EN 14462
(EN1953/A1:2013).
● Safety advice

WARNING! Read all the safety advice and instructions.
Failure to observe the safety advice
and instructions could result in serious injury and / or damage to property.
Keep all the safety advice and instructions in a safe place for future reference!
WARNING! Check the air pressure with a suitable manometer after filling.
WARNING! RISK OF FIRE, EXPLOSION AND DAMAGE TO HEALTH! The device must be used in well-ventilated areas only.
WARNING! DANGER OF INJURY!
Never exceed the maximum allowable working air pressure of 8 bar. Use a pressure reducer to set the working air pressure.
WARNING! RISK OF RECOIL FORCES!
High working pressures can give rise to recoil forces that under certain conditions can result in danger from continuous loading.
Never point the device at people or animals.
WARNING! DANGER OF INJURY!
Never use oxygen or other combustible gas as the energy source.
WARNING! DANGER OF INJURY!
First disconnect the hose from the compressed air source and only then disconnect the compressed air supply hose from the device. This will ensure that the compressed air supply hose does not wave around or recoil in an uncontrolled manner.
For your own safety, wear suitable personal protective equipment.
- Keep children and other people away while you are operating the device.
Distractions can cause you to lose control of the device.
■ Disconnect the device from the compressed air source before carrying out any repairs or maintenance of the device or moving it to another location.
■ When removing the hose coupling, hold the hose tightly in your hand to avoid injury caused by the hose shooting backwards.
- Look out for damage on the device.
Check the device for damage before bringing it into use. Do not use the device if you discover any defects.
Do not kink the device's hose, otherwise you may damage it.
NOTE! Observe the safety advice provided by the manufacturer of your inflatable article.
- Do not remove rating plates or labels - they are safety-relevant parts of the device.
If you are inexperienced in the use of this type of device, you should seek out information or training to learn how to handle it safely.
Originalaccessories/attachments
Use only the accessories and attachments detailed in the operating instructions. The use of accessories other than those recommended in the operating instructions could lead to you being in danger of injury.
● Bringing into use
- Connecting the compressed air source
NOTE: Operate the product only with cleaned, condensate- and oil-free compressed air and never exceed the maximum working air pressure at the device of 8 bar.
NOTE: The compressed air source must be fitted with a (filter) / pressure reducer so that the air pressure can be regulated.
☐ Connect the product to a suitable compressed air source by connecting the quick-release coupling of the air supply hose with the plug-in nipple 4 to the product. It locks itself in place automatically.
● Using the tyre inflator gauge 2
- Place the valve connector 5 on to the valve (Schrader valve (see Fig. E), e.g. often used on mountain bikes).
- Press the trigger 6 to start the delivery of air.
- Release the trigger 6 to stop the delivery of air. Read off the filling pressure on the gauge 1.
-
If the object is overfilled with air (air pressure too high): Press the deflator valve 3 to release some air.
-
Press the lever of the valve connector 5 downwards and pull the valve connector 5 off the valve.
- After you finish work, disconnect the device from the compressor.
NOTE: First disconnect the hose from the compressor and only then disconnect the compressed air supply hose from the device. This will ensure that the compressed air supply hose does not wave around in an uncontrolled manner.
Using accessories:
☐ Press the lever of the valve connector 5 and insert the desired accessory 10 to 13 or the cap 9 into the valve connector 5 (Presta valve (see Fig. F), e.g. cycle tyre valve; (Dunlop valve (see Fig. G), traditional cycle tyre valve).
TIP: Use the valve adapter 13 for the cycle tyre valves shown.
- Using the blow gun 7
- Screw an extension nozzle 8 on to the blow gun 7.
- Press the trigger 6 to start the delivery of air.
- Release the trigger 6 to stop the delivery of air.
- After you finish work, disconnect the device from the compressor.
NOTE: First disconnect the hose from the compressor and only then disconnect the compressed air supply hose from the device. This will ensure that the compressed air supply hose does not wave around in an uncontrolled manner.
● Maintenance and cleaning
WARNING! DANGER OF INJURY!
Always disconnect the device from the compressed air source before you clean or maintain it.
The device requires no maintenance.
- Do not use sharp objects for cleaning the device. Do not allow any liquids to enter the device. Otherwise the device could be damaged.
□ Clean the device frequently; for best results, do this immediately after you have finished using it.
□ Clean the housing with a dry cloth.
Service
Should problems arise whilst operating your ROWI Electronics product, please proceed as follows:
1. Contact us
You may contact the ROWI Electronics Service Team at:
ROWI Electronics GmbH
Augartenstr. 3
service@rowi-electronics.de
Service hotline: +49 (0) 7253 9460-40
Most problems can be resolved with the skilled technical support of our Service Team.
2. Should an inspection or repair by the ROWI Electronics Service Center be required, please proceed as follows:
- Pack product
Pack the product in the original packaging. Ensure it is adequately padded and protected from impact. Transport damage is not covered by the warranty.
- Include receipt
The sales receipt must be included. Repairs under warranty can only be processed with the sales receipt.
- Send product
Only send the product to the above address after contacting the ROWI Electronics Service Center.
Warranty
ROWI Electronics extends a 36 months warranty from the date of purchase to the owner of this product. During this period, the ROWI Electronics Service Center will repair defects in material or manufacturing detected on the product free of charge.
This warranty does not cover problems not resulting from defects in material or manufacturing, e.g.
- Transport damage of any type
- Defects due to incorrect installation
- Defects due to improper use
- Defects due to improper handling
- Defects due to incorrect repairs or repairs attempted by persons and / or companies not authorised by ROWI Electronics
- Normal wear and tear from operation
- Cleaning components
- Adaptation to different national, technical or safety requirements if the product is used in a country for which it was not designed and manufactured.
We further assume no warranty for products where the serial number has been forged, altered or removed. The warranty will also be void when installing parts not approved by ROWI Electronics GmbH into the product.
The warranty does not cover claims beyond free repair of the defect, e.g. claims for damages.
- Disposal

The packaging is wholly composed of environmentally-friendly materials that can be disposed of at a local recycling centre.
Do not dispose of the product with household rubbish!
Contact your local refuse disposal authority for more details of how to dispose of your worn out electrical devices.
● Translation of the original declaration of conformity / Manufacturer CE
We,
ROWI Electronics GmbH
hereby declare the design and construction as well as the version of the following device as marketed by us to comply with the relevant basic safety- and health requirements of the EC directives.
Product designation:
Pneumatic tool set PDSS B2
Relevant EC directives:
Machinery Directive 2006/42/EC
Applicable harmonised standards:
EN 1953:2013
AFPS GS 2014:01 PAK
Brand: Parkside
Year of manufacture: 04–2015
Serial number: IAN 109809
- Managing Director -
Johdanto
11 Universaladapter,
11 Universaladapter,
service@rowi-electronics.de
Service-Hotline: +49 (0) 7253 9460-40
Fourniture......Page 30
service@rowi-electronics.de
Directive machines 2006/42/CE
11 Universeleadapter,
WAARSCHUWING! GEVAAR VOOR
WAARSCHUWING! REACTIEKRACH-
WAARSCHUWING! GEVAAR VOOR
WAARSCHUWING! GEVAAR VOOR
service@rowi-electronics.de
Service-hotline: +49 (0) 7253 9460-40
- PNEUMATIC TOOL SET PDSS B2
- PNEUMATIC TOOL SET
- TRYCKLUFTSTILLBEHÖRSSET
- Introduction
- Safety advice....Page 6
- Bringing into use
- Maintenance and cleaning......Page 8
- Translation of the original declaration of conformity /
- - Introduction
- - Proper use
- ● Features and equipment
- Accessory:
- - Included items
- - Technical data
- ● Safety advice
- Keep all the safety advice and instructions in a safe place for future reference!
- Originalaccessories/attachments
- ● Bringing into use
- ● Using the tyre inflator gauge 2
- Using accessories:
- - Using the blow gun 7
- ● Maintenance and cleaning
- WARNING! DANGER OF INJURY!
- Service
- Contact us
- ROWI Electronics GmbH
- Should an inspection or repair by the ROWI Electronics Service Center be required, please proceed as follows:
- - Pack product
- - Include receipt
- - Send product
- Warranty
- - Disposal
- Do not dispose of the product with household rubbish!
- ● Translation of the original declaration of conformity / Manufacturer CE
- Product designation:
- Relevant EC directives:
- Applicable harmonised standards:
- Brand: Parkside
- Year of manufacture: 04–2015
- Serial number: IAN 109809
- Johdanto
- WAARSCHUWING! GEVAAR VOOR
Brand : PARKSIDE
Model : PDSS B2
Category : Compressor