hrs600 - Electric hoists SCHEPPACH - Free user manual and instructions
Find the device manual for free hrs600 SCHEPPACH in PDF.

User questions about hrs600 SCHEPPACH
0 question about this device. Answer the ones you know or ask your own.
Ask a new question about this device
Download the instructions for your Electric hoists in PDF format for free! Find your manual hrs600 - SCHEPPACH and take your electronic device back in hand. On this page are published all the documents necessary for the use of your device. hrs600 by SCHEPPACH.
USER MANUAL hrs600 SCHEPPACH
natural_image
Blue and silver industrial machine labeled 'scheppach' with a 600 kg weight, suspended by pulleys (no text beyond branding)hrs600
| DE | Elektrischer SeilzugOriginalbetriebsanleitung |
| GB | Electrical cable hoistTranslation from the original instruction manual |
| FR | Palan électriqueTraduction des instructions d'origine |
| IT | Paranco elettrico a funeLa traduzione dal manuale di istruzioni originale |
| CZ | Elektrický lanový zvedákPřeklad z originálního návodu k obsluze |
| SK | Elektrický lanový navijakPreklad originálného návodu na obsluhu |
| HU | Elektromos csörlőEredeti használati utasítás fordítása |
| EE | Elektriline trosstaliTõlge algupārasest kasutusjuhendist |
| LV | Elektriskā vinčaTulkojums no originālā lietošanas pamācību |
| LT | Elektrinė lyno trauklėVertimas iš originalių valdymo instrukciju |
Inhaltsverzeichnis:
Seite:
Günzburger Straße 69
D-89335 Ichenhausen
Verehrter Kunde,
- Introduction 18
- Device description 18
- Scope of delivery 18
- Intended use 19
- General safety information 19
- Remaining hazards 21
- Technical data 21
- Installation 22
-
Operation 22
-
Transport 23
-
Cleaning and maintenance 23
-
Storage 24
-
Electrical Connection 24
-
Disposal and recycling 24
-
Troubleshooting 24
-
Declaration of conformity 106
Explanation of the symbols on the equipment
 | GB | Warning! Danger to life, risk of injury or damage to the tool are possible by ignoring!. |
 | GB | Caution - Read the operating instructions to reduce the risk of inquiry! |
 | GB | Wear a safety helmet! |
 | GB | Wear protective gloves! |
 | GB | Warning! Before installation, cleaning, alterations, maintenance, storage and transport switch off the device and disconnect it from the power supply. |
1. Introduction
Manufacturer:
scheppach
Günzburger Straße 69
D-89335 Ichenhausen
Dear Customer,
We hope your new tool brings you much enjoyment and success.
Note:
According to the applicable product liability laws, the manufacturer of the device does not assume liability for damages to the product or damages caused by the product that occurs due to:
- Improper handling,
• Non-compliance of the operating instructions, - Repairs by third parties, not by authorized service technicians,
- Installation and replacement of non-original spare parts,
• Application other than specified, - A breakdown of the electrical system that occurs due to the non-compliance of the electric regulations and VDE regulations 0100, DIN 57113 / VDE0113.
We recommend:
Read through the complete text in the operating instructions before installing and commissioning the device. The operating instructions are intended to help the user to become familiar with the machine and take advantage of its application possibilities in accordance with the recommendations. The operating instructions contain important information on how to operate the machine safely, professionally and economically, how to avoid danger, costly repairs, reduce downtimes and how to increase reliability and service life of the machine.
In addition to the safety regulations in the operating instructions, you have to meet the applicable regulations that apply for the operation of the machine in your country. Keep the operating instructions package with the machine at all times and store it in a plastic cover to protect it from dirt and moisture. Read the instruction manual each time before operating the machine and carefully follow its information. The machine can only be operated by persons who were instructed concerning the operation of the machine and who are informed about the associated dangers. The minimum age requirement must be complied with. In addition to the safety requirements in these operating instructions and your country's applicable regulations, you should observe the generally recognized technical rules concerning the operation of woodworking machines.
We cannot accept any liability for damage or accidents which arise due to a failure to follow these instructions and the safety instructions.
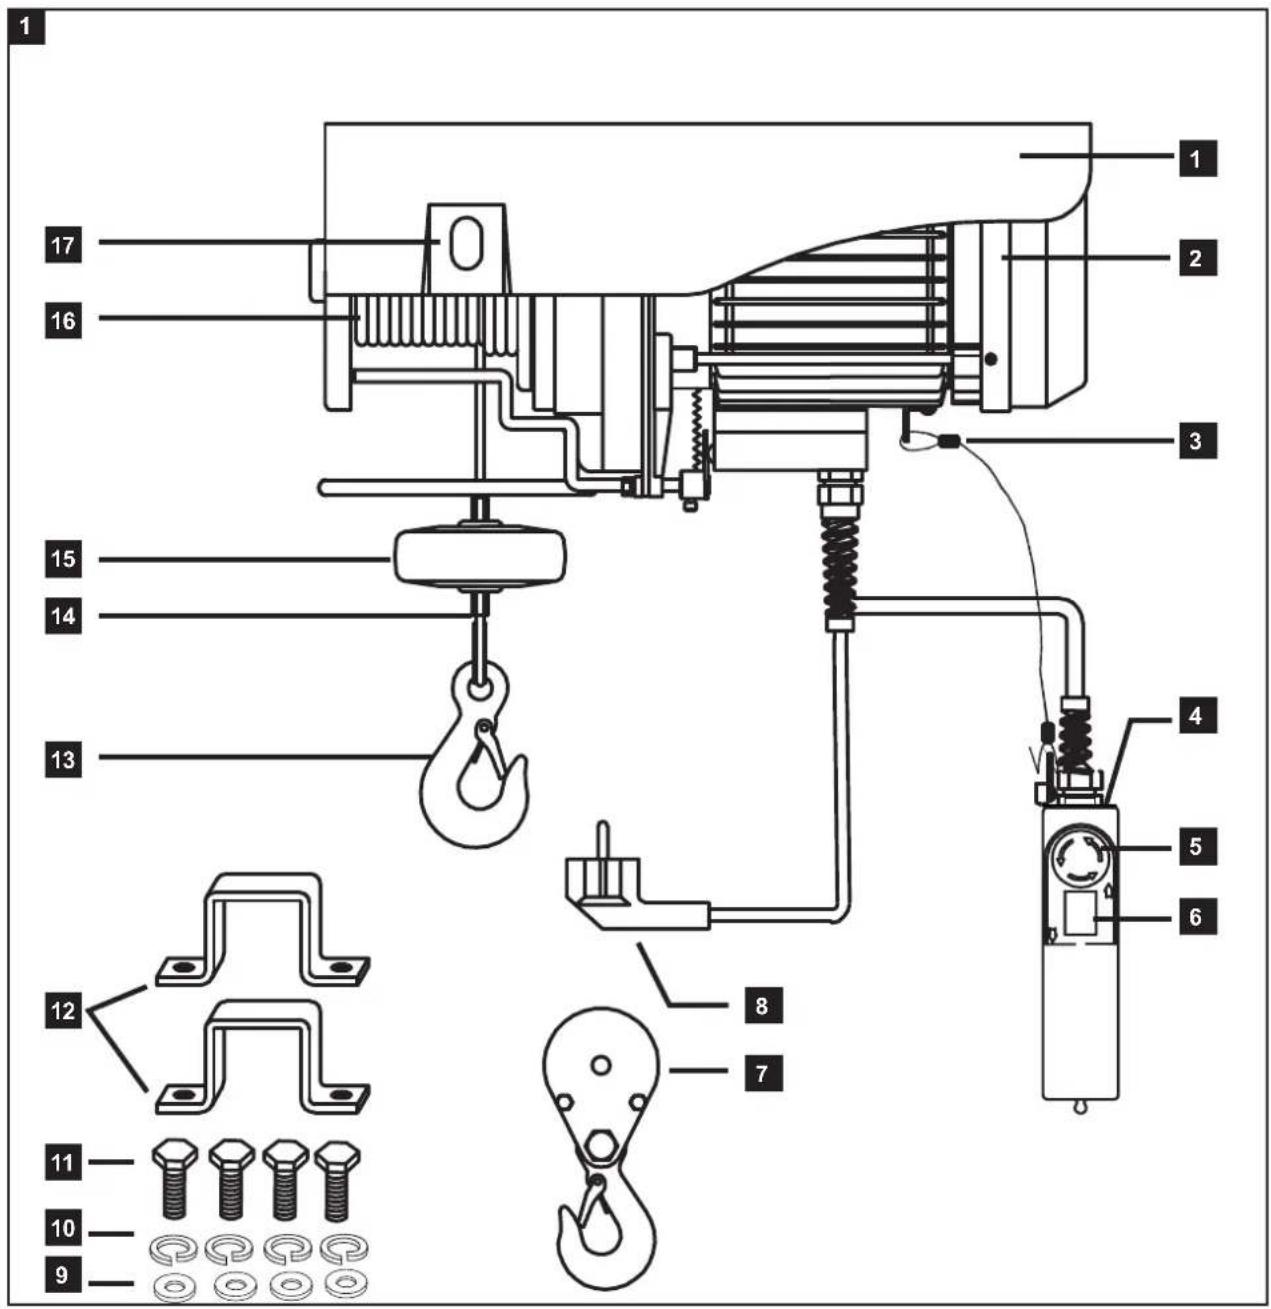
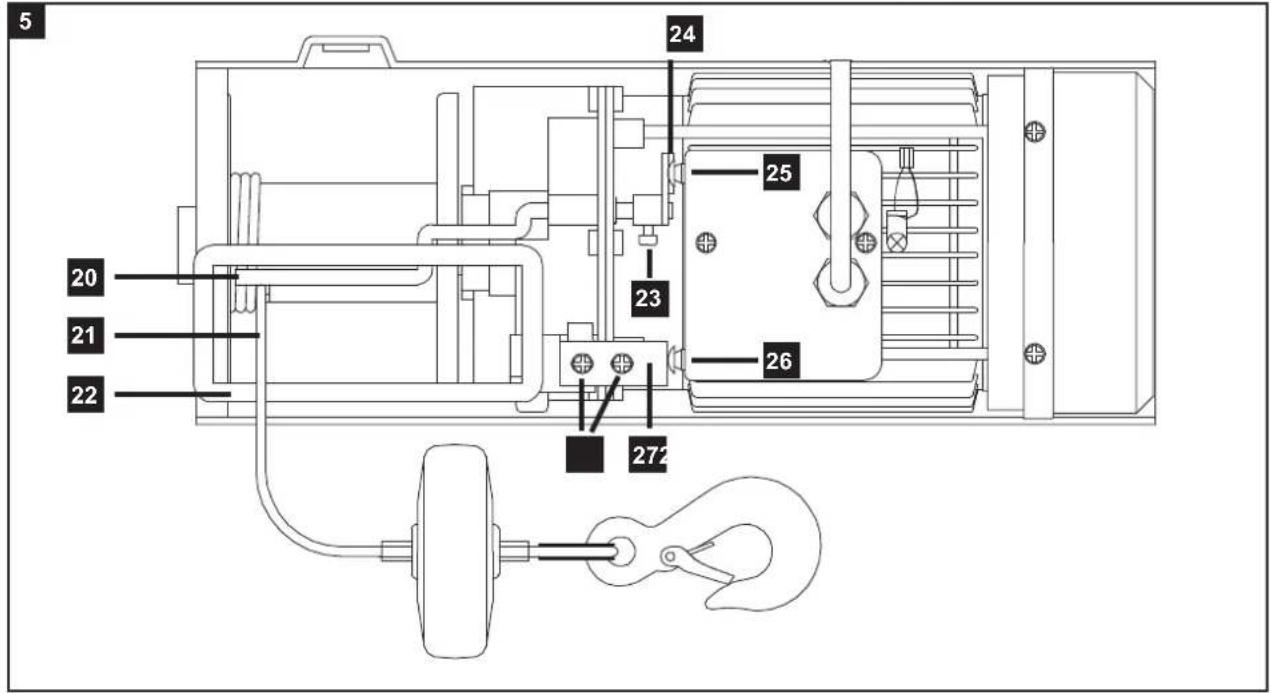
2. Device description
1 Cable hoist
2 Motor
3 Cable holder
4 Control unit
5 Emergency stop switch
6 Toggle switch
7 Hook/roller combination
8 Mains plug
9 Washer
10 Spring washer
11 Fixing screw
12 Retaining bracket
13 Hook of the cable hoist
14 Cable attachment
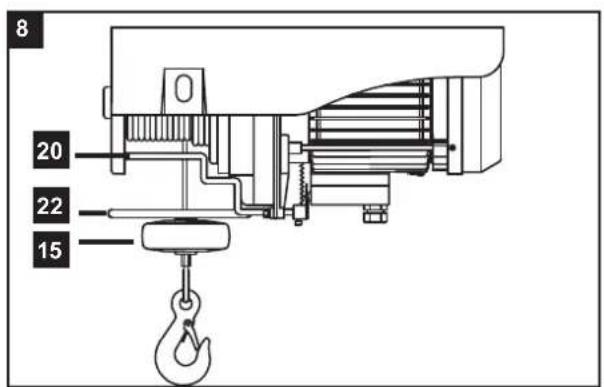
15 Stroke limitation
16 Cable drum
17 Opening for pulley function
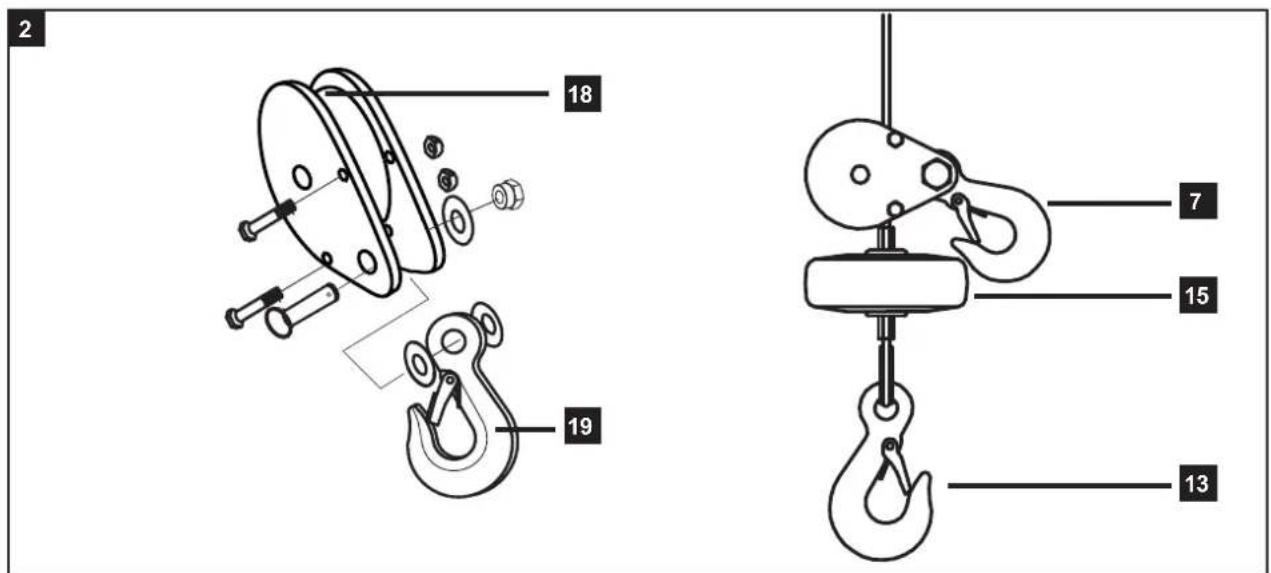
18 Hook/roller combination roller
19 Hook/roller combination hook
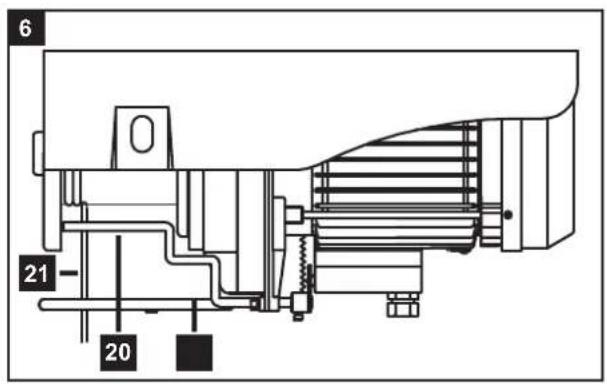
20 Lower release bracket
21 Steel cable
22 Upper release bracket
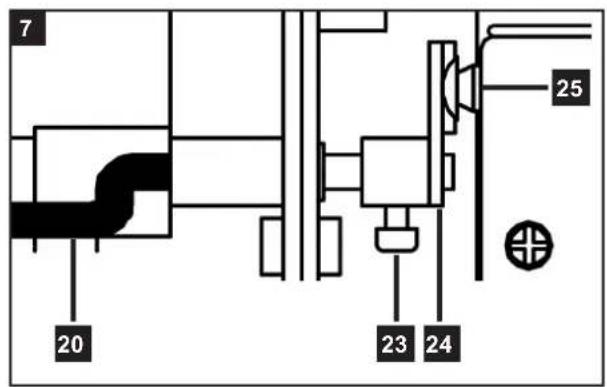
23 Fixing screw for the release plate
24 Release plate
25 Safety switch (lower limit)
26 Safety switch (upper limit)
27 Trigger angle
28 Fixing screw for the trigger angle
3. Scope of delivery
- Open the packaging and remove the device carefully.
- Remove the packaging material as well as the packaging and transport bracing (if available).
- Check that the delivery is complete.
- Check the device and accessory parts for transport damage.
- If possible, store the packaging until the warranty period has expired.
Attention!
The device and packaging materials are not toys! Children must not be allowed to play with plastic bags, film and small parts! There is a risk of swallowing and suffocation!
1x Electrical cable hoist
2x Retaining bracket
4x Fixing screw
4x Spring washer
4x Washer
1x Original instruction manual
4. Intended use
The cable hoist is designed for lifting and lowering loads in enclosed areas commensurate with the machine's capacity.
Relevant accident prevention regulations and other generally recognized safety and technical rules must also be adhered to.
The machine may only be used, maintained or repaired by trained persons who are familiar with the machine and have been informed about the dangers. Unauthorized modifications of the machine exclude a liability of the manufacturer for damages resulting from the modifications.
The machine is intended for use only with original spare parts and original tools from the producer. Any other use is considered to be not intended. The manufacturer excludes any liability for resulting damages, the risk is exclusively borne by the user.
Please note that our equipment has not been designed for use in commercial, trade or industrial applications. Our warranty will be voided if the equipment is used in commercial, trade or industrial businesses or for equivalent purposes.
5. General safety information
Attention! The following basic safety measures must be observed when using electric tools for protection against electric shock, and the risk of injury and fire. Read all these notices before using the electric tool and keep the safety instructions for later reference.
Safe work
1 Keep the work area orderly – Disorder in the work area can lead to accidents.
2 Take environmental influences into account - Do not expose electric tools to rain. - Do not use electric tools in a damp or wet environment. - Make sure that the work area is well-illuminated. - Do not use electric tools where there is a risk of fire or explosion.
3 Protect yourself from electric shock - Avoid physical contact with earthed parts (e.g. pipes, radiators, electric ranges, cooling units).
4 Keep children away - Do not allow other persons to touch the equipment or cable, keep them away from your work area.
5 Securely store unused electric tools - Unused electric tools should be stored in a dry, elevated or closed location out of the reach of children.
6 Do not overload your electric tool - They work better and more safely in the specified output range.
7 Use the correct electric tool
- Do not use low-output electric tools for heavy work.
- Do not use the electric tool for purposes for which it is not intended. For example, do not use handheld circular saws for the cutting of branches or logs.
- Do not use the electric tool to cut firewood.
8 Wear suitable clothing
- Do not wear wide clothing or jewellery, which can become entangled in moving parts.
- When working outdoors, anti-slip footwear is recommended.
– Tie long hair back in a hair net.
9 Avoid abnormal posture
- Make sure that you have secure footing and always maintain your balance.
10 Do not use the cable for purposes for which it is not intended
- Do not use the cable to remove the plug from the power outlet. Protect the cable from heat, oil and sharp edges.
11 Take care of your tools
- Keep cutting tools sharp and clean in order to be able to work better and more safely.
– Follow the instructions for lubrication and for tool replacement.
- Check the connection cable of the electric tool regularly and have it replaced by a recognised specialist when damaged.
- Check extension cables regularly and replace them when damaged.
- Keep the handle dry, clean and free of oil and grease.
12 Do not leave a tool key inserted
– Before switching on, make sure that keys and adjusting tools are removed.
13 Avoid inadvertent starting
- Make sure that the switch is switched off when plugging the plug into an outlet.
14 Use extension cables for outdoors
- Only use approved and appropriately identified extension cables for use outdoors.
- Only use cable reels in the unrolled state.
15 Remain attentive
- Pay attention to what you are doing. Remain sensible when working. Do not use the electric tool when you are distracted.
16 Check the electric tool for potential damage
- Protective devices and other parts must be carefully inspected to ensure that they are fault-free and function as intended prior to continued use of the electric tool.
- Check whether the moving parts function faultlessly and do not jam or whether parts are damaged. All parts must be correctly mounted and all conditions must be fulfilled to ensure fault-free operation of the electric tool.
- Damaged protective devices and parts must be properly repaired or replaced by a recognised workshop, insofar as nothing different is specified in the operating manual.
- Damaged switches must be replaced at a customer service workshop.
- Do not use any faulty or damaged connection cables.
- Do not use any electric tool on which the switch cannot be switched on and off.
17 Attention!
- The use of other insertion tools and other accessories can entail a risk of injury.
18 Have your electric tool repaired by a qualified electrician
- This electric tool conforms to the applicable safety regulations. Repairs may only be performed by an electrician using original spare parts. Otherwise accidents can occur.
Warning! This electric tool generates an electromagnetic field during operation. This field can impair active or passive medical implants under certain conditions. In order to prevent the risk of serious or deadly injuries, we recommend that persons with medical implants consult with their physician and the manufacturer of the medical implant prior to operating the electric tool.
Additional safety rules for the electric cable hoist
Read this manual carefully - familiarise yourself with this device. Observe the instructions for use, restrictions and possible dangers that apply to this device.
△ DANGER! Risk of injury! Improper use of the cable hoist and non-compliance with the safety instructions can result in electric shock, fire and/or serious injuries.
- Do not lift or lower loads when persons are in the danger area.
- Before putting the cable hoist into operation, check the function of the brake, the operating and emergency stop switch as well as the function of the safety switches for the upper and lower limit every day.
- Before connecting to the power supply, make sure that all control devices are in neutral or idle position.
- Do not use the cable hoist if the load to be moved is exposed to a wind effect that endangers operational safety.
- Observe the load and the load-bearing equipment.
- Do not move the load attached to the load-bearing attachment until the load stop is no longer in the danger zone and an instruction for moving the load is issued.
- Always stay in the area of the control unit and outside the danger zone as long as a load is suspended from the hook.
- Do not move a load that exceeds the load capacity of the cable hoist or its attachment.
- Never disable the safety devices. Do not routinely use the emergency stop switch to stop the load.
- When storing goods, maintain a safety distance of at least 0.5m between the moving parts and the stored goods.
- Do not transport persons with the cable hoist.
- Do not tear off any stuck loads.
- Do not pull a load at an angle or drag it over the ground.
- Do not move vehicles with the load or the load-bearing equipment.
- Avoid sudden and abrupt working movements.
- Ensure that the operating personnel are given the necessary instructions.
- Always work in accordance with the operating instructions.
- Initiate the load movement at the lowest available speed. Slowly tension the steel cable before moving the load. The steel cable must not be slack at the beginning of the load movement.
- Do not give the motor short pulses with the control unit to lower or lift the load.
- Wear a helmet when operating the cable hoist.
- Make sure that at least two windings of the steel cable always remain on the cable drum. This ensures that the load is lifted safely.
⚠ WARNING! Risk of electric shock! Incorrect handling, incorrect electrical installation or excessive mains voltage can lead to electric shock.
- Only connect the cable hoist if the mains voltage of the socket corresponds to the information on the type plate.
- Only connect the cable hoist to an easily accessible socket so that you can quickly disconnect it from the mains in the event of a fault.
- Do not operate the cable hoist if it is visibly damaged or if the mains cable or plug is defective.
- If the power cord of the cable hoist is damaged, it must be replaced by the manufacturer, their service department or a similarly qualified person.
- Do not open the housing, but leave the repair to specialists. To do this, contact a specialist workshop. In the event of repairs carried out independently, improper connection or incorrect operation, liability and warranty claims are excluded.
- Only parts that correspond to the original device data may be used for repairs. This cable hoist contains electrical and mechanical parts which are indispensable for protection against sources of danger.
- Do not operate the cable hoist with an external timer or a separate remote control system.
- Do not immerse the cable hoist, power cord or plug in water or other liquids.
- Never touch the power plug with wet hands.
- Never unplug the power cord from the wall outlet by pulling on the cord, but always by taking hold of the power plug.
- Keep the cable hoist, power plug and power cord away from open fire and hot surfaces.
- Route the power cord so that it does not become a trip hazard or an obstacle.
- Do not bend the power cord or place it over sharp edges.
- Only use the cable hoist indoors and never operate it in damp rooms or in the rain.
- If you are not using the cable hoist, if you are cleaning it or if a fault occurs, always switch off the cable hoist and remove the mains plug from the socket
△ Dangers for children and persons with reduced physical, sensory or mental abilities (e.g. partially disabled, elderly persons with limitation of their physical and mental abilities) or lack of experience and knowledge (e.g. older children).
- Keep children and persons with reduced physical, sensory or mental abilities away from the cable hoist and the connecting cable.
- Make sure that children are not playing with or near the hoist while the hoist is in use.
- Do not leave the cable hoist unattended during operation.
- Do not let children play with the packaging material. They can get caught in it and suffocate while playing.
NOTE! Risk of damage! Improper handling of the cable hoist can lead to damage to the cable hoist.
- Never expose the cable hoist to high temperatures or weathering (radiant heaters, rain, etc.). Never fill liquid into the cable hoist.
- Do not use the cable hoist if the plastic or metal components of the cable hoist have fissures or cracks, or are deformed.
Safe work
Lifting and lowering loads with the cable hoist ⚠ WARNING!
Risk of injury!
A damaged or incorrectly wound steel cable can break, cause the load to fall and cause serious injury.
- Always check the entire length of the steel cable for damage before using the cable hoist.
- If the steel cable is damaged, e.g. bent, cracked or broken, have it replaced by a specialist.
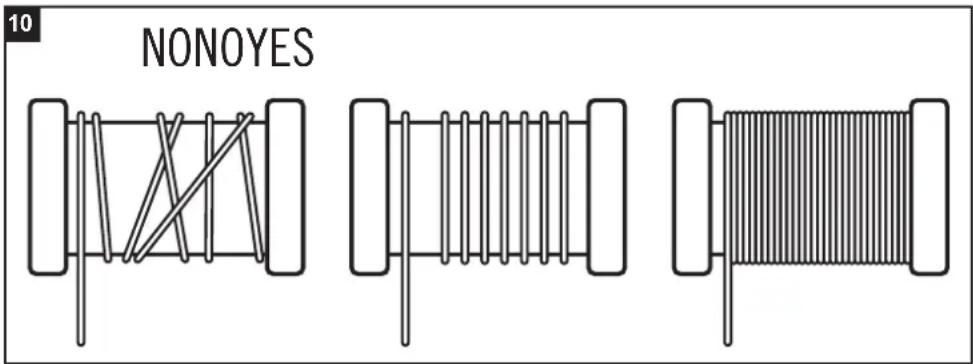
- Before each use of the cable hoist, check that the steel cable is correctly wound onto the cable drum (see Fig.10).
WARNING!
Risk of injury!
- Improper handling of the cable hoist can cause the load to fall and cause serious injury or death.
- Stay away from the load and the steel cable during the lifting or lowering process.
- Do not use the cable hoist if persons or animals are in the immediate vicinity of the cable hoist.
- Do not use the cable hoist if it is visibly damaged.
- Make sure the hook is correctly attached to the load.
- Do not switch directly from forward to reverse, but halt the cable hoist briefly and then switch in the desired running direction. Otherwise the steel cable may break and cause the load to fall.
- Make sure that the steel cable does not swing out more than 15^ .
- Stop the load in time when lowering, as the cable hoist can still run on a few centimetres after stopping.
- Do not routinely use the emergency stop switch to stop the cable hoist.
NOTE!
- Risk of damage!
- If the load to be lifted is too heavy, the motor may overheat and be damaged. The motor has a thermal circuit breaker, but this does not protect against overload.
- Do not overload the motor of the cable hoist with too heavy a load.
- Allow the motor to cool down regularly after longer periods of work and reduce the weight of the load.
6. Remaining hazards
The machine has been built using modern technology and in accordance with recognized safety rules. Some hazards, however, may still remain.
- The use of incorrect or damaged mains cables can lead to electrical injuries.
- Although having regarded all considerable rules there may still remain not obvious remaining hazards.
- Minimize remaining hazards by following the instructions in "Safety Rules", "Use only as authorized" and in the entire operating manual.
- Danger due to backlash of the load.
- Danger due to touching the steel cable during operation.
- Danger of the steel cable tearing during operation.
7. Technical data
| Dimensions LxBxH mm 392/146/174 |
| Single / Double(1) |
| Rated load 300 kg / 600 kg |
| Max. hoisting elevation 12 m / 6 m |
| Hoisting speed 8 m/min / 4m/min |
| Diameter of the steel wire rope | 4,5 mm |
| Tensile strength of the steel wire rope | 1770 N/mm ^2 |
| Weight | 17 kg |
| Rated voltage | 230 V~ / 50 Hz |
| Max. power | 1050W |
| Operating mode | S3 20% |
| Insulation class | B |
| Protection type | IP54 |
| Drive unit class | M1 |
Subject to technical changes!
Operating mode S3 - 20% - 10 minutes: S3 = Intermediate mode without influencing the starting process. This means that the maximum operating period over a time of 10 minutes is 20% (2 minutes).
(1) See chapter 9.3 Increasing the payload The value of the A-rated noise emissions at the operator's position is less than 85 dB (sound pressure level LpA). Sound and vibration values were measured in accordance with EN 14492-2:2006+A1
Keep the noise emissions and vibrations to a minimum.
- Only use appliances which are in perfect working order.
• Service and clean the appliance regularly - Adapt your working style to suit the appliance
- Do not overload the appliance.
- Have the appliance serviced whenever necessary.
- Switch the appliance off when it is not in use.
- Wear protective gloves.
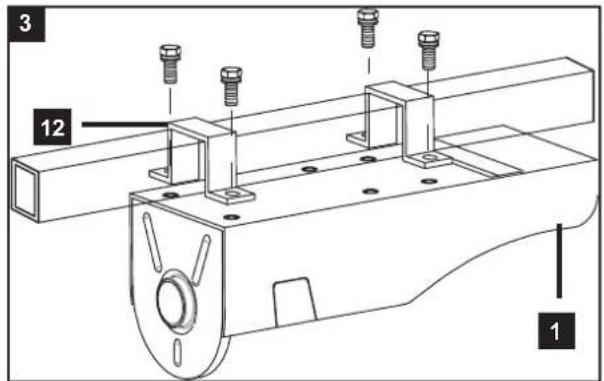
8. Installation
Fitting the cable hoist to the attachment △ DANGER!
Risk of injury and death!
Insufficient attachment of the cable hoist to a beam, pipe, etc. can cause the cable hoist and load to fall, causing serious injury and death.
- Make sure that the attachment to which you are attaching the cable hoist, e.g. beam, pipe, etc., can withstand the load to be lifted.
- Only use the fastening screws included in the scope of delivery for mounting the retaining brackets of the cable hoist.
⚠ WARNING!
Risk of injury!
During installation of the cable hoist on a pipe or beam, the hoist may fall and cause serious injury.
- Never install the cable hoist alone, but let a second person help you.
- Ensure secure and firm footing during installation.
- Use a working platform for installation.
The cable hoist can be mounted on round pipes, square pipes and U-beams using the retaining brackets supplied.
The size of the pipe or beam must be determined taking into account the weight to be lifted and the position of the cable hoist.
If you have no experience with this, contact a specialist who will help you install the cable hoist.
- Place the retaining brackets (12) over the pipe or bracket.
- Tighten the retaining brackets with the washers (9), the spring washers (10) and the fastening screws (11) to the cable hoist (see Fig. 3).
- Tighten the screws with a spanner.
9. Operation
Firstly, remove the adhesive tape on the cable drum
- Before each use of the cable hoist, check that the emergency stop switch (5) is locked.
- If the emergency stop switch is locked, turn it clockwise to unlock it.
- To switch off the cable hoist in an emergency, press the emergency stop switch.
With the toggle switch of the control unit, you can determine the running direction of the cable drum. The running direction is indicated by arrows next to the toggle switch.
- To lift the load, push the toggle switch (6) to the „Lift“ position in the upward direction of the arrow.
- To lower the load, push the toggle switch to the „Lower“ position in the direction of the arrow.
Using the emergency stop switch ⚠ WARNING!
An unsecured cable hoist may cause serious injury if it is accessed by unauthorised persons.
- Make sure that the emergency stop switch is locked if unauthorised persons have access to the cable hoist or if you do not use the cable hoist for a longer period.
The emergency stop switch allows the cable hoist to be switched off immediately in an emergency. The emergency stop switch engages as soon as it is pressed and switches the cable hoist off.
To ensure safe and smooth operation of the cable hoist, the safety devices and the device components must be checked before each use of the cable hoist.
9.1 Checking the safety switches
Checking the safety switches
The safety switches of the cable hoist ensure that the motor of the cable hoist stops as soon as the cable drum is fully wound or almost completely unwound. This safety device prevents damage to the cable hoist and possible breaking free of the load.
Checking the lower limit safety switch
Activation of the lower release bracket (20) ensures that the motor is stopped when the steel cable is unwound and at least two windings remain on the cable drum.
The lower release bracket triggers the safety switch for the lower limit (25).
The downward movement of the cable hoist is stopped to prevent complete unwinding of the cable drum.
- Let the winch extend downwards without load until the safety switch for the lower limit (25) is activated and the motor stops.
The winch must still have at least two windings on the drum (16).
The safety switch also functions when the steel cable is not tensioned.
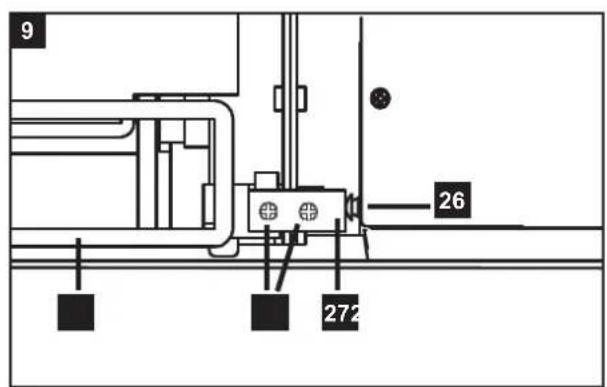
Checking the upper limit safety switch
Activation of the upper release bracket (22) ensures that the motor is stopped when the cable drum is fully wound up. When the switch-off weight reaches the upper release bracket, it triggers the safety switch for the upper limit (26). The upward movement of the cable hoist is stopped to prevent the motor from being blocked and overheating.
- Let the cable drum (16) wind up without load until the safety switch for the upper limit (26) is activated and the motor stops.
The cable drum must be almost completely wound up and the hook of the cable hoist (13) must come to a standstill below the upper release bracket (22).
9.2 Adjusting the safety switches
Adjusting the safety switches
The safety switch for the lower limit and the safety switch for the upper limit can change position during operation and can no longer switch off the cable hoist reliably. It is necessary that you check both safety switches before each use of the cable hoist, and reset them if required.
Setting the lower limit safety switch
You can adjust the release plate, which activates the safety switch for the lower limit, in the position on the lower release bracket.
1 Unscrew the locking screw for the release plate (23) with a spanner.
2 Hold the lower release bracket (20) in its initial position and adjust the release plate (24) so that it lightly touches the safety switch for the lower limit (25) (see Fig. 7).
3 Re-tighten the screw for the release plate.
4 Check the safety switch for the lower limit (see chapter „Checking the safety switches“).
5 If the lower limit safety switch is not activated, repeat steps 1 - 4.
Setting the upper limit safety switch
You can change the position of the trigger angle that activates the safety switch for the upper limit.
1 Screw on the locking screw for the trigger angle (28) with a screwdriver.
2 Hold the trigger angle (27) in its initial position and adjust the trigger angle so that it lightly touches the safety switch for the upper limit (26) (see Fig. 9).
3 Tighten the locking screw for the trigger angle.
4 Check the safety switch for the upper limit (see chapter „Checking the safety switches“).
5 If the safety switch is not activated, repeat steps 1 - 4.
Checking the brake
Risk of injury!
A faulty braking device on the cable hoist can cause the load to fall and cause serious injury.
- If the steel cable runs on, immediately disable the cable hoist and do not use it.
- Have the braking device repaired by a specialist.
The brake ensures a secure hold of the load during lifting and lowering. For physical reasons, the braking distance cannot reach zero. However, during this functional test, it must be apparent that the steel cable is not running on.
1 Press the toggle switch of the control unit (6) to the „Lift“ position in the direction of the arrow upwards and release it again. The steel cable (21) must not noticeably run on after stopping.
2 Press the toggle switch of the control unit into the "Lower" position in the direction of the downwards arrow and release it again. The steel cable must not noticeably run on after stopping.
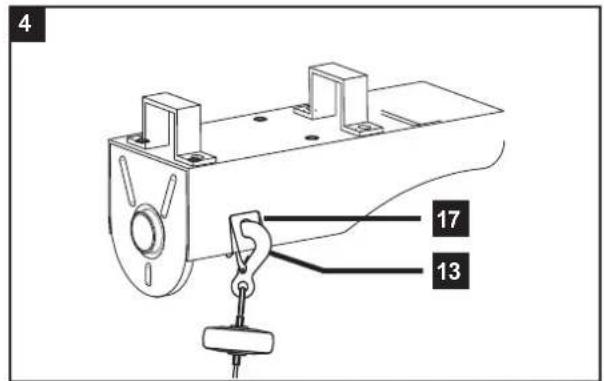
9.3 Increasing the payload
Function: Double payload Fig. (2;4)
1 To mount the pulley on the steel cable (21), disassemble the hook/roller combination (7) into its individual parts (see Fig. 2).
2 Place the pulley of the hook/roller combination (18) against the steel cable
3 Screw the hook/roller combination together (see Fig. 2).
4 Insert the hook of the cable hoist (13) into the opening for the pulley function (17) (see Fig. 4).
5 Attach the hook of the hook/roller combination to the load.
6 When lifting the load, let the hook/roller combination come to a standstill approx. 40 cm below the safety switch for the upper limit (26).
10. Transport
If you want to move the equipment to a different place, disconnect the equipment from the power supply and set it up in the new position you want to use it in.
11. Cleaning and maintenance
Caution! Pull out the mains plug
Clean the rope winch with a rag following use. Keep the air slits of the motor clean.
After 30 runs (1 run = 1x up and 1x down):
Check the entire steel wire rope (21); in case of damage, replace the steel wire rope according to the specification (use only original spare parts).
After 100 runs
Check mains cable and control cable for damage.
Check limit switch at upward and downward movement.
After 200 runs
Lubricate steel wire rope and deflecting roller
After 1000 runs
Hook (13/ 19) and deflecting roller (7).
Tighten all screws at the mounting bracket (12) and the deflecting roller (7).
In case of unusual sounds at the motor or if the load cannot be raised, the brake system may have to be overhauled.
For your safety, check the emergency stop switch (5) and push-buttons before every use.
Please note that the following parts of this product are subject to normal or natural wear and that the following parts are therefore also required for use as consumables.
Wear parts*: Steel cable, hook, pulley, additional hook
* Not necessarily included in the scope of delivery!
12. Storage
Store the device and its accessories in a dark, dry and frost-proof place that is inaccessible to children. The optimum storage temperature is between 5 and 30°C.
Cover the electrical tool in order to protect it from dust and moisture.
Store the operating manual with the electrical tool.
13. Electrical Connection
The installed electric motor is connected and is ready to work.
The connection complies with the relevant VDE and DIN regulations.
The customer-side mains supply and the used extension line must meet these regulations.
Defective Electric Connection Lines
Often, insulation damages occur on electrical connection lines.
Causes are:
- Drag marks if connection lines are led through window or door clearances.
- Kinks due to improper attachment or routing of the connection line.
- Cuts caused by running over the connection line.
- Insulation damages caused by pulling the connection line out of the wall socket.
- Fissures caused by the ageing of the insulation.
Such defective electric connection lines must not be used and are hazardous due to the insulation damages.
Regularly check the electrical connection lines for damages. Please make sure that the connection lines are disconnected from the mains supply during the check.
Electrical connection lines must comply with the relevant VDE and DIN regulations. Only use connection lines labelled with H05VV-F. The labelling of the connection cable with the type specification is required.
AC motor
- The mains voltage must be 220 - 240 V\~
- Extension cables up to 25 m long must have a cross-section of 1.5 mm ^2 .
Connections and repairs of electrical equipment may only be carried out by an electrician.
Please provide the following information in the event of any enquiries:
• Type of current for the motor
• Machine data - type plate
• Machine data - type plate
14. Disposal and recycling
The equipment is supplied in packaging to prevent it from being damaged in transit. The raw materials in this packaging can be reused or recycled. The equipment and its accessories are made of various types of material, such as metal and plastic. Defective components must be disposed of as special waste. Ask your dealer or your local council.
Old devices must not be disposed of with household waste!

This symbol indicates that this product must not be disposed of together with domestic waste in compliance with the Directive (2012/19/EU) pertaining to waste electrical and onic equipment (WEEE).
This product must be disposed of at a designated collection point. This can occur, for example, by handing it in at an authorised collecting point for the recycling of waste electrical and electronic equipment. Improper handling of waste equipment may have negative consequences for the environment and human health due to potentially hazardous substances that are often contained in electrical and electronic equipment. By properly disposing of this product, you are also contributing to the effective use of natural resources. You can obtain information on collection points for waste equipment from your municipal administration, public waste disposal authority, an authorised body for the disposal of waste electrical and electronic equipment or your waste disposal company.
15. Troubleshooting
| Fault Cause Corrective | action | |
| Load cannot be raised | Load too heavyBrake system defective | Switch to double loadCustomer service / service centre |
| Motor does not re-spond | Fuse defectivePush-button defective | Replace fuseCustomer service / service centre |
Table des matières: Page:
Günzburger Straße 69
D-89335 Ichenhausen
Cher client,
Günzburger Straße 69
D-89335 Ichenhausen
Egregio cliente,
Günzburger Straße 69
D-89335 Ichenhausen
Vážený zákazníku,
Günzburger Straße 69
D-89335 Ichenhausen
Vážený zákazník,
Günzburger Straße 69
D-89335 Ichenhausen
Tisztelt vásárló!
Günzburger Straße 69
D-89335 Ichenhausen
Austatud klient!
Günzburger Straße 69
D-89335 Ichenhausen
Godātais klient!
Günzburger Straße 69
D-89335 Ichenhausen
Gerbiamas kliente,
CE - Declaration of Conformity
| 2014/29/EU | 2004/22/EC | 89/686/EC_96/58/EC | 2000/14/EC_2005/88/EC | |||||
| 2014/35/EU | 2014/68/EU | 90/396/EC | Annex V | |||||
| X | 2014/30/EU | X | 2011/65/EU* | Annex VINoise: measured L_WA = xx dB(A); guaranteed L_WA = xx dB(A)P = xx KW; L/∅ = cmNotified Body:Notified Body No.: | ||||
 | ||||||||
| Annex IVNotified Body:Notified Body No.:Certificate No.: | 2010/26/EC | |||||||
| Emission. No: | ||||||||
Standard references:
EN 14492-2:2006+A1, EN 14492-2+A1/AC:2010, EN 60204-32:2008
EN 55014-1:2006+A1+A2, EN 55014-2:2015, EN 61000-3-2:2014, EN 61000-3-3:2013
This declaration of conformity is issued under the sole responsibility of the manufacturer.
Apparent defects must be notified within 8 days from the receipt of the goods. Otherwise, the buyer's rights of claim due to such defects are invalidated. We guarantee for our machines in case of proper treatment for the time of the statutory warranty period from delivery in such a way that we replace any machine part free of charge which provably becomes unusable due to faulty material or defects of fabrication within such period of time. With respect to parts not
manufactured by us we only warrant insofar as we are entitled to warranty claims against the upstream suppliers. The costs for the installation of the new parts shall be borne by the buyer. The cancellation of sale or the reduction of purchase price as well as any other claims for damages shall be excluded.