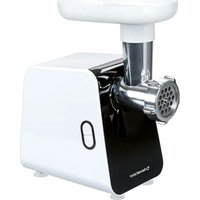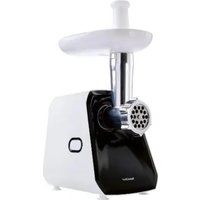
SFW 300 A1 - Electric meat grinder SILVERCREST - Free user manual and instructions
Find the device manual for free SFW 300 A1 SILVERCREST in PDF.


User questions about SFW 300 A1 SILVERCREST
0 question about this device. Answer the ones you know or ask your own.
Ask a new question about this device
Download the instructions for your Electric meat grinder in PDF format for free! Find your manual SFW 300 A1 - SILVERCREST and take your electronic device back in hand. On this page are published all the documents necessary for the use of your device. SFW 300 A1 by SILVERCREST.
USER MANUAL SFW 300 A1 SILVERCREST
For EU market: Imported for GB market by:
HOYER Handel GmbH Lidl Great Britain Ltd
Kühnefo 12 LdHouse-14Kingston Road
22761 Hamburg Surbilon-KTS 9NU
GERMANY
Stand der Informationen - Status of information - Version des information Stand von de informatie - Stau informaci - Stay informaci
Stav informaci - Estado de las informaciones - Informaciones stand Versione delle informazioni - Az informaci kelte
07/2024 ID: SFW 300 A1 BL_24_V1.4
C8 Operating instructions
ELECTRIC MINCER

Gebruksoanwijzing
shop.hoyerhandel.com

- Overview 23
- Intended purpose 24
- Safety information 24
- Items supplied 27
5.Unpacking and setting up 27 - Assembly/disassembly 28
6.1 Attachment assembly for minced meat 28
6.2 Attachment assembly for sausages 28
6.3 Attachment assembly for kibbeh 28
6.4 Placing the assembled attachment on the motor block 28
6.5 Removing the attachment after use 29
- Operation 29
7.1 Preparing food 29
7.2 Processing meat into minced meat 30
7.3 Making sausages 30
7.4 Making rolls for the kibbeh 31
- Overload protection 31
- Cleaning the device 31
9.1 Cleaning the motor block 32
9.2 Cleaning in the dishwasher 32
9.3 Rinsing by hand 32
9.4 Storage 32
- Recipes 33
10.1 Kibbeh 33
10.2 Fresh grilled sausage 34
10.3 Frikadellen (German meatballs) 34
10.4 Cevapcici 35
11.Trouble-shooting 35
12. Disposal 36
13. Ordering accessories 36
14. Technical specifications 36
15.Warranty of the HOYER Handel GmbH 37
1. Overview
1 Food pusher
2 Hopper tray
3:Button for the unlocking mechanism
4 Motor block
5 Power cable with mains plug
6:Onoff button
7 R E V : Reverse button
8 Suction feet
9 Holder for attachment
10 Food chute
11 Attachment
12 Auger
13 Cross-shaped blade
14 Mincer plates
15 Locking ring
16 Narrow stuffing tube
17 Adapter for narrow stuffing tube
18 Wide stuffing tube
19 Adapter for wide stuffing tube
Thank you for your trust!
Congratulations on your new mincer.
For safe handling of the product and in order to get to know the entire range of features:
- Read these operating instructions thoroughly prior to initial use.
- Above all, observe the safety information!
- The device should only be used as described in these operating instructions.
- Keep this copy of the operating instructions for reference.
- If you pass the device on to someone else, please include this copy of the operating instructions. The operating instructions are a part of the product.
We hope you enjoy your new mincer!
Symbols on your device

The food-safe material of devices with this symbol will not change the taste or smell of food.
2. Intended purpose
This mincer is used for mincing fresh, raw meat.
The device is designed for private, domestic use. The device must only be used indoors.
This device must not be used for commercial purposes.
Foreseeable misuse
WARNING! Risk of material damage!
Do not use the mincer for more than 7 minutes at a time.
After this, the device must remain switched off until it has cooled down to room temperature.
Do not use the mincer for processing particularly hard food, such as frozen food, bones, nutmeg, cereal grains or coffee beans.
3. Safety information
Warnings
If necessary, the following warnings are used in these operating instructions:

DANGER! High risk: failure to observe this warning may result in injury to life and limb.
WARNING! Moderate risk: failure to observe this warning may result in injury or serious material damage.
CAUTION: low risk: ignoring this warning may result in minor injuries or damage to property.
NOTE: circumstances and specifics that must be observed when handling the device.
Instructions for safe operation
This device must not be used by children.
Children must not play with the device.
-
The device and the power cable must be kept away from children.
-
This device can be used by people with restricted physical, sensory or intellectual abilities or people without adequate experience and/or understanding if they are supervised or instructed on how to use this device safely and if they are aware of the resulting hazards.
-
If the mains power cable of this device should become damaged, it must be replaced by the manufacturer, the manufacturer's customer service department or a similarly qualified specialist, in order to avoid any hazards.
-
The motor block must not be immersed in water.
-
This device is not intended to be operated using an external timer or a separate remote control system.
-
The device must be disconnected from the mains if left unattended and prior to assembly, disassembly or cleaning.
-
Please note that the blades of the cross-shaped blade are very sharp:
-
Never touch the blades with your bare hands in order to avoid cuts.
-
When rinsing by hand, use water which is so clear that you are able to see the working tools properly in order to ensure that you do not injure yourself on the very sharp blades.
-
When inserting or removing the working tools, make sure that you do not touch the blades.
-
Prior to the replacement of accessories or attachments which move when in operation, the device must be switched off and disconnected from the mains power supply.
-
Misuse of the device may result in injuries.
-
The device is designed for a maximum operating time of 7 minutes without interruption. After this, the device must remain switched off until it has cooled down to room temperature.
-
Clean all parts and surfaces that come into contact with food before using the device for the first time (see "Cleaning the device" on page 31).

DANGER for children!
- Packing materials are not children's toys. Children should not be allowed to play with the plastic bags. There is a risk of suffocation.

DANGER to and from pets and livestock!
- Electrical devices can represent a danger to pets and livestock. In addition, animals can also cause damage to the device. For this reason you should keep animals away from electrical devices at all times.

DANGER! Risk of electric shock due to moisture!
The device must never be operated in the vicinity of a bathtub, a shower, a filled washbasin or similar items.
The motor block, the power cable and the mains plug must not be immersed in water or any other liquids.
- Protect the motor block against moisture, water drips and splashes.
- If liquid gets into the motor block, remove the mains plug immediately. Have the device checked before reusing.
- Never touch the device with wet hands.
- If the device falls into water, disconnect the mains plug immediately. Only then is it safe to remove the device.

DANGER! Risk of electric shock!
- Only plug the mains plug into the wall socket after the device has been completely assembled.
- Only connect the mains plug to a properly installed and easily accessible wall socket whose voltage corresponds to the specifications on the rating plate. The wall socket must still be easily accessible after the device is plugged in.
Ensure that the power cable cannot be damaged by sharp edges or hot spots.
Do not wrap the power cable around the device.
- Even after it has been switched off, the device is not completely disconnected from the power supply. In order to fully disconnect it, pull out the mains plug.
- Ensure that the power cable never becomes a trip hazard, and that nobody can get caught up in or step on it.
- Keep the power cable away from hot surfaces (e.g. hot plates).
- When using the device, ensure that the power cable cannot be trapped or crushed.
-
When removing the mains plug from the wall socket, always pull on the plug and never the cable.
Pull the mains plug out of the wall socket: -
when a malfunction occurs
- when you are not using the device
- before you assemble or disassemble the device
- before you clean the device
-
during thunderstorms
-
Do not use the device if there is visible damage to the device, accessories or power cable.
In order to avoid any hazards, do not make modifications to the device.

DANGER! Risk of injury from cutting!
- Please note that the blades of the cross-shaped blade are very sharp. Never touch the blades with your bare hands in order to avoid cuts.
- When rinsing by hand, use water which is so clear that you are able to see the blades properly in order to ensure that you do not injure yourself on the very sharp blades.

DANGER from rotating parts!
- Do not touch rotating parts with spoons or similar utensils. Keep long hair and loose clothing away from the rotating parts.
- Only use the food pusher to push the food into the food chute, never use your fingers. There is a significant risk of injury.
- Ensure that the device is switched off before plugging the mains plug into the wall socket.
- Switch off the device and pull the mains plug out of the wall socket before attaching or detaching the assembled attachment.
WARNING! Risk of material damage!
- Place the device exclusively on a level, dry, non-slip and waterproof surface, so that it can neither fall nor slip off.
- Ensure that the cross-shaped blade is inserted correctly. Incorrect insertion will damage the device.
- Never place the device on a hot surface, e.g. a hot plate.
Do not exert too much pressure on the filled-in food. Apply pressure evenly so that the motor does not jam.
Do not operate the device when it is empty, as this causes the motor to overheat and may result in it becoming damaged.
Do not press the REV button until the motor has come to a complete standstill.
Only use the original accessories. - When delivered, a thin film of oil is applied to the two mincer plates and the plastic ring at the auger. Rub these parts with a little cooking oil after cleaning.
- Do not use any astringent or abrasive cleaning agents.
The device is equipped with non-slip plastic suction feet. As furniture is coat
ed with a wide array of varnishes and plastics and is also treated with different care products, it cannot be fully ruled out that some of these materials contain components that could attack and soften the non-slip plastic suction feet. If necessary, place a non-slip mat under the device.
4. Items supplied
1 motor block 4
1 attachment 11
1 hopper tray 2 with food pusher 1
lauger 12
1 cross-shaped blade 13
2 mincer plates 14:
5 mm (approx. 1 kg meat per minute)
7 mm (approx. 1.5 kg meat per minute)
1 sausage stuffing attachment (2-piece): narrow stuffing tube 16 and adapter 17
1 kibbeh attachment (2-piece): wide stuffing tube 18 and adapter 19
1 locking ring 15
1 complete copy of the operating instructions (on the Internet)
1 copy of the short manual (enclosed with the device)
5. Unpacking and setting up
- Remove all packing material.
- Check to ensure that all parts are present and undamaged.
- Clean the device prior to its first use! (see "Cleaning the device" on page 31)
- Place the motor block 4 on a level and dry surface. Select a smooth, clean surface, so that the suction feet 8 can stick firmly in place and ensure a secure grip.
6. Assembly/disassembly

DANGER! Risk of injury!
The blades of the cross-shaped blade 13 are very sharp. Do not touch them.
WARNING! Risk of material damage!
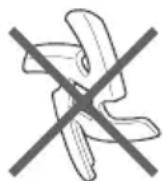
Ensure that the cross-shaped blade 13 is inserted correctly. Incorrect insertion will damage the device.
6.1 Attachment assembly for minced meat
- Slide the auger 12 into the attachment 11.
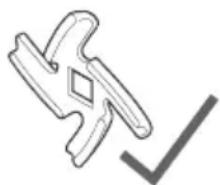
- Place the cross-shaped blade 13 on the auger 12. The blades of the cross-shaped blade must point away from the auger.
-
Select the desired mincer plate 14 and place it on the auger. The two outer fasteners on the mincer plate must fit into the two recesses on the attachment 11.
-
For coarse quality (e.g. for Thuringian mett or coarse bratwurst), select the mincer plate with the large holes (7mm)
-
For a finer quality (e.g. for pâtés, minced meat, fine sausages), select the mincer plate with the smaller holes (5 mm).
-
Screw on the locking ring 15 by hand.
6.2 Attachment assembly for sausages
- Slide the auger 12 into the attachment 11.
- Place the adapter 17 on the auger. The two outer fasteners on the adapter must fit into the two recesses on the attachment 11.
- Place the stuffing tube 16 on the adapter.
- Screw on the locking ring 15 by hand.
6.3 Attachment assembly for kibbeh
- Slide the auger 12 into the attachment 11.
- Place the adapter 19 on the auger. The two outer fasteners on the adapter must fit into the two recesses on the attachment 11.
- Place the stuffing tube 18 on the adapter.
- Screw on the locking ring 15 by hand.
6.4 Placing the assembled attachment on the motor block
- Place the motor block 4 on a level and dry surface. Select a smooth, clean surface, so that the suction feet 8 can stick firmly in place and ensure a secure grip.
- Figure A: place the attachment 11 fully assembled for the respective recipe into the holder 9 on the motor block 4. The arrow symbol on the attachment points to the marking next to the button for the unlocking mechanism 3.
-
Figure A: press the attachment 11 lightly onto the motor block 4 and turn it anticlockwise until you hear it audibly click into place.
-
Place the hopper tray 2 on the food chute 10.
6.5 Removing the attachment after use
After use, the attachment must be separated from the motor block for cleaning.
- Remove the hopper tray 2 if necessary.
- Figure B: press the button for the unlocking mechanism 3.
- Figure B: turn the attachment 11 clockwise as far as it will go. Then pull the attachment off the motor block 4.
- Disassemble the attachment into its individual parts.
7. Operation

DANGER from rotating parts!
- Only use the food pusher 1 to push the food into the food chute 10, never use your fingers. There is a significant risk of injury.
WARNING! Risk of material damage!
The device is designed for a maximum operating time of 7 minutes without interruption. After this, the device must remain switched off until it has cooled down to room temperature.
Do not operate the device when it is empty, as this causes the motor to overheat and may result in it becoming damaged.
NOTES:
-
When the device is used the first few times, some odour may be generated by the device due to the heating of the motor. This is harmless. Please ensure adequate ventilation.
-
If the motor jams during use, e.g. due to overfilling, remove the obstruction. Press the on/off button ① 6 to switch off the device. When the motor stops, briefly press the REV7 button to reverse. This should eliminate the malfunction. Switch the device on again.
7.1 Preparing food
WARNING! Risk of material damage!
Do not use the device to chop particularly hard food such as bones or nutmeg.
Minced meat is a particularly delicate food. It spoils very quickly. Minced meat that has been stored at too high a temperature or for too long a time is an ideal breeding ground for bacteria. If you are going to make and process your own minced meat at home, you should follow the tips below:
- Always ensure maximum cleanliness.
- Only use fresh, very chilled meat, as it heats up in the mincer.
- Remove the bones, tendons and skin from the meat and cut it into pieces up to approx. 20 cm long and approx. 3 cm in diameter.
Once minced, chill immediately (not over +4^ ) and consume within 6 hours.
If you want to store minced meat, freeze it immediately after it has been made. - Clean the mincer carefully. No residue must remain on the accessories.
7.2 Processing meat into minced meat
- Fill the pieces of meat into the food chute 10 and the hopper tray 2.
- Place a bowl under the locking ring 15 to hold the minced meat.
- Plug the mains plug 5 into a wall socket that corresponds to the technical specifications on the rating plate. The wall socket must still be easily accessible after connection.
- Press the on/off button ① 6 to switch on the device.
- Use the food pusher 1 to press the meat into the food chute 10. Do not press the meat too hard, otherwise it will become warm, grey and greasy.
NOTE: if the minced meat is not fine enough after the first pass, chill it (in the refrigerator for approx. 30 minutes) and run it through the mincer a second time.
- Press the on/off button ① 6 to switch off the device.
- Pull the mains plug 5 out of the wall socket.
- Remove all accessories from the motor block 4. Disassemble and clean all parts thoroughly under hot water.
7.3 Making sausages
NOTE: stuffing sausages is a lot easier when two people work together.
- You can obtain sausage casings from a butcher or a specialist butcher's shop.
- Use natural casings when making sausages. It has the perfect thickness and can be eaten with the meat. Measure approx. 1.60m for 1kg of sausage. Place the required amount in lukewarm water for 3 hours.
Depending on the recipe, mix the minced meat with spices and any other ingredients for the sausage filling and knead thoroughly for about 5 minutes.
- Chill the prepared sausage mixture in the refrigerator for approx. 30 minutes.
- Fill the prepared sausage filling into the food chute 10 and the hopper tray 2.
- Remove the sausage casing from the water and squeeze the water out of the casing. Place the sausage casing of the required length approx. 5cm over the stuffing tube 16 and tie the end closed.
- Plug the mains plug 5 into a wall socket that corresponds to the technical specifications on the rating plate. The wall socket must still be easily accessible after connection.
- Press the on/off button ① 6 to switch on the device.
- Press the sausage filling through the food chute 10 and push it in with the food pusher 1. Do this as evenly as possible. Avoid air bubbles. If necessary, prick the sausage with a needle.
NOTE: sausages expand during cooking and freezing, so do not overfill them. Otherwise the sausages could burst.
- After every piece of sausage, press the casing together with your thumb and forefinger to create an empty piece of casing.
- Turn the first sausage 2 - 3 times to the right and the second to the left, always alternating. This creates a chain of sausages.
- After filling the sausages, press the on/off button ① 6 to switch off the device.
- Pull the mains plug 5 out of the wall socket.
- Remove all accessories from the motor block 4. Disassemble and clean all parts thoroughly under hot water.
7.4 Making rolls for the kibbeh
-
Prepare the mixture for the kibbeh rolls. Depending on the food you are using, you may be able to use the mincer and the mincer plate with the smaller holes (5 mm). The mixture will be finer if you put it through the mincer a second time.
-
Fill the prepared mixture for the kibbeh rolls into the food chute 10.
- Plug the mains plug 5 into a wall socket that corresponds to the technical specifications on the rating plate. The wall socket must still be easily accessible after connection.
- Press the on/off button ① 6 to switch on the device.
- Press the mixture for the kibbeh rolls through the food chute 10 and push it in with the food pusher 1. Do this as evenly as possible.
- Cut the roll, for example with a kitchen knife, when it has reached the desired length.
- When you have used up the mixture for the kibbeh rolls, press the on/off button ① 6 to switch off the device.
- Pull the mains plug 5 out of the wall socket.
- Remove all accessories from the motor block 4. Disassemble and clean all parts thoroughly under hot water.
8. Overload protection
The device has overload protection. If this is triggered, e.g. if the motor is blocked, the device switches off automatically.
- Press the on/off button ① 6 to switch off the device.
- Pull the mains plug 5 out of the wall socket.
- Remove all accessories from the motor block and rectify the malfunction.
- Allow the device to cool down for at least 30 minutes before using it again.
9. Cleaning the device

DANGER! Risk of electric shock!
Pull the mains plug 5 out of the wall socket before each cleaning.
- Never immerse the motor block 4 in water.

DANGER! Risk of injury from cutting!
- Please note that the blades of the cross-shaped blade 13 are very sharp. Never touch the blades with your bare hands in order to avoid cuts.
WARNING! Risk of material damage!
- Never use any abrasive, corrosive or scouring cleaning agents. These might damage the device.
NOTE: certain foods or spices (e.g. curry) may discolour the plastic. This is not a device error and is harmless to health.
After use, the attachment must be separated from the motor block for cleaning.
- Remove the hopper tray 2 if necessary.
-
Figure B: press the button for the unlocking mechanism 3
-
Figure B: turn the attachment 11 clockwise as far as it will go. Then pull the attachment off the motor block 4.
- Disassemble the attachment into its individual parts.
9.1 Cleaning the motor block
- Clean the motor block 4 with a damp cloth. You can also use a little detergent.
- Then wipe off with a clean, moist, light cloth with clean water.
- Do not use the motor block 4 again until it is completely dry.
9.2 Cleaning in the dishwasher
The following parts are dishwasher-safe:
- food pusher 1
- hopper tray 2
9.3 Rinsing by hand
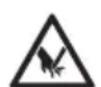
DANGER! Risk of injury from cutting!
- When rinsing by hand, use water which is so clear that you are able to see the working tools properly in order to ensure that you do not injure yourself on the very sharp blades.
All accessories except the motor block 4 can be rinsed by hand.
- If possible, clean all accessories immediately after use.
- Use dishwater with a mild detergent and rinse off all parts with clean water.
- Allow the parts to dry completely before using them again or clearing them away.
- Rub the metal surfaces with a little cooking oil to protect them from rust. The at
tachment 11 and the locking ring 15 are made of aluminium and do not need to be lubricated.
9.4 Storage
WARNING! Risk of material damage!
-
When delivered, a thin film of oil is applied to the two mincer plates 14 and the plastic ring at the auger 12. Rub these parts with a little cooking oil after cleaning.
-
Allow all parts to dry completely before placing them in storage.
- Store the device so that it is protected against dust and dirt and out of the reach of children.
10. Recipes
10.1 Kibbeh
Ingredients for approx. 20 pieces
Ingredients for the filling
200 g lean beef or lamb
l on i on
2 teaspoons flour
1 pinch salt
According to preference, e.g. mixture of spices: coriander, allspice, pepper, cinnamon, cloves, nutmeg, cumin, cardamom
Ingredients for the kibbeh shell
450 g lean beef or lamb
150 - 200 g flour
1 teaspoon chopped nuts
1 teaspoon salt
According to preference, e.g. mixture of spices: coriander, allspice, pepper, cinnamon, cloves, nutmeg, cumin, cardamom 1 teaspoon paprika powder
Chilli powder according to preference
Frying fat or oil
Preparation of filling
- Wash the meat, pat it dry and cut it into large pieces.
- First mince the meat with the coarse (7mm) and then with the finer (5mm) mincer plate 14 of the mincer.
- Peel and finely dice the onion and fry it.
- Place the minced meat, fried onion, spices, salt and flour in a bowl and mix together well.
Preparation of kibbeh shells
- Wash the meat, pat it dry and cut it into large pieces.
-
First mince the meat with the coarse (7mm) and then with the finer (5mm) mincer plate 14 of the mincer.
-
Add the remaining ingredients to the meat and mix well. Vary the amount of flour according to the consistency.
- Process the meat mixture again in the mincer using the finer (5mm) mincer plate 14.
- Switch off the device and pull the mains plug 5 out of the wall socket.
- Replace the mincer plate with the kibbeh attachment (see "Attachment assembly for kibbeh" on page 28).
- Fit the attachment and switch the mincer back on.
- Use the kibbeh attachment to form kibbeh shells approx. 7 cm long.
Preparation of kibbeh
- Fill the kibbeh shells with the prepared kibbeh filling as soon as they are ready.
- Close the kibbeh by gently pressing the ends and sides.
- Fry the kibbeh in hot cooking oil (approx. 190^ for approx. 3 minutes until golden brown.
10.2 Fresh grilled sausage
Ingredients for approx. 8 sausages
Ingredients
300 g lean beef
500 g lean pork
200 g shoulder bacon
approx. 1.6 metres pig casing
(0 approx. 30 - 32 mm)
20 g salt
1/2 tablespoon white ground pepper
1 teaspoon caraway seeds
12 teaspoon nutmeg
Preparation
- Wash the meat, pat it dry and cut it into small pieces.
- Mince the meat with the finer (5mm) mincer plate 14 of the mincer.
- Add the mixed spices and salt to the meat mixture and knead into a smooth mass. Place them in the refrigerator approx. 30 minutes.
- Switch off the device and pull the mains plug 5 out of the wall socket.
- Replace the mincer plate with the sausage stuffing attachment (see "Attachment assembly for sausages" on page 28).
- Fit the attachment and switch the mincer back on.
- Fill the sausage according to instructions (see "Making sausages" on page 30) and twist to form sausages approx. 20cm long.
- Fry the grilled sausage well and eat it the same day.
10.3 Frikadellen (German meatballs)
Ingredients for approx. 8 frikadellen
Ingredients
500 g beef, pork or lamb
12 teaspoon pepper
1 egg (medium)
a little breadcrumbs
2 tablespoons yoghurt
l on i on
1 teaspoon paprika powder
1 clove of garlic
1 tablespoon mustard
½ bunch parsley
1 teaspoon salt
2 - 3 tablespoons cooking oil for frying
Preparation
- Wash the meat, pat it dry and cut it into small pieces.
- Mince the meat with the finer (5mm) mincer plate 14 of the mincer.
- Peel the garlic and press it into a bowl.
- Peel and finely dice the onion.
- Wash and finely chop the parsley.
- Add all the ingredients, except the breadcrumbs, to the garlic in the bowl and knead everything into a smooth mixture.
- Use approx. 3 tablespoons of the mixture to make a frikadelle and flatten slightly.
- If you like, you can put some breadcrumbs on a plate and coat the frikadellen in them.
- Sear the frikadellen on both sides in a non-stick frying pan. Cook the frikadellen over a medium to low heat for approx. 8 - 10 minutes. Turn the frikadellen approx. 2 - 3 times during cooking.
10.4 Cevapcici
Ingredients for approx. 4 portions
Ingredients
500 g beef shoulder
2 onions
2 cloves of garlic
3 tablespoons breadcrumbs
1 tablespoon paprika powder, hot
1 bunch fresh thyme
3 tablespoons olive oil salt and pepper
1 egg
Preparation
- Wash the meat, pat it dry and cut it into small pieces.
- Peel and finely chop the garlic and onion and place everything in a large bowl.
- Strip the thyme leaves from the sprigs, chop them and add them to the large bowl.
- Mince the meat with the coarse (7 mm) mincer plate 14 of the mincer.
- Add the meat and the remaining ingredients to the large bowl and mix everything well.
- Switch off the device and pull the mains plug 5 out of the wall socket.
- Replace the coarse (7 mm) with the fine (5 mm) mincer plate 14.
- Fit the attachment and switch the mincer back on.
- Mince the meat mixture with the fine (5 mm) mincer plate 14 of the mincer.
- Form finger-thick, approx. 5 cm long rolls from the meat mixture.
NOTE: the sausage stuffing attachment of the mincer can also be used for this purpose (see "Making sausages" on page 30).
- Grill the cevapcici over a medium heat until crispy brown.
11. Trouble-shooting
If your device fails to function as required, please try this checklist first. Perhaps there is only a minor problem, and you can solve it yourself.

DANGER! Risk of electric shock!
Do not attempt to repair the device yourself under any circumstances.
| Fault | Possible causes / Action |
| No function | ·Has the device been connected to the power supply? Check the connection. |
| The device vibrates strongly or moves during operation. | ·The suction feet 8 must be clean and dry, and the device must stand on a firm, level surface. |
| The auger in the attachment does not turn or only turns with great difficulty. | ·The device is overfilled. Switch off the device. When the motor stops, briefly press the REV7 button to reverse. This should eliminate the mal-function. Switch the device on again. or ·The device cannot process some of the added food. Switch off the device. Pull the mains plug 5 out of the wall socket. Remove all accessories from the motor block 4. Disassemble all parts and rectify the malfunction. |
12. Disposal
This product is subject to the provisions of European Directive 2012/19/EC. The symbol showing a wheelie bin crossed through indicates that the product requires sep
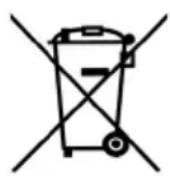
arate refuse collection in the European Union. This applies to the product and all accessories marked with this symbol. Products identified with this symbol may not be discarded with normal household waste, but must be taken to a collection point for recycling electric and electronic appliances.
This recycling symbol marks e.g. an object or parts of the material as valuable for recyc- cling. Recycling helps to re- duce the consumption of raw materials and protect the environment.
Packaging
When disposing of the packaging, make sure you comply with the environmental regulations applicable in your country.
13. Ordering accessories
On our website you will find information on which accessories can be reordered.
Ordering online
shop.hoyerhandel.com

- Scan the QR code with your Smartphone/Tablet.
- The QR code will take you to a website where you can place the reorder.
14. Technical specifications
| Model: SFW 300 A1 BL | |
| Mains voltage: 220 - 24 | 40 V~,50 - 60 Hz |
| Protection class: II | ☐ |
| Power rating: 300 W | |
| Max. continuous operation (short cycle): (indicates how long the device is permitted to run continuously) | 7 minutes |
Symbols used
| Double insulation | |
| GS | Geprüfte Sicherheit (certified safety): devices must comply with the generally acknowledged rules of technology and the German Product Safety Act (Produkt-sicherheitsgesetz - ProdSG). (Not for UK) |
| CE | With the CE marking, HOYER Handel GmbH declares the conformity with EU guidelines. |
| This symbol reminds you to dispose of the packaging in an environmentally friendly manner. | |
| 21PAP | Recyclable materials are marked with the recycling symbol (3 arrows). The material can be specified by the recycling number in the centre (here: 21) and/or an abbreviation (here: PAP). |
| ~ | AC voltage |
| It is a recyclable product which is subject to an extended producer responsibility and for which the rules of waste separation apply. | |
| UKCA | With the UKCA marking, HOYER Handel GmbH declares that the product is in conformity with the UKCA requirements. |
| The symbol identifies the product manufacturer. |
Subject to technical modifications.
15. Warranty of the HOYER Handel GmbH
Dear Customer,
your device is provided with a 3 year warranty starting with the purchase date. In the event of product defects, you are entitled to statutory rights against the vendor. These statutory rights are not restricted by our warranty presented in the following.
Warranty conditions
The warranty period starts with the purchase date. Please keep the original purchase receipt in a safe place. This document is required to verify the purchase.
If within three years from the purchase date of this product a material or factory defect occurs, the product will be repaired or replaced by us - at our discretion - free of charge to you, or the purchase price will be refunded. This warranty implies that within the period of three years the defective device and the purchase receipt are presented, including a brief written description of the defect and the time it occurred.
If the defect is covered by our warranty, the repaired or a new product will be returned to you. No new warranty period starts with a repair or replacement of the product.
Warranty period and statutory claims for defects
The warranty period is not extended when the warranty has been claimed. This also applies to replaced and repaired parts. Any damages and defects already existing at the time of purchase must be reported immediately upon unpacking. Repairs arising after the expiration of the warranty period are subject to a charge.
Warranty coverage
The device was produced carefully according to strict quality guidelines and tested diligently prior to delivery.
The warranty applies to material or factory defects.
Excluded from the warranty are wear parts subject to normal wear and damages to fragile parts, e.g. switches, lamps or other parts manufactured from glass.
This warranty expires if the product is damaged, not used as intended or not serviced. For the proper operation of the product, all instructions listed in the operating instructions must be observed carefully. Any form of use and handling that is advised against in the operating instructions or warned against must always be avoided.
The product is only intended for private and not for commercial use. In the case of incorrect and improper treatment, use of force and interventions not performed by our authorised Service Centre, the warranty shall cease.
Handling in case of a warranty claim
In order to ensure prompt processing of your matter, please observe the following notes:
- Please keep the article number IAN: 471795_2401 and the purchase receipt as a purchase verification for all inquiries.
- The article number can be found on the rating plate, an engraving, the title page of your instructions (in the bottom left), or as a label on the rear or underside of the device.
- If faulty operation or other defects occur, first contact the Service Centre listed in the following by telephone or email.
- Then, you are able to send a product reported as defective free of charge to the service address specified to you, including the purchase receipt and the information on the defect and when it occurred.
At www.lidl-service.com you can download this and many other manuals, product videos and installation software.

This QR code takes you directly to the Lidl Service website (www.lidl-service.com), where you can enter the article number (IAN) 471795_2401 to open your user instructions.

Service Centre
GB Service Great Britain Tel.: 0800 404 7657
E-Mail: hoyer@lidl.co.uk
IE Service Ireland
Tel.: 1800 101010
E-Mail: hoyer@lidl.ie
MT Service Malta
Tel.: 80062230
E-Mail: hoyer@lidl.com.mt
Cy Service Cyprus
Tel.: 80094241
E-Mail: hoyer@lidl.com.cy
IAN: 471795_2401
Supplier
Please note that the following address is no
service address. First contact the afore
mentioned Service Centre.
HOYER Handel GmbH
Kühnhöfe 12
22761 Hamburg
GERMANY
Sommaire
shop.hoyerhandel.com

shop.hoyerhandel.com

7.4 Vyroba masovych šišek kibbeh
shop.hoyerhandel.com

-
Smartfonom alebo tabletom naskenujte QR kód.
-
Pomocou QR kódu sa dostanete na webovú stránku, KDE moźete zadat' objednávku.
14. Technické udaje
shop.hoyerhandel.com

Chilipulver after smag
Friturefedt eller -olie
shop.hoyerhandel.com

shop.hoyerhandel.com

shop.hoyerhandel.com