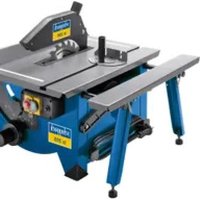
Deco-Tronic - Saw SCHEPPACH - Free user manual and instructions
Find the device manual for free Deco-Tronic SCHEPPACH in PDF.

| Product type | Scroll saw |
| Brand | Scheppach |
| Model | Deco-Tronic |
| Dimensions (L x W x H) | 620 x 320 x 320 mm |
| Weight | 15 kg |
| Power supply | 230 V / 50 Hz |
| Power consumption | 150 / 200 W |
| Table dimensions | 250 x 410 mm |
| Blade length | 133 mm |
| Max. cutting height | 50 mm |
| Throat depth | 400 mm |
| Blade stroke | 14 mm |
| Variable cutting speed | 400 - 1600 rpm |
| Table tilt | 0° to 45° |
| Sound pressure level | 76 dB (A) |
| Dust extraction connection diameter | 35 mm |
| Blade guard | Yes |
| Dust blower | Yes |
| Speed regulator | Yes (Deco-Tronic) |
| Maintenance | Lubricate bearings every 50 hours with SAE 20 oil |
Frequently Asked Questions - Deco-Tronic SCHEPPACH
User questions about Deco-Tronic SCHEPPACH
0 question about this device. Answer the ones you know or ask your own.
Ask a new question about this device
Download the instructions for your Saw in PDF format for free! Find your manual Deco-Tronic - SCHEPPACH and take your electronic device back in hand. On this page are published all the documents necessary for the use of your device. Deco-Tronic by SCHEPPACH.
USER MANUAL Deco-Tronic SCHEPPACH
| D |
| GB |
| FR |
| I |
| NL |
| E |
| P |
| S |
| SF |
| N |
| DK |
| SLO |
| CZ |
| RU |
deco 401
deco 402
deco-tronic
| Dekupiersäge | D |
| Scroll Saw | GB |
| Scie à découper | FR |
| Segatrice a svolgere | I |
| Decoupeerzaag | NL |
| Sierra de marqueteria | E |
| Serra de arcos para recortes | PO |
| Decupersåg | S |
| Käyttöohjeet | SF |
| Dekupersag | N |
| Dekupørsav | DK |
| Žaga za rezljanje - rezljača | SLO |
| Dekupírovací pily | CZ |
| лобзиковых | RU |
| Garantio Offensichtliche Mängel sind innerhalb von 8 Tagen nach Erhalt der Ware anzuzigen, andererfalls verliert der Käufer sämtliche Ansprüche wegen solcher Mängel. Wir leisten Garantie für unsere Maschinen bei richtiger Behandlung auf die Dauer der gesetzlichen Gewährleistungsfrist ab Übergabe in der Weise, dass wir jedes Maschinen, dass innerhalb dieser Zeit nachweisbar in Folge Material oder Fertigungs, fehler unbrauchbar werden sollte, kostenlos ersetzen. Für Tiele, die wir nicht selbst herstellen, leisten wir nur insoweit Gewähr, als uns Gesährleistungsansprüche gegen die Vorderanten zustehen. Die Kosten für das Einsetzten der neuen Teile trägt der Käufer. Wandlungs- und Minderungsansprüche und sonstige Schadensersatzansprüche sind ausgeschlossen. | Garantie Zichtbare gekreken binnen de 8 dagen na ontvangst van de goederen worden gemeid, zo niet verliest de verkoper elke aanspraak op grond van deze gebreken. Onze machines worden geleverd met een garantie voor de duur van de wettelijke garantietermijn. Deze termijn gaat in vanaf het moment dat de koper de machine ontvang. De garantie noudt in dat wij ook onderdeel van de machine dat binnen de garantietermijn santonbaar onbruikbaar wordt als gewog van materiaal of productiefuten, kostelos vervangen. De garantie vervalt echter bij verkeerd gebruik of verkeerde behandeling van de machine. Voor onderdelen die wij niet zelf produceren, geven wij enkel de garantie die wij zelf krijgen van de coorspronkelijke leverancier. De kosten voor de montage van nieuwe onderdelen vallen ten laste van de koper. Eisen tot het aanbrongen van veranderingen of het tocslaan van son korling en overige schadelooststellingsclaims zijn uitgesloten. |
| Warranty Apparent defects must be notified within 8 days from the receipt of the goods. Otherwise, the buyer's rights of claim due to such defects are invalidated. We guarantee for our machines in case of proper treatment for the time of the statutory warranty period from delivery in such a way that we replace any machine part free of charge which provotly becomes unusable due to faulty material or defects of fabrication within such period of time. With respect to parts not manufactured by us we only warrant insfor as we are entitled to warranty claims against the upstream suppliers. The costs for the installation of the new parts shall be borne by the buyer. The cancellation of sale or the reduction of purchase price as well as any other claims for damages shall be excluded. | Takuu Ilimislatä puutteista tulee limottaa kandeksan pälvidin kuluessa tawaran va staanottamisesta. Vuutoin ostaja el vol vasita korvausta ko. puutteista. Annamme takuan olikeen kästelytiile konellemme iaksästeiseksi takauajaksat tavanu luvutuksesta iaken siten, että veildamme kovausessta minka tahansa koneenan, joka oscolbutanu lainlan ajen kulussa käytökevitomalnaks-aine-tai valmistusvirhoestä johtuen. Osille, jolla omme valimsta ilse, annamme takuan vain mikäli osion birlittaja on antanut nistä takuan mollo. Ussien osion asennuskustannukset maksea ostaja. Purku-ja vähennysaalimukset ja muut vahingonkorvausaalimukset eivät tule kysymykseen. |
| Garantie Des défauts visibles doivent être signalés au plus tard 8 jours après la réception de la marchandise, sens quel l'acheteur perd tout droit à des redevances pour de tels défauts. Nous garentissons nos machines, dans la mesure où elles sont mariées correctement, pour la durée légale de garantie à compter de la remise dans ce sens que nous remplaçons gratuitement toute pièce de la machine devenue inutilisable durant cette période pour des raisons d'erreur de matériau ou de fabrication. Toutes pièces que nous ne fabriquons pas nous mêmes ne sont garanties que si nous possèdons des droits à la garantie vis à vis des tourmissures respectifs. Les frais pour la mise en place des nouvelles pièces sont à la charge de l'acheteur. Tous droits à réhatiation et toutes préfinitions à diminutions ainsi que tous autres droits à l'indernite sont exclus. | Garanti Med denne maskin fölger on 24 mänaders garanti. Garantien täcker endest material-och konstruktionsefl. Defekta delar erstitts utan onmkostninger, men kunden stär för installationen. Vår garanti täcker endast original schaepp-chader. Ansprék på garanti örsigger inte för: garantin täcker ej. transportskador, skador orsakade av felaktig behandling och di skétselforeskrifter inte beaktizs. Vicare kan garantikrav endast stallas för maskiner som inte har reparerats av tredje part. |
| Garanzia Vizi evidenti vienne signalati entro 8 giorni dalla ricazione della merce, altrimenti decadono tutti i diritti dell'acquirente ineronti a vizi dei genere. Appureto un impiago corretto da parte dell'acquirente, garantiarno per lo nostre macchine per tutto il periodo legale di garanzia a decorrone dalla consoura in maniera tale che sostiturno gratuitamente qualsiasi componente che entro tele periodo presenti dei vizi di materiale o di fabricazione tali di renderlo utilizzabile. Per componenti non fabricati da noi garantiamo solo nella misura nella quale noi stessi possiamo rivendicare diritti a garanzia nei confronti dei nostri fornitori. Le spese per il montaggio dei componenti nuovi sono a carico dell'acquirente. Sono escluse pretese di risoluzione per vizi, di riduzione o ulteriori pretese di risarcimento dann. | Garanti På denne maskinen gir vi 24 mändecers garanti. Garantien ontfatter materiel eller fabrikessjonsteil. Deler med teli blir erstattet uten onmkostninger. Selve uksfittingen må kunden selv utføre. Vi overtar kun garanti for originale schaepp-chader. Garantien omfatter ikke: Slidedeler. Transkoders. Skader förnsakt av ukyndig eller uforsiklig bruk. Garantikrav blir bare instekommelt sáfront reparasjoner ikke er utfert av tredje person. |
| Garantia Los defectos evidentes declarer ser notificados dentro de 8 días después de hacer recibido la mercancia, de lo contrario el comprador pierce todos los derechos sobre tieles defectos. Garantizamos nuestras máquinas en caso de manipulación correcta durante el plazo de garantia legal a partir de la entrega. Sustituiromos gratuitamente toda pieza de la máquina que dentro de este plazo se tome initi a causa de tallas de material o de fabricación. Las piezas que no son fabricadas por nosotros mismos serán garantizades hasta el punto que nos corresponda garantía del suministrador anterior. Los codes por la colocación de piezas nuevas recenen sobre el comprador. Están excluidos derechos por modificaciones, aminoraciones y otros derechos de indemnización por daños y sorjuicios. | Garanti På denne maskine yder vi Dom 24 mändecers garanti. Garantien dakker udruk-kende materiale-oder fabrikationsfeil. Defekte delo orslattes uden onmkostninger, udskiftningen af delone foretaps af kunden. Vi yder kun garanti for originale schaepp-chader. Garantien dakker ikke: Transkoders, sliddele, skader p.g.a. ukorekt behandling eller manglende overnoldelse af driftsveijedningen. Endvidere kan garantikravet kun gares galdende for maskiner, hvor der ikke er foretaget reparationer gennem tredjepart. |
| Garantia Para este aparelho concedemos garantia de 24 meses. A garantia cobre exclusivamente defeitos de matériel ou de fabricação. Peças zavaridas são substituidas gratuitamente. Cabe ao cliente efetuar a substituição. Assimimos a garantia unica-mente de peças genuinas scheppach. Não na direto a garantia no caso de: peças de desgaste, danos de transporte, danos causados pelo manejo indevido ou pela desatenção as instruções de serviço, talhas de instalação eletrica por Inobservância das normes relativas à electricidade. Além disso, a garantia só poderá ser relinvidicada para aparelhos que não teman sido consolidados portero por lenceiros. O cartão de garantia só vale em conexão com a futura. | Garancija SLO Obtine pomanjkljvosti je potrebno naznanti 8 dni po prejemu blaga, v nasprotnem primeru zgubi kupec vsse pravice do garancije zarsdi takshnih pomanjkljvosti. Za naše naprave dajemo garancijo od pravnili uporabi za čas zakonsko določenega roka garancije od predaje in sicer na takšen način, da vsak del naprave brezpplačno nadomeslimo, za katerega bi se v tem roku izkazalo, da je darzi slabega materiala ali slabe izdelove neuporaben. Za dele, ki jih sami no izdelujemo, jamčimo samo toliko, kolikor zahleva garancija drugih podjeti. Stroški za vstavljanje novih delov nosi kupec. Zahlove za sprominjanje in zmanjanje ter ostiale zahlove za nadomesilo škode so izključene. |
| Záruka CZ Viditelné závady je nutno oznámít do 8 dni po obdržení zboží, v opačném prípadě ztraci kupující veškeré nároky na náhradu za závady kohoto druhu. Záruku u nešich strojý poskytuemej při spřervném zachézení po záčonnou dobu záruční liňuy od predání tim způsobem, že każdy dil stroje, který se v této době stal nepoužitejným prokaszatelné v dúled ICU zaved materialu nebo výrocy, bezplatné vyménime. Za dily, které my sami nevrýsblé, ručilje men do té míry, jax nám prínaleži nároky na záruku vúči subdodavatelům. Naklady za montáz novych díli nese kupující. Nároky na zrušení a snizení kupní ceny a ostatní nároky na náhradu škod jsou vyloučeny. |
| Händler:Dealer:Vendeur:Rivenditore:Handelaar:Comerciante:Revendedor:Aterförsärljare:Myyjä:Förhandler:Forhandler:Trgovec: | Gerätetype:Appliance type:Type d'appareil:Tipo d'apparecchio:Type:Tipo di máquina: | Tipo de aparello:Maskin typ:Kone:Apparat type:Maskintype:Tip naprave: |
| Gerätenummer:Serial numbor:Numero de l'appareil:N. dell'apparecchio:Nummer:Numero de la máquina: | Número do aparelho:Maskin nr:Koneen numero:Apparat nummer:Maskinnummer:Serljska ötevilka: |
Günzburger Straße 69
D-89335 Ichenhausen
Verehrter Kunde,
we wish you a pleasant and successful working experience with your new scheppach circular saw for firewood.
According to the applicable product liability law the manufacturer of this device is not liable for damages which arise on or in connection with this device in case of:
- improper handling
• non-compliance with the instructions for use
• repairs by third party, non authorized skilled workers
• installation and replacement of non-original spare parts - improper use
- failures of the electrical system due to the non-compliance with the electrical specifications and the VDE 0100, DIN 57113 / VDE 0113 regulations

Recommendations:
Read the entire text of the operating instructions prior to the assembly and operation of the device.
These operating instructions are intended to make it easier for you to get familiar with your device and utilize its intended possibilities of use.
The operating instructions contain important notes on how to work safely, properly and economically with your machine and how to avoid dangers, save repair costs, reduce downtime, and increase the reliability and working life of the machine.
In addition to the safety regulations contained herein, you must in any case comply with the applicable regulations of your country with respect to the operation of the machine. Put the operating instructions in a clear plastic folder to protect them from dirt and humidity, and store them near the machine. The instructions must be read and carefully observed by each operator prior to starting the work. Only persons who have been trained in the use of the machine and have been informed on the related dangers and risks are allowed to use the machine. The required minimum age must be met.
In addition to the safety notes contained in the present operating instructions and the special regulations of your country, the generally recognized technical rules for the operation of wood working machines must be observed.
General Notes
- When you unpack the device, check all parts for possible transport damages. In case of complaints the supplier is to be informed immediately.
- Complaints received at a later date will not be acknowledged.
- Check the delivery for completeness.
- Read the operating instructions to make yourself familiar with the device prior to using it.
- Only use original scheppach parts for accessories as well as for wearing and spare parts. Spare parts are available from your specialized dealer.
- Specify our part numbers as well as the type and year of construction of the device in your orders.
Warning
To avoid electrical hazards, fire hazards, or damage to the tool, use proper circuit protection.
Your drill press is wired at the factory for 230 V operation. Connect to a 230 V/15 amp branch circuit and use a 15 amp time delay fuse or circuit breaker. To avoid shock or fire, replace power cord immediately if it is worn, cut or damaged in any way.
deco-tronic 401 402
| Technical data | |||
| DimensionsL x W x H mm | 630 x 290x 320 | 620 x 320x 320 | 620 x 320x 320 |
| Bench size mm | 250 x 410 | 250 x 410 250 | x 410 |
| Saw blade length mm | 133 133 1 | 33 | |
| Cutting height max. mm | 50 50 50 | ||
| Working depth mm | 400 400 4 | 00 | |
| Lifting movement mm | 14 14 14 | ||
| Lifting speed 1/ min (electronical) | 400 – 1600 1 | 450 900/1450 | |
| Bench diagonal adjustment left degrees | 0 – 45 | 0 – 45 | 0 – 45 |
| Weight kg | 11,5 | 15 15 | |
| Suction connection piece mm | 35 35 35 | ||
| Motor | |||
| Electrical motor | 230 V/50 Hz | 230 V/50 Hz | 230 V/50 Hz |
| Power consumption P1 W | 90 | 150 | 150/200 |
| Sound pressure level on operat-or's ear measured in accordance with DIN 45635 with max. speed during idle running | 76 dB (A) | 76 dB (A) | 76 dB (A) |
Special accessories
Pin saw blade-universal
135 x 2,0 x 0,25 Z 10
blade mm 1 set = 6 pieces, Article No. 8800 0011
Pin saw blade- wood/plastic mm
135 x 2,0 x 0,25 Z 7
1 set = 6 pieces, Article No. 8800 0012
Pin saw blade-wood mm
135 × 3,0 × 0,5 Z 4
1 set = 6 pieces, Article No. 8800 0013

In these operating instructions we have marked the places that have to do with your safety with this sign.
General Safety Rules
WARNING! When using electric tools basic safety pre-cautions should always be followed to reduce the risk of fire, electric shock and personal injury.
Read all these instructions before attempting to operate this product. Save these instructions for future reference.
- Keep work area clear. Cluttered areas and benches invite injuries.
- Consider work area environment. Do not expose tools to rain. Do not use tools in damp or wet locations. Keep work area welllit. Do not use tools in the presence of flammable liquids or gases.
- Guard against electric shock. Avoid body contact with earthed or grounded surfaces
- Keep other people away. Do not let others, especially children, not involved in the work touch the tool or the extension lead and keep them away from the work area.
- Store idle tools. When not in use, tools should be stored in a dry locked-up place, out of reach of children.
- Do not force the tool. It will do the job better and safer at the rate for which it was intended.
- Use the right tool. Do not force small tools to do the job of a heavy duty tool. Do not use tools for purposes not intended; for example, do not use circular saws to cut tree limbs or logs.
- Dress properly. Do not wear loose clothing or jewellery they can be caught in moving parts. Non-skid footwear is recommended when working outdoors. Wear protective hair covering to contain long hair.
- Use protective equipment. Use safety glasses. Use face or dust mask if cutting operations create dust.
- Connect dust extraction equipment. If devices are provided for the connection of dust extraction and collecting equipment, ensure these are connected and properly used.
- Do not abuse the lead. Never pull the power cable to disconnect it from the socket. Keep the lead away from heat, oil and sharp edge.
- Secure work. Where possible use clamps or a vice to hold the work. It's safer than using your hand.
- Don't over reach. Keep proper footing and balance at all time.
- Maintain tools with care. Keep cutting tools sharp and clean for better and safer performance. Follow instructions for lubricating and changing accessories. Inspect power cables periodically and if damaged have them replaced by an authorised service facility. Inspect extension cables periodically and replace if damaged. Keep handles dry, clean and free from oil and grease.
- Disconnect tools. When not in use, before servicing and when changing accessories such as blades, bits, cutters, disconnect tools from the power supply.
- Remove adjusting keys and wrenches. Form the habit of checking to see that keys and adjusting wrenches are removed from the tool before turning it on.
- Avoid unintentional starting. Ensure switch is in 'off' position when plugging in.
- Use outdoor extension leads. When the tool is used outdoors, use only extension leads intended for outdoor use and so marked.
- Stay alert. Watch what you are doing, use common sense and do not operate the tool when you are tired.
- Check damaged parts. Before further use of the tools, it should be carefully checked to determine that it will operate properly and perform its intended function. Check the alignment of moving parts, binding of moving parts, breakage of parts, mounting and any other conditions that may affect its operation. A guard or other part that is damaged should be properly repaired or replaced by an authorised service centre unless otherwise indicated in this instruction manual. Do not use the tool if the switch does not turn on and off.
- Warning. The use of any accessory or attachment other than one recommended in this instruction manual may present a risk of personal injury.
- Have your tool repaired by a qualified person. This electric tool complies with the relevant safety rules. Repairs should only be carried out by a qualified person using original spare parts, otherwise this may result in considerable danger to the user.
Additional Safety Rules for Scroll Saws
- This scroll saw is intended for use in dry conditions, and for indoor use only.
- Do not cut pieces of material too small to hold by hand outside the blade guard.
- Avoid awkward hand positions where a sudden slip could cause a hand to move into the blade.
- Always use the blade guard to avoid possible injury due to blade breakage.
- Never leave the scroll saw work area with the power 01), or before the machine has come to a complete stop.
- Do not perform layout, assembly or set up work on the table while the cutting tool is in operation.
- Never turn your scroll saw on before clearing the table of all objects: (tools, scraps of wood, etc) except for the workpiece and related feed or support devices for the operation planned.
Proper use
CE tested machines meet all valid EC machine guidelines as well as all relevant guidelines for each machine.
- The machine must only be used in technically perfect condition in accordance with its designated use and the instructions set out in the operating manual, and only by safety-conscious persons who are fully aware of the risks involved in operating the machine. Any functional disorders, especially those affecting the safety of the machine, sholud therefore be rectified immediately.
- The safety, work and maintenance instructions of the manufacturer as well as the technical data given in the calibrations and dimensions must be adhered to.
- Relevant accident prevention regulations and other, generally recognized safety-technical rules must also be adhered to.
- The machine may only be used, maintained, and operated by persons familiar with it and instructed in its operation and procedures. Arbitrary alterations to the machine release the manufacturer from all responsibility for any resulting damages.
- The machine may only be used with original accessories and tools made by the manufacturer.
- Any other use exceeds authorization. The manufacturer is not responsible for any damages resulting from unauthorized use; risk is the sole responsibility of the operator.
⚠️ Remaining hazards
The machine has been built using modern technology in accordance with recognized safety rules. Some remaining hazards, however, may still exist.
- Long hair and loose clothing can be hazardous when the work piece is rotating. Wear personal protective gear such as a hair net and tight fitting work clothes.
- Saw dust and wood chips can be hazardous. Wear personal protective gear such as safety goggles and a dust mask.
- The use of incorrect or damaged mains cables can lead to injuries caused by electricity.
- Even when all safety measures are taken, some re-
maining hazards which are not yet evident may still be present.
- Remaining hazards can be minimized by following the instructions in „Safety Precautions“, „Proper Use“ and in the entire operating manual.
- Do not force the machine unnecessarily: excessive cutting pressure may lead to rapid deterioration of the blade and a decrease in performance in terms of finish and cutting precision.
- Avoid accidental starts: do not press the start button while inserting the plug into the socket.
Scroll Saw Design Features, Fig. 1
1 Quick release and tension lever: for quick tensioning and removal of the saw blade with a handle on the lever.
2 Blade guard: protects your hands from injury.
3 Work piece holder
4 Shavings blower: keeps the workpiece area free from dust.
5 decotronic: electronical speed switch
deco 402: Speed switch
6 On/Off switch
7 Angle scale: you can read the angle position of the table with this scale.
Installation
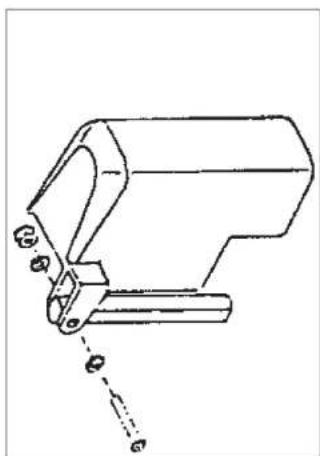
Setting the saw bench, Fig. 2
Setting the angle scale
- Release the star button and bring the saw bench (2) to a right angle (3) in relation to the saw blade.
- Use a 90° angle to measure the right angle between the blade and the bench. The saw blade be 90° to the angle.
- Close the star button again when the distance between the blade and the 90^ angle is at a minimum. The bench should then be at 90^ to the saw blade.
- Release the lock screw and bring the indicator to the zero position. Fasten the screw. Please note: the angle scale is a useful piece of supplementary equipment, but should not be used for precision work. Use scrap wood for saw tests, adjust the bench if necessary.
Note: The bench should not be on the motor block, this can cause undesirable noise.
Horizontal saw bench and diagonal cuts, Fig. 2+3
- The saw bench can be positioned into a 450 diagonal position or be left in the horizontal position.
- You can read off the approximate slope angle by using the angle scale located under the work bench. For more exact adjustment, use scrap wood for some saw tests; adjust the bench if necessary.
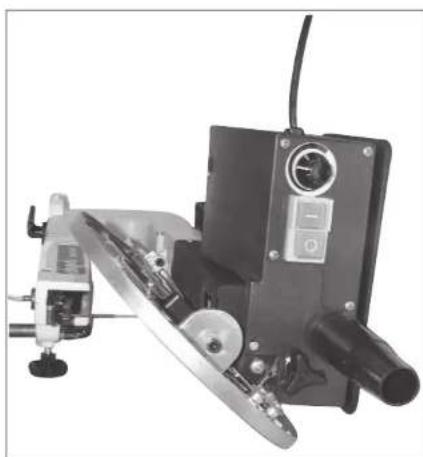
Blade guard assembly, Fig. 4
Install the blade guard to the holder as shown in the diagram. Secure the screws with a nut and washer.
- Lift the saw onto the frame and base and push it onto the workbench.
- Familiarize yourself with the saw operating elements and features.
Mounting the saw on a work bench, Fig. 5
- A workbench made from solid wood is better than one made of plywood, as interfering vibrations and noise are more noticeable with plywood.
- The necessary tools and small parts for assembling the
saw on a workbench are not supplied with the saw. However, use equipment of at least the following size:
1 Saw body
2 Foam rubber base
3 Work bench
4 Flat seal
5 Washer
6 Hexagonal nut
7 Lock nut
8 Hexagonal bolt
Quantity Description
4 Hexagonal bolts (6mm) 1/4-20 x length
4 Flat seal (7mm) 9/321.0
4 Washers (7mm) 9/321.0.
8 Hexagonal nuts (6 mm) 1/4-20
First of all, drill holes into the seating surface and then insert the screws.
- A foam rubber base for reduction of noise is not supplied with the saw either. However, we expressly recommend that you use such a base to keep vibration and noise to a minimum. Ideal size 410 x 320 mm.
Changing the saw blades
Warning: Switch off the saw and remove the mains supply plug before installing saw blades in order to avoid injuries caused by unintentional activation of the saw.
A. Flat saw blades
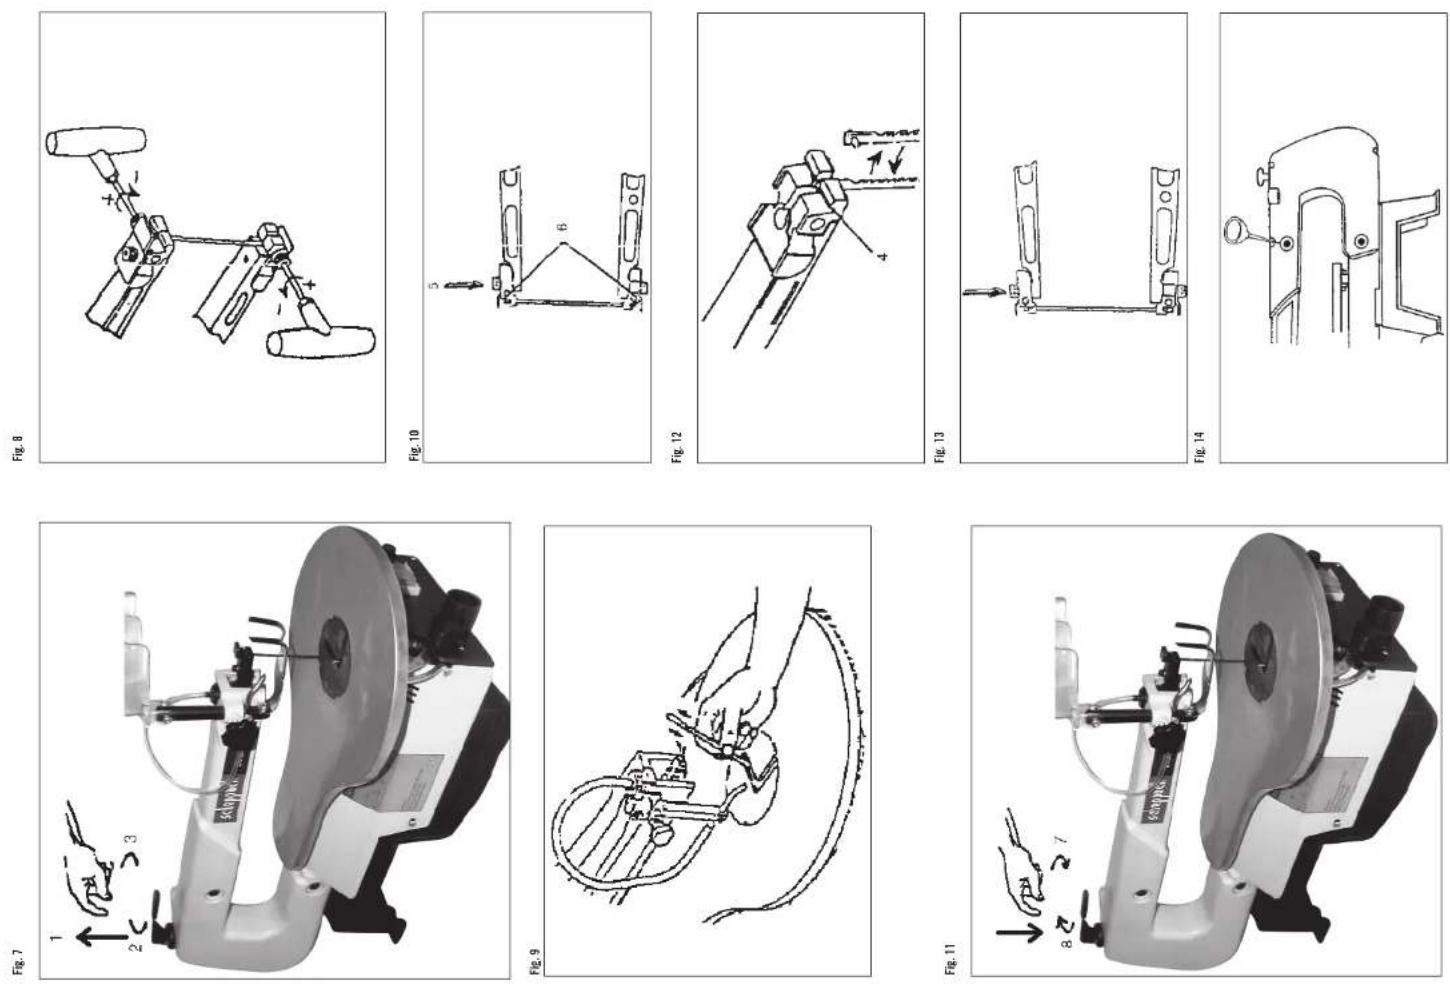
A.1 Removing the saw blades, Fig. 7
1 First af all, release the tension via the tensianing tap ta remove the saw blade.
2 Undo the screw set on the upper blade holder (Fig. 8).
3 Undo the lower holder. To do this, use the spanner which you can feed through the saw blade slot.
4 Remove the saw blade by pulling it forwards from the holders and by pulling it through the access hole in the bench (Fig. 9).
A.2 Installing the saw blade
1 When installing the saw blade, first of all pull it through the saw blade slot in the work bench.
Note: In order to avoid tearing or lifting of lightweight work - pieces, the saw blade teeth should always face down towards the work bench.
2 Guide the saw blade into the lower holder and fasten the screws (Fig. 9).
3 Guide the other end of the blade into upper holder and fasten the screws. Push the upper arm of the saw slightly downwards before tightening the screws (Fig. 10).
4 Tension the blade by turning the tensioning tap clock - wise. Check the blade tension. Carry on turning clock - wise to tension the blade further (Fig. 11).
Note: It is difficult to open the tensioning tap again if the blade is too tightly tensioned.
Saw blade with pins
Note: The upper and lower holders should not be tightened too much when using saw blades which have pins. The gap between the holding blocks must be slightly wider than the saw blade. After installation, the blade is held in place by the tensioning device.
B.1 Removing the saw blade, Fig. 7
1 First of all, release the tension tap.
2 Take the saw blade out from the upper and lower holder. Push the upper arm of the saw slightly downwards before tightening the screws.
B.2 Installing the saw blade
1 Guide one end of the saw blade through the borehole in
the bench and guide the saw blade pins into the recess. Repeat this procedure for the upper blade holder. Push the upper arm of the saw slightly downwards before tightening the screws (Fig. 9, 10, 13).
2 Check the positions of the blade pins in both holders (Fig. 12).
3 Tension the blade using the tensioning tap. Check the blade tension. Carry on turning clockwise to tension the blade further (Fig. 11).
Note: It is difficult to open the tensioning tap again if the blade is too tightly tensioned.
Basic operation
A scroll saw is fundamentally a „curve cutting tool“ but which can also carry out straight and angled edge cuts. Familiarise yourself with the following important points prior to commissioning the saw.
- The saw does not automatically cut wood. You must feed the wood against the saw blade manually.
- The cutting process occurs on I y while the blade is moving downwards.
- Feed the wood slowly against the saw blade as the saw blade teeth are small and cut only while moving down - wards.
- All persons carrying out work with the saw require training. The saw blade may break easily during this training time while the operator is still unfamiliar with the saw.
- The saw is best suited for sheets of wood less than 2.5 cm thick.
- Feed the wood especially slowly against the blade and avoid abrupt curves to prevent the saw blade from breaking, if you wish to cut wood sheets thicker than 2.5 cm.
- Saw blade teeth blunten over time, saw blades must be replaced. The saw blades are sufficient for 1/2 to 2 operating time depending upon the type of wood.
- Try and make sure that the saw blade follows the grain of the wood in order to obtain a clean cut.
- deco 402/decotronic: The saw speed must be reduced to minimum when cutting precious and non-terrous metals.
Inside cuts
Warning: Switch off the saw and remove the mains supply plug before installing saw blades in order to avoid injuries caused by unintentional activation of the saw.
This saw is suited also to inside cuts cuts not starting at the edge of the work piece. Proceed as follows:
- Drill a 6 mm hole in the work piece.
- Loosen the blade tension er and release the tension in the blade.
- Place the bore hole over the saw blade slot in the work bench.
- Install the saw blade through the hole in the work piece and through the work blade slot, and fasten the blade to the holders.
- When you have completed the inside cut, remove the saw blade and then remove the workpiece from the bench.
Electrical connection
The installed electric motor is completely wired ready for operation.
The customer's connection to the power supply system, and any extension cables that may be used, must conform with local regulations.
Important remark:
The motor is automatically switched off in the event of an overload. The motor can be switched on again after a cooling down period that can vary.
Defective electrical connection cables
Electrical connection cables often suffer insulation damage.
Possible causes are:
- Pinch points when connection cables are run through window or door gaps.
- Kinks resulting from incorrect attachment or laying of the connection cable.
- Cuts resulting from running over the connecting cable.
- Insulation damage resulting from forcefully pulling out of the wall socket.
- Cracks through aging of insulation.
Such defective electrical connection cables must not be used as the insulation damage makes them extremely hazardous.
Check electrical connection cables regularly for damage. Make sure the cable is disconnected from the mains when checking.
Electrical connection cables must comply with the regulations applicable in your country.
Single-phase motor
- The mains voltage must coincide with the voltage specified on the motor's rating plate.
- Extension cables up to a length of 25 m must have a cross-section of 1.5 mm ^2 , and beyond 25 m at least 2.5 mm ^2 .
- The connection to the mains must be protected with a 16 A slow-acting fuse.
Only a qualified electrician is permitted to connect the machine and complete repairs on its electrical equipment.
In the event of enquiries please specify the following data:
- Motor manufacturer
• Type of current of the motor - Data recorded on the machine's rating plate
- Data recorded on the switch's rating plate
If a motor has to be returned, it must always be dispatched with the complete driving unit and switch.
Maintenance
Warning: In the interests of operational safety, always switch off the saw and remove the mains plug before carrying out maintenance work.
General
Re-application of the wax coating on the workbench makes feeding the workpiece to the blade easier.
Motor
The mains cable should be replaced immediately if pulled out, cut or damaged in any other way.
Do not lubricate the motor bearings or internal parts!
Saw arm bearings
Lubricate the saw arm bearings every 50 hours. Proceed as follows (Fig. 14).
- Turn the saw to the side
- Apply a generous amount of SAE 20 oil to the shaft end and bronze bearings.
- Let the lubricant oil work in overnight.
- Repeat the procedure the next day on the other side of the saw.
EC Declaration of Conformity
We herewith declare, scheppach Fabrikation von Holzbearbeitungsmaschinen GmbH, Günzburger Str. 69, D-89335 Ichenhausen that the machine described below due to its construction and design and in the version delivered by us complies with the relevant provisions of the following EC Directives. In case of a modification of the machine this declaration ceases to be valid.
Machine description:
Scroll Saw
Machine type:
deco 401, deco 402, deco-tronic
Applicable EC Directives:
Machinery Directive 98/37/EC, Low Voltage Directive 72/23/EEC, last modified by the Directive 93/68/EEC, EMC Directive 89/336/EEC, last modified by the Directive 93/68/EEC.
Notified body within the meaning of Annex VII
Warning: In the interests of operational safety, always switch off the saw and remove the mains plug before carrying out maintenance work.
Fault Possible causes Action
| Saw blades break Tension incorrectly set Set the correct tension | |
| Load to great Feed the workpiece more slowly | |
| Incorrect saw blade variety Use the correct saw blades | |
| Workpiece not fed straight Avoid exerting pressure from the side | |
| Motor does not function Mains Gable faulty Change faulty parts | |
| Motor faulty Call customer service. Do not attempt to repair the motor yourself as this should be carried out by trained personnel. | |
| VibrationNOTE: The saw vibrates slightly when the motor is running in normal operation. | Saw incorrectly installed Refer to the instructions given earlier in this manual for information on installing the saw |
| Unsuitable underlay The heavier the work bench is, the less the vibration. A bench made from ply wood always vibrates more than one made from solid wood. Select the work bench best suited to your working conditions | |
| The work bench is not screwed down or is on the motor | |
| The motor is not secured | |
| Saw blade swings out Holders not aligned straight | Holders not aligned Losen the screws with which the holders are fastened to the arm. Align the holders so that they are perpendicular to each other and retighten the screws. |
Constructeur:
scheppach
Günzburger Straße 69
D-89335 Ichenhausen
Conseils généraux
Günzburger Straße 69
D-89335 Ichenhausen
Avvertenze generali
Günzburger Straße 69
D-89335 Ichenhausen
Günzburger Straße 69
D-89335 Ichenhausen
Günzburger Straße 69
D-89335 Ichenhausen
Indicações gerais
Günzburger Straße 69
D-89335 Ichenhausen
Günzburger Straße 69
D-89335 Ichenhausen
Alment
Günzburger Straße 69
D-89335 Ichenhausen
B.2 Montering at savklingen
Günzburger Straße 69
D-89335 Ichenhausen
Spoštovani kupec,
Günzburger Straße 69
D-89335 Ichenhausen
Vážený zákazníku,
Günzburger Straße 69
D89335 Ichenhausen
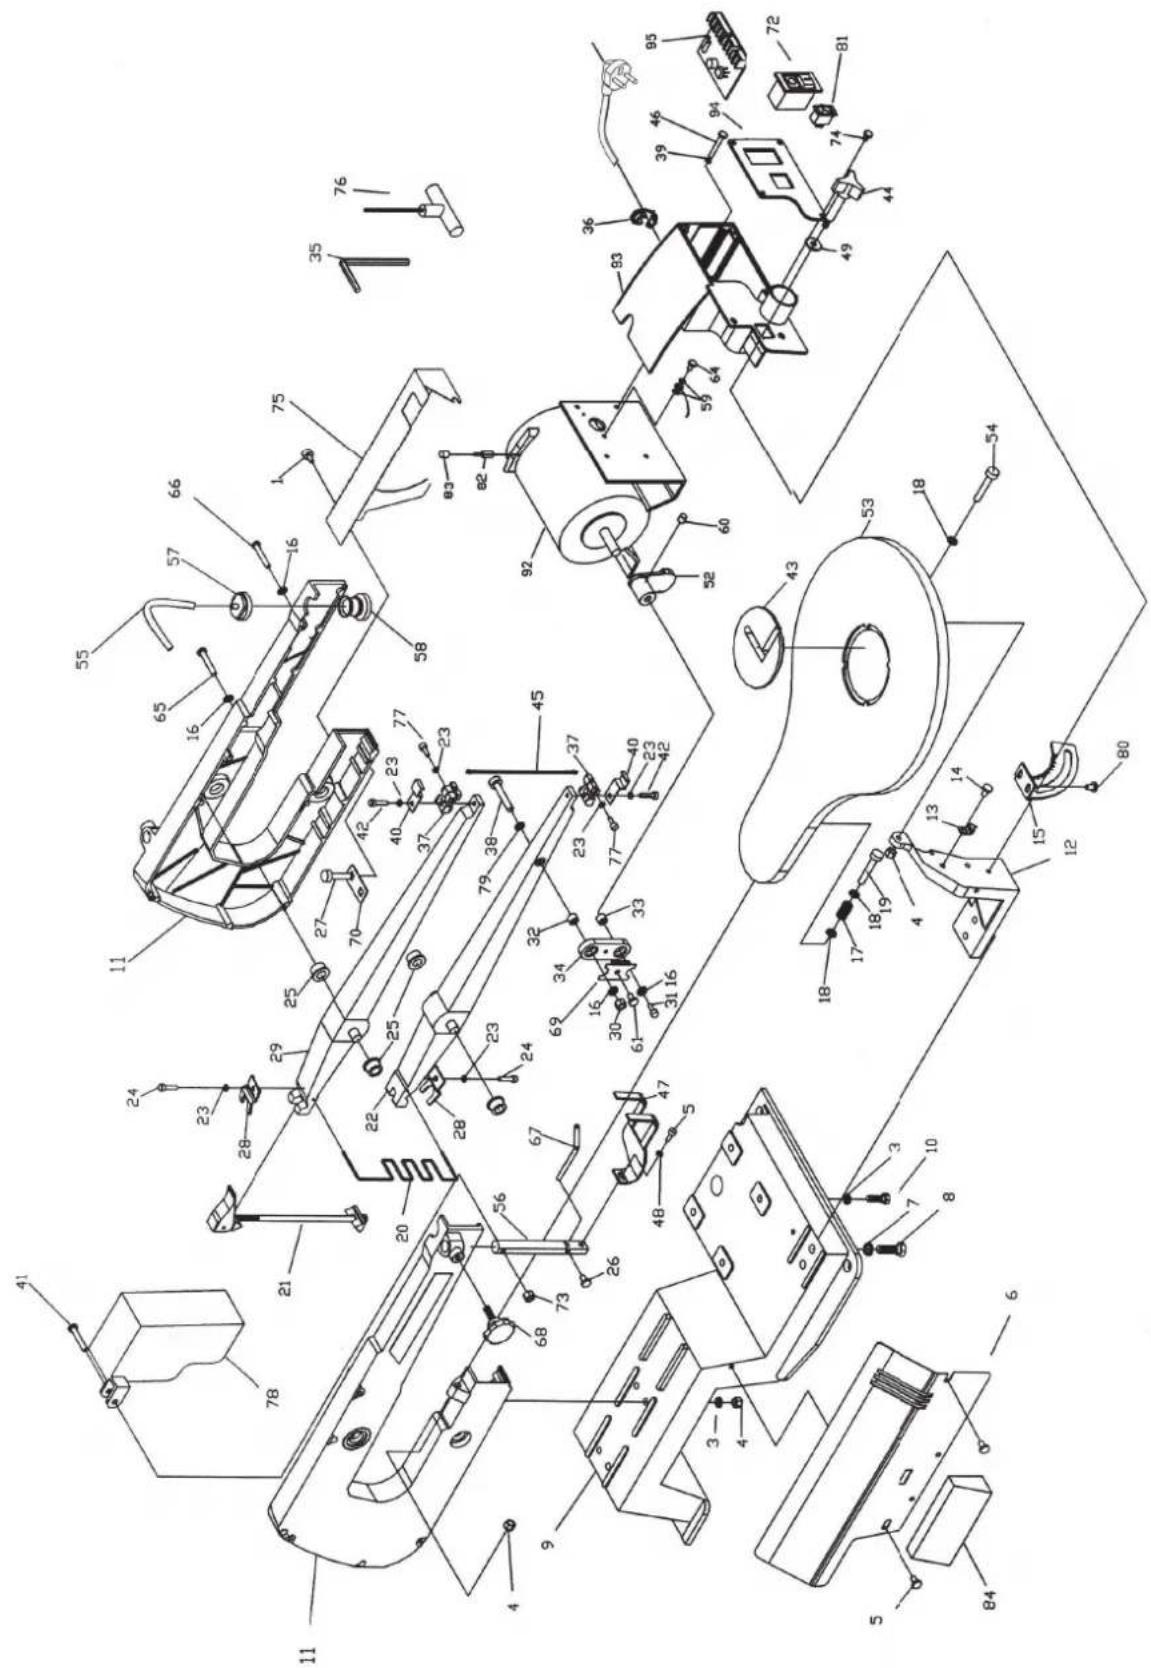

Fig. 1 Fig. 2
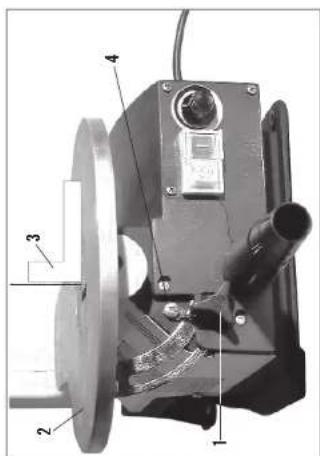
Fig. 4
natural_image
Technical line drawing of a mechanical component with mounting holes and a dashed line indicating a dimension (no text or symbols)Fig. 5
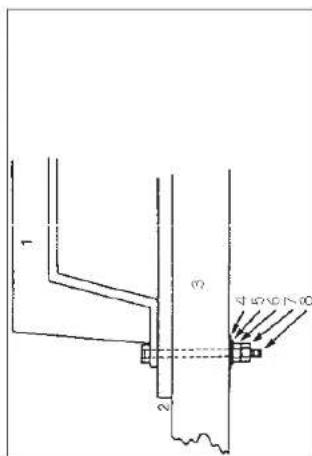
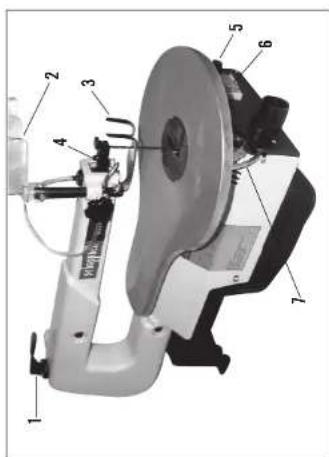
Fig. 3
natural_image
Mechanical device with articulated arm and control panel (no visible text or symbols)