
PCS26O - Saw SCHEPPACH - Free user manual and instructions
Find the device manual for free PCS26O SCHEPPACH in PDF.


User questions about PCS26O SCHEPPACH
0 question about this device. Answer the ones you know or ask your own.
Ask a new question about this device
Download the instructions for your Saw in PDF format for free! Find your manual PCS26O - SCHEPPACH and take your electronic device back in hand. On this page are published all the documents necessary for the use of your device. PCS26O by SCHEPPACH.
USER MANUAL PCS26O SCHEPPACH
natural_image
Technical line drawing of a chainsaw with visible gear and mounting bracket (no text or symbols)
text_image
https://www.scheppach.com/de/service scheppachPCS26O
| DE | Benzin-BaumpflegesägeOriginalbetriebsanleitung | 7 |
| GB | Petrol pruning sawTranslation of original instruction manual | 30 |
| FR | Élagueuse thermiqueTraduction des instructions d'origine | 50 |
| IT | Sega per arboricoltura a benzinaLa traduzione dal manuale di istruzioni originale | 72 |
| NL | Benzine-boomonderhoudszaagVertaling van de originele gebruikshandleiding | 94 |
| ES | Sierra para poda de árboles alimentada por gasolinaTraducción del manual de instrucciones original | 115 |
| PT | Motosserra de poda a gasolinaTradução do manual de operação original | 138 |
| CZ | Benzínová pila pro péči o stromyPřeklad originálního návodu k obsluze | 160 |
| SK | Benzínová pila na orezávanie stromovPreklad originálneho návodu na obsluhu | 180 |
| HU | Benzines favágó fűrészEredeti használati utasítás fordítása | 200 |
| PL | Piła spalinowa do przycinania drzewTłumaczenie oryginalnej instrukcji obsługi | 221 |
| EE | Bensiini-puuhoolitsussaagOriginaalkäitusjuhendi tõlge | 243 |
| LT | Benzininis medžių priežiūros pjūklasOriginalios naudojimo instrukcijos vertimas | 263 |
| LV | Benzīna koku kopšanas zāğisOriginālās lietošanas instrukcijas tulkojums | 284 |
| SE | Bensindriven trädbeskärningssågÖversättning av original-bruksanvisning | 304 |
| FI | Bensiinikäyttöinen puunhoitosahaKäännös alkuperäisestä käyttöohjeesta | 323 |
| DK | Benzindrevet træbeskæringssavOversættelse fra den oprindelige betjeningsvejledning | 343 |
text_image
Technical diagram of a chain-coil device with numbered parts for identification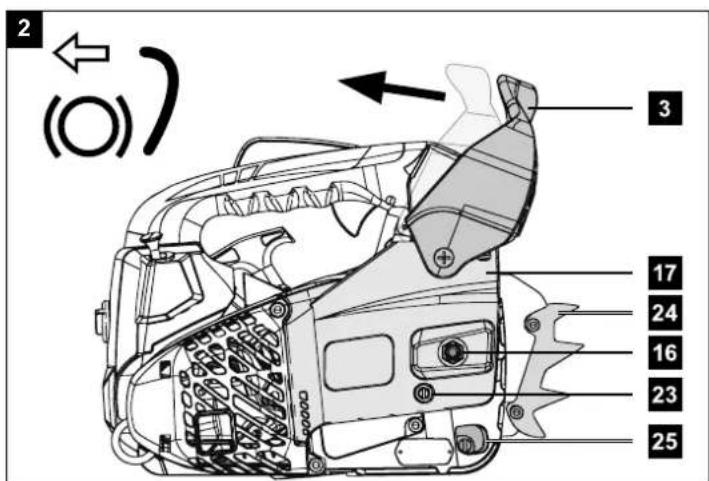
text_image
2 3 17 24 16 23 25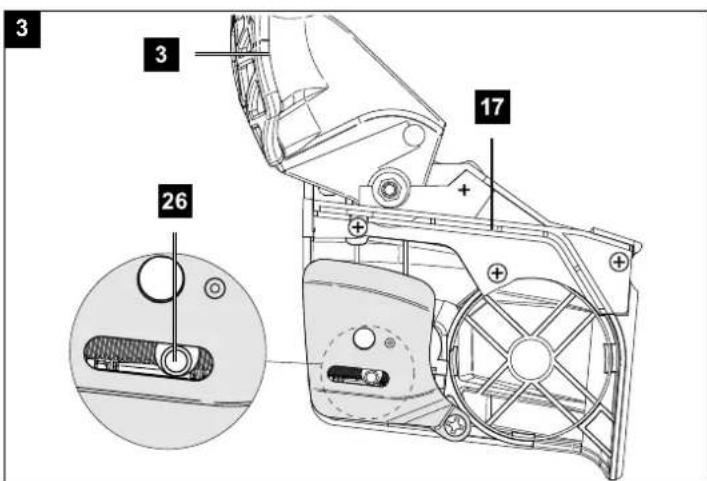
text_image
3 3 17 26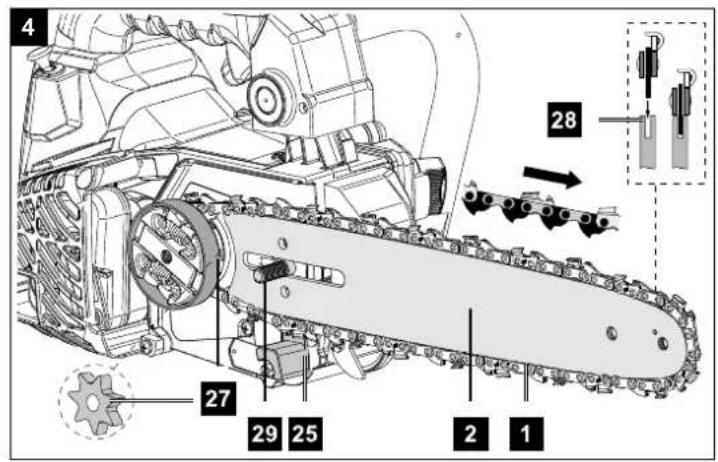
text_image
4 28 27 29 25 2 1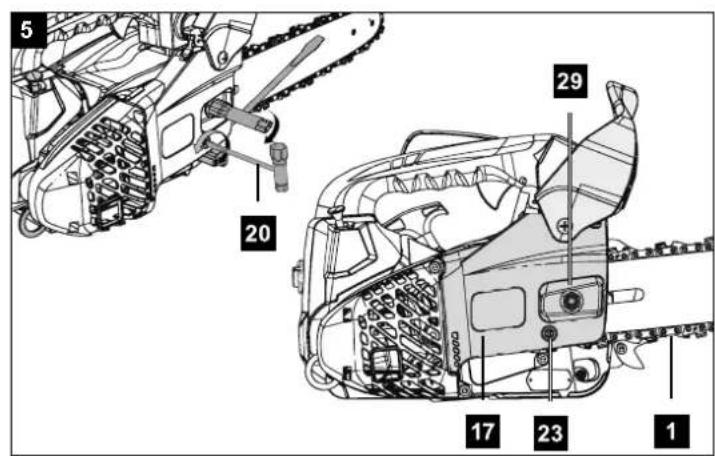
text_image
5 20 29 17 23 1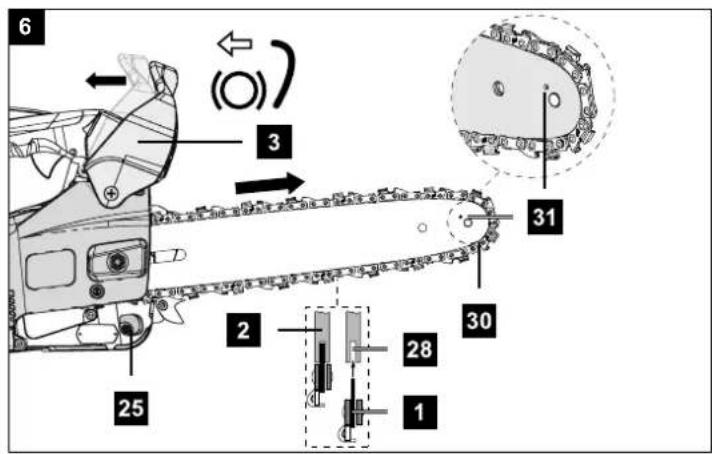
text_image
6 3 25 1 28 30 31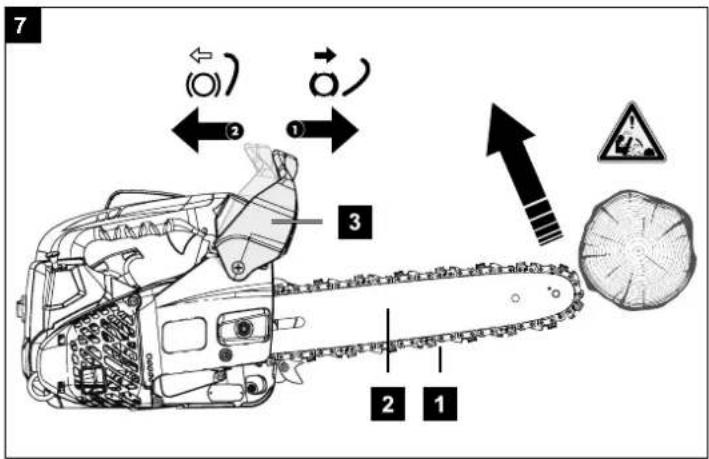
text_image
7 2 1 3 2 1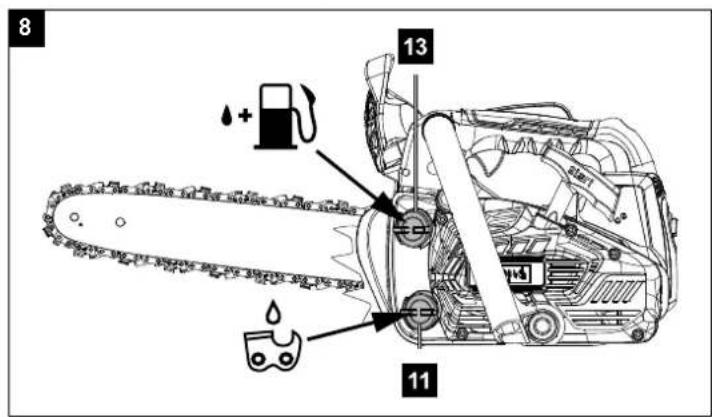
text_image
8 13 11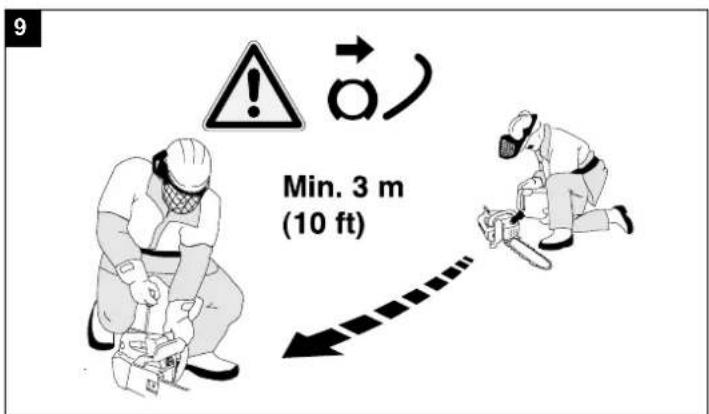
text_image
9 Min. 3 m (10 ft)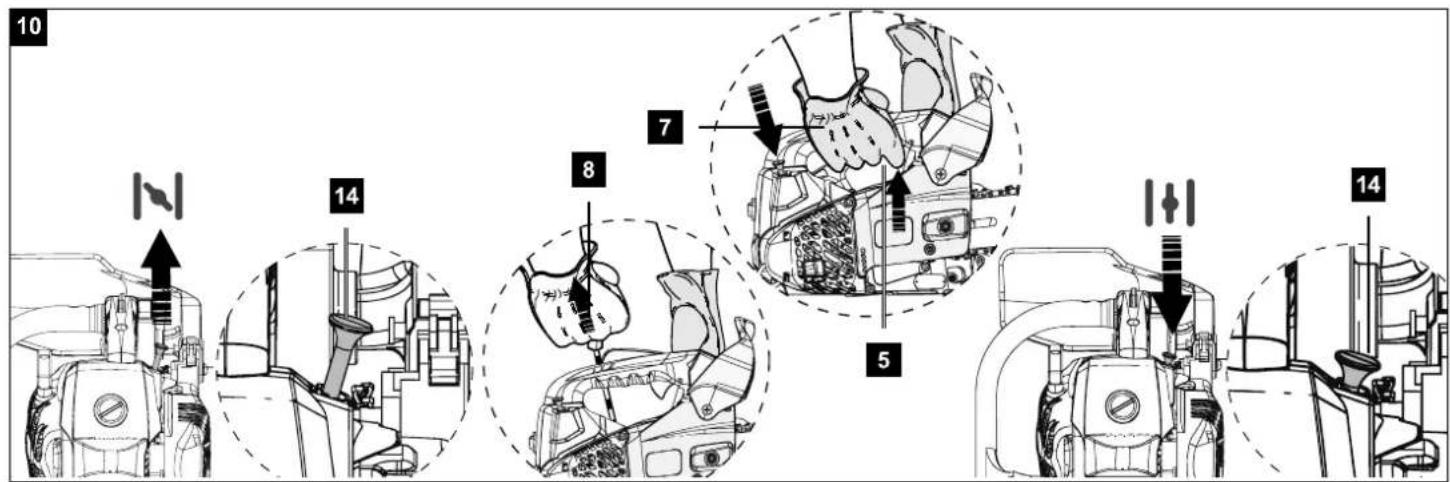
text_image
Technical diagram showing a mechanical assembly with numbered steps and directional arrows indicating motion or force directions.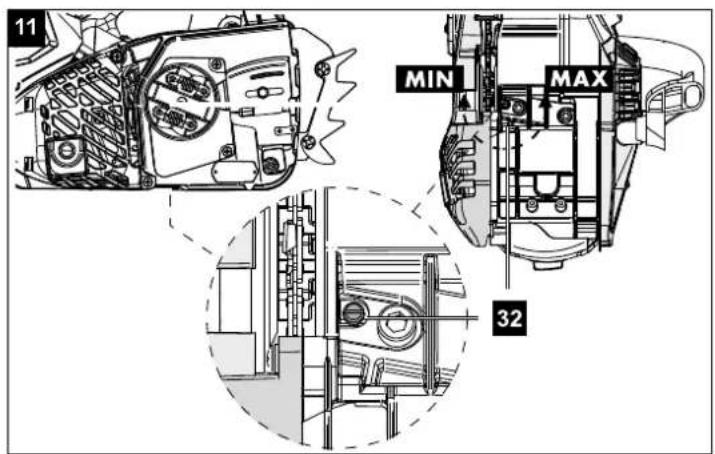
text_image
11 MIN MAX 32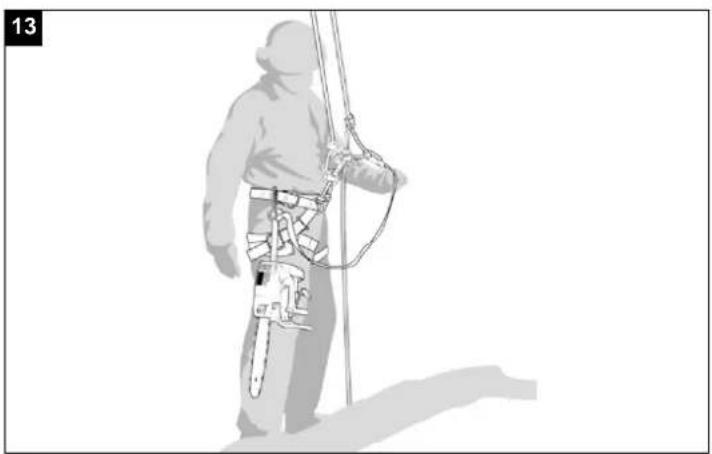
natural_image
Silhouette of a person wearing a harness and holding a pole, standing with shadow (no text or symbols)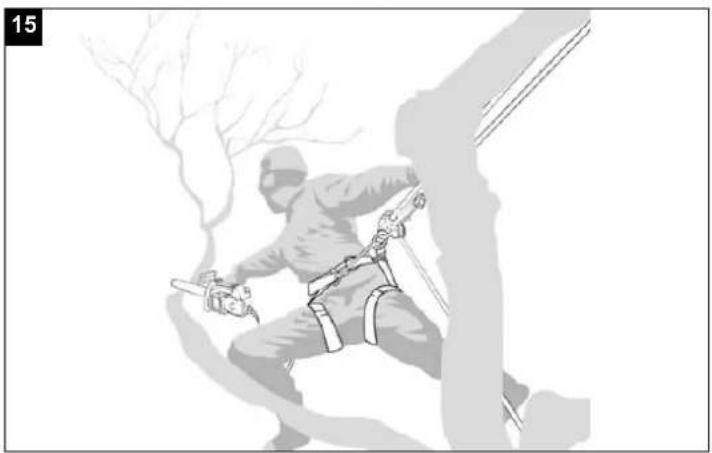
natural_image
Illustration of a soldier climbing a tree with chains, no text or symbols present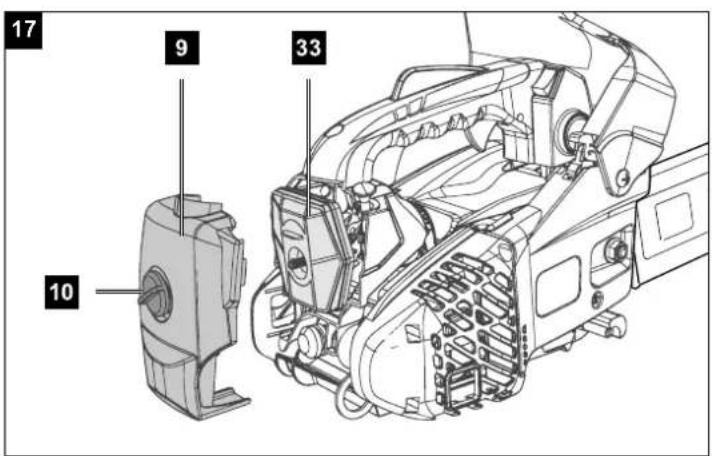
text_image
17 9 33 10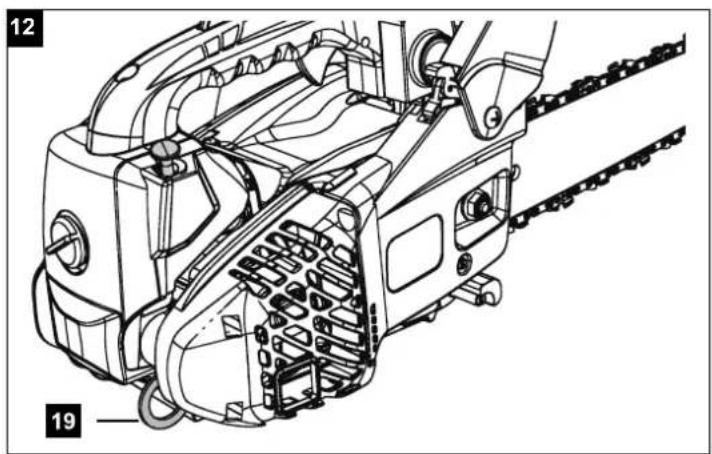
natural_image
Technical line drawing of a mechanical device with numbered components (12 and 19), no readable text or symbols present.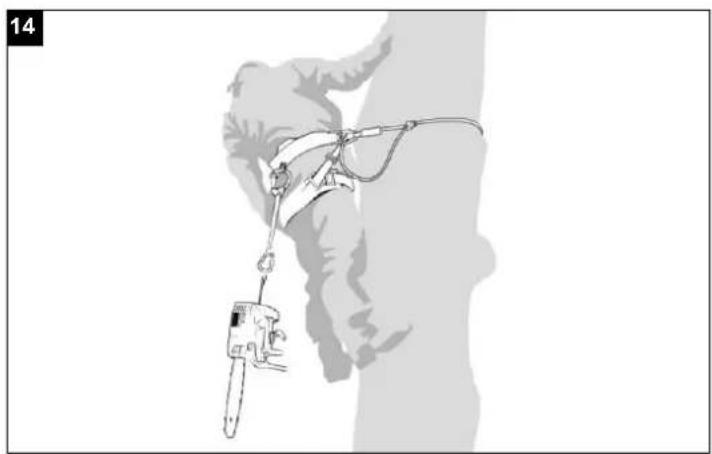
natural_image
Illustration of a climbing gear with a measuring tool and attached harness (no text or symbols)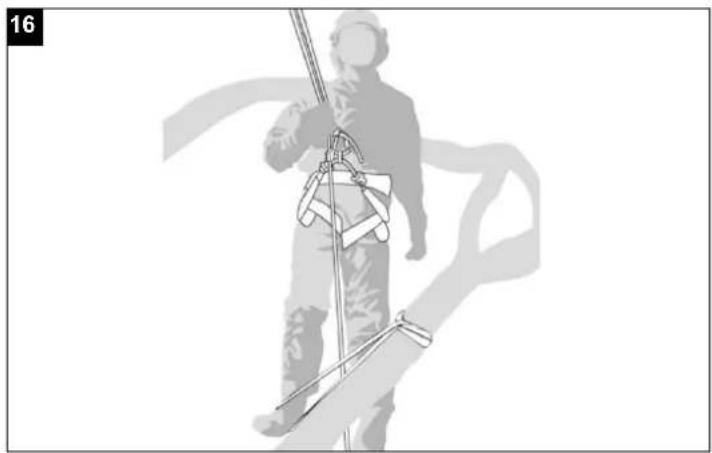
natural_image
Silhouette of a person in protective gear climbing a rope, no text or symbols visible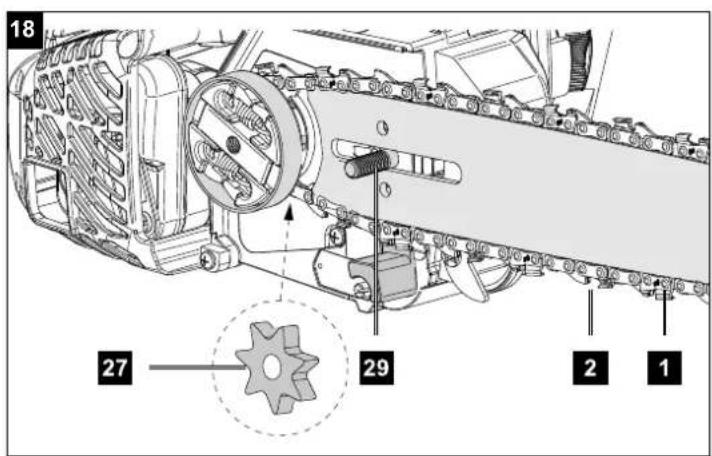
text_image
18 27 29 2 1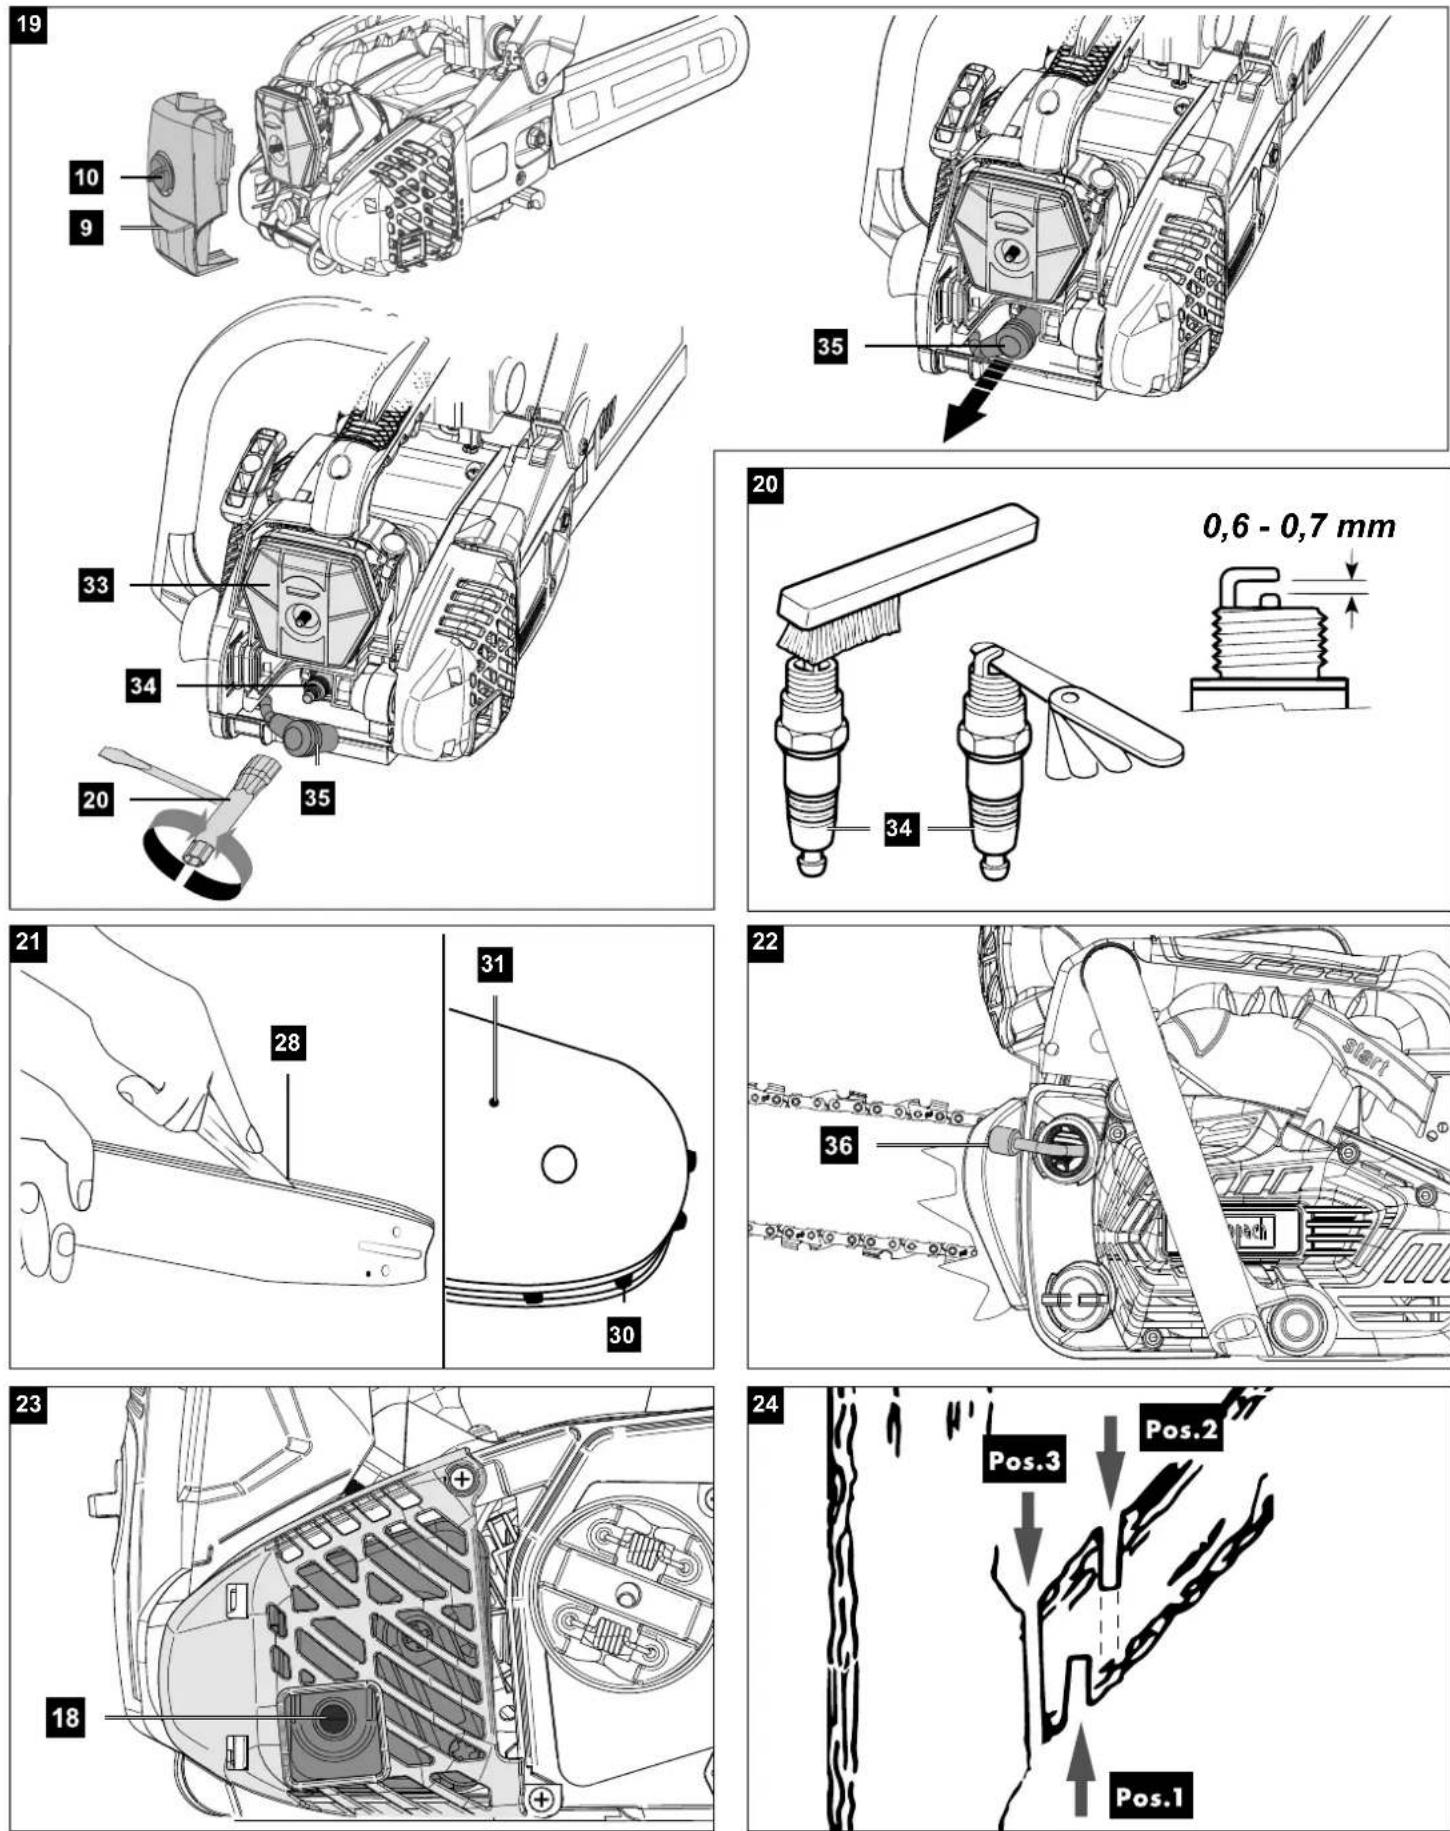
Günzburger Straße 69
D-89335 Ichenhausen
VEREHRTER KUNDE,
text_image
https://www.scheppach.com/de/service scheppachTable of contents: Page:
- Explanation of the symbols on the device....31
- User note 32
- Introduction...... 33
- Device description....33
- Scope of delivery....33
- Proper use....33
- Safety instructions.... 34
- Technical data 38
- Before commissioning....39
- Commissioning....41
- Usage 42
- Transport 44
- Cleaning and maintenance....45
- Storage....48
- Disposal and recycling 49
- Troubleshooting....49
- Declaration of conformity 365
1. Explanation of the symbols on the device
 | Read, understand and follow all warning information. |  | Read the entire operating manual before using the device. |
 | Warning! Danger of kick-back.Beware of the kick-back of the chainsaw and avoid making contact with the tip of the guide bar. |  | Do not operate the device in rain or in humid conditions. |
 | Wear safety goggles.Wear hearing protection. |  | Wear a safety helmet. |
 | Always wear safety and anti-vibration gloves when using the device. |  | Always wear non-slip safety shoes with cut protection when using the device. |
 | It is important to wear protective clothing for feet, legs, hands and forearms. | 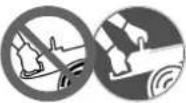 | Always use the chainsaw with both hands.Do not use the chainsaw one-handed. |
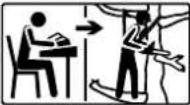 | Attention! Chainsaw use in combination with rope climbing techniques. Before starting work, ensure that you familiarise yourself with all work instructions! |  | Naked flames are forbidden in the workplace! |
 | Filling port for fuel.Oil and fuel mixture 1:40 |  | Attention! Hot part. |
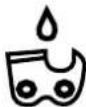 | Oil fuel cap for chain oil |  | Adjusting the chain brake:White arrow: Chain brake inactiveBlack arrow: Chain brake active |
 | Cold start lever (choke) |  | Release chain brake |
 | Apply chain brake |  | Installation direction of the saw chain |
 | Chain lubrication setting |  | Guaranteed sound power level of the device. |
 | The product complies with the applicable European directives. |
| DANGER | Signal word to indicate an imminently hazardous situation which, if not avoided, will result in death or serious injury. |
| WARNING | Signal word to indicate a potentially hazardous situation which, if not avoided, could result in death or serious injury. |
| CAUTION | Signal word to indicate a potentially hazardous situation which, if not avoided, could result in minor or moderate injury. |
| NOTE | Signal word to indicate a potentially hazardous situation which, if not avoided, could result in product or property damage. |
2. User note
WARNING:
Before initial commissioning, read the operating manual thoroughly and be sure to follow the safety instructions! These tree pruning saws may only be operated by "Tree pruning saw operators with additional training for work using raised platforms or ladder platforms and/or using rope climbing techniques"!
It is also recommended to attend a professional safety course on the use and maintenance of the chainsaw as well as a first aid course. If you do not use the petrol chainsaw for an extended period of time and for practice, you should always make simple cuts in safely supported wood before starting to familiarise yourself with the chainsaw.
The petrol chainsaw may only be operated by persons who are aged 18 and above. An exception to this is use by minors if the use takes place as part of occupational training in order to gain proficiency under the supervision of an instructor.
Keep the operating manual in a safe place!
Note:
Please note that some national regulations could restrict the use of the machine.

WARNING - This chainsaw may only be used by trained tree care workers.
Use without proper training can result in severe injuries. See the operating manual!
This tree pruning saw is specially designed for tree pruning and tree surgery. All work with this pruning saw may only be carried out by trained pruning saw operators!
3. Introduction
MANUFACTURER:
Scheppach GmbH
Günzburger Straße 69
D-89335 Ichenhausen
DEAR CUSTOMER,
We hope your new tool brings you much enjoyment and success.
NOTE:
In accordance with the applicable product liability laws, the manufacturer of this device assumes no liability for damage to the device or caused by the device arising from:
- Improper handling,
- Failure to comply with the operating instructions,
- Repairs carried out by third parties, unauthorised specialists,
- Installing and replacing non-original spare parts,
• Application other than specified.
Note:
Read the whole text of the operating manual before assembly and commissioning.
This operating manual should help you to familiarise yourself with your device and to use it for its intended purpose.
The operating manual includes important instructions for safe, proper and economic operation of the device, for avoiding danger, for minimising repair costs and downtimes, and for increasing the reliability and extending the service life of the device.
In addition to the safety instructions in this operating manual, you must also observe the regulations applicable to the operation of the device in your country.
Keep the operating manual with the device at all times and store it in a plastic cover to protect it from dirt and moisture. They must be read and carefully observed by all operating personnel before starting the work.
The device may only be used by personnel who have been trained to use it and who have been instructed with respect to the associated hazards. The required minimum age must be observed.
In addition to the safety instructions in this operating manual and the separate regulations of your country, the generally recognised technical rules relating to the operation of such machines must also be observed.
We accept no liability for accidents or damage that occur due to a failure to observe this manual and the safety instructions.
4. Device description
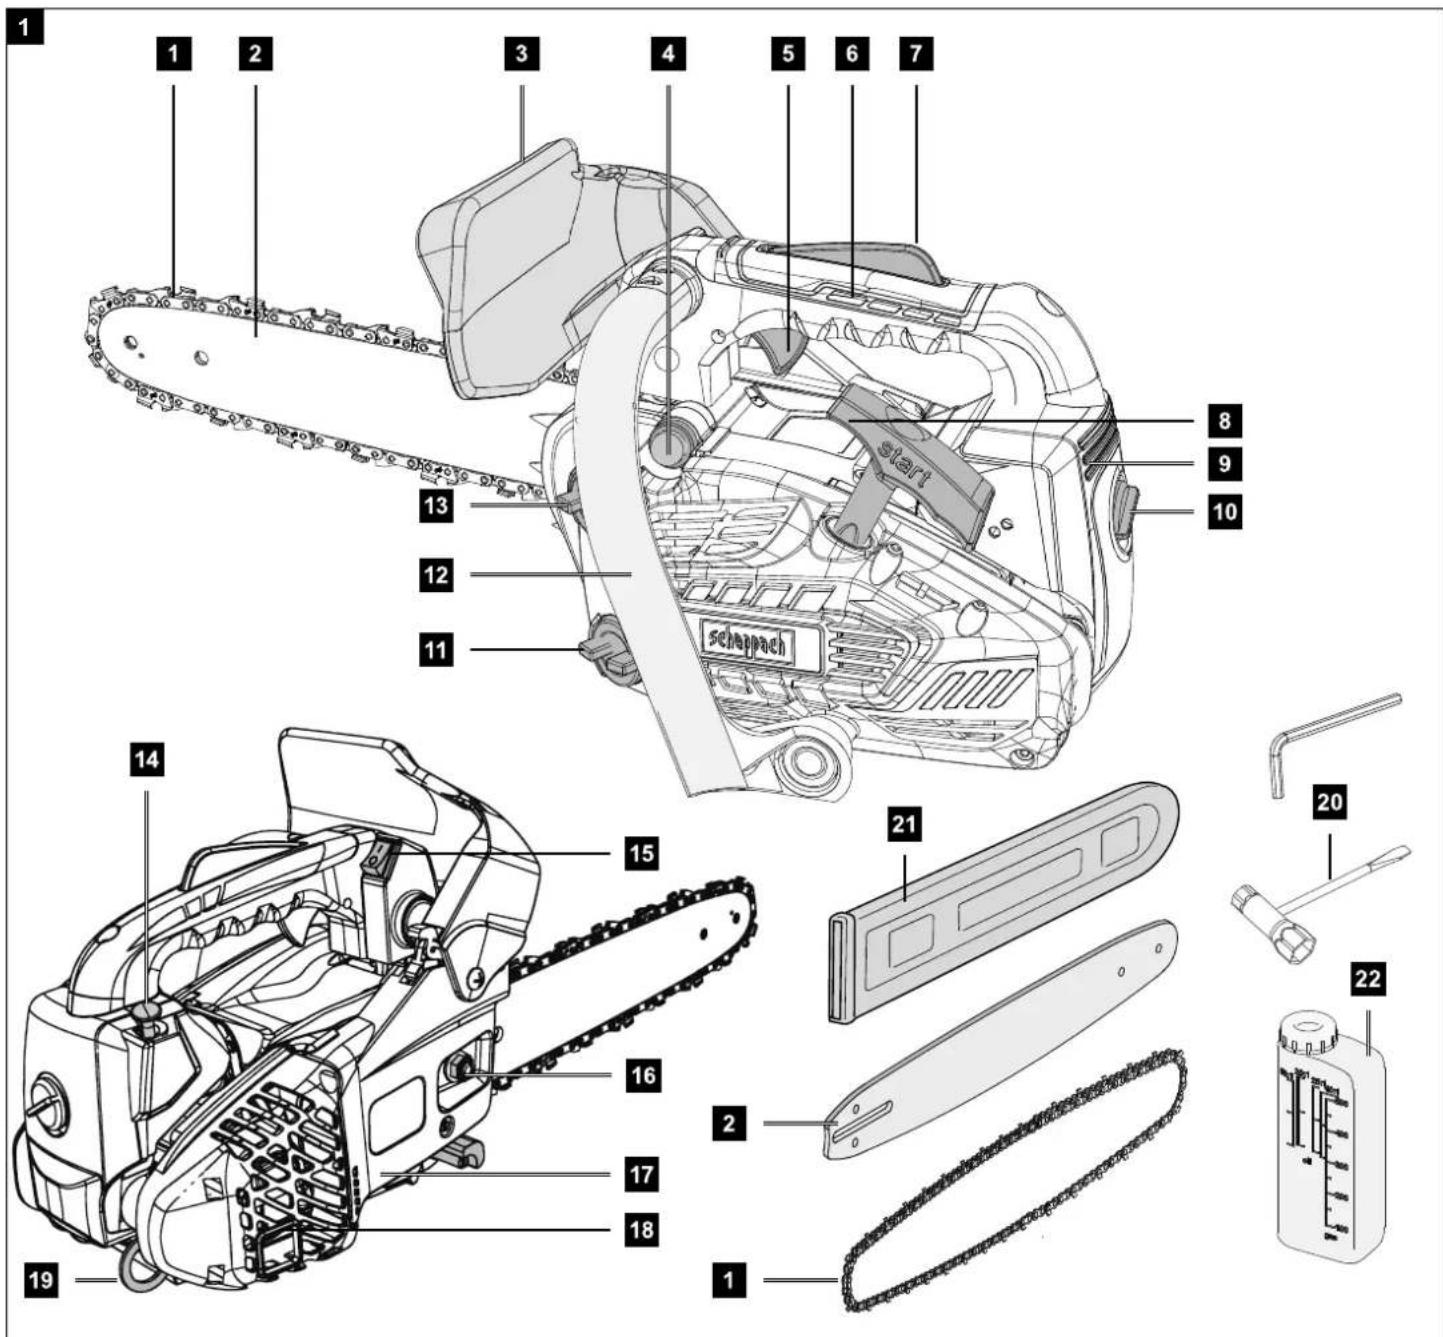
- Saw chain
- Guide rail
- Front hand guard
- Fuel pump "primer"
- Throttle
- Rear handle
- Throttle interlock
- Start pull cord
- Air filter cover
- Lock for the air filter cover
- Chain oil fuel cap
- Front handle
- Fuel tank cap
- Cold start lever (choke)
- On/off switch
- Fixing nuts
- Chain cover
- Silencer
- Suspension device
- Spark plug wrench / slotted screwdriver
- Guide rail cover
- Mixing container
- Chain tensioning screw
- Claw stop
- Chain catcher
- Chain tensioning pin
- Chain wheel
- Guide nut
- Fastening pins
- Sprocket
- Lubrication port
- Oil adjustment screw
- Air filter
- Spark plug
- Spark plug connector
- Suction head
5. Scope of delivery
- Tree pruning saw
- Saw chain
- Guide rail
- Guide rail cover
- Spark plug wrench / slotted screwdriver
- Mixing container
6. Proper use
This device is a particularly light, handy tree pruning saw with an overhead handle. The tree pruning saw has been specially developed for tree surgery and tree care. These tree pruning saws may therefore only be operated by "Tree pruning saw operators with additional training for work using raised platforms or ladder platforms and/or using rope climbing techniques".
For occasional use on thin wood, fruit tree care, branch trimming or cutting to length.
Preparing firewood may only be completed as long as the diameter of the wood does not exceed the cutting length (20cm).
For this work, we recommend a conventional chain-saw with extended handle clearance and cutting length.
Who is not permitted to use the device:
People who are not familiar with the operating manual, children under the age of 16, people under the influence of alcohol, drugs or medication, and people who are tired or unwell.
The device is non-intended to be used exclusively for sawing wood. The manufacturer is not liable for damage caused by non-intended use or incorrect operation.
The device may only be used in the intended manner. Any use beyond this is improper. The user/operator, not the manufacturer, is responsible for damages or injuries of any type resulting from this.
An element of the intended use is also the observance of the safety instructions, as well as the assembly instructions and operating information in the operating manual.
Persons who operate and maintain the device must be familiar with the manual and must be informed about potential dangers.
In addition, the applicable accident prevention regulations must be strictly observed.
Other general occupational health and safety-related rules and regulations must be observed.
The liability of the manufacturer and resulting damages are excluded in the event of modifications of the device.
Please note that our equipment was not designed with the intention of use for commercial or industrial purposes. We assume no guarantee if the device is used in commercial or industrial applications, or for equivalent work.
DANGER
In accordance with the applicable product liability laws, the manufacturer of this device assumes no liability for damage to the device or caused by the device arising from:
- Installing and replacing non-original spare parts,
- Removing or changing safety components.
6.1 Improper use
- This device is not suitable for felling work.
- Do not use the guide rail as a lever to move tree trunks or similar.
- Sawing of wood with a diameter over 20cm is not allowed.
7. Safety instructions
7.1 General information
⚠ WARNING
Stay alert, watch what you are doing and use common sense when operating a power tool. Do not use a power tool while you are tired or under the influence of drugs, alcohol or medication. A moment of inattention while operating power tools may result in serious personal injury.
Avoid misuse, use the machine only as described under "Intended use".
The operating manual contains important notices on how to work safely and professionally with the chain-saw and how to avoid hazards.
If a blockage still occurs between the material to be cut and the saw chain, switch it off immediately. Wait until the saw chain has come to a standstill. Remove the spark plug connector and put on cut-resistant gloves to remove the blockage. If the guide rail (saw bar) has to be removed, follow the instructions as described in the chapter "Installation". After removing the blockage and re-installation, a test run must be carried out.
If vibrations or mechanical noises are detected during this process, stop work and contact an authorised service centre. Should this hazard occur more often, we recommend a new training.
■ Before start-up, read the operating manual for your device and pay particular attention to the safety instructions.
■ Warning and information labels attached to the device provide important information for safe operation.
■ In addition to the information in the operating manual, the general safety and accident prevention regulations of the legislature must be observed.
- Keep packaging films away from children, there is a danger of suffocation!
■ Inadequately informed operators can endanger themselves and others through improper use. The operator is responsible for the safety of third parties.
■ Before starting work, check the function of the throttle. This must automatically return to the neutral position after release.
■ Do not work for more than 10 minutes at a time. It is advisable to take a break of 10 - 20 minutes between operations.
■ Only lend the device to users who have experience with the device. The operating manual must be handed over at the same time.
■ Some cutting tasks require special training and skills. If you have any doubts, consult a specialist.
■ First-time users must be instructed to familiarise themselves with the features of the device. Attend a state chainsaw training course for your safety.
■ When not in use, the device must be set down in such a way that no one is endangered. Secure from unauthorised access.
■ The user of the device is responsible for all accidents and hazards that cause damage to other people or their property.
■ Children, young people and persons with reduced physical, sensory or mental abilities must not use the chainsaw. Exceptions exist only for young people over 16 years of age in the context of training under the supervision of a professional.
■ The electric ignition system of the device generates a low electromagnetic field. If you wear a pacemaker or similar implant, consult your doctor before using the device to avoid health risks.
■ Please note that improper maintenance, the use of non-compliant spare parts, or the removal or modification of safety devices can result in damage to the device and serious injury to the person working with it.
7.2 Personal Protective Equipment (PPE)
⚠️ DANGER
Always wear personal protective equipment (PPE), such as eye protection (visor or goggles), head, hand, leg and foot protection suitable for climbing trees!
- Wear a safety helmet with face protection or safety goggles and hearing protection.
- Wear close-fitting protective clothing with a cut protection insert.
- Wear non-slip safety shoes.
- Wear protective gloves.
■ Avoid loose clothing that can get caught.
■ Do not wear a scarf, tie or jewellery!
■ If you have long hair, use a hair net!
■ Wear a safety helmet for all work in the forest. This provides protection from falling branches. Check the safety helmet regularly for damage. This must be replaced after 5 years at the latest. Only use approved safety helmets.
■ The face guard or safety goggles protect against shavings and wood splinters. To prevent injuries to the eyes, you must always wear a face guard or safety goggles when working with the device.
■ Always wear hearing protection. The noise emitted by the device may cause hearing damage.
■ Wear robust protective gloves made of tough material, such as leather.
■ Wear a dust protection mask when sawing dry wood. Sawdust may form.
■ When working in the tree, the user may fall down. The user can be seriously injured or killed. Wear fall protection equipment.
7.3 Storage and transport
■ Switch off the chainsaw before any transport, even over short distances. Engage the chain brake and fit the chain guard.
■ Use the chain guard during transport and storage.
- Secure the machine against tipping over during transport (including in vehicles) to prevent fuel loss, damage or injury.
- Carry the device only by the front handle. In doing so, the guide rail points backwards, away from your body.
- Keep the hot silencer away from your body. There is a danger of burns!
■ Clean and maintain the chainsaw before storage.
■ Store the device in a safe and dry location. Also secure it from unauthorised access.
7.4 Environmental safety
■ National and/or municipal regulations may impose time restrictions on the use of noise-generating, motorized devices. Ask your local administration about this.
■ The device must not be operated indoors or in other poorly ventilated areas. There is a danger of suffocation due to the toxic exhaust gases / lubricating oil vapours.
■ Only carry out work in daylight.
■ Also, do not work in adverse weather conditions, such as rain or wind. There is an increased risk of accidents here.
- Keep your work area clean and tidy.
- Keep children, other people and animals away before and during work. If distracted, you can lose control of the device.
■ Before starting work, make sure that there are no persons, animals or property in the danger zone.
■ Do not work near wire fences or in areas with loose old wire.
■ Have fire extinguishers ready when working in highly flammable environments such as dry grass, etc. There is a danger of fire!
7.5 Refill with fuel
■ Petrol is very easily flammable. Keep away from naked flames when refuelling and do not smoke while doing so. There is a danger of fire!
■ Be careful not to spill petrol. Ensure that no petrol or chain oil gets into the soil. Use suitable sheeting or similar to help with this.
■ Refuel only in well-ventilated areas. Petrol vapours can easily ignite or explode.
■ Switch off the engine before refuelling and allow the device to cool down. If petrol has been spilled, clean the affected areas immediately. Also, do not let any fuel get on your clothes, otherwise change immediately.
■ Also avoid skin and eye contact with petrol or lubricants (oil).
■ Do not breathe in fuel vapours/lubricating oil vapours.
■ Watch out for leaks. If petrol is leaking, do not start the engine. There is a danger from burns.
■ Carefully open the fuel cap so that any overpressure can slowly escape and no petrol sprays out.
7.6 Before commissioning
⚠ WARNING
Always carry out checks before use and with the engine switched off.
Check the device before each use and after it has fallen to the ground to ensure that it is in safe operating condition.
Check that all moving parts are working properly. Many accidents are caused by poorly maintained tools. Have damaged parts repaired by qualified specialist personnel.
Only use the chainsaw and accessories in accordance with these instructions. Take into account the working conditions and the work to be performed.
Using power tools for operations other than those intended can lead to hazardous situations.
■ Regularly check the chain brake for proper functioning (front hand guard, see Fig. 2).
- Check the guide rail to make sure it is mounted correctly.
- Check that the saw chain is properly tensioned. Follow the instructions for lubrication, chain tensioning and replacing accessories. An improperly tensioned or lubricated chain can break or increase the risk of kick-back.
- Keep cutting tools sharp and clean. Sharpen regularly and replace worn parts in good time. Properly maintained cutting tools with sharp cutting edges are less likely to bind and are easier to control.
- Check that the throttle and the throttle interlock move easily. The throttle lever must spring back to the starting position.
- Check that there is enough fuel and chain lubricating oil in the tank.
- Check that the handles are clean, dry and free from oil and dirt.
■ Never carry out the work alone. In an emergency, someone must be nearby.
■ Only use the chainsaw when standing on firm, safe and level ground. Avoid abnormal postures. Slippery ground or unstable standing surfaces (e.g. on a ladder) can cause loss of balance or loss of control of the chainsaw. Keep proper footing and balance at all times. This will allow you to better control the chainsaw in unexpected situations.
■ Do not work with the chainsaw in a tree. There is a danger of injury when operating in a tree.
■ Never saw above shoulder height.
■ Always hold the chainsaw with your right hand on the rear handle and your left hand on the front handle. Holding the chainsaw using the opposite grip increases the risk of injuries and must be avoided.
- Keep all body parts away from the saw chain when the chainsaw is running. Before starting the chainsaw, ensure that the saw chain is not touching anything. When working with a chainsaw, a moment of carelessness can result in clothing or body parts being caught by the saw chain.
- Switch off the chainsaw immediately if you notice any noticeable changes in the device's behaviour.
■ If the chainsaw has come into contact with stones, nails or other hard objects, stop the engine immediately and check the saw chain and guide rail for damage.
Do not drop the chainsaw, do not hit it against obstacles and never use the guide rail as a lever.
■ Only saw in wood with the chainsaw.
■ When cutting a branch that is under tension, expect it to spring back. If the tension in the wood fibres is released, the tensioned branch can hit the operator and/or wrest the chainsaw from control.
■ Be especially careful when cutting undergrowth and young trees. The thin material can get caught in the saw chain and hit you or throw you off balance.
7.7 Vibrations
⚠ WARNING
Avoid the risks associated with vibration, e.g. the risk of white finger syndrome (circulatory disorders) by taking frequent breaks from work where you rub your palms together, for example.
■ Always wear protective gloves and make sure your hands are warm.
■ Make sure that the chain is always sharp.
■ Take regular breaks from work.
7.8 Precautionary measures against kick-back
⚠ WARNING
Watch out for kick-back when working with the device. There is a danger of injury. Avoid kick-backs through caution and correct sawing technique.
■ Touching with the tip of the guide bar can sometimes lead to an unexpected backward reaction, whereby the guide bar whips up and in the direction of the operator.
- Kick-back can arise if the tip of the guide rail touches an object or if the wood bends and the saw chain jams in the cut.
■ If the saw chain jams on the top edge of the guide rail, the chainsaw can jerk back suddenly in the direction of the operator in an uncontrolled manner.
■ If the saw chain jams on the lower edge of the guide rail, the chainsaw can jerk forward suddenly away from the operator in an uncontrolled manner.
■ Be extremely careful when using the chain of the chainsaw to continue cutting into a cut that has already been started.
■ Do not saw branches or pieces of wood that could change their position during the sawing process or where the cut closes during the sawing process.
■ Each of these reactions can lead to you losing control of the saw and possibly suffering a serious injury. Never rely solely on the safety equipment integrated in the chainsaw. As a chainsaw user, take various measures to work without accidents and injuries.
Kickback is the result misuse and/or incorrect operating procedures or conditions. It can be prevented by suitable precautionary measures, as described in the following:
■ Hold the saw firmly with both hands, with the thumbs and fingers enclosing the chainsaw handles. Bring your body and arms into a position in which you can absorb the kick-back forces. If suitable measures are implemented, the operator will be able to withstand the kick-back forces. Never let go of the chainsaw.
■ Avoid an unusual body stance and never saw above shoulder height. This will help to avoid unintentional contact with the rail tip, and enable improved control of the chainsaw in unexpected situations.
■ Always use replacement guide rails and saw chains prescribed by the manufacturer. Incorrect replacement guide rails and saw chains may cause the saw chain to break and/or lead to kick-back.
■ Adhere to the instructions of the manufacturer when sharpening and maintaining the saw chain. If the depth limiter is too low, this increases the tendency towards kick-back.
■ Do not saw with the tip of the saw bar. There is a danger of kick-back. (Fig. 7)
■ Make sure that there are no nails or metal pieces in the cutting area. Pay special attention to nails or pieces of iron around the cutting area. Also be careful when sawing hardwoods where the chain can get caught. This can cause kick-back.
■ Start cutting at full power and always keep the chainsaw at maximum speed while sawing.
■ Make sure that there are no objects on the floor that you can trip over.
7.9 Work behaviour and technique
■ Only work in good visibility and light conditions. Pay particular attention to slippery conditions, wetness, ice and snow (danger of slipping). There is an increased danger of slipping on freshly peeled wood (bark).
■ Never work on unstable ground. Watch out for obstacles in the work area, danger of tripping. Secure footing must be ensured at all times.
■ Never saw above shoulder height.
■ Never saw when standing on ladders.
■ Never climb into the tree with the chainsaw and carry out work without appropriate restraint systems for man and machine. We always recommend carrying out the work from a work platform.
■ Do not bend too far when working.
■ Guide the chainsaw such that no part of your body is within the extended pivot range of the saw chain.
■ Only saw wood with the chainsaw.
■ Do not touch the ground with the saw chain running.
■ Clean the cutting area of foreign bodies such as sand, stones, nails, etc. Foreign bodies damage the sawing device and can result in dangerous kick-back as well as being flung away.
■ When sawing sawn timber, use a secure support (if possible, a sawhorse). The wood must not be held with the foot or another person.
■ Round wood or logs should be secured against turning while they are being cut.
■ Never work without a claw stop, the chainsaw can pull the operator forward. Use the claw stop for cutting tree trunks or thick branches. Using the claw stop increases work safety, reduces personal strain when working and vibrations are reduced.
■ For felling or cross-cutting, the serrated strip (claw stop) must be applied to the wood to be cut. The use of the spike bar is also recommended when cutting through thick branches.
■ Before every cross-cut, firmly position the serrated strip and only then saw into the wood with the saw chain running. The saw is then lifted up using the rear grip and guided using the front handle. The spike bar acts as a pivot point. Repositioning is done using light pressure on the front handle. Pull the chainsaw back slightly to do this. Insert the spike bar deeper and lift up again using the rear grip.
■ Take care when cutting splintery wood. Cut pieces of wood can be carried away (danger of injury).
■ When cutting using the top of the bar, the chainsaw can be pushed towards the operator if the saw chain binds up. For this reason, if possible, cut using the bottom side of the bar as the chainsaw will be pulled away from the body towards the wood.
■ Tensioned wood must always be cut on the compressed side first. Only then perform the separating cut using the opposite side. This prevents the rail from jamming.
■ When working in the tree, the chainsaw may fall down. People can be seriously injured and material damage can occur. Secure the chainsaw using the suspension device.
■ Before the saw chain is guided into the cutting area, it can slip away to the side or jump up.
ATTENTION
Increased risk of kickback!
In order to maintain full control at the moment of "cutting all the way through", reduce the pressing force towards the end of the cut, without loosening your firm grip of the handles of the chainsaw. Ensure that the saw chain does not come into contact with the ground. After completing the cut, wait for the saw chain to stop before removing the chainsaw. Always switch off the chainsaw's engine before moving from one tree to the next tree.
⚠ WARNING
In case of extended working periods, the operating personnel may suffer circulatory disturbances in their hands (vibration white finger) due to vibrations.
Raynaud's syndrome is a vascular disease that causes the small blood vessels on the fingers and toes to cramp in spasms. The affected areas are no longer supplied with sufficient blood and therefore appear extremely pale. The frequent use of vibrating devices can cause nerve damage in people whose circulation is impaired (e.g. smokers, diabetics).
If you notice unusual adverse effects, stop working immediately and seek medical advice.
Observe the following information to reduce hazards:
- Keep your body and especially your hands warm in cold weather.
- Take regular breaks and move your hands to promote circulation.
- Ensure as little vibration as possible at the device via regular maintenance and stable parts on the machine.
7.10 Residual risks
⚠️ DANGER
DANGER OF INJURY!
Contact with the saw chain can lead to fatal cuts. Never touch the saw chain with your hands while it is running.
DANGER OF KICK-BACK!
Kick-back can lead to fatal cuts.
DANGER OF BURNS!
The chain and guide rail heat up during operation.
The device is state-of-the-art and has been built in accordance with the recognised technical safety rules. However, individual residual risks can arise during operation.
Furthermore, despite all precautions having been met, some non-obvious residual risks may still remain.
Residual risks can be minimised if the “safety instructions” and the “Proper use” are observed along with the whole of the operating instructions.
8. Technical data
Machine without saw bar
Length x width x height ....270 x 230 x 240 mm
Weight unfuelled, without
set of blade and saw chain approx....3.5 kg
Weight unfuelled, with set of blade
and saw chain approx. 3.8 kg
Tank for chain lubricating oil 0.16 l
Fuel tank contents....0.23 l
Oil and fuel mixture 1:40
Cutting length....20 cm
Saw bar length 30 cm
Automated chain oiling.....yes
Chain pitch 3/8" (9.525 mm)
Chain link thickness 1.27 mm
Chain type....91P040X
Number of drive sprocket teeth....6
Drive sprocket tooth pitch.... 3/8"
Saw bar type 100SDEA041
Max. chain speed....21 m/s
Engine ...... 1 cylinder, 2 stroke air-cooled
Engine cubic capacity 25.4 cm ^3
Max. engine power output per ISO 7293 ..... 0.7 kW
Idle speed n_0 ......3300 ± 300 rpm
Maximum speed with
set of blade and saw chain....11000 rpm
CO ^2 output..... 1503 g/kWh
Spark plug ....L8RTC
Noise
Measured sound pressure level L_nA .....99.2 dB
Uncertainty K_nA 3 dB
Guaranteed sound power level L_WA .....113 dB
Measured sound power level L_WA 108.7 dB
Uncertainty K_WA 3 dB
Information on the noise emissions as per the Product Safety Act (ProdSG) and EC machinery directive: The noise pressure level at the workplace can exceed 80 dB.
In this case, noise protection measures are required for the operator (e.g. wearing hearing protection that is suitable and intended for this as well as observance of regular breaks).
Vibration
Vibration front handle....8.98 m/s²
Vibration rear handle.... 8.03 m/s ^2
Uncertainty....1.5 m/s ^2
⚠ WARNING
Avoid the risks associated with vibration, e.g. the risk of white finger syndrome (circulatory disorders) by taking frequent breaks from work where you rub your palms together, for example.
⚠ WARNING
The actual vibration emission value during use of the machine may differ from the vibration emission value indicated in the operating manual or by the manufacturer. This can be caused by the following influencing factors to which attention should be paid both before and during every use:
• Is the machine being properly used
- Is the nature of the cutting or processing of the material correct
- Is the machine in good working order.
- Sharpness of the cutting tool and is the cutting tool the correct one.
- Are the handles or, if applicable, the optional anti-vibration handles installed and firmly attached to the body of the machine.
9. Before commissioning
- Open the packaging and carefully remove the device.
- Remove the packaging material, as well as the packaging and transport safety devices (if present).
- Check whether the scope of delivery is complete.
- Check the device and accessory parts for transport damage.
- If possible, keep the packaging until the expiry of the warranty period.
- Remove the quick start guide from the start pull cord (8).
ATTENTION
The device and the packaging are not children's toys! Do not let children play with plastic bags, films or small parts! There is a danger of choking or suffocating!
9.1 Installing the guide rail (2) and the saw chain (1) (Fig. 2 - 5)
ATTENTION
Always carry out assembly with the engine switched off.
⚠ WARNING
Danger of injury!
Always wear protective gloves when touching the saw chain (1). Danger of injury due to the sharp cutting teeth!
Only use approved combinations of saw chain (1) and guide rail (2) (see chapter "Approved cutting gear").
Note
A new saw chain (1) stretches and needs to be re-tensioned more often. Check and adjust the chain tension regularly.
Depending on wear, the guide rail (2) can be turned.
- Set the chainsaw down on a level and stable surface.
- Pull the front hand guard (3) back up to the stop to release the chain brake. (Fig. 2)
- Remove the fixing nuts (16) with the spark plug wrench (20).
- Remove the chain cover (17).
- Turn the chain tensioning screw (23) (anti-clockwise) until the chain tensioning pin (26) is at the right-hand stop (Fig. 3). Use the slotted screwdriver (20) for this.
- Slide the slotted hole of the guide rail (2) over the protruding fastening pins (29).
- Place the saw chain (1) over the teeth of the chain wheel (27). Insert the saw chain (1) precisely into the guide rail (2). In the tip of the guide rail (2) there is a sprocket (30) into whose teeth the saw chain (1) must be inserted. (Fig. 6 and 18)
- Pull slightly on the guide rail (2) to slightly pre-tension the saw chain (1).
- Fit the chain cover (17) back on. Make sure that the internal chain tensioning pin (26) fits into the matching hole in the guide rail (2). If necessary, adjust the chain tensioning screw (23) with the slotted screwdriver (20).
- Screw on the fastening nuts (16) by hand. However, make sure that you do not tighten them yet. The fastening nuts (16) are tightened only after tensioning the saw chain (1).
9.2 Tensioning and checking the saw chain (1)
⚠ WARNING
Put on protective gloves! Danger of injury due to the sharp cutting teeth!
Check the chain tension regularly before each start-up.
Always carry out checks before use and with the engine switched off.
- Before tensioning, loosen the fixing nuts (16) a little with the spark plug wrench (20).
- Turn the chain tensioning screw (23) clockwise with the slotted screwdriver (20) to increase the tension.
- Tighten the fixing nuts (16) with the spark plug wrench (20).
- The saw chain (1) must be in contact with the underside of the saw bar. Check whether the saw chain (1) can be pulled over the guide rail (2) by hand (with the chain brake released, pull the front hand guard (3) back).
NOTE
A new saw chain (1) stretches and needs to be re-tensioned more often.
9.3 Mixing fuel
The engine must be operated with a fuel mixture of petrol and engine oil.
⚠ WARNING
Avoid direct skin contact with fuel and inhalation of fuel vapours.
Use only a mixture of unleaded petrol (min. RON 95) and special 2-stroke engine oil (JASO FD/ISO - L - EGD). Mix the fuel mixture as per the fuel mixing table.
Put the correct amount of petrol and 2-stroke oil into the enclosed mixing bottle (22) (see "Fuel mixing table"). Then shake the mixing container (22) well.
9.3.1 Fuel mixing table
Mixing process: 40 parts petrol to 1 part oil
Petrol 2-stroke oil
0.5 litres.... 12.5 ml
9.4 Filling in fuel (Fig. 8)
⚠ WARNING
Only fill the fuel when the engine is switched off and has cooled down. There is a danger of fire!
- Always clean the area around the fuel tank cap (13) before filling to prevent dirt from falling into the fuel tank. Use a dry, lint-free cloth for this purpose.
- Lay the device on its side with the fuel tank cap (13) facing upwards.
-
Turn the fuel tank cap (13) anti-clockwise and open it. The fuel tank cap (13) is connected to an anti-loss device in the fuel tank and thus cannot fall off.
-
Pour the fuel mixture into the fuel tank. Do not spill fuel when refuelling and do not fill the fuel tank to the brim.
- Wipe up spilled fuel immediately.
- Turn the fuel tank cap (13) clockwise to close it.
NOTE
Also check the chain oil after each fuel fill.
9.5 Drain the fuel
Only empty the fuel tank outdoors or in well-ventilated rooms. Make sure that no fuel gets into the soil (environmental protection). Use a suitable base.
- Hold a collection container under the fuel tank.
- Unscrew and remove the fuel tank cap (13) of the fuel tank.
- Drain the petrol/oil mixture completely.
- Screw the fuel tank cap (13) back on by hand.
9.6 Fill in chain oil (Fig. 8)
⚠ WARNING
Only fill the saw chain oil when the engine is switched off and has cooled down. There is a danger of fire! Never work without chain lubrication! If the saw chain (1) runs dry, the cutting gear will be irreparably destroyed in a short time.
Always check chain lubrication before working.
NOTE
Use only saw chain oil. Preferably biodegradable. Do not use waste oil, engine oil, etc.
Check during work that the chain lubrication is working.
- Always clean the area around the chain oil fuel cap (11) before filling so that no dirt falls into the chain oil tank. Use a dry, lint-free cloth for this purpose.
- Lay the device on its side with the chain oil fuel cap (11) is facing upwards.
- Turn the chain oil fuel cap (11) anti-clockwise and open it. The chain oil fuel cap (11) is connected to an anti-loss device in the chain oil tank and thus cannot fall off.
- Pour the bio chain oil into the chain oil tank. Do not spill chain oil when refuelling and do not fill the chain oil tank to the brim.
- Wipe up spilled chain oil immediately.
- Turn the chain oil fuel cap (11) clockwise to close it.
10. Commissioning
CAUTION
Please observe the legal provisions from the noise protection ordinance.
⚠ Attention!
Always make sure the product is fully assembled before commissioning!
Working instructions
Familiarise yourself with handling the chainsaw before use.
It is mandatory to carefully check the chainsaw for any damage before each use or after it has been dropped. If damage is identified, it must be rectified immediately by you or an authorised service centre.
Prior to every start-up of the chainsaw, check the following points:
- Correct seating of the guide rail
- Installation/running direction, as well as flawless (sharp) saw chain
- Tension of the saw chain (check and readjust several times if the chain is new)
• Function of the chain lubrication
• Function of the chain brake - Function of the clutch (chain does not move when idle)
- Leak-tightness of the fuel system
- Faultless condition and completeness of the guards and the cutting device
- Tight fit of all screw connections
- Smooth running of all moving parts
NOTE
The chainsaw does not have a start gas lock.
10.1 Starting the engine
ATTENTION
Move at least 3 metres away from the refuelling area before starting the engine (Fig. 9).
Always pull the start pull cord (8) out straight. Hold the handle of the start pull cord (8) firmly when the pull cord (8) winds back in. Never let the start pull cord (8) whip back in.
Release the throttle lever (5) immediately after starting the engine. Ensure that the engine speed has returned to idle before releasing the chain brake (push the front hand guard (3) backwards).
Pull out the cold start lever (choke) (14) only for starting.
10.1.1 Starting the motor when cold
⚠ WARNING
Engage the chain brake before every start-up (push the front hand guard (3) forward).
ATTENTION
Never allow the start pull cord (8) to spin back. This can result in damage.
- Remove the guide rail cover (21).
- Set the chainsaw down on a firm and level surface. The saw chain (1) must not come into contact with the floor.
- Push the front hand guard (3) forwards until it latches into place. The saw chain (1) is clamped by the chain brake.
- Press the fuel pump "primer" (4) 6x. (Fig. 1)
- Switch the ON/OFF switch (15) to "ON". (Fig. 1)
- Pull out the cold start (choke) lever (14). (Fig. 10)
- Hold the chainsaw firmly by the front handle (12) and pull the start pull cord (8) out slowly until you feel the first resistance.
- Now pull the start pull cord (8) and the engine should start. If the engine does not start, repeat the process. As long as the cold start lever (choke) (14) is pulled out, the engine will run for only a short time and then stop.
- As soon as the engine has stopped, actuate the throttle interlock (7) and the throttle (5) together. The cold start (choke) lever (14) will automatically spring back to the "warm start" operating position. (Fig. 10)
- Now pull the start pull cord (8) again and the engine should start.
If the engine does not start even after several attempts, read the "Troubleshooting" chapter.
NOTE
With high outside temperatures, it may be necessary to start the engine without the cold start lever (choke) (14) even when the engine is cold!
- Release the chain brake by pulling the front hand guard (3) backwards. (Fig. 2)
- CAUTION! The chain brake is now released. If the throttle (5) is actuated together with the throttle interlock (7), the saw chain (1) starts up.
10.1.2 Starting the motor when warm
(The device stood still for less than 15-20 minutes)
⚠ WARNING
Engage the chain brake before every start-up (push the front hand guard (3) forward).
- Push the front hand guard (3) forwards until it latches into place. The saw chain (1) is clamped by the chain brake.
- Switch the ON/OFF switch (15) to "ON".
- The cold start lever (choke) (14) does not have to be pulled to start a warm engine.
- Hold the chainsaw firmly by the front handle (12) and pull the start pull cord (8) out slowly until you feel the first resistance.
- Now pull the start pull cord (8) quickly. The device should start after 1-2 pulls. If the device has still not started after 6 pulls, repeat the process described under "Starting the engine when cold".
10.2 Shutting the engine off
10.2.1 Emergency stop procedure
If it is necessary to stop the device immediately, set the ON/OFF switch (15) to "OFF". (Fig. 1)
10.2.2 Normal procedure
- Release the throttle (5). The engine goes into idle speed.
- Then set the ON/OFF switch (15) to "OFF". (Fig. 1)
10.3 Operating while idle
ATTENTION
When idling, the saw chain (1) must be stationary.
NOTE
If the saw chain (1) moves at idle or the engine stops on its own when the throttle is released, a carburettor adjustment must be made (see chapter "Maintenance of the carburettor settings").
- Pick up the chainsaw.
- Use the left hand to hold the front handle (12) firmly.
- Use the right hand to hold the rear handle (6) firmly. The heel of the hand rests on the throttle interlock (7) and the index finger operates the throttle (5).
- After actuating the throttle (5) once, the engine runs at idle.
- Allow the engine to warm up briefly.
10.4 Checking and adjusting chain lubrication
ATTENTION
- Never work without chain lubrication! If the saw chain (1) runs dry, the cutting gear will be irreparably destroyed in a short time.
• Always check chain lubrication before working.
Note
Only use saw chain oil, preferably biodegradable. Do not use waste oil, engine oil, etc.
Hold the chainsaw during operation, at medium speed, over a sawed-off tree stump or a suitable surface. If the lubrication is sufficient, a light film of oil will form on the tree stump or surface.
- If necessary, the chain lubrication can be increased or decreased by means of the oil adjustment screw (32) (Fig. 11).
- Use the slotted screwdriver (20) supplied to help:
- First press and then turn the oil adjustment screw (32) clockwise to reduce chain lubrication.
- First press and then turn the oil adjustment screw (32) anti-clockwise to increase chain lubrication.
10.5 Checking the chain brake
⚠ WARNING
The chain brake must be checked before each use. The chain brake brakes the saw chain (1) immediately in the event of kick-back.
- Make sure that the front hand guard (3) is free of dirt and moves easily.
- Start the chainsaw as described under 10.1 and accelerate the saw chain (1) to full speed (full throttle).
- With the saw chain (1) running, operate the front hand guard (3). The chain brake must brake and block the saw chain (1) at max. speed.
⚠ WARNING
Increased engine speed for too long with the chain brake locked will damage the engine and the chain drive.
If the saw chain (1) still moves, contact the customer service.
11. Usage
11.1 Delimbing work
• Always be aware of the danger of branches snapping back.
- Do not stand on the trunk when delimbing.
- Beware of the kick-back of the chainsaw and avoid making contact with the rail tip of the guide rail. (Fig. 7)
- Never saw several branches at once.
- Support the chainsaw with the claw stop (24) when delimbing, if possible.
- Make sure that at the end of the cut the chainsaw can swing through under its own weight. It is no longer supported in the cut so hold it securely.
• Take a firm, stable and secure stance when delimbing.
11.1.1 Delimbing work in sections
Shorten long or thick branches before making the final cut. Otherwise the saw chain (1) can easily jam.
11.1.2 Working on tensioned wood
It is essential to follow the correct sequence when working on wood that is tensioned. Otherwise the saw chain (1) may jam or kick-back may occur.
Tensioned wood must always be cut on the compressed side first. Only then perform the separating cut using the opposite side. (Fig. 24)
This prevents the saw chain (1) from jamming.
ATTENTION
Property damage!
Lying wood must not touch the floor on the underside of the cutting point, otherwise the saw chain (1) may be damaged.
Recoil
- If the saw chain (1) jams on the top edge of the guide rail (2), the chainsaw can jerk back suddenly in the direction of the operator in an uncontrolled manner.
Dragging
- If the saw chain (1) jams on the lower edge of the guide rail (2), the chainsaw can jerk forward suddenly away from the operator in an uncontrolled manner.
Safe work
- Keep the device in good working order to prevent injuries.
- After dropping the device, check for significant damage or defects.
- Do not use the device whilst standing on a ladder or in an unsafe position.
- Do not be tempted to make a rash cut. This could endanger yourself and others.
- Change your working position regularly. Prolonged use of the device can lead to vibration-induced circulatory disorders of the hands. However, you can extend the duration of use by wearing suitable gloves or taking regular breaks. Be aware that personal predisposition to poor circulation, low outside temperatures or large gripping forces when working reduce the duration of use.
11.2 Wooden branch is bent downwards
- First saw relief cut 1 (approx. 1/3 of the branch diameter) on the compressed side.
- Then make cut 2 (approx. 2/3 of the branch diameter) on the tensioned side.
11.3 Wooden branch is bent upwards
- First saw relief cut 1 (approx. 1/3 of the branch diameter) on the compressed side.
- Then make cut 2 (approx. 2/3 of the branch diameter) on the tensioned side.
11.4 Tree care saw use for tree pruning in combination with rope climbing technique
This appendix presents appropriate working practices to reduce the danger of injury from the use of chain-saws for tree pruning when working at height with a rope and carrying strap. Although it can serve as a guide and training reading, it should not be considered a substitute for formal training. The guidance given in this appendix serves only as an example of good practice.
National or other regulations that may be stricter may apply.
The user of a chainsaw for tree pruning working at height with a rope and carrying strap should never work alone. A ground worker trained in appropriate emergency procedures should be present to assist.
The user should be trained in general safe climbing and work positioning techniques and should be equipped with carrying strap, rope, slings, carabiners and other equipment for obtaining safe and correct working positions for both themselves and the saw.
National laws and regulations must always be strictly observed.
This appendix does not cover techniques for controlling the branches and twigs cut by the chainsaw, nor does it include the points already covered on safe use.
11.4.1 General requirements
The user of a chainsaw for tree pruning working at height with a rope and carrying strap should never work alone. A ground worker trained in appropriate emergency procedures should be present to assist.
The user should be trained in general safe climbing and work positioning techniques and should be equipped with carrying strap, rope, slings, carabiners and other equipment for obtaining safe and correct working positions for both themselves and the saw.
11.4.2 Preparation before using the tree pruning saw on the tree
The chainsaw should be checked, fuelled, started and warmed up by the ground worker and then switched off before being hoisted up to the user in the tree.
The chainsaw should be fitted with a suitable sling so that it can be attached to the user's carrying strap (Fig. 13):
- Secure the sling to the suspension device (19) located on the back of the saw (Fig. 12).
- Suitable carabiners shall be provided to allow indirect (i.e. through the sling) and direct (i.e. to the suspension device (19) of the chainsaw) attachment of the saw to the user's carrying strap.
- Ensure that the chainsaw is securely fastened when it is pulled up to the user (Fig. 14).
- Ensure that the chainsaw is attached to the carrying strap before releasing it from the lifting cable.
The possibility of attaching the chainsaw directly to the carrying strap reduces the danger of damaging the equipment when moving it in the tree. The chainsaw should always be switched off when it is attached directly to the carrying strap.
The chainsaw should only be attached to the recommended suspension devices on the carrying strap. These may be in the middle (front or back) or on the sides. Wherever possible, attach the chainsaw to the centred rear centre of the carrying strap to keep it away from climbing ropes and to support the weight centrally under the user's spine.
If the chainsaw is moved from any suspension device to another, users should ensure that the chainsaw is secured in the new position before it is released from the previous suspension device.
11.5 Use of the chainsaw in the tree
An analysis of accidents with these chainsaws during tree pruning work shows that the main cause is improper one-handed use of the chainsaw. In most accidents, users do not adopt a secured working position that allows them to hold the chainsaw by both handles, resulting in an increased danger of injury from the following:
- Lack of a firm grip on the kick-back of the chainsaw.
- Lack of control of the chainsaw, making it easier for it to come into contact with climbing ropes and with the user's body (especially the left hand and arm).
- Loss of control due to an unsafe working position and thus contact with the chainsaw (unexpected movements while working with the chainsaw).
11.6 Secured working position for two-handed use
In order to be able to hold the chainsaw with both hands, users should always try to adopt a secured working position, guiding the saw as follows:
- at waist height when sawing horizontal pieces.
- at stomach height when sawing vertical pieces. If the user is working close to the vertically running trunk with low lateral forces to the working position, a secure foothold could be sufficient for a safe working position. However, as soon as users move away from the trunk, they must take additional measures to reduce or counteract the increasing lateral forces, e.g. by diverting the main rope via an additional suspension device or by using an adjustable sling leading from the harness to an additional suspension device (Figs. 15 and 16).
11.6.1 Starting the tree pruning saw on the tree
When starting the chainsaw in the tree, the user should:
- activate the chain brake before starting (push the front hand guard (3) forward).
-
hold the chainsaw to the left or right of the body when starting:
-
Holding the chainsaw on the left side with the left hand on the front handle and pushing the chainsaw away from the body while holding the throw-on rope in the right hand.
- Holding the chainsaw on the right side with the right hand on one of the two handles and pushing the chainsaw away from the body while holding the throw-on rope in the left hand.
The chain brake should always be activated before lowering the running chainsaw by its suspension cable.
Before difficult sawing work, the user should always make sure that the chainsaw has sufficient fuel.
11.6.2 One-handed use of the chainsaw
Users should not use chainsaws for tree care one-handed in unstable working positions or instead of a hand saw for sawing off small diameter branch tips.
Chainsaws for tree pruning should only be used one-handed when
a. it is not possible for users to obtain a working position that allows two-handed use.
b. it is necessary to secure the working position with one hand.
c. the chainsaw is used in a fully extended position, at right angles to and out of line with the user's body.
Users should never:
- Saw with the kick-back area at the tip of the guide rail (2) of the chainsaw.
- Holding on to the branch they are sawing on.
- Try to catch falling parts.
11.6.3 Release a jammed chainsaw
If the chainsaw becomes jammed during cutting, the user should:
- Switch off the chainsaw and attach it securely towards the inside of the tree (i.e. towards the tree trunk) or to a separate tool rope.
- Pull the chainsaw out of the notch while lifting the branch as far as necessary,
- If necessary, use a handsaw or second chainsaw to loosen the jammed chainsaw by cutting at least 30 cm away from the jammed chainsaw.
Regardless of whether a hand saw or a chainsaw is used to release a trapped chainsaw, the cuts to release the chainsaw should always be made on the outside (towards the tips of the branches) so that the chainsaw does not get carried away with the sawn-off parts and further complicate the situation.
12. Transport
- Always use the guide rail cover (21) when transporting.
- Switch off the chainsaw before any transport, even over short distances. Secure the machine against tipping over during transport (including in vehicles) to prevent fuel loss, damage or injury.
- Activate the chain brake (push the front hand guard (3) forward).
- Carry the device only by the front handle (12). In doing so, the guide rail (2) points backwards, away from your body.
- Keep the hot silencer (18) away from your body. There is a danger of burns! (Fig. 23)
13. Cleaning and maintenance
⚠ WARNING
Danger of injury!
Always switch off the device and disconnect the spark plug connector (35) before cleaning. (see chapter 13.4 Maintenance of the spark plug (34)).
Note
The device should be thoroughly cleaned after each use.
Only carry out cleaning and maintenance work to the extent specified in this operating manual. Further work must be carried out by qualified specialists. Maintenance work must be carried out regularly (see chapter "Maintenance intervals").
13.1 Cleaning the engine unit
⚠ WARNING
Danger of burns!
Do not touch hot silencers, cylinders or cooling fins.
- Keep protective devices, air vents and the engine housing as free of dust and dirt as possible. Blow it out with low-pressure compressed air.
- Clean the device at regular intervals using a damp cloth and a little detergent. Make sure that no water can penetrate the device interior.
13.2 Cleaning the filter (33) (Fig. 17)
Fouled air filters diminish the engine output due to reduced air supply to the carburettor.
Regular inspection is therefore essential. The air filter (33) should be checked regularly and cleaned as required.
The air filter (33) must be checked more frequently in the case of very dusty air.
- Loosen the catch for the air filter cover (10) by turning it anti-clockwise.
- Remove the air filter cover (9).
- Remove the air filter (33).
- Clean the air filter (33) by knocking out or blowing out (with compressed air).
The re-assembly takes place in reverse order.
ATTENTION
Never clean the air filter (33) with petrol or flammable solvents.
13.3 Cleaning the chain drive (Fig. 18)
⚠ WARNING
Danger of injury!
Always wear protective gloves when touching the saw chain (1). Danger of injury due to the sharp cutting teeth!
Note
Clean the chain drive after each use.
- Set the chainsaw down on a level and stable surface.
- Pull the front hand guard (3) back up to the stop to release the chain brake. (Fig. 2)
- Turn the chain tensioning screw (23) anti-clockwise using the slotted screwdriver (20) to reduce the tension.
- Remove the fixing nuts (16) with the spark plug wrench (20).
- Remove the chain cover (17).
- Carefully remove the saw chain (1) from the guide rail (2) and the chain wheel (27).
- Remove the guide rail (2). Clean them with a brush.
- Now thoroughly clean the entire chain drive area and the chain cover (17) with a brush or by blowing it out (with compressed air).
The re-assembly takes place in reverse order.
13.4 Spark plug maintenance (34) (Fig. 19 / 20)
- Remove the air filter (33) as described in 13.2 "Cleaning the air filter" (33).
- Remove the spark plug connector (35) by turning it to the left and right and pulling it at the same time. Hold and pull the spark plug connector (35) by the connector only. Never pull on the cable!
- Loosen the spark plug (34) with the enclosed spark plug wrench (20).
- The re-assembly takes place in reverse order.
Electrode gap = 0.6 - 0.7 mm (distance between the electrodes, between which the ignition spark is generated). Check the spark plug (34) for contamination for the first time after 10 operating hours and clean it with a copper wire brush if necessary.
Then maintain the spark plug (34) every 50 operating hours.
13.5 Maintaining the chain lubrication
- See chapter "Checking and adjusting chain lubrication".
13.6 Maintaining the carburettor settings
- If the saw chain (1) moves at idle or the engine stops by itself when the throttle is released, a carburettor adjustment must be made.
Note
Have carburettor adjustments (e.g. idle speed) carried out only by qualified specialists to avoid engine damage.
13.7 Guide rail maintenance (2) (Fig. 21)
- Remove any burrs on the edge of the guide bar using a metal file.
- Clean the groove of the guide rail (2) using a brush or compressed air (Fig. 21). Replace the guide rail (2) as soon as the guide nut (28) is worn.
- Turn the guide rail (2) after each use to ensure even wear.
- Check the sprocket (30) at the tip of the guide rail (2) for smooth running. If necessary, lubricate it with a bearing oil. Let some bearing oil drip into the lubrication hole (31). (Fig. 21)
13.8 Checking the chain brake
See chapter 10.5 "Checking the chain brake"
⚠ WARNING
DANGER OF KICK-BACK!
A non-functioning chain brake increases the risk of kick-back.
Check the chain brake regularly.
A functioning chain brake is essential for your safety.
13.9 Tensioning and checking the saw chain (1)
See chapter 9.2 "Tensioning and checking the saw chain (1)".
13.10 Sharpening and maintaining the saw chain (1)
⚠ WARNING
Danger of injury!
Always wear protective gloves when touching the saw chain (1). Danger of injury due to the sharp cutting teeth!
Note
An optimally maintained and sharpened saw chain (1) reduces physical strain, wear and leads to good cutting results.
Clean, maintain and sharpen the saw chain (1) regularly.
Check the saw chain (1) regularly for cracks and damaged rivets.
A bench grinder can be attached to the bench grinder aid for a secure hold during grinding.
Only use special round saw chain files with ∅ 4.8 mm (3/16") for the saw chain (1) included in the scope of delivery.
In a sharpening kit you will find detailed information on the sharpening process.
Alternatively, use an electric chain sharpener and follow the manufacturer's instructions.
If in doubt about the performance of the work, replace the saw chain (1).
If necessary, have the saw chain (1) sharpened by a specialist workshop.
- Accessories required (not included in the scope of delivery):
- Round saw chain file ∅ 4.8 mm (3/16")
- Flat file
- Depth limit gauge
- File only in forward motion to remove material.
- File with a sharpening angle of approx. 25^ at an incline of 10^ to the guide rail (2).
- Check the depth limit distance with a depth limit gauge.
- The correct distance of the depth limiter should be 0.6 mm (0.024").
13.11 Maintenance intervals
For a long service life as well as to prevent damage and to ensure the full function of the safety devices, the maintenance tasks described below must be carried out at regular intervals. Guarantee claims will only be accepted if these tasks have been carried out properly and at regular intervals. There is a danger of accidents if disregarded!
Users of chainsaws are permitted to carry out only those maintenance and care tasks described in this operating manual. All other work may only be performed by a specialist workshop.
| General Complete tree pruning saw Clean the exterior and check for damageIn the event of damage, have a professional repair carried out immediately | ||
| Before start up Saw chain Check for damage and sharpness | Check chain tension | |
| Daily Air filter | Clean | |
| Guide rail Check for damage, clean oil inlet hole | ||
| Guide bar mount Clean, in particular the oil guide groove | ||
| Idle speed Check (saw chain shall not run) | ||
| Weekly | Fan housing | Clean in order to ensure trouble-free routing of cooling air |
| Spark plug | Check, replace if necessary | |
| Silencer | Check for clogging | |
| Chain catcher | Check for damage, replace if necessary | |
| Screws and nuts | Check condition and firm seating | |
| Quarterly | Suction headFuel tank, chain oil tank | ReplaceClean |
| Storage | complete tree pruning saw | Clean the exterior and check for damageIn the event of damage, have a professional repair carried out immediately |
| Saw chain and guide bar | Remove, clean and oil lightlyClean guide rail guide nut | |
| Fuel tank, chain oil tank | Empty and clean | |
| Carburettor | Run until empty | |
13.12 Important note in the case of repairs
When returning the device for repair, for safety reasons, ensure that it is free of oil and fuel when it is sent to the service centre.
13.13 Service information
With this product, it is necessary to note that the following parts are subject to natural or usage-related wear, or that the following parts are required as consumables. Wearing parts*: Saw chain, guide rail, chain oil, engine oil, spark plug, air filter, fuel filter, chain oil filter
* may not be included in the scope of delivery!
Spare parts and accessories can be obtained from our Service Centre. To do this, scan the QR code on the front page.
Approved cutting gear
Saw chain
Kangxin 3/8LP-40 7910100739
Oregon 91P040X....3910102032
Guide rail
Kangxin AP10-40-509P 7910100740
Oregon 100SDEA041 ....7910100744
14. Storage
The spark plug wrench / slotted screwdriver (20) can be attached to the side of the guide rail cover (21) for storage.
Always use the guide rail cover (21) when storing. Clean and maintain the device every time before storage (see chapter "Cleaning and maintenance"). Empty the oil or fuel tank completely.
WARNING
Do not remove the petrol in enclosed spaces, near fire or when smoking. Petrol fumes can cause explosions and fire.
- Start the engine and let it run until the remaining petrol is used up.
Store the device and its accessories in a dark, dry and frost-free place that is inaccessible to children. The optimum storage temperature is between 5 and 30°C. Do not store and use the chainsaw at temperatures below 0°C!
Never store a chainsaw for longer than 30 days without carrying out the following steps.
Follow the cleaning and maintenance information before storing the unit!
14.1 Stowing the chainsaw
If you store a chainsaw for longer than 30 days, it must be prepared ahead of time. Otherwise, the remaining fuel in the carburettor will evaporate and leave a rubbery sediment behind. This could make it difficult to start and result in expensive repair work.
-
Slowly remove the fuel tank cap (13) to release any pressure in the tank. Carefully empty the tank.
-
Start the engine and let it run until the chainsaw stops in order to remove the fuel from the carburettor.
- Allow the engine to cool down (approx. 5 minutes).
- Remove the spark plug (34).
- Add 1 teaspoon of clean 2-stroke oil to the combustion chamber. Pull the start pull cord (8) slowly several times to coat the internal components. Re-insert the spark plug (34).
Store the chainsaw in a dry location and far away from potential sources of ignition, such as furnaces, hot water boilers with gas, gas dryers, etc. out of the reach of children.
Always fit the guide rail cover (21) if the saw chain (1) and the guide rail (2) are not removed
14.2 Recommissioning the chainsaw
- Remove the spark plug (34).
- Pull the start pull cord (8) quickly to remove excess oil from the combustion chamber.
- Clean the spark plug (34) and check that the electrode gap on the spark plug (34) is correct is correctly set, or insert a new spark plug (34) with the correct electrode gap.
- Prepare the chainsaw for operation.
- Fill the tank with the correct oil and fuel mixture (1:40).
14.3 Fuel storage
Fuels only have a limited shelf life. Fuel and fuel mixtures age by evaporation, especially under the influence of high temperatures. Expired fuel and fuel mixtures can thus lead to starting problems and engine damage. Only buy as much fuel as is to be consumed in a few months. Use up fuel mixed at higher temperatures in 6-8 weeks.
Store fuel only in approved containers in a dry, cool and safe place!
WARNING
Avoid skin and eye contact!
Mineral oil products, including oils, degrease the skin. Repeated and prolonged contact dries out the skin. The consequences can be various skin diseases. Allergic reactions are also known.
Eye contact with oil causes irritation. In case of eye contact, immediately rinse the affected eye with clean water. If irritation persists, consult a doctor immediately!
15. Disposal and recycling
Notes for packaging


The packaging materials are recyclable. Please dispose of packaging in an environmentally friendly manner.
You can find out how to dispose of the disused device from your local authority or city administration.
Fuels and oils
- Before disposing of the device, the fuel tank and the motor oil tank must be emptied!
- Fuel and engine oil do not belong in household waste or drains, but must be collected or disposed of separately!
- Empty oil and fuel tanks must be disposed of in an environmentally friendly manner.
16. Troubleshooting
| Fault Possible cause Remedy | ||
| The engine does not start, or it starts but does not continue to run. | Incorrect starting procedure. Observe the instructions given in this manual. | |
| Incorrectly adjusted carburettor mixture. | Have the carburettor adjusted by the authorised service centre. | |
| Sooty spark plug. Clean/adjust or replace the spark plug. | ||
| Clogged fuel filter. Replace the fuel filter. | ||
| The engine starts, but it does not run at full power. | Contaminated air filter. Remove the filter, clean it and reinsert it. | |
| Incorrectly adjusted carburettor mixture. | Have the carburettor adjusted by the authorised service centre. | |
| Engine splutters. Incorrectly adjusted carburettor mixture. | Have the carburettor adjusted by the authorised service centre. | |
| No power under load. Incorrectly set spark plug. Clean/adjust or replace the spark plug. | ||
| Engine runs erratically. Incorrectly adjusted carburettor mixture. | Have the carburettor adjusted by the authorised service centre. | |
| Excessive smoke. | Incorrect fuel mixture. | Use the correct fuel mixture (ratio 1:40). |
| No power under load. Chain blunt or chain loose. Sharpen the chain or insert a new chain. Tension the chain. | ||
| Engine dies. | Fuel tank empty or fuel filter incorrectly positioned in the tank. | Fill the fuel tank. Fill the fuel tank completely or reposition the fuel filter in the fuel tank. |
| Insufficient chain lubrication (saw bar and chain become hot). | Chain oil tank empty. | Fill the chain oil tank. |
| Oil passages clogged. | Clean the oiling hole in the saw bar. Clean the groove of the saw bar. | |
Table des matières: Page:
Günzburger Straße 69
D-89335 Ichenhausen
CHER CLIENT,
Günzburger Straße 69
89335 Ichenhausen, Germania
EGREGIO CLIENTE,
Günzburger Straße 69
D-89335 Ichenhausen
GEACHTE KLANT,
Kettingsteek....3/8" (9,525 mm)
Dikte kettingschakel 1,27 mm
Kettingtype 91P040X
Günzburger Straße 69
Günzburger Straße 69
Günzburger Straße 69
D-89335 Ichenhausen
VÁŽENÝ ZÁKAZNÍKU,
Günzburger Straße 69
D-89335 Ichenhausen
VÁŽENÝ ZÁKAZNÍK,
Günzburger Straße 69
D-89335 Ichenhausen
KEDVES ÜGYFELÜNK!
Günzburger Straße 69
D-89335 Ichenhausen
SZANOWNY KLIENCIE,
Günzburger Straße 69
D-89335 Ichenhausen
AUSTATUD KLIENT!
Günzburger Straße 69
D-89335 Ichenhausen
GERBIAMAS KLIENTE,
Günzburger Straße 69
Kēdes solis....3/8" (9,525 mm)
Kēdes locekla biezums ....1,27 mm
Kēdes tips....91P040X
Günzburger Straße 69
D-89335 Ichenhausen
BÄSTA KUND!
Günzburger Straße 69
D-89335 Ichenhausen
ARVOISA ASIAKAS,
Günzburger Straße 69
D-89335 Ichenhausen, Tyskland
KÆRE KUNDE,
text_image
Exploded view diagram of a mechanical assembly with labeled components in ChineseEU Declaration of Conformity
Standard references:
EN ISO 11681-2:2022; EN ISO 14982:2009
This declaration of conformity is issued under the sole responsibility of the manufacturer.
Apparent defects must be notified within 8 days from the receipt of the goods. Otherwise, the buyer's rights of claim due to such defects are invalidated. We guarantee for our machines in case of proper treatment for the time of the statutory warranty period from delivery in such a way that we replace any machine part free of charge which provably becomes unusable due to faulty material
or defects of fabrication within such period of time. With respect to parts not manufactured by us we only warrant insofar as we are entitled to warranty claims against the upstream suppliers. The costs for the installation of the new parts shall be borne by the buyer. The cancellation of sale or the reduction of purchase price as well as any other claims for damages shall be excluded.