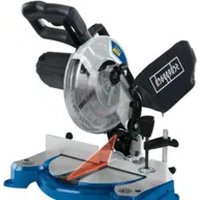
Mitas 7 - Saw SCHEPPACH - Free user manual and instructions
Find the device manual for free Mitas 7 SCHEPPACH in PDF.


User questions about Mitas 7 SCHEPPACH
0 question about this device. Answer the ones you know or ask your own.
Ask a new question about this device
Download the instructions for your Saw in PDF format for free! Find your manual Mitas 7 - SCHEPPACH and take your electronic device back in hand. On this page are published all the documents necessary for the use of your device. Mitas 7 by SCHEPPACH.
USER MANUAL Mitas 7 SCHEPPACH
We wish you much pleasure and success with your new scheppach machine.
Note
In accordance with valid product liability laws, the manufacturer of this device shall not be responsible for damage to and from this device which results from:
nal scheppach replacement parts.
ance with the legal and applicable electrical directives
We recommend
that you read through the entire operating instructions before putting the machine into operation.
These operating instructions are to assist you in getting to know your machine and utilize its proper applications.
The operating instructions contain important notes on how you work with the machine safely, expertly, and economically, and how you can avoid hazards, save repair costs, reduce downtime and increase the reliability and service life of the machine.
In addition to the safety requirements contained in these op rerating instructions, you must be careful to observe your country's applicable regulations.
The operating instructions must always be near the machine. Put them in a plastic folder to protect them from dirt and humidity. They must be read by every operator before beginning work and observed conscientiously. Only per sons who have been trained in the use of the machine and have been informed of the various dangers may work with the machine. The required minimum age must be observed.
In addition to the safety requirements contained in these opereating instructions and your country's applicable regula tions, you should observe the generally recognized tech nical rules concerning the operation of woodwork ing ma chines.
General notes
age. Inform the supplier immediately of any faults.
yourself with the machine by carefully reading these instructions.
place ment parts. You can find replacement parts at your scheppach dealer.
and year of construction of the machine.
Mitas 5 Mitas 7
| Technical Data | ||
| Dimensions L x W x H mm | ||
| Table size for lengthwise cuts mm | ||
| Table height | ||
| Table size for cross-cutting | 490 x 140 490 x 140 | |
| Table height | 80 mm 80 mm | |
| Saw blade Φ mm | WZ Z24 | WZ Z40 |
| Speed | ||
| Cutting rate | ||
| Swivel range | left: 50° | left: 50° |
| Tool cutting edge inclination | 45° | 45° |
| Doublemeter-ing 45° x 45° | links | links |
| Adjustments | ||
| Longitudinal feed stop | 300 mm | 300 mm |
| Weight kg | 19,0 | 21,0 |
| Cutting data, ripping | ||
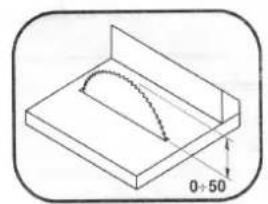
| Cutting height | 40 mm | 0 - 50 mm continuously variable |
| Cut width max | 145 mm | 145 mm |
| Cut data for rip cutting | ||
| 90°/0° | ||
| 90°/45° | ||
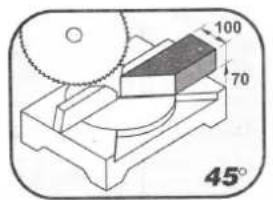
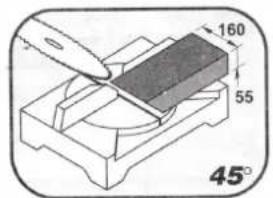
| 45°/0° | 150 x 45 mm | 160 x 65 mm |
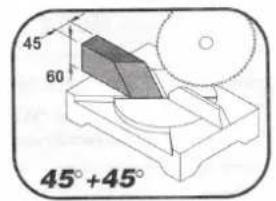
| 45°/45° | 45 x 45 mm | 45 x 60 mm |
| Drive | ||
| Motor | ||
| Input P1 W | 1,2 kW 1,4 kW | |
| Operating mode | S4 20% 5 min | S4 20% 5 min |
Subject to technical modifications!
NOISE CONDITIONS
Idling
Running with full load
positioned on the work bench.
When cutting aluminium the use of protective earphones or ear plugs is absolutely necessary.
The use of this gear is also recommended for all other uses.
In these operating instructions we have marked the places
who work on the machine.
machine.
fully legible.
lines.
ground.
hands and eyes.
t ed to the power supply.
and covers must be mounted.
Trainees must be at least 16 years of age, but may only operate the machine under adult supervision.
from their work.
and wood scrap.
and other jewelry.
chine may only be carried out when the motor is switched off. Pull the power supply plug and wait for the rotating tool to completely stop.
rectifying any malfunctions.
may be carried out by a qualified electrician only.
completing repair and maintenance procedures.
completely clean.
ble substances or gas.
garm ents or objects such as scarves, chains or bracelets which may get caught in machine's moving parts.
pre-vention goggles, well-fitting gloves, earphones or earplugs and headgear to cover hair if necessary.
to lift the machine or to pull the plug out of the socket. Keep it away from cutting edges, oily patches and high temperatures.
extensions.
objects such as pipes, radiators and refrigerators.
CE tested machines meet all valid EC machine guidelines as well as all relevant guidelines for each machine.
con dition in accordance with its designated use and the in structions set out in the operating manual, and only by safety-conscious persons who are fully aware of the risks involved in operating the machine. Any functional dis orders, especially those affecting the safety of the machine, sholud terefo be rectified immediately.
is not responsible for any damages resulting from un
authorized use; risk is the sole responsibility of the operator.
manufacturer as well as the technical data given in the calibrations and dimensions must be adhered to.
rally recognized safety-technical rules must also be adhered to.
ed by persons familiar with it and instructed in its operation and procedures. Arbitrary alterations to the machine release the manufacturer from all responsibility for any resulting damages.
and tools made by the manufacturer.
The machine has been built using modern technology in accord dance with recognized safety rules. Some remaining hazards, how ever, may still exist.
such defects is prone to splintering and can be hazardous.
ing processed due to centrifugal force.
rectly secure before processing. Unbalanced work pieces can be hazardous.
work piece is rotating. Wear personal protective gear such as a hair net and tight fitting work clothes.
so nal protective gear such as safety goggles and a dust mask.
to injuries caused by electricity.
hazards which are not yet evident may still be present.
instructions in "Safety Precautions", "Proper Use" and in the entire operating manual.
ing pressure may lead to rapid deterioration of the blade and a decrease in performance in terms of finish and cutting precision.
ro priate clamps: all workpieces must be clamped down firmly.
while inserting the plug into the socket.
obtain the best results from your machine.
ma chine is running; before performing tasks of any kind release the main switch button located on the handgrip, thus disconnecting the machine.
machine is running; before performing tasks of any kind release the main switch button located on the handgrip, thus disconnecting the machine.
SUITABLE USE
To cut:
UNSUITABLE USE
Do not cut:
MACHINE DESCRIPTION (Fig. 1)
The litre-saw machine consists of three basic parts: the machine body complete with motor 6 which is integrated into lower part 3 by means of the joint 4 and the swivel support 5, and the upper work unit consisting of the work
16.
The base 3 is used as rest when cutting and butting operations have to be carried out in the different available angles; the upper table is used as rest when trimming or sectioning wood tables of huge dimensions and, in particular, when cutting wood along grain.
Legend Fig. 1
- Grip
- Start switch
6. Motor
-
Grid adjustment lever
-
Saw blade guard, fixed
- Saw blade guard, moveable
- Work piece block
- Suction connector
- Table top
- Saw blade guard, top
52. Trigger for start key
Start-up
Observe the safety notes in the operating instructions before operating the machine.
REMOVAL OF PACKAGING
portion and keep it intact for future transportation and storage.
HANDLING
This litre-saw is small and light and, therefore, can be easily handled by one person alone by locking the transportation block by means of the pin 19 and by lifting the machine by means of the control handgrip 1.
TRANSPORTATION
Warning: The upper part of the saw blade has to be covered during transport at all times. Always ensure that the saw blade is covered by the upper protective unit.
To transport the machine, place it in the box it was in when purchased. Ensure it is placed in the correct position indicated by the arrows on the packaging.
Pay careful attention to the symbols printed on the box as they provide all necessary information for palletization and stacking of boxes.
Tying the load down with ropes or safety belts is recommended during transportation to stop the load from sliding or falling.
POSITION/WORK STATION (Fig. 2-3)
Place the machine on a work bench or on a sufficiently flat
bench or of the base should be such that the base surface or the upper work surface is between 90 and 95cm from
Always ensure that there is at least 80~cm of manoeuvring space in all directions around the machine in order to perform all necessary cleaning, maintenance and adjust ment operations safely with a sufficient amount of space avail
CAUTION: Ensure the machine is placed in a suitable position both in terms of environmental conditions and lighting.
Always bear in mind that general environmental conditions are of fundamental importance to prevent accidents.
ELECTRICAL CONNECTIONS
connected is earthed in compliance with current safety regulations and that the current socket is in perfect condition.
The electrical system must be fitted with a magnetothermal protective device to safeguard all conductors from short circuits and overload.
The selection of this device should be in line with the following electrical specifications of the machine stated on the motor.
NOTE: Your litre-saw's electrical system is equipped with an undervoltage relay which automatically opens the circuit when the voltage falls below a minimum pre-est ablished limit and which prevents the self-reset of machine functions when voltage returns to normal levels.
If the machine stops involutarily, do not be allarmed. Make sure that there has not been a voltage failure in the electrical system.
ADJUSTING
ATTENTION: All the adjustment procedures illustrated below must be performed when the machine's engine is off.
Cross-cutting Operation:
Swiveling the Table Top (Fig. 4)
The saw unit can be rotated along with the rotary table to the right or to the left.
Using the scale, absolutely precise angle adjustment is possible.
The 15^ , 22^30' , 30^ and 45^ angles can be set quickly and precisely.
Tilting the Saw Unit (Fig. 5)
The saw unit can be tilted up to an angle of 45^ .
using the scale, tilt the unit to the desired angular position.
tightened.
Warning: When cutting with double tilt (rotation plus head tilt) press the work piece tightly against the machine with the right hand and direct the head during its downward motion with your left hand (Fig. 17).
Adjusting the work piece block (Fig. 6)
desired degree. Use a measuring tape and measure to the saw blade tooth. Perform test cut and dimensional inspection after adjustment.
Warning: when working on the upper level, the protection unit provided has to be mounted.
Bench Circular Saw
Adjusting the Cutting Height (Fig. 7)
of the base.
Lower the saw unit to the lowest position and clamp it
height of the table board. Grasp the table board with both hands at the front and back at the same time and lift it or press it down – this can be done with a hand valve for
Adjusting the Longitudinal Block (Fig. 8)
Use the clamp section of the longitudinal block on the front of the table top.
ADJUSTMENT OF BEARING BRACKET (Fig. 8)
Use the clamp section of the longitudinal block on the front of the table top.
After having performed all the above procedures and operations, you may begin cutting.
ATTENTION: Always keep hands away from the cutting area and do not try to approach it when the machine is running.
Cross-cutting Operation (Fig. 10)
locks into the uppermost position.
zone of the saw blade.
through it by applying slight pressure.
locks into place.
Bench Circular Saw (Fig. 11 + 15)
raising it manually. After releasing it, it must swing back automatically into the starting position and once again cover the saw blade completely.
the ram plate fixes the work piece.
the saw blade.
cally released.
re move the remnants of the work piece from the table top.
Changing the Saw Blade (Fig. 12)
saw blade is exposed.
the 8 mm socket wrench into the bolt and inserting the
when doing this, observe the direction of rotation of the saw blade.
the bolt.
Adjusting the splitting wedge (Fig. 16)
The splitting wedge is adjusted correctly when the distance to the tooth rim of the saw blade is 3 to 8mm . If this is not the case, loosen the screw, fixing it to the arm and adjust the distance.
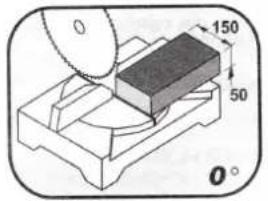
CUTTING CAPACITY (Fig. 9)
The following tables specifies the cutting capacity at 0^ and 45^ which may be achieved under the normal conditions of use illustrated in this manual.
VERSION Mitas 5
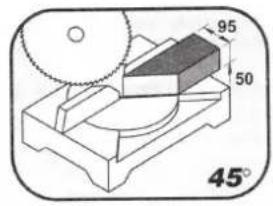
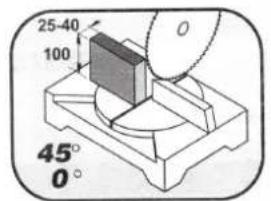
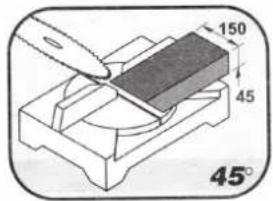
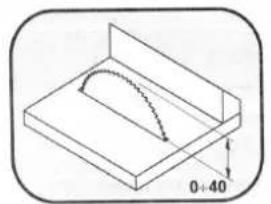
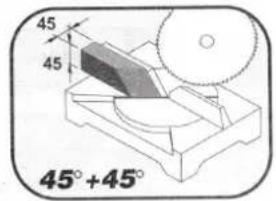
VERSION Mitas 7
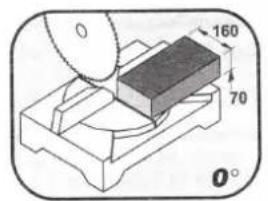

The installed electric motor is completely wired ready for operation.
The customer's connection to the power supply system, and any extension cables that may be used, must conform with local regulations.
Important remark:
The motor is automatically switched off in the event of an overload. The motor can be switched on again after a cooling down period that can vary.
Defective electrical connection cables
Electrical connection cables often suffer insulation damage.
Possible causes are:
window or door gaps.
the connection cable.
the wall socket.
Such defective electrical connection cables must not be used as the insulation damage makes them extremely hazardous.
Make sure the cable is disconnected from the mains when checking.
Electrical connection cables must comply with the regulations applicable in your country.
Single-phase motor
fied on the motor's rating plate.
cross-section of 1.5mm^2 and beyond 25m at least 2.5 mm².
16 A slow-acting fuse.
Only a qualified electrician is permitted to connect the machine and complete repairs on its electrical equipment.
In the event of enquiries please specify the following data:
If a motor has to be returned, it must always be dispatched with the complete driving unit and switch.
ACCESSORIES
SELECTING THE SAW BLADE
The circular saw is supplied with an HW saw blade.
The following saw blades are available upon special request:
250 mm z 60 saw blade
250mm z 80 saw blade for aluminum
300mm z 84 saw blade for aluminum
If specialist personnel must be brought in for extraordinary service or repairs during the warranty period and thereafter, please contact a service provider recommended by us or contact the manufacturer directly.
eli mi nation of any malfunctions must only be undertaken after turning off the motor.
immediately upon completion of any repair or maintenance work.
REGULAR MAINTENANCE
The regular maintenance described above and in the paragraph below can be carried out by unskilled personnel.
ing.
area, work surfaces and support bases.
Use of an aspirator or brush is recommended.
ATTENTION: Do not use compressed air jets!
arise during cutting, have it sharpened by skilled personnel or replace it if necessary.
ASSISTENCE
When in need of skilled personnel for special maintenance, or for repairs, both during and following the guarantee period, always apply to authorized centres for assistance or directly to the manufacturer if there is no authorized centre in your area.
EC Declaration of Conformity
We herewith declare, Scheppach Fabrikation von Holzbearbeitungsmaschinen GmbH, Gunzburger Str. 69, D-89335 Ichenhausen that the machine described below due to its con struc tion and design and in the version delivered by us complies with the relevant provi
In case of a modification of the machine this declaration ceases to be valid.
Machine description:
Undercut Mitre Saw
Machine type:
Mitas 5 / Mitas 7
Article no.
Mitas 5:89320905
Mitas 7:89320906
EC machine directive 98/37/EG (<28.12.2009),
EC machine directive 2006/42/EG (>29.12.2009),
EC Low voltage directive 2006/95/EWG,
EC-EMV directive 2004/108/EWG.
EC type examination test, test report no.:
Place, date:
Signature: Wolfgang Windrich, product manager
| Problem Possible Cause Help | |
| The motor does not run. | Faulty motor, power supply cable or plug. Have the machine checked by skilled personnel. Do not try to repair the machine fuses and replace them if necessary. |
| The motor starts slowly and does not reach running speed. | Low power supply voltage. Damaged voltage available. Have the machine motor checked by skilled personnel. Have the capacitor replaced by skilled personnel. |
| Excessive motor noise. Damaged windings. Faulty motor. Have the motor checked by skilled personnel. | |
| The motor does not reach full power. | Overloaded circuit due to lighting, utilities or other motors. Do not use other utilities or motors on the circuit to which the cutting-off machine is connected. |
| Motor overheats easily Overload of the motor; inadequate cooling of the motor | Prevent overloading the motor when cutting; remove dust from the motor to ensure an optimum cooling of the motor |
| Decrease in cutting power when sawing | |
| The saw cut is rough or wavy | The saw blade is dull; the tooth shape is not suited to the thickness of the material appropriate saw blade |
| The work piece rips or splinters | The cutting pressure is excessive or the saw blade is not suited to the application Use the correct saw blade |
Manufacturer:
Scheppach
Directive CE-EMV 2004/108/EWG.
POSITIONERING/WERKPLAATS (afb. 2-3)
NORMAL VEDLIKEHOLDSARBEID