
KVA 2 - Vacuum Cleaner Kärcher - Free user manual and instructions
Find the device manual for free KVA 2 Kärcher in PDF.

| Product type | Cordless vacuum cleaner |
| Brand | Kärcher |
| Model | KVA 2 |
| Use | Private household, dry surfaces only |
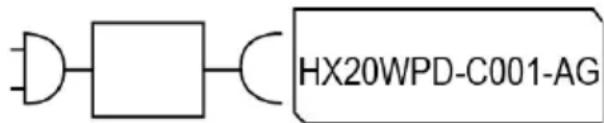
| Power supply | Li-Ion battery 21.6 V, USB-C charger (HX20WPD-C001-AG) |
| Charging time | 240 min (completely discharged battery) |
| Runtime (with floor nozzle) | Eco: 36 min / Standard: 20 min / Boost: 9 min |
| Suction levels | 3 (Eco, Standard, Boost) |
| Container capacity | 0.4 L |
| Weight (without accessories) | Less than 2.4 kg |
| Included accessories | Motorized floor nozzle, crevice nozzle, 2-in-1 furniture brush, suction tube, wall mount, USB-C charger |
| Filters | Pre-filter and fine filter (replacement every 6 months), exhaust air filter |
| Filter maintenance | Clean pre-filter and fine filter once a week; empty dust container after use |
| Floor nozzle maintenance | Removable roller brush for cleaning |
| Charger protection class | Protection class II |
| Charger voltage | 100-240 V, 50-60 Hz |
| Warranty | According to distributor conditions (contact customer service with invoice) |
| Spare parts | Original accessories at www.kaercher.com |
| Symbols on device | Instruction sticker for filter cleaning |
Frequently Asked Questions - KVA 2 Kärcher
User questions about KVA 2 Kärcher
0 question about this device. Answer the ones you know or ask your own.
Ask a new question about this device
Download the instructions for your Vacuum Cleaner in PDF format for free! Find your manual KVA 2 - Kärcher and take your electronic device back in hand. On this page are published all the documents necessary for the use of your device. KVA 2 by Kärcher.
USER MANUAL KVA 2 Kärcher
natural_image
Exterior view of a modern office building (no signage)Deutsch 5
English 9
Français 14
Italiano 18
Español 23
Português 28
Nederlands 32
Türkçe 37
Svenska 42
Suomi 46
Norsk 50
Dansk 54
Eesti 59
Latviešu 63
Lietuviškai 68
Polski 72
Magyar 77
Čeština 82
Slovenčina 86
Slovenščina 91
Română 95
Hrvatski 100
Srpski 104
Ελληνικά 109
Русский 113
Українська 119
Қазақша 124
Български 129
العربيه 138
A

 | 17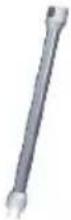 | 18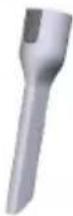 | 19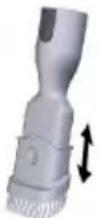 |
20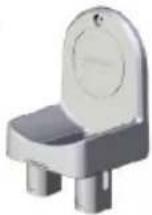 | 21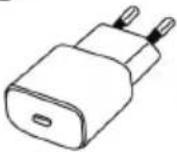 | 22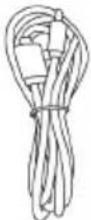 |
natural_image
Illustration of industrial water drop symbols (no text or labels)
Inhalt
| Environmental protection | 9 |
| Accessories and spare parts...... | 9 |
| Warranty | 10 |
| Symbols on the appliance | 10 |
| Scope of delivery | 10 |
| Device description...... | 10 |
| Installing the wall bracket | 10 |
| Initial startup | 10 |
| Operation | 11 |
| General application instructions | 12 |
| Transportation | 12 |
| Storage | 12 |
| Care and service | 12 |
| Troubleshooting guide | 13 |
| Technical data | 13 |
General notes
Read these original operating instructions and the enclosed safety instructions before using the device for the first
time. Proceed accordingly.
Keep both books for future reference or for future owners.
Intended use
- Only use the device in private households.
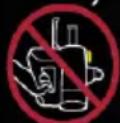
- The device is intended exclusively for cleaning dry surfaces
- The following are not in accordance with the intended use:
— Cleaning people, animals, plants or clothing on the body.
— Soaking up water or other fluids.
— Extraction of glowing ashes, coal, cigarettes or other flammable or easily inflammable substances.
— Use in the vicinity of explosive or highly flammable substances.
Environmental protection

The packing materials can be recycled. Please dispose of packaging in accordance with the environmental regulations.

Electrical and electronic devices contain valuable, recyclable materials and often components such as batteries, rechargeable batteries or ol, which - if handled or disposed of incorrectly - can
pose a potential danger to human health and the environment. However, these components are required for the correct operation of the device. Devices marked by this symbol are not allowed to be disposed of together with the household rubbish.
Notes on the content materials (REACH)
Current information on content materials can be found at: www.kaercher.de/REACH
Accessories and spare parts
Only use original accessories and original spare parts. They ensure that the appliance will run fault-free and safely.
Information on accessories and spare parts can be found at www.kaercher.com.
Warranty
The warranty conditions issued by our relevant sales company apply in all countries. We shall remedy possible malfunctions on your appliance within the warranty period free of cost, provided that a material or manufacturing flaw is the cause. In a warranty case, please contact your dealer (with the purchase receipt) or the next authorised customer service site.
(See overleaf for the address)
Further warranty information (if available) can be found in the service area of your local Kärcher website under "Downloads".
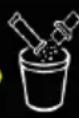
Symbols on the appliance
flowchart
graph TD
    A["1: No Smoking"] --> B["2: Weekly Spray"]
    B --> C["3: New Collection"]
    style A fill:#f9f,stroke:#333
    style B fill:#ccf,stroke:#333
    style C fill:#cfc,stroke:#333
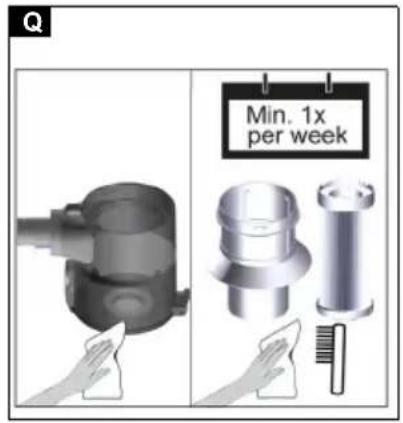
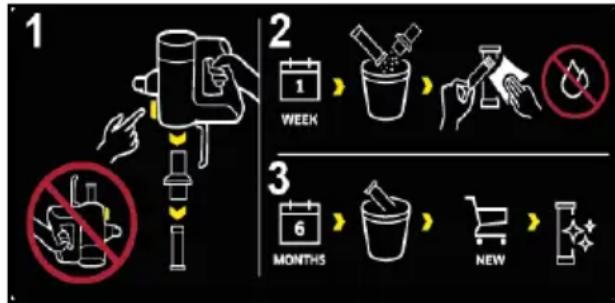
There is a sticker on the pre-filter of the device that describes the cleaning / replacement of the pre- and fine filter.
1 Remove the pre-filter and fine filter from the device. The device must not be turned over during this process.
2 Clean the pre-filter and fine filter once a week without adding water/moisture.
3 Replace the fine filter with a new fine filter every 6 months.
For further descriptions, see chapter Clean the prefilter, fine filter and dust container
Charger
⚠ WARNING
- Only charge the appliance using the original charger HX20WPD-C001-AG enclosed or with a charger approved by KÄRCHER.
Scope of delivery
The scope of delivery for the appliance is shown on the packaging. Check the contents for completeness when unpacking. If any accessories are missing or in the event of any shipping damage, please notify your dealer.
Device description
The scope of delivery of the unit (dependent on model) is shown on the packaging. These operating instructions describe all possible options.
See graphics page for illustrations.
Illustration A
① Control panel for:
② On / Off switch
③ Battery LED indicator lamp
④ Buttons for suction strength adjustment (3 levels)
⑤ Handle
⑥ Charging connection for USB plug (type C)
⑦ Built-in battery
⑧ Exhaust filter cover
⑨ Dust container unlocking button
⑩ Dust container suction fitting
11 Dust container
⑫Dust container cover flap unlocking button
13 Dust container cover flap
⑭ Fine filter
15 Pre-filter
⑯Motorised floor nozzle with universal brush roller
⑰Suction pipe
18 Crevice nozzle
⑲2-in-1 furniture nozzle
20 Wall bracket
②1 Charger (type C)
22 Charging cable (type C)
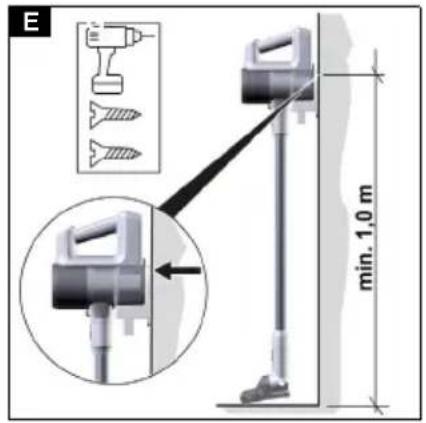
Installing the wall bracket
The scope of delivery includes a wall bracket as well as screws and dowels for tidy storage of the vacuum cleaner.
Note
Mount the wall bracket at a suitable point using the screws and dowels supplied.
To ensure safe storage of the device, the upper screw mount must be placed at least 1.0 m above the ground.
Illustration E
ATTENTION
Material damage due to incorrect installation
Incorrect installation can damage both the device and the floor covering if it falls.
Use suitable mounting tools for wall mounting.
Take the weight of the device and the loading capacity of the installation location into account when selecting the fasteners.
⚠ WARNING
Risk of electric shock and injuries
Make sure there are no electrical cables, water or gas pipes in the wall around the mounting area.
Note
The wall bracket can also be used to store the 2-in-1 furniture nozzle and crevice nozzle alongside the device.
Illustration F
Initial startup
Installing accessories
Note
The motorised floor nozzle is also driven by its own integrated motor and must therefore always be connected directly to the hand-held device or the suction pipe in order to ensure the power supply.
All other accessor parts can also be used directly with the hand-held device or with the suction pipe to increase the reach.
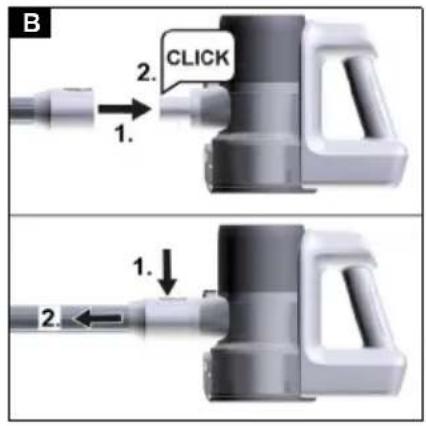
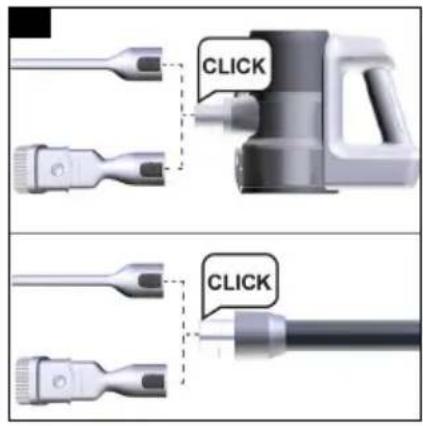
- Push the suction pipe on to the suction fitting of the dust container until it audibly clicks into place.
- Press the unlocking button and remove the suction pipe from the suction fitting.
Illustration B
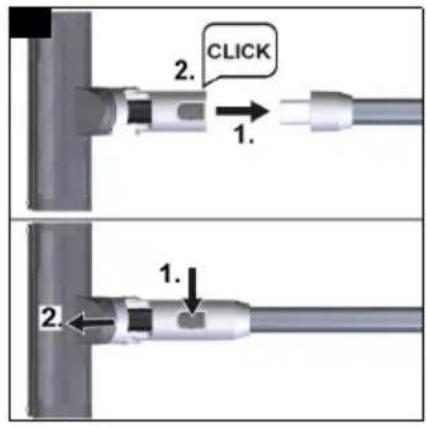
- Push the motorised floor nozzle on to the suction pipe until it audibly clicks into place.
- Press the unlocking button and remove the motorised floor nozzle from the suction pipe.
Illustration C
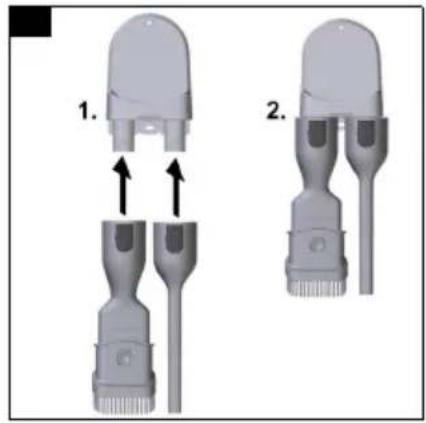
- Push the accessory, such as the crevice nozzle, on to the suction fitting of the dust container or suction pipe until it audibly clicks into place.
Illustration D
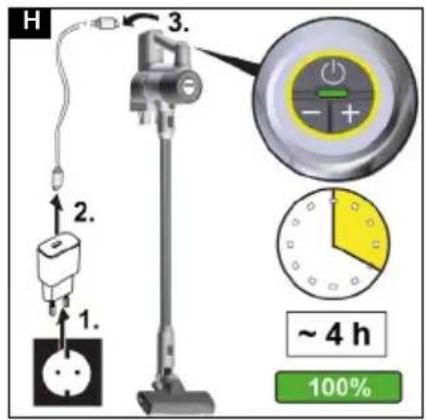
Battery charging
Note
The device is supplied with a fully charged battery. Fully charge the battery before using the device for the first time. Please observe the enclosed safety instructions for battery powered vacuum cleaners.
Note
When using a commercially available USB plug (type C) or charger (not in the scope of delivery for the device), the charging time may differ from that specified in the operating instructions, depending on the power.
- To charge the device, attach it to the wall bracket included in the scope of delivery.
Illustration E
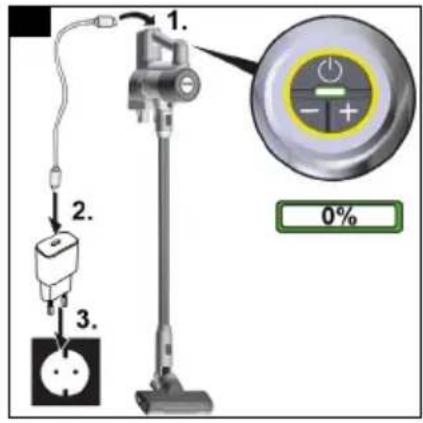
- Insert both USB plugs of the charging cable into the charging port of the device and charger.
Plug the charger into the mains socket.
The LED battery indicator flashes green during the charging process.
Illustration G
- When the device is fully charged, the LED battery indicator lights up continuously green for 120 min. The LED then goes out.
Remove both USB plugs of the charging cable from the charging port of the device and charger.
Remove the charger from the main socket.
Remove the device from the wall bracket.
Illustration H
The device is ready for use.
Operation
LED display
The following table describes the meaning of the LED indicators (green and red) on the device:
| LED Description | |
| LED lights up green continuously. | The device is on. |
| LED does not light up. Device is switched off. | |
| LED flashes green when the device is switched on. | Battery capacity at approx. 10%. |
| LED lights up red continuously. | Battery capacity low, less than 5%. |
| LED flashes green. Battery is being charged. | |
| LED lights up green continuously for 120 min. The LED then goes out. | Battery is fully charged. |
| LED Description | |
| LED flashes red at short intervals (30 sec. / 120 times). | Device displays fault message. e.g:• Blockage of floor nozzle and / or suction channel.• Battery/device is over-heated or undercooled. |
Suctioning
ATTENTION
Device damage
If the filters or dust container are not installed or are not installed correctly, the device may not work properly or may be damaged.
Only use the device when all filters and the dust container are correctly inserted.
Defective filters and filters that can no longer be cleaned must be replaced.
-
Install the desired accessory, see chapter Installing accessories.
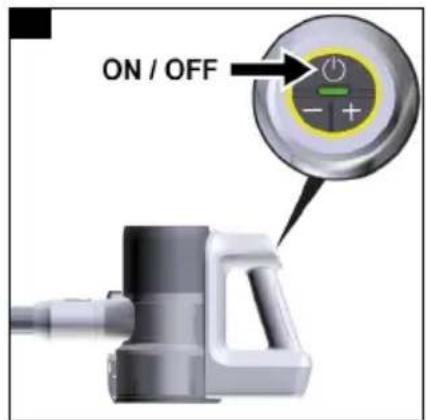
-
Switch on the device:
- Press the On / Off switch.
Illustration I
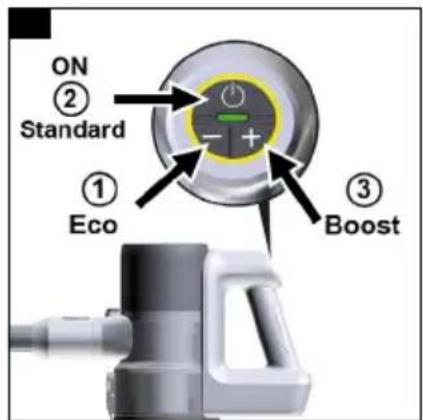
- If necessary, use the "+ / -" button on the control panel to set the suction power.
Note
The device has 3 suction strengths.
1 Eco mode: For cleaning small amounts of dust.
2 Standard mode: For daily cleaning.
3 Boost mode: Maximum power for high-performance cleaning (with this suction power setting, the battery is discharged more quickly than with other settings).
Note
When the device is switched on, the suction power is always in standard mode (level 2).
Illustration J
Changing accessories
To change accessories, see chapter Installing accessories
Ending operation
1 Switch off the device.
- Press the On / Off switch.
Illustration I
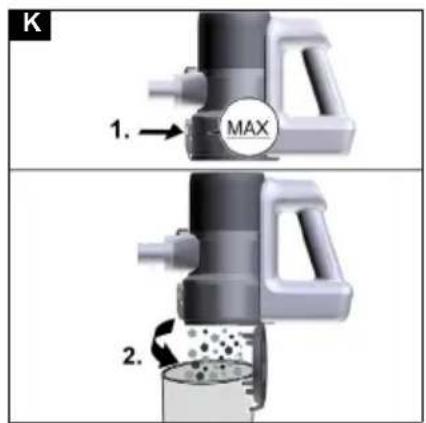
ATTENTION
Device damage
If the pre-filter and fine filter are not cleaned regularly after vacuuming or the dust container is not emptied, the suction power will deteriorate and the device may break down.
Clean the pre-filter and fine filter at least once a week. Empty the dust container at the latest when the "MAX" marking is reached.
2 Remove the suction pipe or accessory.
3 Empty the dust container.
- Press the unlocking button. The flap of the dust container opens.
- Empty the dust container into a waste container. Illustration K
4 To close, push flap of the dust container up until it clicks into place.
5 Clean the pre and fine filter, see chapter Clean the pre-filter, fine filter and dust container
6 Attach the device to the wall bracket.
Illustration E
7 Store accessories on the wall bracket.
Illustration F
8 Charge the device, see chapter Battery charging
General application instructions
- Which accessories are included in the scope of delivery is shown on the device packaging.
- Test the accessory at an inconspicuous point before using it in a sensitive area.
- Follow the manufacturer's cleaning instructions.
- Connect the motorised nozzles to the suction pipe or the hand-held device.
- Also connect the other accessory parts, such as crevice nozzle, to the hand-held device or push it directly onto the suction pipe to increase the reach.
Motorised floor nozzle
Ideal for hard floors and carpets.
The motorised floor nozzle removes dirt stuck between the carpet fibres particularly effectively.
Crevice nozzle
For edges, joints, heaters and areas that are difficult to reach.
2-in-1 furniture brush
For gentle cleaning of sofas and delicate furniture. Depending on requirements, the accessory can be used as a furniture or upholstery brush by pressing the button.
Transportation
The battery has been tested in accordance with the relevant rules for international transport, and can be transported / shipped.
Storage
ATTENTION
Moisture and heat
Risk of damage
Store battery packs indoors only, at low humidity and temperatures below 20^ C.
The battery pack display shows the current charging state during storage.
Care and service
Clean the pre-filter, fine filter and dust container
ATTENTION
Device damage
If the pre-filter and fine filter are not cleaned regularly after vacuuming or the dust container is not emptied, the suction power will deteriorate and the device may break down.
Clean the pre-filter and fine filter at least once a week. Empty the dust container at the latest when the "MAX" marking is reached.
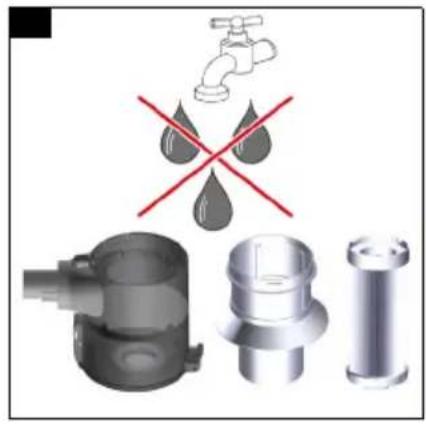
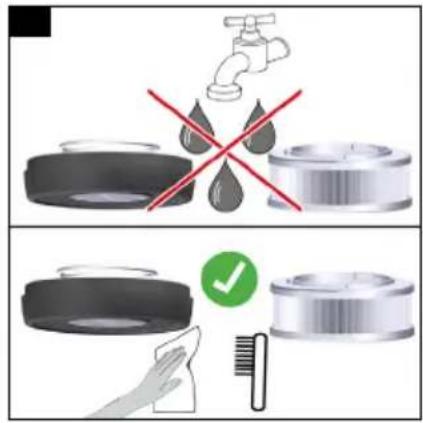
ATTENTION
Short circuit hazard
The dust container contains electrical components.
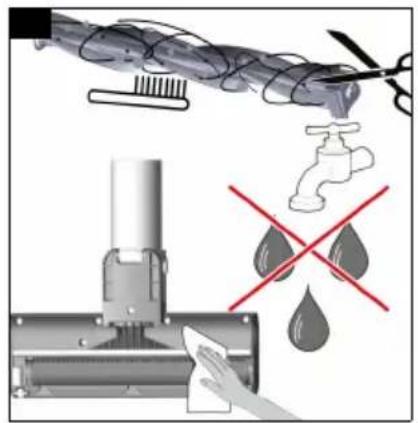
Do not immerse the dust container, pre-filter and fine filter in water and do not clean with a damp cloth.
Illustration O
Note
Replace the fine filter if it is visibly damaged or every 6 months.
Note
The dust container must be empty before cleaning.
1 Switch off the device:
- Press the On / Off switch.
Illustration I
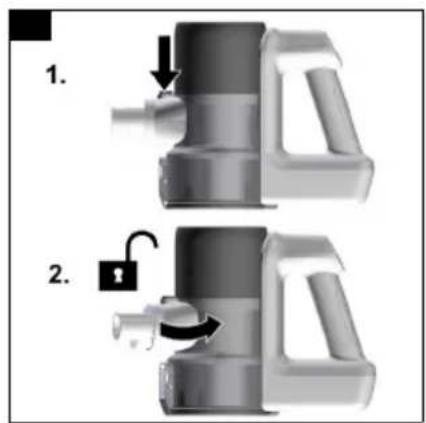
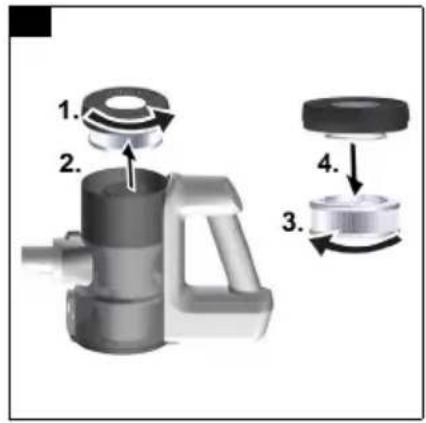
2 Remove the dust container:
- Press the unlocking button on the dust container and unlock and remove by turning in the direction of the "lock open" symbol.
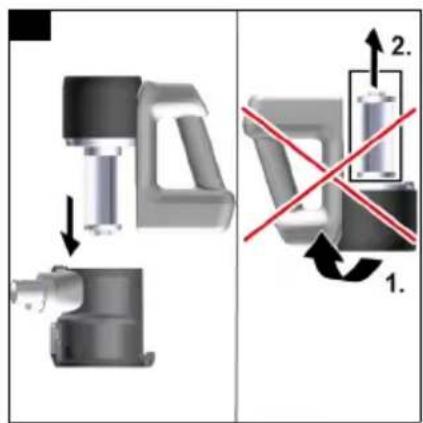
ATTENTION
Device damage
If the device is turned 180 degrees for filter cleaning (fine filter pointing upwards), fine dust can fall into the motor area and damage the device.
Always hold the device downwards when cleaning / removing the fine filter.
Illustration L
Illustration M
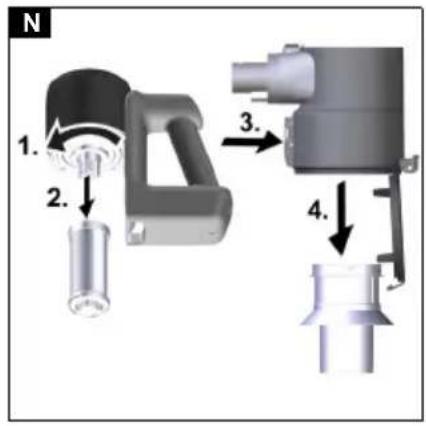
3 Remove the fine filter and pre-filter:
- Unlock the fine filter by turning it counter-clockwise and remove it.
- Press the unlocking button to open the flap of the dust container. Pull the pre-filter downward and remove it from the dust container.
Illustration N
4 Cleaning the dust container, pre-filter and fine filter.
- Any tangled threads or hairs on the pre-filter can be carefully cut off with scissors.
- Carefully knock out the pre-filter and fine filter on a waste paper basket.
Illustration P
- Wipe out the dust container with a cloth.
- If necessary, carefully clean the pre-filter and fine filter with a soft cloth or brush.
Illustration Q
5 Attach the fine filter to the device.
- Check for correct seating.
6 Insert the pre-filter into the dust container.
- Check for correct seating.
7 Attach the dust container:
- Place the dust container on the device and turn in the direction of the "Lock closed" symbol. Check for correct seating.
Cleaning the exhaust air filter
ATTENTION
Short circuit hazard
The device head contains electrical components.
Do not immerse the exhaust filter in water and do not clean with a damp cloth.
Note
The exhaust filter ensures pure blower air.
- Clean the exhaust filter if it is visibly dirty.
- Replace the exhaust filter if it is visibly damaged or every 6 months.
1 Switch off the device:
- Press the On / Off switch.
Illustration I
2 Remove the exhaust filter:
- Unscrew and remove the exhaust filter cover from the device.
- Remove the exhaust filter from the cover.
Illustration R
3 Cleaning the exhaust filter:
- Carefully tap off the exhaust filter or, if it is very dirty, carefully clean it together with the cover using a soft cloth or brush.
- Illustration S
4 Clean the exhaust filter:
- Plug the exhaust filter and cover together and screw onto the device head. Check for correct seating.
Cleaning the motorised floor nozzle
- Switch off the device.
- Press the On / Off switch.
Illustration I
- Remove accessories.
ATTENTION
Short circuit hazard
The motorised floor nozzle contains electrical components.
Do not immerse the motorised floor nozzle in water or clean it with a damp cloth.
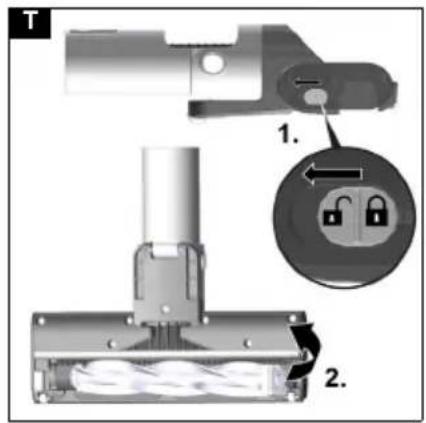
- Clean the motorised floor nozzle.
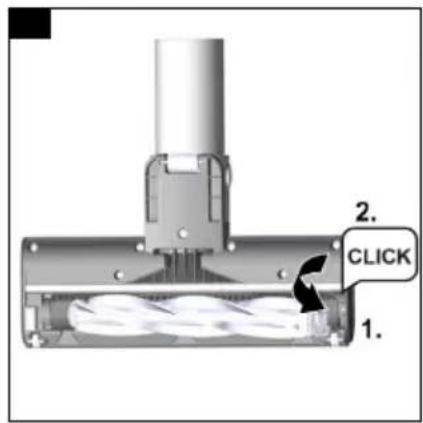
a Slide the release button in the direction of the "lock open" symbol and remove the roller brush. Illustration T
b Remove the dirt e.g. with a brush. Any tangled threads or hairs can be carefully cut off with scissors.
c Carefully clean the brush opening with a cloth or soft brush.
Illustration U
d Insert the roller brush into the brush opening, press down and allow to engage. Check for correct seating.
Illustration V
Troubleshooting guide
Malfunctions often have simple causes that you can remedy yourself using the following overview. When in doubt, or in the case of malfunctions not mentioned here, please contact your authorised Customer Service.
The device does not start up
Battery is empty.
● Charge the rechargeable battery.
Device does not suck
Fine filter was not inserted or not inserted correctly.
- Insert the fine filter.
- Check that the fine filter is seated correctly.
The battery is not charging
The charging plug/mains plug is not connected correctly.
- Connect the charging plug/mains plug correctly.
The socket is defective.
- Check that the socket is working.
The wrong charger is being used
- Check that the correct charger is being used.
Charging time is changed
Use of a USB plug (type C) or charger outside the scope of delivery.
- For a specified charging time, use the USB plug (type C) / charger included in the scope of delivery.
LED flashes red at short intervals / device stops during operation / device has low suction power
The accessories, the suction opening on the dust container or the suction pipes are clogged.
- Remove the blockage/clog with a suitable aid.
Battery/device is overheated or undercooled.
- Switch off the device and disconnect from the current supply.
- Wait until the battery temperature/device temperature is back within the normal range.
The dust container is full.
● Empty the dust container.
The filters are soiled.
- Clean the filter.
Roller brush is blocked.
- Remove any blockage.
Fine filter gets dirty / dusty quickly
Pre-filter was not used.
- Insert the pre-filter.
Dust container cannot be inserted.
Filter unit is not complete.
- Check whether the filter unit (pre-filter and fine filter) is complete.
Abnormal engine noise
The accessories, the suction opening on the dust container or the suction pipes are clogged.
- Remove the clog with a suitable aid.
Technical data
Electrical connection
| Voltage of charger V 21.6 |
| Nominal power W 250 |
| Battery pack type Li-ION |
| Charger | USB-C |
| Model | HX20WPD-C001-AG |
| Nominal voltage of charger | V 100 - |
240
| Frequency | Hz | 50 - 60 |
| Charging time when the battery is completely discharged | min | 240 |
| Protection class | II |
Device performance data
| Tank content | 1 | 0,4 |
Operating time when battery is fully
| charged with floor nozzle | ||
| Eco/Standard/Boost | min | 36/20/9 |
Dimensions and weights
| Weight (without accessories) | kg | <2.4 |
Subject to technical modifications.
Contenu
● Pulsar el interruptor on/off.
Figura I
● Pulsar el interruptor on/off.
Figura I

- Sett inn finfilteret.
- Kontroller at finfilteret sitter korrekt.
Tarvikute monteerimine
Märkus

Mēbeļu birste "2-in-1"
2

WEEK


3

MONTHS


Na predfiltru naprave je nalepka, ki opisuje, kako očistiti/zamenjati pred in fini filter:
flowchart
graph TD
    A["1: Hand spraying"] --> B["2: Week"]
    B --> C["3: Month"]
    C --> D["6: New or new disposal"]
natural_image
Black and white line drawing of a hand giving a thumbs-up gesture (no text or symbols)THANK YOU!
MERCI! DANKE! iGRACIAS!

Register your product and benefit from many advantages.
www.kaercher.com/welcome


Rate your product and tell us your opinion.
natural_image
Icon showing a gear and wrench inside a square frame (no text or symbols)www.kaercher.com/dealersearch
Alfred Kärcher SE & Co. KG
Alfred-Kärcher-Str. 28-40
71364 Winnenden (Germany)


