SS-21725 - Humidifier Sogo - Free user manual and instructions
Find the device manual for free SS-21725 Sogo in PDF.

| Product type | Compact dehumidifier |
| Dehumidification capacity | 18 L/day |
| Supply voltage | AC220-240 V |
| Frequency | 50 Hz |
| Rated power | 350 W |
| Standby power consumption | < 0.8 W |
| Off mode power consumption | < 0.3 W |
| Operating modes | Standard, Rainy days, Sleep, Drying |
| Timer | 1 to 24 hours |
| Fan speed | Low and high |
| Humidity control | Adjustable from 30% to 90% and continuous mode (CO) |
| Defrost function | Automatic |
| Full tank protection | Automatic shutdown and audible alarm |
| Filter | Washable |
| Maintenance | Regular cleaning of filter and tank |
| Safety | Protection against sensor faults (codes E1 to E5) |
| Usage | Indoor only, on a flat and stable surface |
| Compliance | Compliant with EU 2023/826 (ecodesign regulation) |
| After-sales service | www.sogosat.com |
Frequently Asked Questions - SS-21725 Sogo
User questions about SS-21725 Sogo
0 question about this device. Answer the ones you know or ask your own.
Ask a new question about this device
Download the instructions for your Humidifier in PDF format for free! Find your manual SS-21725 - Sogo and take your electronic device back in hand. On this page are published all the documents necessary for the use of your device. SS-21725 by Sogo.
USER MANUAL SS-21725 Sogo
natural_image
White SOGO brand air purifier with black lid and control panel (no visible text or symbols on device body)
Descarga tu manual
Download your manual
Declaration of conformity, Responsibility of Electronic products disposal, Importers Details and After-sales service on the last pages.
natural_image
Line drawing of a portable air conditioner unit with ventilation grilles and cooling fins (no text or symbols)natural_image
Pure mechanical component diagram without any text, numbers, or symbolsnatural_image
Line drawing of a portable air conditioner unit with ventilation grilles and airflow indicators (no text or symbols)natural_image
Line drawing of a portable air conditioner unit with a coiled cable (no text or symbols)Drenaje continuo
natural_image
Line drawing of a portable air conditioner unit with ventilation grilles and wheels (no text or symbols)
natural_image
Simple line drawing of a radiator with a pointer above it (no text or symbols)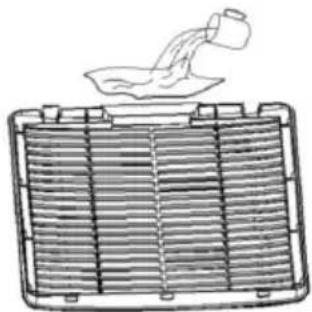
natural_image
Diagram of a radiator with liquid being poured into the air gap (no text or symbols)• Always read the instruction book carefully before using.
- This manual can be downloaded from our web page www.sogo.es
- Keep these instructions for future reference.
safety instructions for the user
GENERAL PRECAUTIONS
General precautions during the use of electrical
equipment
- Do not use the appliance for any other purpose than described in this manual.
- Do not use or store the appliance outdoors.
• Always place the appliance on to the flat and even surface. - This product is intended for indoor, non-industrial, non-commercial and only for household use. Do not use the item outdoors or for any other purpose. Misuse or improper handling may cause problems in the appliance and cause injury to the user.
- The unit must be used only for the intended purposes. No liability is accepted for damages arising from improper use or wrong handling.
- Ensure that the voltage indicated on the nameplate matches the mains voltage before plugging in the appliance.
- Always remove the plug from the power socket when the appliance is not in use. Do not leave the appliance unattended when switched on.
- Close supervision is necessary when any appliance is being used by or near children.
- Before cleaning or storing your appliance, always unplug the appliance from the power supply and let it cool down.
- The device is not completely disconnected from the power source, even after it has been turned off. To disconnect it completely, disconnect it from the mains plug.
- The appliances are not intended to be operated by means of an external timer or separate remote-control system.

Restrictions on use to avoid personal injury
- Do not let the appliance operate unattended.
- Do not place or operate this appliance near water sources.
- Do not place or operate the appliance and its power cord on or near hot surfaces (e.g., stove plates) or open flames.
-
Do not leave the power cord hanging from sharp edges and keep away from hot objects and flames. Do not wind the cord around the appliance and do not bend it.
-
Never use accessories that are not recommended by the manufacturer.
- The use of accessories not recommended or sold by the appliance manufacturer may result in fire, electric shock or injury to persons.
- When you want to remove the plug from the wall contact, please do this at the plug itself and not by pulling on the cable or the appliance itself.
- To avoid electric shock, make sure your hands are dry before plugging or unplugging.
- Do not use the device with wet hands, on damp floors or when the atmosphere is humid, there is a risk of electric shock.
- While using the appliance, make sure that the power cord must not be caught or crushed.
- Do not let the motor unit, cord or plug get wet to protect against the risk of electric shock.
- Be careful, while handling electrical appliances, as the surface of the heating element is subject to residual heat after use. Any misuse may cause potential injury to the user and may damage the appliance.
- Do not touch the outer surface of the appliance as it can get very hot during operation. Instead, use the handle or mitts.
- Never immerse the appliance or the plug-in water or any other liquid. In the event of the appliance falling in water, disconnect immediately from the mains supply and take it to an authorized service agent for repair before reusing.
- Do not use the appliance if it has fallen on the floor, if there are visible signs of damage or if it has a leak.
- Do not use the appliance if the cable or plug is damaged. In case of the cord be damaged, it must be replaced only by the manufacturer, its service agent or similarly qualified persons in order to avoid Hazard.
- In case of appliance malfunction, or if it has been damaged in any manner, return the appliance to the nearest authorized service facility for examination, repair or adjustment.
- In case of hardware problems, do not attempt to repair the product yourself. Repairs should only be carried out by qualified technicians.

Restrictions on use when used with children and elders
- The appliance is not to be used by people (including children) with reduced physical, sensory or mental capabilities, or lack of experience and knowledge, unless they have been given supervision or instruction.
• Children should be supervised to ensure that they do not play with
the appliance.
- Appliances can be used by people with reduced physical, sensory or mental capabilities or lack of experience and knowledge if they have been given supervision or instructions concerning use of the appliance in a safe way and understand the hazards.
• Children should not play with the appliance. - This appliance can be used by children aged from 8 years and above and people with reduced physical, sensory or mental capabilities or lack of experience and knowledge if they have been given supervision or instruction concerning use of the appliance in a safe way and understand the hazards involved.
- Cleaning and user maintenance shall not be made by children.
- Keep the appliance and its cord out of reach of children.

Instructions to follow when using the appliance
- To avoid electric shock and fire, do not allow water, liquid or any flammable detergent to get into or to clean the product.
- Do not spray insecticide, perfume or other flammable spray around the product.
- Before connect the power supply, please check whether the voltage of the product is consistent with the local power supply voltage.
- This product cannot replace normal ventilation, daily dust collection or oil pumping when cooking.
- Ensure the product is used and kept in a well-ventilated area.
- Leave at least 30cm of space on the back and sides of the product, and at least 50cm of space above the product when using.
- Ensure both the filter and its cover are properly installed before using.
- Do not insert fingers or other things into the air outlet/inlet to prevent physical damage or trouble.
- Please do not pull out the silicone rubber
- This appliance shall be installed according to local wiring regulations.
- Please pull off the plug before cleaning or storing the dehumidifier.
- Do not immerse the appliance in water or close to water source (Example: Swimming poolt etc.)
- Please do not sit on this appliance.
- Please drain the water tank as required.
- Do not use this appliance in a sealed environment to avoid fire.
- Please make sure the drain pipe is installed downward so that the condensate can be discharged continuously.
3. TECHNICAL SPECIFICATIONS
| Voltage Frequency Power | ||
| AC220-240V 50Hz 350W | ||
This product complies with EU regulation 2023/826 under directive 2009/125/EC on the Eco design requirements.
Power consumption in off mode: <0.3W
Power consumption in standby mode: <0.8W
Time after which the product enters into off mode: 0 min.
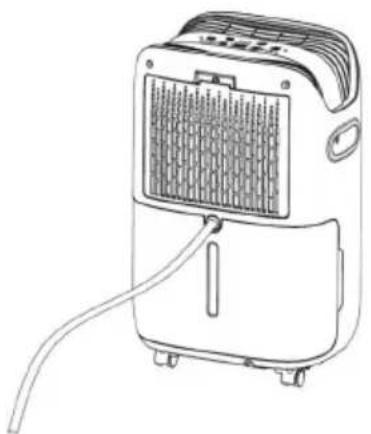
4. PARTS DESCRIPTION
- Power Cord
- Water Tank
- Water Shutoff Plug (Continuous Drain)
- Control Panel
- Filter Net
- Handle
5. CONTROL PANEL
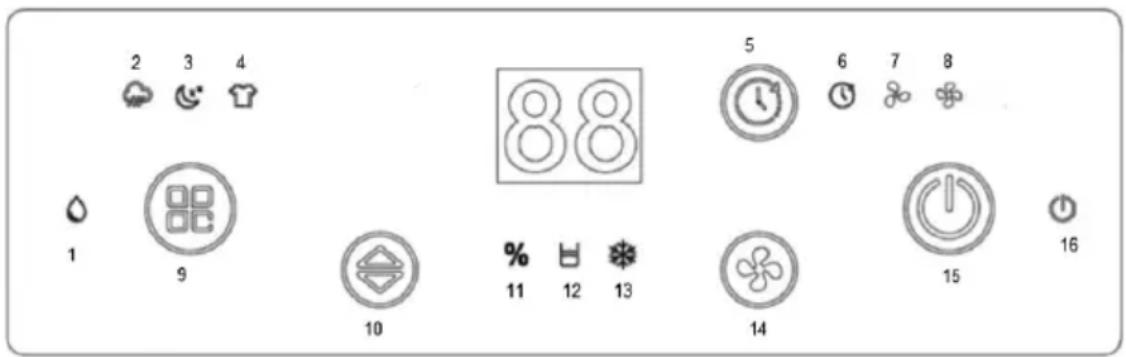
- Standard Dehumification indicator light
- Rainy Days Dehumification indicator light
- Sleeping Dehumification indicator light
- Drying Dehumification indicator light
- Timer Button
- Time indicator light
- Low Wind Speed indicator
-
High Wind Speed indicator
-
Mode Button
- Up/Down Button
- Humidity indicator light
- Water indicator light
- Defrosting indicator light
- Wind Speed Button
- Power Button
- Power indicator light
6. INSTRUCTIONS FOR USE
1. MODE BUTTON:
This button can be used to switch from one mode to another mode as detailed: I. Standard dehumidification mode, II. Rainy days dehumidification mode, III. Sleeping dehumidification mode, IV. Drying dehumidification mode.
I. Standard Dehumidification Mode
(1) Standard dehumidification indicatos light turns on.
(2) Humidity level cn be adjusted with button.
(3) Wind speed as well can be adjusted with wind speed button.
(4) Indicator light, stays continuously illuminated while in dehumidification state.
II. Rainy Days Dehumidification Mode
(1) Rainy days dehumidification indicatos light turns on.
(2) Appliance enters into "AU" comfortable dehumidification mode.
(3) Humidity level is automatically adjusted based on ambient temperature sensor.
(4) Indicatos light stays continuously illuminated while operating.
III. Sleeping Dehumidification Mode
(1) Standard dehumidification indicatos light and sleeping indicatos light both turn on.
(2) Appliance is locked in low wind operation.
(3) Settings cannot be changed.
(4) Standard indicatos light, stays continuously illuminated, during operation.
IV. Drying Dehumidification Mode
(1) Drying dehumidification Indicator light turns on.
(2) Appliance enters into "CO" continuous dehumidification state.
(3) Locked in high wind speed, and humidity level can't be adjusted.
(4) Indicator light, stays continuously illuminated while in use.
2. ON-OFF BUTTON:
Turn the appliance on or off with power button. After the appliance start working, the power indicator light is always on displaying the current humidity. The initial default humidity is the standard dehumidification mode and "CO" continuous dehumidification state, the compressor should start immediately to start dehumidification. After the appliance was shut down, the fan continues to work for 30 seconds and then stopped.
3. TIMER BUTTON:
Timer setting function.
A. In the power on mode, press the timer button to set the time. In the shutdown or standby mode, press the timer button to set the timing. which is the timing startup.
B. Timer range: 01 \~ 24 hours, timing setting sequence: 00 → 01 → 02 → ... → 23 → 24 → 00 in cycle.
C. When the timer button is pressed, the mode changes continuously in the above cycling sequence with a frequency of 0.5 seconds.
D. When the timer is set to start, the timer is set and the time is displayed. When the timer is set to shut down, the timer is set and the humidity is displayed after 5 seconds.
E. Timing boot can set the status after booting.
4. UP/DOWN BUTTON:
With the help pf buttons we can adjust humidity in the sequence: CO → 30% → 35% → ... → 90% → AU → CO, in the cycle of every 0.5 seconds. Default is CO continuous at first startup.
5. WIND SPEED BUTTON:
The appliance can adjust the wind speed through the wind speed button.
7. FUNCTION INSTRUCTION
1. HUMIDITY AUTOMATIC CONTROL
A. When unit set into "CO" (continuous) operation dehumidification mode, then dehumidifier will continue to operate (compressor and fan operate) regardless of the humidity at that time.
B. If the indoor humidity is higher than or equal to 3% of the setting humidity, the compressor will start to operate for dehumidification, the compressor and fan will operate, and the compressor operation mode indicator will be on.
C. After dehumidification, when the humidity drops below 2% of the setting humidity, the compressor stops dehumidification, the mode indicator light start flashing, and the compressor enters into three-minutes protection mode.
D. When dehumidifier stops dehumidification and if the indoor humidity rises to higher than or equal
to over 3% of the setting humidity, and compressor has passed the three-minutes protection state, the compressor will restart dehumidification process.
E. According to the above cycling operation, the indoor humidity can be maintained at the setting humidity.
2. COMFORT MODE (DISPLAY "AU")
- Controller stops if room temperature < 5^ C .
- At 5^ ≤ Temp < 20^ : Set humidity automatically to 60% .
- At 20^ ≤ Temp ≤ 27^ : Set humidity automatically to 55% .
- If Temp >27^ : Set humidity automatically to 50% .
3. FULL WATER PROTECTION
If a full water condition persists for 3 seconds the controller stops working while the fan continues to run for 30 seconds. All other functions turns off and full water indicator lights up and the buzzer sounds 15 times. Pressing any button immediately stops the buzzer. When the full water condition is resolved the system returns to standby mode.
4. DEFROST FUNCTION:
A. While in defrosting mode, the compressor shuts down, the fan is defrosted with high air, and the defrosting indicator light is always on.
B. Room temperature<16 °C:
Temp < 5°C: Appliance stops;
5^ ≤ Temp < 12^ : Compressor runs 30 min, defrost 10 min cycle;
12^ ≤ Temp < 16^ : Compressor runs 45 min, defrost 10 min cycle.
C. Room temperature<16 °C:
When the compressor runs for 45 minutes, check the coil temperature. If the coil temperature is less than -2 C, stop the compressor for defrosting for 10 minutes.
5. COMPRESSOR DELAY PROTECTION:
A. Every time when the compressor is on, it should allow functioning immediately.
B. Once the compressor shuts down, it must started again after an interval of at least 3 minutes.
6. SENSOR FAULT HANDLING:
| Screen Display | Reason of Fault State of Appliance | |
| E1 Temperature and humidity sensor fault not affect normal use | ||
| E2 | Evaporator coil sensor short circuit or open circuit | not affect normal use |
| E3 Full water alarm | No operation, drainage treatment | |
| E4 | The temperature of the product is higher than 40 °C or lower than 5 C | No operation |
| E5 | Operate for 8 hours, shutdown and rest, continue operating automatically in 10 minutes | Proceed according to procedure |
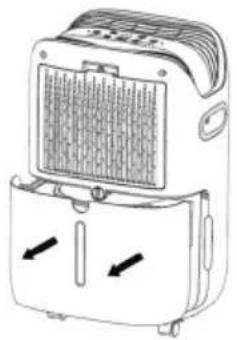
Water tank drainage
When the water tank is full, the indicator light will be on. The buzzer will sound 15 times to warn the user, and then the appliance will stop automatically. The water in the tank must be emptied in order to resotre the functioning of appliance.
Water tank Emptied
natural_image
Line drawing of a portable air conditioner unit with heat sinks and ventilation grilles (no text or symbols)natural_image
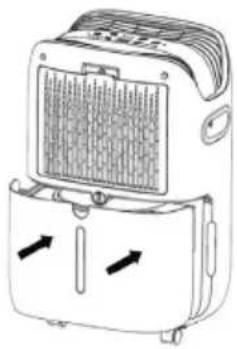
Pure mechanical component diagram without any text, numbers, or symbols- Emptied water of the tank
natural_image
Line drawing of a portable air conditioner unit with heat sinks and ventilation grilles (no text or symbols)Note: Do not remove the float from the water tank, If the float of the water tank is removed, the water full sensor will not be able to detect the water level normally, which will affect the appliance functioning.
- If the water tank is dirty, clean it with cold or warm water. Do not use detergent, steel wool, chemical dust cloth, gasoline, benzene, diluent or other solvents, because it might damage the water tank and cause water leakage.
- Close the water tank tightly with both hands, when placing the water tank back. if the water tank is not placed properly, the full water sensor will still be activated but the dehumidifier won't work.

natural_image
Line drawing of a portable air purifier with ventilation grille and power cord (no text or symbols)Continuous drainage
This dehumidifier has a continuos drain hole. First remove the water plug of the drain hole and keep it.
Then insert the drain pipe into the drain hole of the middle partition plate and straighten out the drain pipe.
At the last the water in the appliance can be drained by the continuous drain hole.
8. MAINTENANCE
CLEANING & STORAGE
- Empty the water in the tank.
- Roll up the power cord.
- Clean the filter.
- Wipe the body with soft and slightly wet cloth.
- Place in a fresh and dry environment.
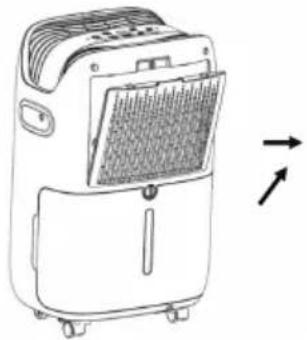
1. Filter Cleaning
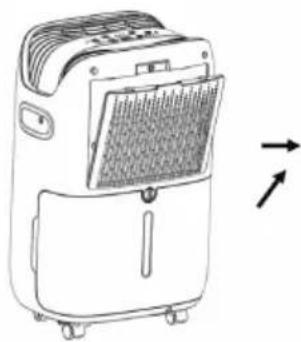
Remove the filter first
natural_image
Line drawing of a portable air purifier with ventilation grilles and wheels (no text or symbols)2. Clean the filter
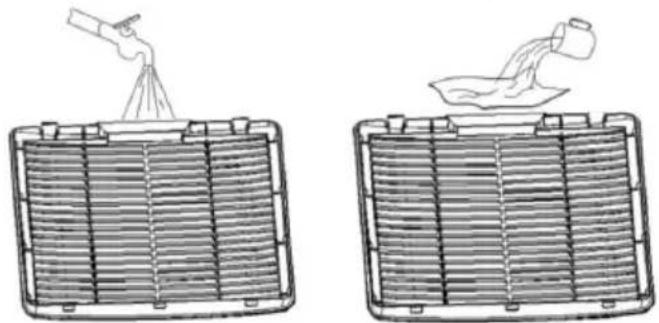
Use a vacuum cleaner to gently absorb the dust on the surface of the filter, If the filter is very dirty, wipe it with warm water and soft detergent and let it cool down completely.
natural_image
Two diagrams showing a person pouring liquid into a grid-like container, with no text or symbols present.3. Filter Install
Insert the filter into the appliance slowly, and then push the two hooks of the filter into place.

Space distance
When the dehumidifier is working, make sure that the minimum spacing around it is as shown in the figure below.
- TROUBLESHOOTING
| Fault Description | Potential Reason of Fault Solution | |
| No operation | Is the power cord properly connected? | Connect well the plug and socket |
| Is the full water indicator on? (water tank is full or not in place) | Drain the water from the tank and put in place | |
| Is the room temperature above 40°C or below 5°C? | The protection device starts, and the appliance can not work | |
| The dehumidification function can not be started | Is the filter blocked? | Clean the filter according to the "dehumidifier cleaning instructions" |
| Is the air inlet or outlet blocked? | Remove the obstruction from the air inlet or outlet | |
| No wind entering is | the filter blocked?. | Clean the filter according to the "dehumidifier cleaning instructions" |
| Big noise when operating | Is the appliance tilted? | Move the appliance to a flat and firm position. |
| Is the filter blocked? | Clean the filter according to the "dehumidifier cleaning instructions" |

PORTANT:
natural_image
Line drawing of a portable air heater with ventilation grilles and cooling fins (no text or symbols)1. Appuyez
natural_image
Technical line drawing of a curved mechanical component with an arrow indicating direction (no text or symbols)natural_image
Line drawing of a portable air heater with heat exchangers and ventilation grilles (no text or symbols)natural_image
Line drawing of a portable air conditioner unit with a coiled cable (no text or symbols)Drainage continu
natural_image
Line drawing of a portable air conditioner unit with ventilation grilles and wheels (no text or symbols)natural_image
Two diagrams showing a person pouring liquid into a container with heat sinks (no text or symbols)Distance
natural_image
Line drawing of a portable air heater with heat sinks and ventilation grilles (no text or symbols)natural_image
Pure mechanical component diagram without any text, numbers, or symbolsnatural_image
Line drawing of a portable air heater with ventilation grilles and directional arrows indicating airflow (no text or symbols)natural_image
Line drawing of a portable air conditioner unit with a coiled cable (no text or symbols)Drenagem contínua
natural_image
Line drawing of a portable air conditioner unit with ventilation grilles and wheels (no text or symbols)
natural_image
Diagram of a person standing above a rectangular grid structure with diagonal lines (no text or symbols)
natural_image
Diagram of a radiator with a pipe pouring into the air (no text or symbols)natural_image
Line drawing of a portable air heater with heat sinks and ventilation grilles (no text or symbols)natural_image
Pure mechanical component diagram without any text, numbers, or symbolsnatural_image
Line drawing of a portable air conditioner unit with ventilation grilles and directional arrows indicating airflow (no text or symbols)natural_image
Line drawing of a portable air conditioner unit with a coiled cable (no text or symbols)natural_image
Line drawing of a portable air conditioner unit with ventilation grilles and wheels (no text or symbols)natural_image
Diagram of a person standing above a grid-like structure with a pointer, possibly indicating a device or component (no text or symbols present)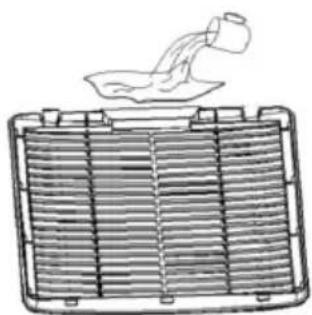
natural_image
Diagram of a radiator with a pipe pouring into the heat sink (no text or symbols)3. Filter einbauen
natural_image
Line drawing of a portable air heater with ventilation grilles and cooling fins (no text or symbols)natural_image
Pure mechanical component diagram without any text, numbers, or symbolsnatural_image
Line drawing of a portable air conditioner unit with heat exchangers and ventilation grilles (no text or symbols)natural_image
Line drawing of a portable air conditioner unit with cooling fins and a cord (no text or symbols)Drenaggio continuo
natural_image
Line drawing of a portable air purifier with ventilation grilles and directional arrows indicating airflow or movement (no text or symbols)2. Pulire il filtro
natural_image
Two diagrams showing a person pouring liquid into a container with heat sinks (no text or symbols)natural_image
Line drawing of a portable air heater with heat sinks and ventilation grilles (no text or symbols)natural_image
Pure mechanical part diagram without any text, numbers, or symbolsnatural_image
Line drawing of a portable air conditioner unit with ventilation grilles and airflow indicators (no text or symbols)natural_image
Line drawing of a portable air conditioner unit with a coiled cable (no text or symbols)natural_image
Line drawing of a portable air conditioner unit with ventilation grilles and directional arrows indicating airflow (no text or symbols)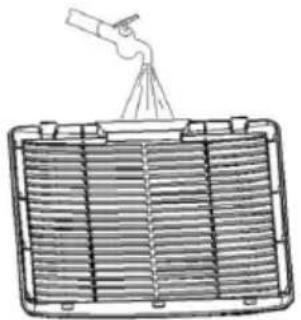
natural_image
Diagram of a person standing above a grid-like structure with a pointer, possibly indicating a device or component (no text or symbols present)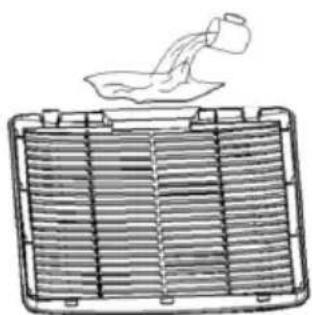
natural_image
Diagram of a radiator with a pipe pouring into the heat sink (no text or symbols)3. Instalace filtru
natural_image
Line drawing of a portable air heater with ventilation grilles and cooling fins (no text or symbols)natural_image
Pure mechanical component diagram without any text, numbers, or symbols- Tømt vand i tanken

natural_image
Technical line drawing of a portable air heater with heat exchangers and ventilation grilles (no text or symbols)natural_image
Line drawing of a portable air conditioner unit with a coiled cable (no text or symbols)natural_image
Line drawing of a portable air conditioner unit with heat exchanger and directional arrows (no text or symbols)2. Rengør filteret
natural_image
Simple line drawing of a person standing above a grid-like structure with a pointer (no text or symbols)
natural_image
Diagram of a radiator with a pipe pouring into the heat sink (no text or symbols)3. Installation af filter
natural_image
Line drawing of a portable air heater with ventilation grilles and cooling fins (no text or symbols)- Nežno pritisnite obe strani rezervoarja in ga z obema rokama izvlecite.

natural_image
Pure mechanical component diagram without any text, numbers, or symbolsnatural_image
Technical line drawing of a portable air heater with heat exchangers and cooling fins (no text or symbols)natural_image
Line drawing of a portable air conditioner unit with a coiled cable (no text or symbols)Nenehno odtekanje vode
natural_image
Line drawing of a portable air conditioner unit with ventilation grilles and directional arrows indicating airflow (no text or symbols)
natural_image
Diagram of a person standing above a grid-like structure with a pointer, possibly indicating a device or component (no text or symbols present)
natural_image
Diagram of a radiator with a pipe pouring into the heat sink (no text or symbols)natural_image
Line drawing of a portable air heater with ventilation grilles and directional arrows indicating airflow (no text or symbols)- Nježno pritisnite obje strane spremnika i izvucite spremnik obje ruke.
natural_image
Pure mechanical part diagram without any text, numbers, or symbolsnatural_image
Line drawing of a portable air conditioner unit with ventilation grilles and airflow indicators (no text or symbols)Napomena: Nemojte uklanjati plutajući mehanizam iz spremnika za vodu. Ako se plovak ukloni, senzor punog spremnika neće moći pravilno detektirati razinu vode, što će utjecati na rad uređaja.
- Ako je spremnik za vodu prljav, očistite ga hladnom ili toplom vodom. Nemojte koristiti deterdžente, čelične vune, kemijske krpe za prašinu, benzin, benzen, razrjeđivače ili druga otapala, jer to može oštetiti spremnik za vodu i uzrokovati curenje.
- Čvrsto zatvorite spremnik za vodu obje ruke prilikom vraćanja na mjesto. Ako spremnik nije pravilno postavljen, senzor punog spremnika će i dalje biti aktiviran, ali odvlaživač neće raditi.
natural_image
Line drawing of a portable air conditioner unit with a coiled cable (no text or symbols)Kontinuirano ispuštanje vode
Ovaj odvlaživač ima otvor za kontinuirano ispuštanje vode. Prvo uklonite čep iz otvora za ispuštanje i sačuvajte ga. Zatim umetnite cijev za odvod u otvor za ispuštanje na srednjoj pregradi i poravnajte cijev. Na kraju, voda iz uređaja može se ispuštati kroz otvor za kontinuirani odvod.
8. ODRŽAVANJE
ČIŠĆENJE I SKLADIŠTENJE
1- Ispraznite vodu iz spremnika.
2- Uvijte kabel za napajanje.
3- Očistite filter.
4- Obrišite tijelo uređaja mekanom i lagano vlažnom krpom.
5- Spremite uređaj na svježe i suho mjesto.
1. Čišćenje filtera Prvo uklonite filter.
2. Očistite filter
Koristite usisavač za nježno usisavanje prašine s površine filtera. Ako je filter vrlo prljav, operite ga toplom vodom s blagim deterdžentom i ostavite da se potpuno osuši.
natural_image
Line drawing of a portable air conditioner unit with ventilation grilles and directional arrows indicating airflow (no text or symbols)
natural_image
Diagram of a person standing on a canopy next to a grid-like structure (no text or symbols)
natural_image
Diagram of a radiator with a pipe pouring into the heat sink (no text or symbols)3. Umetanje filtera
Polako umetnite filter u uređaj, zatim pritisnite dva kuka filtera na mjesto.
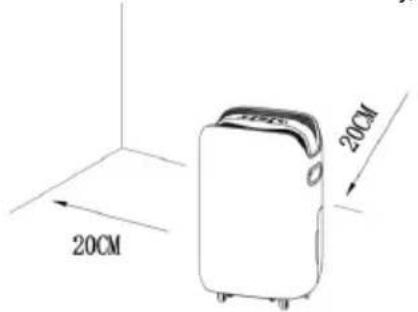
Razmak oko uređaja
Kada odvlaživač radi, osigurajte da je minimalni razmak oko njega onakav kao što je prikazano na slici ispod.
9. RJEŠAVANJE PROBLEMA
| Opis problema Mogući uzrok problema Rješenje | ||
| Ne radi | Je li kabel za napajanje pravilno priključen? | Pravilno spojite utikač i utičnicu. |
| Je li uključen indikator punog spremnika? (spremnik je pun ili nije pravilno postavljen) | Ispraznite vodu iz spremnika i pravilno ga postavite. | |
| Je li sobna temperatura iznad 40°C ili ispod 5°C? | Zaštitni uređaj je aktiviran i uređaj ne može raditi. | |
| Funkcija odvlaživanja se ne može pokrenuti | Je li filter začepljen? | Očistite filter prema uputama za čišćenje odvlaživača. |
| Je li ulaz ili izlaz zraka blokiran? | Uklonite prepreku sa ulaza ili izlaza zraka. | |
| Nema protoka zraka Je | li filter začepljen? | Očistite filter prema uputama za čišćenje odvlaživača. |
| Velika buka tijekom rada | Je li uređaj nagnut? | Pomaknite uređaj na ravnu i čvrstu površinu. |
| Je li filter začepljen? | Očistite filter prema uputama za čišćenje odvlaživača. | |

AŽNE:
natural_image
Line drawing of a portable air heater with ventilation grilles and cooling fins (no text or symbols)natural_image
Pure mechanical component diagram without any text, numbers, or symbolsnatural_image
Line drawing of a portable air heater with ventilation grilles and heat exchangers (no text or symbols)natural_image
Line drawing of a portable air conditioner unit with cooling fins and a cord (no text or symbols)natural_image
Line drawing of a portable air conditioner unit with ventilation grilles and wheels (no text or symbols)
natural_image
Diagram of a person standing on a ladder above a grid-like structure (no text or symbols)
natural_image
Diagram of a radiator with a smokestack emitting vapor, showing heat distribution (no text or symbols)2. MOD CONFORT (AFIŞAJ "AU")
- Regulatorul se oprește dacă temperatura camerei < 5^ .
- La 5^ ≤ Temp < 20^ : Setează automat umiditatea la 60% .
- La 20^ ≤ Temp ≤ 27^ : Setați automat umiditatea la 55% .
- Dacă Temp > 27°C: Setați automat umiditatea la 50%.
3. PROTECTIE LA APĂ COMPLETĂ
natural_image
Line drawing of a portable air heater with heat exchangers and cooling fins (no text or symbols)natural_image
Pure mechanical part diagram without any text, numbers, or symbolsnatural_image
Line drawing of a portable air conditioner unit with ventilation grilles and cooling fins (no text or symbols)natural_image
Line drawing of a portable air conditioner unit with a coiled cable (no text or symbols)Drenaj continuu
natural_image
Line drawing of a portable air conditioner unit with ventilation grilles and directional arrows indicating airflow (no text or symbols)2. Curățati filtrul
natural_image
Diagram of a person standing above a grid-like structure with a pointer, possibly indicating a device or component (no text or symbols present)
natural_image
Diagram of a car radiator with a pipe pouring into the air (no text or symbols)natural_image
Line drawing of a portable air heater with heat exchangers and cooling fins (no text or symbols)natural_image
Pure mechanical component diagram without any text, numbers, or symbolsnatural_image
Line drawing of a portable air conditioner unit with ventilation grilles and airflow indicators (no text or symbols)natural_image
Line drawing of a portable air conditioner unit with a coiled cable (no text or symbols)natural_image
Line drawing of a portable air conditioner unit with ventilation grilles and directional arrows indicating airflow (no text or symbols)
natural_image
Diagram of a person standing above a rectangular grid structure with a pointer, no text or symbols present
natural_image
Diagram of a radiator with a pipe pouring into the heat sink (no text or symbols)natural_image
Line drawing of a portable air heater with heat exchanger and cooling unit (no text or symbols)natural_image
Pure mechanical component diagram without any text, numbers, or symbolsnatural_image
Line drawing of a portable air conditioner unit with ventilation grilles and cooling fins (no text or symbols)natural_image
Line drawing of a portable air conditioner unit with a mesh grille and power cord (no text or symbols)Drenatge continu
natural_image
Line drawing of a portable air conditioner unit with ventilation grilles and wheels (no text or symbols)
natural_image
Simple line drawing of a person standing above a rectangular grid structure (no text or symbols)
natural_image
Diagram of a radiator with a pipe pouring into the heat sink (no text or symbols)DÉCLARATION DE CONFORMITÉ
DECLARATION OF CONFORMITY
This device complies with EU Low Voltage Directive 2014/35/EC.
Electromagnetic Compatibility Directive 2014/30/EU. Directive 2015/863/EU on the restriction of the use of certain hazardous substances in electrical.
Directive 2009/125/EC on the eco-design requirements applicable to energy-related products.

This symbol on the product or on the packaging indicates that this product can't be disposed as normal rubbish or household waste. All the electrical, electronic equipment's and battery-operated units must recycle in proper manner and according to the local municipal laws. You can recycle them by taking them to government authorized disposal centres or specialized bins which you can find in any nearby big super markets, electronics or electro domestics products stores or malls who have these types of facilities available.
Designed by: SOGO based on European quality standards Imported by: Sanysan Appliances S.L, NIF: B98753056, C/ Barcas 2, 2, 46002 Valencia, Spain Product manufactured in CHINA. After-sales service: www.sogosat.com sogosat@sogosat.com / 0034 902 222 161