SD110 - Smoke detector ALECTO - Free user manual and instructions
Find the device manual for free SD110 ALECTO in PDF.

User questions about SD110 ALECTO
0 question about this device. Answer the ones you know or ask your own.
Ask a new question about this device
Download the instructions for your Smoke detector in PDF format for free! Find your manual SD110 - ALECTO and take your electronic device back in hand. On this page are published all the documents necessary for the use of your device. SD110 by ALECTO.
USER MANUAL SD110 ALECTO
natural_image
Color palette bar with grayscale gradient and a central crosshair symbol (no text or labels)Alecto
SD110
SD530
QUICK START GUIDE
SMOKE DETECTOR

text_image
DO NOT PENT 30-50% Test TEST CUSTOMER'S OUEST
For more information, scan the QR code to see the extended manual.


natural_image
Color palette bar with grayscale gradient from black to white (no text or symbols)
EN Quick start guide 5
DE Kurzanleitung 11
natural_image
Color swatch bar with grayscale gradient from black to white (no text or symbols)
A

B
text_image
Floor plan diagram of a residential apartment with room labels and safety iconsC
text_image
30 cm 30 cm
natural_image
Color swatch bar with grayscale gradient from black to white (no text or symbols)

text_image
D 50 cm 50 cm 200 cm ✓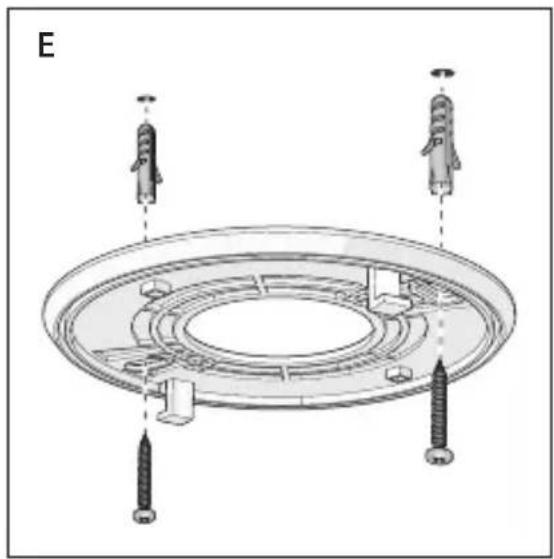
natural_image
Technical diagram of a mechanical assembly with three screws and two hanging components (no text or labels)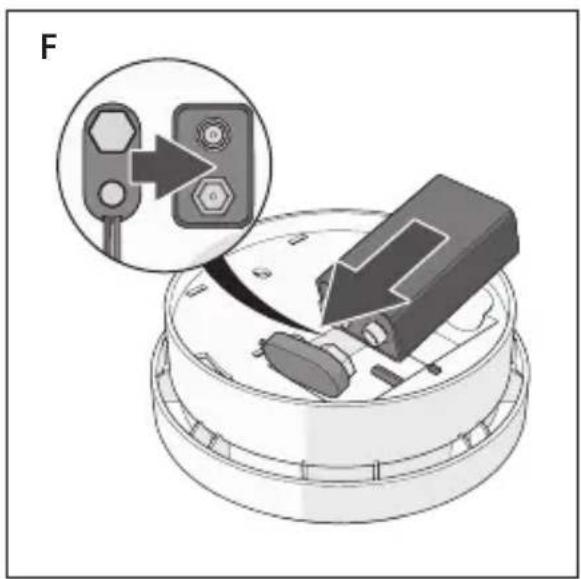
text_image
F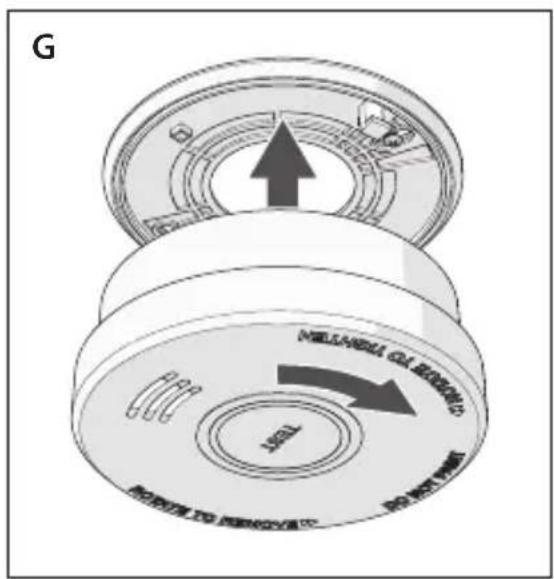
text_image
G MILLIANDA OIL BONION 100% DENTO TO REMOVAIC
natural_image
Color swatch bar with grayscale gradient from black to white (no text or symbols)
EN Quick start guide
SMOKE DETECTOR
SD110/SD530

For more information, scan the QR code on the front page to see the extended manual.
About this document
This document is the user manual and contains all the information for correct, efficient, and safe use of the product.
Ensure you have fully read and understood the instructions in this document before you install or use the product. Keep the packaging and this document for future reference.
Symbols used
WARNING!
Signal word used to indicate a potentially hazardous situation which, if not avoided, could result in death or serious injury.
CAUTION!
Signal word used to indicate a potentially hazardous situation which, if not avoided, could result in minor or moderate injury.
NOTICE
Signal word used to address practices not related to physical injury.

Indicates important information that is not directly related to safety.
| [YY3] | This symbol indicates a suitable and/or required installation location for the product. |
 | This symbol indicates an unsuitable installation location for the product. |
To prevent injury, this unit must be securely attached to the ceiling in accordance with the installation instructions.
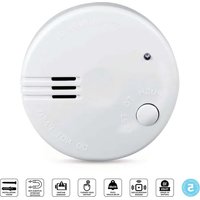
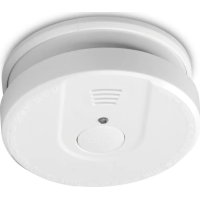
Product description (image A)
① Smoke detector
4 Mounting bracket
② Test/Hush button (with red indicator LED)
5 Battery*
6 Screws and plugs (4×)
3 Battery connector
*SD110: Pairdeer 6F22 battery (DC 9 V) *SD530: Pairdeer 6LR61 battery (DC 9 V)
Intended use
This product is intended as a photoelectric smoke detector and alarm for use in domestic indoor environments, such as hallways, living and dining rooms, and bedrooms.
This product is only intended for the detection of micro particles associated with smouldering fires (i.e. a cigarette burning a carpet or couch).
This product is not intended for detection of flames, heat, carbon monoxide or other hazardous gases.
The product must not be mounted in damp rooms, near doors, windows, ventilators or radiators.
This product is intended for indoor use only. Only use the product as described in this user manual.


Any modification of the product may have consequences for safety, warranty and proper functioning.
snoitcurtsni ytefaS
Ensure you have fully read and understood the instructions in this document before you install or use the product. Keep the packaging and this document for future reference.
WARNING!
Health hazard:
- When in doubt, always leave the building immediately when the alarm activates. Call emergency services. Not leaving the building may result in serious injury or death.
Choking hazard:
- Do not let children play with packaging material. Packaging materials can lead to choking and suffocation. Always keep the packaging material out of reach of children.
- Battery usage by children should be supervised.
Electrical hazard:
- Do not immerse the product in water or other liquids.
- Do not expose the product to water, rain, moisture, or high humidity.
- Do not open the product. The product may only be opened by an authorised technician for maintenance.
- Do not use any cell or battery that is not designed for use with the product.
Fire hazard:
- Do not use the product if a part is damaged or defective. Always replace a damaged or defective product immediately.
- Do not dismantle, open or shred cells or batteries. Chemicals inside the batteries can combust upon contact with ambient air.
- Do not short-circuit a cell or a battery.
- Do not expose cells or batteries to heat or fire. Avoid storage in direct sunlight.
- Do not subject cells or batteries to mechanical shock.
- Do not store cells or batteries haphazardly in a box or drawer where they may short-circuit each other or be short-circuited by other metal objects.
- In the event of a battery leaking, do not allow the liquid to come in contact with the skin or eyes. If contact has been made, wash the affected area with copious amounts of water and seek medical advice.
- Seek medical advice immediately if a cell or a battery has been swallowed.
- Never use an open flame (lighter, candle or match stick) to test the alarm. The open flame can melt and damage the product, and highly increases the chance of an actual fire hazard. Only use the test button to test the alarm.
Risk of improper functionality of the product:
- Only use the product in locations specified in this manual. Correct placement of the product ensures proper functioning, and reduces the risk of faulty smoke detection.
- Test the product once per week to ensure proper operation.
- Do not use the product for outdoor uses, the product is designed for indoor use.
- Do not use this product in dusty or smoky locations.
- Only use the battery type(s) recommended in this manual.
- Do not paint the product.
- Do not use the product if a part is damaged or defective. Always replace a damaged or defective product immediately.
- Do not use any accessories that are not included.
Chemical burns hazard:
- Do not subject cells or batteries to mechanical shock.
CAUTION!
- Keep cells and batteries clean and dry.
NOTICE
Risk of damaging the product:
- Only use the product as described in this document.
- Do not drop the product and avoid bumping.
- Do not use aggressive chemical cleaning agents when cleaning the product.
- Remove the batteries if you do not use the product for an extended period of time.
- Do not use rechargeable batteries.
- Dispose of the battery properly.

Check that all parts are present and that no damage is visible on the parts. If parts are missing or damaged, contact the Alecto B.V. service desk via the website: support.alecto.nl.
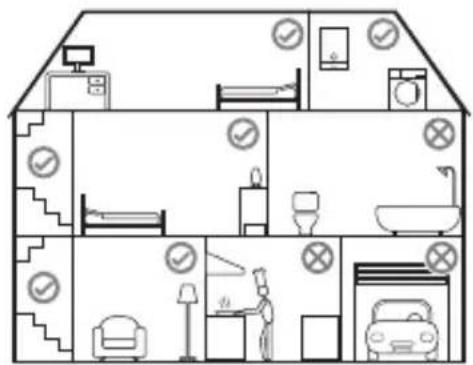
Choosing a location (image B - D)
The installation location is crucial for the correct functioning of the product.
Choose the best installation location(s) in your home based on the following requirements:
Suitable locations
- Bedroom
- Living room
- Dining room
• Hallway (on both ends of hallway longer than 9m)
Unsuitable locations
• Rooms with normal regular combustion:
- Garage
- Kitchen
- Rooms with hot water heaters
- Rooms with a fireplace
• Bathroom (and other high humidity rooms)
• Rooms where temperatures fall below 0^ C or exceed 40^ C
• Extremely dusty rooms
⚠️ Use specialised smoke detectors for rooms with normal regular combustion (garage, kitchen, fireplace).
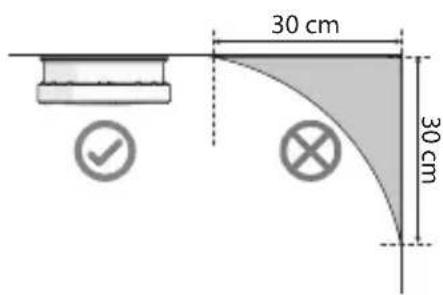
The location on the ceiling must comply with the following requirements:
- Ideally, in the middle of the room on the ceiling
• At least 50 cm from the wall - At least 50 cm from the highest point on a slanted roof
- At least 300 cm from high humidity appliances (washing machine, dish washer)
- At least 300 cm from possible sources of smoke or exhaust fumes (kitchen, cooking appliances, fireplaces, garages)
- At least 100 cm from air returns or cooling/heating supply vents
Installing the product (image E - G)
Make sure the installation location(s) meets the requirements explained in chapter Choosing a location.
- Twist the mounting bracket anti-clockwise and remove the bracket from the alarm.
- Hold the bracket against the installation location and use a pencil to mark the drill holes.
- Drill two ∅ 5 mm holes.
- Insert the plugs into the holes.
- Fasten the bracket with the screws.
- Connect the battery to the battery connector and insert the connected battery into the product.
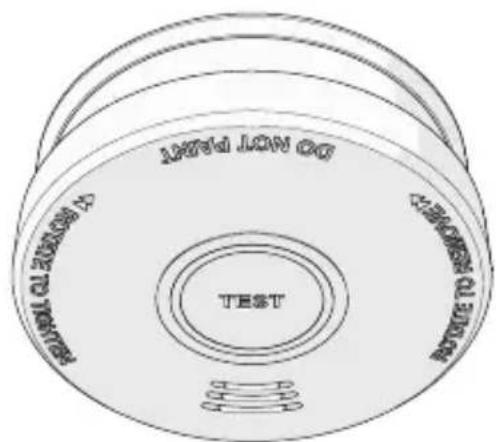
- Press and hold the Test button for 5 seconds to test the alarm.
The alarm sounds 3 times.
The red indicator LED blinks every 32 seconds, indicating the alarm is active.
- Fit the alarm to the mounted bracket and rotate the alarm clockwise to secure the alarm.
rala eht griseT
The alarm must be tested weekly. To test the alarm:
- Press and hold the Test button for 5 seconds to test the alarm.
The alarm sounds 3 times.

natural_image
Color swatch bar with grayscale gradient from black to white (no text or symbols)
The red indicator LED blinks every 32 seconds, indicating the alarm is active.
Stopping the alarm
When in doubt, always leave the building immediately when the alarm activates. Call emergency services. Not leaving the building may result in serious injury or death.
Only stop the alarm if you are sure the alarm activated accidentally or when the area has been cleared by the fire department after a fire. Press the test button to stop the alarm.
ecnanetniaM
Clean the product regularly with a soft, clean, dry cloth. Avoid abrasives that can damage the surface.
Do not use aggressive chemical cleaning agents such as ammonia, acid or acetone when cleaning the product.
Replacing the battery
When the battery is low, the alarm will sound a chirp and flashes the red indicator LED every 32 seconds. The battery needs to replaced as soon as possible.
-
Rotate the alarm anti-clockwise to remove the alarm from the bracket.
-
Disconnect the old battery from the battery connector.
- Connect the new battery to the battery connector and insert the connected battery into the product.
Only use a Pairdeer 9V 6F22 battery for SD110 and a Pairdeer 9v 6LR61 battery for SD350. - Fit the alarm to the mounted bracket and rotate the alarm clockwise to secure the alarm.
- Press and hold the Test button for 5 seconds to test the alarm.
The alarm sounds 3 times.
gninaelC
Clean the outside of the product every month with a soft, damp cloth. Avoid abrasives that can damage the surface.
remialcsiD
Alecto retains the right to change the design, specification and performance criteria of the product without notice or obligation.
lasopsiD
The product is designated for separate collection at an appropriate collection point. Do not dispose of the product with household waste.
For more information, contact the retailer or the local authority responsible for the waste management.


natural_image
Color palette bar with grayscale gradient from black to white (no text or symbols)
TROUBLE SHOOTING
| Problem Trouble shooting | |
| Smoke alarm does not sound when tested.NOTE: Push test button for at least five seconds while testing! | 1.Remove smoke alarm from bracket, then check the battery is properly connected to battery connector.2.Clean smoke alarm3.If there are still failures during warranty, you can return it to your retailer.4.If the unit is out of warranty, please replace it with another new alarm. |
| The alarm chirp occurs every about approx 32 seconds, at the same time the red LED flashes once. | The battery is in low status, replace battery refer to “replace battery” section. |
| Smoke alarm chirp occurs every approx 32 seconds (alarm goes into fault mode) | 1.Clean smoke alarm. Refer to “cleaning and maintenance” section.2.Purchase and change another smoke alarm if problem still exists. |
| Smoke alarm unwanted alarms intermittently or when residents are cooking, taking showers, etc. | 1.Press test button to pause alarm.2.Clean the smoke alarm device. Please refer to the “maintenance and cleaning” section.3.Move the smoke alarm device to new location and press test button. |
| The alarm sounds different. It starts and stops. | 1.Clean smoke alarm device. Please refer to “maintenance and cleaning” section".2.If there are still failures during warranty, you can return it to your retailer.3.If the unit is out of warranty, please replace it with another new alarm. |
DE Kurzanleitung
RAUCHMELDER SD110 / SD530

natural_image
Color palette bar with grayscale gradient and a central crosshair symbol (no text or labels)natural_image
Color swatch bar with grayscale gradient from black to white (no text or symbols)
FEHLERBEHEBUNG
natural_image
Color swatch bar with grayscale gradient from black to white (no text or symbols)
sésilitu selobrøy
AVERTISSEMENT!
natural_image
Color swatch bar with grayscale gradient from black to white (no text or symbols)
Nettoyage
natural_image
Color swatch bar with grayscale gradient from black to white (no text or symbols)

Snelstartgids
ROOKMELDER
SD110/SD530

natural_image
Color palette bar with grayscale gradient and a crosshair symbol at the bottom (no text or labels)natural_image
Color swatch bar with grayscale gradient from black to white (no text or symbols)
natural_image
Color swatch bar with grayscale gradient from black to white (no text or symbols)
itasu ilobmiS
AVVERTENZA!
natural_image
Color swatch bar with grayscale gradient from black to white (no text or symbols)
natural_image
Color palette bar with grayscale gradient and a central crosshair symbol (no text or labels)natural_image
Color swatch bar with grayscale gradient from black to white (no text or symbols)
natural_image
Color swatch bar with grayscale gradient from black to white (no text or symbols)
natural_image
Color palette bar with grayscale gradient from black to white (no text or symbols)
natural_image
Color swatch bar with grayscale gradient from black to white (no text or symbols)
PT
adipár oãçaicinjed aiu
DETETOR DE FUMO SD110 / SD530

natural_image
Color swatch bar with grayscale gradient from black to white (no text or symbols)
sv Snabbstartsguide
BRANDVARNARE
SD110/SD530

natural_image
Color palette bar with grayscale gradient from black to white (no text or symbols)
FELSÖKNING
natural_image
Color palette bar with grayscale gradient from black to white (no text or symbols)

Pika-aloitusopas
SAVUNILMAISIN
SD110 / SD530

natural_image
Color swatch bar with grayscale gradient from black to white (no text or symbols)
Jätehuolto
natural_image
Color palette bar with grayscale gradient from black to white (no text or symbols)
FEILS∅KING
natural_image
Color swatch bar with grayscale gradient from black to white (no text or symbols)
natural_image
Color swatch bar with grayscale gradient from black to white (no text or symbols)
FEJLFINDING
natural_image
Color palette bar with grayscale gradient from black to white (no text or symbols)
Fel
natural_image
Color palette bar with grayscale gradient from black to white (no text or symbols)
Ártalmatlanítás
natural_image
Color palette bar with grayscale gradient from black to white (no text or symbols)

*SD110: Akumulator Pairdeer 6F22 (DC 9 V)
*SD530: Akumulator Pairdeer 6LR61 (DC 9 V)
einezcanzezrP
natural_image
Color swatch bar with grayscale gradient from black to white (no text or symbols)
SK
odán yihRý
DETEKTOR DYMU
SD110 / SD530

natural_image
Color palette bar with grayscale gradient and a crosshair symbol at the bottom (no text or labels)- Otoč te montážnu konzolu proti smeru hodinových ručičiek a odstráňte ju z budíka.
- Držte držiak na mieste inštalácie a ceruzkou si označte otvory na vítanie.
- Vyvítajte dva otvory ∅ 5 mm.
- Vložte príchytky do otvorov.
- Upevnite držiak pomocou skrutiek.
- Pripojte batériu ku konektoru batérie a vložte pripojenú batériu do výrobku.
- Stlačením a podržaním tlačidla Test na 5 sekúnd otestujte alarm.
natural_image
Color swatch bar with grayscale gradient from black to white (no text or symbols)
CS
dován ýlhcyR
DETEKTOR KOUŘE SD110 / SD530

natural_image
Color palette bar with grayscale gradient from black to white (no text or symbols)
Likvidace

natural_image
Color swatch bar with grayscale gradient from black to white (no text or symbols)
RO
natural_image
Blank white image with a color palette bar at the top and corner markers (no text or symbols)
natural_image
Color palette bar with grayscale gradient and a central crosshair symbol (no text or labels)

Commaxx B.V.
Wiebachstraat 37
6466 NG Kerkrade, The Netherlands
service-alecto@commaxxgroup.com

03/2025 V01