
Active Balls 50 - Water filter Steinbach - Free user manual and instructions
Find the device manual for free Active Balls 50 Steinbach in PDF.

| Brand | Steinbach |
| Model | Active Balls 50 |
| Category | Water filter |
| Product reference | 040220 |
| Pump type | Self-priming with pre-filter and integrated timer |
| Circulation flow rate | 5,500 l/h |
| Max. discharge head | 9.0 m |
| Power consumption | 450 W |
| Power supply | 230 V~ 50/60 Hz |
| Max. water temperature | 35 °C |
| Tank diameter | 400 mm |
| Hose connection | 32/38 mm |
| Max. pool capacity | 22,000 litres |
| Required amount of filter balls | Approx. 545 g |
| Timer battery | Lithium 3 V CR2032 |
| Filtration type | With filter balls |
| Electrical protection | Residual current circuit breaker 30 mA |
| Pump installation | On support plate |
| Saltwater compatible | Yes, up to 0.5% salt |
| Main material | Plastic |
Frequently Asked Questions - Active Balls 50 Steinbach
User questions about Active Balls 50 Steinbach
0 question about this device. Answer the ones you know or ask your own.
Ask a new question about this device
Download the instructions for your Water filter in PDF format for free! Find your manual Active Balls 50 - Steinbach and take your electronic device back in hand. On this page are published all the documents necessary for the use of your device. Active Balls 50 by Steinbach.
USER MANUAL Active Balls 50 Steinbach
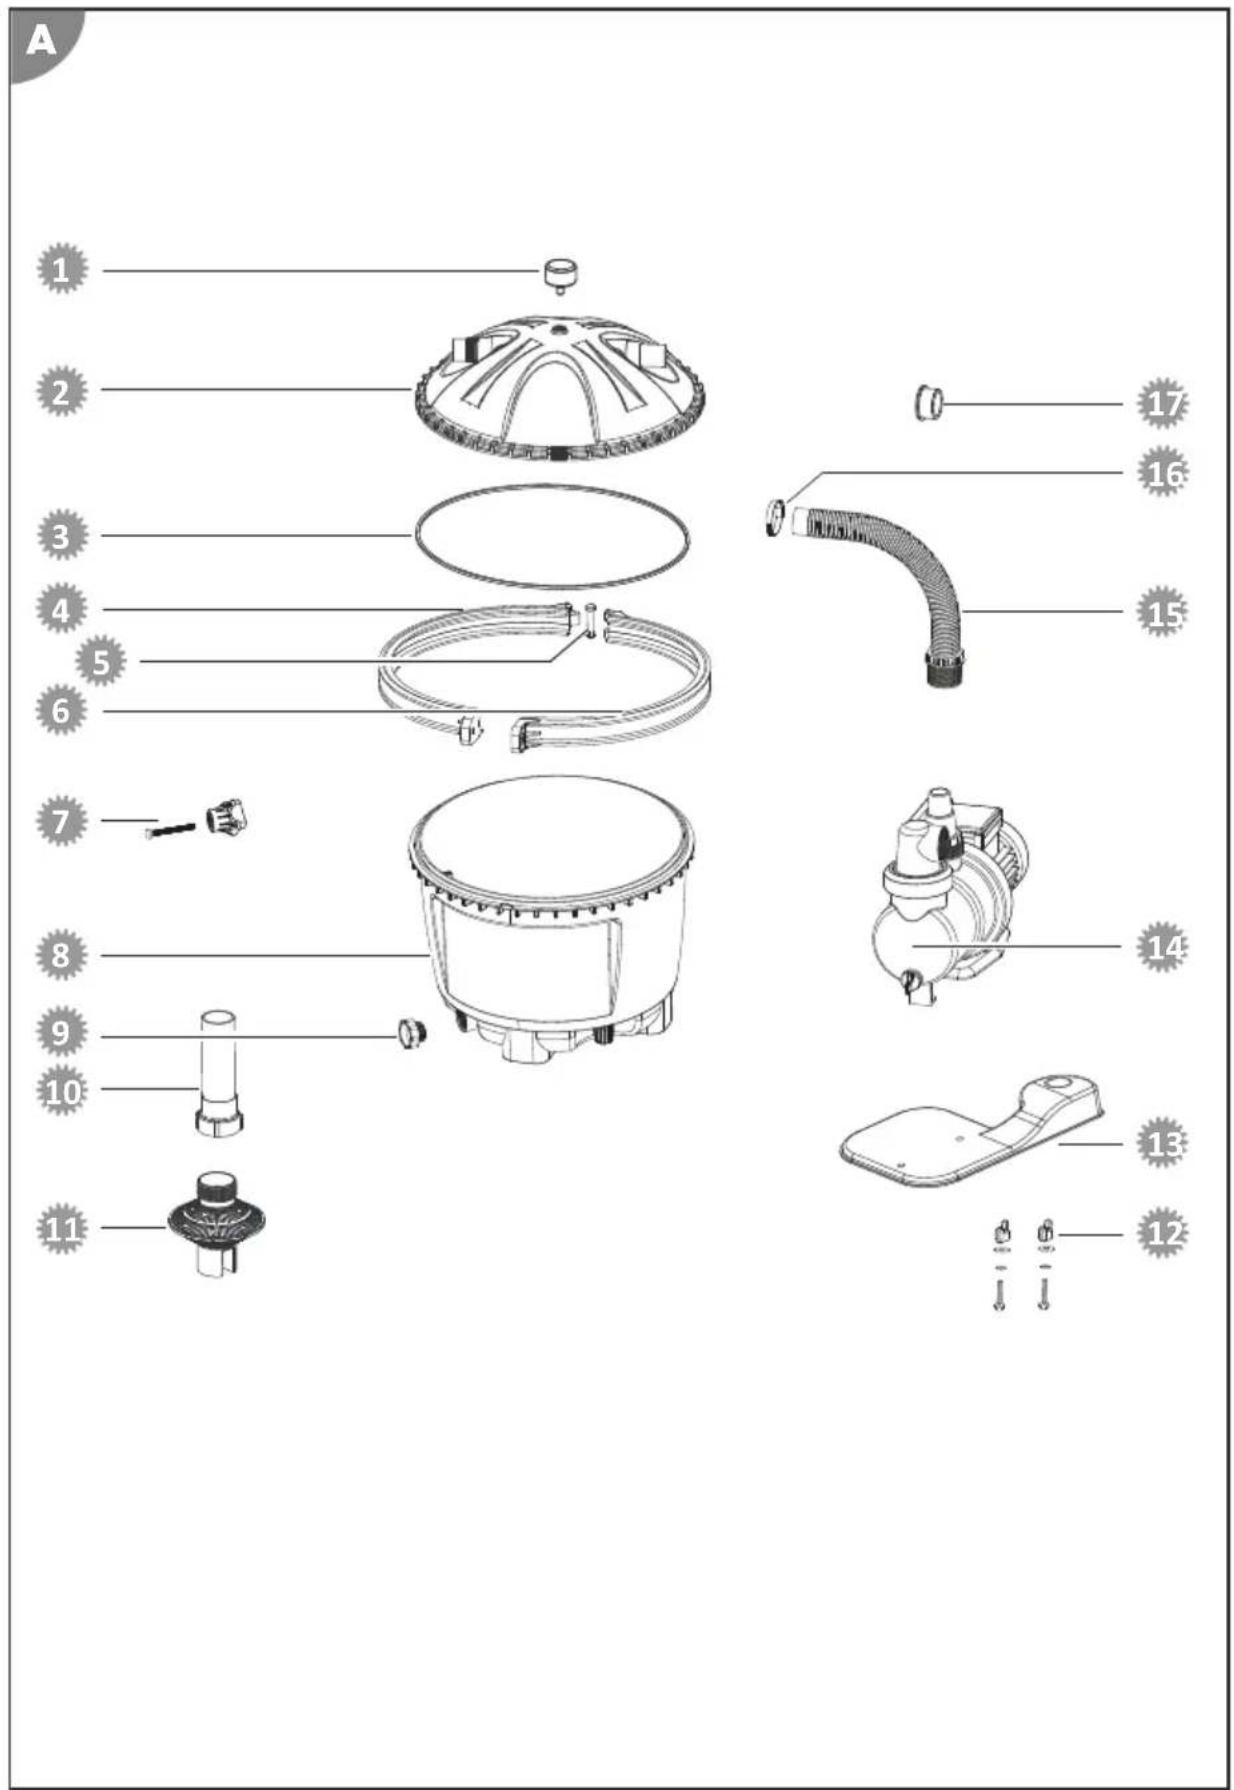
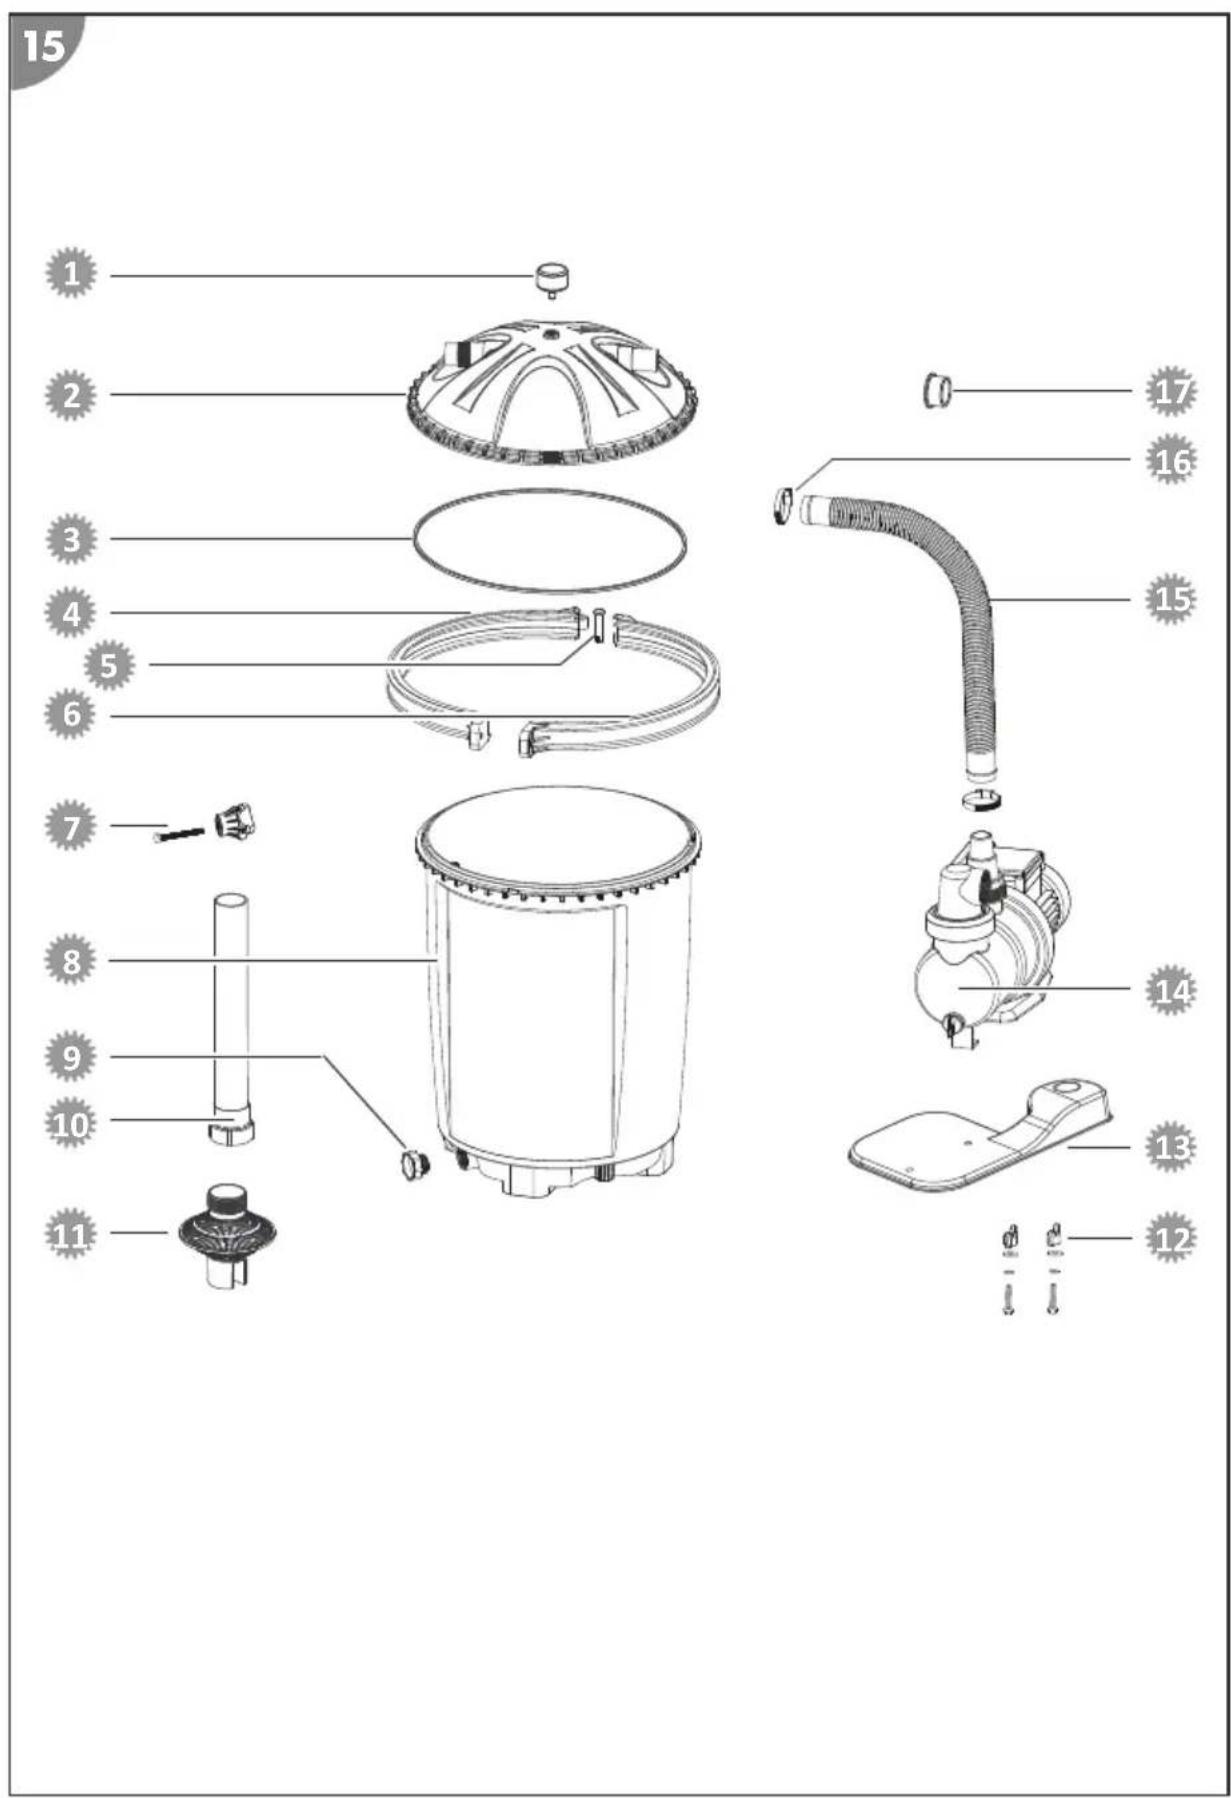
Package contents/components
1 Filter cover
2 Locking ring
3 Filter vessel seal
4 Locking ring bolt
5 Wing nut
6 Filter vessel
Riser pipe
8 Screen
9 Base plate
10 Pump
11 Prefilter cover
12 Hose adapter (2x)
13 Threaded ring
14 Pressure hose
15 Hose clamp (2x)
16 O-ring seal, large (0 79 mm)
17 O-ring seal, medium (0 54 mm)
18 O-ring seal, small (0 45 mm)
19 Screw set for fastening the pump (2x)
20 Manometer
Teflon tape (no illustration)
Instruction manual (no illustration)
Components
21 Prefilter
22 Pump outlet
23 Drainage opening
24 Drain screw
25 Suction line
Pressure line
27 Return line
28 Bleeder screw
29 Timer
30 ON/OFF button
31 Timer button
Required tools not included in the package
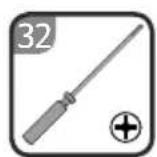
32 Phillips screwdriver PH1
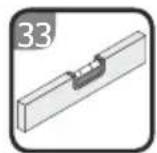
33 Spirit level
Contents
Overview 2
Package contents/components 33
General Information 36
Explanation of Symbols 36
Safety 37
Unpacking and checking the package contents 40
Preparation 41
Initial cleaning of the device. 41
Choosing the location 41
Filter shaft. 42
Description of the filter system 42
Description of the filter system 42
How the timer works. 43
Filtering time 44
Operation with floor cleaners 44
Before First Use 44
Check the following before start-up. 44
Preparing the filter vessel. 44
Initial start-up of the timer 46
- Preparing the pump 46
Mounting the pump on the base plate. 47
Hose connections 48
Preparing the filter system 49
Operation 50
Pump operation 50
Care instructions. 50
Maintenance. 50
Exchanging the filter medium. 50
Replacing the timer battery. 51
Winter storage. 52
Cleaning. 52
Cleaning the filter balls. 52
Test. 53
Storage. 53
Troubleshooting 53
Technical data. 54
Active Balls 50. 54
Active Balls 75. 54
Spare parts. 56
Active Balls 50. 56
Active Balls 75. 58
Declaration of Conformity 59
Disposal. 59
General Information
Read and keep the operating instructions

These operating instructions are a part of this filter system (in the following also called "device"). It contains important information about start-up and operation.
Read the operating instructions and especially the safety instructions carefully before using the device. Non-observation of these operating instructions can lead to severe injuries or damage to the device.
The operating instructions are based on the standards and regulations in effect in the European Union. Also observe country-specific directives and laws abroad.
Keep the operating instructions for further use. If you pass on the device to a third party, you must pass on these operating instructions as well.
Intended use
This device has been designed exclusively for cleaning pool water. It can be used in salt water as long as the salt content of the water is less than 0.5% (salt electrolysis). It removes visible dirt and is suited for all standard pools with a hose connection of 32 / 38 mm.
The filter medium in the filter vessel filters dirt particles out of the flowing water and serves as a permanent dirt and floating debris filter for your pool water. The cleaned water flows through the filter cover in the return line back into the pool.
Only use Steinbach filter balls as a filter medium. Please refer to the section "Technical data" for the required quantities.
This product is exclusively intended for private use and not suited for the commercial sector. Only use the device as described in these operating instructions. Any other use is considered inappropriate and may lead to material damage or even injury. The device is not a toy.
The manufacturer or retailer will not assume any liability for damage caused by inappropriate or incorrect use.
Explanation of Symbols
The following symbols are used in these operating instructions, on the device or on the packaging.

This symbol provides you with useful additional information on handling and use.

Products marked with this symbol meet all the applicable Community regulations of the European Economic Area.

Never use a sharp knife or other pointed object to open the packaging. You may damage the contents.
Safety
The following signal words are used in these operating instructions.
WARNING!
This signal symbol/word denotes a hazard with an average risk level that could lead to death or severe injury if it is not avoided.
CAUTION!
This signal symbol/word denotes a hazard with a low risk level that could lead to mild or moderate injury if it is not avoided.
NOTICE!
This signal word provides a warning about potential material damage.
General safety instructions
WARNING!
Risk of electric shock!
Faulty electric installation or excess mains voltage can cause an electric shock.
- Only connect the power cable if the mains voltage of the socket matches that on the type plate.
- Only connect the power cable to an easily accessible socket so that you can quickly disconnect it in the case of a fault.
- Only operate the device on a grounded socket secured with at least 16A.
- The device must be powered via a residual current device with a rated residual current of at most 30mA .
-
Do not operate the device if it shows visible damage or if the power cable is defective.
-
Do not open the device; leave repairs to an expert. Contact the service address on the back of the instruction manual for this purpose. All liability and warranty claims will be void in the case of arbitrary repairs, improper connection or wrong operation.
- Never touch the power cable with wet hands.
- Never pull the power cable out of the socket by the cable; always hold it by the plug.
- Never use the power cable as a carrier handle.
- Keep the device and the power cable away from naked flames and hot surfaces.
- Do not place any objects on the power cable.
- Do not bury the power cable.
- Route the power cable such that no one can trip over it.
- Do not kink the power cable and do not place it over sharp edges.
- Only use extension lines, if required, that are also suitable for outdoor use. Using an extension line that is suited for outdoor use reduces the risk of electric shock.
- Do not use the device during a thunderstorm. Switch it off and pull the power cable out of the socket.
- Always switch off the device and disconnect it from the power supply if you are not using the device, when cleaning it or in the case of a fault.
- Only components that meet the original device data must be used for repair. There are electric and mechanical components in this device that are indispensable for hazard protection.
- Only use spare parts and accessory parts supplied or recommended by the manufacturer. All warranty claims will be void when using third-party components.
WARNING!
Danger to children and persons with reduced physical, sensory or mental capacities (such as partially disabled persons/older persons with reduced physical and mental capacities) or persons lacking experience and knowledge (such as older children).
Improper handling of the device can lead to severe injury or damage to the device.
- Only allow others to access the device after they have read and comprehended the entire manual or have been instructed about the intended use and the associated risks.
- Never let persons with reduced physical, sensory or mental capacities (such as children or drunk people) or a lack of experience and knowledge unsupervised near the device.
- Never allow children and persons with limited physical, sensory or mental capacities or persons lacking the respective experience and knowledge to operate the device.
- Do not let children clean or service the device.
- Children are not allowed to play with the device or with the power cable.
- Install the filter system at a sufficient distance to the pool wall so that it cannot be used as an aid for entering the pool.
WARNING!
Risk of injury through insufficient qualification!
Insufficient experience or skills for handling the required tools and insufficient knowledge of regional or normative regulations for the required work can lead to severe injuries or material damage.
-
Assign all work whose risks you cannot estimate due to insufficient personal experience to a qualified expert.
-
Do not operate the device under the influence of drugs, alcohol or medication or if you are tired.
NOTICE!
Improper handling of the device can damage the device.
- Select a location for the device that is protected from the weather.
- Never place the filter system in a cavity or directly on the lawn as this poses the risk of flooding and overheating.
- Do not let the device run dry (without water).
- Never place the device or parts of it in the pool.
- Do not use the device if there are persons in the water.
Unpacking and checking the package contents
NOTICE!
Careless opening of the packaging, especially with the help of sharp or pointed objects, may cause damage to the device.
- Open the packaging very carefully.
- Do not penetrate the packaging with sharp or pointed objects.
WARNING!
Packaging materials pose a risk of suffocation!
Catching your head in the packaging foil or swallowing other packaging materials can cause death. There is a higher risk for children and mentally challenged persons who cannot estimate the hazard potential due to lack of knowledge and experience.
- Prevent children and mentally challenged persons from playing with the packaging materials.
NOTICE!
There is a higher risk of damage to the device if it is stored or transported without the packaging.
- Do not dispose of the packaging.
- In the case of damage, substitute the packaging with an at least similar box.
Checking the delivery for completeness and damage
- Open the packaging carefully.
- Take all parts out of the packaging.
- Check the completeness of the delivery.
- Check the delivery for damage.
Preparation
Initial cleaning of the device
- Remove the packaging materials and all protective foils if present.
- Clean all parts of the package content as described in the "Cleaning" section.
The device has been cleaned and is ready for use.
Choosing the location

The filter system is sufficiently protected against the penetration of water and foreign objects. We nonetheless recommend choosing a site that is protected from the weather.
- Position the filter system between the suction opening and the injection nozzle.
- Ensure sufficient distance to the pool wall so that the filter system cannot be used as an aid for entering the pool.
- Make sure that the maximum distance of 3 meters to the pool is not exceeded.
- Install the filter system on a solid base such as a large concrete patio stone. Use a spirit level 33 to make sure it is level.
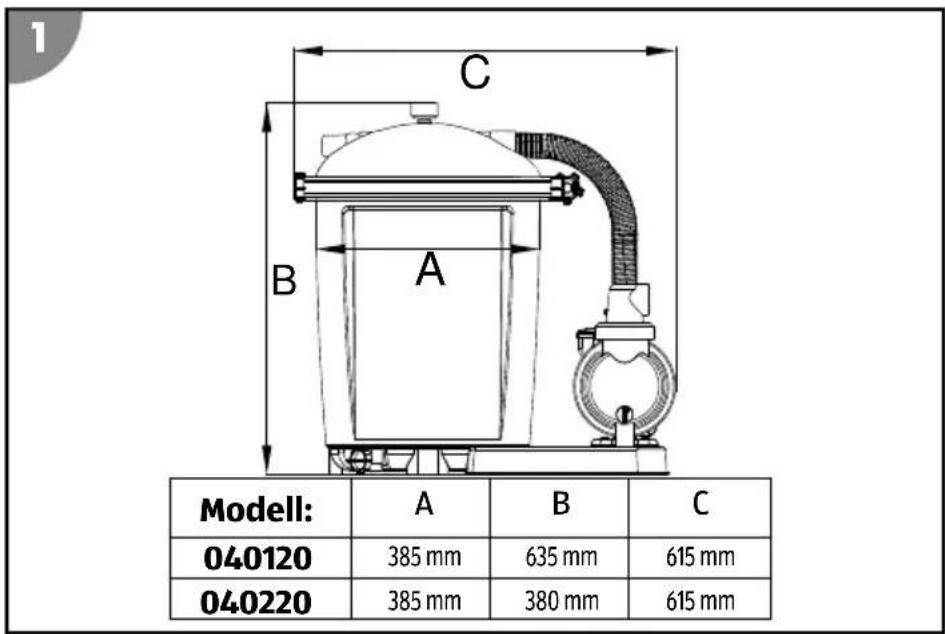
Product dimensions:
Filter shaft

A filter shaft is required if the pool is partially or entirely installed in the ground so you can place the pump of the filter system below the pool's water level.
- Make sure that the filter shaft cannot be flooded and that ambient and rainwater can drain away easily.
You can do so by installing a gravel layer at the bottom of the shaft. An optional immersion pump with a float switch that is connected to a canal or drain additionally protects your filter system from rising water inside the shaft.
- Ensure sufficient natural ventilation of the shaft to prevent condensation.
- Design the size of the filter shaft so that you can carry out work on the filter system.
Description of the filter system
Description of the filter system
The filter balls in the filter vessel 6 serve as a dirt and floating debris filter.
Contaminated pool water passes through the suction line 25 of the pool, through the filter pump 10 and the filter cover 1, from the top into the filter vessel.
When the water flows through the filter balls, dirt particles are deposited and filtered out of the water.
The cleaned water flows through the filter cover in the return line back into the pool.
If the manometer 20 on the filter cover rises above 1 bar, the filter balls are very dirty and must be cleaned.
How the timer works
The pumps has an integrated timer.
When the desired filter pump running time is set (visible on the LED bar), the pump operates for the set time from the time of first start-up and stops for the rest of the time until 24 hours have passed. The colors of the LED display do not have any specific meaning.
Within a 24-hour period, you can only set one filter running time with the integrated timer. To set several intervals within a 24-hour period, you need an external timer (see example "External timer").
The timer has battery (see "Technical data"). If the power supply is disconnected or in case of a power outage, the start time and the running time are saved.
When the power supply to the pump is restored, the timer reactivates the pump at the set start time and for the set running time.

The ON/OFF button only stops the pump while it is running. The timer function can be deactivated only by disconnecting the pump from the power supply.
Example: 6 hours running time
- Connect the pump's power plug to the power supply.
The running time display is lit.
- Press the timer button 29 several times, until the LED "6" is lit.
- Press the ON/OFF button 30 to switch on the pump 10.
The pump now runs for 6 hours nonstop. If you pressed the ON/OFF button at 12 PM, for instance, the filter system runs until 6 PM.
The timer activates the pump again at 12 PM.
Example: external timer
To use this mode a battery must be inserted and you need an external timer (not included in the package contents).
- Connect the timer to the power supply and set the desired running times.
The timer must not supply power to the pump.
- Connect the pump's power plug to the timer.
The running time display is lit. If the display is not lit, the timer is inactive. Read the operating instructions of the timer.
- Press the timer button 29 several times, until the LED "24" is lit.
The 24-hour setting indicates continuous operation.
- Press the ON/OFF button 30 to switch on the pump 10.
The timer now controls the running times of the pump.
Filtering time
The pool's water content should be turned over at least three to five times in 24 hours depending on the use and the size of the system. The operating time depends on the output of the filter system and the pool size.
Operation with floor cleaners

Use a skimmer with a screen basket or similar device if your filter system does not feature a prefilter to prevent foreign objects from damaging the device.

Observe the instruction manual notes of the floor cleaner. Air must not penetrate the filter system to prevent the system running dry and overheating.
You can connect the hose of the floor cleaner directly to the suction line of the filter system. The hose of the floor cleaner must be completely filled with water.
Before First Use
Check the following before start-up
- Make sure that the pump's power cable is disconnected from the power supply.
- Make sure that the device is located outside the pool and below the water level.
- Make sure that all feed and drain lines are correctly connected and fastened in place.
- Make sure that the pool's water level is at least 2.5 to 5cm above the opening of the suction line. If this is not the case, fill the pool.
Preparing the filter vessel
- Remove the locking ring by unscrewing the wing nut counterclockwise.
- Put aside the locking ring and its wing nut.
-
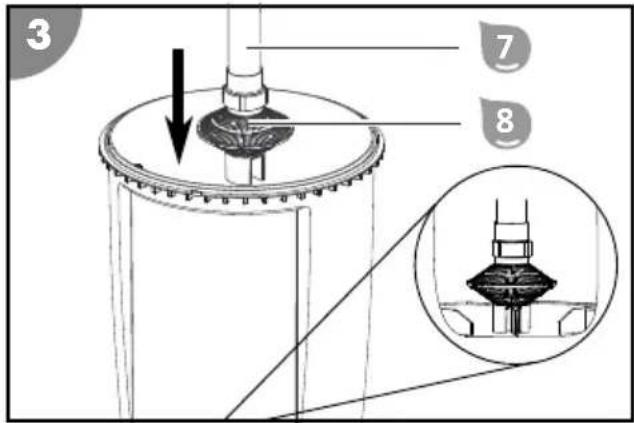
Screw the riser pipe onto the screen 8.
-
Position the riser pipe including screen 8 in the middle of the filter vessel bottom.
Make sure that the protrusion in the middle of the filter vessel bottom fits into the recess of the screen.
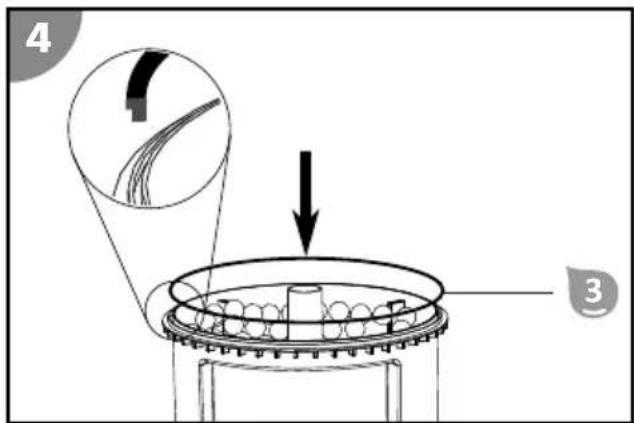
- Fill the filter vessel with Steinbach filter balls.
Please refer to the section "Technical data" for the required quantities.
- Insert the vessel seal 3. Check for any foreign objects in the groove and make sure that the seal is fitted correctly.
-
Align the notch on the outer edge of the filter cover with the adjustment lug of the filter vessel.
-
Place the filter cover on the filter vessel.
Make sure that the riser pipe is inserted into the recess at the bottom of the filter cover.
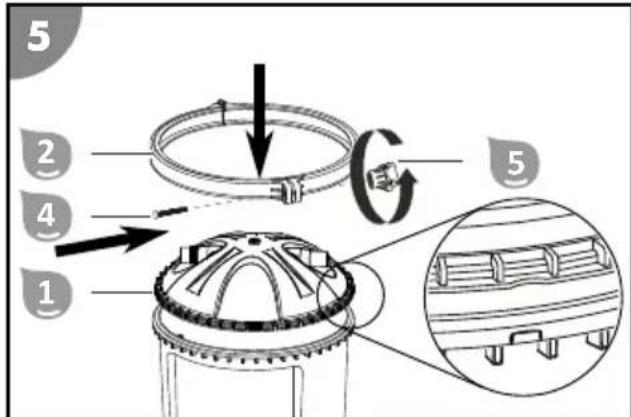
- Place the locking ring around the
filter cover and filter vessel connecting point.
-
Insert the locking ring bolt into the hexagon socket of the locking ring.
-
Pass the locking ring bolt through the hole on the opposite side of the clamping ring.
-
Place the wing nut 5 onto the thread and turn it clockwise to tighten it.
-
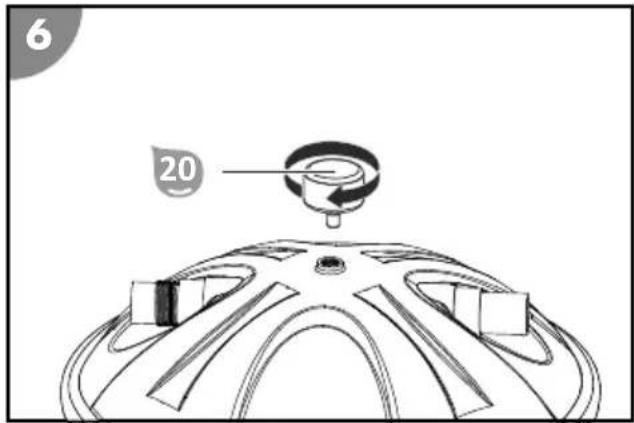
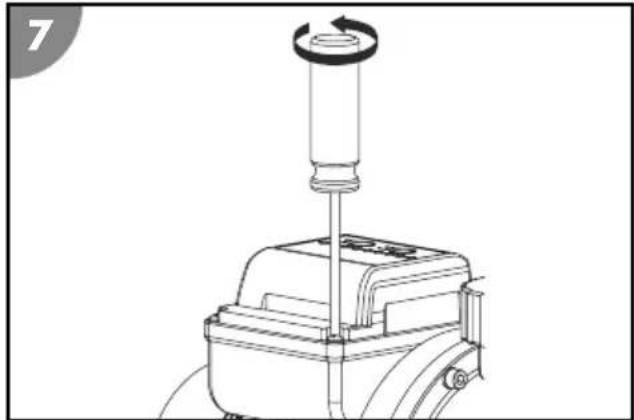
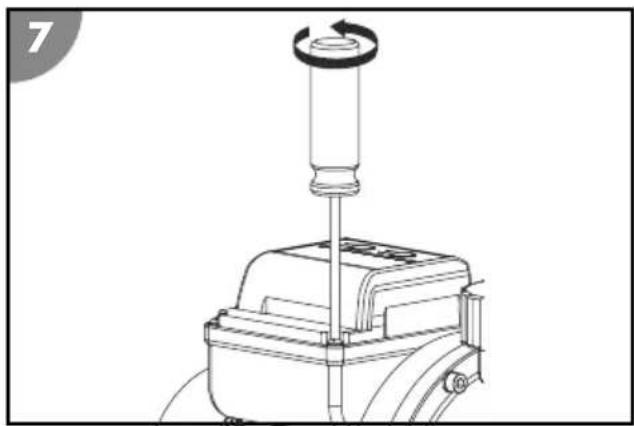
Remove the bleeder screw 28 on the filter cover by turning it counterclockwise.
-
Wrap the manometer thread 20 with Teflon tape.
- Screw in the manometer at the removal position of the bleeder screw by turning it clockwise.
The filter vessel is prepared.
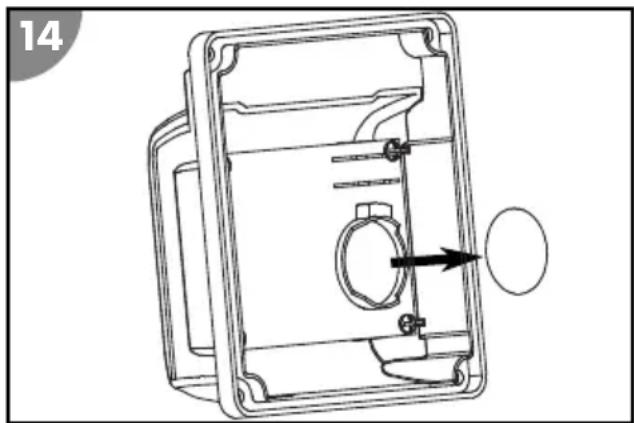
Initial start-up of the timer

The timer is going to function flawlessly even if you do not perform the steps described below. However, should the power supply be interrupted, the saved filter running times will be lost.
- Make sure that the pump's power cable is disconnected from the power supply.
- Use a Phillips PH1 screwdriver to remove the screws of the timer cover (turn counterclockwise).
- Remove the cover.
- Pull out the strip of plastic from underneath the battery.
- Replace the cover.
- Screw in the screws clockwise.
The timer's memory backup function is activated.
Preparing the pump
At the time of delivery, the pump is only partially assembled.

Only hand-tighten all screw connections. Excessive tightening of the screw connections damages seals and plastic components. Do not use any tools. You can use Teflon tape to seal screw connections with minor leakage.
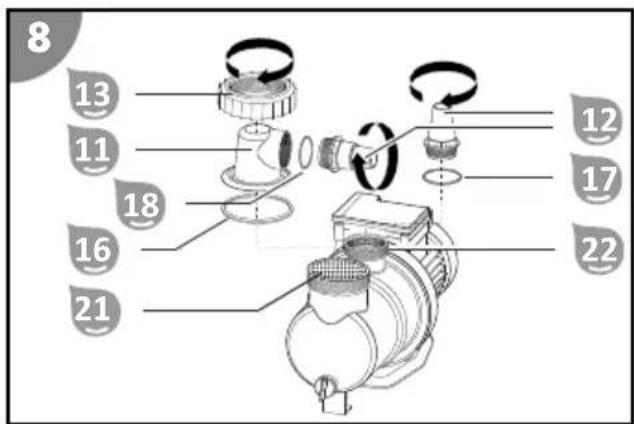
- Loosen the threaded ring 13 on the prefilter cover 11 by turning it counterclockwise.
- Lift the prefilter cover with the threaded ring off the pump housing.
- Insert the large O-ring seal 16 into the groove on the pump housing.
- Insert the prefilter into the pump. The prefilter is already inserted into the pump at the factory.
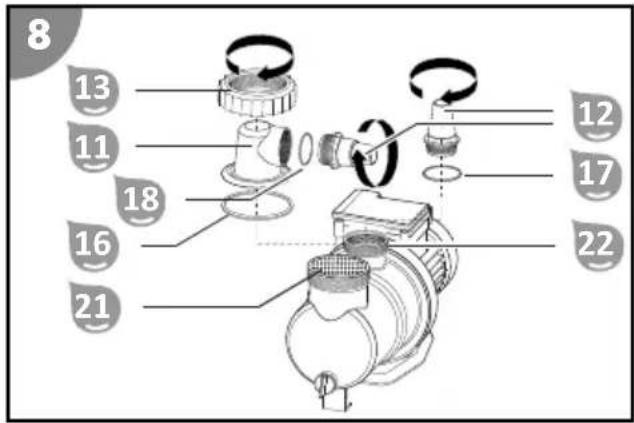
- Check the O-ring seal for dirt or damage. Replace the seal if necessary.
- Place the prefilter cover 11 on the pump housing.
- Guide the threaded ring over the prefilter cover.
- Turn the threaded ring clockwise until it is hand-tight.
- Insert the small O-ring seal 18 into the prefilter cover.
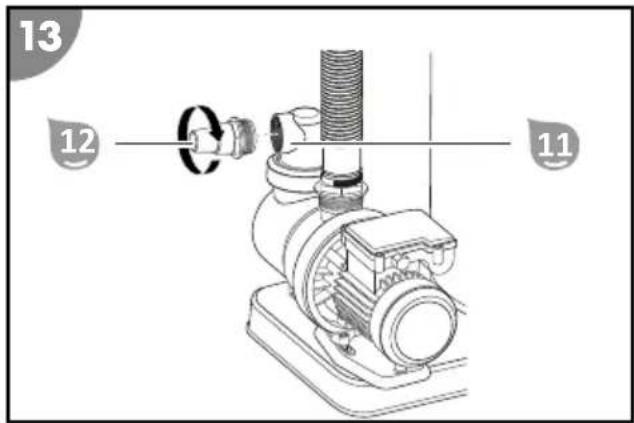
- Screw the hose connection clockwise into the prefilter cover until it is hand-tight.
- Place the medium O-ring seal 17 into the recess of the pump outlet 22.
- Screw a hose adapter 12 clockwise into the pump outlet until hand-tight.
The Active Balls 50 filter system has the hose adapter assembled on the pressure hose.
The pump is ready for operation. You can now connect it to the lines.
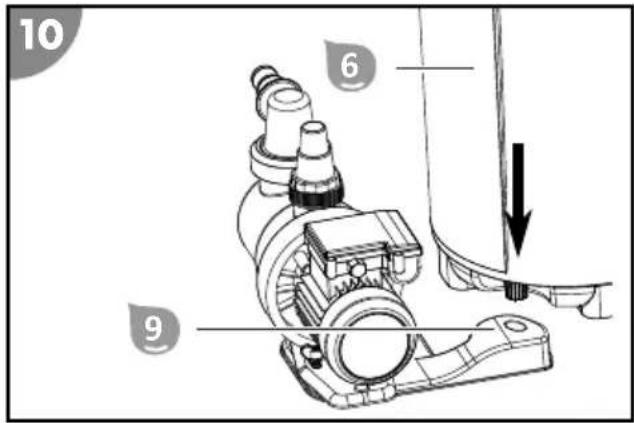
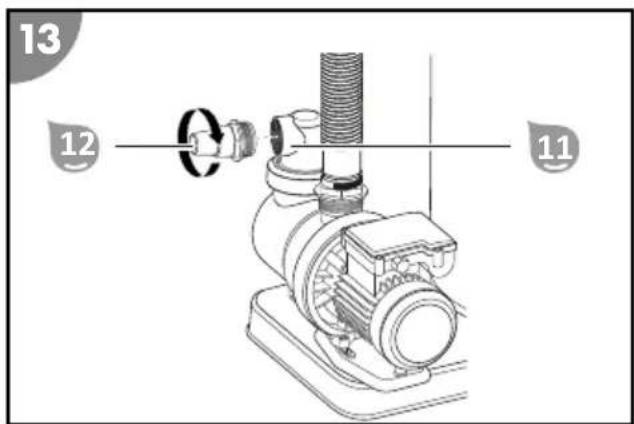
Mounting the pump on the base plate
- Insert the threaded screws of the screw set for fastening the pump 19 from below into the two hexagonal holes in the base plate 9.
- Place the pump on the base plate so that the threads protrude through the fastening opening in the pump base.
- Push the washer and then the serrated lock washer over the screw thread.
- Put on one winged screw each and tighten it. The pump is mounted on the base plate.
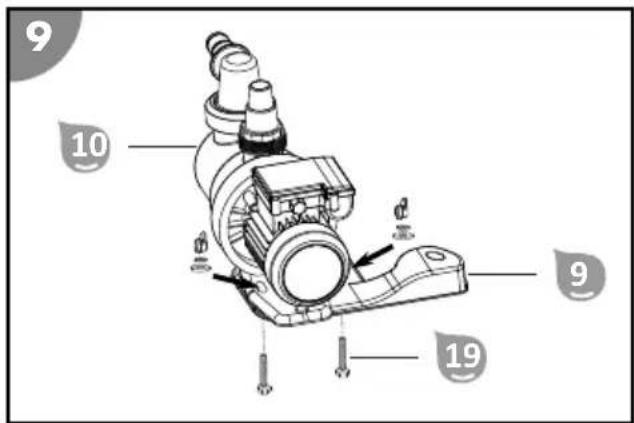
- Connect the base plate to the filter vessel 6.
The base plate is connected to the filter vessel.

Hose connections
- Fasten all attached hose connections with hose clamps to ensure that the system does not leak.
We recommend additionally sealing the hose connections with Teflon tape.
- Use suitable pool hoses for the described connections.

Some hoses, such as the pressure hose, are very stiff. Place them in the sun before use so that the heat makes them more flexible.
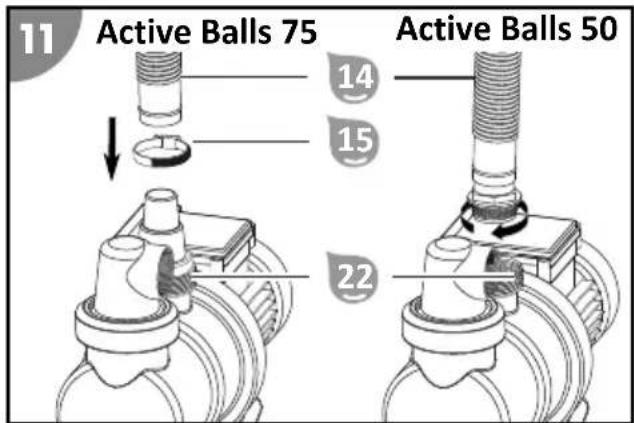
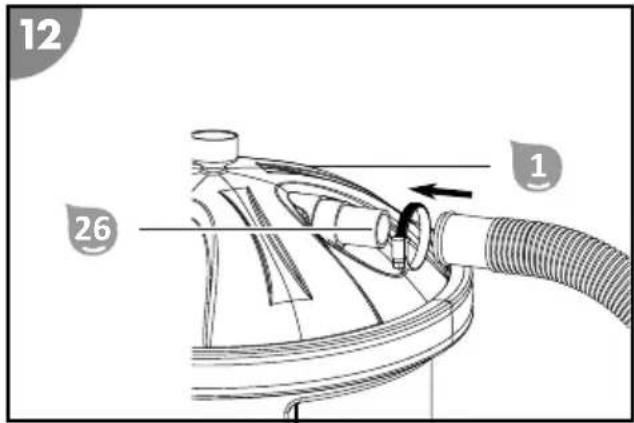
Connecting the pressure line
- Push or screw one end of the pressure hose onto the pump outlet 22.
- Place a hose clamp 15 over the pressure hose. Using a Phillips screwdriver PH1 32, turn the screw on the hose clamp clockwise to tighten the hose clamp over the connection.
- Place the second hose clamp over the pressure hose.
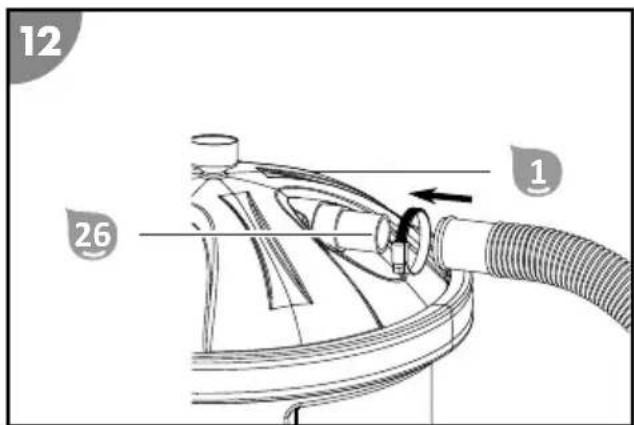
- Push the end of the pressure hose onto the pressure line 26 connection on the filter cover 1.
- Position the hose clamp on the connection and tighten this one as well with a Phillips screwdriver.
The pressure line 26 is connected.

Connecting the suction line
Connecting the suction line with the self-fastening hose
-
When using self-fastening hoses 32 / 38mm
-
Screw a hose adapter 12 clockwise onto the prefilter cover 11.
- Make sure that water from the supply or drain line does not flow into the pool.
- Push the hose end onto the hose adapter and use the hose clamps to fix the hose in place.
The suction line is connected.
Connecting the return line
Connecting the return line

When using push-on hoses.
- Push one hose end onto the connection for the return line 27 on the filter cover 1
- Connect the second end to the connection on the injection nozzle of the pool.
The return line 27 is connected.
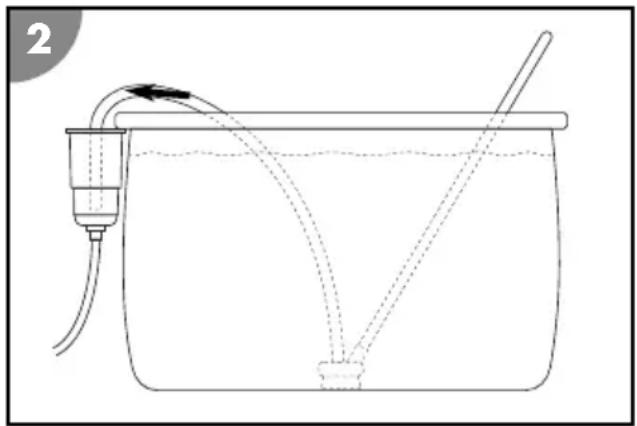
Preparing the filter system
- Remove the stopper on the suction line if applicable.
- Check that the suction line is free and then open the shut-off valve on the suction line.
The filter system fills automatically with water because it is below the water level.
- Let the filter vessel fill completely with water.
- Bleed the filter system. Open the prefilter cover 11 on the pump slightly by loosening the threaded ring 13 until water flows from the prefilter cover.
- Let the prefilter cover fill completely with water.
- Check the filter system and the connections for leaks. In the case of leaks, wrap extra Teflon tape around the affected connections.
Operation
CAUTION!
Risk of injury!
A damaged device or damaged accessories may cause injuries.
- Check the device and the accessories (see section "Testing").
Pump operation
Information on how the timer function works can be found in the "How the timer works" section
Starting the pump operation
- Connect the pump's power plug to the power supply.
The running time display is lit. If a battery is inserted, the last selected running time is displayed.
- Press the timer button 29 several times until the LED of the desired running time is lit.
- Press the ON/OFF button 30 to switch on the pump 10.
The pump will now run nonstop for the selected running time. The timer function activates the pump again at the same time on the following day.
The pump is running. Listen to the pump to check for any unusual noises. If there is air in the system, bleed it again.
Stopping the pump operation
To stop the pump operation, press the ON/OFF button 30. The timer function can be deactivated only by disconnecting the pump from the power supply.
Care instructions
The filter system cannot filter out algae, bacteria and other microorganisms.
- Use special water care substances to prevent and remove these to ensure hygienically clean water.
- Consult an expert and observe the dosage.
Maintenance
Exchanging the filter medium

The Steinbach filter balls should be exchanged every 2 to 3 years, depending on the operating period and the amount of dirt on the device.
- Press the ON/OFF button 30 to switch off the pump 10.
2.Pull the power plug of the pump 10. - Close the shut-off valves or block the water flow to the pool's connecting hoses.
- Open the screw cap on the drainage opening 23 by twisting it counter-clockwise.
- Completely drain the water from the filter vessel via the drainage opening.
- Place the screw cap on the drainage opening and screw it down by turning it counterclockwise.
- Remove the locking ring by unscrewing the wing nut counterclockwise.
- Put aside the locking ring and its screws.
- Remove the filter cover.
- Slowly turn the filter vessel on its head and empty out the filter balls.
- Remove the riser pipe with the screen
- Thoroughly rinse the riser pipe and screen under flowing water.
- Rinse the filter vessel with clean water.
- Carry out the steps described in the "Preparing the filter vessel" section.
The filter medium is exchanged.
Replacing the timer battery
- Make sure that the pump's power cable is disconnected from the power supply.
- Use a Phillips PH1 screwdriver to remove the screws of the timer cover (turn counterclockwise).
- Remove the cover.
- Lightly push down on one edge of the battery to loosen it.
- Remove the battery.
- Replace the battery.
You can find the battery type needed in the "Technical data" section.
- Replace the cover.
- Screw in the screws clockwise.
The timer battery is exchanged.
Winter storage

Always store the dried filter medium separately from the filter vessel in the winter.
- Press the ON/OFF button 30 to switch off the pump 10.
2.Pull the power plug of the pump 10. - Close the shut-off valves or block the water flow to the pool's connecting hoses.
- Uninstall the connecting lines to the pool and drain the hoses.
- Loosen the drain screw 24 on the pump housing and completely empty the pump.
- Remove the filter medium (see the "Exchanging the filter medium" section). If you are using filter balls, wash them by hand and let them dry completely.
- Rinse the filter system with tap water.
- Let the filter system dry completely.
The device can be stored over the winter.
Cleaning
NOTICE!
Improper cleaning might damage the device.
- Clean the surface of the device with plain water after each use.
- Do not use any aggressive cleaning agents.
- Do not use any sharp or metal objects such as knives, hard scrapers or similar.
- Do not use any cleaning brushes.
- Do not use a high-pressure cleaner.
Cleaning the filter balls

Never clean the filter balls in the washing machine or tumble dryer!
Clean the filter balls in the sink under running water or use a garden hose.
If the cleaned filter balls no longer clean the pool water sufficiently, exchange the filter balls.
Test
Check the following before each use:
- Is there visible damage on the device?
- Is there visible damage on the control elements?
- Are the accessories in flawless condition?
- Are all lines in flawless condition?
- Are the ventilation slots unobstructed and clean?
Do not start up a damaged device or damaged accessories. Have them checked by the manufacturer or its customer service or a qualified service technician.
Storage
- Thoroughly clean the device (see section "Cleaning").
- Let the device dry completely after cleaning.
- Store the device in a dry and frost-free location (>= +5^) without direct sunlight.
Troubleshooting
| Problem Possible cause | Remedy | |
| The pressure on the manometer exceeds 1 bar. | The filter balls are dirty. Remove and wash the filter balls by hand. Exchange the filter balls if necessary. | |
| Air bubbles escape from the injection nozzle. | The pump is sucking in air. Check all hoses and seals for leaks. Retighten the hose clamps. | |
| The pump is not getting enough water or the system pressure is too low. | The water level in the pool is too low. | Raise the water level in the pool. |
| The prefilter basket (if present) is clogged. | Empty the prefilter basket. | |
| The suction line is clogged. Clean the pressure line. | ||
| The pump does not start up. The pump has no power. Connect the pump's power plug to the power supply. Check whether the fuse has tripped. | ||
| The pump is defective. Contact customer service. | ||
If the problem cannot be solved, contact the customer service listed on the last page.
Technical data
Active Balls 50
Model Active Balls 50
Article number 040220
Pump model SPS 75-1 T; item no.040916
Battery for timer
Button battery lithium 3V CR 2032
Circulation rate 5,500 l/h
Max. pumping height 9.0m
Type of pump
Self-priming with prefilter and integrated timer
Max. water temperature 35^
Power supply 230V 50 / 60Hz
Output 450 W
Vessel 400mm
ConnectionØ 32/38 mm
Pump installationOn base plate
Required quantity of filter balls Approx. 545g
Suitable for pools up to
22,000 l of water content
Active Balls 75
Model
Active Balls 75
Article number 040120
Pump model SPS 100-1 T; item no. 040917
Battery for timer
Button battery lithium 3V CR 2032
Circulation rate 6,500 l/h
Max. pumping height 10.0 m
Type of pump
Self-priming with prefilter and integrated timer
Max. water temperature 35^ C
Power supply 230V 50 / 60Hz
Output 550 W
Vessel 400mm
ConnectionØ 32/38 mm
Pump installationOn base plate
Required quantity of filter balls Approx. 1150g
Suitable for pools up to 26,000 l of water content
Spare parts
Active Balls 50

040952 - manometer
040823 - filter cover
3 040814 - filter vessel seal
4 040813 - right locking ring
040811 - pin
6 040812 - left locking ring
040810 - wing nut
040804 - filter vessel
9 040802 - drain screw for filter vessel, blue
10 040832 - riser pipe
11 040831 - screen
040978 - attachment set for filter pumps
13 040807 - base plate
14 040916 - filter pump SPS 75-1T
15 040936 - connection hose L = 25 cm, Ø 38 mm
16 040946 - hose clamp 30-50 mm
17 040834 - hose reducer
Active Balls 75

1 040952 - manometer
040823 - filter cover
3 040814 - filter vessel seal
4 040813 - right locking ring
040811 - pin
6 040812 - left locking ring
040810 - wing nut
040803 - filter vessel
9 040802 - drain screw for filter vessel, blue
10 040833 - riser pipe
11 040831 - screen
12 040978 - attachment set for filter pumps
13 040807 - base plate
14 040917 - filter pump SPS 100-1T
15 040923 - connection hose L = 48 cm, Ø 38 mm
16 040946 - hose clamp 30-50 mm
17 040834 - hose reducer
Declaration of Conformity
CE Steinbach International GmbH hereby declares that the filter pump meets the following directives:
EMC Directive (2014/30/EU)
- EN55014-1: 2017; EN55014-2: 2015; EN61000-3-2: 2014; EN61000-3-3: 2013
-AfPS GS 2019:01 PAK
- EN 60335-2-41: 2003 / A2:2010; EN 60335-1:2012 / A2: 2019; EN 62233:2008
- EC Directive (2014/35/EU)
You can request the complete text of the EU Declaration of Conformity from the address stated at the end of this instruction manual.
Disposal
Disposing of the packaging
Sort the packaging before you dispose of it. Dispose of paperboard and cardboard with the recycled paper service and wrappings with the appropriate collection service.
Disposing of used appliances
Used appliances do not belong in the household waste!
If the device can no longer be used, each consumer is obligated by law to drop off used appliances separate from the household waste at a
municipal collection point. This ensures that used appliances are recycled properly and negative effects on the environment are avoided. Therefore
electrical appliances are marked with the above symbol.
Active Balls 50. 85
Active Balls 75. 87
Active Balls 50. 112
Active Balls 75. 113
Pezzi di ricambio 114
Active Balls 50. 114
Active Balls 75. 116
prevalenza max. pompa 9,0 m
Tipodi pompa
Modello Active Balls 75
Active Balls 50. 141
Active Balls 75. 142
Active Balls 50. 143
Active Balls 75. 145
Active Balls 50. 169
Active Balls 75. 170
Nahradni dily. 171
Active Balls 50. 171
Active Balls 75. 173
Model Active Balls 50
CisloVyrobku 040220
Model Active Balls 75
CisloVyrobku 040120
Model cerpadla SPS 100-1 T; c. vyr. 040917
Baterie pro chasovy spinač Knofliková baterie Lithium 3 V CR 2032
Preecerpavacviykon 65001/h
max. vyska cerpani 10,0 m
Active Balls 50. 198
Active Balls 75. 199
Pótalkatrészek 200
Active Balls 50. 200
Active Balls 75. 202
Active Balls 50. 226
Active Balls 75. 226
Nadomestni deli 228
Active Balls 50 228
Active Balls 75. 230
Izjava o skladnosti 231
Odstranjevanje 232
Splošno
Navodila za uporabo preberite in jih shranite

Model Active Balls 50
Stevilka izdelka 040220
Model crpalke SPS 75-1 T; st. izd. 040916
Baterija za chasovnik Litijeva gumbna baterija 3V CR 2032
Zmogljivost krozenja 5.500 l/h
najv. višina Črpanja 9,0 m
Vrsta crpalke samosesalna s predfiltrom in vgrajenim
casovnikom
Najv. temperatura vode 35^
Elektricno napajanbe 230V^ 50/60 Hz
Zmogljivost 450 W
Rezervoor 400mm
Prikljucek 032/38 mm
Active Balls 50. 254
Active Balls 75. 255
Nahradné diely. 256
Active Balls 50. 256
Active Balls 75. 258
Vyhlasenie o zhode 259
Likvidácia 260
Model Active Balls 75
Cislo tovaru 040120
Model cerpadla SPS 100-1 T; c. tov. 040917
Bateria pre casaovac Gombikovy clanok, litium 3V CR 2032
Active Balls 50. 283
Active Balls 75. 284
Czeci zamienne 285
Active Balls 50 285
Active Balls 75. 287
Model Active Balls 75
Active Balls 50. 312
Active Balls 75. 313
Active Balls 75. 316
Declaratie de conformitate 317
Eliminarea 318
Generalità
Model Active Balls 75
Numar articol040120
Active Balls+ 50. 340
Active Balls+ 75. 340
Active Balls+ 50. 342
Active Balls+ 75. 344
Izjava o sukladnosti 345
Odlaganje 346
Općenito
Procitajte i cuvaje upute za upotrebu

Ove upute za upotrebu sastavni su dio ovog sustava filtriranja (u dalnjem tekstu „Ureăj“). One sadrze važne informacije oPokretanju i rukovanju.
Model Active Balls+ 50
Broj artickla040220
Model pumpe SPS 75-1 T; br. art. 040916
Baterija za tajmer Gumbasta celija litij 3V CR 2032
Kapacitet cirkulacije 5500 l/h
maks. visina pumpe 9,0 m
Vrsta pumpesamousisavajucaspredfiltromiintegriranim
tajmerom
maks. temperatura vode 35^
Napajanje strujom 230V 50 / 60Hz
Snaga 450 W
Kucieste 400 mm
Model pumpe SPS 100-1 T; br. art. 040917
Baterija za tajmer Gumbasta celija litij 3V CR 2032
Kapacitet cirkulacije 6500 l/h
maks. visina pumpe 10,0 m
Vrsta pumpesamousisavajucaspredfiltromiintegriranim
tajmerom
maks. temperatura vode 35^
Napajanje strujom 230V 50 / 60Hz
Snaga 550 W
Kucieste 400 mm
O6xBaT Ha DoCTabKa/ Yactn Ha ypeDa
1 Kanak Ha 0nTbpa
2ПиТиСКаTeJIeH npbCteH
3 YnIbTHeHneΦnITbpeH Kopnyc
4 BoNT Ha npntnckateJeH npbcteH
5 Kpniluata raikka
6 Φилтьрен корпс
7 Bb3xoJaua Tpb6a
8 MpeXecT fHITbP
9 OchOBHa nloya
10 Nomna
11 Kaapan ha npedphiIITbP
12 AdaanTep 3a Mapkyu (2x)
13 Пьстей на pe36a
14 HanopeH mApKyu
15 3ateraTeHa cko6a 3a Mapkyu (2x)
16 YnIbTHeHne Ha O-o6pa3HnI npbcTeH, rOJaMo (0 79 MM)
17 YnIbTHeHne Ha O-o6pa3HnI npbCTeH, cpeDHo (0 54 MM)
18 YnIbTHeHne Ha O-o6pa3HnI npbCTeH, MaIko (45 MM)
19 Komплікт виHTоBE 3a ФнКсИpaHe Ha nomnata (2x)
20 MaHomeTbp
TefoHOBaIeHTa(6e3n3o6paXeHne)
PbkoBoDCTBO 3a 06cnyKBaHe (6e3 n3o6paJxHne)
UactnHa ypeda
21 PpeDΦnITbP
22 I3nyckaTeJIeH OTBOp Ha nomnata
23 N3nyckaTeJIeH OTBOp
24 N3nyckaTeHa npo6ka
25 CmykaTeJIeH Tpb6OppoBOD
26 Hanopen Tpb6oPBOD
27 O6paTeH Tpb6OpPBOoD
28 Pe36Oba npo6ka 3a n3nyckaHe Ha Bb3dYxa
29 TaHmep
30 ByToH ON/OFF
31 BytoH TaMep
Heo6xOaHmN IHCTpyMeHTn, KOnto He ca BkIIOueHb 06XbaTa Ha DOCTaBkaTa
32 Kpbctata OTBepTKa PH1
CbDbpXaHne
Iperneid. 2
06xbaT Ha doctabka/chaTn Ha ypeda. 347
067a 351
06acheHne Ha 3HaunTe. 351
Be3onachocT 352
Pa3oNaKOBaHe n npOBePka Ha 06XBaTa Ha dOcTaBkata. 356
Iodrotobka 357
OchOBHO nouHCTBaHe Ha ypeHa 357
H36op Ha MectOnoJoxeHne 357
ΦnIbpaHa 358
OnncanHe Ha 9nTbphata cnctema. 358
OnncanHe Ha 9nIbPHaTa cnCTema. 358
Haun Ha deiCTBue Ha taMepa. 359
BpeMe Ha 9nTpnpaHe 360
Pa6ota c BaKyyMHN YeTkn 3a NOUcTBaHe Ha DbHOTo. 360
PbRBO n3noJ3BaHe 361
PpOBePKa npEi BbBekdaHe B eKcPiOaTaun. 361
IopTbHe Ha 9nTbpHnKOpNyc. 361
PbpoHauaen nysk Ha TaMepa. 362
IodrotBHe Ha nomnata 363
MOnTnpaHe Ha nomnata Bbpxy ochOBHa nloya. 364
PnncbEduHnteHH eIeMeHTn Ha MapKyuHte 365
IopTbHe Ha nltbPha cnctema. 367
06cnykBaHe 367
EcknoataaHa nomnata 367
Yka3aHn 3a noDnpbKka. 368
IopdpbKka 368
CmHa Ha 9nTbPaTa cpeJa. 368
CmHa Ha 6aTeepnTa Ha TaMepa. 369
3aImyBaHe 369
Почистван. 370
NouchBaHe Ha 9nTbprHnTe TOnKn. 370
IpoBepka 371
Cbxpanenne 371
OtctpaHbAHe Ha Hen3npaBHOCTn 371
TexHHueckn daHHN 372
Active Balls 50. 372
Active Balls 75. 372
Pe3epBn qactn 374
Active Balls 50 374
Active Balls 75. 376
ДeКларачиязсьOTBeTCTBHe 377
N3XbprJaHe 378
O6ua
IpoyeTe H cbxpaHete HHCTpyKzraTa 3a ekcnloataa

Hactoata Hnctpykua 3a ekcnloatau e qact OT Ta3n fnlTbphacntema (HapnuHa no-HaTaBk 3a KpaTkoCT cbso ,ypeD"). Tc sbdpka BaJHa HHopMaun 3a BbBeKdaHeTO Beknloatau n O6clnyKbaHeTo.
IpeNi BbBexJa B yNoTpe6a Ha yCTpoiCTBOTO npOyeTe BHNMaTeJHo IHCTpyKcIyTa 3a ekCnloaTaun, no-KOHKeTHo yKa3aHnraTa 3a 6e3OnacHocT. Hecna3BaHeTo Ha NaCTOaTa IHCTpyKcIy 3a ekCnloaTaun MoKe Da DoBeDe Do TeKKn HapaHЯBaHnry IJI NOBpeDa Ha yCTpoiCTBOTO.
HnctpykuaTa 3a ekcnloatauHa e 6a3npaHa Ha npniloKmTe B paMKte Ha Ebponeckna cIIO3 cTaNdapTu n npabila. B dOnbJIHeHne, B yJx6nHa cNa3BaTe CpeunphiHnTe 3a cTpaHaTa HOpMaTHBn pa3npope6n n 3aKOHn.
CbxaHbAte HnCTpyKzraTa 3a ekcnloatauia 3a 6bdeo noI3BaHe. Korato npedabate yctpoiCTBOTO Ha TpeTn Iuca, npdaTe Henpemehno n HactOaTa HnCTpyKzra 3a ekcnloatauia.
YnoTpe6a no npedHa3HaueHne
To3n ypeD e npoeKtnpaT n3KnIouHTeJHo 3a nouchTaBHe Ha Boda B baceHn. Toe npirodoen 3a n3noJ3BaHe B coJeHa BODa, DOkaTO coJHOTcBdApJxAHne BB BODaTa e NOd 0,5% (coJHa eJeKtpoJn3a). ToJ OTcTpaHraBa BVdImN 3aMbpcnteJIu e npirodoen 3a BCNUKn CTaNdapTHn 6aceHn C wlaHROBO npncBeDNHBAhe c dNaMeTbp 32/38 MM.
CbIbpxkaaata Ce BvB fHITbPnHa KOpnyc fHITbPna CpeDa fHITnppa MaIKnTe TBbpDn ChactuOn OT npOTnuAaTa BODa N NO TO3N HauHH CnyKn KaTO fHITbP 3a MaIKN TBbpDN I cycneHdnpaHn YacTnCi 3a BaShaTa BODa 3a KbNaHe. IppeHcTeHa TBOda Ce BpBa a npe3 KaapaHa fHITbPa no O6paTHnra Tpb6oNpOBoD B baceHa.
3a Φилтьрна среда ИЗползва само Φилтьрни ТОПКИ Steinbach. 3a Zeелта Вижту Heo6хODIMNTe кOLичecТВа в Галав "TEXHNUeCKN DAHN".
UpeBt e npEeBnIeH n3KJIouHTeJIHO 3a IInuHo nOJ3BaHe n He e NODXoJaIz 3a INDyCTpNaJIHaTcΦepa. H3NoJ3BaIte YcTPOiCTBOTo cMo n OauHa, ONIcaH B NaCTOaTa INCTpyKcIg 3a ekCnloaTauaJ. BcKa dpyra yNOTpe6a ce cHTa 3a HeIpaBnIHa n MoKe Da IOBeJe DO MaTePnaJIHn 7eTI nIIN DOpN Do HapaHЯBaHn Ha Xopa. UpeBt He e nIrpauka 3a DeIca.
Ipon3BODntelTnn TbproBeTHe noema OTROBOPHOCT 3a etsn, npuHHeNOT HecbO6pa3eHa c npedHa3NaueHneTo nn norpesha ynoTe6a.
O6aChHeHne Ha 3HaunTe
B hactoata Hnctpykua 3a ekcnloataun Bbpxy ypea nn Bbpxy onakobka tca n3noJ3BaHn cIeHNTE CmBOJI.

To3n cImb0J npEIOCTaB NOle3Ha DOnbHInTeJIHa INHΦOpMaζηa 3a MOHTaJka nII pa6OtaT.

ДeКларачя 3a сьOTВЕТСВЕ (ВИЖTe rIaBa „ДeКларачя 3aсьOTВЕТСВЕ"): ПюдуктITE, МарКирани CTOЗ N CMBOЛ, OTROвapЯТ Ha BCИЧКИ ппложими обшноctни раэпореби Ha EБрoneйсКOTOИКOHOMUYeCKO прocтpaHCTBO.

He n3noJ3BaIte HnKOra ocTpN HOxOBe nn DpyrN ocTpN npEmdTe 3a OTBapJe Ha onakOBkata. NTo3n NaunH MoKe da nobpeDnte CbDbpKaHHeTO.
be3onachoct
B HacToaTa HNcTpKu73eKcNloaTaunCe N3No3BaT CneHnTe CnHaHn Dym.

PPEdYnPEKdEHNc!
To3n cnHaJIeH cIMBOL/CnIHaJIHa dYMa O3HaUaBa onaCHOCT CbC CpeHa CTeHe H a PnCK, KOrTO, aKO He 6bJe n36erHaTa, MoKe Da IOBeDe DO CMBPT IIN TeKko HapaHbAHe.

BHIMAHNE!
To3n CnHaleh CmB0J/CnHalHa dyma O3NaUaBa OnaCHOCT C HsCKa CTepeH Ha pNCK, KOrTO, aKO He 6bJe n36erHaTa, MoKe Da DoBeDe Do JeKu NJIcpeHN HapaHraHn.
yKA3AHHE!
Ta3n CnHaJHa Dyma npedynpejkaBa 3a Bb3MOxHn MaTePnaJHn 7eTn.
O6uynka3aHnna 3a 6e3oNaCHOCT
PPEdUYPExKDEHNE!
Onachoct OT TOKOB ydap!
HenpaBnHnT MoHTaJ Ha eIeKtpoObOpyDbaHeTo IJI npEkaJeHO BnCOKOTO MpeXBO HappeKeHne MORaT Da IOBeDaT Do TOKOB ydap.
-
Cbpxte 3axpaHbau nka6eI cmo aKO mpekoBTo HappeKeHne Ha KOHTaKTHaTa Kytna CbotBeTCTBa Ha HHΦOpMaunra Bbpxy TnNoBaTa Ta6ela.
-
Cbbp3BaIte 3axpaHbaunia Ka6eI cAmo KbM IecHO IOCTbpeH KOHTaKT, 3a da MoKeTe 6bp3O da rO n3KJIIOUHTe OT eIeKTPnueckaTa MpeJa B cIyauHa aBapnra.
- Използвашистю само вклочень сенинна Ктуг
Тип „шуко" сбс зашитейkoHTакт с пpeдпазител пое 16A.
- YcTpoiCTBOTO TpI6Ba Da 6bJe cHa6DeHOC HOMnHaJIeH OCTaTBueH TOK He NObuee ot 30 mA Upe3 ycTpoiCTBO 3a OCTaTBueH TOK (RCD).
- He bBbExkdaIte yCTpoiCTBOTO B eKcPiOaTau npi HaNuHne Ha BnIMN 5eTN IIN DeΦeKTeH Cbbp3BaU Ka6eI.
- He OTbaprIte camu yctpoiCTBOTo, octaBeTe peMOHTa da 6bJe n3BbPWeH OT cpeunalnCTn. 3a ceJIta ce CBbPjKeTe c aDpeca Ha cepBn3a, nocoueH ha rbp6a Ha pbKOBoDcTBOTO. B clyuaH na CamoCTOJTeJIHO n3BbPWeH peMOHTn, He npaBnIHO CBbP3BaHe IIN He npaBnIHa ekCnloatauia, ot oxbaTa Ha rapaHtA t IOTROBOPHOCTTa ce N3KJIIOUvBAT BCNUKN rapaHcIOHn IpTeHcN.
- Hnkora He xBaaTe 3axpaHbuaaKa6eI c BlaJHn pbue.
- HnKora He n3KlouBaIte 3axpaHbAsnKa6eI ype3 dIbpnaHe 3a Ka6eIa, a XBaUaIte BInHaIg 3a IeNceIa.
- Hnkora He n3noJ3BaIte Cbbp3Baunra Ka6eI KaTO dpBxxKa.
-ДрьжTe yctpoiCTBOTOи CBbp3Baunя Ka6eI daJeU OT OTKpNT orbH n ropeuIN NOBbpXHOCTN.
- He noctabraye HnkaKbn ppeMeTn Bbpxy Cbbp3Baun Ka6eJ.
- He BkonabaTe 3axpaHbau nKa6eI.
- Покарайт ecвьрзваши Ka6eI taka Que Heпрази3ВИКВа cnьbaHe.
- He orbbaite cBbp3Baunna Ka6e n He ro noctabraite Bbpxy octpn pb6oBe.
- При Heo6xOdMocT n3POn3BaIte caMo yIbJXHTeHNn Tpb6OpBoOAn, KOnTO ca POnXoJaU n 3a 30Hn Ha OTKpNTo. I3POn3BaHeTo Ha POnXoJaU 3a 30Hn Ha OTKpNTo yIbJXHTeJeH Tpb6OpBoOHaMaJIyBa pIcKa OT eJIeKTpNueckn yIap.
- He n3poJI3BaITe yCTpoIcTBOTO npn 6byr. N3KJIIOUeTe ro n n3DbpNaIte 3axpaHbAuzna Ka6eI OT KOHTaKTa.
- Binhari n3KJIIOUBAIte n OTCTpaHABaIte yCTPOIcTBOTO oTeleKTPnueckaTa MpeKa B clyuai, ye CbIyT He ce N3NoJ3Ba, NOuchTBA nII Bb3HNKHe NOBpeJa.
- Прп ремонтн могат да ce Използват само части, конто OTROВарят на пьравоначалнiteхаразкетеростникни устюйстOTO.В_TOBA устюйстBO ce hamират[elektprucecki и менични части, Конто са 6e3ycloBHO Heo6xodmN 3a 3auntata OT ИЗTOUHицни На ONaCHOCTN.
- Използваite само peзерви части и принадлесноctи, контocа доставени пени порьчани OT понзворпеля. ПпиИЗПОЛ3Ване на части на дугни роги ворпдntели OTпадаТВсякakви rapaнционни петенции.
Yka3aHnra 3a 6e3onachocr 3a xopa
PPEyPExKdEHNIE!
IbpbHOHaJIeH NcK Ha TaMepa

Дори ида He 6bДaT ИЗпьлHeHи ONИcaHnte NO-ДОЛу CTbПКи, Таймерьт Функцюнра 6e3ynpeЧNo.В сlyчай Н пpeкьсВаHe Ha 3axpaHbaHeto obache CBxpaHEnTe BpemeHa 3a npOДьЖИteJIHOCt Ha pa6Ota Ha ΦИТьpa ce n3TpNBaT.
- Ybepete ce, ye 3axpaHbaaunr Ka6eHa nomnata e pa3eDnHeN OT 3axpaHbauata Mpeka.
- Cкрьста OTВертka PH1 otctpaheTe BINTOBete Ha Kaнaka Ha TaMepaЧpe3 Вьртоно посяка,образна Ha YacOBHnKOBaTa CTpeлka.
- CbaleTe kanaKa.
4.ИЗТERЛЕТЕ ПДАCTMACOBATAЯНТа, KOЯTO ce BIXДа побATEРЯТа. - NocTabete OTHOBO Kanaka.
- 3aBnTe BnHTOBeTe Upe3 BbPTeHe NO NocOKa Ha YacOBHnKobTa CTpeJka.
Функцama 3a cbxpaHue Ha daHHume b Namemma Ha maMepa e akmuepuha.
IodrotbHe Ha nomnata
B KOHfIpyaunra npn DOCTabkata nomnata e camo qactuHc rIo6eHa.

3aterheTe cAmo Ha pbka BCnKu BnHTOBn CbeDnHeHn. IpeKaJeHO 3aTaraHe Ha BnHTOBte CbeDnHeHn NOBpeJda yIbTHeHnra T n IlaCTMaCOBtE qactn. He n3noJ3BaIte nHcTpymENT.
JIeKo HeynblTHeHn BnHTOBu CbeDnHeHn MaRat Da ce yNtHrT C TeJIOHOBa IeHTa.
- Pa3BnTe npbCTeHa Ha pe36a 13 Ha KaNaKa Ha npedΦnITbpa 11 No Nocoka, o6paTHa Ha yacOBnKOBaTa CTpeIka.
- ПовдиггichtekanakaHa npedФилТьра cnpbctehHa pe36a OT KOpnyca Ha NOMnata.
- NocTaBeTe yNtBHeHneTo Ha O-06pa3Hn npbCTeH, rOJaMo 16 B KJIe6a Ha Kopnyca Ha NOMnata.
- NocTabeTe npednTbpa 21 B nomnata. B KOHfNpyaunrTa npn DocTabkata npednTbpBt e Beue MOHTnpaH.
- Побереу улбтэнcopeTo Ha O-образня пьсөн 3a 3amрсаи He eBeHTyaHn noBpeД. Рп Heo6xOДМОCT CMeHeTe yлбтэнcopeTo.
- NocTabete Kanaka Ha npedΦnITbpa 11 Bbpy KOpnyca Ha nomnata.
- Порokашипьстену на pe36а no Калaka на пpeДилтbp.
- Habnite npbcteHa Ha pe36a No Nocoka Ha yacobnkobata CTpeIka Do Heroboto 3aTraHe.
- Пoctabete улт themselves O-o6pa3HnЯ npbCTeH, MaNKo 18В kaNaKa Ha npedФнТьра.
- Habиite здраво письединтуелем ent Ha Mapkyua no nocoka Ha Часовникова Тстелka в Калaka Ha пефнлъра
- NocTaBeTe yIbTHeHHeTo Ha O-06pa3HnI npbCTeH, cpeiHO 17 BvB BdIb6HaTHHaT a Ha n3NyCKaTeJIHHo OTBOp Ha NOMNaTa 22.
- Habиiteи 3aTeHete eDIN aadanTep 3a Mapkyu 12 no Nocoka Ha yacOBHKOBaTa CTpeIka B n3nyckaTeHnIy OTBOp Ha nomNaTa.
При Фильтуна систema Active Balls+ 50 aадапгьт за марку e монтуран на habорни марку.
Iomnama e 2omobnocm 3a pa6oma u moKe da 6bde npucbeduheHa KbM mp6o npo8oDume.
MOHTINPAHE HA NOMNATA Bbpxy OCHOBHa NIOOa
1.ВkapaTe pe36OBITE BnHTOBe OT KOMJIeKTA BnHTOBe 3aФИКсИрАТо Ha NOMnata 19OTДOLHATA CTpaHaВ ДВaTAt OTBopa C WecTOCTeHHO THe3do BOCHOBHATA nloya 9.
2.Пoctabete nomnata 10 Bbpyx OCHOBHATA nloa Taka 9 ye BnHTOBaTa pe36a da cTbpuN n3BbH fHKcnpaunTe OTBOPN BB yHdAmeHa nOMnata.

- CbOTBETHO npokapaiTe noJIOXHaTa, a cIeT TOBa 3aCTOnOpRAuHa a Wai6a no BnHTOBaTa pe36a.
- NocTabete cboTBetHO KpUlyat BnHT n rO 3aterheTe.
IOMnata e MOHTnpaHa Ha OCHOBHata nloya.
- CbpxKeTe oCHOBHaTa nloa 9 c cnTbpHnKOpnyc 6.
Ochohama nnoa e c6bp3aHa c 4unmbphn KOpnyc.
PnncbeHnHTeHH eIeMeHTn Ha MapkyuHte
-ФИКСИРаTe BCИЧКВ BCTABHn Bpb3KN Upe3 cKOBn 3a МарКуч,За Дa rapaHTирaTe HeO6xODIMATA VYIIbTHHeOCT Ha CnCTeMaT a.
IpenopbVame npncbeHHHTeHHTe Bpb3Kn da ce yNtHTTdoNbHHTeHHO C TefoHOBa IeHTa.
- 3a onncaHnte npncbeHNHTeHN eIemeHTu n3noJ3BaTe noDxoJauN 3a 6aceHm Mapkyu.

HЯkon Mapkyu, KaTo Hanp. HanOpHnT MapKyu, ca MHOrO TBbpDn. IpeDn MOHTaJg rN OCTaBeTe Ha CbHnce, 3a Da cTaHaT NO-ΓbBkABy OT TOJIINHaTa.
PncbdeHHrahe Ha HAnopnna Tpb6onpoBOD
- BkapaTe nnn 3aBnTe eDHHnKpaHnHaNoPnHa Mapkyu 14Bn3nyckaTeHHnOTbOp Ha NOMnata 22.
2.ПрokapаTe eHata 3ateraTeHa cKo6a 3a Mapkyu 15 no HanopnHa Mapkyu Iro 3abNte C nOMOHTa Ha KpbCTata OTBepTKa PH1 32 ue3 BbptHe NO NOCOKa Ha yacOBHnKOBaTa CTpeIka Ha npncbeDnHHTeHnE leMeHT.
-
Порокаши Сторара Загална скоба за маркуни наюня марку.
-
BkapaTe KpaHa HAnOpHnMaPkyB npncBeHNHTeHHnEneMeHT Ha HanOpHnTpb60npoBOd 26 Ha KaNaKa HaΦnITbpa1.
5.ПОЗИЦИОнпаTe 3ateraTeIHTa cko6ata 3a МаркуHa npncbeDHHTeHnIeIeMeHT N CbIo ro 3aterHeTe c KpbCTaTa OTBepTKa.
Haopnma m mpb6o npo8o 26 e npucbeuHeN.
PncbeHHaHe Ha cMyKATEHnTpb6onpoBOD
Cbbp3BaHe Ha cMykATEHnTpb6OpOBoD C BkapAHn Mapkyu
-Прии n3noJ3BaHe Na BCTaBn Маркун 032/38mm.
- 3aBnTe aAnTep 3a Mapkyu 12 ue3 BbptHe NO NocOKa Ha yacOBHnKOBaTa cTpeIka Ha KaIaKa Ha npedΦnITbpa 11.
- YBepeTe ce, Ye He Teue Boda OT NOdaBaunn nn OTTOUHNr Tpb6OpBoD KbM 6aceHa.
- BkapaTe KpaHa MapkyaВ aanTepa 3a Mapkya nФнкupaTe Mapkya cbc ckobn 3a Mapkyu.
Cmykamenu m p6b6onpooD e npucbeuHeN.
PncbeHnBaHe Ha o6paTHn Tpb6OpPOB
PncbdeHnBaHe Ha o6paTHn Tpb6oNpOBoD

Pn n3no3BaHe Ha BCTaBn MapKyu.
- BkapaTe eHnHa KpaHa MapKyuA B npncBeHNHTeHnE element 3a o6paTHna Tpb6oNpOBoD 27 Ha KaNaKa Ha fHtbpa 1.
- Cbpxte Btopn Kpa c npncbeHnHnna eJeMeHT KbM cmykaTeHaTa I03a Ha 6aceHa.
06pamHua mmpb6o npoBod e npucbeuHeN.
IodrotbHe Ha hntbphc nctema
- При НEOБХОДМОСТ OTСТРАНЕ ТАпАТа на смУКATEЛПИЯ ТрьбОПРОВОД.
- Правец далсмкателнгт Трбопровд e свобODEн И след TOВа OTbopete cnnpaTeHnЯ Кларан Ha smkATEHnЯ TprboppoBOD.
Tb' kamo fummbpama cucmema ce hamupa noB bOdHama noobpxHocm, mce nbHn aBmamuUHO c oda.
- Octabete ΦιπTBpHηκ KOpNγς Αa ce HαπβλΗνιν C BΟДα.
- 06e3Bb3dUweTe ΦnITbPHaTa cnCTema. OTbOpTe JekO kanaKa Ha npedΦnITbpa 11 Ha nomnata KaTO pa3Xla6nte npbCTeHa Ha pe36aTa 13,doKATO BODaTa n3Teue ot kanaKa Ha npedΦnITbpa .
- Octabete kana Ka npeiNtbpa da ce Hnbln C Boda.
- Поберете ситбпа tcstema n npscbeHHTeHHTe elementn 3a HeynilbTHHeOCTN.
BcIyauHa HeynbTheHocTn HabnTe DoIbHnTeJHo TefoHOBa IeHTa Ha CbOTBeTHHe TnpScbeHNHTeJH eJeMeHTn.
O6cIyXBAHe
BHIMAHNE!
Onachoct ot HapaHЯBaHe!
Повреeding уред有很大 повреeding понадлесною може ддоветдо наразаньаня.
OtctpaHЯBaHe Ha Hen3npabHOCTN
MaKc. HanopHa BucOuHa Ha nomNaTa 9,0 M
BnD nomna camo3acMykBaua c npeDphiNtbp n BrpaDeH
TaMep
MaKc.TempepaTpaHaBoData 35^
3axpaHbHe 230V 50 / 60Hz
MoHocT 450 W
Kopnyc 400 MM
PncbeDHHTeH enement 32/38 MM
MONTAK Ha nomnata
Ha OCHOBHa nIOUa
HeoXoDnMo KOJIuYeCTBO HnTbPn TOnKn
okono 545g
noxdo7a 6aceHH cpa3Me np
22000IBoDHeNo6eM
Active Balls 75
MoeJ
Active Balls 75
ApTnKyIeH Homep 040120
MoJeI nomna SPS 100-1 T; apT. Hom. 040917
MaKc. HanopHa BncoUnHa Ha nomnata 10,0 M
BnD nomna camo3acmykbaa c npedeHnITbp n Brpaed
TaMep
MaKc.TemepaTpaHaBoData 35^
3axpaHbHe 230 V\~ 50/60 Hz
MOUHOCT550W
kopnyc 400 MM
PpncbeHnHteHeJeMeHr 32/38 MM
MOHTaJH a NOMnTaHa OCHOBHa IIOUa
Heo6xoDnMo KOJIueCTBO HntbPN TOnKn OkOJ 1150g
noXoJaU 3a 6aceHn c pa3MeP do 26.000 J BODen o6em
Pe3epBHH qactn
Active Balls 50
040952 - MaHOMeTbp
2 040823 - kaan Ka nHa ΦnTbpa
3 040814 - ynpbTHeHne pntbpen pe3epBoap
4 040813 - npntnckaTeJeH npbCTeH BdACHO
040811-6oI
6 040812 - npntnckaTeJeH npbcteH BIABO
7 040810 - крпльда raйka
040804 -ФиNTbpeHkopnyc
9 040802 - n3nyckaTeHa npo6ka fniltbpeH Kopnyc, cnH
10 040832 - Вьзхая за Трьба
11 040831 - Мржест ФилТьр
12 040978 - cet 3a 3akpenBahe 3a φилтbpHa nomna
13 040807 - ochOBha nloya
14 040916 - Фпльгнаnomma SPS 75-1T
15 040936 - cBbP3BaU,MapKyuL=25cm038MM
16 040946 - cko6a 3a Mapkyu 0 30 - 50 MM
17 040834 - peyuupaiccbeiHnTeI 3a Mapkyu
Active Balls 75
040952 - MaHOMeTbp
2 040823 - kaNAK Ha ΦnTbpa
3 040814 - ynpbTHeHne pntpeh pe3epBoap
4 040813 - npntnckatehen npbcteh BdACHO
040811-6oI
6 040812 - npntnckatehen npbcteh BnaBO
7 040810 - крпльда raйka
040803 -ФиNTbpeH KOpnyc
9 040802 - n3nyckaTeHa npo6ka fntbpeH Kopnyc, cnH
10 040833 - Вьзхая за Трьба
11 040831 -mpeKecT φnIITbp
12 040978 - cet 3a 3akpenBaHe 3a φилтbpHa nomna
13 040807 - ochOBha nloya
14 040917 - Фильтура пома SPS 100-1T
15 040923 - cBbp3BaA, mapKyu L=48 cm 038 MM
16 040946 - cko6a 3a mapkyu 0 30 - 50 MM
17 040834 - peyuupaiccbeHNHTeI 3a Mapkyu
ДeКларачnia 3a CbOTBETCTBHe

C hactoToSteinbach International GmbH JeKlapanpa, ye fHnTbphata NOMa e B CbOTBeTCTBne Cbc CNeDHNTe DnpeKTNB:
-Директуba за EMC (2014/30/EC)
- EN55014-1: 2017; EN55014-2: 2015; EN61000-3-2: 2014; EN61000-3-3: 2013
-AfPS GS 2019:01 PAK
- EN 60335-2-41: 2003 / A2:2010; EN 60335-1:2012 / A2: 2019; EN 62233:2008
-EOДиpeKТиBa(2014/35/EC)
ПьлниТTekт Ha DeКларацята 3a CBOTBETCTBne Ha EC може Да 6ьдe ИзИСКан Ha NOCOЧЕпь в Края Ha HAcTOrITo pьКOBODCTBO aDPEC.
N3XbBpJrHe
H3XbpyHe Ha onaKOBkata

I3xBbPte ONaKOBkata Cnopei BnDa i. I3XBbPte Te BeNpAneTo n KapToHa B OTnAbTne 3a XapTna, fOJINoTO npn MaTePnAInTe 3a peUKNipaHe.
H3XBbPJIHe Ha H3JIa3JIo OT yNtpe6a yCTpoIcTBO
I3ne3nn ot ynotpe6a ycTpoiCTBa Da He ce n3XbPnT 3aeDnC 6ntOBn OTnadbu!
Ako ypeT Beue He MoKe Da ce n3no3Ba, BceKn noTppe6nte 3aBxKeH
No 3aKoH Da n3xBpIg N3Je3nn OT ynoTe6a yctpoiCTBa OTdEInHOOT
6HTOBtE OTnAdbU, HAnp. Da rN npedeHa NyHKT 3a BTOpuHN
cypOBHH BbB CBOYa O6uHa/YacT Ha rpaJa. TOba rapaHTnpa npabHnHOTo peuKlnpaHe Ha n3Je3JIte OT yNoTpe6a ycTpoiCTBa n 36yRbaHeTO Ha HeraTHBnTe Bb3DeIcTBnB YbpxOkOLHaTa cpeJa. 3aTOBa eJeKTpOpyeDiTe ca o6o3HaueHn C rOpHn CnMB0J.
Active Balls 50. 400
Active Balls 75. 400
Yedek parçalar 402
Active Balls 50. 402
Active Balls 75. 404
Model Active Balls 50
Urun numarasi 040220
Pompa modeli SPS 75-1 T; Ürün No. 040916
Zamanlayici icin batarya Lityum duğme pil 3V CR 2032
- Package contents/components
- Components
- Required tools not included in the package
- Contents
- General Information
- Read and keep the operating instructions
- Intended use
- Explanation of Symbols
- Safety
- WARNING!
- CAUTION!
- NOTICE!
- General safety instructions
- Risk of electric shock!
- Risk of injury through insufficient qualification!
- Unpacking and checking the package contents
- Packaging materials pose a risk of suffocation!
- Checking the delivery for completeness and damage
- Preparation
- Initial cleaning of the device
- Choosing the location
- Filter shaft
- Description of the filter system
- How the timer works
- Example: 6 hours running time
- Example: external timer
- Filtering time
- Operation with floor cleaners
- Before First Use
- Check the following before start-up
- Preparing the filter vessel
- Initial start-up of the timer
- Preparing the pump
- Mounting the pump on the base plate
- Hose connections
- Connecting the pressure line
- Connecting the suction line
- Connecting the return line
- Preparing the filter system
- Operation
- Risk of injury!
- Pump operation
- Starting the pump operation
- Stopping the pump operation
- Care instructions
- Maintenance
- Exchanging the filter medium
- Replacing the timer battery
- Winter storage
- Cleaning
- Cleaning the filter balls
- Test
- Storage
- Technical data
- Active Balls 50
- Active Balls 75
- Spare parts
- Declaration of Conformity
- Disposal
- Disposing of the packaging
- Disposing of used appliances
- Splošno
- Navodila za uporabo preberite in jih shranite
- Generalità
- Općenito
- Procitajte i cuvaje upute za upotrebu
- O6xBaT Ha DoCTabKa/ Yactn Ha ypeDa
- UactnHa ypeda
- Heo6xOaHmN IHCTpyMeHTn, KOnto He ca BkIIOueHb 06XbaTa Ha DOCTaBkaTa
- CbDbpXaHne
- O6ua
- IpoyeTe H cbxpaHete HHCTpyKzraTa 3a ekcnloataa
- YnoTpe6a no npedHa3HaueHne
- O6aChHeHne Ha 3HaunTe
- be3onachoct
- Onachoct OT TOKOB ydap!
- PPEyPExKdEHNIE!
- IbpbHOHaJIeH NcK Ha TaMepa
- IodrotbHe Ha nomnata
- MOHTINPAHE HA NOMNATA Bbpxy OCHOBHa NIOOa
- PnncbeHnHTeHH eIeMeHTn Ha MapkyuHte
- PncbdeHHrahe Ha HAnopnna Tpb6onpoBOD
- PncbeHHaHe Ha cMyKATEHnTpb6onpoBOD
- PncbeHnBaHe Ha o6paTHn Tpb6OpPOB
- IodrotbHe Ha hntbphc nctema
- O6cIyXBAHe
- BHIMAHNE!
- Onachoct ot HapaHЯBaHe!
- Pe3epBHH qactn
- ДeКларачnia 3a CbOTBETCTBHe
- N3XbBpJrHe
- H3XbpyHe Ha onaKOBkata
- H3XBbPJIHe Ha H3JIa3JIo OT yNtpe6a yCTpoIcTBO
Brand : Steinbach
Model : Active Balls 50
Category : Water filter