
MUG-23 - Heating MPM - Free user manual and instructions
Find the device manual for free MUG-23 MPM in PDF.

| Product Type | Electric Heating Panel |
| Brand | MPM |
| Model | MUG-23 |
| Rated Power | 600 W |
| Power Supply | 220-240 V ~ 50/60 Hz |
| Mounting Type | Wall-mounted (brackets included) or freestanding on feet |
| Control | Touch panel + remote control |
| Connectivity | Wi-Fi (Tuya Smart app) |
| Temperature Range | 5 °C to 50 °C (adjustable in 1 °C increments) |
| Timer | 0 to 24 hours |
| Child Lock | Yes, via dedicated button |
| ECO Mode | Yes (via remote control) |
| Display | LED |
| Power Cord Length | 1.55 m |
| Remote Control Batteries | 2 x AAA (not included) |
| Seasonal Energy Efficiency | 94.0 % |
| Standby Consumption | 0.36 W (standby mode), 0.86 W (connected standby) |
| Safety | Overheat protection, safety grille |
| Cleaning and Maintenance | Wipe with a soft damp cloth; do not immerse |
| Repairability | Have it repaired by an authorized service center |
Frequently Asked Questions - MUG-23 MPM
User questions about MUG-23 MPM
0 question about this device. Answer the ones you know or ask your own.
Ask a new question about this device
Download the instructions for your Heating in PDF format for free! Find your manual MUG-23 - MPM and take your electronic device back in hand. On this page are published all the documents necessary for the use of your device. MUG-23 by MPM.
USER MANUAL MUG-23 MPM
INFRACERY NY ELECTRICY RADIATOR
ELEKTRISCFENIFRAOTHEIZSTMAFLER ELEK RULINE INFAFUNAKUTISEADE
HAELIKBERMAJURYLEYOPON
IN RARLOLLCIRCTLA LR
PANOU RADIAN CLINI HAROSU
natural_image
Front view of a black rectangular TV with a digital clock showing 20, mounted on a stand (no visible text or symbols)CZ NÁVOD K OBSLUZE 3
DE REDIENUNGSANIEITUNG 12
EE KASJUSUHEND 22
EL EFXEIPIDOXPHETH 31
EN USR MANUAL
ES MANUAL OF INSTRUCTION-5 51
FR MANUEL DE L'UTILISATEUR 61
HU HAS/NAI AII JIAS AS /1
IT MANUAL YUSO 81
LT VARTOTOJOVADOVAS 91
LV III TOJALA ROKASGRAVIA 107
NL SLBRUK RSHAND LIDING 109
PL INSTRUKCJA OBSŁUGI 1:9
RO MANUAL DE UTILIZARE 129
RU ИНСТРУКЦИЯ ПО ОБСЛУЖИВАНИЮ 138
SK POUZÍVATELSKÁ PRÍRUČKA 149
UA HOCUHVKKOPMCTYBAHA 150
Energy saving-infrared glass panel heater
LED display: ECO mode and parental lock

Control via the Tuya app or remote control
Adjustable temperature setting 5-50°C

Weekly programmer timer
Free standing or wall-mounted
BEZPEČNOSTNÍ POKYNY PŘI POUŽÍVÁNÍ
VOLNĚ STOJÍCÍ INSTALACE
natural_image
Pure mechanical diagram showing two identical lever arms with no text or symbolsPOUŽITÍ ZAŘÍZENÍ
natural_image
Pure mechanical diagram showing two identical lever arms mounted on a horizontal rod, with no text or symbols present.natural_image
Simple line drawing of a rectangular frame with vertical supports and a small rectangular cutout on the left side (no text or symbols)
VABALT SEISEV PAIGALDUS
natural_image
Pure mechanical diagram showing two identical clamping or mounting components with no text, numbers, or symbolsSEADME KASUTAMINE
natural_image
Simple line drawing of a rectangular frame with vertical supports and a small rectangular cutout on the left side (no text or symbols)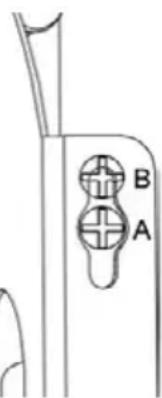
natural_image
Pure mechanical diagram showing two identical clamps mounted on a horizontal bar, with no text or symbols present.ΧΡΗΣΗ ΤΗΣ ΣΥΣΚΕΥΗΣ
-Read the instructions carefully before use.
The device can only be used/stored indoors. The device is designed for use in a domestic environment, do not expose it to atmospheric factors such as rainfall, direct sunlight, etc.
-Take special care when children are near the appliance.
-Do not immerse the appliance, cable or charger in water or other liquids.
-Do not hang the mains cable on sharp edges or allow it to come into contact with hot surfaces.
Always remove the plug from the mains socket when not in use or before cleaning.
- Never use a damaged appliance, including one with a damaged cord or plug, in which case have it repaired at an authorised service centre. Particular attention should be paid to the safety grille – its failure can result in temperature rise, failure, malfunction or deformation and discolouration of the cover due to overheating of the body.
-Use of accessories not recommended by the manufacturer may cause damage to the appliance, fire or personal injury.
-Do not touch the appliance with wet hands.
- Use the device on a smooth and stable surface.
-Children under the age of 3 should not be allowed near the device unless under constant supervision.
-This equipment may be used by children of at least 8 years of age and by persons of diminished physical, mental capacity and lack of experience and knowledge of the equipment if supervision or instruction is provided regarding the safe use of the equipment so that the hazards involved are understood. Unsupervised children should not perform cleaning and maintenance of the equipment.
-The device is not a toy and should not be used as such by children.
-Do not install or use the device in vehicles.
-Keep the appliance away from water!
-Take special care when children and people with disabilities and pets are in the vicinity of the unit!
-It is absolutely forbidden to insert foreign objects into the appliance while it is in operation – pay special attention to children!
-If the device accidentally falls into water before removal, unplug it from the mains socket immediately!
- Never leave the device switched on unattended.
-Do not place the unit on hot, unstable or uneven surfaces!
-Do not place the appliance near flammable agents and other electrical appliances, burners, cookers, ovens, etc.
-Do not let the power cord come into contact with hot surfaces.
-Do not carry a hot device.
-CAUTION! The device blows out hot air. Be careful not to burn yourself.
-Do not wind the power cord around the device!
-To avoid overheating, the power cord should be unwound to its full length.
-Do not use the device for any other purpose than it was intended.
-Do not use the device near water in bath-tubs, bowls or other vessels, or in wet rooms, showers or swimming pools.
-Do not use the device with a programmer, timer switch or other device that switches on the device automatically.
-Do not pull the plug out of the power socket by pulling the cord.
-Do not connect the plug to the power socket with wet hands.
- Keep the device and its cord out of reach of children under 8 years of age.
-For the safety of children, please do not leave freely accessible parts of the packaging (plastic bags, cardboard boxes, polystyrene, etc.).
-WARNING! Do not allow children to play with the film. Danger of suffocation!
-CAUTION! The device has components that heat up to a high temperature during operation – touching them poses a risk of burns! Be particularly careful when the device is in use near children or disabled persons.
Remember to always switch off the device first before removing the plug from the mains socket.
- Do not place the appliance directly under a plug socket.
-Do not place the unit near walls, furniture, etc.
-The appliance should always be operated in the upright position!
-The appliance must be placed on a flat, dry and stable surface at least 90 cm away from walls, furniture, household appliances, etc.
The appliance must also be kept at least 1 m clearance above the appliance! – You should also keep at least 1 m free space above the appliance!
-Do not use the appliance to dry clothes, curtains, curtains, towels, etc.!
WARNING! Do not cover the device. Fire hazard.
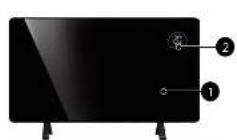
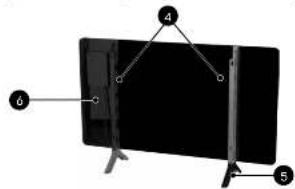
DESCRIPTION OF THE APPLIANCE
- Heating panel
- Touch control panel
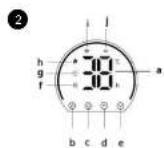
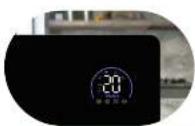
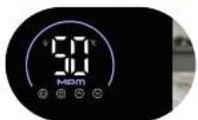
a. LED display
b. On/Off button
c. operating time selection button
d. button to increase the set temperature and running time (+)
e. button to reduce the set temperature and running time (-)
f. parental lock control
g. time indicator light
h. heating indicator light
i. Wi-Fi indicator light
j. ECO mode indicator light
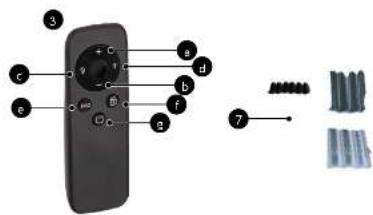
a. button to increase the set temperature and running time (+)
b. button to reduce the set temperature and running time (-)
c. display off/on button
d. operating time selection button (T)
e. ECO mode
f. parental lock button
g. On/Off button
- Wall brackets x 2pc.
- Legs
- Mains cable
-
Accessories for wall mounting
-
Remote control
BEFORE FIRST USE
- Remove the device from the box; remove all stickers, transport protectors, bags and fillers.
- Check the device for damage that may have occurred during transportation. If you have any doubts contact the seller.
- Install 2 x AAA 1.5V batteries in the remote control (see section: "CLEANING AND MAINTENANCE")
- Make sure that the parameters of your mains supply correspond to the data on the appliance's rating plate.
CAUTION! Batteries are not included in the MUG-23 product.
WALL MOUNTING
- Screw the rear brackets to the unit using the four screws provided.
- Mark four points on the wall where holes should be drilled.
- Drill the holes and then place the mounting dowels in them.
- Screw in the screws, leaving their heads protruding by about 5 mm.
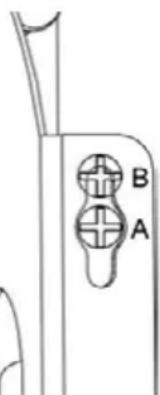
- Lift the radiator and align the four holes on the brackets at the back of the unit with the screws installed in the wall.
- Gently move the heater by sliding the screw from position A to position B to securely fix the unit.

natural_image
Pure technical line drawing of a rectangular panel with internal vertical slots and mounting holes (no text or symbols)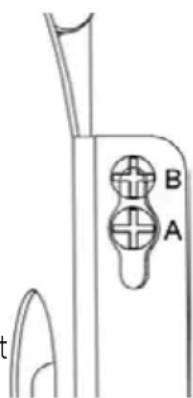
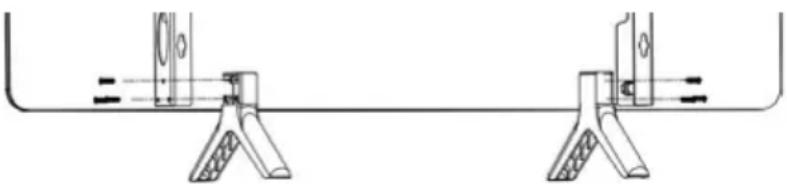
FREE-STANDING INSTALLATION
Place the legs (5) on a flat surface and align their holes with those on the bottom of the brackets. Then screw them in by screwing the 6 screws into the designated places in the bracket.
natural_image
Pure mechanical diagram showing two identical clamps mounted on a horizontal bar, with no text or symbols present.USING THE APPLIANCE
- Connect the device to the mains. On start-up, a beep will sound and the control panel display (2a) will show the “--” symbol and the On/Off button symbol.
- On the control panel (2), press the On/Off button (2b). The display will show the default temperature setting of 25^ C. The heater will start working when the room temperature is below 25^ C. The heater indicator light will illuminate.
- To adjust the temperature, press the increase (2d) or decrease (2e) button on the control panel (2). Each press changes the temperature by 1^ C up or down. The control range is 5^ C to 50^ C. After 5 seconds, the selected temperature value will be confirmed and will start to shine continuously on the display. The heater will start to operate when the set temperature is 1^ C higher than the room temperature or will stop operating when the set temperature is 1^ C lower than the room temperature.
- Press the runtime selection button (2c) on the control panel (2). The time value will start flashing on the display. Use the increase (2d) or decrease (2e) buttons to set the desired operating time from 0 to 24 hours. After 5 seconds of inactivity, the set time is automatically confirmed.
- To activate the parental lock, press and hold the button (2d) on the control panel (2). The display will show a padlock symbol indicating that the lock has been activated. To switch it off, press and hold the button (2g).
- All appliance functions can also be controlled using the remote control (3), which has buttons with the same function as those on the appliance control panel. In addition, the remote control has a button to activate the energy-saving ECO mode.
WIFI CONFIGURATION AND THE "TUYA" APPLICATION CONNECTION
- To connect the heater to your Wi-Fi network, first download the TUYA Smart app to your smartphone by searching for 'TUYA Smart' in the Google Play Store or Apple App Store.
- Download and install the app. If you do not already have a Smart Life account, register by selecting "Register" and follow the on-screen instructions.
- The device will automatically recognise the user's country, but it can be manually changed if necessary. Then enter your telephone number or email address. If you choose to register using your phone number, you will receive an SMS verification code – enter it and then create an account. If registering via email address, simply set a password and complete the registration process.
- To add a heater to the app, the device must first be switched to Wi-Fi connection mode. To do this, connect the heater to a power source. After starting, you will hear a beep and the touch control panel (2) will display --' and the On/Off button symbol. Press the On/Off button (2b), then press and hold the time selection button (2c). The Wi-Fi light (2i) will start flashing, indicating that the device is trying to connect to the network. You can now connect to Wi-Fi and add
the heater to the TUYA APP using your smartphone. If the Wi-Fi light (2i) is not flashing, press and hold the time selection button (2c).
-
When the Wi-Fi light (2i) starts flashing, open the app and select "Add device". When the device is detected, press "Add". Then enter the details of your Wi-Fi network – select the appropriate network and enter the password. When you have finished, click "Continue". Once the heater has been successfully added to the application, press "Finish".
-
The app will then display the connection screen and a steady Wi-Fi light will appear on the LED display, indicating that the device has been successfully connected. The application will confirm that the device has been added to the system.
-
If another device or family members want to connect to the WI-FI network, press and hold the time selection button (2c) to first disable the WI-FI connection from the current device.
CLEANING AND MAINTENANCE
CAUTION! Unplug the device from the mains and wait until it has cooled completely before cleaning.
- Solvents, insecticides and other strong substances must not be used for cleaning. This could cause damage to the unit's housing or electrical failure.
- The outer surface of the unit should be cleaned with a damp, soft cloth and then wiped with a dry cloth. Do not use abrasive cleaning powders or furniture polishes, as these can damage the surface.
- For short-term storage, it is sufficient to disconnect the heater from the power supply, while for long-term storage it can be removed from the wall or covered with some kind of material.
- The remote control is powered by two AAA batteries (1.5 V). To access the batteries, open the container located at the bottom of the remote control. When replacing batteries, make sure they are fitted correctly, paying attention to polarity. Do not combine batteries of different types or use new batteries together with used ones.
CAUTION! Do not immerse the device in water or other liquids! Do not wipe the appliance with sharp, abrasive cloths or sponges as this can damage the surface!
SIMPLIFIED EU DECLARATION OF CONFORMITY
MPM agd S.A. hereby declares that the appliance complies with the requirements and standards contained in European Union directives and national regulations. As a radio appliance, it conforms to the Directive 2014/53/EU of 16 April, 2014 on the harmonisation of the laws of the Member States relating to the making available on the market of radio equipment and repealing Directive 1999/5/EC.
| Model ID: MUG-23 | |||||
| Parameter | Identification | Value | Unit | Parameter | Unit |
| Thermal power Type of heat output/room temperature controller | |||||
| Nominal heat output | Pnom | 0.60 | kW | single-stage heat output without room temperature control | NO |
| Minimum heat output (approximate) | Pmin - | kW at least two manual stages without room temperature control | NO | ||
| Maximum constant heat output | Pmax,c | 0.60 | kW | mechanical control of room temperature by thermostat | NO |
| Power consumption | electronic room temperature control | NO | |||
| In off mode | After | - | W | electronic room temperature control with a daily controller | NO |
| In standby mode | Psm | 0,36 | W | electronic room temperature control with weekly controller | YES |
| In idle mode | Pidle | 0,37 | W | Other adjustment options | |
| In standby mode when connected to the mains | Pnsm 0.86 W | room temperature control with presence detection | NO | ||
| Standby mode with information or status display | NO | room temperature control with open window detection | YES | ||
| Seasonal energy efficiency of space heating in active mode | ηs,on | 94,0 | % | remote adjustment option | YES |
| adaptive launch control | NO | ||||
| restriction of working time | YES | ||||
| radiant heat sensor | NO | ||||
| self-learning function | NO | ||||
| precision of adjustment | NO | ||||
| Contact details | MPM agd S.A. ul.Brzozowa 3, 05-822 Milanówek, Poland, BDO: 000027599 tel. + 48 (22) 380 52 00, info@mpm.pl | ||||
TECHNICAL DATA
| Model MUG-23 | |
| Power supply 220 – 240 V ~ 50/60 Hz | |
| Power 600 W | |
| Length of mains cable 1.55 m |
CAUTION! MPM agd S.A. reserves the right to technical changes.
Proper removal of product (batteries and/or accumulators)
The icon with a crossed out trash can indicate that accumulators/batteries are subject to selective collection and recycling. Pursuant to Directive 2006/66/WE, batteries and/or accumulators must not be thrown away together with other waste coming from households after their service life comes to an end. To prevent possible damage to the environment or human health resulting from uncontrolled waste disposal, accumulators/batteries should be collected, disposed of or recycled in accordance with applicable laws. A used battery should be placed in a special container at separate collection points for this type of waste.
Proper disposal of the product (waste electrical and electronic equipment)
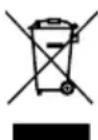
Marking on the product indicates that after the service-life of the product expires, it should not be disposed with other type of municipal waste. Used equipment may have a negative impact on the environment and health of people due to potentially containing hazardous substances, mixtures and components. Mixing electric waste with other types of waste or disassembling those in an unprofessional manner may cause a release of substances that are hazardous to the environment and health.
Used equipment should be handed-over to a point for collection of electric waste. In order to obtain detailed information regarding the electric waste collection points, the user should contact the municipal point of electric waste collection or used equipment processing department.
natural_image
Pure mechanical diagram showing two identical arms supported by a central rod, with no text or symbols present.USO DEL DISPOSITIVO
natural_image
Pure mechanical diagram showing two identical clamping devices mounted on a horizontal bar, with no text or symbols present.UTILISATION DE L'APPAREIL
natural_image
Pure mechanical assembly diagram showing two clamping arms with no text or symbolsA BERENDEZÉS HASZNÁLATA
natural_image
Pure mechanical diagram showing two identical lever arms mounted on a horizontal bar, with no text or symbols present.USO DEL DISPOSITIVO
natural_image
Simple line drawing of a rectangular frame with vertical supports and a small rectangular cutout on the left side (no text or symbols)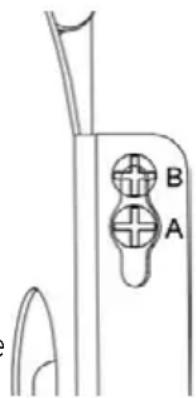
LAISVAI PASTATOMAS |RENGINYS
natural_image
Pure mechanical assembly diagram showing two clamps mounted on a horizontal bar with no text or symbolsnatural_image
Pure technical line drawing of a rectangular panel with vertical connectors and mounting holes (no text or symbols)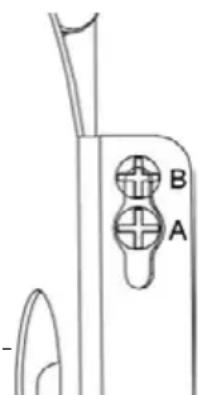
BRÍVI STÁVOŠA UZSTÁDÍŠANA
natural_image
Pure mechanical diagram showing two identical lever arms mounted on a horizontal rod, with no text or symbols present.IERİCES LIETOŠANA
BESCHRIJVING VAN HET APPARAAT
natural_image
Pure mechanical diagram showing two identical clamping or mounting components with no text, numbers, or symbolsGEBRUIK VAN HET APPARAAT
natural_image
Pure technical line drawing of a rectangular panel with internal vertical slots and mounting holes (no text or symbols)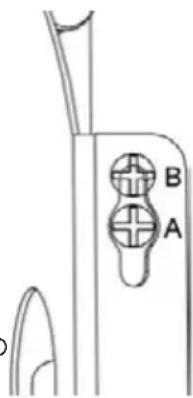
MONTAŻ WOLNOSTOJĄCY
natural_image
Pure mechanical assembly diagram showing two clamps mounted on a horizontal bar with no text or symbolsUŻYCIE URZĄDZENIA
natural_image
Pure mechanical assembly diagram showing two vertical supports with internal components, no text or symbols presentUTILIZAREA DISPOZITIVULUI
natural_image
Simple line drawing of a rectangular frame with vertical supports and a small rectangular cutout on the left side (no text or symbols)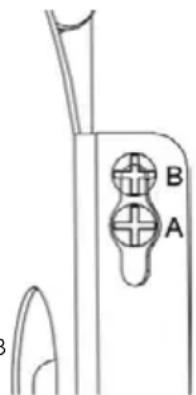
natural_image
Pure mechanical diagram showing two clamping arms with no text or symbolsnatural_image
Pure mechanical diagram showing two clamping arms with no text or symbolsPOUŽÍVANIE ZARIADENIA
natural_image
Simple line drawing of a rectangular frame with vertical supports and a small rectangular cutout on the left side (no text or symbols)