
CMBL-01 - Blender MPM - Free user manual and instructions
Find the device manual for free CMBL-01 MPM in PDF.

| Product type | Cordless immersion blender |
| Brand | MPM |
| Model | CMBL-01 |
| Power supply | Rechargeable battery (model CAKU-01, sold separately) or optional CAKU-02 charging base |
| Mixing container capacity | 700 ml max |
| Grinding container capacity | 500 ml max |
| Blade material | Stainless steel |
| Speeds | Variable (speed control button) |
| Battery life | 20 to 50 minutes depending on charge |
| Charging time (USB) | Approximately 3 hours (at 2A) |
| Charging time (CAKU-02 base) | Approximately 30 minutes |
| Included accessories | Blending shaft, milk frother attachment, whisk, grinding container with blade, adapter |
| Main functions | Blend, grind, emulsify, whip egg whites, froth milk |
| Safety | Dual unlock and start buttons; overheat protection (blue/red indicator) |
| Maximum food temperature | 60 °C |
| Care and cleaning | Clean accessories with warm soapy water; do not immerse motor unit |
| Spare parts and repairability | Battery and charging base available as an option from manufacturer |
| General information | Compatible with GoFree cordless range; household use only |
Frequently Asked Questions - CMBL-01 MPM
User questions about CMBL-01 MPM
0 question about this device. Answer the ones you know or ask your own.
Ask a new question about this device
Download the instructions for your Blender in PDF format for free! Find your manual CMBL-01 - MPM and take your electronic device back in hand. On this page are published all the documents necessary for the use of your device. CMBL-01 by MPM.
USER MANUAL CMBL-01 MPM
EN We wish you satisfaction from using the product and invite you to check a wide range of other MPM appliances.
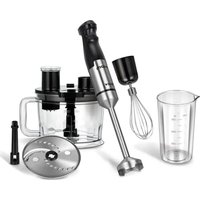
natural_image
Product photo of a kitchen blender with whisk, stand mixer, and side dish (no visible text or labels)cz NAVOD K OBSLUZE 3
ored - operating up to a line's claims
Crapping, sourcing, grinding, milk processing
BEZPEČNOSTNÍ POKYNY PŘI POUŽÍVÁNÍ

Read the instructions carefully before use.
- Do not handle the device with wet hands.
- Take special care when children are near the device.
- Do not use the device for purposes other than those for which it was intended.
-Do not submerge the device in water or other liquids.
- Do not leave the appliance unattended during operation.
-Do not use a damaged device – in this case, return the device to an authorised service centre for repair.
- Do not use the appliance outdoors.
- Do not place the device on a hot surface.
-Do not place the device near other electric cookers, burners, ovens, etc.
- The device should be put on a dry, flat and stable surface.
- The device is intended for domestic use only.
-Always ensure that all parts of the device are correctly fitted before starting work.
- Use of accessories not recommended by the manufacturer may cause damage to the device, fire or personal injury.
- The device may be used by people with reduced physical, sensory or mental abilities, as well as those without prior knowledge or experience in using such types of device, provided that they either are supervised or have been instructed and informed about potential threats which they fully understood.
-The appliance must be kept away from children. Keep the device out of the reach of children.
-Children are forbidden to perform cleaning and maintenance activities.
-The device is not a toy and should not be used as such by children.
-For the safety of children, please do not leave freely accessible parts of the packaging (plastic bags, cardboard boxes, polystyrene, etc.).
-WARNING! Do not allow children to play with the film. Danger of suffocation!
-CAUTION! Disconnect all accessories from the device and wait until it has cooled completely after operation before starting
cleaning and maintenance. Do not submerge the appliance into water!
- CAUTION! Do not use sharp objects, abrasive polishes, solvents or other strong chemicals for cleaning since their use may cause damages to the device.
-Before the first use, remove all bags, stickers, tapes and transport locks from the device and its accessories.
- Wait until the motor stops completely before disassembling the appliance.
- Pay special attention when handling the blades, especially when removing and washing them.
-Do not exceed the maximum capacity indicated on the container.
- Allow hot ingredients to cool down before processing them.
-Clean the appliance, in particular parts being in direct contact with food, before first use, immediately after finishing work and if the appliance has not been used for a long time. The procedure is described in details in the “CLEANING AND MAINTENANCE” section.
- Keep your hands away from moving parts when the device is in operation!
- CAUTION! Avoid physical contact with the cutting blades while emptying and cleaning the device as they are very sharp and might cause serious injuries.
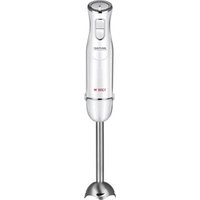
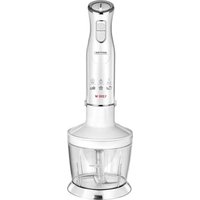
APPLIANCE DESCRIPTION
- Replaceable battery
- Battery mounting socket
- Start button and speed control
- Power unlock button
- Blender housing
- Stainless steel blending attachment
- Lid of the shredding container
-
Chopping knife with a stainless steel blade
-
Shredding container with capacity (max. 500 ml)
- Adapter
- Milk frothing attachment
- Whipping attachment for egg whites, light creams and sauces
- Container with capacity (max. 700 ml)
CAUTION! The kit does not include a rechargeable battery, USB-A/USB-C type cable or a base with charger. For the device to work, it is necessary to purchase a dedicated rechargeable battery with a USB-A/USB-C type charging cable (CAKU-01 model). AI -ternatively, you can buy a base with a charger (CAKU-02 model).
BEFORE FIRST USE
- Take the device out of the box and remove all protecting cardboard and foil.
- Check the device for damage that may have occurred during transportation. If you have any doubts contact the seller.
- Thoroughly wash and dry the parts that directly come into contact with food (see section: "CLEANING AND MAINTENANCE").
- Charge the battery until all the battery charge status lights are on continuously. When fully charged, 5 lights are lit.
CHARGING THE BATTERY
The battery can be charged in two ways:
Using a USB-A/USB-C type cable connected directly to the battery:
- Connect the end of the cable (USB-A) to a 5V === power source equipped with a USB-A port (such as a phone charger).
- Connect the other end of the cable (USB-C) to the USB-C port on the battery.
- During charging, the battery lights will flash. The progress of charging will be indicated by the lighting of successive lights, full charging will be indicated by the lighting of all 5 lights with a continuous light.
- The approximate time for this method of charging, with a current of 2A, is about 3 hours.
Using a dedicated base with CAKU-02 charger (fast charging):
- Connect the dedicated 12.6V = 4A charger to the mains and then to the charging base.
- Insert the battery into the charging base. Thanks to built-in magnets, the battery installs automatically when the battery is applied to the charging base.
- During charging, the battery lights will flash. The progress of charging will be indicated by the lighting of successive lights, full charging will be indicated by the lighting of all 5 lights with a continuous light.
- The approximate time required to fully charge the battery using the base with charger model CAKU-02 is about 30 minutes.
CAUTION! Optionally, you can connect the end of the cable (USB-C) to the charging base, and the other end to a 5V === power source (such as a phone charger). The approximate time for this method of charging, with a current of 2A, is about 3 hours.
CAUTION! The blender's operating time with a fully charged battery ranges from 20 minutes (for heavy weights) to 50 minutes (for light weights).
CAUTION! When charging is complete, disconnect the charger from the mains and the charger cable from the battery.
| Battery indicator light colours | Battery lights in % Note |
| 1 white less than 20% - | |
| 2 white 21-40% - | |
| 3 white 41-60% - | |
| 4 white 61-80% - | |
| 5 white 81-100% - | |
| blue - high engine temperature | |
| Red - battery protection function is enabled | |
The battery is compatible with all devices in the GoFree wireless series.
BATTERY INSTALLATION
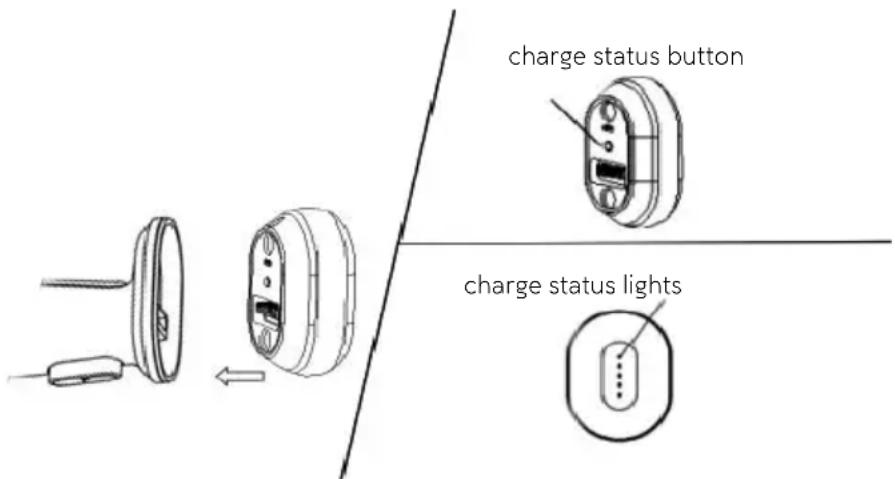
- To check the battery charge level, press the button on the inside of the battery.
- Pay attention to the correct position of the battery during installation, otherwise the battery cannot be installed in the device.
- The battery pack, thanks to built-in magnets, installs automatically when the battery is applied to the mixer housing.
- To remove the battery from the device, simply hold the blender with one hand and pull the battery with the other.
USING A BLENDER
CAUTION! Do not allow the blender housing (5) to get wet.
CAUTION! The temperature of food prepared with the blender must not exceed 60°C. CAUTION! The blades' cutting edges are sharp Risk of possible injury! Use with caution!
CAUTION: During operation of the device, do not extend the blender attachment beyond the perimeter of the vessel in which the food is blended. In order to avoid dangerous situations and spilling of food outside, we recommend using dedicated containers or dishes with high sides. Maximum volume of mixed food articles may not exceed 700 ml.
The CMBL-01 rechargeable hand blender is a compact device that will make everyday meal preparation easier. The device is especially recommended for grinding raw and cooked vegetables, soft fruits (without seeds), preparing sauces, creams, soups, mixing liquids, etc. Prior to grinding large ingredients with a blender cut them into smaller pieces (1-2 cm).
- Attach one of the accessories of your choice to the blender housing (5): blender attachment (6), adapter (10) with milk frothing attachment (11) or adapter (10) with foam whisking attachment (12).
- To lock the accessory, rotate the attachment in the direction of the closed padlock according to the markings on the adapter and on the attachments until it locks.
- After ensuring that all components are properly assembled, mount the battery (1) in the battery mounting slot (2).
- Do the opposite for disassembling the attachment. Take care not to injure yourself or damage parts when disconnecting accessories.
- Do not exceed the maximum time of continuous operation of the device (information given in the table below):
| Appetizer type | Maximum time of continuous operation | Interval time between cycles |
| Mixing attachment (6) 1 minute 1 minute | ||
| Milk frothing attachment (11) 10 minutes 30 minutes | ||
| Attachment for whipping egg whites, light creams and sauces (12) | 10 minutes 30 minutes | |
| Shredding and chopping set (knife) (8) 15 seconds 2 minutes |
SHREDDING AND CHOPPING SET (KNIFE) ASSEMBLY
- Place the container (9) on a dry and stable surface.
- Remove the lid (7) from the container (9) by turning it in the direction of the open padlock according to the markings on the lid (7).
- Next, place the chopping knife (8) on the pin protruding from the centre of the bottom of the container, then place the lid so that the tip of the chopping knife fits into the lid.
- After making sure that all parts are assembled correctly, insert the blender housing (5) into the slot in the lid (7) by turning it towards the closed padlock according to the markings on the lid (7).
LAUNCH AND SPEED CONTROL BUTTON OF THE BLENDER
To start the blender, press the power unlock button (4) and the speed control button (3) simultaneously. The device will start working at low speed. Continuing to press the button (3) increases the blender's speed. Releasing pressure on the button (3) stops the blender.
CLEANING AND MAINTENANCE
CAUTION! The blades' cutting edges are sharp Risk of possible injury! They should be handled with care!
- Before cleaning, remove the battery (1) from the mounting socket (2).
- Before and after each use, disassemble the device's components and wash it thoroughly in warm water with the addition of detergent, then rinse thoroughly and dry.
- Periodically check parts before reassembling. Do not use the blender if the knives of blender blades (6) are jammed or rotate with difficulty.
- Never submerge the blender in water. Disconnect the battery from the device, wipe the case with a damp cloth, and then wipe it dry.
- If discoloration of plastic elements occurs after rubbing, e.g. carrots, they can be wiped with a cloth and cooking oil.
CAUTION! Do not use sharp objects, abrasive polishes, solvents or other strong chemicals for cleaning since their use may cause damages to the device.
CAUTION! Do not submerge the device in water or wash it with water, as there is a risk of electric shock.
TECHNICAL DATA
Technical specifications are given on the product nameplate.
CE
CAUTION! MPM agd S.A. reserves the right to technical changes.
Proper disposal of the product (waste electrical and electronic equipment)
Marking on the product indicates that after the service-life of the product expires, it should not be disposed with other type of municipal waste. Used equipment may have a negative impact on the environment and health of people due to potentially containing hazardous substances, mixtures and components.
Mixing electric waste with other types of waste or disassembling those in an unprofessional manner may cause a release of substances that are hazardous to the environment and health. Used equipment should
be handed-over to a point for collection of electric waste. In order to obtain detailed information regarding the electric waste collection points, the user should contact the municipal point of electric waste collection or used equipment processing department.
BESCHRIJVING VAN HET APPARAAT


- BEZPEČNOSTNÍ POKYNY PŘI POUŽÍVÁNÍ
- APPLIANCE DESCRIPTION
- BEFORE FIRST USE
- CHARGING THE BATTERY
- BATTERY INSTALLATION
- USING A BLENDER
- SHREDDING AND CHOPPING SET (KNIFE) ASSEMBLY
- LAUNCH AND SPEED CONTROL BUTTON OF THE BLENDER
- CLEANING AND MAINTENANCE
- CAUTION! The blades' cutting edges are sharp Risk of possible injury! They should be handled with care!
- TECHNICAL DATA
- Proper disposal of the product (waste electrical and electronic equipment)
- BESCHRIJVING VAN HET APPARAAT
Brand : MPM
Model : CMBL-01
Category : Blender