
DKD4820B - Coffee machine DE DIETRICH - Free user manual and instructions
Find the device manual for free DKD4820B DE DIETRICH in PDF.

| Brand | De Dietrich |
| Model | DKD4820B |
| Product type | Automatic coffee machine with integrated grinder |
| Dimensions (W x H x D) | 597 x 450 x 470 mm |
| Net weight | 20 kg |
| Power supply | 220 - 240 V~ 50/60 Hz, max 10 A |
| Rated power | 1350 W |
| Pump pressure | 15 bar |
| Water tank capacity | 2.5 L |
| Bean hopper capacity | Approximately 250 g (not exactly specified) |
| Coffee types | Whole beans, ground coffee |
| Available drinks | Espresso, Doppio+, Coffee, Long, Americano, Cappuccino, Latte Macchiato, Café Latte, Hot milk, Cappuccino+, Espresso Macchiato, Flat White, Cappuccino Mix, Hot water, Steam |
| Grind adjustment | Fineness adjustment knob (1 to 7, with grinder running) |
| Aroma setting | 5 levels: Extra light, Light, Medium, Strong, Extra strong |
| Coffee temperature setting | Low, Medium, High, Max |
| Water filter | Water softener filter (optional, lasts ~2 months) |
| Programming | Clock, automatic on/off, energy saving, cup warmer, personalized profiles (6) |
| Display | Home screen with icons and navigation |
| Milk container | Integrated, with froth adjustment knob and CLEAN cleaning function |
| Cleaning | Automatic rinse cycle, programmed descaling, infuser cleaning, dishwasher-safe milk container |
| Descaling | Automatic program (~45 min) with supplied descaling product |
| Safety | Auto-off, main switch, child safety lock, hot surface warnings |
| Supplied accessories | Measuring spoon, cleaning brush, hot water/steam nozzle, water hardness test strip, descaling product, water filter (depending on model) |
| Repairability | Original spare parts via authorized service center |
Frequently Asked Questions - DKD4820B DE DIETRICH
User questions about DKD4820B DE DIETRICH
0 question about this device. Answer the ones you know or ask your own.
Ask a new question about this device
Download the instructions for your Coffee machine in PDF format for free! Find your manual DKD4820B - DE DIETRICH and take your electronic device back in hand. On this page are published all the documents necessary for the use of your device. DKD4820B by DE DIETRICH.
USER MANUAL DKD4820B DE DIETRICH
natural_image
Top-down view of a coffee cup filled with coffee beans, surrounded by scattered beans on a dark surface (no text or symbols visible)
flowchart
graph TD
    A[" "] --> B[" "]
    B --> C[" "]
    C --> D[" "]
    D --> E[" "]
    style A fill:#fff,stroke:#000
    style B fill:#999,stroke:#000
    style C fill:#ccc,stroke:#000
    style D fill:#fff,stroke:#000
    style E fill:#fff,stroke:#000
CHÈRE CLIENTE, CHER CLIENT,


natural_image
Diagram of a 3D printer internal structure with arrows indicating rotation or assembly (no text or symbols present)


TABLE DES MATIÈRES
SOMMAIRE
INTRODUCTION....17
SOLUTIONS DES PROBLÈMES ....39
natural_image
Illustration of a hand inserting a plug into an electrical socket (no text or symbols)

natural_image
Diagram of a refrigerator interior showing a door, front panel, and side panel with a hanging container (no text or symbols)
natural_image
Diagram of a device with an upward arrow indicating process, showing internal components (no text or symbols)
natural_image
Line drawing of a refrigerator with an inset showing a trash can (no text or symbols)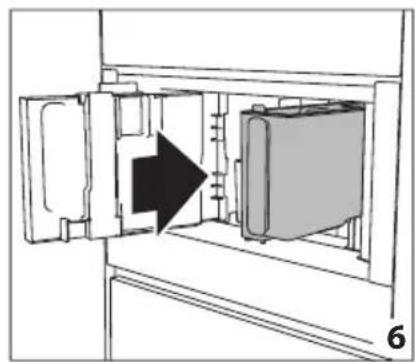
natural_image
Diagram of a refrigerator interior showing door, vent, and side panel with an arrow indicating direction (no text or symbols)
natural_image
Diagram of a mechanical assembly with an arrow indicating direction, no text or symbols present
natural_image
Line drawing of a water spray bottle pouring liquid into a container (no text or symbols)


natural_image
Technical line drawing of a mechanical component with a magnified inset showing a circular feature (no text or symbols)
natural_image
Diagram of a vehicle interior showing engine, battery, and exhaust components with two inset images of two black objects (no text or symbols)
natural_image
Simple line drawing of a coffee cup being poured into a container, with a downward arrow indicating the drop (no text or symbols)
natural_image
Diagram of a vehicle interior showing intake manifold, exhaust pipe, and dashboard (no text or labels)
natural_image
Diagram of a mechanical device with an upward arrow indicating direction (no text or symbols present)
natural_image
Diagram showing a mechanical device with a rod and arrow, labeled '17' (no text or symbols on the diagram itself)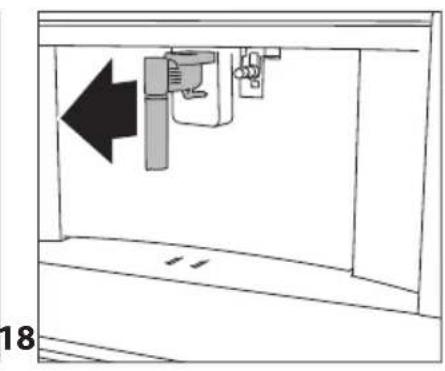
natural_image
Diagram of a mechanical device with an arrow indicating leftward movement, no text or symbols present
natural_image
Simple line drawing of a cabinet with an arrow indicating direction, no text or symbols present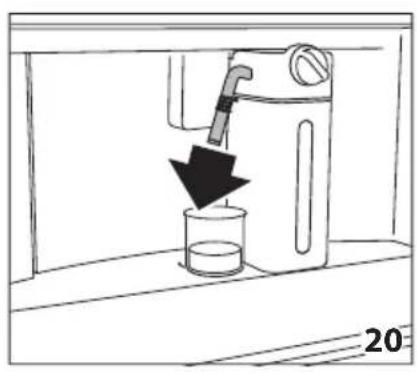


natural_image
Line drawing of a water dispenser pouring liquid into a beaker (no text or symbols)
natural_image
Illustration of a hand cleaning a wall with a cloth, showing a black arrow pointing to the edge (no text or symbols)
natural_image
Two mechanical assembly diagrams showing a tool pressing down and falling, with no visible text or symbols.
natural_image
Technical line drawing of a mechanical device interior with no visible text or symbols
natural_image
Technical line drawing of a mechanical assembly or machine component with no visible text or symbols
natural_image
Technical line drawing of a mechanical assembly or enclosure with no visible text or symbols
natural_image
Technical line drawing of a mechanical assembly with a magnified inset showing a component (no text or symbols)
natural_image
Illustration of hands using a tool to adjust or install electronic components inside a device (no text or symbols visible)
natural_image
Line drawing of a hand using a screwdriver to adjust or install a mechanical component (no text or symbols present)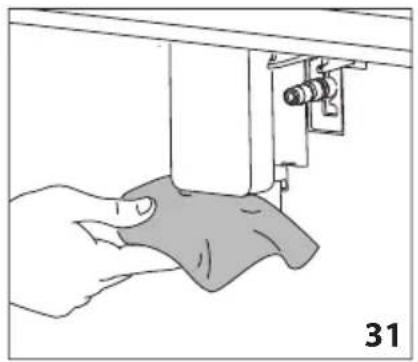
natural_image
Illustration of a hand using a sewing machine to lift a fabric or cloth (no text or symbols visible)
natural_image
Diagram of a mechanical device inside a cabinet, showing internal components and an arrow indicating direction (no text or symbols)
natural_image
Technical diagram of a mechanical assembly with a black arrow indicating a specific component (no text or symbols present)
natural_image
Illustration of hands holding a device with arrows indicating movement or force direction (no text or symbols)
natural_image
Technical diagram of a mechanical device with directional arrows indicating movement or force (no text or symbols present)

natural_image
Line drawing of a hand holding a tool next to a mechanical component (no text or symbols)
natural_image
Line drawing of a hand holding a water tap with a valve, labeled with numbers 38 and 39 (no text or symbols on the diagram itself)
natural_image
Diagram of a mechanical device with a cylindrical component inserted into a housing, showing an upward arrow (no text or symbols present)

natural_image
Diagram showing a mechanical component with a downward arrow indicating motion or assembly (no text or symbols present)

natural_image
Line drawing of a faucet pouring water into a plastic bottle (no text or symbols)
natural_image
Diagram of a container with a labeled inlet and outlet, showing liquid level and a device inside (no text or symbols)natural_image
Close-up of coffee beans and a glass cup on a dark surface, with decorative paper outlines at the bottom (no text or symbols)
DEAR CUSTOMER,
You have just purchased a De Dietrich appliance. This choice reflects your high standards as well as your taste for the French art of living.
With over 300 years of heritage, our creations embody the perfect blend of design, authenticity and technology at the service of the culinary arts.
De Dietrich cultivates a constant quest for excellence, perpetuating exceptional craftsmanship in the creation of impeccably finished products. These are made with the finest materials and finished to the highest standards.
We hope you find great satisfaction in using your new appliance and eagerly anticipate any suggestions or questions you may have. De Dietrich's Customer Service is available to address your inquiries and feedback, ensuring that we consistently meet your needs.
We are honored to become your new partner in your home and sincerely appreciate your trust.
www.de-dietrich.com
De Dietrich
CRÉATEUR D'ÉMOTIONS DEPUIS 1684


natural_image
Diagram of a 3D printer internal structure with arrows indicating rotation or assembly (no text or symbols present)


CONTENTS
SUMMARY
INTRODUCTION....17
Symbol used in these Instructions .....17
Letters in brackets....17
Troubleshooting and repairs .....17
Instructions for use....17
DESCRIPTION OF THE APPLIANCE .....17
Description of the appliance .....17
Description of homepage (page 3 - B) ..17
Description of the accessories .....18
Description of the milk container......18
PRELIMINARY OPERATIONS ....18
Checking the appliance....18
SETTING UP THE APPLIANCE ....18
TURNING THE APPLIANCE ON......19
TURNING THE APPLIANCE OFF .....19
MENU SETTINGS....19
Rinsing 19
De-scaling 19
Water filter 20
Beverages settings i....20
Set time ⏻......20
Auto-start 20
Auto-off (standby) ⏻......21
Cup warmer....21
Energy saving Ⓧ 21
Coffee temperature 21
Water hardness 21
Selecting the language 21
Sound notification 21
Lights 21
Demo mode 22
Default values 22
Statistics 22
MAKING COFFEE 22
Selecting the coffee aroma 22
Selecting the coffee quantity 22
Making coffee using coffee beans.....23
Making coffee using pre-ground coffee.23
Adjusting the coffee mill 24
Tips for a hotter coffee .....24
MAKING MILK-BASED HOT DRINKS ....24
Filling and attaching the milk container.24
Adjusting the amount of froth 25
Making milk-based drinks automatically.25
Cleaning the milk container after use ...25
DELIVERING HOT WATER....26
STEAM DELIVERY 26
Tips for using steam to froth milk .....27
Cleaning the hot water/steam spout after use....27
CUSTOMISING BEVERAGES MY....27
MEMORISING YOUR PERSONAL
PROFILE......27
CLEANING....28
Cleaning the machine 28
Cleaning the appliance internal circuit ..28
Cleaning the coffee grounds container .28
Cleaning the drip tray 28
Cleaning the inside of the coffee machine....29
Cleaning the water tank 29
Cleaning the coffee spouts....29
Cleaning the pre-ground coffee funnel..29
Cleaning the infuser 29
Cleaning the milk container (D)....30
Cleaning the hot water/steam connection nozzle ....30
DESCALING 30
PROGRAMMING WATER HARDNESS ..31
Measuring water hardness....32
Setting water hardness 32
WATER SOFTENER FILTER....32
Installing the filter 32
Replacing the filter ....33
Removing the filter 33
TECHNICAL DATA 33
DISPLAYED MESSAGES....34
TROUBLESHOOTING....39
Before the installation and use of the machine, carefully read the supplied instructions. The manufacturer is not responsible if an incorrect installation and use causes injuries and damages. Always keep the instructions with the machine for future reference.
1.1 Safety of children and vulnerable persons
- The machine is not intended for use by persons (including children) with reduced physical, sensory or mental capabilities, or with insufficient experience and knowledge, unless they are properly supervised or have been instructed on safe use of the appliance by a person responsible for their safety.
- Children should be supervised to ensure that they do not play with the machine.
- For European markets only:
- This machine can be used by children aged 8 years and over provided they are supervised or have been instructed on safe use of the machine and are aware of the dangers involved. Cleaning and user maintenance shall not be made by children unless they are older than 8 and supervised. Keep the machine and its cord out of the reach of children aged less than 8 years.
• Children must not play with the machine.
1.2 General Safety
- Intended use: this machine is designed and developed to pre-pare milk, coffee and hot water based beverages. Any other use is considered improper and thus dangerous. The manufacturer is not liable for damage deriving from improper use of the machine.
- The surface of the heating element remains hot after use and the outside of the machine may retain the heat for several minutes depending on use.
- Clean all the components thoroughly, taking particular care with parts in contact with the coffee and milk.
- Cleaning and user maintenance shall not be made by children without supervision.
- Never submerge the machine into water.
- CAUTION: To prevent damage to the machine, do not use alkaline cleaning agents when cleaning, use a soft cloth and a mild detergent.
- This machine is for household use only. It is not intended to be used in: staff kitchen areas in shops, offices and other working environments; farm houses; by clients in hotels, motels and other residential type environments; bed and breakfast type environments.
- If the plug or power cable is damaged, it must be replaced by customer services only to avoid all risk.
SAFETY INFORMATION
- Machines with removable cord: avoid splashes of water on the power cord connector or socket at the back of the appliance.
- WARNING: Models with glass surfaces: do not use the machine if the surface is cracked.
• For European markets only: - Machines can be used by persons with reduced physical, sen-sory or mental capabilities or lack of experience and knowledge only if they are supervised or have been instructed on safe use of the machine and understand the hazards involved.
• Always disconnect the machine when not in use and before cleaning.

Surfaces marked with this symbol become hot during use (the symbol present in certain models only).

Danger!
This is an electrical appliance, it is therefore important to respect the following safety warnings:
- Never touch the appliance with damp hands.
- Never touch the plug with damp hands.
- Make sure the socket used is freely accessible at all times, enabling the appliance to be unplugged when necessary.
- Unplug directly from the plug only.
- Never pull the power cable as you could damage it.
- To disconnect the appliance completely, place the main switch (A23) on the side of the appliance in the 0 position.
- If the appliance is faulty, do not attempt to repair.
Turn it off using the main switch (A23), unplug from the mains socket and contact Customer Services.

Important!
Keep all packaging (plastic bags, polystyrene foam) away from children. CHOKING HAZARD. The appliance might contain small parts.
Some of those small parts might be required to get disassembled during cleaning and maintenance operations. Handle with care and keep small parts out of reach of children.

Danger of burns!
This appliance produces hot water and steam may form while it is in operation.
Avoid contact with splashes of water or hot steam. Use knobs and handles.

Important!
Do not hold on to the coffee machine when it is out of the cabinet.
Do not rest recipients containing liquids or inflammable or corrosive materials on top of the appliance. Place the accessories required to make the coffee (the measure for example) in the special holder. Do not rest large objects which could obstruct movement or unstable objects on the appliance.
Do not allow children and animals to stop or linger near the appliance when it is pulled out of the cabinet.
Do not leave the machine pulled out of the cabinet when it is being used.
Do not leave the machine pulled out of the cabinet when it is not needed.
Install the machine according to the instructions in the handbook to guarantee there are no spills when it is pulled out from the cabinet.

Important!
Do not use the appliance when extracted.
Make sure the appliance is inactive before extracting it. The only exception is adjusting the coffee mill which must be done with the machine extracted.

Please note:
Use original or manufacturer recommended accessories and spare parts only.

Important!
Never turn off the machine during descaling.
Designated use
This appliance is designed and made to prepare coffee and heat drinks.
All other use is considered improper.
This appliance is not suitable for commercial use.
The manufacturer is not liable for damage deriving from improper use of the appliance.
This appliance can be installed over a built-in oven if the latter is fitted with a cooling fan at the rear (maximum microwave power 3kW).
1.1 INSTALLATION

WARNING!
This machine must be installed only by qualified personnel.
Read these instructions carefully before using the machine.
- Keep these instructions
- Failure to respect these instructions may result in burns or damage to the machine.
- Never touch the machine with damp hands.
- Never touch the plug with damp hands.
- Make sure the socket used is freely accessible at all times, enabling the machine to be unplugged when necessary.
- Unplug directly from the plug only.
- Never pull the power cable as you could damage it.
- To disconnect the machine completely, place the main switch on the side of the machine in the 0 position.
- If the machine is faulty, do not attempt to repair.
- Turn it off using the main switch, unplug from the mains socket and contact Customer Services.
- Keep all the packaging (plastic bags) away from children.
- Install the machine according to the instructions in the manual to ensure there is no spillage when it is removed from its frame.
- The machine is equipped with a cooling fan.
- This comes on whenever coffee, steam or hot water is delivered.
• After several minutes, the fan goes off automatically.
Suitable cable types for installation or replacement:
H05 VV-F, H05 V2V2-F (T90)
For the cable size, see the total power reported on the nameplate. Another table can also be consulted:
| Total power (W) | Cable size (mm2) |
| maximum 2300 | 3 x 1 |
2.2 ELECTRICAL CONNECTION

WARNING!
Risk of fire and electric shocks.
- Check that the supply voltage corresponds to the value reported on the nameplate on the side of the machine.
- Connect the machine to a properly installed and earthed power socket only with a minimum current of 10A.
- If the power socket does not match the plug on the machine, have the socket replaced with a suitable type by a qualified professional.
- To comply with safety directives, an omnipolar switch with a minimum contact distance of 3 mm must be installed.
- Do not use multiple sockets or extensions.
- The power supply must include safety disconnect switches in compliance with the installation regulations in force in the country of installation.
1.3 USING THE MACHINE

WARNING!
Risk of injury, burns, electric shock or explosion.
- During use, the machine produces hot water and steam.
- Avoid contact with splashes of water or hot steam. Use knobs and handles.
- Do not grab the coffee machine when it is out of its frame.
- Do not place containers with flammable or corrosive liquids or materials on the machine, either when extracted or inserted. Place the accessories required to make the coffee (the measure for example) in the special holder.
- Do not rest large objects which could obstruct movement or unstable objects on the machine.
- Do not allow children and animals to stop or loiter near the machine when it has been removed from its frame.
- Do not use the machine while out of its frame.
• 1 SAFETY INSTRUCTIONS
- Do not leave the machine out of its frame unless strictly necessary.
- Do not use the machine if it has been removed from its frame. Check that the machine is switched off before removing it.
- The only exception is adjusting the coffee mill which must be done with the machine out (see the section “Adjusting the coffee mill”).
- Use only original or manufacturer-recommended accessories and spare parts.
- This machine is designed and developed to prepare coffee and hot drinks. All other use is considered improper. This machine is not suitable for commercial use.
- The manufacturer is not liable for damage deriving from improper use of the machine. This machine can be installed over a built-in oven if the latter is fitted with a cooling fan at the rear (maximum microwave power: 3 kW).
- The manufacturer is not liable for damage deriving from failure to respect these instructions.
1.4 MAINTENANCE AND CLEANING

WARNING!
Risk of injury, fire or machine damage.
- Always switch off the machine before maintenance.
- Clean the machine with a soft, damp cloth.
- Use only neutral detergents. Do not use
- abrasive products, abrasive cleaning pads, solvents or metal objects.
1.5 ASSISTANCE
- For machine repairs, contact the Authorised Service Centre.
- Use only original spare parts.
1.6 DISPOSAL

WARNING!
Risk of injury or suffocation.
- Disconnect the machine from the mains.
- Remove the network cable near the appliance and dispose of it properly.

natural_image
Illustration of a hand inserting a plug into an electrical socket (no text or symbols)

natural_image
Diagram of a refrigerator interior showing a door, front panel, and side panel with a hanging container (no text or symbols)
natural_image
Diagram of a device with an upward arrow indicating process, showing internal components (no text or symbols)
natural_image
Line drawing of a refrigerator with an inset showing a trash can (no text or symbols)
natural_image
Diagram of a refrigerator interior showing door, vent, and side panel with an arrow indicating direction (no text or symbols)
natural_image
Diagram of a mechanical assembly with an arrow indicating direction, no text or symbols present
natural_image
Line drawing of a water spray bottle pouring liquid into a container (no text or symbols)


natural_image
Technical line drawing of a mechanical component with a magnified inset showing a circular feature (no text or symbols)
natural_image
Diagram of a device interior with a highlighted inset showing two black circular features (no text or symbols present)
natural_image
Simple line drawing of a coffee cup being poured into a container, with a downward arrow indicating the process (no text or symbols)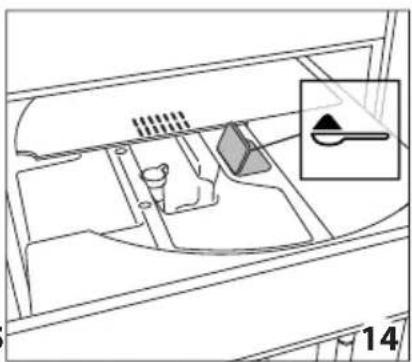
natural_image
Diagram of a vehicle interior showing intake manifold, exhaust manifold, and intake tray (no text or labels)
natural_image
Diagram of a mechanical device with an upward arrow indicating direction (no text or symbols present)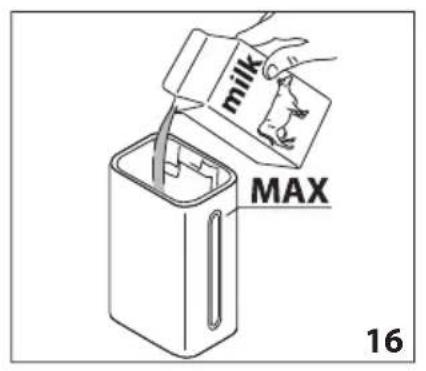

natural_image
Diagram showing a mechanical device with a rod and arrow, labeled '17' (no text or symbols on the device itself)
natural_image
Diagram of a mechanical device with an arrow indicating leftward movement, no text or symbols present
natural_image
Diagram of a water filter unit inside a container, showing internal components and a directional arrow (no text or symbols)


natural_image
Line drawing of a water tap pouring liquid into a beaker (no text or symbols)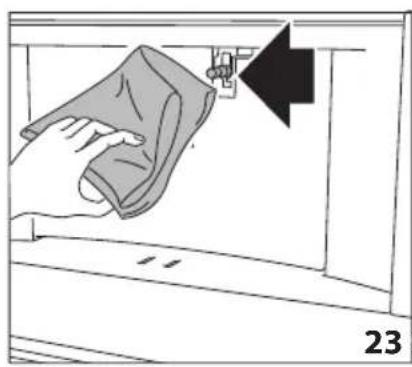
natural_image
Illustration of a hand cleaning a wall with a cloth, showing a black arrow pointing to the edge (no text or symbols)
natural_image
Two identical diagrams showing a mechanical device with downward arrows indicating motion or force, no text or symbols present.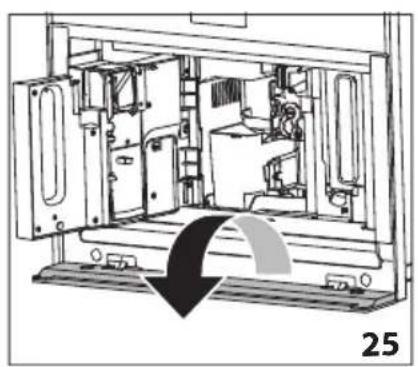
natural_image
Technical line drawing of a mechanical device interior with no visible text or symbols
natural_image
Technical line drawing of a mechanical assembly or machine component with no visible text or symbols
natural_image
Technical line drawing of a mechanical assembly or enclosure with no visible text or symbols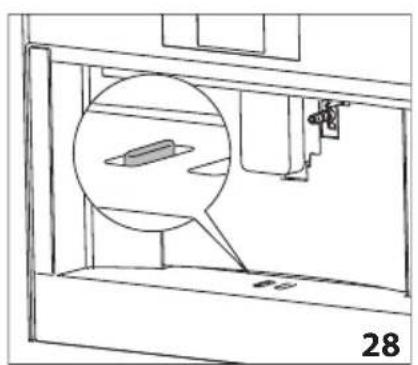
natural_image
Technical line drawing of a mechanical assembly with a magnified inset showing a component (no text or symbols)
natural_image
Illustration of hands using a tool to adjust or install electronic components inside a device (no text or symbols visible)
natural_image
Line drawing of a hand using a screwdriver to adjust or install a mechanical component (no text or symbols present)
natural_image
Illustration of a hand using a sewing machine to lift a fabric or cloth (no text or symbols visible)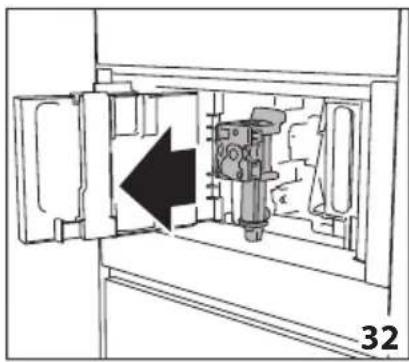
natural_image
Technical diagram of a mechanical device inside a cabinet, showing internal components and an arrow indicating direction (no text or symbols)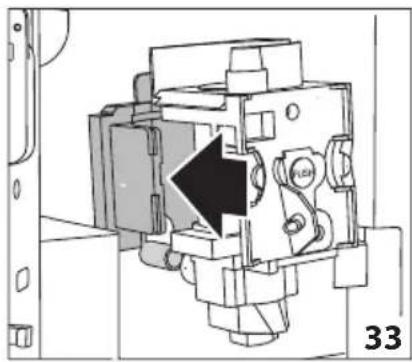
natural_image
Technical diagram of a mechanical assembly with a black arrow indicating a specific component (no text or symbols present)
natural_image
Illustration of hands holding a mechanical device with directional arrows indicating movement (no text or symbols)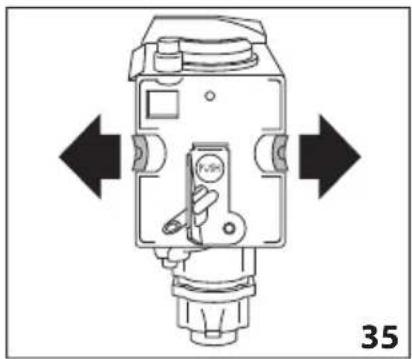
natural_image
Technical diagram of a mechanical device with directional arrows indicating movement or force (no text or symbols present)
natural_image
Line drawing of a hand holding a tool next to a mechanical component (no text or symbols)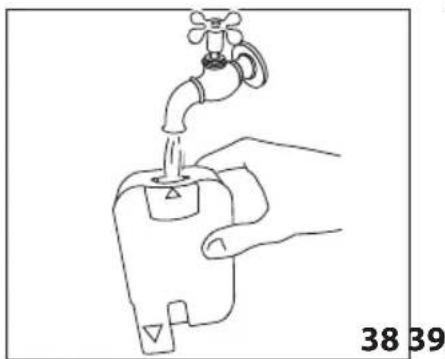
natural_image
Line drawing of a hand using a faucet to lift water from a sink (no text or symbols)
natural_image
Diagram of a mechanical device with a cylindrical component inserted into a housing, showing an upward arrow (no text or symbols present)


natural_image
Diagram showing a mechanical component with a downward arrow indicating motion or force, labeled '42' (no text or symbols on the diagram itself)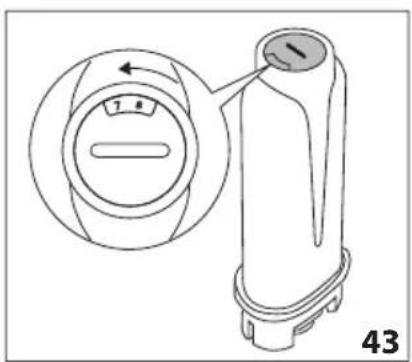
natural_image
Line drawing of a faucet pouring water into a plastic bottle (no text or symbols)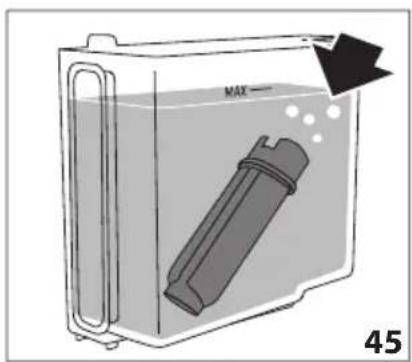
natural_image
Diagram of a container with a labeled inlet and outlet, showing liquid level and a black arrow indicating flow direction (no text or symbols beyond labels)Symbol used in these Instructions
Important warnings are identified by these symbols. Failure to observe the Instructions for Use could result in electric shock, serious injury, burns, fire or damage to the appliance

Danger!
Failure to observe the warning may result in life threatening injury by electric shock.

Important!
Failure to observe the warning could result in injury or damage to the appliance.

Danger of burns!
Failure to observe the warning could result in scalds or burns.

Please note:
This symbol identifies important advice or information for the user.
Letters in brackets
The letters in brackets refer to the key in the Description of the appliance.
Troubleshooting and repairs
In the event of problems, follow the information given in the sections "Displayed messages" and "Troubleshooting".
If this does not resolve the problem, you should consult customer services. For repairs, contact customer services only.
Instructions for use
Read these Instructions for Use carefully before using the appliance.
- Keep these Instructions for Use carefully.
- Failure to follow these Instructions for Use may result in injury or damage to the appliance. The manufacturer is not liable for damage deriving from failure to respect these Instructions for Use.

Please note:
The appliance is equipped with a fan. It activates when necessary.
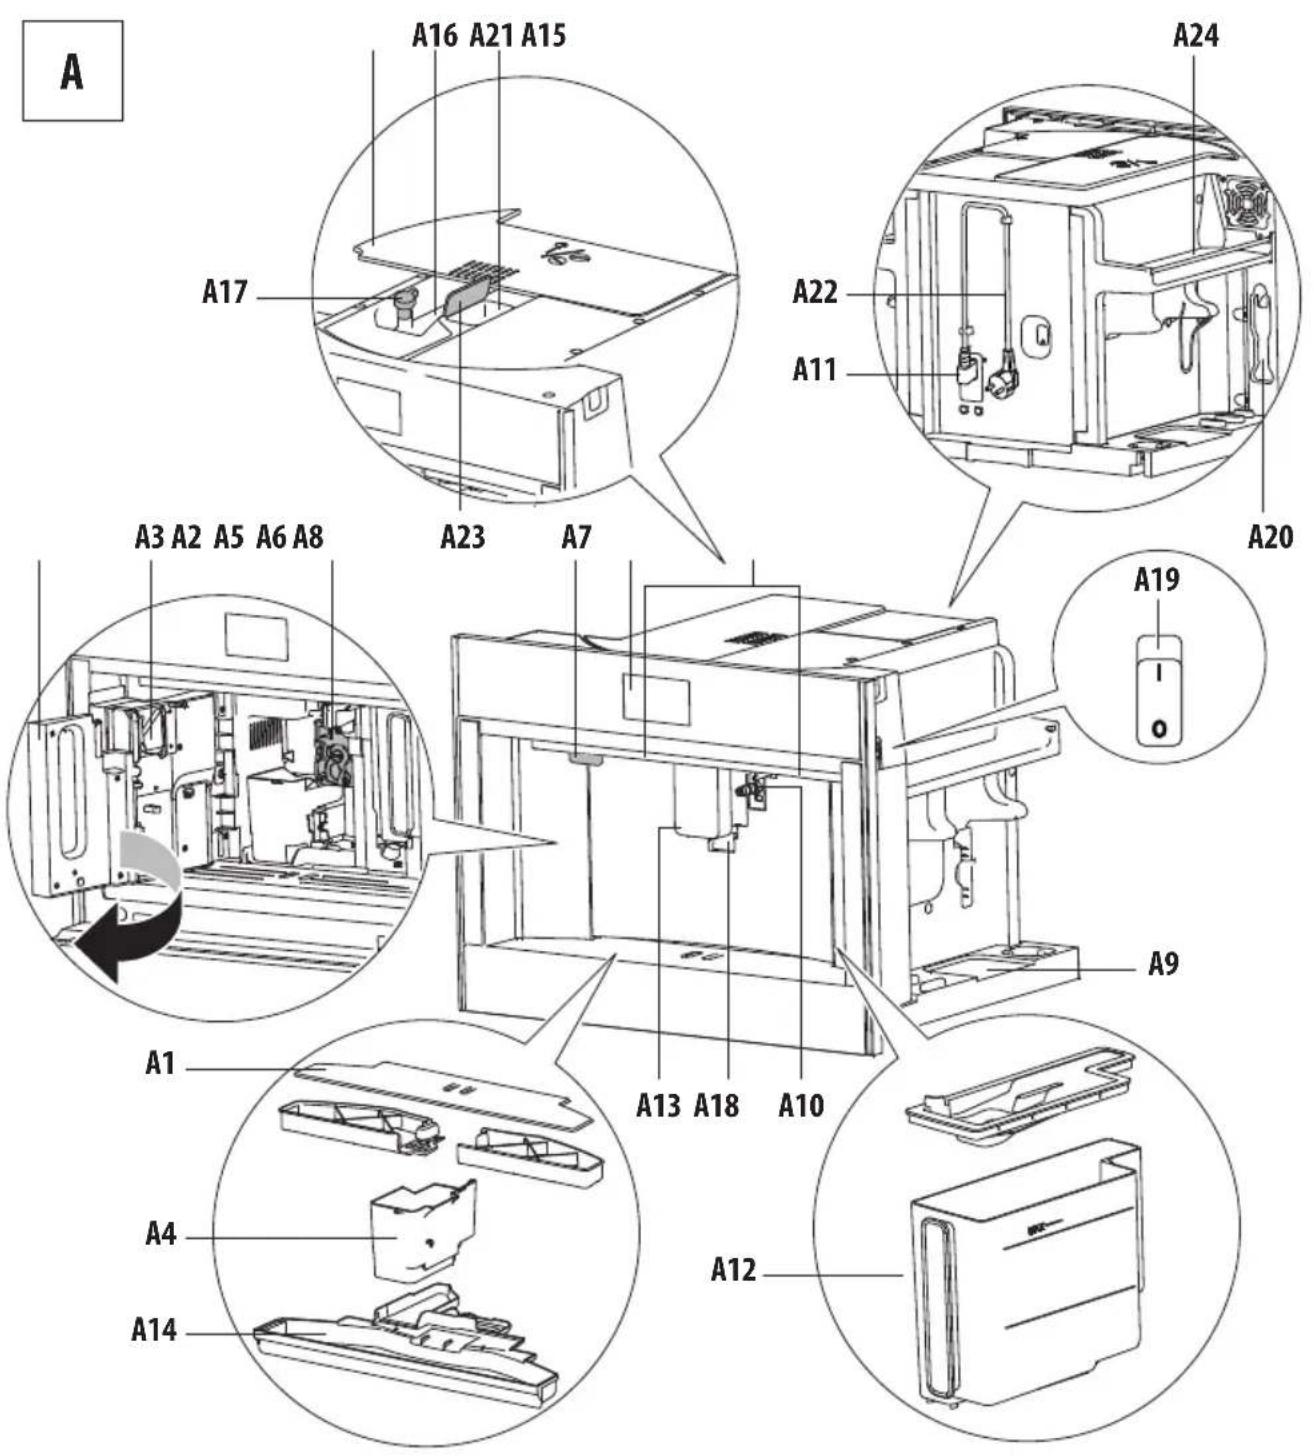
Description of the appliance
(page 3 - A)
A1. Cup holder tray
A2. Service door
A3. Coffee guide
A4. Coffee grounds container
A5. Infuser
A6. Lighting to illuminate interior compartment
A7. On/stand-by button
A8. Control panel
A9. Tray for objects
A10. Hot water/steam connection nozzle
A11. IEC connector
A12. Water tank
A13. Coffee spouts (adjustable height)
A14. Drip tray
A15. Beans container lid
A16. Beans container
A17. Grinding adjustment dial
A18. Lights to illuminate cup
A19. Main ON/OFF switch
A20. Measure holder
A21. Ground coffee funnel
A22. Power cord
A23. Pre-ground door
A24. Cup warming ledge
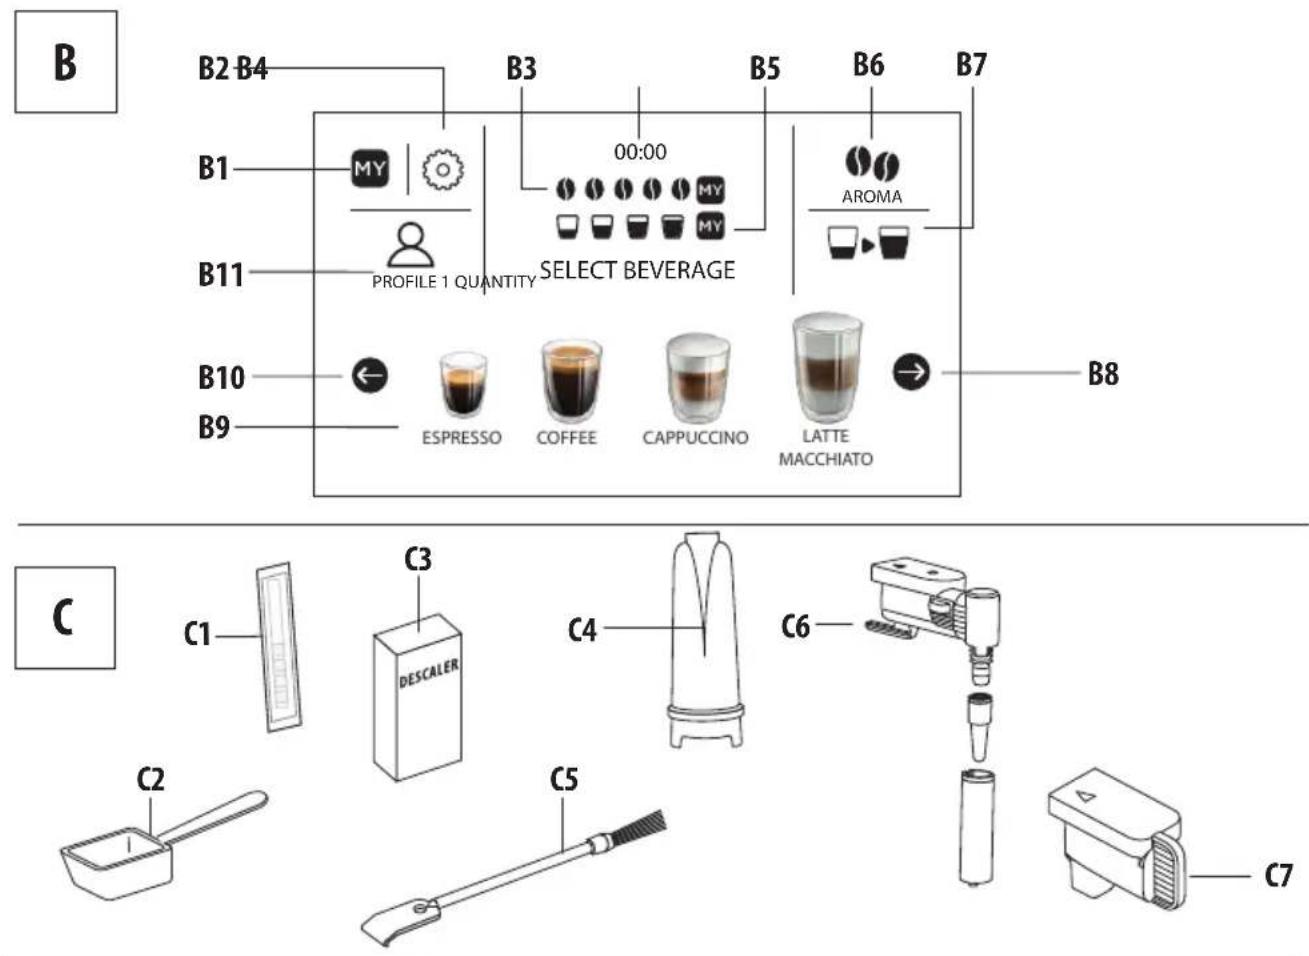
Description of homepage (page 3 - B)
B1. MY menu to customise beverages settings
B2. : appliance settings menu
B3. Selected aroma
B4. Clock
B5. Selected quantity
B6. : aroma selection
B7. □▶: quantity selection
B8. →: scroll arrow
B9. Selectable drinks (press on the scrolling arrow or to see all the drinks
B10. ←: scroll arrow
B11. Customisable profiles (see "Memorising your personal profile")
Description of the accessories
(page 3 - C)
C1. "Total Hardness Test" indicator paper
C2. Ground coffee measure
C3. Descaler
C4. Water softener filter (certain models only)
C5. Cleaning brush
C6. Hot water/steam spout
C7. Connection nozzle cover
Description of the milk container
(page 3 - D)
D1. Froth adjustment and CLEAN function dial
D2 Lid with milk frother
D3. Milk container
D4. Milk intake tube
D5. Adjustable frothed milk spout
D6. Thermal casing
D7. Lid release buttons
PRELIMINARY OPERATIONS
Checking the appliance
After removing the packaging, make sure the product is complete and undamaged and that all accessories are present. Do not use the appliance if it is visibly damaged. Contact customer services Technical Assistance.
SETTING UP THE APPLIANCE

Please note:
- Coffee has been used to factory test the appliance and it is therefore completely normal to find traces of coffee in the mill. The machine is, however, guaranteed to be new.
- You should customise water hardness as soon as possible following the instructions in section “Setting water hardness”.
-
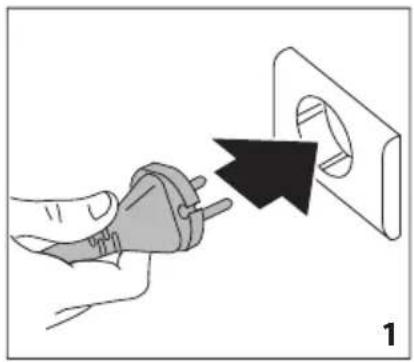
Connect the appliance to the mains electricity supply (fig. 1) and make sure the main switch (A19) on the side of the appliance is pressed down (fig. 2);
-
SELECT LANGUAGE (setting language): press ⬇310) or (B) until the flag corresponding to the required language appears on the display (B), then press the flag;
To proceed follow the instructions indicated on the appliance display:
- FILL WATER TANK WITH FRESH WATER: remove the water tank (A12) (fig. 3), open the lid (fig. 4), fill to the MAX line (marked on the inside of the tank) with fresh water (fig. 5); close the lid and put the tank back into the appliance (fig. 6);
- Insert the water outlet (C6) in the steam connection nozzle (A10) until the acoustic signal sounds, and place a container with a minimum capacity of 100 ml underneath (fig. 8);
- WATER CIRCUIT EMPTY PRESS OK TO START FILLING PROCESS is shown on the display;
- Press √ok to confirm: the appliance delivers water from the spout (fig. 8) then goes off automatically.
The coffee machine is now ready for normal use.

Please note:
- The first time the appliance is used, it needs to make 4-5 cappuccinos before it starts to give satisfactory results.
- On first use the water circuit is empty, the machine could therefore be very noisy: the noise will lessen as the circuit fills up.
- When making the first 5-6 cappuccinos, it is normal to hear the noise of boiling water: after this the noise will lessen.
- To improve the performance of the appliance, we recommend installing a water softener filter (C4) as described in section "Water softener filter". If your model is not equipped with a filter, it is possible to request one from Authorised Customer Service Centres.
TURNING THE APPLIANCE ON

Please note:
Before turning the appliance on, make sure the main switch (A23) is pressed (fig. 2). Each time the appliance is turned on, it performs an automatic preheat and rinse cycle which cannot be interrupted. The appliance is ready for use only after completion of this cycle.

Danger of burns!
During rinsing, a little hot water comes out of the coffee spouts (A13) and is collected in the drip tray (A14) underneath. Avoid contact with splashes of water.
- To switch the appliance on, press the button (A7-fig. 9): message HEATING UP PLEASE WAIT, is shown on the display.
- When heating is complete, the message changes to: Rinsing HOT WATER RUNNING; As well as heating the boiler, the appliance also continues to allow hot water to run in the internal pipework as they also heat up.
The appliance is at the desired temperature when the main screen, homepage, appears.
TURNING THE APPLIANCE OFF
Every time the appliance is turned off, it automatically carries out a rinse if it has made a coffee.

Danger of burns!
During rinsing, a little hot water flows from the coffee spouts (A13). Avoid contact with splashes of water.
- To turn the appliance off, press the button ⏻ (A7-fig. 9).
- The message Turning off Please wait is shown on the display: if needed the appliance performs a rinse cycle and then goes off (standby).

Please note:
If the appliance is not used for long periods, disconnect from the electricity supply as follows:
- first turn the appliance off by pressing the button ⏻ (fig. 9);
- release the main switch (A23) situated on the side of the appliance (fig. 2).

Important!
Never press the main switch while the appliance is on.
MENU SETTINGS
Rinsing

Use this function to supply hot water from the coffee spouts (A13) to clean and heat the appliance's internal circuit. Place a container with a minimum capacity of 100ml under the coffee and hot water spouts (fig. 8).
To enable the function, proceed as follows:
- Press Ⓞ (B2) to enter the menu;
- Press ← (B10) or → (B8) until the display shows (B) RINSING;
- Press ▶ to start rinsing.

Danger of burns!
Do not leave the appliance unattended while hot water is being delivered.
- After a few seconds, hot water comes out of the coffee spout which cleans and heats the internal circuit of the appliance: the following message is shown on the display Rinsing HOT WATER RUNNING as well as a progress bar which fills up as the preparation progresses;
- To stop the rinsing cycle, press × STOP or wait for rinsing to stop automatically.

Please note:
- If the appliance is not used for more than 3-4 days, when switched on again, we strongly recommend doing 2/3 rinses before use;
• After rinsing, it is normal that there is some water in the grounds container (A10).
De-scaling

For instructions on descaling, see section "Descaling".
Water filter
For instructions on how to install the filter (C4), see section "Water softener filter".
Beverages settings i
In this section, you can consult your customised settings and, if you wish, reset the default values for each beverage.
- Press (B2) to enter the menu;
-
Press (B10) or (B) until DRINKS SETTINGS appears on the display (B);
-
Press The values for the first beverage appear on the display;
-
The reference user profile is highlighted on the display. The values are shown on the vertical bars: the manufacturer default value is indicated by the symbol while the current set value is highlighted by the filled part of the vertical bar;
-
To go back to the settings menu, press L ESC . To scroll and display the beverages, press > NEXT;
-
To return to the default manufacturer values for the beverage shown on the display, press RESET ;
-
CONFIRM RESET?: to confirm, press √ OK (to cancel, press ESC);
-
RETURN TO FACTORY: press √ OK. The beverage has been reset to the default values. Continue with the other beverages, or go back to the settings menu.

Please note:
- To change the beverages for another profile, go back to the homepage, select the required profile (B11) and repeat the procedure.
- To reset all the beverages in the profile to the default values, see paragraph "Manufacturer Default values".
Set time ⏰
To adjust the time on the display (B), proceed as follows:
- Press (B2) to enter the menu;
-
Press ←310) or (B) until the display (B) shows ⏻ SET TIME;
-
Press ⬆: The time setting panel appears on the screen;
-
Press ← or → corresponding to the hours and minutes until the current time is displayed;
-
To confirm, press √ OK (to cancel, press ESC), then press ESC to go back to the homepage.
The time is now set.
Auto-start
The auto-start time can be set in order to have the appliance ready at a certain time (for example in the morning) so that it can immediately make coffee.

Please note:
To enable this function, the time must already be set correctly, see paragraph "Set time 🔊".
To enable auto-start, proceed as follows:
- Press (B2) to enter the menu;
-
Press ←B10) or (B) until the display (B) shows ⏻ AUTO-START;
-
Select the function by pressing ⏻: The time setting panel appears on the screen;
-
Press ← or → corresponding to the hours and minutes until the required auto-start time is displayed;
-
Press OFF or ON to enable or disable auto-start.
-
To confirm, press √ OK (to cancel and go back to the settings menu press ESC), then press ESC to go back to the homepage.
The auto-start time is now set and the corresponding symbol is displayed next to the time to indicate that the function has been enabled.

Please note:
When the appliance is turned off using the main switch (A21), the auto-start setting if enabled, is lost.
Auto-off (standby) ⏻
Auto-off can be set so that the appliance goes off after 15 or 30 minutes, or 1, 2 or 3 hours of no use.
To programme Auto-off, proceed as follows:
- Press (B2) to enter the menu;
- Press ←310) or (B→ until the display (B) shows AUTO-OFF, together with the current selection (15 or 30 minutes, or 1, 2 or 3 hours);
- Press ⏻ on the display to select the required value;
- Press to go back to the homepage.
Auto-off is now programmed.
Cup warmer
To warm the cups before making coffee, it is possible to activate the cup warmer (A24) and put it above the cups.
- Press " (B2) to enter the menu;
- Press ←(B10) or → (B8) until the display (B) shows " Cup warmer";
- Press ☐ to activate- ON or deactivate - OFF the cup warmer.
- Press "L→ESC" to go back to the homepage.
Energy saving

Use this function to enable or disable energy saving mode. When enabled, the function guarantees reduced energy consumption in compliance with European regulations. When it is disabled, warming time is reduced. To disable or enable "Energy Saving", proceed as follows:
- Press (B2) to enter the menu;
- Press ← (B10) or → (B8) until √ ENERGY SAVING appears on the display (B);
- Press ☑ to enable-ON or disable-OFF energy saving.
- Press to go back to the homepage.
Coffee temperature

To modify the temperature of the water supplied to make the coffee, proceed as follows:
- Press (B2) to enter the menu;
- Press ← (B10) or → (B8) until the display (B) shows COFFEE TEMPERATURE
together with the current selection (LOW, MEDIUM, HIGH, OR MAX);
- Press ⚡ to select the required temperature;
- Press L to go back to the homepage.
Water hardness

For instructions related to setting water hardness, see section "Setting water hardness".
Selecting the language
To modify the language of the display (B), proceed as follows:
- Press (B2) to enter the menu;
- Press ←310) or (B→ until the display shows SET LANGUAGE;
- Press : press ← or → until the flag corresponding to the required language is shown and then select it;
- Press ESC 2 times to go back to the homepage.
Sound notification

This enables or disables the beep emitted by the machine each time an icon is pressed or an accessory is inserted/removed. To disable or enable the beep, proceed as follows:
- Press (B2) to enter the menu;
- Press ←310) or (B) until the display (B) shows BEEP;
- Press to enable- ON disable-OFF the sound notification;
- Press to go back to the homepage.
Lights

This function enables or disables the lights (A6). The cup lights (A18) come on each time coffee beverages are produced, hot milk is made and during each rinse cycle and turn off after a few seconds.
To disable or enable this function, proceed as follows:
- Press (B2) to enter the menu;
- Press ← (B10) or → (B8) until the display (B) shows LIGHTS ;
- Press to enable-ON or disable-OFF the lights;
- Press → go back to the homepage.
Demo mode
By enabling this mode, the main functions of the machine are shown on the display:
- Press (B2) to enter the menu;
-
Press ←310) or (B→ until the display shows □DEMO MODE;
-
Press " " to start the demo;
-
To exit from the DEMO MODE, first turn the appliance off by pressing the button (A7). Press again the button to go back to the homepage.
Default values

This resets all menu settings and programmed quantities back to the default values (with the exception of the language which remains as set).
To reset the default values, proceed as follows:
- Press (B2) to enter the menu;
-
Press ←B10) or (B) until the display (B) shows DEFAULT VALUES. Press
-
Press RESET ALL to reset all the profiles to the original parameters, otherwise select the required profile (e.g. USER 1);
-
RETURN TO FACTORY SETTINGS? RESET ALL: press √ OK to confirm (or → ESC to leave parameters unaltered);
-
FACTORY SETTINGS SET : press √ OK to confirm.
Statistics
This function displays statistical data relating to the machine. To display the statistics, proceed as follows:
- Press (B2) to enter the menu;
- Press ←310) or (B) until the display (B) shows STATISTICS;
- Press ⬇ : it is possible to check all the available statistics by pressing ← or → ;
- Press ESC : to go back to the homepage.
MAKING COFFEE
(see recipes on page 29)
Selecting the coffee aroma
Select the required aroma from the homepage by pressing AROMA (B6):
| (see “Making coffee using pre-ground coffee”) | |
| AROMA EXTRA LIGHT | |
| LIGHT AROMA | |
| MEDIUM AROMA | |
| STRONG AROMA | |
| X-STRONG AROMA | |
| Custom (if programmed) / Standard |
After delivering the beverage, the aroma setting is reset to the M2ue.
Selecting the coffee quantity
From the homepage select the required quantity of coffee in the cup by pressing QUANTITY (B7):
| SMALL SIZE(SMALL) | |
| MEDIUM SIZE(MEDIUM) | |
| LARGE SIZE(LARGE) | |
| X-LARGE SIZE(EXTRA LARGE) | |
| Custom quantity(if programmed) /Standard quantity |
After delivering the beverage, the quantity setting is reset to the MY value.
Making coffee using coffee beans

Important!
Do not use green, caramelised or candied coffee beans as they could stick to the coffee mill and make it unusable.
- Fill the beans container (A16) (fig. 12) with coffee beans;
- Place a cup under the coffee spout (A13);
- Lower the spout so that it is as near as possible to the cup (fig. 13): this helps achieve a better cream;
- Press ←310) or (B→ until the required coffee is displayed;
-
Then select your required coffee from the homepage:
-
ESPRESSO
- DOPPIO+
- COFFEE
-
LONG
• 2 X ESPRESSO
• AMERICANO -
Preparation begins and the display (B) shows the image of the selected beverage together with a progress bar which gradually fills as preparation proceeds.

Please note:
- It is possible to prepare 2 cups of ESPRESSO coffee at the same time by also pressing x2 during preparation of 1 ESPRESSO (the image remains shown on the display for a few seconds at the start of preparation).
- While the machine is making coffee, delivery can be interrupted at any time by pressing × STOP.
- As soon as delivery has ended, to increase the quantity of coffee in the cup, just press + EXTRA : once the desired quantity is reached, press × STOP.
Once the coffee has been made, the appliance is ready to make the next beverage.

Please note:
Various alarm messages may be displayed while using the appliance (FILL TANK,
EMPTY GROUNDS CONTAINER, etc.).
Their meaning is explained in section "Displayed messages".
- For hotter coffee, see paragraph “Tips for a hotter coffee”.
- If the coffee comes out in drops, too weak and not creamy enough or too cold, read the tips in section “Adjusting the coffee mill” and the “Troubleshooting” chapter.
- Preparation of each coffee can be customised (see sections “Customising beverages” and “Memorising your personal profile”).
- If "Energy Saving" mode is active, the first coffee may take a few seconds before it is delivered.
Making coffee using pre-ground coffee

Important!
- Never add pre-ground coffee when the machine is off in order to avoid it spreading through the inside of the machine and making it dirty. This could damage the appliance.
- Never use more than 1 level measure (C2) or it could dirty the inside of the coffee machine or block the funnel (A4).

Please note:
If you use pre-ground coffee, you can only make one cup of coffee at a time.
- Repeat Press AROMA (B6) until the display (B) shows (pre-ground).
- Open the cover (A15) and the pre-ground door (A23).
- Make sure the funnel (A21) is not blocked, then add one level measure of pre-ground coffee (fig. 14).
- Place a cup under the coffee spouts (A13) (fig. 13).
- Then select your required coffee (ESPRESSO, COFFEE, LONG etc.) from the homepage;
- Preparation begins and the image of the selected beverage appears on the display, together with a progress bar which gradually fills as preparation progresses.

Please note:
- While the machine is making coffee, delivery can be interrupted at any time by pressing ✗ STOP
- As soon as delivery has ended, to increase the quantity of coffee in the cup, just press +. once the desired quantity is reached, press ✗ STOP
Once the coffee has been made, the appliance is ready to make the next beverage.

Important! Making LONG coffee

Halfway through preparation, the display will show message ADD pre-ground coffee, MAXIMUM ONE MEASURING CUP. Add one level measure of pre-ground coffee and press √ OK.
Adjusting the coffee mill
The coffee mill should not require adjusting, at least initially, because it has already been set by default in order to prepare coffee correctly.
However, if after making the first few coffees you find that the coffee is either too weak and not creamy enough or delivery is too slow (a drop at a time), this can be corrected by adjusting the grinding adjustment dial (fig.11).

Please note:
The grinding adjustment dial must only be turned when the coffee mill is in operation during the initial phase of coffee preparation.
If the coffee comes out too slowly or does not come out
at all, a message will be shown GROUND TOO FINE. ADJUST GRIND LEVEL, turn the coffee mill dial one or two clicks clockwise.
For fuller bodied creamier coffee, turn one click anticlockwise towards 1 (do not turn more than one click at a time otherwise the
coffee could come out one drop a drop at a time).
The effect of these adjustments will only be evident after at least 2 cups of coffee have been delivered. If this adjustment does not obtain the desired result, repeat the correction by turning the dial another click.
Tips for a hotter coffee
For hotter coffee, it is recommended to:
- carry out a rinse cycle by selecting the "Rinsing" function in the settings menu (paragraph "Rinsing");
- warm the cups with hot water (using the hot water function, see section "hot water supply");
- increase the coffee temperature in the settings menu (see section "Coffee temperature").
MAKING MILK-BASED HOT DRINKS
(see recipes on page 30)

Please note:
To avoid milk with little froth or large bubbles, always clean the milk container lid (D2) and hot water connection nozzle (A9) as described in sections “Cleaning the milk container after use”, “Cleaning the milk container” and “Cleaning the hot water/steam connection nozzle”.
Filling and attaching the milk container
- Remove the lid (D2) (fig. 15);
- Fill the milk container (D3) with a sufficient quantity of milk, not exceeding the MAX level marked on the container (fig. 16). Each mark on the side of the container corresponds to about 100 ml of milk;

Please note:
- For a denser and more even froth, you must use skimmed or partially skimmed milk at refrigerator temperature (about 5°C).
-
If "Energy Saving" mode is enabled, there may be a few seconds delay before the beverage is delivered.
-
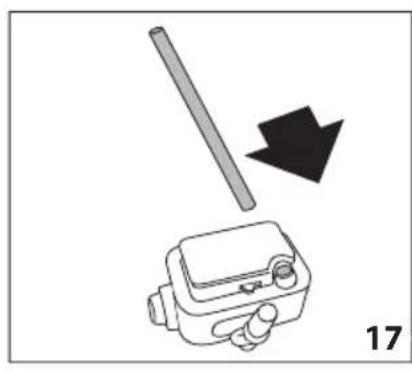
Make sure the milk intake tube (D4) is correctly inserted in the bottom of the milk container lid (fig. 17);
- Place the lid back on the milk container;
- Remove the hot water/steam spout (C6) (fig. 18);
- By pushing the bottom attach the milk container (D) to the nozzle (A10) (fig.19): the machine will let out a noise signal (if the sound notification function is enabled);
- Place a sufficiently large cup under the coffee spouts (A13) and frothed milk spout (D5); adjust the length of the milk spout, to move it nearer to the cup, simply pulling it downwards (fig. 20).
- Follow the instructions below for each function.
Adjusting the amount of froth
Turn the froth adjustment dial (D1) on the milk container lid, to adjust the amount of froth on the milk delivered while making the drinks. Follow the tips in the table below:
| Dial position | Description | Recommended for... |
 | No froth CAFE LATTE / MILK (hot milk) | |
 | Min. froth latte macchiato | |
 | Max. froth | CAPPUCCINO / MILK (frothed milk) |
Making milk-based drinks automatically
- Fill the milk container (D) and attach it as described above.
-
Select the required beverage from the homepage:
-
CAPPUCCINO
- latte macchiato
- caffe latte
- hot milk
- cappuccino+
- ESPRESSO MACCHIATO
- flat white
-
cappuccino mix
-
On the display (B) the machine recommends turning the foam adjustment dial (D1) based on the foam requirements for the original recipe: therefore turn the dial on top of the milk container lid (D") and confirm the selection by pressing √ OK.
- After a few seconds, preparation begins automatically and an image of the selected beverage appears on the display, together with a progress bar which gradually fills as preparation progresses.

Please note:
general indications when preparing all milk based drinks
- L_ ESC: press to interrupt preparation completely and go back to the homepage.
- ✗ STOP: press to interrupt milk or coffee delivery and move on to the next delivery (if applicable) to complete the beverage.
- At the end of delivery, to increase the quantity of coffee in the cup, press+ EXTRA.
- Preparation of each milk based drink can be customised (see sections "Customising beverages" and "Memorising your personal profile").
- Do not leave the milk container out of the fridge for a long time: as the temperature increases (5°C ideal), the quality of the foam decreases.
Once the coffee has been made, the appliance is ready to make the next beverage.
Cleaning the milk container after use

Danger of burns!
The following cleaning operations should be performed each time a milk beverage is delivered.
When cleaning the internal tubes of the milk container, a little hot water and steam leak out of the frothed milk spout (D5). Avoid contact with splashes of water. Each time a milk function is used, TURN MILK FROTH
ADJUSTMENT KNOB TO CLEAN TO START CLEANING appears on the display and the milk frother lid must be cleaned:
- Leave the milk container (D) in the machine (you do not need to empty it);
- Place a cup or other recipient under the frothed milk spout (fig. 20);
- Turn the foam adjustment dial (D1) to CLEAN (fig.21): CLEANING MILK CONTAINER PLACE A CUP UNDER THE MILK OUTLET (FIG.22) appears on the display (B) together with a bar which gradually fills as cleaning proceeds. Cleaning stops itself automatically;
- Turn the dial back to one of the froth selections;
- Remove the milk container and always clean the steam connection nozzle (A10) with a clean cloth (fig. 23).

Please note:
- If a number of milk based drinks need to be made, only clean the milk container after preparing the last beverage. To proceed with making the next beverages, when the CLEAN message is displayed, press ESC.
- If the milk container does not get cleaned, the symbol 📋 appears on the display as a reminder that the milk container needs cleaning.
- The milk container can be kept in the refrigerator.
- In some cases, to carry out the cleaning the appliance requires a short time to heat up.
DELIVERING HOT WATER

Danger of burns!
Do not leave the appliance unattended while hot water is being delivered.
- Make sure the hot water/steam spout (C6) is attached correctly to the hot water/steam connection nozzle (A10);
- Place a container under the spout (as close as possible to avoid splashes);
- Select 🔒 HOT WATER from the homepage. The corresponding image appears on the display (B), together with
a progress bar which fills gradually as preparation proceeds;
- The machine delivers hot water, then delivery stops automatically. To interrupt hot water delivery manually, press ✗ STOP.

Please note:
- If "Energy Saving" mode is active, there may be a few seconds delay before hot water is delivered.
- Preparation of hot water can be customised (see sections “Customising beverages” and “Memorising your personal profile”).
STEAM DELIVERY

Danger of burns!
Do not leave the appliance unattended while steam is being delivered.
- Make sure the hot water/steam spout (C6) is attached correctly to the hot water/steam connection nozzle (A10);
- Fill a container with the liquid to be heated or frothed and immerse the hot water/steam spout in the liquid;
- Select "STEAM" from the homepage. The corresponding image appears on the display (B), together with a progress bar which fills gradually as preparation proceeds and after a few seconds, steam to heat the liquid is delivered from the hot water/steam spout;
- When the required temperature or level of froth is reached, interrupt steam delivery by pressing ✗ STOP;

Important!
Always stop steam delivery before extracting the container containing the liquid to avoid burns from splashes.

Please note:
If “Energy saving” mode is active, there may be a few seconds delay before steam is delivered.
Tips for using steam to froth milk
- When choosing the size of the container, bear in mind that the liquid doubles or triples in volume.
- For a richer denser froth, use skimmed or partially skimmed milk at refrigerator temperature (about 5°C).
- For a creamier froth, rotate the container with slow movements in an upward motion.
- To avoid milk with poor froth or large bubbles, always clean the spout (C6) as described in the following paragraph.
Cleaning the hot water/steam spout after use
Always clean the hot water/steam spout (C6) after use to avoid the build-up of milk residues and prevent it from clogging.
-
Place a container under the hot water/steam spout and let a little water out (see section "Delivering hot water"). Then stop the delivery of hot water by pressing ✗ STOP.
-
Wait a few minutes for the hot water/steam spout to cool down; then extract it (fig. 18). Hold the spout steady with one hand and with the other, turn and detach the cappuccino maker pulling it downwards (fig. 24).
-
Also remove the steam connection nozzle by pulling it downwards (fig. 24).
-
Check the hole in the connection nozzle is not blocked. If necessary, clean using a toothpick.
-
Wash all parts of the spout thoroughly with a sponge and warm water.
-
Attach the connection nozzle and the cappuccino maker onto the spout by pushing it upwards and turning it clockwise until it is secure.
CUSTOMISING BEVERAGES

The aroma (for drinks where required) and length of the drinks can be customised.
-
Make sure that the profile for which customising the drink is required is active: it is actually impossible to select the drinks MY for all 6 profiles;
-
From the homepage, press MY (B1);
-
Choose the beverage you wish to customise in order to access the customising screens: the relative accessories must be inserted;
-
(Beverages with coffee only) CHOOSE COFFEE AROMA LEVEL: Select the required aroma by pressing ⏻ or Ⓕ and press √ OK ;
-
CUSTOMISING COFFEE (OR WATER) QUANTITY, PRESS STOP TO SAVE: Preparation begins and the appliance displays the quantity customising screen in the form of a vertical bar. The star alongside the bar represents the current quantity set.
-
When the amount reaches the minimum quantity you can set, the display shows ✗ STOP.
-
Press × STOP when the required quantity in the cup is reached.
-
SAVE NEW SETTINGS? : Press YES or NO.
The appliance confirms if the values have been saved or not (depending on the previous selection): press √ OK.
The appliance goes back to the homepage.

Please note:
- Milk based drinks: the coffee aroma is saved first, followed by the quantity of first milk, then coffee;
- Hot water: the appliance supplies hot water: press × STOP to save the desired quantity.
- It is possible to come out of programming by pressing ESC: the values will not be saved.
MEMORISING YOUR PERSONAL PROFILE
The appliance allows you to memorise 6 different profiles, each associated with a different icon.
In every profile the customised MY beverages AROMA and QUANTITY values are saved (see section "Customising beverages MY") and the order in which all the beverages are displayed is based on the frequency of selection.
To select or enter a profile, press on the
profile currently in use (B11), press (B10) or -88) until the required profile is displayed, then press on the profile.

Please note:
- Profile 🔊 GUEST : select this profile to deliver beverages with the default settings. The MInction is not active.
CLEANING
Cleaning the machine
The following parts of the machine must be cleaned regularly:
• appliance internal circuit;
• coffee grounds container (A4);
- drip tray (A14);
• water tank (A12);
• coffee spouts (A13);
• pre-ground coffee funnel (A21);
- infuser (A5), accessible after opening the service door (A2);
- milk container (D);
- hot water/steam connection nozzle (A10);
• control panel (B).

Important!
- Do not use solvents, abrasive detergents or alcohol to clean the coffee machine. It is not necessary to use chemical products to clean the machine.
- None of the components of the appliance can be washed in a dishwasher with the exception of the milk container (D).
- Do not use metal objects to remove encrustations or coffee deposits as they could scratch metal or plastic surfaces.
Cleaning the appliance internal circuit
If the appliance is not used for more than 3/4 days, before using it again, we strongly recommend switching it on and:
- performing 2/3 rinse cycles by selecting the "Rinse" function (paragraph "Rinsing";
- delivering hot water for a few seconds (section "Delivering hot water").


Please note:
After cleaning, it is normal for the grounds container (A4) to contain water.
Cleaning the coffee grounds container
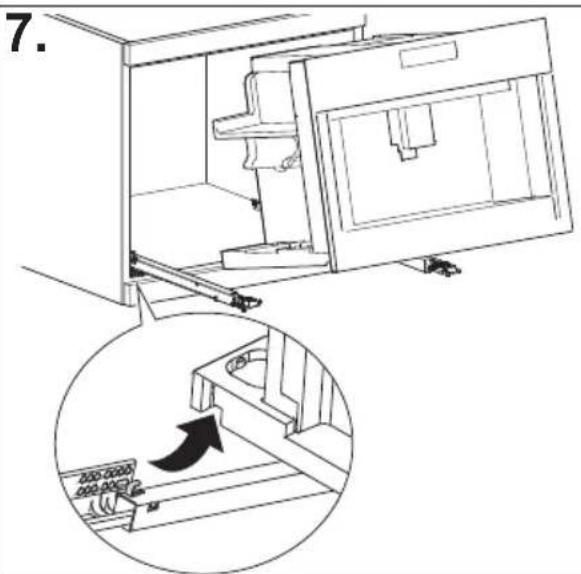
When the display (B) shows the message empty ground container (fig. 26) the grounds container must be emptied and cleaned. The appliance cannot be used to make coffee until the grounds container (A4) has been cleaned. Even if not full, the empty grounds container message is displayed 72 hours after the first coffee has been prepared (for the 72 hours to be calculated correctly, the machine must never be turned off with the main switch).
To clean (with the machine on):
- Open the bottom door by rotating it downwards (fig. 25).
- Open the door.
- Remove the drip tray (A14) (fig. 27), empty and clean it.
- Carefully empty and clean the coffee grounds container (A4) taking care to remove all the residue that can be deposited on the bottom: the brush provided (C5) features a spatula especially for this job.

Important!
When removing the drip tray it is obligatory to always empty the grounds container even if it contains few grounds. If this is not done, when you make the next coffees, the grounds container may fill up more than expected and clog the machine.
Cleaning the drip tray

Important!
The drip tray (A14) is fitted with a level indicator (red) showing the level of water it contains (fig. 28). Before the indicator protrudes from the cup tray (A1), the drip tray must be emptied and cleaned, otherwise the water may flow over the edge and damage the appliance, the surface it rests on or the surrounding area.
To remove the drip tray, proceed as follows:
- Open the door (fig. 25). Remove the drip tray and coffee grounds container (A4) (fig. 27);
- Empty the drip tray and grounds container and wash them;
- Replace the drip tray complete with grounds container.
Cleaning the inside of the coffee machine

Danger!
Before cleaning internal parts, the machine must be turned off (see section “Turning the appliance off”) and unplugged from the mains power supply. Never immerse the coffee machine in water.
- Check regularly (about once a month) that the inside of the appliance (accessible after removing the drip tray - A14) is not dirty.
- If necessary, remove coffee deposits with the brush (C5) supplied and a sponge. Remove all the residues with a vacuum cleaner (fig. 29).
Cleaning the water tank
- Clean the water tank (A12) regularly (about once a month) and whenever you replace the water softener filter (C4) (if provided) with a damp cloth and a small amount of mild washing up liquid.: rinse carefully before filling and replacing the tank;
- Remove the filter (if present) and rinse with running water;
- Replace the filter (if provided), fill the tank with fresh water and replace the tank;
- (Models with water softener filter only) Deliver about 100ml of hot water to reactivate the filter.
Cleaning the coffee spouts
- Clean the coffee spouts (A13) regularly with a sponge or cloth (fig. 31);
- Check that the holes in the coffee spouts are not blocked. If necessary, remove coffee deposits with a toothpick (fig. 30).
Cleaning the pre-ground coffee funnel
Check regularly (about once a month) that the pre-ground coffee funnel (A21) is not blocked. If necessary, remove coffee deposits with the brush (C5) supplied.
Cleaning the infuser
The infuser must be cleaned at least once a month.

Important!
The infuser (A5) must not be removed when the appliance is on. Do not use force to remove the infuser.
- Make sure the machine is correctly turned off (see "Turning off").
- Open the service door.
- Remove the drip tray and waste coffee container (fig. 27).
- Press the two coloured release buttons inwards and at the same time pull the infuser outwards (fig. 32).

Important!
Do not use washing up liquid to clean the infuser to avoid removing the lubricant applied to the inside of the piston.
- Soak the infuser in water for about 5 minutes, then rinse.
- After cleaning, replace the infuser (A5) by sliding it onto the internal support and pin at the bottom, then push the PUSH symbol fully in until it clicks into place (fig. 33).

Please note carefully:
If you encounter difficulty inserting the infuser, (before inserting it) you must adapt it to the right dimension by pressing it forcefully from the bottom and top as shown in the figure 34.
- Once inserted, make sure the two coloured release buttons have snapped out (fig. 35).
- Replace the drip tray and waste coffee container.
- Close the service door.
Cleaning the milk container (D)
Clean the milk container after each time you prepare milk, as described below:
- Lift and remove the lid (D2);
- Extract the milk container (D3) from the thermal casing (D6), holding it by the two side grips.

Important!
The thermal casing must not be filled or immersed in water: to clean it wipe with a damp cloth.
- Remove the milk spout (D5) and intake tube (D4).
- Turn the froth adjustment dial clockwise to the "INSERT" position (fig. 36) and pull off.
- Wash all the components of the frother thoroughly with hot water and mild washing-up liquid. All components and the container are dishwasher safe, placing them in the top basket of the dishwasher.
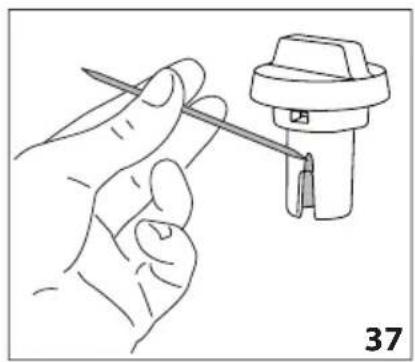
Pay particular attention to check in the hollow and groove under the dial (fig. 37) that no milk residues remain: scrape any residue from the groove with a toothpick. - Rinse inside the froth adjustment dial seat (fig. 38) and the milk frother connector hole using running water.
- Check as well that the intake tube and spout are not clogged with milk residues.
- Replace the dial, lining up the arrow with the word INSERT, the spout and milk intake tube.
- Place the milk container in the thermal casing.
- Place the lid back on the milk container.
Cleaning the hot water/steam connection nozzle
Each time you prepare milk, clean the connection nozzle (A13) with a sponge to remove milk residues deposited on the seals (fig. 23).
DESCALING

Important!
- Before use, read the instructions and the labelling on the descaler packaging.
- You should use descaler authorised by the manufacturer only. Using unsuitable descaler and/or performing descaling incorrectly may result in faults not covered by the manufacturer's guarantee.
Descale the appliance when the display (B) shows message DESCALING NEEDED PRESS OK TO START (\~45min) !: to descale immediately, press √ OK and follow the instructions from point 4.
To postpone descaling to another time, press ESC : on the display the symbol is a reminder that the appliance needs to be descaled (the message will be reproposed every time the machine is switched on).
To access the descaling menu:
- Press Ⓞ (B2) to enter the menu;
- Press ← (B10) or → (B8) until the display shows ⚠️ DESCALE;
- Press ▶ to start the descaling cycle then follow the instructions on the display;
- REMOVE WATER FILTER (fig. 39):extract the water tank (A12), remove the water softener filter (C4) (if present) and empty the water tank. Press > NEXT;
- ADD DESCALER (UP TO LEVEL A) AND WATER (UP TO LEVEL B) (fig. 40); Pour the de-scaler into the tank up to the level A marked inside the tank (equal to one 100 ml pack); then add water (one litre) up to level B; and put the water tank back in. Press > NEXT ;
- EMPTY GROUND CONTAINER AND DRIP TRAY (fig. 27): remove, empty and replace the drip tray (A14) and the ground container (A4). Press > NEXT ;
- PLACE 2.5I CONTAINER UNDER OUTLET PRESS OK TO START DESCALING :
Place an empty container with a minimum capacity of 2.5 litres under the hot water/steam spout (C6) and coffee spouts (A13) (fig. 8);
Danger of burns!
Hot water flows out of the hot water/steam spout which contains acid. Take care to avoid contact with splashes of this solution.
- Press to confirm that you have added the descaling solution. The display shows DESCALING please wait: the descale programme starts and the descaler liquid comes out of the hot water/steam and coffee spouts. A series of rinses and pauses is automatically carried out to remove all the scale residues from the inside of the coffee machine;
After about 25 minutes, descaling stops:
-
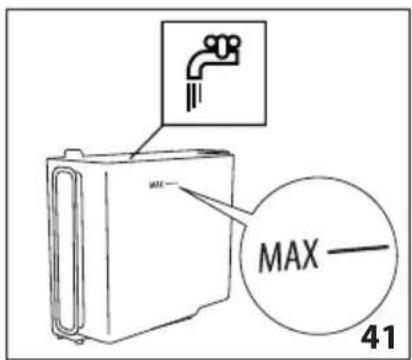
RINSE AND FILL WATER TANK UP TO MAX LEVEL (fig. 41): the appliance is now ready for a fresh water rinsing cycle. Empty the container used to collect the descaler solution and extract the water tank, empty, rinse under running water, fill with fresh water up to the MAX level and put back in the appliance;
-
PLACE 2.5I CONTAINER UNDER OUTLET PRESS OK TO START RINSING: Place the container used to collect the descaler solution empty under the coffee spouts and hot water/steam spout (fig. 8) again and press ;
-
Hot water is delivered first from the coffee spouts and the display shows RINSING please wait;
-
When the water in the tank has run out, empty the container used to collect the rinsing water;
-
(If the filter is installed) INSERT FILTER INTO ITS HOUSING (fig. 42). Press and extract the water tank, reinsert the water softener filter if removed previously;
-
RINSE AND FILL WATER TANK UP TO MAX LEVEL (fig. 41): Fill the tank up to the MAX level with fresh water;
-
INSERT WATER TANK (fig. 6): Put the water tank back in the appliance;
-
PLACE 2.5I CONTAINER UNDER OUTLET PRESS OK TO START RINSING :
Place the empty container used to collect the descaler solution under the hot water/steam spout (fig. 8) and press ;
-
Hot water is delivered from the hot water/steam spout and RINSING PLEASE WAIT is displayed.
-
EMPTY DRIP TRAY (fig. 27): At the end of rinsing, remove, empty and replace the drip tray (A14) and grounds container (A4): press ;
-
For a few seconds DESCALE COMPLETE PRESS OK will be shown on the display; the appliance turn off.
Descaling is complete.
Please note:
- If the descaling cycle is not completed correctly (e.g. no electricity) we recommend repeating the cycle;
• After descaling, it is normal for the grounds container (A4) to contain water. - If the water tank has not been filled to the max level, at the end of descaling, the appliance requests a third rinse to guarantee that the descaler solution has been completely eliminated from the machine's internal circuits. Before starting rinsing, remember to empty the drip tray;
- The appliance may request descaling cycles at very short intervals. This is normal and due to the appliance's advanced control system
PROGRAMMING WATER HARDNESS
The DESCALING NEEDED - PRESS OK TO START (\~45min) message is displayed after a period of time established according to water hardness.
The appliance default is pre-set in manufacturing at "level 4" hardness. The machine can also be programmed according to the hardness of the mains water in the various regions so that the machine needs to be descaled less often.
Measuring water hardness
- Remove the "Total hardness test" indicator paper (C1) provided from its packaging, attached to the instructions.
- Immerse the paper completely in a glass of water for about one second.
- Remove the paper from the water and shake lightly. After about a minute, 1, 2, 3, or 4 red squares form, depending on the hardness of the water. Each square corresponds to one level.
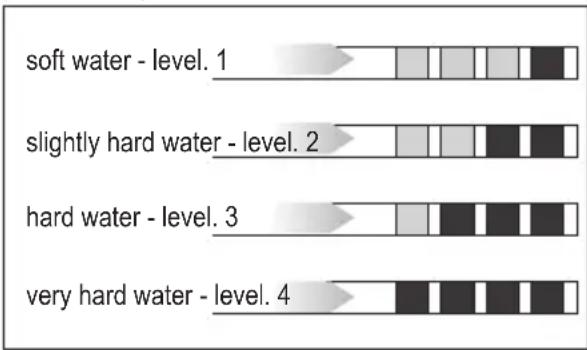
bar
| Level | Color Segment 1 | Color Segment 2 | Color Segment 3 | Color Segment 4 | | :--- | :--- | :--- | :--- | :--- | | soft water - level. 1 | Light Gray | White | White | Dark Gray | | slightly hard water - level. 2 | White | White | White | Dark Gray | | hard water - level. 3 | White | White | Dark Gray | Dark Gray | | very hard water - level. 4 | Medium Gray | Dark Gray | Dark Gray | Dark Gray |Setting water hardness

- Press (B2) to enter the menu;
- Press ← (B10) or → (B8) until the display (B) displays WATER HARDNESS;
- To change the level selected, press the symbol itself until the required level is displayed (Level 1 = soft water; Level 4 = very hard water);
Press L to go back to the homepage.
The machine is now reprogrammed with the new water hardness setting.
WATER SOFTENER FILTER
Some models are fitted with a water softener filter (C4): if your model is not equipped with one, we recommend buying one through an authorised customer service centre.
To use the filter correctly, follow the instructions below.
Installing the filter
- Remove the filter (C4) from the packaging;
- Press (B2) to enter the menu;
- Press ← (B10) or → (B8) until the display shows ☐ WATER FILTER ;
-
Press ▶;
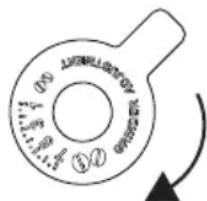
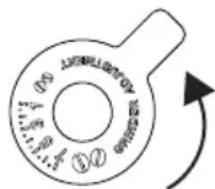
-
TURN THE DATE INDICATOR UNTIL THE NEXT 2 MONTHS ARE DISPLAYED (fig. 43):
turn the date indicator disk until the next two months of use are displayed. Press > NEXT ;

Please note:
the filter lasts about two months if the appliance is used normally, if the coffee machine is left unused with the filter installed, it will last a maximum of 3 weeks.
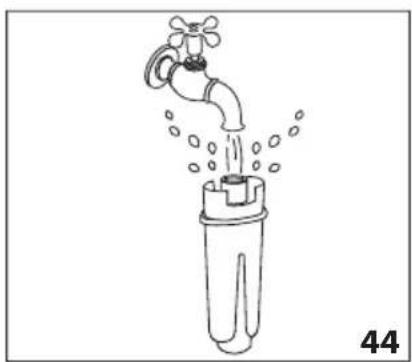
- FILL FILTER WITH WATER UNTIL IT'S COMPLETELY FILLED (fig. 44): To activate the filter, run tap water through the hole in the filter as shown in the figure until water comes out of the openings at the side for more than a minute. Press > NEXT ;
- Extract the tank (A12) from the appliance and fill with water.
- IMMERSE FILTER IN THE WATER TANK LETTING AIR BUBBLES ESCAPE (fig. 45): Insert the filter in the water tank and immerse it completely for about ten seconds, sloping it and pressing it lightly to enable the air bubbles to escape. Press > NEXT;
- INSERT FILTER INTO ITS HOUSING AND PUSH IT DOWN TO BOTTOM: Insert the filter in the filter housing (fig. 42) and press as far as it will go. Press > NEXT ;
- INSERT WATER TANK : Close the tank with the lid (A15), then replace the tank in the machine.
- PLACE 0.5L CONTAINER UNDER OUTLET, PRESS OK TO FILL FILTER (fig. 8): place the container under the hot water/steam spout (C6) and press √OK: delivery starts and stops itself automatically.
The ☐ symbol appears on the display alongside the time to indicate that the filter has been enabled. The coffee machine can now be used.
Replacing the filter
Replace the filter (C4) when the display (B) shows the message REPLACE WATER FILTER, PRESS OK TO START !: to replace immediately, press √ and follow the instructions from point 4.
To postpone replacing the filter to another time, press: on the display the symbol
is a reminder that the filter needs to be replaced.
To replace, proceed as follows:
-
Extract the water tank (A12) and exhausted filter;
-
Remove the new filter from the packaging;
-
Press (B2) to enter the menu;
-
Press ← (B10) or → (B8) until the display shows 📋 WATER FILTER ;
-
Press ▶ ;
-
The display shows ☐ REPLACE FILTER ;
-
Press ▶;
-
Follow the operations described in the previous paragraph from point 5.
The filter is now active and the coffee machine can be used.

Please note:
After two months (see date indicator) or when the appliance has not been used for 3 weeks, you should replace the filter even if the message has not yet been displayed.
Removing the filter
If you want to use the appliance without the filter (C4), you must remove it and notify the appliance of its removal. Proceed as follows:
-
Extract the water tank (A12) and exhausted filter;
-
Press (B2) to enter the menu;
-
Press ← (B10) or → (B8) until the display shows 📋 WATER FILTER ;
-
Press ▶;
-
On the display ↻ REMOVE FILTER appears;
-
Press ↓ ;
-
! REMOVE FILTER? : press √ OK (or to go back to the settings menu, press ESC );
-
FILTER REMOVED: the appliance has recognised the change. Press √ OK to go back to the homepage.

Please note:
After two months (see date indicator) or when the appliance has not been used for 3 weeks, you should remove/replace the filter even if the message has not yet been displayed.
TECHNICAL DATA
Voltage: 220-240 V\~ 50/60 Hz max. 10A
Absorbed power: 1350W
Pressure: 15 bar
Water tank capacity: 2.5 litres
Size:LxHxD: 597x450x470 mm
Net weight: 20 kg
| DISPLAYEDMESSAGE | POSSIBLE CAUSE REMEDY | |
FILL WATER TANK WITH FRESH WATER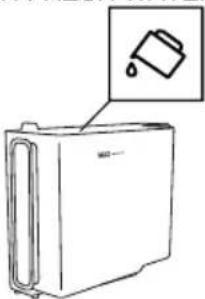 | Water in the tank (A12) is not sufficient. | Fill the tank with water and/or insert it correctly, pushing it as far as it will go until it clicks into place. |
EMPTY GROUND CONTAINER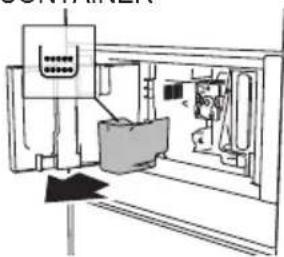 | The grounds container (A4) is full. | Empty the grounds container and drip tray (A14), clean and then replace them. Important: when removing the drip tray, the grounds container must always be emptied, even if it contains few grounds. If this is not done, when you make the next coffees, the grounds container may fill up more than expected and clog the machine. |
INSERT GROUND CONTAINER AND DRIP TRAY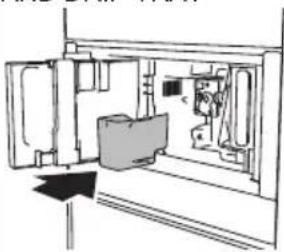 | After cleaning, the grounds container (A4), has not been replaced. | Remove the drip tray (A14) and insert the grounds container. |
ADD PRE-GROUND COFFEE PRE-GROUND MAXIMUM ONE MEASURING CUP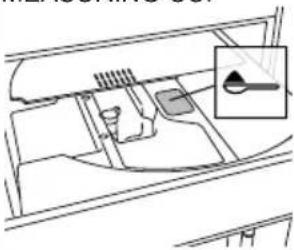 ↓ESC ↓ESC | The "pre-ground coffee" function has been selected, but without placing any pre-ground coffee in the funnel (A21). | Place pre-ground coffee in the funnel (fig. 14) and repeat delivery |
| The funnel (A21) for pre-ground coffee, is clogged. | Empty the funnel with the help of the brush (C5) as described in par. "Cleaning the pre-ground coffee funnel". | |
ADD PRE-GROUND COFFEEPRE-GROUND MAXIMUM ONE MEASURING CUP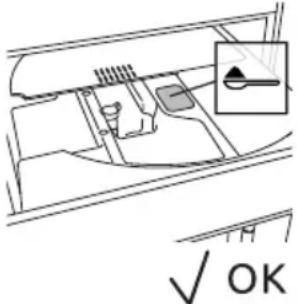 | A LONG coffee with pre-ground coffee has been requested | Place pre-ground coffee in the funnel (A21) (fig. 14) and press√ok continue and complete delivery. |
FILL BEAN CONTAINER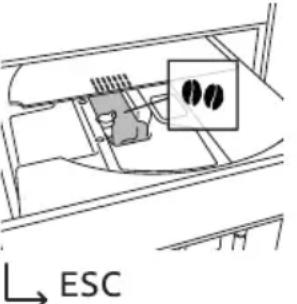 | The coffee beans have run out. Fill the beans container (A16 - fig.12). | |
GROUND TOO FINE.ADJUST GRIND LEVEL 1 CLICK WHILE IN OPERATION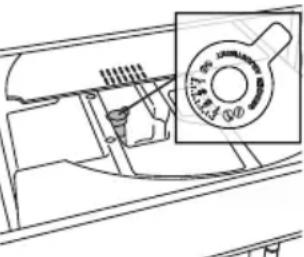 → ESC → ESC | The grinding is too fine and the coffee is delivered too slowly or not at all. | Repeat coffee delivery and turn the grinding adjustment dial (fig. 11) one click clockwise towards number 7 while the coffee mill is in operation. If after making at least 2 coffees delivery is still too slow, repeat the correction procedure, turning the grinding adjustment dial another click (par. "Adjusting the coffee mill"). If the problem persists, make sure the water tank (A12) is fully inserted. |
| If the water softener filter (C4) is present, an air bubble may have been released inside the circuit, obstructing delivery. | Insert the hot water/steam spout (C6) in the appliance and deliver a little water until the flow becomes regular. | |
SELECT A MILDERTASTE OR REDUCE PRE-GROUND COFFEE QUANTITY | Too much coffee has been used. | Select a milder taste by pressing AROMA (B6) or reduce the quantity of pre-ground coffee (maximum 1 measure). |
| DISPLAYEDMESSAGE | POSSIBLE CAUSE REMEDY | |
INSERT WATER OUTLET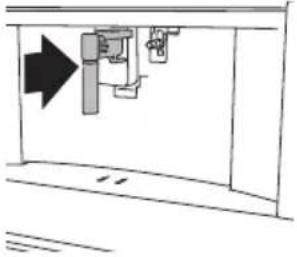 | The hot water spout (C6) is not inserted or is inserted incorrectly | Insert the water spout as far as it will go. |
INSERT MILK CONTAINER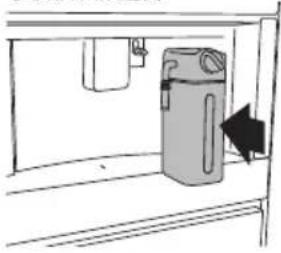 | The milk container (D) is not inserted correctly. | Insert the milk container as far as it will go (fig. 19). |
INSERT BREWING UNIT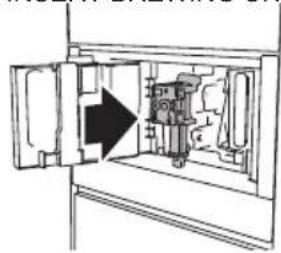 | After cleaning the infuser (A19) has not been replaced. | Insert the infuser as described in par."Cleaning the infuser". |
WATER CIRCUIT EMPTY PRESS OK TO START FILLING PROCESS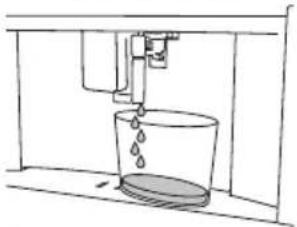  | The water circuit is empty | Press and allow water to drain out of the spout (C6): the flow will stop itself automatically.If the problem persists, make sure the water tank (A12) is fully inserted. |
| DISPLAYEDMESSAGE | POSSIBLE CAUSE REMEDY | |
PRESS OK TO START CLEANING PROCESS OR TURN MILK FROTH ADJUSTMENT KNOB | The milk container has been inserted with the froth adjustment dial (D1) in the CLEAN position. | To proceed with the CLEAN function, press √turn the froth adjustment dial to one of the milk positions. |
TURN THE MILK FROTH ADJUSTMENT KNOB TO START CLEANING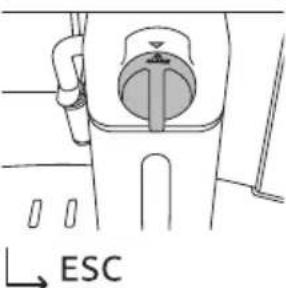 | Milk has been delivered recently and the tubes inside the milk container must be cleaned (D). | Turn the froth adjustment dial (D1) to CLEAN (fig. 21). |
TURN THE MILK FROTH ADJUSTMENT KNOB TO MILK POSITION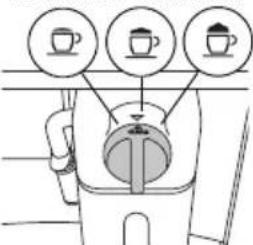 | The milk container has been inserted with the froth adjustment dial (D1) in the CLEAN position. | Turn the dial to the required froth position. |
DESCALING NEEDED PRESS OK TO START | Indicates that the machine must be descaled. | Press √to start descaling or press → ESC to descale later. The descaling procedure described in section “Descale” needs to be performed. |
REPLACE WATER FILTER PRESS OK TO START | The water softener filter (C4) is exhausted. | Press √to replace or remove the filter, or → carry out the procedure later. Follow the instructions in section “Water softener filter”. |
GENERAL ALARM:REFER TO USER | The inside of the appliance is very dirty. | Clean the inside of the appliance thoroughly, as described in section “Cleaning”. If the message is still displayed after cleaning, contact an authorised Customer Service centre. |
 | Reminder that appliance needs descaling and/or the filter (C4) must be replaced. | The descaling procedure described in section “Descale” needs to be performed as soon as possible and/or the filter needs replacing or removing as described in section “Water softener filter”. |
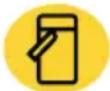 | Reminder that tubes inside the milk container (D) must be cleaned. | Turn the froth adjustment dial (D1) to CLEAN (fig. 21). |
 | Reminder that filter (C4) must be replaced. | Replace the filter or remove it as described in section “Water softener filter”. |
 | Reminder that machine must be descaled. | The descaling procedure described in section “Descale” needs to be carried out as soon as possible. |
 | Indicates that the auto-start function is enabled. | To disable the function, proceed as described in par. "Auto-start". |
 | Energy saving is enabled. To disable energy saving, proceed as described in par. "Energy saving". | |
 | Indicates that the filter (C4) has been enabled | To remove the filter, proceed as described in section “Water softener filter”. |
TROUBLESHOOTING
Below is a list of some of the possible malfunctions.
If the problem cannot be resolved as described, contact Customer Services Technical Assistance.
| PROBLEM POSSIBLE CAUSE REMEDY | ||
| The coffee is not hot. The cups were not preheated. | Warm the cups by rinsing them with hot water (Please note! the hot water function can be used). | |
| The inhuser has cooled down because 2/3 minutes have elapsed since the last coffee was made. | Before making the coffee, heat the inhuser by rinsing using the rinse function (see par."Rinsing") | |
| A low coffee temperature is set. | Set a hotter coffee temperature in the menu (see par. "Coffee temperature"). | |
| The coffee is weak or not creamy enough. | The coffee is ground too coarsely. | Turn the grinding adjustment dial one click anticlockwise towards number 1 while the coffee mill is in operation (g. 11). Continue one click at a time until coffee delivery is satisfactory. The effect can only be noticed after delivering 2 coffees (see par. "Adjusting the coffee mill"). |
| The coffee is unsuitable. Use coffee for espresso machines. | ||
| The coffee is delivered too slowly or a drop at a time. | The coffee is ground too nely. | Turn the grinding adjustment dial one click clockwise towards number 7 while the coffee mill is in operation (g. 11). Continue one click at a time until coffee delivery is satisfactory. The effect can only be noticed after delivering 2 coffees (see par. "Adjusting the coffee mill"). |
| Coffee does not come out of one or both of the spouts. | The coffee spouts (A13) are blacked. | Clean the spouts with a toothpick (g. 30). |
| The appliance is not producing coffee | The appliance detects impurities in its system; the display shows "Cleaning in progress". | Wait for the appliance to be ready for use again and reselect the required beverage. Contact an Authorised Customer Service Centre if the problem persists. |
| The appliance does not come on. | It is not plugged into the socket. | Plug into the mains socket (g. 1). |
| The main switch (A21) is not turned on. | Press the main switch (g. 2). | |
| The inhacer cannot be extracted | The appliance has not been turned off currently. | Turn the appliance off by pressing the |
EN
| PROBLEM POSSIBLE CAUSE REMEDY | ||
| The milk does not come out of the milk spout (D5) | The lid (D2) of the milk container (D) is dirty | Clean the milk container lid as described in par. "Cleaning the milk container". |
| The milk contains large bubbles and squirts out of the milk spout (D5) or there is little froth | The milk is not cold enough or is not semi-skimmed or skimmed. | Use fully skimmed or semi-skimmed milk at refrigerator temperature (about 5°C). If the result is not as you wished, try changing brand of milk. |
| The froth adjustment dial (D1) is incorrectly adjusted. | Adjust following the instructions in section “Adjusting the amount of froth”. | |
| The milk container lid (D2) or froth adjustment dial (D1) is dirty | Clean the milk container lid and froth adjustment dial as described in par. "Cleaning the milk container". | |
| The hot water/steam connection nozzle (A13) is dirty | Clean the connection nozzle as described in par. "Cleaning the hot water/steam connection nozzle". | |
| The machine emits noises or small puffs of steam while not in use | The machine is ready for use, or has recently been turned off, and condensate is dripping into the vaporiser which is still hot | This is part of normal operation. To limit this, empty the drip tray. |
ESPRESSO
ORIGIN Italy
PROCESS Grinding Coffee powder 6-11gr (according to aroma)
Brewing Pre-infusion •
Infusion high pressure (9-12 bar)
RESULT IN CUP Default Quantity \~ 40ml
Cream compact and nut-coloured
Taste intense
OCCASION OF USE short-term pleasure, every moment of the day
COFFEE
ORIGIN Germany & Central Europe
PROCESS Grinding Coffee powder 8-14gr (according to aroma)
Brewing Pre-infusion no pre infusion
Infusion high pressure (9-12 bar)
RESULT IN CUP Default Quantity \~ 180ml
Cream thinner than espresso
Taste balanced and delicate
OCCASION OF USE long-lasting pleasure, every moment of the day
LONG
PROCESS Grinding Coffee powder 2 grindings of 5-9gr (according to aroma)
Brewing Pre-infusion no pre infusion
Infusion impulse mode lower pressure than espresso
RESULT IN CUP Default Quantity \~ 160ml
Cream thinner and lighter than espresso
Taste perfect for drip coffee lovers
OCCASION OF USE long-lasting pleasure, every moment of the day
DOPPIO+
ORIGIN Italy
PROCESS Grinding Coffee powder 15gr
Brewing Pre-infusion reduced pre infusion
Infusion higher pressure than espresso
RESULT IN CUP Default Quantity \~ 120ml
Cream thicker and darker than espresso
Taste stronger than espresso
OCCASION OF USE need for energy
AMERICANO
ORIGIN USA, UK
PROCESS Grinding Coffee powder 6-11gr (according to aroma)
Brewing Pre-infusion •
Infusion high pressure (9-12 bar)
RESULT IN CUP Default Quantity \~ 150ml
Cream thinner and lighter than espresso
Taste Light and delicate
ESPRESSO MACCHIATO
ORIGIN Italy
PROCESS Coffee 6-11gr (according to aroma) (\~ 30ml)
Milk few drops (\~ 20ml)
Milk foam maximum level
Delivery order coffee first, milk afterwards
RESULT IN CUP Visual black with one thin layer or milk foam
Milk foam
OCCASION OF USE every moment of the day, people who want to taste a slightly sweet espresso
CAPPUCCINO
ORIGIN Italy
PROCESS Coffee balanced (\~ 80ml)
Milk balanced (\~ 70ml)
Milk foam maximum level
Delivery order milk first, coffee afterwards
RESULT IN CUP Visual separate layers of foam, coffee and milk
Milk foam white with milky taste
OCCASION OF USE every moment of the day, people who want to taste coffee and milk separately
CAPPUCCINO+
ORIGIN Italy
Delivery order milk first, coffee afterwards
RESULT IN CUP Visual darker than cappuccino
Milk foam separate layers of foam, coffee and milk, with
milky taste
OCCASION OF USE need for energy, people who want a cappuccino with a strong coffee taste
CAPPUCCINOMIX
ORIGIN Italy
PROCESS Coffee balanced (\~ 80ml)
Milk balanced (\~ 70ml)
Milk foam maximum level
Delivery order coffee first, milk afterwards
RESULT IN CUP Visual uniformly brown milk drink
Milk foam light brown with coffee taste
OCCASION OF USE every moment of the day, people who loves melted milk and coffee tastes
LATTE MACCHIATO
ORIGIN Italy
PROCESS Coffee \~ 60ml
Milk \~ 90ml
Milk foam medium level
Delivery order milk first, coffee afterwards
RESULT IN CUP Visual separate layers of foam, coffee and milk
Milk foam white with milky taste
OCCASION OF USE every moment of the day, people who want to taste coffee and milk separately
FLAT WHITE
Milk foam medium level
Delivery order milk first, coffee afterwards
RESULT IN CUP Visual separate layers of foam, coffee and milk
Milk foam served in a ceramic cup white with milky taste
OCCASION OF USE every moment of the day, people who want to taste coffee and milk separately
CAFFELATTE
ORIGIN Italy
PROCESS Coffee \~ 60ml
Milk \~240ml
Milk foam medium level
Delivery order milk first, coffee afterwards
RESULT IN CUP Visual separate layers coffee and milk
Milk foam little layer of white foam with milky taste
OCCASION OF USE every moment of the day, people who want to taste coffee and milk separately
Product information concerning power consumption and the maximum time required to reach the applicable low-power mode
| Power consumption when the product is off 0 W |
| Power consumption in stand-by mode with the display off 0.5 W |
| Time required for the appliance to automatically reach the applicable low-power mode 29 min |
AUTOMATICKÝ VESTAVNÝ KÁVOVAR
Návod k použití
FR EN CS ZH DA DE ES EL IT NL PL PT RU SK

natural_image
Top-down view of a coffee cup filled with coffee beans, surrounded by scattered beans on a dark surface (no text or symbols visible)
VÁŽENÝ ZÁKAZNÍKU,


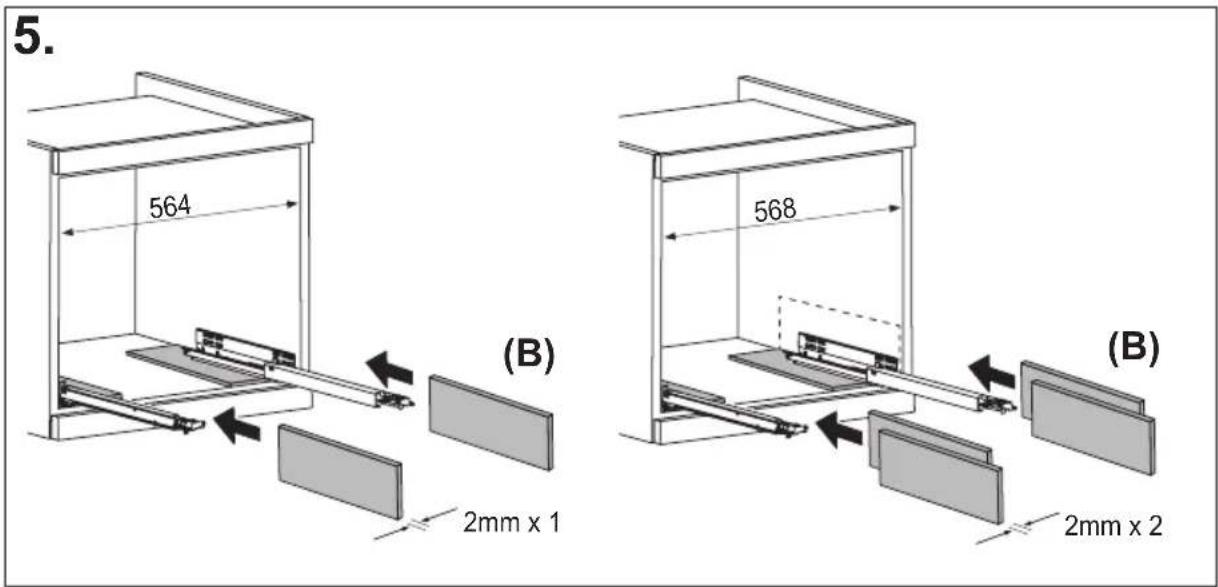


SHRNUTÍ
ÚVOD....17
HLÁŠENÍ NA DISPLEJI....36
ŘEŠENÍ PROBLÉMŮ......41
natural_image
Illustration of a hand inserting a plug into an electrical socket (no text or symbols)

natural_image
Diagram of a refrigerator interior showing a door, front panel, and side panel with a hanging container (no text or symbols)
natural_image
Diagram of a device with an upward arrow indicating process, showing internal components (no text or symbols)
natural_image
Line drawing of a refrigerator with an inset showing a trash can (no text or symbols)
natural_image
Diagram of a refrigerator interior showing door, vent, and side panel with an arrow indicating direction (no text or symbols)
natural_image
Diagram of a mechanical assembly with an arrow indicating direction, no text or symbols present
natural_image
Line drawing of a water spray bottle pouring liquid into a container (no text or symbols)


natural_image
Technical line drawing of a mechanical component with a magnified inset showing a circular feature (no text or symbols)
natural_image
Diagram of a vehicle interior showing engine compartment with two circular insets highlighting internal components (no text or symbols)
natural_image
Simple line drawing of a coffee cup being poured into a container, with a downward arrow indicating the drop (no text or symbols)
natural_image
Diagram of a vehicle interior showing intake manifold, exhaust pipe, and dashboard (no text or labels)
natural_image
Diagram of a mechanical device with an upward arrow indicating direction (no text or symbols present)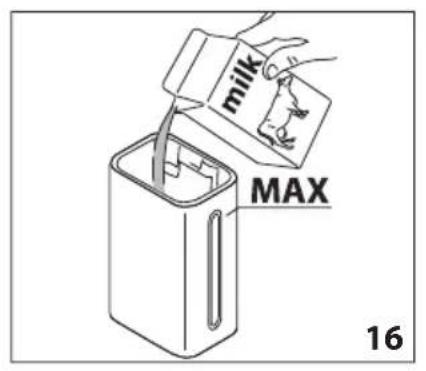

natural_image
Diagram showing a mechanical device with a rod and arrow, labeled '17' (no text or symbols on the device itself)
natural_image
Diagram of a mechanical device with an arrow indicating leftward movement, no text or symbols present
natural_image
Simple line drawing of a cabinet with an arrow indicating direction, no text or symbols present


natural_image
Line drawing of a water dispenser pouring liquid into a beaker (no text or symbols)
natural_image
Illustration of a hand cleaning a wall with a cloth, showing a black arrow pointing to the edge (no text or symbols)
natural_image
Two identical diagrams showing a mechanical device with downward arrows indicating motion or force, no text or symbols present.
natural_image
Technical line drawing of a mechanical device interior with no visible text or symbols
natural_image
Technical line drawing of a mechanical assembly or machine component with no visible text or symbols
natural_image
Technical line drawing of a mechanical assembly or enclosure with no visible text or symbols
natural_image
Technical line drawing of a mechanical assembly with a magnified inset showing a component (no text or symbols)
natural_image
Illustration of hands using a tool to adjust or install electronic components inside a device (no text or symbols visible)
natural_image
Line drawing of a hand using a screwdriver to adjust or install a mechanical component (no text or symbols present)
natural_image
Illustration of a hand using a sewing machine to adjust fabric (no text or symbols visible)
natural_image
Technical diagram of a mechanical device inside a cabinet, showing internal components and an arrow indicating direction (no text or symbols)
natural_image
Mechanical assembly diagram showing a piston mechanism with an arrow indicating direction (no text or symbols present)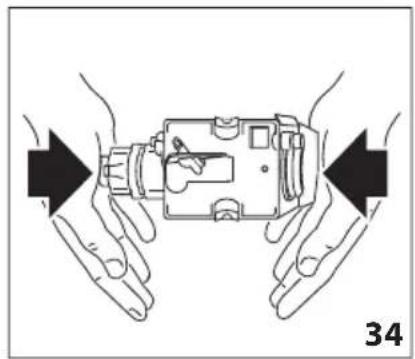
natural_image
Illustration of hands holding a device with arrows indicating movement or force direction (no text or symbols)
natural_image
Technical diagram of a mechanical device with directional arrows indicating movement or force (no text or symbols present)

natural_image
Line drawing of a hand holding a tool next to a mechanical component (no text or symbols)
natural_image
Line drawing of a hand holding a water tap with a valve, labeled with numbers 38 and 39 (no text or symbols on the diagram itself)
natural_image
Diagram of a mechanical device with an upward arrow indicating motion or force (no text or symbols present)


natural_image
Diagram showing a mechanical component with a downward arrow indicating motion or assembly (no text or symbols present)

natural_image
Line drawing of a faucet pouring water into a plastic bottle (no text or symbols)
natural_image
Diagram of a container with a labeled inlet and outlet, showing liquid level and internal components (no text or symbols)CS ENERGETICKÁ ÚČINNOST
CS
natural_image
Top-down view of a coffee cup filled with coffee beans, surrounded by scattered beans on a dark surface (no text or symbols visible)De Dietrich
CRÉATEUR D'ÉMOTIONS DEPUIS 1684


安装说明

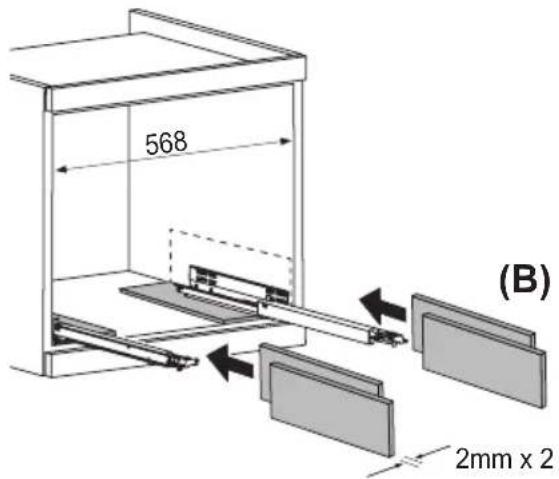
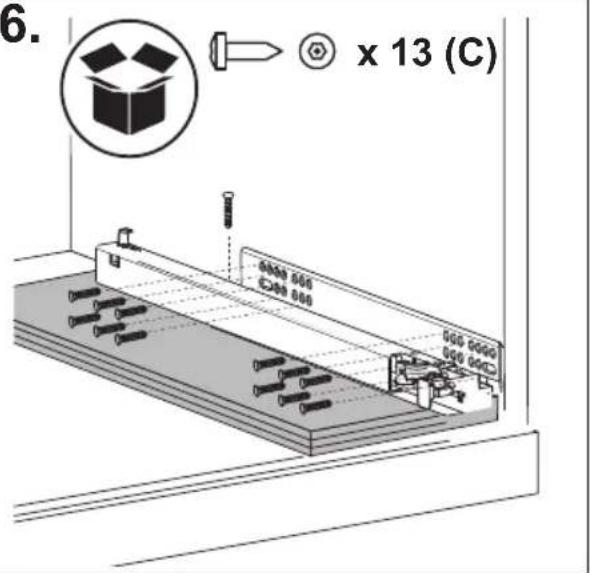
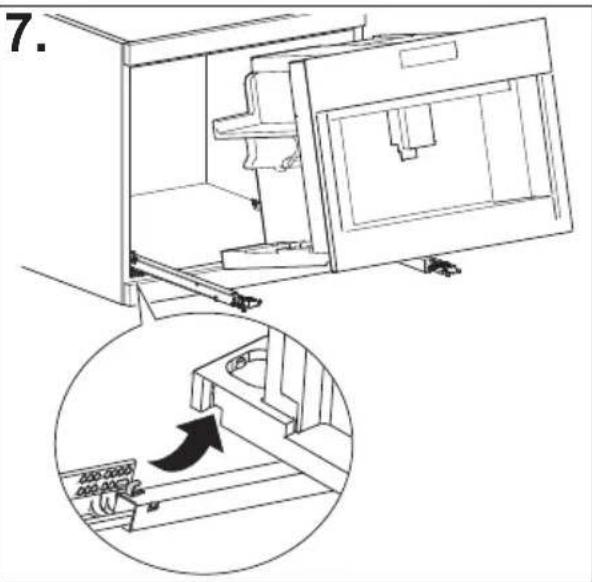

natural_image
Diagram of a refrigerator interior showing internal components and directional arrows indicating movement (no text or symbols)


目录
概述
简介 ……17
说明书中使用的符号 17
括号中的字母 17
故障排除与维修 17
使用说明 17
咖啡机描述 ……17
咖啡机描述 17
主页描述(第3页-B) 17
配件描述 18
牛奶容器描述 18
初始操作 ……18
检查咖啡机 18
设置咖啡机 ……18
开机 ....18
关机 ……19
菜单设置....19
冲洗 19
除垢 19
过滤器 20
饮品设置 i 20
设置时间 20
自动启动 20
自动关机(待机) ⏱ 20
杯子加热 20
节能 21
咖啡温度 21
水硬度 21
设置语言 21
声音通知 21
灯光 21
演示模式 22
默认值 22
统计数据 22
制作咖啡 22
选择咖啡香气 22
选择咖啡量 22
使用咖啡豆制作咖啡 22
使用预磨咖啡粉制作咖啡 23
调整咖啡研磨器 24
提高咖啡温度的技巧 24
制作奶基热饮 24
加注并安装牛奶容器 24
调整泡沫量 24
自动制作奶基饮品 25
使用后清洁牛奶容器 25
热水输送 25
蒸汽输送 26
使用蒸汽打奶泡的技巧 26
使用后清洁热水/蒸汽出口 26
自定义饮品 MY 26
保存个人配置 ……27
清洁 27
清洁机器 27
清洁咖啡机内部管路 27
清洁咖啡渣容器 27
清洁接水盘 27
清洁咖啡机内部 27
清洁水箱 28
清洁咖啡出口 28
清洁预磨咖啡粉漏斗 28
清洁冲泡器 28
清洁牛奶容器 (D) 28
清洁热水/蒸汽连接喷嘴 28
除垢 28
配置水硬度 ……29
测量水硬度 30
设置水硬度 30
软水过滤器 30
安装过滤器 30
更换过滤器 30
移除过滤器 31
技术参数 31
显示的消息 ……34
故障排除 39
natural_image
Illustration of a hand inserting a plug into an electrical socket (no text or symbols)

natural_image
Diagram of a refrigerator interior showing a door, front panel, and side panel with a hanging container (no text or symbols)
natural_image
Diagram of a device with an upward arrow indicating process, showing internal components (no text or symbols)
natural_image
Line drawing of a refrigerator with an inset showing a trash can (no text or symbols)
natural_image
Diagram of a refrigerator interior showing the door, vent, and side panel with an arrow indicating direction (no text or symbols)
natural_image
Diagram of a mechanical assembly with an arrow indicating direction, no text or symbols present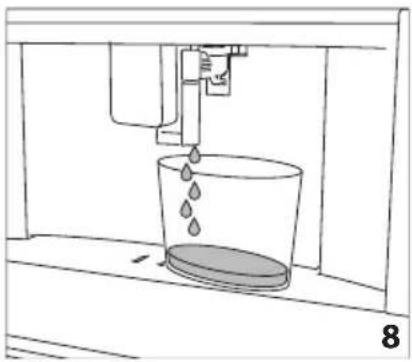
natural_image
Line drawing of a water spray machine pouring liquid into a bucket (no text or symbols)


natural_image
Technical line drawing of a mechanical component with a magnified inset showing a circular feature (no text or symbols)
natural_image
Diagram of a vehicle interior showing engine, air intake, and exhaust components with two inset images of two circular objects (no text or symbols)
natural_image
Simple line drawing of a coffee cup being poured into a container, with a downward arrow indicating the process (no text or symbols)
natural_image
Diagram of a vehicle interior showing intake manifold, exhaust manifold, and intake tray (no text or labels)
natural_image
Diagram of a mechanical device with an upward arrow indicating motion or direction (no text or symbols present)

natural_image
Diagram showing a mechanical device with a rod and arrow, labeled '17' (no text or symbols on the diagram itself)
natural_image
Diagram of a mechanical device with an arrow indicating leftward movement, no text or symbols present
natural_image
Diagram of a water dispenser with a bag inside a container, showing airflow direction (no text or symbols)


natural_image
Line drawing of a water dispenser pouring liquid into a beaker (no text or symbols)
natural_image
Illustration of a hand cleaning a wall with a cloth, showing a black arrow pointing to the edge (no text or symbols)
natural_image
Two mechanical assembly diagrams showing a tool pressing down and falling, with no visible text or symbols.
natural_image
Technical line drawing of a mechanical device interior with no visible text or symbols
natural_image
Technical line drawing of a mechanical assembly or machine component with no visible text or symbols
natural_image
Technical line drawing of a mechanical assembly or enclosure with no visible text or symbols
natural_image
Technical line drawing of a mechanical assembly with a magnified inset showing a component (no text or symbols)
natural_image
Illustration of hands using a tool to adjust or install electronic components inside a device (no text or symbols visible)
natural_image
Hand using a screwdriver to adjust or install a mechanical component (no text or symbols visible)
natural_image
Illustration of a hand using a sewing machine to lift a fabric or cloth (no text or symbols visible)
natural_image
Technical diagram of a mechanical device inside a cabinet, showing internal components and an arrow indicating direction (no text or symbols)
natural_image
Mechanical assembly diagram showing a piston mechanism with an arrow indicating direction (no text or symbols present)
natural_image
Illustration of hands holding a device with arrows indicating movement or force direction (no text or symbols)
natural_image
Technical diagram of a mechanical device with directional arrows indicating movement or force (no text or symbols present)

natural_image
Line drawing of a hand holding a screwdriver next to a mechanical component (no text or symbols)
natural_image
Line drawing of a hand holding a water tap with a valve, labeled 38 and 39 (no text or symbols on the diagram itself)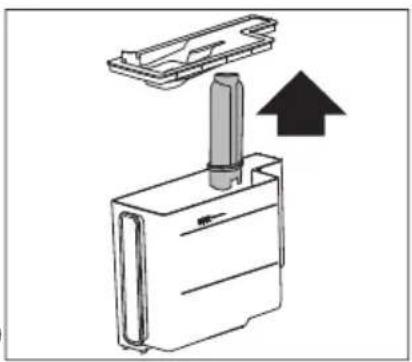
natural_image
Diagram of a mechanical device with an upward arrow indicating motion or force (no text or symbols present)

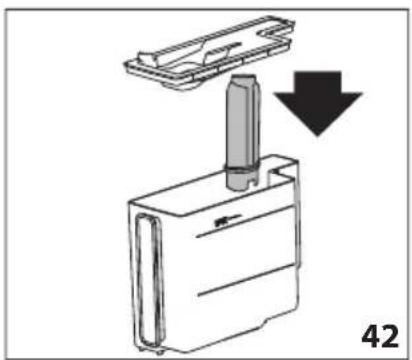
natural_image
Diagram showing a mechanical component with a downward arrow indicating motion or assembly (no text or symbols present)

natural_image
Line drawing of a faucet pouring water into a plastic bottle (no text or symbols)
natural_image
Diagram of a container with a bag inside, showing liquid and bubbles, labeled 'MAX' and page number 45 (no text or symbols on the diagram itself)简介
说明书中使用的符号
natural_image
Top-down view of a coffee cup filled with coffee beans, surrounded by scattered beans on a dark surface (no text or symbols visible)De Dietrich
CRÉATEUR D'ÉMOTIONS DEPUIS 1684

KÆRE KUNDE,

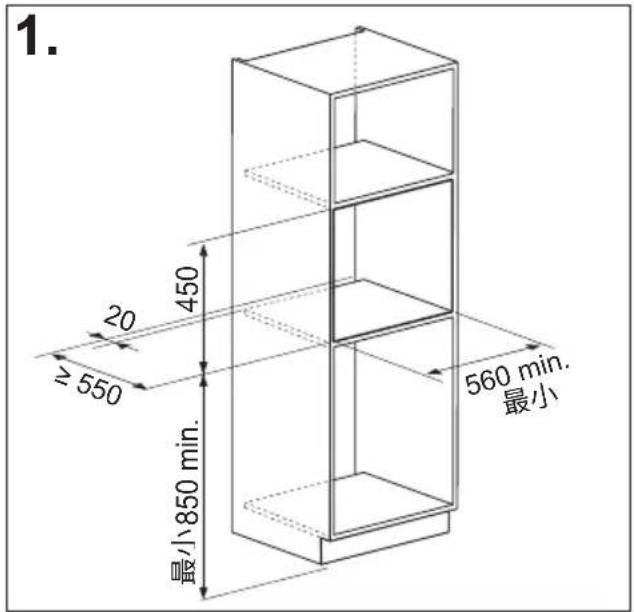


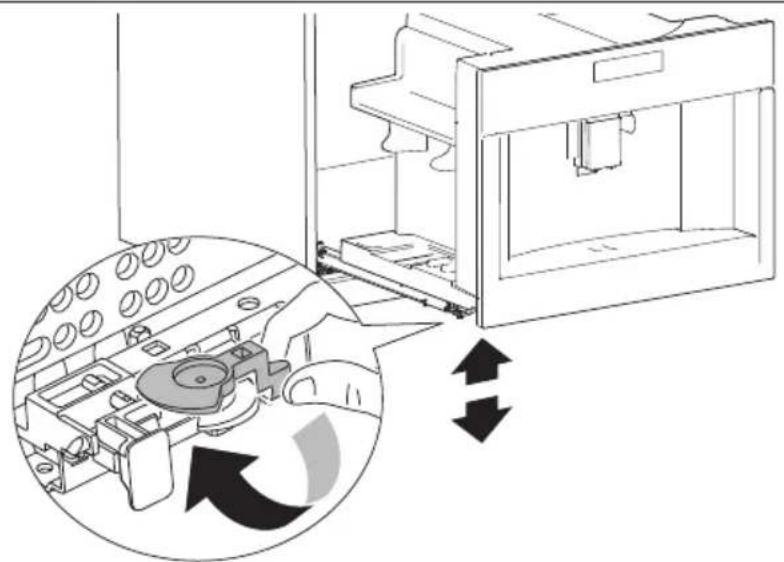
natural_image
Diagram of a 3D printer internal structure with arrows indicating rotation or assembly (no text or symbols present)


INDHOLDSFORTEGNELSE
INDHOLD
INTRODUKTION......17
OPSÆTNING AF APPARATET......18
TÆNDING AF APPARATET ......19
SLUKNING AF APPARATET....19
MENUINDSTILLINGER ......20
Skylning 20
Afkalkning 20
Vandfilter 20
Indstillinger for drikke i....20
natural_image
Illustration of a hand inserting a plug into an electrical socket (no text or symbols)

natural_image
Diagram of a refrigerator interior showing a door, front panel, and side panel with a hanging container (no text or symbols)
natural_image
Diagram of a device with an upward arrow indicating process, showing internal components (no text or symbols)
natural_image
Line drawing of a refrigerator with an inset showing a trash can (no text or symbols)
natural_image
Diagram of a refrigerator interior showing door, vent, and side panel with an arrow indicating direction (no text or symbols)
natural_image
Diagram of a mechanical assembly with an arrow indicating direction, no text or symbols present
natural_image
Line drawing of a water spray machine pouring liquid into a bucket (no text or symbols)


natural_image
Technical line drawing of a mechanical component with a magnified inset showing a circular feature (no text or symbols)
natural_image
Diagram of a device interior with a highlighted inset showing two black circular features (no text or symbols present)
natural_image
Simple line drawing of a coffee cup being poured into a container, with a downward arrow indicating the drop (no text or symbols)
natural_image
Diagram of a vehicle interior showing intake manifold, exhaust manifold, and intake tray (no text or labels)
natural_image
Diagram of a mechanical device with an upward arrow indicating direction (no text or symbols present)

natural_image
Diagram showing a tool interacting with a device, with a black arrow indicating direction (no text or symbols present)
natural_image
Diagram of a mechanical device with an arrow indicating leftward movement, no text or symbols present
natural_image
Simple line drawing of a cabinet with an arrow indicating direction, no text or symbols present


natural_image
Line drawing of a water dispenser pouring liquid into a beaker (no text or symbols)
natural_image
Illustration of a hand cleaning a window with a cloth, showing a black arrow pointing to the handle (no text or symbols)
natural_image
Two identical diagrams showing a mechanical device with downward arrows indicating motion or force, no text or symbols present.
natural_image
Technical line drawing of a mechanical device interior with no visible text or symbols
natural_image
Technical line drawing of a mechanical assembly or machine component with no visible text or symbols
natural_image
Technical line drawing of a mechanical assembly or enclosure with no visible text or symbols
natural_image
Technical line drawing of a mechanical assembly with a magnified inset showing a component (no text or symbols)
natural_image
Illustration of hands using a tool to adjust or install electronic components inside a device (no text or symbols visible)
natural_image
Hand holding a screwdriver inserted into a mechanical component (no text or symbols visible)
natural_image
Illustration of a hand using a sewing machine to lift a fabric or cloth (no text or symbols visible)
natural_image
Diagram of a mechanical device inside a cabinet, showing internal components and an arrow indicating direction (no text or symbols)
natural_image
Technical diagram of a mechanical assembly with a black arrow indicating a specific component (no text or symbols present)
natural_image
Illustration of hands holding a device with arrows indicating movement or force direction (no text or symbols)
natural_image
Technical diagram of a mechanical device with directional arrows indicating movement or force (no text or symbols present)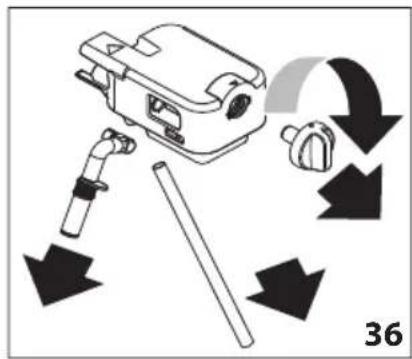
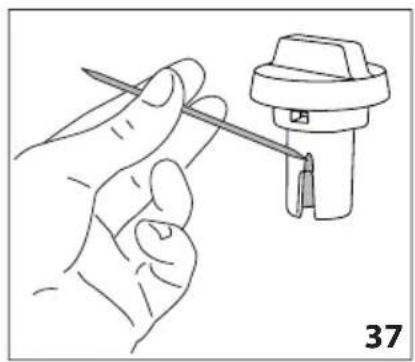
natural_image
Line drawing of a hand holding a tool next to a mechanical component (no text or symbols)
natural_image
Line drawing of a hand holding a water tap with a valve, labeled with numbers 38 and 39 (no text or symbols on the diagram itself)
natural_image
Diagram of a mechanical device with a cylindrical component inserted into a housing, showing an upward arrow (no text or symbols present)


natural_image
Diagram showing a mechanical component with a downward arrow indicating motion or assembly (no text or symbols present)

natural_image
Line drawing of a faucet pouring water into a plastic bottle (no text or symbols)
natural_image
Diagram of a container with a labeled inlet and outlet, showing liquid level and a device inside (no text or symbols)OPSÄTNING AF APPARATET

Bemærk venligst:
TÆNDING AF APPARATET

Bemærk venligst:
SLUKNING AF APPARATET
natural_image
Close-up of coffee beans and a glass cup on a dark surface, with decorative border elements (no text or symbols)
flowchart
graph TD
    A["Start"] --> B{Decision}
    B -->|Yes| C["Final Output"]
    B -->|No| D["Intermediate Decision"]
    D --> E["Final Output"]
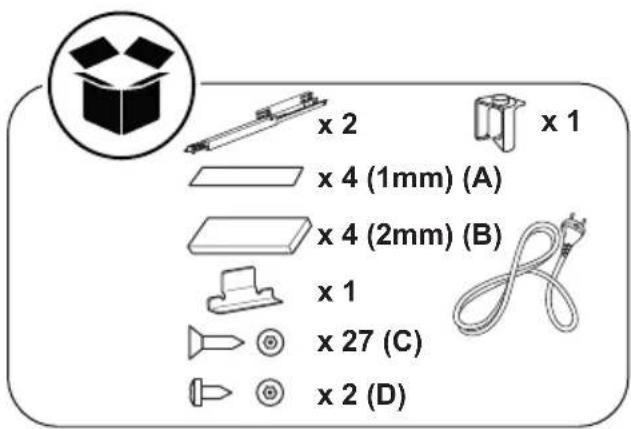


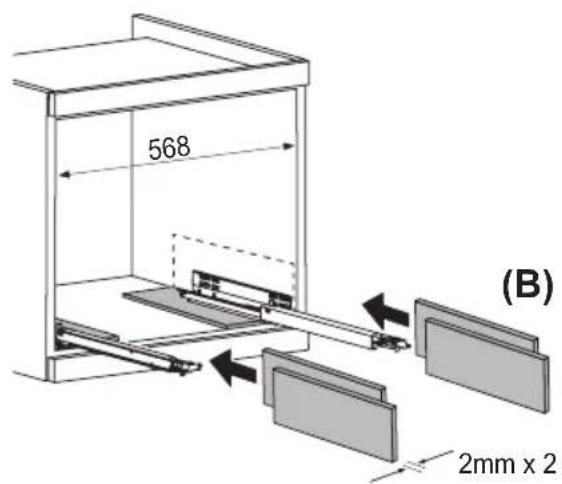


natural_image
Diagram of a mechanical device with internal components and directional arrows indicating motion (no text or symbols)

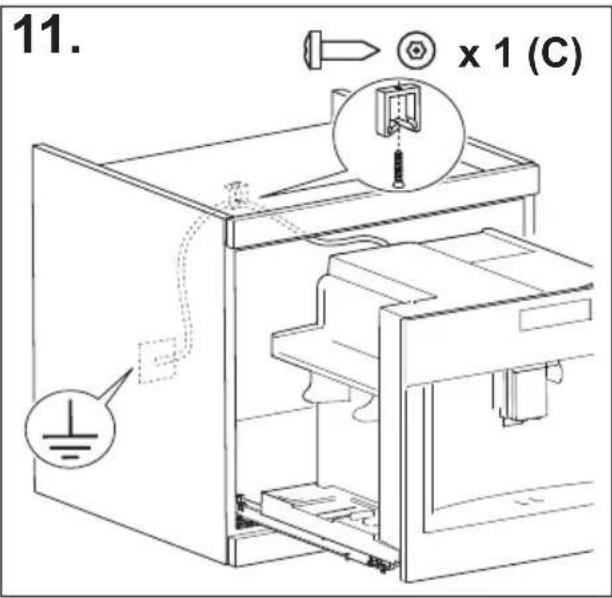
INHALT
ÜBERSICHT
EINFÜHRUNG......17
natural_image
Illustration of a hand inserting a plug into an electrical socket (no text or symbols)

natural_image
Diagram of a refrigerator interior showing a door, front panel, and side panel with a hanging container (no text or symbols)
natural_image
Diagram of a device with an upward arrow indicating process, showing internal components (no text or symbols)
natural_image
Line drawing of a refrigerator with an inset showing a trash can (no text or symbols)
natural_image
Diagram of a refrigerator interior showing door, vent, and side view with an arrow indicating direction (no text or symbols)
natural_image
Diagram of a mechanical assembly with an arrow indicating direction, no text or symbols present
natural_image
Line drawing of a mechanical device with liquid pouring into a bucket (no text or symbols)


natural_image
Line drawing of a mechanical component with a magnified inset showing a circular dial (no text or symbols)
natural_image
Diagram of a device interior with a highlighted inset showing two black circular features (no text or symbols present)
natural_image
Simple line drawing of a coffee cup being poured into a container, with a downward arrow indicating the process (no text or symbols)
natural_image
Diagram of a vehicle interior showing intake manifold, exhaust pipe, and dashboard (no text or labels)
natural_image
Diagram of a mechanical device with an upward arrow indicating direction (no text or symbols present)

natural_image
Diagram showing a tool interacting with a device, with a black arrow indicating direction (no text or symbols present)
natural_image
Diagram of a mechanical device with an arrow indicating leftward movement, no text or symbols present
natural_image
Diagram of a water filter unit inside a container, showing internal components and a directional arrow (no text or symbols)

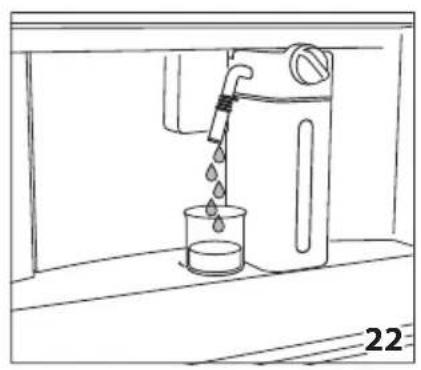
natural_image
Line drawing of a water dispenser pouring liquid into a beaker (no text or symbols)
natural_image
Illustration of a hand cleaning a window with a cloth, showing a black arrow pointing to the wall (no text or symbols)
natural_image
Two identical diagrams showing a mechanical device with downward arrows indicating motion or force, no text or symbols present.
natural_image
Technical line drawing of a mechanical device interior with no visible text or symbols
natural_image
Technical line drawing of a mechanical assembly or machine component with no visible text or symbols
natural_image
Technical line drawing of a mechanical assembly or enclosure with no visible text or symbols
natural_image
Technical line drawing of a mechanical assembly with a magnified inset showing a component (no text or symbols)
natural_image
Illustration of hands using a tool to adjust or install electronic components inside a device (no text or symbols visible)
natural_image
Hand holding a screwdriver inserted into a mechanical component (no text or symbols visible)
natural_image
Illustration of a hand using a sewing machine to lift a fabric or cloth (no text or symbols visible)
natural_image
Diagram of a mechanical device inside a cabinet, showing internal components and an arrow indicating direction (no text or symbols)
natural_image
Technical diagram of a mechanical assembly with a black arrow indicating a specific component (no text or symbols present)
natural_image
Illustration of hands holding a device with arrows indicating movement or force direction (no text or symbols)
natural_image
Technical diagram of a mechanical device with directional arrows indicating movement or force (no text or symbols present)

natural_image
Line drawing of a hand holding a tool next to a mechanical component (no text or symbols)
natural_image
Line drawing of a hand holding a water tap with a valve, labeled with numbers 38 and 39 (no text or symbols on the diagram itself)
natural_image
Diagram of a mechanical device with an upward arrow indicating motion or force (no text or symbols present)

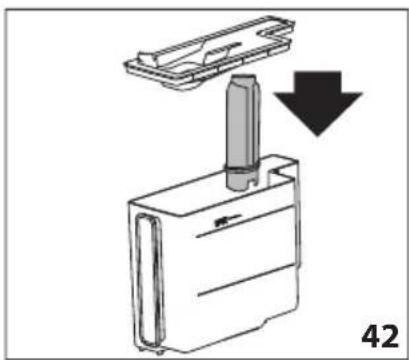
natural_image
Diagram showing a mechanical component with a downward arrow indicating motion or assembly (no text or symbols present)

natural_image
Line drawing of a faucet pouring water into a plastic bottle (no text or symbols)
natural_image
Diagram of a container with a labeled inlet and outlet, showing liquid level and a device inside (no text or symbols)natural_image
Close-up of coffee beans and a cup on a dark surface, with no visible text or symbols.
flowchart
graph TD
    A[" "] --> B["ES"]
    C[" "] --> D[" "]
    E[" "] --> F[" "]
    G[" "] --> H[" "]
ESTIMADO/A CLIENTE/A:


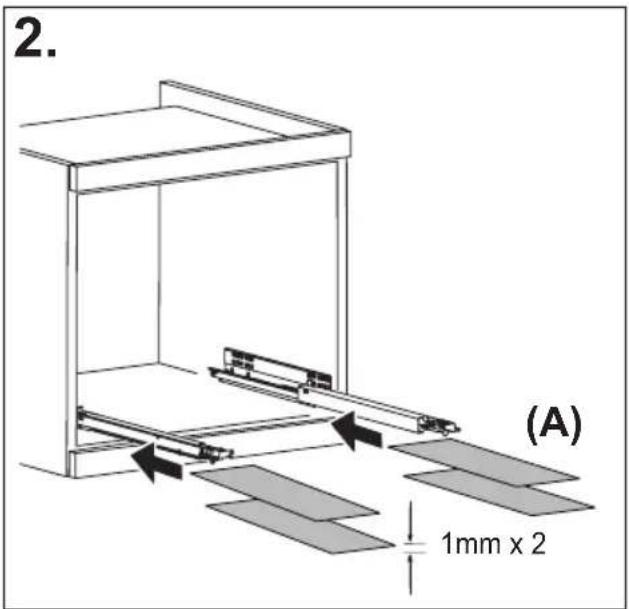


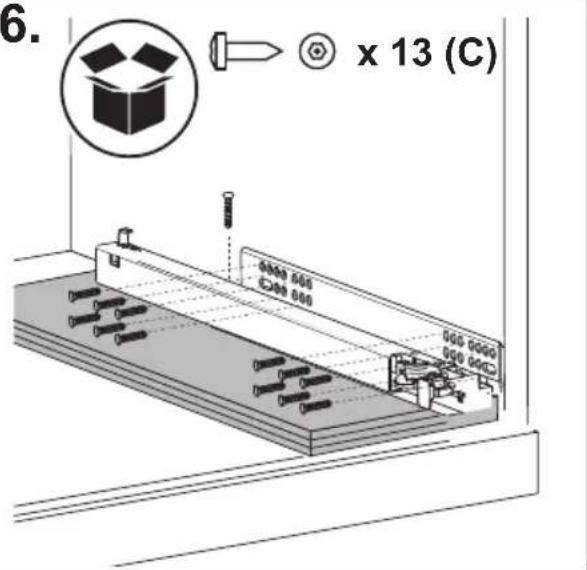


natural_image
Diagram of a 3D printer internal structure with arrows indicating rotation or assembly (no text or symbols present)


CONTENIDO
ÍNDICE
natural_image
Illustration of a hand inserting a plug into an electrical socket (no text or symbols)

natural_image
Diagram of a refrigerator interior showing a door, front panel, and side panel with a hanging container (no text or symbols)
natural_image
Diagram of a device with an upward arrow indicating process, showing internal components (no text or symbols)
natural_image
Line drawing of a refrigerator with an inset showing a trash can (no text or symbols)
natural_image
Diagram of a refrigerator interior showing door, vent, and side view with an arrow indicating direction (no text or symbols)
natural_image
Diagram of a mechanical assembly with an arrow indicating direction, no text or symbols present
natural_image
Line drawing of a water spray bottle pouring liquid into a container (no text or symbols)


natural_image
Technical line drawing of a mechanical component with a magnified inset showing a circular feature (no text or symbols)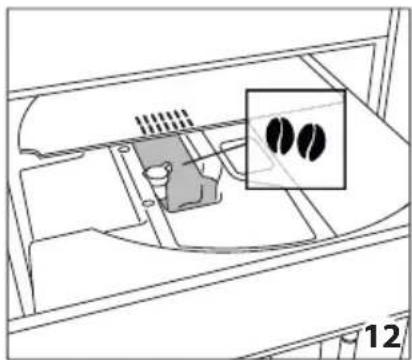
natural_image
Diagram of a device interior with a highlighted inset showing two black circular features (no text or symbols present)
natural_image
Simple line drawing of a coffee cup being poured into a container, with a downward arrow indicating the drop (no text or symbols)
natural_image
Diagram of a vehicle interior showing intake manifold, exhaust manifold, and intake tray (no text or labels)
natural_image
Diagram of a mechanical device with an upward arrow indicating direction (no text or symbols present)

natural_image
Diagram showing a mechanical device with a rod and arrow, labeled '17' (no text or symbols on the diagram itself)
natural_image
Diagram of a mechanical device with an arrow indicating leftward movement, no text or symbols present
natural_image
Simple line drawing of a cabinet with an arrow indicating direction, no text or symbols present


natural_image
Line drawing of a water dispenser pouring liquid into a beaker (no text or symbols)
natural_image
Illustration of a hand cleaning a window with a cloth, showing a black arrow pointing to the handle (no text or symbols)
natural_image
Two identical diagrams showing a mechanical device with downward arrows indicating motion or force, no text or symbols present.
natural_image
Technical line drawing of a mechanical device interior with no visible text or symbols
natural_image
Technical line drawing of a mechanical assembly or machine component with no visible text or symbols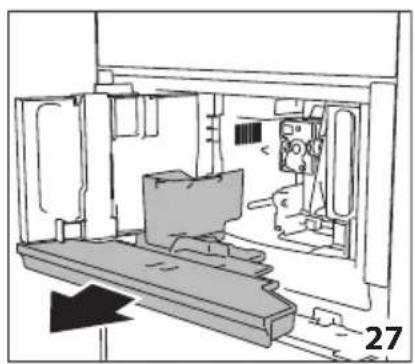
natural_image
Technical line drawing of a mechanical assembly or enclosure with no visible text or symbols
natural_image
Technical line drawing of a mechanical assembly with a magnified inset showing a component (no text or symbols)
natural_image
Illustration of hands using a tool to adjust or install electronic components inside a device (no text or symbols visible)
natural_image
Hand using a screwdriver to adjust or install a mechanical component (no text or symbols visible)
natural_image
Illustration of a hand using a sewing machine to lift a fabric or cloth (no text or symbols visible)
natural_image
Diagram of a mechanical device inside a cabinet, showing internal components and an arrow indicating direction (no text or symbols)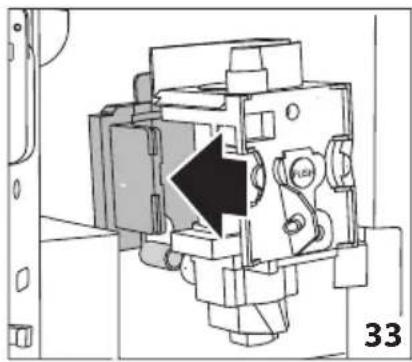
natural_image
Technical diagram of a mechanical device with a black arrow indicating a specific component (no text or symbols present)
natural_image
Illustration of hands holding a device with arrows indicating movement or force direction (no text or symbols)
natural_image
Technical diagram of a mechanical device with directional arrows indicating movement or force (no text or symbols present)

natural_image
Line drawing of a hand holding a tool next to a mechanical component (no text or symbols)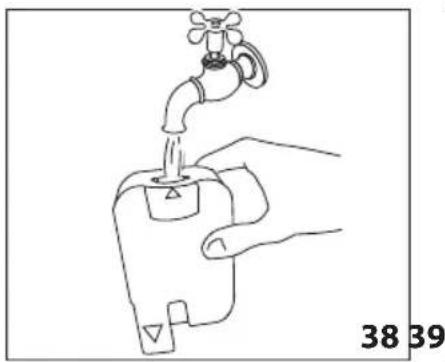
natural_image
Line drawing of a hand holding a water tap with a valve, labeled with numbers 38 and 39 (no text or symbols on the diagram itself)
natural_image
Diagram of a mechanical device with a cylindrical component inserted into a housing, showing an upward arrow (no text or symbols present)


natural_image
Diagram of a mechanical device with a downward arrow indicating a process or transformation (no text or symbols present)

natural_image
Line drawing of a faucet pouring water into a plastic bottle (no text or symbols)
A19. Interruptor principal ON/OFF
natural_image
Top-down view of a coffee cup filled with coffee beans, surrounded by scattered beans on a dark surface (no text or symbols visible)De Dietrich
CRÉATEUR D'ÉMOTIONS DEPUIS 1684

ΑΓΑΠΗΤΕ ΠΕΛΑΤΗ,


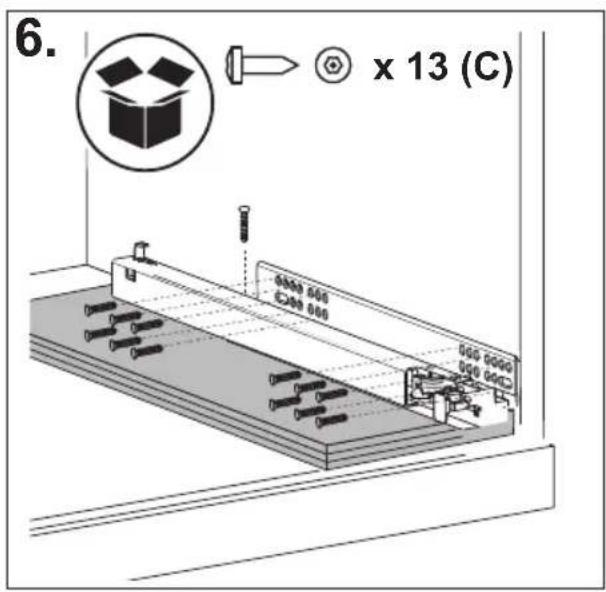


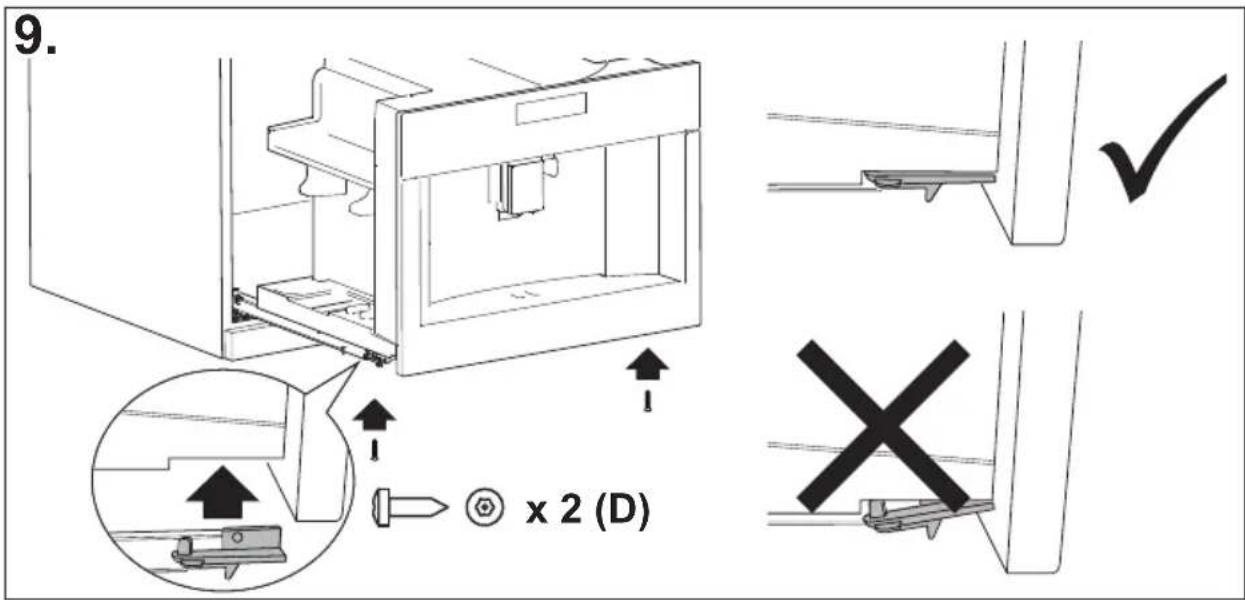


ΣΥΝΟΨΗ
ΕΙΣΑΓΩΓΗ 17
natural_image
Illustration of a hand inserting a plug into an electrical socket (no text or symbols)

natural_image
Diagram of a refrigerator interior showing a door, front panel, and side panel with a hanging container (no text or symbols)
natural_image
Diagram of a device with an upward arrow indicating process, showing internal components (no text or symbols)
natural_image
Line drawing of a refrigerator with an inset showing a trash can (no text or symbols)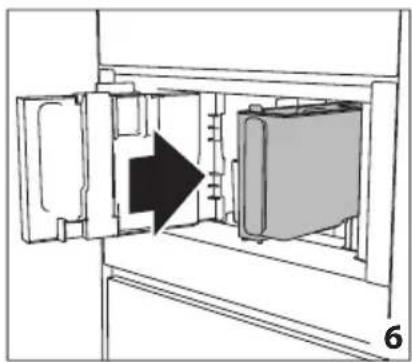
natural_image
Diagram of a refrigerator interior showing door, vent, and side view with an arrow indicating direction (no text or symbols)
natural_image
Diagram of a mechanical assembly with an arrow indicating direction, no text or symbols present
natural_image
Line drawing of a mechanical device with liquid and a container, labeled '8' (no text or symbols on the diagram itself)


natural_image
Technical line drawing of a mechanical component with a magnified inset showing a circular component (no text or symbols)
natural_image
Diagram of a device interior with a highlighted inset showing two black circular features (no text or symbols present)
natural_image
Simple line drawing of a coffee cup being poured into a container, with a downward arrow indicating the process (no text or symbols)
natural_image
Technical line drawing of a vehicle interior showing intake manifold and exhaust pipe (no text or symbols)
natural_image
Diagram of a mechanical device with an upward arrow indicating direction (no text or symbols present)

natural_image
Diagram showing a tool interacting with a device, with a black arrow indicating direction (no text or symbols present)
natural_image
Diagram of a mechanical device with an arrow indicating leftward movement, no text or symbols present
natural_image
Simple line drawing of a cabinet with an arrow indicating direction, no text or symbols present


natural_image
Line drawing of a water dispenser pouring liquid into a beaker (no text or symbols)
natural_image
Illustration of a hand cleaning a garment with a cloth, showing a black arrow pointing to the fabric (no text or symbols)
natural_image
Two identical diagrams showing a mechanical device with downward arrows indicating motion or force, no text or symbols present.
natural_image
Technical line drawing of a mechanical device interior with no visible text or symbols
natural_image
Technical line drawing of a mechanical assembly or machine component with no visible text or symbols
natural_image
Technical line drawing of a mechanical assembly or enclosure with no visible text or symbols
natural_image
Technical line drawing of a mechanical assembly with a magnified inset showing a component (no text or symbols)
natural_image
Illustration of hands using a tool to adjust or install electronic components inside a device (no text or symbols visible)
natural_image
Hand using a screwdriver to adjust or install a mechanical component (no text or symbols visible)
natural_image
Illustration of a hand using a sewing machine to lift a fabric or cloth (no text or symbols visible)
natural_image
Technical diagram of a mechanical device inside a cabinet, showing internal components and an arrow indicating direction (no text or symbols)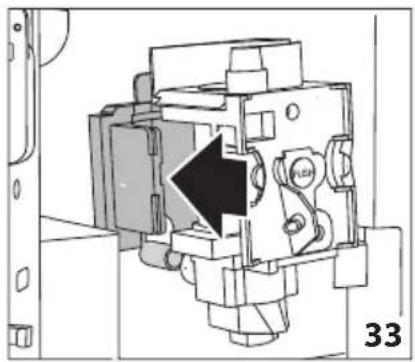
natural_image
Mechanical assembly diagram showing a piston mechanism with an arrow indicating direction (no text or symbols present)
natural_image
Illustration of hands holding a device with arrows indicating movement or force direction (no text or symbols)
natural_image
Technical diagram of a mechanical device with directional arrows indicating movement or force (no text or symbols present)

natural_image
Line drawing of a hand holding a screwdriver next to a mechanical component (no text or symbols)
natural_image
Line drawing of a hand holding a water tap with a valve, labeled with numbers 38 and 39 (no text or symbols on the diagram itself)
natural_image
Diagram of a mechanical device with an upward arrow indicating motion or force (no text or symbols present)


natural_image
Diagram showing a mechanical component with a downward arrow, labeled '42' (no text or symbols on the diagram itself)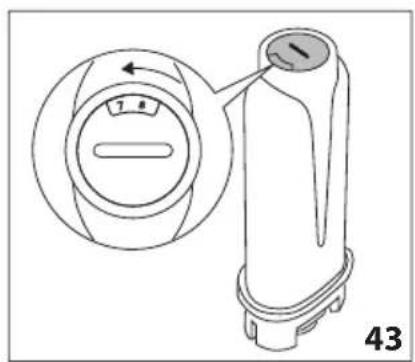

natural_image
Line drawing of a faucet pouring water into a test tube (no text or symbols)
natural_image
Diagram of a container with a bag inside, showing liquid and bubbles, labeled 'MAX' and page number 45 (no text or symbols on the diagram itself)natural_image
Top-down view of a coffee cup filled with coffee beans, placed on a dark surface with decorative border elements (no text or symbols)De Dietrich
CRÉATEUR D'ÉMOTIONS DEPUIS 1684

GENTILE CLIENTE,


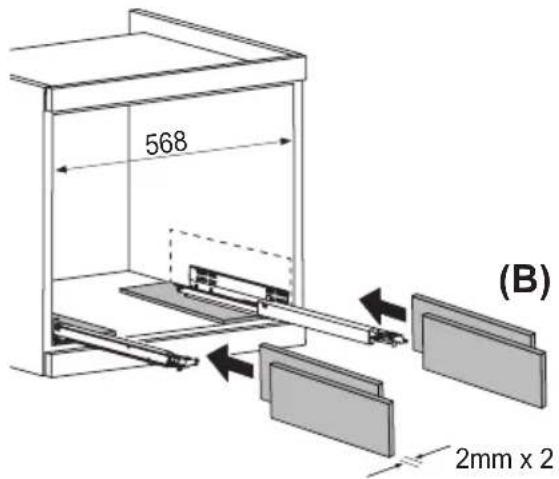


natural_image
Diagram of a mechanical device with internal components and directional arrows indicating motion (no text or symbols)


CONTENUTI
SOMMARIO
INTRODUZIONE......17
ACCENSIONE DELL'APPARECCHIO......20
SPEGNIMENTO DELL'APPARECCHIO ...... 20
natural_image
Illustration of a hand inserting a plug into an electrical socket (no text or symbols)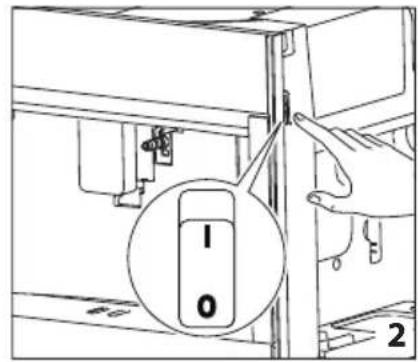

natural_image
Diagram of a refrigerator interior showing a door, front panel, and side panel with a hanging container (no text or symbols)
natural_image
Diagram of a device with an upward arrow indicating process, showing internal components (no text or symbols)
natural_image
Line drawing of a refrigerator with an inset showing a trash can (no text or symbols)
natural_image
Diagram of a refrigerator interior showing door, vent, and side panel with an arrow indicating direction (no text or symbols)
natural_image
Diagram of a mechanical assembly with an arrow indicating direction, no text or symbols present
natural_image
Line drawing of a water spray bottle pouring liquid into a container (no text or symbols)

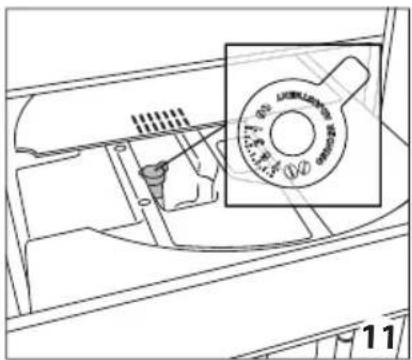
natural_image
Technical line drawing of a mechanical component with a magnified inset showing a circular feature (no text or symbols)
natural_image
Diagram of a device interior with a highlighted inset showing two black circular features (no text or symbols present)
natural_image
Simple line drawing of a coffee cup being poured into a container, with a downward arrow indicating the drop (no text or symbols)
natural_image
Diagram of a vehicle interior showing intake manifold, exhaust manifold, and intake tray (no text or labels)
natural_image
Diagram of a mechanical device with an upward arrow indicating direction (no text or symbols present)

natural_image
Diagram showing a tool interacting with a device, with a black arrow indicating direction (no text or symbols present)
natural_image
Diagram of a mechanical device with an arrow indicating leftward movement, no text or symbols present
natural_image
Simple line drawing of a cabinet with an arrow indicating direction, no text or symbols present


natural_image
Line drawing of a water dispenser pouring liquid into a beaker (no text or symbols)
natural_image
Illustration of a hand cleaning a garment with a cloth, showing a black arrow pointing to the fabric (no text or symbols)
natural_image
Two identical diagrams showing a mechanical device with downward arrows indicating motion or force, no text or symbols present.
natural_image
Technical line drawing of a mechanical device interior with no visible text or symbols
natural_image
Technical line drawing of a mechanical assembly or machine component with no visible text or symbols
natural_image
Technical line drawing of a mechanical assembly or enclosure with no visible text or symbols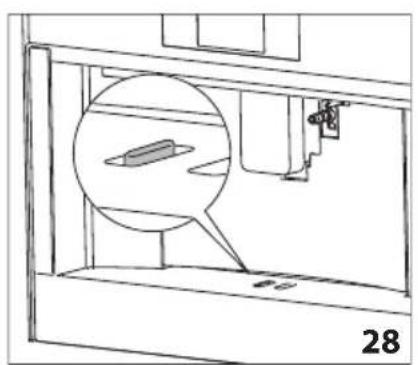
natural_image
Technical line drawing of a mechanical assembly with a magnified inset showing a component (no text or symbols)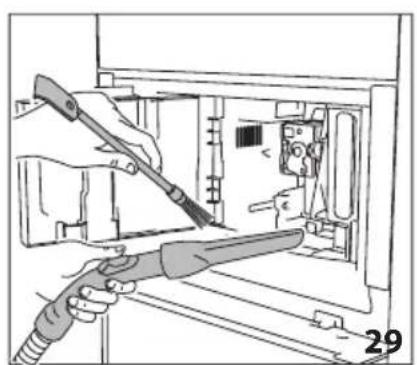
natural_image
Illustration of hands using a tool to adjust or install electronic components inside a device (no text or symbols visible)
natural_image
Hand using a screwdriver to adjust or install a mechanical component (no text or symbols visible)
natural_image
Illustration of a hand using a sewing machine to lift a fabric or cloth (no text or symbols visible)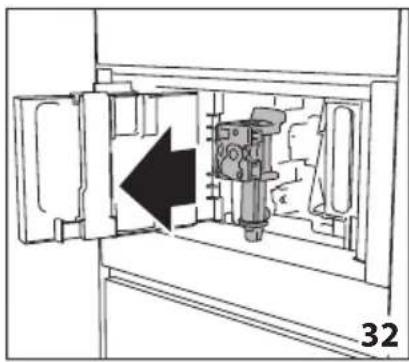
natural_image
Diagram of a mechanical device inside a cabinet, showing internal components and an arrow indicating direction (no text or symbols)
natural_image
Technical diagram of a mechanical device with a black arrow indicating a specific component (no text or symbols present)
natural_image
Illustration of hands holding a device with arrows indicating movement or force direction (no text or symbols)
natural_image
Technical diagram of a mechanical device with directional arrows indicating movement or force (no text or symbols present)

natural_image
Line drawing of a hand holding a tool next to a mechanical component (no text or symbols)
natural_image
Line drawing of a hand holding a water tap with a valve, labeled with numbers 38 and 39 (no text or symbols on the diagram itself)
natural_image
Diagram of a mechanical device with a cylindrical component inserted into a housing, showing an upward arrow (no text or symbols present)


natural_image
Diagram showing a mechanical component with a downward arrow indicating motion or force, labeled '42' (no text or symbols on the diagram itself)

natural_image
Line drawing of a faucet pouring water into a test tube (no text or symbols)
natural_image
Close-up of coffee beans and a cup on a dark surface, with decorative border elements (no text or symbols)De Dietrich
CRÉATEUR D'ÉMOTIONS DEPUIS 1684

BESTE KLANT,


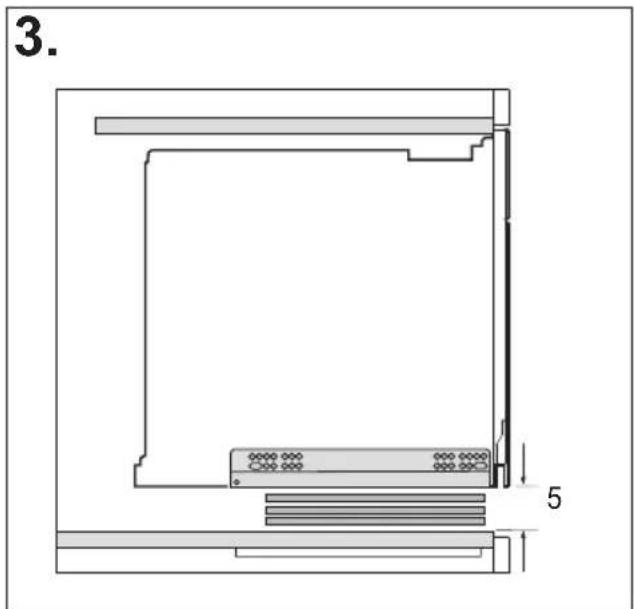


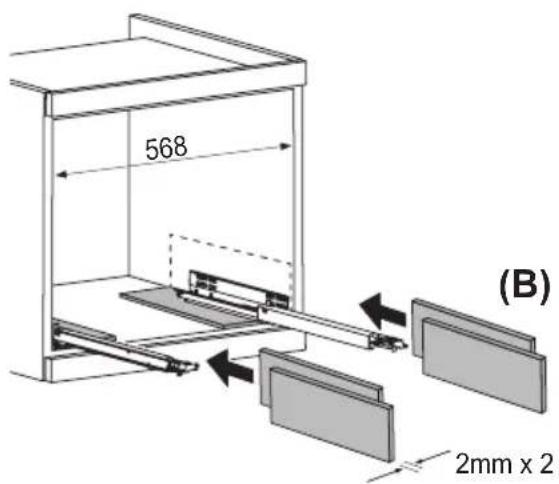


natural_image
Diagram of a refrigerator interior showing internal components and directional arrows indicating movement (no text or symbols present)


INHOUDSOPGAVE
INLEIDING ....17
HET APPARAAT INSCHAKELEN....19
HET APPARAAT UITSCHAKELEN......19
MENU-INSTELLINGEN ......20
Spoelen 20
Ontkalken 20
Waterfilter 21
Drankinstellingen i 21
WARMWATERAFGIFTE....29
STOOMAFGIFTE....29
PROBLEEMOPLOSSING....39
WAARSCHUWING! Risico on letsol, bra
WAARSCHUWING! Risico on letsel of ve
Risico op letsel of verstikking.
natural_image
Illustration of a hand inserting a plug into an electrical socket (no text or symbols)

natural_image
Diagram of a refrigerator interior showing a door, front panel, and side panel with a hanging container (no text or symbols)
natural_image
Diagram of a device with an upward arrow indicating process, showing internal components (no text or symbols)
natural_image
Line drawing of a refrigerator with an inset showing a trash can (no text or symbols)
natural_image
Diagram of a refrigerator interior showing door, vent, and side panel with an arrow indicating direction (no text or symbols)
natural_image
Diagram of a mechanical assembly with an arrow indicating direction, no text or symbols present
natural_image
Line drawing of a water spray bottle pouring liquid into a container (no text or symbols)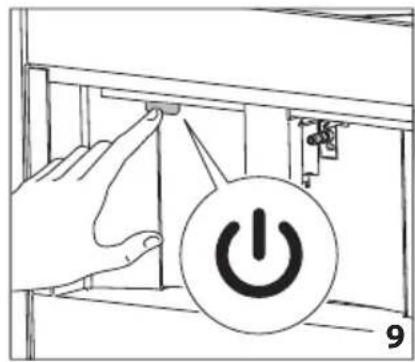


natural_image
Technical line drawing of a mechanical component with a magnified inset showing a circular component (no text or symbols)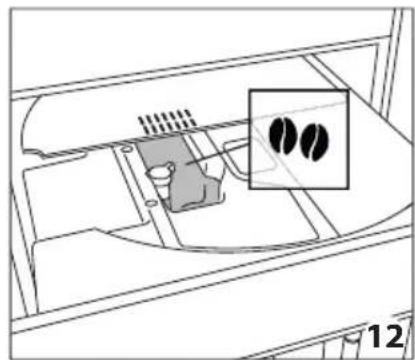
natural_image
Diagram of a vehicle interior showing engine, air intake, and exhaust components with no visible text or symbols
natural_image
Simple line drawing of a coffee cup being poured into a container with a downward arrow (no text or symbols)
natural_image
Diagram of a vehicle interior showing intake manifold, exhaust pipe, and dashboard (no text or labels)
natural_image
Diagram of a mechanical device with an upward arrow indicating direction (no text or symbols present)

natural_image
Diagram showing a mechanical device with a rod and arrow, labeled '17' (no text or symbols on the diagram itself)
natural_image
Diagram of a mechanical device with an arrow indicating leftward movement, no text or symbols present
natural_image
Simple line drawing of a cabinet with an arrow indicating direction, no text or symbols present


natural_image
Line drawing of a water dispenser pouring liquid into a beaker (no text or symbols)
natural_image
Illustration of a hand cleaning a window with a cloth, showing a black arrow pointing to the handle (no text or symbols present)
natural_image
Two identical diagrams showing a mechanical device with downward arrows indicating motion or force, no text or symbols present.
natural_image
Technical line drawing of a mechanical device interior with no visible text or symbols
natural_image
Technical line drawing of a mechanical assembly or machine component with no visible text or symbols
natural_image
Technical line drawing of a mechanical assembly or enclosure with no visible text or symbols
natural_image
Technical line drawing of a mechanical assembly with a magnified inset showing internal components (no text or symbols)
natural_image
Illustration of hands using a tool to adjust or install electronic components inside a device (no text or symbols visible)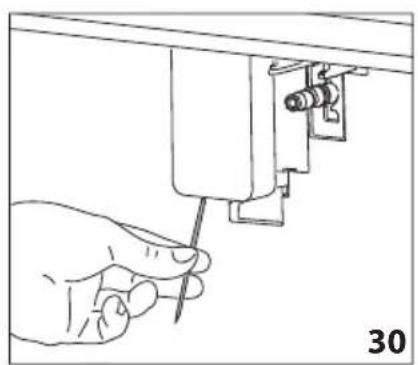
natural_image
Line drawing of a hand using a screwdriver to adjust or install a mechanical component (no text or symbols present)
natural_image
Illustration of a hand using a sewing machine to adjust fabric (no text or symbols visible)
natural_image
Technical diagram of a mechanical device inside a cabinet, showing internal components and an arrow indicating direction (no text or symbols)
natural_image
Mechanical assembly diagram showing a piston mechanism with an arrow indicating direction (no text or symbols present)
natural_image
Illustration of hands holding a device with arrows indicating movement or force (no text or symbols)
natural_image
Technical diagram of a mechanical device with directional arrows indicating movement or force (no text or symbols present)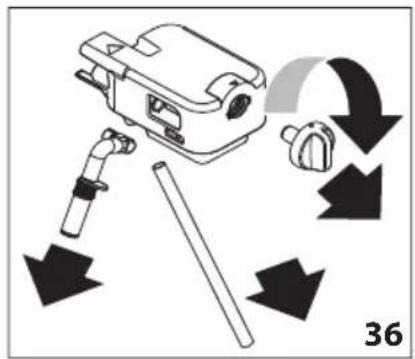

natural_image
Line drawing of a hand holding a tool next to a mechanical component (no text or symbols)
natural_image
Line drawing of a hand holding a water tap with a valve, labeled with numbers 38 and 39 (no text or symbols on the diagram itself)
natural_image
Diagram of a mechanical device with an upward arrow indicating motion or force (no text or symbols present)


natural_image
Diagram showing a mechanical component with a downward arrow indicating motion or assembly (no text or symbols present)
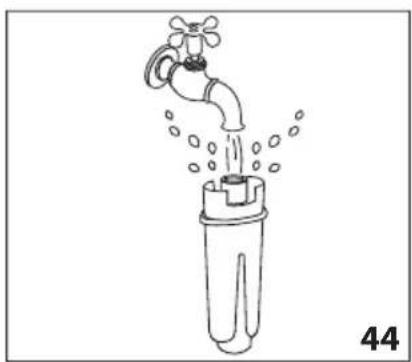
natural_image
Line drawing of a faucet pouring water into a plastic bottle (no text or symbols)
natural_image
Diagram of a container with a labeled inlet and outlet, showing liquid level and internal components (no text or symbols)BESCHRIJVING VAN HET APPARAAT
HET APPARAAT INSCHAKELEN

Let op:
natural_image
Close-up of coffee beans and a cup on a dark surface, with decorative paper outlines at the bottom (no text or symbols)De Dietrich
CRÉATEUR D'ÉMOTIONS DEPUIS 1684

DRODZY KLIENCI!


SPIS TREŚCI
PODSUMOWANIE
WPROWADZENIE 17
CZYNNOŚCI WSTĘPNE....18
PODAWANIE GORACEJ WODY....29
PODAWANIE PARY....29
natural_image
Illustration of a hand inserting a plug into an electrical socket (no text or symbols)
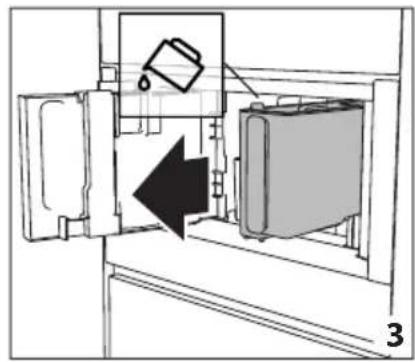
natural_image
Diagram of a refrigerator interior showing a door, front panel, and side panel with a hanging container (no text or symbols)
natural_image
Diagram of a device with an upward arrow indicating process, showing internal components (no text or symbols)
natural_image
Line drawing of a refrigerator with an inset showing a trash can (no text or symbols)
natural_image
Diagram of a refrigerator interior showing door, vent, and side panel with an arrow indicating direction (no text or symbols)
natural_image
Diagram of a mechanical assembly with an arrow indicating direction, no text or symbols present
natural_image
Line drawing of a water spray bottle pouring liquid into a container (no text or symbols)


natural_image
Technical line drawing of a mechanical component with a magnified inset showing a circular feature (no text or symbols)
natural_image
Diagram of a device interior with a highlighted inset showing two black circular features (no text or symbols present)
natural_image
Simple line drawing of a coffee cup being poured into a container with a downward arrow (no text or symbols)
natural_image
Diagram of a vehicle interior showing dashboard and steering wheel (no text or labels)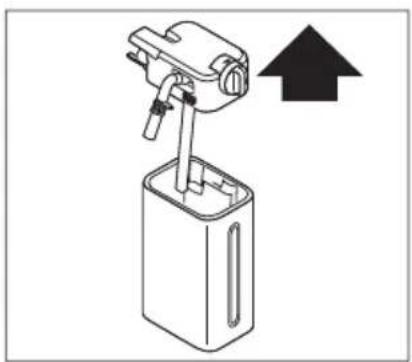
natural_image
Diagram of a mechanical device with an upward arrow indicating direction (no text or symbols present)

natural_image
Diagram showing a mechanical device with a rod and arrow, labeled '17' (no text or symbols on the device itself)
natural_image
Diagram of a mechanical device with an arrow indicating leftward movement, no text or symbols present
natural_image
Diagram of a water dispenser with a bag inside a container, showing airflow direction (no text or symbols)


natural_image
Line drawing of a water dispenser pouring liquid into a beaker (no text or symbols)
natural_image
Illustration of a hand cleaning a garment with a cloth, showing a black arrow pointing to the fabric (no text or symbols)
natural_image
Two identical diagrams showing a mechanical device with downward arrows indicating motion or force, no text or symbols present.
natural_image
Technical line drawing of a mechanical device interior with no visible text or symbols
natural_image
Technical line drawing of a mechanical assembly or machine component with no visible text or symbols
natural_image
Technical line drawing of a mechanical assembly or enclosure with no visible text or symbols
natural_image
Technical line drawing of a mechanical assembly with a magnified inset showing a component (no text or symbols)
natural_image
Illustration of hands using a tool to adjust or install electronic components inside a device (no text or symbols visible)
natural_image
Hand using a screwdriver to adjust or install a mechanical component (no text or symbols visible)
natural_image
Illustration of a hand using a sewing machine to lift a fabric or cloth (no text or symbols visible)
natural_image
Diagram of a mechanical device inside a cabinet, showing internal components and an arrow indicating direction (no text or symbols)
natural_image
Technical diagram of a mechanical assembly with a black arrow indicating a specific component (no text or symbols present)
natural_image
Illustration of hands holding a device with arrows indicating movement or force direction (no text or symbols)
natural_image
Technical diagram of a mechanical device with directional arrows indicating movement or force (no text or symbols present)

natural_image
Line drawing of a hand holding a tool next to a mechanical component (no text or symbols)
natural_image
Line drawing of a hand holding a water tap with a valve, labeled with numbers 38 and 39 (no text or symbols on the diagram itself)
natural_image
Diagram of a mechanical device with an upward arrow indicating motion or force (no text or symbols present)


natural_image
Diagram showing a mechanical component with a downward arrow indicating motion or assembly (no text or symbols present)
natural_image
Technical line drawing of a mechanical device with a circular dial and handle, showing internal components and a pointer (no text or symbols)
natural_image
Line drawing of a faucet pouring water into a plastic bottle (no text or symbols)
- RINSE AND FILL WATER TANK UP
natural_image
Close-up of coffee beans and a glass cup on a dark surface, with no visible text or symbols.
CARO CLIENTE,


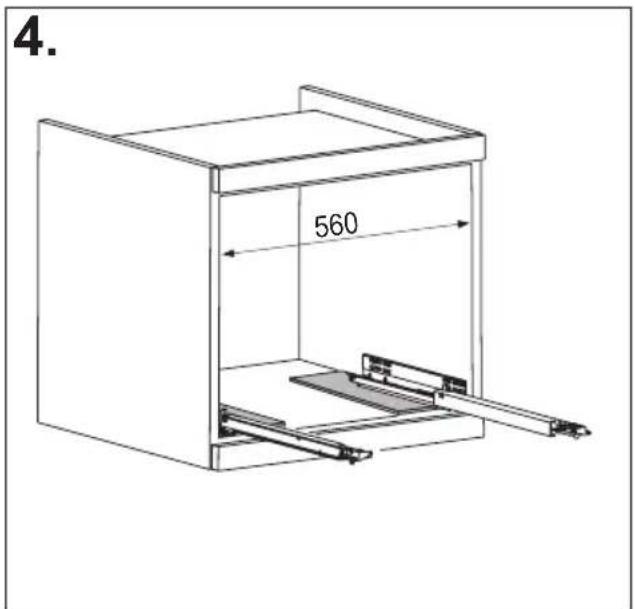


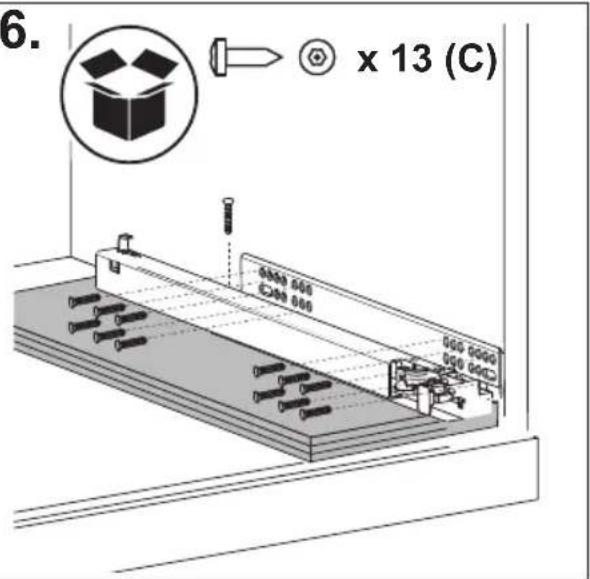


natural_image
Diagram of a refrigerator interior showing internal components and directional arrows indicating movement (no text or symbols present)
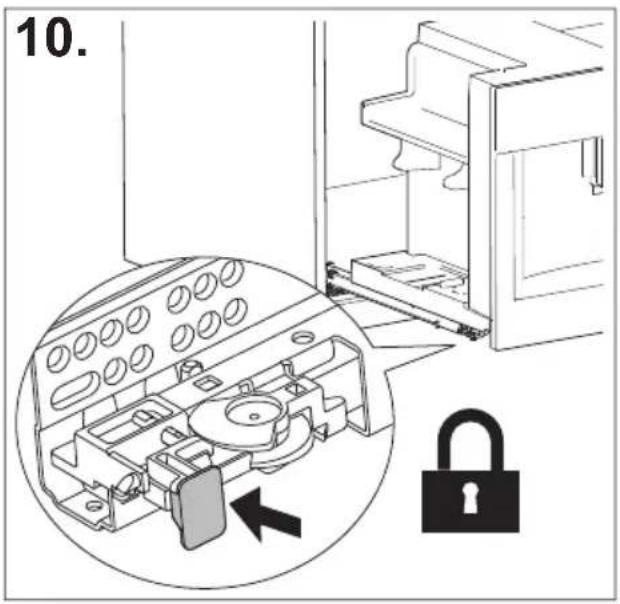

SUMÁRIO
INTRODUÇÃO....17
natural_image
Illustration of a hand inserting a plug into an electrical socket (no text or symbols)

natural_image
Diagram of a refrigerator interior showing a door, front panel, and side panel with a hanging container (no text or symbols)
natural_image
Diagram of a device with an upward arrow indicating process, showing internal components (no text or symbols)
natural_image
Line drawing of a refrigerator with an inset showing a trash can (no text or symbols)
natural_image
Diagram of a refrigerator interior showing door, vent, and side view with an arrow indicating direction (no text or symbols)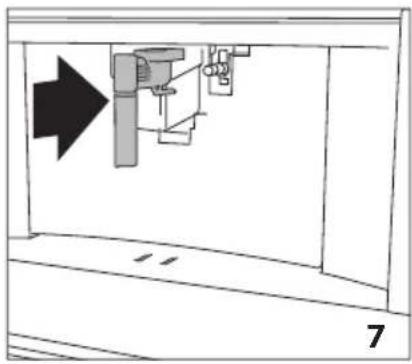
natural_image
Diagram of a mechanical assembly with an arrow indicating direction, no text or symbols present
natural_image
Line drawing of a water spray machine pouring liquid into a bucket (no text or symbols)


natural_image
Technical line drawing of a mechanical component with a magnified inset showing a circular feature (no text or symbols)
natural_image
Diagram of a device interior with a highlighted inset showing two black circular features (no text or symbols present)
natural_image
Simple line drawing of a coffee cup being poured into a container, with a downward arrow indicating the process (no text or symbols)
natural_image
Diagram of a vehicle interior showing intake manifold, exhaust manifold, and intake tray (no text or labels)
natural_image
Diagram of a mechanical device with an upward arrow indicating direction (no text or symbols present)

natural_image
Diagram showing a mechanical device with a rod and arrow, labeled '17' (no text or symbols on the diagram itself)
natural_image
Diagram of a mechanical device with an arrow indicating leftward movement, no text or symbols present
natural_image
Diagram of a water dispenser with a bag inside a container, showing airflow direction (no text or symbols)


natural_image
Line drawing of a water tap pouring liquid into a beaker (no text or symbols)
natural_image
Illustration of a hand cleaning a window with a cloth, showing a black arrow pointing to the handle (no text or symbols)
natural_image
Two identical diagrams showing a mechanical device with downward arrows indicating motion or force, no text or symbols present.
natural_image
Technical line drawing of a mechanical device interior with no visible text or symbols
natural_image
Technical line drawing of a mechanical assembly with no visible text or symbols
natural_image
Technical line drawing of a mechanical assembly or enclosure with no visible text or symbols
natural_image
Technical line drawing of a mechanical assembly with a magnified inset showing a component (no text or symbols)
natural_image
Illustration of hands using a tool to adjust or install electronic components inside a device (no text or symbols visible)
natural_image
Line drawing of a hand using a screwdriver to adjust or install a mechanical component (no text or symbols present)
natural_image
Illustration of a hand using a sewing machine to lift a fabric or cloth (no text or symbols visible)
natural_image
Diagram of a mechanical device inside a cabinet, showing internal components and an arrow indicating direction (no text or symbols)
natural_image
Technical diagram of a mechanical device with a black arrow indicating a specific component (no text or symbols present)
natural_image
Illustration of hands holding a device with arrows indicating movement or force direction (no text or symbols)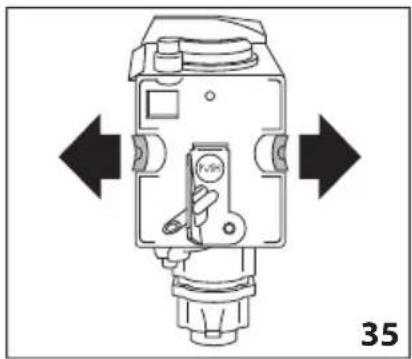
natural_image
Technical diagram of a mechanical device with directional arrows indicating movement or force (no text or symbols present)

natural_image
Line drawing of a hand holding a tool next to a mechanical component (no text or symbols)
natural_image
Line drawing of a hand holding a water tap with a valve, labeled 38 and 39 (no text or symbols on the diagram itself)
natural_image
Diagram of a mechanical device with an upward arrow indicating motion or force (no text or symbols present)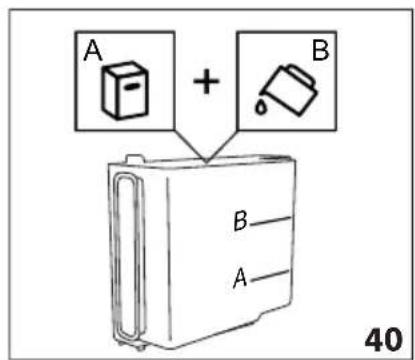


natural_image
Diagram of a device with a handle and arrow indicating downward motion, labeled '42' (no text or symbols on the diagram itself)

natural_image
Line drawing of a faucet pouring water into a plastic bottle (no text or symbols)
CAFÉ ESPRESSO MACCHIATO
ORIGEM Itália
PROCESSO Café 6-11g (de acordo com o aroma) (\~ 30ml)
natural_image
Close-up of coffee beans and a glass cup on a dark surface, with decorative border elements (no text or symbols)De Dietrich
CRÉATEUR D'ÉMOTIONS DEPUIS 1684

УВАЖАЕМЫЙ ПОЛЬЗОВАТЕЛЬ!


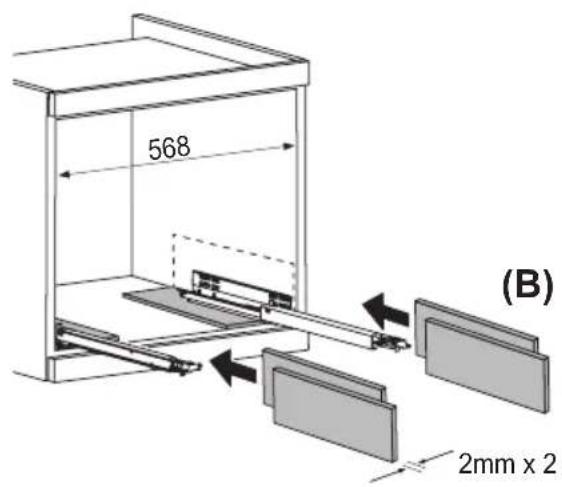


natural_image
Diagram of a 3D printer internal structure with arrows indicating rotation or assembly (no text or symbols present)


СОДЕРЖАНИЕ
СОДЕРЖАНИЕ
ВВЕДЕНИЕ 17
natural_image
Illustration of a hand inserting a plug into an electrical socket (no text or symbols)

natural_image
Diagram of a refrigerator interior showing a door, front panel, and side panel with a hanging container (no text or symbols)
natural_image
Diagram of a device with an upward arrow indicating process, showing internal components (no text or symbols)
natural_image
Line drawing of a refrigerator with an inset showing a trash can (no text or symbols)
natural_image
Diagram of a refrigerator interior showing door, vent, and side panel with an arrow indicating direction (no text or symbols)
natural_image
Diagram of a mechanical assembly with an arrow indicating direction, no text or symbols present
natural_image
Line drawing of a water spray bottle pouring liquid into a container (no text or symbols)


natural_image
Technical line drawing of a mechanical component with a magnified inset showing a circular feature (no text or symbols)
natural_image
Diagram of a device interior with a highlighted inset showing two black circular features (no text or symbols present)
natural_image
Simple line drawing of a coffee cup being poured into a container, with a downward arrow indicating the drop (no text or symbols)
natural_image
Diagram of a vehicle interior showing intake manifold, exhaust manifold, and intake tray (no text or labels)
natural_image
Diagram of a mechanical device with an upward arrow indicating direction (no text or symbols present)

natural_image
Diagram showing a mechanical device with a rod and arrow, labeled '17' (no text or symbols on the diagram itself)
natural_image
Diagram of a mechanical device with an arrow indicating leftward movement, no text or symbols present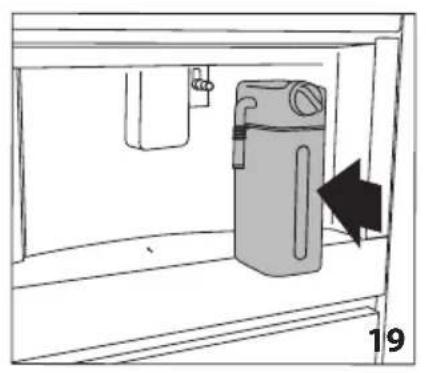
natural_image
Diagram of a water dispenser with a bag inside a container, showing airflow direction (no text or symbols)
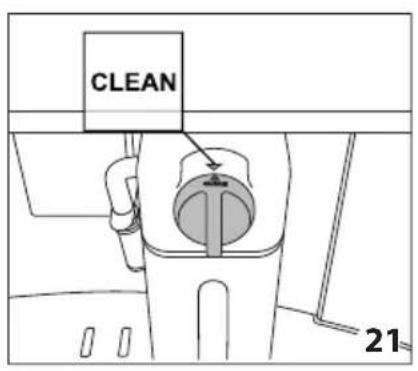

natural_image
Line drawing of a water tap pouring liquid into a beaker (no text or symbols)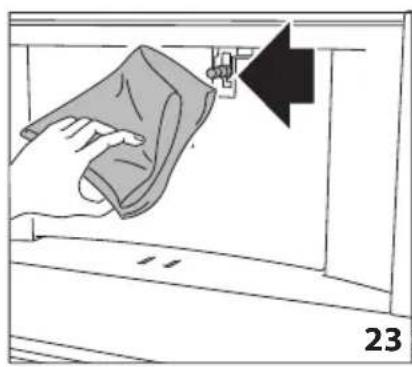
natural_image
Illustration of a hand cleaning a garment with a cloth, showing a black arrow pointing to the fabric (no text or symbols)
natural_image
Two mechanical assembly diagrams showing a tool pressing down and falling, with no visible text or symbols.
natural_image
Technical line drawing of a mechanical device interior with no visible text or symbols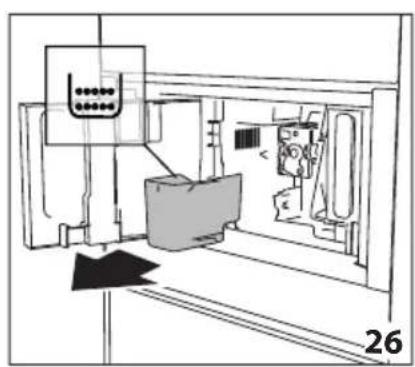
natural_image
Technical line drawing of a mechanical assembly with no visible text or symbols
natural_image
Technical line drawing of a mechanical assembly or enclosure with no visible text or symbols
natural_image
Technical line drawing of a mechanical assembly with a magnified inset showing a component (no text or symbols)
natural_image
Illustration of hands using a tool to adjust or install electronic components inside a device (no text or symbols visible)
natural_image
Line drawing of a hand using a screwdriver to adjust or install a mechanical component (no text or symbols present)
natural_image
Illustration of a hand using a sewing machine to adjust fabric (no text or symbols visible)
natural_image
Diagram of a mechanical device inside a cabinet, showing internal components and an arrow indicating direction (no text or symbols)
natural_image
Technical diagram of a mechanical device with a black arrow indicating a specific component (no text or symbols present)
natural_image
Illustration of hands holding a device with arrows indicating movement or force direction (no text or symbols)
natural_image
Technical diagram of a mechanical device with directional arrows indicating movement or force (no text or symbols present)

natural_image
Line drawing of a hand holding a tool next to a mechanical component (no text or symbols)
natural_image
Line drawing of a hand holding a water tap with a valve, labeled 38 and 39 (no text or symbols on the diagram itself)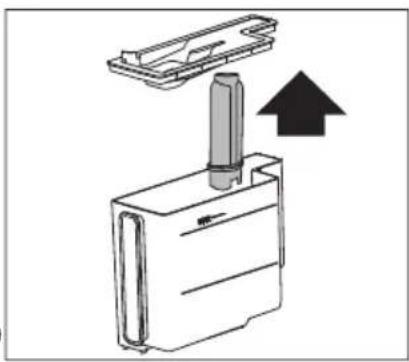
natural_image
Diagram of a mechanical device with an upward arrow indicating motion or force (no text or symbols present)


natural_image
Diagram of a device with a handle and arrow indicating downward motion, labeled '42' (no text or symbols on the diagram itself)

natural_image
Line drawing of a faucet pouring water into a plastic bottle (no text or symbols)
natural_image
Top-down view of a coffee cup filled with coffee beans, placed on a dark surface with decorative border elements (no text or symbols)


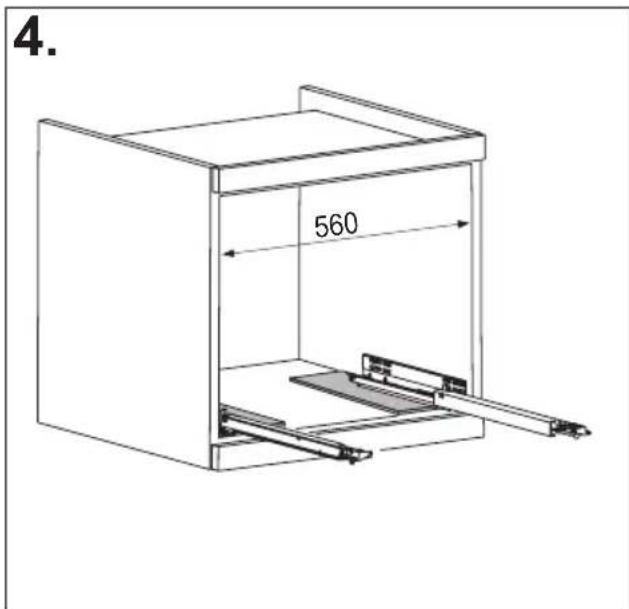
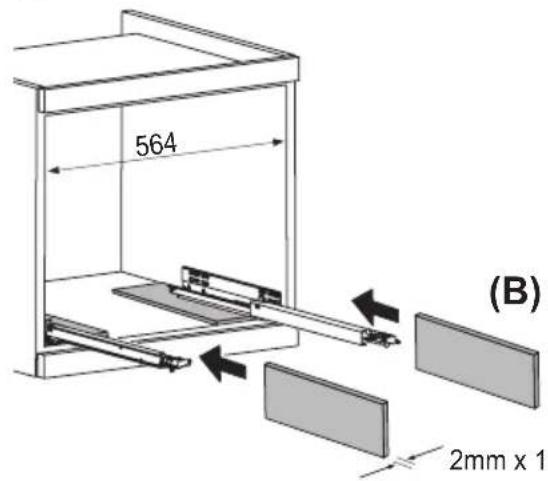


natural_image
Diagram of a 3D printer internal structure with arrows indicating rotation or assembly (no text or symbols present)


PREHL'AD
ÚVOD....17
natural_image
Illustration of a hand inserting a plug into an electrical socket (no text or symbols)

natural_image
Diagram of a refrigerator interior showing a door, front panel, and side panel with a hanging container (no text or symbols)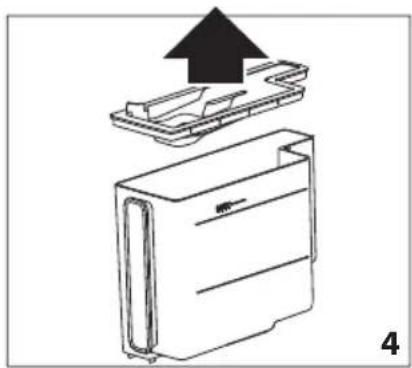
natural_image
Diagram of a device with an upward arrow indicating process, showing internal components (no text or symbols)
natural_image
Line drawing of a refrigerator with an inset showing a trash can (no text or symbols)
natural_image
Diagram of a refrigerator interior showing door, vent, and side view with an arrow indicating direction (no text or symbols)
natural_image
Diagram of a mechanical assembly with an arrow indicating direction, no text or symbols present
natural_image
Diagram of a water filtration or distillation setup with a bucket and pump, labeled with number 8 (no text or symbols on the diagram itself)


natural_image
Technical line drawing of a mechanical component with a magnified inset showing a circular feature (no text or symbols)
natural_image
Diagram of a device interior with a highlighted inset showing two black circular features (no text or symbols present)
natural_image
Simple line drawing of a coffee cup being poured into a container, with a downward arrow indicating the process (no text or symbols)
natural_image
Diagram of a vehicle interior showing intake manifold, exhaust manifold, and intake tray (no text or labels)
natural_image
Diagram of a mechanical device with an upward arrow indicating direction (no text or symbols present)

natural_image
Diagram showing a mechanical device with a rod and arrow, labeled '17' (no text or symbols on the device itself)
natural_image
Diagram of a mechanical device with an arrow indicating leftward movement, no text or symbols present
natural_image
Simple line drawing of a cabinet with an arrow indicating direction, no text or symbols present


natural_image
Line drawing of a water dispenser pouring liquid into a beaker (no text or symbols)
natural_image
Illustration of a hand cleaning a window with a cloth, showing a black arrow pointing to the handle (no text or symbols)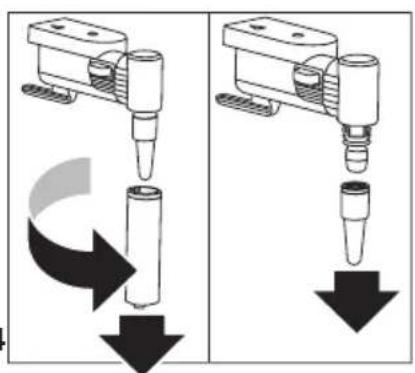
natural_image
Two identical diagrams showing a mechanical device with downward arrows indicating motion or force, no text or symbols present.
natural_image
Technical line drawing of a mechanical device interior with no visible text or symbols
natural_image
Technical line drawing of a mechanical assembly or machine component with no visible text or symbols
natural_image
Technical line drawing of a mechanical assembly or enclosure with no visible text or symbols
natural_image
Technical line drawing of a mechanical assembly with a magnified inset showing a component (no text or symbols)
natural_image
Illustration of hands using a tool to adjust or install electronic components inside a device (no text or symbols visible)
natural_image
Hand using a screwdriver to adjust or install a mechanical component (no text or symbols visible)
natural_image
Illustration of a hand using a sewing machine to adjust fabric (no text or symbols visible)
natural_image
Technical diagram of a mechanical device inside a cabinet, showing internal components and an arrow indicating direction (no text or symbols)
natural_image
Mechanical assembly diagram showing a piston mechanism with an arrow indicating direction (no text or symbols present)
natural_image
Illustration of hands holding a device with arrows indicating movement or force direction (no text or symbols)
natural_image
Technical diagram of a mechanical device with directional arrows indicating movement or force (no text or symbols present)

natural_image
Line drawing of a hand holding a tool next to a mechanical component (no text or symbols)
natural_image
Line drawing of a hand holding a water tap with a valve, labeled with numbers 38 and 39 (no text or symbols on the diagram itself)
natural_image
Diagram of a mechanical device with an upward arrow indicating motion or force (no text or symbols present)


natural_image
Diagram showing a mechanical component with a downward arrow indicating motion or assembly (no text or symbols present)

natural_image
Line drawing of a faucet pouring water into a plastic bottle (no text or symbols)