IN-88DDI - Incubator incubato - Free user manual and instructions
Find the device manual for free IN-88DDI incubato in PDF.


User questions about IN-88DDI incubato
0 question about this device. Answer the ones you know or ask your own.
Ask a new question about this device
Download the instructions for your Incubator in PDF format for free! Find your manual IN-88DDI - incubato and take your electronic device back in hand. On this page are published all the documents necessary for the use of your device. IN-88DDI by incubato.
USER MANUAL IN-88DDI incubato

m = 311 ;
DE
| Parameter description | Parameter value | |||
| Product name Egg incubator | ||||
| Model IN- | IN-48DDI | IN-56DDI | IN-96DDI | |
| Rated voltage [V]-[Frequency [Hz]) | 230/50 | |||
| Rated power [W] | 15 90 90 120 | |||
| Protection class | II | |||
| Protection rating IP | IPX4 | |||
| Capacity [hens' eggs] [pcs] | 7 48 56 96 | |||
| Automatic egg rotation Function | ---- Yes | |||
| Alarm function ---- Yes | ||||
| Fan Yes | ||||
| Egg canister Accessory powered by TxAA battery (Battery is not included) | Built-in Accessory powered by TxAA battery (Battery is not included) | |||
| Dimensions [mm] | 165 x165 x155 | 495 x471 x230 | 485 x460 x210 | 495 x477 x380 |
| Weight [kg] O/A 5.1 | 3.5 | 5.5 | ||
| Product name Egg incubator | ||||
| Model | IN-88DDI | IN-32DDI | IN-112DDI | IN-12DDI |
| Rated voltage [V]-[frequency [Hz]) | 230/50 | |||
| Rated power [W] | 100 | 90 | 120 40 | |
| Protection class | II | |||
| Protection rating IP | IPX4 | |||
| Capacity [hens' eggs] [pcs] | 88 | 32 | 112 12 | |
| Automatic egg rotation Function | ---- Yes | |||
- GENERAL DESCRIPTION
| Alarm function | - | Yes | ||
| Fan | Yes | |||
| Egg candler | Accessory powdered by 1xAA battery (Battery is not included) | Built-in | Accessory powered by 1xAA battery (Battery is not included) | Built-in |
| Dimensions [mm] | 490 x/100 x/180 | 350 x/160 x/195 | 495 x/70 x/385 | 260 x/70 x/170 |
| Weight [kg] | 1.4 | 2.75 | 5.6 | 1 |
The user manual is designed to assist in the safe and trouble-free use of the device. The product is designed and manufactured in accordance with strict technical guidelines, using state-of-the-art technologies and components. Additionally, it is produced in compliance with the most stringent quality standards.
DO NOT USE THE DEVICE UNLESS YOU HAVE
THOROUGHLY READ AND UNDERSTOOD THIS
To increase the product life of the device and to ensure trouble-free operation, use it in accordance with this user manual and regularly perform maintenance tasks. The technical data and specifications in this user manual are up to date. The manufacturer reserves the right to make changes associated with quality improvement. The device is designed to reduce noise emission risks to a minimum, taking into account technological progress and noise reduction opportunities.
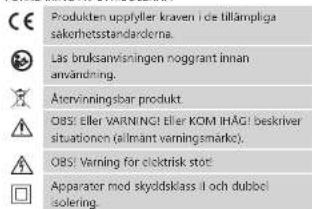
LEGEND
C
The product satisfies the relevant safety
standards.
Read instructions before use.
The product must be recycled.
A
WARNING OR CAUTION OR REMEMBER!
Applicable to the given situation (general)
A
ATTENTION! Electric shock warning!
□
Class II protection device with double insulation.
A
PLEASE NOTEI Drawings in this manual are for
Illustration purposes only and in some details may differ from the actual product.
The original operation manual is in German. Other language versions are translations from German.
2.USAGE SAFETY
A
ATTENION! Read all safety warnings and all
Constructions may result in an electric shock, fire and/or serious injury or even death.

22.03.2023
EN
The terms "device" or "product" are used in the warnings and instructions to refer to
2.1. ELECTRICAL SAFETY
a) The plug must fit the socket. Do not modify the plug in any way. Using original plugs and matching the socket, you can make changes to the socket.
b) Avoid touching earthed elements such as pipes, heaters, boilers and refrigerators. There is an increased risk of electric shock if the earthed device is exposed to rain, comes into direct contact with a wet surface or is operating in a damp environment. Water getting into the device increases the risk of damage to the device and of electric shock.
c) Do not touch the device with wet or damp hands.
d) Use the cable only for its designated use. Never use it to carry the device or to pull the plug out of a socket. Keep the cable away from heat sources, oil, sharp edges or moving parts. Damaged or tangled cables increase the risk of electric shock.
e) if using the device in a damp environment cannot be avoided, a residual current device (RCD) should be applied. The use of an RCD reduces the risk of electric shock.
Do not use the device if the power cord is damaged or shows obvious signs of wear. A damaged power cord should be replaced by a qualified electrician or the manufacturer's service centre.
g) ATTENTION DANGER TO LIFE! While cleaning, never immerse the device in water or other liquids.
2.2.SAFETY IN THE WORKPLACE
a) Make sure the workplace is clean and well lit. A messy or poorly lit workplace may lead to accidents. Try to think ahead, observe what is going on and use common sense when working with the device.
b) Do not use the device in a potentially explosive environment, for example in the presence of flammable liquids, gases or dust. The device generates sparks which may ignite dust or fumes.
c) If you discover damage or irregular operation, immediately switch the device off and report it to a supervisor without delay.
d) if there are any doubts as to the correct operation of the device, contact the manufacturer's support team.
e) Only the manufacturer's service point may repair the device. Do not attempt any repairs independently
In case of fire, use a powder or carbon dioxide (CO) as the source. The fire should be intended for use on live strictured charcoal to it to be
g) Please keep this manual available for future reference. If this device is passed on to a third party, the manufacturer will be responsible for any damage caused by the use of the device.
h) Keep packaging elements and small assembly parts in a place not available to children.
i) Keep the device away from children and animals.
REMEMBER! When using the device, protect children and other bystanders.
22.09.2023
23. PERSONAL SAFETY
a) Do not use the device when tired, ill or under the influence of alcohol, narcotics or medication which can significantly impair the ability to operate the device.
b) The device can be handled only by physically fit persons who are capable of handling it, properly trained, familiar with this manual and trained within the scope of occupational health and safety.
c) To prevent the device from accidentally switching on, make sure the switch is on the Off position before switching.
d) The device is not a toy. Children must be supervised to ensure that they do not play with the device.
2.A.SAFE DEVICE USE
a) Do not use the device if the ON/OFF switch does not function properly (does not switch the device on and off). Devices which cannot be switched on and off using the ON/OFF switch are hazardous, should not be carried out immediately.
b) Disconnect the device from the power supply before commencement of adjustment, cleaning and maintenance. Such a preventive measure reduces the risk of accidental activation.
c) When not in use, store in a safe place, away from children and people not familiar with the device who have not read the user manual. The device may pose a hazard in the hands of inexperienced users.
d) Keep the device in perfect technical condition. Before each use check for general damage and especially check for cracked parts or elements and for any other conditions which may impact the safe operation of the device. If damage is discovered, hand over the device for repair before use.
e) Keep the device out of the reach of children.
f) Device repair or maintenance should be carried out by qualified persons, only using original spare parts. This will ensure safe use.
g). To ensure the operational integrity of the device, do not remove factory-fitted guards and do not loosen any other equipment.
h): Do not touch articulated parts or accessories unless the device has been disconnected from the power source.
Do not move, adjust or rotate the device in the course of work.
1. Clean the device regularly to prevent stubborn grime from accumulating
k) The device is not a toy. Cleaning and maintenance may not be carried out by children without the consent of the parents.
b) It is forbidden to interfere with the structure of the device in order to change its parameters or frequencies.
m) Keep the device away from sources of fire and heat.
n) Before the first use, always verifies that the device is completely cleaned and free of any other elements that may affect the safety of embryonated eggs or chicks, e.g. the fans, are protected by covers.
a) Do not cover the device when in use.
b) Warning: Risk of fire.
q). Some parts of this appliance can get very hot. To avoid injury, be careful when touching these surfaces.
Inspect the water level in the egg incubator regularly. Fill with warm water.

s) Use a measuring cup when filling with water.
t) Always disconnect the egg incubator from power
when topping up with water and when not in use. u) In order to improve incubation observe generally accepted breeding principles.
ATTENTION! Despite the safe design of the device and its protective features, and despite the use of additional elements protecting the operator, there is still a slight risk of accident or injury when using the device. Stay alert and use common sense when using the device.
- USE GUIDELINES
The egg incubator is designed for incubating fertile avian eggs. The incubator keeps the eggs at the correct temperature and humidity required for the embryo to develop and hatch.
The user is liable for any damage resulting from nonintended use of the device!
3.1.DEVICE DESCRIPTION
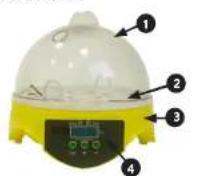
IN-7DDI model
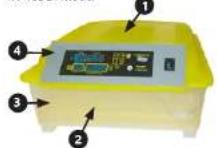
IN-48DDI model
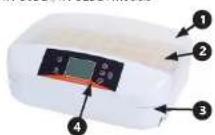
IN-56DDI IN-32DDI models
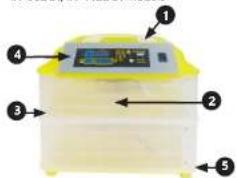
IN-96DDI, IN-112DDI models
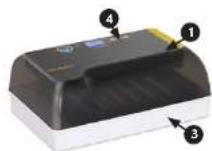
Model IN-96DPL IN-12DPI
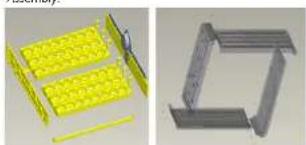
Assembly:
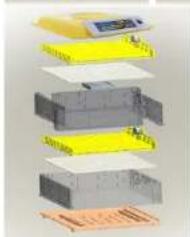
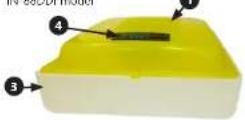
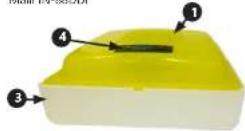
IN 88CDI model
22.03.2023
-
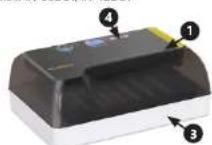
Cover
-
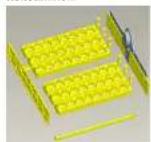
egg tray
- Housing
- Control panel
- Water inlets
IN-7DDI, IN-48DDI, IN-95DDI, IN-112DDI and IN-882DDI egg incubators include an egg cycler as an additional accessory. The IN-96DDI, IN-120DDI and IN-320DDI features a built-in egg cycler.
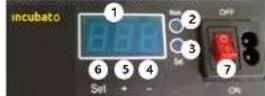
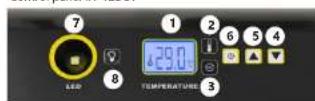
Control panel IN-70DI, IN-88DDI models
1.Temperature display
2. Work clocks
3. Set diode
4. Decrease value button
5.Increase value button
6. Ser burton
7. ON/OFF switch (Applies to model IN-88DDI only)
IN-48DDI, IN-95DDI, IN-112DDI models
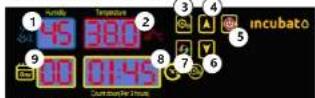
1.Humidity display
2. Temperature display
3. Set button
4.Incrase value button
5. ON/OFF switch
6.Decrease value button
7.8act button
8. Display showing time left until next egg rocking
5. Number of incubation days display
IN-56DD, IN-32DD models
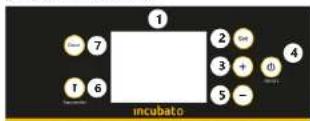
- Display
- Set button
3.Increase value button - ON/OFF switch
- Decrease value button
- Fong canglor switch
- Reset button
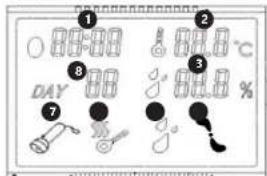
Display description:
- Time countdown until next egg rocking.
- Temperature
Humidity - Jan
- Low humidity alarm
- Heating on
- Ego candler light on
- Number of incubation days
Control panel (1) 10VDC
- Temperature display
- Work diodes
- Set diode
- Decrease value button
5.Increase value button - Set button
- Fen candler
- Eog canister switch
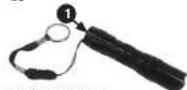
Egg cander
- ON/OFF switch
3.2 PREPARING FOR USE
APPLIANCE LOCATION
The temperature of environment must not be higher than 40^ , and the relative humidity should be less than 85% . Ensure good ventilation in the room in which the device is being used. There should be at least 10~cm distance between each side of the device and the wall or other objects. The device should always be used when positioned on an even, stable, clean, fireproof and dry surface, and be out of the reach of children and persons with limited mental and sensory functions. Position the device such that you always have access to the power plug. The power cord connected to the appliance must be properly grounded and correspond to the technical details on the product label!
3.3 DEVICE USE
The following tables present the summary of how many eggs of a particular type can be incubated simultaneously in the device and how they should be spaced.
| Model | IN-7001 | IN-46001 | IN-56001 | IN-58001 | IN-12001 | IN-32001 | IN-132001 | IN-68001 |
| The maximum number of hen eggs. | 7 | 48 | 56 | 96 | 12 | 32 | 112 | 88 |
| The maximum number of pigeon and quail eggs. | 7 | 48 | 56 | 96 | 35 | 32 | 112 | 132 |
| The maximum number of turkey and duck eggs. | 4 | 24 | 28 | 48 | 9 | 16 | 56 | 44 |
| The maximum number of goose eggs. | - | 16 | 18 | 32 | 4 | 10 | 38 | 29 |
| How should hens and pigeon eggs be spaced. | One egg in each egg tray hole. | - | ||||||
| How should turkey and duck eggs be spaced. | Leave one empty space (hole) between the eggs on the tray. | - | ||||||
| How should goose eggs be spaced. | Remove the egg tray and place the eggs on the net. | - | ||||||
IN-7DDI model
-
Remove cover and lift eog tray.
-
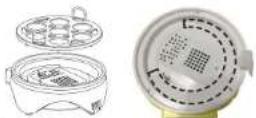
Pour water into the groove around the white mesh as (shown in the picture below).
ATTENTION: Do not pour water into the white mesh as that may damage the device!
EN
-
Attach cover
-
Connect the device to a power source.
-
Select the required temperature: press the SET' (8) button. The set' (3) diode will illuminate, indicating that the device is in settings mode. Use ^+ "S" and 一 ^ 一 4 buttons to select the Temperature. Use the SET' (6) button to confirm. The Work' (2) diode will come on.
-
Wait for the device to warm up (approx. 10-20 min.)
-
Gently arrange the eggs on the tray.
-
Inspect the water level in the egg incubator regularly.
IN-42DDI, IN-96DDI, IN-112DDI models IMPACT model. The main function will be only measured/ shown but can't be regulated.
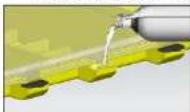
- Open the covers covering the water inlets at the bottom of the device. Pour water into the egg incubator. Make sure the drive mechanism does remains dry. Close the covers.
- Connect the device to a power source
- Use the On/Off (5) switch to turn the device on.
- An alarm will sound. Disable the alarm by pressing a button on the control panel.
- The device will automatically rock the eggs every 2 hours. The eggs are rocked to the left and right up to 45 degrees for 10 seconds. Do not lift the cover during automatic egg turning. Pay particular attention when using the incubator for the first time.
- Pressing the "reset" button (7) once makes the eggs rock and resets the timer which counts down to the next egg rocking (sets it back to 1:59).
- In order to reset the incubation days counter, press and hold buttons (3) and (4), then disconnect and connect the device to the power supply without releasing the buttons. Device's factory settings will be restored.
B. Setting the temperature:
The egg incubator's temperature factory setting is 38^
-Press the Set" (3) button - Use buttons (4) and (6) to set the heating temperature.
- Process the Set' (3) button to confirm the selection. 9.Setting alarm values and calibration
- To enter settings mode press and hold the .Set" (3) button for three seconds.
- Use buttons (4) and (6) to switch between the parameters shown in the table below.
EN
| Parameter: Parameter meaning Factory setting | ||
| AL Setting the low temperature alarm. | 1°C | |
| AH | Setting the high temperature alarm. | 1°C |
| AS | Setting the low humidity alarm. | 45% |
| CA | Thermometer calibration. | 0°C |
| HS | Setting the upper temperature limit. | 39.5°C |
| LS | Setting the lower temperature limit. | 30°C |
To enter settings of the selected parameter: press and hold the ,Set(3) button
- Use buttons (4) and (6) to set alarm values. Wait for the device to automatically return to the main me
- The alarm emits a sound signal. To disable the alarm, press a button on the control panel.
10. Wait for the device to warm up (approx. 10-20 min).
11. Gently arrange the eggs on the tray.
12. Inspect the water level in the egg incubator regularly, ATTENTION. This product IN-480DI does not feature cooling. This means the lowest internal temperature of the product is 35 degrees. The product is the ambient temperature around the product.
IN-56DDI, IN-32DDI models
1. Remove cover and lift egg tray. Carefully pour water into the groove. Close the cover:
2. Connect this device to a power source.
3. Use the On/Off (4) switch to turn the device on.
4. An alarm will sound. Disable the alarm by pressing a button on the control panel.
5. Setting the temperature:
The egg incubator's temperature factory setting is 38^ .
- Press the Set (2) button
- Use buttons ·^ (3) and ·^ (5) to set the heating temperature.
- Press the ,Set' (2) button to confirm the selection.
6. Setting alarm values and calibration - in accordance with operating instructions point 10 for IN-48DDI and IN-96DDI models
7. Pressing the reset button (T) once makes the eggs rock and resets the timer which counts down to the next egg rocking (sets it back to 1.59).
8. To reset the egg incubation days counter, press and hold the reset button (7) until the start screen appears. During the resetting procedure, do not release the depressed key after the beep goes off or during the countdown. Only when the start screen appears is the procedure completed correctly and the factory settings restored.
9. Wait for the device to warm up approx. 10-20 min.
10. Gently arrange the eggs on the tray.
11. Inspect the water level in the egg incubator regularly.
12. Use button (6) to activate the egg candler and check embryo development inside the egg.
IN-88DDI model
IMPORTANT! This model does not have humidity detection function, so the display show temperature only.
- Remove cover. Fill with water. Close the cover.
-
Connect the device to a power source.
-
Use the On/Off (7) switch to turn the device on.
-
Select the required temperature: press the .SET (6) button. The .set (3) diode will illuminate, indicating that the device is in settings mode. Use ,+ (5) and ,- (4) buttons to select the temperature. Use the .SET (6) button to confirm. The .Work (2) diode will come on.
-
Wait for the device to warm up (approx. 10-20 min).
-
Cently arrange the eggs on the tray.
-
Inspect the water level in the egg incubator regularly, to prevent it from drying out completely.
Tips for incubating eggs
Before incubating eggs, always check that the incubator is in operational condition and its temperature is maintained at 4^ .
- For best results, it's better to choose medium or small-sized eggs for hatching. Fertilized eggs for inculsion should be fresh and cleaned of impurities on the shell.
The proper method of placing eggs for hatching is to arrange them with the wider end upwards and the narrower end downwards, as shown in the figure below.
- To avoid hitting the egg with the lid, place large eggs in the middle of the tray and smaller ones on the sides. Always check that the egg is not too large to avoid accidental damage.
If the eggs are too large to place on the tray, it is recommended to remove the trays and arrange the fertilised eggs directly on the white grid (not applicable for the IN 7DDI model).
The water level in the incubator should be constantly monitored to ensure adequate humidity for hatching eggs.
The IN 88000 does not have an auto turn feature, so for the first 18 days, the eggs should be rotated manually.4-6 times a day.
If the ambient temperature drops below 20^, we recommend replacing the incubator in a unit made of insulating material, e.g. polystyrene foam, etc. If such insulation is not possible, it is recommended to place the incubator in a heated room or surround it with thick material such as blankets. - After 19 days of incubation, when the egg shells start to crack, it is recommended to remove the eggs from the egg tray and place them on a white grid to hatch the chicks (does not apply to the IN7DDI model).
- It often happens that some eggs do not completely hatched after 19 days, then you should wait another 2-3 days.
- When a chick gets stuck in the shell, spray the shell with warm water and help by gently pulling off the egg shell.
- After hatching, the chicks should be kept in a warm place and supplied with proper food and water.
IN-12DD1 MODEL
- Remove cover. Fill with water. Close the cover.
- Connect the device to a power source.
- Select the required temperature, press the SET (6) button. The set (3) diode will illuminate, indicating that the device is in settings mode. Use +^ (5) and -^ (4) buttons to select the temperature. Use the SET (6) button to confirm. The Work (2) diode will come on.
- Wait for the device to warm up (approx. 10-20 min.)
- gently arrange the eggs on the tray.
- Insect the water level in the egg incubator regularly
- The device will automatically rock the eggs every 2 hours. The eggs are rocked to the left and right for 10 seconds. Do not lift the cover during automatic egg turning. Pay particular attention when using the device.
- Setting alarm values and calibration
- To enter settings mode press and hold the Set button for three seconds.
- Use buttons (4) and (5) to switch between the parameters shown in the table below.
| Parameter Parameter meaning Factory setting | |
| AL Setting the low temperature alarm. | 1°C |
| AH Setting the high temperature alarm. | 1°C |
| CAU Thermometer calibration. | 0°C |
| HS Setting the upper temperature limit. | 39.5°C |
| LS Setting the lower temperature limit. | 30°C |
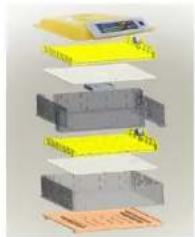
- ASSEMBLING THE EQUIPMENT
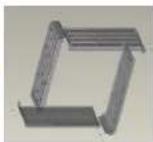
WARNING! An instructional video of the element assembly is available at the link / QR code provided below.



https://youtu.be/le2orwepKVU

22.03.2023
3.4.CLEANING AND MAINTENANCE
a) Always unplug the device before cleaning it.
b) Use only non-corrosive cleaners to clean the surface.
c) After cleaning the device, all parts should be dried
completely before using it again.
d) Store the unit in a dry, cool place, free from moisture and direct exposure to sunlight.
e) Do not spray the device with a water jet or submerge R in water.
fi: Do not allow water to get inside the device through vents in the housing of the device.
g) Clean the vents with a brush and compressed air.
h) The device must be regularly inspected to check its technical effectiveness and what can damage
i. Use a soft cloth for cleaning
i. Do not leave the battery in the device if it will not be
f Do not leave the battery in the device it will not be used for a longer period of time.
Disinfect the device after each use.
SAFE REMOVAL OF BATTERIES AND RECHARGEABLE BATTERIES IN720DI, IN48DDI, IN96DDI, IN112DDI, IN88DDI
An AA 1.5V battery is installed in the egg canner. Use the On/Off button to turn the canner off before attempting to remove the battery. Un screw the back of the housing and remove the battery, recycle batteries.
DISPOSING OF USED DEVICES
Do not dispose of this device in municipal waste systems. Hand it over to an electric and electrical device recycling and collection point. Check the symbol on the product, instruction manual and packaging. The plastics used to construct the device can be recycled in accordance with their markings. By choosing to recycle you are making a significant contribution to the protection of our environment. Contact local authorities for information on your local recycling facility.
INSTRUKCJA OBSUGI
DANE TECHNICZNE
MANUAL DE INSTRUCTIONS
ES
DATOS TECNICOS
3.Helvzce fef a fedeict
mea rct a SET agmbal 6A Work LED2
kigvllid
m = 311 ;
MallIN-96DDI,IN-112DDI

MaLLIN-95DOLN-12D0
Kokoamincn:
22.03.2023
MallIN-8BD01
2.2.SIKKERHEI PAA ARBEIDSPLASSEN
ai) Oppretthold roien pa arbeidepslassen og sarg for god belynsning. Uoronic og darell belynsning kan fere til ulykder. Du skare verefremsmt, passe je deg selv og bruke sunn formr naru du bruker ustyrst.
b) like bruk utsytre i oksposjonsfarlige atmosfarnor, for ekspelm i naeherten av brownbare vasserk. gesser ell stav. Ustyret skaper gnister som kan anteanne stav eryll nyk.
c) I tilielle skadie eler fell drift av utsret, slit dist av unidimbelt og rapporter det hi en autonserti.
d) Ta kontakt med productenservice, ivis du erit vill om utsyrct fungerer som det selek.
e) Produktet kan bare reparaciones av producunjent service. Ikke utfer reparacionje eigen handl
F1 tifelle bruinbrun uolukonde pulverulizing apparater er karbondiodiol (CO_2) 10543678900000000000000000000000000000000000000
g) Bohold brusansinienen for tromfdig reference, Hvi's utsyret overfars til redisperson, skal brusansinienen leveres sammen med utsysetr.
h) Elementer av embaialjen og smi monteringolementer skal oppbevarres utigiengelig for barn.
Holl utstyret unna barn og dyr
HUSKI Berskiih mgo tredjepersen mes du bruker utyset.
2.3.PERSONLIGSIKKERHET
a) Det er forbudt a bruke ursyt t i relte trethet, skydom, pvdrikng av alcohol, narkotka eter medisiner som i vesentlig grad begrencr even di & händelte ursyt.
b) Ustyret kam betjenes av personer i god fisyk stand, dytage og skilkeleg opplate personer som har lest而这 handlooken ar her fatt opplaering i HMS pa areoidslassen.
c) for a forhindi ulkitistik copostert sergat for at bokrakur av position far du kobler utsytet nil en stamiklrd.
d) Ustytret ar Ikke et leket. Barn skal ovekles for a silke at de Ikke leker med ustytret.
2.4.SIKKERBRUKAYUTSTYRET
a) iike bruk: uistret tviis ON/OIT-bryterien like fungerer som den skial uostret slas iike av og pa. Uostret som iike kan kontraleres med bryterien er farite, kan iike vare i drift no ma reperates.
b) Kobl's tystret fra stremorsyihingen fer justering, renjering og vedilichold. Dette reduser risikoen for utiliskit aktivering.
c) När utstydyr lik er i bkr. skal det opboevans utligiengeli for barn og personer som ilke er kjeit med utstydyr ellere各项bkransvinsingen. Ustydyr er färli h indende o urfebrar bkrüe.
d) Hold produit je god technik stand. Für hwt arborid, kontroller on dit er noen generelle skader aller skader pa bevegelege deleer sprekker i deleer og komponenter / oller andere fordrol som kan pänwicke sikker drift av utystrét. Hvi produceset der skadot, fä det repartir af bruk.
c) Utstyrot skal vaere utilgengelig for barn.
fi Reparason og vedleihold ov utystcr skal utfores av kvalifsete personer ved hjelp av originale reservoird. Dette vil garantare skik bruk
g). For a sikre ubstretys designede dritsintegretes, mal du kike ferebridinasterte delsaker el skr ula skr.
h) Det er forbudt a ta pe bevegeleg dei ller tibleher, med minde utstryet o koblet fra starmforsyrningen.
i) Det er forbudt a skye, flytte et roter utstryet men det er idrift.
Jongjar unstyt regelemessig for forhindre permanent tilmsmingssing.
k) Ustyrte or lde ic leketoy. Renginga od vegildiketh kulek ufores ic abum tyni bslv en voiesen person.
1 Det er forbudt a modifiere konstruktjponen av utstyrfet for a ndre dets parametere oller oppbyong.
m) Hold prodeltot breta frid og varmarkelde. n) Far stange gangs brauk ma du alitid kontrallere at utstryet or komplett og at alle bevegige elementer som kan paivirke sikcherket til befruktode egg ciler unger, for eksempel vifter, ber esbyttode mod skjermes.
o) Usttyret som er i dirft ma aldir tidekkcs.
p) ORS: Bransfarg
qi. Noen deier au styret kian bil velig varme For a unna skader, veer forsikg nar du beraren disse overlatene.
NO
r) Regelmessig kontrollender vonniväde i rugemaskinen. Diet antebefäle à helle varmt vann.
5. Det anebafeles a hellev vannd help av dispenser.
6. To koble altid rugemaksien fra stramforsingnare nara
7. To koble altid rugemaksien fiera stamforsingnare
u: For nikog inkubering av egg, folg generel; alszepterte avisanbefaliger.

OBS! Tl cross for at ulstrye er uniformet for a vare sikker, hat strelkeigke bysketytesmuikel og ekstra brukens-krhehtselementer, et det fortstatt en lien risiko for ulykke ell skade mens muiker ulstrye. Det anteblades a uvei foreskildegch und sunn formult nár du buhler det.
- REGLINE FOR BRUK
FÖRKLARING AV SYMBOLERNA
OBSI Iustracionema n i dnunda brusvansinir an endest avsedda som referecns och kain i vissa detalar skja sig nagot fran produktive virgula utseende. Den Urspriggna sprakevionen o vnunda brusvansinir an der tsya versionen.De andra sprakevionema ar overaattingar fran tsya.
2. SAKER ANVANDINING
NAMEPLATE TRANSLATIONS
| INCUBATO |
| #PRODUCT NAME LGG INCUBATOR |
| #MODEL |
| #VOLTAGE / FREQUENCY 230 V- / 50 r.h |
| #POWER |
| #PRODUCTION YEAR |
| #SERIAL NO. |
| 1 | 2 | 3 | |
| EN | Produkt Name | Model | Voltage/Frequency |
| DE | Produktname | Modell | Spannung/Frequenz |
| PL | Nazwa produktu | Model | Napićce/Czostotilovost |
| CZ | Název vyroblu | Model | Jmenovite napojednapiš/Frakvence |
| FR | Nom du produit | Modèle | Tension/Frequency |
| II | Nome del prodotto | Modelllo | Tensione/Frequency |
| ES | Nombre del produit | Modelolo | Voltaje/Frecuencia |
| HU | Termék neve | Modell | Fesztalség/Nyomatěk kikapcsolasi |
| DA | Produktnavn | Model | Spending/Trekvens |
| FIN | Tuolenimi | Mall | Jannite [V-/-/Taejus] [Hz] |
| NL | Produktnaam | Modell | Spanning [V-/-]/Frequencie [Hz] |
| SE | Produktnamm | Modell | Spanning [V-/-]/Frokkvens [Hz] |
| PT | Nome do produto | Modello | Tensiono [V-/-]/Frequência [Hz] |
| NOR | Produktnavn | Modell | Spensing [V-/-]/Frokkvens [Hz] |
| 4567 | ● | ● | ● | |
| EN Power Production year: Serial No. Manufacturer | ||||
| DF Leistung Produktionsjahr Ordnungsummer Hersteller | ||||
| PL Moc Rok produktij | Nummer seri# | Producent | ||
| CZ Jemovity vkon | Rok vroby | Seriove dsko | Vyrobce | |
| FR Russland | Anne de produzition | Numero de series | Fabricant | |
| IT Polenza | Anno di produzione | Numero di series | Produktive | |
| ES Patencia | Afo de produzione | Numero de series | Fabricante | |
| HU Telisztmemy | Gyartás éve | Gyertás szam | Gyáro | |
| DA Effekt | Produktionsär | Seriennummer | Producent | |
| FIN Tehu | Valmisusvuosi | Sarjanumero | Valmistaja | |
| NL Vermogen | Productiejaar | Seriennummer | Producent | |
| SE Effekt | Produktionsär | Seriennummer | Tillvorkare | |
| PT Potência | Ano de Produção | Numero de série | Productor | |
| NOR Effekt | Produksgonsär | Seriennummer | Producent | |

22.03.2023
22.03.2023

110111
NOTES/NOTIZEN NOTES/NOTIZEN

22.03.2023
22.03.2023

For the disposal of the device please consider and act according to the national and local rules and regulations.
CONTACT
expondo Polska sp. z o.o. sp. k.