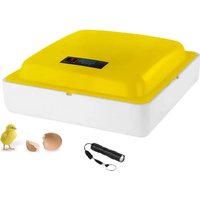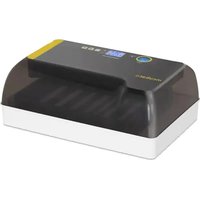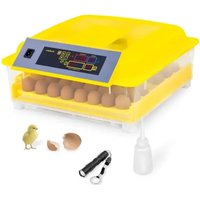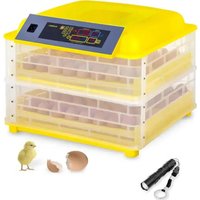
IN-96DDI - Incubator incubato - Free user manual and instructions
Find the device manual for free IN-96DDI incubato in PDF.


User questions about IN-96DDI incubato
0 question about this device. Answer the ones you know or ask your own.
Ask a new question about this device
Download the instructions for your Incubator in PDF format for free! Find your manual IN-96DDI - incubato and take your electronic device back in hand. On this page are published all the documents necessary for the use of your device. IN-96DDI by incubato.
USER MANUAL IN-96DDI incubato
| Parameter description | Parameter value | |||
| Product name Egg incubator | ||||
| Model IN- | IN-48DDI | IN-56DDI | IN-96DDI | |
| Rated voltage [V]-[Frequency [Hz]) | 230/50 | |||
| Rated power [W] | 15 90 90 120 | |||
| Protection class | II | |||
| Protection rating IP | IPX4 | |||
| Capacity [hens' eggs] [pcs] | 7 48 56 96 | |||
| Automatic egg rotation Function | ---- Yes | |||
| Alarm function ---- Yes | ||||
| Fan Yes | ||||
| Egg canister Accessory powered by TxAA battery (Battery is not included) | Built-in Accessory powered by TxAA battery (Battery is not included) | |||
| Dimensions [mm] | 165 x165 x155 | 495 x471 x230 | 485 x460 x210 | 495 x477 x380 |
| Weight [kg] O/A 5.1 | 3.5 | 5.5 | ||
| Product name Egg incubator | ||||
| Model | IN-88DDI | IN-32DDI | IN-112DDI | IN-12DDI |
| Rated voltage [V]-[frequency [Hz]) | 230/50 | |||
| Rated power [W] | 100 | 90 | 120 40 | |
| Protection class | II | |||
| Protection rating IP | IPX4 | |||
| Capacity [hens' eggs] [pcs] | 88 | 32 | 112 12 | |
| Automatic egg rotation Function | ---- Yes | |||
- GENERAL DESCRIPTION
| Alarm function | - | Yes | ||
| Fan | Yes | |||
| Egg candler | Accessory powdered by 1xAA battery (Battery is not included) | Built-in | Accessory powered by 1xAA battery (Battery is not included) | Built-in |
| Dimensions [mm] | 490 x/100 x/180 | 350 x/160 x/195 | 495 x/70 x/385 | 260 x/70 x/170 |
| Weight [kg] | 1.4 | 2.75 | 5.6 | 1 |
The user manual is designed to assist in the safe and trouble-free use of the device. The product is designed and manufactured in accordance with strict technical guidelines, using state-of-the-art technologies and components. Additionally, it is produced in compliance with the most stringent quality standards.
DO NOT USE THE DEVICE UNLESS YOU HAVE
THOROUGHLY READ AND UNDERSTOOD THIS
USERMANUAL
To increase the product life of the device and to ensure trouble-free operation, use it in accordance with this user manual and regularly perform maintenance tasks. The technical data and specifications in this user manual are up to date. The manufacturer reserves the right to make changes associated with quality improvement. The device is designed to reduce noise emission risks to a minimum, taking into account technological progress and noise reduction opportunities.
LEGEND

The product satisfies the relevant safety
standards

Read instructions before use.

The product must be recycled.

WARNING OR CAUTION OR REMEMBER!

Applicable to the given situation Igeneral

ATTENION:Electric shock warning

Class II protection device with double insulation

PLEASE NOTEI Drawings in this manual are for

original operation manual is in German. Other

age versions are translations from German.
2. USEAGE SAFETY

ATTENTION! Read all safety warnings and all instructions carefully.
Instructions. Failure to follow the warnings and instructions may result in an electric shock fire and/ or

or serious injury or even death
22.03.2023
The terms "device" or "product" are used in the warnings and instructions to refer to
2.1. ELECTRICAL SAFETY
a) The plug must fit the socket. Do not modify the plug in any way. Using original plugs and matching the socket, you can make changes to the socket.
b) Avoid touching earthed elements such as pipes, heaters, boilers and refrigerators. There is an increased risk of electric shock if the earthed device is exposed to rain, comes into direct contact with a wet surface or is operating in a damp environment. Water getting into the device increases the risk of damage to the device and of electric shock.
c) Do not touch the device with wet or damp hands. d) Use the cable only for its designated use. Never use it to carry the device or to pull the plug out of a socket. Keep the cable away from heat sources, oil, sharp edges or moving parts. Damaged or tangled cables increase the risk of electric shock.
e) If using the device in a damp environment cannot be avoided, a residual current device (RCD) should be applied. The use of an RCD reduces the risk of electric shock.
Do not use the device if the power cord is damaged or shows obvious signs of wear. A damaged power cord should be replaced by a qualified electrician or the manufacturer's service centre.
g) ATTENTION DANGER TO LIFE! While cleaning, never immerse the device in water or other liquids.
2.2.SAFETY IN THE WORKPLACE
a) Make sure the workplace is clean and well lit. A messy or poorly lit workplace may lead to accidents. Try to think ahead, observe what is going on and use common sense when working with the device.
b) Do not use the device in a potentially explosive environment, for example in the presence of flammable liquids, gases or dust. The device generates sparks which may ignite dust or fumes.
c) if you discover damage or irregular operation, immediately switch the device off and report it to a supervisor without delay.
d) if there are any doubts as to the correct operation of the device, contact the manufacturer's support service.
e) Only the manufacturer's service point may repair the device. Do not attempt any repairs independently
In case of firc, use a powder or carbon dioxide (CO) as the only other material intended for use on live material (carbon dioxide) it is to be
g) Please keep this manual available for future reference. If this device is passed on to a third party, the manual must be passed on with it.
h) Keep packaging elements and small assembly parts in a place not available to children.
i) Keep the device away from children and animals.

REMEMBERI When using the device, protect children and other bystanders.
2.3. PERSONAL SAFETY
a) Do not use the device when tired, ill or under the influence of alcohol, narcotics or medication which can significantly impair the ability to operate the device.
b) The device can be handled only by physically fit persons who are capable of handling it, properly trained, familiar with this manual and trained within the scope of occupational health and safety.
c) To prevent the device from accidentally switching on, make sure the switch is on the OFF position before connecting to a power source.
d) The device is not a toy. Children must be supervised to ensure that they do not play with the device.
2.A.SAFE DEVICE USE
a) Do not use the device if the ON/OFF switch does not function properly (does not switch the device on and off). Devices which cannot be switched on and off using the device should be avoided, and any hazardous, should not be propagated and must be replaced.
b) Disconnect the device from the power supply before commencement of adjustment, cleaning and maintenance. Such a preventive measure reduces the risk of accidental activation.
c) When not in use, store in a safe place, away from children and people not familiar with the device who have not read the user manual. The device may pose a hazard in the hands of inexperienced users.
d) Keep the device in perfect technical condition. Before each use check for general damage and especially check for cracked parts or elements and for any other conditions which may impact the safe operation of the device. If damage is discovered, hand over the device for repair before use.
c) Keep the device out of the reach of children.
fi Device repair or maintenance should be carried out by qualified persons, only using original spare parts. This will ensure safe use.
g) To ensure the operational integrity of the device, do not remove factory-fitted guards and do not loosen any screws.
h) Do not touch articulated parts or accessories unless the device has been disconnected from the power source.
b Do not move, adjust or rotate the device in the course of work.
j. Clean the device regularly to prevent stubborn grime from accumulating
k) The device is not a toy. Cleaning and maintenance may not be carried out by children without supervision by an adult person.
It is forbidden to interfere with the structure of the device in order to change its parameters or construction.
m) Keep the device away from sources of fire and heat. n) Before the first use, always verify that the device is complete and that all movable elements that may affect the safety of embryonated eggs or chicks, e.g. the fans, are protected by covers.
a) Do not cover the device when in use.
b) Warning: Risk of fire.
q): Some parts of this appliance can get very hot. To avoid injury, be careful when touching these surfaces.
Inspect the water level in the egg incubator regularly. Fill with warm water.


22.03.2023
22.03.2023
s) Use a measuring cup when filling with water.
t) Always disconnect the egg incubator from power when topping up with water and when not in use. u) In order to improve incubation observe generally accepted breeding principles.
ATTENTION! Despite the safe design of the device and its protective features, and despite the use of additional elements protecting the operator, there is still a slight risk of accident or injury when using the device. Stay alert and use common sense when using the device.
- USE GUIDELINES
The egg incubator is designed for incubating fertile avian eggs. The incubator keeps the eggs at the correct temperature and humidity required for the embryo to develop and hatch.
The user is liable for any damage resulting from nonintended use of the device!
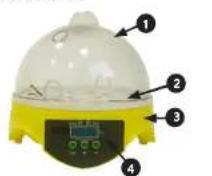
3.1.DEVICE DESCRIPTION IN-7DDI model
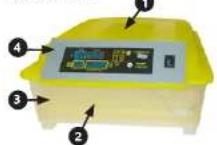
IN-48DD model
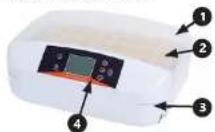
IN-56DDI, IN-32DDI models
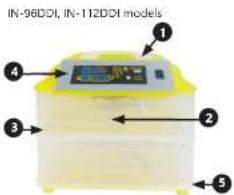
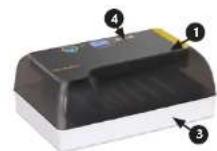
Model IN-96DPL IN-12DPI
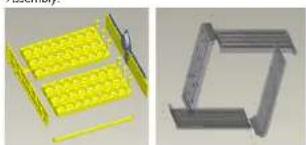
Assembly
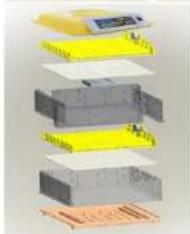
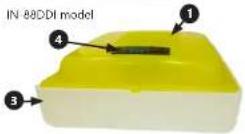
22.03.2023
- Cover
- Egg tray
- Housing 4. Control panel
5.Water injec
IN-7DDI, IN-48DDI, IN-95DDI, IN-112DDI and IN-882DDI egg incubators include an egg candler as an additional accessory. The IN-56DDI, IN-12DDI and IN-32DDI features a built-in egg candler.
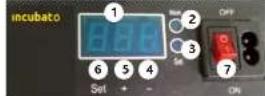
Control panel IN-7DDI, IN-88DDI models
- Temperature display
2.Work cloo# 3. Self-dates - Set dicSet A.
- Decrease value button 5.
- set burnout
- ON/OFF switch (Applies to model IN-88DDI only)
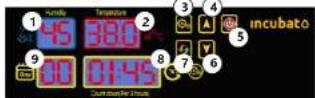
IN-45DDI, IN-96DDI, IN-112DDI models
- Humidity display
2.Temperature - Set button
4.Incrcasevalue button - ON/OFF switch 6. F1
- Decrease value button 7. Bountt button
- Display showing time left until next egg rocking
- Number of incubation days display
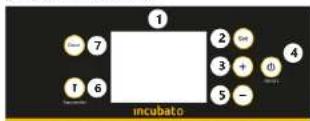
IN-56DD, IN-32DD models
- Display
- Set button
3.Incrasevaluebutton - ON/OFF switch
- Decrease value button
- Egg canler switch
- Reset button
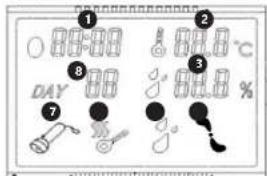
Display description:
- Time countdown until next egg rocking. 2. Temperature
2 Temperature 3 Humidity
4.10
5.Low humidity alarm - Heating on
- too slender
Number of incubation days
Control
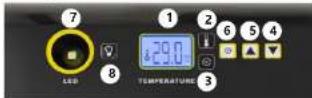
Control panel IN-12CDI
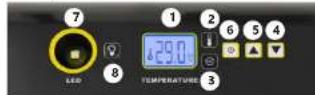
-
Temperature display
-
Work diodes
- Set diode
- Decrease value button
5.Increase value button - Set button
- Fee cancellation
- Eog canister switch
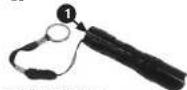
Egg cander
1. ON/OFF switch
3.2. PREPARING FOR USE
APPLIANCE LOCATION
The temperature of environment must not be higher than 40^ and the relative humidity should be less than 85% . Ensure good ventilation in the room in which the device is being used. There should be at least 10~cm distance between each side of the device and the wall or other objects. The device should always be used when positioned on an oven, stable, clean, freproof and oily surface, and be out of the reach of children and persons with limited mental and sensory functions. Position the device such that you always have access to the power plug. The power cord connected to the appliance must be properly grounded and correspond to the technical details on the product label!
3.3 DEVICE USE
The following tables present the summary of how many eggs of a particular type can be incubated simultaneously in the device and how they should be spaced.
| Model | IN-7001 | IN-46001 | IN-56001 | IN-58001 | IN-12001 | IN-32001 | IN-132001 | IN-68001 |
| The maximum number of hen eggs. | 7 | 48 | 56 | 96 | 12 | 32 | 112 | 88 |
| The maximum number of pigeon and quail eggs. | 7 | 48 | 56 | 96 | 35 | 32 | 112 | 132 |
| The maximum number of turkey and duck eggs. | 4 | 24 | 28 | 48 | 9 | 16 | 56 | 44 |
| The maximum number of goose eggs. | - | 16 | 18 | 32 | 4 | 10 | 38 | 29 |
| How should hens and pigeon eggs be spaced. | One egg in each egg tray hole. | - | ||||||
| How should turkey and duck eggs be spaced. | Leave one empty space (hole) between the eggs on the tray. | - | ||||||
| How should goose eggs be spaced. | Remove the egg tray and place the eggs on the net. | - | ||||||
IN-7DDI model
-
Remove cover and lift eog tray.
-
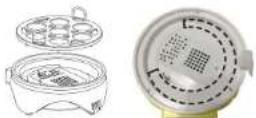
Pour water into the groove around the white mesh as shown in the picture below).
ATTENTION: Do not pour water into the white mesh as that may damage the device!
EN
-
Attach cover
-
Connect the device to a power source.
-
Select the required temperature: press the SET' (8) button. The set' (3) diode will illuminate, indicating that the device is in settings mode. Use ^+ "S" and 一 ^ 一 4 buttons to select the Temperature. Use the SET' (6) button to confirm. The Work' (2) diode will come on.
-
Wait for the device to warm up (approx. 10-20 min.)
-
Gently arrange the eggs on the tray.
-
Inspect the water level in the egg incubator regularly.
IN-42DDI, IN-96DDI, IN-112DDI models IMPACT model. The main function will be only measured/ shown but can't be regulated.
- Open the covers covering the water inlets at the bottom of the device. Pour water into the egg incubator. Make sure the drive mechanism does remains dry. Close the covers.
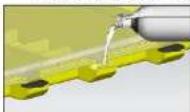
- Connect the device to a power source
- Use the On/Off (5) switch to turn the device on.
- An alarm will sound. Disable the alarm by pressing a button on the control panel.
- The device will automatically rock the eggs every 2 hours. The eggs are rocked to the left and right up to 45 degrees for 10 seconds. Do not lift the cover during automatic egg turning. Pay particular attention when using the incubator for the first time.
- Pressing the "reset" button (7) once makes the eggs rock and resets the timer which counts down to the next egg rocking (sets it back to 1:59).
- In order to reset the incubation days counter, press and hold buttons (3) and (4), then disconnect and connect the device to the power supply without releasing the buttons. Device's factory settings will be restored.
B. Setting the temperature:
The egg incubator's temperature factory setting is 38^
-Press the Set" (3) button - Use buttons (4) and (6) to set the heating temperature.
- Process the Set' (3) button to confirm the selection. 9.Setting alarm values and calibration
- To enter settings mode press and hold the .Set" (3) button for three seconds.
- Use buttons (4) and (6) to switch between the parameters shown in the table below.
EN
| Parameter: Parameter meaning Factory setting | ||
| AL Setting the low temperature alarm. | 1°C | |
| AH | Setting the high temperature alarm. | 1°C |
| AS | Setting the low humidity alarm. | 45% |
| CA | Thermometer calibration. | 0°C |
| HS | Setting the upper temperature limit. | 39.5°C |
| LS | Setting the lower temperature limit. | 30°C |
To enter settings of the selected parameter: press and hold the ,Set(3) button
- Use buttons (4) and (6) to set alarm values. Wait for the device to automatically return to the main me
- The alarm emits a sound signal. To disable the alarm, press a button on the control panel.
10. Wait for the device to warm up (approx. 10-20 min).
11. Gently arrange the eggs on the tray.
12. Inspect the water level in the egg incubator regularly, ATTENTION. This product IN-480DI does not feature cooling. This means the lowest internal temperature of the product is 35 to 40 degrees. The product is the ambient temperature around the product.
IN-56DDI, IN-32DDI models
1. Remove cover and lift egg tray. Carefully pour water into the groove. Close the cover:
2. Connect this device to a power source.
3. Use the On/Off (4) switch to turn the device on.
4. An alarm will sound. Disable the alarm by pressing a button on the control panel.
5. Setting the temperature:
The egg incubator's temperature factory setting is 38^
- Press the Set (2) button
- Use buttons ·^ (3) and ·^ (5) to set the heating temperature.
- Press the ,Set' (2) button to confirm the selection.
6. Setting alarm values and calibration - in accordance with operating instructions point 10 for IN-48DDI and IN-96DDI models
7. Pressing the reset button (T) once makes the eggs rock and resets the timer which counts down to the next egg rocking (sets it back to 1.59).
8. To reset the egg incubation days counter, press and hold the reset button (7) until the start screen appears. During the resetting procedure, do not release the depressed key after the beep goes off or during the countdown. Only when the start screen appears is the procedure completed correctly and the factory settings restored.
9. Wait for the device to warm up approx. 10-20 min.
10. Gently arrange the eggs on the tray.
11. Inspect the water level in the egg incubator regularly.
12. Use button (6) to activate the egg candler and check embryo development inside the egg.
IN-88DDI model
IMPORTANT! This model does not have humidity detection function, so the display show temperature only.
- Remove cover. Fill with water. Close the cover.
-
Connect the device to a power source.
-
Use the On/Off (7) switch to turn the device on.
-
Select the required temperature: press the .SET (6) button. The .set (3) diode will illuminate, indicating that the device is in settings mode. Use ,+ (5) and ,- (4) buttons to select the temperature. Use the .SET (6) button to confirm. The .Work (2) diode will come on.
-
Wait for the device to warm up (approx. 10-20 min).
-
Cently arrange the eggs on the tray.
-
Inspect the water level in the egg incubator regularly, to prevent it from drying out completely.
Tips for incubating eggs
Before incubating eggs, always check that the incubator is in operational condition and its temperature is maintained at 4^ .
- For best results, it's better to choose medium or small-sized eggs for hatching. Fertilized eggs for inculsion should be fresh and cleaned of impurities on the shell.
The proper method of placing eggs for hatching is to arrange them with the wider end upwards and the narrower end downwards, as shown in the figure below.
- To avoid hitting the egg with the lid, place large eggs in the middle of the tray and smaller ones on the sides. Always check that the egg is not too large to avoid accidental damage.
If the eggs are too large to place on the tray, it is recommended to remove the trays and arrange the fertilised eggs directly on the white grid (not applicable for the IN 7DDI model).
The water level in the incubator should be constantly monitored to ensure adequate humidity for hatching eggs.
The IN 88000 does not have an auto turn feature, so for the first 18 days, the eggs should be rotated manually.4-6 times a day.
If the ambient temperature drops below 20^, we recommend replacing the incubator in a unit made of insulating material, e.g. polystyrene foam, etc. If such insulation is not possible, it is recommended to place the incubator in a heated room or surround it with thick material such as blankets. - After 19 days of incubation, when the egg shells start to crack, it is recommended to remove the eggs from the egg tray and place them on a white grid to hatch the chicks (does not apply to the IN7DDI model).
- It often happens that some eggs do not completely hatched after 19 days, then you should wait another 2-3 days.
- When a chick gets stuck in the shell, spray the shell with warm water and help by gently pulling off the egg shell.
- After hatching, the chicks should be kept in a warm place and supplied with proper food and water.
EN
IN-12DD1 MODEL
1. Remove cover. Fill with water. Close the cover.
2. Connect the device to a power source.
3. Select the required temperature, press the SET (6) button. The set (3) diode will illuminate, indicating that the device is in settings mode. Use +^ (5) and -^ (4) buttons to select the temperature. Use the SET (6) button to confirm. The Work (2) diode will come on.
4. Wait for the device to warm up (approx. 10-20 min.)
5. gently arrange the eggs on the tray.
6. Insect the water level in the egg incubator regularly
7. The device will automatically rock the eggs every 2 hours. The eggs are rocked to the left and right for 10 seconds. Do not lift the cover during automatic egg turning. Pay particular attention when using the device.
6. Setting alarm values and calibration
- To enter settings mode press and hold the Set button for three seconds.
- Use buttons (4) and (5) to switch between the parameters shown in the table below.
| Parameter | Parameter meaning | Factory setting |
| AL Setting | the low temperature alarm. | 1°C |
| AH Setting | the high temperature alarm. | 1°C |
| CAU Thermometer calibration. | 0°C | |
| HS Setting | the upper temperature limit. | 39.5°C |
| LS Setting | the lower temperature limit. | 30°C |
- ASSEMBLING THE EQUIPMENT
WARNING! An instructional video of the element assembly is available at the link / QR code provided below.

scan it
https://youtu.be/le2orwepKVU
3.4.CLEANING AND MAINTENANCE
a) Always unplug the device before cleaning it.
b) Use only non-corrosive cleaners to clean the surface.
c) After cleaning the device, all parts should be dried completely before using it again.
d) Store the unit in a dry, cool place, free from moisture and direct exposure to sunlight.
e) Do not spray the device with a water jet or submerge it in water.
fi: Do not allow water to get inside the device through vents in the housing of the device.
g) Clean the vents with a brush and compressed air fan.
h) The device must be regularly inspected to check its technical effectiveness and what can damage
i. Use a soft cloth for cleaning
j) Do not leave the battery in the device if it will not be used for a longer period of time.
k) Disinfect the device after each use.
SAFE REMOVAL OF BATTERIES AND RECHARGEABLE BATTERIES IN720DI, IN48DDI, IN96DDI, IN112DDI, IN88DDI
An AA 1.5V battery is installed in the egg canner. Use the On/Off button to turn the canner off before attempting to remove the battery. Un screw the back of the housing and remove the battery, recycle batteries.
DISPOSING OF USED DEVICES
Do not dispose of this device in municipal waste systems. Hand it over to an electric and electrical device recycling and collection point. Check the symbol on the product, instruction manual and packaging. The plastics used to construct the device can be recycled in accordance with their markings. By choosing to recycle you are making a significant contribution to the protection of our environment. Contact local authorities for information on your local recycling facility.

22.03.2023
INSTRUKCJA OBSLUGI
DANE TECHNICZE
Cyladaci panel Model IN-12DDI
Tiny are inlubcvi jace
Pfed inkubaci vajec vzdy zkontrolujte technickou
Uinnost inkubatoru a spravmost funkci zalizen
Pro dusalaen nelepeish vysledk je lepi zvulit naśadovace stve strédnó nebo meile vioklst. Oplodnena veje uce rcnpa pro inkubir by mela byt Cersteva bez nolstot na skofakchek.
Nasadovvejcevkladeje do inkubatoru sirsi ranou
narrou a spickou dol, jaki znezomeno na orzaku nife.

Aby nodosi ke kontaku vujec s wikem, umistrevec vietje voce do strudr ccast zasobnika a menje vise pre stranach. Vzady krotkulje, zda vuce nej pifila velke, alvedy noso i nahodneu poikogzeni.
- Pokud jsou vegie prilil waki na to ayohla byt umlstna na podnes, dopuroujce ye jyvmut zasobniky na vegie a uspofad opclodnene vajkica prime na hilo miu kuk (copoiat model INZDD)
Hladna vody v kinkubotu bya mely bit neustile kontrlovana,aby blya pro naedova voje zajitena odovicijvichost.
IN 88DDI nomi funki automatickecho tatae, taek de nvnich 18 dni by seveje meda oiaet ruine 4-6krat denne
Kieske II okkoli tepola pod 20^ ,dopoujocme. incubator umisti de izolainimo materiali, jako napi, polystyrene nebo izolaino peni. Poku neni umisti de takevoho izolainno materiali moze, dopoujocme ji primitem de yvihre mistrosti neba ji zabili de silneho materiali jako napi, dewy.
- Po 19 eineh inkubace, kzy zashov praskat vojneje skoraplike, se doporukujy wjmout vjes z podnosna na vojea umistit je na hilo skitu, aby se kufatska wylihla (neplat promln IN-TDD)
Casta so stava, ze se nekatriva poje 19 dinchel uipne neynihnuilv, v tom pivadre pojckje jeste 2-3 dyr.
Kdyz kuriaku uizne ve skihper, postikeje ho teglou vodou a pomozte mu jemn stahovanim snykiny.
- Pe yilinjuni by kufata melia biet uchovsina na teplim misie a yizvivana, choshinou poutarau a voudou.
ModelIN-12DDI
1 Sejmete viko, Nalji te vccu. Zavreteviko.
2. Zarzeni pripojekelektricemu napajeni


cz
- Nastavlete pozadovanov leplotu: stasisnefte lactiko SET*6), Rozsvilte konstaflo SET*1) (inokujic), ze zaizenti ne sachai v rehim nastavet. Pomocl lactiket 一 + 5 14) natavste hodnotu leploty. Potvirodte stasisnirum lactika SET*6), Rozsvilte se konstaflo,Work2).
- Podkete, as za zafieren zahlege (asi 10-20 min).
- Opatne poloţie jeze ne lac.
- Opatne poloţie jeze ne lac.
- Zaizeni kaze 2d houming automatikny kaniye vjece ve naianeji vevo a vpravo po dobu 10 vierin. Nazvezdeje vko pih automatikem otamen vojec. Budje opotni pivrvin pravnoi poti kubitoru.
- Nastaveni hodnot alarmu a kalibrace
- Pukud Čišteča vistupit do naslavnić, vistnešte tlačitko, Set' (3) a pridiržć na 3 va tvić.
- Múzete prepiñat mezí paramiarya predelastaverni y nizé uveledr tabulc mo porladiek (4) a 6).
| Parameter Vyznam parametru Továmi | nastaveni |
| AL Nastaveni alarmu pflüßnizké teploty. | 1°C |
| AH Nastaveni alarmu pflüßvyské teploty. | 1°C |
| CAU Kalibrace teplomérú. | 0°C |
| HS Nastaveni hörni meze teploty. | 39,5°C |
| LS Nastaveni spocni meze teploty. | 30°C |
- SKLADANI ZARIZENI
UPOZORONNI Nalovodne videogost sestavny prok je k dispezil na okaiz / JR Kódu vloemende niz.



3.4.CISTENIAUDRZBA
a) Pfed kazdym iistenim a take tehdy. kdyz zaifeni
Hepodzive, Vyamtece shovod 2sradk 2e 2a b) K. fisiipn oponhy zafzeni pouyveite vihadne
prostoky neoobsahuijci zrayl kty.
b) K. dienii powchru zafzeni pouzveitey vhradne prostosky nosbeahuiyi rizav letyk.
c) Po kaddim cristeni je nutno vischemy privy doobre osusit. ne budz a zafironi opet poutzoi.
dZalizeni skladyne na suchem chladnem mistre.
chranenp proti viksho a pifimemu skunchinau
eJezakzano zafzeni polevat rodou nebo je do yodo ponorovat.
f: Davitsz pozer, aby so ventilamnici omory
chazochizomji na se kruty zalzeni nestoslava donvid'
g) Venlachla otyv oltele pomoc stiekeu a slazeho zuduzhu.
h) Pravidne providene revite zeizeni a kontruktule, zdje te technicikixpobolea a reni poskozeno.
1. K citeri pouzive mecky hedikl.
2. R perei zhe k r aht that deis doobu, yvathme z ne akumurut/bateni.
k) Zaizeni po kaidem pouziti ydezinifukte
NAVOO K BEZPECENMU VYMJUTI AXUMULATORU A BATERI (IN-7DDI, IN-48DDI, IN-96DDI, IN-112DDI, IN-88DD)
V provostovacce vaje phizone k inkubatoru je narmotovora batrata AA 15V. Pled jeim vyazinenynyvoplete provostovacku laciteln OMOFF.Vsinutobue zadn czast kruva y vijmte batrata.Batrare odzedje do sbemy estrictko edpud.
LIKVIDACE OPOTREBENYCH ZARIZENI
Pu okuneni'do plyb podziarny nevyhazjuye tetro vrobek opsoletne s komunaliom odipadem, ale ovezddejei je k recyclaci do sbemy elektryckii an eklektonikych zafzeni. O tom inoumej symbolu umstzeni na zafzeni, v navodce k obtsze nebo na aboi. Komponenty pouzhe v zafzeni jouv vhochrno pro zuzkirovii v souladu si jejich eznacenim. Dicyk zuzykovi, recyclaci nebo jinnim zolobomov yufurt opotefbeniych zafzeni vyznannne spivpitae oc ochranie zoivnihosti prostudin. Informa o pfisidne sberne opotefbeniych zafzeni posktyne misti obenoy nebo mlestsky ufd.

22.03.2023
MANUEL D'UTILISATION
FR
DETAILS TECHNIQUES
MANUAL DE INSTRUCTIONS
ES
DATOS TECNICOS
2.2.SIKKERHEI PAA ARBEIDSPLASSEN
FÖRKLARING AV SYMBOLERNA
| Produktu uppyler kraven i de tillampiga sakorehsetstanderna. |
| Las brukansvvingen nogrant inan anvandring. |
| Aterviningsbar produit. |
| OBSI Efter VARNING NI Efter KOM IHAGI beskriver situationen (malant vamingsmark). |
| OBSI Varning for elektrisk stot. |
| Apparater mod skyddklss I och dubbel bolering. |
OBSI Ilustracionema in dnubrus braunsanvising ar endast avsedda som referecns och kain i vissa detalar skja sig nagot fran produktive virgula utsceende. Den Urspriggende sprakevionen ov dnubrus braunsanvising ar den tsya versionen.De andra sprakevionema ar overaansingarin fran tsya.
2. SAKER ANVANDINING
OBS! Las alla sakerhsetvarung och alla instruetioner: Undarthetaen att folja varmingara och instructionerna kan lea till elektrika stector, brand ech/cller alvarir perskndaka er iddall. Termen apparenter' celer produkton som anwands i varmingara och i beskrivungen i donne bruscensvising avser AGGKLACKINNGSMASKINEN. Anvand inte apparatusi u itymmen med mycket hog luftluftigkeit / I omeledar barnet vaventantenkat Lintic apparatus bilvat. Risk for elektrik stot! Apparatus ventilationsoppening far aierig overiackla
2.1 ELSAKER-ET
a) Apparatiens strikppro masta passia i vagguttaget Modifica arldig strikpposten pagnot vis. Original strikppro por och passande vagguttag minskar risiken fer elektrikt stdd.
NAMEPLATE TRANSLATIONS
| INCUBATO |
| #PRODUCT NAME LGG INCUBATOR |
| #MODEL |
| #VOLTAGE / FREQUENCY 230 V- / 50 r.h |
| #POWER |
| #PRODUCTION YEAR |
| #SERIAL NO. |
| 1 | 2 | 3 | |
| EN | Produkt Name | Model | Voltage/Frequency |
| DE | Produktname | Modell | Spannung/Frequenz |
| PL | Nazwa produktu | Model | Napićce/Czostotilovost |
| CZ | Název vyroblu | Model | Jmenovite napojednapiš/Frakvence |
| FR | Nom du produit | Modèle | Tension/Frequency |
| II | Nome del prodotto | Modelllo | Tensione/Frequency |
| ES | Nombre del produit | Modelolo | Voltaje/Frecuencia |
| HU | Termék neve | Modell | Fesztalség/Nyomatěk kikapcsolasi |
| DA | Produktnavn | Model | Spending/Trekvens |
| FIN | Tuolenimi | Mall | Jannite [V-/-/Taejus] [Hz] |
| NL | Produktnaam | Modell | Spanning [V-/-]/Frequencie [Hz] |
| SE | Produktnamm | Modell | Spanning [V-/-]/Frokkvens [Hz] |
| PT | Nome do produto | Modello | Tensiono [V-/-]/Frequência [Hz] |
| NOR | Produktnavn | Modell | Spensing [V-/-]/Frokkvens [Hz] |
| 4567 | ● | ● | ● | |
| EN Power Production year: Serial No. Manufacturer | ||||
| DF Leistung Produktionsjahr Ordnungsummer Hersteller | ||||
| PL Moc Rok produktij | Nummer seri# | Producent | ||
| CZ Jemnoviti vykon | Rok vroby | Seriove dsko | Vyrobce | |
| FR Russland | Anne de produzuction | Numero de series | Fabricant | |
| IT Polenza | Anno di produzione | Numero di series | Produktive | |
| ES Patencia | Afo de produzione | Numero de series | Fabricante | |
| HU Telisztmemy | Gyartás éve | Gyartás szam | Gyarto | |
| DA Effekt | Produktionsär | Seriennummer | Producent | |
| FIN Tehu | Valmisusvuosi | Sarjanumero | Valmistaja | |
| NL Vermogen | Productiejaar | Seriennummer | Producent | |
| SE Effekt | Produktionsär | Seriennummer | Tillvorkare | |
| PT Potência | Ano de Produção | Numero de série | Productor | |
| NOR Effekt | Produksgonsär | Seriennummer | Producent | |

22.03.2023
22.03.2023

110111
NOTES/NOTIZEN NOTES/NOTIZEN

22.03.2023
22.03.2023

For the disposal of the device please consider and act according to the national and local rules and regulations.
CONTACT
expondo Polska sp. z o.o. sp. k.