
SS-5668 - Coffee machine Sogo - Free user manual and instructions
Find the device manual for free SS-5668 Sogo in PDF.

| Brand | Sogo |
| Model | SS-5668 |
| Product type | Espresso coffee machine |
| Power supply | AC 220-240V ~ 50/60Hz |
| Power | 1350W |
| Pressure | 20 bars |
| Water tank capacity | 1.5 L |
| Main functions | Espresso (1 shot, 2 shots), Americano, Cold Espresso, Steam |
| Capsule compatibility | NESPRESSO®, STARBUCKS® by NESPRESSO®, UCC |
| Main materials | Stainless steel, plastic |
| Included accessories | Filter holder, 1 and 2 shot filters, capsule filter, measuring spoon, tamper, milk pitcher (not mentioned but likely) |
| Care and cleaning | Regular cleaning of filters, filter holder, steam wand, drip tray; descaling every 1 to 2 months |
| Safety | Automatic shut-off, burn protection, grounded plug, do not immerse |
| Estimated net weight | 5 kg (estimate) |
| Approximate dimensions (L x W x H) | 30 x 25 x 35 cm (estimate) |
| General information | Household use only, after-sales service: sogosat.com |
Frequently Asked Questions - SS-5668 Sogo
User questions about SS-5668 Sogo
0 question about this device. Answer the ones you know or ask your own.
Ask a new question about this device
Download the instructions for your Coffee machine in PDF format for free! Find your manual SS-5668 - Sogo and take your electronic device back in hand. On this page are published all the documents necessary for the use of your device. SS-5668 by Sogo.
USER MANUAL SS-5668 Sogo
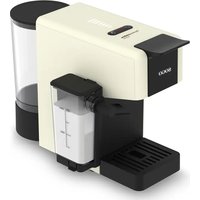
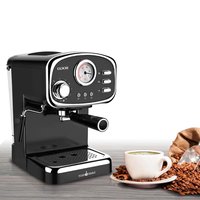
natural_image
Exterior view of a SOGO 20 Bar coffee machine (no signage or text on device body)
Descarga tu manual
Download your manual
Declaration of conformity, Responsibility of Electronic products disposal, Importers Details and After-sales service on the last pages.
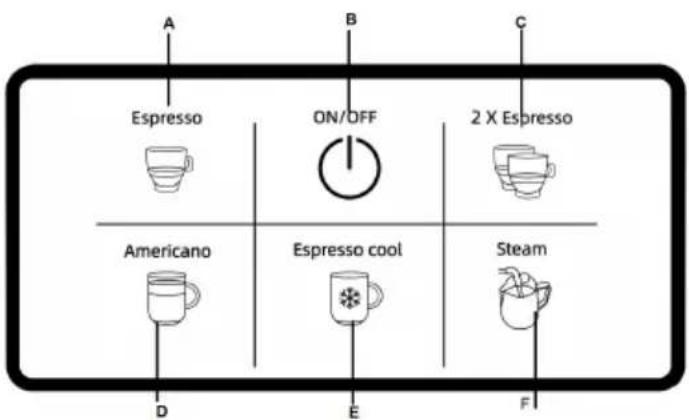
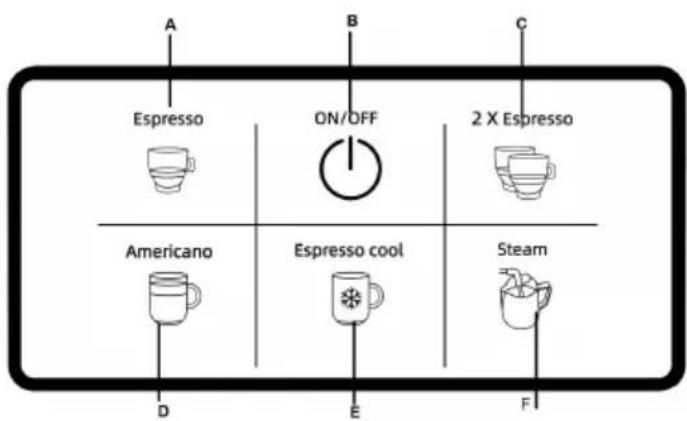
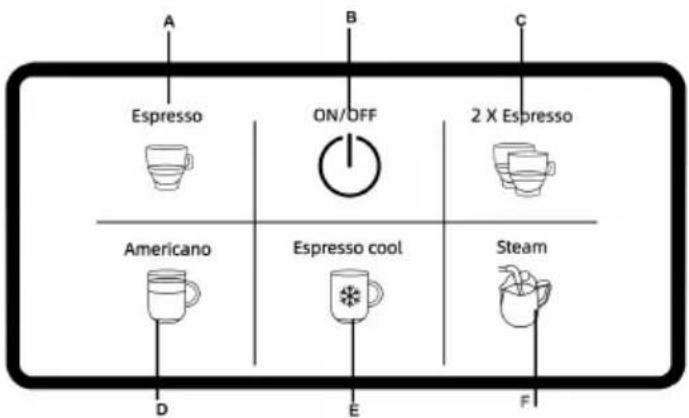
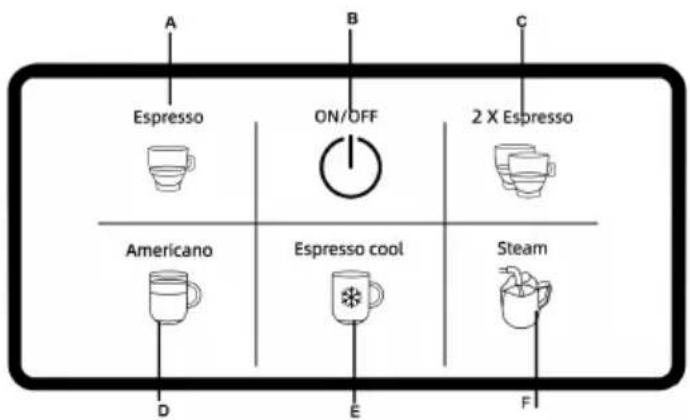
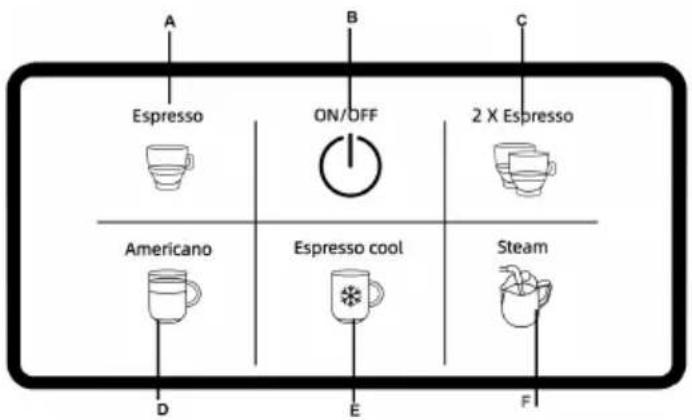
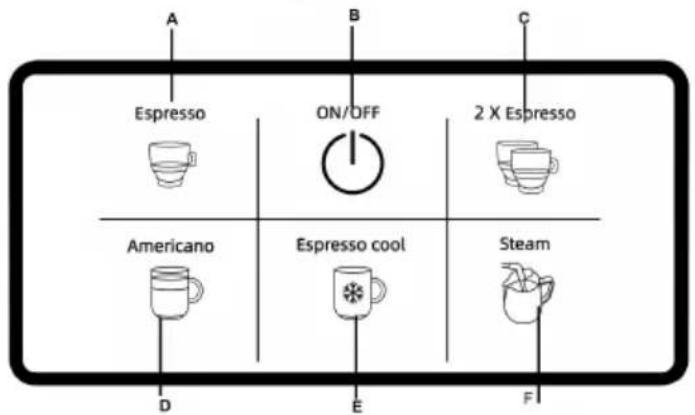
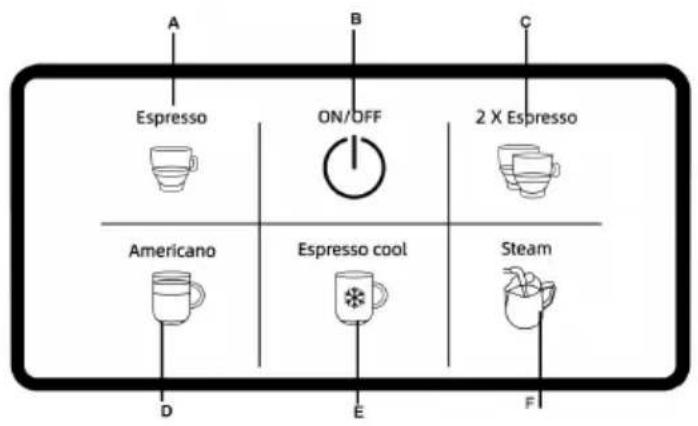
5. PANEL DE CONTROL
A:Espresso caliente 1 taza
B: ON/OFF
C:Espresso caliente de 2 tazas
D: Americano
E: Espresso fria
F: Vapor
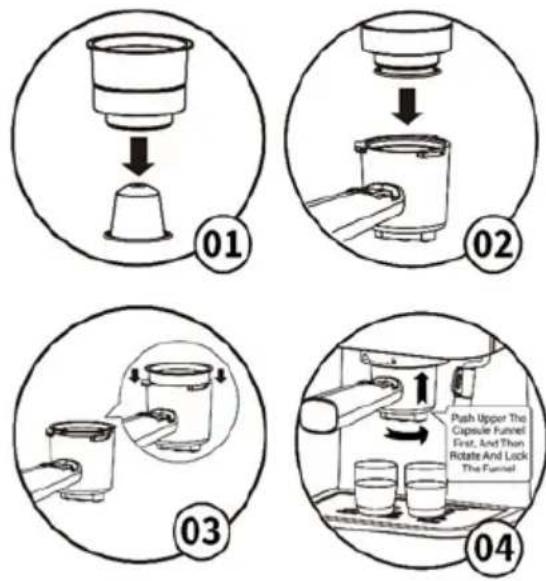
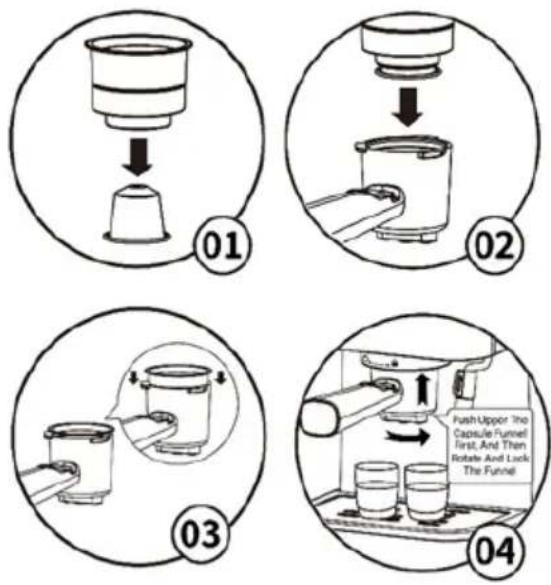
6. INSTRUCCIONES DE USO
natural_image
Technical line drawing of a mechanical device before and after assembly, showing internal components and motion (no text or symbols)natural_image
Technical line drawing of a mechanical device with no visible text or symbols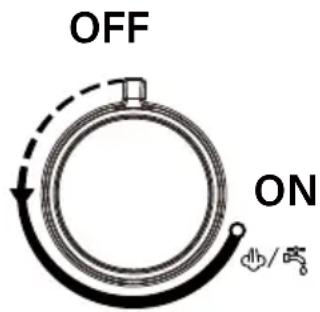
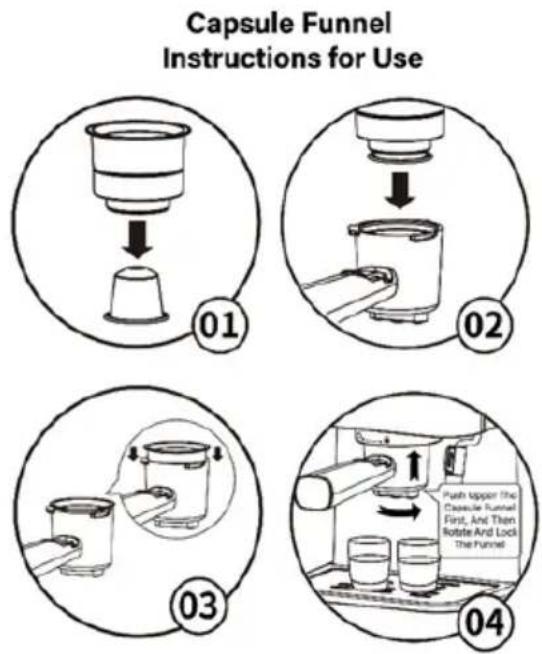
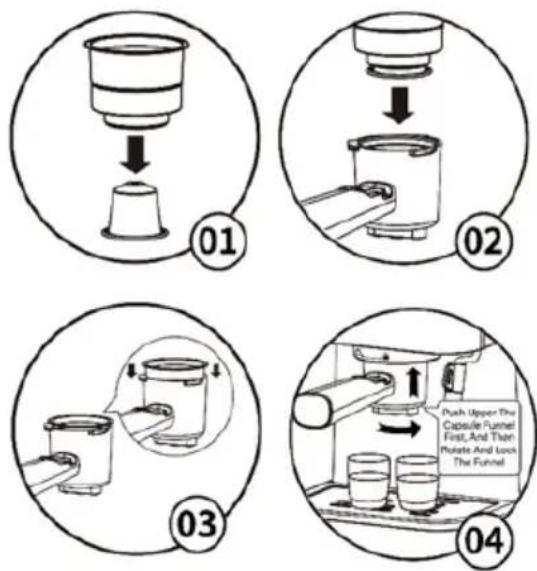
flowchart
graph TD
    A["Step 01: Initial setup with capsule container"] --> B["Step 02: Insert pump into tray"]
    B --> C["Step 03: Insert pump into tray with liquid"]
    C --> D["Step 04: Push upper the capsule funnel first and then rotate and lock the funnel"]
• Always read the instruction book carefully before using.
- This manual can be downloaded from our web page www.sogo.es
- Keep these instructions for future reference.
2. Safety instructions for the user

General precautions during the use of electrical equipment
- Do not use the appliance for any other purpose than described in this manual.
- Do not use or store the applianc e outdoors.
• Always place the appliance on to the flat and even surface. - This product is intended for indoor, non-industrial, non-commercial and only for household use. Do not use the item outdoors or for any other purpose. Misuse or improper handling may cause problems in the appliance and cause injury to the user.
- The unit must be used only for the intended purposes. No liability is accepted for damages arising from improper use or wrong handling.
- Ensure that the voltage indicated on the nameplate matches the mains voltage before plugging in the appliance.
• Always remove the plug from the power socket when the appliance is not in use. Do not leave the appliance unattended when switched on. - Close supervision is necessary when any appliance is being used by or near children.
- Before cleaning or storing your appliance, always unplug the appliance from the power supply and let it cool down.
- The device is not completely disconnected from the power source, even after it has been turned off. To disconnect it completely, disconnect it from the mains plug.
- The appliances are not intended to be operated by means of an external timer or separate remote-control system.
- This appliance is intended to be used in household and similar applications such as
– staff kitchen areas in shops, offices and other working environments;
– farm houses;
– by clients in hotels, motels and other residential type environments;
– bed and breakfast type environments

Restrictions on use to avoid personal injury
- Do not let the appliance operate unattended.
- Do not place or operate this appliance near water sources.
- Do not place or operate the appliance and its power cord on or near hot surfaces (e.g., stove plates) or open flames.
- Do not leave the power cord hanging from sharp edges and keep away from hot objects and flames. Do not wind the cord around the appliance and do not bend it.
- Never use accessories that are not recommended by the manufacturer.
- The use of accessories not recommended or sold by the appliance manufacturer may result in fire, electric shock or injury to persons.
- When you want to remove the plug from the wall contact, please do this at the plug itself and not by pulling on the cable or the appliance itself.
- To avoid electric shock, make sure your hands are dry before plugging or unplugging.
- Do not use the device with wet hands, on damp floors or when the atmosphere is humid, there is a risk of electric shock.
- While using the appliance, make sure that the power cord must not be caught or crushed.
- Do not let the motor unit, cord or plug get wet to protect against risk of electric shock.
- Be careful, while handling electrical appliances, as the surface of the heating element is subject to residual heat after use. Any misuse may cause potential injury to the user and may damage the appliance.
- Do not touch the outer surface of the appliance as it can get very hot during operation. Instead, use the handle or mitts.
- Never immerse the appliance or the plug-in water or any other liquid. In the event of the appliance falling in water, disconnect immediately from the mains supply and take it to an authorized service agent for repair before reusing.
- Do not use the appliance if it has fallen on the floor, if there are visible signs of damage or if it has a leak.
- Do not use the appliance if the cable or plug is damaged. In case of the cord be damaged, it must be replaced only by the manufacturer, its service agent or similarly qualified persons in order to avoid Hazard.
- In case of appliance malfunction, or if it has been damaged in any manner, return the appliance to the nearest authorized service facility for examination, repair or adjustment.
- In case of hardware problems, do not attempt to repair the product
yourself. Repairs should only be carried out by qualified technicians.

Restrictions on use when used with children and elders
- The appliance is not to be used by persons (including children) with reduced physical, sensory or mental capabilities, or lack of experience and knowledge, unless they have been given supervision or instruction.
- Children should be supervised to ensure that they do not play with the appliance.
- Appliances can be used by persons with reduced physical, sensory or mental capabilities or lack of experience and knowledge if they have been given supervision or instructions concerning use of the appliance in a safe way and understand the hazards.
• Children shall not play with the appliance. - This appliance can be used by children aged from 8 years and above and persons with reduced physical, sensory or mental capabilities or lack of experience and knowledge if they
• have been given supervision or instruction concerning use of the appliance in a safe way and understand the hazards involved. - Cleaning and user maintenance shall not be made by children unless they are older than 8 and supervised.
- Keep the appliance and its cord out of reach of children less than 8 years.

Instructions to follow when using the appliance
- The appliance has been incorporated with a grounded plug. Please ensure the wall outlet in your house is well earthed.
- Be careful to not to get burned by the steam.
- Do not touch the hot surface of appliance (such as steam wand, and the brewing filter while in use). Use handle or knobs.
- Do not let the coffee maker operate without water.
- Do not remove the metal funnel, when appliance is brewing coffee or when steam and hot water escape from metal funnel and ensure to release the pressure in water tank before removing metal funnel.
- Relief pressure through steam wand before removing tank cover or metal funnel.
- ⚠️ WARNING: The filling aperture must not be opened during use.
- WARNING: Potential injury from misuse.
- ⚠️ WARNING: high risk to get burn! Do not touch the hot parts of
coffee maker.
- The coffee-maker shall not be placed in a close cabinet.
- Do not touch or move the coffee maker while in use.
- Never use the coffee maker in the environment of high temperature, high magnetic field and humidity, do not place the coffee maker on or hot surface or beside fire or another electrical appliance, such as on the top of refrigerator, avoid to be damaged.
- When the appliance prompts trouble, never operation the appliance, do not place the foreign object into the brewer.
- Never use the detergent or hot water for cleaning the brewing component, to avoid the running component is lack of lubricant oil and the component will be distortion as the high temperature.
- To avoid a circuit overload when using this product, do not operate another high-wattage product on the same electrical circuit.
- A short power supply cord is provided with this product. An extension cord is not recommended for use with this product, but if one must be used:
- The marked electrical rating of the cord must be at least as great as that of the product.
- Arrange the extension cord so that it does not hang where it can be tripped over or pulled unintentionally.
CLEANING AND MAINTENANCE
Kindly refer to the cleaning and maintenance section for details on how to clean surfaces which comes in the contact of food.
- TECHNICAL SPECIFICATIONS
| Voltage Frequency Power Pressure Capacity | ||||
| AC220-240V | 50-60Hz | 1350 20 Bar | 1,5L | |
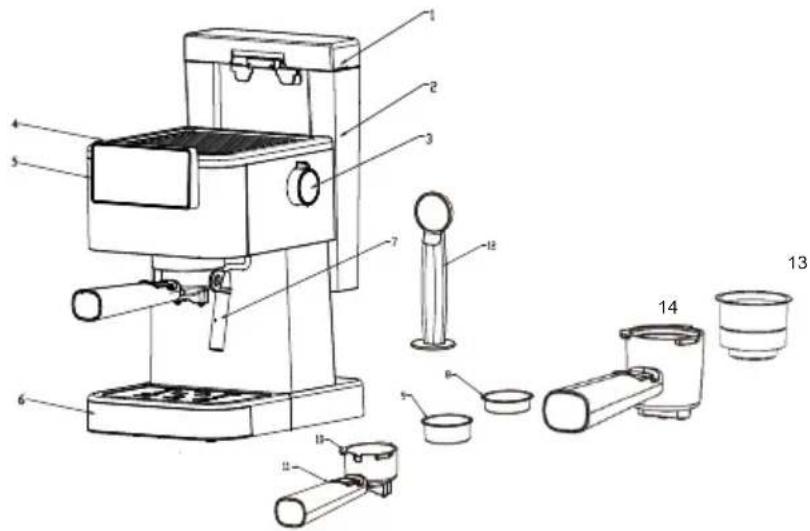
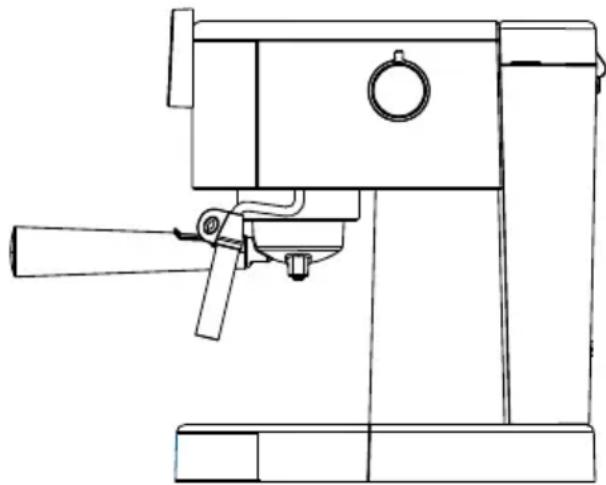
4. PARTS DESCRIPTION
- Tank cover
- Water tank
- Steam knob
- Top plate
- Control panel
- Drip tray
- Steam Nozzle
- 1-cup filter
- 2-cup filter
- Portafilter
- Portafilter handle
- Coffee Spoon & Tamper
- Capsule bracket
- capsule portafil
5.CONTROL PANEL
A: 1-shot hot espresso
B: ON/OFF
C:2-shot hot espresso
D: Americano
E: Espresso cool
F: Steam
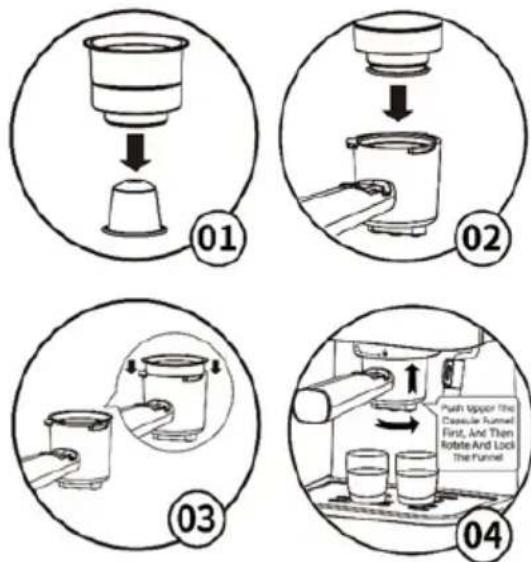
6. INSTRUCTIONS FOR USE
BEFORE THE FIRST USE
- Ensure that the espresso machine is switched OFF and disconnected from main power supply.
- Hold the water tank carrying handle and pull the water tank upwards.
- Fill the tank with fresh and cold water. DO NOT exceed the maximum filing level mark 'MAX'.
- Reinsert the water tank and make sure that the tank is placed correctly.
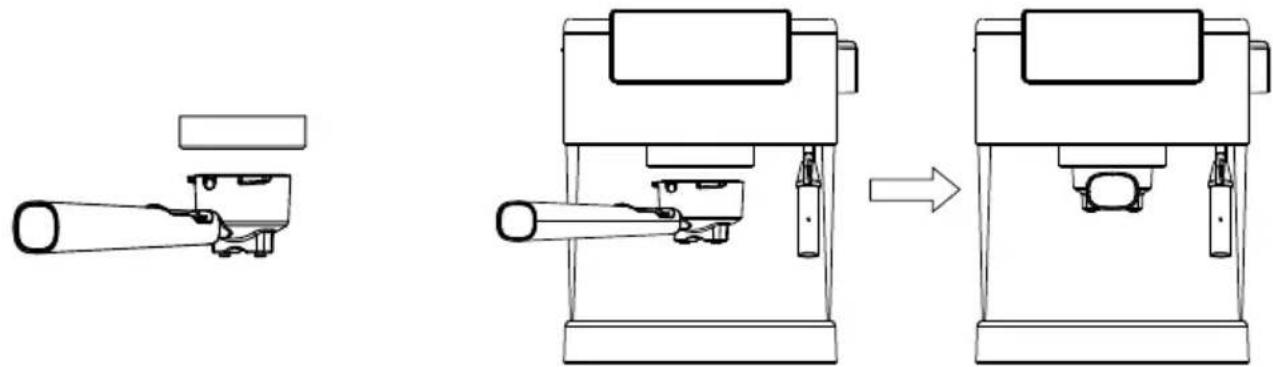
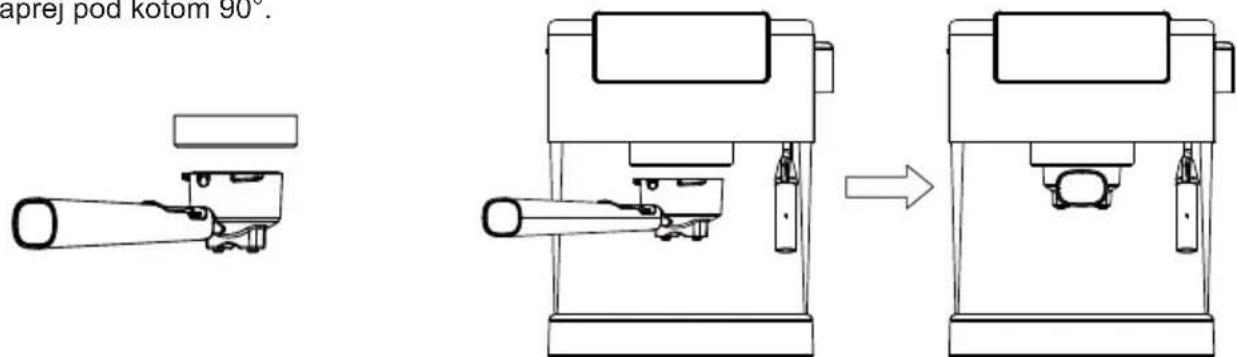
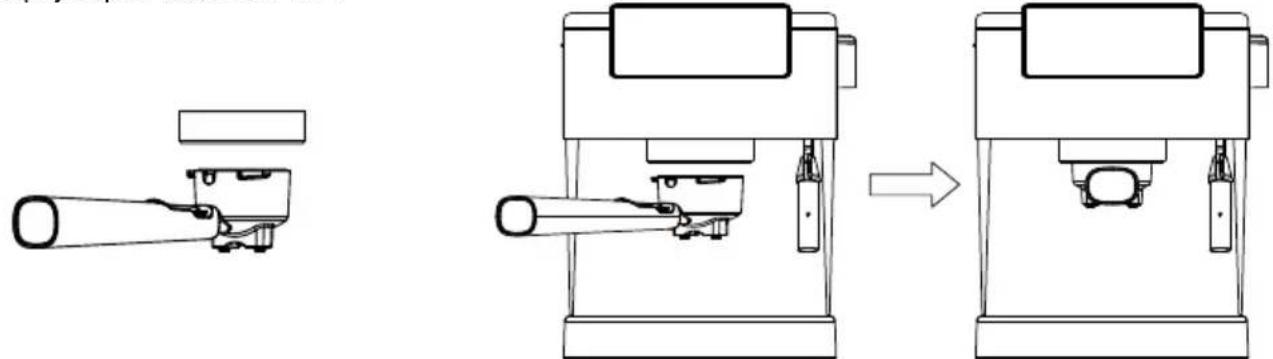
- Insert the filter into the portafilter and secure the portafilter into the brew head. Slide the handle towards to the left, then turn the handle to the right until it locks. Release the handle, the portafilter must place properly in the brew head and point forwards at a 90° angle.
- Place one espresso coffee on the drip tray below the coffee spout.
- Plug in the appliance in the power socket supply and press the ON/OFF button, all indicators are stable.
- Hot water start to pour into the espresso coffee cup; once filled throw the water.
- Repeat this process 2-3 times and now your coffee maker is ready to prepare the fresh espresso coffee as per your requirement.
Note: Before every single use, drain the air of the pipe to avoid brew problems.
a. Refill the water tank and press the power button.
b. Turn the steam control knob to "ON" position.
c. Wait until the water start running out of the steam wand continuously. (To drain the pipe air it is necessary to fill it with water.)
d. Turn the knob to off position.
e. Coffee maker is ready to brew the coffee.
Preparation of Espresso Coffee for first time:
- Insert the filter into the portafilter. Fill the espresso coffee powder into the brewing filter using the provided measuring spoon. The contact pressure in the brewing filter is as important as the coffee variety and degree of coffee grinding for a good espresso. Therefore, always make sure that the espresso filter is clean and does not contain any powder residues.
Note: Below you can find the list of effect of coffee variety and the degree of grinding of the coffee.
- If grounded coffee is too fine, over extraction and bitterness will occur with a spotted and uneven cream on the top.
- If grounded coffee is too coarse, the water will pass through too rapidly and there will be an inadequate amount of cream on the top of the espresso
- If the espresso power is compressed very tightly, the espresso will run through slowly and there will be more cream.
- If the espresso power is not compressed very tightly, the espresso will run through more quickly and there will be less cream.
- While adding more espresso powder, it is necessary that the brewing filter is filled up.
- After adding espresso powder make sure to press it with the tamper.
- If there is excess of coffee in porta filter make sure to clean it from the rim to ensure proper fit under brew head and avoid leaks.
- The compressing of the espresso powder is an important process for espresso preparation.
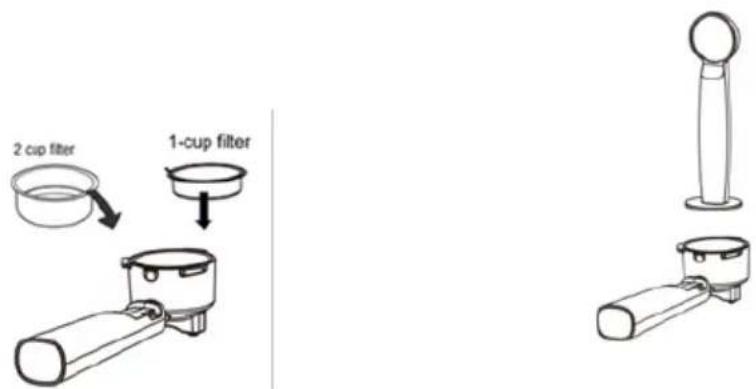
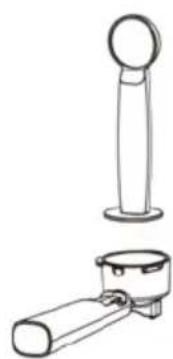
- Secure the portafilter into the brew head. Slide the handle towards left, then turn the handle to the right until it locks. Release the handle, the portafilter must place securely in the brew head and point forwards at a 90° angle.
natural_image
Technical line drawing of a mechanical device before and after assembly, showing internal components and motion (no text or symbols)- Place one or two pre-heated cups below coffee spout.
- After plugging in the coffee make, press the ON/OFF button, all indicators are stable.
Preparation of different coffees with the help of Digital display panel
- Espresso Cool: Drop the ice cubes in the water tank, press the Espresso cool button for cool espresso coffee. Maximum brewing time is 19 seconds.
Tip: Always use iced water for best result.
-
Single-shot hot espresso: Press the espresso button, digital display start flashing, which indicates that the machine is preheating. When the light stops flashing and remains on, the machine is ready to brew coffee. Maximum brewing time is 17 seconds. Pour the coffee in espresso cup and enjoy.
-
Double-shot hot espresso: Press the 2x espresso button, digital display start flashing, which indicates that the machine is preheating. When the light stops flashing and remains on, the machine is ready to brew coffee. Maximum brewing time is 25 seconds. Pour the coffee in espresso cup and enjoy.
⚠️Note: The ideal pour is dark and caramel with reddish reflections.
⚠️Note: After making hot espresso, allow machine to cool down for 15 minutes, before making cold brew espresso.
-
Americano: Press the Americano button, digital display start flashing, which indicates that the machine is preheating. When the light stops flashing and remains on, the machine is ready to brew coffee. Maximum brewing time is 41 seconds. Pour the coffee in espresso cup and enjoy.
-
Steam: We can use the steam function for 2 purposes. Either we can heat the milk or prepare the milk froth by mixing the air in it and create foamy texture. Follow below mentioned tips to heat the milk or prepare milk froth.
A. Determine how much milk is needed based on the number of cups being made.
Note: Keep in mind that the volume of milk will be increased during the heating or frothing process.
B. Pour cold refrigerated milk into the stainless frothing pitcher, quantity should not be exceeded 1/3 of total quantity.
C. When you press the steam button, digital display will start flashing. It will be stabilized when it's ready to be used.
D. Clean the water on the steam wand. The steam function will be activated by turning on the steam function and steam control knob. Remember to turn off the steam knob when there is not any water in it.
E. Turn the steam wand to the side of the espresso machine.
F. Place the steam wand into the milk. Make sure that the nozzle is about a 1cm below the surface and activate the steam function by turning steam function on displayed on to the digital display and steam control knob.
G. Move the cup, so that the steam wand "touches" the nozzle of the cup and lower the cup until the tip of the steam nozzle is just below the surface of the milk. A frothing action will be started in the milk.
natural_image
Line drawing of a mechanical device with lever and handle (no text or symbols)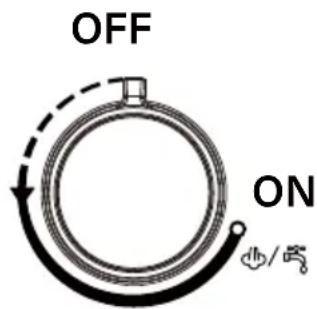
Note: Do not allow the steam to spurt unevenly, because it will create aerated froth/large bubbles. If this is happening, you should raise the cup so that the steam nozzle is lowered further into the milk. H. As the steam heats and textures the milk, the level of the milk in the cup will begin to rise. Once this happens, follow the level of the milk by lowering the cup, always keeping the tip of the steam nozzle just below the milk surface.
- Once the foam is created, raise the cup until the steam nozzle is in the centre of the milk.
Note: Each drink needs a specific amount of froth. For example, a cappuccino requires more foam than a latte.
J. Turn off the steam control dial to stop the steaming process immediately.
⚠️IMPORTANT: Do not boil the milk.
K. Remove the cup, wipe the steam nozzle and wand with a clean damp cloth and purge a small amount of steam immediately.
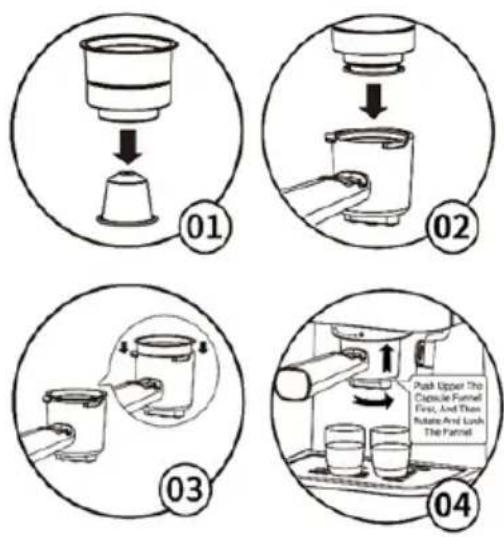
- Place the capsule inside the capsule filter and then press it tightly, set the capsule filter into the capsule portafilter, fix the portafilter into the machine firmly, by turning it right until it is at the LOCK position.
Note: It's compatible with NESPRESSO ® y STARBUCKS® by NESPRESSO® AND UCC CAPSULES.
- Place the 1-shot hot cup on drip tray.
- After preheating completes, press 1-shot coffee button, wait for a moment, and coffee will flow out. Brewing time is Max 17s and unit will automatically stop working if there will not be any operation within 17s.
- After finishing preparing coffee, press power button, and all the indicator go out and the coffee maker stops working, your coffee is ready now.
- Remove the metal portafilter out by turning to left, then pour out the capsule filter.
- Let them cool down completely, then rinse under running water
MAKE CAPPUCCINO / FROTHED MILK
Get a cup of cappuccino when you top up a cup of espresso with frothed milk
Method:
- First prepare Espresso coffee with container big enough according to the part "Preparation of Espresso coffee making", make sure that steam control knob is at the OFF position.
- Press Steam button, Coffee button indicator will be extinguished, wait until Steam button indicator is illuminated.
- Turn steam control knob slowly anti-clockwise, steam will come out from frothing nozzle.
Note: Never turn steam control button rapidly, as the steam will accumulate rapidly within short period of time which may increase a potential risk of explosion. - Place the steam wand into the milk so that the nozzle is about a 1cm below the surface and activate the steam function by turning to ON position both the steam control dial.
- When the required result is obtained, turn steam control knob to OFF position.
Note: Clean steam outlet with wet sponge immediately after steam stops producing. Be careful while cleaning the steam wand. - Pour the frothed milk into the espresso prepared and your cappuccino is ready. Sweeten to taste as per desire sprinkle, the froth with a little cocoa powder.
- Press Power button to turn it off. All indicators' lights will be extinguished.
Note: If you want to make coffee immediately after steam preparation, coffee indicator will flash for alarming upon touching coffee button, at this time you should turn steam control knob to the ON position to pump hot water in order to let unit cool down
7. CLEANING AND MAINTENANCE
Turn off the espresso maker and remove the plug from the electrical outlet during the cleaning process. Do not immerse any part of coffee maker in water or in other liquid. To clean, simply wipe with a clean damp cloth and dry before storing.
CLEANING THE FILTERS, PORTAFILTER HOLDER AND BREW HEAD
- You have to clean well the stainless-steel filters. The portafilter holder should be rinsed under water immediately after use to remove the coffee remains.
- Periodically run water through the machine with the portafilter holder in place, but without any ground coffee, to rinse out any lingering coffee remains.
- You have to use a damp clean cloth to clean and wipe well inside the brew head to remove any coffee remains.
CLEANING THE OUTER HOUSING/CUP WARMING PLATE
Do not use any common cleanser or harsh ones to clean the outer cover. Use only soft and damp cloth to clean the outer cover and the cup warming plate.
Remove the drip tray rack, clean and empty frequently the little rack, particularly when the drip tray is full. The rack can be washed and rinsed thoroughly in warm soapy water. Use a non-abrasive washing liquid (do not use abrasive cleansers, pads or cloths which can scratch the surface).
CLEANING THE DRIP TRAY
Remove the drip tray when the rack is removed. Clean it with a soft and damp cloth (do not use any harsh cleansers or scouring agents).
NOTE: Do not clean any of the parts or accessories in the dishwasher.
CLEANING THE STEAM WAND
After every single use remember to clean the steam wand. Use a damp cloth to wipe the steam wand and then turn the steam wand back into the drip tray, directing towards the drip tray, set the steam control dial to be on for a while. This time any remaining milk will be released from inside the steam wand. Remember to bring back the steam wand control dial in the OFF position. Turn off the machine, unplug the power cord and allow the machine to cool. If the steam wand remains blocked, use pin to clean the opening.
Cooling function
If you want to make coffee again after the milk frothing process or to make coffee again immediately after frothing milk or steam pipe washing process, then let the coffee maker cool down. Remember if you do not do so, the coffee will be burnt and splashed. After machine cooling down process coffee can be prepared.
The temperature gets higher after the cleaning of steam pipe and the milk frothing process. To stop the steam function, Press steam button. Rotate the steam control dial to release hot water to cool down the appliance. After a while, turn off “Steam Knob”. The coffee maker is ready to use it again.
CLEANING OF MINERAL DEPOSITS
- To ensure your coffee maker can operate efficiently, internal piping is clean and the peak flavour of coffee, you should clean away the mineral deposits left every 1-2 months.
- Fill the tank with water and descale to the MAX level (the proportion of water and descaler is 4:1, details refer to the instruction of descaler. Please use "household descaler", you can use the citric acid (obtainable from chemist's or drug stores) instead of the descaler (one hundred parts of water and three parts of citric acid).
- According to the program of preheating, put the metal funnel (no coffee powder in it) and carafe (jug) in place. Brew water per "PREHEATING".
- Press the power button to turn on the unit, press any function button and let the water flow out. Make sure to place the big jug.
- Restart the unit and repeat the steps at least 3 times.
- Then pressing and release the coffee/steam to the Max, position, when the green lamp is illuminated, press down the pump control button to the lower position to brew, until no descaler is left.
- Then start brewing coffee (without coffee powder) with tap water in the MAX level, repeat the steps of for 3 times (it is not necessary to wait 15 minutes
- Repeat the step at least 3 times until clean water comes out of the pipe..
TROUBLESHOOTING
| Problem Reason Method | ||
| Coffee doesn't pours out | No water in the water tank | Fill the tank with water, run through the appliance without coffee filter to ensure it is fully primed |
| The coffee grounds are too fine or tamped down too hard | Empty the filter and rinse under water to clean, Wipe the filter with a cloth. Refill the filter with ground coffee and tamper it correctly. | |
| No steam from the Steam wand | Steam Nozzle tube is blocked | Check “If the steam outlet becomes blocked” |
| No water in the water tank | Fill the tank with water, run hot water through the Steam Nozzle to ensure water flows | |
| Water is leaking from the bottom of the machine | Too much water in the drip tray Clean out the drip tray | |
| Water is leaking from the outer side of the filter | There is some ground coffee on edge of filter | Clean it off |
| Tainted taste to the coffee | Allowing water to sit too long, improper cleaning | Clean and de-scale |
| Low or no steam from the steam wand | Steam Nozzle is clogged up Clean | and de-scale |
| Poor milk frothing Using skimmed milk Use full fat milk | ||
NESPRESSO ® y STARBUCKS® by NESPRESSO® are trademarks/registered trademarks of their rightful owners. Neither we nor our products have any aliation or association with or endorsement by the owners of these trademarks/trademarks.

ORTANT:
5. PANNEAU DE CONTRÔLE
natural_image
Technical line drawing of a mechanical device before and after assembly, showing internal components and motion (no text or symbols)natural_image
Line drawing of a mechanical device with lever and handle (no text or symbols)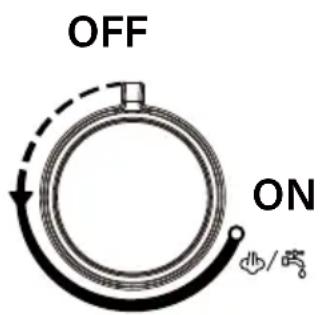
flowchart
graph TD
    A["Step 01: Initial setup with cup"] --> B["Step 02: Down step"]
    B --> C["Step 03: Insert cup into tray"]
    C --> D["Step 04: Push upper the capsule funnel first, and then rotate and lock the funnel"]
5. PANEL DE CONTROL
A: 1 dose de café expresso quente
B: ON/OFF
C:2 doses de café expresso quente
D: Americano
E: Expresso fresco
F: Vapor

natural_image
Technical line drawing of a mechanical device before and after assembly, showing internal components and motion (no text or symbols)natural_image
Line drawing of a mechanical device with lever and handle (no text or symbols)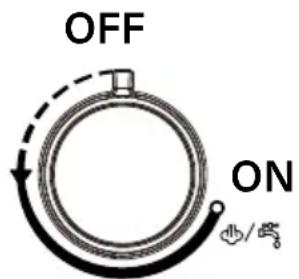
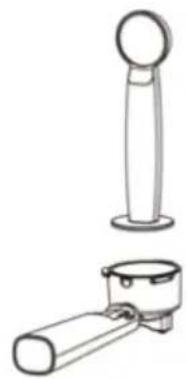
Capsule Funnel
Instructions for Use
5. BEDIENFELD

natural_image
Line drawing of a mechanical device with a cylindrical handle and a base component (no text or symbols)natural_image
Technical line drawing of a mechanical device before and after assembly, showing internal components and motion (no text or symbols)natural_image
Technical line drawing of a mechanical device with no visible text or symbols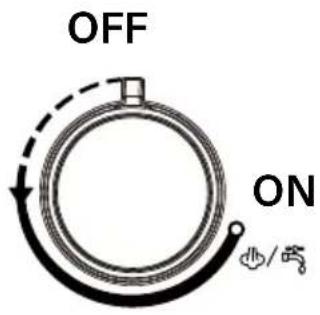
flowchart
graph TD
    A["Step 01: Initial setup"] --> B["Step 02: Inserted pump"]
    B --> C["Step 03: Inserted pump with hand"]
    C --> D["Step 04: Push upper the capsule funnel first, then rotate and lock the funnel"]
5.PANNELLO DI CONTROLLO
natural_image
Line drawings of a mechanical device with a cylindrical component and a base mount (no text or symbols)natural_image
Technical line drawing of a mechanical device before and after assembly, showing internal components and motion (no text or symbols)flowchart
graph TD
    A["01: Capsule Funnel"] --> B["02: Down"]
    B --> C["03: Stabilized Capsule Funnel"]
    C --> D["04: Pressing Capsule Funnel with Pull, Upper, Bottom, and Inside Capsules And Lock Capsule Funnel"]
5.OVLÁDACÍ PANEL
A: 1 dávka horkého espressa
B: ZAPNUTO/VYPNUTO
C: 2 šálky horkého espressa
D: Americano
E: Espresso cool
F: Pára

6. NÁVOD K POUŽITÍ
PŘED PRVNÍM POUŽITÍM
natural_image
Technical line drawing of a mechanical device before and after assembly, showing internal components and motion (no text or symbols)natural_image
Line drawing of a mechanical device with lever and handle (no text or symbols)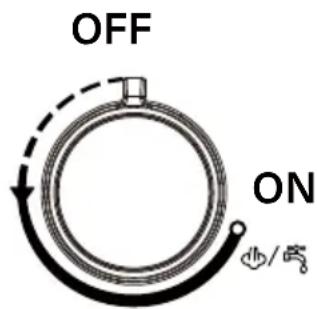
Capsule Funnel
Instructions for Use
5. KONTROLPANEL
A: 1shotvarmespresso
B: ON/OFF
C: 2 shot varm espresso
D: Americano
E: Espresso cool
F: Damp
6. INSTRUKTIONER TIL BRUG
F∅R F∅RSTE BRUG
natural_image
Line drawings of a mechanical device with a cylindrical handle and a base component (no text or symbols)natural_image
Simple line drawing of a mechanical device with a cylindrical shaft and rectangular top (no text or symbols)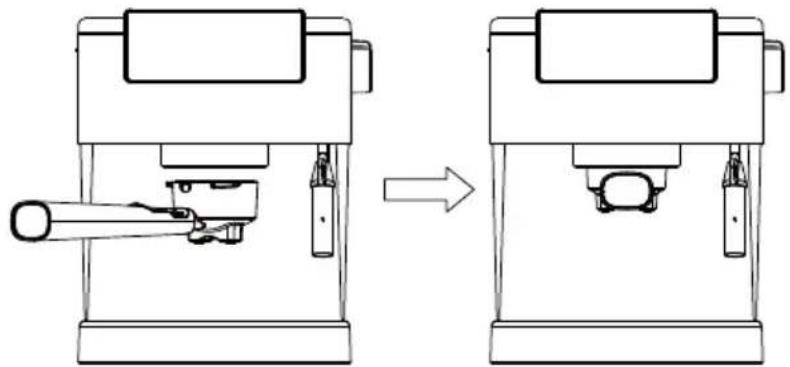
natural_image
Technical line drawing of a mechanical device before and after assembly (no text or symbols)flowchart
graph TD
    A["01: Capsule Funnel"] --> B["02: Process"]
    B --> C["03: Stabilization"]
    C --> D["04: Product Handling with Stabilization"]
5.NADZORNA PLOŠČA
A: 1 odmerek vročega espressa
B: VKLOP/IZKLOP
C:2 šota vročega espressa
D: Americano
E: Espresso cool
F: Para
6. NAVODILA ZA UPORABO
PRED PRVO UPORABO
- Portafilter pritrdite v glavo za kuhanje. Ročaj potisnite proti levi, nato pa ga obrnite v desno, dokler se ne zaskoči. Sprostite ročaj, portafilter mora biti trdno nameščen v glavi za kuhanje in usmerjen naprej pod kotom 90°.
natural_image
Technical line drawing of a mechanical device with no visible text or symbols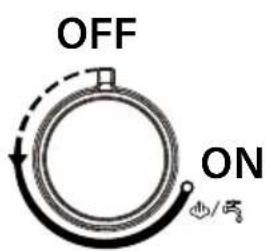
⚠️Opomba: Ne dovolite, da bi se para razlila neenakomerno, saj bi tako nastala zračna pena/veliki mehurčki. Če se to zgodi, dvignite skodelico, da se šoba za paro spusti globlie y mleko.
H. Ko se para segreje in strukturira mleko, se raven mleka v skodelici začne dvigovati. Ko se to zgodi, spremljajte raven mleka tako, da skodelico spustite, pri čemer mora biti konica parne šobe vedno tik pod površino mleka.
i. Ko se ustvari pena, dvignite skodelico, da je šoba za paro na sredini mleka.
5.UPRAVLJAČKA PLOČA
A: 1 doza vrućeg espressa
B: UKLJUČENO/ISKLJUČENO
C: 2-hot vrući espresso
D: američki
E: Espresso cool
F: Steam
6. UPUTE ZA UPORABU
PRIJE PRVE UPOTREBE
- Provjerite je li aparat za espresso ISKLJUČEN i odspojen s glavnog napajanja.
- Držite ručicu za nošenje spremnika za vodu i povucite spremnik za vodu prema gore.
- Napunite spremnik svježom i hladnom vodom. NEMOJTE prekoračiti oznaku maksimalne razine turpijanja 'MAX'.
- Ponovno umetnite spremnik za vodu i provjerite je li spremnik ispravno postavljen.
- Umetnite filter u portafilter i pričvrstite portafilter u glavu kave. Gurnite ručicu ulijevo, zatim okrenite ručicu udesno dok se ne zaključa. Otpustite ručku, portafilter mora biti pravilno postavljen u glavu za kavu i okrenut prema naprijed pod kutom od 90°.
- Stavite jednu espresso kavu na pladanj ispod grlića za kavu.
- Uključite uređaj u strujnu utičnicu i pritisnite tipku ON/OFF, svi indikatori su stabilni.
- Vruća voda počni teći u šalicu za espresso kavu; kada se napuni bacite vodu.
- Ponovite ovaj postupak 2-3 puta i sada je vaš aparat za kavu spreman za pripremu svježe espresso kave prema vašim zahtjevima.
- Pričvrstite portafilter u glavu kave. Gurnite ručicu prema lijevo, a zatim je okrenite udesno dok se ne zaključa. Otpustite ručku, portafilter mora biti čvrsto postavljen u glavu za kavu i okrenut prema naprijed pod kutom od 90°.
natural_image
Technical line drawing of a mechanical device before and after assembly, showing internal components and motion (no text or symbols)flowchart
graph TD
    A["01: Capsule Funnel"] --> B["02: Down"]
    B --> C["03: Stabilized Capsule"]
    C --> D["04: Pressing Capsule Funnel with a 'Furry', 'Turner', 'Lock', 'The Funnel'"]
- Stavite vruću šalicu za 1 dozu na pladanj za skupljanje tekućine.
- Nakon završetka predgrijavanja, pritisnite tipku za 1-shot kavu, pričekajte trenutak i kava će iscuriti. Vrijeme kuhanja je maksimalno 17 s i jedinica će automatski prestati raditi ako unutar 17 s nema nikakve operacije.
- Nakon završetka pripreme kave, pritisnite tipku za uključivanje, svi indikatori će se ugasiti i aparat za kavu prestaje raditi, vaša kava je sada spremna.
- Uklonite metalni portafilter okretanjem ulijevo, zatim izlijte filter kapsule.
- Pustite da se skroz ohlade, a zatim isperite pod mlazom vode
NAPRAVITE CAPPUCCINO / PJENJENO MLIJEKO
5.PANEL STEROWANIA
Instructions for Use
5.PANOU DE CONTROL
A: 1 shot de espresso fierbinte
B: ON/OFF
C: 2 shot espresso fierbinte
D: Americano
E: Espresso rece
F: Abur
6. INSTRUCTIUNI DE UTILIZARE
ÎNAINTE DE PRIMA UTILIZARE
natural_image
Technical line drawing of a mechanical device before and after assembly, showing internal components and motion (no text or symbols)natural_image
Line drawing of a mechanical device with lever and handle (no text or symbols)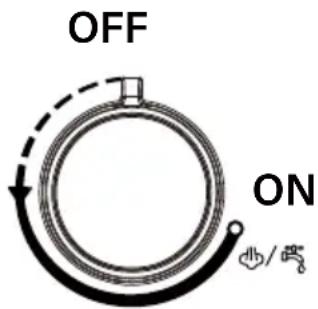

Capsule Funnel
Instructions for Use

5. ПАНЕЛЬ КЕРУВАННЯ
natural_image
Technical line drawing of a mechanical device before and after assembly, showing internal components and motion (no text or symbols)natural_image
Technical line drawing of a mechanical device with no visible text or symbols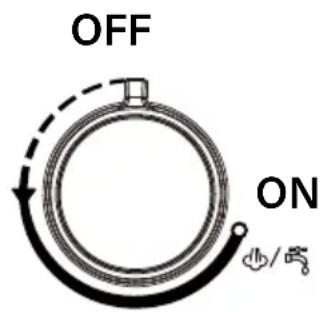
Capsule Funnel
Instructions for Use
5. PANELL DE CONTROL
A: 1 espresso calenta
B: Boto ON / OFF
C: Espresso calent de 2 tasses
D: Americà
E: Espresso Freda
F: Vapor
6. INSTRUCCIONS D'ÚS
ABANS DEL PRIMER ÚS
natural_image
Technical line drawing of a mechanical device before and after assembly (no text or symbols)Capsule Funnel
Instructions for Use
DÉCLARATION DE CONFORMITÉ
DECLARATION OF CONFORMITY
This device complies with EU Low Voltage Directive 2014/35/EC.
Electromagnetic Compatibility Directive 2014/30/EU. Directive 2015/863/EU on the restriction of the use of certain hazardous substances in electrical.
Directive 2009/125/EC on the eco-design requirements applicable to energy-related products.

This symbol on the product or on the packaging indicates that this product can't be disposed as normal rubbish or household waste. All the electrical, electronic equipment's and battery-operated units must recycle in proper manner and according to the local municipal laws. You can recycle them by taking them to government authorized disposal centres or specialized bins which you can find in any nearby big super markets, electronics or electro domestics products stores or malls who have these types of facilities available.
Designed by: SOGO based on European quality standards Imported by: Sanysan Appliances S.L, NIF: B98753056, C/ Barcas 2, 2, 46002 Valencia, Spain Product manufactured in CHINA. After-sales service: www.sogosat.com sogosat@sogosat.com / 0034 902 222 161
- PANEL DE CONTROL
- INSTRUCCIONES DE USO
- Safety instructions for the user
- General precautions during the use of electrical equipment
- Restrictions on use to avoid personal injury
- Restrictions on use when used with children and elders
- Instructions to follow when using the appliance
- CLEANING AND MAINTENANCE
- PARTS DESCRIPTION
- 5.CONTROL PANEL
- INSTRUCTIONS FOR USE
- BEFORE THE FIRST USE
- Preparation of Espresso Coffee for first time:
- Preparation of different coffees with the help of Digital display panel
- MAKE CAPPUCCINO / FROTHED MILK
- Method:
- CLEANING AND MAINTENANCE
- CLEANING THE FILTERS, PORTAFILTER HOLDER AND BREW HEAD
- CLEANING THE OUTER HOUSING/CUP WARMING PLATE
- CLEANING THE DRIP TRAY
- CLEANING THE STEAM WAND
- Cooling function
- CLEANING OF MINERAL DEPOSITS
- ORTANT:
- PANNEAU DE CONTRÔLE
- BEDIENFELD
- 5.PANNELLO DI CONTROLLO
- 5.OVLÁDACÍ PANEL
- NÁVOD K POUŽITÍ
- PŘED PRVNÍM POUŽITÍM
- KONTROLPANEL
- INSTRUKTIONER TIL BRUG
- F∅R F∅RSTE BRUG
- 5.NADZORNA PLOŠČA
- NAVODILA ZA UPORABO
- PRED PRVO UPORABO
- 5.UPRAVLJAČKA PLOČA
- UPUTE ZA UPORABU
- PRIJE PRVE UPOTREBE
- NAPRAVITE CAPPUCCINO / PJENJENO MLIJEKO
- 5.PANEL STEROWANIA
- 5.PANOU DE CONTROL
- INSTRUCTIUNI DE UTILIZARE
- ÎNAINTE DE PRIMA UTILIZARE
- ПАНЕЛЬ КЕРУВАННЯ
- PANELL DE CONTROL
- INSTRUCCIONS D'ÚS
- ABANS DEL PRIMER ÚS
- DÉCLARATION DE CONFORMITÉ
- DECLARATION OF CONFORMITY
Brand : Sogo
Model : SS-5668
Category : Coffee machine