
Romax 4000 - Hydraulic clamp ROTHENBERGER - Free user manual and instructions
Find the device manual for free Romax 4000 ROTHENBERGER in PDF.

| Product type | Cordless hydraulic press |
| Brand | Rothenberger |
| Model | Romax 4000 |
| Rated voltage | 18 V |
| Power consumption | 540 W |
| Max pressing force | 34 kN |
| Pressing time | Approx. 5 s |
| Dimensions (L x W x H) | 450 x 125 x 79 mm |
| Weight (without battery) | Approx. 2.9 kg |
| Working range | Ø 12 to 108 mm (depending on system) |
| Operating temperature | -10 to 60 °C |
| Sound pressure level | 71 dB(A) |
| Sound intensity level | 82 dB(A) |
| Total vibrations | ≤ 2.5 m/s² |
| Battery type | Li-Ion 18 V (CAS) |
| Jaw rotation | 270° |
| Inspection indicator | Flashing LED after 40,000 cycles |
| Emergency stop | Yes (dedicated button) |
| Duty cycle | S3 (intermittent) |
| Maintenance | Regular cleaning and lubrication; inspection every 40,000 cycles or 2 years |
| Included accessories | Battery, charger, jaws (depending on version) |
| Warranty | Subject to conditions, warranty seal |
Frequently Asked Questions - Romax 4000 ROTHENBERGER
User questions about Romax 4000 ROTHENBERGER
0 question about this device. Answer the ones you know or ask your own.
Ask a new question about this device
Download the instructions for your Hydraulic clamp in PDF format for free! Find your manual Romax 4000 - ROTHENBERGER and take your electronic device back in hand. On this page are published all the documents necessary for the use of your device. Romax 4000 by ROTHENBERGER.
USER MANUAL Romax 4000 ROTHENBERGER
natural_image
Product display of a Rothenberger electric shaver with two additional labeled designs (no visible text or symbols on main body)EN Instructions for use
rothenberger.com
No.: 1200001764 ROMAX 4000 basic
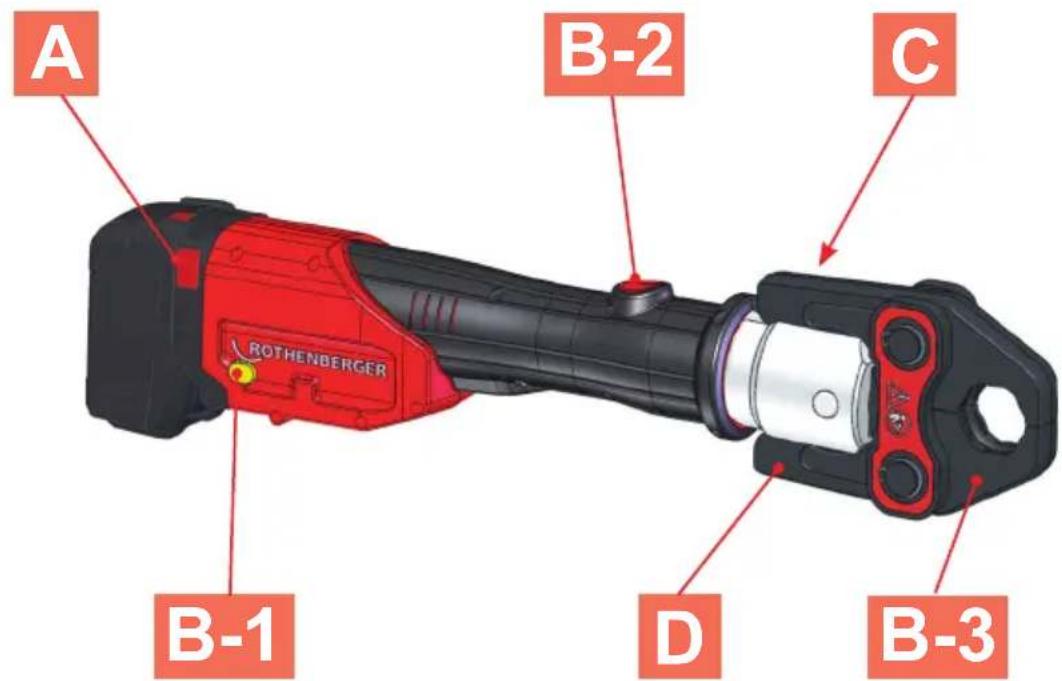
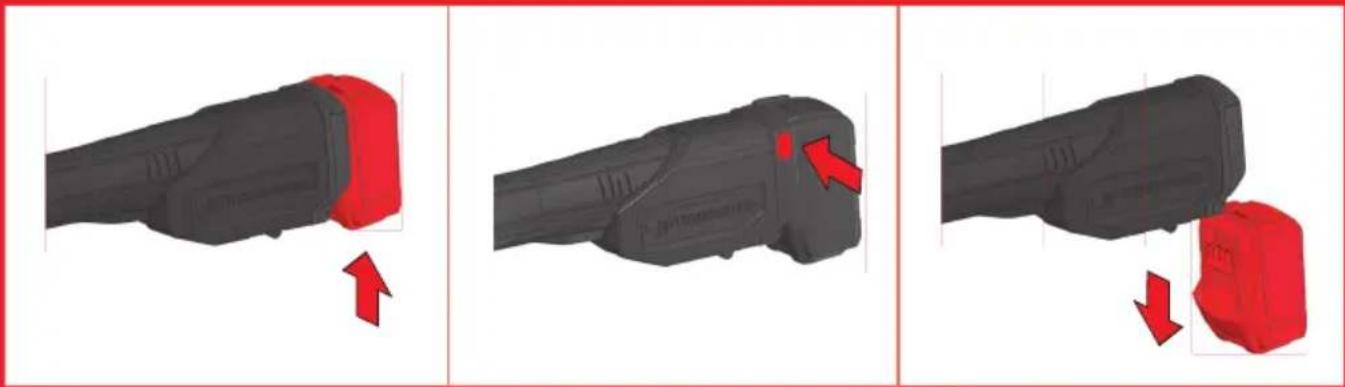
A Changing Battery
natural_image
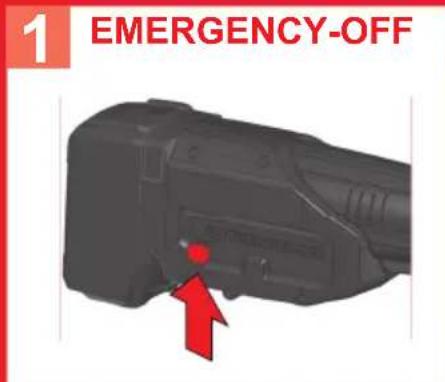
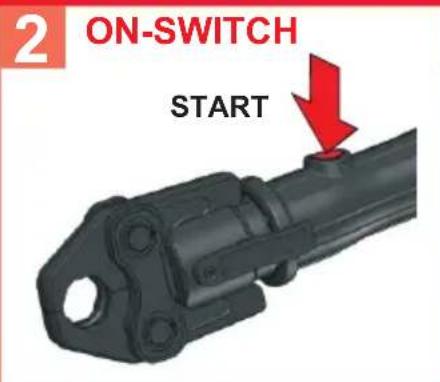
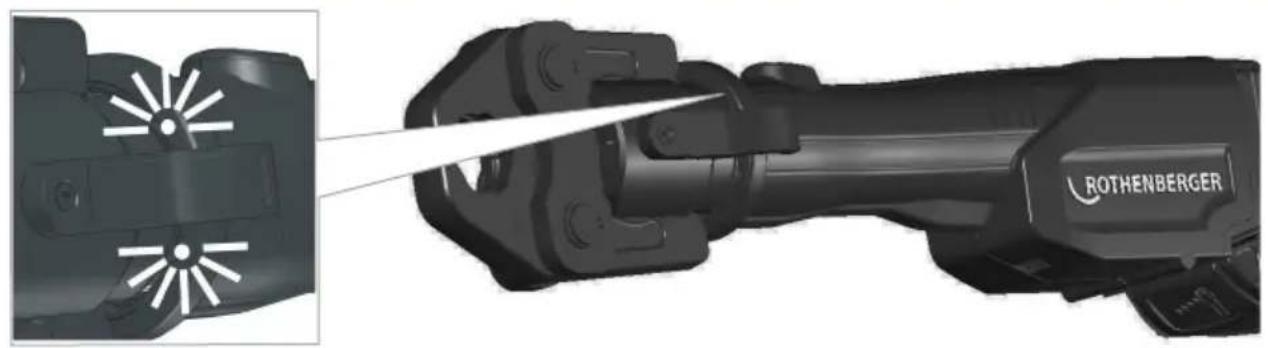
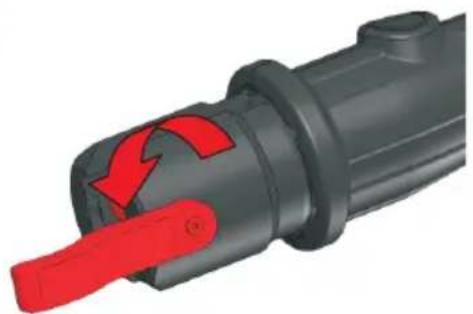
Three-step illustration of a black cylindrical device with red arrows indicating movement, showing progressive assembly or disassembly (no text or symbols)B Emergency-Off / ON-Switch / Positions

natural_image
Close-up of a Rothenberger robotic device with a tool inserted, showing internal components and a close-up inset (no text or symbols on the device itself)Insert Press Jaw
D
1
natural_image
Close-up of a mechanical component with red arrows indicating motion or force direction (no text or symbols)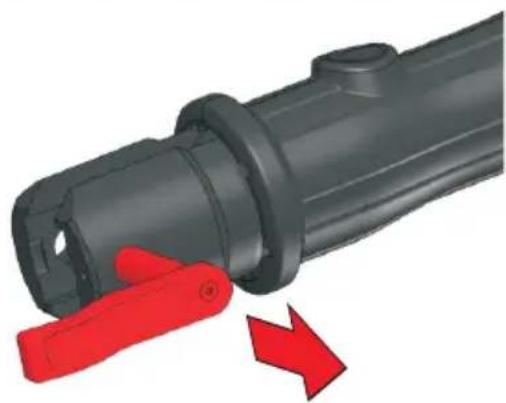
natural_image
3D rendering of a mechanical component with red directional arrow indicating movement (no text or symbols)2

natural_image
3D mechanical component illustration showing a red bracket being processed into a black cylindrical part (no text or symbols)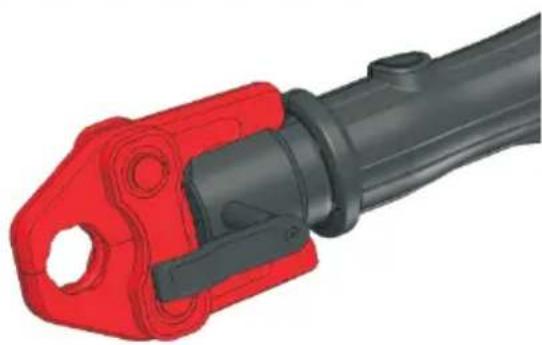
natural_image
3D rendered mechanical component with red and black parts, no visible text or symbols3
natural_image
3D mechanical component with red arrow indicating a specific part (no text or symbols visible)
natural_image
3D mechanical component with red directional arrows indicating motion or movement (no text or symbols)E Operating
1
natural_image
Illustration of a red pipe clamp tool interacting with two red cylindrical components, showing mechanical assembly (no text or symbols)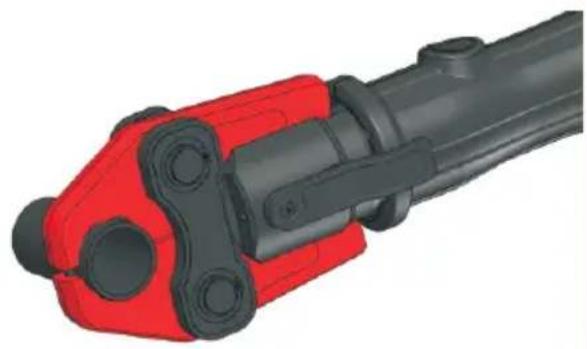
natural_image
3D rendered mechanical component with red and black parts, no visible text or symbols2
natural_image
Illustration of a robotic arm with red components and a red eye symbol, accompanied by a warning sign (no text or symbols present)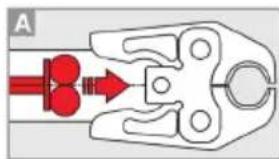
natural_image
Diagram of a mechanical clamp or clamping device with red components and a central connector (no text or symbols)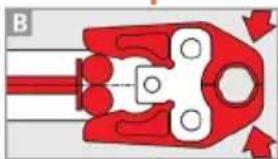
natural_image
Red mechanical clamp or clamping device with mounting holes and directional arrows (no text or symbols)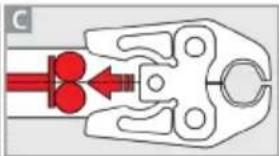
natural_image
Diagram of a mechanical clamp or clamp mechanism with red components and directional arrows (no text or labels)3
natural_image
Red and black 3D illustration of a red pipe fitting with a handle, showing a drop and movement (no text or symbols)
natural_image
Two red geometric shapes: a tall trapezoid and a solid square, with no text or symbols.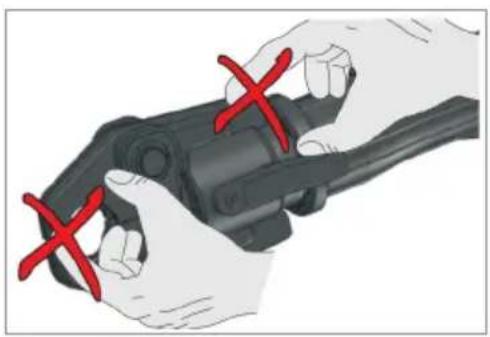
natural_image
Illustration of hands holding a mechanical device with red X marks (no text or symbols)Charger / Battery
F
| Battery art. no. U Ⓒ W lc t | ||||||
| RO BP18/2 100000 | 1652 18 V 2,0 Ah | 400 g | 3 A 40 min | |||
| RO BP18/4 100000 | 1653 18 V 4,0 Ah | 670 g | 3 A 80 min | |||
| RO BP18/4 Li-HD 1 | 000002548 18 V | 4,0 Ah | 584 g 3 A | 80 min | ||
| RO BP18/8 Li-HD 1 | 000002549 18 V | 8,0 Ah | 977 g 3 A | 160 min | ||

| Charger | art. no. | U1 | f1 | P1 | U2 | I2 | Nc | W |
| RO BC14/36 EU | 1000001654 | 220 - 240V | 50 - 60Hz | 85W | 14 - 42V | 3,0 A DC | 4 - 10 | 600g |
| RO BC14/36 AUS | 1000001655 | 220 - 240V | 50 - 60Hz | 85W | 14 - 42V | 3,0 A DC | 4 - 10 | 600g |
| RO BC14/36 USA CND | 1000001656 | 115V | 50 - 60Hz | 85W | 14 - 42V | 3,0 A DC | 4 - 10 | 600g |
| RO BC14/36 UK | 1000001691 | 220 - 240V | 50 - 60Hz | 85W | 14 - 42V | 3,0 A DC | 4 - 10 | 600g |
| RO BC14/36 JP | 1000003033 | 100V | 50 - 60Hz | 85W | 14 - 42V | 3,0 A DC | 4 - 10 | 600g |
fi g. charger and battery similar
Intro
EU-DECLARATION OF CONFORMITY
We declare on our sole accountability that this product conforms to the standards and guidelines stated.
DECLARATION EU DE CONFORMITÉ
t = Ladedauer (90% voll)
Ladespannung....20,75 V DC
Ladetemperatur 0° - 50° C
Max. Entladetemperatur.....5° - 50°C
service@rothenberger.com - www.rothenberger.com
8 Entsorgung
1.1 Intended use....13
1.2 General Power Tool Safety Warnings 13
1.3 Special safety instructions 15
2 Technical data ROMAX 4000....17
3 Technical Data charger and battery (F) 18
4 Function of the Unit....18
4.1 Changing the battery (A)....18
4.2 EMERGENCY STOP Button (B-1) 18
4.3 To switch on (B-2) 18
4.4 To turn the press jaw (B-3)....18
4.5 LED (C)....19
4.6 To insert the press jaw (D)....19
4.7 Operation (E)....19
4.8 Charger and battery (F)....19
5 Care and Maintenance....20
6 Accessories....21
7 Customer service....21
8 Disposal....21
Markings in this document:

Markings in this document!
This sign warns against the danger of personal injuries.

Caution!
This sign warns against the danger of property damage and damage to the environment.

Call for action
FCC-Statement (Class A, Group 1)

This device complies with Part 15 of the FCC Rules. Operation is subject to the following two conditions: (1) This device may not cause interference, and (2) this device must accept any interference received, including interference that may cause undesired operation.
Federal Communications Commission Statement
NOTE – This equipment has been tested and found to comply with the limits for a Class A, Group 1 digital device, pursuant to Part 15 of the FCC Rules. These limit values were designed to provide adequate protection against faults occurring during operation in industrial areas. This equipment generates uses and can radiate radio frequency energy and, if not installed and used in accordance with the instructions, may cause harmful interference to radio communications. However, there is no guarantee that interference will not occur in a particular installation.
Class A, Group 1 Note
Warning – This is a Class A, Group 1 product. In a domestic environment this product may cause radio interference in which case the user may be required to take adequate measures.
1.1 Intended use
The user bears sole responsibility for any damage caused by improper use.
Generally accepted accident prevention regulations and the enclosed safety information must be observed.
ROMAX 4000:
The ROMAX 4000 is designed exclusively for the use of pressing jaws manufactured by ROTHENBERGER or that have been declared suitable by ROTHENBERGER.
The device and the press jaws are designed exclusively for crimp fittings, for which the corresponding pressing jaws have been designed. Any other or additional use shall be deemed improper.
ROTHENBERGER cannot accept any liability for the resultant consequences and damage, nor for the use of pressing jaws from other manufacturers, neither for damage caused by these pressing jaws.
Proper usage also includes compliance with the operating manual, compliance with the inspection and servicing conditions and adherence to all the relevant safety regulations.
The ROMAX 4000 is a handheld electric machine and must not be used for stationary applications.
This device may only be used correctly as described.
Use only original ROTHENBERGER or CAS (Cordless Alliance System) battery packs and accessories.
Charger and battery:
The chargers are only suitable for charging ROTHENBERGER and CAS (Cordless Alliance System) battery packs.
This tool is not designed for use by persons with physical, sensory or mental disabilities, or with insufficient experience and/or knowledge, unless they are supervised by a person responsible for their safety, or have received instructions on how to use the tool by this person.
Never attempt to charge batteries that are not rechargeable. Danger of explosion!
Battery packs marked with CAS are 100% compatible with CAS devices (Cordless Alliance System). To select the appropriate device, please contact your ROTHENBERGER dealer. Read the relevant instructions for the devices used.
1.2 General Power Tool Safety Warnings

WARNING! Read all safety warnings, instructions, illustrations and specifications provided with this power tool.
Failure to follow all instructions listed below may result in electric shock, fire and/or serious injury.
Save all warnings and instructions for future reference.
The term “power tool” in the warnings refers to your electrically-operated (corded) power tool or battery-operated (cordless) power tool.
1) Work area safety
a) Keep work area clean and well lit. Cluttered and dark areas invite accidents.
b) Do not operate power tools in explosive atmospheres, such as in the presence of flammable liquids, gases or dust. Power tools create sparks which may ignite the dust or fumes.
c) Keep children and bystanders away while operating a power tool. Distractions can cause you to lose control.
2) Electrical safety
a) Power tool plugs must match the outlet. Never modify the plug in any way. Do not use any adapter plugs with earthed (grounded) power tools. Unmodified plugs and matching outlets will reduce risk of electric shock.
b) Avoid body contact with earthed or grounded surfaces, such as pipes, radiators, ranges and refrigerators. There is an increased risk of electric shock if your body is earthed or grounded.
c) Do not expose power tools to rain or wet conditions. Water entering a power tool will increase the risk of electric shock.
d) Do not abuse the cord. Never use the cord for carrying, pulling or unplugging the power tool. Keep cord away from heat, oil, sharp edges and moving parts. Damaged or entangled cords increase the risk of electric shock.
e) When operating a power tool outdoors only, use an extension cords suitable for outdoor use. Use of a cord suitable for outdoor use reduces the risk of electric shock.
f) If operating a power tool in a damp location is unavoidable, use a residual current device (RCD) protected supply. Use of an RCD reduces the risk of electric shock.
3) Personal safety
a) Stay alert, watch what you are doing and use common sense when operating a power tool. Do not use a power tool while you are tired or under the influence of drugs, alcohol or medication. A momentary lack of attention while operating power tools may result in serious personal injury.
b) Use personal protective equipment. Always wear eye protection. Protective equipment such as dust mask, non-skid safety shoes, hard hat, or hearing protection used for appropriate conditions will reduce personal injuries.
c) Prevent unintentional starting. Ensure the switch is in the off-position before connecting to power source and/or battery pack, picking up or carrying the tool. Carrying power tools with your finger on the switch or energising power tools that have the switch on invites accidents.
d) Remove any adjusting key or wrench before turning the power tool on. A wrench or a key left attached to a rotating part of the power tool may result in personal injury.
e) Do not overreach. Keep proper footing and balance at all times. This enables better control of the power tool in unexpected situations.
f) Dress properly. Do not wear loose clothing or jewellery. Keep your hair, clothing and gloves away from moving parts. Loose clothes, jewellery or long hair can be caught in moving parts.
g) If devices are provided for the connection of dust extraction and collection facilities, ensure these are connected and properly used. Use of dust collection can reduce dust-related hazards.
h) Do not let familiarity gained from frequent use of tools allow you to become complacent and ignore tool safety principles. A careless action can cause severe injury within a fraction of a second.
4) Power tool use and care
a) Do not force the power tool. Use the correct power tool for your application. The correct power tool will do the job better and safer at the rate for which it was designed.
b) Do not use the power tool if the switch does not turn it on and off. Any power tool that cannot be controlled with the switch is dangerous and must be repaired.
c) Disconnect the plug from the power source and/or remove the battery pack, if detachable, from the power tool before making any adjustments, changing accessories, or storing power tools. Such preventive safety measures reduce the risk of starting the power tool accidentally.
d) Store idle power tools out of the reach of children and do not allow persons unfamiliar with the power tool or these instructions to operate the power tool. Power tools are dangerous in the hands of untrained users.
e) Maintain power tools and accessories. Check for misalignment or binding of moving parts, breakage of parts and any other condition that may affect the power tool's operation. If damaged, have the power tool repaired before use. Many accidents are caused by poorly maintained power tools.
f) Keep cutting tools sharp and clean. Properly maintained cutting tools with sharp cutting edges are less likely to bind and are easier to control.
g) Use the power tool, accessories and tool bits etc., in accordance with these instructions, taking into account the working conditions and the work to be performed. Use of the power tool for operations different from those intended could result in a hazardous situation.
h) Keep handles and grasping surfaces dry, clean and free from oil and grease. Slippery handles and grasping surfaces do not allow for safe handling and control of the tool in unexpected situations.
5) Battery tool use and care
a) Recharge only with the charger specified by the manufacturer. A charger that is suitable for one type of battery pack may create a risk of fire when used with another battery pack.
b)
WARNING! Use power tools only with specifically designated battery packs and respectively battery types. Use of any other battery packs may create a risk of explosions, injury and fire.
c) When battery pack is not in use, keep it away from other metal objects like paper clips, coins, keys, nails, screws, or other small metal objects that can make a connection from one terminal to another. Shorting the battery terminals together may cause burns or a fire.
d) Under abusive conditions, liquid may be ejected from the battery; avoid contact. If contact accidentally occurs, flush with water. If liquid contacts eyes, additionally seek medical help. Liquid ejected from the battery may cause irritation or burns.
e) Do not use a damaged or modified battery. Damaged or modified batteries can behave unexpectedly and lead to fires, explosions or injuries.
f) Do not expose a battery for fire or high temperatures. Fire or temperatures above 130^ C ( 265^ F) can cause an explosion.
g) Follow all the instructions for charging and never charge the battery or the cordless tool outside the temperature range specified in the operating instructions. Incorrect charging or charging outside the permitted temperature range can destroy the battery and increase the fire risk.
6) Service
a) Have your power tool serviced by a qualified repair person using only identical replacement parts. This will ensure that the safety of the power tool is maintained.
b) Never service damaged batteries. All maintenance of batteries should only be carried out by the manufacturer or authorised customer service points.

1.3 Special safety instructions
The term press jaw also includes main Jaw, press ring and press chain.
ROMAX 4000:
Never hold your fingers or other body parts in the working area of the cylinder or the press jaws.
Remove the battery before carrying out any work on the machine.
If the device is so badly damaged that electric cables or drive parts are exposed, disconnect the mains plug immediately and contact your service outlet. Unauthorised repair work may result in the user suffering major injuries or even death.
Only personnel trained in how to use the device may make crimp pipe joints using the ROMAX 4000.
The machine may only be used with a press jaw inserted into it. The press jaw must be in perfect technical condition.
Only start the machine if it is in perfect working order.
Servicing and repair work may only be carried out by workshops authorised by ROTHEN-BERGER.
Use only suitable press jaws and press fitting systems that have been approved by ROTHEN-BERGER.
After you have inserted the press jaw check that the bolt is securely locked.
In the event of problems during the pressing process, press the EMERGENCY STOP button.
Check that the pipe joint is secure after you have completed the pressing process.
Imperfect pipe joints must be compressed again using a new fitting.
Follow the installation instructions supplied by the fitting and pipe manufacturers.
Assure by pressing leaky press fittings that no humidity respectively lotic water reaches into the inside of the machine!
After finishing the work, check the installation with appropriate testing equipment and assure that it is leakproof!
Charger and battery:
This charger is not intended for use by children and persons with physical, sensory or mental limitations or a lack of experience or knowledge. This charger can be used by children aged 8 and above and by persons who have physical, sensory or mental limitations or a lack of experience or knowledge if a person responsible for their safety supervises them or has instructed them in the safe operation of the charger and they understand the associated dangers. Otherwise, there is a danger of operating errors and injuries.
Supervise children during use, cleaning and maintenance. This will ensure that children do not play with the charger.
Do not charge non-rechargeable batteries.

Danger - electrical voltage!!

Only use the charger indoors!

Protect the charger from moisture!
Never allow children to use the machine. Children should be supervised to ensure that they do not play with the tool.
Keep children away from the battery charger and the working area!
Keep your battery charger out of reach of children!
Pull out the mains plug immediately if the battery charger starts to smoke or flames emerge!
Do not insert objects into the ventilation slots on the battery charger – there is a danger of electric shocks and short circuits!
Do not recharge a fully charged battery pack!

Protect battery packs from water and moisture!
Do not expose battery packs to naked flame!
Do not use faulty or deformed battery packs!
In areas with high metal dust exposure do not load any battery packs with AIR COOLED chargers.
Do not open battery packs!
Do not touch or short-circuit battery packs!

Slightly acidic, flammable fluid may leak from defective Li-ion battery packs!

If battery fluid leaks out and comes into contact with your skin, rinse immediately with plenty of water. If battery fluid leaks out and comes into contact with your eyes, wash them with clean water and seek medical attention immediately!
Transporting li-ion battery packs: The contained lithium-ion batteries are subject to the Dangerous Goods Legislation requirements. The user can transport the batteries by road without further requirements. When being transported by third parties (e.g.: air transport or forwarding agency), special requirements on packaging and labelling must be observed. For preparation of the item being shipped, consulting an expert for hazardous material is required. Only send the battery pack if the housing is intact and no fluid is leaking. Remove the battery pack from the machine for sending. Prevent the contacts from short-circuiting (e.g. by protecting them with adhesive tape).
Dispatch batteries only when the housing is undamaged. Tape or mask off open contacts and pack up the battery in such a manner that it cannot move around in the packaging. Please also observe possibly more detailed national regulations.
2 Technical data ROMAX 4000
Battery voltage 18 V
Rated power consumption.... 540 W
Motor speed. 22000 min ^-1
Maximum piston force ....max. 34 kN
Pressing time (according to nominal size).....ca. 5 s
Dimensions (L x W x H) 450 x 125 x 79 mm
Weight (without battery) ......ca. 2,9 kg
Working range (system-dependent)....Ø 12 – 108 mm
Application temperature range....-10 - 60°C / 14 - 140°F
Operating mode ....S3
Sound pressure level ( L_pA ) 71 dB (A) | K_pA 3 dB (A)
Sound power level (LWA) 82 dB (A) | KWA 3 dB (A)
The noise level during operation can exceed 85 dB (A). Wear hearing protection!
Measured values determined in accordance with EN 62841-1.
Vibration total value ....≤ 2,5 m/s ^2 | K= 1,5m/s ^2
The Vibration Total Value quoted in these instructions and the quoted noise emission values were measured according to standardized measurement procedures and can be used to compare one electric power tool with another. They can also be used to make an initial estimate of the loading.

The quoted vibration and noise emissions can vary during actual use of the electric power tool dependent on the way in which the electric power tool is used, in particular what type of workpiece is being processed. Establish additional safety measures to protect the operator which are based upon an estimate of the vibration loading during the actual usage conditions (in doing so taking account of parts of the operating cycle, for example times in which the electric power tool is switched and those in which it is switched on but not running under load).
3 Technical Data charger and battery (F)
Battery: Charger:
U = Voltage U1 = Input voltage
C = Capacity f1 = Input frequency
W = Weight P1 = Input power
lc = Charge current
t = Approx. charging time (90% full)
Charging voltage.....20,75 V DC
Charging temperature .. 0° - 50° C, 32° - 122° F W
Max. discharging
temperature....5° - 50° C, 41° - 122° F
Recharge battery pack before first use!
U2 = Charging voltage
12 = Max. charge current
Nc = No. of battery cells
= Weight
Pay attention to the electrical outlet voltage! Check the label on the bottom of the charger!
4 Function of the Unit
4.1 Changing the battery
(A)
Insert battery until the catch clicks into place. (LED flashes briefly = Contact made). To remove press the catch and take out the battery.

If the required voltage is not delivered by the battery, the LED will flash and a tone sequence will be issued during renewed starting. Charge the battery in the charger.
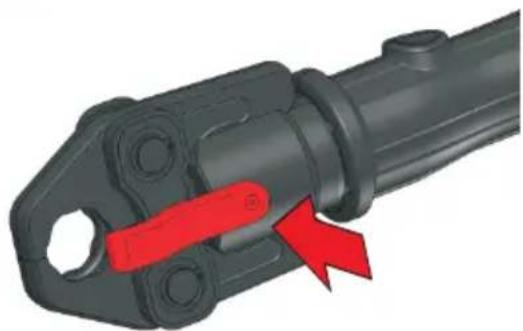
4.2 EMERGENCY STOP Button
(B-1)
If there is any danger to personnel or the machine during the pressing process, press the EMERGENCY STOP button immediately and release the ON switch. The valve will open and the piston will return to its initial position.
4.3 To switch on
(B-2)
Press the ON button until the pressing process has been completed. The motor cut out indicates the end of the moulding cycle.
4.4 To turn the press jaw
(B-3)
The press jaw can be turned through 270^ depending on the application.
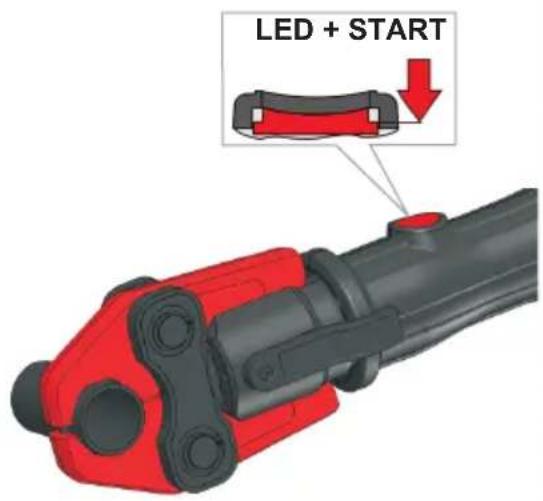
4.5 LED (C)
The white LED's lights up by starting the press cycle (up to 30 sec. after end of the press cycle).
The white LEDs flash: after 40,000 pressing processes the LEDs flash after every pressing process as an indication of the need for the next inspection. An internal counter keeps a record of the number of pressing since leaving the factory.
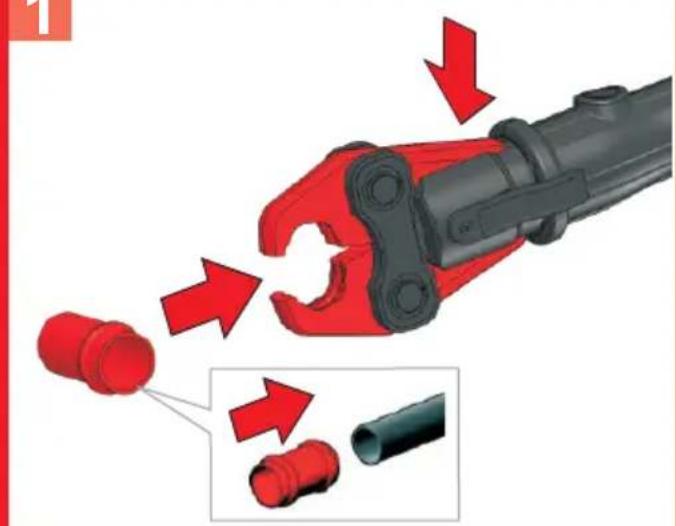
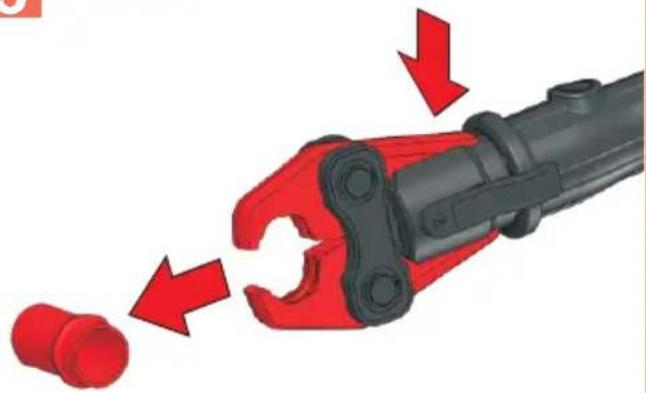
4.6 To insert the press jaw (D)
Remove battery!
→ Open the bolt (1).
→ Insert the appropriate press jaw for the job in hand (2).
→ Lock the bolt (3).
After changing the press jaw it is essential to ensure that, once engaged, the crimping jaw matches the profile being moulded and the nominal width of the fitting being moulded. A visual inspection must be carried out in order to determine that the press jaw is fully closed at the end of the press cycle.
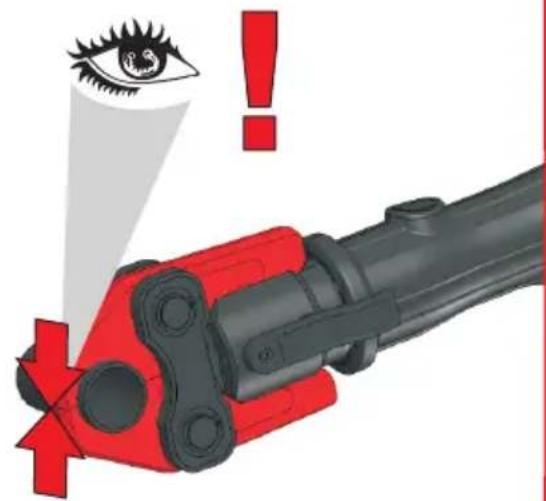
4.7 Operation (E)
Use only system-compatible press fittings and press jaws designed for them. The nominal size of the press jaw must be identical with the nominal size of the press fitting.

When inserting the pipe / press fitting system, there is a risk of crush injuries for the fingers or other body parts near the press jaw!
→ Push the press fitting on to the pipe (1). Pull the press jaw apart and insert the pipe with the press fitting at right angles.
There must be no foreign bodies between the press contour and the fitting. If you fail to ensure this, the pressing process will not produce a perfect joint!
→ Press the ON button until the pressing process has been completed (2). The motor cut out indicates the end of the moulding cycle.
→ Push the press jaw apart and take the machine off the joint (3).
Do not start the machine while the piston retracts or the emergency shutdown is pressed!
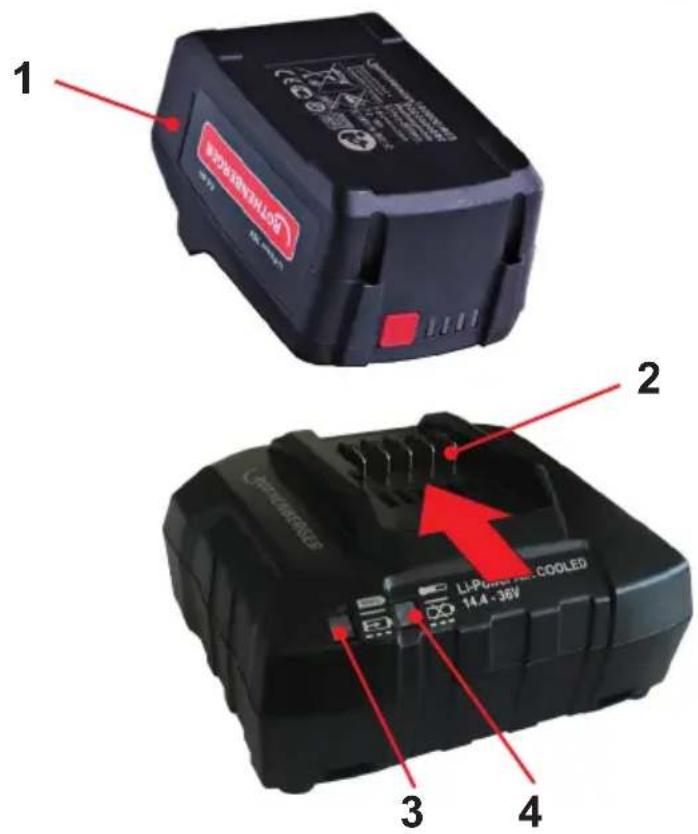
4.8 Charger and battery (F)
Overview:
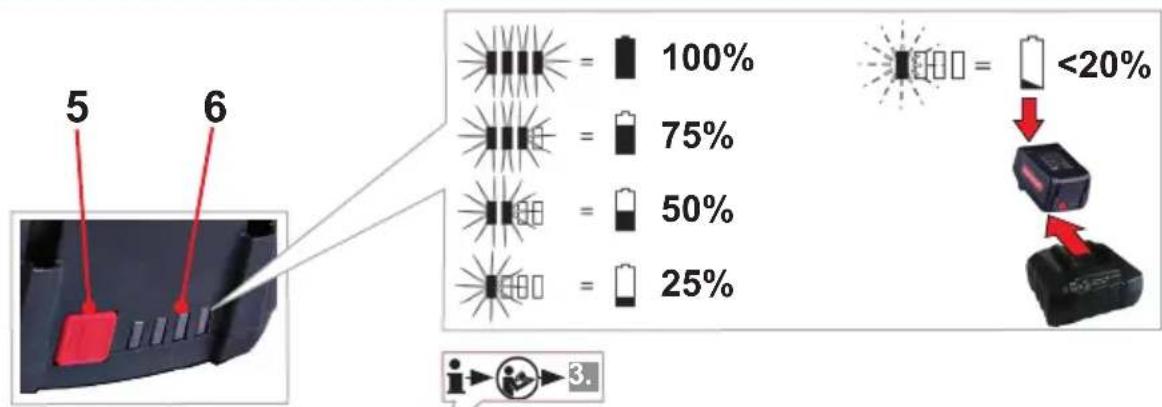
1 Battery pack 4 Warning display
2 Sliding seat 5 Capacity indicator button
3 Operation display 6 Capacity and signal indicator
Start of operation

Before plugging in, check to see that the rated mains voltage and mains frequency, as specified on the rating label, match your power supply!
Devices such as this one, which generate direct current, may have an effect on basic residual-current circuit breakers. Use type F or better, with a release current of max. 30 mA.

Before commissioning the charger, ensure that the air slots are free. Minimum distance to other objects is 5 cm/2"!
Self-test:
→ Insert mains supply plug.
The warning display (4) and the operating indicator (3) light up one after the other for approx. 1 second and the installed fan runs for approx. 5 seconds.
Battery pack:
Charge the battery pack before use (1).
If performance diminishes, recharge the battery pack.
The ideal storage temperature is between 10^ C / 50^ F and 30^ C / 86^ F. The permissible storage temperature is between 0^ C and 50^ C / 32^ - 122^ F.
Li-ion battery packs have a capacity and signal indicator: (6)
→ Press the button (5), the LEDs indicate the charge level.
If one LED is flashing, the battery pack is almost flat and must be recharged.
Handling
Charging battery pack:
→ Push the battery pack completely to the stop on the sliding seat (2).

The operating indicator (3) flashes.
Conservation charge:
Once the charging process has finished, the battery charger automatically switches to conservation mode.
The battery pack can remain in the battery charger and is therefore always ready for use.

The operating display (3) lights up continuously.
Fault:
- Warning display (4) lights up continuously.

Battery pack is not charged. Temperature too high/ too low. When the temperature of the battery pack is between 0 °C and 50 °C / 32° - 122° F, the charging process begins automatically.
- Warning display (4) flashes.
Battery pack is defective. Remove the battery pack immediately from the charger.
The battery pack was not pushed correctly onto the sliding seat (2).
5 Care and Maintenance
ROMAX 4000:
Remove the battery prior to carrying out any work on the machine.
Check that the press jaws are fully functional. Damaged press jaws must not be used and must be sent to an authorised ROTHENBERGER repair shop.
Check that the press jaw and drive rolls move freely.
Check the bolt for signs of damage at regular intervals. Have damaged bolts replaced by an authorised ROTHENBERGER repair shop.
Clean and grease the drive rolls, the bolt and press jaws when you have finished work.
Use only high quality pressing or ball bearing grease.
The pressing contour must be kept free of grease.
All other servicing, maintenance and repair work must be carried out by an authorized ROTHENBERGER repair shop.
If the seal is damaged the warranty will be null and void.
After 40.000 pressing cycles or 2 years have the machine serviced by an authorized ROTHEN-BERGER workshop.
When dispatching the machine ensure that it is packed in its carrying case completely with battery and charger in the carry case only.
Electro-hydraulic machine does not exceed 3 hours in a -5^ C / 23^ F storage.
Disconnect battery from machine before storing.
Charger:
Repairs to the charger must only be carried out by qualified electricians.
If the mains connection cable of this tool is damaged, in order to prevent endangering personnel and property it must be replaced by the manufacturer, or the Customer Service of the manufacturer, or a similarly qualified person.
6 Accessories
You can find suitable accessories in the main catalog or at www.rothenberger.com
7 Customer service
The ROTHENBERGER service locations are available to help you (see listing in catalog or online) and replacement parts and service are also available through these same service locations. Order your accessories and spare parts from your specialist retailer or using RO SERVICE+ online: 📞 + 49 (0) 61 95/ 800 8200 📄 + 49 (0) 61 95/ 800 7491 ✉ service@rothenberger.com - www.rothenberger.com
8 Disposal
Components of the unit are recyclable material and should be put to recycling. For this purpose registered and certified recycling companies are available. For an environmental friendly disposal of the non-recyclable parts (e.g. electronic waste) please contact your local waste disposal authority.
Old batteries can be taken to your specialist dealer who will dispose of them in conformity with environmental regulations.
For EU countries only:
Do not dispose of electric tools with domestic waste. In accordance with European Directive 2012/19/EU on waste electrical and electronic equipment and its implementation as national law, electric tools that are no longer serviceable must be collected separately and utilised for environmentally compatible recycling.
lc = Courant de charge U2
t = Temps de charge (90%)
Tension de charge....20,75 V DC
4.3 Enclenchement (B-2)
service@rothenberger.com - www.rothenberger.com
service@rothenberger.com - www.rothenberger.com
8 Eliminación
7 Klantenservice....61
4.2 NOODSTOP-toets (B-1)
Nc = Antal akkuceller
Opladningstemperatur .....0° - 50° C
W = Vægt
Akkumulatorspenning 18 V
t = Ladetid (90% full) l2 = Max. Ladestrøm
Ladespenning....20,75 V DC
Lading temperatur....0° - 50° C
Max. utladet temperatur.....5° - 50° C
4.6 Sette inn pressbakke
(D)
Ta ut akkumulator!
service@rothenberger.com - www.rothenberger.com
8 Kierrätys
Ładowarki i Akumulator:
Ładowarki i Akumulator:
service@rothenberger.com - www.rothenberger.com
8 Utylizacja
service@rothenberger.com - www.rothenberger.com
8 Likvidace
service@rothenberger.com - www.rothenberger.com
8 Ártalmatlanítás
Akumulatorski paket:
Pred uporabo napolnite akumulatorski paket (1).
Razina zvučne snage (LWA) 82 dB (A) | KWA 3 dB (A)
Akumulators: Uzlādes ierīce:
U = Spriegums U1
= leejas spriegums
natural_image
Blank grid paper with uniform gray squares on white background (no text or symbols)NOTES
D-65779 Kelkheim / Germany
Telefon +49 6195 / 800 - 0
Telefax +49 6195 / 800 - 3500
info@rothenberger.com

- A Changing Battery
- B Emergency-Off / ON-Switch / Positions
- Insert Press Jaw
- D
- E Operating
- Charger / Battery
- Intro
- EU-DECLARATION OF CONFORMITY
- DECLARATION EU DE CONFORMITÉ
- Entsorgung
- Technical data ROMAX 4000....17
- Technical Data charger and battery (F) 18
- Function of the Unit....18
- Care and Maintenance....20
- Accessories....21
- Customer service....21
- Disposal....21
- Markings in this document:
- Markings in this document!
- FCC-Statement (Class A, Group 1)
- Federal Communications Commission Statement
- Class A, Group 1 Note
- Intended use
- ROMAX 4000:
- Charger and battery:
- General Power Tool Safety Warnings
- Save all warnings and instructions for future reference.
- 1) Work area safety
- 2) Electrical safety
- 3) Personal safety
- Special safety instructions
- Protect battery packs from water and moisture!
- Do not expose battery packs to naked flame!
- Slightly acidic, flammable fluid may leak from defective Li-ion battery packs!
- If battery fluid leaks out and comes into contact with your skin, rinse immediately with plenty of water. If battery fluid leaks out and comes into contact with your eyes, wash them with clean water and seek medical attention immediately!
- Technical data ROMAX 4000
- Technical Data charger and battery (F)
- Battery: Charger:
- Function of the Unit
- Changing the battery
- EMERGENCY STOP Button
- To switch on
- To turn the press jaw
- LED (C)
- To insert the press jaw (D)
- Operation (E)
- Charger and battery (F)
- Overview:
- Start of operation
- Self-test:
- Battery pack:
- Handling
- Charging battery pack:
- Conservation charge:
- Fault:
- Care and Maintenance
- Charger:
- Accessories
- Customer service
- Disposal
- For EU countries only:
- Enclenchement (B-2)
- Eliminación
- Klantenservice....61
- NOODSTOP-toets (B-1)
- Sette inn pressbakke
- Kierrätys
- Ładowarki i Akumulator:
- Utylizacja
- Likvidace
- Ártalmatlanítás
- Akumulatorski paket:
- Akumulators: Uzlādes ierīce:
- NOTES
Brand : ROTHENBERGER
Model : Romax 4000
Category : Hydraulic clamp