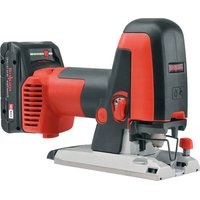
PS 2-18 - Saw Mafell - Free user manual and instructions
Find the device manual for free PS 2-18 Mafell in PDF.


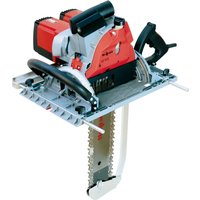
| Product type | Powerful cordless jigsaw |
| Brand | Mafell |
| Model | PS 2-18 |
| Rated voltage | 18 V |
| Motor speed range | 750 - 3100 min⁻¹ (6 levels) |
| Stroke length | 26 mm |
| Cutting depth | 65 mm (at 90°) / 115 mm (at 45°) |
| Weight without battery | 2.21 kg |
| Weight with small battery | approx. 2.8 kg |
| Weight with large battery | approx. 3.19 kg |
| Sound pressure level | 91.8 dB(A) (uncertainty K=3.2 dB) |
| Sound power level | 99.8 dB(A) (uncertainty K=3.2 dB) |
| Hand-arm vibration (wood) | 5.7 m/s² (uncertainty K=1.5 m/s²) |
| Hand-arm vibration (metal) | 5.6 m/s² (uncertainty K=1.5 m/s²) |
| Power supply | Li-Ion CAS battery pack (Cordless Alliance System) |
| Charger | APS M (230 V) included for ref. 91C101, 91C121 |
| Blade change system | Tool-free, clamping lever |
| Oscillating stroke | 2 adjustable levels + stop |
| Work light | LED, 10 s after-run delay |
| Safety devices | Base plate, contact protection, handles, start-up device |
| Standard equipment | Base plate, parallel guide, saw blades, dust extraction sleeve, chip deflector, splinter guard, transport case |
| Maintenance | Regular cleaning, special lubricant (part no. 049040) |
| Spare parts | Available at www.mafell.com |
Frequently Asked Questions - PS 2-18 Mafell
User questions about PS 2-18 Mafell
0 question about this device. Answer the ones you know or ask your own.
Ask a new question about this device
Download the instructions for your Saw in PDF format for free! Find your manual PS 2-18 - Mafell and take your electronic device back in hand. On this page are published all the documents necessary for the use of your device. PS 2-18 by Mafell.
USER MANUAL PS 2-18 Mafell
natural_image
3D rendering of a black industrial sewing machine with levers and base mount (no text or symbols visible)MAF02374/a
WARNUNG
Please read all safety instructions and directions. Failure to comply with the safety instructions and directions can cause electric shock, fire and/or serious injuries. Please retain all safety instructions and directions for future reference.
AVERTISSEMENT
natural_image
3D mechanical component diagram showing exploded view of a handheld device with labeled parts (no text or symbols beyond labels)MAF02368/a
MAF02369/a
MAF02370/a

natural_image
Mechanical assembly diagram showing a bracket with mounting holes and a labeled component (11), no readable text or symbols present.MAF02371/a
natural_image
Mechanical device with mounting base and side-mounted lever mechanism (no visible text or symbols)MAF02372/a
natural_image
Mechanical device with clamping mechanism and mounting base (no visible text or symbols)MAF02373/a
Sonderzubehör – Optional accessories – Accessoires supplémentaires – Accessori speciali – Extra toebehoren – Accesorios especiales – Erikoistarvikkeet – Extra tillbehör – Specialudstyr – Специальные принадлежности – Wyposażenie specjalne – Speciální příslušenství – Poseben pribor - Zvláštne príslušenstvo
natural_image
Line drawing of a sewing machine needle with a sewing machine base and a sewing machine handle (no text or symbols)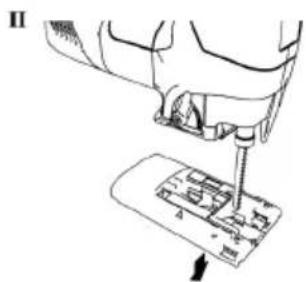
natural_image
Technical line drawing of a sewing machine tool interacting with a base panel (no text or symbols)
natural_image
Technical line drawing of a mechanical assembly with no visible text or symbols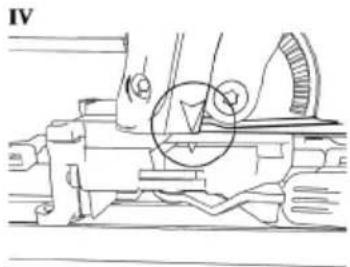
natural_image
Technical line drawing of a mechanical assembly with no visible text or symbols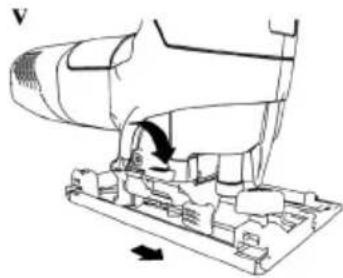
natural_image
Technical line drawing of a mechanical assembly with no visible text or symbols
natural_image
Line drawing of a mechanical device with no visible text or symbols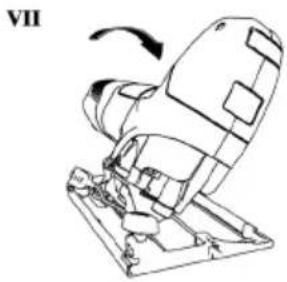
natural_image
Technical line drawing of a mechanical device with no visible text or symbols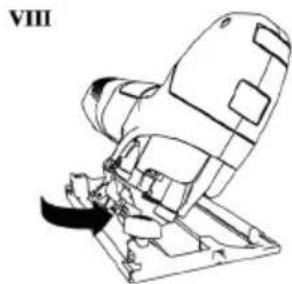
natural_image
Technical line drawing of a mechanical assembly with a directional arrow indicating movement (no text or symbols)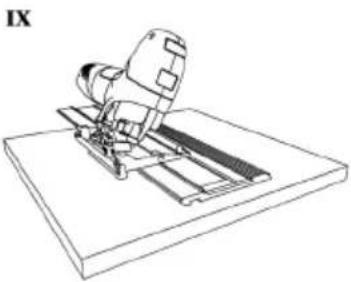
natural_image
Technical line drawing of a mechanical assembly or cutting tool on a base plate (no text or symbols)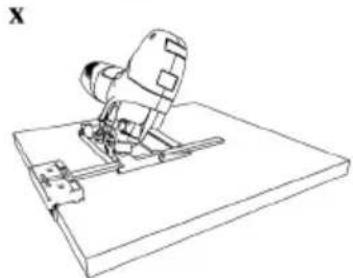
natural_image
Line drawing of a mechanical device mounted on a base plate (no text or symbols)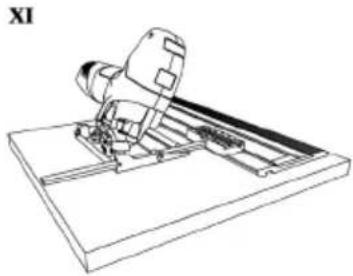
natural_image
Technical line drawing of a mechanical assembly or tool with no visible text or symbolsGB - EC Declaration of Conformity
We herewith confirm that the machine PS 2-18 complies with the EU directives quoted. The standards listed were used for design and construction.
Empowered person for the configuration of the technical documents: Malell AG
natural_image
Close-up of a mechanical component with circular features and a magnifying glass (no visible text or symbols)1 Signs and symbols 26
2 Product information 2
2.1 Manufacturer's data 20
2.2 Information on the rechargeable battery 2
2.3 Machine identification....2
2.4 Technical data 27
2.5 Emissions 27
2.6 Scope of supply 28
2.7 Safety devices....28
2.8 Use according to intended purpose....28
2.9 Residual risks 28
3 Safety instructions....29
4 Layout....30
4.1 Depicted components....30
5 Setting / adjustment....30
5.1 Charging the rechargeable battery....30
5.2 Fitting the rechargeable battery....30
5.3 Removing the rechargeable battery 31
5.4 Dust extraction .... 3
5.5 Inserting the saw blade ....3
5.6 Saw blade change....31
5.7 Large base plate and swivel plate 31
5.8 Use of the performance jigsaw on the guide rail 3
5.9 Assembly and disassembly of the saw blade holder 32
6 Operation....35
6.1 Initial operation....3
6.2 Switching on and off 3
6.3 Pendulum stroke setting....3
6.4 Splinter-free sawing....3
6.5 Positioning the base plate 34
6.6 Reverse sawing....34
6.7 Sawing with parallel guide fence P-PA....3
6.8 Lighting of the work area....3
7 Service and maintenance....35
7.1 Storage....35
7.2 Transport....35
7.3 Disposal of rechargeable batteries/batteries 35
8 Troubleshooting....30
9 Optional accessories....38
9.1 Rechargeable battery 38
9.2 Swivel plate, anti-splintering device, parallel stop ....
9.3 Jigsaw blades....38
9.4 Guide rails 39
10 Exploded drawing and spare parts list 39
1 Signs and symbols

This symbol is found in all places where you will find information for your safety.
Non-compliance with these instructions may result in very serious injuries.
This symbol indicates a potentially hazardous situation.
If this situation is not avoided, the product or objects in its vicinity may get damaged.

This symbol indicates tips for the user and other useful information.
2 Product information
for machines with product no. 91C101, 91C102, 91C121
2.1 Manufacturer's data
MAFELL AG, Beffendorfer Straße 4, D-78727 Oberndorf / Neckar, Phone +49 (0)7423/812-0, Fax +49 (0)7423/812-218, e-mail: mafell@mafell.de
2.2 Information on the rechargeable battery
The CE Declaration of Conformity with regard to the rechargeable batteries can be found on our website www.mafell.com in the footer area under the header Legal Matters, Declaration of Conformity.
2.3 Machine identification
All details required for machine identification are available on the attached rating plate.

CE symbol to document compliance with the basic safety and health requirements according to Appendix I of the Machinery Directive.
For EU countries only
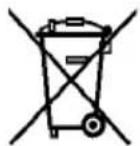
Do not dispose of electrical tools together with domestic waste!
In accordance with the European directive 2002/96/EC on waste electrical and electronic equipment and transposition into national law, obsolete electrical tools must be collected separately and recycled in an environmentally-compatible manner.

Read the operating instructions. This reduces the risk of injury.

Protect the rechargeable battery from heat, excessive solar radiation, fire, frost, water and humidity.
Protect rechargeable battery packs from humidity!

Protect rechargeable battery packs from fire!
There is danger of explosion!

Cordless Alliance System (=CAS) is a cross-manufacturer battery pack system.
Further information is available at www.cordless-alliance-system.com
2.4 Technical data
| Nominal voltage | 18 V | |
| Motor speed adjustment range | 750 - 3100 rpm | |
| Number of speed stages 6 | ||
| Length of stroke/working stroke | 26 mm | |
| Cutting speed at normal load | 0.4 – 1.3 m/s | |
| Cutting depth | 65/115 mm | |
| Weight without rechargeable battery | 2.21 kg | |
| Weight of rechargeable battery | small / large | 0.59 - 0.975 kg |
| Diameter hose connector (outside ø) | 26 mm |
2.5 Emissions
The declared noise emission values have been measured in accordance with EN 62841-1 and EN 62841-2-11 and may be used for comparing the tool with another and also in a preliminary assessment of exposure.

Danger
The noise emissions during actual use of the power tool can differ from the declared values depending on the ways in which the tool is used especially what kind of workpiece is processed.
Always wear hearing protection, even when the power tool is running idle in addition to the trigger time!
2.5.1 Noise emission specifications
Noise emission values determined according to EN 62841:
| Sound pressure level L | _PA = 91,8 dB (A) |
| Uncertainty K | _PA = 3,2 dB (A) |
| Sound power level | L_PA = 99,8 dB (A) |
| Uncertainty K | _PA = 3,2 dB (A) |
The noise measurement was recorded using the saw blade included in the standard equipment.
2.5.2 Vibration specifications
The typical hand-arm-vibration is 5.7 m/s^2 (224.4 in.) for wood and 5.6 m/s^2 (220.4 in.) for metal.
The measuring inaccuracy K is 1.5 m/s ^2 (59.1 in.)
The vibration measurement was carried out with the saw blade available in the standard equipment.
Saw blade for wood: CUnex W1 WOOD (item No. 093676)
Saw blade for metal: M2 METAL Progressive BIM (item No. 093709)
2.6 Scope of supply
Performance jigsaw PS 2-18 complete with:
1 base plate
1 parallel stop
1 selection of jigsaw blades
1 hose connector
1 hose connector extension
1 chip deflector
5 splinter guard
1 glider
2 rechargeable battery PowerTank 18 M 72 LiHD (only with item No. 91C101)
1 APS M charger 230 V (only with item No. 91C101, 91C121)
1 Adapter for 230 V plug (only with item No. 91C121)
1 carrying case
1 operating manual
1 folder "Safety instructions"
2.7 Safety devices

Danger
These devices are required for the machine's safe operation and may not be removed or rendered inoperative.
Before operating the machine, check the safety devices for function and possible damage. Do not use the machine with missing or ineffective safety devices.
The machine is equipped with the following safety devices:
- Large base plate
- Saw blade contact protection realised with guard wire
- Handles
- Index mechanisms
2.8 Use according to intended purpose
The performance jigsaw is exclusively intended to be used to cut solid wood and panel materials such as chip board, coreboard and MDF board, synthetic materials, mineral building materials and metals.
Any other use than described above is not permissible. The manufacturer cannot be held liable for any damage arising from such other use.
So as to use the machine as intended, comply with the operating, maintenance and repair instructions specified by Mafell.
Only use original Mafell / CAS rechargeable batteries and accessories.
2.9 Residual risks

Danger
Even if used in accordance with its intended purpose and despite conforming with the safety instructions, residual risks caused by the intended use that can lead to health consequences will always remain.
- Touching the saw blade below the guide plate.
- Touching the part of the saw blade that protrudes below the workpiece when cutting.
- Backlash of the machine if the saw blade gets stuck in the workpiece.
- Breakage of the saw blade and risk of the blade or pieces of the blade being hurled away.
- Hearing can be impaired when working for longer periods without ear protectors.
- Emission of harmful wood dusts during longer operation without extraction.
3 Safety instructions

Danger
Always observe the following safety instructions and the safety regulations applicable in the respective country of use! Please also read the safety information in the enclosed folder 070500 "Safety instructions" (according to standard 62841-1).
General instructions:
- Children and adolescents must not operate this machine. This rule does not apply to young persons receiving training and being supervised by an expert.
- Never work without the protection devices stipulated for the respective operating sequence and do not effect any modifications on the machine that could impair safety.
- Protect the machine and the rechargeable batteries from humidity!
- Do not throw the rechargeable batteries into a fire!
- Do not use any defective or deformed rechargeable batteries!
- Do not open the rechargeable batteries!
- Do not touch the contacts of the rechargeable batteries and do not short-circuit them!
- A slightly acidic, combustible liquid may leak from defective li-ion rechargeable batteries! If any battery liquid is leaking and comes in contact with the skin, immediately rinse with a copious amount of water. If any battery liquid gets into your eyes, rinse with clean water and immediately consult a doctor for medical treatment!
- Remove the rechargeable batteries from the machine before carrying out any setting, retooling, maintenance or cleaning tasks.
- Ensure that the machine is switched off when you push in the rechargeable battery.
- Please remove the rechargeable battery from the machine if the machine is put down, transported or stored unattended.
Do not use:
- Cracked and misshapen saw blades.
- Blunt saw blades as they impose an excessive load on the motor.
Instructions on the use of personal protective equipment:
- The noise pressure level at the ear generally exceeds 85 dB (A). Operators should therefore wear ear protectors.
- Wear protective goggles.
- Wear a dust mask.
Instructions on operation:
Cutting procedures

Danger
- Keep hands away from cutting area and the blade. Keep your second hand on auxiliary handle, or motor housing (see A/B - Fig. 1). If both hands are holding the saw, they cannot be cut by the blade.
- Do not reach under the workpiece.
- Use clamps or another practical way to secure and support the workpiece to a stable platform. Holding the workpiece by your hand or against the body leaves it unstable and may lead to loss of control.
- Always hold the power tool by the insulated gripping surfaces when carrying out work during which the bit may hit concealed power lines. Contact with a live power line also energises the metal parts of the power tool and leads to an electric shock.
- If you would like to restart a saw that is stuck in the workpiece, centre the saw blade in the saw slit and check whether the saw teeth are stuck in the workpiece.
- Support large plates to reduce the risk of backlash caused by a jammed saw blade.
- Do not use any blunt or damaged saw blades.
- Before starting to saw, tighten the cutting angle adjustments and the swivel plate P-SP. The swivel plate P-SP is an optional accessory.
- Be especially careful when making a "plunge cut" into a concealed area, e.g. into an existing wall.
- Examine the workpiece for foreign objects.
- Only saw into metal parts, e.g. nails, with a suitable saw blade.
- Reduce the speed when using saw blades >180 mm [7 in.] to prevent swinging up.
Instructions on service and maintenance:
- Regularly cleaning the machine, especially the adjusting devices and guides, constitutes an important safety factor.
- Only original MAFELL spare parts and accessories may be used. Otherwise the manufacturer will not accept any warranty claims and cannot be held liable.
4 Layout
4.1 Depicted components
(see Fig. 1-5)
(1) Switch trigger
(2) Switch lever for pendulum stroke
(3) Clamping lever saw blade adapter
(4) Setting wheel for speed control
(5) Base plate
(6) Clamping lever
(7) Push button to unlock rechargeable battery
(8) Chip deflector
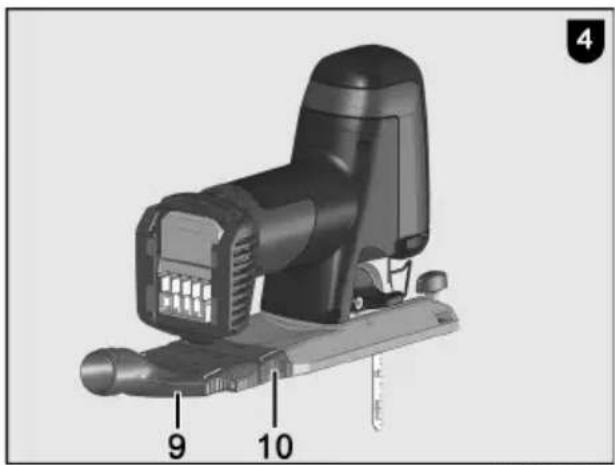
(9) Hose connector
(10) Hose connector extension
(11) Glider
5 Setting / adjustment
5.1 Charging the rechargeable battery
Check whether the rated voltage of the rechargeable battery agrees with the information specified on the machine.
Rechargeable battery and charger are matched to each other. Only use the MAFELL – APS M chargers for recharging.
Before using a new machine, first of all charge the rechargeable battery.
A description of how to start up and charge the APS M can be found in the appended instructions "APS M+ / APS M".
The rechargeable battery is equipped with a temperature monitoring system. This guarantees that the rechargeable battery is only charged in the temperature range between 0^ C and 50^ C. This achieves a long service life for the rechargeable battery.
A considerably shortened operating time per charging procedure indicates that the rechargeable battery is spent and needs to be replaced.

Danger
Explosion hazard
Protect the rechargeable battery from heat, fire and moisture.
Do not place the rechargeable battery onto heating appliances and do not expose the rechargeable battery to strong solar radiation for a longer period of time. Temperatures above 50^ C are detrimental to the rechargeable battery. Allow a heated rechargeable battery to cool down before charging it.
The optimum storage temperature ranges between 10^ C and 30^ C.
Do not open the rechargeable battery and protect it from impacts. Keep the rechargeable battery in a dry and frost-proof place.

Danger
Cover the rechargeable battery's contacts if it is stored outside the charger. There is a fire and explosion hazard in case of a short circuit caused by metallic bridging.

Follow the instructions for the protection of the environment.
5.2 Fitting the rechargeable battery
Slide the charged rechargeable battery into the battery guide behind the handle until it perceptibly engages.
Before using the machine, convince yourself that the rechargeable battery is firmly seated in the machine.
5.3 Removing the rechargeable battery
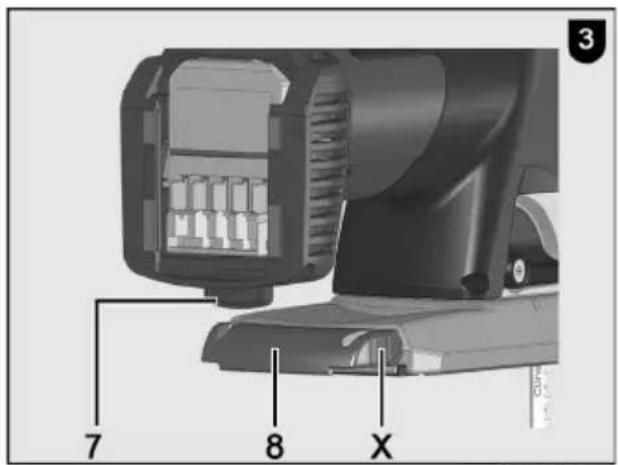
Unlock the rechargeable battery by pressing the button 7 (Fig. 3) and pull it out of the battery guide.
Do not use force to do so.
5.4 Dust extraction
Connect the machine to a suitable external dust extractor during all work generating a considerable amount of dust. The air velocity must be at least 20 m/s (65.6 ft / sec.).
The machine is supplied with a hose connector 9 (Fig. 4), a hose connector extension 10 (Fig. 4) and a chip deflector 8 (Fig. 3).
Use the hose connector to connect an external dust extractor. The outer diameter of the hose connector is 26 mm.
Chips in the visible tracing area are blown from this area by means of an air stream and through a channel. The chips can be extracted via the hose connector including hose connector extension mounted on the base plate.
Use the chip deflector 8 (Fig. 3) if you are unable to extract the arising dust. The dust is guided away from the user by the deflector. You can alternatively mount both parts on the machine base plate:
- Push the two spring arms together at the position marked with "X" (Fig. 3) and pull out the hose connector, the hose connector extension and the chip deflector to the rear while keeping the spring arms pressed together.
- For assembly, push the hose connector, the hose connector extension and the chip deflector into the opening at the rear end of the base plate until the spring arms engage automatically.

For material machining from below, the chip deflector can be fitted turned by 180^ .
5.5 Inserting the saw blade

Danger
Unplug the rechargeable battery for all service work.
- Swivel the clamping lever 3 (Fig. 1) to the outside up to the stop and hold on to it with one hand.
- Take a saw blade and insert it into the saw blade holder up to the stop. Depending on the application, the saw blade toothing can point forwards or backwards.
- Now release the clamping lever 3. This closes the locking sleeve and the saw blade is fixed.
- Check the saw blade for a tight and straight seat.
5.6 Saw blade change

Danger
Unplug the rechargeable battery for all service work.
- Swivel the clamping lever 3 (Fig. 1) to the outside up to the stop and hold on to it with one hand.
- Grip the saw blade with the other hand. If slight lateral pressure is exerted onto the saw blade it is automatically ejected.
- Take a new saw blade and insert it into the saw blade holder up to the stop. Depending on the application, the saw blade toothing can point forwards or backwards.
- Now release the clamping lever 3. This closes the locking sleeve and the saw blade is fixed.
- Check the saw blade for a tight and straight seat.
5.7 Large base plate and swivel plate
The machine is as a standard equipped with a base plate 5 (Fig. 2) that facilitates precise rectangular cuts. To carry out angular cuts, mount the swivel plate P-SP (Item No. 205446) that is available as special accessory. Assembly/disassembly is carried out in the same order as for the base plate. Please also note Fig. I to XI on page 6.
Follow the procedure below:
- Open the clamping lever 6 (Fig.2) anti-clockwise from a horizontal to a vertical position. This releases the clamping between machine and base plate.
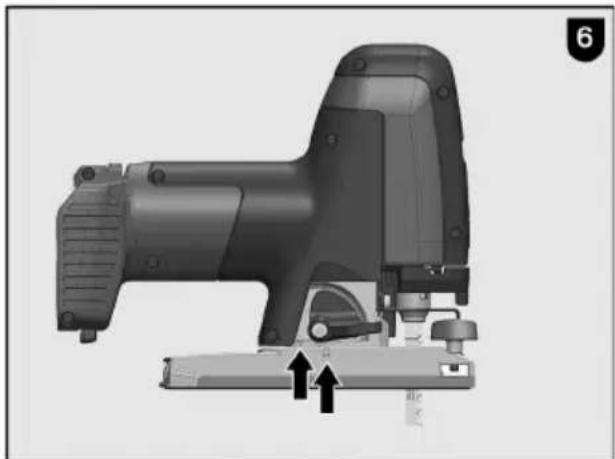
- Move the base plate until the indicator position on the machine coincides with the notch in the base plate (see Fig. 6).
- Now take the machine off the base plate.
- Take the swivel plate and when joining swivel plate and machine, pay attention that the clamping lever is in a vertical position.
- Assemble the machine and swivel plate in such a manner that the indicator on the machine and the indicator on the swivel plate are standing above each other.
- Move the swivel plate towards the machine in the desired direction.
- Turn the clamping lever as far as possible clockwise into a horizontal position until the swivel plate and the machine are firmly joined.
- Actuate the clamping lever on the swivel plate (Fig. VI on page 6) to tilt the machine at the desired angle.
- Close the clamping lever on the swivel plate.
Fig. IX to XI on page 6 illustrate sawing with the swivel plate on the guide rail (Fig. IX), with a parallel guide fence (Fig. X) as well as using both parallel guide fence and guide rail (Fig. XI).
5.8 Use of the performance jigsaw on the guide rail
The machine can be used on the guide rail F. One half of the base plate will protrude the rail in the process. The rail thickness is levelled out by fitting a glider 11 (Fig. 5).
The glider can be fitted on the base plate or on the swivel plate.
5.8.1 Attaching the glider
- Insert the glider hook into the recesses on the base plate or swivel plate (see Fig. 5). Glider and base plate or swivel plate will form an approximate angle of 30^ in the process.
- Tilt the glider against the base plate or swivel plate until the pin engages in the drill hole.
- Place the machine onto the guide rail F such that the groove in the base plate or swivel plate reaches over the spring of the rail.
5.8.2 Detaching the glider
- Tilt the glider to approx. 30° away from the base plate or swivel plate by reaching into the recess provided with your finger (Fig. 5) and lifting the glider.
- Now you can remove the hook from the recesses in the base plate or swivel plate and detach the glider.
5.9 Assembly and disassembly of the saw blade holder
This machine is equipped with a particularly accurate saw blade holder. If this holder is worn or dirty, you can replace it or clean it.
Follow the procedure below:
- Bring the plunger (lifting rod) into an as deep as possible end position by starting the machine several times.
- Remove the rechargeable battery.
- Remove the saw blade. See chapter 5.6.
- Remove the base plate 5 (Fig. 2). See chapter 5.7.
- Open the clamping lever 3 (Fig. 1).
Note: The saw blade holder must only be assembled / disassembled with open clamping lever.

Danger
Unplug the rechargeable battery for all cleaning and service work.

Scan the QR code. The explainer video shows how to clean the saw blade adapter.

- Manually turn the locking sleeve anti-clockwise until it can be removed.
- Remove the pressure piece and spring and clean or replace them.
- Now re-insert spring and pressure piece into the adapter sleeve and slide the locking sleeve over it.
- Turn the locking sleeve anti-clockwise until it engages in the thread of the adapter sleeve.
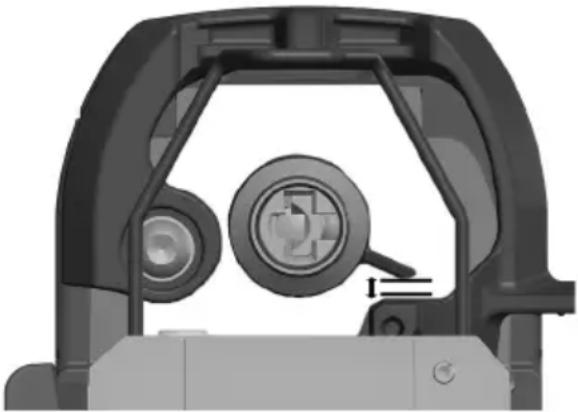
- Tension the spring by continuing to turn the locking sleeve. Skip three thread turns in the process. Then release the lug on the locking sleeve. The distance between the lug on the locking sleeve and the clamping lever is approx. 2 mm (see illustration).
natural_image
Close-up of a mechanical component with a magnified circular detail and internal features (no visible text or symbols)The locking sleeve must not chafe on the driver of the clamping lever when no saw blade is inserted.

If only two thread turns are skipped when continuing to turn the locking sleeve, the lug chafes on the locking sleeve at the clamping lever and the inserted saw blade falls out.
- Finally, reinstall the base plate on the machine. See chapter 4.6.
- Carry out a test cut.
6 Operation
6.1 Initial operation
Personnel entrusted to work with the machine must be made aware of the operating instructions, calling particular attention to the chapter "Safety instructions".
6.2 Switching on and off
For switching on and off, briefly actuate the switch trigger 1 (Fig. 1).
The built-in electronic system provides for jerk-free acceleration when the machine is switched on and under load readjusts the speed to the fixed setting.
In addition, this electronic system adjusts the motor down in case of overload, i.e. the saw blade will stop. An acoustic warning signal is sounded. Switch the machine off then. Then switch the machine on again and continue sawing at a reduced feed speed.
With the setting wheel 4 (Fig. 1) you can continuously adjust the stroke rate in 6 levels between 750 rpm and 3100 rpm.

Only switch on the machine with fitted saw blade.
6.3 Pendulum stroke setting
The jig saw is equipped with a soft start, i.e. the pendulum stroke only takes effect when pressure is exerted on the saw blade. The degree of pendulum movement is set with control lever 2 (Fig. 1) in two levels. The pendulum stroke pushes the saw blade against the workpiece during the working stroke and lifts it off the workpiece during the downstroke. This results in a favourable chip removal and a reduction of the frictional heat.
If the switch is set to 0, the pendulum stroke is switched off. For a faster work process, use levels 1 and 2.
You work without pendulum stroke:
- on thin material
- when working with rasp, tooth saw blade or knife
- on soft materials
- when cutting without predrilling for cut-outs in wood
- Reverse sawing
6.4 Splinter-free sawing
For splinter-free sawing on the surface of the material, use the splinter guard included in the scope of supply (see page 5, Item No. 205447, P-SS).

Danger
The machine must be switched off before inserting the splinter guard.
- With the machine switched off, push the splinter guard flush along the surface until just in front of the saw blade (see Fig. I, P-SS).
- Switch on the machine.
- Press the machine with the splinter guard against a stable edge to push in the splinter guard flush with the front edge of the base plate, sawing into it in the process. (Fig. II).

The use of pendulum stroke positions 1 and 2 is advantageous for the tearing behaviour on the underside of the material.
6.5 Positioning the base plate
Once it has been released, the base plate can be moved to the front and rear.
- Release the base plate as described under 5.7.
- Move the base plate into the desired position.
- Clamp the base plate as described under 5.7.
Possible base plate positions:
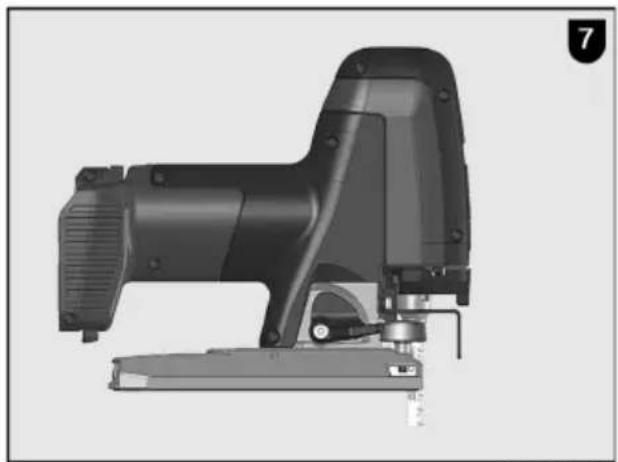
- Standard position for right-angled cuts, saw blade is completely enclosed (Fig. 6).
- Base plate position is flush with the front edge of the saw blade. This makes sawing close to the edge possible (Fig. 7).
6.6 Reverse sawing
If cutting near a corner, only a small bearing face is available for the base plate and an angular application of the saw is difficult. To increase the bearing face, turn the saw blade by 180^ and saw against the normal direction of sawing. Please note that it is not possible to use the pendulum stroke for this sawing operation and that it must be switched off.
6.7 Sawing with parallel guide fence P-PA
For sawing cuts parallel to the edge of the material, the parallel guide fence is used (see page 5 Item No. 205448 P-PA). The parallel guide fence is included in the scope of supply.
6.7.1 Locking and unlocking the guide fence (Fig. I)
The stop flap on the base body of the parallel guide fence can be opened. To do so, push the stop flap in direction of the arrow to the right to open the stop flap. To lock the stop flap in an open state, push it in direction of the arrow to the left. The stop flap engages. The lock symbols on the inside of the stop flap indicate whether it is locked or unlocked.
For sawing out circle patterns, it is possible to remove either the compass tip or compass pin from the base body of the parallel guide fence (see also Fig. VI to X on page 5).
6.7.2 Assembly of the guide fence (Fig. III)
The parallel guide fence can be inserted in the machine's base plate but also in the swivel plate. The swivel plate is an optional accessory.
- Turn the parallel guide fence so that the stop flap is pointing downwards.
- Insert the parallel guide fence into the opening provided on the base plate 5 (Fig. 2). The parallel guide fence can be used on both sides of the machine.
- Fasten the parallel guide fence with the wing screw included in the scope of supply.
6.7.3 Parallel guide fence und guide rail (Abb. II, IV, V)
When using a guide rail and the parallel guide fence, the machine can be used next to (see Fig. IV) or on the guide rail (see Fig. V).
The guide rail is available in different lengths and is an optional accessory.
Inserting next to the guide rail (Fig. IV)
• Fix the guide rail with two tension clamps.
- Assemble the parallel guide fence on the machine with the stop flap pointing upwards.
- Place the groove of the parallel guide fence onto the guide web of the guide rail.
Inserting on the guide rail (Fig. V)
• Fix the guide rail with two tension clamps.
- Assemble the parallel guide fence on the machine with the stop flap pointing downwards.
- Place the groove of the parallel guide fence onto the guide web of the guide rail.
- Adjust the desired distance to the machine.
As half of the machine base plate protrudes beyond the guide rail, the rail thickness is levelled out by fitting the glider included in the supply (see Chapter 4.8.1).
6.8 Lighting of the work area
The jig saw is equipped with a working light. When it is switched on, the work area around the machine standing on the workpiece is illuminated. If the material is machined from below, the light goes out automatically. The operator is thus not dazzled when he applies the machine to the workpiece.
The light mode can be inverted by knocking three times (such as on a door) on the front side of the machine in the area of the light symbol. The machine must be switched off for inverting the light mode.
During sawing, the state of the light remains unchanged.
If the machine is not in use for more than 10 min, the original state of the light module is active again when the machine is switched back on. This also applies when the rechargeable battery is replaced.

When the machine is switched off, the working light continues to glow for 10 s. If the machine is moved within 10 min after it was switched on the last time, the working light switches on again.
7 Service and maintenance

Danger
Unplug the rechargeable battery for all service work.
MAFELL machines are designed to be low in maintenance.
The ball bearings used are greased for life. When the machine has been in operation for a longer period of time, we recommend to hand the machine in at an authorised MAFELL customer service shop for inspection.
Only use our special grease, order No. 049040 (1 kg tin) for all greasing points.
7.1 Storage
Clean the machine thoroughly if the machine is not used for a longer period of time. Spray blank metal parts with a rust-proofing agent.
7.2 Transport
The included Li-ion rechargeable batteries are subject to the requirements of dangerous goods legislation. The rechargeable batteries can be transported by the user on the road without any further requirements.
For the dispatch by third parties (e.g.: air transport or forwarding agent), special requirements for packaging and labelling must be observed. In this case, a dangerous goods expert must be consulted when preparing the package.
Only dispatch rechargeable batteries if their housing is undamaged. Tape open contacts and pack the rechargeable battery so that it does not move in the packaging.
Please also observe any further national regulations.
7.3 Disposal of rechargeable batteries/batteries

Electrical tools, rechargeable batteries, accessories and packaging should be recycled in an environmentally friendly manner.
Do not dispose of electrical tools together with domestic waste!
For EU countries only:
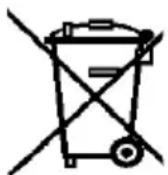
According to the European Directive 2002/96/EC, power tools that are no longer serviceable, and according to the European Directive 2006/66/EC, defective or used rechargeable batteries/batteries must be collected separately and recycled in an environmentally sound manner.
Return unusable rechargeable batteries/batteries directly to:
Germany
Stiftung
GRS Batterien
Heidenkampsweg 44
20097 Hamburg
Germany
Rechargeable batteries/batteries:
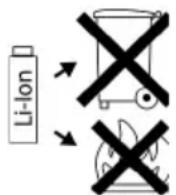
Li-lon:
Please comply with the information in Section "Transport", page 35.
Subject to changes.
8 Troubleshooting

Danger
Determining the causes for existing defects and eliminating these always requires increased attention and caution. Pull the mains plug beforehand!
Some of the most frequent defects and their causes are listed in the following chart. In case of other defects, please contact your dealer or the MAFELL customer service directly.
| Defect | Cause | Remedy |
| Machine cannot be switched on. | Discharge the rechargeable battery | Charge the rechargeable battery |
| Rechargeable battery not engaged in end position | Allow rechargeable battery to engage completely | |
| Rechargeable battery almost empty, an LED on the rechargeable battery is flashing. | Electronic system protects the rechargeable battery from deep discharge. | To check, press the button on the rechargeable battery.Only one LED is still glowing.Charge the rechargeable battery. |
| Overload, machine switches off. | A sustained load has overheated the machine or the rechargeable battery. A warning signal is sounded (constant bleeping).It will go out after max. 30 seconds or after the switch trigger is released. | Allow the machine and the rechargeable battery to cool down.The rechargeable battery can be cooled down much faster with a charger with air cooling.The machine can also be cooled down much faster by using a different rechargeable battery and idling the machine. |
| Defect Cause Remedy | ||
| The machine switches off at a sudden increase in load. | The sudden increase in load also causes the current that is required for the machine to rise. This rise in current, which occurs when there is a sudden blockage or backlash, is measured and then leads to the machine being switched off. | Switch off the machine by releasing the switch trigger. Afterwards, you can switch the machine back on again and resume work as normal. Try to avoid further blockages. |
| Saw blade jams when the machine is advanced. | Feed rate too fast Reduce feed speed | |
| Blunt saw blade | Release the switch immediately. Remove the machine from the workpiece and replace the saw blade | |
| Tension in the workpiece | ||
| Poor machine guidance Use parallel guide fence | ||
| Uneven workpiece surface Straighten the surface | ||
| Burn marks on the cut surfaces | The saw blade used is unsuitable for the task or blunt | Replace saw blade |
| Chip ejection blocked | Wood is too damp | Clean chip ejection |
| Extended cutting operation without extraction | Connect machine to an external extraction, e.g. portable dust extractor | |
| Saw blade vibrates in the work piece | Saw blade is not correctly positioned or dirty | Clean and / or position the saw blade correctly |
| Work piece not fastened Fasten the work piece | ||
| Saw blade stops - motor continues to turn | Saw blade is not correctly positioned or dirty | Clean and / or position the saw blade correctly |
| Mechanical defect Take the machine to a MAFELL customer service shop |
9 Optional accessories
9.1 Rechargeable battery
- Rechargeable battery PowerTank 18 M 72 LiHD Order No. 094500
- Rechargeable battery PowerTank 18 M 72 LiHDX Order No. 094523
- Rechargeable battery PowerTank 18 M 99 LiHD Order No. 094503
- Rechargeable battery PowerTank 18 M 144 LiHD Order No. 094498
- Rechargeable battery PowerTank 18 M 144 LiHDX Order No. 094520
- Rechargeable power station APS M Order No. 094492
- Rechargeable power station APS M GB Order No. 094493
9.2 Swivel plate, anti-splintering device, parallel stop
- swivel plate cpl. P-SP Order No. 205446
- anti-splintering device P-SS (5 pieces) Order No. 205447
- parallel stop P-PA Order No. 205448
9.3 Jigsaw blades
- Jigsaw blades W1, 2 pieces for precise straight and curved cuts till 64 Order No. 093676 mm in solid wood and chip / core board
- Jigsaw blades W2, 5 pieces for coarse straight cuts and plunging till 64 Order No. 093701 mm in solid wood and chip / core board
- Jigsaw blades W3, 5 pieces for coarse straight cuts in solid wood till Order No. 093702 114 mm and chip / core board
- Jigsaw blades W4, 5 pieces for coarse / curved cuts and plunging till Order No. 093703 64 mm in solid wood and chip / core board as well as coated / veneered board
- Jigsaw blades W5, 5 pieces for clean straight cuts and plunging till 79 mm in solid wood and chip / core board as well as coated / veneered board Order No. 093704
- Jigsaw blades W6, 5 pieces for fine/clean straight cuts and plunging till Order No. 093706 64 mm in solid wood and chip / core board as well as coated / veneered board inverse toothing
- Jigsaw blades W+P 2, 5 pieces for fine/clean straight cuts and plunging till 64 mm in solid wood and chip / core board as well as coated / veneered board, soft gypsum / cement fibre board and soft synthetic / acrylic materials Order No. 093705
- Jigsaw blades W+M 2, 5 pieces for straight cuts and plunging till 94 mm in solid wood and construction timber with metallic residues, long-life design Order No. 093707
-
Jigsaw blades L2, 5 pieces for fine/clean straight cuts and plunging till Order No. 093708 15 mm in laminate panels and parquet, long-life design
-
Jigsaw blades M2, 5 pieces for fine straight cuts in precious / non-ferrous metals, till 3 mm metals, Al and Al composite board, long-life design Order No. 093709
- Jigsaw blades E+F 2, 1 pieces for coarse cuts in melamine resin board, till 64 mm fibre cement and fibre-reinforced synthetic materials, long-life design Order No. 093710
- Selection 1 of jigsaw blades: 4xW2, W+P2, W5, W4, 2xCUnex W1 Order No. 093712
- Selection 2 of jigsaw blades: 4xM2, W6, L2, W+M2, 2xCUnex W1 Order No. 093713
9.4 Guide rails
- Guide rails F80 (0.8 m long) Order No. 204380
- Guide rails F 110 (1.10 m long) Order No. 204381
- Guide rails F 160 (1.60 m long) Order No. 204365
- Guide rails F 210 (2.10 m long) Order No. 204382
- Guide rails F 310 (3.10 m long) Order No. 204383
- Connecting piece F-VS Order No. 204363
- Angle fence F-WA Order No. 205357
- Rail bag TZ-FST1600 Order No. 095257
- Rail bag kit F160/160 consisting of: 2 x F160 + connecting piece + 2 Order No. 209591 screw clamps + rail bag
- Rail bag kit F80/160 with angle fence consisting of: F80 + F160 + Order No. 209592 connecting piece + angle fence + 2 screw clamps + rail bag
- End caps packed F-EK Order No. 205400
- Adhesive profile packed F-HP 6.8 m Order No. 204376
- Splinter guard packed F-SS 3.4 m Order No. 204375
- Tension clamp packed F-SZ 180 mm (2 pcs) Order No. 207770
- Aerofix suction-clamping-system F-AF 1 consisting of: Rail 1.3 m, Order No. 204770 adapter for top and bottom, flexible hose
- Flexible hose FXS-L, length 3.2 m Order No. 205276
10 Exploded drawing and spare parts list
The corresponding information in respect of spare parts can be found on our homepage: www.mafell.com
Français
Sommaire
natural_image
Close-up of a mechanical component with circular features and a magnifying glass (no visible text or symbols)natural_image
Close-up of a mechanical component with circular features and a magnifying glass (no visible text or symbols)natural_image
Close-up of a mechanical component with circular features and a magnifying glass (no visible text or symbols)natural_image
Close-up of a mechanical component with circular features and a magnifying glass (no visible text or symbols)natural_image
Close-up of a mechanical component with circular features and a magnifying glass (no visible text or symbols)natural_image
Close-up of a mechanical component with circular features and a magnifying glass (no visible text or symbols)natural_image
Close-up of a mechanical component with circular features and a magnifying glass (no visible text or symbols)natural_image
Close-up of a mechanical component with circular features and a magnifying glass (no visible text or symbols)Negotovost K _PA = 3,2 dB (A)
Negotovost K_A=3,2 dB(A)
natural_image
Close-up of a mechanical component with circular features and a magnifying glass (no visible text or symbols)natural_image
Close-up of a mechanical component with a circular feature and internal components (no visible text or symbols)Upon presentation of the warranty document (original invoice), we will carry out all repairs free of charge in accordance with the applicable warranty provisions, processing and mounting faults free of charge on presentation of this properly filled-in Guarantee Certificate and your original receipt. This is not valid for consumables and wearing parts. For this purpose, the machine or the appliance is to be forwarded freight paid to our plant or to an authorized MAFELL repair service. Refrain from trying to carry out the repairs yourself as otherwise your warranty claim will become extinct. We do not accept any liability for any damage resulting from improper handling or normal wear.
GARANTIE
MAFELL AG
Beffendorfer Straße 4, D-78727 Oberndorf / Neckar
Telefon +49 (0)7423/812-0
Internet:
E-Mail:
Fax +49 (0)7423/812-218
www.mafell.de
mafell@mafell.de
- WARNUNG
- AVERTISSEMENT
- GB - EC Declaration of Conformity
- Signs and symbols
- Product information
- Manufacturer's data
- Information on the rechargeable battery
- Machine identification
- Cordless Alliance System (=CAS) is a cross-manufacturer battery pack system.
- Further information is available at www.cordless-alliance-system.com
- Emissions
- Danger
- Noise emission specifications
- Vibration specifications
- Scope of supply
- Safety devices
- Use according to intended purpose
- Residual risks
- Safety instructions
- General instructions:
- Do not use:
- Instructions on the use of personal protective equipment:
- Instructions on operation:
- Cutting procedures
- Instructions on service and maintenance:
- Layout
- Depicted components
- Setting / adjustment
- Charging the rechargeable battery
- Explosion hazard
- Fitting the rechargeable battery
- Removing the rechargeable battery
- Dust extraction
- Inserting the saw blade
- Saw blade change
- Large base plate and swivel plate
- Follow the procedure below:
- Use of the performance jigsaw on the guide rail
- Attaching the glider
- Detaching the glider
- Assembly and disassembly of the saw blade holder
- Operation
- Initial operation
- Switching on and off
- Pendulum stroke setting
- You work without pendulum stroke:
- Splinter-free sawing
- Positioning the base plate
- Possible base plate positions:
- Reverse sawing
- Sawing with parallel guide fence P-PA
- Locking and unlocking the guide fence (Fig. I)
- Assembly of the guide fence (Fig. III)
- Parallel guide fence und guide rail (Abb. II, IV, V)
- Inserting next to the guide rail (Fig. IV)
- Inserting on the guide rail (Fig. V)
- Lighting of the work area
- Service and maintenance
- Storage
- Transport
- Disposal of rechargeable batteries/batteries
- For EU countries only:
- Germany
- Rechargeable batteries/batteries:
- Subject to changes.
- Troubleshooting
- Optional accessories
- Rechargeable battery
- Swivel plate, anti-splintering device, parallel stop
- Jigsaw blades
- Guide rails
- Exploded drawing and spare parts list
- Français
- Sommaire
- GARANTIE
Brand : Mafell
Model : PS 2-18
Category : Saw