
KEM 2320 M - Coffee machine Koenic - Free user manual and instructions
Find the device manual for free KEM 2320 M Koenic in PDF.


| Product Type | Espresso machine with milk frother |
| Brand | Koenic |
| Model | KEM 2320 M |
| Dimensions (approx.) | 30 x 25 x 30 cm |
| Weight (approx.) | 4.5 kg |
| Power supply | 220-240 V~, 50-60 Hz, 1250-1450 W |
| Water tank capacity | 1200 ml |
| Protection class | I |
| Coffee types | Single espresso (30 ml) and double (60 ml) |
| Functions | 1 cup espresso, 2 cup espresso, steam, hot water, memory function |
| Pump pressure | Not specified (estimated 15 bar typical) |
| Milk frother | Removable pivoting steam nozzle |
| Filter holder | With handle, locking, compatible with 1 and 2 cup filters |
| Included filters | 2 stainless steel filters (1 cup and 2 cups) |
| Included accessories | Dosing spoon with tamper, user guide |
| Maintenance and cleaning | Clean after each use; regular descaling; descaling reminder after 500 cycles |
| Spare parts and repairability | Filters and stainless steel grid dishwasher safe; repairs only by authorized service |
| Safety | Automatic shut-off not mentioned; hot surface; supervision required; children under 8 years kept away |
Frequently Asked Questions - KEM 2320 M Koenic
User questions about KEM 2320 M Koenic
0 question about this device. Answer the ones you know or ask your own.
Ask a new question about this device
Download the instructions for your Coffee machine in PDF format for free! Find your manual KEM 2320 M - Koenic and take your electronic device back in hand. On this page are published all the documents necessary for the use of your device. KEM 2320 M by Koenic.
USER MANUAL KEM 2320 M Koenic
Cinical, anoregative. Dermocral Parabolic instructions. Necro-dampic Dung-, clayy, Hans-olivian. Parabolic solutions Ceruloseurizing Lachophila Paradise and borbic Sarodaphandic K. Amisharm
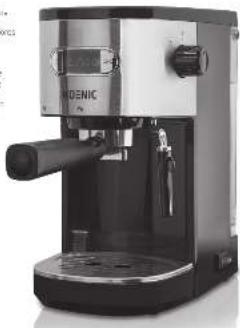
natural_image
Exterior view of a modern espresso machine (no visible text or symbols)Deutsch 30 Engeln 11-13 Baufläch 28 Tortels 7-14 EviWA 35-43 Mags 04-21 In-kap 52-69 Südansk 30-07 Rivfall 25 Art. gals 28-31 Scorsa 89-91 Lakka 42-49
(1) Credit (2) Credit (3) Credit (4) Credit (5) Credit (6) Credit (7) Credit (8) Credit (9) Credit (10) Credit (11) Credit (12) Credit (13) Credit (14) Credit (15) Credit (16) Credit (17) Credit (18) Credit (19) Credit (20) Credit (21) Credit (22) Credit (23) Credit (24) Credit (25) Credit (26) Credit (27) Credit (28) Credit (29) Credit (30) Credit (31) Credit (32) Credit (33) Credit (34) Credit (35) Credit (36) Credit (37) Credit (38) Credit (39) Credit (40) Credit (41) Credit (42) Credit (43) Credit (44) Credit (45) Credit (46) Credit (47) Credit (48) Credit (49) Credit (50) Credit (51) Credit (52) Credit (53) Credit (54) Credit (55) Credit (56) Credit (57) Credit (58) Credit (59) Credit (60) Credit (61) Credit (62) Credit (63) Credit (64) Credit (65) Credit (66) Credit (67) Credit (68) Credit (69) Credit (70) Credit (71) Credit (72) Credit (73) Credit (74) Credit (75) Credit (76) Credit (77) Credit (78) Credit (79) Credit (80) Credit (81) Credit (82) Credit (83) Credit (84) Credit (85) Credit (86) Credit (87) Credit (88) Credit (89) Credit (90) Credit (91) Credit (92) Credit (93) Credit (94) Credit (95) Credit (96) Credit (97) Credit (98) Credit (99) Credit
HJ 1712H2078L56
CE
Sicherheitshinweise

Risk of burning! Do not touch the product's hot surfaces. Heat rises from the product during use. Caution! Hot surface!
- This product can be used by children aged from 8 years and above if they are being supervised or have received instruction concerning use of the product in a safe way and if they understand the hazards involved.
• Children shall not play with the product. - Cleaning and user maintenance shall not be carried out by children unless they are older than 8 years and supervised.
- Keep the product and its power supply cord out of reach of children aged less than 8 years.
- This product can be used by persons with reduced physical, sensory or mental capabilities or lack of experience and knowledge if they are being supervised or have received instruction concerning use of the product in a safe way and understand the hazards involved.
- A damaged power cord may only be replaced by an authorised service agent in order to avoid hazards.
- The product is designed for the preparation of normal household quantities in the home, or in household-like, non-commercial environments. Household-like environments include staff kitchens in shops, offices, agricultural and other small businesses or for use by guests at bed-and-breakfast establishments, small hotels and similar residential facilities.
- Use the product only for its intended purpose and with recommended accessories and components. Improper use or wrong operation may lead to hazards.
- Never immerse electrical parts of the product in water or any other fluid during cleaning or operation. Never hold the product under running water.
English
Safety instructions
- Caution! The surface of the heating element is subject to residual heat after use.
- Clean the product and all other accessories after each use.
-
Follow the instructions in the chapter Cleaning and care.
-
Read this user manual thoroughly before first use and pass it on with the product. Pay attention to the warnings on the product and in this user manual. It contains important information for your safety as well as for the use and maintenance of the equipment.
- Never leave the product unsupervised while it is switched on.
- Do not place any objects on top of the product.
- Do not under any circumstances attempt (e.g. damaged power cord, product has been dropped, etc.) to repair the product yourself. For servicing and repairs, please consult an authorised service agent.
- The mains voltage must match the information on the rating label of the product.
- Only unplugging from the power socket can separate the product completely from the mains. Please be sure that the power plug is in operable condition.
- Avoid damages to the power cord that may be caused by kinks or contact with sharp corners.
- Keep this product including power cord and power plug away from all heat sources such as ovens, hot plates and other heat-producing products/objects.
- Only unplugging from the power socket by the plug itself. Do not pull on the cord.
- Unplug the product ...
- when the product is not being used,
- in case of malfunctions,
- before attaching / detaching accessories and
-
before cleaning the product.
-
Use this product in dry indoor areas only and never outdoors.
- Place the product on a flat, sturdy and slip-resistant surface.
-
Never use, expose or place the product near to:
-
direct sunlight and dust;
-
fire (fireplace, grill, candles), water (water splashes, vases, bathtub) or heavy moisture.
-
Risk of burning! The product's housing as well as parts of the sieve holder become very hot during use.
- Do not move or transport the product during use.
- Never attempt to replace parts yourself. If a part needs to be replaced, contact an authorised service agent.
- Make sure not to overfill the water tank.
- Do not operate the product when there is no water in the water tank.
- Fill the product with water only when it is unplugged.
Congratulations!
Thank you for your purchase of a KOENIC product. Please read this manual carefully and keep it for future reference.
Intended use
The product is intended for making espresso and frothing milk. Any other use may result in damage to product or injuries. The Imtron GmbH assumes no liability for damage to the product, for property damage or for personal injury due to careless or improper usage of the product, or usage of product which does not meet the manufacturer's specified purpose.
Before first time use
Remove the product and accessories carefully from the original packaging. It is recommended to keep the original packaging for storage. If you wish to dispose of the original packaging, please observe applicable legal provisions. Should you have any questions regarding proper disposal, contact your local waste management center.
Inspect the delivery contents for completeness and damages. Should the delivery contents be incomplete or damaged, contact your sales outlet immediately.
After unpacking, please refer to chapter
Preparation.

Warning
Before first use, remove the water tank and remove the protective film on its underside.

Do not dispose of this product as unsorted municipal waste. Return it to a designated collection point for the recycling of WEEE.
By doing so, you will help to conserve resources and protect the environment. Contact your retailer or local authorities for more information.
Content
1 x Espresso maker with sieve holder
2 x Sieves
1 x Measuring spoon with tamper
1 x User manual
Technical data
Rated voltage : 220 - 240 V\~
Rated power : 1250 - 1450 W
Frequency : 50-60 Hz
Capacity : 1200 ml
Protection class : I
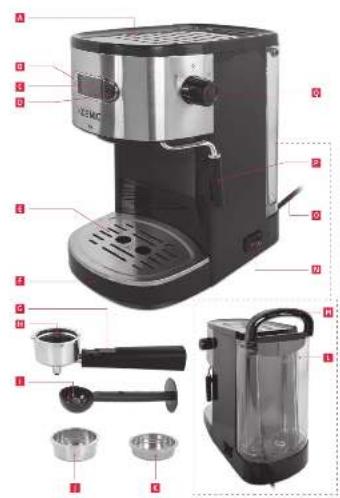
Controls and components
A Tray
B Button Espresso - 1 cup
c Display
D Button Espresso - 2 cups
E Stainless steel drip tray (removable)
F Drip tray (removable)
G Sieve lock
H Sieve holder with handle
I Measuring spoon with tamper
Sieve 2 cups
K Sieve 1 cup
L Water tank
M Water tank lid with folding handle
N On/Off switch
0 Power cord with plug
P Swivel arm with steam nozzle (removable)
Q Steam knob/hot water
English
Preparation
- Clean the product prior to using the espresso maker for the first time. Also clean the product if it has not been used for a significant period of time, and after each descaling operation.
- Remove the water tank and fill it with fresh water. Follow the instructions in point Preparing Espresso. Fill the water tank at most up to the MAX mark. Set the water container back on the device.
- Press the On/Off button to turn on the product. The indicator lights on.
- Wait approx. 1 minute after turn on, as the product has to be heated up. During the heating up the display illumination flashes. When the heating process has ended, the display backlight lights permanently. Follow the procedure below in point Preparing Espresso.
Preparing espresso
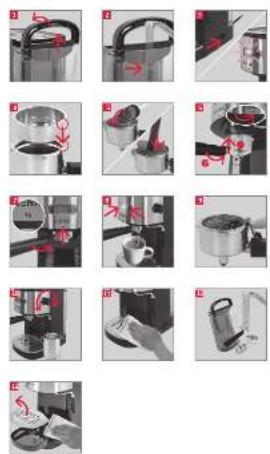
Fig. 1 Remove the water tank.
Fig. 2 Fill it with fresh water. Do not fill the water tank beyond the MAX mark. Set the filled water container back on the espresso machine.
Fig. 3 Press the on/off switch. The display light flashes, indicating that the product is heating up. During the heating up, the display illumination will flash, and shine constantly when the heating process has ended.
Fig. 4 Place the desired sieve (1 or 2 cups) in the sieve holder. When doing so, the nose of the sieve must grasp in the groove of the sieve holder.
Note: To prepare an espresso, insert the small sieve into the sieve holder. To prepare two espressos, insert the large sieve into the sieve holder.
Fig. 5 Fill the small sieve with about 7g (+/- 0.5g) espresso powder to prepare a simple espresso (about 30ml). Fill the large sieve with about 14g (+/- 0.5g) espresso powder to prepare a double espresso (about 60ml). Compact the espresso powder with the tamper so that the espresso sieve is filled to MAX mark.
Fig. 6 Observe the mark ▼ of the sieve holder on the espresso machine. Now insert the sieve holder with sieve from below into the holder of the espresso machine.
Fig. 7 Push the sieve holder all the way up into the fitting and turn the handle all the way to the right towards the symbol ▼
Fig. 8 Place a suitable cup under the sieve holder and press the corresponding button for one or two cups. If you wish to abort the brewing process prior to its end, press the respective button again.
Fig. 9 To prepare more espressos, turn the sieve holder back to the open position by the handle and remove it. Before pouring the coffee grounds, fold the sieve lock upwards so that the sieve is held in place. Hold down the sieve lock and empty the sieve over a suitable container.
- To prepare more espressi follow points 5 to 9. To remove the sieve from the sieve holder empty it first. Now turn the sieve so that the nose lies in the groove of the sieve holder and pull the sieve out upwards.

Caution
- Danger of burns!
- Parts of the espresso maker as well as parts of the sieve holder become very hot!
Memory function
It is possible, to individually adjust the volume of the coffee for both one as well as two cups:
Setting desired coffee volume of one-cup
- Press Espresso - 1 cup button for 3s, and you enter the set-up mode. The cup symbol is flashing in display.
- Press the Espresso - 1 cup button, the brewing process starts and the cup symbol is flashing on display.
- When the desired coffee volume has been reached, press the Espresso - 1 cup button again and the new setting is saved within 2s and the cup symbol is continuously shining.
Setting desired coffee volume of two-cups
Follow above steps 1. - 3. but using Espresso - 2 cups button.
Reset the factory settings
Press the Espresso - 1 cup and the Espresso - 2 cups buttons for 3s to get back to default setting.
Steam function
Fig. 10 Clean the nozzle before each use. Press the on/off switch. The product is heated for about 1 minute. If the display is illuminated permanently, the product is heated up and the steam function can be used. Turn out the swivel arm and hold an empty container under the steam nozzle. Set the knob to steam steam is coming out stably and continuously. This will clean the nozzle and water circulation inside the unit before use.
a) Heating up drinks
- Place the cup with the liquid to be heated under the steam nozzle and immerse the steam nozzle in the liquid.
- Turn the control knob to steam

Warning
Hot steam escapes immediately.
- Set the knob to O as soon as the drink has reached the desired temperature. Clean the swivel arm as well as the steam nozzle after each usage to avoid residues from building up (see Note below).
English
b) Froth the milk
-
Place the cup with the milk to be frothed (at least 50 ml) under the steam nozzle and immerse the steam nozzle in the milk.
-
Turn the control knob to steam


Warning
Hot steam escapes immediately.
-
Make a circular motion with the cup until sufficient milk froth has formed.
-
When you have achieved the desired result, set the knob to 0 and remove the cup with the milk.
-
If steam is still leaking, place a container under it. Clean the swivel arm as well as the steam nozzle after each usage to avoid residues from building up (see Note below).
Note:
Immediate cleaning
Clean the steam nozzle and the swivel arm immediately after every use. Immerse the steam nozzle in a cup of clear water and set the knob to steam 🔊 and let steam escape into the clear water for several seconds. Repeat the process several times if necessary.
Note:
Cooling down after using the steam function
After using the steam function for a longer period of time, the machine needs to cool down, before espressi can be prepared. This is indicated by a rapidly flashing coffee symbol in the display for warning. If the one cup or two cup button will be pressed immediately after steam function.
To cool down the machine, place a cup under the steam nozzle, turn the control knob to the left, and draw hot water for about 10s, then turn the knob back to the middle position. When the symbols shine constantly, the machine has cooled down and all functions are ready to be used.
Hot water
Turn the swivel arm out and place an empty container under the steam nozzle. Set the control knob to hot water.

Warning
Hot water comes out immediately. When you have filled the desired amount of hot water, turn the control knob back to 0.
Tips
- Only use fresh drinking water for espresso preparation.
- Dispose of the coffee grounds after each brewing process. Do not use the same coffee grounds for a new brewing process because the aroma is not preserved.
-
Use only cold milk in a cold cup for frothering, as this leaves more time because the milk must not get hotter than 60°C. At higher temperatures, the protein of the milk coagulates and it can therefore no longer froth. Do not froth the milk a second time, otherwise it will scorch. Note that temperature, freshness and fat content of the milk influence the quality of the foam.
-
Hold your hand on the bottom of the cup to better assess the temperature.
• Always keep the device clean and clean it after every use (see Cleaning and care).
Cleaning and care

Warning
- Unplug the product and let it cool down completely before cleaning. Never immerse electrical parts of the product in water or any other fluid during cleaning or operation. Never hold the product under running water.
- When cleaning, never use solvents or abrasive materials, hard brushes, metallic or sharp objects. Solvents are harmful to human health and can attack plastic parts, while abrasive cleaning mechanisms and tools may scratch the surface(s).
Fig. 11 Clean the product's exterior surfaces, the swivel arm and the steam nozzle with a slightly damp cloth and then dry them thoroughly. Make sure that no water enters the product interior (for example, through the switch). The steam nozzle can be removed by pulling down and being washed separately.
Fig. 12 Remove the sieve holder and sieve and pour out the coffee grounds. Wash under running water and dry thoroughly.
Note:
The stainless steel sieve (single cup or double cup) and stainless steel drip tray are suitable for dishwasher.
Fig. 13 Regularly remove the drip tray with storage tray, pour out any water, etc., rinse and dry both parts. The assembling is done in reverse order.
Descaling

Warning
Never use a descaler based on mineral acids such as sulphuric acid, hydrochloric acid, sulphamic acid and acetic acid (e.g. vinegar). These descalers may damage the espresso maker.
- Descale your product regularly depending on your water's lime content and frequency of use.
- Use an off-the-shelf decalcifier and follow the provided instructions.
- Pour fresh water and the specified amount of decalcifier into the water tank.
• Repeatedly start the brewing process until the water tank is empty. If necessary, repeat this process.
• After descaling, rinse the product several times by brewing water with no coffee to remove any decalcifier residue.
Descaling reminder
Descaling reminder will be activated after accumulated operation of functions coffee, steam or hot water for 500 times and both cup symbols on display are flashing alternating for 10 times. The descaling reminder will be always on every time after you switch on the espresso maker, unless it is cancelled.
Cancel descaling reminder
Pressing the single cup button while you turn the knob steam/ hot water to the left side and then to center position 0 (off). The descaling reminder will be cancelled.
English
Troubleshooting
If there are any problems during operation, please refer to the following table. If problems cannot be solved as indicated under Solution, please contact your manufacturer.
| Problem Possible causes Solution | ||
| No more espresso comes out | Water tank is empty Refill the water tank | |
| The sieve of the sieve holder is clogged | Clean the sieve and the sieve holder | |
| The water tank isn't properly placed on the machine | Make sure the water tank is properly placed and connected | |
| The machine is calcified Descale | the espresso maker | |
| The espresso leaks from the edges of the sieve holder | The sieve holder is improperly inserted or clogged | Make sure the sieve holder is properly inserted and turned all the way to the rightClean the sieve holder and make sure no ground coffee sits on the upper edges |
| The sieve of the sieve holder is clogged | Clean the sieve and the sieve holder | |
| The sieve holder cannot be (properly) inserted and locked in the machine | Too much coffee has been filled into the sieve | Use the provided measurement spoon and do not overfill the sieve |
| Ground coffee has gathered on the upper edges | Clean the sieve holder and make sure no ground coffee sits on the upper edges | |
| The taste of the espresso is insufficient | Not enough ground coffee has been filled in | Use more ground coffee |
| The ground coffee is too fine / coarse | Only use ground coffee suitable for espresso makers | |
| The machine is calcified Descale | the espresso maker | |
| The ground coffee hasn't been properly pressed | Use more strength to press the ground coffee | |
| Coffee quality deteriorates | Product is calcified Descale the product, refer to chapter DESCALING | |
Hot water comes out immediately. When you have filled the desired amount of hot water, turn the control knob back to 0
Conseils
- Sicherheitshinweise
- English
- Safety instructions
- Congratulations!
- Intended use
- Before first time use
- Preparation.
- Warning
- Content
- Technical data
- Controls and components
- Preparation
- Preparing espresso
- Caution
- Memory function
- Setting desired coffee volume of one-cup
- Setting desired coffee volume of two-cups
- Reset the factory settings
- Steam function
- a) Heating up drinks
- b) Froth the milk
- Note:
- Immediate cleaning
- Cooling down after using the steam function
- Hot water
- Tips
- Cleaning and care
- Descaling
- Descaling reminder
- Cancel descaling reminder
- Troubleshooting
- Conseils
Brand : Koenic
Model : KEM 2320 M
Category : Coffee machine