USER MANUAL KCM 141224 Koenic
In millions of dollars
Hua Sui Yuan
(5) S. (the letter)
LUTTER
(5.27) 田中梅
16.0% 16.2% 16.3% 16.4%
(1) A 的 为
Get ready for compliments
Co ee Maker with Grinder
62141224
(1) 本次股东大会的决议
- 2014年1月1日
图 198
图 10.1.1.2.
P8 沈阳(刘敏)
- 2024年1月1日
m. 30 samples (cell/hero)
7.60倍(177元/百
■ 2016年1月3日
图 40A.5A-1
(1) 0481 号 CIEC31/19
natural_image
Exterior view of a modern coffee maker with digital display and control panel (no visible text or symbols)
(1)
1
(1) 计算式
- 2017年1月1日
(48) 77-91
201354
(2) ( x - 1) = 0
kaward 57, 05
(1) 2017年1月1日
Prod. 24+15
19467-74
[Unreadable]
The image is too blurry to recognize any text content.
Sicherheitshinweise

Risk of burning! Do not touch the product's hot surfaces. Heat rises from the product during use.
Caution! Hot surface!
- This product shall not be used by children. Keep the product and its cord out of reach of children.
- This product can be used by persons with reduced physical, sensory or mental capabilities or lack of experience and knowledge if they are under supervision or have been given instruction concerning the use of the product in a safe way and if they understand the hazards involved.
• Children shall not play with the product.
- A damaged power cord may only be replaced by an authorised service agent in order to avoid hazards.
- The product is designed for the preparation of normal household quantities in the home, or in household-like, non-commercial environments. Household-like environments include staff kitchens in shops, offices, agricultural and other small businesses or for use by guests at bed-and-breakfast establishments, small hotels and similar residential facilities.
- The coffee maker shall not be placed in a cabinet during use.
- Warning! Misuse can cause injuries.
- Use the product only for its intended purpose and with recommended accessories and components. Improper use or wrong operation may lead to hazards.
- Never immerse electrical parts of the product in water or any other fluid during cleaning or operation. Never hold the product under running water.
English
Safety instructions
- Caution! The surface of the heating element is subject to residual heat after use.
- Clean the product and all other accessories after each use.
- Follow the instructions in the chapter Cleaning and care.
- Always disconnect the product from the mains if it is left unattended and before assembling, disassembling or cleaning.
- Switch off the product and disconnect it from the mains before changing accessories or approaching parts that move in use.
- Never use accessories which are not recommended by the manufacturer. They could pose a safety risk to the user and might damage the product. Only use original parts and accessories.
- Do not continuously operate the product for too long to avoid overheating the motor. If the grinder works continuously for 2 times and the break in between is less than 1 minute, the device will limit the use of the grinding function. After a break of 1 minute, the grinder can be used again.
Safety instructions
- Read this user manual thoroughly before first use and pass it on with the product. Pay attention to the warnings on the product and in this user manual. It contains important information for your safety as well as for the use and maintenance of the equipment.
- Never leave the product unsupervised while it is switched on.
- Do not place any objects on top of the product.
- Do not under any circumstances attempt (e.g. damaged power cord, product has been dropped, etc.) to repair the product yourself. For servicing and repairs, please consult an authorised service agent.
- The mains voltage must match the information on the rating label of the product.
- Only unplugging from the power socket can separate the product completely from the mains. Please be sure that the power plug is in operable condition.
- Avoid damages to the power cord that may be caused by kinks or contact with sharp corners.
- Keep this product including power cord and power plug away from all heat sources such as ovens, hot plates and other heat-producing products/objects.
- Only unplugging from the power socket by the plug itself. Do not pull on the cord.
- Unplug the product ...
- when the product is not being used,
- in case of malfunctions,
- before attaching / detaching accessories and
- before cleaning the product.
- Use this product in dry indoor areas only and never outdoors.
- Place the product on a flat, sturdy and slip-resistant surface.
- Never use, expose or place the product near to:
- direct sunlight and dust;
- fire (fireplace, grill, candles), water (water splashes, vases, bathtub) or heavy moisture.
- Risk of burning! The product's housing as well as the coffee pot become very hot during use. Touch the coffee pot only by its handle.
- Do not move or transport the product during use or while there is hot coffee in the coffee jug. Spraying hot coffee poses a risk of scalding.
- Do not disassemble the coffee jug.
- Never use the coffee jug if it is damaged. Handle the coffee jug carefully.
- Cease using the coffee jug if the handle is loosened or has lost its stability.
- The coffee jug is intended exclusively for use with this coffee maker.
- Never attempt to replace parts yourself. If a part needs to be replaced, contact an authorised service agent.
- Make sure not to overfill the water tank. Please note, that there's a spillover on the back of the product.
- Do not operate the product when there is no water in the water tank.
- Fill the product with water only when it is unplugged.
- Important! Check to ensure that the product is in a serviceable condition before use. The product shall not be used if it shows any signs of damage or if it's suspected to be defect.
English
Congratulations!
Thank you for your purchase of a KOENIC product. Please read this manual carefully and keep it for future reference.
Intended use
The product is intended for making coffee. Any other use may result in damage to product or injuries.
The Imtron GmbH assumes no liability for damage to the product, for property damage or for personal injury due to careless or improper usage of the product, or usage of product which does not meet the manufacturer's specified purpose.
Before first time use
Remove the product and accessories carefully from the original packaging. It is recommended to keep the original packaging for storage. If you wish to dispose of the original packaging, please observe applicable legal provisions.
Should you have any questions regarding proper disposal, contact your local waste management center.
Inspect the delivery contents for completeness and damages. Should the delivery contents be incomplete or damaged, contact your sales outlet immediately.
After unpacking, please refer to chapter
Preparation.
Content
1 x Main unit
1 x Coffee jug
1 x User manual
1 x Warranty card
Technical data
Rated voltage : 220 - 240 V\~
Rated power : 1280 - 1520 W
Frequency : 50 - 60 Hz
Capacity : 1500 ml
Protection class : I
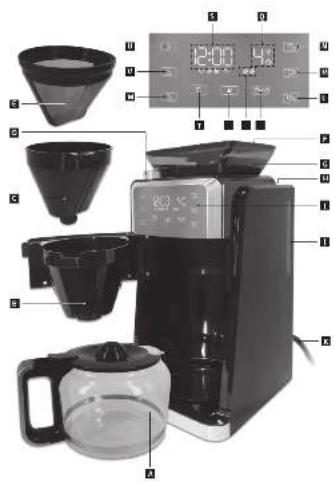
Controls and components
A Coffee jug
B Filter holder
C Filter holder insert
D Coarseness setting
€ Permanent filter
F Coffee bean tank cap
G Coffee bean tank
H Water tank with lid
Control panel with display
J Water level indicator
K Power cord with power plug
L Start / stop button
M Cup number selection button
N Keep warm button
- Coffee strength and grinder switch-off button
P Coffee strength display
Q Cup number display
R Cleaning reset button
s Time display
Timer button
U On / standby button
v Hour button
w Minute button
Preparation
- Clean the product prior to using the coffee maker for the first time. Also clean the product if it has not been used for a significant period of time, and after each descaling operation.
- Open the lid and fill with fresh water. It is recommended to use the coffee pot for filling the water tank.
- Press the on / standby button to turn on the product. Switch off the grinder by using the grinder switch off-button but don't fill any coffee powder into filter. Start the brewing process by pressing the start / stop button.
- Wait until all of the water has run through. Press the on / standby button to switch off the product. Allow the product to cool for approx. 5 minutes before starting another brewing process. Repeat this process two or three times. Pour any water away before each new coffee making process.
- Clean the coffee jug and the filter holder.
Making Coffee
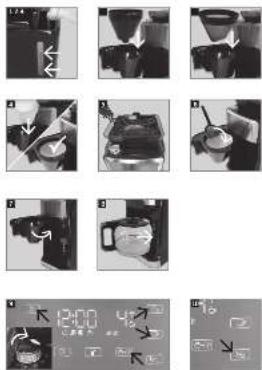
Fig.1 Open the water tank lid and fill the water tank with fresh water. The amount of water filled must not be below the lowest mark or above the 12 / MAX mark. Use the coffee jug to fill the water tank. Do not overfill the water tank. There is an overflow on the back.
Fig. 2 Place the filter holder in the filter holder insert.
Fig. 3 Place the permanent filter in the filter holder.
Fig. 4 Optionally, you can insert a paper filter (size 4) into the filter holder. Make sure that the paper filter is seated correctly and cannot bend over.
Fig. 5 Remove the coffee bean tank lid and fill coffee beans into the coffee bean tank. Do not overfill the tank.
Fig. 6 If you want to use ground coffee to brew coffee, pour the desired amount into the filter using a suitable spoon.
Fig. 7 Close the filter system so that it clicks into place.
Notes:
- If the filter holder insert and permanent filter are not correctly installed into the filter holder and the filter system is closed incorrectly, OPEN appears in display, 📄 is shown, 🌐ashes and an acoustic alarm signal sounds.
- Start the coffee brewing process by pressing the start / stop button within 5 minutes after closing the filter system. After time-out, open and close the filter system again and make sure it clicks into place correctly.
Fig. 8 Place the coffee pot on the shelf.
Fig. 9 Press the on / standby button. The display and control panel lighting are switched on.
Use the number of cups selection button 📋 to set the number of cups 2-4-6-8-10-12. The default setting is 4 cups. Use the coffee strength and grinder switch-off button 📋 to set the strength 🎶/ⓆⓆ/ⓆⓆ of the coffee. The settings are shown on the display. Use the coarseness setting knob to set the desired grinding coarseness of the coffee from coarse 🔍 to very fine 🔍 The default and recommended setting is the medium setting.
Note: Only when grinder is working, you can set the grinding coarseness using the setting knob.
If you want to use ground coffee to brew coffee, switch off the grinder using the coffee strength and grinder switch-off button 📄/10. When the grinder is switched off, 🤔 appears on the display.
English

Caution
- The jug will get hot during the brewing process. Do not touch the bottom of the jug. Danger of burns!
• The warming plate becomes hot!
Fig. 10 Press the start / stop button. The coffee maker starts to brew the coffee. During the brewing process, appears on the display. After the brewing has finished, the coffee maker will turn into keep warm mode automatically. is displayed. The standard keep warm time is 30 minutes. You can use the button to set the keep-warm time to 1 or 2 hours or to turn off keep warm mode (00:00).
Note: Stop the brewing process at any time by pressing the start / stop button.
Setting the clock
Note: It is not necessary to set the time for normal operation of the coffee machine. However, to use the timer function, the time must be set before.
Fig. 11 After you have inserted the plug into the socket, 12:00 flashes in the display.
- Press the 📄 button to set the hour.
- Press the ⓄM button to set the minute.
- The set time is automatically adopted after 3 seconds without making any settings.
Timer function
Fig. 12 You can use the timer function to preset the time at which the machine should start preparing coffee.
Note: If you use the timer function, you must make sure that the time is set correctly as given in point
Setting the clock.
- Set the number of cups, the strength of the coffee and the grinding level or switch the grinder off or on as desired as described before.
- Press the button 🔒.
Note: If the next step to set or activate the timer is not done within 5 seconds after the last button press, the setting will be taken over and the timer will be activated.
- 12:00 flashes in the display.
- Press C_H to set the hour.
- Press C_M to set the minute.
- Press the button again to accept the set time and to activate the timer mode. lights up in the display and the timer button flashes.
Notes:
- If no further setting is done within 5 seconds after setting the time, the timer will be activated.
-
If you want to cancel the activated timer, press the button again.
-
The device starts brewing at the preset time and the start / stop button flashes. In the display turns off.
Note: Ensure that a sufficient amount of coffee beans is in the coffee bean tank or coffee powder in the filter. Additionally ensure that the water tank is filled.
Cleaning and care

Warning
- Unplug the product and let it cool down completely before cleaning. Never immerse electrical parts of the product in water or any other fluid during cleaning or operation. Never hold the product under running water.
- When cleaning, never use solvents or abrasive materials, hard brushes, metallic or sharp objects. Solvents are harmful to human health and can attack plastic parts, while abrasive cleaning mechanisms and tools may scratch the surface(s).
Fig.13 Clean the product's exterior surfaces with a slightly damp cloth and then dry them thoroughly. Make sure that no water enters the product interior (for example, through the control panel).
Fig.14 Clean the coffee jug, the permanent filter and the filter holder after use with warm water and a little dishwashing detergent. Then let them dry.
Fig. 15 Clean the stand and the lid regularly with a slightly damp cloth and then dry them of thoroughly.
Note: The coffee jug is dishwasher safe.
Fig. 16 If you use coffee beans, clean the coffee spout at least once a month or at best weekly:
- Open the filter system.
- Turn the brew head inwards.
- Remove coffee residue from the outlet opening.
- The brew head does not need to be turned back to its original position, but will be automatically reset the next time the machine is switched on.
Note: Follow the steps above if coffee grounds are blocking the outlet opening.
Rinse the coffee bean tank
Fig. 17 1. Remove the coffee bean tank lid.
2. Rotate the coffee bean tank clockwise and remove it.
Caution! The coffee bean tank must not be cleaned in a dishwasher.
3. Rinse with warm water (max 50°C).
Coffee grinder
Fig. 18 1. Turn the grinding ring handle counterclockwise and then remove it. Clean the grinding ring and the grinding ring seat.
2. Put the grinding ring back in position and turn it clockwise. Make sure it is installed properly.
Assembly
Fig. 19 When inserting the coffee bean tank, the ▼ and ▲ symbols must be aligned and face each other. Now press the coffee bean tank down and twist it counterclockwise. Make sure it is properly installed and locked into place.
Cleaning cycle reminder
After each 50 coffee brewing processes the cleaning reset button ⚙️ will flash to remind you to perform a cleaning cycle. Follow point
Descaling and click the cleaning reset button to reset the indication.
Note: The coffee maker can still be used without resetting the reminder, but note, that the function of the machine might become impaired.
English
Descaling

Warning
Never use a descaler based on mineral acids such as sulphuric acid, hydrochloric acid, sulphamic acid and acetic acid (e.g. vinegar). These descalers may damage your coffee machine.
- Descale your product regularly depending on your water's lime content and frequency of use, the latest, when the brewing process is aborted and water remains in the tank.
- Use an off-the-shelf decalcifier and follow the provided instructions.
-
Pour fresh water and the specified amount of decalcifier into the water tank.
-
Start brewing and let the water run through completely. Empty the coffee jug. If necessary, repeat this process.
- After descaling, rinse the product several times by brewing water with no coffee to remove any decalcifier residue.
- Rinse the coffee jug with warm water after descaling.
Troubleshooting
If there are any problems during operation, please refer to the following table. If the problems cannot be solved as indicated under Solution, please contact your sales agent.
| Problem Possible causes Solution | |
| Product does not work • Interrupted power supply • Check the power supply |
| Coffee quality deteriorates | • Product is calcified • Descale | the product, refer to chapter Descaling |
| The brewing process is aborted prematurely / water remains in the water tank |