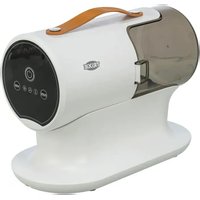
23850 - Electric mower Trixie - Free user manual and instructions
Find the device manual for free 23850 Trixie in PDF.


| Product type | Clipping kit with fur vacuum |
| Brand | Trixie |
| Model | 23850 |
| Power supply | 220–240 V, 50/60 Hz |
| Power | 600 W |
| Vacuum dimensions | 320 mm × 160 mm × 225 mm (L × W × H) |
| Weight | 2 kg |
| Collection container capacity | 2 litres |
| Flexible hose length | 1.5 m |
| Power cord length | 1.65 m |
| Main functions | Simultaneous clipping and vacuuming of pet hair |
| Included accessories | Grooming brush, cleaning brush, undercoat remover, electric clipper, 3 attachment combs |
| Suction speeds | 3 levels (low/medium/high) |
| Filters | HEPA filter and foam filter |
| Filter maintenance | Clean with water, dry 24 hours before reassembly |
| Clipper maintenance | Regular oil (clipper oil #23872-25) |
| Safety | Automatic shut-off in case of overheating; do not use without filters |
| Usage | Domestic, indoor only |
| Storage | Hose wrapped around the base, cord stored under the device |
| Warranty / Reparability | Contact the manufacturer for repairs |
Frequently Asked Questions - 23850 Trixie
User questions about 23850 Trixie
0 question about this device. Answer the ones you know or ask your own.
Ask a new question about this device
Download the instructions for your Electric mower in PDF format for free! Find your manual 23850 - Trixie and take your electronic device back in hand. On this page are published all the documents necessary for the use of your device. 23850 by Trixie.
USER MANUAL 23850 Trixie
DE Schermaschinenset mit Fellsauger Gebrauchsanweisung
© Clipper Set with fur vacuum
Instructions
FR Kit de tonte avec aspirateur à fourrure
Mode d'emploi
NL Tondeuse-set met vachtafzuiger
Handleiding
IT Set per la tosatura con aspira peli
Istruzioni
SV Klippet med pälsdammsugare
Instruktioner
ES Clipper Set con aspirador de pelos
Instrucciones
RU Комплект машинки для стрижки с пылесосом для шерсти
Инструкция
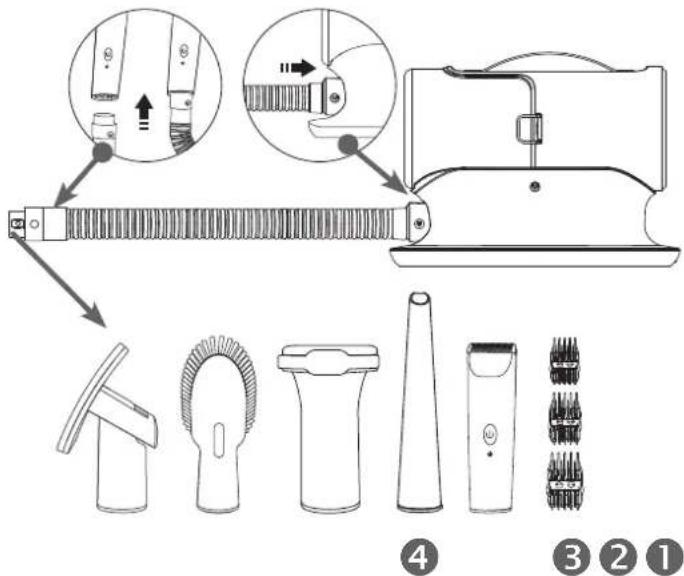
(With preinstalled HEPA filter and foam filter)
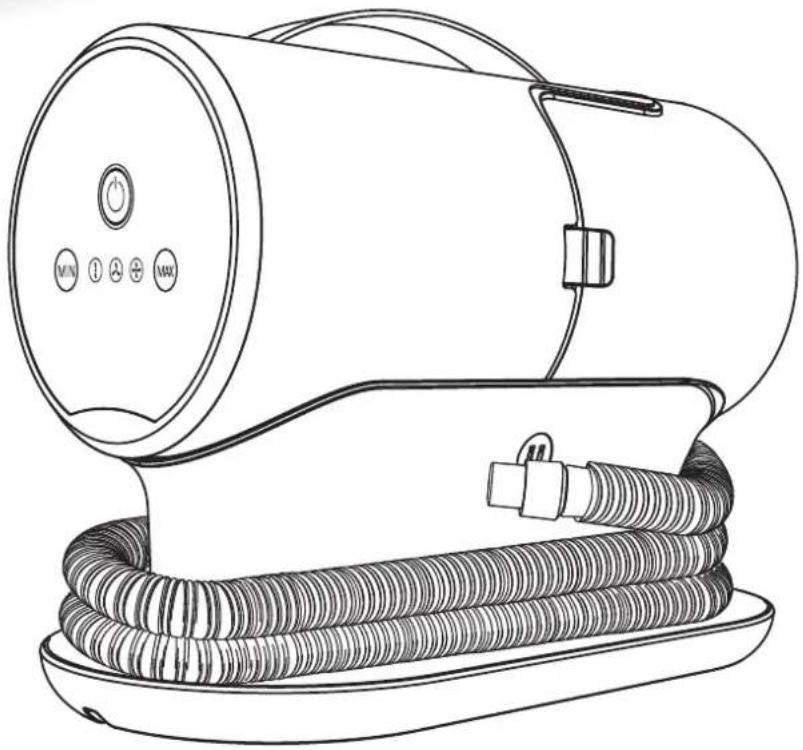
FR Aspirateur
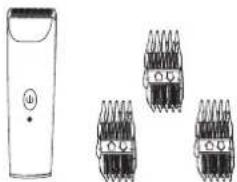
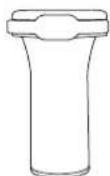
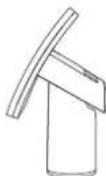
EN Electric clipper / attachment combs
② Reinigungsbürste
4 Fugendüse
1. Safety information
2. Specifications
3. General troubleshooting
4. How to use the vacuum
5. Use of the accessories
6. Maintenance
6.1. HEPA filter & foam filter maintenance
6.2. Maintaining the collection container
6.3. Maintaining the electric clipper
7. Storage
7.1. Storing the flexible hose
7.2. Storing the power cord
1. Safety information
- This product may only be used for domestic purposes and not for commercial or industrial purposes. This product must also not be used outdoors or in a damp environment.
- Be especially careful when using this product around children and pets. Please do not allow children or pets to play with this product.
- Dispose of all packaging materials properly. Keep away from children and pets.
- Do not use or store this product in damp places such as outdoors or in bathrooms.
- Do not touch the power plug or this product with wet hands.
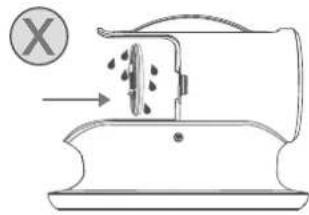
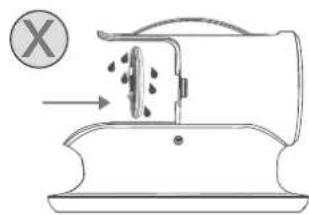
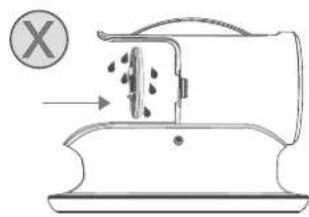
- Do not use this product to vacuum up wet hair or liquids.
- Do not use this product if the power cord or the plug is damaged.
- Do not disassemble this product yourself. Incorrect assembly can lead to electric shock or fire. Please contact the manufacturer if repairs are necessary.
- Never use this product to vacuum flammable or combustible liquids such as gasoline. Do not use this product to vacuum up hot or flammable objects such as cigarettes, matches, hot soot, etc., as this may cause fires and explosions.
- Do not use the product in or near environments where flammable or combustible gases or liquids are present.
- Do not pull on the power cord. Do not place any heavy objects on the product.
- Do not insert your fingers or other body parts into the suction opening. Do not insert foreign objects such as plastic bags into the suction opening to avoid injury or product failure.
- Do not use chemical products with aroma substances and fragrances on the filter, otherwise there is the risk of fire.
- Clean the collection container and the filters regularly, otherwise this may lead to product failure or accidents.
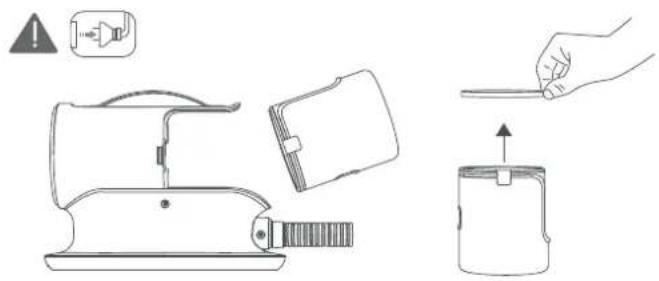
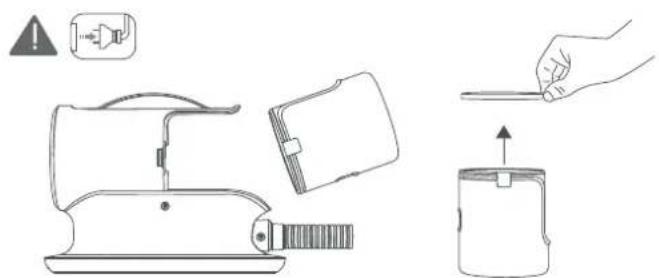
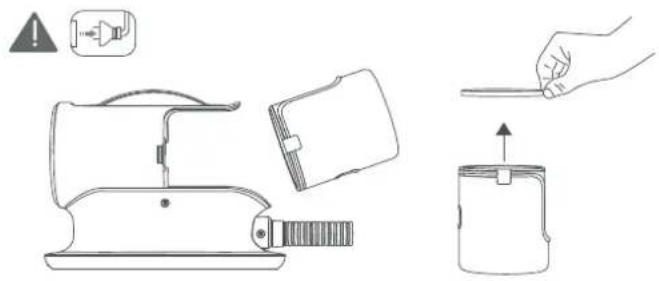
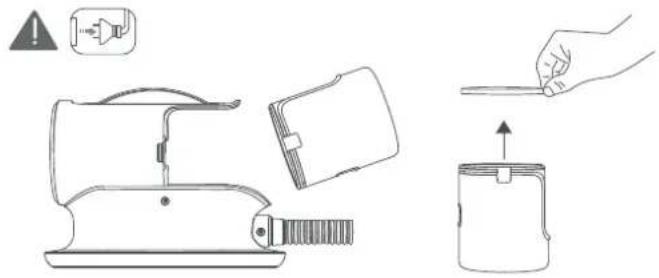
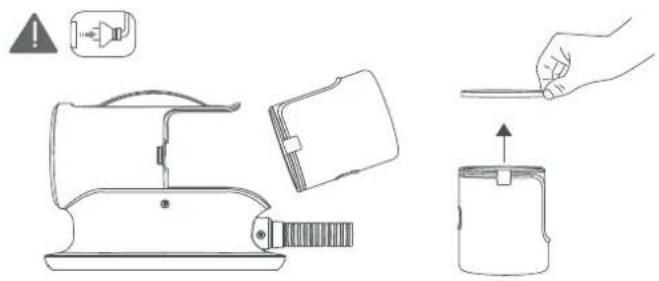
- Before cleaning and maintenance, disconnect the appliance from the power supply and pull out the mains plug. Otherwise, there is a risk of electric shock, accidents and injuries.
- This product has a function that interrupts operation if the temperature rises abnormally. If the motor heats up abnormally, stop using it immediately and switch off the appliance. If the suction opening is blocked, stop using the appliance immediately and switch it off. Remove the collection container, make sure that the suction opening and the filters are clean and restart the appliance after 60 minutes.
- Make sure that the filters are correctly installed for the device to work. Using the appliance without filters can lead to appliance failure.
- Pay attention to the sharp edges on the accessories to avoid injury. The blades of some accessories (e.g. detangling tool and electric clipper) have been sharpened for functional reasons. Always pay attention to safety when using this product.
- The flexible hose contains electrical wires and must not be used to vacuum up water or be immersed in water for cleaning. Check the hose regularly and stop using it if it is damaged.
2. Specifications
Product Name: Clipper Set with fur vacuum/#23850
Model: PG100
Power supply: 220–240 V, 50/60 Hz
Power: 600 W
Length of flexible hose: 1.5 m
Length of mains cable: 1.65 m
Collection container capacity: 2 liters
Vacuum dimensions: 320 mm × 160 mm × 225 mm (L × W × H)
Weight: 2 kg
3. General troubleshooting
Error: The appliance cannot be switched on.
Possible causes of error: The mains cable is not connected or the mains socket is not supplied with power.
Suggested solution: Check whether the mains cable is plugged in and whether the mains socket is supplied with power.
Error: Low suction power.
Possible cause of error: The hose is clogged.
Suggested solution: Check whether the hose is clogged.
Possible cause of error: The collection container is full.
Suggested solution: Empty the collection container.
Possible cause of error: The HEPA filter or the foam filter is too dirty.
Suggested solution: Clean HEPA filter or foam filter.
Possible cause of error: The collection container or the accessories are not installed correctly.
Suggested solution: Check that the collection container or the accessories are installed according to the user manual.
Possible cause of error: Accessories are clogged with hair.
Suggested solution: Clean the accessories immediately and remove any hair.
Note: If the above measures do not solve the problem, please stop using the product and contact customer service for help.
4. How to use the vacuum
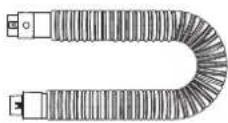
- Connect the accessories and the vacuum using the flexible hose. Make sure that the connections at both ends of the hose are tight so that no air escapes.
- Plug the power cord of the vacuum into a mains socket.
- Switch on the power switch on the vacuum. Select a suction power level as required. There are three different suction power levels (low/medium/high).
The appliance generates noise, therefore it is recommended to start with the lowest level and calm your pet while using the device to avoid stress or anxiety. After your pet has become accustomed to it, you can increase the suction power as needed.
Note: Please pay attention to the sharp edges on the accessories when using them to avoid cuts.
5. Use of the accessories
① Grooming brush
It removes loose hair and light dirt from your pet's body.
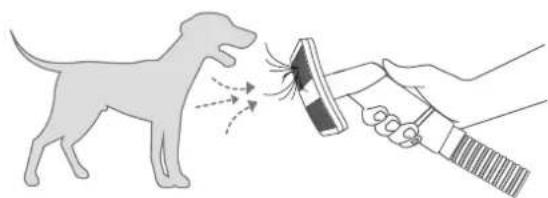
② Cleaning brush
It can be used to remove pet hair or dust from clothes, sofas or carpets and also to clean pets' paws.
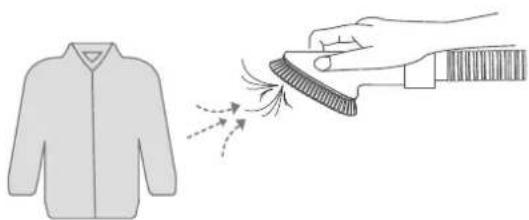
③ Undercoat remover
It can be used to remove loose undercoat and loose topcoat.
4 Crevice nozzle
It can be used to remove pet hair or dust in the crevices of sofas and beds.
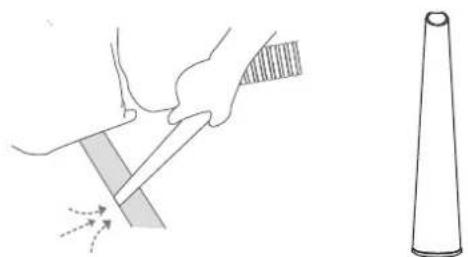
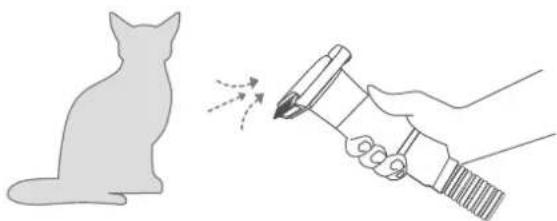
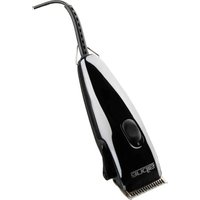
⑤ Electric clipper
It is used to finely trim pet hair and vacuum it into the collection bin. Clipping, grooming and vacuuming are all done in one operation. The clipper head can be changed if necessary. The electric clipper has its own power button. After switching on the vacuum, you can control the electric clipper separately with this button, which makes operating it easier.
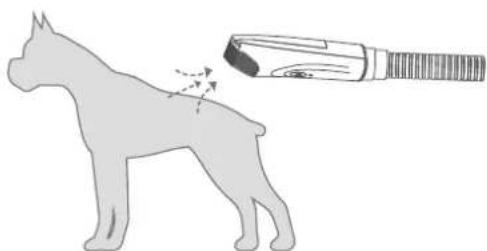
Note: The clipper is only suitable for clipping animal hair. Please be careful with the soft parts of your pet's skin and do not use excessive force to avoid scratch wounds on your pet's skin. Be sure to bathe and dry and brush the animal thoroughly before clipping. Only clean fur may be clipped. Oil the clipper regularly, even during clipping; the vacuum must be switched off for this purpose.
Be careful on the ears and face; it is preferable to use a conventional clipper on these sensitive areas of the body. (If this clipper is used, use only at the lowest setting and very carefully. There is a risk of the edges of the ears and flews in particular being sucked in and harmed.
Please also note that the fur is pulled smooth by the vacuum; it is therefore better to use an attachment comb for longer fur lengths (especially with curly hair).
⑥ Attachment combs
Depending on your pet's hair length and different trimming and grooming needs, attachable combs of various lengths can be exchanged and used with the electric clipper. The packaging contains three attachment combs, in two different sizes each. Simply reverse the installation direc-
tion for the attachment comb for use.
Note: Keep the attachment combs in a safe place when not in use so that they do not get lost.
6. Maintenance
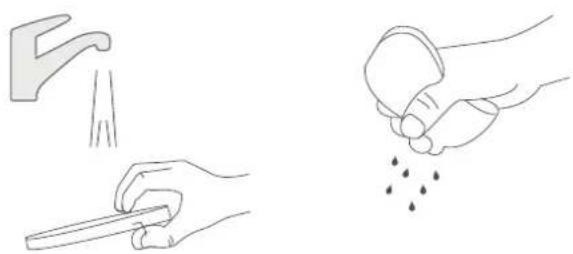
6.1. HEPA filter & foam filter maintenance
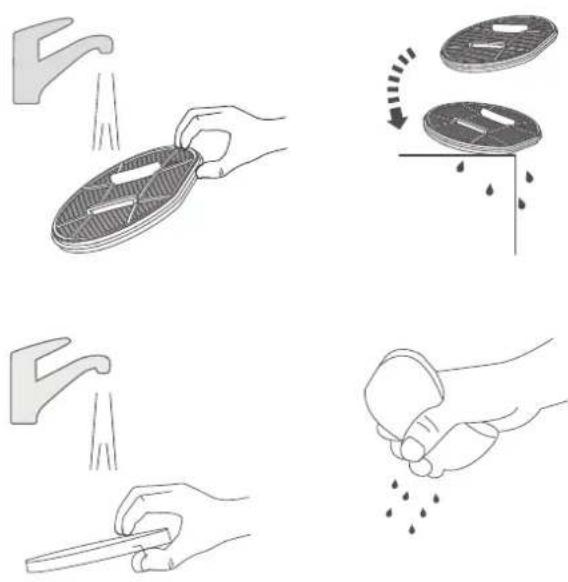
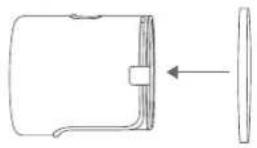
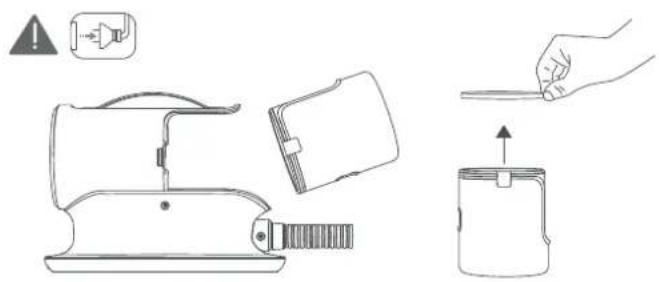
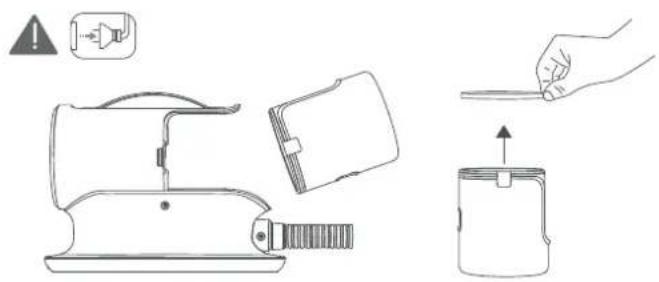
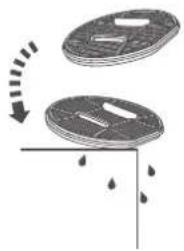
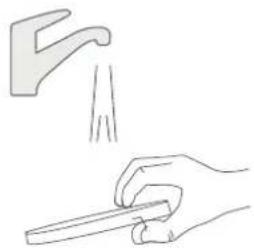
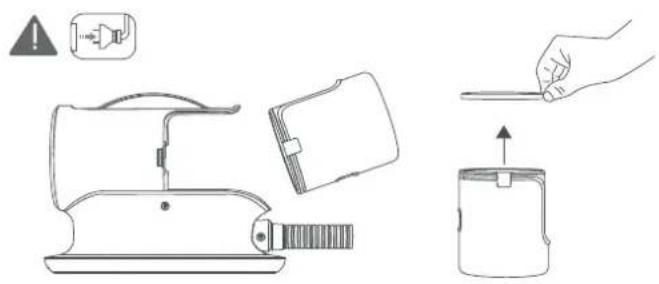
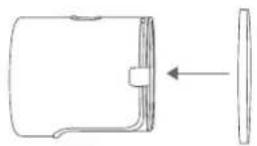
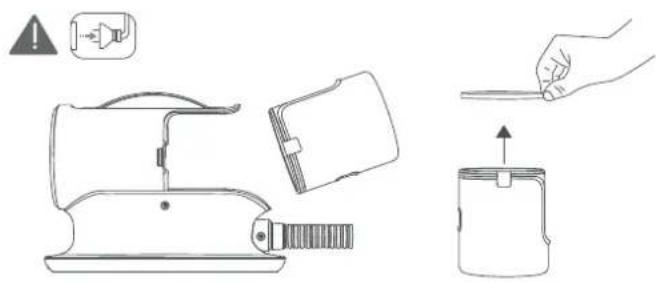
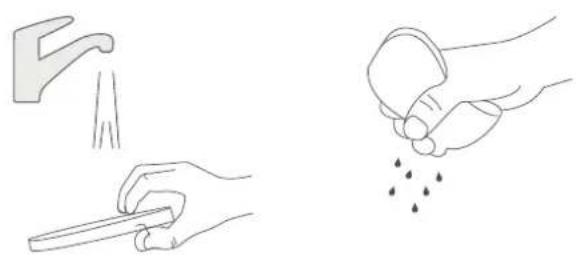
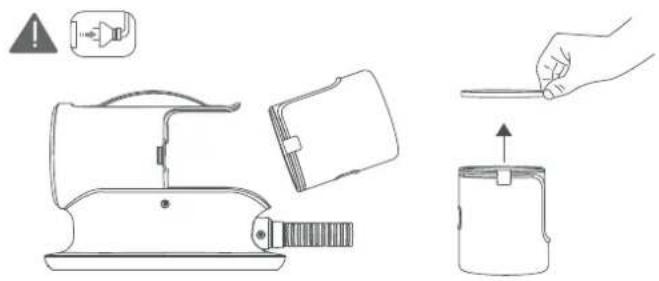
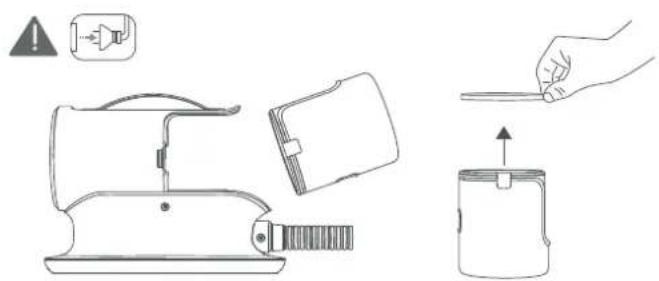
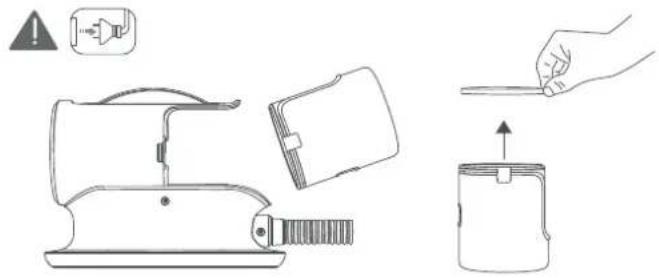
- Remove the collection container and then remove the HEPA and foam filters.
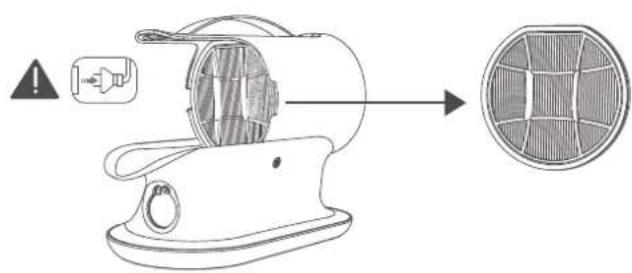
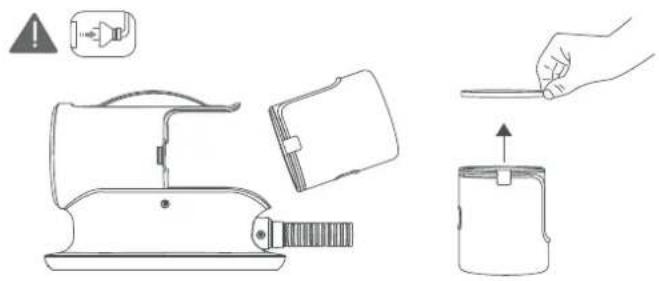
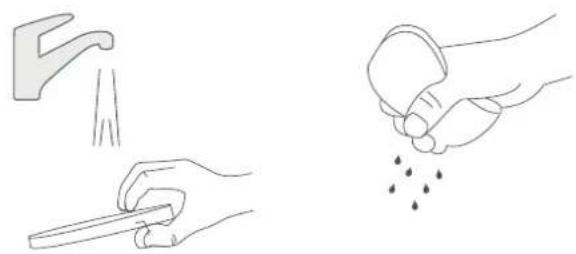
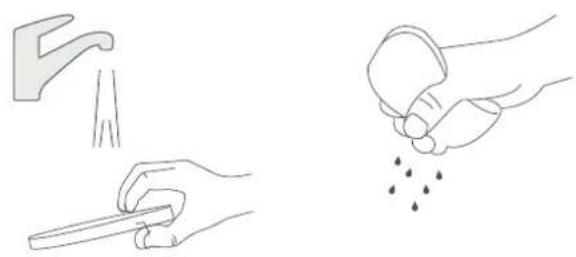
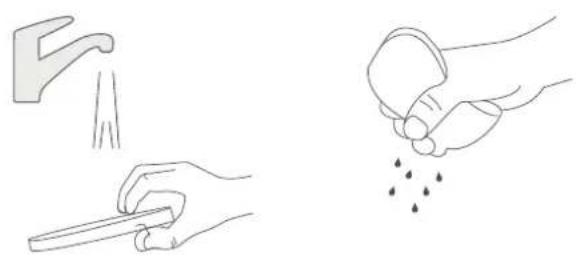
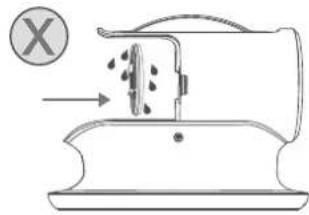
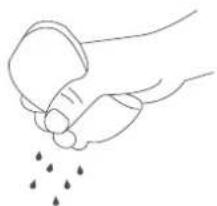
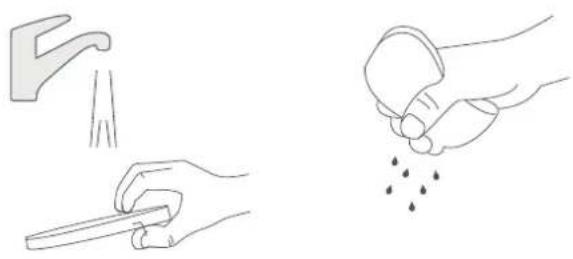
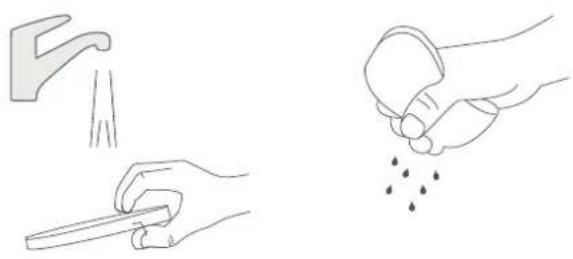
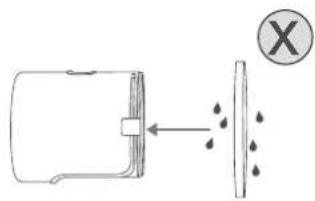
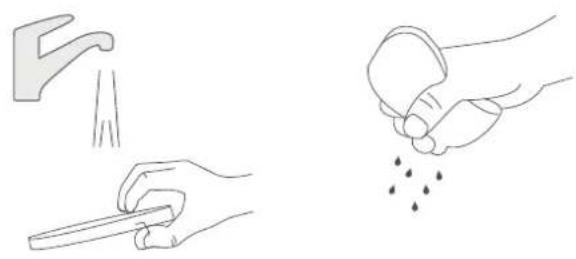
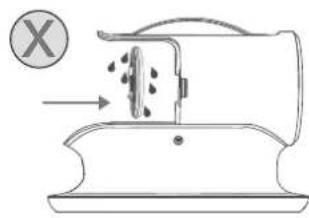
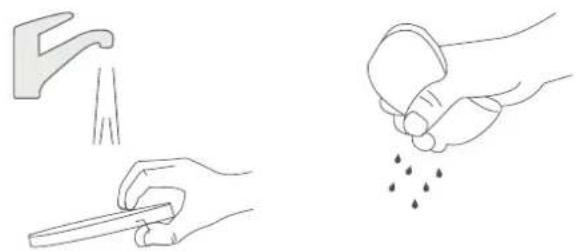
- Wash with tap water and drain the water after washing.
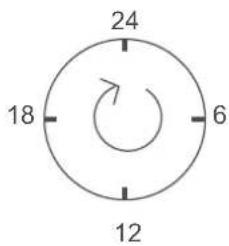
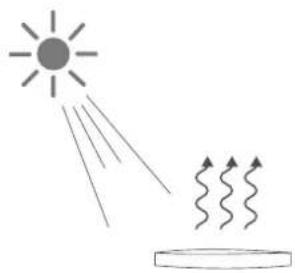
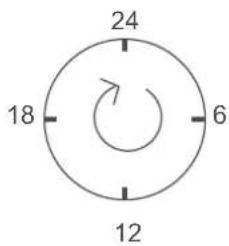
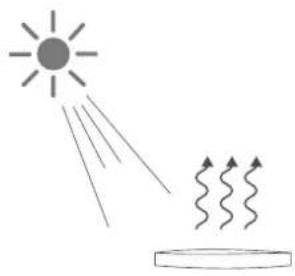
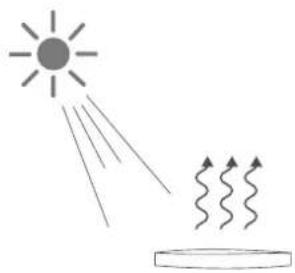
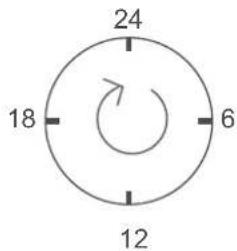
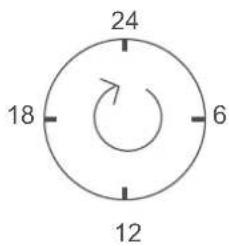
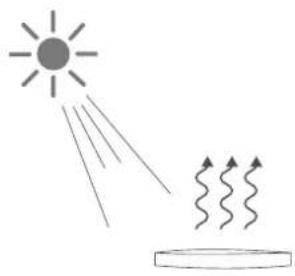
- Place in a well-ventilated place for at least 24 hours and allow to dry sufficiently.
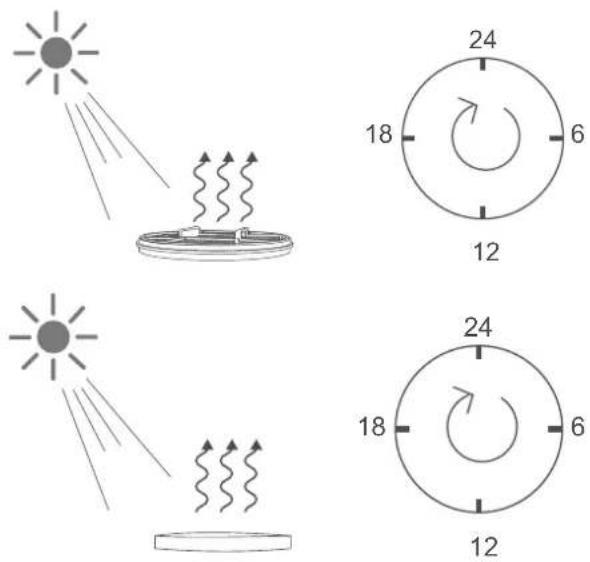
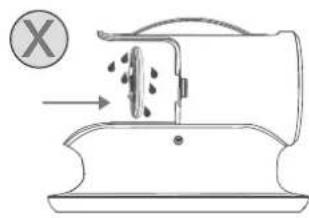
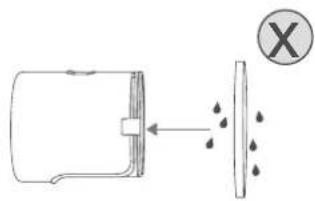
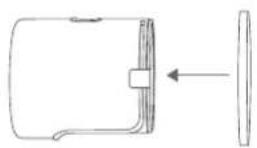
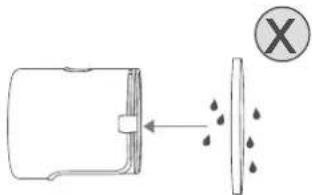
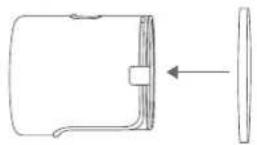
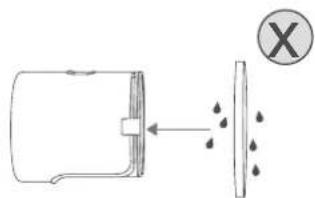
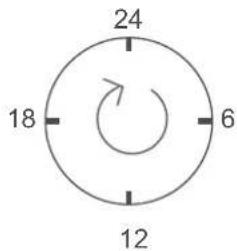
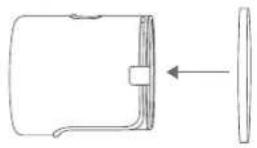
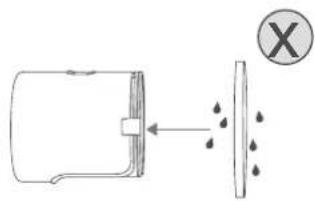
- Reinstall the HEPA and foam filters only after they are completely dry. Be sure to reinstall both HEPA filter and foam filter before using the appliance.
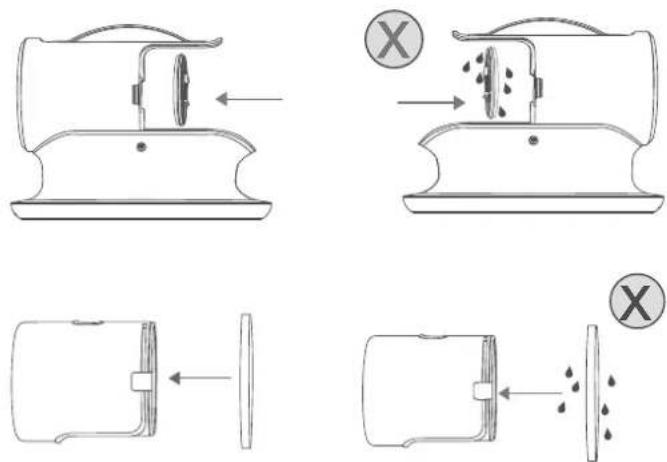
Note: Clean HEPA filter and foam filter regularly, depending on the frequency of use and the degree of soiling. Before cleaning, always disconnect the appliance from the power supply and pull the plug out of the mains socket. Only install the HEPA filter and the foam filter after they have dried completely, otherwise an electric shock and product failure may occur.
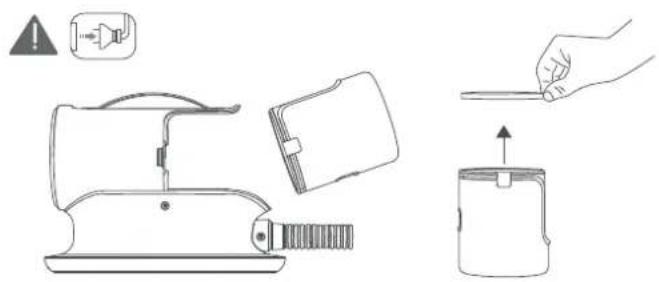
6.2. Maintaining the collection container
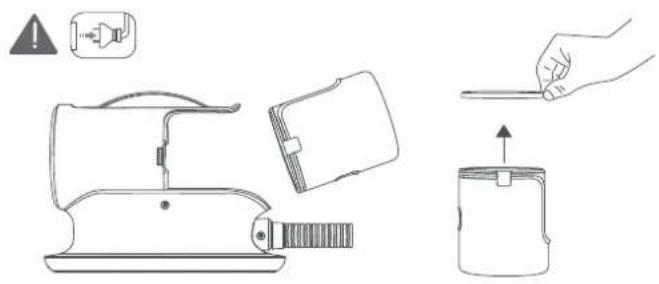
- Gently lift the collection container in the direction of the arrow and remove it.
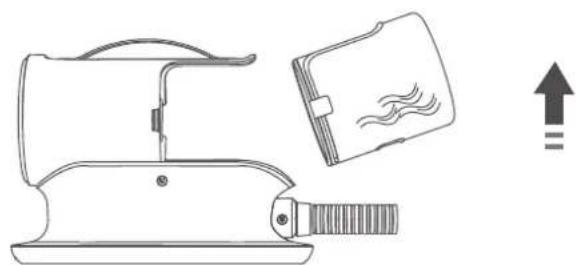
- Press the push button to open and empty the collection container.
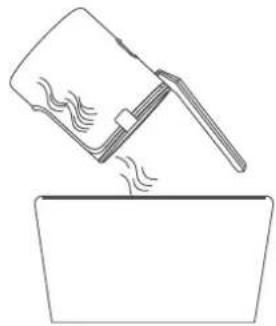
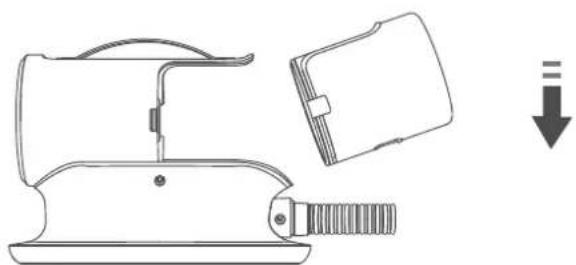
- Replace the collection container in the direction of the arrow.
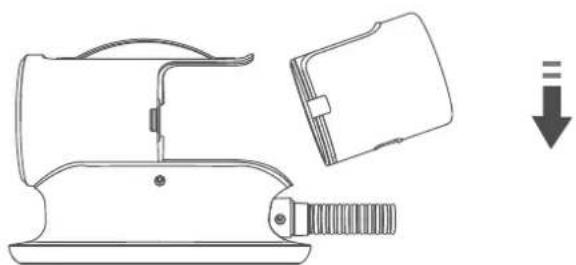
Notes: If you remove the collection container and clean it with water, be sure to wait until it is completely dry before reinstalling it to avoid electric shock or damage from water in the motor.
6.3. Maintaining the electric clipper
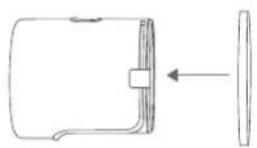
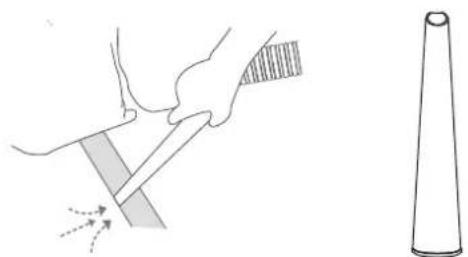
- Remove the clipper head in the direction of the arrow.
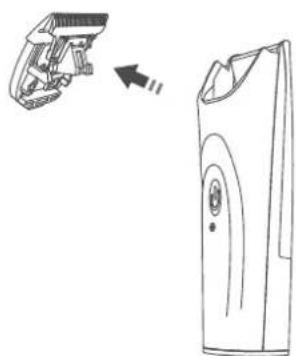
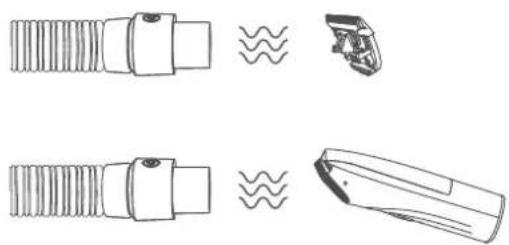
- The suction opening of the flexible hose can be used to vacuum up hair and dust from the clipper head and the clipper head holder.
- Maintain the clipper head by oiling it regularly with an appropriate amount of clipper oil (sold separately #23872-25).
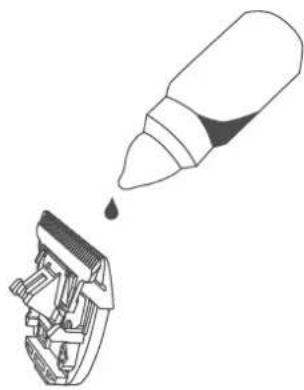
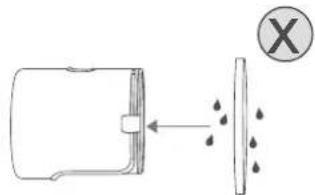
Note: The clipper head is very sharp, please be careful to avoid injury. The electric clipper is not waterproof, never rinse with water to avoid damage.
7. Storage
7.1. Storing the flexible hose
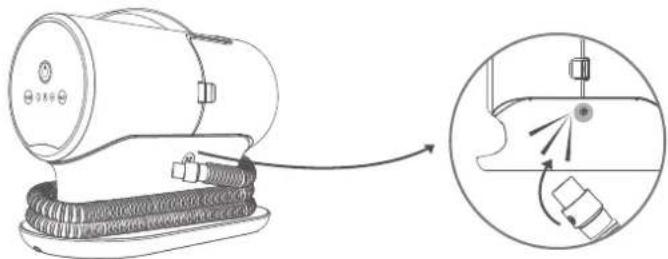
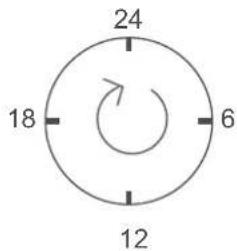
Disconnect the flexible hose from the clipper and the vacuum. Then wrap it clockwise around the base of the vacuum. The hose suction opening can be attached to the side of the vacuum using a magnetic connector.
7.2. Storing the power cord
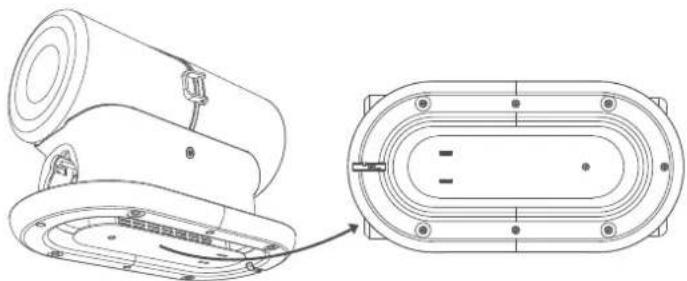
The power cord can be wrapped around the appliance and stored in the slot on the underside of the appliance.
4 Suceur plat

NL Handleiding
② Reinigingsborstel
③ Onderwol borstel
4 Spleetmondstuk
IT Istruzioni
③ Rimuovi-sottopelo
② Rengöringsborste
③ Underullsborttagare
4 Spaltmunstycke
③ Cepillo desenredante
4 Boquilla para hendiduras
② Щетка для очистки
4 Щелевая насадка
② Escova de limpeza
③ Removedor de subpêlo
4 Bocal para fendas
Pode ser utilizado para remover pêlos ou pó das fendas de sofás e camas.
PL Instrukcja
4 Dysza szczelinowa
② Čisticí kartáč
4 Štěrbinová hubice
5. Brug af tilbehør
1 Plejebørste
② Rengøringsbørste
③ Underuld-fjerner
4 Sprækkemundstykke
- Sæt opsamlingsbeholderen på plads igen i pilens retning.
② Čistiaca kefa
4 Štrbinová hubica
7.2. Uloženie napájacieho kábla
4 Щілинна насадка
② Tisztítókefe
4 Résfúvóka
EN Electrical and electronic devices/information for private households
The Directive 2012/19/EU on waste electrical and electronic equipment contains a large number of requirements for handling electrical and electronic equipment. The most important are compiled here.
1. Separate collection of waste electrical and electronic equipment
Electrical and electronic equipment that has become waste is referred to as waste electrical and electronic equipment (WEEE). Owners of WEEE must collect them separately from unsorted municipal waste. WEEE do not belong in household waste, but in special collection and return systems.
2. Batteries, accumulators and lamps
Owners of WEEE must hand over them in complete condition. However, owners of WEEE have to separate old batteries and accumulators which are not enclosed by the WEEE, as well as lamps which can be removed, from the WEEE without destroying it before handing it over to a collection point.
3. Ways to return the WEEE
Owners of WEEE from private households can hand them in free of charge at the designated collection points of the public waste disposal authorities or at the take-back points set up by manufacturers or distributors in terms of the Directive 2012/19/EU.
4. Privacy Protection Notice
WEEE often contain sensitive personal data. This applies especially to information and telecommunications technology devices such as computers and smartphones. In your own interest, please note that each end user is responsible for deleting the data on the WEEE before disposing it.
5. Potential environmental impact
WEEE contain substances that may have a negative impact on the environment and human health if their collection, hand-over, re-use or material recovery is not done in compliance with respective legislation.
6. Your role in WEEE waste treatment
By fulfilling these obligations and especially by fulfilling the obligation to collect WEEE separately, not to dispose it together with unsorted municipal waste and to hand it over to at collection points, you as the end user contribute to the re-use and material recovery of WEEE.
7. Meaning of the crossed-out dustbin symbol
The crossed-out dustbin, which is regularly displayed on electrical and electronic equipment, indicates that the respective device must be collected separately from unsorted municipal waste at the end of its life cycle.
Version 1.0 / March 2022
DE Schermaschinenset mit Fellsauger Gebrauchsanweisung
© Clipper Set with fur vacuum
Instructions
FR Kit de tonte avec aspirateur à fourrure
Mode d'emploi
NL Tondeuse-set met vachtafzuiger
Handleiding
⑪ Set per la tosatura con aspira peli
Istruzioni
SV Klippet med pälsdammsugare
Instruktioner
ES Clipper Set con aspirador de pelos
Instrucciones
RU Комплект машинки для стрижки с пылесосом для шерсти
Инструкция

- ② REINIGUNGSBÜRSTE
- 4 FUGENDÜSE
- SAFETY INFORMATION
- SPECIFICATIONS
- GENERAL TROUBLESHOOTING
- HOW TO USE THE VACUUM
- USE OF THE ACCESSORIES
- MAINTENANCE
- STORAGE
- STORING THE FLEXIBLE HOSE
- STORING THE POWER CORD
- ERROR: THE APPLIANCE CANNOT BE SWITCHED ON
- ERROR: LOW SUCTION POWER
- ① GROOMING BRUSH
- ② CLEANING BRUSH
- ③ UNDERCOAT REMOVER
- 4 CREVICE NOZZLE
- ⑤ ELECTRIC CLIPPER
- ⑥ ATTACHMENT COMBS
- HEPA FILTER & FOAM FILTER MAINTENANCE
- MAINTAINING THE COLLECTION CONTAINER
- MAINTAINING THE ELECTRIC CLIPPER
- 4 SUCEUR PLAT
- NL HANDLEIDING
- ② REINIGINGSBORSTEL
- ③ ONDERWOL BORSTEL
- 4 SPLEETMONDSTUK
- IT ISTRUZIONI
- ③ RIMUOVI-SOTTOPELO
- ② RENGÖRINGSBORSTE
- ③ UNDERULLSBORTTAGARE
- 4 SPALTMUNSTYCKE
- ③ CEPILLO DESENREDANTE
- 4 BOQUILLA PARA HENDIDURAS
- ② ЩЕТКА ДЛЯ ОЧИСТКИ
- 4 ЩЕЛЕВАЯ НАСАДКА
- ② ESCOVA DE LIMPEZA
- ③ REMOVEDOR DE SUBPÊLO
- 4 BOCAL PARA FENDAS
- PL INSTRUKCJA
- 4 DYSZA SZCZELINOWA
- ② ČISTICÍ KARTÁČ
- 4 ŠTĚRBINOVÁ HUBICE
- BRUG AF TILBEHØR
- 1 PLEJEBØRSTE
- ② RENGØRINGSBØRSTE
- ③ UNDERULD-FJERNER
- 4 SPRÆKKEMUNDSTYKKE
- ② ČISTIACA KEFA
- 4 ŠTRBINOVÁ HUBICA
- ULOŽENIE NAPÁJACIEHO KÁBLA
- 4 ЩІЛИННА НАСАДКА
- ② TISZTÍTÓKEFE
- 4 RÉSFÚVÓKA
- EN ELECTRICAL AND ELECTRONIC DEVICES/INFORMATION FOR PRIVATE HOUSEHOLDS
- SEPARATE COLLECTION OF WASTE ELECTRICAL AND ELECTRONIC EQUIPMENT
- BATTERIES, ACCUMULATORS AND LAMPS
- WAYS TO RETURN THE WEEE
- PRIVACY PROTECTION NOTICE
- POTENTIAL ENVIRONMENTAL IMPACT
- YOUR ROLE IN WEEE WASTE TREATMENT
- MEANING OF THE CROSSED-OUT DUSTBIN SYMBOL
Brand : Trixie
Model : 23850
Category : Electric mower