MN8X - Shaver BEURER - Free user manual and instructions
Find the device manual for free MN8X BEURER in PDF.

| Product type | Rotary electric shaver |
| Brand | Beurer |
| Model | MN8X |
| Dimensions (manual part) | Approx. 16 × 4 × 4.5 cm |
| Dimensions (charging station) | Approx. 9 × 6 × 7 cm |
| Weight (manual part with head) | 175 g |
| Weight (charger) | 75 g |
| Power supply | AC adapter 100‑240 V ~ 50/60 Hz, output 5.0 V ⎓ 2.0 A |
| Battery | Li‑ion 1100 mAh, 3.7 V |
| Runtime | Approx. 100 minutes |
| Charging time | 120 minutes for initial charge; quick charge in 5 minutes |
| Charge indicator | LED display with percentage, charge indicator and cleaning symbol |
| Travel lock | Lock by holding switch for 3 seconds |
| Water resistance | IPX7 (washable under running water) |
| Main functions | Shaving and trimming beard / sideburns with 2‑in‑1 styler |
| Included accessories | 1 shaver, 1 beard/sideburn styler, 1 adapter, 1 USB‑C cable, 1 cleaning brush, 1 protective cover, 1 charging and storage station |
| Spare parts | Cutting unit (ref. 110.074) |
| Intended use | Cutting and trimming human facial and body hair |
| Minimum age of use | 8 years (under supervision) |
| Warranty | See provided warranty card |
Frequently Asked Questions - MN8X BEURER
User questions about MN8X BEURER
0 question about this device. Answer the ones you know or ask your own.
Ask a new question about this device
Download the instructions for your Shaver in PDF format for free! Find your manual MN8X - BEURER and take your electronic device back in hand. On this page are published all the documents necessary for the use of your device. MN8X by BEURER.
USER MANUAL MN8X BEURER
natural_image
Black beurer with three rotary buttons and a digital display showing 100% usage (no text or symbols on the device body)EN Rotary shaver Instructions for use....14
natural_image
Illustration of an open book with a geometric arrow pointing to the front page (no text or symbols present)EN Unfold page 3 before reading the instructions for use.
natural_image
Simple line drawing of an open book with no text or symbols visiblenatural_image
Illustration of hands performing a mechanical operation with a cylindrical component (no text or symbols)natural_image
Line drawing of a hand pressing down on a mechanical component (no text or symbols)natural_image
Illustration of hands holding a cylindrical object with an arrow pointing to it, no text or symbols presentnatural_image
Line drawing of a hand pressing down on a mechanical component with a downward arrow (no text or symbols)natural_image
Simple line drawing of an open book with no text or symbols visibleRead these instructions for use carefully. Follow the warnings and safety notes. Keep these instructions for use for future reference. Make the instructions for use accessible to other users. If the device is passed on, provide the instructions for use to the next user as well.
WARNING
- The device is intended only for domestic/private use, and not for commercial use.
- For the purposes of recharging the battery, only use the detachable supply unit “ZD010M050200EU and ZD010M050200BS” provided with this appliance.
- This device can be used by children over the age of 8 and by people with reduced physical, sensory or mental skills or people lacking experience or knowledge, provided that they are supervised or have been instructed on how to use the device safely and are aware of the consequent risks of use.
- Children must not play with the device.
- Cleaning and user maintenance must not be performed by children unless supervised.
- The hand-held part must be disconnected from the connection cable before it is cleaned in water.
- When using the device in the bathroom, disconnect it from the power outlet after charging, as water in the vicinity constitutes a danger even when the device is switched off.
- As an additional safety measure, we recommend the installation in the bathroom circuit of a residual-current protective device (RCD) with a rated operational current not exceeding 30 mA. Your local electrical specialist can provide you with the relevant information.
- If the mains connection cable of this device is damaged, it must be replaced by the manufacturer, its customer service department or a similarly qualified person to avoid any risk.
- The device may only be operated with the supplied mains adapter.
- Under no circumstances should you open or repair the device yourself, as faultless functionality can no longer be guaranteed thereafter. Failure to adhere to this instruction will void the warranty.
TABLE OF CONTENTS
-
Included in delivery 16
-
Signs and symbols....16
-
Intended use....17
-
Warnings and safety notes......17
-
Device description....18
-
Initial use 18
6.1 Travel lock....19
- Usage 19
7.1 Shaving with the shaver heads....19
7.2 2-in-1 beard and sideburn styler . 19
- Cleaning and maintenance......20
8.1 Cleaning the device 20
8.2 Clean the shaver unit under running water....20
-
Accessories and/or replacement parts .. 21
-
Disposal....21
-
Technical specifications 21
-
Guarantee....21
1. INCLUDED IN DELIVERY
Check that the exterior of the cardboard delivery packaging is intact and make sure that all contents are included in the delivery. Before use, ensure that there is no visible damage to the device or accessories and that all packaging material has been removed. If you have any doubts, do not use the device and contact your retailer or the specified Customer Services address.
- 1 rotary shaver
• 1 2-in-1 beard and sideburn styler - 1 mains adapter
- 1 cleaning brush
• 1 x shaver head protective cover - 1 x USB-C cable
• 1 x charging and storage case
2. SIGNS AND SYMBOLS
The following symbols are used on the device, in these instructions for use, on the packaging and on the type plate for the device:
! DANG
Indicates an imminent danger. If it is not avoided, it will result in death or serious injury.
WARNING
Indicates a potentially impending danger. If it is not avoided, there is a risk of death or serious injury.
CAUTION
Indicates a potentially impending danger. If it is not avoided, slight or minor injuries may result.
NOTICE
Indicates a potentially harmful situation. If it is not avoided, the device or something in its vicinity may be damaged.

Product information
Note on important information

Read the instructions

Manufacturer

Conformity assessed marking for the United Kingdom
Disposal in accordance with the Waste Electrical and Electronic Equipment EC Directive (WEEE)
Do not dispose of batteries containing harmful substances with household waste
Marking to identify the packaging material.
A = material abbreviation, B = material number:
1-7 = plastics, 20-22 = paper and cardboard

CE labelling
This product satisfies the requirements of the applicable European and national directives.

Separate the packaging elements and dispose of them in accordance with local regulations.

Separate the product and packaging elements and dispose of them in accordance with local regulations.

The products demonstrably meet the requirements of the Technical Regulations of the EAEU
Suitable for use in the bathroom and bath

Protected against the effects of temporary immersion in water.
 | Importer symbol |
 | Direct currentThe device is suitable for use with direct current only |
 | Protection class II device |
 | Alternating current |
 | Safety isolating transformer, short-circuit proo |
 | Energy efficiency level 6 |
 | Switch mode power supply unit |
 | For indoor use only |
 | Protected against solid foreign objects that are 1 mm in diameter and larger, and against splashing water from all sides |
 | Rated ambient temperature |
 | Do not use the power adapter if the plug is damaged. |
 | Polarity of d.c. power connector |
3. INTENDED USE
The device is only intended for cutting and trimming human facial and body hair. Do not use the device on animals or objects!
The device may only be used for the purpose for which it is designed and in the manner specified in the instructions for use. Any form of improper use can be dangerous. The manufacturer is not liable for damage resulting from improper or incorrect use.
4. WARNINGS AND SAFETY NOTES
WARNING
To avoid damage to health, we strongly advise against using the device in the following situations:
- Danger of suffocation by packaging material! Keep packaging material away from children.
- Inspect the device and accessories for visible damage before use. If you have any doubts, do not use the device and contact your retailer or the specified Customer Services address.
- Keep the mains adapter away from water.
- If the device has been dropped or has suffered any other damage, it must no longer be used. Risk of electric shock and injury!
- Risk of electric shock! If there is visible damage to the device, accessories or mains adapter, do not use the device if you have any doubts and contact your retailer or the specified Customer Services address.
- Risk of injury! Do not use the device if the stainless steel blade is damaged as it may have sharp edges.
- Do not use extension cables in the bathroom to ensure the mains adapter can be accessed quickly in an emergency.
- Use original manufacturer accessories only.
WARNING
To avoid damage to health, please note the following:
- Ensure that no highly flammable liquids are located near the device. Risk of fire!
- Do not use the device if you have sunburn, open wounds, eczema or cuts on your face.
- Switch off the device before changing attachments.
- Remove all packaging material before using the device.
- Ensure that the mains cable does not pose a trip hazard.
- Only connect the device to a socket that has the correct voltage as indicated on the type plate.
- Only operate the device according to the specifications on the type plate.
- Only pull on the mains adapter to remove the mains cable from the power outlet.
- In the event of a fault or damage, have the device repaired by a certified specialist workshop.
- Never leave the device unattended while in use.
- Do not use the device outside.
- If you pass the device to someone else, make sure to also pass on these instructions for use.
- Switch off the device after every use.
- Pull the mains adapter out of the socket after each completed charging process.
CAUTION
- Protect the device and its accessories from impact, humidity, dirt, marked temperature fluctuations and direct sunlight.
- Only operate, charge or store the device at temperatures between -10^ and 40^ .
Notes on handling batteries
- If your skin or eyes come into contact with fluid from the battery cell, flush out the affected areas with plenty of water and seek medical assistance.
- Risk of explosion! Never throw batteries into a fire.
- Do not disassemble, split or crush the batteries.
- Only use chargers as specified in the instructions.
- Batteries must be charged correctly prior to use. The instructions from the manufacturer, and the specifications in these
instructions regarding correct charging must be observed at all times.
- Fully charge the battery prior to initial use (see section 7).
- In order to achieve as long a battery service life as possible, fully charge the battery at least 2 times a year.
5. DEVICE DESCRIPTION
The associated drawings are shown on page 3.
1 Shaver head
2 Shaver unit
3 Shaver head holder
4 On/Off control
5 LED display with battery status in %, charging indicator, travel lock and cleaning symbol
6 Charging and storage station
7 Shaver head protective cover
8 2-in-1 beard and sideburn styler
9 Mains adapter
10 USB-C cable
11 Cleaning brush
6. INITIAL USE
You must fully charge the battery for 120 minutes before the first use. The operating period of the device is approx. 100 minutes when it is fully charged.
If the battery charge level is less than 20%, the LED display will show 5 "Lo" for "Low" and flash.
- Connect the USB charging cable 10 to the connection socket 6 and a mains adapter 9.
- Insert the mains adapter 9 into a suitable socket. The LED display 5 shows the
current battery status in % and the charge display flashes.
- The battery is fully charged once the LED display 5 shows "100%" and the charging symbol is permanently illuminated. The device is now ready for use.
Quick charging
If you have forgotten to charge the shaver before use, the quickcharge function can help. Connect the device to the power supply. The device will be ready for a complete shave via battery operation within 5 minutes.
6.1 Travel lock
The travel lock prevents the device from being switched on by accident (e.g. when being carried in a suitcase).
-
To activate the travel lock, press and hold the On/Off control 4 for 3 seconds. The travel lock symbol lights up. The travel lock symbol flashes during activation. As soon as the travel lock is activated, the travel lock symbol lights up continuously for a short time.
-
If the On/Off control 4 is briefly pressed when locked, the travel lock symbol will also light up.
-
To deactivate the travel lock, press and hold the On/Off control 4 for 3 seconds. The travel lock symbol flashes during deactivation. As soon as the travel lock is deactivated, the travel lock symbol goes out. The device starts up.
7. USAGE
7.1 Shaving with the shaver heads
-
Make sure that the shaver unit 2 is securely attached to the device.
-
Remove the shaver head protective cover 7 if it is still attached.
-
Press the On/Off control 4 to switch on the device. The LED display 5 begins to light up.
-
Move the shaver head 1 in a circular motion over the areas of the face you want to shave whilst applying gentle pressure.
-
To switch off the device after use, press the On/Off control 4. The LED display turns off.
-
Clean the shaver heads after every shave using the cleaning brush 11 provided. For information on thorough cleaning, see section "9. Cleaning and maintenance".
7.2 2-in-1 beard and sideburn styler
The shaver also has an extra 2-in-1 beard and sideburn styler to create particularly defined beard and sideburn styles. How to use the 2-in-1 beard and sideburn styler:
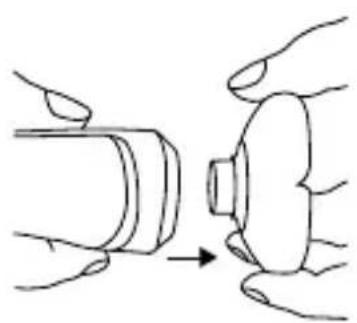
- Remove the shaver head holder from the shaver if it is attached. The shaver head must be held firmly on two sides and removed with a sharp tug.
natural_image
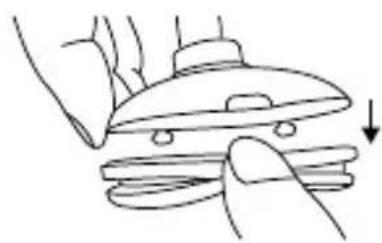
Illustration of hands performing a step on a cylindrical object, showing a change from the main component to the end (no text or symbols present)- To attach the 2-in-1 beard and sideburn styler, push it down onto the shaver until you hear and feel it click into place.
natural_image
Line drawing of a hand pressing down on a mechanical component (no text or symbols)- Press the On/Off control 4 to switch on the device. The LED display 5 begins to light up.
- Slowly move the 2-in-1 beard and sideburn styler over the required areas to style your beard or sideburns.
- To switch off the device after use, press the On/Off control 4. The LED display 5 turns off.
- Clean the 2-in-1 beard and sideburn styler after every shave, using the cleaning brush provided.
8. CLEANING AND MAINTENANCE
8.1 Cleaning the device
WARNING
- Risk of electric shock! Always disconnect the device from the power source before cleaning it.
- Risk of fire! Do not clean the device with highly flammable liquids!
- Do not clean the device in the dishwasher!
-
The device is waterproof and can be cleaned under running water.
-
For thorough cleaning, pull the attachments upwards to remove them from the device.
-
Leave the attachments to dry completely before reattaching them to the device.
8.2 Clean the shaver unit under running water
For an optimal shave we recommend cleaning the shaver after each use, and at the latest as soon as the maintenance symbol lights up on the display 5.
After switching off the device, the cleaning symbol lights up briefly to remind you to clean it.
To clean the shaver heads very thoroughly, you can also rinse them under running water.
To do so, proceed as follows:
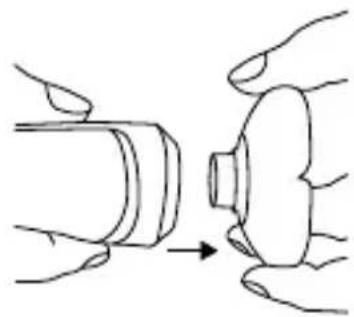
- Pull the shaver head up and off the device.
natural_image
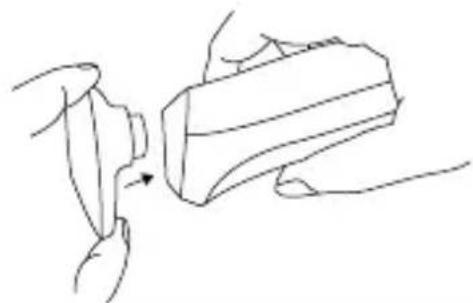
Illustration of hands holding a cylindrical object with an arrow indicating process (no text or symbols)- Grip the side recess on the top section of the shaver head and pull the shaver unit off the shaver head holder.
natural_image
Line drawing of a hand pressing down on a computer mouse (no text or symbols)- Hold the cutting unit 2 under running water in such a way that the water flows through the shaver heads from the inside out.
- When the shaver unit 2 is completely dry, reassemble it, following the above instructions in reverse order.
9. ACCESSORIES AND/OR REPLACEMENT PARTS
Accessories and/or replacement parts are available on the website. To purchase accessories and replacement parts, please visit www.beurer.com or contact the corresponding service address (according to the service address list) in your country. Accessories and replacement parts are also available from retailers.
| Designation Item num | number and/or order number |
| Shaver unit 110.074 |
10. DISPOSAL
For environmental reasons, do not dispose of the device in household waste at the end of its service life. Dispose of the device at a suitable local collection or recycling point in your country. Observe the local regulations for material disposal. Dispose of the device in accordance with EC Directive Waste Electrical and Electronic Equipment (WEEE). If you have any questions, please contact the local authorities responsible for waste disposal. You can obtain the location of collection points for old devices from the local or municipal authorities, local waste disposal companies or your retailer, for example.
Used, completely flat batteries must be disposed of via specially designated collection boxes, recycling points or electronics retailers. You are legally required to dispose of the batteries.
The codes below are printed on batteries containing harmful substances:
Pb = battery contains lead, Cd = battery contains cadmium, Hg = battery contains mercury.
11. TECHNICAL SPECIFICATIONS
| Model MN8X | |
| Weight (including shaver unit)2-in-1 beard and sideburn styler | 175 g(Handpiece including shaver head)75g (charger) |
| Device dimensions ca. | 16 x 4 x 4,5 cm(Handpiece including shaver head)ca. 9 x 6 x7 cm(charger) |
| Device protection type | IPX7 |
| Power supply Input: 1 | 00-240 V ~50/60 Hz; 0.5 A maxOutput:5.0 V ===2.0 A;10,0 W |
| Average active efficiency | 81,17 % |
| No-load power consumption | 0.064 W |
| Battery:CapacityNominal voltageType designation | 1100 mAh3,7 VLi-Ion |
Subject to technical changes
12. GUARANTEE
More information on the guarantee and guarantee conditions can be found in the guarantee leaflet supplied.
FRANÇAIS

natural_image
Simple line drawing of an open book with no text or symbols visibleRemarques relatives aux batteries
natural_image
Illustration of hands performing a button press operation (no text or symbols)natural_image
Line drawing of a hand pressing down on a mechanical component (no text or symbols)natural_image
Illustration of hands performing a mechanical operation with a cylindrical component and a knob (no text or symbols)natural_image
Line drawing of a hand pressing down on a mechanical component with a downward arrow (no text or symbols)natural_image
Simple line drawing of an open book with no text or symbols visiblenatural_image
Illustration of hands performing a procedure on a mechanical component (no text or symbols present)natural_image
Line drawing of a hand holding a small object with an arrow indicating motion (no text or symbols)natural_image
Illustration of hands holding a cylindrical object with an arrow pointing to it, no text or symbols presentnatural_image
Line drawing of a hand pressing down on a mechanical component with a downward arrow (no text or symbols)natural_image
Simple line drawing of an open book with no text or symbols visiblenatural_image
Illustration of hands performing a button press operation (no text or symbols)natural_image
Line drawing of a hand pressing a button into a cylindrical object (no text or symbols)natural_image
Illustration of hands performing a mechanical operation with a cylindrical component and a knob (no text or symbols)natural_image
Line drawing of a hand pressing down on a flat surface with a downward arrow (no text or symbols)9. ACCESSORI E/O RICAMBI
natural_image
Simple line drawing of an open book with no text or symbols visiblenatural_image
Illustration of hands assembling a cylindrical component with an arrow indicating process (no text or symbols)natural_image
Line drawing of a hand pressing down on a mechanical component (no text or symbols)natural_image
Illustration of hands performing a mechanical operation with a cylindrical component (no text or symbols)natural_image
Line drawing of a hand pressing down on a flat plate with a downward arrow (no text or symbols)natural_image
Simple line drawing of an open book with no text or symbols visiblenatural_image
Illustration of hands performing a mechanical operation with a cylindrical component (no text or symbols)natural_image
Line drawing of a hand pressing a button into a device (no text or symbols)natural_image
Illustration of hands holding a cylindrical object with an arrow indicating process (no text or symbols)natural_image
Line drawing of a hand pressing down on a computer mouse (no text or symbols)natural_image
Simple line drawing of an open book with no text or symbols visiblenatural_image
Illustration of hands performing a procedure on a mechanical component (no text or symbols present)natural_image
Line drawing of hands using a tool to lift a cylindrical object (no text or symbols)natural_image
Illustration of hands performing a mechanical operation with a cylindrical component and a curved housing (no text or symbols)natural_image
Line drawing of a hand pressing down on a computer mouse (no text or symbols)natural_image
Simple line drawing of an open book with no text or symbols visible4. WAARSCHUWINGEN EN VEILIGHEIDSRICHTLIJNEN
⚠ WAARSCHUWING
5. BESCHRIJVING VAN HET APPARAAT
natural_image
Illustration of hands holding a cylindrical object with an arrow pointing to it (no text or symbols)natural_image
Line drawing of a hand holding a small object with an arrow indicating motion (no text or symbols)natural_image
Illustration of hands performing a button press operation (no text or symbols)natural_image
Line drawing of hands using a lathe machine to press or install a flat sheet of food (no text or symbols)natural_image
Simple line drawing of an open book with no text or symbols visiblenatural_image
Illustration of hands performing a procedure on a cylindrical object, showing a step from left to right (no text or symbols)natural_image
Line drawing of a person using a tool to lift a cylindrical object (no text or symbols)natural_image
Illustration of hands performing a mechanical operation with a cylindrical component (no text or symbols)natural_image
Line drawing of a hand pressing down on a mechanical component with a downward arrow (no text or symbols)natural_image
Simple line drawing of an open book with no text or symbols visiblenatural_image
Illustration of hands performing a mechanical operation with a cylindrical component and a knob (no text or symbols)natural_image
Line drawing of a hand holding a small object with an arrow indicating motion (no text or symbols)natural_image
Illustration of hands holding a cylindrical object with an arrow indicating process (no text or symbols)natural_image
Line drawing of a hand pressing down on a computer mouse (no text or symbols)natural_image
Simple line drawing of an open book with no text or symbols visiblenatural_image
Illustration of hands holding a cylindrical object with an arrow pointing to it (no text or symbols present)natural_image
Line drawing of a hand holding a small object with an arrow indicating motion (no text or symbols)natural_image
Illustration of hands performing a mechanical operation with a tool (no text or symbols present)natural_image
Line drawing of a hand pressing down on a computer mouse (no text or symbols)natural_image
Simple line drawing of an open book with no text or symbols visiblenatural_image
Illustration of hands performing a process with a cylindrical object being inserted (no text or symbols)natural_image
Line drawing of a hand holding a small object with an arrow indicating motion (no text or symbols)natural_image
Illustration of hands holding a cylindrical object with an arrow indicating process (no text or symbols)natural_image
Line drawing of a hand pressing down on a mechanical component with a downward arrow indicating force or motion (no text or symbols)BEURER UK Ltd., Suite 16, Stonecross Place Yew Tree Way, WA32SH Golborne, United Kingdom