SteamForce Speed Pro - Paint spray WAGNER - Free user manual and instructions
Find the device manual for free SteamForce Speed Pro WAGNER in PDF.


| Product type | Steam wallpaper stripper |
| Brand | Wagner |
| Model | SteamForce Speed Pro |
| Power supply | 230 V ~ 50 Hz |
| Power consumption | 2750 W (EU) / 2300 W (CH) |
| Water tank capacity | Approx. 5.1 liters |
| Steam output | 58 g/min (EU) / 47 g/min (CH) |
| Continuous operation time | 78 min (EU) / 95 min (CH) before refill |
| Device weight | Approx. 7.5 kg |
| Steam hose length | 4.9 m |
| Maximum load on the device | 150 kg (single person) |
| Safety features | Automatic shut-off in case of overheating; pressure relief valve; thermal circuit breaker; water level and descaling indicator |
| Maintenance | Regular descaling (automatic program); filter cleaning; drain after use |
| Spare parts | Large steam plate (2448647), small steam plate (2414573), hose (2448661), water tank (2448637), boiler (2448631 EU / 2448707 CH), lid (2448667) |
| Warranty | 3 years, extendable by 2 years upon registration (conditions apply) |
| Repairability | Spare parts available; repair possible by authorized service center |
Frequently Asked Questions - SteamForce Speed Pro WAGNER
User questions about SteamForce Speed Pro WAGNER
0 question about this device. Answer the ones you know or ask your own.
Ask a new question about this device
Download the instructions for your Paint spray in PDF format for free! Find your manual SteamForce Speed Pro - WAGNER and take your electronic device back in hand. On this page are published all the documents necessary for the use of your device. SteamForce Speed Pro by WAGNER.
USER MANUAL SteamForce Speed Pro WAGNER
natural_image
Technical line drawing of a mechanical component with grid-patterned top and base (no text or symbols)STEAMFORCE SPEED PRO
USER GUIDE
natural_image
Technical diagram of a mechanical assembly with a magnified circular detail showing internal components (no text or symbols)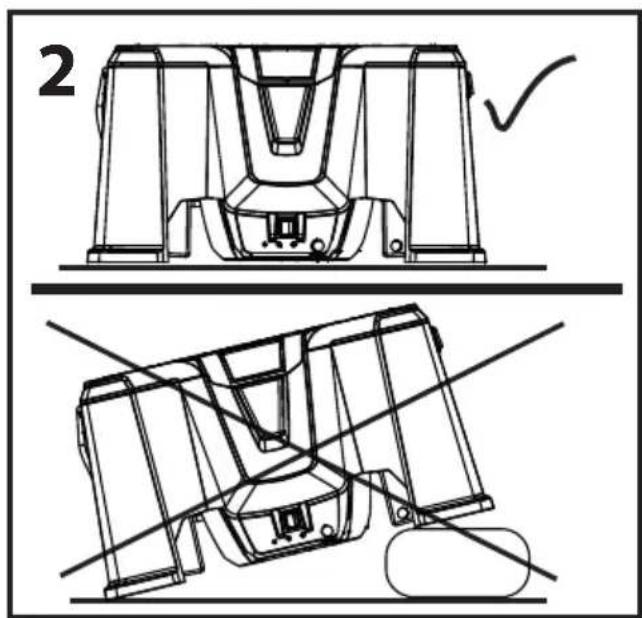
natural_image
Technical line drawing of a mechanical assembly with no visible text or symbols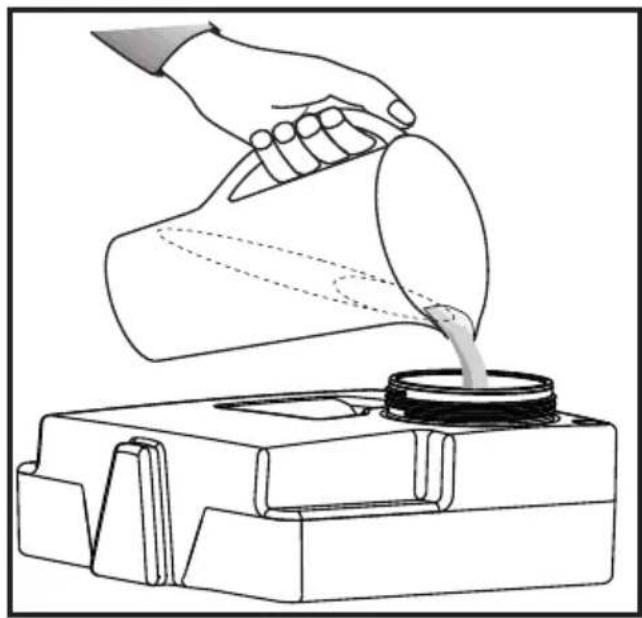
natural_image
Line drawing of a hand pouring liquid into a container using a tool (no text or symbols)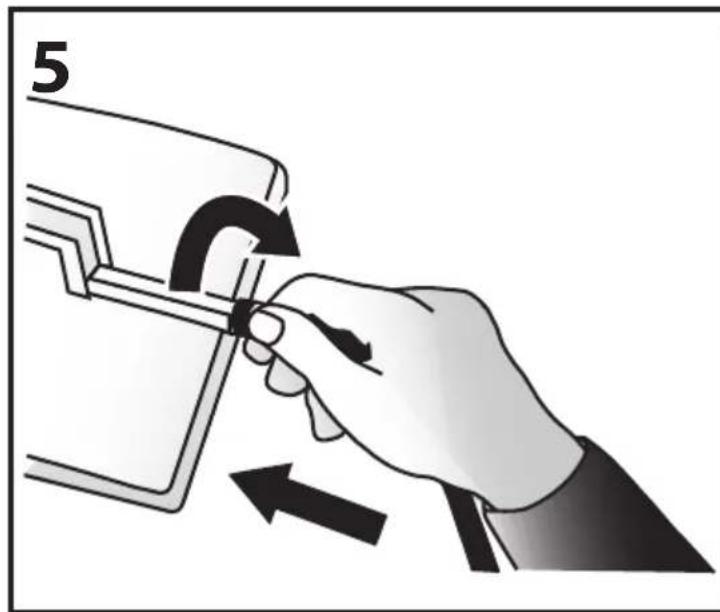
natural_image
Illustration of a hand using a tool to adjust or install a component, with no visible text or symbols.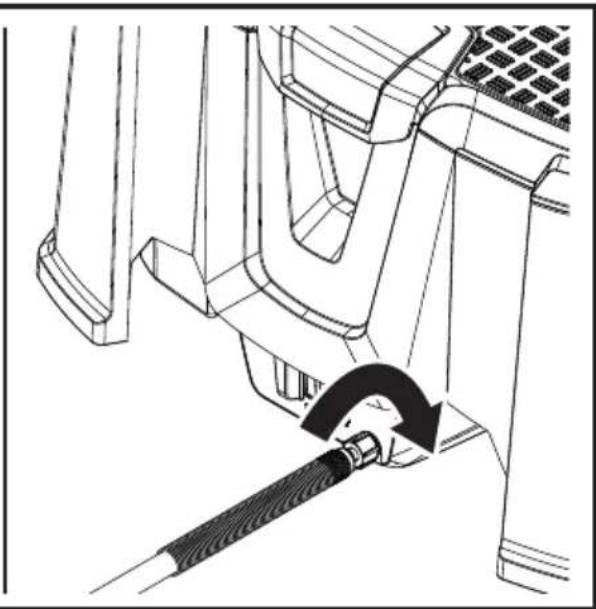
natural_image
Technical line drawing of a mechanical component with a black arrow indicating rotation or adjustment (no text or symbols)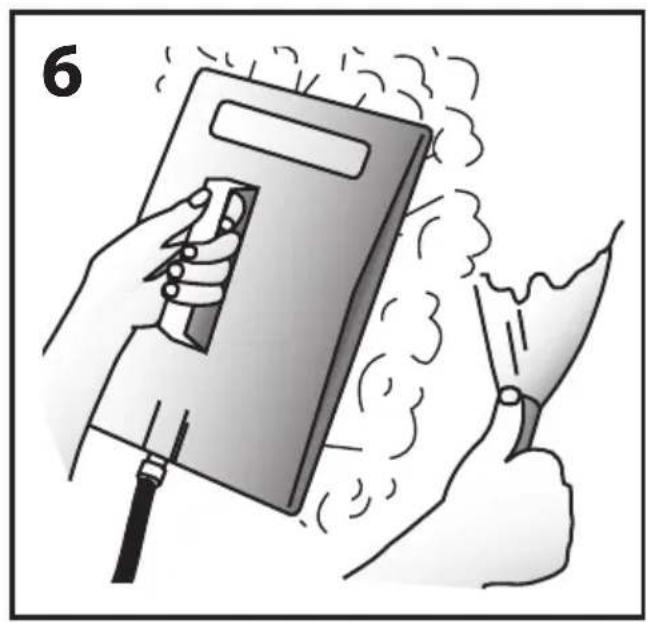
natural_image
Illustration of a hand holding a tablet with motion lines indicating sound or vibration (no text or symbols)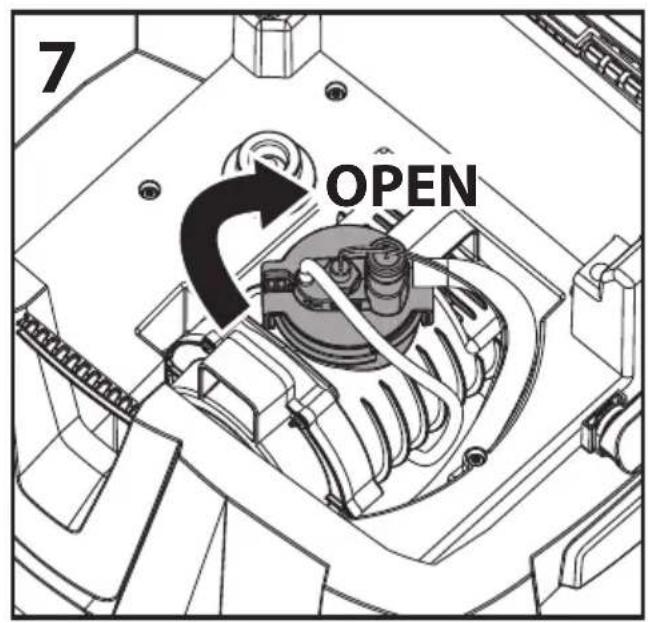
natural_image
Technical line drawing of a mechanical assembly with gears and conveyor system (no text or symbols)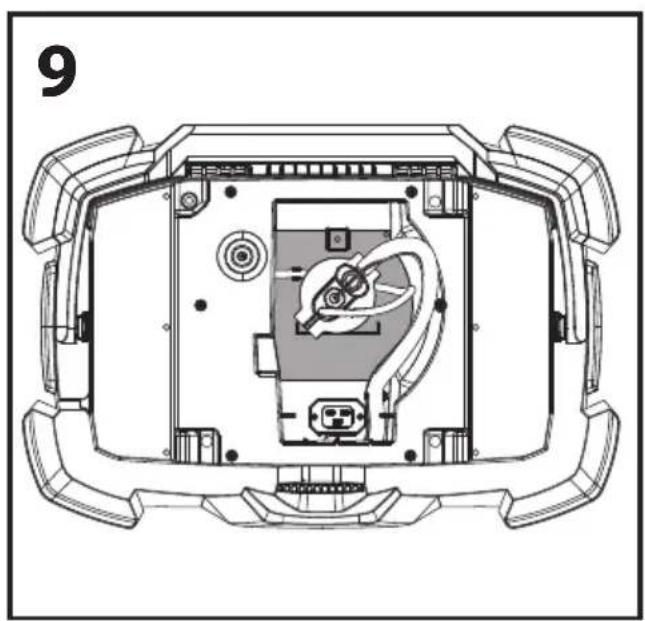
natural_image
Top-down schematic of a vehicle's internal components, showing engine, battery, and control panel (no text or labels)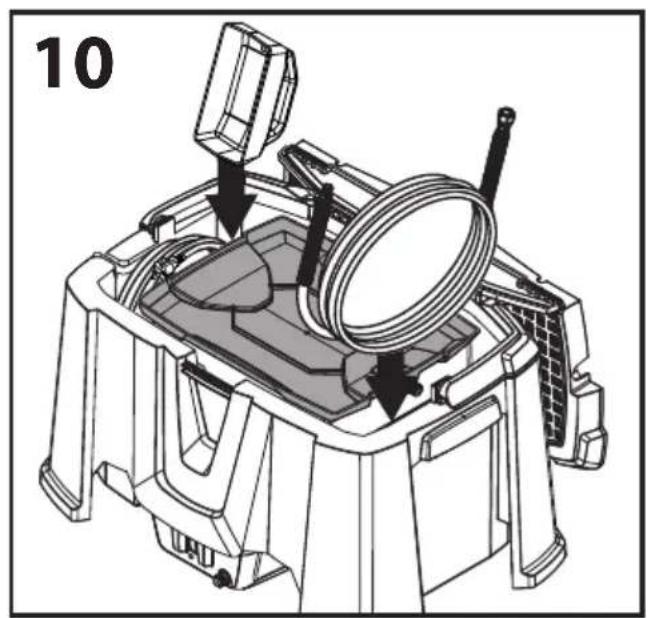
natural_image
Technical line drawing of a mechanical device with labeled component '10' (no text or symbols on the diagram itself)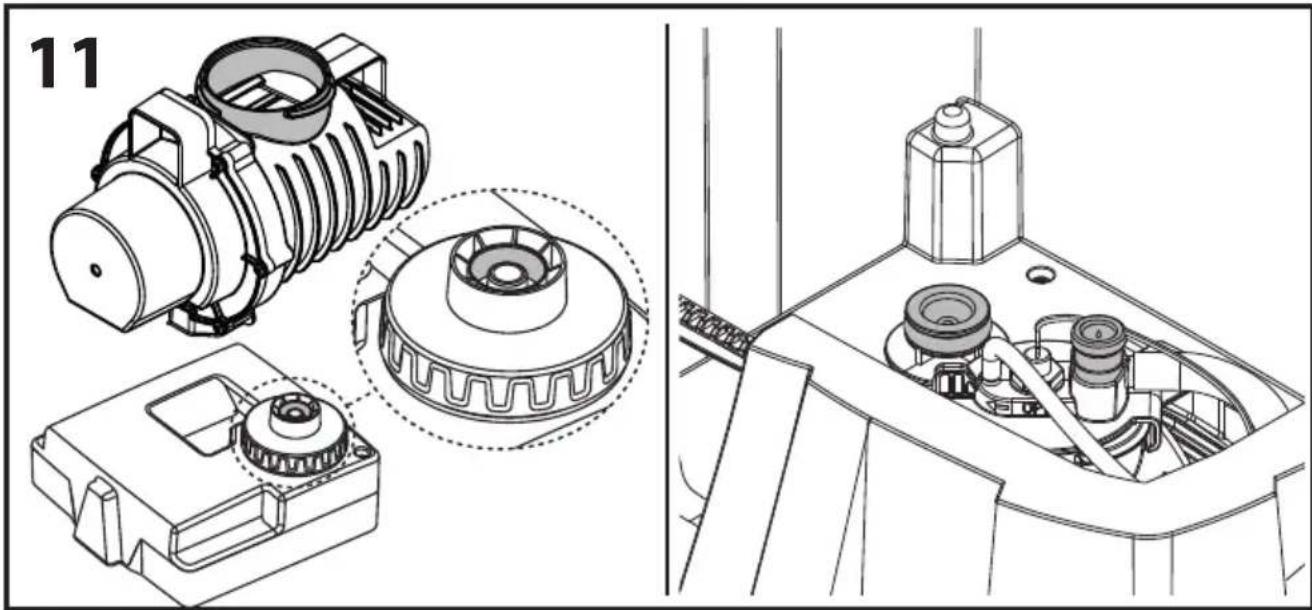
natural_image
Technical line drawing of a mechanical assembly with exploded and assembled views (no text or symbols)DE 5-17
EN 18-29
FR 30 - 42
NL 43 - 54
ES 55 - 66
DA 67-78
SE 79 - 90
IT 91 - 102
PT 103-114
PL 115-127
RU 128-142

HERZLICHEN DANK FÜR IHR VERTRAUEN
natural_image
Illustration of a hand holding a trowel over a grid-patterned background (no text or symbols)17. Zubehör
https://go.wagner-group.com/pf-warranty-conditions

We would like to congratulate you on purchasing this WAGNER product; we are sure that you will enjoy working with it greatly.
Please read the Operating Manual carefully and observe the safety information before starting the tool. Store the Operating Manual in a safe place close to the product in case it needs to be used by someone else.
We would be happy to be of assistance if you have any questions, suggestions or requests. Please contact us via the phone number included on the back page or via our homepage, www.wagner-group.com.
Contents
- Explanation of symbols used.... 19
- Scope of delivery 19
- General Safety Instructions .... 20
- Safety Instructions for Steam Wallpaper Strippers....21
- Intended use 22
- Extension Leads EU/UK 22
- Preparation....23
- Operation 23
- Refilling 24
- Descaling 24
- Storage 25
- Maintenance 26
- Important Note regarding Product Liability! 26
- Correction of Malfunctions....26
- Technical Data.... 27
- Spare parts.... 27
- Accessories....28
- Environmental protection.... 28
1. Explanation of symbols used
 | This symbol indicates a potential danger to you or for the tool. Under this symbol you can find important information on how to avoid injuries and damage to the power tool. |  | Indicates tips for use and other particularly useful information. |
 | Indicates tips on efficient and sustainable use and how to extend the life of the product. | ||
 | Caution - risk of burns: surface can get hot during use. | 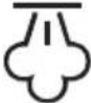 | Beware of steam. |
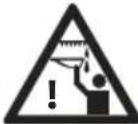 | Risk of scalding: When working overhead, beware of hot dripping water |  | Wear suitable safety gloves when working. |
 | Wear suitable safety goggles while working. |  | Use the device indoors only. |
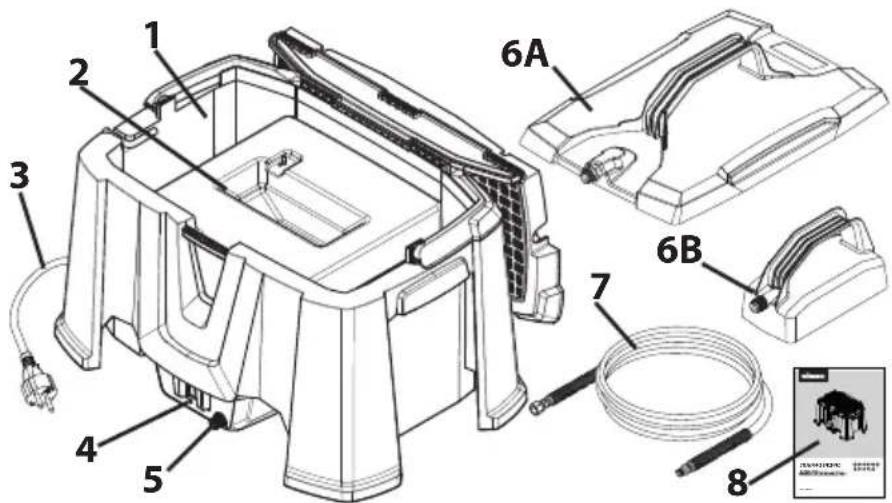
2. Scope of delivery
1 Main unit
2 Water tank
3 Supply cord
4 Control panel
5 Hose connection
6 Steamplates (A) large/ (B) small
7 Steam hose 4.9 m
8 Operating manual
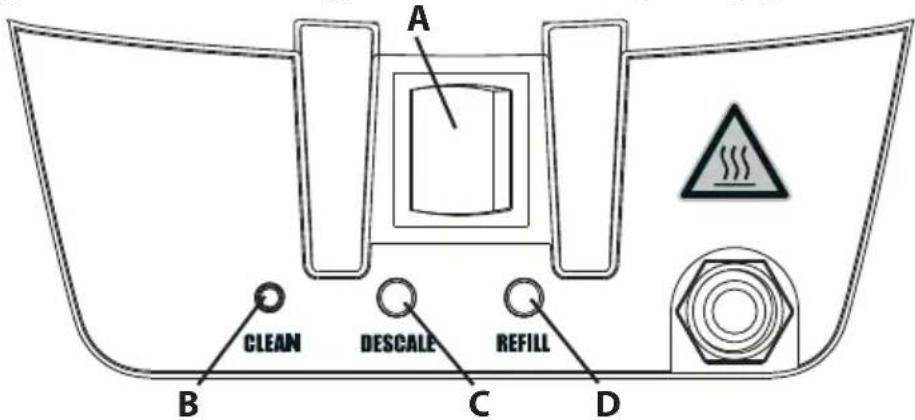
Controls and displays on the device
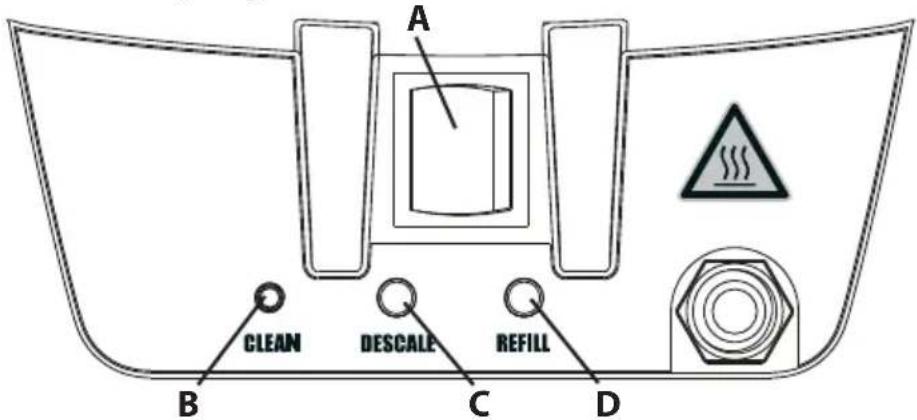
A ON/OFF switch (lights up when ON)
B Clean button: Starts the automatic descaling function (press and hold for 3 seconds)
C Descaling indicator: Lights up when the appliance is to be descaled.
D Water level indicator: Lights up when the water tank is to be refilled.
3. General Safety Instructions
CAUTION!

Read all the instructions. Non-observance of the instructions below can cause electric shock, fire and/or serious personal injuries.
a) Keep your workplace clean and well lit. Disorderly or unlit workplaces may result in accidents.
b) Keep children, unauthorised persons and animals out of reach of the steamer. You can lose control of the appliance if you are distracted.
c) The steamer plug must fit into the socket-outlet. The plug may not be modified in any form. Do not use adaptor plugs together with protective-earthed tools. Unmodified plugs and suitable sockets reduce the risk of an electric shock.
d) Avoid physical contact with earthed surfaces such as pipes, heating elements, stoves and refrigerators. The risk through electric shock increases if your body is earthed.
e) This device can be used by persons with impaired physical, sensory or mental capacities or a lack of experience and knowledge if they are supervised or have been instructed in the safe use of the device and understand the dangers arising from it.
f) Children shall not play with the appliance. Risk of scalding or shock.
g) Never use the tool in hazardous areas that contain flammable liquids, gases or dusts. Power tools generate sparks that can ignite dust or vapours.
h) If the supply cord is damaged, it must be replaced by the manufacturer or its service agents to avoid a safety hazard.
4. Safety Instructions for Steam Wallpaper Strippers
ATTENTION ! When working with hot steam (min.100°C), there is a risk of

serious scalding. Hot steam and boiling water can emit when the safety valve (fig. 1) is activated due to overpressure in incorrect operation of the unit.

Only change position during use, with care. The steam unit, hose and steamplate can be very hot. Always wear suitable protective clothing / gloves.
Operate the unit only with pure water without agents or additives. Do not switch the unit on when empty.
Never point the steamplate / bar at people, animals, at objects sensitive to temperature or other electrical equipment. Do not point liquid or steam directly at electrical devices or equipment containing electrical components, such as the interior of ovens. Always ensure that the unit is standing securely in a horizontal position (on the floor). (Fig. 2)
Be careful of overhead dripping, when using on overhead areas tilt the steamplate away from the face and body and regularly empty the steamplate of any collected condensation.
Always visually check that the hose and steamplate inlet are not blocked before attempting to use.
Do not stand on or place objects onto the unit or steam hose. Never over-twist or make kinks in the steam hose and never block the valve. Only carry the device by the handles provided.
Never pull on the steam hose or supply cord. Whenever accessories are replaced, during maintenance, when filling / refilling or draining, and whenever the steam device is not in use (including breaks between work), the plug on the mains cable must be removed from the socket. The device must be kept out of the reach of children whenever it is switched on or
cooling down.
Never overfill the unit. Unplug the unit in the event of overfilling or a fault.
Use only WAGNER original spare parts and accessories!
Caution! Danger of short-circuits! Cover socket-outlets and switches and do not subject them to steam. When using an extension cable: max.10m long – the cord cross-section must be at least 3 x 1,5 mm ^2 . Avoid damage! When working in the vicinity of wood / gypsum bases and coated materials these can be impaired by heat or steam. Remedy: Use a heat / steam shield made of cardboard or metal. The device must never be left unsupervised while it is plugged into the mains power supply. Keep the unit away from children and animals.

Maximum weight for standing on the unit is 150 kg and no more than 1 person at a time. Ensure a safe stand.
Do not permit oil, grease or slippery material to accumulate on the step/platform.
Do not allow objects to accumulate on the step/platform.
Do not use a ladder or other device on the step to get greater heights.
Do not apply impact loads on the step/platform.
5. Intended use
The Steam Wallpaper Stripper is solely suited to removing wallpaper. The device may only be used indoors.
To ensure long life of the steam wallpaper stripper, unplug and clean your unit immediately and thoroughly after each use.
CAUTION! - Steam can loosen weak, cracked, porous or poorly bonded plaster. Check a small area before starting work. Do not hold the steamplate in one position too long and stop if plaster starts to break.
PROTECT YOUR HOME - To prevent marks from steam on carpets and soft furnishings it is recommended the unit be place on a hard flat board. Ensure the unit will not slip or tilt. Dust sheets and newspapers are not suitable.

- Supply cord must be connected to a grounded (3 prong) mains socket-outlet.
- Arrange replacement of a worn or damaged supply cord. NEVER repair a supply cord.
6. Extension Leads EU/UK
If you are using an extension lead it must be rated at a minimum of 16 Amps (110V) / 13 Amps (230V) and fully unwound. Do not operate with an extension lead rated less than 16 Amps / 13 Amps as this will cause premature failure of the element which is not covered
by the guarantee.
7. Preparation

Prepare the old wallpaper well so that you can remove it as quickly as possible and thus in an energy-efficient way.
natural_image
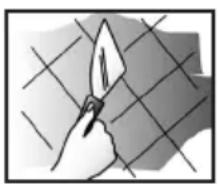
Illustration of a hand holding a trowel over a grid-patterned background (no text or symbols)To achieve fast paper removal always gently score the areas to be stripped. With heavily embossed, vinyl-coated or painted papers this is essential. Either use a proprietary perforator tool or alternatively score the paper with the edge of a wall scraper in a ‘criss-cross’ pattern with 15 cm spacing. As with all decorating work be sure to protect carpets and furniture with covers.
8. Operation
- Place the unit on a flat surface near the area to be stripped.
- Open the lid of the device and remove the hose, the steam plates and the power cable.
- Hold the water tank by the sides and pull it out of the device (Fig. 3).
- Place the water tank on a flat surface with the tank opening facing upwards, unscrew the tank cap and fill with clean water (no hot water). (Fig. 4). Do not use additives - do not overfill.
- Screw the tank cap back in place and check that it is tight.
- Put the water tank back into the device.
- Fully uncoil the hose and supply cord.
- Screw hose onto threaded outlets of boiler and steamplate, securely by hand. Do not overtighten (Fig. 5).
- Connect the supply cord from the unit to the socket-outlet and switch on.

Caution! Beware of hot water discharge prior to steam emission.
- It can take up to 3.5 mins (approx.) before steam is produced - depending on fill water temperature. DO NOT leave unattended.
- Once steam is being produced at the steamplate you are ready to commence operation.
CAUTION! WARNING: Hot liquid or steam can burn.

Danger of scalding! Steam may also condense into boiling droplets. Steam should not be directed towards electrical appliances.
- Press the steam plate against the wall for a few seconds.

Determine what the shortest time is to remove the wallpaper. The faster you work, the more energy you can save.
- Move the steamplate to the section immediately next to where you have just been working and use a wallpaper scraper to remove the section that has just been steamed (Fig. 6).
- You may need to leave the steamplate against the wall for longer periods with some papers or re-steam if not completely removed.
9. Refilling

The unit will operate for approximately 78 minutes (230V) / 129 minutes (110V) before requiring refilling (the water level indicator lights up).

You must never allow the unit to boil dry. There is a safety thermal cut-out device fitted to the unit. If the unit is allowed to boil dry this will operate and prevent further use.
- Switch the unit off and allow it to cool for at least 5 minutes.
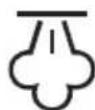
Beware of Steam! The Steam is very hot - wear gloves and keep face clear.
- Open the lid, hold the water tank by the sides and pull it out (Fig. 3).
- Place the water tank on a flat surface with the tank opening facing upwards, unscrew the tank cap and fill with clean water (no hot water). (Fig. 4). Do not use additives - do not overfill.
10. Descaling

Regular descaling is key to your steamer functioning properly. The descaling indicator serves as a guide (depending on the hardness of the water, earlier or later descaling may be advisable). Units which are defective due to a lack of descaling are excluded from the guarantee!

Limescale deposits on the heating element act like an insulating layer and increase energy consumption. Check the heating element visually at regular intervals and descale at an early stage.
- Using standard descaling liquid (citric acid recommended) or tablets, fill a jug with 1.0 litres of water.
- Add correct amount of descaler following manufacturer's guidelines and mix thoroughly.
- Hold the water tank by the sides and pull it out (Fig. 3).
- Place the water tank on a flat surface with the tank opening facing upwards, unscrew
the tank cap and pour in the prepared descaling solution (Fig. 4).
- Screw the tank cap back in place and check that it is tight.
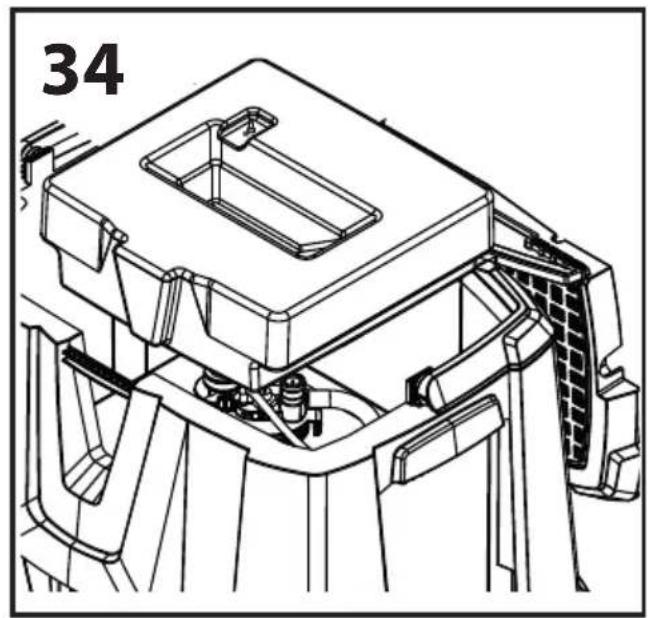
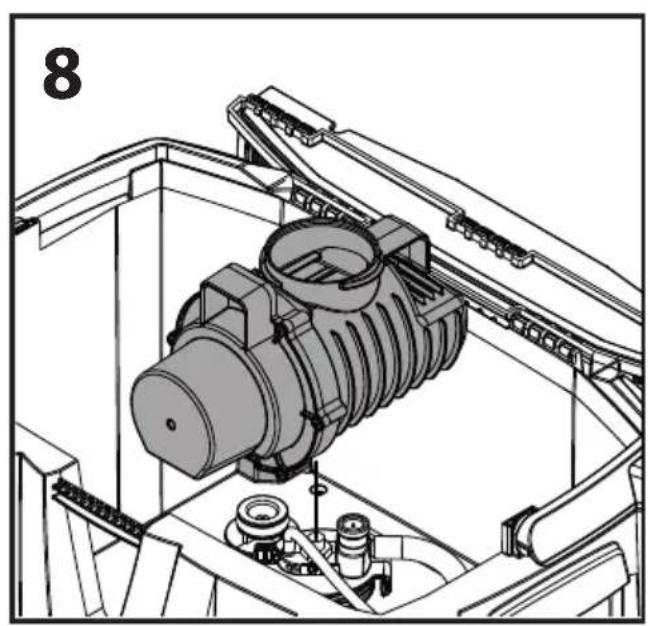
- Open the cover and remove the boiler (Fig. 7+8).
• Empty the boiler completely.

If the boiler is not completely emptied, the descaling programme will not start and an acoustic signal will sound (5 beeps).
- Insert the boiler into the device and hand-tighten the cover.
- Put the water tank back into the device.
- Switch on the device.
- Press the CLEAN button for about 3 seconds to start the automatic descaling programme (an acoustic signal sounds and the descaling indicator starts flashing).
- When descaling is complete (duration approx. 20 minutes), an acoustic signal sounds again and the descaling indicator goes out.
- Switch off the device.
- Clean all connections on the appliance, hose and steam plate.
- Blow through the steam hose with compressed air to remove deposits and prevent a malfunction.
- Hold the water tank by the sides and pull it out of the device (Fig. 3).
- Open the cover and remove the boiler (Fig. 7+8).
- Rinse the unit thoroughly two or three times with clean water in order to remove any remaining descaling solution.

Before reinserting the boiler, check whether condensation has collected at the bottom of the device and, if so, remove it (Fig. 9).

If no further work is done after descaling, run the machine again with clear water for approx. 20 seconds.
11. Storage
- Allow the device to cool down.
- Hold the water tank by the sides and pull it out of the device (Fig. 3).
- Open the cover and remove the boiler (Fig. 7+8).
- Rinse out the water tank and boiler with clean water and empty them completely.
- Check whether condensation has collected at the bottom of the device and, if so, remove it (Fig. 9).
- Insert the boiler into the device and hand-tighten the cover.
- Put the water tank back into the device.
- Store the hose, steam plates and power cable in the designated places (Fig. 10).

To make it easier to stow the hose, there are markings on it for the correct winding radius.

12. Maintenance
- Grease the boiler and tank cap opening as well as the O-rings on the tank nozzle and pressure relief valve if necessary. (Fig. 11)
- Check the filter in the tank cap and clean it if necessary.
13. Important Note regarding Product Liability!
In accordance with an EC directive, the manufacturer is liable for this product only if all parts originate from or were approved by the manufacturer and the tools are assembled and operated correctly. The use of other accessories and spare parts can partially or completely invalidate the liability.
14. Correction of Malfunctions
| Malfunction | Cause | Remedy |
| The steam wallpaper stripper is not working | ·Heating element covered in limescale·Malfunction (Descale and Refill flash and an acoustic signal sounds)·Too little water in tank. A safety cut out is fitted to prevent overheating of element if there is little water in tank.·Unit at an angle, heating element is not in water.·Usage of an extension lead·Overpressure valve triggered (e.g. due to calcification or kinked/ clogged hose) | ·Clean·Check the unit (tank, hose) for leaks. Check if the float is stuck. Check the heating element for scale build-up. Check / clean the filter in the tank cap.·Check the heating element and descale if necessary. Fill with more water. Wait 2 minutes. Refill will reset the cut-out element.·Move unit into horizontal position.·Check that the extension lead is rated at minimum of 13 Amps (230V)/ 16 Amps (110V) and fully unwound.·Let the device cool down and eliminate the cause (e.g. descale and clean hose) |
| Water in or under the device | ·Overpressure valve triggered (e.g. due to calcification or kinked/ clogged hose)·Boiler leaking | ·Let the device cool down and eliminate the cause (e.g. descale and clean hose)·Replace |
| Device calcifies very quickly | •Water too calcareous | •Use distilled water |

If the unit still will not operate return the unit to the dealer or authorised agent for investigation.
- Technical Data
| 230 V version 110 | V version | |
| Power source: 230 V ~ 50Hz 110 V ~ 50Hz | ||
| Power consumption: 2750W (UK/EU) | 2300W (AUS) | 1760W |
| Max steaming time:* 78 Minutes (UK) | 95 Minutes (AUS) | 129 Minutes |
| Steam rate: 58 g/ min (UK) | 47 g/ min (AUS) | 35 g/min |
| Max. filling volume: 5.1L | ||
| Hose length: 4.9 m | ||
| Unit weight: 7.5kg | ||
| Max. weight load (one person only): | 150 kg | |
*Approximate steam time before the safety cut-out operates.
- Spare parts
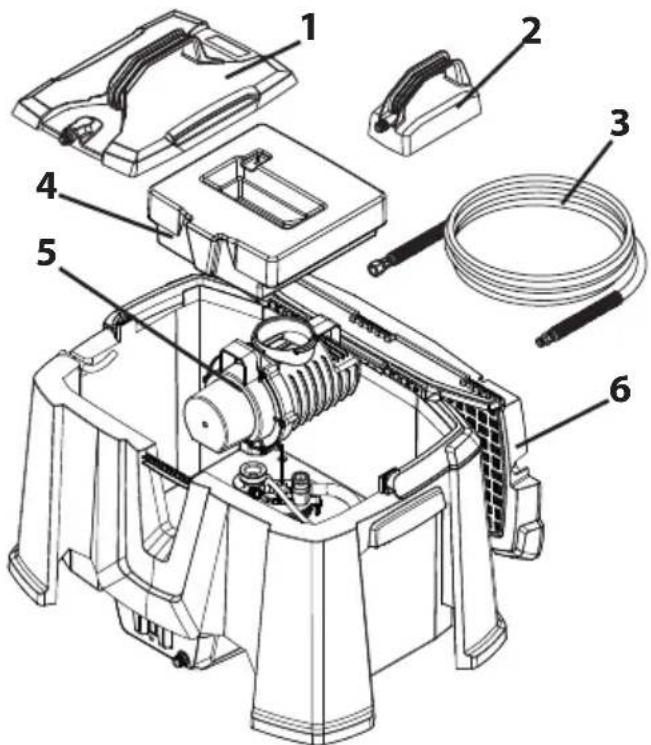
| Pos. | Name | Order No. |
| 1 | Stamplate large 244 | 8647 |
| 2 | Stamplate small 241 | 4573 |
| 3 | Steam hose 244 | 8661 |
| 4 | Water tank cpl. 244 | 8637 |
| 5 | Make sure to order the boiler with the correct voltage.Boiler cpl. (EU/UK, 230V) Boiler cpl. (UK, 110V) Boiler cpl. (AUS, 230V) | 244863124486962448707 |
| 6 | Cover cpl. 244 | 8667 |
17. Accessories
Further information about the WAGNER range of products for decorative preparation is available on www.wagner-group.com.
18. Environmental protection
The tool and all accessories and packaging have to be recycled in an environmentally friendly manner. Do not dispose of the tool with household waste. Support environmental protection by taking the tool to a local collection point or obtain information from a specialist retailer.
WARNING (UK ONLY)
Mains Connection 230V
Your unit has been supplied with a supply cord and a fitted plug. This is identified by the fuse holder in the base of the plug. Please read the following safety instructions before use.
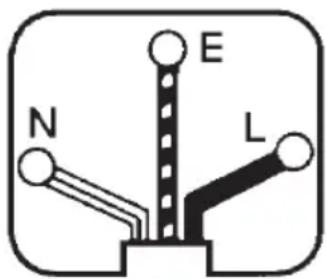
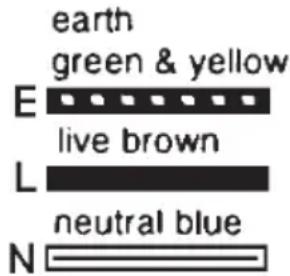
- If the fitted plug is cut off from the supply cord then the plug must be disposed of safely.
2 NEVER under any circumstances insert such a plug into a 13 Amp socket-outlet. - NEVER under any circumstances use the appliance or supply cord without the fuse cover fitted. This is the little cover fixed into the base of plug to hold the fuse in place.
- If you lose the fuse cover then please contact any electrical dealer for a replacement or ring our helpline above.
- A replacement fuse must be rated at 13 Amps and approved to BS1362.
IF IN ANY DOUBT PLEASE CONSULT A QUALIFIED ELECTRICIAN.
If you need to fit a plug to the supply cord, this should be fitted in accordance with the wiring instructions below, and will need to be used with a 13 Amp fuse. If in doubt consult a qualified electrician.
EU Declaration of conformity
We declare under sole responsibility that this product conforms to the following relevant stipulations:
2014/35/EU, 2014/30/EU, 2011/65/EU, 2012/19/EU
Applied harmonised norms:
EN 60335-1, EN 60335-2-54, EN IEC 55014-1, EN IEC 55014-2, EN IEC 61000-3-2,
EN 61000-3-3, EN 62233
The EU declaration of conformity is enclosed with the product.
If required, it can be re-ordered using order number 2450631.
3 + 2 YEAR GUARANTEE ON THIS WAGNER CONTRACTOR PRODUCT
(Status 03.03.2022)
WAGNER exclusively provides the commercial buyer who has purchased the product from an authorised specialist dealer (hereinafter referred to as the „Customer“) with a guarantee for the products listed on the Internet at https://go.wagner-group.com/3plus2-info in addition to the statutory warranty regulations, unless there is a guarantee exclusion.
The guarantee period for WAGNER products (devices) in the contractor's sector is 36 months and begins with the date of purchase of the initial purchase. This guarantee period is extended by a further 24 months if the product is registered within 28 days of purchase on the Internet at https://go.wagner-group.com/3plus2.
In cases of commercial rental, industrial use (e.g. use in shift operation) or equivalent use, the guarantee period is 12 months due to the significantly higher load. We reserve the right to carry out a check in individual cases and refuse the guarantee where necessary. If any material, machining or performance defects are identified in the device within the guarantee period, then the guarantee claims must be made immediately and within a period of no more than 2 weeks following discovery of the defect.
The detailed guarantee conditions can be obtained on
request from our authorised WAGNER partners (see website or operating instructions) or in text form on our website:
https://go.wagner-group.com/pf-warranty-conditions

UKCA Declaration of conformity
We declare under sole responsibility that this product conforms to the following relevant regulations:
Electrical Equipment (Safety) Regulations 2016
Electromagnetic Compatibility Regulations 2016
The Restriction of the Use of Certain Hazardous Substances in Electrical and Electronic Equipment Regulations 2012
The Waste Electrical and Electronic Equipment Regulations 2013
Applied harmonised standards
BS EN 60335-1:2012+A15:2021, BS EN 60335-2-23:2003+A2:2015,
BS EN IEC 55014-1:2021, BS EN IEC 55014-2:2021, BS EN IEC 61000-3-2:2019+A1:2021,
BS EN 61000-3-3:2013+A2:2021, BS EN 62233:2008
MERCI DE VOTRE CONFIANCE
17. Accessoires
https://go.wagner-group.com/pf-warranty-conditions

natural_image
Illustration of a hand holding a trowel over a metal grid background (no text or symbols)17. Accessoires
https://go.wagner-group.com/pf-warranty-conditions

natural_image
Illustration of a hand holding a trowel over a metal grid background (no text or symbols)https://go.wagner-group.com/pf-warranty-conditions

Betjeningselementer og indikatorer på apparatet
natural_image
Illustration of a hand holding a trowel over a grid-patterned background (no text or symbols)17. Tilbehør
https://go.wagner-group.com/pf-warranty-conditions

natural_image
Hand holding a trowel over a grid-patterned surface (no text or symbols)17. Tillbehör
https://go.wagner-group.com/pf-warranty-conditions

natural_image
Illustration of a hand holding a trowel over a metal grid background (no text or symbols)17. Accessori
natural_image
Illustration of a hand holding a trowel over a grid-patterned surface (no text or symbols)17. Acessórios
https://go.wagner-group.com/pf-warranty-conditions

natural_image
Illustration of a hand holding a trowel against a grid-patterned background (no text or symbols)17. Akcesoria
https://go.wagner-group.com/pf-warranty-conditions

Zmiany zastrzeżone
41-605 Swietochlowice
T +48/32/346 37 00
F +48/32/346 37 13
17. Аксессуары
AUS Wagner Spraytech Australia Pty. Ltd. 8 – 10 Dansu Court Hallam, Victoria, 3803 Australia Customer Service 1800 924 637 Email: info@wagneraustralia.com.au
Wagner S.p.A. 23868 Valmadrera (Lc) Via Santa Vecchia, 109 Italia Tel./Fax 0341 210100 (centralino) wagner_it_va@wagner-group.com
S Orkla House Care AB, Tallvägen 6 564 23 Bankeryd, Sweden Tel. +46 36 376300 Info@orkla.se
- STEAMFORCE SPEED PRO
- USER GUIDE
- HERZLICHEN DANK FÜR IHR VERTRAUEN
- Zubehör
- Contents
- Explanation of symbols used
- Scope of delivery
- Controls and displays on the device
- General Safety Instructions
- CAUTION!
- Safety Instructions for Steam Wallpaper Strippers
- Intended use
- Extension Leads EU/UK
- Preparation
- Operation
- Refilling
- Descaling
- Storage
- Maintenance
- Important Note regarding Product Liability!
- Correction of Malfunctions
- Accessories
- Environmental protection
- WARNING (UK ONLY)
- Mains Connection 230V
- IF IN ANY DOUBT PLEASE CONSULT A QUALIFIED ELECTRICIAN.
- EU Declaration of conformity
- + 2 YEAR GUARANTEE ON THIS WAGNER CONTRACTOR PRODUCT
- UKCA Declaration of conformity
- MERCI DE VOTRE CONFIANCE
- Accessoires
- Betjeningselementer og indikatorer på apparatet
- Tilbehør
- Tillbehör
- Accessori
- Acessórios
- Akcesoria
- Аксессуары
Brand : WAGNER
Model : SteamForce Speed Pro
Category : Paint spray