
Tourino - Car seat Chipolino - Free user manual and instructions
Find the device manual for free Tourino Chipolino in PDF.

| Product type | Child car seat |
| Brand | Chipolino |
| Model | Tourino |
| Dimensions (L × W × H) | 65 cm × 44 cm × 55-88 cm |
| Weight | 11 kg |
| Power supply | None (mechanical) |
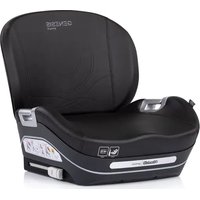
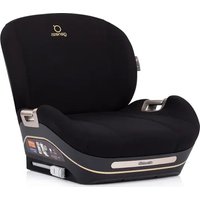
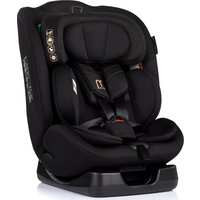
| Main functions | Rear-facing installation (40-105 cm), forward-facing (76-105 cm), booster (100-150 cm); i-Size ISOFIX system; 5-point harness; support leg; seat rotation; tilt adjustment |
| Care and cleaning | Cover hand washable at 30 °C; do not use bleach, dryer or iron; clean plastic/metal parts with damp cloth and mild detergent |
| Safety | i-Size R129 approval; Side Protection System (SPS); green indicators for ISOFIX and support leg; anti-twist harness; no active airbag in rear-facing position |
| Spare parts and repairability | Contact authorized service centers; do not use parts not supplied by the manufacturer |
| General information | Suitable for children from 40 to 150 cm; adjustable headrest with 11 positions; harness height adjustable with headrest; comes with additional cushion and padding |
Frequently Asked Questions - Tourino Chipolino
User questions about Tourino Chipolino
0 question about this device. Answer the ones you know or ask your own.
Ask a new question about this device
Download the instructions for your Car seat in PDF format for free! Find your manual Tourino - Chipolino and take your electronic device back in hand. On this page are published all the documents necessary for the use of your device. Tourino by Chipolino.
USER MANUAL Tourino Chipolino
natural_image
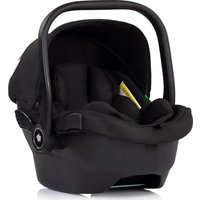
Tourino car seat with blue and black design, no visible text or symbols on the seat bodyChipoliNo
продуктов номер / item number / cikkszám/ número de artículo / codice articolo / artikelnummer / numéro d'article / broj proizvoda / αριθμός προϊόντος / numărul produsului / número de produto / productnummer / číslo produktu / 3πησεργρύξης δησθυξη:
STKTRN024xxxx
UN Regulation №129/04

ФИГУРИ / FIGURES / ÁBRÁK / CIFRAS / FIGURE / FIGUREN / LES FIGURES /
FIGURE / ΦΙΓΟΥΡΕΣ / FIGURILE / FIGURAS / FIGUREN / OBRÁZKY / gradesynjod
flowchart
graph TD
    A["Step 9"] --> B["Step 9-1"]
    B --> C["Step 9-2"]
    C --> D["Step 11"]
    D --> E["Step 12"]
ФИГУРИ / FIGURES / ÁBRÁK / CIFRAS / FIGURE / FIGUREN / LES FIGURES /
FIGURE / ΦΙΓΟΥΡΕΣ / FIGURILE / FIGURAS / FIGUREN / OBRÁZKY / gradesynjod
ВАЖНО! ЗАПАЗЕТЕ ЗА БЪДЕЩА СПРАВКА: ПРОЧЕТЕТЕ ВНИМАТЕЛНО!

TO ASSURE SAFE USAGE OF THIS PRODUCT
FOLLOW ALL WARNINGS, INSTRUCTIONS AND
RECOMMENDATIONS GIVEN IN THIS USER MANUAL!
NOTICE for i-Size Child Restraint System, Child Height: 40-150 cm
This is an enhanced i-Size child restraint system. It is approved according to Regulation No. 129 for use in "i-Size compatible" seating positions in vehicles, as specified by vehicle manufacturers in the vehicle user manual.
In case of doubt, consult the manufacturer or retailer of the child restraint system.
NOTICE for i-Size Enhanced Child Restraint System, Booster Seat Category (100-150 cm)
This is an i-Size enhanced child restraint system of the "booster seat" type. It is approved according to Regulation No. 129 for use primarily in "i-Size" seating positions in vehicles, as specified by vehicle manufacturers in the vehicle user manual.
In case of doubt, consult the manufacturer or retailer of the child restraint system.

NO SYSTEM CAN GUARANTEE ABSOLUTE PROTECTION AGAINST INJURY IN THE EVENT OF A COLLISION OR ACCIDENT! DRIVE WITH EXTRA CAUTION, ESPECIALLY WHEN A CHILD IS IN THE VEHICLE!
TO ENSURE THE SAFE USE OF THIS PRODUCT, FOLLOW THE WARNINGS, INSTRUCTIONS, AND RECOMMENDATIONS IN THIS MANUAL!
IMPROPER USE OF THE SEAT WILL REDUCE ITS PROTECTIVE AND SAFETY FUNCTIONS! FAILURE TO FOLLOW THE INSTRUCTIONS IN THIS MANUAL INCREASES THE RISK OF SERIOUS INJURY OR DEATH!
WARNING!
! NEVER INSTALL THE SEAT FACING FORWARD BEFORE THE CHILD REACHES 15 MONTHS OF AGE!
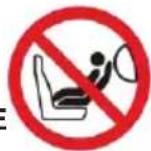
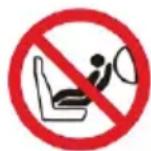
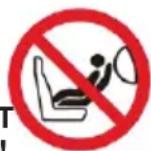
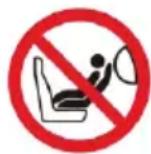
! NEVER USE THE SEAT ON A PASSENGER SEAT EQUIPPED WITH AN ACTIVE FRONT AIRBAG! THIS CAN RESULT IN DEATH OR SERIOUS INJURY!
DO NOT USE THE SEAT IN A FORWARD-FACING POSITION BEFORE THE CHILD REACHES A HEIGHT OF 76 cm.
DO NOT USE ANY SUPPORT CONTACT POINTS OTHER THAN THOSE DESCRIBED IN THE INSTRUCTIONS AND MARKED ON THE CHILD SEAT!
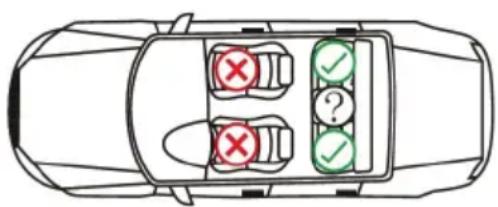
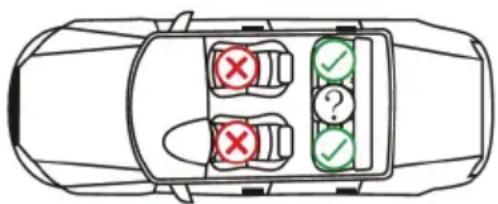
SEATING POSITIONS IN THE VEHICLE!
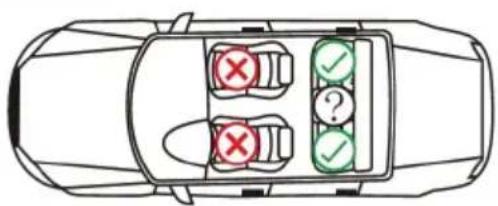

Suitable installation location

Unsuitable installation location

Only suitable if the seat is equipped with ISOFIX connectors.
WARNING! SAFETY INSTRUCTIONS!
✿ WARNING! NEVER LEAVE YOUR CHILD UNATTENDED!
✿ WARNING! DO NOT USE ANY ATTACHMENT POINTS OTHER THAN THOSE DESCRIBED IN THE INSTRUCTIONS AND MARKED ON THE CAR SEAT!
✿ WARNING! WHEN INSTALLING THE SEAT IN A "REAR-FACING" POSITION, NEVER PLACE IT ON A PASSENGER SEAT EQUIPPED WITH AN ACTIVE AIRBAG! THIS MAY RESULT IN DEATH OR SERIOUS INJURY!
✿ WARNING! NEVER INSTALL THE SEAT IN THE FORWARD-FACING POSITION BEFORE THE CHILD IS OLDER THAN 15 MONTHS!
✿ WARNING! THE VEHICLE SEATBELTS HOLDING THE SEAT IN PLACE MUST BE TIGHTENED AND SECURED!
WARNING! THE CAR SEAT HARNESS HOLDING THE CHILD MUST BE PROPERLY TIGHTENED, SECURED, AND ADJUSTED TO FIT THE CHILD'S BODY AND SIZE!
WARNING! THE LAP BELT SHOULD BE POSITIONED LOW, AND ANY SAFETY BARRIER MUST BE PROPERLY INSTALLED TO ENSURE THE CHILD'S HIPS ARE SECURE WITHOUT BEING COMPRESSED!
✿ WARNING! DO NOT MAKE ANY MODIFICATIONS OR ADDITIONS TO THE CAR SEAT WITHOUT APPROVAL FROM THE CERTIFYING AUTHORITY! FAILURE TO FOLLOW THE MANUFACTURER'S INSTRUCTIONS MAY BE DANGEROUS!
WARNING! KEEP AWAY FROM FIRE!
The installation of the product in the vehicle and securing the child must only be performed by an adult!
Hard plastic parts of the child restraint system must be positioned and installed so that, under normal vehicle operation, they cannot be trapped by a sliding seat or a vehicle door.
Make sure that the car seat belts are not twisted, worn, or torn. The buckles and clasps must always be in good condition and properly secured.
If you notice any defects in the structure, buckles, harnesses, locking mechanisms, or ISOFIX attachments, stop using the seat until the damaged parts are replaced.
❖ Replace the car seat if it has been subjected to impact or high forces in an accident.
Do not use a second-hand car seat, as you do not know what stress it has been exposed to.
Do not use the seat without its original cover, and do not replace the cover with any other fabric. The cover is an integral part of the safety system.
- Ensure that any luggage or objects that could cause injury in a collision are properly secured. Remove or secure any loose items near the seat that could pose a danger in case of sudden braking or an accident.
Always check that the seat is securely fastened in the vehicle, even when not in use. A loose seat, even without a child in it, can cause injuries in a collision.
Do not place additional cushions or inserts in the seat unless they are supplied by the manufacturer.
Do not use spare parts or accessories not provided by the manufacturer. The manufacturer is not responsible for safety if parts other than the original approved or recommended ones are used.
Keep the instruction manual in the designated storage space on the seat or inside the vehicle where the seat is used.
Do not expose the car seat to direct sunlight to prevent overheating, deformation, or damage to plastic components.
The car seat is not a substitute for a crib or bed. When the child needs to sleep, place them in a suitable baby crib, bassinet, or bed.
Do not attach cords or strings to the product to prevent the risk of strangulation!
✿ Never place the seat on beds, sofas, or similar soft surfaces!
Do not allow children to play with the product!
Do not remove labels and warnings from the seat. These are important for every user!
- Keep plastic packaging away from children to avoid the risk of suffocation!
INSTRUCTIONS FOR USING THE SAFETY SYSTEM
This is an enhanced i-Size universal ISOFIX child safety system for children from 40 to 150 cm. The seat is installed in the vehicle as follows:
For children 40-105 cm in height, rear-facing with ISOFIX connectors + support leg (i-Size universal ISOFIX system). The child is secured with the seat's 5-point harness.
For children 76-105 cm in height, forward-facing with ISOFIX connectors + support leg (i-Size universal ISOFIX system). The child is secured with the seat's 5-point harness.
For children 100-150 cm in height, forward-facing with ISOFIX connectors + 3-point vehicle seat belt (i-Size booster seat) or using only the 3-point vehicle seat belt (i-Size booster seat). The child is secured with the vehicle's 3-point seat belt.
WARNING! When driving, the seat must be fixed only in the rear-facing or forward-facing position according to the child's height.
IMPORTANT! Follow the exact instructions and installation sequence from the manual, including the provided text and illustrations. Check the security of the fixation after each step! ALWAYS CHECK THE SECURE FASTENING OF THE BELTS! After each installation, ensure the vehicle seat belts are not twisted and are in the correct position.
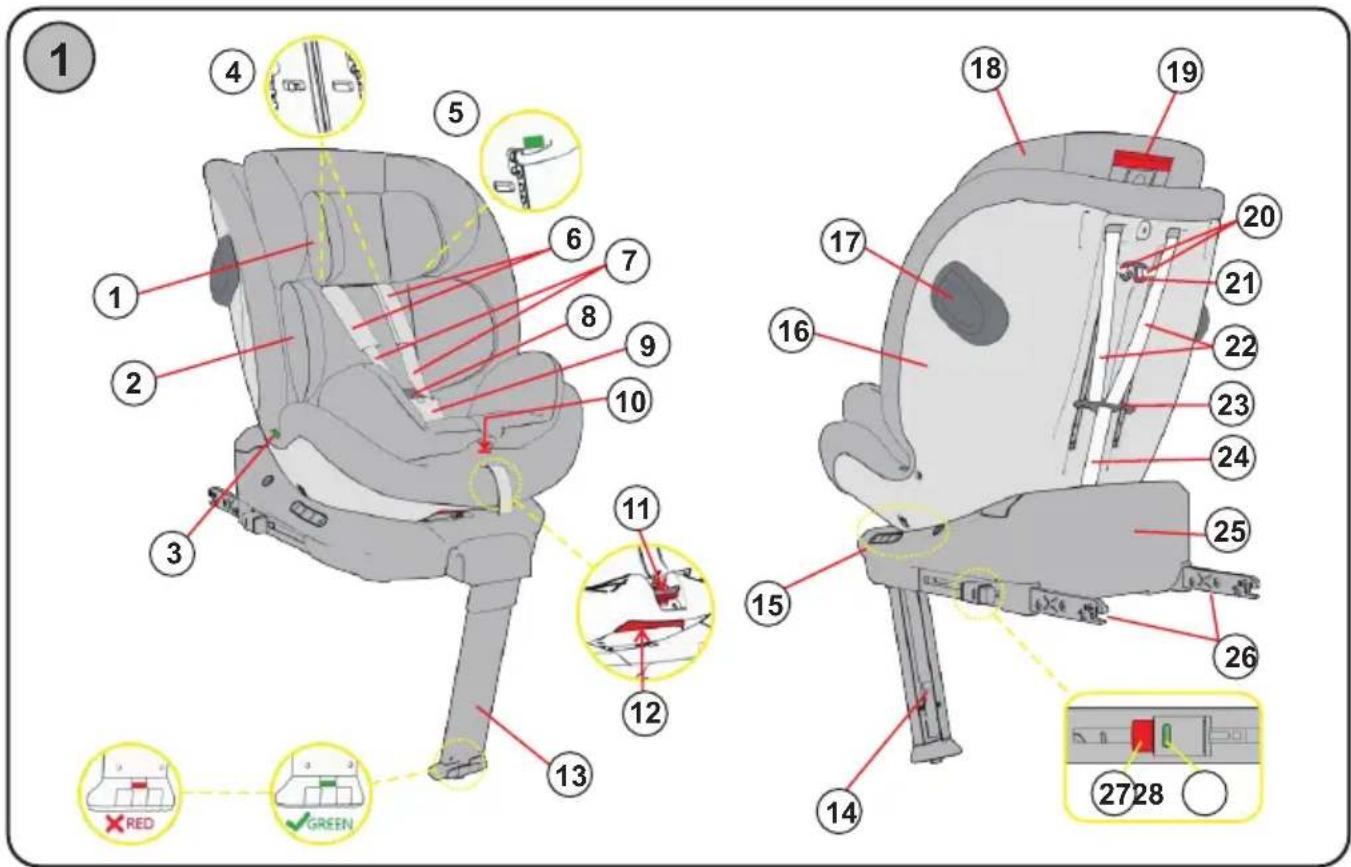
1. MAIN COMPONENTS
- Additional cushion
- Extra padding
- Car seat belt guide (marking)
- Shoulder belt channels
- Hook guide for the car seat belt
- Soft shoulder belt pads
- Shoulder belts
- Central buckle
- Soft crotch belt pad
- Shoulder belt release button (under the fabric)
- Seat rotation button
-
Seat recline adjustment lever
-
Support leg
- Support leg adjustment button
- Seat recline position marking
- Backrest
- Side Protection System (SPS)
- Headrest
- Headrest adjustment handle
- Shoulder belt crossbar
- Shoulder belt connector
- Belts
- Belt connection hook
- Shoulder belt adjustment strap
- Base
- ISOFIX connectors
27.ISOFIX connector release button - ISOFIX connector indicator
2. ADJUSTING THE HEADREST
Pull the headrest adjustment handle (1) and, at the same time, move the headrest up or down to the desired position. You will hear a "click" sound when it locks into place.
IMPORTANT! Before installing the car seat, adjust the headrest according to your child's height. The headrest can be adjusted to 11 positions.
IMPORTANT! Make sure the headrest is securely fixed at the selected height by pulling it up or pushing it down!
The height of the shoulder straps is adjusted simultaneously with the headrest height.
Adjust the headrest so that the shoulder straps are at the level of your child's shoulders or slightly above, as shown in the illustration (CORRECT). They should not be positioned too high (TOO HIGH) or too low (TOO LOW).
IMPORTANT! If the headrest needs to be placed between two positions, choose the higher one.
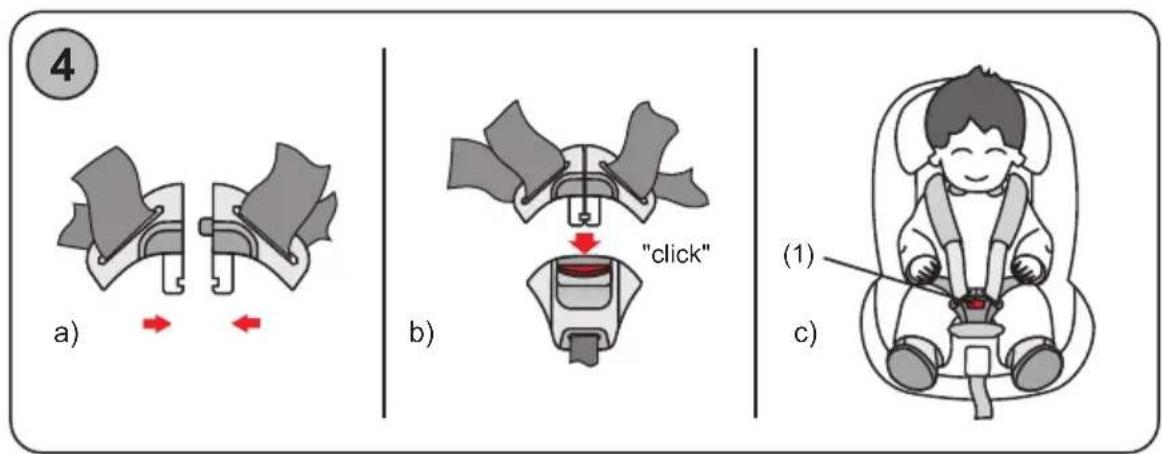
4. CENTRAL BUCKLE
a) Connect both metal ends of the shoulder straps.
b) Insert the connected metal ends into the central buckle and press until you hear a "click" sound. Ensure that the straps are securely locked by trying to pull them out.
c) Press the red button (1) on the buckle to release and remove the straps.
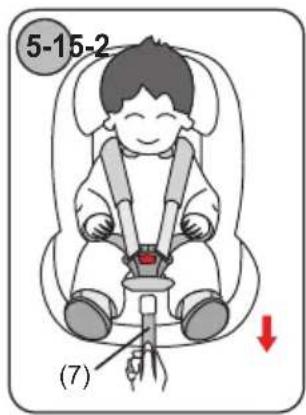
5-1. Tightening the Shoulder Straps - Pull the adjustment strap (7) to ensure that the straps fit snugly around the child's body without being too tight or uncomfortable. The recommended space between the child's body and the straps is two fingers (approximately 2–3 cm).
The waist straps should be positioned as low as possible, close to the crotch, and not on the child's stomach.
WARNING! Make sure the straps are not twisted and that they fit the child securely without causing discomfort!
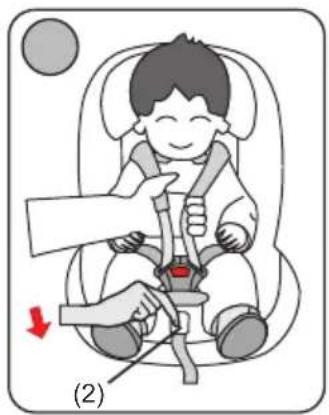
5-2. Loosening the Shoulder Straps - Press the release button (2) with one hand while pulling the straps outward with the other.
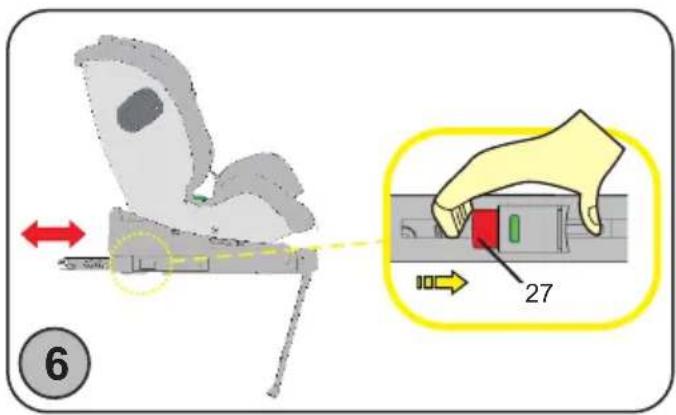
6. ISOFIX CONNECTORS
Grip and press the ISOFIX release button (27) to unlock the ISOFIX connectors, as shown in the diagram, while moving the connector outward as far as possible. Repeat the same process for the other ISOFIX connector.
To retract the ISOFIX connector, press the release button (27) and push the connectors inward.
7. INSTALLING THE ISOFIX CONNECTORS TO THE VEHICLE
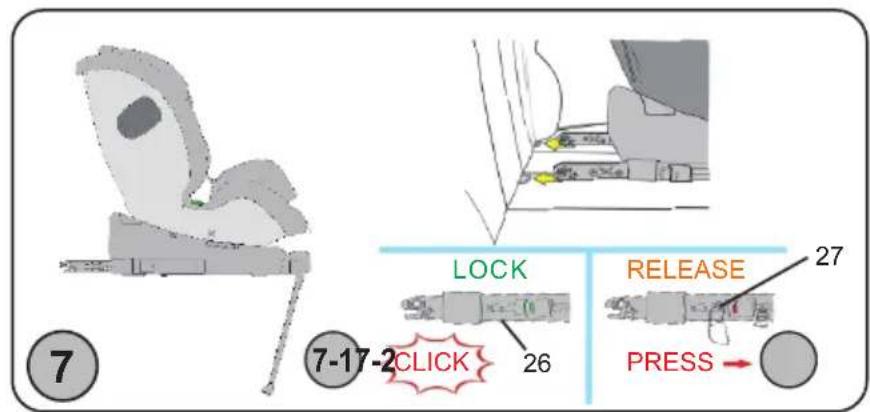
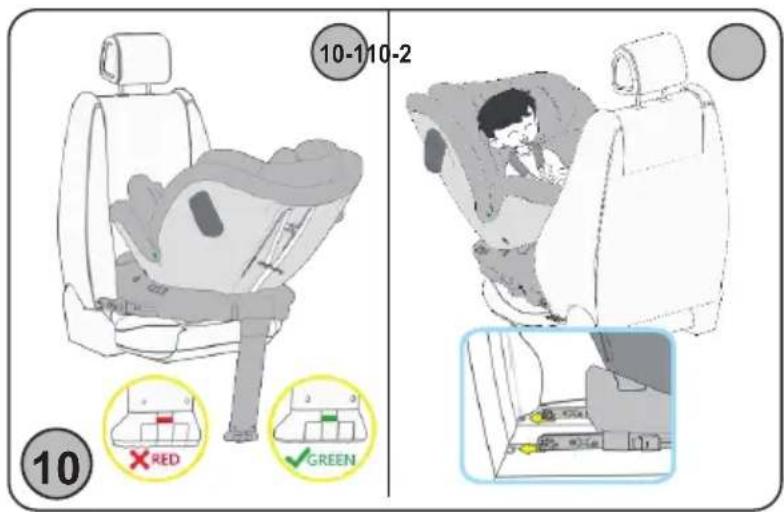
7-1. Pull the ISOFIX connectors (26) out as far as possible and insert them into the ISOFIX anchorage points in the vehicle. Push the car seat back until you hear a "click" sound, indicating that it is securely fastened.
WARNING! The ISOFIX connectors are properly secured when both indicators are fully green.
Note: If the indicators are red, repeat the installation process following the steps described above.
WARNING! The base of the car seat must fit snugly against the vehicle seat without any gaps between the bottom of the car seat and the seat surface of the vehicle.
7-2. Push the child car seat firmly against the vehicle seatback. To release the ISOFIX connectors, press the release button (27).
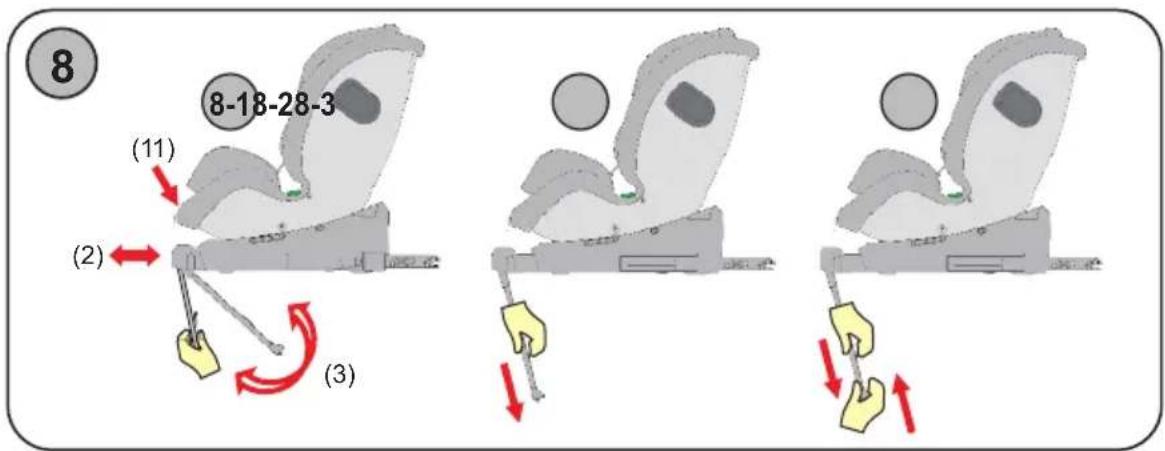
8. SUPPORT LEG
The support leg must be used for children with a height of 40 to 105 cm.
8-1. Press the seat rotation button (11) with one hand. Pull the support leg panel out or push it inward with the other hand. Rotate the support
leg downward to a vertical position when in use. Retract the support leg when not in use.
8-2. Press the support leg adjustment buttons and pull it down until it firmly touches the vehicle floor. Ensure that the support leg is securely in contact with the floor of the vehicle with no gaps.
WARNING! The support leg is properly fixed when the indicator is fully green.
Note: If the indicator is red, repeat the installation process following the steps described above.
8-3. Press the support leg adjustment button with one hand and push the lower part of the support leg upward with the other hand until you hear a "click" sound. Retract the support leg.
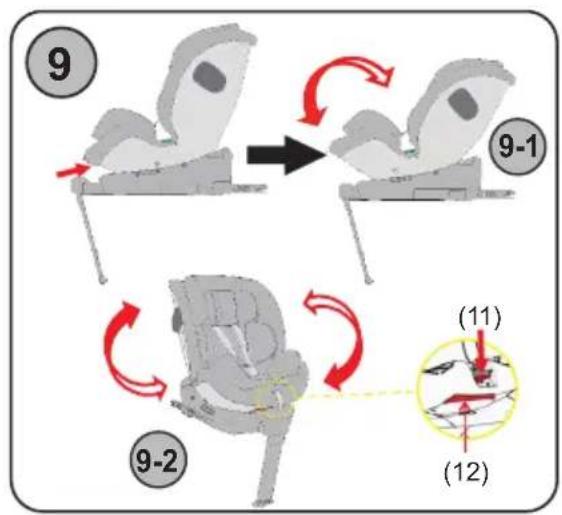
9. SEAT ROTATION AND INCLINATION ANGLE
9-1. Press the seat recline adjustment lever (12) and adjust the seat to the desired inclination:
Position A: for a child height of 40-105 cm, when the seat is facing BACKWARD.
Positions 1, 2, 3, 4: for a child height of 76-105 cm, when the seat is facing FORWARD.
Position 1 (the most upright position): for a child height of 100-155 cm, when the seat is facing FORWARD.
9-2. Press the seat rotation button (11) and rotate it to the desired position.
10. INSTALLATION OF THE CHILD SEAT IN THE CAR
For child height 40-105 cm (Rear-facing installation)
10-1. Install the seat in the car using the ISOFIX connectors (See sections "ADJUSTING THE ISOFIX CONNECTORS" and "INSTALLING THE ISOFIX CONNECTORS"). Press the backrest of the child seat against the car seat backrest and ensure that the seat is firmly pressed against it.
WARNING! The ISOFIX connectors are securely fastened when both indicators are fully green.
10-2. Extend and secure the support leg to the car floor (See section "SUPPORT LEG").
WARNING! The support leg is correctly secured when the indicator is fully green.
Set the seat in the most upright position (Position 1) and rotate it 180^ to Position A.
Unbuckle the 5-point harness and loosen the shoulder straps. Place the child in the seat, fasten the 5-point harness, and tighten it securely around the child.
WARNING! Ensure that the shoulder straps are at the correct height!
WARNING! Make sure the straps are not twisted and fit snugly around the child without excessive pressure!
For child height 76-105 cm (Forward-facing installation)
10-3. Install the seat in the car using the ISOFIX connectors (See sections "ADJUSTING THE ISOFIX CONNECTORS" and "INSTALLING THE ISOFIX CONNECTORS"). Press the backrest of the child seat against the car seat backrest and ensure that the seat is firmly pressed against it.
WARNING! The ISOFIX connectors are securely fastened when both indicators are fully green.
10-4. Extend and secure the support leg to the car floor (See section "SUPPORT LEG").
WARNING! The support leg is correctly secured when the indicator is fully green.
Adjust the seat recline to the desired position (Positions 1, 2, 3, 4).
Unbuckle the 5-point harness and loosen the shoulder straps. Place the child in the seat, fasten the 5-point harness, and tighten it securely around the child.
WARNING! Ensure that the shoulder straps are at the correct height!
WARNING! Make sure the straps are not twisted and fit snugly around the child without excessive pressure!
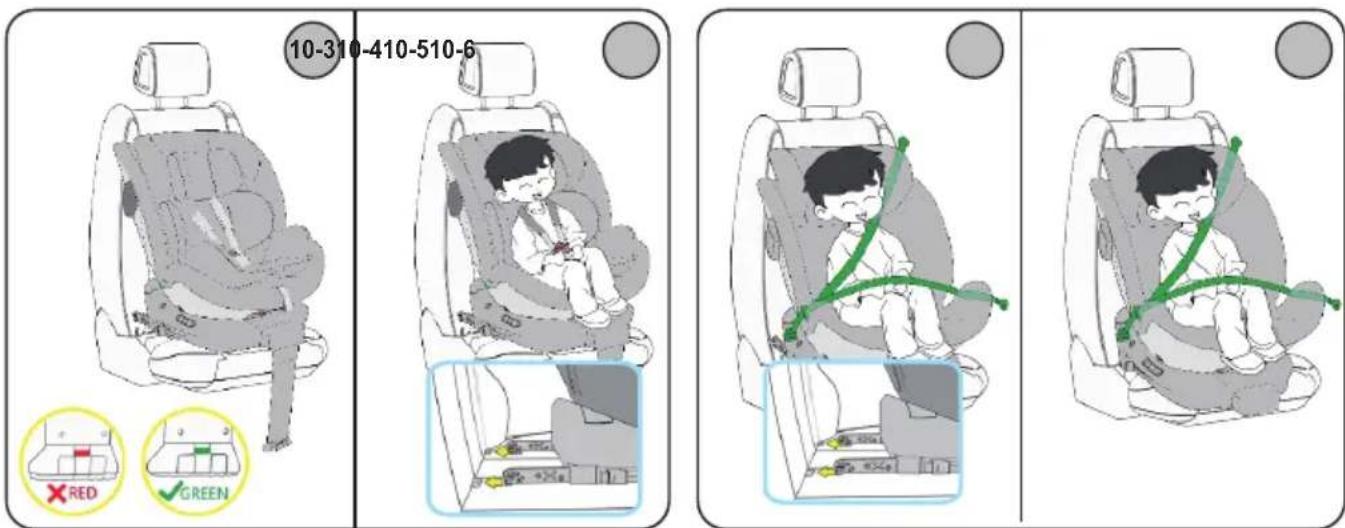
For child height 100-150 cm (Forward-facing installation)
Retract the support leg (See section "SUPPORT LEG"). Set the seat in the most upright position (Position 1). Remove the 5-point harness (See section "REMOVING THE 5-POINT HARNESS").
There are two ways to secure the seat to the car seat.
10-5. Option A – Installation with ISOFIX and the car's 3-point seatbelt:
Install the seat in the car using the ISOFIX connectors (See sections "ADJUSTING THE ISOFIX CONNECTORS" and "INSTALLING THE ISOFIX CONNECTORS"). Press the backrest of the child seat against the car seat backrest and ensure that the seat is firmly pressed against it.
WARNING! The ISOFIX connectors are securely fastened when both indicators are fully green.
Secure the child using the car's 3-point seatbelt, threading the belt as shown in Figure 10-5.
10-6. Option B – Installation with the car's 3-point seatbelt (without ISOFIX):
Secure the child using the car's 3-point seatbelt, threading the belt as shown in Figure 10-6.
WARNING! Ensure that the seatbelt is not twisted!
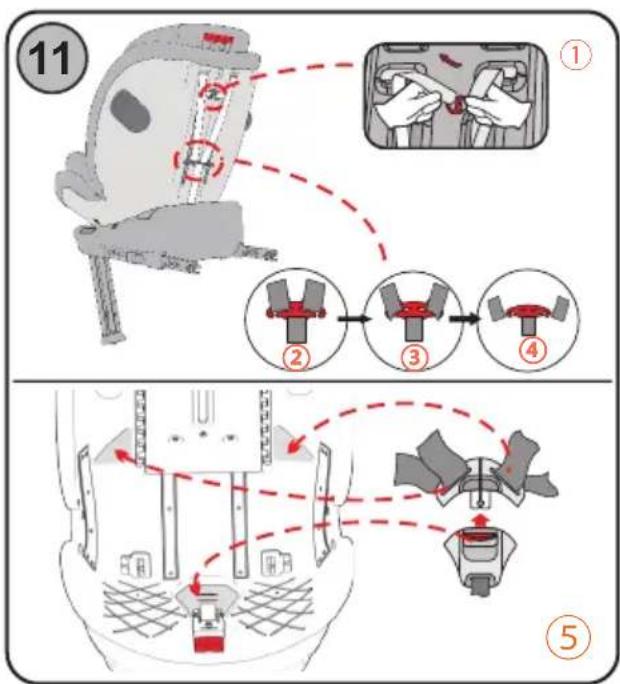
11. REMOVING THE 5-POINT SAFETY HARNESS
Step 1: Loosen the shoulder straps (see section "Loosening the Shoulder Straps").
Step 2: Release the straps at the back of the seat (positions 22 and 24 in the diagram of main components), as shown in fig. ①, ②, ③, ④.
Step 3: Unfasten the straps from the central buckle and remove the extra cushion, seat padding, and the strap between the legs.
Step 4: Store the straps and the central buckle under the seat fabric, in the designated compartments of the seat shell, as shown in fig. ⑤.
REMOVING THE UPHOLSTERY
-
Remove the additional cushion and seat pad, as well as the crotch belt pad, and tuck the harness straps and central buckle under the upholstery of the seat (See section "REMOVING THE 5-POINT SAFETY HARNESS").
-
Unfasten the buttons on both sides of the upholstery near the marking for the 3-point seat belt guide, then remove the upholstery from the seat.
To reinstall the cover, follow the above steps in reverse order.
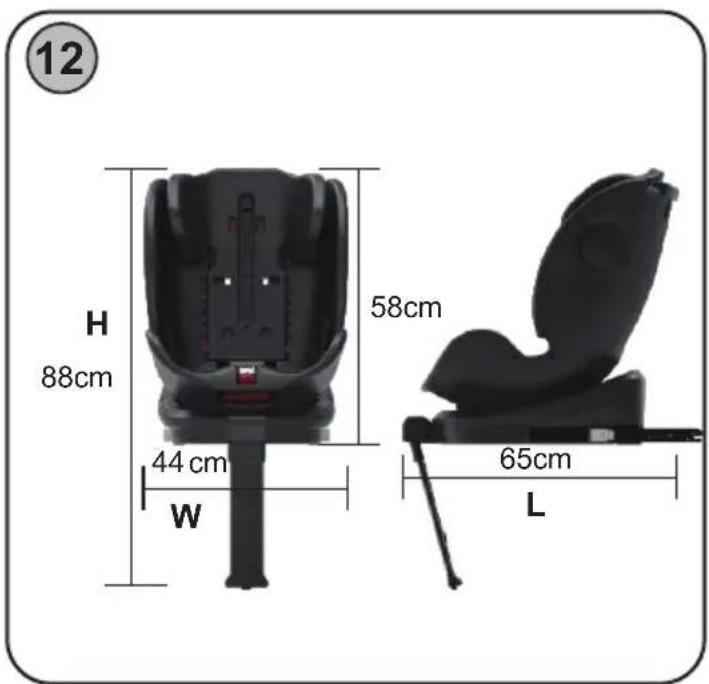
12. SEAT DIMENSIONS
Length: 65 cm, Width: 44 cm, Height: 55/88 cm, Weight: 11 kg.
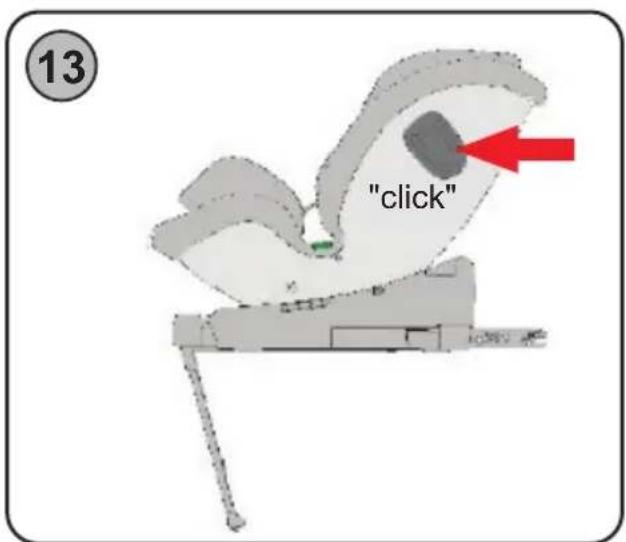
13. SIDE PROTECTION SYSTEM (SPS)
The additional Side Protection System (SPS) is designed to reduce impact energy and minimize shock to the child's neck and head in case of a side collision.
To activate the seat's additional side protection, pull the cover outward. You will hear a "click" sound, and the cover will lock into place.
IMPORTANT! When using the seat's SPS, activate the side protection on the side closest to the car door.
CARE AND MAINTENANCE INSTRUCTIONS
- Clean dirty plastic or metal parts with a soft cotton cloth or sponge moistened with water or mild detergent.
- Wash the upholstery and soft pads by hand at 30°C using a mild detergent!
Do not bleach!
Do not spin-dry!
Do not tumble dry!
Do not iron!
Do not clean with aggressive detergents containing abrasive particles, ammonia, bleach, or alcohol.
✿ After cleaning, let the seat dry completely before use or storage. - Clean the belts only externally with mild soap and a damp cloth!
Do not wet or remove labels! They contain important information! - Store the product in a clean, dry place. Avoid exposure to environmental elements such as direct sunlight, rain, humidity, or sudden temperature changes!
For issues related to normal use, consult or seek repairs from authorized service centers.
Composition of the upholstery:
Outer layer: 100% polyester
Filling: 100% polyester


Materials used: plastic, metal, textile.
A TERMÉK BIZTONSÁGOS HASZNÁLATÁNAK BIZTOSÍTÁSA
ÉRDEKÉBEN KÖVESSE A FELHASZNÁLÓI KÉZIKÖNYVBEN TALÁLHATÓ
EGYETLEN RENDSZER SEM KÉPES TELJES VÉDELMET
NYÚJTANI ÜTKÖZÉS VAGY BALESET ESETÉN!
VEZESSEN FOKOZOTT ÓVATOSSÁGGAL, KÜLÖNÖSEN,
HA GYERMEK TARTÓZKODIK A JÁRMÜBEN!
A TERMÉK BIZTONSÁGOS HASZNÁLATA ÉRDEKÉBEN
KÖVESSE A HASZNÁLATI ÚTMUTATÓBAN SZEREPLÓ


AUCUN SYSTÈME NE PEUT GARANTIR UNE PROTECTION ABSOLUE CONTRE LES BLESSURES EN CAS DE COLLISION OU D'ACCIDENT ! CONDUISEZ AVEC UNE PRÉCAUTION ACCRUE, EN PARTICULIER LORSQU'UN ENFANT SE TROUVE DANS LE VÉHICULE !
POUR ASSURER UNE UTILISATION SÉCURISÉE DE CE PRODUIT, SUIVEZ LES AVERTISSEMENTS, INSTRUCTIONS ET RECOMMANDATIONS DE CE MANUEL !
UNE MAUVAISE UTILISATION DU SIÈGE RÉDUIT SES FONCTIONS DE PROTECTION ET DE SÉCURITÉ ! LE NON-RESPECT DES INSTRUCTIONS DE CE MANUEL AUGMENTE LE RISQUE DE BLESSURES GRAVES OU DE MORT !
ATTENTION!
NE JAMAIS INSTALLER LE SIÈGE AUTO EN POSITION FACE À LA ROUTE AVANT QUE L'ENFANT N'AIT ATTEINT L'ÂGE DE 15 MOIS !
NE JAMAIS UTILISER LE SIÈGE AUTO SUR UN SIÈGE ÉQUIPÉ D'UN AIRBAG FRONTAL ACTIF ! CELA PEUT ENTRAÎNER DES BLESSURES GRAVES OU LA MORT !

NE PAS UTILISER LE SIÈGE AUTO EN POSITION FACE À LA ROUTE AVANT QUE L'ENFANT N'ATTEIGNE UNE TAILLE DE 76 CM.
N'UTILISEZ PAS D'AUTRES POINTS DE FIXATION QUE CEUX DÉCRITS DANS LE MANUEL ET MARQUÉS SUR LE SIÈGE AUTO !
EMPLACEMENTS DANS LE VÉHICULE!


HR: UPUTE ZA UPORABU
VAŽNO! ZADRŽATI ZA BUDUĆU REFERENCU: ČITAJTE PAŽLJIVO!
KAKO BISTE OSIGURALI SIGURNU UPOTREBU OVOG
PROIZVODA, SLIJEDITE SVA UPOZORENJA, UPUTE I PREPORUKE
NAVEDENE U OVOM KORISNIČKOM PRIRUČNIKU!
NITI JEDAN SUSTAV NE MOŽE JAMČITI APSOLUTNU ZAŠTITU OD OZLJEDA U SLUČAJU SUDARA ILI NESREĆE! VOZITE S POJAČANIM OPREZOM, OSOBITO KADA SE DIJETE NALAZI U VOZILU!
ZA SIGURNO KORIŠTENJE OVOG PROIZVODA, PRIDRŽAVAJTE SE UPOZORENJA, UPUTA I PREPORUKA IZ OVOG PRIRUČNIKA!
NEPRAVILNA UPOTREBA SJEDALICE SMANJUJE NJEZINE ZAŠTITNE I SIGURNOSNE FUNKCIJE! NEPOŠTIVANJE UPUTA IZ OVOG PRIRUČNIKA POVEĆAVA RIZIK OD TEŠKIH OZLJEDA ILI SMRTNOG ISHODA!
UPOZORENJE!


NICIUN SISTEM NU POATE GARANTA PROTECTIE ABSOLUTĂ ÎMPOTRIVA RĂNIRILOR ÎN CAZ DE IMPACT SAU ACCIDENT! CONDUCEȚI CU PRUDENTĂ SPORITĂ, MAI ALES CÂND UN COPIL SE AFLĂ ÎN VEHICUL!
PENTRU A ASIGURA UTILIZAREA ÎN SIGURANȚĂ A ACESTUI PRODUS, RESPECTAȚI AVERTISMENTELE, INSTRUCTIUNILE ȘI RECOMANDĂRILE DIN ACEST MANUAL!
UTILIZAREA NECORESPUNZĂTOARE A SCAUNULUI VA REDUCE FUNCTIILE SALE DE PROTECTIE ȘI SIGURANȚĂ! NEREPECTAREA INSTRUCTIUNILOR DÎN ACEST MANUAL CREȘTE RISCUL DE ACCIDENTARE GRAVĂ SAU DECES!
ATENTIE!
!NU INSTALAȚI NICIODATĂ SCAUNUL AUTO ÎN DIRECTIA DE DEPLASARE ÎNAINTE CA VĂRSTA COPILULUI SĂ DEPĂȘEASCĂ 15 LUNI!
! NU UTILIZAȚI NICIODATĂ SCAUNUL PE UN SCAUN DE PASAGER DOTAT CU AIRBAG ACTIV! ĀCEST LUCRU POATE PROVOCA DECES SAU RĂNI GRAVE!
! NU UTILIZATI SCAUNUL ÎN POZITIA ORIENTATĂ ÎN FATĂ ÎNAINTE CA ÎNĂLȚIMEA COPILULUI SĂ AJUNGĂ LA 76 CM.
NU UTILIZATI ALTE PUNCTE DE FIXARE DECÂT CELE INDICATE ÎN INSTRUCTIUNI ŞI MARCATE PE SCAUNUL AUTO!
LOCURI ADECVATE ÎN VEHICUL!

NENHUM SISTEMA PODE GARANTIR PROTEÇÃO ABSOLUTA
CONTRA LESÕES EM CASO DE COLISÃO OU ACIDENTE!
CONDUZA COM MAIOR CUIDADO, ESPECIALMENTE
QUANDO HOUVER UMA CRIANÇA NO VEÍCULO!
PARA GARANTIR O USO SEGURO DESTE PRODUTO, SIGA OS
AVISOS, INSTRUÇÕES E RECOMENDAÇÕES DESTE MANUAL!

GEEN ENKEL SYSTEEM KAN ABSOLUTE BESCHERMING TEGEN LETSEL BIJ EEN BOTSING OF ONGELUK GARANDEREN! RIJD EXTRA VOORZICHTIG, VOORAL WANNEER ER EEN KIND IN HET VOERTUIG ZIT!
OM EEN VEILIG GEBRUIK VAN DIT PRODUCT TE WAARBORGEN, VOLG DE WAARSCHUWINGEN, INSTRUCTIES EN AANBEVELINGEN IN DEZE HANDLEIDING!
ONGEPAST GEBRUIK VAN HET AUTOSTOELTJE VERMINDERT ZIJN BESCHERMENDE EN VEILIGHEIDSFUNCTIES! HET NIET VOLGEN VAN DE INSTRUCTIES IN DEZE HANDLEIDING VERHOOGT HET RISICO OP ERNSTIG LETSEL OF OVERLIJDEN!
LET OP!
INSTALLLEER HET AUTOSTOELTJE NOOIT IN DE RIJRICHTING VOORDAT HET KIND TEN MINSTE 15 MAANDEN OUD IS!
GEBRUIK HET AUTOSTOELTJE NOOIT OP EEN PASSAGIERSSTOEL MET EEN ACTIEVE AIRBAG! DIT KAN LEIDEN TOT OVERLIJDEN OF ERNSTIG LETSEL!
⚠️ GEBRUIK HET AUTOSTOELTJE NIET IN VOORWAARTSE POSITIE VOORDAT HET KIND 76 CM LENGTE HEEFT BEREIKT.
GEBRUIK GEEN ANDERE BEVESTIGINGSPUNTEN DAN DEGENE DIE IN DE HANDLEIDING WORDEN BESCHREVEN EN OP HET AUTOSTOELTJE ZIJN AANGEGEVEN!
GESCHIKTE ZITPLAATSEN IN HET VOERTUIG!


ŽÁDNÝ SYSTÉM NEMŮŽE ZARUČIT ABSOLUTNÍ OCHRANU PROTI ZRANĚNÍ PŘI NÁRAZU NEBO NEHODĚ! JEZDĚTE SE ZVÝŠENOU OPATRNOSTÍ, ZVLÁŠTĚ POKUD JE VE VOZIDLE DÍTĚ!
PRO ZAJIŠTĚNÍ BEZPEČNÉHO POUŽITÍ TOHOTO PRODUKTU DODRŽUJTE VAROVÁNÍ, POKYNY A DOPORUČENÍ UVEDENÁ V TÉTO PŘÍRUČCE!
NESPRÁVNÉ POUŽITÍ AUTOSEDAČKY SNÍŽÍ JEJÍ OCHRANNÉ A BEZPEČNOSTNÍ FUNKCE! NEDODRŽENÍ POKYNŮ V TÉTO PŘÍRUČCE ZVYŠUJE RIZIKO VÁŽNÉHO ZRANĚNÍ NEBO ÚMRTÍ!
UPOZORNĚNÍ!
NIKDY NEINSTALUJTE AUTOSEDAČKU VE SMĚRU JÍZDY, DOKUD DÍTĚ NEDOSÁHNE VĚKU 15 MĚSÍCŮ!
NIKDY NEPOUŽÍVEJTE AUTOSEDAČKU NA SEDADLE S AKTIVNÍ ČELNÍ AIRBAGEM! TO MŮŽE VÉST K SMRTI NEBO VÁŽNÉMU ZRANĚNÍ!
NEPOUŽÍVEJTE AUTOSEDAČKU V POZICI SMĚREM DOPŘEDU, DOKUD DÍTĚ NEDOSÁHNE VÝŠKY 76 CM.
NEPOUŽÍVEJTE JINÉ UPEVŇOVACÍ BODY, NEŽ TY UVEDENÉ V NÁVODU A OZNAČENÉ NA AUTOSEDAČCE!
VHODNÁ MÍSTA VE VOZIDLE!

ghmngjds! ISOFIX hsdy36jdn ngjgds, mngjus mngz ngcn36jmn dcmnnsbce dh36jds.
Dh6n365: 078 0609561mngd n gncgns, Dh5n365ngd n6b4smsgs bgdms66ndbymn dmjd265dngd n56dn463mmon.
ghmngjds! ls3smdmnl j3gos bsfgnmn dgnqmmcg y6gos dmgmaml dsbjsbln ls3smdgml, ls3smdmnl j3gos bsfgnmlus os dsbjsbln ls3smdmnl gqosdnml dmmnl bsm3gjdnl gsmjdy.
ghmqngd! ISOFIX hsdy36gdn ngj6gds, mmcqgsb mthzg ndqn36mtn dcmn56ae dd36gds.

- ВАЖНО! ЗАПАЗЕТЕ ЗА БЪДЕЩА СПРАВКА: ПРОЧЕТЕТЕ ВНИМАТЕЛНО!
- NOTICE for i-Size Child Restraint System, Child Height: 40-150 cm
- WARNING!
- SEATING POSITIONS IN THE VEHICLE!
- WARNING! SAFETY INSTRUCTIONS!
- INSTRUCTIONS FOR USING THE SAFETY SYSTEM
- MAIN COMPONENTS
- ADJUSTING THE HEADREST
- CENTRAL BUCKLE
- ISOFIX CONNECTORS
- INSTALLING THE ISOFIX CONNECTORS TO THE VEHICLE
- SUPPORT LEG
- SEAT ROTATION AND INCLINATION ANGLE
- INSTALLATION OF THE CHILD SEAT IN THE CAR
- For child height 40-105 cm (Rear-facing installation)
- For child height 76-105 cm (Forward-facing installation)
- For child height 100-150 cm (Forward-facing installation)
- 10-5. Option A – Installation with ISOFIX and the car's 3-point seatbelt:
- 10-6. Option B – Installation with the car's 3-point seatbelt (without ISOFIX):
- REMOVING THE 5-POINT SAFETY HARNESS
- REMOVING THE UPHOLSTERY
- SEAT DIMENSIONS
- SIDE PROTECTION SYSTEM (SPS)
- CARE AND MAINTENANCE INSTRUCTIONS
- ATTENTION!
- EMPLACEMENTS DANS LE VÉHICULE!
- HR: UPUTE ZA UPORABU
- VAŽNO! ZADRŽATI ZA BUDUĆU REFERENCU: ČITAJTE PAŽLJIVO!
- UPOZORENJE!
- ATENTIE!
- LOCURI ADECVATE ÎN VEHICUL!
- NENHUM SISTEMA PODE GARANTIR PROTEÇÃO ABSOLUTA
- LET OP!
- GESCHIKTE ZITPLAATSEN IN HET VOERTUIG!
- UPOZORNĚNÍ!
- VHODNÁ MÍSTA VE VOZIDLE!
Brand : Chipolino
Model : Tourino
Category : Car seat