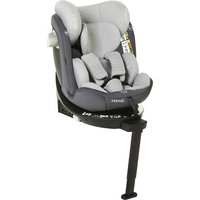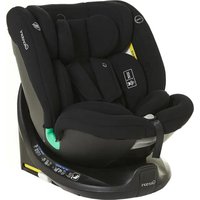
Polaris - Car seat Giordani - Free user manual and instructions
Find the device manual for free Polaris Giordani in PDF.


User questions about Polaris Giordani
0 question about this device. Answer the ones you know or ask your own.
Ask a new question about this device
Download the instructions for your Car seat in PDF format for free! Find your manual Polaris - Giordani and take your electronic device back in hand. On this page are published all the documents necessary for the use of your device. Polaris by Giordani.
USER MANUAL Polaris Giordani
natural_image
Line drawing of a car comfort seat with I-Size ECE R129 branding (no text or symbols on the diagram itself)|
IMPORTANTE:
LEGGERE ATTENTAMENTE
E CONSERVARE
PER FUTURO RIFERIMENTO.
UK
IMPORTANT:
KEEP FOR FUTURE REFERENCE, READ CAREFULLY.
E
¡IMPORTANTE!
LEER DETENIDAMENTE
Y CONSERVAR PARA FUTURAS
CONSULTAS.
2


P
IMPORTANTE!
text_image
Technical diagram of a car seat with numbered labels pointing to various body parts and accessories.COMPONENTI
- ISOFIX Insertion Aids (optional)
- ISOFIX Fastening Points (vehicle)
- Headrest
- Seat Cover
- Shoulder Pads
- Shoulder Straps
- Harness Buckle
- Groin Pad
- Adjustment Button
-
Groin Strap
-
360° Rotation Adjuster
- Recline Handle
- Base
- Belt Guide
- Seat "Cradleyou" Reducer
- Belt Guidance
- Buckle Tongues
- Red Release Button
- Headrest Height Adjuster
-
Instruction Back Cover Button
-
Shoulder Belt Connector
- Back Cover instructions (instructions can be inserted into it)
- Top Tether Adjuster
- Top Tether Clip
- ISOFIX Locking Arms
- ISOFIX Buttons
- R-elf
- Elastic
E COMPONENTES
text_image
Diagram illustrating the step-by-step installation of a medical device, showing steps from pinning to assembly.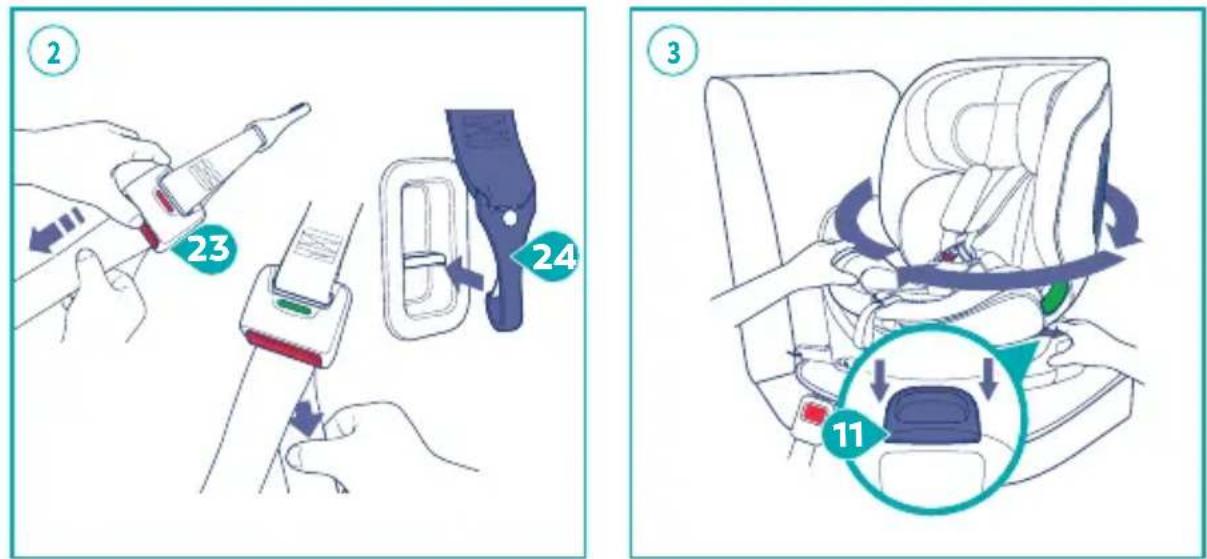
text_image
Diagram illustrating car seatbelt usage steps with numbered instructions and labeled parts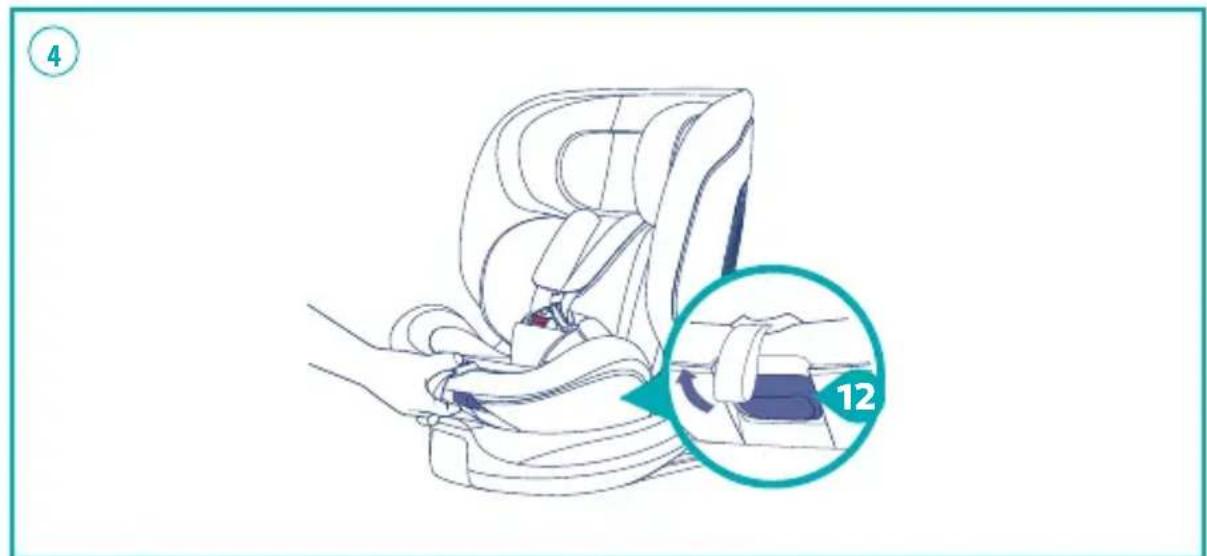
text_image
4 12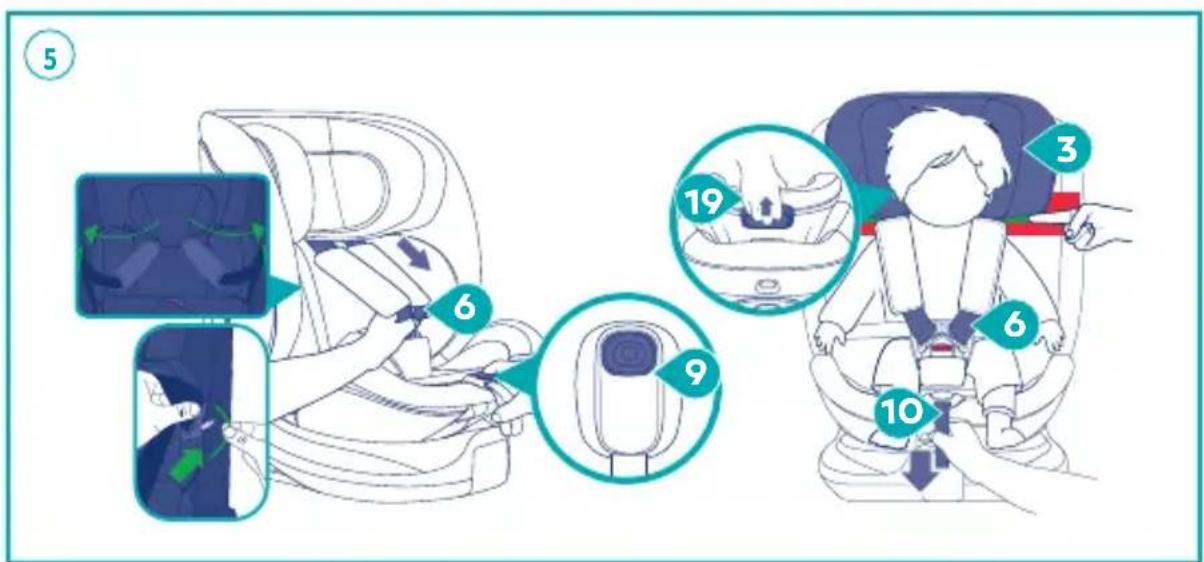
text_image
5 6 9 10 3 6 19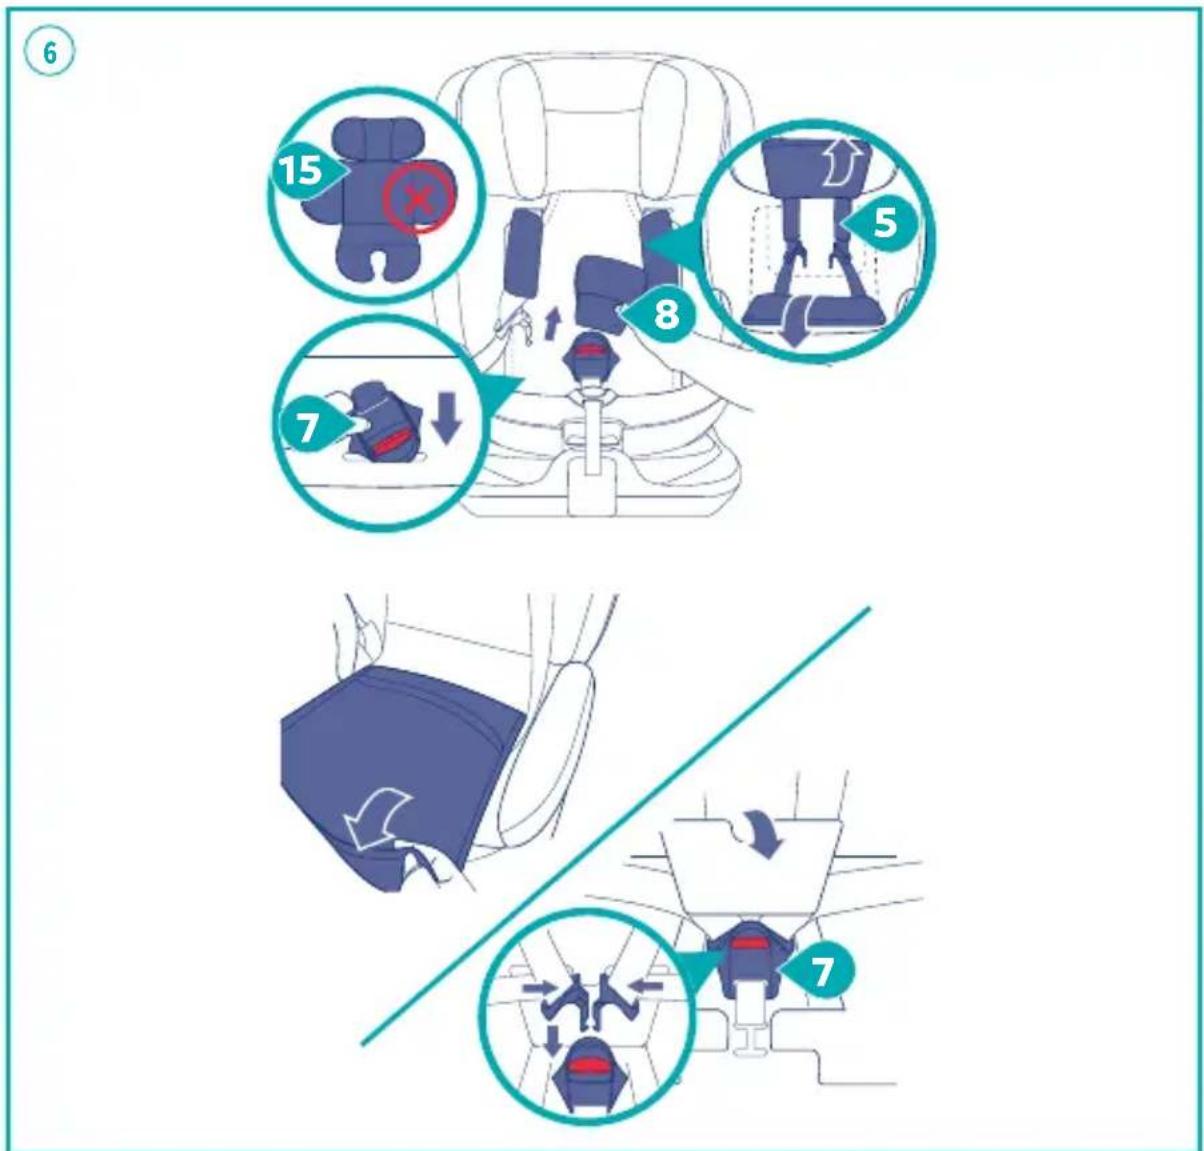
text_image
6 15 7 8 5 710
text_image
7 A 24 B C 15 40-105CM A 24 B C 76-105CM 100-150CM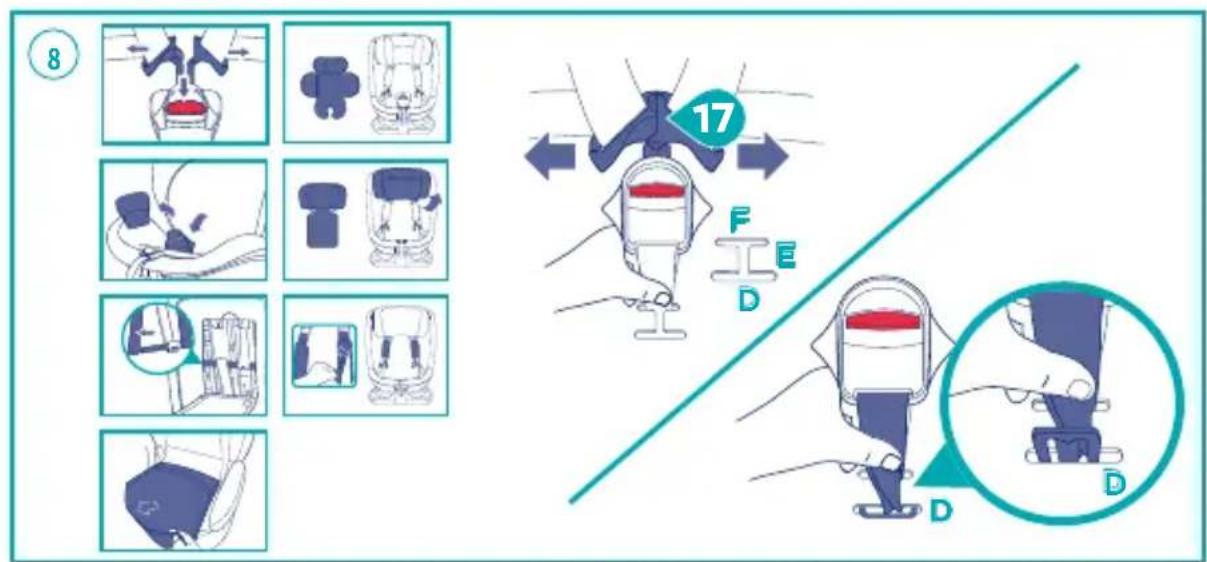
text_image
8 17 F E D D11
These instructions use the following symbols:
| Symbol | Keyword Explanation | |
| DANGER! | RISK of severe personal injury | |
| WARNING! | RISK of minor personal injury | |
| CAUTION! | RISK of material damage | |
| TIP! | Useful notes | |
The POLARIS i-Size is intended exclusively to keep your child safe in your vehicle.
| Tested and approved according to ECE R129 | ||
| Body size Installation method | Installation direction | |
| 40-105 cm; ≤18kg | ISOFIX+Top Tether | Facing backwards |
| 76-105 cm; ≤18kg | ISOFIX+Top Tether | Facing forwards |
| 100-150 cm Adult Safety Belt +ISOFIX | Facing forwards | |
*ECE=European Standard for Child Safety Equipment
The child safety seat has been designed, tested and approved according to the requirements of the European Standard for Child Safety Equipment (ECE R129/03). The seal of approval ‘E’ (in a circle) and the approval number are located on the orange approval label (sticker on the child safety seat).
⚠ DANGER! This certification will be invalidated if you make any modifications to the child safety seat. Only the manufacturer is allowed to make modifications to the child safety seat. Unauthorised technical changes may reduce or completely eliminate the protective function of the seat. Do not make any technical changes to the child safety seat.
⚠️ DANGER! Use the POLARIS i-Size exclusively to keep your child safe in your vehicle. It is absolutely unsuitable for use as a seat or toy at home.
USE IN THE VEHICLE
Please follow the instructions for the use of Enhanced Child Restraint Systems (ECRS) in the vehicle handbook. When using it, make sure to comply with airbag restrictions. Please refer to the vehicle handbook for information on vehicle seats certified for use with child restraints in accordance with the ECE R16 standard. POLARIS i-Size usage options:
| POLARISChild safety seat | Vehicle seating position with ISOFIX | |
| i-Size | NOT i-Size | |
| POLARIS i-Size | √ | √ |
You can use your child safety seat as follows:
| Facing forwards (in the direction of travel) | Yes^B-C |
| Facing backwards (against the direction of travel) | Yes^A |
| With adult two-point seat belt | No |
| With adult three-point seat belt | Yes^c |
| On seats featuring: ISOFIX fastenings | Yes^A-B-C |
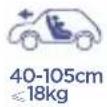
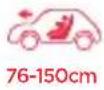
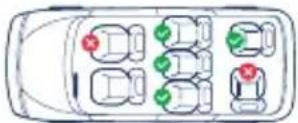
A - When using as i-Size (40-105 cm).
This ECRS is suitable for use in vehicles compliant with the ECE R14 requirements and with ISOFIX installed.
B -When using as i-Size (76-105 cm).
This ECRS is suitable for use in vehicles compliant with the ECE R14 requirements and with ISOFIX installed.
C - When using as i-Size booster seat (100-150 cm).
This ECRS system is suitable for seat belt models equipped with adult three-point belts compliant with the ECE R16 requirement and is not suitable for models only equipped with adult two-point seat belts.
(Please observe the regulations in force in your country).
- Facing backwards 40-105 cm:
Do not use on passenger seats with an active front airbag!
- Facing forwards 76-150 cm:
If there is a passenger airbag: slide the passenger seat all the way back and follow the relevant instructions provided in your vehicle handbook, making sure that the airbag is deactivated.
INSTALLATION
1.ISOFIX
- If your vehicle is not equipped as standard with ISOFIX Insertion Aids, clamp the two ISOFIX Insertion Aids (1), which are included in the scope of delivery of the seat, with the opening pointing upwards, to the two ISOFIX Fastening Points (2) of your vehicle. If you do not have the ISOFIX Insertion Aids (1), please ignore this step.
TIP! The ISOFIX fastening points are located between the surface and the backrest of the vehicle seat.
-
Press the ISOFIX Buttons (26) to push out the two ISOFIX Locking Arms (25) from the seat base.
-
Push back the child safety seat until you hear a clicking sound and the green safety colour shows on both sides of the ISOFIX indicators.
-
Move the child safety seat backwards so that it rests firmly against the seat of the vehicle.
① TIP! Release the button towards the other side to loosen the ISOFIX fastening points on both sides. By placing the ISOFIX locking arms back into the seat base, the ISOFIX can be protected.
2. TOP TETHER
-
Pull out the top tether strap by pressing the Top Tether Adjuster (23) button.
-
Pull the top tether long enough to hang the Top Tether Clip (24) on the fixed point, which is on the back of the vehicle seat.
-
Make sure the top tether strap is tightened and the Top Tether Adjuster (23) indicator turns green.
3. ROTATION
- Pull the 360° Rotation Adjuster (11) with one finger and rotate the seat shell.
- Rotate the seat shell so it is facing either forwards or backwards, depending on the height of your child, until it engages with a clicking sound.
① TIP! Rotation may be limited when installed in the forward-facing position with ISOFIX and top tether (76-105 cm).
⚠️ DANGER! When the seat is rotated to 90^ , the user can place the child in this position, but the user cannot use this angle while driving.
4. SEAT ANGLE
The seat shell of the C007 i-Size can be used in 4 level positions when facing forward and in 4 level positions when facing rearward.
- Pull the Recline Handle (12), then pull the seat outward to adjust it.
It can be adjusted to 4 positions for forward facing use.
By rotating the seat in the rearward direction, the seat can be adjusted to the fifth to eighth level.
40-87 cm: for rearward-facing installation, use fifth level to eighth level.
87-105 cm: for rearward-facing installation, use fifth level.
76-105 cm: for forward-facing installation, use fourth level.
100-150 cm: for forward-facing installation, use first level.
TIP! In models from 76 to 105 cm, the ECRS may not be suitable for all vehicles; the reclining angles may not match the vehicle seat during adjustment.
5. USE
- Loosen the Shoulder Straps (6) by pressing the Adjustment Botton (9) and pull both Shoulder Straps (6) forwards, loosening them as much as possible.
- Press the Red Release Button (18) to open the Harness Buckle (7) and attach the Buckle Tongues (17) to the Elastic (28) on both sides of the fabric cover. Place your child in the child safety seat.
- Bring both Buckle Tongues (17) together. Lock the buckle tongues in the Harness Buckle (7) until they engage with a clicking sound.
- Pull the Headrest Height Adjuster (19), select the correct height of the Headrest (3) and engage it in a position that fits your child by releasing the adjuster.
- Adjust the Headrest (3) to the correct position. Make sure that there is less than a finger's distance between the child's shoulder and the bottom of the headrest. Pull the Groin Strap (10) until it lies flat and snug on your child's body. Make sure the shoulder straps are slightly higher or at the same height as the child's shoulders.
⚠ WARNING! Before each car
journey, in order to ensure your child's safety, make sure that:
- The child safety seat is fastened in the ISOFIX Fastening Points (2) on both sides with the ISOFIX Locking Arms (25) and that both ISOFIX Buttons (26) are fully green;
• The child safety seat is securely fastened; - The harness of the child safety seat fits snugly to the child's body without being constricting and is not twisted;
- The Shoulder Straps (6) are correctly adjusted and the straps are not twisted;
- The Shoulder Pads (5) are in the correct position on your child's body;
- The child safety seat is facing in the right direction for your child's age/size;
- The Buckle Tongues (17) are inserted into the Harness Buckle (7).
⚠ DANGER! If your child tries to open the ISOFIX buttons or the red release button, stop the vehicle immediately or as soon as possible. Check whether the child safety seat is correctly fastened and ensure that your child is properly secured. Explain to your child the dangers associated with his or her actions.
6. STORING THE FIVE-POINT HARNESS
Once the child reaches a height of 100 cm, the five-point safety harness should be stored away and the child should be secured with the adult safety belt.
- Open the Harness Buckle (7) as shown. Remove the Seat 'Cradleyou' Reducer (15) and Groin Pad (8).
- Loosen the Shoulder Straps (6).
- Open the Seat Cover (4).
Re-connect the Harness Buckle (7).
Hide the Shoulder Straps (6) under the cover and hide the Harness Buckle (7) in the storage compartment.
WARNING! Remove the seat 'Cradleyou' reducer accordingly when your child is taller than 75 cm.
7. USING
THE CHILD SAFETY SEAT
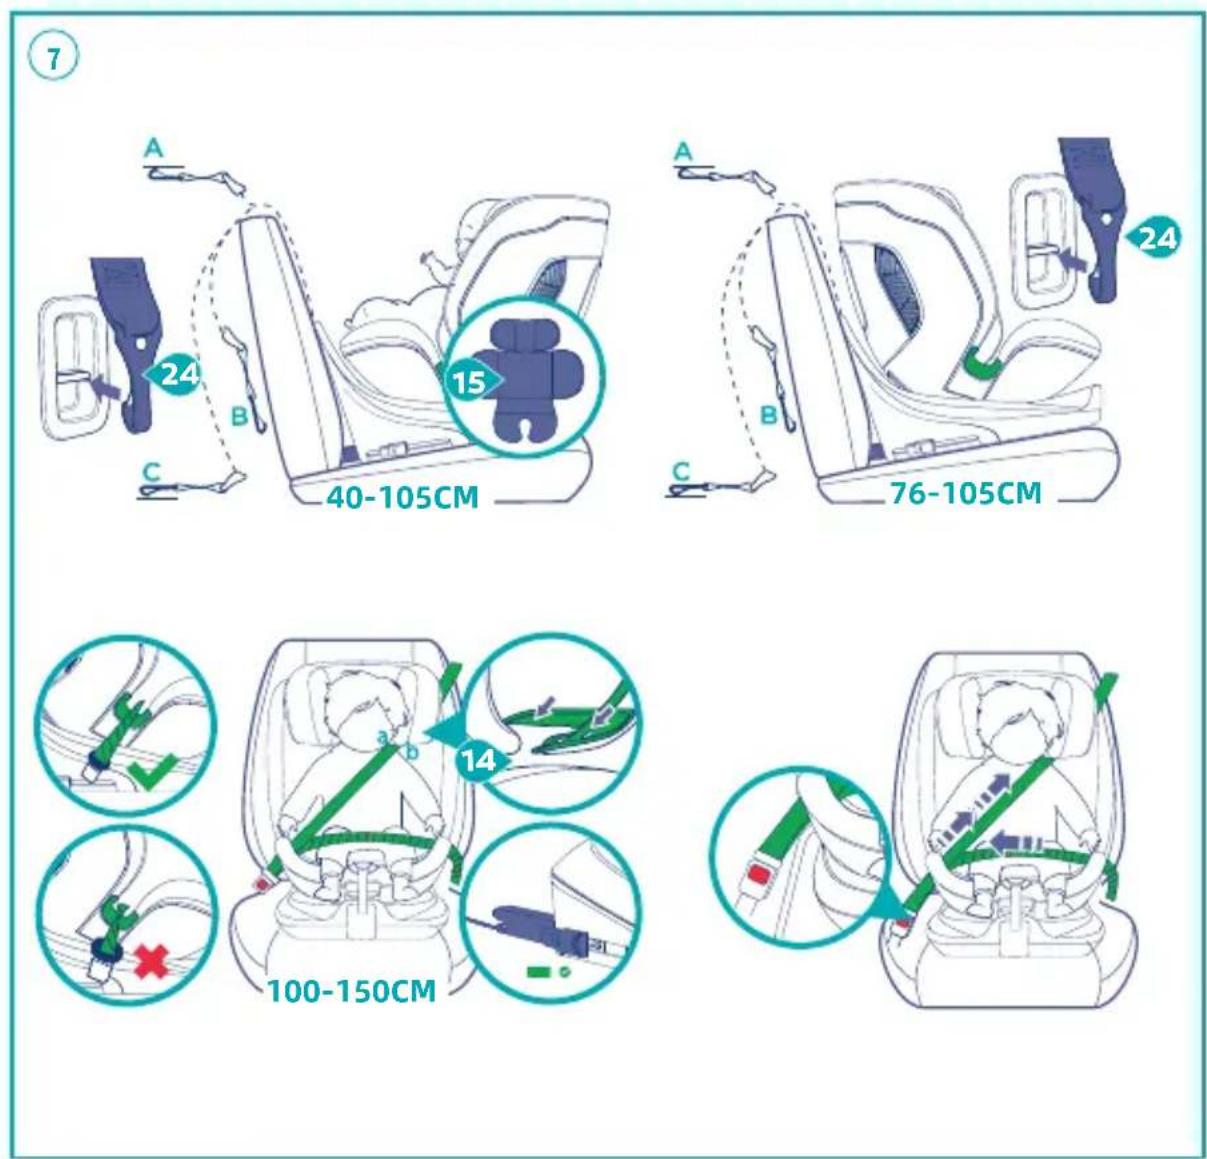
Facing backwards (40-105 cm) Installation
Install the child safety seat with ISOFIX + Top Tether.
Attach the Top Tether Clip (24) to the fixed point on the back of the vehicle seat backrest; the position of the fixed point is shown in the picture (one of the A/B/C positions).
Facing forwards (76-105 cm) Installation
Install the child safety seat with ISOFIX+Top Tether
Attach the Top Tether Clip (24) to the fixed point on the back of the vehicle seat backrest; the position of the fixed point is shown in the picture (one of the A/B/C positions).
CAUTION! For the safety of your child, the top tether must be tightened when driving.
Facing forwards (100-150 cm) Installation
Install the child safety seat with
ISOFIX + adult safety belt. If you don't have ISOFIX, please ignore this step. Install the child safety seat with an adult safety belt only. Pull out the belt from the belt ALR (Automatic Locking Retractor). Pass the shoulder belt through the same side of the Belt Guide (14) on the headrest, then pull the shoulder belt and lap belt together through the other Belt Guide (16) on the seat base. Insert the tip of the buckle into the vehicle seat buckle until it engages with a clicking sound. Follow the direction of the arrow to tighten the belt and put the redundant belt into the ALR. Wiggle the child safety seat to make sure it is securely attached.
i TIP! Keep the shoulder belt in the belt guide position between the outside of the neck and the shoulder (in the middle of point a and point b).
⚠ WARNING! The adult seat belt must not be twisted or put in a different place.
① TIP! It is important to ensure that the lap belt is worn low so that the pelvis is firmly engaged.
① TIP! The shoulder belt section must run diagonally backward. The alignment of the belt can be adjusted with your vehicle’s ALR on both sides.
8. CARE AND MAINTENANCE
Seat cover
Only use authentic POLARIS Seat2 Covers (4). The Seat Cover (4) is an integral part of the child safety seat and is crucial to ensuring trouble-free operation of the system. Replacement Seat Covers (4) are available from your dealer.
The Shoulder Pads (5), Seat Cover (4) and Seat “Cradleyou” Reducer (15) can be washed in lukewarm soapy water. Remove all foam parts from the top and bottom sections before washing. These must not be washed.
TIP! Use the seat cover R-elf to assemble the cover more easily. Harness Buckle
-
Open the Harness Buckle (7) as shown. Remove Groin Pad (8).
-
Lift the seat cover and pull down the Harness Buckle (7) across the Seat Cover (4).
-
Rotate the metal plate on the groin straps from (F) by 90° vertically. Slide the metal plate through the harness slot so that (E) is in a horizontal position, then the Harness Buckle (7) can be pulled out from the slot (D). To re-install the Harness Buckle (7), follow the steps in reverse order until the metal plate is hooked into the harness slot. Pass the Harness Buckle (7) through the Groin Pad (8) on the cover. Make sure the metal plate is under slot (F) during use.
△ WARNING! Tug hard on the groin strap to make sure that it is secure in the seat shell.
To ensure your child's safety, it is absolutely essential that the Harness Buckle (7) continues to function correctly. Harness
Buckle (7) malfunctions are usually caused by a build-up of soiling or by external objects: when you press the Red Release Button (18), it takes a long time for the Buckle Tongues (17) to be ejected. The Buckle Tongues (17) no longer engage (i.e. when you try to push them in, they pop out again). The Buckle Tongues (17) engage without a clicking sound. The Buckle Tongues (17) are difficult to push in (you feel some resistance). The Buckle Tongues (17) only open if extreme force is applied. Remedy: soak the harness buckle in warm water containing washing-up liquid for at least an hour. Rinse the buckle thoroughly and dry it. The plastic parts and the harnesses can be cleaned with soapy water. Do not use any caustic cleaning agents (such as solvents).
DISPOSAL
Please observe the waste disposal regulations in your country.
| Disposal of packaging | Container for cardboard boxes |
| Seat cover Residual waste, waste incineration | |
| Plastic parts To be placed in the corresponding container according to labelling | |
| Metal parts Container for metals | |
| Belt straps Container for polyester | |
| Buckle and tongue | Residual waste |
WARNING
- WARNING! BEFORE USE, REMOVE AND DISPOSE OF ALL PLASTIC BAGS AND PACKAGING MATERIALS AND KEEP THEM OUT OF REACH OF CHILDREN. IT IS RECOMMENDED TO DISPOSE OF THESE ITEMS AT AN APPROPRIATE WASTE SORTING POINT, AS REQUIRED BY CURRENT REGULATIONS.
- WARNING! If the child car seat is damaged, deformed or excessively worn, it must be replaced as its original safety features may have been compromised. Make sure there are no protruding elements that could cause damage to the child or to the vehicle upholstery: in this case, do not use the child seat or contact the manufacturer if in doubt.
SAFETY NOTES
- Notice regarding i-Size category Enhanced Child Restraint Systems (40-105 cm). This is an i-Size Enhanced Child Restraint System. It is approved according to UN Regulation No.129 for use in i-Size compatible vehicle seating positions as indicated by vehicle manufacturers in the vehicle users' manual. If in doubt, consult either the Enhanced Child Restraint System manufacturer or the retailer.
- Notice regarding i-Size booster seat category Enhanced Child Restraint Systems (100-150 cm). This is an i-Size booster seat Enhanced Child
Restraint System. It is approved according to UN Regulation No. 129 for use primarily in ‘i-Size seating positions’ as indicated by vehicle manufacturers in the vehicle user’s manual. If in doubt, consult either the Enhanced Child Restraint System manufacturer or the retailer. DANGER! Please carefully read and make sure you understand all instructions in this manual and in the vehicle handbook related to child safety seats. Install and use the child safety seat as described in the instruction manual. Otherwise, your child could suffer serious injury or death. Keep the instructions together with the ECRS for future reference.
DANGER! Since preterm and low-birth-weight infants may have health issues, it is always necessary to have a trained professional such as a doctor or a hospital assess the suitability of ECRS before leaving the hospital or using the ERCS.
- MAKE SURE that the straps holding the ECRS to the vehicle are securely tightened. Any straps restraining the child should be adjusted to the child's body. Make sure that the straps are not twisted.
- MAKE SURE that, if your child is 100-150 cm tall, the lap seat belt of the vehicle is worn in such a way as to properly secure your child's pelvis.
• MAKE SURE that the ECRS is
replaced if it has been subjected to violent stress in an accident
- MAKE SURE that the rigid elements and plastic parts of an ECRS are positioned and installed in such a way that there is no risk of being trapped by a moving seat or vehicle door during daily vehicle use.
• DO NOT make any alterations or additions to the ECRS without the approval of the Type Approval Authority. It is also dangerous to not follow the instructions for installation provided by the manufacturer of the child restraint.
- HOT! If the child seat is not provided with a textile cover, it should be kept out of direct sunlight, otherwise it may be too hot for the child's skin.
- DO NOT leave your child unattended in this restraint system even for a short period of time.
• MAKE SURE that any luggage and other objects liable to cause injuries in a collision are properly secure.
• A) DO NOT use the ECRS without the cover.
• B) DO NOT replace the seat cover with a seat cover other than the one recommended by the manufacturer because it constitutes an integral part of the restraint performance.
- DO NOT use forward facing before the child's age exceeds 15 months (refer to instructions).
- WARNING! The safest place for your child is the rear of your car. However, if you need to install the
seat in the front passenger seat, please ensure that the airbag is deactivated.
FOR TECHNICAL OR COMMERCIAL REASONS, PRG RESERVES THE RIGHT, AT ANY TIME AND ALSO ONLY IN A SPECIFIC COUNTRY, TO MODIFY THE TECHNICAL CHARACTERISTICS OF THE PRODUCTS DESCRIBED IN THIS LEAFLET, AND/OR THE SHAPE, TYPE AND NUMBER OF THE ACCESSORIES SUPPLIED.


E GIORDANI POLARIS SILLA DE AUTO
APROBACIÓN
Jianhua Village, Hanjiang District,
Yangzhou city, Jiangsu Province, 225127, P.R. China
Imported and distributed by:
https://giordanibaby.com/manuali/
UK Approved to: ECE R 129/03