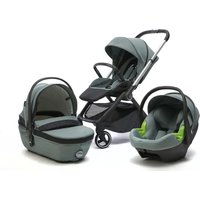
City Lifestyle Deluxe - Car seat Giordani - Free user manual and instructions
Find the device manual for free City Lifestyle Deluxe Giordani in PDF.


| Brand | Giordani |
| Model | City Lifestyle Deluxe |
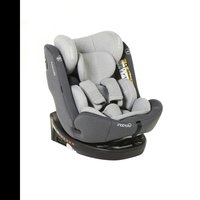
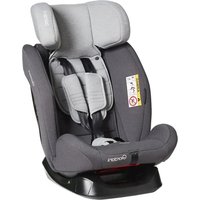
| Product type | Child car seat (group 0+/1) |
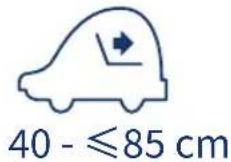
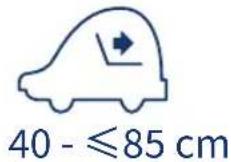
| Approval | UN Regulation No. 129/03, height 40-85 cm |
| Mounting orientation | Only rear-facing |
| Dimensions (L x W x H) | Approx. 65 x 45 x 75 cm (estimated) |
| Seat weight | Approx. 5 kg (estimated) |
| Maximum child weight | Up to 85 cm (approx. 13 kg) |
| Restraint system | 5-point safety harness with central buckle |
| Harness adjustment | Shoulder strap height adjustable to 9 positions, tightening by strap |
| Headrest | Height adjustable (9 positions) |
| Carry handle | 4 positions: A (car), B (carrycot), C (sitting), D (seat) |
| Canopy | Removable and foldable for sun protection |
| Newborn insert | Removable, for smaller children |
| i-Size base compatible | Yes, sold separately (Q00100) |
| Use with stroller | Travel system, adapters included for compatible chassis |
| Care and cleaning | Hand wash covers at 30°C, do not use aggressive detergents |
| Safety | Do not use on seat with active airbag, 3-point seatbelt mandatory, check installation |
| Materials | Lining 100% polyester, injected plastic parts |
| Spare parts | Covers, harness, adapters available from manufacturer |
Frequently Asked Questions - City Lifestyle Deluxe Giordani
Important: always respect the height limit; once the child exceeds 85 cm, the seat must no longer be used.
Ensure the attachment device is not located at the belt guide.
User questions about City Lifestyle Deluxe Giordani
0 question about this device. Answer the ones you know or ask your own.
Ask a new question about this device
Download the instructions for your Car seat in PDF format for free! Find your manual City Lifestyle Deluxe - Giordani and take your electronic device back in hand. On this page are published all the documents necessary for the use of your device. City Lifestyle Deluxe by Giordani.
USER MANUAL City Lifestyle Deluxe Giordani
|
IMPORTANTE
LEGGERE ATTENTAMENTE
E CONSERVARE
PER FUTURO RIFERIMENTO.
UK
IMPORTANT
READ CAREFULLY AND KEEP
FOR FUTURE REFERENCE.
E
IMPORTANTE
LEER DETENIDAMENTE
Y MANTENERLAS
- Handle
- Headrest
-
Protection pad
-
Shoulder strap sleeve
- Shoulder strap
- Five-point seat belt buckle
-
Shoulder strap adjustment button
-
Seat belt webbing
- Canopy
- Seat belt guide groove
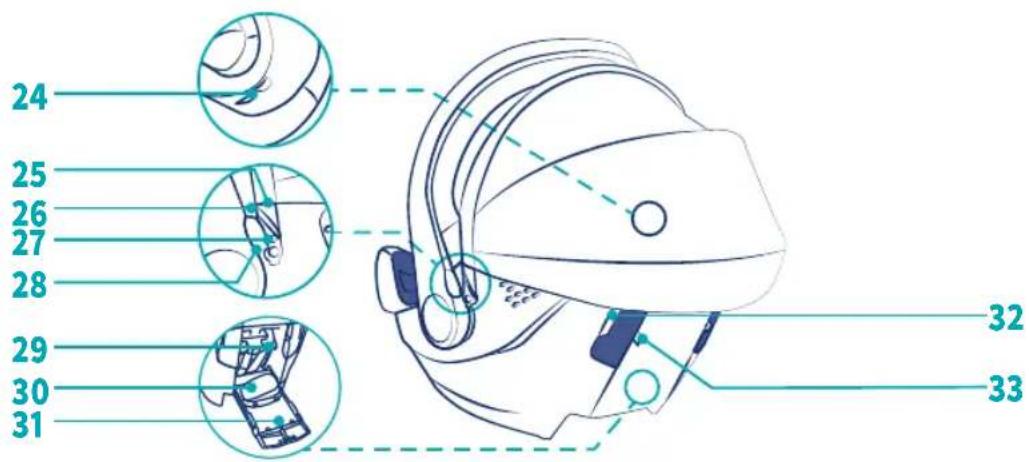
- Headrest handle
- Canopy plastic strip
- Canopy elastic webbing
-
Canopy plastic strip bump
-
Handle adjustment button
- Headrest positions
- Anti-collision block
-
Manual compartment
-
Seat belt slot
- Compartment button
USE IN THE VEHICLE:
Please follow the instructions for using the child restraint system in the operating instructions of your vehicle. Please read the vehicle operating instructions to get the related information for the child restraint system you can use.
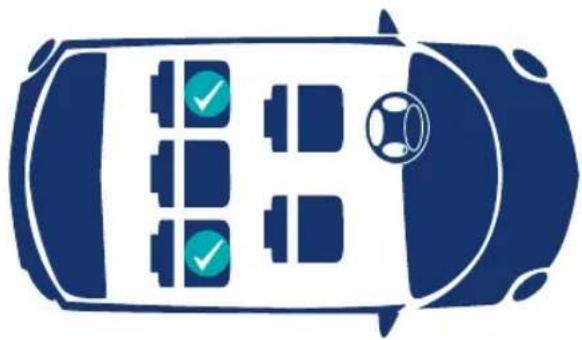
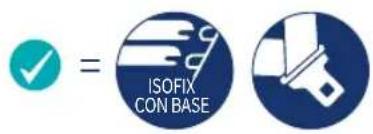
You can use the following child car seats:
| Driving direction NO | |
| Driving in the converse direction YES | |
| 2-point seat belt NO | |
| 3-point seat belt YES | |
| On the rear outer seats YES |
If the vehicle seat is only equipped with a two-point seat belt, it cannot be used.
Use of child car seats:
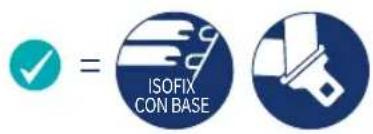
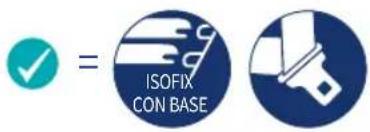
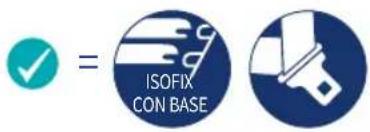
You can also use the base of child car seat (purchased separately as an accessory) as an i-Size collection. Using the base is more convenient to install or release the seat.
| Child car seat | Vehicle seat |
| I - Size | |
| Q00100 | √ |
FUNCTION DESCRIPTION AND USE:
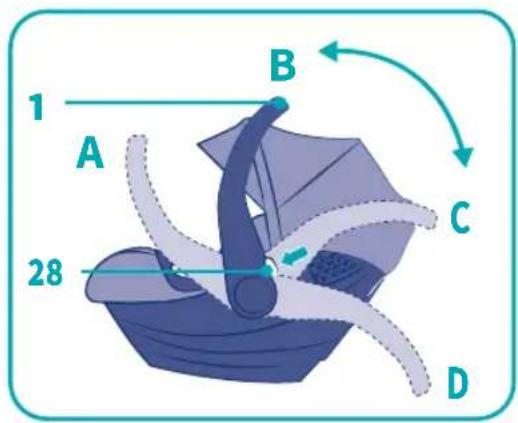
Handle 4-position adjustment:
A. Position when placed on the vehicle seat.
B. Position when used as a baby carrier.
C. Position for the baby when it is put in the car seat.
D. Position when used as a baby seat.
1. Press the two buttons 28 on the handle 1, at the same time, and then rotate the handle 1 until it is on position A/B/C/D.
2. Release the button 28; make sure that the handle 1 is properly placed.
Use of protective pads: When in use, the protective pad can be removed.
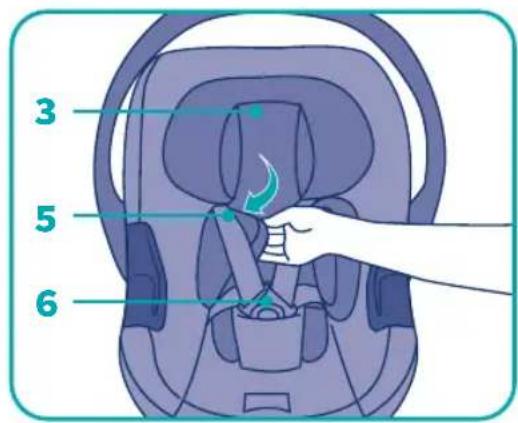
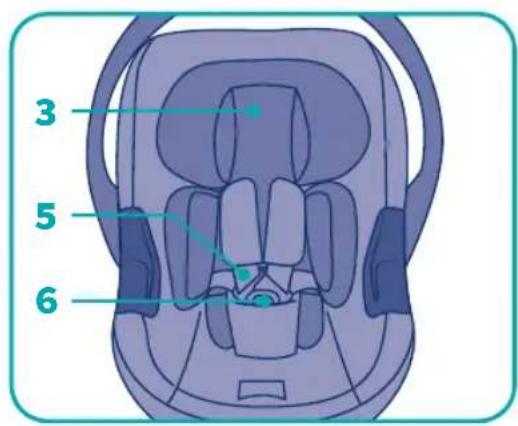
Installing the protective pad:
- Release the buckle 6 (press the red release button).
- Put the protective pad 3 into the child car seat. The filling foam block must face down.
- Ensure that the shoulder strap 5 crosses the protective pad 3 as shown in the photo.
- Tidy up the protective pad 3.
Protective pad removal:
- Release the buckle 6 (press the red release button).
- The protective pad 3 can be removed.
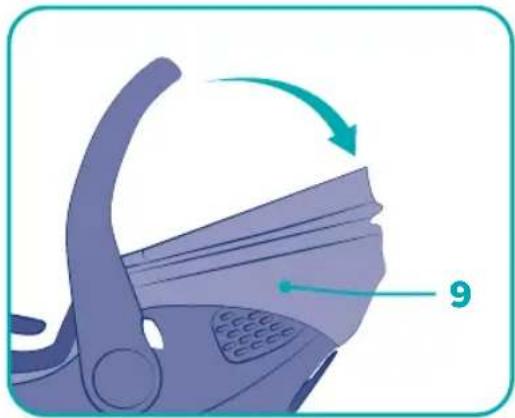
Use of the canopy:
- Rotate the canopy 9 in the direction of the arrow to close the canopy.
- To open the canopy, rotate it in the opposite direction.
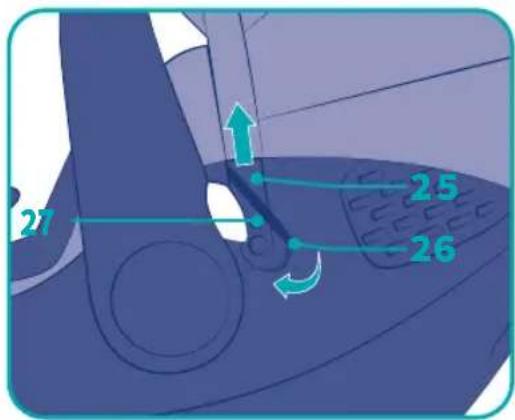
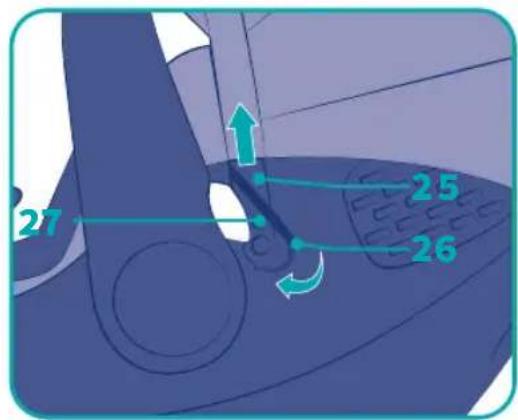
Canopy removal:
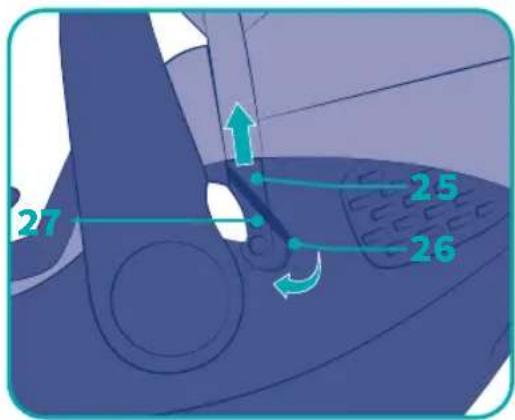
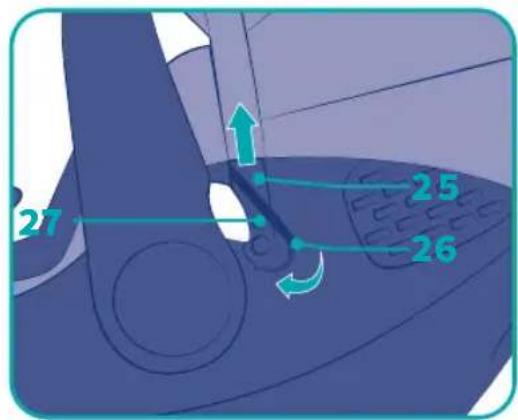
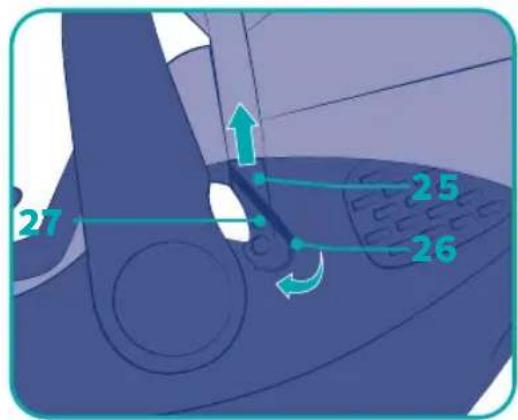
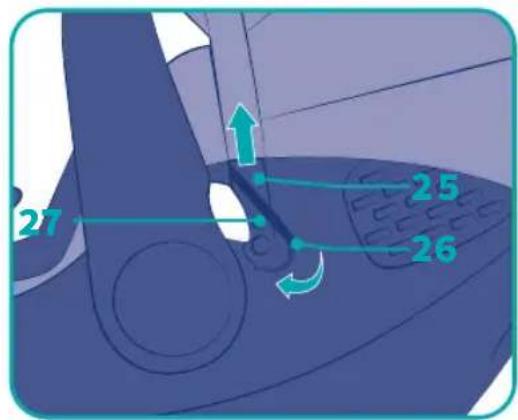
- Untie the elastic webbing in the direction of the arrow 26.
- Press the bump 27 and pull out the plastic strip 25 in the direction of the arrow at the same time. Pull out the plastic strip on the other side in the same way to complete the canopy 9 disassembly. Conversely, the canopy 9 can be installed.
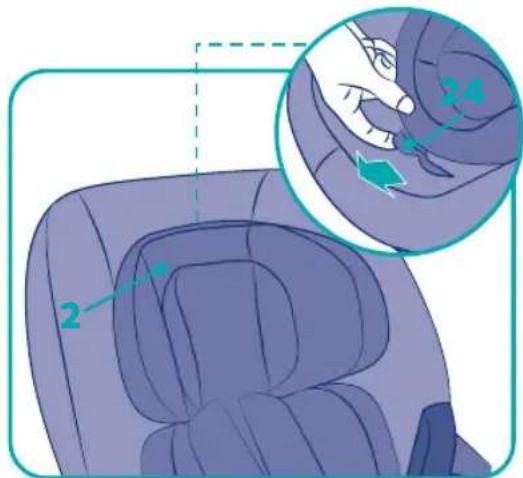
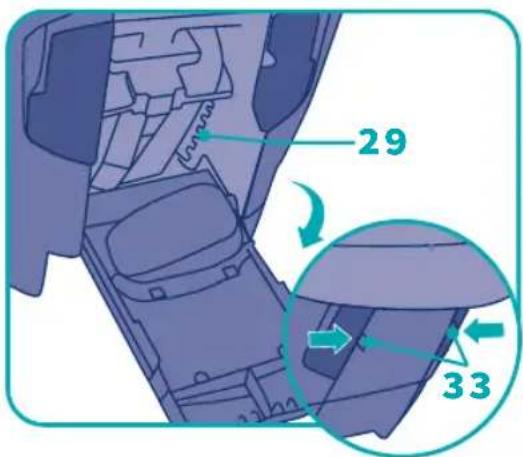
9-position height adjustment of the headrest:
- Pull the headrest height adjustment handle 24 in the direction of the arrow.
- Pull the headrest 2 at the same time to adjust to the position where the shoulder strap outlet slot is about two fingers (25mm) below the position of the baby's shoulder.
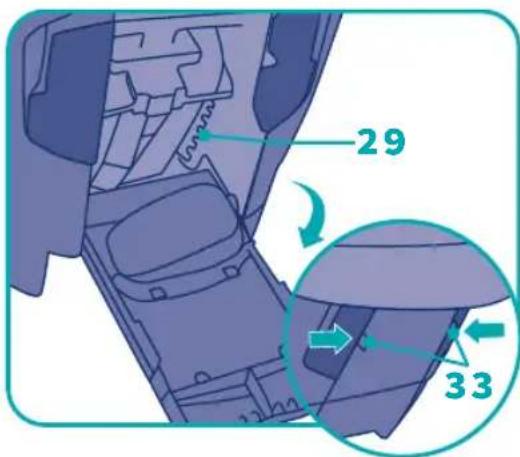
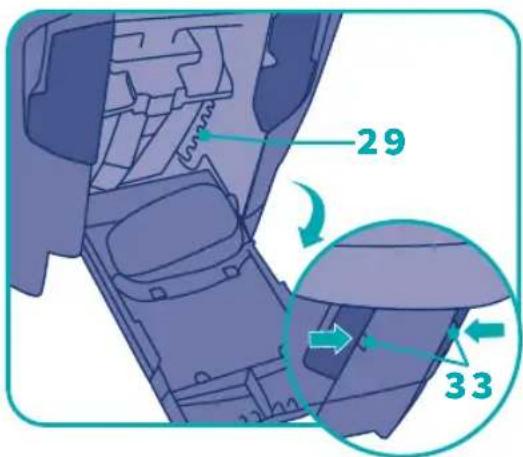
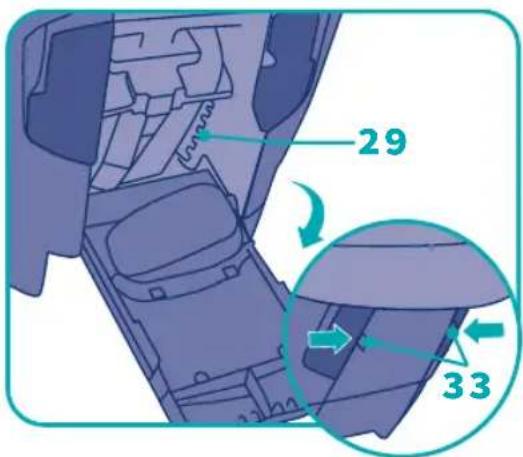
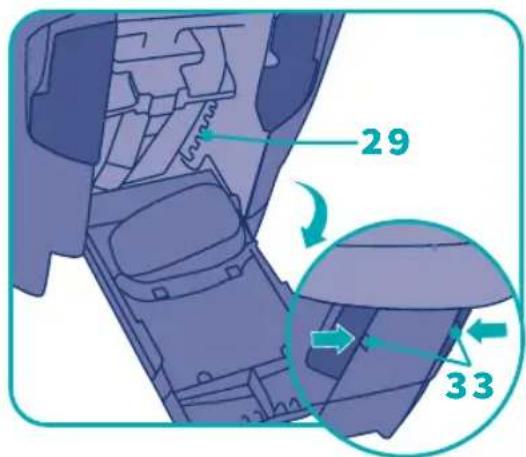
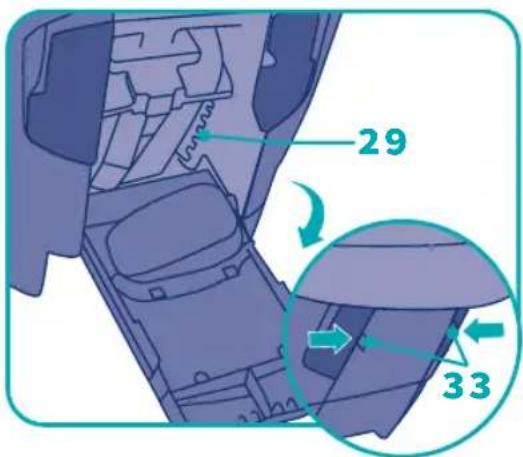
- Press and hold the two compartment buttons 33 to open the manual compartment;
- Check whether the headrest position 29 is in place or not.
Use of thefive-point seat belts:
Unfastening the seat belt:
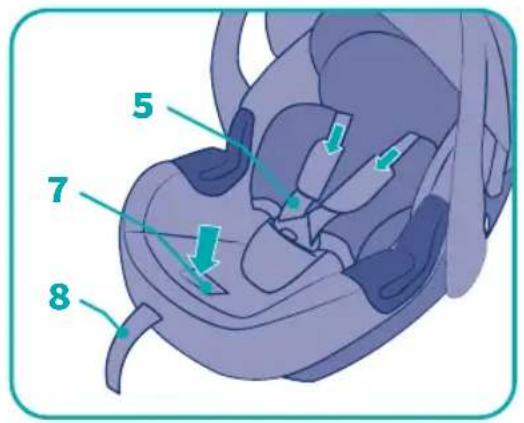
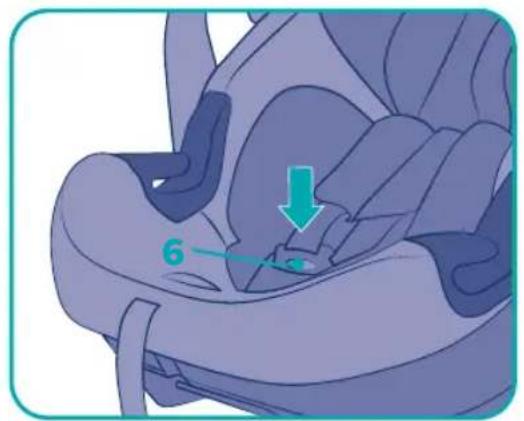
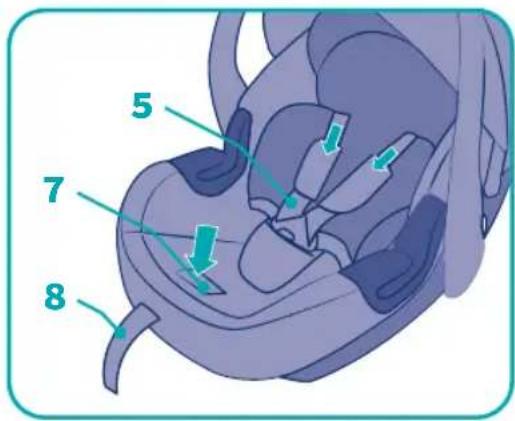
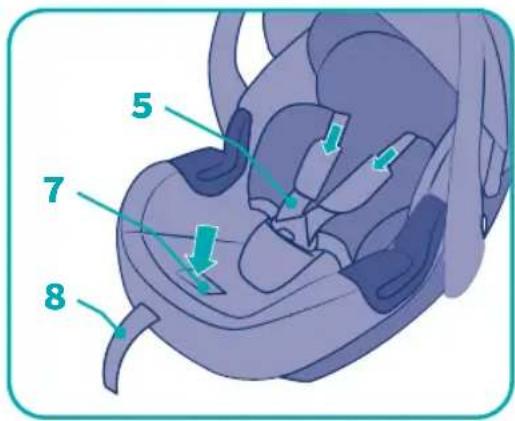
Press and hold the red button in the middle of the seat belt buckle 6 to pop out the shoulder belt.
Releasing the shoulder straps:
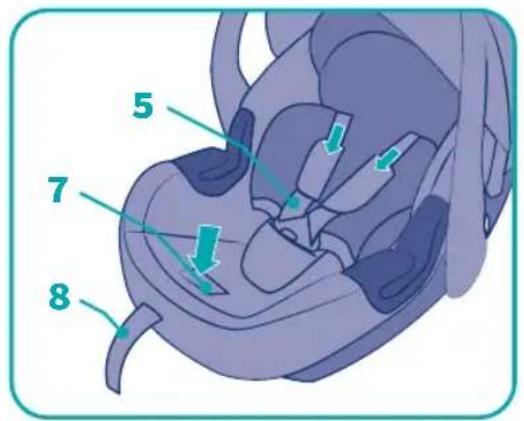
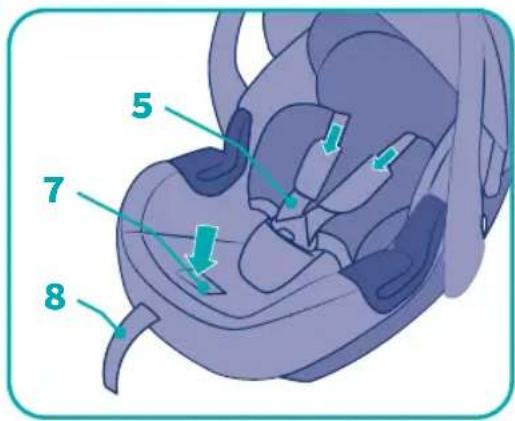
Press the adjustment button 7 and pull the two shoulder straps 5 forward at the same time.
Tighten the shoulder straps:
Pull the seat belt webbing 8. Make sure that the webbing 8 is pulled straightly out but not up or down.

Fastening the seat belt:
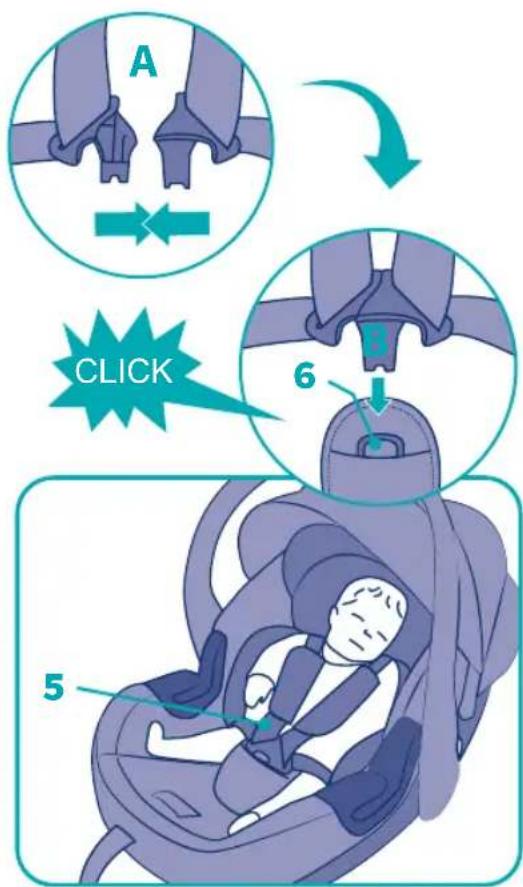
Put the shoulder strap 5 on the baby's shoulder, buckle the two buckle tongues together, and then insert it on the seat belt buckle 6 until you hear a "click", and then tighten the shoulder strap 5 until the shoulder strap 5 closes the baby's body.

WARNING
Do not twist or change the shoulder straps, so that the protection function will be invalid. The crotch seat belt must be as low as possible above the baby's groin.
Car seat installation in the vehicle:
Before installing the child car seat in the vehicle, place the baby in the child car seat as described in "Using the five-point safety belt".
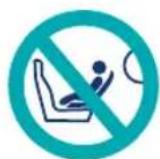
! DANGER!
If the airbag hits the child car seat, it may cause serious injury to your baby, or death in severe cases.
When the front airbag is enabled, please do not use the child car seat in the passenger seat! For seats with side airbags, please follow the instructions in the owner's manual.
- According to the description of "Use in the vehicle", choose a suitable location in the vehicle.
- Put the child car seat face backwards (Baby facing the backrest of the vehicle seat).
- Place the handle 1 at the position A.
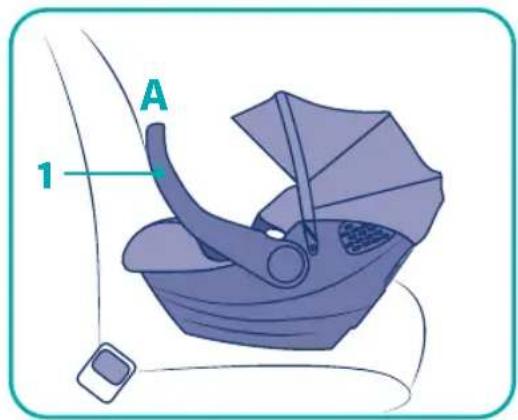
-
Pull out the vehicle seat belt and cross it across the child car seat.
-
Engage the buckle tongue 34 with the seat buckle 35.
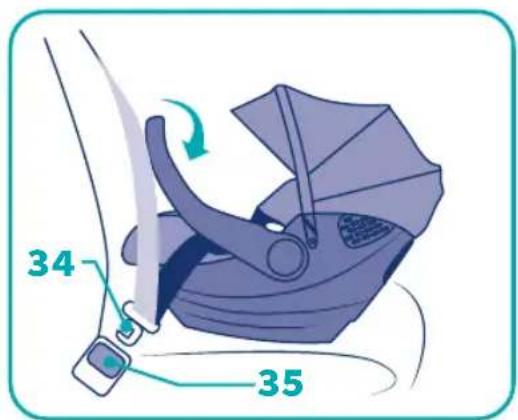
- Put the waist belt 37 into the safety belt guide groove 10 on both sides of the child car seat. Make sure that the waist belt 37 is not twisted.
- Tighten the diagonal belt 36 and the waist belt 37.
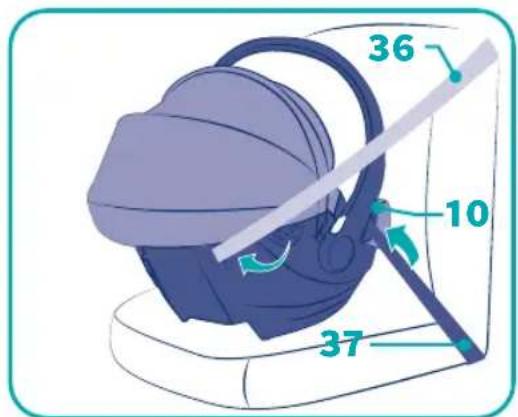
-
Pull the car diagonal belt 36 behind the head end of the child car seat.
-
Place the diagonal belt 36 into the seat belt slot 32 to ensure that the car seat belt is not twisted.
-
Tighten the diagonal belt 36 to ensure that the vehicle seat buckle 35 is not in the seat belt guide groove 10, and not too far forward, so that it is located in front of the seat belt guide groove 10 (in the direction of travel), if the vehicle seat buckle 35 is in the seat belt guide groove 10 or in front of the seat belt guide groove 10, the child car seat should be placed on another seat. If you have any question about the correct installation of the seat, please contact the distributor.
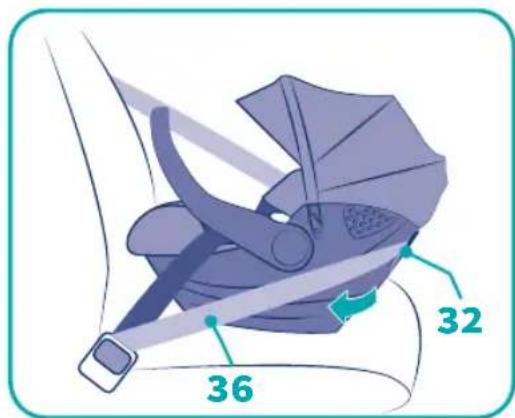
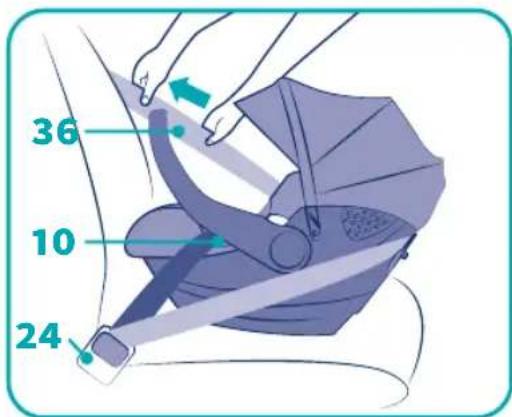

For the safety of your child, please check before driving:
• The fixed direction of the child car seat is in the opposite direction of travel;
• The child car seat is fixed with a three-point safety belt;
- The waist belt passes through the two seat belt guide grooves 10 on the child car safety seat;
• The diagonal belt 36 passes through the seat belt slot 32;
- The vehicle seat buckle 35 is neither in the seat belt guide groove 10 nor in front of the seat belt guide groove 10;
• The car seat belt is tight and not twisted.
Car seat removal:
- Pull out the diagonal belt 36 from the seat belt slot 32.
- Release the vehicle seat buckle 35 and take out the waist belt 37 from the seat belt guide groove 10. Remove the child car seat from the vehicle seat.

DANGER!
If the child car seat is placed in the car, even if there is no child in the child car seat, it must always be fixed.
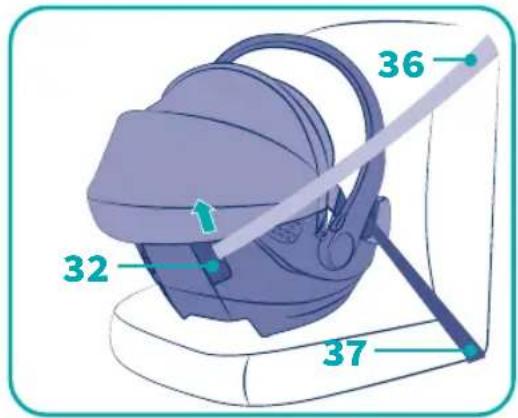
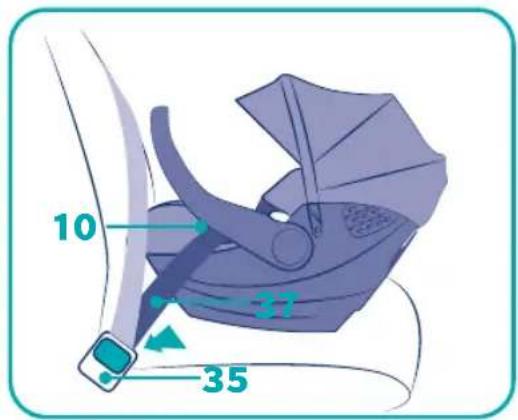

Optional accessories:
Install the adapter on the stroller frame:
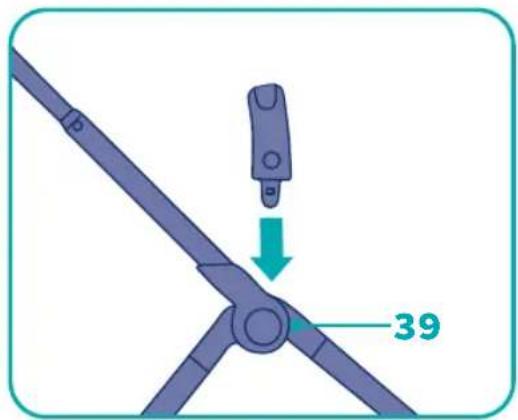
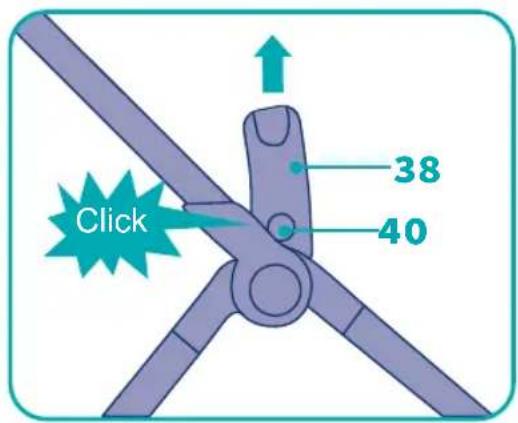
Align the adapter 38 with the stroller seat pocket 39 and insert it until you hear a "click" Install the adapter on the other side in the same way to complete the adapter installation.
Adapter removal:
Press and hold the quick release button 40 on the adapter 38, and then pull up the adapter to remove the adapter 38.
Using with the stroller:
Please read the instruction manual provided by your stroller. The child car seat can be used as a travel system when used as a baby carrier and used on a stroller frame approved for use with the baby carrier.

WARNING
This travel system is not suitable for:
Be sure to use a safety belt to secure the baby in the baby carrier, and make sure that the baby carrier is securely fastened to the stroller. Never use a baby carrier to lift or push the stroller. Always use the brakes before installing the baby carrier on the stroller or removing it. After the installation, pull the handle 1 upward to ensure that the baby carrier is firmly connected to the stroller.
Installing the baby carrier on the stroller:
- Always use the brake, as shown in the instruction manual attached with the trolley.
- Prepare the trolley for the travel system according to the instructions of the trolley (For example, adjust the trolley seat and untie the seat cover).
- Face the baby carrier back and lift it above the stroller.
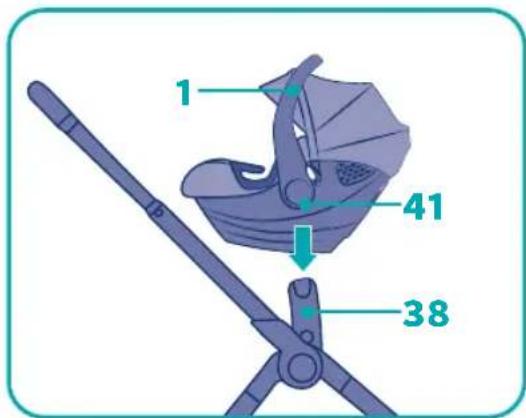
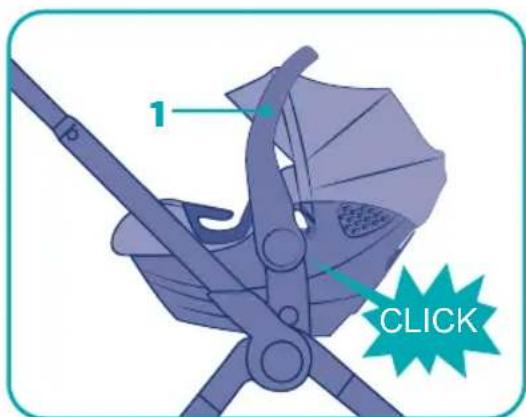
- Insert the buckles 41 on both sides of the baby carrier into the adapters 38 on both sides.
- Until you hear a "click" try to lift the baby carrier and check if the car seat is installed in place before it can be used.
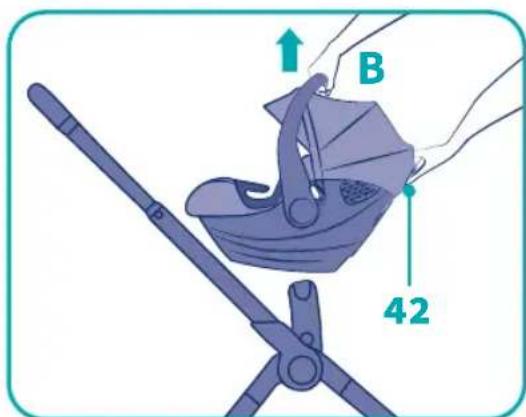
Removing the baby carrier from the stroller:
- Always use the brakes, please refer to the instructions provided with the stroller for details.
- Make sure that the handle 1 is at the upper position B (see the function description and use "4-position adjustment of the handle" for details).
- Pull the white release latch 42.
- Lift the infant carrier to remove.
Warning: Hold the baby carrier firmly!
APPLICATION:
The child car seat is specially designed to protect the children in the vehicle:
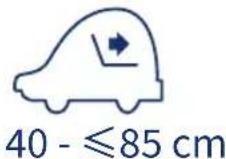
| Child car seat | UN-Regulation No.129/03 |
| Suitable size | |
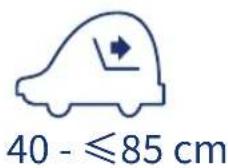
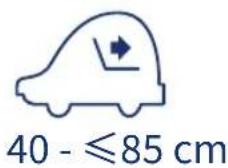
| Q00100 40-≤85cm |

DANGER!
- Except for the bases listed in the functional instructions “Use in the vehicle”, the child car safety seat must not be used with uncertified bases.
- If you make any modifications to the child car seat, this instruction manual will become invalid. Only the manufacturer can modify the child car seat. Unauthorized technical changes may reduce or completely eliminate the protective function of the car seat. Do not make any technical changes to the child car seat.
- Only use child car seats to protect children in the vehicle. It must not be used as a seat or toy at home.
- Never use the two-point safety belt to secure your child or child car seat. If you only use the two-point safety belt to secure your child on the child car seat, then if an accident occurs, it may cause serious injury to your child, and there may be a risk of death.
NOTE:
- Please use the car seat recommended by the manufacturer for this child car seat;
- If in doubt, please consult the manufacturer or retailer of the child restraint system.
CARE AND CLEANING:
- The car seat can be washed with soap and warm water. Do not use other scrubbing detergents. Seat covers must be hand-washed (water temperature should not exceed 30 degrees Celsius). Do not use a dehydrator. The seat belt can be cleaned with warm water, do not use lubricating oil.
- For example, the service life of plastic parts, under the influence of ultraviolet rays in the sun, will gradually reduce the quality of the product. Once the child's body exceeds the seat, it is recommended that you do not use the car seat, and dispose it properly.

WARNING:
- This product is suitable for a child from 40-≤85cm.
- To prevent your child from falling off the car seat, please check to make sure that the carrying handle is locked in the slot position before lifting the car seat. Take some time to check that your child is securely and comfortably fastened by the seat belt.
- According to the green signs, the correct placement of vehicle seat belts is also an important factor to ensure the safety of children. See the operating instructions for details. Do not use other methods to wrap the strap.
- Do not use this product when the vehicle seat is equipped with an airbag.
- When installing a car seat belt, it can only be installed backwards. Use a 3-point seat belt with automatic or non-moving. This seat belt has passed the ECE R16 standard or similar standards.
- This product can be used in the back seat of a car and should be placed backwards.
- We strongly recommend not to buy a second-hand child car seat, because it is difficult for us to understand the background of these car seats in the past.
- To prevent damage to the seat cover, please do not remove the label or sticker on the airbag. The seat restraint must not be used without the seat cover. The seat cover should only be replaced with one that is recommended by the manufacturer. The seat cover is an integral part of the normal function of the car seat.
- Without the approval of the Type Approval Authority, the equipment shall not be modified or added and Please follow the manufacturer's instructions for tight installation, otherwise it may be dangerous.
- Any luggage items that may cause injury in a collision should be placed properly.
- Except as indicated in the instruction manual or on the stroller, no bearing contact points may be used.
- Do not leave your child alone in the car seat, unattended.
- Products without certification and modified products are very dangerous, and products without instructions provided by the manufacturer are also very dangerous, do not use!
- The child restraint system cannot be used without a cover.
- The system cover cannot use materials other than those recommended by the manufacturer. The cover material directly affects the overall performance of the child restraint system.
- Make sure that the child restraint system is not jammed by the movable seat or door of the car.
- Please read these instructions through carefully before commencing installation.
- The importance of ensuring that any lap strap is worn low down, and that any impact shield is installed properly, so that the pelvis is firmly engaged, shall be stressed.
- That the device should be replaced when it has been subject to violent stresses in an accident.
- When the seat is not provided with a textile cover, the seat should be kept away from sunlight, otherwise it may be too hot for the child's skin.
- This is an “i-Size Enhanced Child Restraint System”, the user shall also refer to the vehicle manufacturer’s handbook.
SILLA DE AUTO





Uso do cinto de segurança de cinco pontos:
Uso com o carrinho:

Χρήση με καροτσάκι:


COMPONENTI
A Canopy
B Front armrest
c Five-point seat belt
D Pedal
E Pedal button
F Front wheel Positioning button
G Front wheel quick Release button
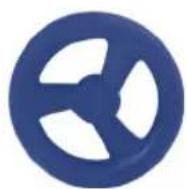
H Front wheel
1 Storage basket
L Rear wheel quick Release button
M Rear wheel
N Seat quick Release button
Armrest quick Release button
P Seat adjustment button
Q Handle Adjustment button
R Two-way Lock button
E COMPONENTES
B
C
I CONTENUTO
A Ruote anteriori x2
B Ruote posteriori x2
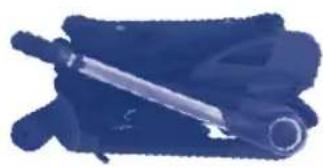
c Telaio x1
UK CONTENTS
A Front wheel x2
B Rear wheel x2
C Frame x1
E CONTENIDO
A Rueda delantera x2
B Rueda trasera x2
c Chasis x1
P CONTEÚDO
A Rodas dianteiras x2
B Rodas traseiras x2
c Estrutura x1
GR ΠΕΡΙΕΧΟΜΕΝΑ
90

91

93
94

96


NAVICELLA - CARRYCOT - CAPAZO - ALCOFA
PORTE-BÉBÉ - DRAAGMAND - NACELLE
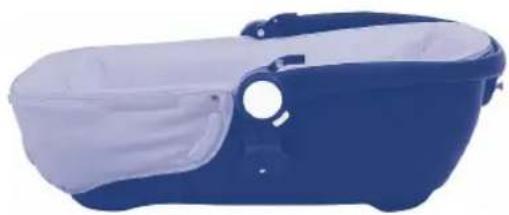
COMPONENTI
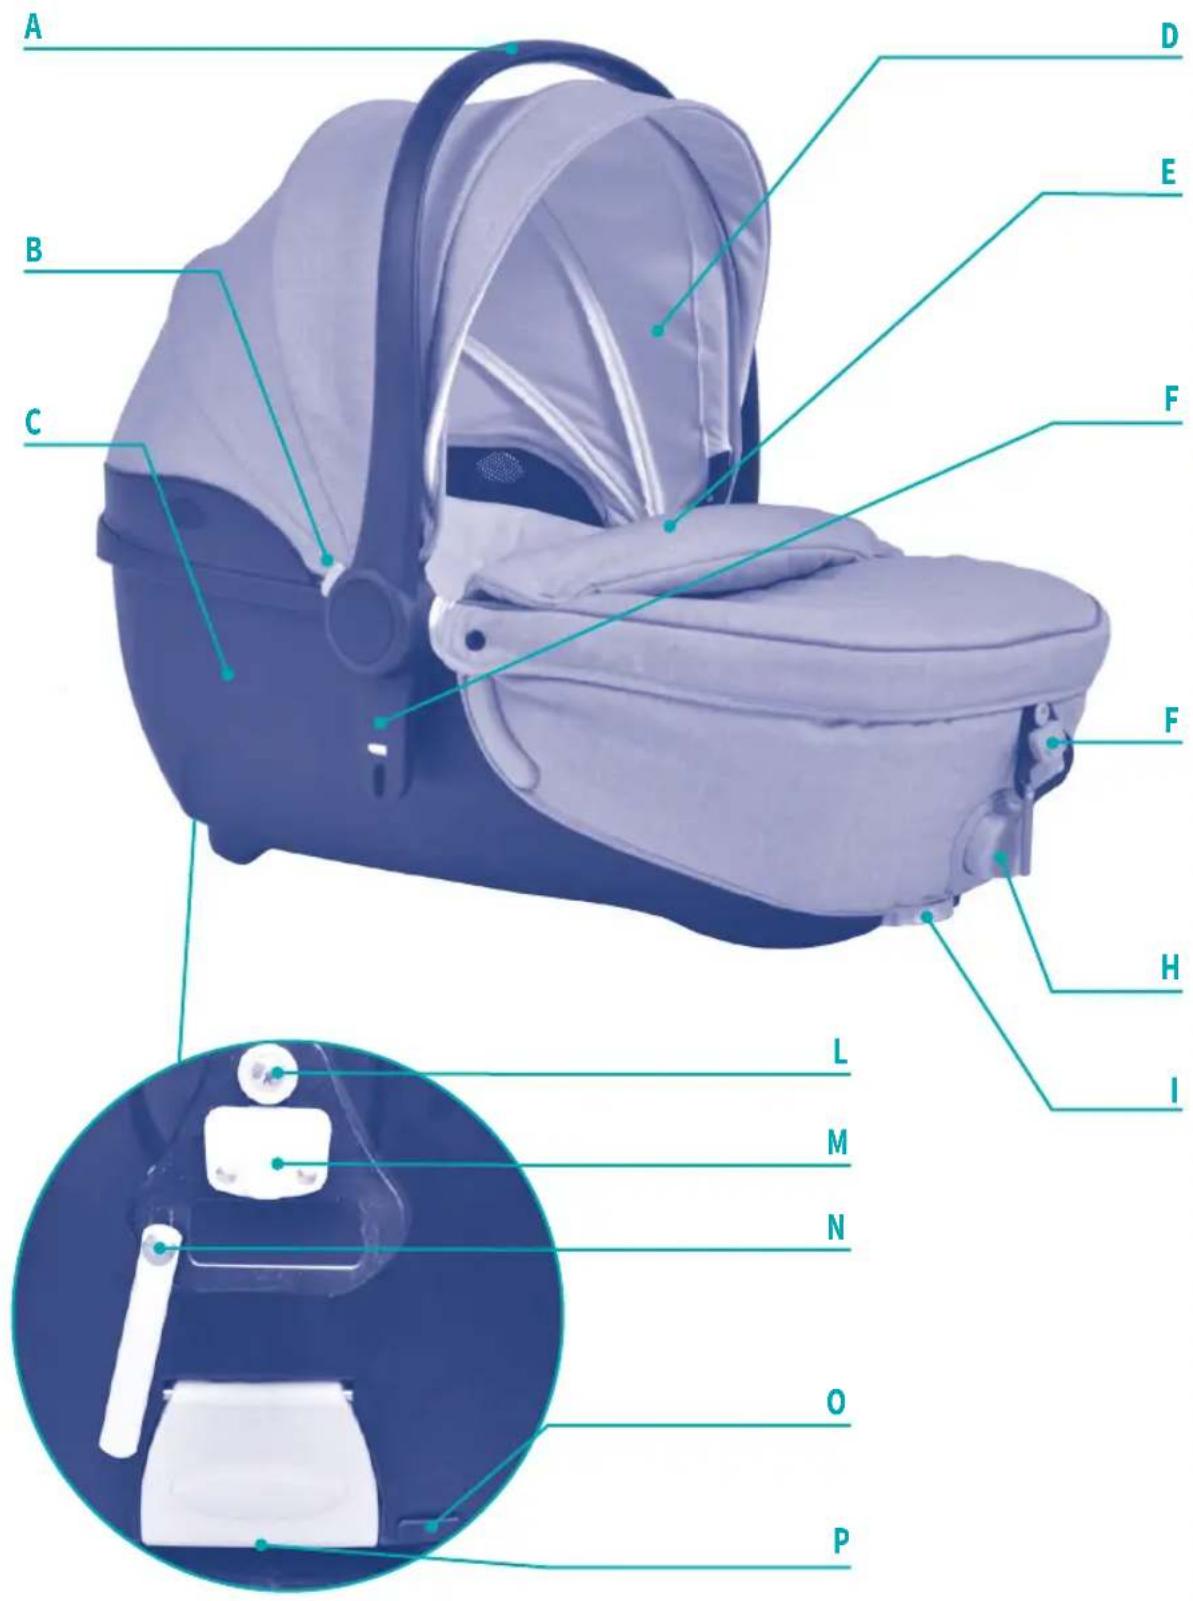
A Carrying handle
B Carrying handle adjustment button
c Kit
D Hood
E Leg cover
F Adapter
G Metal car connector
H Backrest adjuster
I Breath hole adjuster
L Fixed plastic
M Positioning plastic
N Lever
0 Second lock
P Carrycot release button
E COMPONENTES
B
C
D
E
I CONTENUTO
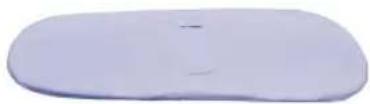
A Coprigambe x1
B Cuscino morbido x1
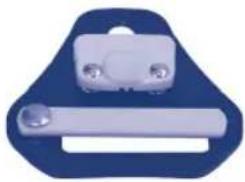
c Fibbia grande x2
D Kit x1
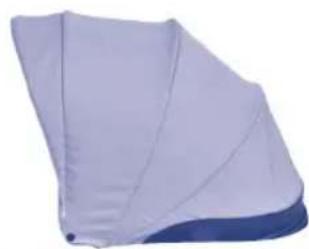
E Cappottina x1
UK CONTENTS
A Leg cover x1
B Soft cushion x1
c Big buckle x2
D Kit x1
E Hood x1
E CONTENIDO
A Cubrepiernas x 1
B Suave almohada x 1
C Hebilla grande x 2
D Kit x 1
E Capota x 1
P CONTEÚDO
A Cobertura para os pés x1
B Almofada macia x1
c Fivela grande x2
D Kit x1
E Capota x1
GR ΠΕΡΙΕΧΟΜΕΝΑ
103


104




105

36a
Sedile posteriore
Back seat
Asiento trasero
Banco posterior
Πίσω κάθισμα
Achterzitting
Siège arrière

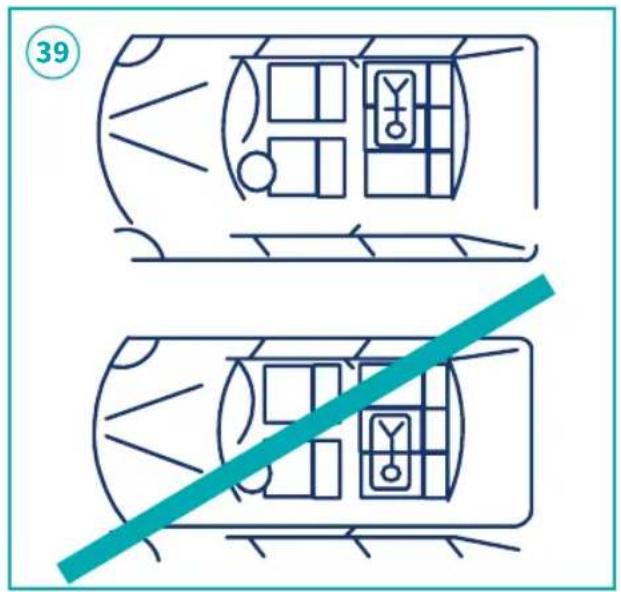
The carrycot must be placed between the seats of the vehicle when installed in the two-backseat car.
The carrycot must be placed on the central back seat of the vehicle when installed in the three-backseat car.

107




108




109




![graph LR A["44a"] --> B["44b"] B --> C["44c"]](/content/2026/04/700074/images/1b117ccae076fb4fd6e0d8b9d688bbc6cecb5f80a29b5615e644e4b32c0bcd11.jpg)
110

I GIORDANI CITY LIFESTYLE DELUXE SISTEMA MODULARE
PASSEGGINO
APRIRE IL TELAIO
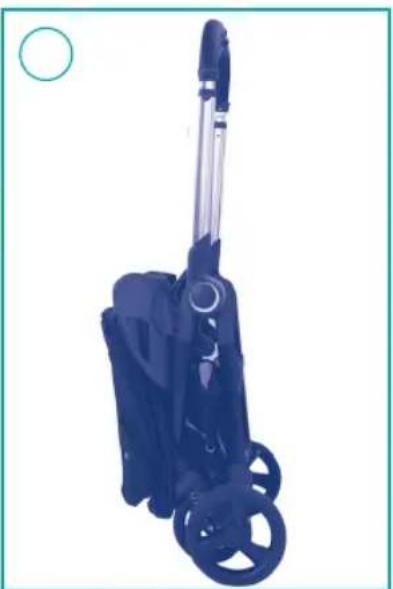
- As shown in Figure 1a/1b/1c, stand the frame and open the handle in the direction of the arrow until you hear a "click".
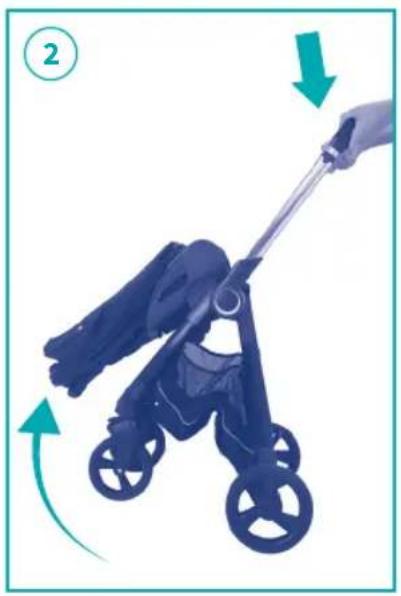
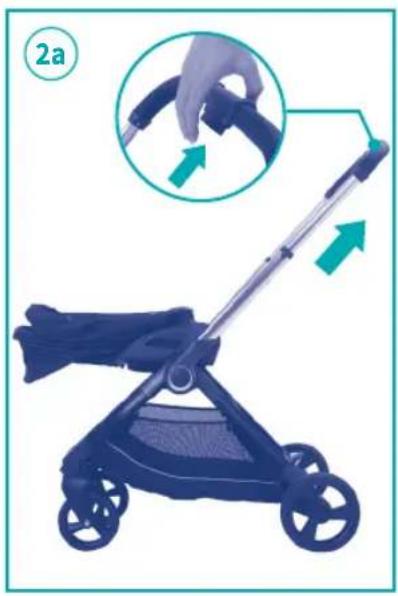
- As shown in Figure 2, hold the handlebar with both hands to press it down, and the frame will unfold until you hear a "click" to complete the frame expansion; press and hold the handle adjustment button and then pull the handle up to adjust the handle to the desired position, as shown in Figure 2a.
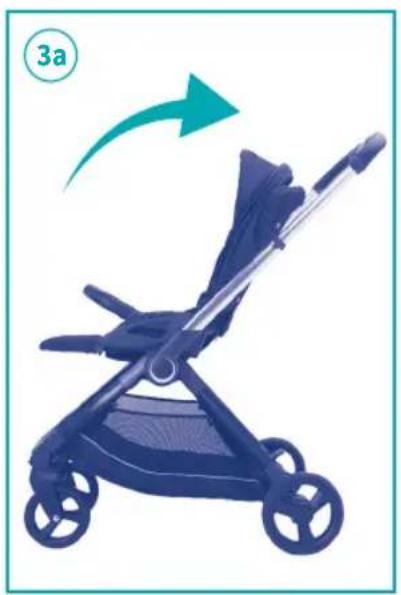
- As shown in Figure 3/3a, pull up the seat adjustment button, and then open the backrest in the direction of the arrow to complete the opening of the backrest.
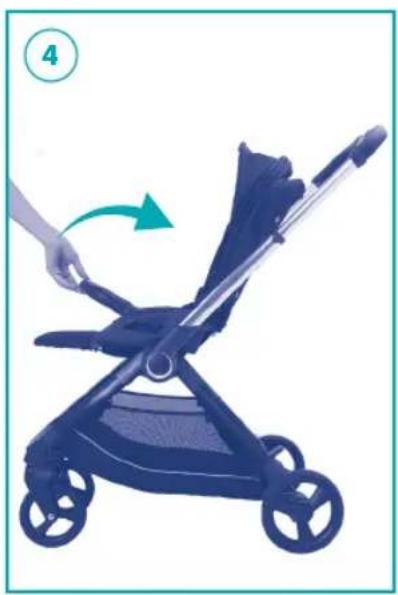
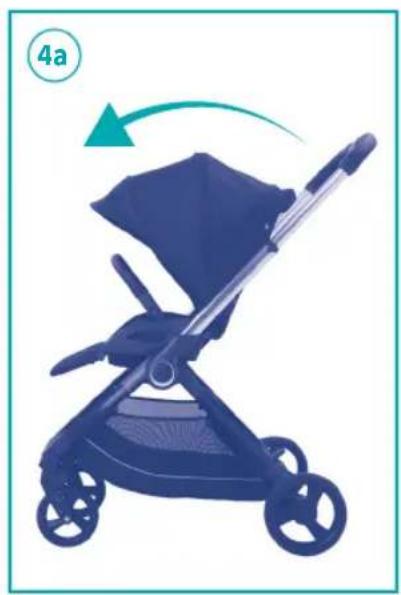
- As shown in Figure 4, open the front bumper bar in the direction of the arrow until you hear a "click", then open the canopy in the direction of the arrow to complete the frame opening, as shown in Figure 4a.
ASSEMBLY INSTRUCTIONS
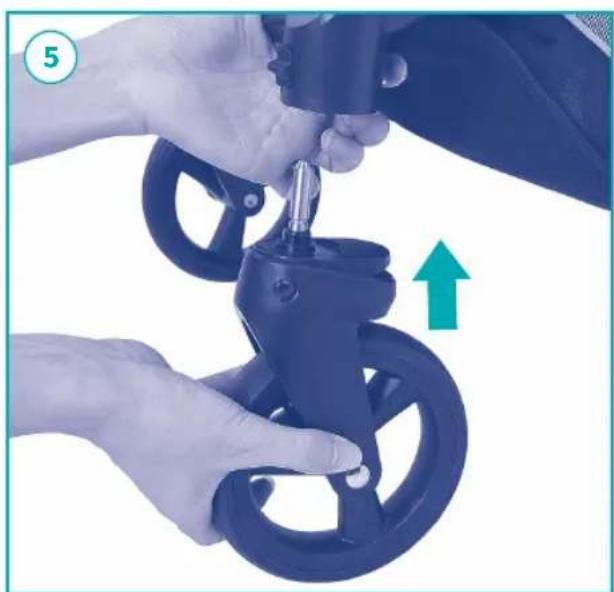
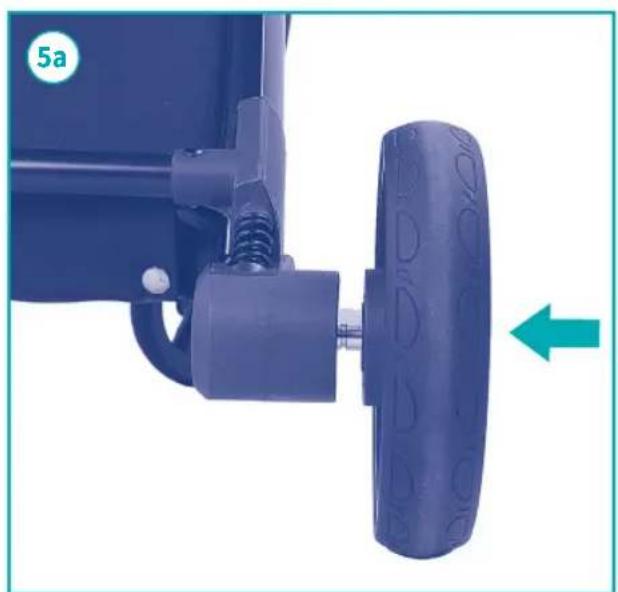
- Front wheel assembly: As shown in Figure 5, align the front wheel axle with the front wheel axle hole and insert it until you hear a "click". Rear wheel assembly: As shown in Figure 5a, align the rear wheel axle with the rear wheel axle hole and insert it until you hear a "click". Reminder: After fitting the wheel, please rotate it a few times and pull the wheel out a few times to ensure that the wheel rotates normally and is fitted in place without loosening before use.
FUNCTIONS AND INSTRUCTIONS
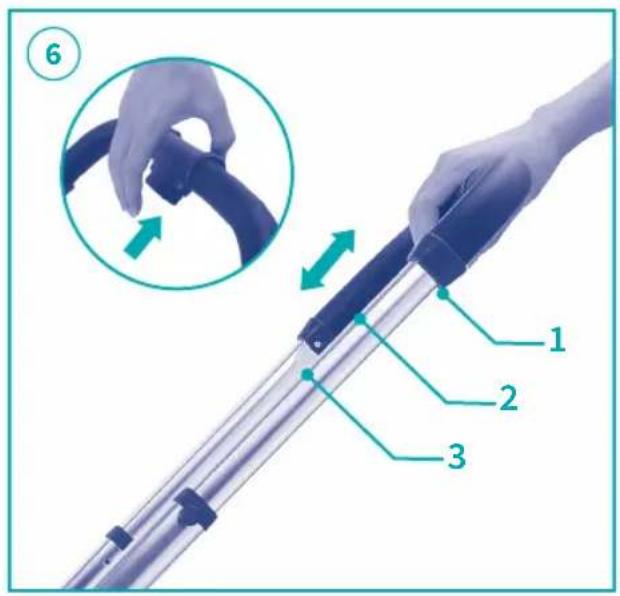
- Height adjustment of the handle (3 heights): As shown in Figure 6, hold the handle adjustment button with your hand, and then pull the handle up or push down to adjust the handle to 3 heights.
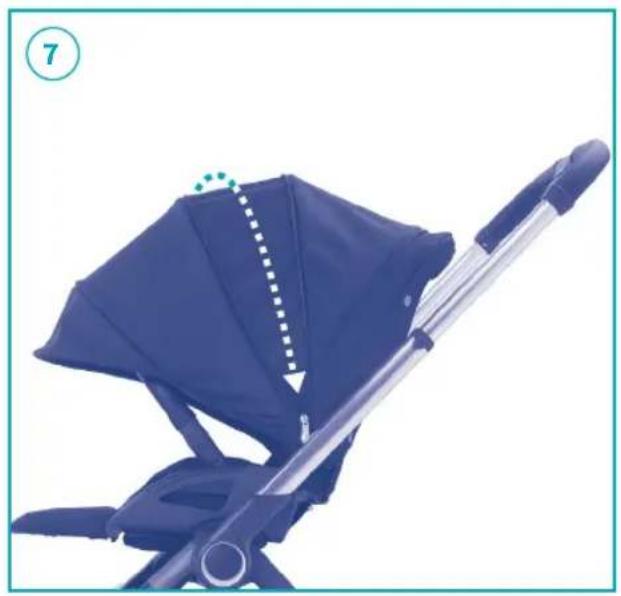
- Canopy zipper adjustment: As shown in Figure 7, open the zipper on the canopy, and adjust choosing one of the settings available.
-
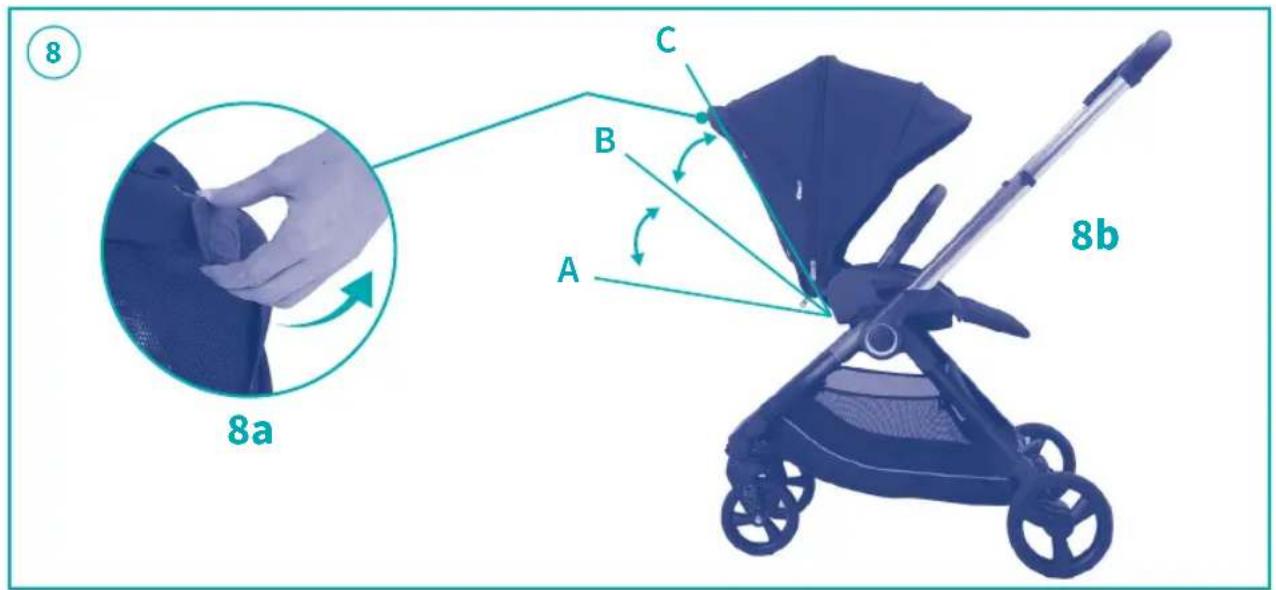
Seat adjustments: As shown in Figure 8/8a. Pull up the seat adjustment button, and then push the seat back up or down to adjust the seat in 3 heights.
-
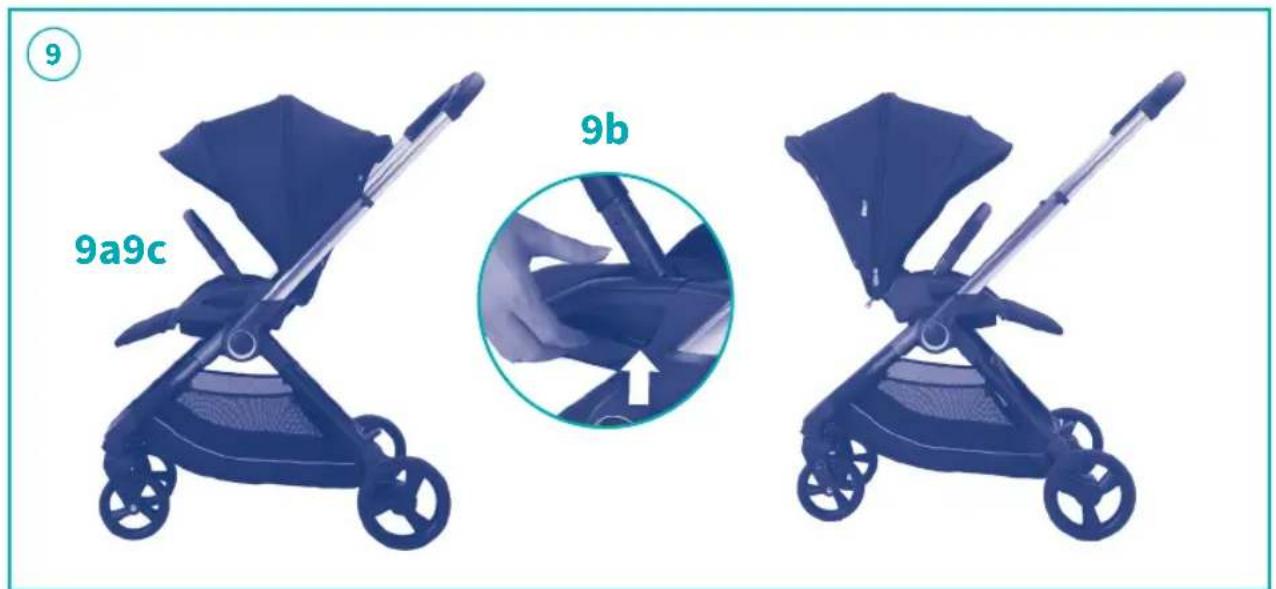
Seat reversing: As shown in Figure 9/9a/9b, press the seat reversing button with both hands, and then lift the seat, the seat can be quickly removed or the seat can be reversed.
QUICK DISASSEMBLY AND INSTALLATION OF THE BUMPER
-
Unilateral quick release: As shown in Figure 10, press and hold any bumper quick release button, and then pull out the front bumper detaching it on one side.
-
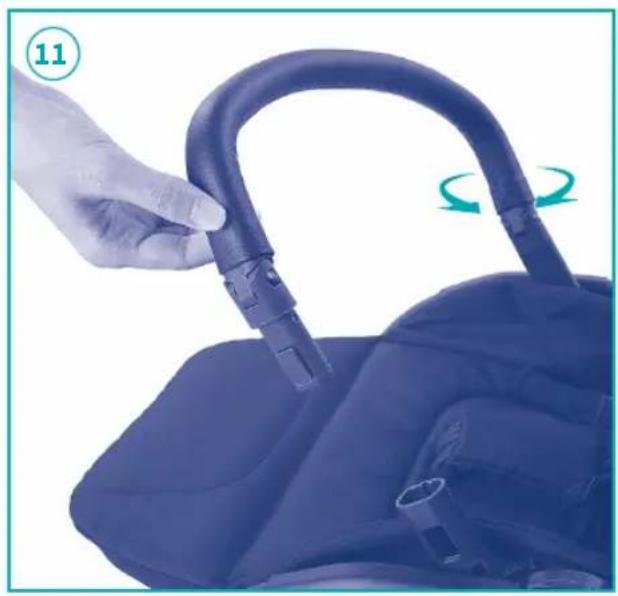
As shown in Figure 11, after releasing the bumper on one side, it can be rotated 360 degrees, which is convenient when placing the baby in or out of the car. Quick release on both sides.
-
As shown in Figure 12, press and hold the quick release buttons on both sides of the bumper, and then pull out the bumper detaching it on both sides. Installation of the bumper: align the front bumper socket with the front bumper hole and insert it, and check whether the quick release buttons on both sides of the bumper pop out of place before use.
-
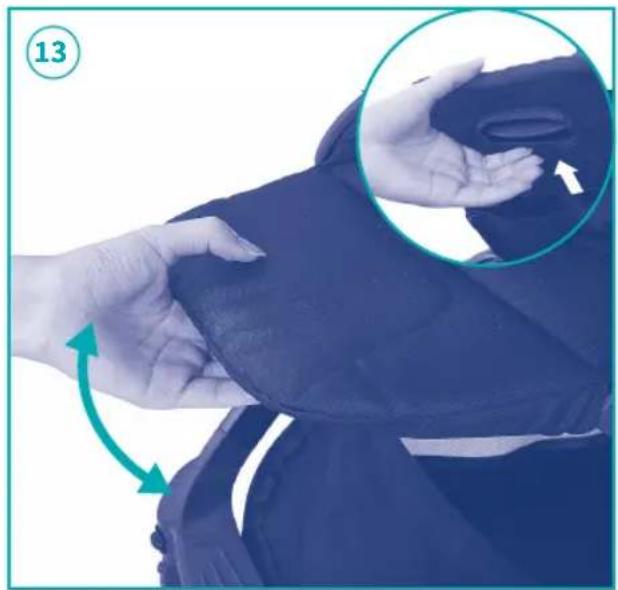
Footrest adjustment: As shown in Figure 13, press and hold the pedal adjustment button to adjust the angle of the pedal up and down.
-
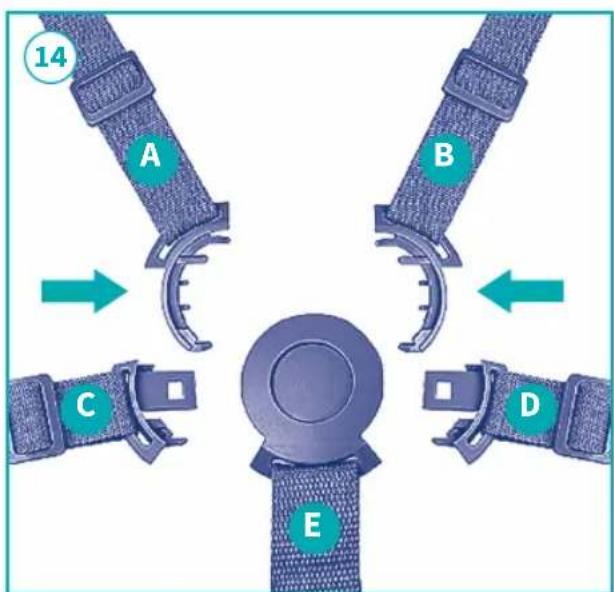
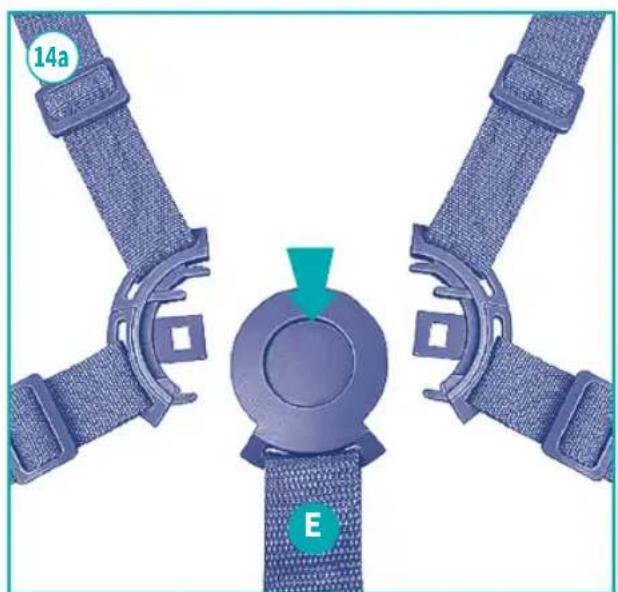
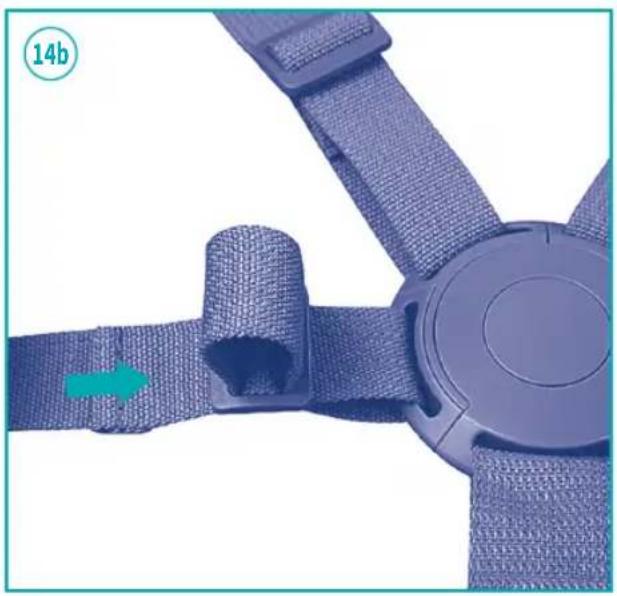
Use of the five-point safety belt: Fastening: as shown in Figure 14, first insert the plastic buckle C/D into the plastic slot A/B respectively; then insert the buckle into socket E respectively, as shown in Figure 14a, when you hear a "click", it indicates that the seat belt buckle is in place. Opening: As shown in Figure 14b, press the round button in the middle of the E socket, and the sockets on both sides will pop out of socket E. Adjusting the length of the seat belt: as shown in Figure 14c, pull the webbing to adjust the length of the seat belt, making it more comfortable for the child.
-
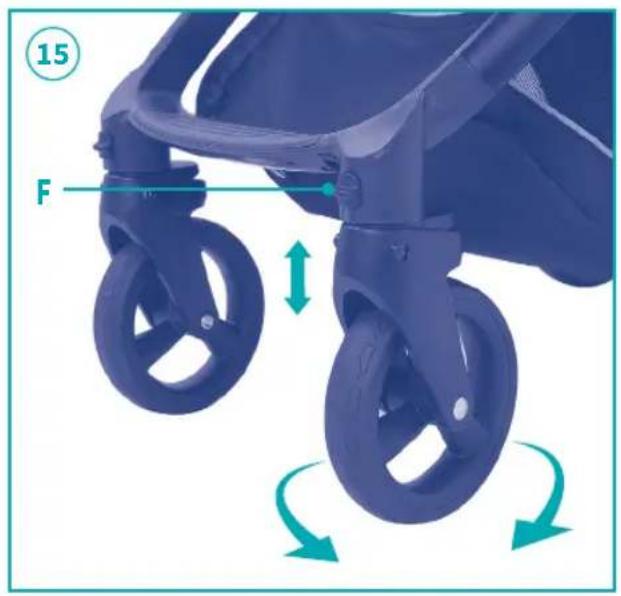
Wheel function: front wheel universal or fixed position. As shown in figure 15, when the front wheel positioning button F is moved upward, the front wheel can travel in universal direction; when button F is pushed down, the front wheel will drive in a direction. Front and rear wheel suspension: front and rear wheels are equipped with damping springs, which have a shock-absorbing function.
-
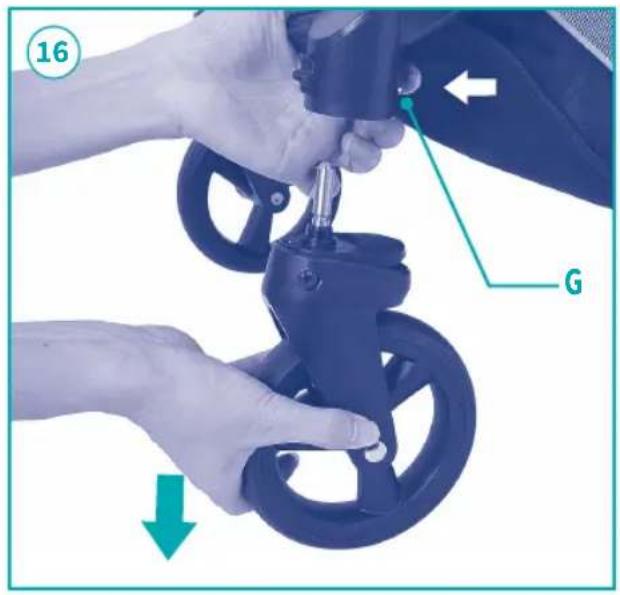
Front wheel quick release: As shown in Figure 16, press and hold the front wheel quick release button G, and then pull down the front wheel to complete the
front wheel quick release.
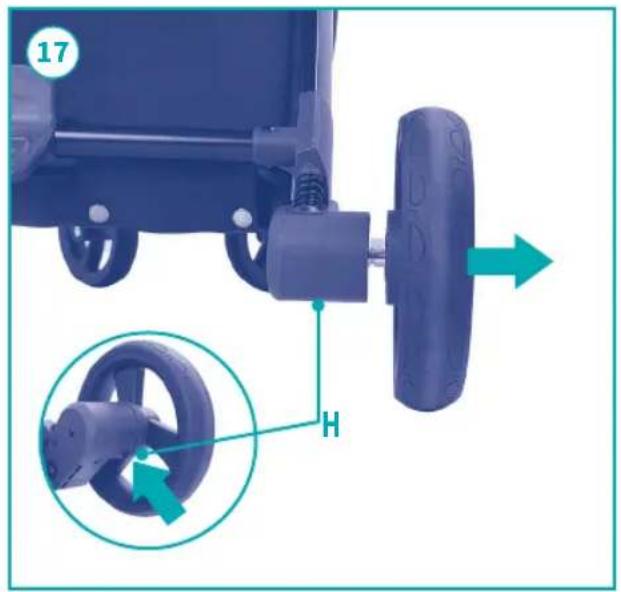
- Rear wheel quick release: As shown in Figure 17, press and hold the rear wheel quick release button H, and then pull the rear wheel outwards to complete the rear wheel quick release.
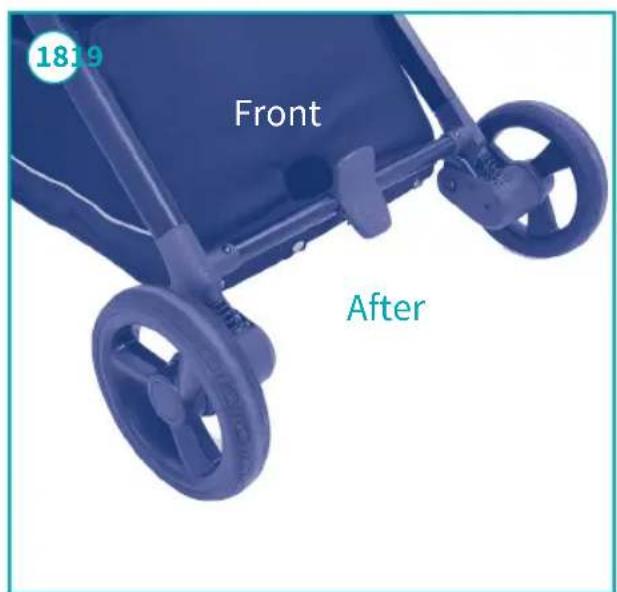
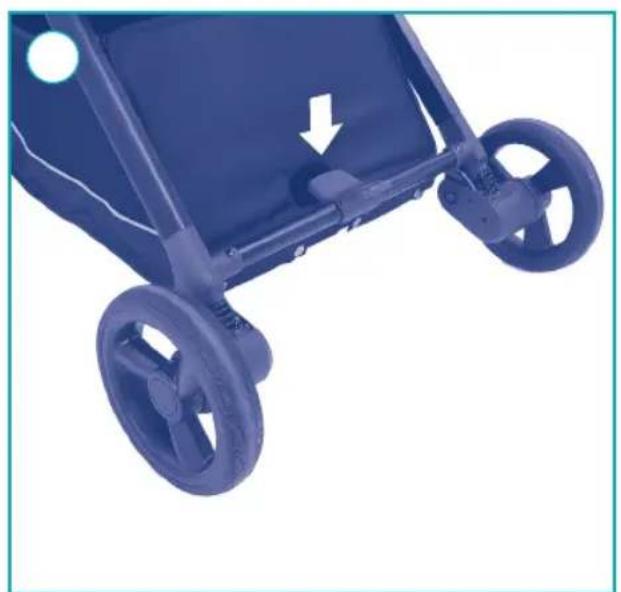
- Rear wheel brake: As shown in Figure 18, step on the rear wheel brake with your foot to brake the rear wheel.
- Touch the rear wheel brake: As shown in Figure 19, step on the rear wheel brake with your foot to unlock the rear wheel brake.
INSTRUCTIONS FOR CLOSURE
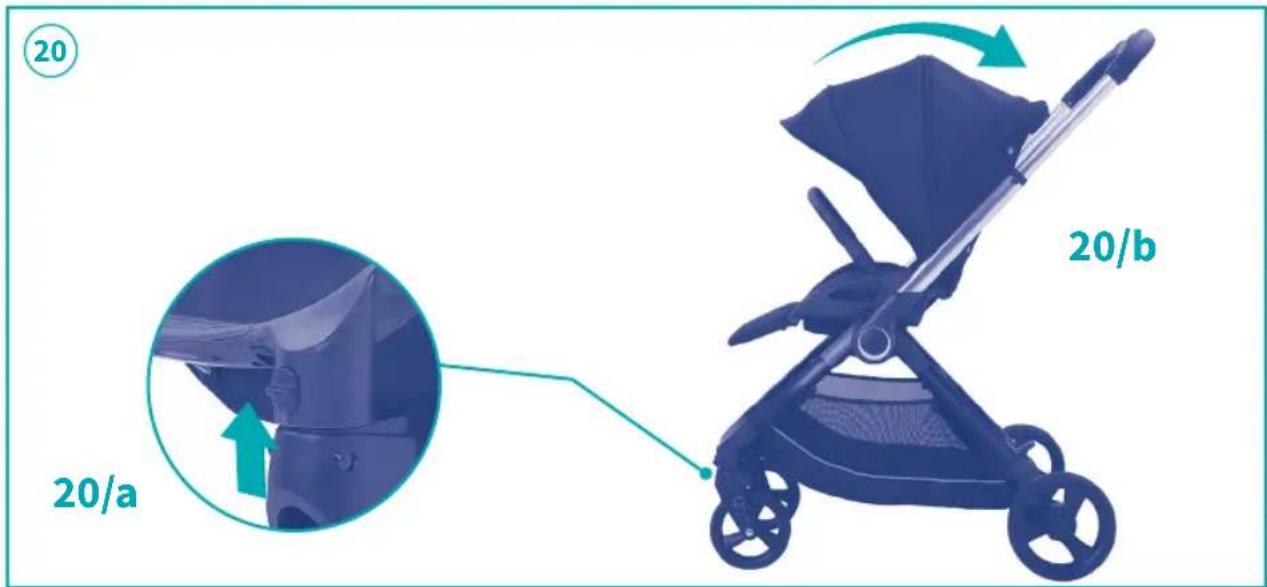
- When closing the stroller, as shown in Figure 20a/20b, adjust the front wheels to the universal position and then fold the canopy in the direction of the arrow.
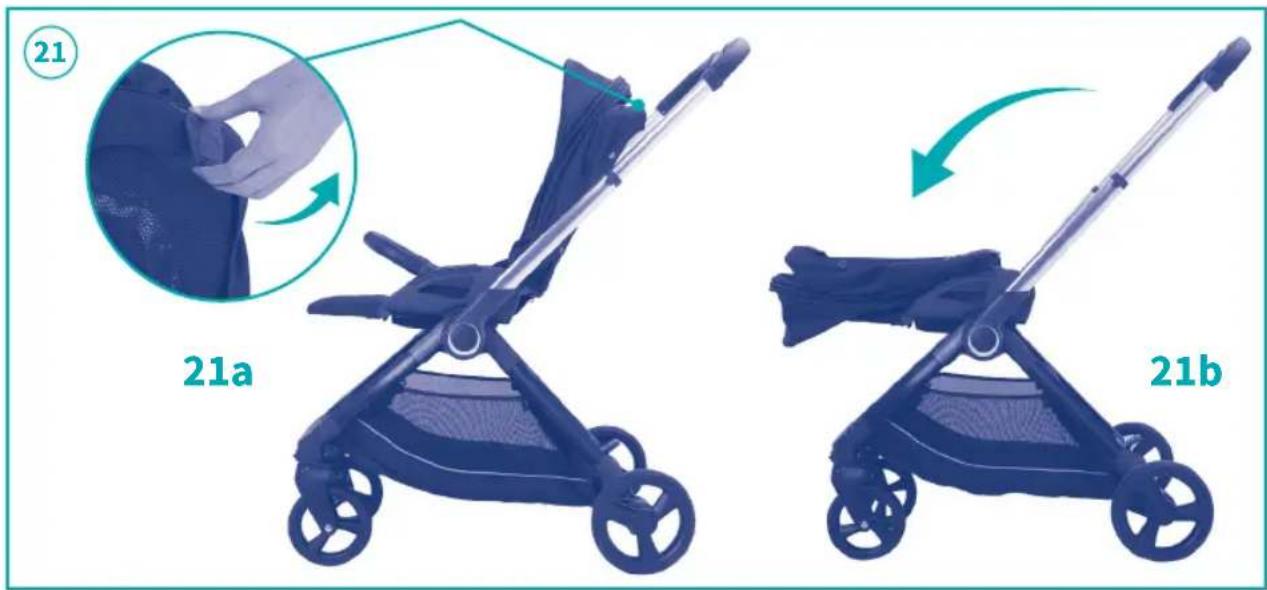
- As shown in Figure 21a/21b, pull up the seat adjustment button in the direction of the arrow, and then fold the seat back in the direction of the arrow.
- As shown in Figure 22a, hold down the second lock button A with your thumb, and press button B, quickly push the handle to the lowest position, and then push the handle forward, the handle will be folded downward, as shown in Figure 22b. (please do not use the handle in the position shown in Figure 22b).
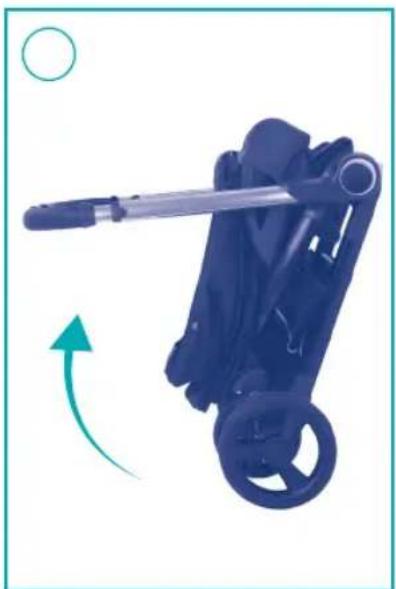
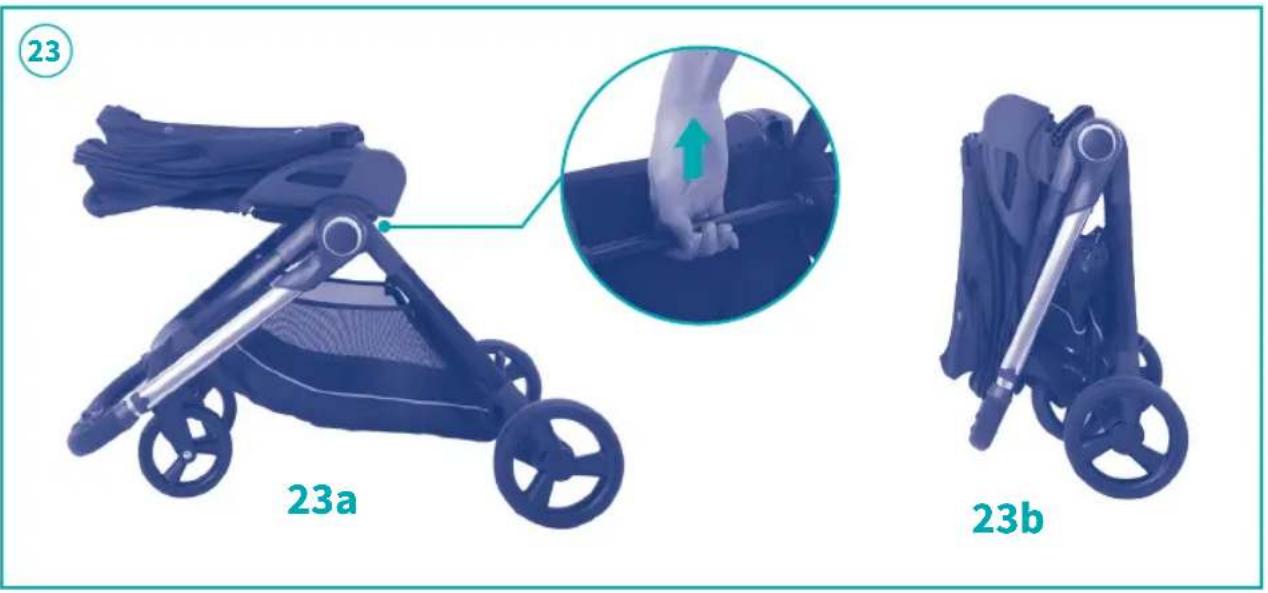
- After the handle is folded, as shown in Figure 23a, hold the retraction lever under the seat and lift the stroller upwards. The stroller will automatically fold to complete the retraction and stand up after retracting, as shown in Figure 23b.
SEAT REVERSING AND CLOSING
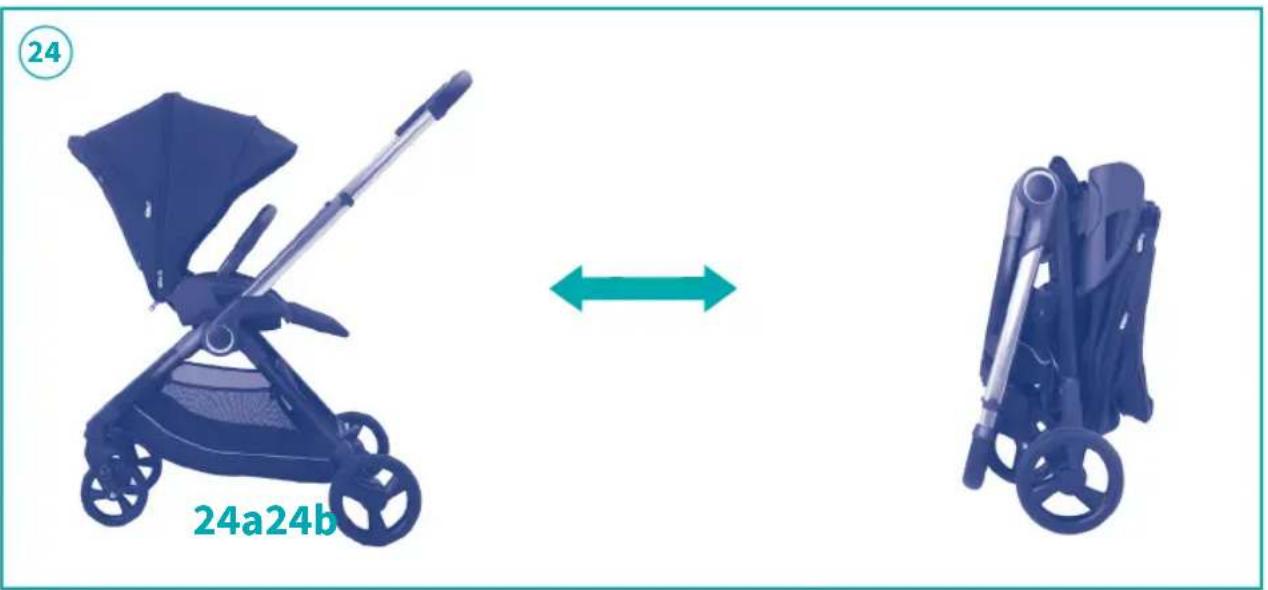
- As shown in Figure 24a/24b, when your seat is reversed, the stroller can also be retracted. For retracting steps, please refer to Figure 20-23 of “Retracting Instructions” to retract the stroller. To operate the stroller refer to “Opening the frame” Figure 1-4.
MAINTENANCE
To keep your baby safe, check and maintain your stroller constantly.
Please clean the fabric cover with a sponge and use detergent to clean other parts.
Please regularly check if there are any loose screws, accessories breakage or damage, and replace components accordingly.
Please follow the instruction manual during assembly and avoid unnecessary damages.





CARRYCOT WITH ADAPTER
| Adjustable adapter | Positive Negative | |
| The adapter is used for the Carrycot and Car Seat. | 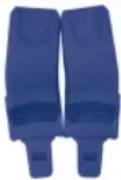 | 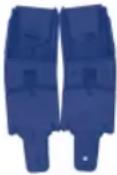 |
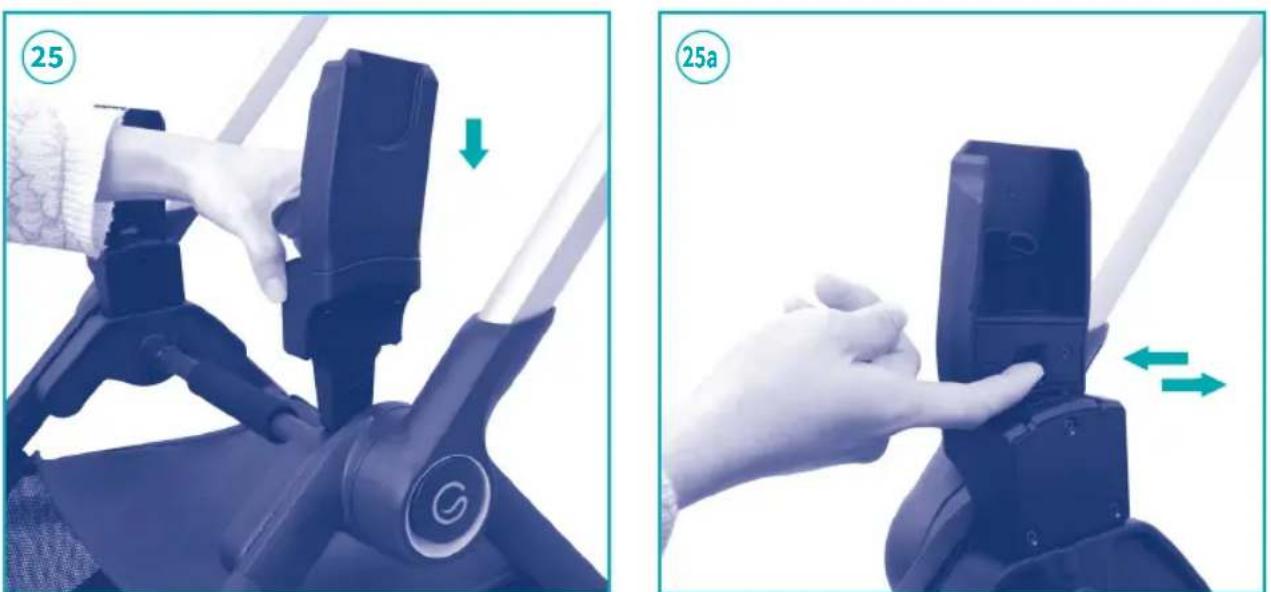
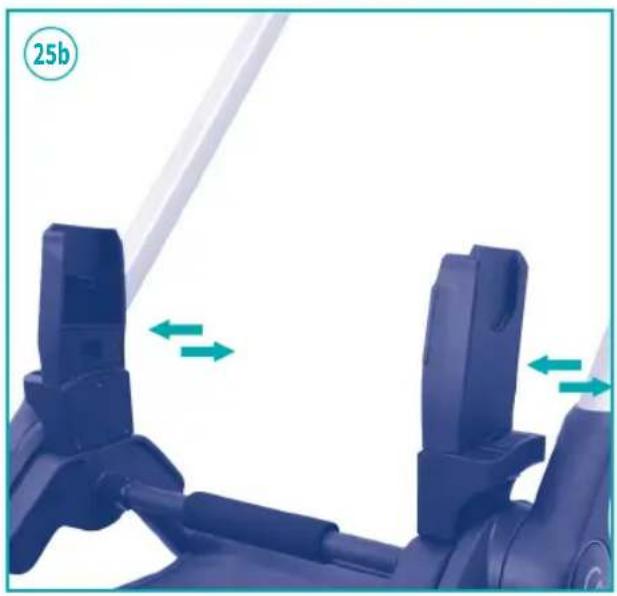
- Adapter installation and adjustment: Place the adapters on the frame, make sure that the attachment points are in a vertical position, as shown in image 25. Press the button in Figure 25a to move the width of the adapter, as shown in images 25a/25b.
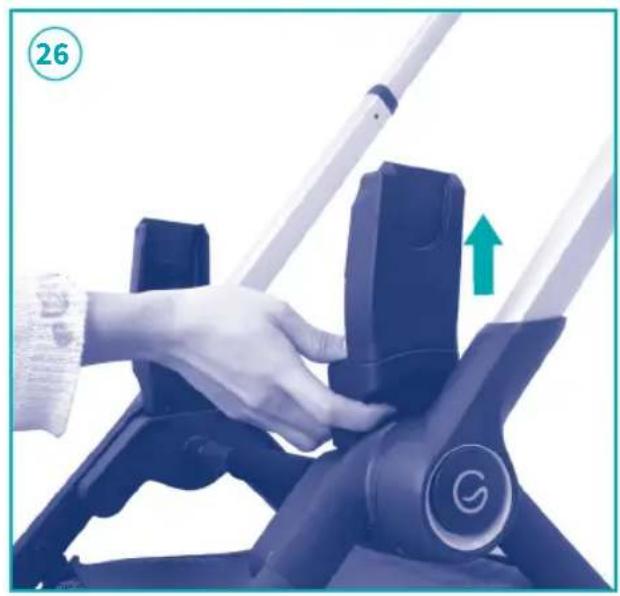
- Adapter removal: Press the button in Figure 26 to release the adapter.
INSTALLATION AND REMOVAL OF THE CAR SEAT OF THE CARRYCOT
The adapters must be compatible with our carrycot and car seat.
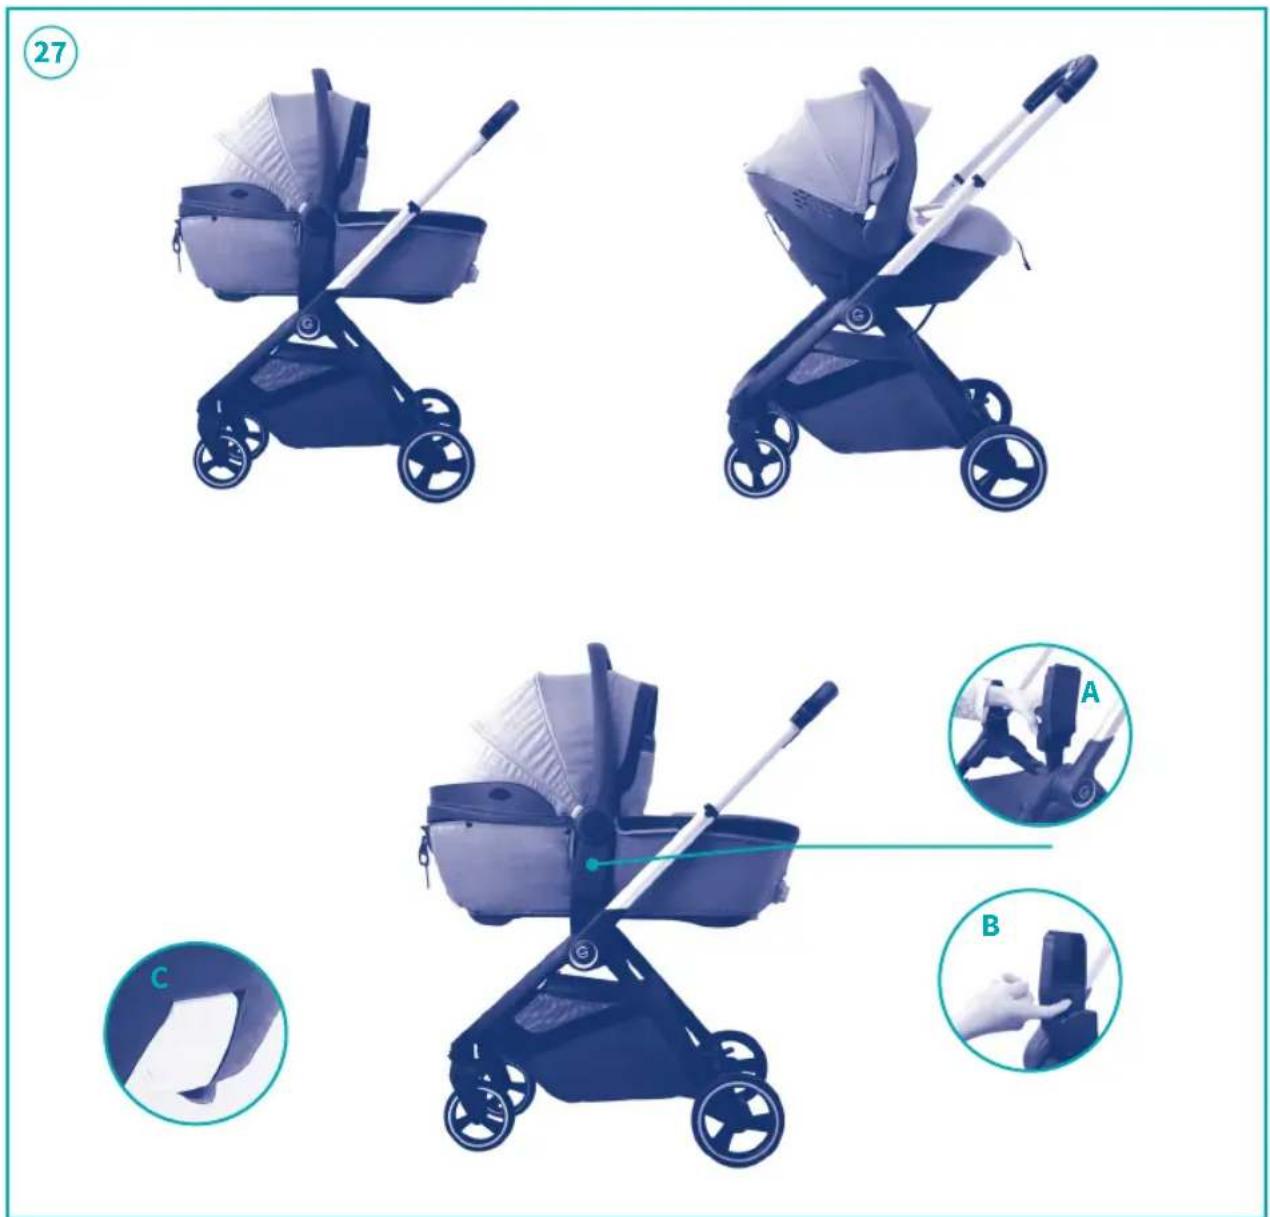
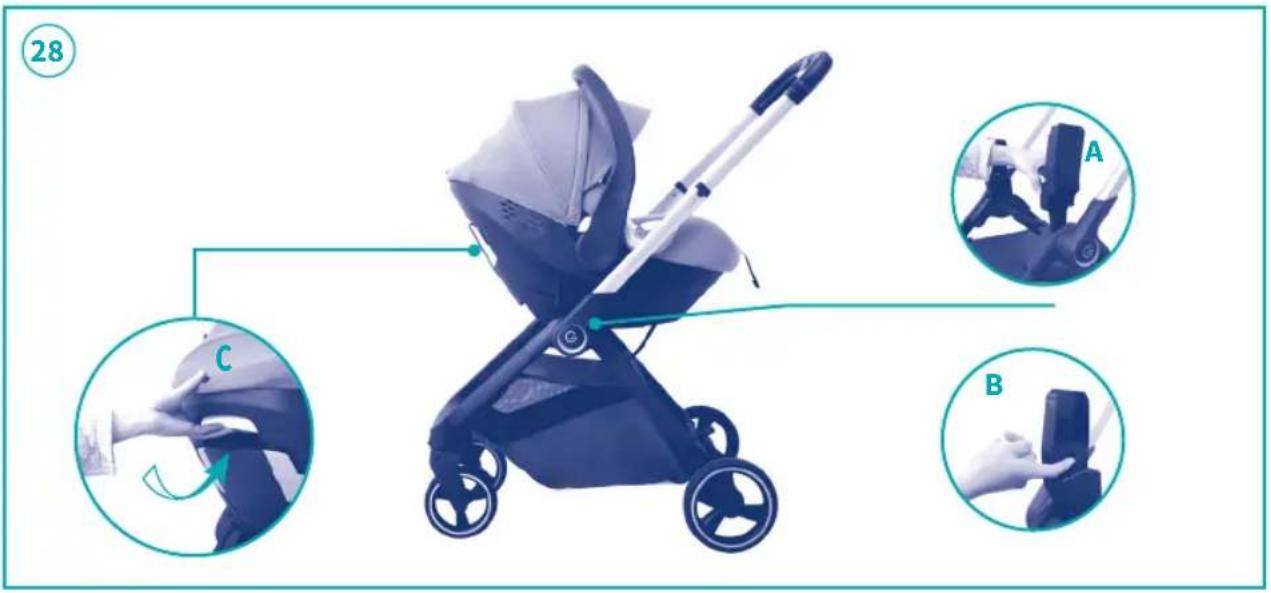
- Installation and disassembly of Carrycot: Place the adapters on the frame, make sure that the attachment points are in a vertical position, meanwhile adjust the adapters to maximum width, and place the seat on the frame, it is in the correct position when you hear a click, as images A/B shown. Orientate the maxi-cosi attached point with the carrycot, and press solidly into the adapters until you hear a click. The installation is complete. Pull the unlocking adapters button on the carry cot, lift the carrycot straight up from the frame, as shown in image C.
- Installation and disassembly of car seat: Place the adapters on the frame, make sure that the attachment points are in a vertical position, meanwhile adjust the adapters to width, and place the seat on the frame, it is in the correct position when you hear a click, as shown in images A/B. Orientate the maxi-cosi attachment point with the carrycot, and press solidly into the adapters until you hear a click. The installation is complete.
WARNINGS
- Be sure to read the following before you use this stroller.
- WARNING: Never leave the child unattended.
- WARNING: Ensure that all the locking devices are engaged before use.
- WARNING: To avoid injury ensure that the child is kept away when unfolding and folding this product.
- WARNING: Do not let the child play with this product.
- WARNING: Always use the restraint system.
- WARNING: This product is not suitable for running or skating.
- It is suitable for children from birth up to 4 years or 22kg, whichever comes first.
- To prevent serious injury always use the restraint system.
• Always keep child in view. - Do not carry parcels and accessories anywhere other than in the basket. It makes the stroller unstable.
• This stroller is to be used for one child only. - Don't allow the child to climb unassisted into or hang on stroller.
- Don't use the stroller on escalators or stairs with the child in it, the child could fall out.
- Do not overload the parcel basket (3KG).
- The child should be clear of moving parts while making adjustments. Be particularly careful when performing these tasks with the child nearby.
- Use only parts and accessories approved by the Manufacturer. Accessories which are not approved by the manufacturer shall not be used.
- Pay attention to the child's safety when using the stroller's moving parts (backrest, rain cover). Always engage the brake when
performing the above operations.
- Do not leave the stroller on a slope when a child is seated in it, even if the brake is applied. Brake performance is limited on gradients.
- Regularly inspect all locking devices to ensure perfect product maintenance. Do not use the product if breakages or damage of any kind are found. In the event of any of the above situations, please contact the manufacturer immediately.
- Keep packaging materials, such as plastic or waterproof wrappings, away from children to avoid suffocation.
- The parking device shall be engaged when placing and removing the child.
- The most reclined position is designed for new born babies.
• Executive standard: EN1888-2:2018. - Only replacement parts supplied or recommended by the manufacturer/distributor shall be used.
- WARNING Check that the devices used to attach the frame or the seat or car seat are correctly engaged before use.
- WARNING Only the compatible car seat, carrycot and stroller -included in the package- shall be attached to the frame.
- Any load attached to the handle and/or on the back of the backrest and/or on the sides of the modular system will affect the stability of the vehicle.
- For car seats used in conjunction with a chassis, this seat does not replace a carrycot or a bed. Should your child need to sleep, then it should be placed in a suitable pram body, carrycot or bed.
CARRYCOT
HOOD ASSEMBLY
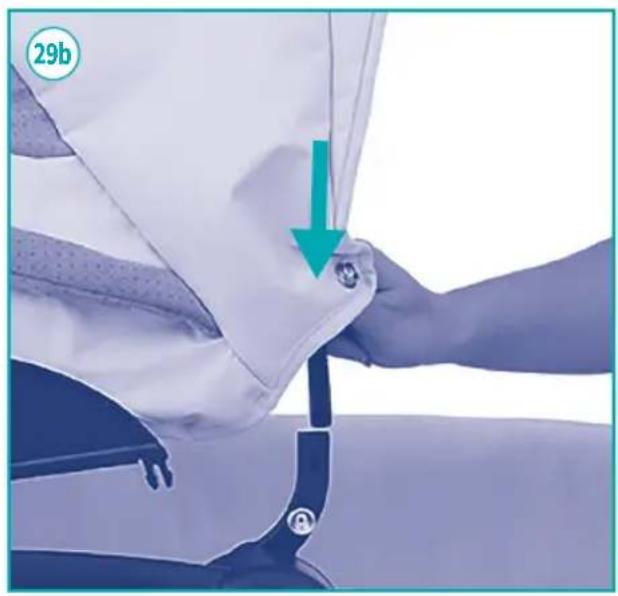
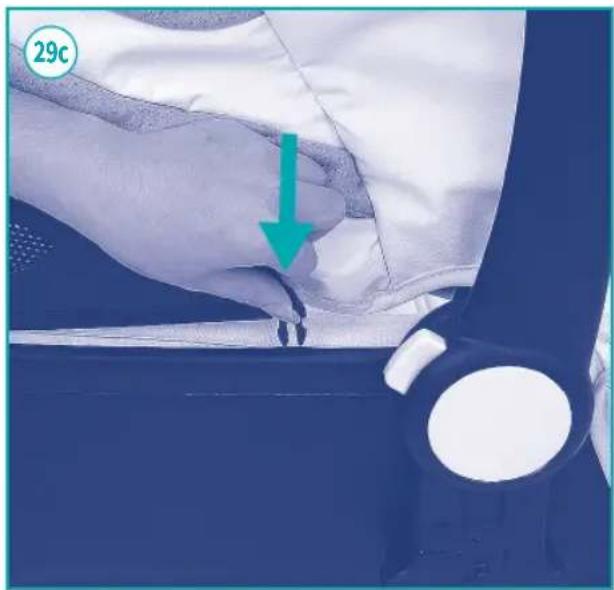
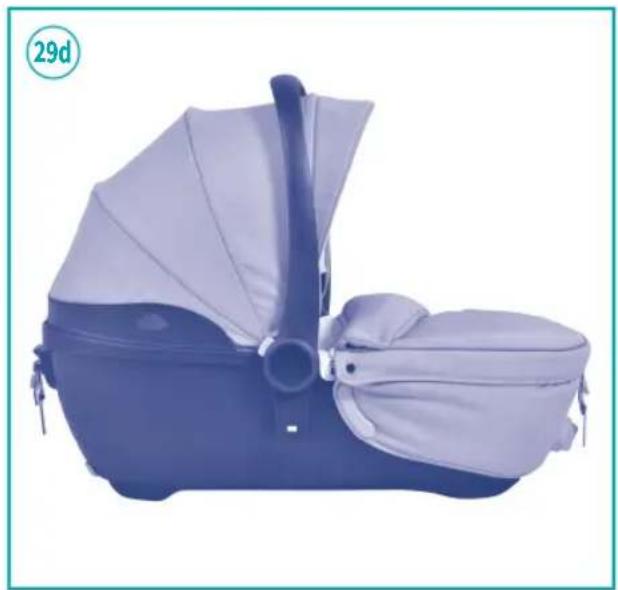
- Raise the hood axis as shown in Fig. 29a and insert the 2 side metal plates on the axis. The metal plate is mounted correctly when a CLICK is heard. Before using the carrycot, try moving the hood with your hands to make sure it is steadily mounted (see Fig. 29a/29b). Insert the decorative parts in the base of the clip as shown in figure 29c. The decorative clips are mounted correctly when a CLICK is heard. Before using the carrycot, try moving them with your hands to make sure each clip is steadily mounted. The hood is completely assembled as shown in Fig. 29d.
FITTING THE LEG COVER
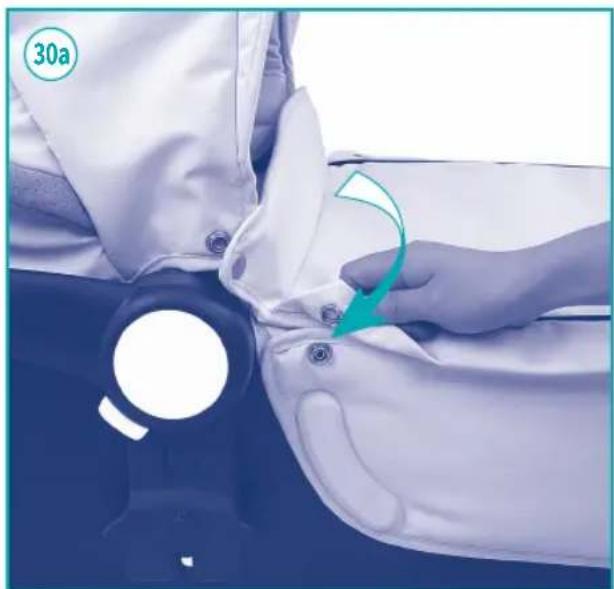
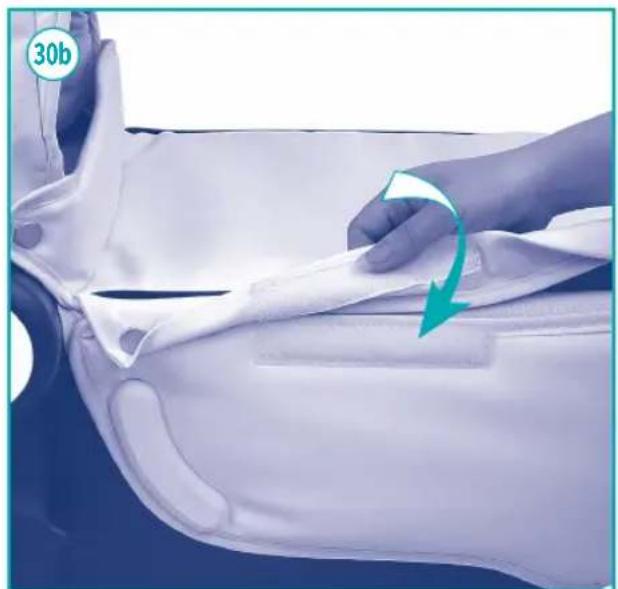
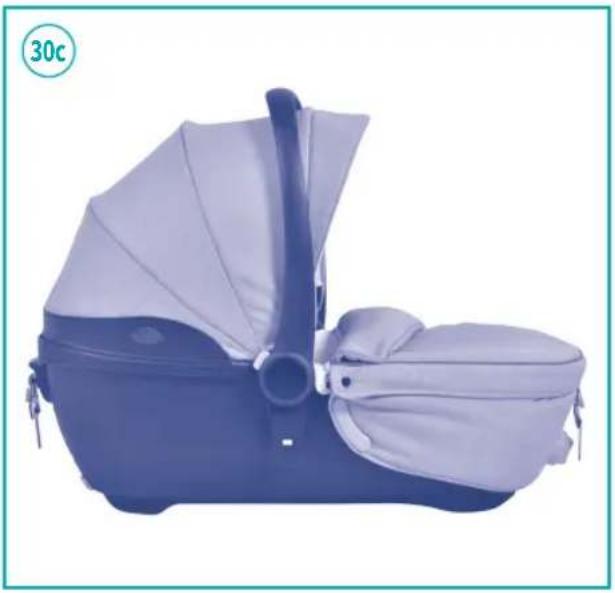
- As shown in Fig. 30a/30b/30c, first place the leg cover on the kit, and then attach the snap button and fasten with the Velcro.
HOOD ADJUSTMENT
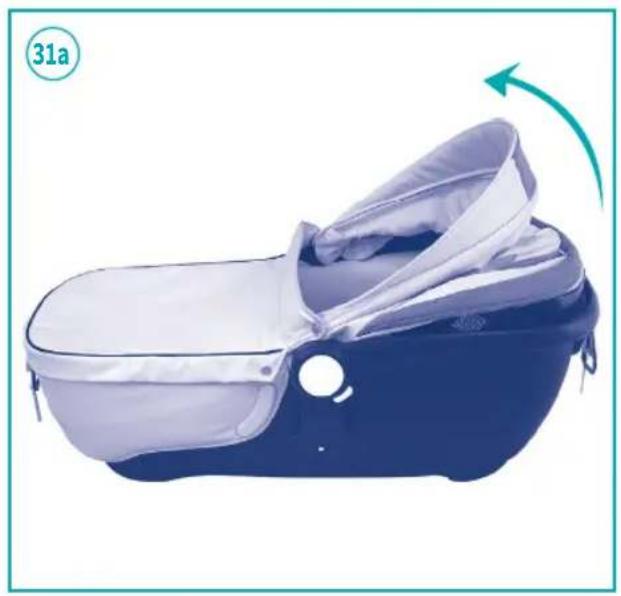
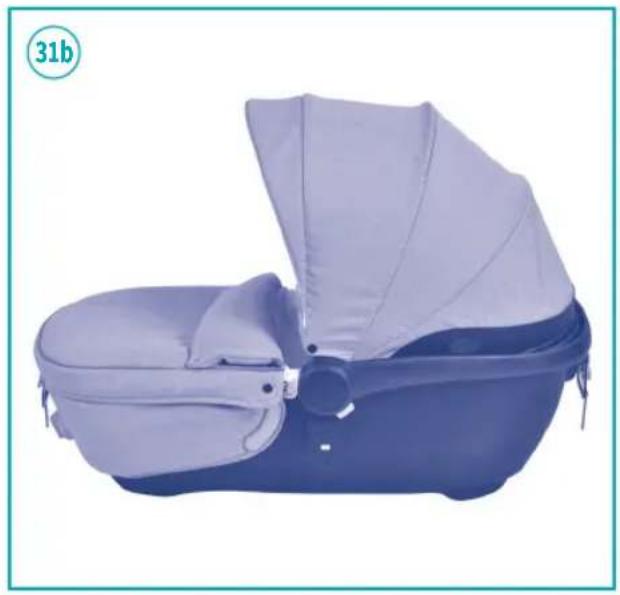
- Opening the hood: Open the hood by pushing it forward as shown in Fig. 31a.
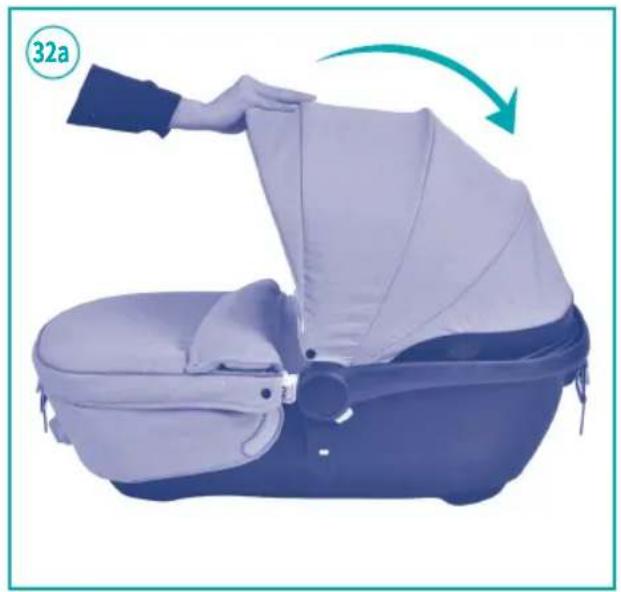
- Closing the hood: When storing the carrycot, close the hood as indicated by the arrow (see Fig. 32a/32b).
ADJUSTABLE HANDLE
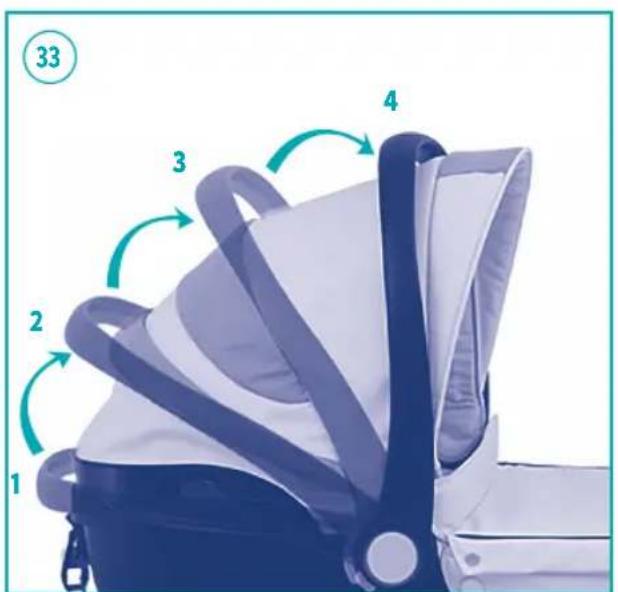
- Unlocking the handle: Pull the handle upward as indicated by the arrow, it can be adjusted in three positions. The carrycot is correctly fixed when a CLICK is heard (see Fig. 33).
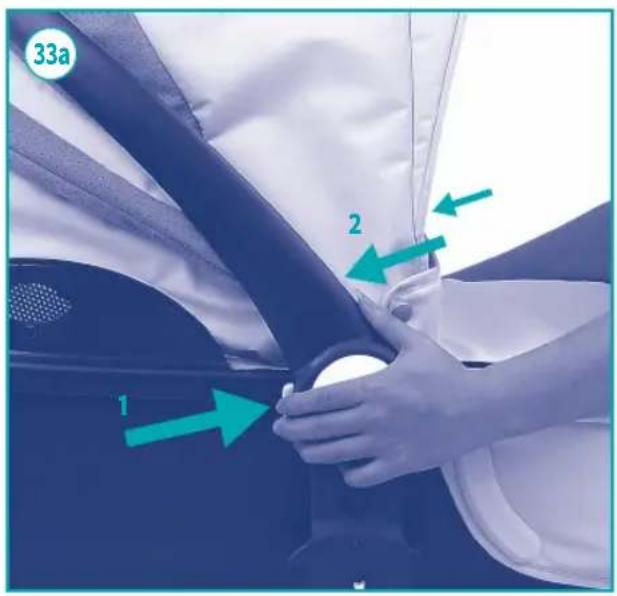
Locking the handle: Press the buttons on both sides of the handle bar simultaneously and the adapter will lock, then push it as indicated by arrow 2. The handle is securely locked when a CLICK is heard (see Fig. 33a/33b).
ADJUSTABLE BACKREST
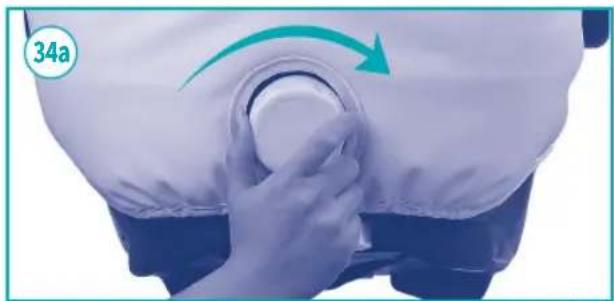
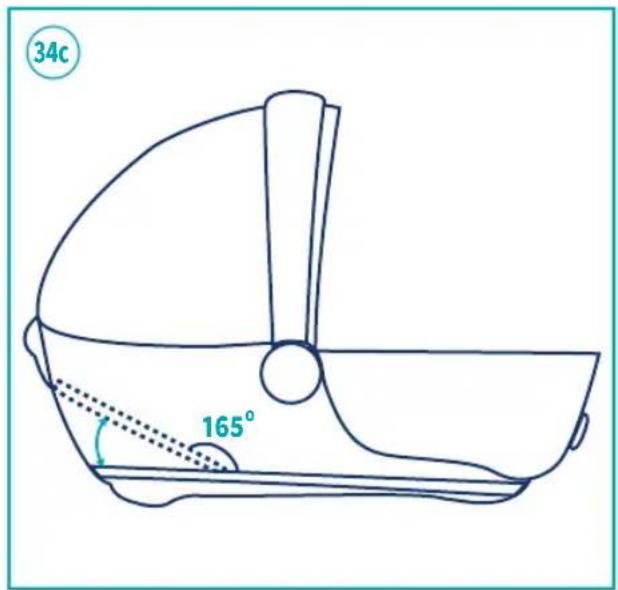
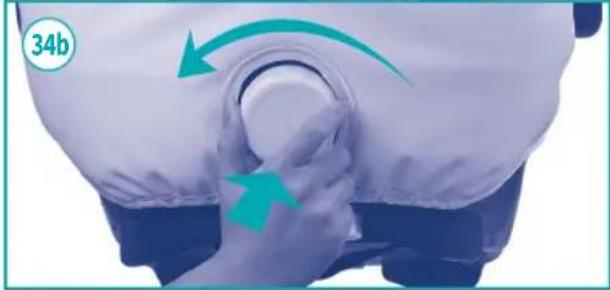
- Turn the knob clockwise, the backrest can be raised to the highest position at 165° . Turn the knob counter-clockwise and push down slightly: this way the backrest can be lowered (see Fig. 34a/34b/34c).
ACCESSORIES
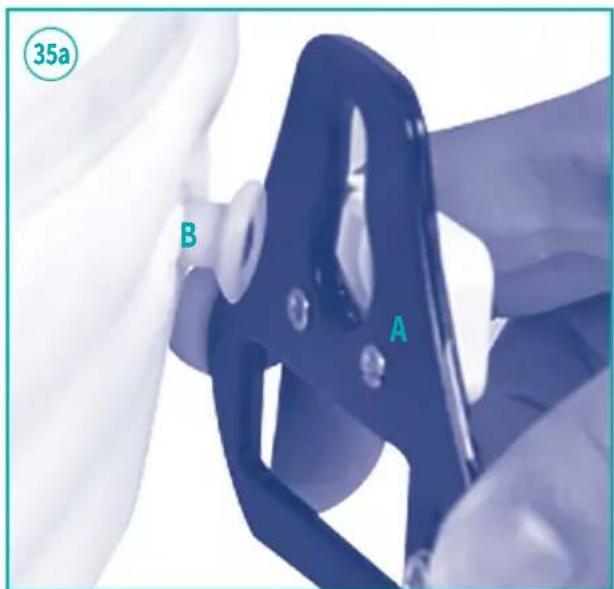
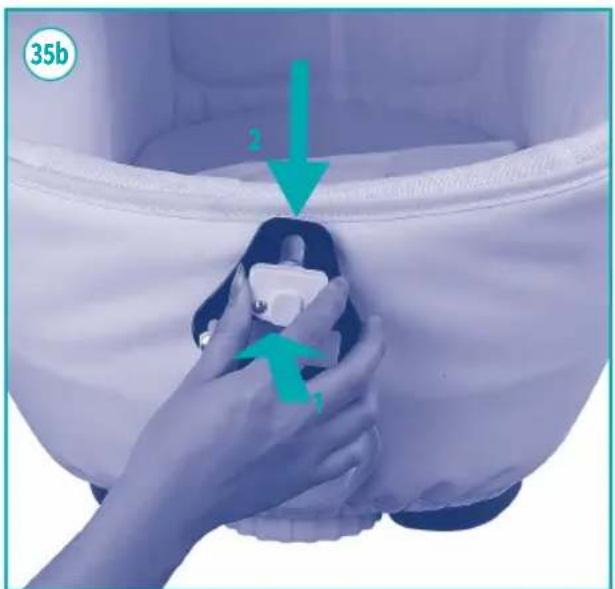
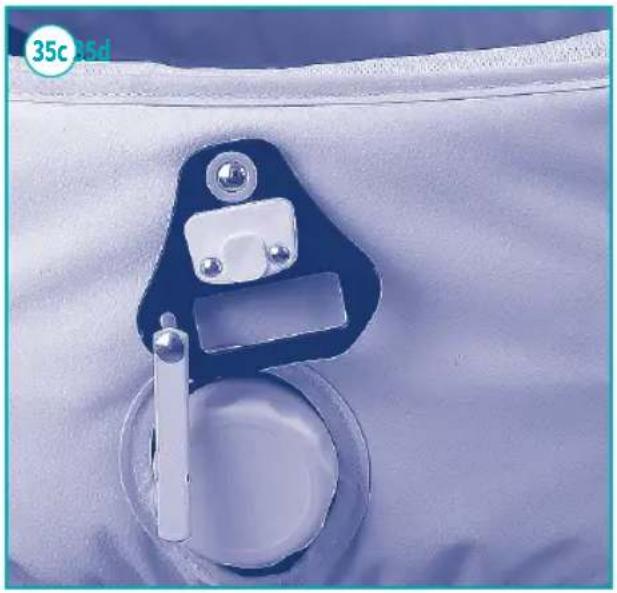
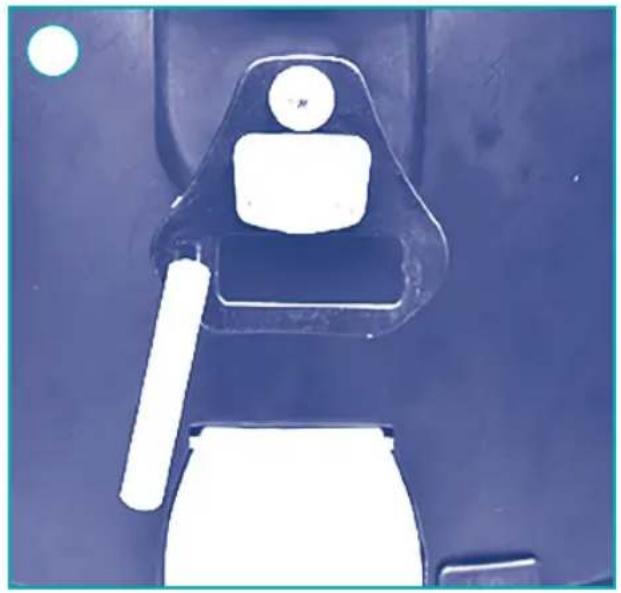
- Preparation before use: First mount the large buckle on the carrycot. Fix "hole a" to the fixed plastic element b, insert and push the large buckle at the same time downwards as indicated by arrow
2 (see Fig. 35a/35b). Repeat the operation also for the other buckle of the carrycot.
- Pay attention to the various operations when the seat is used in the car, see Fig. 36a/36b.
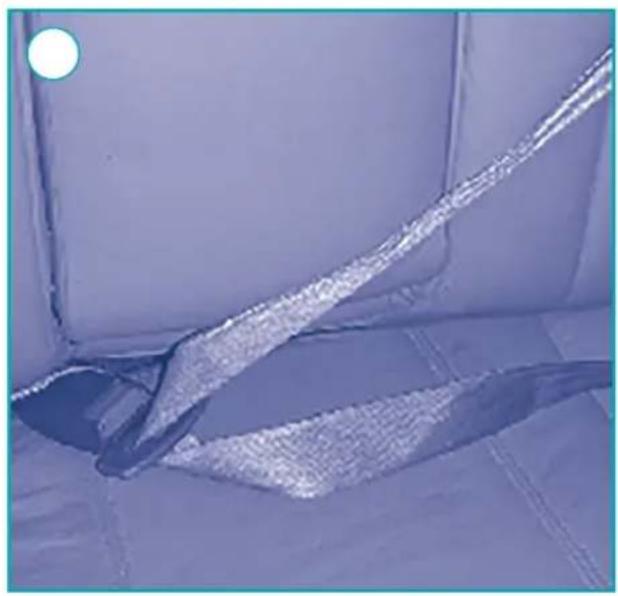
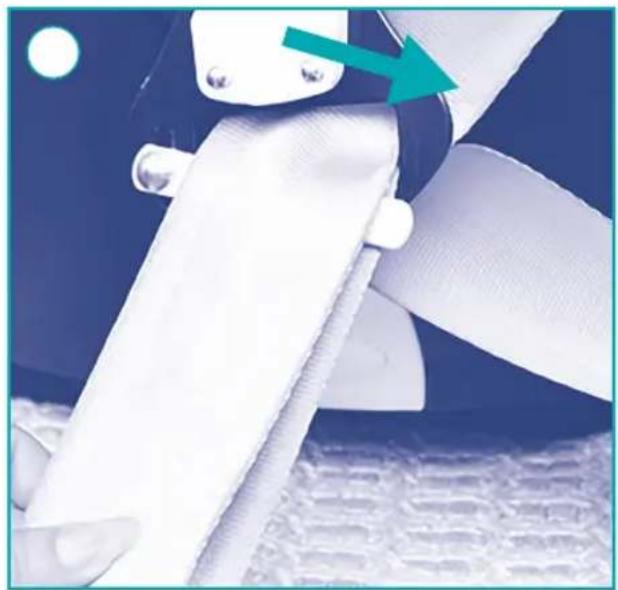
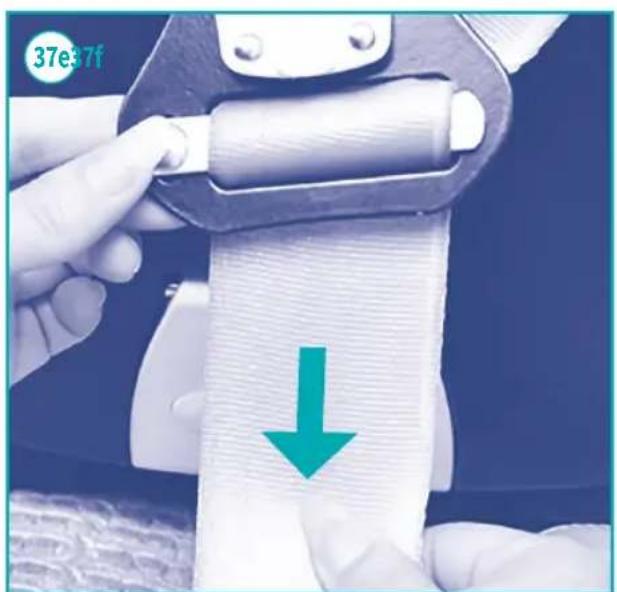
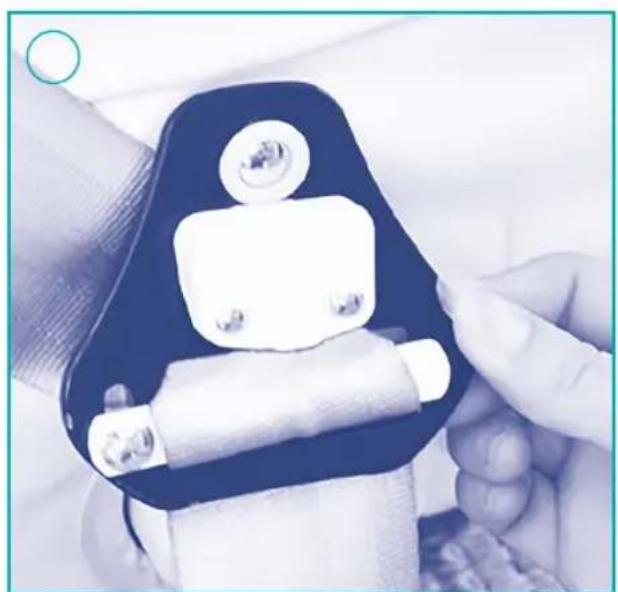
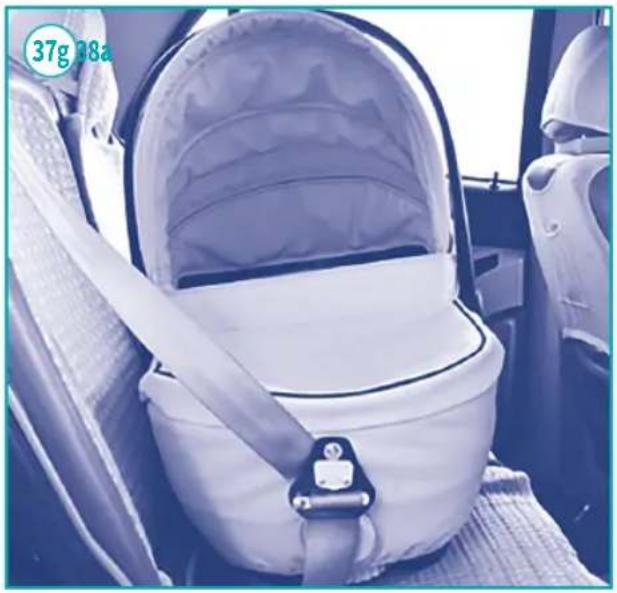
- Fitting the carrycot in the car: Mount the carrycot in the position shown in Fig. 36a/36b. Insert the car's security slot into the buckle on the seat and push out the seat belt (see Fig. 37a/37b); create an eyelet with the strap, pass the eyelet in the hole of the metal connector of the car and pass it on the tab of the connector as indicated in Fig. 37c/37d; tighten the seat belt as indicated by the arrow (see Fig. 37e). Repeat the operation also for the other buckle. In this way the carrycot is permanently mounted in the car as indicated in Fig. 37f/37g.
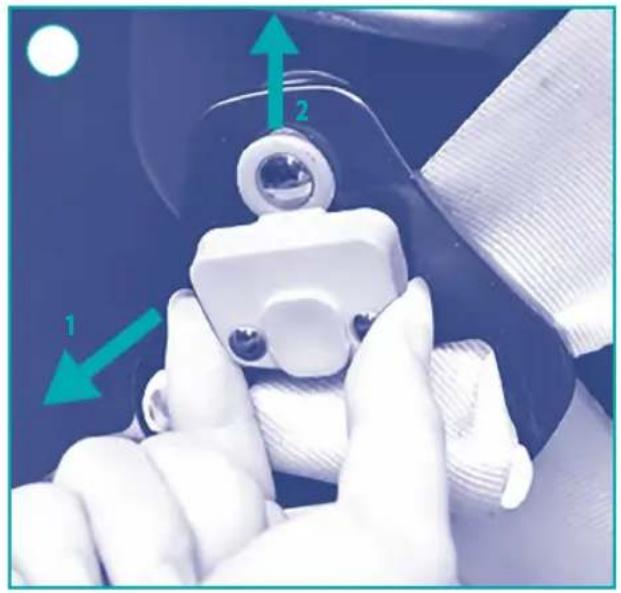
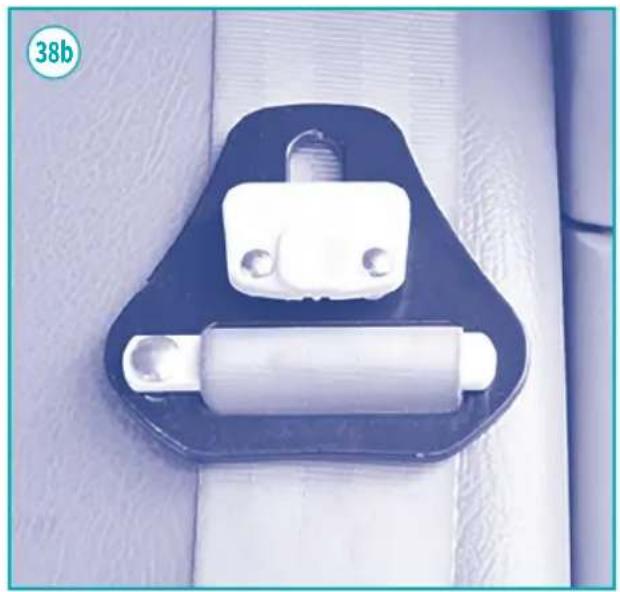
- Removing the carrycot from the car: As shown in Fig. 38a, the carrycot can be disassembled from the car by releasing the large buckle (see arrow). Large buckles can be fastened to the seat belt after removing the carrycot from the car (see Fig. 38b).
Note: The carrycot can only be mounted on the rear seat and always in the direction of travel. It can be mounted in vehicles equipped with a 3-point static belt in compliance with the R6 ECE/EEC standard.
WARNING
- For safety reasons, never place the child's head facing the door. Once the carrycot is mounted in the back seat, for the child's safety make sure that the carrycot restraint system is securely fastened, especially if you are travelling. After fitting the carrycot on the back seat, adjust the backrest to the lowest position and lower the transport handle. When installed in the rear seat, the seat belts that hold the carrycot's restraint system to the vehicle must be securely tightened. Adjust the seat belt to its maximum length to ensure the stability of the carrycot when used in the car. Adjust the seat belt to keep the carrycot stable in the vehicle, the belt must be tight and never twisted.
USE OF SAFETY BELTS IN THE CAR
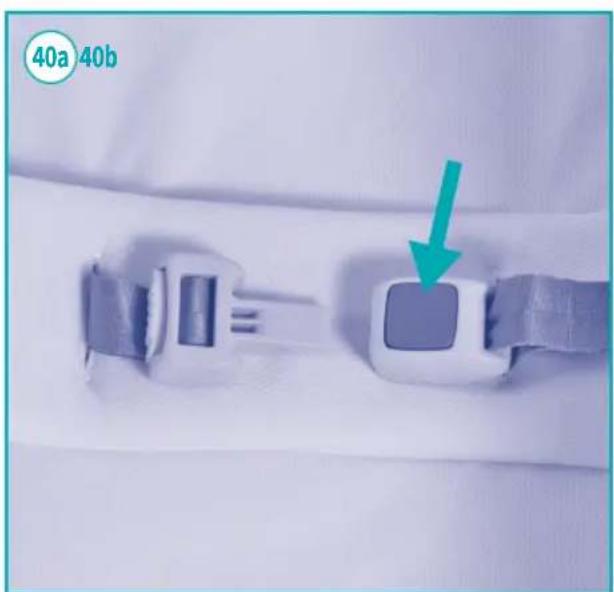
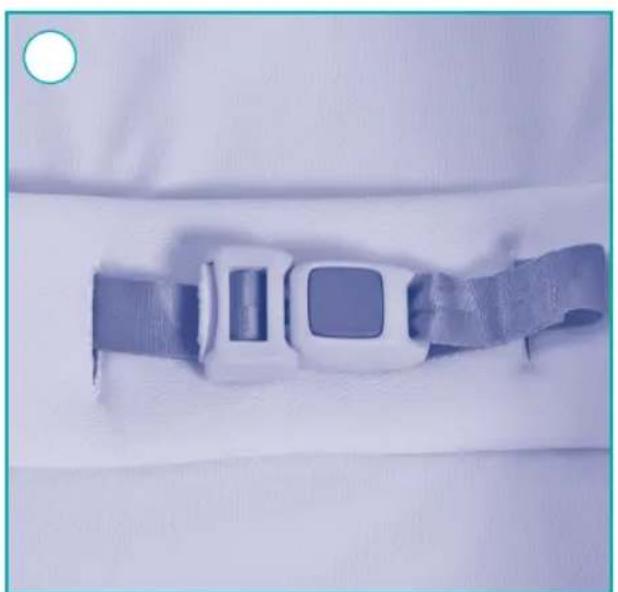
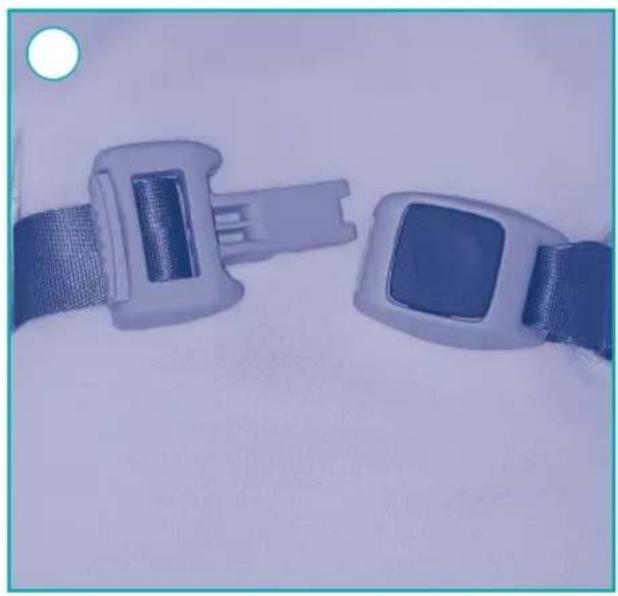
- If the carrycot is used as a car seat, press the centre button to open the buckle, see Fig. 40a. Connect the buckle to both sides, the buckle can be fixed, see Fig. 40b.
Note: Always use the seat belt when the child is in the carrycot.
USE OF SAFETY BELTS OUTSIDE THE CAR
- When using the carrycot outside the car, the seat belts
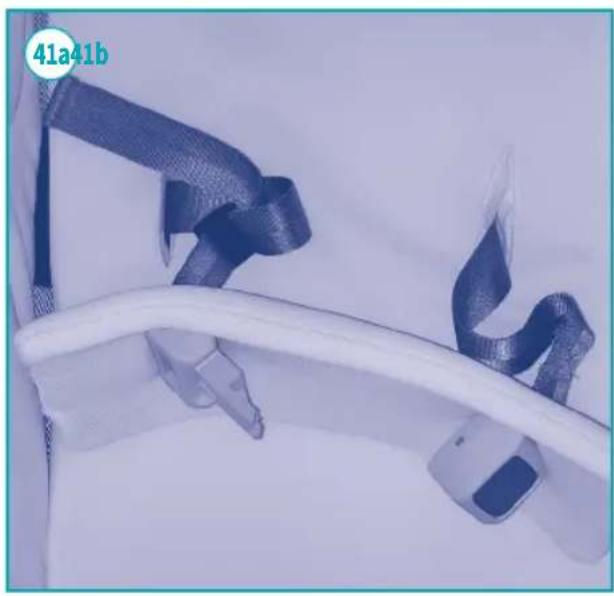
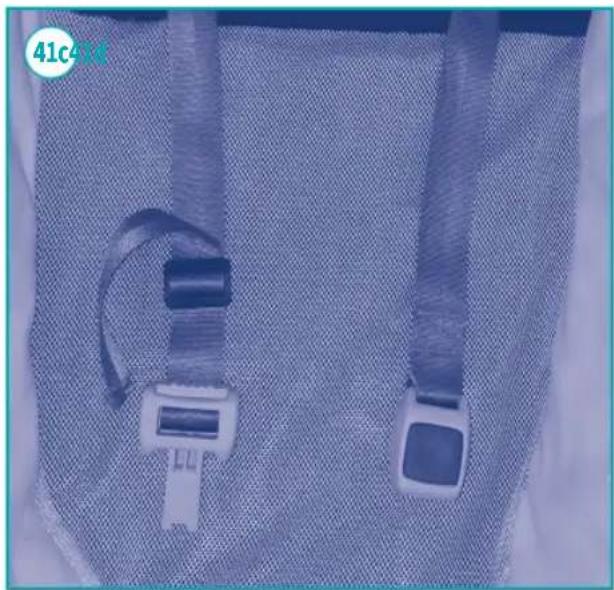
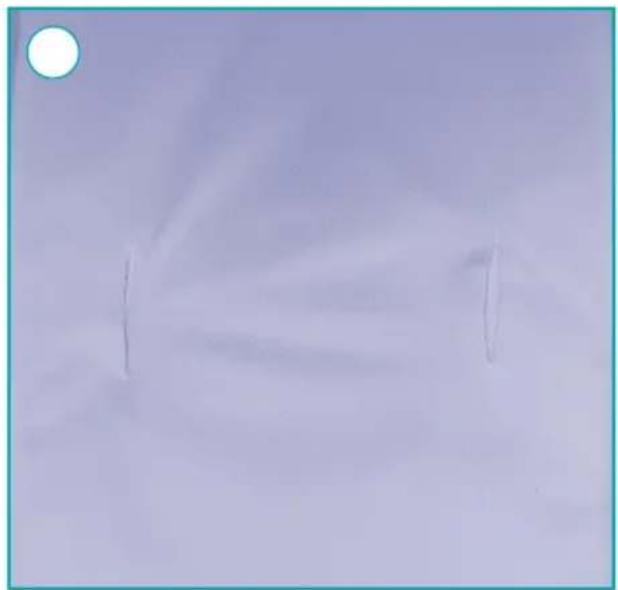
must be hidden. Remove the reducer by removing the belt from the eyelets (Fig. 41a). Remove the two ends of the belt from the mattress by passing the buckles into the corresponding eyelets (Fig. 41b). Place the two ends of the belt towards the foot area of the carrycot (Fig. 41c). Reposition the mattress so as to cover the two ends of the belt. For use in cars the steps must be repeated in reverse order to make the belt usable.
USE OF THE BREATHING HOLE
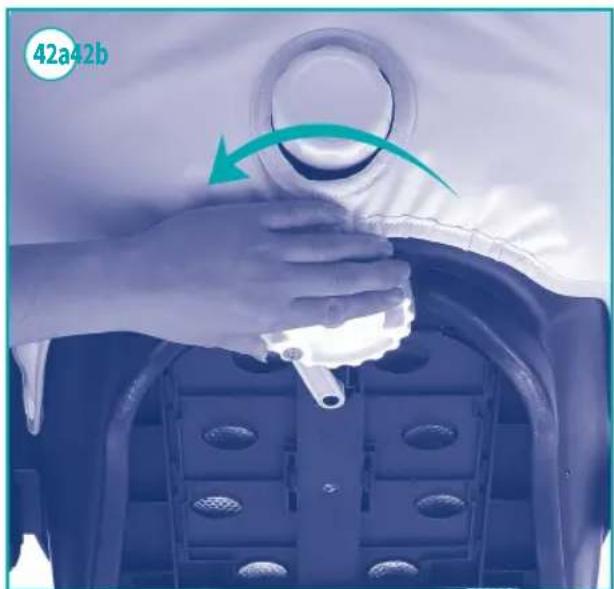
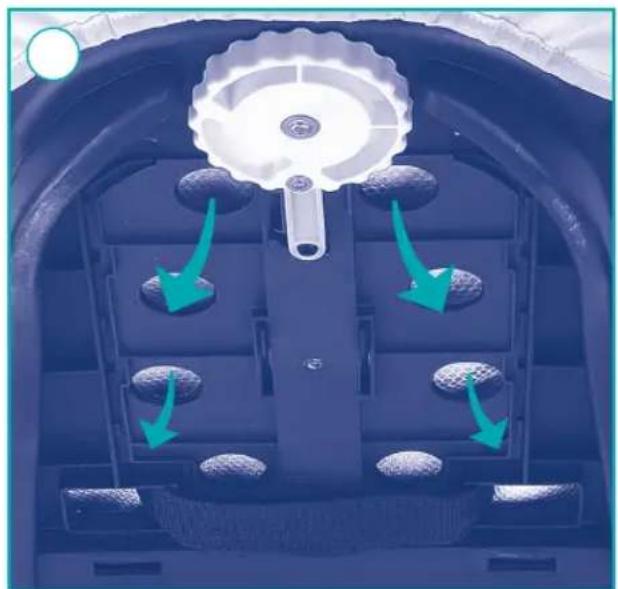
- Opening the ventilation hole: Turn the knob under the basket anti-clockwise, the breathing holes will open. The ventilation function is now enabled with all the holes facing up.
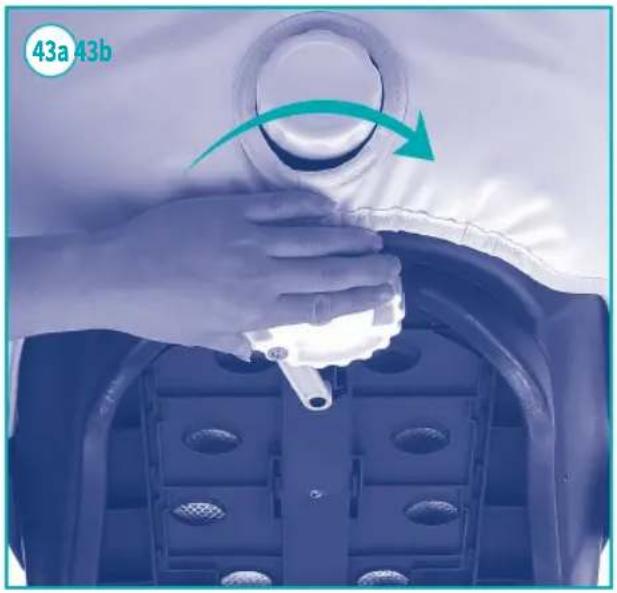
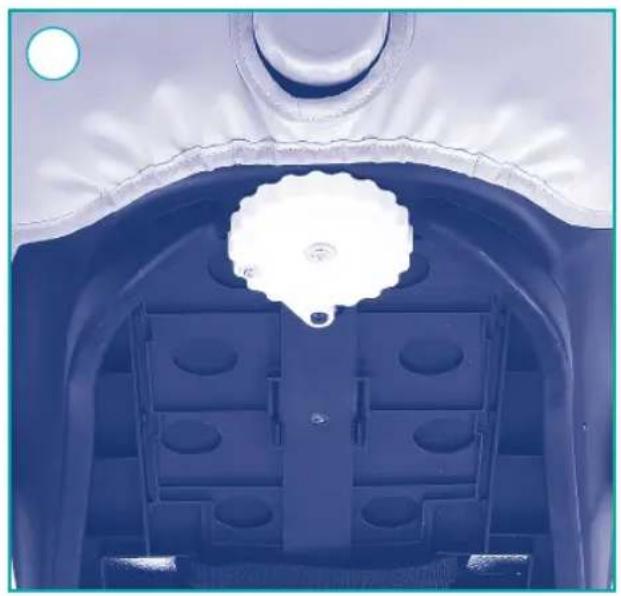
- Closing the ventilation hole: Turn the knob under the basket clockwise, the breathing holes will close (see Fig. 43a/43b). There will be no ventilation function with the holes facing down.
USE ON THE STROLLER
- Fitting the carrycot: If you use the carrycot on the frame, connect the adapter and push the carrycot downwards until you hear a click (see Fig. 44a/44b). The carrycot is correctly mounted on the frame as shown in Fig. 44c.
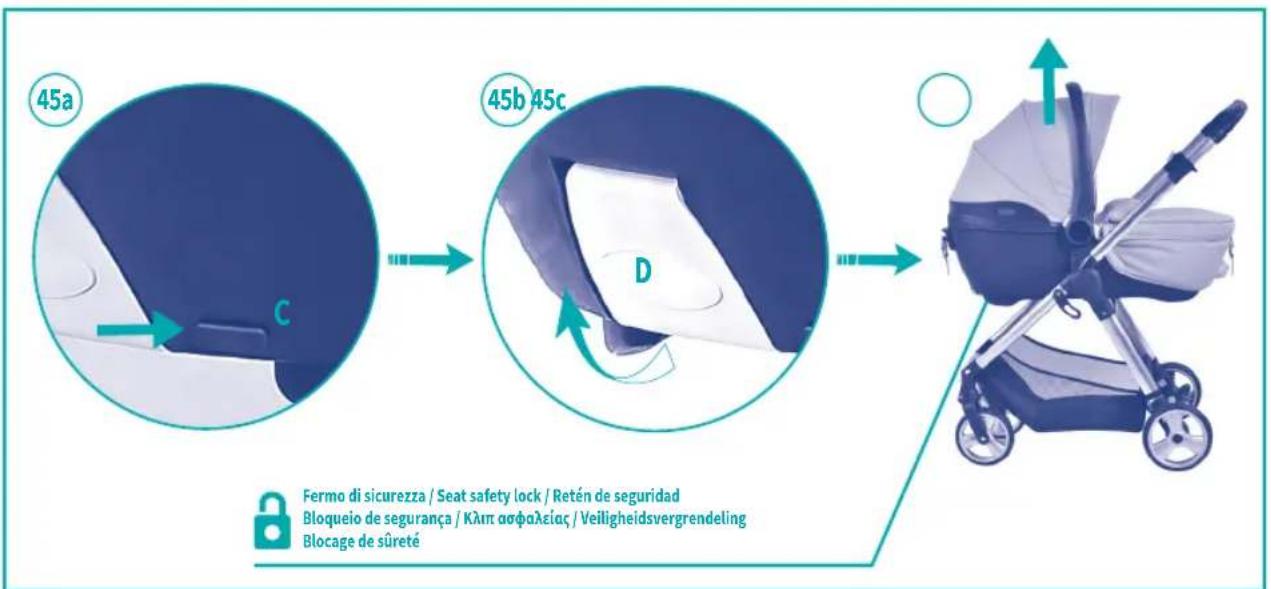
- Push catch C as shown by the arrow in Fig. 45a, lift button D on the bottom of the carrycot as indicated by the arrow and raise it, then you can easily release the carrycot from the stroller (see Fig. 45b/45c).
CARE AND MAINTENANCE:
For security purposes. This product requires regular checks and maintenance. Keep all parts clean. If the parts harden, apply a layer of silicone-based spray lubricant. Metal parts, seat and fabric parts - Wipe with a cloth dampened in warm water with a mild detergent and dry. Do not clean with abrasive detergents based on ammonia, bleach or alcohol. The leg cover and accessories can be removed for cleaning. The hood can be removed by simply pulling it out of the fasteners. Do not use solvents, chemical detergents or lubricants on the parts of the seat and never try to decolour or dye the fabric. Never store the carrycot if it is still damp. Wait until it has dried completely. If it is damp, leave it totally open in a warm place and dry it with a soft cloth. Storing the damp carrycot can cause mould formation. Use in the vicinity of the sea can cause the formation of salt deposits. Keep the carrycot regularly clean with a soft cloth moistened with warm water and a mild detergent.
Use the carrycot in compliance with the instructions to avoid any damage. Perform general maintenance on the carrycot before using it for a second child.





MATERIALS
Lining: 100% polyester
Structure: aluminum
DIMENSIONS
L: 97.5 cm;
H: 60 cm;
D: 107 cm.
WARNINGS
- WARNING: This product is only suitable for a child who cannot sit up unaided.
- WARNING: Only use on a firm, horizontal level and dry surface.
- WARNING: Do not let other children play unattended near the carrycot.
- WARNING: Do not use if any part of the is broken, torn or missing.
- Only use replacement parts supplied or approved by the manufacturer.
- Do not place the carrycot near an open fire or other source of strong heat.
- The handles and the bottom of the carrycot should be inspected regularly for signs of damage and wear.
- Before carrying or lifting, make sure that the handles are in the correct position of use.
- Before carrying or lifting the base shall be adjusted in the lowest position.
- The restraint system shall be removed when the product is used outside the car for unattended sleeping.
- The head of the child in the carrycot should never be lower than the body of the child.
- Do not add another mattress on top
of the mattress or recommended by the manufacturer.
- The child must never be left unattended in the carrycot! Always keep the child in view.
- Never overload the carrycot with an additional child or any objects.
- This product is suitable for children from birth to approximately 9 months.
- This product is suitable for a child who cannot sit up by itself, roll over and cannot push itself up on its hands and knees. Maximum weight of the child: 9 kg.
- Never use the carrycot in passenger seats with airbags.
- The carrycot can only be installed on the rear seat of the car as described in the instructions, never install on the front seat.
• Always use the carrycot by fastening the harness correctly. - Never use the carrycot without fastening the safety harness to the car or stroller.
- Make sure the carrycot can be fixed firmly when used on the assigned stroller.
- The buckle should always be easily accessible.
• Children should never play with the buckle. - It is in important that the child can be released quickly in the event of an emergency.
- Only suitable if the approved vehicles are fitted with 3 point static or with retractor safety belts, approval to UN/ECE regulation No.16 or other equivalent standards.
- The child should be clear of moving parts while making any adjustments. Be particular careful when performing these tasks with the child nearby.
- Never carry the product by second lock,
and keep the handle upwards.
• We strongly recommend that changing the damaged accessories or parts.
- Any luggage or other objects liable to cause injuries in the event of a collision shall be properly secured.
- Contact your nearest retailer should you have any problems or question regarding the use of the product.
• Always use the restraint system.
- WARNING: Use the safety harness as soon as your child can sit unaided.
FOR TECHNICAL OR COMMERCIAL REASONS, PRG RESERVES THE RIGHT, AT ANY TIME AND ALSO ONLY IN A SPECIFIC COUNTRY, TO MODIFY THE TECHNICAL CHARACTERISTICS OF THE MODELS DESCRIBED IN THIS LEAFLET, AND/OR THE SHAPE, TYPE AND NUMBER OF THE ACCESSORIES SUPPLIED.
E GIORDANI CITY LIFESTYLE DELUXE SISTEMA MODULAR
SILLA DE PASEO
APERTURA DE LA SILLA
Voering: 100% polyester
Frame: aluminium
AFMETINGEN
Br: 97.5 cm;
H: 60 cm;
D: 107 cm.
WAARSCHUWINGEN
Structure: aluminium
DIMENSIONS
L:97.5 cm;
H:60cm;
D:107 cm.
WARNINGS
Fujian O'SK Baby and Children Products Corp.Ltd
1022#, Tangbian, Jishan village, Xingtai Development
Zone, Changtai County, Fujian Province.
Imported and distributed by:
PRG S.p.A.
Via delle Primule, 5 - 20815 Cogliate (MB) Italy
In conformità con: EN 1888-2:2018 - EN 1466:2014 - UN n. 129/03
UK Approved to: EN 1888-2:2018 - EN 1466:2014 - UN n. 129/03
E En conformidad con: EN 1888-2:2018 - EN 1466:2014 - UN n. 129/03
P Em conformidade com: EN 1888-2:2018 - EN 1466:2014 - UN n. 129/03
GR Σύμφωνα με: EN 1888-2:2018 - EN 1466:2014 - UN n. 129/03
NL In overeenstemming met: EN 1888-2:2018 - EN 1466:2014 - UN n. 129/03
- IMPORTANTE
- LEGGERE ATTENTAMENTE
- E CONSERVARE
- PER FUTURO RIFERIMENTO
- UK
- IMPORTANT
- READ CAREFULLY AND KEEP
- FOR FUTURE REFERENCE
- E
- LEER DETENIDAMENTE
- Y MANTENERLAS
- USE IN THE VEHICLE
- USE OF CHILD CAR SEATS
- FUNCTION DESCRIPTION AND USE
- HANDLE 4-POSITION ADJUSTMENT
- USE OF PROTECTIVE PADS: WHEN IN USE, THE PROTECTIVE PAD CAN BE REMOVED
- INSTALLING THE PROTECTIVE PAD
- PROTECTIVE PAD REMOVAL
- USE OF THE CANOPY
- CANOPY REMOVAL
- 9-POSITION HEIGHT ADJUSTMENT OF THE HEADREST
- USE OF THEFIVE-POINT SEAT BELTS
- UNFASTENING THE SEAT BELT
- RELEASING THE SHOULDER STRAPS
- TIGHTEN THE SHOULDER STRAPS
- FASTENING THE SEAT BELT
- WARNING
- CAR SEAT INSTALLATION IN THE VEHICLE
- DANGER
- FOR THE SAFETY OF YOUR CHILD, PLEASE CHECK BEFORE DRIVING
- CAR SEAT REMOVAL
- OPTIONAL ACCESSORIES
- ADAPTER REMOVAL
- USING WITH THE STROLLER
- INSTALLING THE BABY CARRIER ON THE STROLLER
- REMOVING THE BABY CARRIER FROM THE STROLLER
- WARNING: HOLD THE BABY CARRIER FIRMLY
- APPLICATION
- NOTE
- CARE AND CLEANING
- SILLA DE AUTO
- USO DO CINTO DE SEGURANÇA DE CINCO PONTOS
- USO COM O CARRINHO
- ΧΡΉΣΗ ΜΕ ΚΑΡΟΤΣΆΚΙ
- COMPONENTI
- E COMPONENTES
- I CONTENUTO
- UK CONTENTS
- E CONTENIDO
- P CONTEÚDO
- GR ΠΕΡΙΕΧΟΜΕΝΑ
- 36A
- I GIORDANI CITY LIFESTYLE DELUXE SISTEMA MODULARE
- PASSEGGINO
- APRIRE IL TELAIO
- ASSEMBLY INSTRUCTIONS
- FUNCTIONS AND INSTRUCTIONS
- QUICK DISASSEMBLY AND INSTALLATION OF THE BUMPER
- INSTRUCTIONS FOR CLOSURE
- SEAT REVERSING AND CLOSING
- MAINTENANCE
- INSTALLATION AND REMOVAL OF THE CAR SEAT OF THE CARRYCOT
- WARNINGS
- CARRYCOT
- HOOD ASSEMBLY
- FITTING THE LEG COVER
- HOOD ADJUSTMENT
- ADJUSTABLE HANDLE
- ADJUSTABLE BACKREST
- ACCESSORIES
- USE OF SAFETY BELTS IN THE CAR
- USE OF SAFETY BELTS OUTSIDE THE CAR
- USE OF THE BREATHING HOLE
- USE ON THE STROLLER
- CARE AND MAINTENANCE
- MATERIALS
- DIMENSIONS
- E GIORDANI CITY LIFESTYLE DELUXE SISTEMA MODULAR
- SILLA DE PASEO
- APERTURA DE LA SILLA
- AFMETINGEN
- WAARSCHUWINGEN
Brand : Giordani
Model : City Lifestyle Deluxe
Category : Car seat