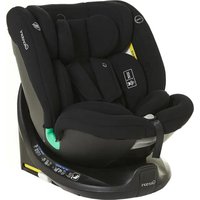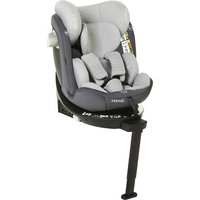
Crono - Car seat Giordani - Free user manual and instructions
Find the device manual for free Crono Giordani in PDF.


User questions about Crono Giordani
0 question about this device. Answer the ones you know or ask your own.
Ask a new question about this device
Download the instructions for your Car seat in PDF format for free! Find your manual Crono - Giordani and take your electronic device back in hand. On this page are published all the documents necessary for the use of your device. Crono by Giordani.
USER MANUAL Crono Giordani
natural_image
Line drawing of a baby car seat assembly (no text or symbols)|
IMPORTANTE:
LEGGERE ATTENTAMENTE
E CONSERVARE
PER FUTURO RIFERIMENTO.
UK
IMPORTANT:
KEEP FOR FUTURE REFERENCE, READ CAREFULLY.
E
¡IMPORTANTE!
LEER DETENIDAMENTE
Y CONSERVAR PARA FUTURAS
CONSULTAS.
2
P
IMPORTANTE!
text_image
Diagram of a car seat with numbered labels pointing to different parts, including a magnified inset showing a hand holding a device.Premere il pulsante di sblocco per regolare la lunghezza del piedino di supporto.
Press the Release button to adjust the length of the support leg.
Presione el botón de apertura para ajustar la longitud de la pierna de soporte.
Prima o botão de desbloqueio para ajustar o comprimento do pé de apoio.
Πατήστε το κουμπί Release για να ρυθμίσετε το μήκος του ποδιού στήριξης.
Druk op de ontgrendelknop om de lengte van de steunpoot aan te passen.
Appuyez sur le bouton de déverrouillage pour régler la longueur de la jambe de force.
Um die Länge des Stützbeins anzupassen, drücken Sie die Freigabetaste.
text_image
Technical diagram of a device with numbered parts and an inset showing a close-up of a device's seatbelt switch.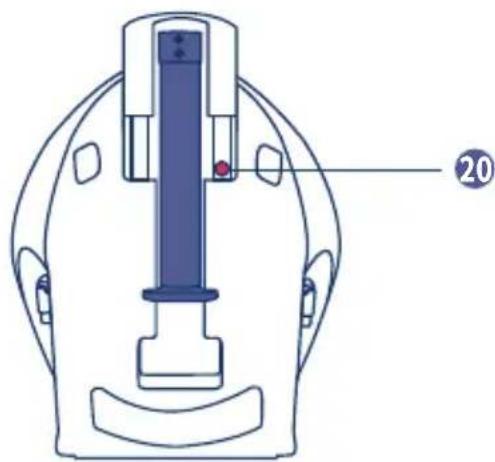
natural_image
Technical line drawing of a mechanical device with no visible text or symbols

COMPONENTI
- Headrest
- Small headrest (suitable for heights of 60 cm or less)
- Harness cover
- Buckle
- Crotch pad
- Harness adjuster
- Rotation handle
- Support leg indicator
- Upper support leg
-
Lower support leg
-
Vehicle belt guide
- Shoulder strap
- Inner cushion insert (suitable for children up to 75 cm tall)
- Vehicle belt guide
- Isofix button
- Support leg button
- Headrest adjustment handle
- Side impact protector (SIP)
- ISOFIX connectors
- Support leg retract button


E COMPONENTES
text_image
Diagram showing a car seat assembly with a close-up of the seat being adjusted for a cable, labeled with step number 1.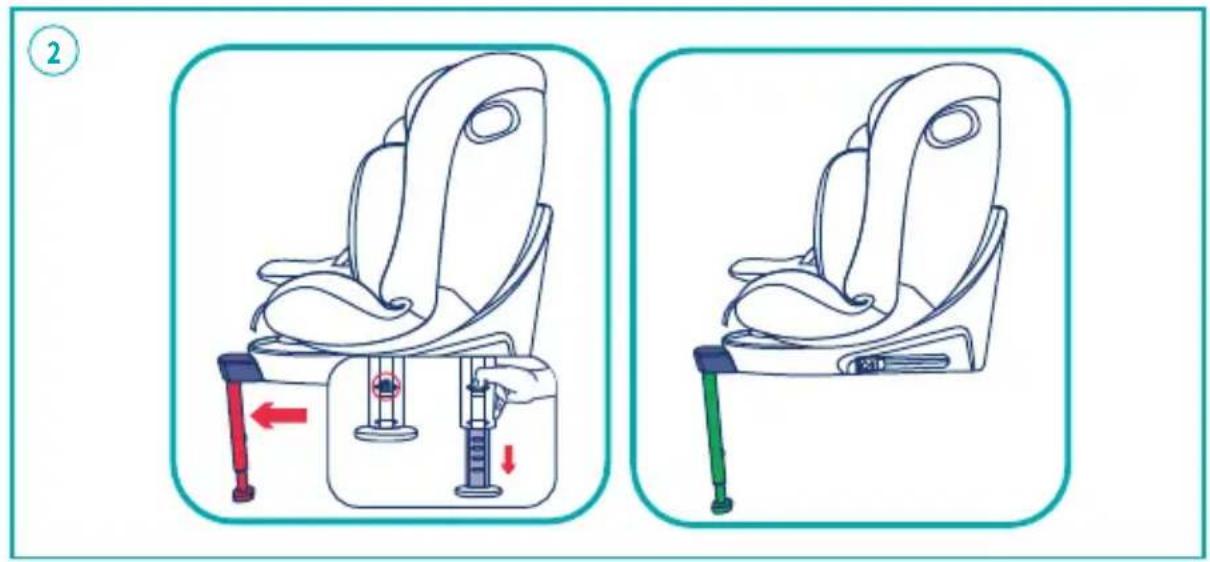
text_image
Illustration showing two steps of a car seat lift exercise, with arrows indicating movement and change in the seat.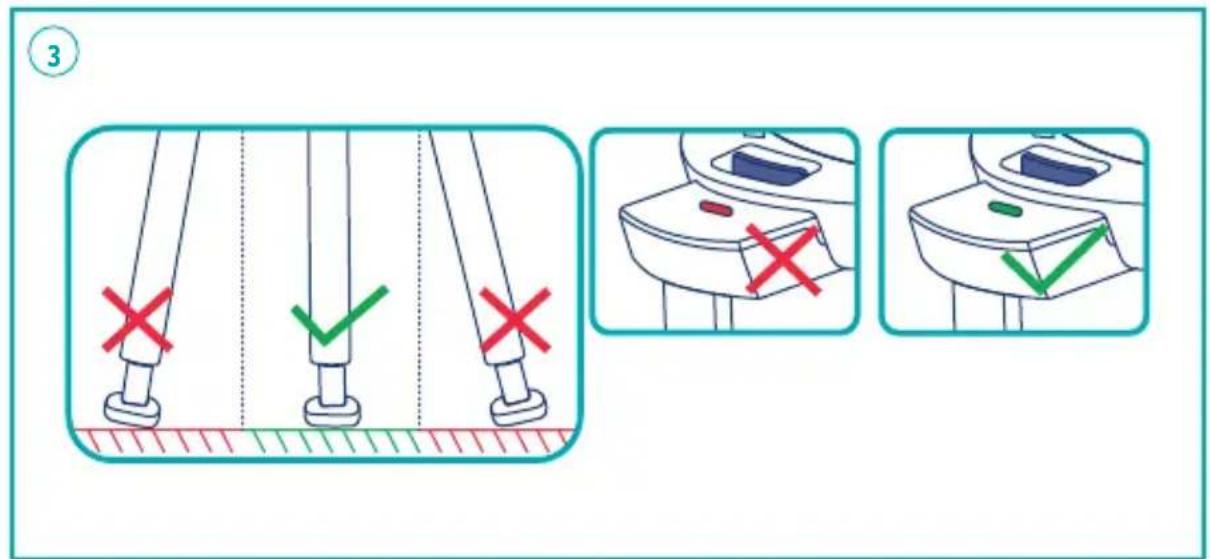
text_image
③ ✓ ✓ ✓4

natural_image
Line drawing of a car seat with a green vertical post (no text or symbols)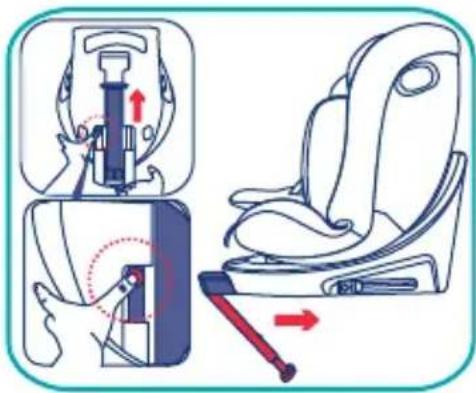
text_image
Diagram illustrating car seatbelting and locking mechanism with labeled parts and directional arrows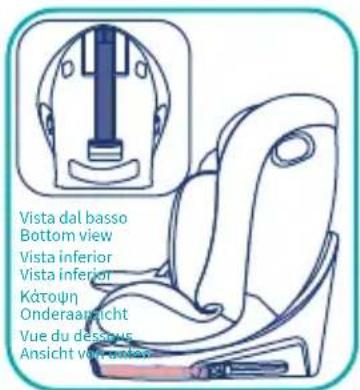
text_image
Vista dal basso Bottom view Vista inferior Vista inferior Kátoşn Onderaansicht Vue du dessous Ansicht voor worden
5
natural_image
Illustration of a hand holding a small object with a red arrow indicating motion or force (no text or symbols)
natural_image
Line drawing of a car seat with adjustable seat and seatbelt (no text or symbols)
natural_image
Line drawing of a car seat with no text or symbols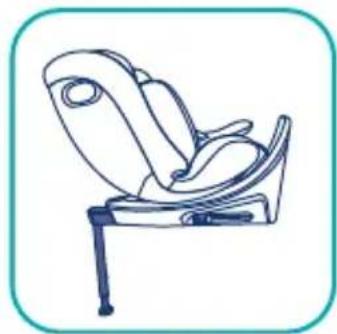
natural_image
Line drawing of a car seat with adjustable seat and seatbelt (no text or symbols)
natural_image
Line drawing of a car seat with seatbelt and seat rack (no text or symbols)
natural_image
Line drawing of a baby car seat with straps and seatbelt (no text or symbols)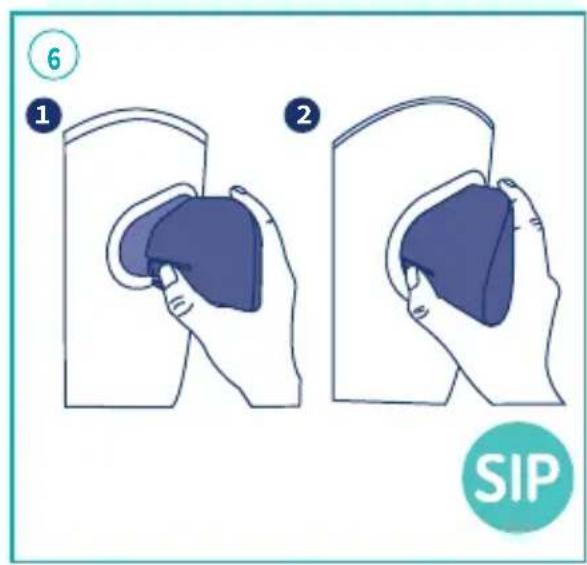
text_image
⑥ ① ② SIP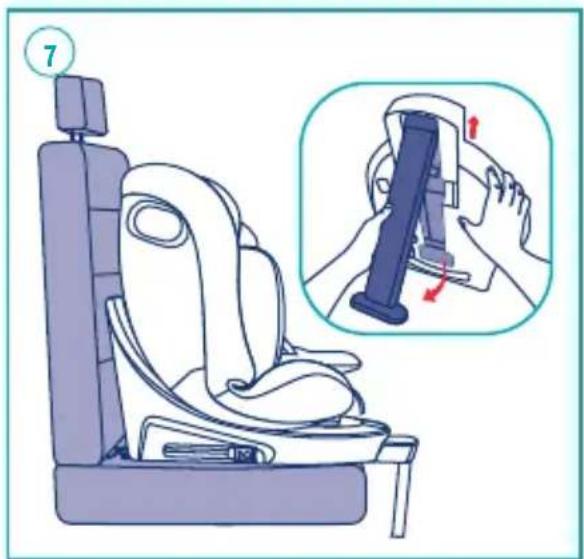
text_image
Illustration of a car seat assembly with a magnified view showing hand positioning and adjustment mechanism.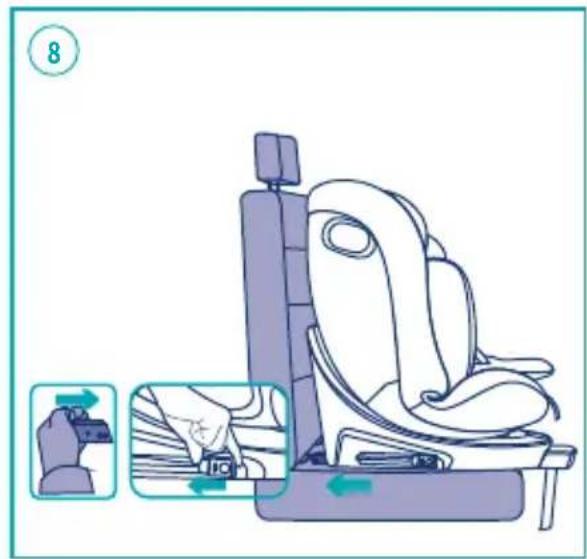
natural_image
Illustration of a car seat assembly with a hand adjusting the seatbelt (no text or symbols present)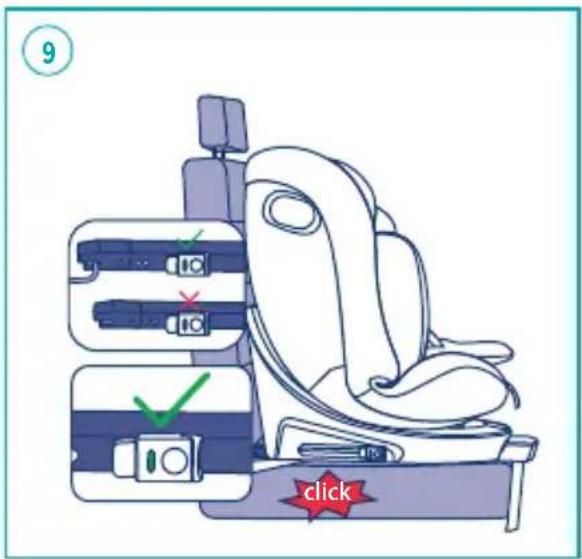
text_image
9 click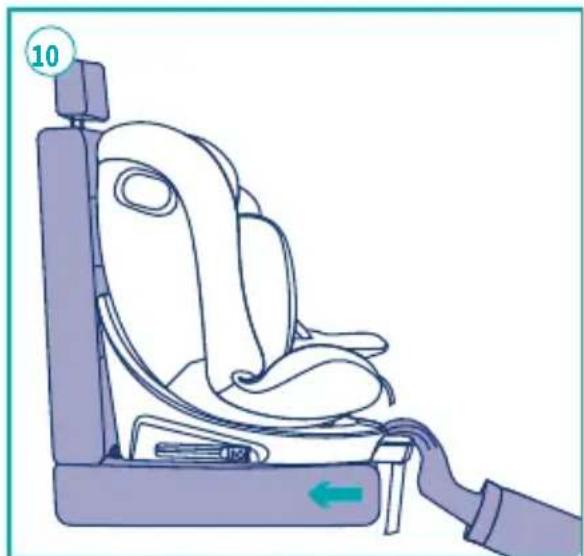
natural_image
Line drawing of a car seat assembly with a numbered label (10) and a green arrow indicating left side (no text or symbols on the diagram itself)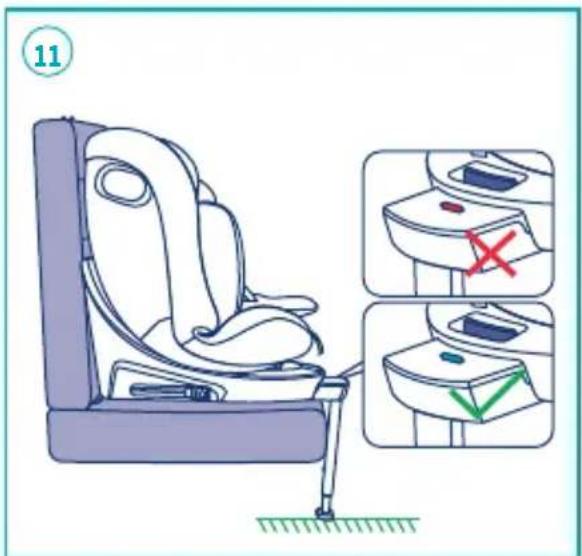
text_image
1113
text_image
12.13 5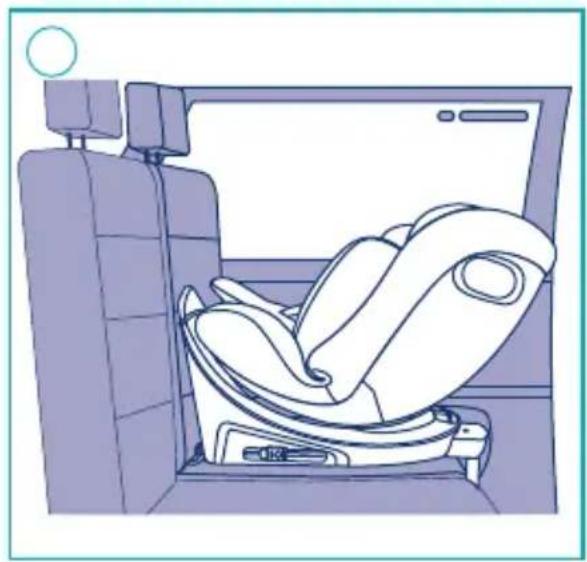
natural_image
Interior view of a car showing a backrest seat and seatbelt (no text or symbols visible)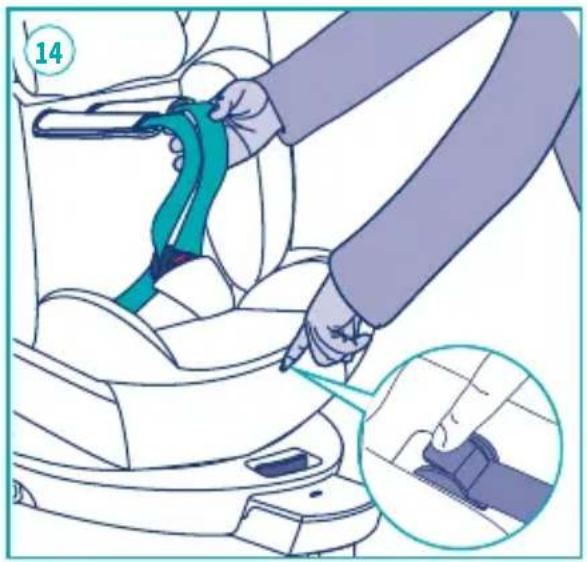
natural_image
Illustration of a car seatbelt being adjusted for a person's seatbelt, showing the grip and seat area (no text or symbols)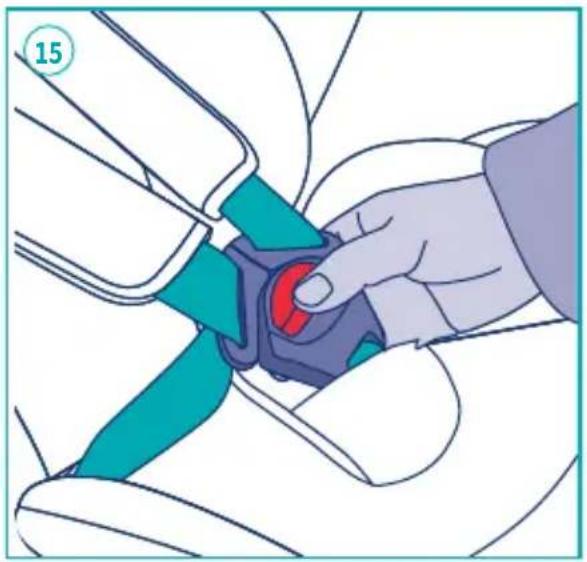
natural_image
Illustration of a hand adjusting a car seatbelt with a red circular button (no text or symbols)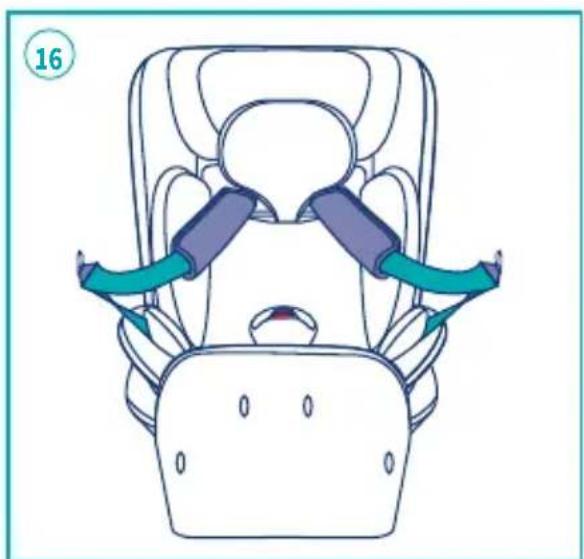
natural_image
Line drawing of a car seat with two blue USB straps attached, no text or symbols present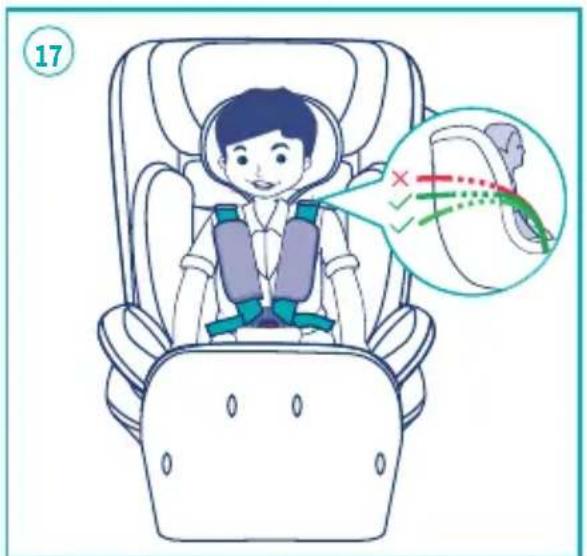
text_image
1714


natural_image
Illustration of a child in a car seat being assisted by an adult, no text or symbols present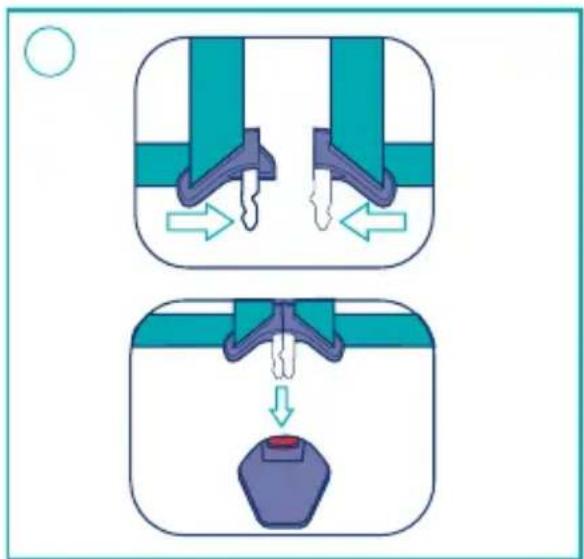
natural_image
Diagram showing two mechanical or fluidic states with arrows indicating flow direction, no text or symbols present.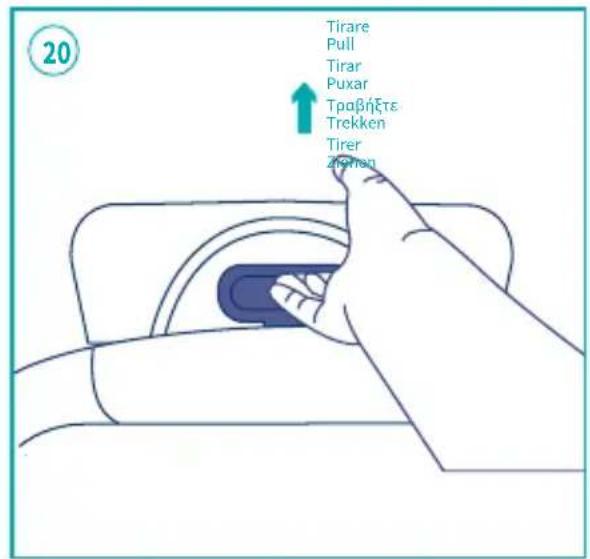
text_image
20 Tirare Pull Tirar Puxar Tpoβήξε Trekken Tirer Zhenen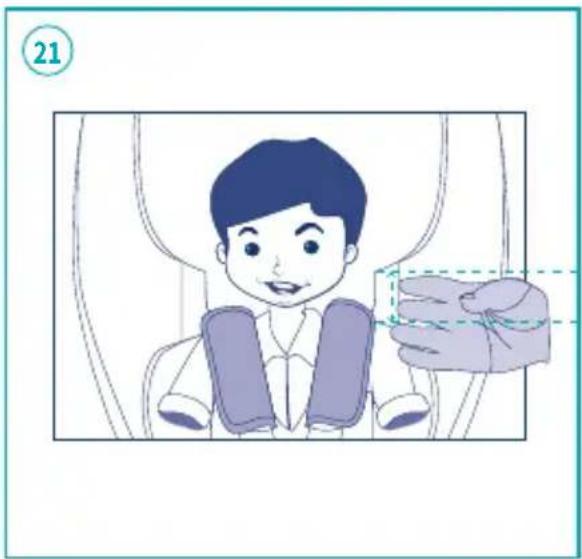
natural_image
Illustration of a child wearing a seatbelt, pointing at a hand gesture (no text or symbols)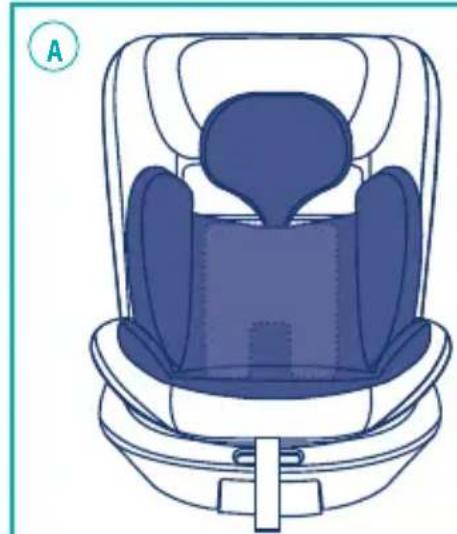
natural_image
Line drawing of a baby car seat with blue upholstery and white seat cover (no text or symbols)Only for heights of 75 cm or less.
natural_image
Illustration of a car seat assembly with two highlighted side views showing left and right movement arrows (no text or symbols)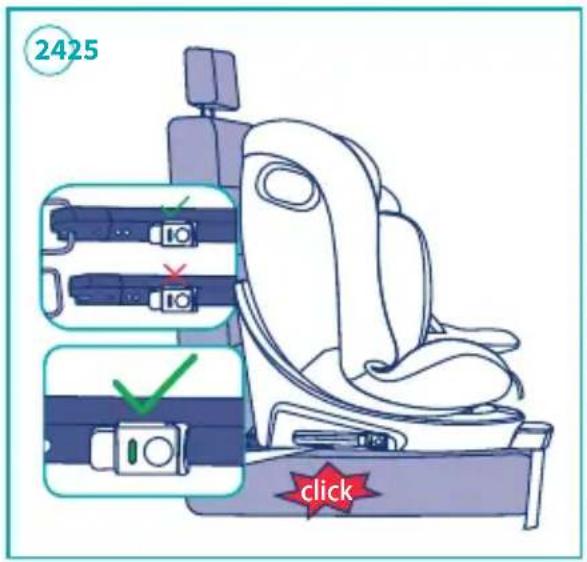
text_image
2425 click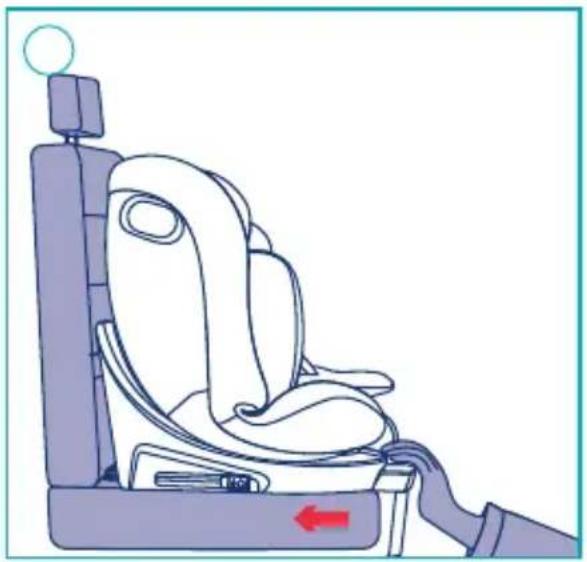
natural_image
Line drawing of a car seat with a red arrow indicating left side (no text or symbols)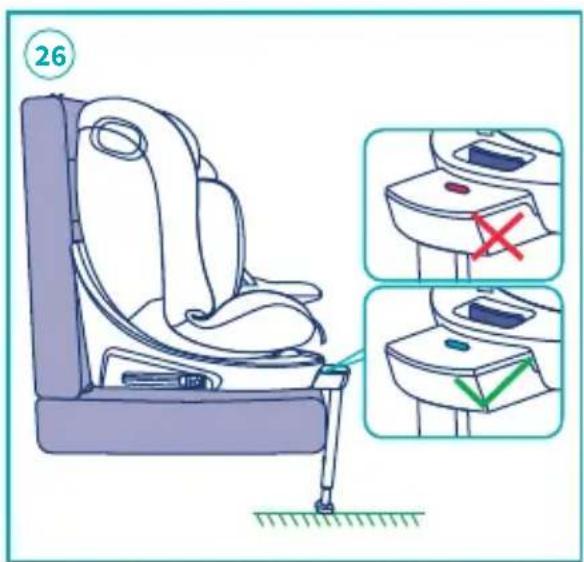
text_image
26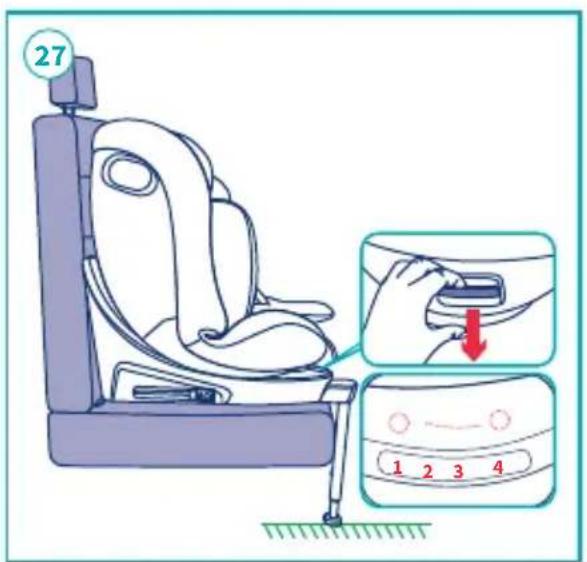
text_image
27 1 2 3 416

natural_image
Line drawing of a car backseat with seatbelt and passenger seat, no text or symbols present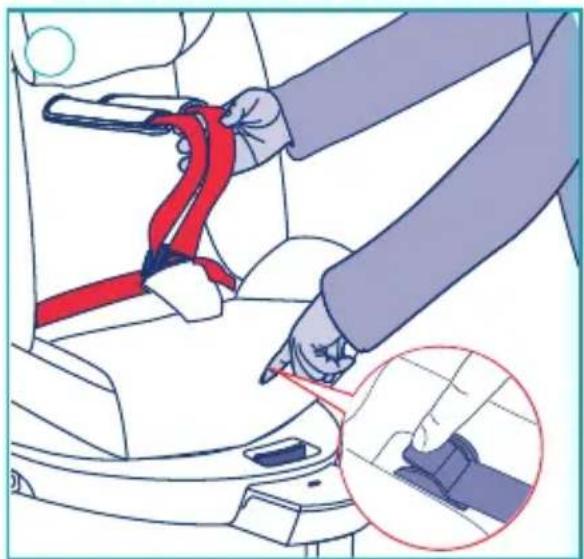
natural_image
Illustration of a person adjusting a red belt on a car seatbelt, with an inset showing the same belt (no text or symbols present)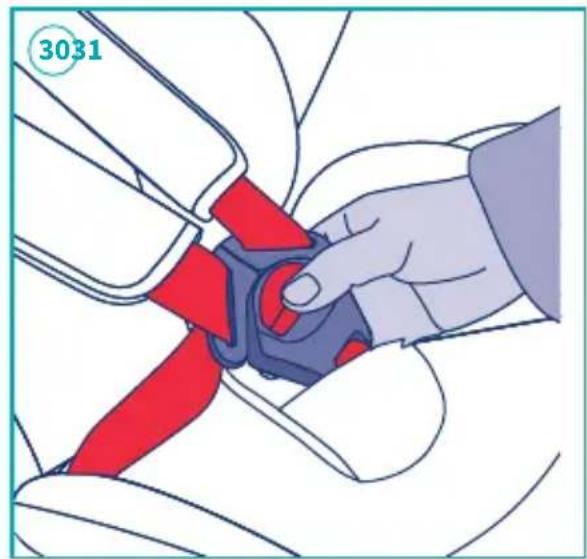
natural_image
Illustration of a hand adjusting a red and blue mechanical component (no text or symbols)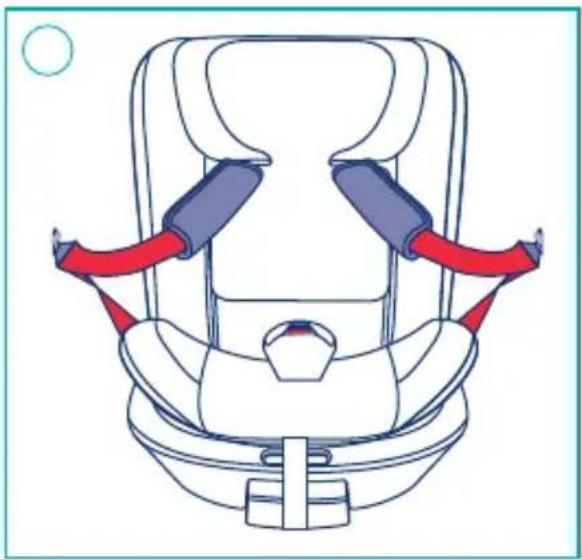
natural_image
Line drawing of a baby car seat with two blue straps and red straps (no text or symbols)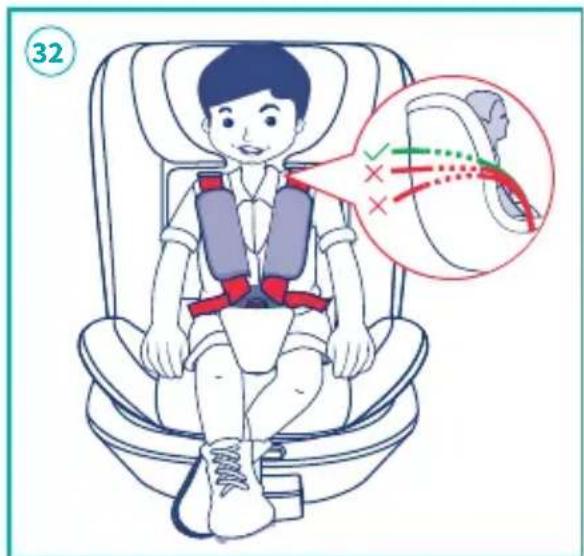
text_image
32
natural_image
Illustration of a child in a car seat being assisted by an adult, showing safety harness and seatbelt (no text or symbols)17


text_image
3435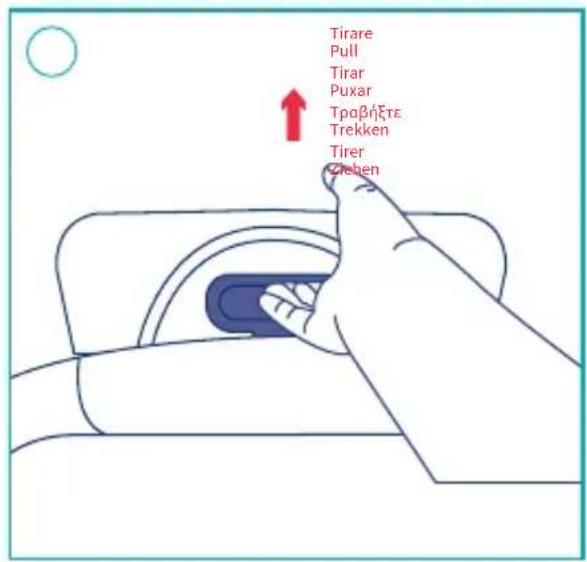
text_image
Tirare Pull Tirar Puxar Tpaβήξτε Trekken Tirer Ziehen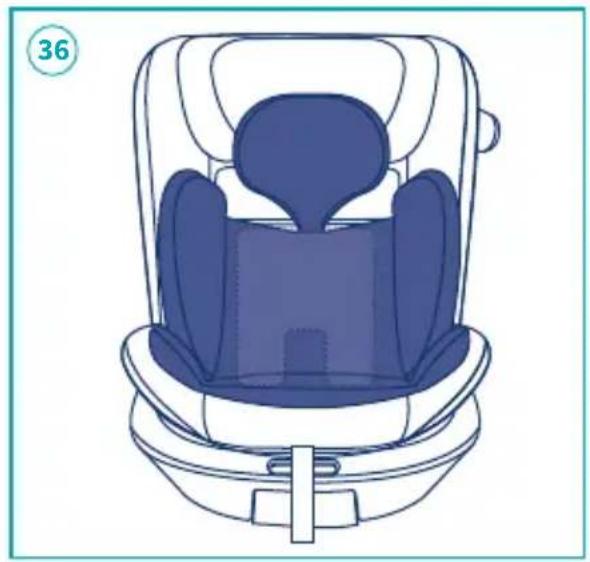
natural_image
Line drawing of a baby car seat with blue upholstery and black seat cover (no text or symbols)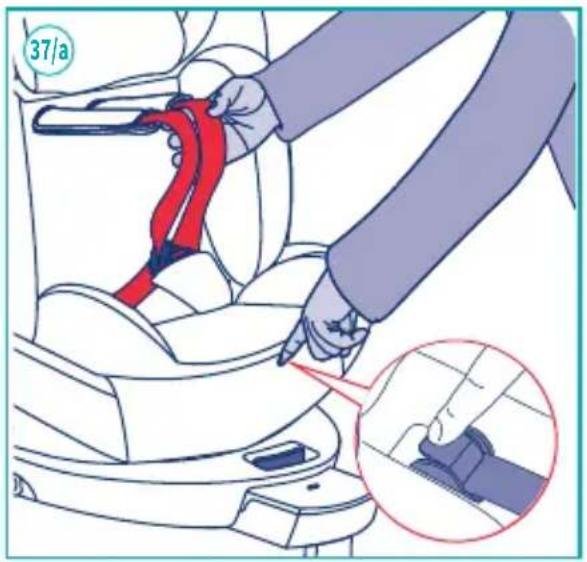
text_image
37/a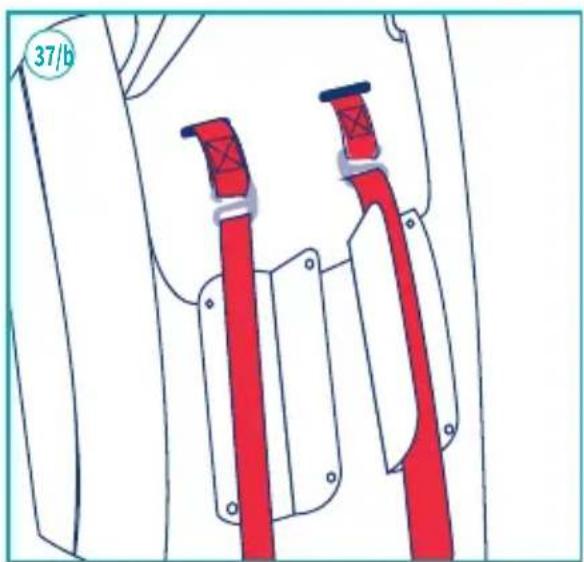
natural_image
Diagram of two red cable connectors with black seals, mounted on white surfaces (no text or symbols)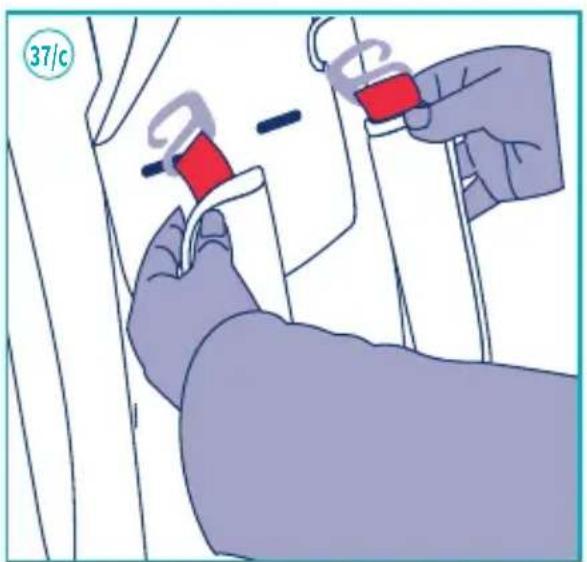
natural_image
Illustration of a hand holding a red plastic clip attached to a white surface, with no visible text or symbols.18




text_image
38/a38/b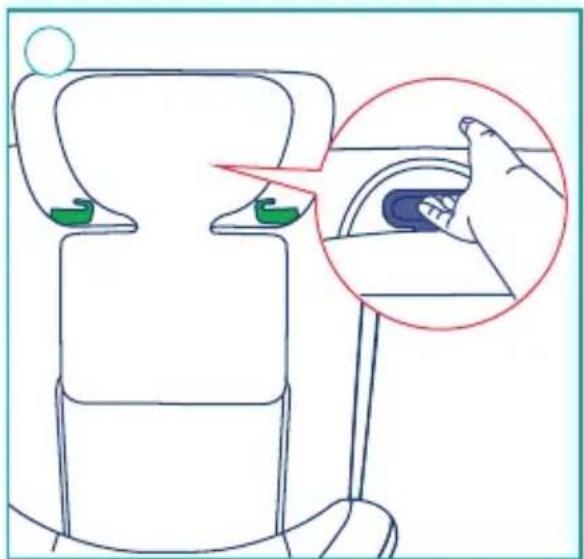
text_image
Diagram showing a robot with green eyes and a magnified view of the eye's finger placement, likely illustrating a medical or diagnostic concept.
text_image
38/c38/d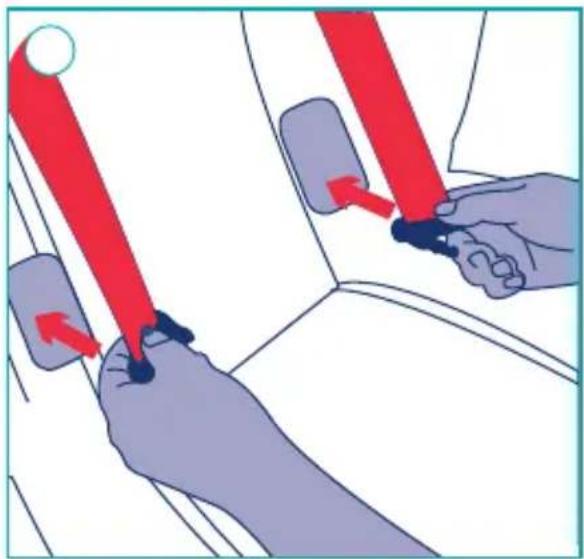
natural_image
Illustration of hands using red belt sensors to connect a car seatbelt (no text or symbols present)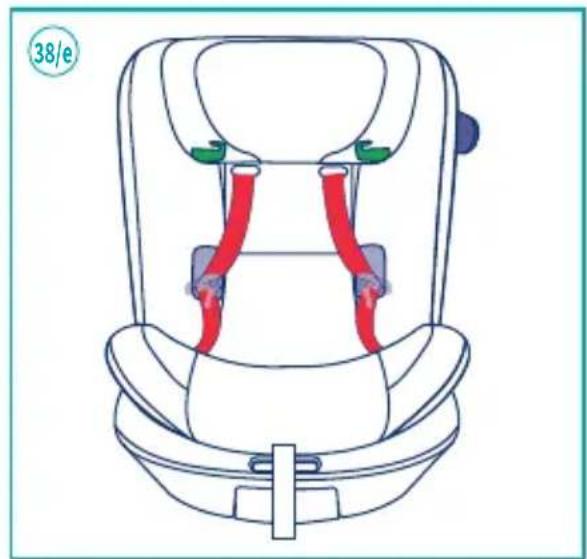
natural_image
Line drawing of a car seat with red and green straps, no text or symbols present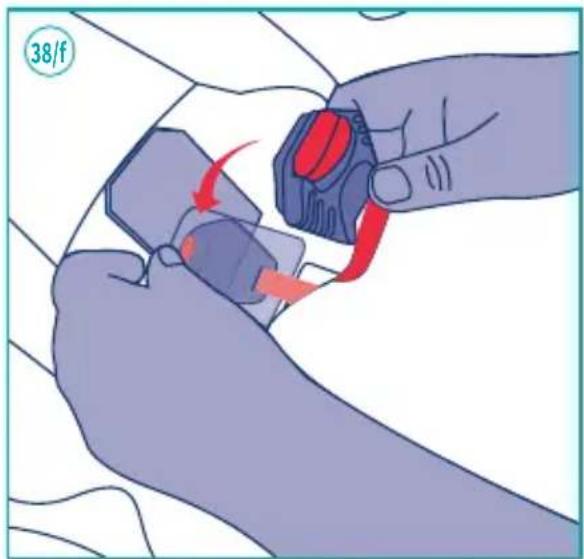
text_image
38/f19
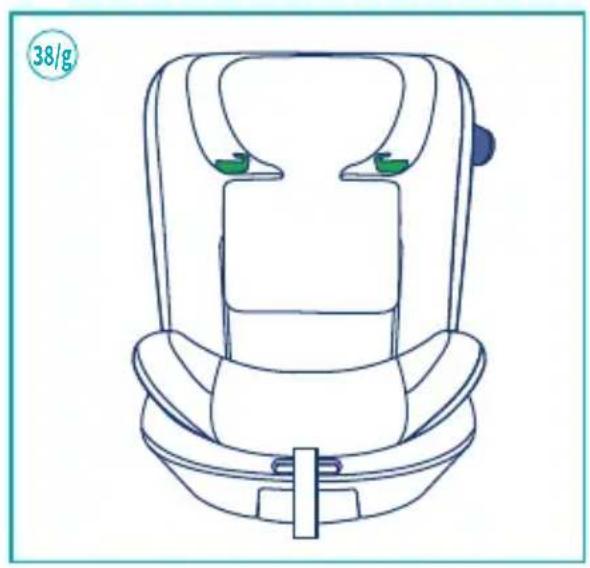
natural_image
Line drawing of a car comfort seat with green eyes and blue buttons (no text or symbols)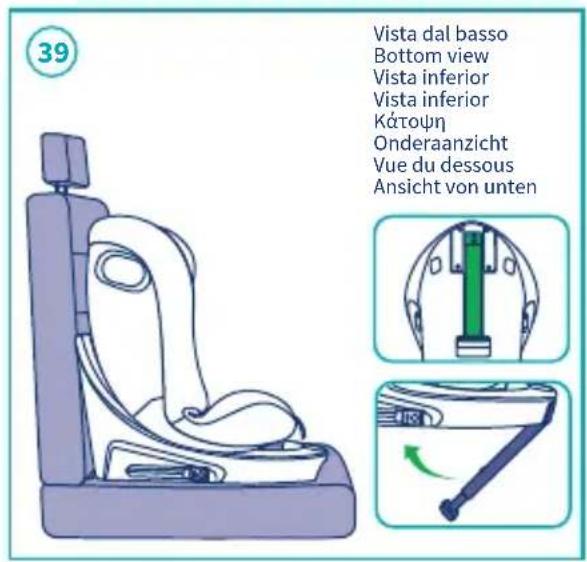
text_image
39 Vista dal basso Bottom view Vista inferior Vista inferior Kátoψη Onderaanzicht Vue du dessous Ansicht von unten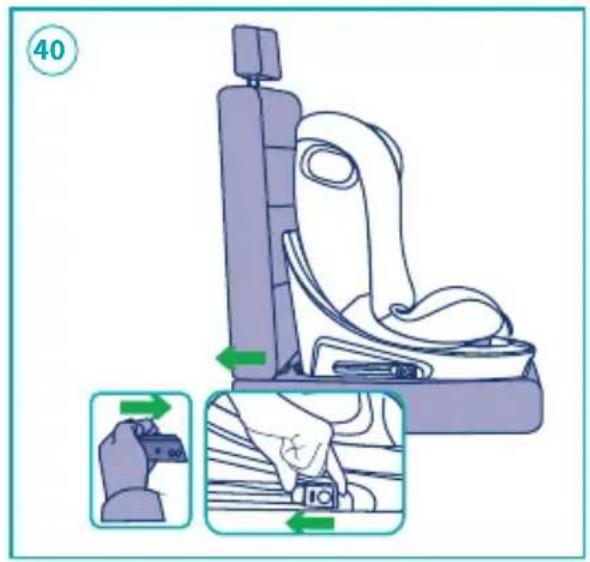
text_image
40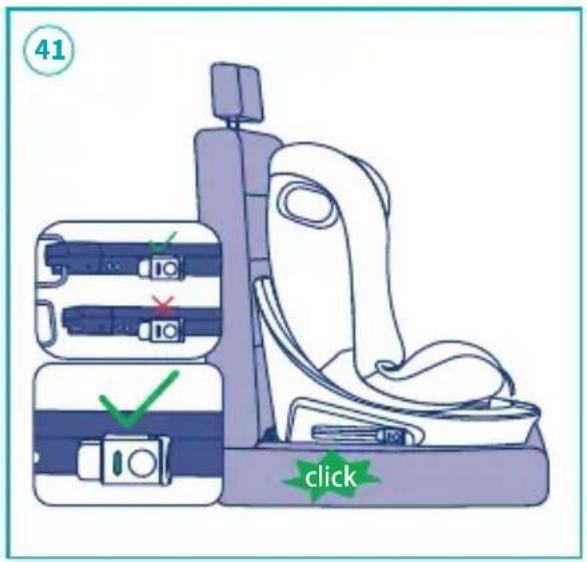
text_image
41 click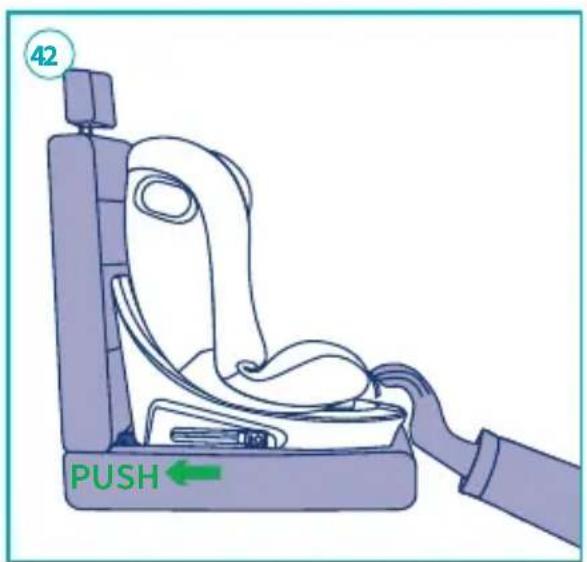
text_image
42 PUSH ←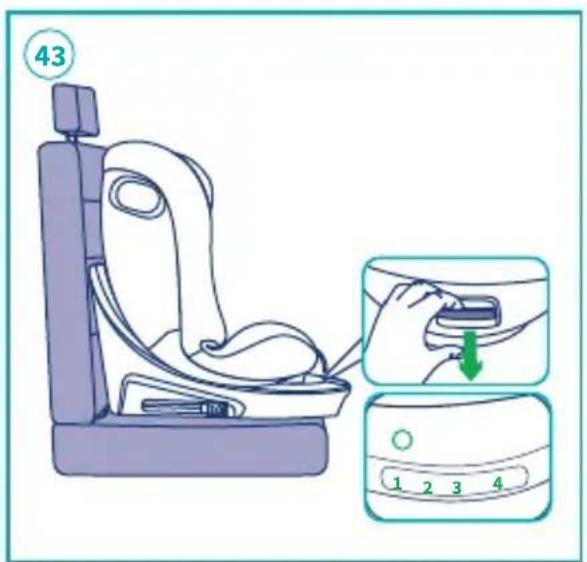
text_image
43 1 2 3 420


natural_image
Line drawing of a car backrest seat and passenger seat inside a vehicle (no text or symbols)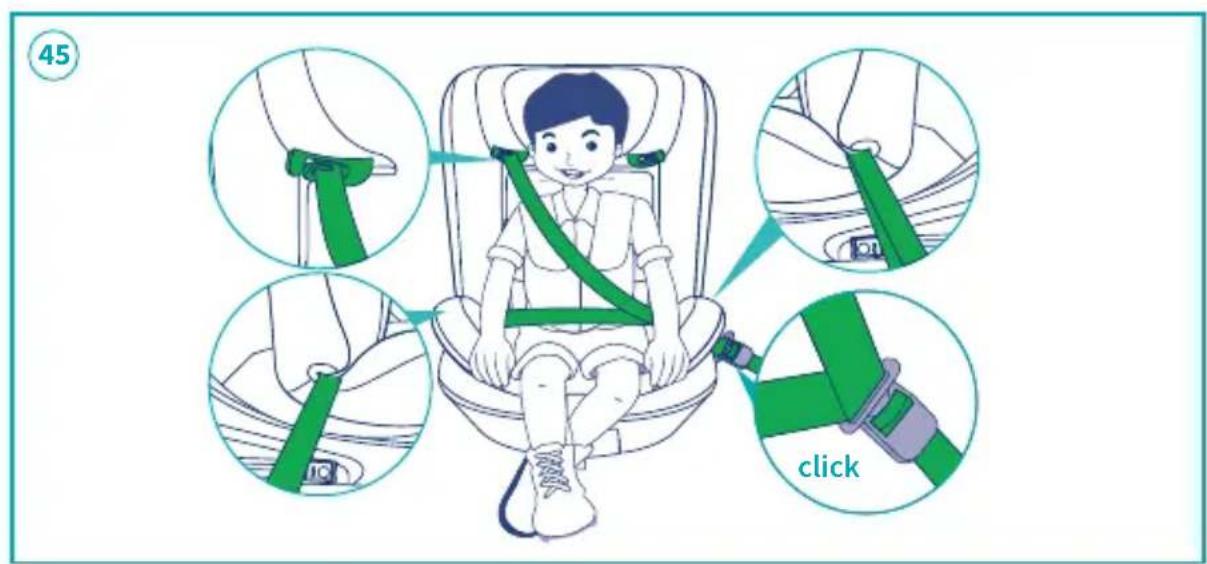
text_image
45 click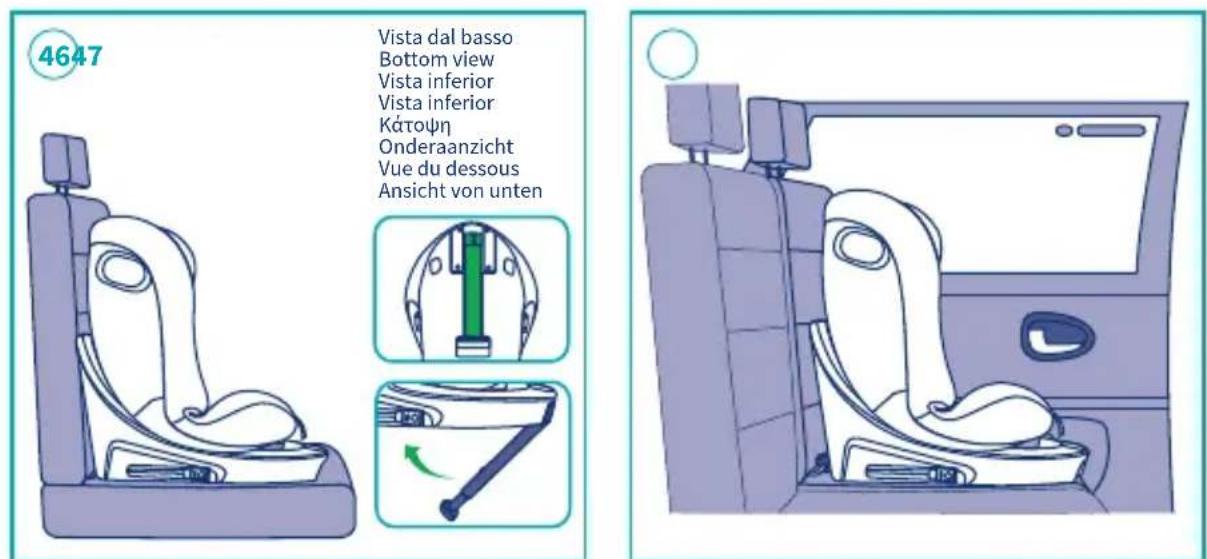
text_image
4647 Vista dal basso Bottom view Vista inferior Vista inferior Kátoψη Onderaanzicht Vue du dessous Ansicht von unten21
text_image
48 click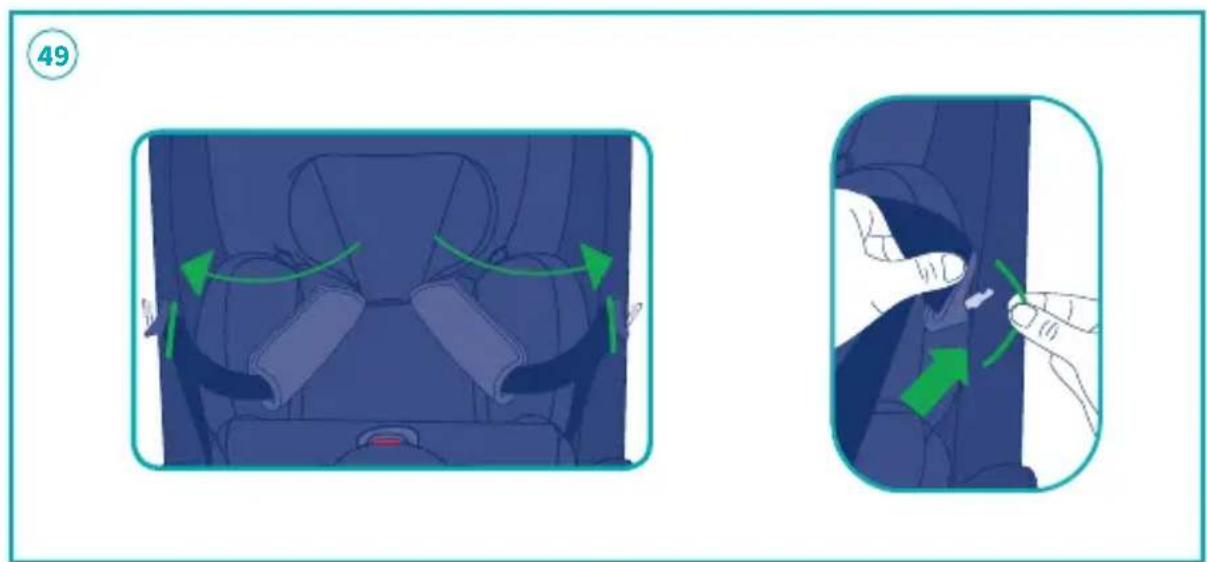
text_image
Diagram illustrating car seatbelt usage and hand movement, showing green arrows indicating changes in seatbelt position.22
natural_image
Illustration of a baby car seat with front and back views, no text or symbols present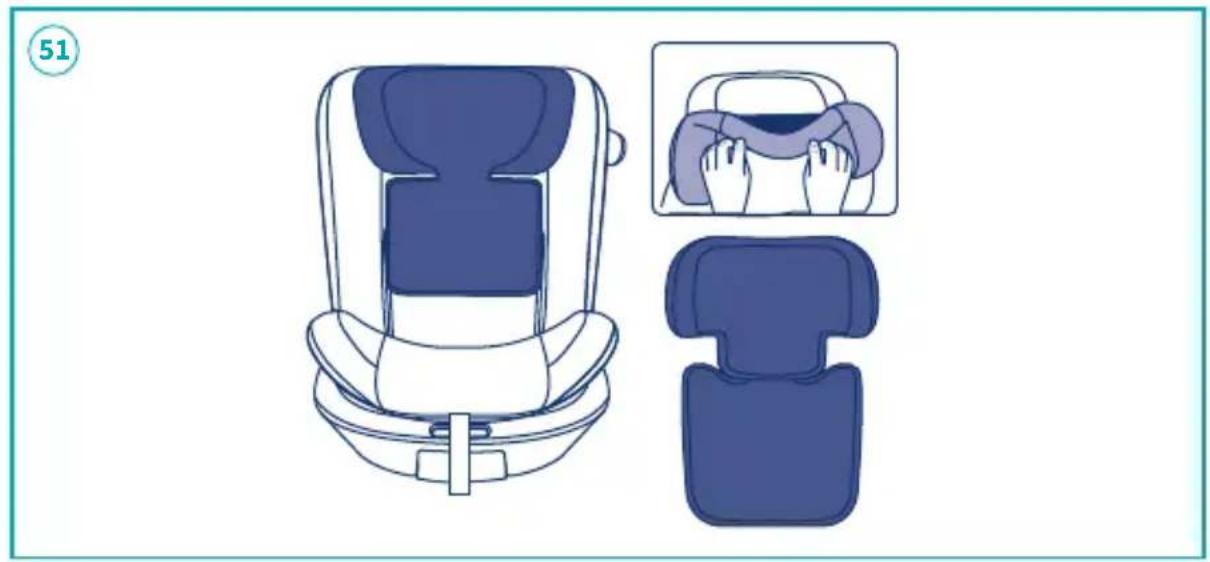
natural_image
Illustration of a car seat with two views: top view showing front seat, side view showing back seat, and close-up of hands adjusting the seat (no text or symbols)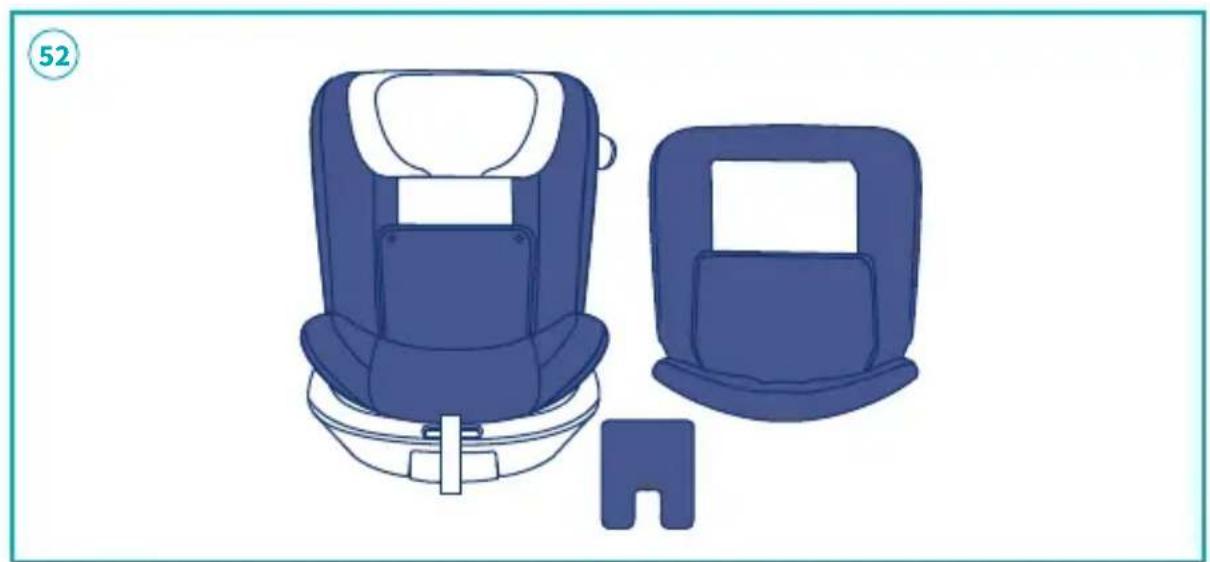
natural_image
Illustration of a blue baby car seat and backrest with a small inset showing the front panel (no text or symbols)text_image
Diagram of a car with checkmarks and red X marks indicating unknown status, showing a grid of checkmarks and a question mark.
Before use, check that the safety seat has all of its parts. Make sure it is in good condition, as this will reduce the risk of an accident. Before use, check that the seat belts are not too loose. Do not expose the safety seat to excessively cold or hot temperatures or damp environments. Keep the instruction manual in a safe place. In the event of an accident, replace the car seat with a new one. Contact your retailer if you have any questions. WARNING! BEFORE USE, REMOVE AND DISPOSE OF ALL PLASTIC BAGS AND PACKAGING MATERIALS AND KEEP THEM OUT OF REACH OF CHILDREN. IT IS RECOMMENDED TO DISPOSE OF THESE ITEMS AT AN APPROPRIATE WASTE SORTING POINT, AS REQUIRED BY CURRENT REGULATIONS.
SUPPORT LEG INSTALLATION
- Open the support leg and pull outward. When you hear a click, the support leg is in place.
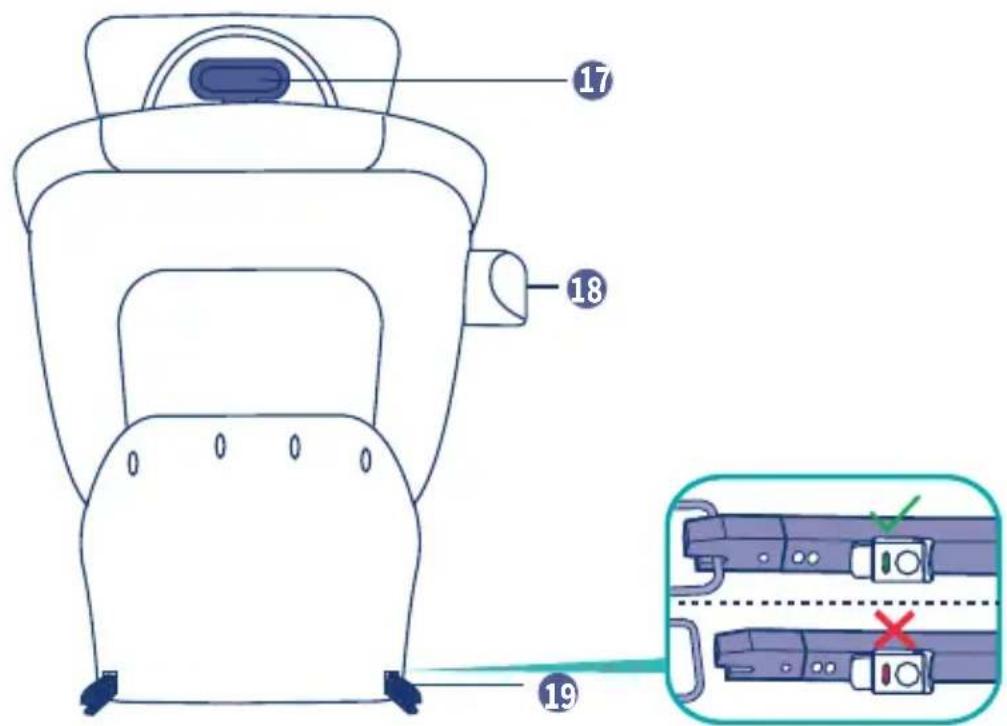
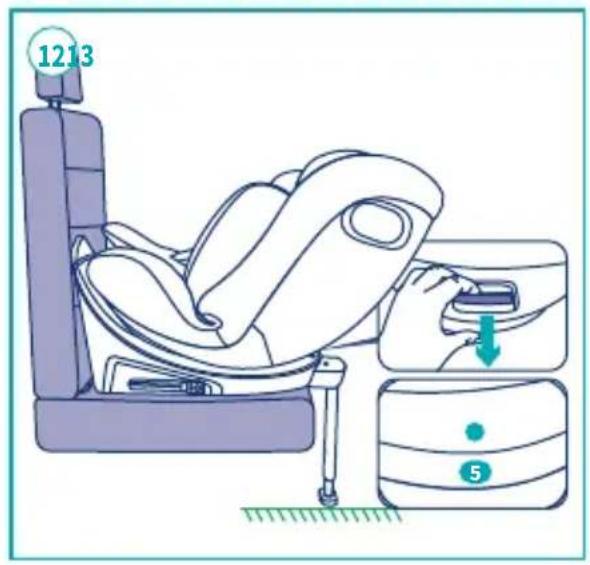
- Press the support leg release button and lower the inner part of the support leg to support the bottom surface. Note that the bottom surface should lie completely flat against the contact surface. When the upper indicator turns green, it is correctly installed.
- If the indicator is red, the support
leg is not properly installed; if the indicator turns green, the support leg is properly installed.
RETRACTING THE SUPPORTLEG
- Retracting the leg: Press the button below the base (circled in red) to retract the support leg.
ROTATION FUNCTION
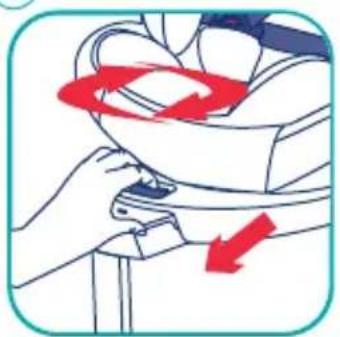
- Use two fingers to pull the rotation button once, and with your other hand rotate the main body of the seat until you hear it click into place. Check that the rotation indicator is green. ATTENTION: the rotation function activates once the support leg has been fully opened.
SIDE IMPACT PROTECTOR FUNCTION
- Your car seat is fitted with a spacer which, in the event of side impact, creates some distance between the side of the seat and the collision zone. This SIP should be activated on the side nearest the vehicle door.
I-SIZE UNIVERSAL (40-105 cm): ISOFIX+- SUPPORT LEG+ FIVE-POINT HARNESS
ATTENTION:
- Suitable for models with ISOFIX systems compliant with ECE R14.
- This i-size seat is installed in the rearward facing position, suitable
for children with a height of 40-105 cm. Only one seat can be fitted in the fifth position.
- i-size seats must not be installed on seats fitted with active airbags.
- IMPORTANT - DO NOT USE IN THE FORWARD FACING POSITION BEFORE THE CHILD IS 15 MONTHS OLD (Refer to the instruction manual).
- IMPORTANT - The seat should not be used in the side position while driving.
I-SIZE (40-105 cm) (rearward facing)
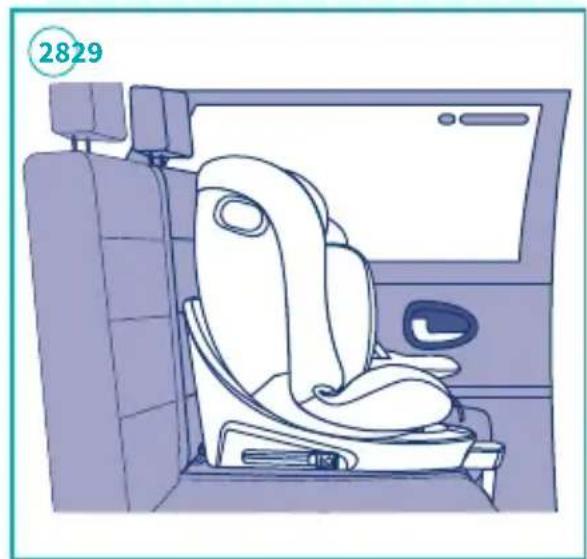
- Extend the support leg and fit it into place, making sure the indicator turns green.
- Press the ISOFIX button at the bottom of the seat forward and backward with your hand, extend the ISOFIX connectors on both sides to the maximum length, press the end of the ISOFIX, and it will not be retracted.
- Insert the ISOFIX connectors of the child car seat into the corresponding ISOFIX anchors of the car, you will hear them lock with a click and the display window will show the green symbol. If the ISOFIX connectors are inserted incorrectly, the window will display the red symbol.
-
Push the child car seat firmly against the backrest of the vehicle seat. Shake the seat from side to side to make sure it is securely attached.
-
Extend the support leg to its maximum length until the indicator on the top of the support leg turns green.
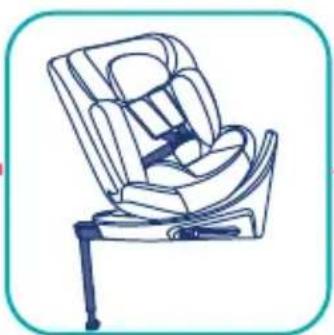
- Adjust the body of the safety seat from position 1, forward facing, and rotate it to position 5, rearward facing.
- Install the SIP and, once the safety seat has been installed, close the car door.
I-SIZE (40-105 cm) PUTTING THE CHILD IN THE SEAT (rearward facing position)
- Press and hold the central regulator button while pulling the shoulder strap outwards to loosen the shoulder strap.
- Press the red button to open the buckle.
- Pull out the shoulder straps and place them on both sides of the seat.
- When the i-size safety seat (40-105 cm) is used by children, please refer to the picture above to see the correct position for the shoulder strap.
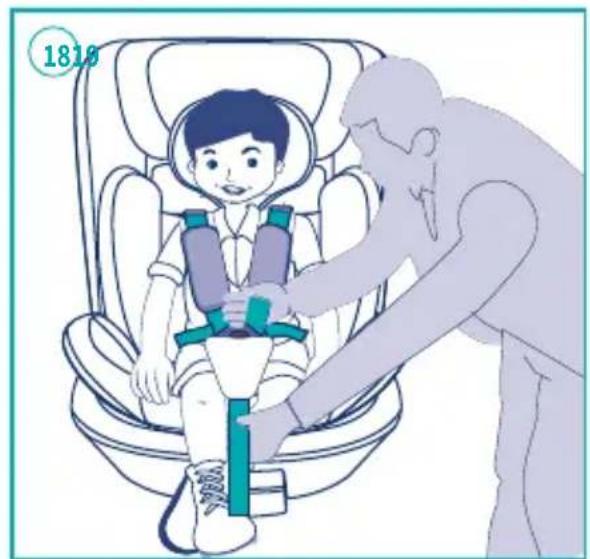
- Pull and adjust the seat belt outward to make the shoulder belt effectively restrain the child, and make sure there is a certain amount of play to prevent the belt from pressing the child too tightly. The adult should be able to slip their hand just between the seat belt and the child's chest. The belt must not be too loose or too tight, and make sure that the child's
pelvis is held securely when the belt is worn. Note: The bottom of both sides of the shoulder pads should be about the same level and pulled down to the bottom.
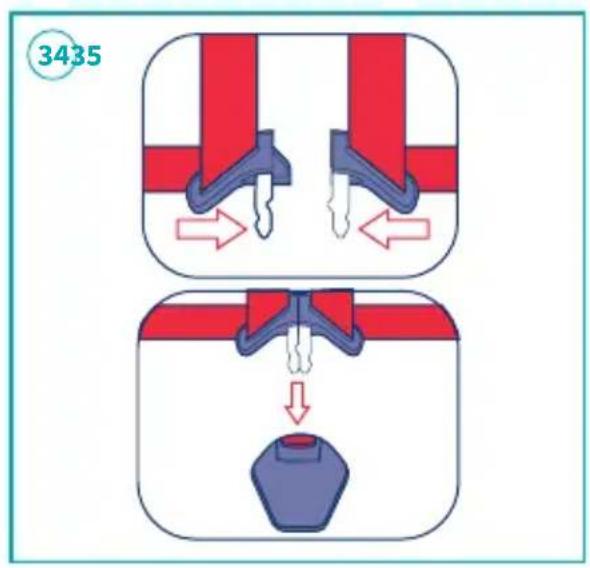
- Fastening the buckle: pull the buckle insertion points together and then insert them into the buckle slot at the same time. The buckle will click when securely locked. Then pull upwards on the straps to check the buckle is properly locked. To unfasten the buckle, press the red button and the buckle inserts will pop out automatically.
- Pull the headrest handle upward to adjust the height of the headrest. Adjust the height to the correct position according to the child's height.
- Adjust the headrest to the correct height (Note: you should always be able to put 1-2 fingers between the lower part of the headrest and the shoulder).
A_Cushion insert
B_Only for children up to 75 cm tall
I-SIZE UNIVERSAL (76-105 cm): ISOFIX+- SUPPORT LEG+ FIVE-POINT HARNESS
ATTENTION:
- Suitable for models with ISOFIX systems compliant with ECE R14.
-
The i-size seat is installed in the forward facing position, suitable for children with a height of 76-105 cm. It has 4 adjustable sitting positions, 1/2/3/4 respectively.
-
I-size seats must not be installed on a vehicle seat fitted with active airbags.
- IMPORTANT - DO NOT USE IN THE FORWARD FACING POSITION BEFORE THE CHILD IS 15 MONTHS OLD (Refer to the instruction manual)
- IMPORTANT – The seat should not be used in the side position while driving.
I-SIZE (76-105 cm) (forward facing)
- Extend the support leg and fit it into place, making sure the indicator turns green.
- Press the ISOFIX button at the bottom of the seat forward and backward with your hand, extend the ISOFIX connectors on both sides to the maximum length, press the end of the ISOFIX, and it will not be retracted.
- Insert the ISOFIX connectors of the child car seat into the corresponding ISOFIX anchors of the car, you will hear them lock with a click and the display window will show the green symbol. If the ISOFIX connectors are inserted incorrectly, the window will display the red symbol.
- Push the child car seat firmly against the backrest of the vehicle seat. Shake the seat from side to side to make sure it is securely attached.
- Extend the support leg to its


maximum length until the indicator on the top of the support leg turns green.
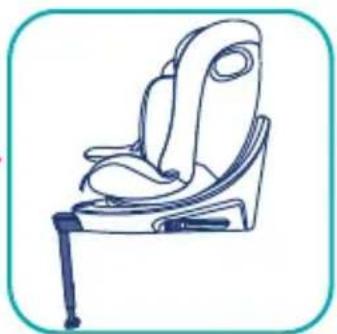
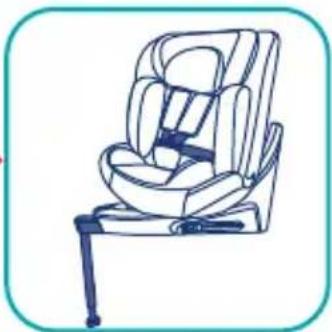
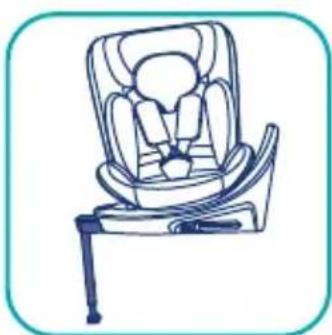
- Rotate the child car seat to the forward facing position, then pull the reclining button to adjust the reclining position as required.
- Press the button to activate the SIP and, once the safety seat has been installed, close the car door.
I-SIZE (76-105 cm) PUTTING THE CHILD IN THE SEAT
(forward facing position)
- Press and hold the central regulator button while pulling the shoulder strap outwards to loosen the shoulder strap.
- Press the red button to open the buckle.
- Pull out the shoulder straps and place them on both sides of the seat.
- When the i-size safety seat (40-105 cm) is used by children, please refer to the picture above to see the correct position for the shoulder strap.
- Pull and adjust the seat belt outward to make the shoulder belt effectively restrain the child, and make sure there is a certain amount of play to prevent the seat belt from pressing the child too tightly. The adult should be able to slip their hand just between the seat belt and the child's chest. The belt must not be too loose or too tight, and
make sure that the child's pelvis is held securely when the belt is worn. Note: The bottom of both sides of the shoulder pads should be about the same level and pulled down to the bottom.
- Fastening the buckle: pull the buckle insertion points together, and then insert them into the buckle slot at the same time. The buckle will click when securely locked, then pull upwards on the straps to check that the buckle is properly locked. To unfasten the buckle, press the red button and the buckle inserts will pop out automatically.
- Pull the headrest handle upward to adjust the height of the headrest. Adjust the height to the correct position according to the child's height.
- Once the child is seated, adjust the headrest to the correct position (note: the lowest part of the headrest should be 1 -2 fingerbreadths above the child's shoulders.
A\_Cushion insert
B\_Only for children up to 75 cm tall
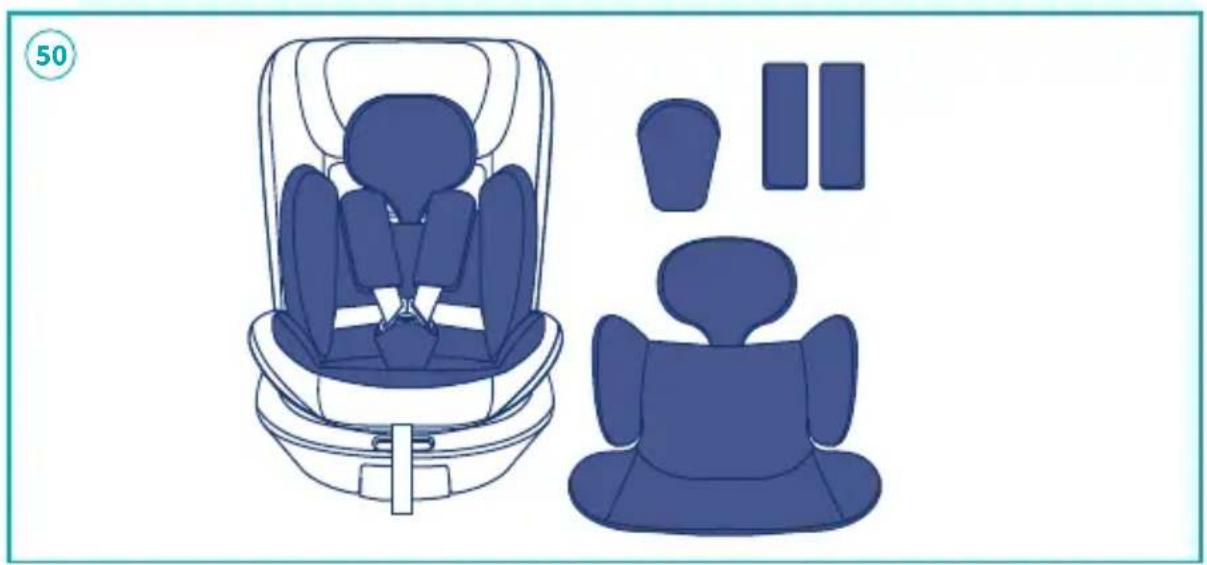
- Press button A to pull the straps up as far as they will go. Remove the shoulder pads from the webbing. Keep them for future use.
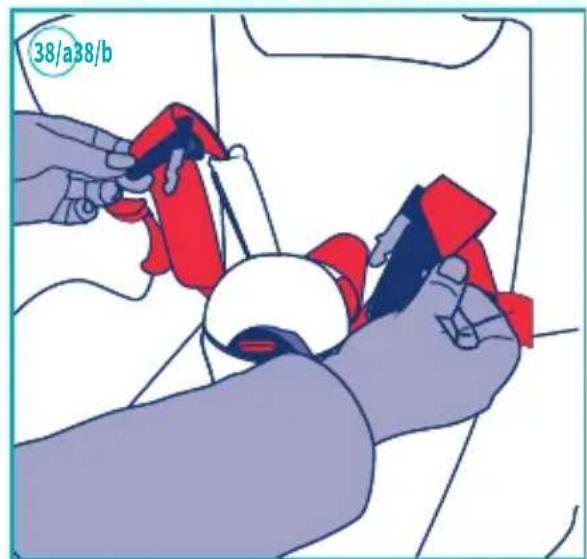
- Press the buckle button to release the buckle inserts. Adjust the headrest to expose the slots in the backrest, peel off the fabric, and put the two inserts into the slots
of the backrest. Store the buckle in the storage compartment of the safety seat. Check that the headrest moves to the highest position freely. Replace the fabric smoothly.
I-SIZE UNIVERSAL(100-150 cm):
OPTION 1: ISOFIX CONNECTORS+- THREE-POINT CAR SEAT BELT OPTION 2: THREE-POINT CAR SEAT BELT ATTENTION:
- This ECRS seat is installed in the forward facing position and is suitable for children with a height of 100-150 cm. It has 1 adjustable sitting position.
- Conceal the five-point harness and pads before using the ECRS seat.
- Suitable for models with ISOFIX systems compliant with ECE R14 and with three-point seat belt/seat belt with a retractor compliant with ECE R16.
- Don’t use force-bearing points without markings
I-SIZE (100-150 cm) (forward facing)
- Retract the support leg and store it in the base.
- Press the ISOFIX button at the bottom of the seat forward and backward with your hand, extend the ISOFIX connectors on both sides to the maximum length, press the end of the ISOFIX, and it will not be retracted.
- Insert the ISOFIX connectors
of the child car seat into the corresponding ISOFIX anchors of the car, you will hear them lock with a click and the display window will show the green symbol. If the ISOFIX connectors are inserted incorrectly, the window will display the red symbol.
- Push the child car seat firmly against the backrest of the vehicle seat. Shake the seat from side to side to make sure it is securely attached.
- Adjust the child car seat in the forward facing position, suitable for children with a height of 100-150 cm, 1 reclining position is available.
- Install the SIP and, once the safety seat has been installed, close the car door.
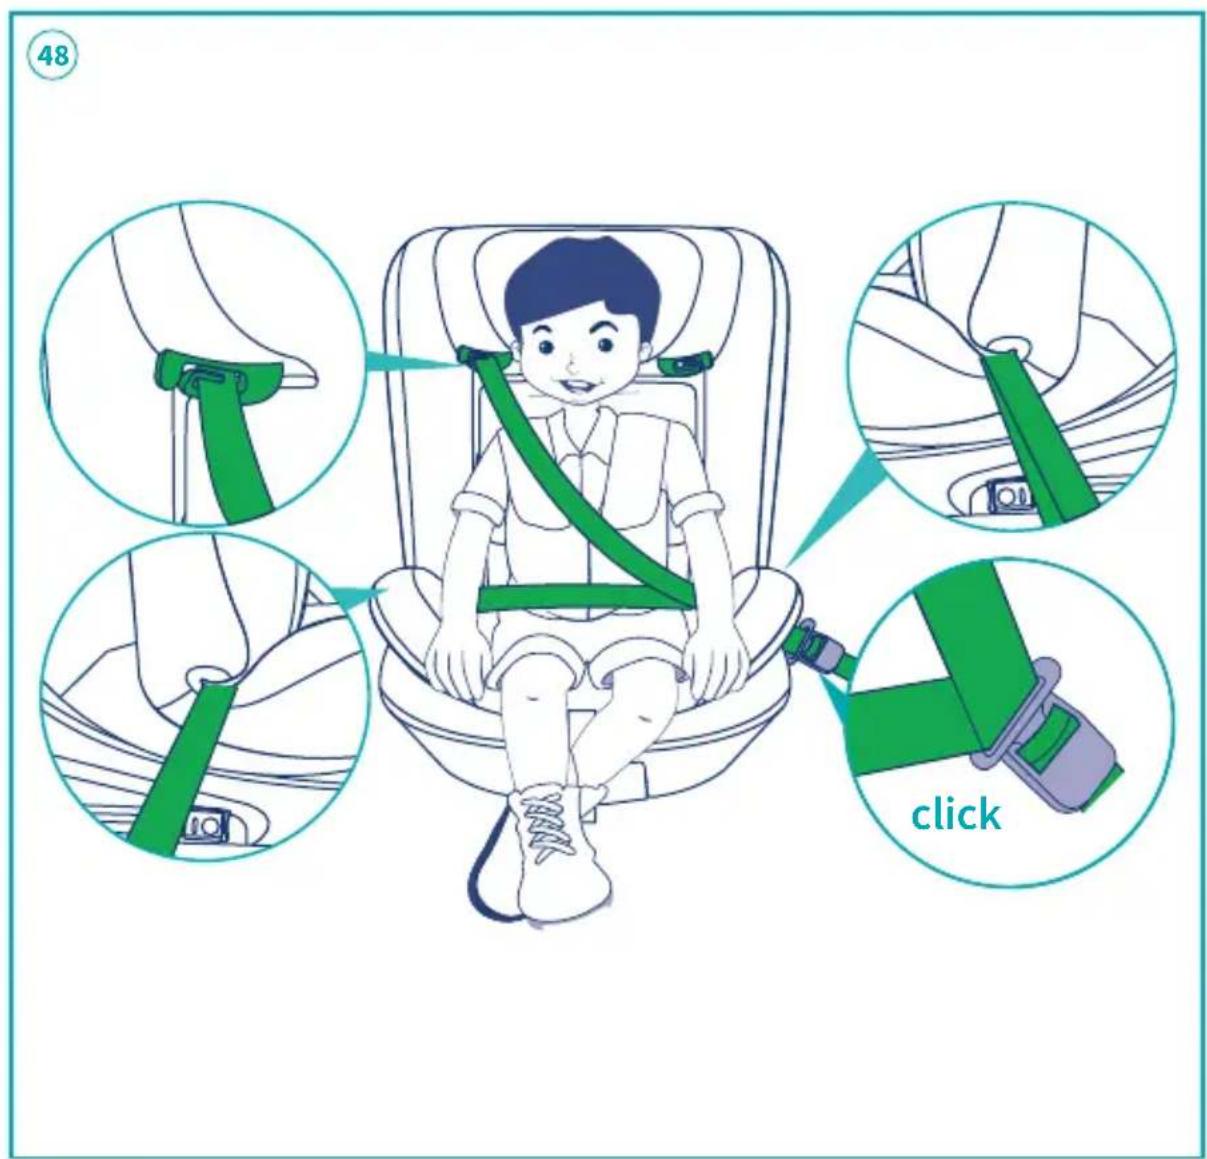
- Place the child in the safety seat, adjust the headrest to the correct position, with the guide hook slightly higher (1-2 cm) than the child's shoulders, then pass the diagonal seat belt through the green guide under the headrest. The lap belt must go through green hook and both seat belts should pass through the green guide under the armrest. Click the metal parts into the buckle of the car seat belt. Check that the belt is not twisted and tighten the seat belt by pulling the diagonal belt upwards. Check that the lap belt is positioned as low as possible, across the thighs and
not around the tummy. Don't use force-bearing points without markings.
Don't use the support leg when using the adult seat belt
THREE-POINT CAR SEAT BELT
-
Retract the support leg and store it in the base.
-
Place the child in the safety seat, adjust the headrest to the correct position, with the guide hook slightly higher (1-2 cm) than the child's shoulders, then pass the diagonal seat belt through the green guide under the headrest. The lap belt must go through the green hook and both seat belts should pass through the green guide under the armrest. Click the metal parts into the buckle of the car seat belt. Check that the belt is not twisted and tighten the seat belt by pulling the diagonal belt upwards. Check that the lap belt is positioned as low as possible, across the thighs and not around the tummy.
-
Press the button to activate the SIP and, once the safety seat has been installed, close the car door. Don't use force-bearing points without markings.
-
In order to easily place the child in the child safety seat, pass the seat belts through the special elastic bands on the sides, as shown in figure 49.
Don't use the support leg when using the adult seat belt.
REMOVING THE COVER
- Remove the inner padded pillow and shoulder pads.
- Remove the headrest cover: guide the tension at the hook. Once the belt is detached, take off the fabric cover.
- Remove the fabric cover from the body of the safety seat: clip the body of the safety seat open and remove the fabric cover. It is suitable for use until the baby is 60 cm tall.
MAINTENANCE
Store the harness away and remove the padding. Take the fabric cover off the headrest. Unfasten the button and remove the fabric cover from the lower part of the headrest. To fit the fabric cover again, follow the same steps in reverse order. If the following occurs, the safety lock will not function properly:
- When the red button is pressed, it opens slowly.
- It is not possible to insert the metal parts of the safety lock into the fastener or, when inserted, they automatically detach.
- The safety button does not make a click sound.
- It is difficult to insert the metal parts into the safety lock.
- Excessive force is required to open the safety lock. The five-point safety harness is very important for the child’s safety. Incorrect use of the five-point harness may put the child’s safety at risk.
Do not use oils or other lubricants on the safety lock. Defects in the functioning of the safety lock are usually caused by inserting foreign objects into the lock.
CHECKING THE CONDITION OF THE COMPONENTS
- It is recommended to regularly check the condition of the following components to make sure they are not damaged or worn:
- Lining: check that the padding does not come out from the seams. Check the condition of:
- the seams: they must always be intact and undamaged.
- harness straps: check that the fabric lining is not frayed and that the harness strap is not worn out in the areas around the adjuster on the crotch strap, shoulders and harness adjustment plate.
- plastic parts: check that the plastic parts are not worn out, damaged or faded.
WARNINGS
- WARNING! BEFORE US E, REMOVE AND DISPOSE OF ALL PLASTIC BAGS AND PACKAGING MATERIALS AND KEEP THEM OUT OF REACH OF CHILDREN IT IS RECOMMENDED TO DISPOSE OF THESE ITEMS AT AN APPROPRIATE WASTE SORTING COLLECTION POINT, AS REQUIRED BY REGULATIONS IN FORCE.
• WARNING! If the child car seat is
damaged, deformed or excessively worn, it must be replaced as its original safety features may have been compromised. Make sure there are no protruding elements that could cause damage to the child or to the vehicle upholstery: in this case, do not use the child seat or contact the manufacturer if in doubt.
- The metal parts and plastic parts of the safety seat must be fastened by referring to the manual, which ensures that the safety seat does not get caught on the vehicle seat or in the door.
- Any straps securing the child restraint system to the vehicle should be tight and adjusted to fit the child's body, and should not be twisted.
- The lap belt must be worn low, so that the pelvis is firmly secured.
- The safety seat must not be used after it has been involved in an accident.
- It is dangerous to make any alterations or additions to the safety seat without the manufacturer's approval. The installation instructions provided by the manufacturer of the child restraint system must be followed closely to ensure the child's safety.
- The safety seat should be kept out of direct sunlight, otherwise it may be too hot for the child's skin.
- Please do not leave your child
unattended in the child restraint system.
- Any luggage or other objects liable to cause injuries in the event of a collision must be properly secured.
- a: The child restraint must not be used without the cover.
- b: The seat cover should not be replaced with a seat cover other than the one recommended by the manufacturer, since it is an integral part of the child restraint system.
- The instructions for the child restraint system should be kept for as long as the safety seat is in use.
- Do not use any load bearing contact points other than those described in the instructions and marked on the child restraint system.
- The rigid elements and plastic parts of the child restraint system must be positioned and installed so that they do not get caught in the vehicle seat or door during everyday use of the vehicle.
- Any luggage or other objects liable to cause injuries in the event of a collision must be properly secured.
- Safe driving is the best way to protect children; child safety seats can protect children effectively, but they cannot completely prevent the harmful consequences of car accidents.
- Please make sure to use the correct type of safety seat with the appropriate application method, as indicated in the instruction
manual of the child restraint system.
- Otherwise, the child’s safety could be at risk.
- The child safety seat must not be positioned anywhere near an active airbag, as this could result in your child being injured in the event of an accident.
- If there is any risk of interference between the adult safety-belt buckle and the main load bearing contact points on the restraint system, it must not be used. If in doubt about this point, the user is advised to contact the manufacturer of the child restraint system.
- Do not use the safety seat in the forward facing position before the child is 15 months old and has reached a height of 76 cm.
- The safety seat must not be installed in the rearward facing position onto a vehicle seat fitted with an airbag.
- Keep the instruction manual for future reference.
FOR TECHNICAL OR COMMERCIAL REASONS, PRG RESERVES THE RIGHT, AT ANY TIME AND ALSO ONLY IN A SPECIFIC COUNTRY, TO MODIFY THE TECHNICAL CHARACTERISTICS OF THE PRODUCTS DESCRIBED IN THIS LEAFLET, AND/ OR THE SHAPE, TYPE AND NUMBER OF THE ACCESSORIES SUPPLIED.


GUARANTEE INFORMATION
- This item is guaranteed against manufacturing defects as stipulated in the legal Directives and/or regulations in force on guarantees for consumer goods applicable to the European Union and those of the country in which it is marketed.
- It is essential to provide the purchase invoice or receipt in order to process the guarantee through the seller of the item or, failing that, through the manufacturer.
- The guarantee does not cover anomalies or faults caused by misuse, non-compliance with the safety regulations and instructions for use and maintenance provided, or due to wear and tear caused by normal use and regular handling of the item.
- The label containing the serial number of your model must not be torn off under any circumstances, as it contains information relevant to the guarantee.
Installation instructions
| Height Body restraint mode Seat connection mode | Installation direction | ||||
| 40 -105 cm Five-point harness ISOFIX | +Support leg |  Rearward facing Rearward facing |  |  | |
| 76 - 105 cm Five-point harness ISOFIX | +Support leg |  Forward facing Forward facing |  |  | |
| 100 - 150 cm Three-point car seat belt restraint | ISOFIX+ connectors+ Three point car seat belt |  Forward facing Forward facing |  | ||
| 100 - 150 cm Three-point car seat belt restraint | Three-point car seat belt |  Forward facing Forward facing |  | ||
- Rearward facing
40-105 cm/weight≤18 kg: ISOFIX + Support Leg + Five-point seat belt
- Forward facing
75-105 cm: ISOFIX + Support Leg + Five-point seat belt
100-150 cm: ISOFIX + Three-point car seat belt or Three-point car seat belt only.
- Notice regarding i-Size category Enhanced Child Restraint Systems (40-105 cm). This is an i-Size Enhanced Child Restraint System.
This is an i-Size Enhanced Child Restraint System.
It is approved according to UN Regulation No. 129 for use in i-Size compatible vehicle seating positions as indicated by vehicle manufacturers in the vehicle users' manual. If in doubt, consult either the Enhanced Child Restraint System manufacturer or the retailer. Notice regarding i-Size booster seat category Enhanced Child Restraint Systems (100-150 cm). This is a i-Size booster seat Enhanced Child Restraint System.
It is approved according to UN Regulation No. 129 for use primarily in “i-Size seating positions” as indicated by vehicle manufacturers in the vehicle user’s manual. If in doubt, consult either the Enhanced Child Restraint System manufacturer or the retailer.
DO NOT USE REARWARD FACING ECRS IN SEATING POSITIONS WHERE THERE IS AN ACTIVE FRONTAL AIRBAG INSTALLED.
Do not use forward facing before the child is 15 months old and has reached a height of 76 cm.
IMPORTANT - DO NOT USE FORWARD FACING BEFORE THE CHILD'S AGE EXCEEDS 15 MONTHS (Refer to instructions).
text_image
Diagram of a car with checkmarks and a question mark inside, indicating selection or status.
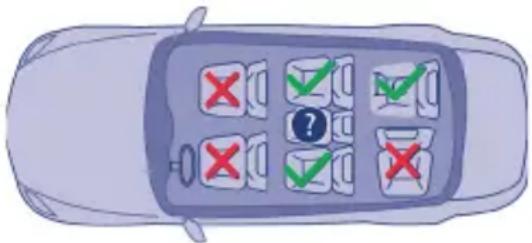
- Suitable for models with ISOFIX systems compliant with ECE R14 and with three-point seat belt/seat belt with a retractor compliant with ECE R16. It is not suitable for cars with only two-point seat belts.


text_image
Diagram of a car with checkmarks and red X marks indicating failure or error, surrounded by vehicle compartments.
text_image
Diagram of a car with checklist and checkmarks, showing unknown status indicators and a question mark in the center.text_image
Diagram of a car with checkmarks and a question mark on the dashboard, indicating verification or status.
ZIJDELINGSE BOTSBESCHERMINGSFUNCTIE (SIP)
text_image
Diagram of a car with checkmarks and red X marks indicating unknown or missing status, overlaid on a grid of checkmarks and a question mark.
INFORMATIONS SUR LA GARANTIE
text_image
Diagram of a car with checkmarks and a question mark, indicating selection or confirmation stepstext_image
Diagram of a car with checklist and checkmarks, showing red and green checkmarks for incorrect identificationCar manufacturer Model Approved seat
Meihu Village, Henghe Town, Cixi City, Ningbo, China

Imported and distributed by:
https://giordanibaby.com/manuali/

UK Approved to: ECE R 129/03